

Page 1
SAS31601E PCI Express to 3.0-Gb/s Serial Attached SCSI (SAS) Host Bus Adapter
Quick Installation Guide
Step 2 Prepare the computer.
Turn off the computer and remove the power cord
from the back of the power supply. Remove the
cover from the chassis. Be certain to disconnect
the computer from the power supply and from any
networks before installing the controller card.
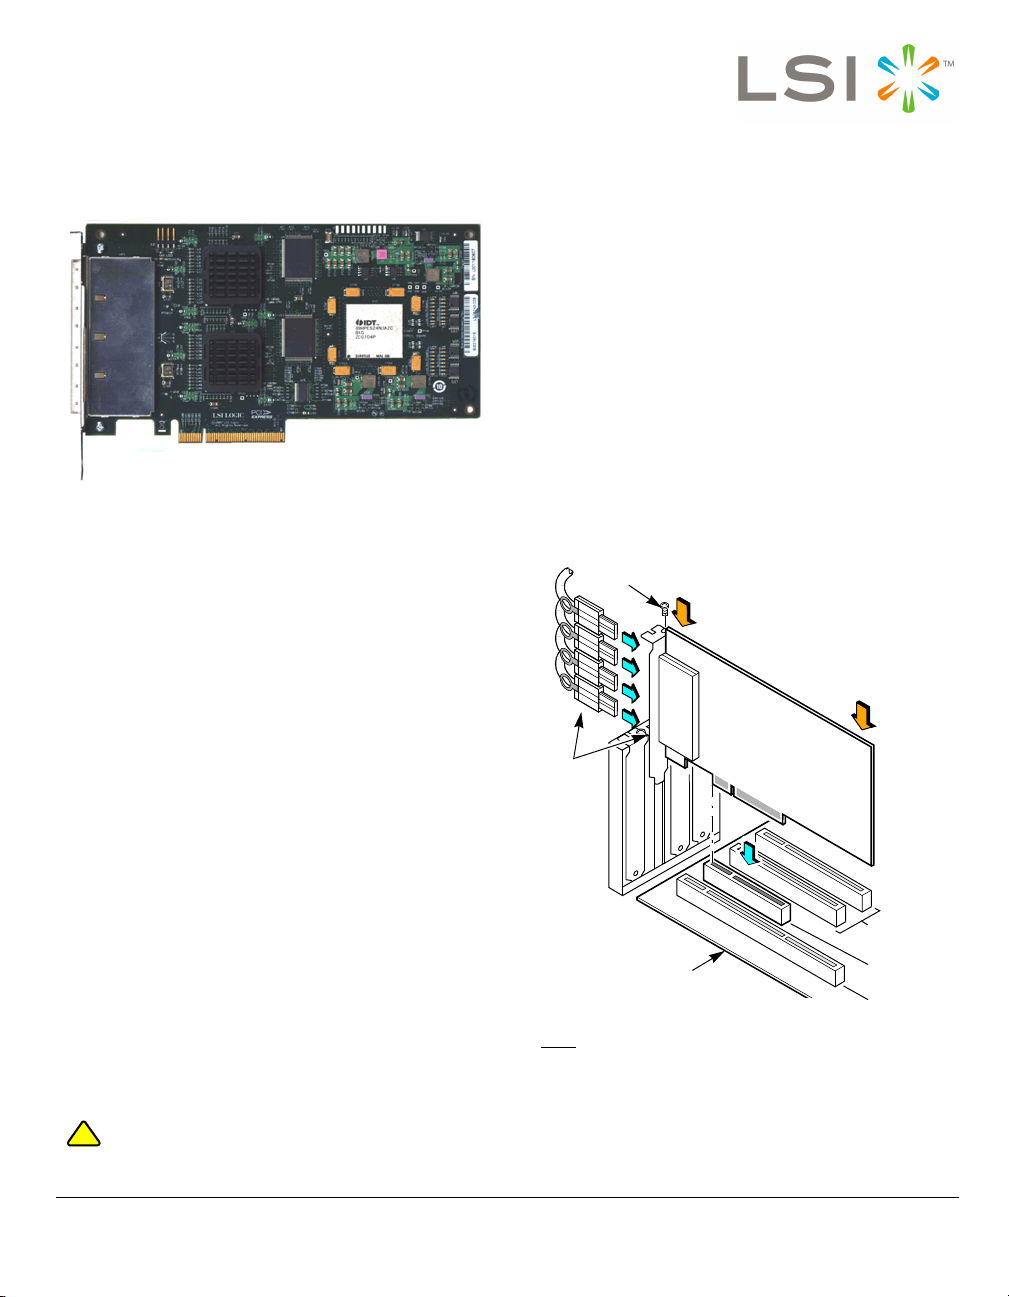
Step 3 Insert the SAS31601E in an available
PCI Express slot.
Locate an empty PCI Express slot. Remove the
blank bracket panel on the back of the computer
that is aligned with the PCI Express slot you have
selected. Save the bracket screw when present.
Align the HBA with a PCI Express slot. Press
Thank you for purchasing the SAS31601E PCI Express to
3.0-Gb/s Serial Attached SCSI (SAS) Host Bus Adapter.
Please take a few minutes to read this quick installation
guide before you install the SAS31601E.
If you need more information about any topic covered in this
guide, please refer to the other documents on the
accompanying LSI Serial Attached SCSI Device Drivers and
Utilities CD.
CONTENTS OF THE LSI DEVICE DRIVERS
AND UTILITIES CD
The LSI host bus adapter (HBA) CD contains utility
programs, device drivers for various operating systems, and
the following LSI documentation:
• Serial Attached SCSI (SAS) to PCI Express Host
Adapters User’s Guide
• Fusion-MPT
™
Device Management User’s Guide
• Host adapter technical product briefs
QUICK HBA INSTALLATION
To install the SAS31601E, follow these steps:
Step 1 Unpack the HBA in a static-free environment.
Remove the HBA from the antistatic bag and
inspect it for damage. If it appears to be
damaged, contact LSI or your reseller support
representative.
Make a backup of your data before changing your
!
CAUTION
system configuration.
SFF-8088
Mini-SAS
Cables and
Connectors
Note
Step 4 Secure the bracket to the system chassis.
down gently but firmly to properly seat the HBA
in the slot. The following figure illustrates how to
insert the HBA into a PCI Express slot.
Bracket
Screw
Four
Host Board
: The HBA shape, size, and locations of
components may vary from this illustration.
Install the bracket screw, when present, or
engage the system retention mechanism to
secure the HBA to the system chassis.
Press Here
Edge of
Press Here
32-b Slots
(3.3V Only)
PCI Express
x8 Slot
64-b Slot
(3.3V Only)
Page 2

Step 5 Connect the SAS hard disk drives (HDDs) to the
SAS connectors on the HBA.
The SAS31601E has four external mini-SAS signal
connectors, each connecting to four 3-Gb/s SAS
PHYs. The HBA needs to be connected to the
external SAS storage devices using the appropriate
cable. Four SAS external cables with the standard
SAS external plug connector (SFF-8088) are
required to connect to external devices.
Step 6 Replace the cover and the power cords. Turn on
the power to the system.
Reconnect the power cords and any network
cables. Turn on the power to the system.
The SAS31601E HBA hardware installation is complete, and
you are ready to install the operating system drivers.
Step 4 Follow the instructions until a screen displaying
the words Setup could not determine the type
of one or more mass storage device… appears.
Step 5 Choose S to specify additional devices.
Step 6 Follow the prompts and insert the Windows driver
diskette when you are prompted to insert the
hardware support disk. Select the driver version
appropriate for your system.
Step 7 Follow the Windows installation procedure to
complete the installation. Microsoft provides
documentation with its installation CD-ROM.
Note
: Refer to the Fusion-MPT Device Management
User’s Guide for detailed configuration and
installation instructions for all firmware and drivers.
WINDOWS DRIVER INSTALLATION
To load the SYMMPI.SYS miniport driver during a new
Microsoft Windows 2000 or Windows XP system installation
or to load the LSI_SAS.SYS driver during a new
Windows 2003 installation, you can boot directly from the
Microsoft installation CD-ROM. The Windows drivers are not
interchangeable; however, the instructions are similar.
To install a new Windows operating system and its
appropriate device driver, follow these steps:
Step 1 Using another computer, copy the appropriate
driver files supplied on the LSI Serial Attached
SCSI Device Drivers and Utilities CD onto a
diskette. This is needed in step 6.
To create the driver diskette, open the driver folder
on the CD, then open the folder for the version of
the Windows operating system to be installed on
the new system. Next, select all folders and files
within the directory and copy them to the root
directory of a blank floppy diskette.
Step 2 Boot the computer from the Windows CD-ROM.
Step 3 Shortly after the Windows Setup begins, press F6
Important
when the words Setup is inspecting your
computer's hardware configuration appear,
or when prompted to press F6 if you need to
install a third-party SCSI or RAID driver.
: You must press F6 for the new driver to be
recognized. Otherwise, the system does not
recognize the devices controlled by the driver
during the Windows setup.
LINUX DRIVER INSTALLATION
Consult the Linux ReadMe.txt file on the LSI Device Drivers
& Utilities CD. LSI provides Open Source Drivers that may
be implemented in the following ways:
• Adding precompiled binaries to an existing installation
using driver update disks or RPMs for selected distributions
• Adding or updating the Fusion-MPT
™
source in the Linux
kernel for any distribution
TECHNICAL SUPPORT
For assistance installing, configuring, or running the
SAS31601E, contact an LSI Technical Support
representative:
E-mail: support@lsi.com
Phone: 1-800-633-4545 (North America)
+44.1344.413.115 (Europe)
Web Site: http://www.lsi.com/support/
DB11-000086-00, Version 1.0, July 2007
Find a list of LSI Corporation’s U.S. distributors, international distributors, sales
offices, and design resource centers on the LSI web site at:
http://www.lsi.com
LSI, the LSI logo design, and Fusion-MPT are trademarks or registered
trademarks of LSI Corporation. All other brand and product names may be
trademarks of their respective companies.
Copyright © 2007 by LSI Corporation. All rights reserved.
LSI Corporation reserves the right to make changes to any products and services
herein at any time without notice. LSI does not assume any responsibility or liability
arising out of the application or use of any product or service described herein,
except as expressly agreed to in writing by LSI; nor does the purchase, lease, or
use of a product or service from LSI convey a license under any patent rights,
copyrights, trademark rights, or any other of the intellectual property rights of LSI
or of third parties.
 Loading...