

Page 1

USER’S GUIDE
Fusion-MPT
™
Device Management
January 2007
Version 1.3
®
DB15-000186-02
Page 2

Proprietary Rights Notice
This document contains proprietary information of LSI Logic Corporation. The
information contained herein is not to be used by or disclosed to third parties
without the express written permission of an officer of LSI Logic Corporation.
Document Description
Document DB15-000186-02, January 2007
This document describes version 1.3 of LSI Logic Corporation’s Fusion-MPT
driver and utility products and will remain the official reference source for all
revisions/releases of these products until rescinded by an update.
Disclaimer
It is the policy of LSI Logic Corporation to improve products as new technology,
components, software, and firmware become available. LSI Logic reserves the
right to make changes to any products herein at any time without notice. All
features, functions, and operations described herein may not be marketed by LSI
Logic in all parts of the world. In some instances, photographs and figures are
of equipment prototypes. Therefore, before using this document, consult your LSI
Logic representative for information that is applicable and current. LSI LOGIC
DOES NOT ASSUME ANY RESPONSIBILITY OR LIABILITY FOR THE USE OF
ANY PRODUCTS DESCRIBED HEREIN EXCEPT AS EXPRESSLY AGREED
TO IN WRITING BY LSI LOGIC.
LSI Logic products are not intended for use in life-support appliances, devices,
or systems. Use of any LSI Logic product in such applications without written
consent of the appropriate LSI Logic officer is prohibited.
License Restriction
The purchase or use of an LSI Logic Corporation product does not convey a
license under any patent, copyright, trademark, or other intellectual property right
of LSI Logic or third parties.
Copyright Notice
Copyright © 2001, 2002, 2007 by LSI Logic Corporation. All rights reserved.
ii
Version 1.3 Copyright © 2001, 2002, 2007 by LSI Logic Corporation. All rights reserved.
Page 3

Trademark Acknowledgment
LSI Logic, the LSI Logic logo design, Fusion-MPT, GigaBlaze,
Integrated Mirroring, and SureLINK are trademarks or registered trademarks of
LSI Logic Corporation. ARM is a registered trademark of ARM Ltd., used under
license. All other brand and product names may be trademarks of their respective
companies.
KL
For a current list of our distributors, sales offices, and design resource
centers, view our web page located at
http://www.lsi.com
Version 1.3 Copyright © 2001, 2002, 2007 by LSI Logic Corporation. All rights reserved.
iii
Page 4

iv
Version 1.3 Copyright © 2001, 2002, 2007 by LSI Logic Corporation. All rights reserved.
Page 5

Audience
Preface
This User’s Guide is the primary reference for installing, configuring, and
using the Fusion-MPT™(Message Processing Technology) firmware,
device drivers, and utilities. Much of the information about device drivers
and utility programs is derived from the readme files for those drivers and
utilities.
The Fusion-MPT product encompasses Fusion-MPT firmware
architecture, SCSI hardware architecture, Fibre Channel (FC) hardware
architecture, Serial Attached SCSI architecture, and the operating
system level device drivers that support these architectures.
This book assumes you have some familiarity with storage systems and
have had experience installing drivers in the Windows, NetWare, Linux,
and Unix operating systems. The people who benefit from this book are:
Organization
• OEM customers
• End users
This document has the following chapters:
• Chapter 1, Fusion-MPT Device Management Product, provides
general information about the Fusion-MPT device management
product.
• Chapter 2, Windows Driver Installation, provides instructions for
installing the Fusion-MPT device driver onto Window-based system.
It provides detailed instructions for Window XP, Windows
Server 2003, and Windows 2000.
Fusion-MPT Device Management User’s Guide v
Version 1.3 Copyright © 2001, 2002, 2007 by LSI Logic Corporation. All rights reserved.
Page 6

• Chapter 3, UNIX Operating System Device Drivers, provides
instructions for installing the Fusion-MPT device driver into Unix- and
Linux-based operating system.
• Chapter 4, NetWare Drivers, provides instructions for installing the
Fusion-MPT NetWare device driver.
• Chapter 5, Host Adapter Flash Utility, explains how to use the
DOS-based LSI Flash Utility to download firmware and BIOS images
to LSI Fibre Channel and Serial Attached SCSI controllers.
• Chapter 6, Integrated RAID Configuration Utility, explains how to
use the CFGGEN Integrated RAID (IR) Configuration Utility to create
Integrated Mirroring (IM), Integrated Mirroring Enhanced (IME) and
Integrated Striping (IS) volumes.
• Chapter 7, SCSI BIOS and Setup Utility, describes the Fusion-MPT
SCSI BIOS and Configuration Utility (CU) for 32-bit systems.
• Chapter 8, SCSI EFI BIOS and Setup Utility, describes the Fusion-
MPT EFI and CU for 64-bit systems.
• Chapter 9, Fusion-MPT SAS BIOS and Setup Utility, provides
instructions for using the Fusion-MPT SAS BIOS Configuration Utility
to monitor and configure storage configurations.
• Chapter 10, Fibre Channel BIOS and Configuration Utility,
explains how to use the LSI Fibre Channel BIOS and Configuration
Utility to create RAID volumes on LSI Fibre Channel controllers.
Related Publications
MyStorage Management Software User’s Guide, Document No.
DB15-000308-03
MyStorage management software is designed to simplify storage
area network (SAN) management and reduce SAN installation time.
MyStorage management software automates the task of configuring
an LSI storage adapter and connecting to storage devices. Features
include host adapter information screens, diagnostics, and statistics
gathering.
MyStorage management software is written in Java, making it
portable across multiple operating systems. LSI offers MyStorage
management software for Windows and Linux environments.
vi Preface
Version 1.3 Copyright © 2001, 2002, 2007 by LSI Logic Corporation. All rights reserved.
Page 7

LSI53C1030 PCI-X to Dual Channel Ultra320 SCSI Multifunction
Controller, Document No. DB14-000156-05
LSI53C1020/1020A PCI-X to Ultra320 SCSI Controller TechnicalManual,
Document No. DB14-000176-06
LSIFC949E PCI Express to 4 Bbit/s Fibre Channel Controller Technical
Manual, Document No. DB14-000345-00
LSIFC949X Dual Channel Fibre Channel I/O Processor Technical
Manual, Document No. DB14-000284-02
LSIFC929XL Dual Channel Fibre Channel I/O Processor Technical
Manual, Document No. DB14-000272-01
LSIFC929X Dual Channel Fibre Channel I/O Processor Technical
Manual, Document No. DB14-000202-02
LSIFC929 Dual Channel Fibre Channel I/O Processor Technical Manual,
Document No. DB14-000135-02
LSIFC919X Single Channel Fibre Channel I/O Processor Technical
Manual, Document No. DB14-000225-00
LSIFC919 Single Channel Fibre Channel I/O Processor Technical
Manual, Document No. DB14-000151-02
LSIFC909 Fibre Channel I/O Processor Technical Manual,
Document No. DB14-000150-01
LSISAS1068E PCI Express to 8-Port Serial Attached SAS Controller
Technical Manual, Document No. DB14-000330-02
LSISAS1068 PCI-X to 8-Port to 4-Port Serial Attached SAS Controller
Technical Manual, Document No. DB14-000287-04
LSISAS1064E PCI Express to 4-Port Serial Attached SAS Controller
Technical Manual, Document No. DB14-000331-02
LSISAS1064 PCI-X to 4-Port Serial Attached SCSI/SATA Controller
Technical Manual, Document No. DB14-000274-05
PCI-X to 3.0 Gbit/s SAS Host Adapters User’s Guide,
Document No. DB15-000333-02
Preface vii
Version 1.3 Copyright © 2001, 2002, 2007 by LSI Logic Corporation. All rights reserved.
Page 8

Ultra320 SCSI to PCI-X Host Board Adapter User’s Guide,
Document No. DB15-000192-03
4 Gbits/s Fibre Channel Host Adapters User’s Guide,
Document No. DB15-00334-02
2 Gbits/s Fibre Channel Host Adapters User’s Guide,
Document No. DB15-00264-02
Conventions Used in This Manual
Hexadecimal numbers are indicated by the prefix “0x” —for example,
0x32CF. Binary numbers are indicated by the prefix “0b” —for example,
0b0011.0010.1100.1111.
Revision History
Revision Date Remarks
Version 1.3 1/2007 Updated all driver chapters from the most recent readme files.
Version 1.2 7/2002 Added the SCSI Flash and NVDATA utilities chapter.
Preliminary
Version 1.0
9/2001 Initial release of document.
Added chapters on SAS configuration utility and CFGGEN utility.
Many other edits and updates.
Added the CIM Solution chapter.
Added the Linux IM CU chapter.
Combined the Unix OSes into a single chapter.
Combined the Windows OSes into a single chapter.
Added the Linux and Linux CU.
Added the SCSI EFI and Configuration Utility chapter.
Updated the Fibre Channel BIOS chapters.
Updated SCSI CU and BIOS.
viii Preface
Version 1.3 Copyright © 2001, 2002, 2007 by LSI Logic Corporation. All rights reserved.
Page 9

Contents
Chapter 1
Fusion-MPT Device Management Product
1.1 Fusion-MPT Overview 1-2
1.2 Fusion-MPT Features 1-3
1.2.1 Fusion-MPT Firmware 1-3
1.2.2 Fusion-MPT Hardware 1-3
Chapter 2
Windows Driver Installation
2.1 Description of Windows Device Drivers 2-1
2.2 Installing the Windows XP Driver 2-2
2.2.1 Introducing the Windows XP Driver 2-2
2.2.2 Driver Features and LSI Device Support 2-3
2.2.3 Preparing to Install the Windows XP Driver 2-4
2.2.4 Installing the Driver on a New WindowsXP System 2-5
2.2.5 Installing the Driver on an Existing Windows
XP System 2-6
2.2.6 Performance Tuning for Windows XP 2-7
2.2.7 Hibernation Support 2-9
2.2.8 Troubleshooting 2-10
2.3 Windows Server 2003 Drivers 2-10
2.3.1 Introducing the Windows Server 2003 Drivers 2-11
2.3.2 Driver Features and LSI Device Support 2-11
2.3.3 Preparing to Install the Windows Server 2003
Drivers 2-12
2.3.4 Installing the Driver on a New Windows Server
2003 System 2-14
2.3.5 Installing the Driver on an Existing Windows Server
2003 System 2-15
2.3.6 Performance Tuning for Windows Server 2003 2-17
2.3.7 Troubleshooting 2-18
Contents ix
Version 1.3 Copyright © 2001, 2002, 2007 by LSI Logic Corporation. All rights reserved.
Page 10

Chapter 3
UNIX Operating System Device Drivers
3.1 Installing the Solaris x86 Device Driver 3-1
3.1.1 Introducing the Solaris x86 Driver 3-1
3.1.2 Driver Features and LSI Device Support 3-2
3.1.3 Preparing to Install the Solaris x86 Driver 3-3
3.1.4 Installing the Driver on an Existing Solaris x86
System 3-3
3.1.5 Installing the Driver on a New Solaris x86 System 3-5
3.2 Installing the Solaris SPARC Driver 3-7
3.2.1 Introducing the Solaris SPARC Driver 3-7
3.2.2 Driver Features and LSI Device Support 3-8
3.2.3 Preparing to Install the Solaris SPARC Driver 3-8
3.2.4 Installing the Driver on an Existing Solaris SPARC
System 3-11
3.2.5 Network System Installation of the Solaris
SPARC Driver 3-12
3.3 Installing the UnixWare 7 and Open Unix 8 Device Driver 3-15
3.3.1 Introducing the UnixWare 7 and Open Unix 8
Driver 3-16
3.3.2 Driver Features and LSI Device Support 3-16
3.3.3 Preparing to Install the UnixWare 7 and Open
Unix 8 Driver 3-17
3.3.4 Installing the Driver on a New UnixWare or
Open Unix System 3-17
3.3.5 Installing the Driver on an Existing UnixWare or
Open Unix System 3-17
3.3.6 Troubleshooting 3-18
3.4 SCO OpenServer 5 Device Driver Installation 3-19
3.4.1 Introducing the SCO OpenServer Driver 3-19
3.4.2 Driver Features and LSI Device Support 3-20
3.4.3 Preparing to Install the SCO OpenServer Driver 3-20
3.4.4 Installing the Driver on an New OpenServer UNIX
System 3-21
3.4.5 Installing the Driver on an Existing SCO
OpenServer 5 System 3-22
3.4.6 Troubleshooting 3-26
3.5 Installing the Fusion-MPT Linux Device Drivers 3-27
x Contents
Version 1.3 Copyright © 2001, 2002, 2007 by LSI Logic Corporation. All rights reserved.
Page 11

Chapter 4
NetWare Drivers
3.5.1 Introducing the Linux Drivers 3-28
3.5.2 Driver Features and LSI Device Support 3-28
3.5.3 Preparing to Install the Fusion-MPT Linux Drivers 3-29
3.5.4 Configuring and Building the Fusion-MPT Linux
Drivers 3-32
3.5.5 Loading the Drivers as Modules 3-34
3.5.6 Boot Setup Commands 3-35
3.5.7 Troubleshooting 3-37
4.1 Introduction and Driver Features 4-1
4.1.1 Driver Features 4-2
4.1.2 Supported LSI Devices 4-3
4.1.3 Driver Description 4-3
4.1.4 Configuration IOCTL Interface Support 4-4
4.1.5 ASPI Support 4-4
4.2 Installing the NWPA NetWare Driver 4-4
4.2.1 Preparing Your System for the NWPA Driver 4-4
4.2.2 NetWare 5.1 and 6.0 Driver Installation 4-5
4.2.3 Reconfiguring Driver Options 4-6
4.3 Command Line Options 4-7
4.3.1 Information Option: Using the Help Mode Option 4-7
4.3.2 NetWare NWPA Driver Customizable Options 4-7
4.4 Supported DOS Configurations and DOS Drivers 4-11
Chapter 5
Host Adapter Flash Utility
5.1 Features and Supported Controller Chips 5-1
5.2 Starting the Host Adapter Flash Utility 5-2
5.3 Running the Host Adapter Flash Utility 5-3
5.4 Supported Flash ROM Chips 5-6
Contents xi
Version 1.3 Copyright © 2001, 2002, 2007 by LSI Logic Corporation. All rights reserved.
5.3.1 Fibre Channel Controller Options 5-3
5.3.2 SAS Controller Options 5-4
5.3.3 Command Line Options 5-5
5.4.1 Fibre Channel (1-MB Capacity) 5-6
5.4.2 Serial Attached SCSI (1-MB Capacity) 5-6
5.4.3 Serial Attached SCSI (2-MB Capacity) 5-6
5.4.4 Serial Attached SCSI (4-MB Capacity) 5-7
Page 12

Chapter 6
Integrated RAID Configuration Utility
6.1 Hardware and Software Requirements 6-1
6.2 CFGGEN Interface Description 6-3
6.3 CFGGEN Commands 6-3
6.3.1 Common Command Line Parameters 6-4
6.3.2 AUTO Command 6-5
6.3.3 CREATE Command 6-7
6.3.4 DELETE Command 6-9
6.3.5 DISABLEIR Command 6-10
6.3.6 DISPLAY Command 6-10
6.3.7 ENABLEIR Command 6-14
6.3.8 FORMAT Command 6-14
6.3.9 HOTSPARE Command 6-15
6.3.10 LIST Command 6-16
6.3.11 LOCATE Command 6-17
6.3.12 LOGIR Command 6-17
6.3.13 SETOFFLINE Command 6-18
6.3.14 SETONLINE Command 6-19
6.3.15 STATUS Command 6-19
6.3.16 VSIME Command 6-20
Chapter 7
SCSI BIOS and Setup Utility
7.1 Overview and Features 7-1
7.1.1 Boot Initialization with BIOS Boot Specification
7.1.2 CD-ROM Boot Initialization 7-2
7.2 Starting the SCSI BIOS Setup Utility 7-3
7.3 Setup Utility Menu Screens 7-4
7.3.1 User Input Keys 7-4
7.3.2 Main Menu 7-5
7.3.3 Boot Adapter List Menu 7-6
7.3.4 Global Properties Menu 7-7
7.3.5 Adapter Properties Menu 7-9
7.3.6 Device Properties Menu 7-11
7.3.7 RAID Properties Menu 7-13
xii Contents
Version 1.3 Copyright © 2001, 2002, 2007 by LSI Logic Corporation. All rights reserved.
(BBS) 7-2
Page 13

7.3.8 Exiting the SCSI BIOS Setup Utility 7-18
Chapter 8
SCSI EFI BIOS and Setup Utility
8.1 Overview and Features 8-1
8.2 Installing the Boot Services Driver 8-3
8.3 Starting the EFI Setup Utility 8-3
8.4 Setup Utility Menu Screens 8-4
8.4.1 Main Menu 8-5
8.4.2 Adapter Properties Menu: SCSI Adapters 8-7
8.4.3 Adapter Properties Menu: FC Adapters 8-8
8.4.4 RAID Properties Menu 8-10
8.5 Creating RAID Arrays 8-13
8.5.1 Creating a Mirrored Array 8-14
8.5.2 Creating a Striped Array 8-15
8.5.3 SCSI Device Properties 8-17
8.5.4 Fibre Channel Device Properties 8-21
8.5.5 Persistent IDs Menu 8-23
8.6 Exiting the SCSI Setup Utility 8-27
8.7 SCSI Pass-Thru Protocol 8-27
Chapter 9
Fusion-MPT SAS BIOS and Setup Utility
9.1 Overview and Features 9-1
9.1.1 Boot Initialization with BIOS Boot Specification
(BBS) 9-2
9.1.2 CD-ROM Boot Initialization 9-2
9.2 Starting the SAS BIOS Setup Utility 9-3
9.3 Setup Utility Menu Screens 9-4
9.3.1 User Input Keys 9-4
9.3.2 Adapter List Menu 9-5
9.3.3 Global Properties Menu 9-6
9.3.4 Adapter Properties Menu 9-7
9.3.5 SAS Topology Menu 9-9
9.3.6 Expander Properties Menu 9-13
9.3.7 Device Properties Menu 9-14
9.3.8 Format and Verify Screens 9-16
9.3.9 Advanced Adapter Properties Menu 9-18
Contents xiii
Version 1.3 Copyright © 2001, 2002, 2007 by LSI Logic Corporation. All rights reserved.
Page 14

9.3.10 Advanced Device Properties Menu 9-20
9.3.11 PHY Properties Menu 9-23
9.3.12 Integrated RAID Configuration and Management
Screens 9-25
9.3.13 Exit Screen 9-30
9.4 Performing Configuration Tasks 9-31
9.4.1 Creating an Integrated Striping Volume 9-31
9.4.2 Creating an Integrated Mirroring Volume 9-32
9.4.3 Creating a Second RAID Volume 9-33
9.4.4 Viewing RAID Volume Properties 9-34
9.4.5 Adding or Deleting a Hot Spare 9-34
9.4.6 Synchronizing an Array 9-35
9.4.7 Activating an Array 9-35
9.4.8 Deleting an Array 9-35
9.4.9 Locating a Disk Drive 9-36
9.4.10 Selecting a Boot Disk 9-36
Chapter 10
Fibre Channel BIOS and Configuration Utility
10.1 Overview and Features 10-1
10.1.1 Boot Initialization with BIOS Boot Specification
(BBS) 10-2
10.1.2 CD-ROM Boot Initialization 10-2
10.2 Starting the FC BIOS Configuration Utility 10-3
10.3 Configuration Utility Menu Screens 10-4
10.3.1 User Input Keys 10-4
10.3.2 Main Menu 10-5
10.3.3 Boot Adapter List Menu 10-6
10.3.4 Global Properties 10-8
10.3.5 Adapter Properties Menu 10-9
10.3.6 Device Properties Menu 10-10
10.3.7 Persistent IDs Menu 10-12
10.4 Exiting the Fibre Channel Configuration Utility 10-14
Customer Feedback
xiv Contents
Version 1.3 Copyright © 2001, 2002, 2007 by LSI Logic Corporation. All rights reserved.
Page 15

Figures
1.1 Fusion-MPT Architecture 1-2
5.1 Host Adapter Flash Utility Main Menu 5-3
7.1 Setup Utility Main Menu 7-5
7.2 Boot Adapter List Menu 7-6
7.3 Global Properties Menu 7-8
7.4 Adapter Properties Menu 7-9
7.5 Device Properties Menu: Part 1 7-11
7.6 Device Properties Menu: Part 2 7-12
7.7 RAID Properties Menu 7-14
8.1 Setup Utility Main Menu 8-5
8.2 Adapter Properties Menu for SCSI Adapters 8-7
8.3 Adapter Properties Menu for FC Adapters 8-9
8.4 RAID Properties Menu 8-11
8.5 RAID Array Menu 8-16
8.6 SCSI Device Properties: Part 1 8-18
8.7 SCSI Device Properties: Part 2 8-18
8.8 SCSI Device Properties: Part 3 8-19
8.9 Fibre Channel Device Properties: Part 1 8-21
8.10 Fibre Channel Device Properties: Part 2 8-22
8.11 Persistent IDs Menu: Part 1 8-23
8.12 Persistent IDs Menu: Part 2 8-24
8.13 Persistent IDs Menu: Part 3 8-24
8.14 Persistent IDs Menu: Part 4 8-25
8.15 Persistent IDs Menu: Part 5 8-25
9.1 Adapter List Menu 9-5
9.2 Global Properties Menu 9-7
9.3 Adapter Properties Menu 9-8
9.4 SAS Topology Menu: Part 1 9-10
9.5 SAS Topology Menu: Part 2 9-11
9.6 SAS Topology Menu: Part 3 9-12
9.7 Expander Properties Menu 9-13
9.8 Device Properties Menu 9-15
9.9 Device Format Screen 9-16
9.10 Device Verify Screen 9-17
9.11 Advanced Adapter Properties Menu 9-18
9.12 Advanced Device Properties Menu 9-20
Contents xv
Version 1.3 Copyright © 2001, 2002, 2007 by LSI Logic Corporation. All rights reserved.
Page 16

9.13 Phy Properties Menu 9-23
9.14 Select New Array Type Screen 9-26
9.15 Create New Array Screen 9-26
9.16 View Array Screen 9-29
9.17 Manage Array Screen 9-30
9.18 Exit Screen 9-31
10.1 FC BIOS CU Main Menu 10-5
10.2 Boot Adapter List Menu 10-7
10.3 Global Properties Menu 10-8
10.4 Adapter Properties Menu 10-9
10.5 Device Properties Menu 10-11
10.6 Persistent IDs Menu 10-12
xvi Contents
Version 1.3 Copyright © 2001, 2002, 2007 by LSI Logic Corporation. All rights reserved.
Page 17

Tables
2.1 Files for Windows 2003 Server Driver Installation CD 2-13
3.1 Solaris SPARC Resource Requirements 3-9
5.1 Fibre Channel Option Menu 5-4
5.2 SAS Option Menu 5-5
5.3 Command Line Options 5-5
6.1 CFGGEN Commands 6-3
7.1 User Input Keys 7-4
7.2 Main Menu Field Descriptions 7-5
7.3 Boot Adapter List Field Descriptions 7-7
7.4 Global Properties Field Description 7-8
7.5 Adapter Properties Field Descriptions 7-9
7.6 Device Properties Field Description 7-12
7.7 Data Transfer Rate Information 7-13
7.8 RAID Properties Field Descriptions 7-14
7.9 Disk Diagnostic Codes 7-18
7.10 Array Commands 7-18
8.1 General Input Keys 8-4
8.2 Main Menu Field Descriptions 8-6
8.3 Adapter Properties Field Descriptions: SCSI Adapters 8-7
8.4 Adapter Properties Field Descriptions: Fibre Channel
Adapters 8-9
8.5 RAID Properties Field Descriptions 8-11
8.6 Status Field Definitions 8-12
8.7 RAID Array Setup Field Descriptions 8-16
8.8 SCSI Device Properties Field Descriptions 8-19
8.9 Data Transfer Rate Information 8-20
8.10 Fibre Channel Device Properties Field Descriptions 8-22
8.11 Persistent IDs Field Descriptions 8-26
9.1 General Input Keys 9-4
9.2 Adapter List Field Descriptions 9-6
9.3 Global Properties Field Descriptions 9-7
9.4 Adapter Properties Field Descriptions 9-8
9.5 SAS Topology Field Descriptions 9-12
9.6 Expander Properties Field Descriptions 9-14
9.7 Device Properties Field Descriptions 9-15
9.8 Format and Verify Field Descriptions 9-17
Contents xvii
Version 1.3 Copyright © 2001, 2002, 2007 by LSI Logic Corporation. All rights reserved.
Page 18

9.9 Advanced Adapter Properties Field Descriptions 9-19
9.10 Advanced Device Properties Field Descriptions 9-21
9.11 PHY Properties Field Descriptions 9-24
9.12 Create New Array Field Descriptions 9-27
9.13 View Array Field Descriptions 9-29
10.1 User Input Keys 10-4
10.2 Main Menu Field Descriptions 10-6
10.3 Boot Adapter List Field Descriptions 10-7
10.4 Global Properties Field Descriptions 10-8
10.5 Adapter Properties Field Descriptions 10-9
10.6 Fibre Channel Device Properties Field Descriptions 10-11
10.7 Persistent IDs Field Descriptions 10-13
xviii Contents
Version 1.3 Copyright © 2001, 2002, 2007 by LSI Logic Corporation. All rights reserved.
Page 19

Chapter 1
Fusion-MPT Device
Management Product
This chapter provides general information about the Fusion-MPT device
management technology and about the contents of this document. This
chapter contains the following sections:
• Section 1.1, “Fusion-MPT Overview”
• Section 1.2, “Fusion-MPT Features”
LSI provides a common device-level interface for Fusion-MPT compatible
devices. Fusion-MPT architecture provides an open programming
interface that supports a single binary device driver for LSI Ultra320
SCSI, Fibre Channel, and SAS solutions. LSI also provides a complete
suite of common drivers, including the Windows, Linux, Solaris, and
NetWare operating systems.
This document explains how to install and use the Fusion-MPT firmware,
BIOS, and device drivers for the supported operating systems. It also
documents the Fusion-MPT Common Information Model (CIM) Solution,
which provides a user interface for monitoring storage systems on a
network.
Fusion-MPT Device Management User’s Guide 1-1
Version 1.3 Copyright © 2001, 2002, 2007 by LSI Logic Corporation. All rights reserved.
Page 20
1.1 Fusion-MPT Overview
Fusion-MPT architecture is the newest generation of I/O architecture
designed to deliver the highest performance available today.
The main elements of Fusion-MPT architecture are the Fusion-MPT
firmware architecture, the Fibre Channel and SCSI hardware
architecture, and the operating system level drivers that support these
architectures. Fusion-MPT architecture offers the unique feature of
having a single binary, operating system driver that supports both Fibre
Channel and SCSI devices now and other bus architectures inthe future.
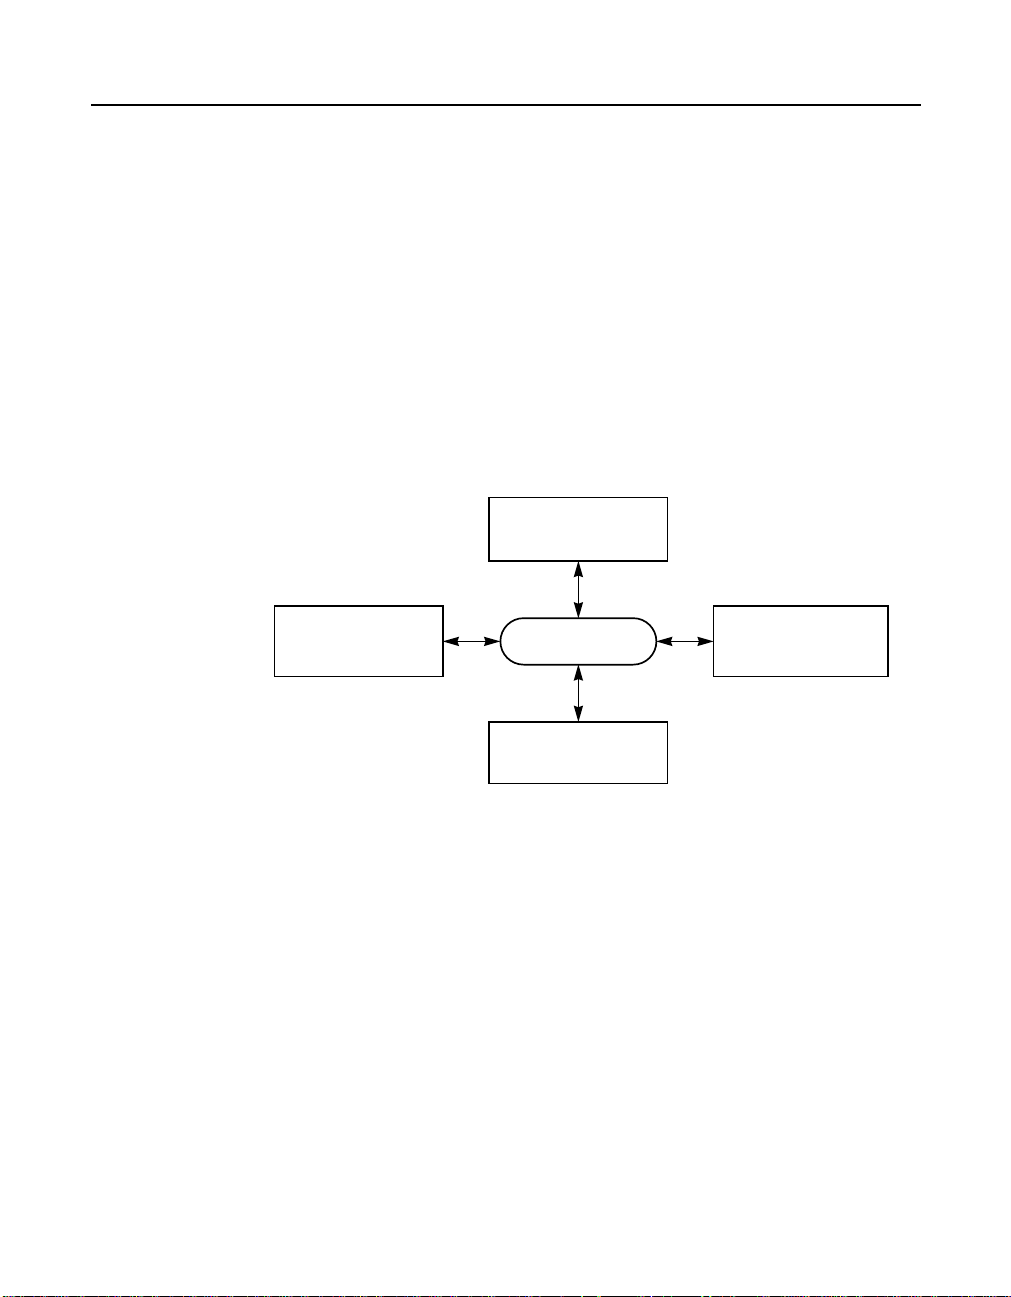
Figure 1.1 illustrates the Fusion-MPT architecture.
Figure 1.1 Fusion-MPT Architecture
Fusion-MPT
Firmware Architecture
Fusion-MPT Fibre
Channel Architecture
OS Device Drivers
Fusion-MPT
SAS/SATA Architecture
Fusion-MPT
SCSI Architecture
The message passing interface defines the host interface used by all LSI
Common Architecture chipsets, such as the Fibre Channel LSIFC929,
LSIFC929X, LSIFC949X, LSIFC949E; the SCSI LSI53C1020,
LSI53C1030 chips; and the Serial Attached SCSI SAS1064, SAS1068,
SAS1068E, and SAS1078 RAID on-a-Chip (ROC). These chips use the
high-performance ARM®or PowerPC processor. Benefits of the ARM
processor include reduced host CPU utilization and a decreased number
of host interrupts per I/O. Using the Fusion-MPT architecture in all of its
Common Architecture Chipsets, the host does not need to know the
underlying bus protocol architecture to be able to communicate with the
target devices.
1-2 Fusion-MPT Device Management Product
Version 1.3 Copyright © 2001, 2002, 2007 by LSI Logic Corporation. All rights reserved.
Page 21

1.2 Fusion-MPT Features
The Fusion-MPT design supports a single binary device driver, a
message passing interface, intelligent firmware, and various hardware
cores.
1.2.1 Fusion-MPT Firmware
The LSI Parallel SCSI, SAS, and Fibre Channel controllers contain
firmware that presents a multi-protocol service layer based on the
Fusion-MPT architecture. The firmware isolates the host drivers from the
hardware and controls the device side of the message passing interface
to the host device drivers. The firmware manages all phases of an I/O
request and optimizes interrupt management for the system. For Fibre
Channel, the firmware also manages all FC-2 through FC-4 services,
which minimizes the amount of Fibre Channel unique services required
with the host device driver.
1.2.2 Fusion-MPT Hardware
The Fusion-MPT hardware encapsulates various technologies that
deliver new levels of performance. GigaBlaze transceivers are utilized in
the Fusion-MPT technology based Fibre Channel and SAS products.
LVDlink™ transceivers ensure robust, high-performance SCSI transfers
in the Fusion-MPT architects Parallel SCSI product family.
Fusion-MPT Features 1-3
Version 1.3 Copyright © 2001, 2002, 2007 by LSI Logic Corporation. All rights reserved.
Page 22

1-4 Fusion-MPT Device Management Product
Version 1.3 Copyright © 2001, 2002, 2007 by LSI Logic Corporation. All rights reserved.
Page 23

Chapter 2
Windows Driver
Installation
This chapter describes the SYMMPI.SYS, LSI_FC.SYS, LSI_SCSI.SYS,
and LSI_SAS.SYS drivers for Windows-based operating systems and
provides driver installation instructions for Windows XP and Windows
Server 2003. This chapter contains the following sections:
• Section 2.1, “Description of Windows Device Drivers”
• Section 2.2, “Installing the Windows XP Driver”
• Section 2.3, “Windows Server 2003 Drivers”
2.1 Description of Windows Device Drivers
Microsoft and LSI provide two types of miniport device drivers:
• The SYMMPI.SYS ScsiPort based driver, called the “LSI PCI
Fusion-MPT MiniPort Driver”
• Several StorPort drivers: LSI_FC.SYS (LSI Fusion-MPT FC StorPort
Driver), LSI_SCSI.SYS (LSI Fusion-MPT SCSI StorPort Driver), and
LSI_SAS.SYS (LSI Fusion-MPT SAS StorPort Driver)
These drivers complete the path to the LSI controller with an optional
SCSI or FC BIOS.
Fusion-MPT Device Management User’s Guide 2-1
Version 1.3 Copyright © 2001, 2002, 2007 by LSI Logic Corporation. All rights reserved.
Page 24

2.2 Installing the Windows XP Driver
This section describes the SYMMPI.SYS driver for Windows XP for 32-bit
and 64-bit systems and explains how to install and configure it. This
section includes these topics:
• Section 2.2.1, “Introducing the Windows XP Driver”
• Section 2.2.2, “Driver Features and LSI Device Support”
• Section 2.2.3, “Preparing to Install the Windows XP Driver”
• Section 2.2.4, “Installing the Driver on a New Windows XP System”
• Section 2.2.5, “Installing the Driver on an Existing Windows XP
System”
• Section 2.2.6, “Performance Tuning for Windows XP”
• Section 2.2.7, “Hibernation Support”
• Section 2.2.8, “Troubleshooting”
2.2.1 Introducing the Windows XP Driver
Windows XP is designed to run on Intel-architecture (32-bit) and Itanium
Processor Family (64-bit) processors using current technology. An I/O
manager handles I/O requests in Windows XP. To address a SCSI
peripheral, the I/O manager goes through the appropriate drivers.
Windows XP provides class drivers for hard disk, optical, CD-ROM,
printer, and scanner peripherals. Other class drivers, provided by
peripheral manufacturers, may be added to support new devices. Tape
device support is built into the operating system itself and does not
require a class driver.
Microsoft provides the port driver and LSI provides the SYMMPI.SYS
miniport driver. This driver completes the path to the LSI controller or
processor with an optional SCSI or Fibre Channel BIOS.
LSI uses the same filenames for their drivers for different Windows
operating systems. The driver files are packaged either in separate
subdirectories based on the Windows operating system or on different
disks. To determine the driver file for Windows XP, note that the filename
ends with .SYS . For example, this driver is SYMMPI.SYS.
2-2 Windows Driver Installation
Version 1.3 Copyright © 2001, 2002, 2007 by LSI Logic Corporation. All rights reserved.
Page 25

To determine the operating system version, open Windows Explorer, find
the driver file, right click on the filename, click on Properties, and click
on the Version tab. Click on the Internal Filename in the lower section.
For Windows XP, the filename appears as filename (XP32) for 32-bit
systems and filename (XP64) for 64-bit systems.
The SYMMPI.SYS driver meets the Microsoft specification for miniport
drivers. This driver allows connection of parallel SCSI and Fibre Channel
devices including disk drives, CD-ROMs, and tape drives for PCI and
PCI-X based machines. To support a different SCSI or Fibre Channel
device type, the Windows XP architecture requires that a class driver for
that type of device be present (usually supplied by Microsoft, or possibly
by the peripheral manufacturer). No changes to SYMMPI.SYS are
required. The driver supports Windows XP and all subsequent Service
Packs.
2.2.2 Driver Features and LSI Device Support
The SYMMPI.SYS miniport driver supports these features:
• 320 Mbyte/s parallel SCSI transfers (for LSI53C1020 and
LSI53C1030 controllers)
• Integrated Mirroring technology (for LSI53C1020 and LSI53C1030
controllers)
• PCI and PCI-X bus protocols (for LSI53C1020 and LSI53C1030
controllers)
• 2 Gbaud Fibre Channel transfers (for LSIFC929XL and LSIFC919XL
controllers)
• 4 Gbaud Fibre Channel transfers (for LSIFC949X and LSIFC949E
controllers)
• LSI MPT common software interface
• Multiple host adapters
• Multiple Logical Unit Numbers (LUNs)
• Scatter-Gather
• SCSI pass-thru functionality
• Disk array configurations with no LUN 0
• Disk array configurations with non-contiguous LUNs
Installing the Windows XP Driver 2-3
Version 1.3 Copyright © 2001, 2002, 2007 by LSI Logic Corporation. All rights reserved.
Page 26

• Auto request sense
• Maximum block size support: 1 Mbyte (32-bit), 2 Mbyte (64-bit)
The SYMMPI.SYS driver supports the following LSI controller chips and
their associated host adapters:
• LSI53C1020 (LSI20320)
• LSI53C1030 (LSI21320, LSI22320)
• LSIFC919 (LSI40919O, LSI40919LO, LSI40919H, LSI40919LH)
• LSIFC919X (LSI7102XP)
• LSIFC929 (LSI44929O, LSI44929LO, LSI44929H, LSI44929LH,
7004G2-LC)
• LSIFC929X (LSI7202XP, LSI7402XP)
2.2.3 Preparing to Install the Windows XP Driver
Before you install the SYMMPI.SYS driver onto a new or existing Windows
XP system, you need to create a driver diskette. To do this, copy the
following files from the LSI CD-ROM or the LSI website to the root
directory of a clean diskette and label it Windows XP Driver Diskette:
\txtsetup.oem
\symmpi.tag
\32_bit\lsipseud.inf
\32_bit\mpixp32.cat
\32_bit\symmpi.inf
\32_bit\symmpi.sys
\64_bit\lsipseud.inf
\64_bit\mpixp64.cat
\64_bit\symmpi.inf
\64_bit\symmpi.sys
Note: You can download the most current Windows XP drivers
from www.lsi.com/support. Click on Downloads. Next,
click on Download Center. Select the product category,
then the appropriate product. A bullet in the Drivers section
will display all driver packages associated with the product
selection.
2-4 Windows Driver Installation
Version 1.3 Copyright © 2001, 2002, 2007 by LSI Logic Corporation. All rights reserved.
Page 27

2.2.4 Installing the Driver on a New Windows XP System
Follow this procedure to install the SYMMPI.SYS driver on a new
Windows XP system. During installation, Windows XP automatically adds
the driver to the registry and copies it to the appropriate directory. To
install Windows XP you must boot the PC from the Windows XP
CD-ROM. Refer to your system documentation if you need to change
BIOS settings to enable the PC to boot from a CD-ROM.
1. Boot the system from the Windows XP CD-ROM.
2. Press F6 to install the SYMMPI.SYS driver when the screen displays
the message Windows Setup.
Note: You must press F6 in order for the system to recognize the
new driver. Otherwise, the system will not recognize the
devices controlled by the driver during Windows XP setup.
3. Select S to specify an additional device when the screen displays the
following message:
Setup was unable to load support for the mass storage
device you specified...
Note: If this messagedoes not appear, the Setup program did not
recognize the F6 key press. If this happens, reboot the
system and try again.
The system prompts you for the manufacturer-supplied hardware
support disk.
4. Insert the Window XP Driver Diskette that you prepared earlier and
press Enter.
5. The screen displays a list of two drivers:
LSI Logic PCI SCSI/FC MPI Driver (XP 32-bit)
LSI Logic PCI SCSI/FC MPI Driver (XP 64-bit)
6. Select either the 32-bit or 64-bit driver by highlighting it, and press
Enter to continue.
You are returned to the Windows XP Setup screen.
7. Press Enter to continue.
A message appears to notify you that Setup is loading files.
8. Follow the Windows XP installation procedure from this point to
complete the installation.
Installing the Windows XP Driver 2-5
Version 1.3 Copyright © 2001, 2002, 2007 by LSI Logic Corporation. All rights reserved.
Page 28

2.2.5 Installing the Driver on an Existing Windows XP System
This procedure installs or upgrades the SYMMPI.SYS driver on an
existing Window XP system.
Note: When an LSI adapter is added to an existing system
installation, Windows XP automatically detects the new
adapter at the next reboot. When the Device Driver Wizard
appears at boot, click the Next button and continue at
step 8 below.
1. Boot Windows XP and logon as a user with Administrator privileges.
2. Click the Start button, then right-click My Computer in the menu.
3. Select Properties.
4. Click the Hardware tab, and then click the Device Manager button.
5. Click the plus sign to the left of the SCSI and RAID controllers line.
Double-click the entry for the adapter whose driver you want to
upgrade.
6. Click the Driver tab.
Information on the currently installed driver is displayed. You can
view more driver information by clicking the Driver Details button.
7. Click the Update Driver button to update the existing driver. The
Hardware Update Wizard starts.
8. Click Install from a list or specific location..., then click Next.
9. Click Don't search, I will choose the driver to install, then click
Next.
10. Click Have Disk and type the path to the driver, or click Browse.
Drivers for 32-bit systems are in the \32_bit directory and drivers
for 64-bit systems are in the \64_bit directory.
11. Select the path to the driver, and click OK.
12. Select the driver from the list and click Next.
13. Click Next again to start the driver update.
In some cases, a message will appear stating that this driver has not
passed logo testing. In other words, it is a nonsigned driver.
Note: Drivers are digitally signed by the Microsoft Windows
Hardware Quality Lab (WHQL) when they complete logo
2-6 Windows Driver Installation
Version 1.3 Copyright © 2001, 2002, 2007 by LSI Logic Corporation. All rights reserved.
Page 29

testing. Due to the time lag between the LSI general
customer release of Windows drivers and the completionof
WHQL logo testing, some drivers distributed with adapters
or downloaded from the LSI web site may not be digitally
signed.
14. Click Continue Anyway to continue the installation, or click STOP
Installation if you do not want to install an unsigned driver.
The system loads the driver from the Windows XP driver diskette. A
message may appear indicating that the target (existing) driver is
newer than the source (upgrade) driver.
15. Click Yes to continue the installation, or click No to cancel the driver
upgrade at this point.
Windows copies the driver to the system disk. For any adapter other
than the boot adapter, the updated driver becomes active
immediately. For the boot adapter, a message appears indicating that
you must reboot your system in order for the new driver to take
effect.
16. Click Finish to complete the driver upgrade.
2.2.6 Performance Tuning for Windows XP
Windows XP has registry entries that you can use to tune SCSI I/O
performance for certain configurations. The tunable parameters are large
transfer block size support and guaranteed number of concurrent I/Os for
a particular SCSI bus.
By default, the LSI ScsiPort and StorPort miniport drivers provide
optimum performance in most standard computer systems. Some
nonstandard systems require fine tuning to obtain peak system memory
utilization and performance. If you observe less than the advertised
functionality and performance on any platform after installation, contact
LSI Technical Support. Go to the LSI technical support home page at:
http://www.lsi.com/support/index.html#hotline
and call the listed number for assistance. LSI can provide additional
registry settings to customize the driver for specific systems and
applications.
Installing the Windows XP Driver 2-7
Version 1.3 Copyright © 2001, 2002, 2007 by LSI Logic Corporation. All rights reserved.
Page 30

2.2.6.1 Large Block Size Support
The SYMMPI.SYS driver can support up to a 1 Mbyte transfer size in
Windows XP; however, the default Windows XP transfer size is
64 Kbytes. To enable better performance, the driver installation process
adds a registry entry to enable the maximum 1 Mbyte transfer size. Also,
the mpi_256K.reg file can be used to set or enable a 256 Kbyte
maximum transfer size, and it can be edited to set other maximum
transfer sizes as well. There are two ways to add this registry setting:
• Locate the mpi_256K.reg data file using Windows Explorer, double-
click on the file, and edit it.
• Type the following at the command prompt:
regedit mpi_256K.reg
This command inserts an entry in the registry to enable 256 Kbyte
block size support.
By editing mpi_256K.reg, you can set any maximum block size between
64 Kbytes and 1 Mbyte. The formula to calculate the proper value for
MaximumSGList in a 32-bit OS is:
MaximumSGList = ((Maximum Block Size)/4 Kbytes) + 1
For example, to determine the MaximumSGList value for 256 Kbytes in
a 32-bit OS, take ((256 Kbytes/4 Kbytes) +1) = 65 (or 0x41 in
hexadecimal).
The maximum value allowed for MaximumSGList is 0xFF (255 decimal).
For the particular value of 0xFF, the internal value passed to Windows
XP is increased to 0x101, allowing support for a full 1 Mbyte transfer.
Read the information in the mpi_256K.reg data file before editing it. You
must reboot the system for the new registry setting to take effect.
For 64-bit systems, the OS page size is 8 Kbytes instead of 4 Kbytes.
Therefore, the maximum transfer size is 2 Mbytes, and the default driver
installation enables support for 512 Kbytes transfer size. The formula to
calculate the MaximumSGList is:
MaximumSGList = ((Maximum Block Size)/8 Kbytes) + 1
To reset the maximum block size to the default of 64 Kbytes, follow the
instructions above, except use mpidfblk.reg as the data file.
2-8 Windows Driver Installation
Version 1.3 Copyright © 2001, 2002, 2007 by LSI Logic Corporation. All rights reserved.
Page 31

2.2.6.2 Maximum Number of Concurrent I/Os (Guaranteed)
Windows XP guarantees a maximum of 32 concurrently active I/Os on a
particular SCSI bus. Due to the method of memory allocation, the actual
limit of concurrent I/Os can vary between different drivers or versions of
drivers. This can have a significant impact on performance benchmarking
between different driver versions or adapter vendors. In effect, one
adapter may be able to support 70 or 80 outstanding I/Os, while another
adapter could support only 32 outstanding I/Os. This can also affect
systems with high performance storage subsystems, such as disk arrays.
To enable better performance, the driver installation process adds a
registry entry to support 255 concurrent I/Os. If you want a different
maximum value, you can use the mpi100io.reg data file to add a
registry entry that sets the maximum number of concurrent I/Os. There
are two ways to add this registry setting:
• FInd the mpi100io.reg data file using Windows Explorer, double-
click on the file name, and edit it to change the maximum concurrent
I/Os to some other number. (This file is included with the driver files.)
• Type the following at the command prompt:
regedit mpi100io.reg
This command inserts an entry in the registry to guarantee a
maximum of 100 concurrent I/Os per adapter.
Be sure to read the information in the mpi100io.reg data file before
editing it. If you set the number of concurrent I/Os to a high number, large
amounts of non-paged pool memory (a critical NT resource) will be used
and system performance can be degraded.
To reset the guaranteed number of concurrent I/Os to the Windows XP
default of 32, follow the instructions above but use mpidefio.reg as the
data file.
You must reboot the system for the new registry settings to take effect.
2.2.7 Hibernation Support
The LSI Fusion-MPT storage adapters and the SYMMPI.SYS driver are
high-performance storage solutions. This performance level requires
more resources than typical storage adapters. Windows XP supports this
resource level adequately during normal operations. However, due to
Installing the Windows XP Driver 2-9
Version 1.3 Copyright © 2001, 2002, 2007 by LSI Logic Corporation. All rights reserved.
Page 32

limitations imposed by Windows XP, when attempting to Hibernate the
system may fail to Hibernate and display the following error message:
Windows - System Error Insufficient system resources exist
to complete the API.
To allow Windows XP to Hibernate successfully, all critical Windows
update patches should be applied to the system. These patches can be
downloaded at:
http://windowsupdate.microsoft.com
2.2.8 Troubleshooting
The SYMMPI.SYS driver logs error messages to the system error log. For
these errors, the system errorlog EventID is 11, and the specific error
code values are displayed at offset 0x10. Data is displayed in text format.
2.3 Windows Server 2003 Drivers
This section describes the LSI Fusion-MPT StorPort drivers for the
Windows Server 2003 operating system and explains how to install them.
There are three of the Windows Server 2003 drivers:
• LSI_SCSI.SYS (StorPort) for U320 SCSI
• LSI_FC.SYS (StorPort) for Fibre Channel
• LSI_SAS.SYS (StorPort) for Serial Attached SCSI (SAS)
This section has the following topics:
• Section 2.3.1, “Introducing the Windows Server 2003 Drivers”
• Section 2.3.2, “Driver Features and LSI Device Support”
• Section 2.3.3, “Preparing to Install the Windows Server 2003 Drivers”
• Section 2.3.4, “Installing the Driver on a New Windows Server 2003
System”
• Section 2.3.5, “Installing the Driver on an Existing Windows Server
2003 System”
• Section 2.3.6, “Performance Tuning for Windows Server 2003”
• Section 2.3.7, “Troubleshooting”
2-10 Windows Driver Installation
Version 1.3 Copyright © 2001, 2002, 2007 by LSI Logic Corporation. All rights reserved.
Page 33

2.3.1 Introducing the Windows Server 2003 Drivers
Windows Server 2003 runs on Intel architecture (32-bit), Itanium
Processor Family(IA-64), and Extended-64 (AMD64/EM64T) processors.
A Windows application uses the SCSI pass-thru facility to pass SCSI
commands directly to the parallel SCSI, Fibre Channel, or SAS Protocol
devices. This facility allows applications to directly control and access
devices by filling in a data structure and calling into the port or class
driver. Windows Server 2003 provides class drivers for hard disk drives,
optical drives, CD-ROM drives, printers, and scanners. Other class
drivers, provided by peripheral manufacturers, may be added to support
new devices. (Tape device support is built into the operating system itself
and does not require a class driver.)
Microsoft provides the port driver and LSI provides the LSI_SCSI.SYS ,
LSI_FC.SYS, and LSI_SAS.SYS miniport drivers. These drivers complete
the path to the LSI controller or processor with an optional U320 SCSI,
Fibre Channel, or SAS BIOS. The LSI_SCSI.SYS, LSI_FC.SYS and
LSI_SAS.SYS drivers meet the Microsoft specification for miniport drivers.
These drivers allow connection of parallel SCSI, Fibre Channel, and SAS
devices including disk drives, CD-ROM drives, and tape drives for PCI
and PCI-X based systems. The drivers support all Windows Server 2003
Service Packs.
The LSI miniport drivers use the Microsoft StorPort port driver (instead
of the Microsoft ScsiPort driver used in earlier versions of Windows). The
StorPort driver has architectural enhancements that provide performance
improvements on large server systems with many storage adapters. The
miniport drivers are designed to take advantage of these enhancements
for improved performance.
2.3.2 Driver Features and LSI Device Support
The LSI_SCSI.SYS, LSI_FC.SYS, and LSI_SAS.SYS miniport drivers
support the following:
• 320 Mbytes/s parallel SCSI transfers for LSI53C1020 and
LSI53C1030 controllers using the LSI_SCSI.SYS driver
• 1 Gbyte, 2 Gbyte, and 4 Gbyte Fibre Channel transfers for
LSIFC949X, LSIFC939X, LSIFC929X, LSIFC919X, LSIFC929, and
LSIFC919 controllers using the LSI_FC.SYS driver
Windows Server 2003 Drivers 2-11
Version 1.3 Copyright © 2001, 2002, 2007 by LSI Logic Corporation. All rights reserved.
Page 34

• End-to-End Data Protection (EEDP) for LSIFC949X and LSIFC939X
controllers
• 1.5 Gbyte and 3 Gbyte SAS expanders/devices and SATA devices for
the LSISAS1064 controller using the LSI_SAS.SYS driver.
• PCI and PCI-X bus protocols
• LSI Fusion-MPT common software interface
• Multiple host adapters
• Multiple Logical Unit Numbers (LUNs)
• Scatter-Gather operations
• SCSI pass-thru functionality
• Disk array configurations with no LUN 0
• Disk array configurations with non-contiguous LUNs
• Auto request sense
• Maximum block size support: 1 Mbyte (32-bit systems), 2 Mbyte
(64-bit systems)
• Microsoft WMI HBA API for Fibre Channel devices using the
LSI_FC.SYS driver.
The miniport drivers support the following LSI devices and associated
host adapters:
• The LSI_SCSI.SYS driver supports the LSI53C1020, LSI53C1020A,
LSI53C1030, and LSI53C1030T controllers.
• The LSI_FC.SYS driver supports the LSIFC919, LSIFC919X,
LSIFC929, LSIFC929X, LSIFC939X, and LSIFC949X controllers.
• The LSI_SAS.SYS driver supports theLSISAS1064 and LSISAS1068
controllers.
2.3.3 Preparing to Install the Windows Server 2003 Drivers
Before you install the LSI Windows Server 2003 drivers on a new or
existing system, you must create a driver installation CD.To do this, copy
the files listed in Table 2.1 from the LSI CD-ROM or the LSI website to
the root directory of a writable CD-ROM and label it Windows Server
2003 Driver Installation.
2-12 Windows Driver Installation
Version 1.3 Copyright © 2001, 2002, 2007 by LSI Logic Corporation. All rights reserved.
Page 35

Table 2.1 Files for Windows 2003 Server Driver Installation CD
Driver Files to Copy to Driver Installation CD
LSI_SCSI.SYS \txtsetup.oem
LSI_FC.SYS \txtsetup.oem
LSI_SAS.SYS \txtsetup.oem
\lsi_scsi.tag
\i386\p2k332.cat
\i386\lsi_scsi.inf
\i386\lsi_scsi.sys
\IA64\p2k3ia64.cat
\IA64\lsi_scsi.inf
\IA64\lsi_scsi.sys
\AMD64\p2k3am64.cat
\AMD64\lsi_scsi.inf
\AMD64\lsi_scsi.sys
\lsi_fc.tag
\i386\f2k332.cat
\i386\lsi_fc.inf
\i386\lsi_fc.sys
\IA64\f2k3ia64.cat
\IA64\lsi_fc.inf
\IA64\lsi_fc.sys
\AMD64\f2k3am64.cat
\AMD64\lsi_fc.inf
\AMD64\lsi_fc.sys
\lsi_sas.tag
\i386\s2k332.cat
\i386\lsi_sas.inf
\i386\lsi_sas.sys
\IA64\s2k3ia64.cat
\IA64\lsi_sas.inf
\IA64\lsi_sas.sys
\AMD64\s2k3am64.cat
\AMD64\lsi_sas.inf
\AMD64\lsi_sas.sys
Note: You can download the most current Windows Server 2003
drivers from www.lsi.com/support. Click on Downloads.
Next, click on Download Center. Select the product
category, then the appropriate product. A bullet in the
Drivers section will display all driver packages associated
with the product selection.
In the following driver installation sections, LSI_xxx means the
LSI_SCSI, LSI_FC,orLSI_SAS driver, depending on which driver you are
installing.
Windows Server 2003 Drivers 2-13
Version 1.3 Copyright © 2001, 2002, 2007 by LSI Logic Corporation. All rights reserved.
Page 36

2.3.4 Installing the Driver on a New Windows Server 2003 System
Follow this procedure to install the LSI_xxx.SYS driver onto a new
Windows Server 2003 system. Windows Server 2003 automatically adds
the driver to the registry and copies the driver to the appropriate
directory.
Note: Windows Server 2003 contains a SYMMPI.SYS driver that
supports the U320, 919, and 929 devices. When you
perform a fresh installation with a device that is supported
by the bundled SYMMPI.SYS driver, you cannot load the
LSI_xxx.SYS driver using the F6 key. Pressing this key has
no effect, and the SYMMPI.SYS driver is used. To use the
LSI_xxx.SYS driver, you must upgrade the driver after the
installation has completed, as described in Section 2.3.5,
“Installing the Driver on an Existing Windows Server 2003
System.”
A CD-ROM is used to install Windows Server 2003 on a new system.
Follow these steps for a new system installation:
1. Boot from the Windows Server 2003 CD-ROM. If necessary, change
the BIOS settings to enable CD-ROM booting.
2. Press F6 to install the LSI_xxx.SYS driver when the screen displays
Windows Setup.
Note: You must press F6 in order for the system to recognize the
new driver. Otherwise, the system will not recognize the
devices controlled by the driver during Windows Server
2003 setup.
3. Select S to specify an additional device when the screen displays the
following message:
Setup could not determine the type of one or more mass
storage devices...
Note: If this messagedoes not appear, the Setup program did not
recognize the F6 key press. If this happens, reboot the
system and try again.
The system prompts you for the manufacturer-supplied hardware
support disk.
2-14 Windows Driver Installation
Version 1.3 Copyright © 2001, 2002, 2007 by LSI Logic Corporation. All rights reserved.
Page 37

4. Insert the CD-ROM containing the Windows Server 2003 driver
required to support your LSI adapter(s) and press Enter.
The screen lists three driver selections:
– LSI Fusion-MPT xxx Driver (Server 2003 32-bit)
– LSI Fusion-MPT xxx Driver (Server 2003 IA-64)
– LSI Fusion-MPT xxx Driver (Server 2003 AMD64)
(where xxx is SCSI, FC, or SAS, depending on which driver is being
installed)
5. Select the driver that matches the processor architecture of the
system (32-bit, IA-64, or AMD64). For Intel EM64T architecture
processors, use the AMD64 driver.
6. Press Enter to continue. You are returned to the Windows Server
2003 Setup screen.
7. Press Enter to continue.
The message about setup loading files appears.
8. Follow the Microsoft Windows Server 2003 installation procedure at
this point.
2.3.5 Installing the Driver on an Existing Windows Server 2003 System
Follow these steps to install or upgrade the LSI_xxx.SYS drivers onto an
existing Windows Server 2003 system.
Note: When an LSI SCSI, Fibre Channel, or SAS adapter is
added to an existing system installation, Windows
automatically detects the new adapter at the next reboot.
When the Device Driver Wizard appears at boot, click the
Next button and continue at step 8 below.
1. Boot Windows Server 2003 and logon as a user with Administrator
privileges.
2. Click the Start button, then right-click My Computer on the menu.
3. Select Properties.
4. Click the Hardware tab, and then click the Device Manager button.
Windows Server 2003 Drivers 2-15
Version 1.3 Copyright © 2001, 2002, 2007 by LSI Logic Corporation. All rights reserved.
Page 38

5. Click the plus sign to the left of the SCSI and RAID controllers line.
Double-click the entry for the adapter whose driver you want to
upgrade.
6. Click the Driver tab.
Information about the currently installed driver is displayed. You can
view more driver information by clicking the Driver Details button.
7. Click Update Driver to update the existing driver. The Hardware
Update Wizard starts.
8. Click Install from a list or specific location..., and then click Next.
9. Click Don’t search, I will choose the driver to install, and then
click Next.
10. Click Have Disk and type the path to the driver, or click Browse.
Drivers for 32-bit systems arein the \i386 directory. Drivers for IA-64
systems are in the \IA64 directory. Drivers for AMD64/EM64T
systems are in the \AMD64 directory.
11. When the path to the driver has been selected, click OK.
12. Select the driver from the list and click Next.
13. Click Next again to start the driver update.
In some cases, a message appears saying that this driver has not
passed logo testing—in other words, it is a nonsigned driver.
Note: Drivers are digitally signed by the Microsoft Windows
Hardware Quality Lab (WHQL) when they complete logo
testing. Due to the time lag between the LSI general
customer release of Windows drivers and the completionof
WHQL logo testing, some drivers distributed with adapters
or downloaded from the LSI web site may not be digitally
signed.
14. Click Continue Anyway to continue the installation, or click STOP
Installation if you do not want to install an unsigned driver.
The system loads the driver from the Windows Server 2003 driver
CD-ROM. A message box may appear indicating that the target
(existing) driver is newer than the source (upgrade) driver.
15. Click Yes to continue the installation, or click No to cancel the driver
upgrade.
2-16 Windows Driver Installation
Version 1.3 Copyright © 2001, 2002, 2007 by LSI Logic Corporation. All rights reserved.
Page 39

The system copies the driver to the system disk. For any adapter
other than the boot adapter, the updated driver becomes active
immediately. For the boot adapter, a message box appears indicating
that you must reboot your system for the new driver to take effect.
16. Click Finish to complete the driver upgrade.
2.3.6 Performance Tuning for Windows Server 2003
Windows Server 2003 has registry entries that you can use to tune the
performance of SCSI I/O for certain configurations. The tunable
parameter for LSI_xxx.SYS is a guaranteed number of concurrent I/Os
for a particular SCSI bus.
The LSI_SCSI.SYS, LSI_FC.SYS, and LSI_SAS.SYS drivers are
configured by default to provide optimum performance in most standard
computer systems. Some nonstandard systems require fine tuning to
obtain peak system memory utilization and performance. If you observe
less than the advertised functionality and performance on any platform
after installation, contact LSI Technical Support. Go to the LSI technical
support home page at:
http://www.lsi.com/support/index.html#hotline
and call the listed number for assistance. LSI can provide additional
registry settings to customize the driver for specific systems and
applications.
2.3.6.1 Maximum Number of Concurrent I/Os (Guaranteed)
Windows Server 2003 guarantees a maximum of 32 concurrent I/Os
active on a particular SCSI bus. However, due to the method of memory
allocation, the actual limit of concurrent I/Os can vary greatly between
different drivers or versions of drivers. This can have a large impact on
performance benchmarking between different driver versions or adapter
vendors. In effect, one adapter may actually be able to have 70 or 80
I/Os outstanding, while another adapter could only have 32. This can
also affect systems with high performance storage subsystems, such as
disk arrays.
To enable the best performance, the driver installation process adds a
registry entry to support 255 concurrent I/Os. If you want a different
maximum value, you can use the mpi100io.reg file to add a registry
Windows Server 2003 Drivers 2-17
Version 1.3 Copyright © 2001, 2002, 2007 by LSI Logic Corporation. All rights reserved.
Page 40

entry that guarantees the desired number of concurrent I/Os. There are
two ways to add this registry setting:
• Locate the mpi100io.reg data file (supplied with the driver files)
using Windows Explorer, double-click on the file name, and edit the
file.
• Type this command at the command prompt:
regedit mpi100io.reg
This command inserts an entry in the registry to guarantee a
maximum of 100 concurrent I/Os per adapter.
If you want a different maximum number, you can edit the mpi100io.reg
data file; however, setting this value to a high number uses increasing
amounts of non-paged pool memory, a critical Windows resource. High
values for this setting can degrade system performance. Be sure to read
the information in the mpi100io.reg data file before editing it. You must
reboot the system to activate the new registry setting.
To reset the guaranteed number of concurrent I/Os to the operating
system default of 32, follow the instructions above, but use
mpidefio.reg as the data file.
2.3.7 Troubleshooting
The LSI_SCSI.SYS, LSI_FC.SYS, and LSI_SAS.SYS drivers log error
messages to the system error log. For these errors, the system error log
EventID is 11, and the specific error code values are displayed at offset
0x10. Data should be displayed in words.
2-18 Windows Driver Installation
Version 1.3 Copyright © 2001, 2002, 2007 by LSI Logic Corporation. All rights reserved.
Page 41

Chapter 3
UNIXOperatingSystem
Device Drivers
This chapter describe the Fusion-MPT device driver for various UNIX
operating systems. This chapter contains the following sections:
• Section 3.1, “Installing the Solaris x86 Device Driver”
• Section 3.2, “Installing the Solaris SPARC Driver”
• Section 3.3, “Installing the UnixWare 7 and Open Unix 8 Device
Driver”
• Section 3.4, “SCO OpenServer 5 Device Driver Installation”
• Section 3.5, “Installing the Fusion-MPT Linux Device Drivers”
3.1 Installing the Solaris x86 Device Driver
This section describes version 5.xx.xx of the LSI Fusion-MPT device
driver for Solaris x86. This section includes the following topics:
• Section 3.1.1, “Introducing the Solaris x86 Driver”
• Section 3.1.2, “Driver Features and LSI Device Support”
• Section 3.1.3, “Preparing to Install the Solaris x86 Driver”
• Section 3.1.4, “Installing the Driver on an Existing Solaris x86
System”
• Section 3.1.5, “Installing the Driver on a New Solaris x86 System”
3.1.1 Introducing the Solaris x86 Driver
The LSI Solaris X86 driver, itmpt, allows the Solaris x86 operating
system (for Solaris versions 8.0, 9.0, and 10.0) to interface with the
devices connected to the LSI Ultra320 SCSI, SAS, and Fibre Channel
host adapters. The LSI driver is optimized for low CPU overhead and
Fusion-MPT Device Management User’s Guide 3-1
Version 1.3 Copyright © 2001, 2002, 2007 by LSI Logic Corporation. All rights reserved.
Page 42

high I/O throughput, making use of the Fusion-MPT architecture. This
driver takes advantage of new hardware features in the LSI Ultra320
SCSI, SAS, and LSI Fibre Channel chips to minimize CPU utilization,
including interrupt coalescing, which can result in less than one interrupt
per I/O.
The lsiutil utility, which is included with the itmpt driver, provides a
wealth of functionality for displaying and modifying settings for LSI MPT
adapters. You can execute lsiutil with no arguments to start an
interactive session. You can also use the command lsiutil -h to view
information about the lsiutil command line options. This utility is
installed to /usr/bin/lsiutil.
In order to preserve a consistent mapping between Solaris target IDs and
fibre channel target devices, the driver maintains a configuration file with
entries that map each Solaris target ID to an FC target World Wide Name
(WWN). Entries are created for all FC target devices; this is in addition
to the Root Boot persistent target ID selection, which is configurable
through the BIOS. By default, the itmpt driver does not maintain
persistent bindings between targets and WWNs. However, persistent
bindings are recommended for most RAID controllers such as Engenio
RAID controllers. The lsiutil utility can be used to modify persistent
bindings, similar to the way this is done through the BIOS. Additional
entries can be made in the /kernel/drv/itmpt.conf configuration file.
See the syntax and examples that are included in that file.
3.1.2 Driver Features and LSI Device Support
The Solaris x86 driver supports these features:
• State-of-the-art Fusion-MPT interface, providing support for FC,
SCSI, SAS, and RAID devices with a single binary image
• Highly efficient, low CPU usage architecture
• Multiple host adapters
• Multiple Logical Unit Numbers (LUNs)
• Scatter-gather
• Disk array configurations with no LUN 0
• Disk array configurations with non-contiguous LUNs
• Multiprocessor environments.
3-2 UNIX Operating System Device Drivers
Version 1.3 Copyright © 2001, 2002, 2007 by LSI Logic Corporation. All rights reserved.
Page 43

The LSI Solaris X86 driver supports the following LSI host adapters:
• Fibre Channel: LSI7104XP, LSI7204XP, LSI7404XP, LSI7104XLP,
LSI7204XLP, LSI7102XP, LSI7202XP, LSI7402XP, LSI7402EP,
LSI7102XLP, LSI7202XLP, LSI44929, LSI44919
• SCSI: LSI22320-R, LSI21320-R, LSI20320-R
• SAS (Serial Attached SCSI): LSI3041X, LSI3442X, LSI3080X,
LSI3800X
The LSI Solaris X86 driver supports the following LSI microchip
controllers:
• LSIFC949X, LSIFC929X, LSIFC919X, LSIFC929, LSIFC919
• LSI53C1030, LSI53C1020
• LSI1064, LSI1064E, LSI1068, LSI1068E
3.1.3 Preparing to Install the Solaris x86 Driver
Your Solaris x86 system must have the following available resources in
order to install the LSI Host Adapter and the itmpt Solaris x86 driver.
• Host Bus Slot: Sun Solaris system with available PCI slot
• Operating System: Solaris 8.0 release or later
After installing the module in an appropriate PCI slot and making all the
necessary internal and external connections to the module, power on the
host system.
Note: When the itmpt driver initializes an LSI host adapter’s
disks, it attaches under the Sun sd target driver. Toalter the
probing of target IDs and probing for non-zero LUNs on
devices attached to an LSI adapter, modify the
/kernel/drv/sd.conf file.
3.1.4 Installing the Driver on an Existing Solaris x86 System
Follow these steps to install the itmpt driver on a system in which
Solaris x86 is already installed:
Note: You must be logged on as root to perform the installation.
Installing the Solaris x86 Device Driver 3-3
Version 1.3 Copyright © 2001, 2002, 2007 by LSI Logic Corporation. All rights reserved.
Page 44

1. Uncompress and untar the itmpt-x86-XXX.tar.Z file by typing the
following commands in order to create a directory named install:
uncompress itmpt-x86-XXX.tar.Z
tar -xvf itmpt-x86-XXX.tar
cd install
2. Enter the following command to execute the pkgadd procedure and
add the itmpt driver to the operating system:
pkgadd -d .
You will see the following text on the screen:
The following packages are available:
1 ITImpt LSI Logic FusionMPT(tm) Fibrechannel/SCSI drivers
(X86) itmpt kit version 5.07.01
Select package(s) you wish to process (or ’all’ to process
all packages).
(default: all) [?,??,q]: 1
Processing package instance <ITImpt> from </floppy/lsilogic>
LSI Logic FusionMPT(tm) Fibrechannel/SCSI drivers (X86)
itmpt kit version 5.xx.xx
LSI Logic
Using </> as the package base directory.
## Processing package information.
## Processing system information.
2 package pathnames are already properly installed.
## Verifying disk space requirements.
## Checking for conflicts with packages already installed.
## Checking for setuid/setgid programs.
This package contains scripts which will be executed with
superuser permission during the process of installing
this package.
Do you want to continue with the installation of <ITImpt>
[y,n,?] y
Installing LSI Logic FusionMPT(tm)
Fibrechannel/SCSI drivers as <ITImpt>
## Installing part 1 of 1.
/kernel/drv/itmpt
/kernel/drv/itmpt.conf
3-4 UNIX Operating System Device Drivers
Version 1.3 Copyright © 2001, 2002, 2007 by LSI Logic Corporation. All rights reserved.
Page 45

[ verifying class <none> ]
## Executing postinstall script.
Following installation, please reboot the system to properly
configure and load the drivers.
Installation of <ITImpt> was successful.
3.1.5 Installing the Driver on a New Solaris x86 System
See your LSI host adapter user’s guide for instructions if you are
installing a new LSI host adapter to support the system disk on a new
Solaris x86 installation. If you need to do this, you must first build an
Install Time Update (ITU) diskette using the itmpt-x86-XXX-itu-YYY.dd
file. Instructions for creating the diskette are included here for your
convenience. (The instructions are also in the bldsol.txt file.)
3.1.5.1 Preparing to Create the ITU Diskette
These directions are for the zip file distribution of the ITMPT driver
package. They assume you have already successfully unzipped the
contents of the original zip file into a directory somewhere on your
system’s hard drive.
To create a ITMPT diskette for X86 Solaris installations, copy the raw
itmpt-x86-XXX-itu-YYY.dd image file onto a 1.44 Mbyte floppy
diskette.
Note: XXX indicates the driver version and YYY indicates the
version of Solaris that the image is for. s9 is for Solaris 9
and s10 is for Solaris 10.
See the following instructions for creating the ITU diskette on a Solaris
system or a DOS/Windows System.
3.1.5.2 Creating the ITU Diskette on a Solaris System
Follow these steps to create the ITMPT driver diskette on a Solaris
system:
1. Insert a 3.5-inch diskette in the floppy disk drive.
2. At the shell prompt, type the following:
# volcheck -v
# dd if=/<path>/itmpt-x86-XXX-itu.dd of=/vol/dev/aliases/floppy0 bs=32768
# eject floppy
Installing the Solaris x86 Device Driver 3-5
Version 1.3 Copyright © 2001, 2002, 2007 by LSI Logic Corporation. All rights reserved.
Page 46

<path> is the path name where the file itmpt-x86-XXX-itu.dd is
located. The dd command copies the image to the floppy diskette,
thus creating the ITMPT driver diskette.
3. Label this diskette ITMPT Driver Diskette.
3.1.5.3 Creating the ITU Diskette on a DOS or Windows System
To create the ITU diskette on a DOS or Windows system, you must use
a utility that will copy the raw diskette image onto a 1.44 Mbyte floppy
diskette. The easiest way to do this is to use fdimage.exe, a public
domain utility written by Robert Nordier that is included in the zip file with
the Solaris x86 driver.
The usage information and command syntax for fdimage is as follows.
(This text appears on the screen when you enter the command name at
the DOS prompt.)
Usage: fdimage [-dqsv] [-f size] [-r count] file drive
• -d: Debug mode
• -f size: Specify the capacity of the floppy disk; the choices are
160K, 180K, 320K, 360K, 720K, 1.2M, 1.44M, 2.88M
• -q: Quick mode: don’t format the disk
• -r count: Retry count for format/write operations
• -s: Single-sector I/O
• -v: Verbose mode
The following command syntax example assumes that a formatted,
1.44 Mbyte diskette is inserted in the a: floppy drive and that all the files
from the zip file are in the current working directory.
fdimage -qv itmpt-x86-XXX-itu.dd a:
This command works when running MS-DOS, Windows 9x, Windows
ME, Windows NT, Windows 2000, or Windows XP. If you are running
anti-virus software, it is recommended that you temporarily disable it
when running fdimage. Otherwise, fdimage may not be able to get
exclusive access to your floppy drive which it needs in order to write the
image to a diskette.
When the diskette is created, label it ITMPT Driver Diskette.
3-6 UNIX Operating System Device Drivers
Version 1.3 Copyright © 2001, 2002, 2007 by LSI Logic Corporation. All rights reserved.
Page 47

3.2 Installing the Solaris SPARC Driver
This section provides instructions for installing version 5.xx.xx of the
Solaris SPARC Fusion-MPT driver. This section includes the following
topics:
• Section 3.2.1, “Introducing the Solaris SPARC Driver”
• Section 3.2.2, “Driver Features and LSI Device Support”
• Section 3.2.3, “Preparing to Install the Solaris SPARC Driver”
• Section 3.2.4, “Installing the Driver on an Existing Solaris SPARC
System”
• Section 3.2.5, “Network System Installation of the Solaris SPARC
Driver”
3.2.1 Introducing the Solaris SPARC Driver
The LSI driver, itmpt, allows the Solaris SPARC operating system to
interface with the devices connected to the LSI Ultra320 SCSI, SAS, and
Fibre Channel host adapters. The LSI driver is optimized for low CPU
overhead and high I/O throughput, making use of the LSI Fusion-MPT
architecture. LSI adapters have built-in FCode, designed to operate in
the Sun OpenBoot environment, allowing devices to be available to the
OpenBoot (ok) prompt. The driver takes advantage of new hardware
features in the LSI Ultra320 SCSI, SAS, and Fibre Channel chips to
minimize CPU utilization, including interrupt coalescing, which can result
in less than one interrupt per I/O.
The lsiutil utility, which is included with the itmpt driver, provides a
wealth of functionality for displaying and modifying settings for LSI MPT
adapters. This includes updating the FCode, firmware, and BIOS on an
MPT adapter as well as managing target persistence. You can execute
lsiutil with no arguments to start an interactive session. You can also
use the command lsiutil -h to view information about the lsiutil
command line options. This utility is installed to /usr/bin/lsiutil.
For Fibre Channel adapters, the lsiprobe utility configures extended
LUN support by automatically adding or deleting extended LUN support
from the /kernel/drv/ssd.conf file, used by the itmpt driver.
Installing the Solaris SPARC Driver 3-7
Version 1.3 Copyright © 2001, 2002, 2007 by LSI Logic Corporation. All rights reserved.
Page 48

3.2.2 Driver Features and LSI Device Support
The Solaris SPARC Fusion-MPT driver supports these features:
• State-of-the-art Fusion-MPT interface, providing support for Fibre
Channel, SCSI, SAS, and RAID devices with a single binary image
• Highly efficient, low CPU usage architecture
• Multiple host adapters
• Multiple Logical Unit Numbers (LUNs)
• Scatter-Gather
• Disk array configurations with no LUN 0
• Disk array configurations with non-contiguous LUNs
• Multiprocessor environments
The LSI Solaris SPARC driver supports the following LSI host adapters:
• Fibre Channel: LSI7104XP, LSI7204XP, LSI7404XP, LSI7104XLP,
LSI7204XLP, LSI7102XP, LSI7202XP, LSI7402XP, LSI7402EP,
LSI7102XLP, LSI7202XLP, LSI44929, LSI44919
• SCSI: LSI22320-R, LSI21320-R, LSI20320-R
• SAS (Serial Attached SCSI): LSI3041X, LSI3442X, LSI3080X,
LSI3800X
The LSI Solaris SPARC driver supports the following LSI microchip
controllers:
• LSIFC949X, LSIFC929X, LSIFC919X, LSIFC929, LSIFC919
• LSI53C1030, LSI53C1020
• LSI1064, LSI1064E, LSI1068, LSI1068E
3.2.3 Preparing to Install the Solaris SPARC Driver
Table 3.1 lists the Solaris SPARC system resources that are required in
order to install a supported LSI host adapter and the Solaris SPARC
driver.
3-8 UNIX Operating System Device Drivers
Version 1.3 Copyright © 2001, 2002, 2007 by LSI Logic Corporation. All rights reserved.
Page 49

Table 3.1 Solaris SPARC Resource Requirements
Resource Requirement
Host Bus Slot Sun Solaris system with available PCI slot
Operating System Solaris 2.6 release or later
Network Boot Server SPARC or Intel Solaris boot server (required only if
Firmware OpenBoot PROM version 3.0 or greater
you are using the LSI host adapter to control the
Solaris system disk)
After you physically install the LSI host adapter in the computer, you can
use the following procedure to verify that it is installed correctly, before
you boot the system and install the Solaris SPARC driver.
1. Power on the system.
2. When the banner text appears, press the Stop-A keys to interrupt
the boot process and stop at the ok prompt.
3. Type the following command at the ok prompt to list the system
devices:
ok show-devs
The system displays an output similar to the following (the text will
vary depending on the physical configuration and installed devices):
/SUNW,UltraSPARC-IIi@0,0
/pci@1f,0
/virtual-memory
/memory@0,10000000
/aliases
/options
/openprom
/chosen
/packages
/pci@1f,0/pci@1
/pci@1f,0/pci@1,1
/pci@1f,0/pci@1/pci@2
/pci@1f,0/pci@1/IntraServer,Ultra2-scsi@1
/pci@1f,0/pci@1/pci@2/IntraServer,fc@4
/pci@1f,0/pci@1/pci@2/IntraServer,fc@4/disk
/pci@1f,0/pci@1/pci@2/IntraServer,fc@4/tape
/pci@1f,0/pci@1/IntraServer,Ultra2-scsi@1/tape
/pci@1f,0/pci@1/IntraServer,Ultra2-scsi@1/disk
/openprom/client-services
Installing the Solaris SPARC Driver 3-9
Version 1.3 Copyright © 2001, 2002, 2007 by LSI Logic Corporation. All rights reserved.
Page 50

4. If the LSI host adapter is not listed, shut down the system and be
sure that the host adapter is firmly seated in the slot and is
connected properly. Check the diagrams and instructions in the host
adapter user’s guide. Some LSI adapters include the string LSILogic
and others, such as the example above, include IntraServer. Both are
valid LSI products.
To determine if all SCSI, SAS, and/or Fibre Channel disk drives are
properly connected and functional, use the probe-scsi-all command
at the ok prompt. The system displays output similar to the following:
/pci@1f,0/pci@1/IntraServer,Ultra2-scsi@1
Target 0
Unit 0 Disk IBM DNES-309170W SA30
/pci@1f,0/pci@1/pci@2/IntraServer,fc@7
MPT Firmware Version 1.00
Target 0
Unit 0 Disk SEAGATE ST39173FC 6615
WWN 220000203710d063 ID 111d2
Target 1
Unit 0 Disk SEAGATE ST39173FC 6258
WWN 220000203710c09b ID 111d6
Target 2
Unit 0 Disk SEAGATE ST39173FC 6258
WWN 220000203710b066 ID 111d5
Target 3
Unit 0 Disk SEAGATE ST39173FC 6258
WWN 220000203710b063 ID 111d3
Target 4
Unit 0 Disk SEAGATE ST39173FC 6258
WWN 220000203710b04f ID 111d4
Target 5
Unit 0 Disk SEAGATE ST39173FC 6615
WWN 2200002037104f73 ID 111d9
Target 6
Unit 0 Disk SEAGATE ST39173FC 6615
WWN 2200002037102d0f ID 111d1
If some of the disk drives connected to the host adapter(s) are not listed
in this display, check the following:
• Are all the cables correctly connected to the disk enclosure?
• Is the disk enclosure powered up?
• If the external disk enclosure requires a loopback connector, is the
loopback connector correctly installed?
3-10 UNIX Operating System Device Drivers
Version 1.3 Copyright © 2001, 2002, 2007 by LSI Logic Corporation. All rights reserved.
Page 51

3.2.4 Installing the Driver on an Existing Solaris SPARC System
Note: If you are using an LSI host adapter to control the Solaris
system disk, follow the instructions in Section 3.2.5,
“Network System Installation of the Solaris SPARC Driver.”
Follow these instructions to install the itmpt Solaris SPARC driver on an
already existing Solaris system.
1. Log on as root to perform the installation.
2. Uncompress and untar the itmpt_install.tar.Z file by typing the
following commands:
# uncompress itmpt_install.tar.Z
# tar -xvf itmpt_install.tar
# cd install
3. Load the itmpt driver by typing the following command:
pkgadd -d .
You will see the following text on the screen:
The following packages are available:
1 ITImpt LSI Logic FusionMPT(tm) Fibrechannel/SCSI drivers
(sparc) itmpt kit version xx.xx.xx
Select package(s) you wish to process (or ’all’ to process
all packages).
(default: all) [?,??,q]: 1
Processing package instance <ITImpt> from </floppy/intraserver>
LSI Logic FusionMPT(tm) Fibrechannel/SCSI drivers (sparc)
itmpt kit version 5.xx.xx
LSI Logic
Using </> as the package base directory.
## Processing package information.
## Processing system information.
2 package pathnames are already properly installed.
## Verifying disk space requirements.
## Checking for conflicts with packages already installed.
## Checking for setuid/setgid programs.
This package contains scripts which will be executed with
superuser permission during the process of installing this
package.
Do you want to continue with the installation of <ITImpt>
[y,n,?] y
Installing the Solaris SPARC Driver 3-11
Version 1.3 Copyright © 2001, 2002, 2007 by LSI Logic Corporation. All rights reserved.
Page 52

Installing LSI Logic FusionMPT(tm)
Fibrechannel/SCSI drivers as <ITImpt>
## Installing part 1 of 1.
/kernel/drv/itmpt
/kernel/drv/itmpt.conf
[ verifying class <none> ]
## Executing postinstall script.
Following installation, please reboot the system to properly
configure and load the drivers.
Installation of <ITImpt> was successful.
Note: Refer to the file Errata_0708.pdf for configuration
instructions regarding non-zero LUNs.
Note: When the itmpt driver initializes an LSI Ultra320 SCSI or
LSI SAS host adapter’s disk drives, it attaches under the
Sun sd target driver. To alter the probing of target IDs and
probing for non-zero LUNs on devices attached to an LSI
host adapter, modify the /kernel/drv/sd.conf file.
When the itmpt driver initializes an LSI FibreChannel host
adapter’s disk drives, it attaches under the Sun ssd target
driver. To alter the probing of target IDs and probing for
non-zero LUNs on devices attached to an LSI Fibre
Channel adapter, modify the /kernel/drv/ssd.conf file or
use the lsiprobe utility.
3.2.5 Network System Installation of the Solaris SPARC Driver
If you install an LSI host adapter that you will use to control a Solaris
SPARC system disk, you must install the Solaris operating system and
the Solaris SPARC driver using the network installation instructions in
this section. This section describes a complete installation of Solaris to
a client system that is using an LSI host adapter to control the system
disk. The method described in this section installs the LSI itmpt driver
onto a network boot kit, making it available during the SPARC installation
process.
If the LSI FC host adapter is an additional storage adapter added to an
existing Solaris SPARC system, refer instead to Section 3.2.4, “Installing
the Driver on an Existing Solaris SPARC System.”
3-12 UNIX Operating System Device Drivers
Version 1.3 Copyright © 2001, 2002, 2007 by LSI Logic Corporation. All rights reserved.
Page 53

3.2.5.1 Setting Up a Boot/Install Server
Refer to the “Preparing to Install Solaris Software Over the Network”
section of the Solaris Advanced Installation Guide, available at
http://docs.sun.com.
To set up a boot and install server, follow these steps:
1. Insert the Solaris distribution CD-ROM in the CD-ROM drive of the
boot/install server.
2. Change the directory to the Tools area on the Solaris distribution
CD-ROM:
cd /cdrom/cdrom0/Solaris_2.7/Tools
3. Use the setup_install_server script to copy the boot and
installation files to the boot/install server:
./setup_install_server /export/home/install
3.2.5.2 Installing the itmpt Driver on the Boot/Install Server
After you have set up your network boot and install server, follow these
steps to run the install.sh script and copy the driver kit to the boot
server’s boot files:
1. Place the diskette in the floppy drive and execute the volcheck
command to ensure that the system sees the diskette.
2. Change the directory to the root of the floppy:
cd /floppy/floppy0
3. Execute the install.sh shell script to add the itmpt driver to the
boot installation area (for Solaris 2.8 systems, substitute
Solaris_2.8 on the command line):
./install.sh -n /export/home/install/Solaris_2.7
You can safely ignore the following message that may appear:
major number maximum based on server, not client
When you run the install.sh script in this way, it copies and installs the
Fusion-MPT drivers into the Tools/Boot/ area of the boot files and
allows LSI host adapters to be booted for installation using the
bootserver.
Installing the Solaris SPARC Driver 3-13
Version 1.3 Copyright © 2001, 2002, 2007 by LSI Logic Corporation. All rights reserved.
Page 54

3.2.5.3 Adding Clients to the Boot/Install Server
Follow these steps toadd a client entry on the boot/install server for each
machine that boots into the boot/install server:
1. Change the directory to the boot/install kit (for Solaris 2.8 systems,
substitute Solaris_2.8 on the command line):
cd /export/home/install/Solaris_2.7/Tools
2. Use the add_install_client script to add the client machine by
typing at the command prompt:
./add_install_client -i ipaddr -e ethernetid client_name
platform_group
where:
ipaddr is the TCP/IP address of the client.
ethernetid is the Ethernet hardware (mac) address of the client.
client_name is the client's system name.
platform_group is the client's vendor defined hardware group.
An example is:
./add_install_client -i 192.168.103.124 -e 00:08:26:02:25:34
sunsys sun4u
Note: You can obtain the platform_group from a machine of the
same type as the target client by using the uname -m
command.
3.2.5.4 Booting the Client Using the itmpt Driver
Now you can begin the installation of the Solaris operating system to the
client target machine using the boot and install server. To do this, follow
these steps:
1. On the client machine, boot the network install kit you created in the
preceding steps by entering this command at the OpenBoot prompt:
ok boot net -v
2. Choose Manual Reboot rather than Auto Reboot during the
installation of Solaris on the target machine. If you choose Auto
Reboot you will not be able to complete the installation of the LSI
drivers, and the system will fail to boot.
After the installation has completed, the system waits for a manual
reboot.
3-14 UNIX Operating System Device Drivers
Version 1.3 Copyright © 2001, 2002, 2007 by LSI Logic Corporation. All rights reserved.
Page 55

3. Run the following script from a console window:
/sbin/itmptinst
This script copies the drivers from the boot server and installs them
to the newly created Solaris installation. After the script has finished,
the LSI device driver installation is complete.
4. Manually reboot the system.
You can safely ignore the following message that may appear:
major number maximum based on server, not client
The system prompts you to allow power saving automatic shutdown.
5. Respond No to the power saving prompt if you are using the LSI host
adapter to support your boot disk.
If you change the disk drive configuration of the machine, you may need
to issue the touch /reconfigure command. Then reboot the system so
it can detect and correctly install the new disks.
3.3 Installing the UnixWare 7 and Open Unix 8 Device Driver
This section describes the LSI Fusion-MPT driver for the Caldera
UnixWare 7 and Open Unix 8 operating systems. Both of these operating
systems will be referred to as UnixWare in this section. Older versions of
these operating system are not supported. The driver itself is referred to
as mpt.
This section includes the following topics:
• Section 3.3.1, “Introducing the UnixWare 7 and Open Unix 8 Driver”
• Section 3.3.2, “Driver Features and LSI Device Support”
• Section 3.3.3, “Preparing to Install the UnixWare 7 and Open Unix 8
Driver”
• Section 3.3.4, “Installing the Driver on a New UnixWareor Open Unix
System”
• Section 3.3.5, “Installing the Driver on an Existing UnixWare or
Open Unix System”
• Section 3.3.6, “Troubleshooting”
Installing the UnixWare 7 and Open Unix 8 Device Driver 3-15
Version 1.3 Copyright © 2001, 2002, 2007 by LSI Logic Corporation. All rights reserved.
Page 56

3.3.1 Introducing the UnixWare 7 and Open Unix 8 Driver
Note: The UnixWare 7/Open Unix 8 driver files are named
uw103xx.z, uw103xx.dd, etc. The xx refers to the last two
digits of the actual driver version number.For example, files
associated with mpt driver version 1.03.04 are labeled
uw10304.z, uw10304.dd, etc.
UnixWare software extends the UNIX SVR4.2 operating system.
UnixWare features include a graphical user interface (GUI), networking,
application compatibility, multitasking and multiuser capabilities, and
multiprocessor support. The mpt driver allows UnixWare operating
systems to interface with devices connected to the LSI Fusion-MPT
family of chipsets and/or LSI Fusion-MPT host adapter boards.
3.3.2 Driver Features and LSI Device Support
The UnixWare/Open Unix mpt driver supports these features:
• Easy installation using UnixWare tools
• Multiple host adapters
• Multiple and non-contiguous Logical Unit Numbers (LUNs)
• Dynamic interrupt mapping
• Scatter/gather
• Pass-thru functionality
• Multiple processors
• One Ultra320 SCSI bus with 15 SCSI devices per bus
• Eight buses with 15 Fibre Channel devices per bus
The mpt driver supports the following LSI controller chips and the LSI
host adapters that use them:
• LSI53C1030
• LSI53C1020
• LSIFC929XL
• LSIFC919XL
• LSIFC949X
• LSIFC949E
3-16 UNIX Operating System Device Drivers
Version 1.3 Copyright © 2001, 2002, 2007 by LSI Logic Corporation. All rights reserved.
Page 57

3.3.3 Preparing to Install the UnixWare 7 and Open Unix 8 Driver
The mpt driver for UnixWare operating systems is available on a 3.5-inch
diskette labeled Fusion-MPT UnixWare driver. Use this diskette to load
the driver during the installation of the operating system, or to access
attached devices after a UnixWare installation. The following sections
describe these procedures.
The current UnixWare Fusion-MPT driver is also available from the LSI
web site at http://www.lsi.com.
3.3.4 Installing the Driver on a New UnixWare or Open Unix System
Follow these steps to install the mpt driver on a new UnixWare or
Open Unix system:
1. Boot the system using the installation diskettes or CD-ROMs in the
UnixWare Operating System media kit.
2. Follow the instructions on the screen.
3. Insert the mpt driver diskette when the installation prompts for the
host adapter diskette.
The system loads the required drivers, such as mpt, and displays a
message when they are finished loading. At the end of the
installation, the system prompts you to reinsert the host adapter
driver diskette.
4. When this prompt appears, insert the mpt driver diskette and press
Enter. The kernel builds and the installation terminates.
5. Remove the driver diskette when prompted.
6. Reboot the system.
3.3.5 Installing the Driver on an Existing UnixWare or Open Unix System
Before you install the mpt driver on an existing UnixWare or Open Unix
system, make a backup copy of the existing kernel, as explained in the
following steps:
1. Log on as root.
2. At the shell prompt type the following:
cp /stand/unix /stand/unix.safe
Installing the UnixWare 7 and Open Unix 8 Device Driver 3-17
Version 1.3 Copyright © 2001, 2002, 2007 by LSI Logic Corporation. All rights reserved.
Page 58

Use this copy of the old kernel to reboot the system if the driver
installation fails. See Section 3.3.6, “Troubleshooting,” for more
information.
3. Insert the mpt UnixWare driver diskette after the kernel backup
completes.
4. Load the driver using the pkgadd command:
pkgadd -d diskette1
5. Select the mpt package.
The mpt driver on the diskette is then loaded onto the system. The
system prompts you again to load a driver, even if the driver was
loaded successfully.
6. Type q (quit) and press Enter.
7. Verify that the driver loaded successfully by typing the command:
pkginfo mpt
If the driver loaded successfully, the package information looks like
this:
system mpt LSI Logic IHV HBA
8. Reboot the system by typing this command:
init 6
During the boot process, the operating system scans the system and lists
the devices found. If the kernel panics during boot, then reboot the
system with the saved copy of the old kernel, as explained in Section
3.3.6, “Troubleshooting.” If the reboot is successful, the system is ready
to use.
3.3.6 Troubleshooting
If the mpt driver installation fails, you can recover by rebooting the system
with the unix.safe kernel file that you created before attempting to
installing the driver. To do this, follow these steps:
1. Reboot the system.
2. When the UnixWare Logo screen appears, press the space bar to
begin an interactive boot session.
3. When the interactive boot prompt appears, type the command:
3-18 UNIX Operating System Device Drivers
Version 1.3 Copyright © 2001, 2002, 2007 by LSI Logic Corporation. All rights reserved.
Page 59

boot unix.safe
The UnixWare Logo screen reappears and the system boots from
the unix.safe kernel file.
3.4 SCO OpenServer 5 Device Driver Installation
This section describes how to install the lsil device driver for the SCO
OpenServer 5 operating system environments. This section consists of
the following subsections:
• Section 3.4.1, “Introducing the SCO OpenServer Driver”
• Section 3.4.2, “Driver Features and LSI Device Support”
• Section 3.4.3, “Preparing to Install the SCO OpenServer Driver”
• Section 3.4.4, “Installing the Driver on an New OpenServer UNIX
System”
• Section 3.4.5, “Installing the Driver on an Existing SCO OpenServer
5 System”
• Section 3.4.6, “Troubleshooting”
3.4.1 Introducing the SCO OpenServer Driver
SCO UNIX is the first UNIX operating system licensed for IBMcompatible microcomputers. The integrated communications, file system,
international application support, and documentation create an ideal
platform for those requiring a full-featured, UNIX-based operating
system. SCO UNIX takes full advantage of the capabilities of the 80386
and above microprocessors.
Version 1.03.xx of the lsil driver supports all OpenServer 5 releases of
SCO UNIX (5.0.0, 5.0.2, 5.0.4, 5.0.5 and 5.0.6).
The Fusion-MPT lsil driver allows SCO OpenServer 5 operating
systems to interface with devices connected to LSI Ultra320 SCSI and
Fibre Channel controller chips and host adapter cards.
When you add SCSI disk drives, tape drives, and CD-ROM drives to an
SCO OpenServer system, the system prompts you for the name of the
package/driver that will control the devices. Enter lsil as the
package/driver name.
SCO OpenServer 5 Device Driver Installation 3-19
Version 1.3 Copyright © 2001, 2002, 2007 by LSI Logic Corporation. All rights reserved.
Page 60

3.4.2 Driver Features and LSI Device Support
The lsil OpenServer device driver supports these features:
• Provides easy UNIX installation through the lsil BTLD diskette
• SureLINK Domain Validation
• Multiple host adapters
• Multiprocessor support
The lsil driver supports the following devices and LSI host adapters
based on those devices:
• LSI53C1030 and LSI53C1020 Ultra320 SCSI Chips
• LSIFC929X, LSIFC919X, LSIFC929, LSIFC919 and LSIFC909 Fibre
Channel Chips
3.4.3 Preparing to Install the SCO OpenServer Driver
Note: You can download the latest versions of the Fusion-MPT
SCO OpenServer driver from the LSI web site at
http://www.lsi.com. Click the Downloads link and follow
the instructions on the screen to download the driver.
Driver files are labeled sco103xx.z, sco103xx.dd,etc. The
xx refers to the last two digits of the actual driver version
number. For example, files associated with lsil driver
version 1.03.04 are labeled sco10304.z, sco10304.dd.
To connect SCSI devices to one or more host adapters, you must place
the proper host adapter driver in the SCO UNIX kernel. The lsil Boot
Time Loadable Driver (BTLD) diskette contains the driver for SCO
OpenServer 5.
You must link-edit the proper driver into the SCO UNIX kernel. The kernel
must reside on the boot drive: either an internal, non-SCSI hard drive or
a SCSI hard drive attached to host adapter 0 with SCSI ID 0 and LUN
0. The BTLD permits an easy installation of SCO UNIX with the software
provided by SCO.
SCO OpenServer 5 provides only one installation diskette, labeled Boot
Disk. This diskette, the lsil BTLD driver diskette, and other software
media are used during an SCO OpenServer 5 installation.
3-20 UNIX Operating System Device Drivers
Version 1.3 Copyright © 2001, 2002, 2007 by LSI Logic Corporation. All rights reserved.
Page 61

3.4.4 Installing the Driver on an New OpenServer UNIX System
Note: LSI recommends that you complete the entire installation
procedure in one session. This may take an hour or more.
This procedure installs SCO UNIX onto a hard disk drive and builds a
new UNIX kernel that includes the lsil driver. During installation you are
given the option of retaining current partitions on the root hard disk drive.
For example, you might have already created a DOS partition or a UNIX
partition on the hard disk drive. Refer to the SCO OpenServer Handbook
for more details on SCO UNIX installation.
To complete a new installation of SCO UNIX and the lsil driver, follow
these steps:
1. Insert the SCO UNIX installation diskette and reboot the system. For
SCO OpenServer 5, this diskette is labeled Boot Disk.
2. At the boot prompt, type link and press Enter.
3. At the next prompt, type lsil and press Enter. Do not remove the
diskette.
4. When the installation prompts for the diskette, insert either the
installation diskette or the lsil BTLD diskette, and press Enter.
5. If you see the following system prompt for a routine number, enter
the routine number that precedes the prompt:
Please enter which routine (0-40) to replace'?' to list):
'a' to add "lsilinit" at the end [default],
'n' to do nothing, or
'q' to quit"
6. If you see this additional system prompt for another routine number,
enter the indicated routine number that precedes the prompt:
Please enter which routine (0-2) to replace '?' to list),
'a' to add "lsilpoll" at the end [default],
'n' to do nothing, or
'q' to quit"
7. Continue the installation according to the instructions in the SCO
UNIX documentation.
The SCO OpenServer 5 system automatically creates a file,
unix.safe, during installation. To access this UNIX kernel, type
unix.safe at the boot prompt.
SCO OpenServer 5 Device Driver Installation 3-21
Version 1.3 Copyright © 2001, 2002, 2007 by LSI Logic Corporation. All rights reserved.
Page 62

8. Install SCSI device support by continuing from step 10 in Section
3.4.5, “Installing the Driver on an Existing SCO OpenServer 5
System.”
3.4.5 Installing the Driver on an Existing SCO OpenServer 5 System
This procedure assumes that SCO UNIX is already installed on a hard
disk drive. This procedure is necessary to build a new UNIX kernel that
includes the lsil LSI host adapter driver. The basic steps for
accomplishing this task are outlined below. For more details on UNIX
installation, refer to the SCO UNIX System Administrator’s Reference
Manual.
1. The SCO OpenServer 5 system automatically creates a unix.safe
file during installation. To access this UNIX kernel, type
“unix.safe”.
2. Insert the lsil BTLD diskette in the drive. Type installpkg and press
Enter.
3. When you are prompted to insert the requested diskette, press
Enter. (The BTLD diskette is already inserted.)
4. When you are prompted for the name of the package, type lsil and
press Enter.
5. If you are prompted about replacing a driver from a previous
installation, press y for Yes.
6. After the package installation routine completes, relink the kernel by
entering the following command:
/etc/conf/cf.d/link_unix
7. When you see the following prompt, type y and press Enter:
Do you want this kernel to boot by default (y/n)?
The system backs up the old kernel.
8. When you see the following prompt, type y and press Enter:
Do you want the kernel environment rebuilt (y/n)?
9. Reboot the system by typing reboot and pressing Enter. This
activates the new kernel.
10. After the system has rebooted, add a SCSI or Fibre Channel disk
drive to the configuration by following the sub-steps below. (If you are
not adding a SCSI or FC disk drive, skip to step 11.)
3-22 UNIX Operating System Device Drivers
Version 1.3 Copyright © 2001, 2002, 2007 by LSI Logic Corporation. All rights reserved.
Page 63

a. Type mkdev hd at the command prompt and press Enter.
You are prompted to enter the identifier of the host adapter that
supports this disk drive.
b. If the displayed default identifier is not lsil, type lsil and press
Enter.
c. When you are prompted for the host adapter that supports the
disk drive, type the host adapter number and press Enter. (The
host adapter number appears on the screen during boot-up.)
If you are adding another LSI host adapter to the SCO UNIX
kernel, the system might prompt you to update the link-kit. If this
happens, type y and press Enter. If you entered the host adapter
number incorrectly, type n and press Enter. The system then
prompts for the host adapter identifier.
d. When you are prompted for the bus number of the disk drive,
press Enter to accept the default (zero).
e. When you are prompted for the target ID of the disk drive, type
the disk drive ID number and press Enter. (The target ID number
appears on the screen during boot-up.)
f. When you are prompted for the LUN of the disk drive, type the
LUN number and press Enter, or press Enter to accept the
default value of zero.
g. When you are prompted to update the configuration file, type y
and press Enter if the displayed values are correct. Type n if the
values are incorrect and retry from step 4.
h. When you are prompted to create a new kernel. Type “y” and go
to step 13 if this is the last device to add. Type “n” and return to
step 10 if there are more devices to add.
11. Add a tape drive to the configuration by following the sub-steps
below. (If you are not adding a tape drive, skip to step 12.)
a. Type mkdev tape at the command prompt and press Enter.
b. When the Tape Drive Configuration Program menu appears,
select option 1 to install a tape drive, and press Enter.
c. When the Tape Drive Installation menu appears, select option 4
to install a tape drive, and press Enter.
SCO OpenServer 5 Device Driver Installation 3-23
Version 1.3 Copyright © 2001, 2002, 2007 by LSI Logic Corporation. All rights reserved.
Page 64

d. From the next list, select the type of tape drive to install and
press Enter.
e. When you are prompted to configure the tape drive, type y and
press Enter.
f. When you are prompted for the name of the device driver, type
lsil and press Enter.
g. When you are prompted for the host adapter that supports the
tape drive, type the host adapter number and press Enter. (The
host adapter number appears on the screen during boot-up.)
If you are adding another LSI host adapter to the SCO UNIX
kernel, the system might prompt you to update the link-kit. If this
happens, type y and press Enter. If you entered the host adapter
number incorrectly, type n and press Enter. The system then
prompts for the host adapter identifier.
h. When you are prompted for the bus number of the tape drive,
press Enter to accept the default (zero).
i. When you are prompted for the target ID of the tape drive, type
the tape drive ID number and press Enter. (The target ID
number appears on the screen during boot-up.)
j. When you are prompted for the LUN of the tape drive, type 0
[zero] and press Enter.
k. When you are prompted to update the configuration file, type y
and press Enter. A list appears showing the special devices
created.
l. Press Enter. A list appears showing the links to the installed tape
drive.
m. When you are prompted for a boot string, type q and pressEnter
to return to the Tape Drive Configuration Program menu.
n. Type q and press Enter to terminate the Tape Drive
Configuration Program menu.
o. When you are prompted to create a new kernel type y and
proceed to step 13 if this is the last device to add. Type n and
return to step 10 if you want to add more devices.
12. Add a CD-ROM drive to the configuration by following the sub-steps
below. (If you are not adding a CD-ROM drive to this system, skip to
step 13.)
3-24 UNIX Operating System Device Drivers
Version 1.3 Copyright © 2001, 2002, 2007 by LSI Logic Corporation. All rights reserved.
Page 65

a. Type mkdev cdrom at the command prompt and press Enter.
b. When the CD-ROMConfiguration Program menu appears, select
option 1 to install a CD-ROM drive and press Enter.
c. When you are prompted to configure the CD-ROM drive, type y
and press Enter.
d. When you are prompted for the identifier of the host adapter that
supports this device, type lsil and press Enter.
e. When you are prompted for the host adapter that supports the
CD-ROM drive, type the host adapter number and press Enter.
(The host adapter number appears on the screen during bootup.)
If you are adding another LSI host adapter to the SCO UNIX
kernel, the system might prompt you to update the link-kit. If this
happens, type y and press Enter. If you entered the host adapter
number incorrectly, type n and press Enter. The system then
prompts for the host adapter identifier.
f. When you are prompted for the bus number of the CD-ROM
drive, press Enter to accept the default (zero).
g. When you are prompted for the ID of the CD-ROM drive, type
the ID number and press Enter. (The target ID number appears
on the screen during boot-up.)
h. When you are prompted for the LUN of the CD-ROM drive, type
the LUN number and press Enter, or press Enter to accept the
default value of zero.
i. When you are prompted to update the configuration file, type y
and press Enter. A prompt appears to configure a
CD-ROM/TAPE installation device. Unless you want to do this,
type n and press Enter.
j. When the installation prompts you to configure a CD-ROM/TAPE
installation device, type n and press Enter.
k. When you are prompted to add a High-Sierra file system, type y
and press Enter. The system displays the High Sierra/ISO9600
file system Configuration Program menu.
l. Select option 1 to add High-Sierra and press Enter. The system
updates the configuration file and returns to the CD-ROM
Configuration Program menu.
SCO OpenServer 5 Device Driver Installation 3-25
Version 1.3 Copyright © 2001, 2002, 2007 by LSI Logic Corporation. All rights reserved.
Page 66

m. Type q and press Enter to terminate the CD-ROM Configuration
Program menu.
n. When you are prompted to create a new kernel, type y and
proceed to step 13 if this is the last device to add. Type n and
return to step 10 if you want to add more devices.
13. To rebuild the kernel, type the following on the command line:
/etc/conf/cf.d/link_unix
The following prompt appears:
Do you want this kernel to boot by default (y/n)?
14. Type y and press Enter. The system backs up the old kernel.
The following prompt appears:
Do you want the kernel environment rebuilt (y/n)?
15. Type y and press Enter.
16. Reboot the system by typing reboot and pressing Enter.
17. After the system reboots and the boot: prompt appears, press Enter
to load the new kernel.
18. Log in as usual.
3.4.6 Troubleshooting
The following conditions should exist after a successful installation:
• The directory etc/conf/sdevice.d should contain a file named
lsil. This file contains the sdevice entries.
• The directory etc/conf/cf.d should contain the files sdevice,
mdevice, and mscsi. Files sdev.hdr and mdev.hdr describe the
values of the possible field entries in the files sdevice and mdevice,
respectively.
• The sdevice file should contain an lsil entry for each LSI host
adapter configured in the system.
• The second field in the sdevice file should read Y.
• An lsil entry should appear in the mdevice file.
• An lsil entry for each configured device should appear in the mscsi
file.
3-26 UNIX Operating System Device Drivers
Version 1.3 Copyright © 2001, 2002, 2007 by LSI Logic Corporation. All rights reserved.
Page 67

• Directory /etc/conf/pack.d/lsil should exist and should contain
the files Driver.o and space.c.
Here are some potential problems and their suggested solutions:
• Difficulty loading the SCO UNIX kernel to an IDE hard drive.
You only need to link if a device is attached to an LSI host adapter.
Follow the instructions in the SCO UNIX Installation documentation.
After the installation completes, proceed to Step 2 in Section 3.4.5,
“Installing the Driver on an Existing SCO OpenServer 5 System,” and
use installpkg to install the lsil device driver.
• A device is not found.
Reboot and press Ctrl-C when prompted to view the LSI
Configuration Utility. Verify that the device has the correct host
adapter and ID. If the device is not shown, it may be turned off or
there may be a cabling problem.
• The UNIX system behaves unreliably after the configuration change.
Whenever you change the hardware or software configuration, you
must rebuild the kernel. Use the /etc/conf/cf.d directory and type
the following command:
./link_unix
• An error message occurs during the rebuild of the kernel.
Reinstall the proper lsil driver using the installpkg utility. Relink
the kernel and reboot the system.
• The root disk is not found or the partitioning of the disk fails.
If the boot drive is a disk, use the BIOS Configuration Utility to check
that the disk is assigned ID 0 and is configured to host adapter 0,
LUN 0.
3.5 Installing the Fusion-MPT Linux Device Drivers
This section describes the LSI Fusion-MPT device drivers for Linux. It
includes instructions for building, patching, and installing the drivers. This
section has the following topics:
• Section 3.5.1, “Introducing the Linux Drivers”
Installing the Fusion-MPT Linux Device Drivers 3-27
Version 1.3 Copyright © 2001, 2002, 2007 by LSI Logic Corporation. All rights reserved.
Page 68

• Section 3.5.2, “Driver Features and LSI Device Support”
• Section 3.5.3, “Preparing to Install the Fusion-MPT Linux Drivers”
• Section 3.5.4, “Configuring and Building the Fusion-MPT Linux
Drivers”
• Section 3.5.5, “Loading the Drivers as Modules”
• Section 3.5.6, “Boot Setup Commands”
• Section 3.5.7, “Troubleshooting”
3.5.1 Introducing the Linux Drivers
The LSI Fusion-MPT mptlinux drivers allow Linux operating systems to
interface with devices connected to LSI Ultra320 SCSI and Fibre
Channel controller chips and host adapter cards.
The LSI mptlinux drivers are free software and are supported in source
form. These drivers are distributed in the hope that they will be useful,
but without any warranty and without even the implied warranty of
merchantability or fitness for a particular purpose. You can redistribute
them and/or modify them under the terms of version 2 or later of the
GNU Public License, as published by the Free Software Foundation. You
should have received a copy of this license with your Linux kernel source
tree (/usr/src/linux/COPYING).
For detailed information on the GNU Public License, contact the Free
Software Foundation, Inc. at the following URL:
http://www.gnu.org/copyleft/gpl.html.
3.5.2 Driver Features and LSI Device Support
The mptlinux drivers support these features:
• 1 Gbit/s and 2 Gbit/s Fibre Channel transfer rates
• Ultra320 transfer rates
• LSI Fusion-MPT Architecture and common software interface
• Low host CPU utilization with one, or less than one, interrupt per I/O
The mptlinux drivers support the following LSI controller chips:
• LSIFC949X
3-28 UNIX Operating System Device Drivers
Version 1.3 Copyright © 2001, 2002, 2007 by LSI Logic Corporation. All rights reserved.
Page 69

• LSIFC949E
• LSIFC919XL
• LSIFC929XL
• LSI53C1020
• LSI53C1030
3.5.3 Preparing to Install the Fusion-MPT Linux Drivers
The mptlinux drivers are provided in binary and source form to provide
the greatest flexibility to LSI’s customers. The binaries are suitably
formatted for use as installation diskettes or post-install binary upgrades.
The source may be added to an existing kernel for custom kernel builds.
The binaries and source may be downloaded from the LSI web site:
http://www.lsi.com
They may also be downloaded from the anonymous ftp site:
ftp://ftp.lsil.com/HostAdapterDrivers/linux/Fusion-MPT
3.5.3.1 Installing to a Fusion-MPT Controller
The Fusion-MPT driver is a bundled boot controller for Red Hat releases
beginning with 7.3 and for SuSE releases beginning with 8.0. You may
install to a disk attached to the controller with no additional media.
LSI provides 1.44 Mbyte images that are suitably formatted to use as
driver update disks for installations where there is no bundled driver:
• Red Hat 7.0, 7.1, 7.2 (32 bit and 64 bit), 7.3, and 2.1ASE
• SuSE 7.2, 7.3, and 8.0
• Caldera 3.1 and 3.1.1
Use these commands on the ftp site:
ftp> cd 2.06.24
ftp> cd mptlinux-disks
Download the Vendor readme file for further instructions, and download
the appropriate tarball.
Installing the Fusion-MPT Linux Device Drivers 3-29
Version 1.3 Copyright © 2001, 2002, 2007 by LSI Logic Corporation. All rights reserved.
Page 70

For all other releases, the bundled driver must be used for installation.
Post-installation upgrades are possible by using the driver RPM.
Use these commands on the ftp site:
ftp> cd 2.06.24
ftp> cd mptlinux-rpms
Download the README_rpms.txt file to obtain a listing of the kernels
supported by the RPM.
3.5.3.2 Adding Pre-Compiled Binaries to an Existing Installation
Driver binaries are provided in 1.44-MB images that are suitably
formatted to use as driver update disks for the following platforms:
• Red Hat 7.0, 7.1, 7.2 (32 bit and 64 bit), 7.3, and 2.1ASE
• SuSE 7.2, 7.3, and 8.0
• Caldera 3.1 and 3.1.1
And in RPMS:
• Red Hat i686: 7.2, 7.3, 8.0, 9, 2.1ASE
• Red Hat ia64: 7.2, 2.1ASE
• SuSE x86: 7.2, 7.3, 8.0, 8.1, 8.2, SLES8
• SuSE x86_64: SLES8
RPMs should be used to upgrade the driver post-install.
The RPMs contain binaries for the install kernel and the latest released
errata kernel for each distribution at the time the RPM was created. The
README_rpms.txt file has a listing of the kernels supported by the RPM.
The update disks should beused for architectures that are not supported
by RPM.
The RPMs contain binaries for the install kernel and the latest released
errata kernel for each distribution at the time the RPM was created. The
README_rpms.txt file to obtain a listing of the kernels supported by the
RPM. The update disks should be used for architectures not supported
by RPM.
3-30 UNIX Operating System Device Drivers
Version 1.3 Copyright © 2001, 2002, 2007 by LSI Logic Corporation. All rights reserved.
Page 71

To use the driver disks, follow the instructions from the previous section
to transfer the image to a diskette. Then use the following commands:
# mount /dev/fd0
# cd /mnt/floppy
# ./post_install.scr
# cd
# umount /dev/fd0
To use the RPMs, the standard install, erase, and upgrade commands
may be used. The driver source will be placed in your installations RPM
Base directory (/usr/src/redhat or /usr/src/packages). On the ftp
site, use the following commands to download the appropriate tarball:
ftp> cd 2.05.06
ftp> cd mptlinux-rpms
3.5.3.3 Adding or Upgrading the Fusion-MPT Source to the Linux Kernel
Adding or upgrading the Fusion-MPT source to the Linux kernel is a two
step procedure:
1. Add or upgrade the Fusion-MPT source.
2. Patch the kernel.
Before you do this, LSI recommends that you save the original source:
# cd /usr/src/linux/drivers/message
# tar czvf fusion.orig.tar.gz fusion
Then continue with the following instructions.
For Red Hat 7.0, all 2.2 and 2.4.0 through 2.4.6 kernels, Fusion-MPT
support must be added to the kernel source. To do this, follow these
instructions:
1. Unpack the mptlinux driver source tar archive in a temporary
directory (/home/<myname>/mptlinux-tmp). Example:
$ cd
$ mkdir mptlinux-tmp
$ cd mptlinux-tmp
$ zcat /tmp/mptlinux-2.05.06-src.tar.gz | tar xvf -
2. Run the install script to install the source to the kernel directory.
For example, use these commands to install the source into
/usr/src/linux-2.4.18-20:
Installing the Fusion-MPT Linux Device Drivers 3-31
Version 1.3 Copyright © 2001, 2002, 2007 by LSI Logic Corporation. All rights reserved.
Page 72

$ su root
# ./install /usr/src/linux-2.4.18-20
Next, continue with the kernel patch instructions in the next section.
3.5.3.4 Kernel Patch Instructions
The mptlinux host drivers may require a small set of patches to your
Linux kernel source tree. Patch sets for stock and well known kernel
versions have been included with the packed source tar archive. Patches
may be required even if the mptlinux driver is currently bundled.
See the driver readme files for more information about which kernel
patches are available.
To identify which kernel version you have, examine the
/usr/src/linux/Makefile as follows:
Example (on a RedHat 6.2 system):
VERSION = 2
PATCHLEVEL = 2
SUBLEVEL = 14
EXTRAVERSION = -5.0
Then apply the closest patch set you can find.
3.5.4 Configuring and Building the Fusion-MPT Linux Drivers
The following examples show how to configure and build the LSI
Fusion-MPT driver(s) as kernel modules. However, the MPT base and
ScsiHost drivers can alternatively be compiled into the Linux kernel
instead of being built as modules.
1. From the /usr/src/linux directory , ensure a clean kernel source
tree by executing the following command:
# make mrproper
2. From the /usr/src/linux directory, run the normal kernel
configuration routine:
# make oldconfig
or:
# make config
or:
3-32 UNIX Operating System Device Drivers
Version 1.3 Copyright © 2001, 2002, 2007 by LSI Logic Corporation. All rights reserved.
Page 73

# make menuconfig
or:
# make xconfig
3. Look for the new top-level Fusion-MPT device support entry:
Fusion-MPT device support --->
and select it to access the Fusion-MPT drivers submenu entries:
<M> Fusion-MPT (base + ScsiHost) drivers
<M> Enhanced SCSI error reporting
< > Fusion-MPT misc device (ioctl) driver
4. On the submenu, select Fusion-MPT (base + ScsiHost) drivers,
and then enter m to configure for building this support as a module.
(Alternatively, you can enter y to have this support built into the
kernel.)
Note: Enhanced SCSI error reporting and ioctl drivers are
optional. LSI recommends that they only be built as
modules, due to kernel size considerations.
Note: Do not answer y for the Fusion-MPT LAN driver option!
Support for this driver is currently restricted to module use
only.
5. Save the kernel config changes. Follow any post config instructions,
and do everything needed on your platform to rebuild the kernel. This
typically includes the following:
# make dep
and:
# make bzImage # varies on non-Intel platforms
6. Rebuild the kernel modules with this command:
# make modules
7. (Optional) Do everything needed on your Linux platform to install a
newly built kernel. (This can be temporary, for sanity testing only.) Be
very careful if you do this, and be sure you know what you are doing.
It is easy to accidentally wipe out a good and stable kernel from this
point forward in the procedure!
8. Install (or reinstall) newly compiled kernel modules:
# make modules_install
Installing the Fusion-MPT Linux Device Drivers 3-33
Version 1.3 Copyright © 2001, 2002, 2007 by LSI Logic Corporation. All rights reserved.
Page 74

The output from the last step should look something like this:
Installing modules under /lib/modules/2.2.14-5.0/block
Installing modules under /lib/modules/2.2.14-5.0/net
Installing modules under /lib/modules/2.2.14-5.0/ipv4
Installing modules under /lib/modules/2.2.14-5.0/scsi
Installing modules under /lib/modules/2.2.14-5.0/fs
Installing modules under /lib/modules/2.2.14-5.0/fs
Installing modules under /lib/modules/2.2.14-5.0/cdrom
Installing modules under /lib/modules/2.2.14-5.0/video
Installing modules under /lib/modules/2.2.14-5.0/net
Installing modules under /lib/modules/2.2.14-5.0/misc
9. Update the /boot sector with the new System.map and bzImage, re-
create your ramdisk image (refer to your vendor literature), and
update your boot manager (lilo.conf, grub.conf). If you are using
lilo, you must run lilo -v prior to reboot.
10. Shut down the system. For example:
# shutdown -r now
11. Reboot with the newly built Linux kernel.
3.5.5 Loading the Drivers as Modules
Follow these steps to load the new driver binaries:
1. Load the Fusion-MPT base driver.
# insmod mptbase
Fusion-MPT base driver 2.xx.xx
Copyright (c) 1999-2002 LSI Corporation
2. Load the Fusion-MPT SCSI host driver.
# insmod mptscsih
Fusion-MPT SCSI Host driver 2.xx.xx
Depending on which FC devices you have attached to your FC link, you
should see something like the following on the console and in the system
log:
scsi0 : ioc0: LSIFC919, FwRev=1000h, Ports=1, MaxQ=256, IRQ=9
scsi : 1 host.
Vendor: SEAGATE Model: ST39102FC Rev: 0007
Type: Direct-Access ANSI SCSI revision: 02
Detected scsi disk sda at scsi0, channel 0, id 0, lun 0
Vendor: SEAGATE Model: ST19171FC Rev: 0017
Type: Direct-Access ANSI SCSI revision: 02
Detected scsi disk sdb at scsi0, channel 0, id 1, lun 0
3-34 UNIX Operating System Device Drivers
Version 1.3 Copyright © 2001, 2002, 2007 by LSI Logic Corporation. All rights reserved.
Page 75

SCSI device sda: hdwr sector= 512 bytes. Sectors= 17783240 [8683 MB] [8.7 GB]
sda: sda1
SCSI device sdb: hdwr sector= 512 bytes. Sectors= 17783112 [8683 MB] [8.7 GB]
sdb: sdb1
All Fibre Channel target devices should be detected and mapped to
Linux SCSI devices, /dev/sd{a,b,c,...} when themptscsih module is
loaded.
All Linux commands pertaining to SCSI disk storage management
(fdisk, mke2fs, mount, etc.) using the /dev/sdX[N] notation should now
be functional.
FCP (SCSI) Device Access Example:
# fdisk /dev/sdb
# mke2fs /dev/sdb1
# mount /dev/sdb1 /mnt/s1
3.5.6 Boot Setup Commands
3.5.6.1 Syntax
Setup commands can be passed to the SCSI host driver mptscsih as a
string variable using insmod. The following command installs the driver
module with the bus width set to narrow and Domain Validation disabled:
insmod mptscsih.o mptscsih="dv:n width:0"
Each string argument must be specified as keyword:value. Only lowercase characters and digits are allowed.
3.5.6.2 Available Arguments
The available arguments are Domain Validation, Maximum SCSI Bus
Width, and Minimum SCSI Synchronous Factor.
Domain Validation
• dv:n Disabled
• dv:y Enabled [default]
The SCSI host driver performs a sequence of write, read, and compare
commands to each target device during driver initialization. If the driver
detects data corruption or bus hangs during this sequence, it
Installing the Fusion-MPT Linux Device Drivers 3-35
Version 1.3 Copyright © 2001, 2002, 2007 by LSI Logic Corporation. All rights reserved.
Page 76

automatically slows the transfer rate until reliable transmission is
achieved.
Warning: These tests use adevice’sinternal buffer. Some older SCSI
devices freeze when they receive a Read or Write Buffer
command.
DV may be disabled on a per-device basis by setting the transfer
characteristics to ASYNC and NARROW in the adapter BIOS.
Alternatively, DV may be disabled for the driver by passing in dv:n as a
command line argument.
This option has no effect for LSIFC9XX parts.
Maximum SCSI Bus Width
• width:0 Wide SCSI disabled
• width:1 Wide SCSI enabled
The maximum allowed SCSI bus data transfer width is set to the
minimum of the command line options, adapter capabilities, and NVRAM
settings.
This option has no effect for LSIFC9XX parts.
Minimum SCSI Synchronous Factor
• factor:0x08 Ultra320 (160 Mega-transfers / second)
• factor:0x09 Ultra160 (80 Mega-transfers / second)
• factor:0x0A Ultra2 (40 Mega-transfers / second)
• factor:0x0C Ultra (20 Mega-transfers / second)
• factor:0x19 FAST (10 Mega-transfers / second)
• factor:0x32 SCSI (5 Mega-transfers / second)
• factor:0xFF 5 Mega-transfers/second and asynchronous
The minimum allowed SCSI synchronous factor is set to the maximum
of the command line input, adapter capabilities, and NVRAM setting. If
the minimum synchronous factor is 0xFF, the synchronous offset is set
to 0 (asynchronous).
This option has no effect for LSIFC9XX parts.
3-36 UNIX Operating System Device Drivers
Version 1.3 Copyright © 2001, 2002, 2007 by LSI Logic Corporation. All rights reserved.
Page 77

3.5.7 Troubleshooting
If you have compiled your Linux kernel with /proc file system support,
you can examine SCSI devices using this command:
$ cat /proc/scsi/scsi
A summary of attached/recognized Fusion-MPT adapters can be
examined with the following command:
$ cat /proc/mpt/summary
The driver version is stored in:
$ cat /proc/mpt/version
If an LSI Fibre Channel RAID subsystem is attached to the system, some
of the standard Linux SCSI devices that show up will not be accessible,
depending on the exact configuration of the RAID controller(s). For
example, if you have dual active controllers in one subsystem with 8
active LUNs configured for each controller, all 16 LUNs will be visible
through each controller (32 SCSI devices total), although only 8 LUNs
will actually be accessible from each controller. There is currently no
filtering out of the entries that are visible but not accessible.
Installing the Fusion-MPT Linux Device Drivers 3-37
Version 1.3 Copyright © 2001, 2002, 2007 by LSI Logic Corporation. All rights reserved.
Page 78

3-38 UNIX Operating System Device Drivers
Version 1.3 Copyright © 2001, 2002, 2007 by LSI Logic Corporation. All rights reserved.
Page 79

Chapter 4
NetWare Drivers
This chapter describes the features and use of the LSI Fusion-MPT
NetWare Peripheral Architecture (NWPA) device drivers for the Novell
NetWare 5.1 and Novell Netware 6.0 operating systems. This chapter
contains the following sections:
• Section 4.1, “Introduction and Driver Features”
• Section 4.2, “Installing the NWPA NetWare Driver”
• Section 4.3, “Command Line Options”
• Section 4.4, “Supported DOS Configurations and DOS Drivers”
4.1 Introduction and Driver Features
The LSI MPT NWPA driver for the Novell NetWare operating system
allows you to utilize LSI SCSI Fusion MPT controllers and processors.
The MPT SCSI BIOS (version 5.02 or higher) controls these controllers
or processors with NetWare.This driver, together with the designated LSI
controllers or processors and an appropriate Custom Device Module
(CDM), provides a SCSI solution within the NetWare environment.
A single driver is provided for the Novell NetWare versions 5.1 and 6.0
environments. This chapter explains how to install and use the LSI MPT
NWPA SCSI Host Adapter Module (HAM) driver for NetWare.
Note: Current Netware drivers can be downloaded from the LSI
web site at http://www.lsi.com/support. After you are
connected to this web site, go to the Download Center.
Select the product category, then the appropriate product.
A bullet in the Drivers section will display all driver
packages associated with the product selection.
Fusion-MPT Device Management User’s Guide 4-1
Version 1.3 Copyright © 2001, 2002, 2007 by LSI Logic Corporation. All rights reserved.
Page 80

4.1.1 Driver Features
The MPT HAM driver supports these features:
• Multiple host adapters
• Multiple logical unit numbers (LUNS)
• Large LUN support (larger than 7.844 Gigabytes)
• SCSI Fibre Channel protocol.
• Disconnect/Reselect
• Tagged command queuing
• Simple and ordered queue tags
• Scatter/Gather
• Shared interrupts
• MPT 5.xx BIOS (with ASPIMPT.SYS version 5.02 or greater)
• MPT 5.xx BIOS (without ASPIMPT.SYS)
• MPT 5.xx DOS drivers
The following features are supported for parallel SCSI devices only:
• Data Transfers at up to Ultra320 SCSI speeds
• Domain Validation
• Synchronous negotiation (Fast/Ultra/Ultra2/Ultra160/Ultra320 SCSI)
• Wide SCSI (single-ended and differential)
The following features are supported in conjunction with Novell software:
• MPI IOCTL Interface for NetWare using the LSICFGNW.NLM utility
driver.
• Support for SCSI CD-ROM devices via NetWare’s SCSICD.CDM
• Support for tape and ASPI devices by using NetWare’s
NWTAPE.CDM for NetWare versions 5.1 and 6.0.
In addition to the Release Definitions, the following restrictions apply:
• NWPA.NLM must be version 3.12 (or higher) for NetWare 6.0, or
version 3.09 (or higher) for Netware 5.1 or newer in SMP
environments.
4-2 NetWare Drivers
Version 1.3 Copyright © 2001, 2002, 2007 by LSI Logic Corporation. All rights reserved.
Page 81

Follow these instructions to upgrade to SMP after NetWare has been
installed:
1. At the server prompt, type: load install
A menu appears.
2. Select Multiprocessor.
Another menu appears.
3. Select the default: MPS14
4. Follow the remaining prompts and then exit load install.
5. Shut down the server and reboot the system.
Note: Other third-party CDMs may also support these devices.
4.1.2 Supported LSI Devices
The LSIMPTNW.HAM supports the following devices and associated LSI
host adapters:
• LSI53C1020, LSI53C1030 (SCSI chips)
• LSIFC929X (Fibre Channel chips)
• LSI20320, LSI21320, LSI22320 (host adapters)
• LSI7202 (Fibre Channel host adapter)
4.1.3 Driver Description
The LSI MPT NWPA solution consists of the device driver
LSIMPTNW.HAM and the NetWare NWPA installation file
LSIMPTNW.DDI.
LSIMPTNW is an NWPA Host Adapter Module (HAM). In order to
support SCSI devices, you must load the HAM module in conjunction
with a SCSI Custom Device Module (CDM). Novell has developed
generic CDMs to support SCSI Hard Drives, SCSI CD-ROM devices,
SCSI tape devices, and SCSI changer devices. In addition, third party
vendors are developing CDMs to support their specific devices.
Introduction and Driver Features 4-3
Version 1.3 Copyright © 2001, 2002, 2007 by LSI Logic Corporation. All rights reserved.
Page 82

4.1.4 Configuration IOCTL Interface Support
Support for the MPI IOCTL Interface (see LSI specification for details) for
NetWare is provided by the LSICFGNW.NLM utility driver. This software in
conjunction with this driver provides an interface for management and
SCSI pass-thru utility applications. If your application requires this
functionality, the LSICFGNW.NLM software must be loaded after the driver
instances are loaded. This can be accomplished by adding the following
line to the startup.ncf file:
LOAD LSICFGNW.NLM
Only one instance of this NLM should be loaded. The NLM will
automatically attach to all of the adapter driver instances at that point. In
order for the LSICFGNW.NLM software to load from the startup.ncf file,
it should be placed in the C:\NWSERVER directory on the DOS partition.
4.1.5 ASPI Support
NWPA ASPI support is provided via NetWare’s NWTAPE driver.
NetWare, or third party applications, may use this interface to
communicate with a SCSI device attached to an LSI MPT-controller,
including SCSI tape devices using NWTAPE.CDM.
4.2 Installing the NWPA NetWare Driver
To install NetWare, follow the instructions in the Novell NetWare
Installation Manual. The following information is provided to assist in the
installation. The LSI MPT NWPA NetWare driver must be loaded once
for each SCSI channel on an LSI controller installed in the system.
4.2.1 Preparing Your System for the NWPA Driver
The LSI NWPA driver, LSIMPTNW.HAM supports the following DOS
drivers:
• ASPIMPT.SYS (Version 5.02 or greater)
• SYMCD.SYS
• SYMDISK.SYS
4-4 NetWare Drivers
Version 1.3 Copyright © 2001, 2002, 2007 by LSI Logic Corporation. All rights reserved.
Page 83

The MPT BIOS version 5.xx is the minimum MPT BIOS required for
NetWare when not used with ASPIMPT.SYS.
Follow these steps to check the status of DOS drivers:
1. Edit the CONFIG.SYS file.
2. If any of the following lines appear, you may remove or delete them.
(LSI recommends commenting them out with the REM command in
case they are needed later.)
DEVICE=<path>\CDROM.SYS /d:<name>
DEVICE=<path>\SYMDISK.SYS
DEVICE=<path>\HIMEM.SYS
DEVICE=<path>\EMM386.SYS
3. If SCSI CD-ROM support is required, add the following:
DEVICE=<path>\ASPIMPT.SYS
DEVICE=<path>\SYMCD.SYS /d:<name>
4. Add the following line to the AUTOEXEC.BAT file:
DEVICE=<path>\mscdex /d:<name>
4.2.2 NetWare 5.1 and 6.0 Driver Installation
Follow these steps to install the NetWare 5.1/6.0 driver.
1. Begin the file server installation according to the instructions in the file
server installation chapter in the No vell NetW are Installation Manual.
2. When the NetWare installation procedure prompts you for a disk
driver, insert the LSI device driver diskette into drive A: or B:.
3. Use the INS key to select an unlisted driver.
A dialog box appears.
4. If the driver diskette is in the A: drive, press Enter to continue. If the
driver diskette is in the B: drive, press F3 (to specify the path to
search for the driver), enter the drive letter B: and press Enter.
The LSIMPTNW.HAM driver will appear as a selection.
Note: If the INS key option does not appear during the
installation, choose Server Drivers to go to the Summary
page. Highlight Disk and CD-ROM Drivers (e.g., IDEATA).
Press Enter and load an additional driver. Then press the
INS key. The system defaults to the A: path. Highlight the
Installing the NWPA NetWare Driver 4-5
Version 1.3 Copyright © 2001, 2002, 2007 by LSI Logic Corporation. All rights reserved.
Page 84

LSI NWPA driver and press Enter. Select Yes to save and
move the driver into the operating system. Press Enter to
copy the files.
Next, the system prompts you with the available command line
options to load the driver. A description ofeach option appearsin the
box at the bottom of the installation screen. A more detailed
description is given in the section titled Command Line Options.
5. Modify any option values, as needed.
A description of each option appears in the box at the bottom of the
installation screen. A more detailed description is given in Section
4.3, “Command Line Options.”
6. Load a separate instance of the driver for every LSI controller SCSI
channel or host adapter present in the system.
7. When prompted for a slot number, accept the slot numbers
displayed. Be sure to write these slot numbers down for later use.
8. When asked to edit the STARTUP.NCF file, be sure the LSIMPTNW.HAM
is loaded once per LSI controller SCSI channel. Add the following
statement to each load line in the STARTUP.NCF, specifying the slot
numbers written down in the previous step, with only one slot number
per load instance:
SLOT=<slot number>
The HAM driver(s) are loaded for each LSI controller SCSI channel
from the first LOAD statement to the last LOAD statement.
4.2.3 Reconfiguring Driver Options
Follow these steps to reconfigure driver options:
1. To unload all instances of the driver, type:
unload LSIMPTNW.HAM
2. To reload each instance of the driver with the desired option settings,
type:
load LSIMPTNW.HAM slot=<slot number> <options>
3. If the changes made to the load options of oneor more load instance
are permanent, and the driver is loaded automatically at server boot
time, you must specify these options in the STARTUP.NCF or
AUTOEXEC.NCF files.
4-6 NetWare Drivers
Version 1.3 Copyright © 2001, 2002, 2007 by LSI Logic Corporation. All rights reserved.
Page 85

4.3 Command Line Options
The LSIMPTNW.HAM driver has many tuning parameters, as listed
below. A default is listed for each option, as well as a list of valid entries.
Each option has a description of when to use it, the syntax used, and
any impact its use may have on the system.
If an option is specified but the assignment is not valid, the default value
is used.
The options described below are used by typing the specified characters
on the load command line for the NWPA driver. For example, the load
command line to specify the Width SCSI Option is:
load LSIMPTNW.HAM width=narrow
Note: No spaces areallowed in a single command line option, but
spaces are required between different command line
options.
4.3.1 Information Option: Using the Help Mode Option
• Command line option: ?orh
• Function: Display the options available in the driver.
• Possible Impact: The driver will not load with ? or h specified.
Use this command line option to view a brief description of each driver
option, as well as valid entries for each option. If the ? or h option is
specified along with other options, the help screen is invoked, the other
options are ignored, and the driver is not loaded.
4.3.2 NetWare NWPA Driver Customizable Options
Each command may be preceded by a "/" or "-" for backwards
compatibility at the discretion of the user. The line options with multiple
names are simply aliases for the same command. The command line is
case insensitive, so you can mix upper and lower case.
4.3.2.1 Using the Elevator Threshold Option
• Syntax: elev=<option>[targetIDlist] or
elevator=<option>[targetIDlist]
Command Line Options 4-7
Version 1.3 Copyright © 2001, 2002, 2007 by LSI Logic Corporation. All rights reserved.
Page 86

• Default value: 32
• Valid entries: 0–250 (0 = disable)
• Function: Specifies the maximum number of I/Os that the HAM
queues before allowing NWPA to filter and organize requests.
NWPA uses elevator queues to determine how many I/Os are queued to
the HAM before organizing requests and generating scatter gather lists.
If this number is set too low, adapter I/O starvation can result. If the
number is too high, I/Os may not be sorted and/or scatter gather lists
may not be generated. Varying the elevator threshold value affects
performance.
4.3.2.2 Using the Handles Option
• Syntax: handles=<option>[targetIDlist] or
• Default value: 144 handles
• Valid entries: Number of handles
• Function: Defines the maximum number of bus/device/target
handles.
handle =<option>[targetIDlist] or
hdl=<option>[targetIDlist]
For larger configurations, increase this value to the total number of
bus/target/device(s) in a system.
4.3.2.3 Using the Minimum Timeout Option
• Syntax: mintimeout=<option>[targetIDlist] or
mint=<option>[targetIDlist]
• Default value: 0 (0 = no timeout)
• Valid entries: 0–1200
• Function: Specifies the minimum device timeout, in seconds.
This option uses a timeout mechanism to support particularly slow
devices. When a driver issues a command to a SCSI device, a timer is
started. If the timer expires before the command completes, the driver
assumes something has gone wrong and takes steps to recover. The
minimum setting is 0, which is no timeout.
4-8 NetWare Drivers
Version 1.3 Copyright © 2001, 2002, 2007 by LSI Logic Corporation. All rights reserved.
Page 87

4.3.2.4 Using the Tagged Queuing Option
• Syntax: qtags=<option>[targetIDlist] or
qtag=<option>[targetIDlist] or
tag=<option>[targetIDlist]
• Default value: on
• Valid entries: on, off
• Function: Enables/disables use of simple/ordered tagged command
queueing.
Enabling the qtags option causes the driver to issue tagged I/O requests
to the devices that support tagged queuing. Tagged I/O requests are not
issued to devices that do not support tagged queuing. Depending on the
drive controller, use of queue tags increases throughput of the device.
However, the optimal number of queue tags is based on the specific
device type. Tagged queuing may result in improved I/O throughput in
devices that support it.
4.3.2.5 Using the Scan Option
• Syntax: scan=<option>[targetIDlist][lunIDlist]
• Default value: list
• Valid entries: on, off, list, or order
• Function: Specifies the Logical Unit Numbers (LUNs) to scan.
This option allows you to change the default for scanning LUNs per
target ID on the SCSI bus.
4.3.2.6 Using the Slot Option
• Syntax: slot=<option>[targetIDlist]
• Default value: None
• Valid entries: 0–10099
• Function: Specifies the slot instance number of the LSI controller to
which the load instance applies.
The slot option specifies the LSI controller SCSI channel (embedded
chip or host adapter) that pertains to the current load. This information
is required to load the driver. If this information is not specified on the
load line, the driver will prompt for the slot number.
Command Line Options 4-9
Version 1.3 Copyright © 2001, 2002, 2007 by LSI Logic Corporation. All rights reserved.
Page 88

4.3.2.7 Using the Synchronous SCSI Option
• Syntax: synchronous=<option>[targetIDlist] or
sync=<option>[targetIDlist] or
sync=<option>[targetIDlist] or
speed=<option>[targetIDlist]
• Default value: Maximum of the HBA
Examples of rate specifier are:
0MBor 10 MB (megabytes per second)
20 MT or 40 MT (mega transfers per second)
• Valid entries:
0 = asynchronous
5 = 5 mt/sec
10 = 10 mt/sec
20 = 20 mt/sec
40 = 40 mt/sec
80 = 80 mt/sec
160 = 160 mt/sec
OFF = asynchronous
ASYNC = asynchronous
MAX = Adapter maximum rate
• Function: Sets synchronous transfer rate for specified target(s).
• Possible Impact: Could cause a device to operate slower than its
maximum speed.
This synchronous SCSI option allows you to enable/disable support of
Fast, Ultra, Ultra2, Ultra160 and Ultra320 SCSI synchronous data
transfers when using a Fast, Ultra, Ultra2, Ultra160, or Ultra320 SCSI
controller. Synchronous data transfers increase the I/O performance of a
system.
4.3.2.8 Using the Verbose Option
• Syntax: verbose=<option>[targetIDlist]
• Default value: off
• Valid entries: on, off
• Function: Displays more detailed information on options and DOS
configuration.
4-10 NetWare Drivers
Version 1.3 Copyright © 2001, 2002, 2007 by LSI Logic Corporation. All rights reserved.
Page 89

This option is useful when multiple adapters are present in the system,
and the PCI Device ID, PCI Bus number, and PCI Device/Function
number for each adapter need to be known.
4.3.2.9 Using the Width Option
• Syntax: width=<option>[targetIDlist] or
• Default value: on
• Valid entries:
narrow = 8 bit data bus
wide = 16 bit data bus
off = 8 bit data bus
on = 16 bit data bus
8 = 8 bit data bus
16 = 16 bit data bus
max = Adapter maximum width
• Function: Sets bus width negotiations for specified targets.
This option allows you to disable support of wide SCSI when using a
wide SCSI controller. Set this option to narrow, off,or8 to disable a wide
SCSI device when an 8-bit SCSI cable is connected on the bus between
the wide SCSI host adapter and the wide device. This type of connection
prohibits the transfer of wide data.
wide=<option>[targetIDlist] or
wid=<option>[targetIDlist]
If this option is set to narrow, off,or8, the wide device still works, but all
data transferred to or from the device is narrow (8 bit). The driver does
not initiate a wide SCSI transfer request negotiation. Alternatively, to
enable support of wide SCSI transfers, set this option to wide, on,or16.
4.4 Supported DOS Configurations and DOS Drivers
The LSIMPTNW.HAM driver supports the following DOS configurations:
• MPT 5.XX or greater BIOS, without ASPIMPT.SYS
• MPT 5.XX BIOS with ASPIMPT.SYS
• No MPT BIOS, ASPIMPT.SYS
Supported DOS Configurations and DOS Drivers 4-11
Version 1.3 Copyright © 2001, 2002, 2007 by LSI Logic Corporation. All rights reserved.
1
Page 90

The MPT ASPIMPT.SYS (version 5.02 or greater) DOS driver supports
the MPT 5.xx or later BIOS. SYMCD.SYS and SYMDISK.SYS provide
support for CD-ROM and MO devices under DOS. Neither SYMCD.SYS
nor SYMDISK.SYS are required for NetWare support of CD-ROM and
MO devices. For SCSI CD-ROM installation, ASPIMPT.SYS and
SYMCD.SYS are required.
The MPT NWPA driver, LSIMPTNW.HAM supports the list of DOS drivers
described below.
• ASPIMPT.SYS
The ASPIMPT.SYS driver provides an ASPI layer interface for disk
and non-disk devices. If NetWare is being installed from a SCSI
CD-ROM device on an LSI controller, SYMCD.SYS is required with
ASPIMPT.SYS.
• SYMCD.SYS
To install the NetWare operating system from CD-ROM, load the
SYMCD.SYS driver with ASPIMPT.SYS. Once the NetWare
operating system installation has completed, SYMCD.SYS is not
needed. The NetWare NWPA environment provides support for SCSI
CD-ROMs through the NetWare driver interface.
• MSCDEX.EXE
The MSCDEX.EXE driver (provided with DOS) is required in
conjunction with SYMCD.SYS to install NetWare from a CD-ROM.
• SYMDISK.SYS
The SYMDISK.SYS driver provides support for removablemedia and
large sector size devices under DOS. This driver is not required for
NetWare support of these devices.
Note: The NetWare drivers can function independently of any
DOS drivers, except for the installation of NetWare from a
SCSI CD-ROM drive.
1. In addition to ASPIMPT.SYS (version 5.XX or greater), SYMCD.SYS and/or SYMDISK.SYS
can be loaded for DOS CD-ROM and DOS Magneto Optical (MO) support, respectively.
SYMCD.SYS and SYMDISK.SYS are NOT required for CD-ROM or MO support under NetWare.
4-12 NetWare Drivers
Version 1.3 Copyright © 2001, 2002, 2007 by LSI Logic Corporation. All rights reserved.
Page 91

Chapter 5
Host Adapter Flash
Utility
This document explains how to use the DOS-based LSI Flash Utility to
download firmware and BIOS images to LSI Fibre Channel (FC) and
Serial Attached SCSI (SAS) host adapter cards.
This chapter has the following sections:
• Section 5.1, “Features and Supported Controller Chips”
• Section 5.2, “Starting the Host Adapter Flash Utility”
• Section 5.3, “Running the Host Adapter Flash Utility”
• Section 5.4, “Supported Flash ROM Chips”
5.1 Features and Supported Controller Chips
The Host Adapter Flash Utility supports the following features:
• Host adapter selection for updating
• Total flash part erasure (FC only)
• Command line execution
• Provides a means to identify the firmware or BIOS image version on
the adapter or residing in a file.
The Host Adapter Flash Utility allows you to update the LSI Fusion-MPT
based firmware and/or BIOS on the following controller chips and host
adapters:
• Fibre Channel Controller Chips: LSIFC929, LSIFC929X,
LSI929XL, LSI949X
• Fibre Channel Host Adapters: LSI40919H, LSI409190,
LSI40919LO, LSI449290, LSI44929H, LSI44929L0, LSI7004G2-LC,
Fusion-MPT Device Management User’s Guide 5-1
Version 1.3 Copyright © 2001, 2002, 2007 by LSI Logic Corporation. All rights reserved.
Page 92

LSI7102AX-LC, LSI7102LXP-LC, LSI7102XP-LC, LSI7104EP-LC,
LSI7104XP-LC, LSI7104XP-SGI, LSI7202AX-LC, LSI7202X-LC,
LSI7202LXP-LC, LSI7202LXP-NCR, LSI7202XP, LSI7202XP-4M,
LSI7202XP-LC, LSI7204EP-LC, LSI7204XP-LC, LSI7204XP-SGI,
LSI7402AX, LSI7402AX-LC, LSI7402EP-LC, LSI7402XP-LC,
LSI7402XP-NCR, LSI7404EP-LC, LSI7404XP-LC
• SAS Controller Chips: LSISAS1064, LSISAS1068, LSISAS106xE
• SAS Host Adapters: SAS3040X, SAS3041X, SAS3440X,
SAS3041XL-S, SAS3080X, SAS3441X, SAS3442X, SAS3800X,
SAS3041E, SAS3442E
5.2 Starting the Host Adapter Flash Utility
The utility’s executable name is mptutil.exe . This utility requires the
DOS extender, dos4gw.exe, to operate. LSI strongly recommends that
you copy both files to a DOS bootable diskette and execute the utility
from this diskette. Either MS-DOS or PC-DOS is acceptable. No memory
manager or other drivers beyond the minimum required should be
installed via the config.sys file. The utility can optionally be executed
from a hard drive. However, the drive should not be connected to an
adapter board that you are updating, and the DOS4GW extender should
reside in the same directory as the mptutil.exe executable file.
Note: The host adapter must have an onboard flash in order to
use this utility.
Follow these steps to start the Host Adapter Flash Utility:
1. Insert the diskette into drive A:.
2. Boot the system to the DOS prompt a:\>.
3. Type mputil and press Enter.
DOS4GW will be loaded automatically if it is located in the same
directory as the utility or is in the defined path. The main menu
appears, as shown in Figure 5.1.
5-2 Host Adapter Flash Utility
Version 1.3 Copyright © 2001, 2002, 2007 by LSI Logic Corporation. All rights reserved.
Page 93

Figure 5.1 Host Adapter Flash Utility Main Menu
Choice ID ID Bus Device
------- ------ ------ --- ----- 1 0x1000 0x0030 0x3 0x10
LSI Logic, Inc. LSIFC929X FC Host Adapter
3 0x1000 0x0031 0x4 0x10
LSI Logic, Inc. LSISAS1064 SAS Host Adapter
4 - Refresh
Which PCI chip (0 to quit)?
Vendor Device
The main menu allows you to choose which controller chip to use to
update the BIOS and firmware. Dual channel cards have a single entry
(chip) displayed on this screen. Note that choice selections may not
always have concurrent choice selections (see example below). Since
both channels of a dual channel board share a flash part, only one of the
paths needs to be chosen. However, nothing is damaged if separate
updates are done through both paths.
To continue, type the number of the controller chip you want.
5.3 Running the Host Adapter Flash Utility
When you choose a controller chip from the menu, a menu of options is
displayed. The menu is different for fibre channel controller chips versus
SAS controller chips.
5.3.1 Fibre Channel Controller Options
Table 5.1 lists the menu options that are displayed if you selected a fibre
channel controller chip.
Note: If you are updating the firmware or BIOS/Fcode (options a
or b on the menu), you should exit the Host Adapter Flash
Utility after the update is complete and perform a cold
reboot. Then you can restart the utility if you need to
change other settings like board speed or interrupt
coalescing values. This ensures that the updated firmware
is running on the chip.
Running the Host Adapter Flash Utility 5-3
Version 1.3 Copyright © 2001, 2002, 2007 by LSI Logic Corporation. All rights reserved.
Page 94

Table 5.1 Fibre Channel Option Menu
Option Description
a - Update Firmware
b - Update BIOS & FCode
c - Upload current firmware to a file
d - Upload current BIOS to a file
f - Toggle Board Speed on Function 0
g - Toggle Board Speed on Function 1
h - Toggle Topologies on Function 0
i - Toggle Topologies on Function 1
l - Change Interrupt Coalescing
Values on Port 0
m - Change Interrupt Coalescing
Values on Port 1
n - Change Device Pathing to One
Path per device
x - Erase BIOS Removes the BIOS from the adapter, but leaves the firmware
y - Change Protocol Support Allows you to enable all protocols or just initiator or target only.
z - Change Adapters Returns you to the host adapter selection menu (displayed
q - Quit Quits the utility.
Allows you to download images to the currently selected PCI
chip. This option requires the user to input a filename to be
flashed. In the case of BIOS & FCode it will require the user
to input two file names to be concatenated and then flashed.
Allows you to upload the firmware or BIOS image to a
designated file. Before you select one of these options, make
sure there is enough disk space for the image.
Provides a quick one-stroke method for setting a particular
port’s board speed. Option g is not displayed if a single port
host adapter is currently selected.
Provides a quick one-stroke method for setting a particular
port’s topology. Option i is not displayed if a single port host
adapter is currently selected.
Allows you to set the Coalescing Timeout and Depth. You must
press c to commit any changes made.
Toggles the multi-pathing bit, which tells the firmware whether
to present a target that is seen via multiple paths as a single
target ID (multi-pathing is OFF) or as a target ID per path
(multi-pathing is ON). If you enable multi-pathing, you should
use a multi-pathing driver and you should be aware that the
same target will be visible via multiple target IDs.
intact.
These changes will affect both ports of a multi-port host
adapter.
earlier) so you can select a different host adapter.
5.3.2 SAS Controller Options
Table 5.2 lists the menu options that are displayed if you selected a SAS
controller chip.
Note: If you are updating the firmware or BIOS (options a or b on
the menu), you should exit the Host Adapter Flash Utility
after the update is complete and perform a cold reboot.
5-4 Host Adapter Flash Utility
Version 1.3 Copyright © 2001, 2002, 2007 by LSI Logic Corporation. All rights reserved.
Page 95

Then you can restart the utility if you need to manage the
configuration settings. This ensures that the updated
firmware is running on the chip.
Table 5.2 SAS Option Menu
Option Description
a - Update Firmware
b - Update BIOS
c - Upload current firmware to a file
d - Upload current BIOS to a file
f - Manage configuration settings Allows you to view and modify configuration pages. You must
z - Change Adapters Returns you to the host adapter selection menu (displayed
q - Quit Quits the utility.
Allows you to download images to the currently selected PCI
chip. This option requires the user to input a filename to be
flashed.
Allows you to upload the firmware or BIOS image to a
designated file. Before you select one of these options, make
sure there is enough disk space for the image.
press c to commit any changes made. If a page cannot be
modified, the information will be displayed.
earlier) so you can select a different host adapter.
5.3.3 Command Line Options
Table 5.3 lists the command line options that the utility supports. You can
use these commands to create an automated process to perform the
utility’s operations.
Table 5.3 Command Line Options
Command Description
-ax Select a port on a host adapter, where x is the port number. (FC
-bx Download the BIOS image, where x is the name of the input file.
-cx Change current adapter where x is the number of the adapter.
-fx Download the firmware image where x is the name of the input file.
-? Displays a screen of help information.
only)
If x is missing, you will be prompted for a file name.
If x is missing, the user will be prompted for a file name.
Running the Host Adapter Flash Utility 5-5
Version 1.3 Copyright © 2001, 2002, 2007 by LSI Logic Corporation. All rights reserved.
Page 96

5.4 Supported Flash ROM Chips
The Host Adapter Flash Utility supports the following Flash ROM chips
in the following part numbers and corresponding sizes:
5.4.1 Fibre Channel (1-MB Capacity)
• Sharp LH28F008BJT (LSIFC929x)
• Sharp LH28F008SCT (LSIFC929)
• Sharp LH28F008SCHT-L12 (LSIFC929)
• Sharp LH28F008SCHT-TE (LSIFC929)
• Intel E28F008S3-120 (LSIFC929)
• Intel TE28F08B3BA (LSIFC929X)
5.4.2 Serial Attached SCSI (1-MB Capacity)
• Sharp LH28F008SCT-L12
• Sharp LH28F008SCHT-L12
• Sharp LH28F008SCHT-TE
• Intel E28F008S3-120
5.4.3 Serial Attached SCSI (2-MB Capacity)
• AMD AM29LV017D-120ED
• AMD AM29LV017D-120EF
• AMD AM29LV017D-70ED
• AMD AM29LV017D-70EF
• AMD AM29LV017D-90ED
• AMD AM29LV017D-90EF
• Intel E28F016S3-120
• Sharp LH28F016SCT-120
• MACRONIX MX29LV017BTC-70G
• MACRONIX MX29LV017BTC-90G
5-6 Host Adapter Flash Utility
Version 1.3 Copyright © 2001, 2002, 2007 by LSI Logic Corporation. All rights reserved.
Page 97

5.4.4 Serial Attached SCSI (4-MB Capacity)
• AMD AM29LV033C-70EI
• AMD AM29LV033C-90EI
Supported Flash ROM Chips 5-7
Version 1.3 Copyright © 2001, 2002, 2007 by LSI Logic Corporation. All rights reserved.
Page 98

5-8 Host Adapter Flash Utility
Version 1.3 Copyright © 2001, 2002, 2007 by LSI Logic Corporation. All rights reserved.
Page 99

Chapter 6
Integrated RAID
Configuration Utility
This chapter explains how to use the CFGGEN Integrated RAID (IR)
Configuration Utility to create Integrated Mirroring (IM), Integrated
Mirroring Enhanced (IME) and Integrated Striping (IS) volumes.
CFGGEN is a command line utility that runs in the DOS, Linux, EFI, and
Windows Pre-Installation (WinPE) environments. CFGGEN can be
executed from a command line prompt or a shell script. The result from
invoking this utility is communicated via the program status value that is
returned when the program exits.
CFGGEN can be used to create IM, IME, and IS storage configurations
on both SCSI controllers and SAS controllers.
This chapter contains the following sections:
• Section 6.1, “Hardware and Software Requirements”
• Section 6.2, “CFGGEN Interface Description”
• Section 6.3, “CFGGEN Commands”
Note: CFGGEN is intended for use primarily in the manufacturing
environment. End users can use the BIOS-based
configuration utilities to create IM and IS volumes. (See
Chapter 7, “SCSI BIOS and Setup Utility,” Chapter 8, “SCSI
EFI BIOS and Setup Utility,” and Chapter 9, “Fusion-MPT
SAS BIOS and Setup Utility.”)
6.1 Hardware and Software Requirements
The CFGGEN IR Configuration Utility runs on any Intel IA-32 or IA64
compatible platform. It operates with any SCSI, SATA, orSAS device that
is compliant with existing SCSI standards. CFGGEN supports the
following LSI controllers:
Fusion-MPT Device Management User’s Guide 6-1
Version 1.3 Copyright © 2001, 2002, 2007 by LSI Logic Corporation. All rights reserved.
Page 100

• LSI53C1020 and LSI53C1030 SCSI controllers (DOS, Linux, and
WinPE environments only)
• SAS1064/1064E, SAS1068/1068E, and SAS1078 SAS controllers
(the SAS1078 controller is not currently supported in the EFI
environment).
The supported versions of CFGGEN are as follows:
DOS Version –
CFGGEN operates in any environment that is fully compatible with
MS-DOS 6.22 and has at least 2 MB of memory. The system BIOS must
support 32-bit BIOS services, including the PCI BIOS services. CFGGEN
uses these services to locate the controller and its interface registers.
CFGGEN must be able to directly access the controller chip’s interface
registers.
Note: You cannot run CFGGEN in a virtual DOS window from
within Windows.
EFI Version –
CFGGEN operates in any environment that is fully EFI compatible.
Currently, this includes only the SAS controllers listed above.
Linux Version –
CFGGEN is a statically linked Linux application. Static linking prevents
any library version compatibility problems that might stop CFGGEN from
working with a specific release or distribution of Linux. Version 3.02.04
or newer of the LSI mptlinux driver must be installed on the system.The
required modules include mptbase.o, mptscsih.o and mptctl.o .
Caution: mptbase.o , mptscsih.o and mptctl.o must be loaded into
the Linux kernel before CFGGEN will function correctly.
They can be loaded using the Linux modprobe command.
WinPE Version –
CFGGEN operates in Windows Pre-Installation Environment (WinPE)
and is statically compiled with the LSI MptLib Library (MptLib.lib). The
WinPE environment must have the appropriate LSI MPT Windows driver
6-2 Integrated RAID Configuration Utility
Version 1.3 Copyright © 2001, 2002, 2007 by LSI Logic Corporation. All rights reserved.
 Loading...