

1
M1060W / M1080W
Quick Start Guide
Installation & Configuration Guide
With USA Technical Support & Warranty Information
AVACOMTECH INC. www.avacomtech.com

2
Hardware Installation
Please check to see that you have the following:
1. M1060W or M1080W device
2. Antenna
3. Ethernet cable
4. 5V power adapter
5. Mounting bracket and screws
6. CD-ROM with setup software
You will also need:
1. A computer with a CD-ROM drive or active Internet connection
2. A WiFi router with at least one other available Ethernet port
3. A screwdriver (optional)
Preparation for Wi-Fi settings
1. Mount the bracket on the back of the camera (optional)
2. Connect one end of the Ethernet cable to camera and the other end to your
Wi-Fi router
3. Connect the antenna to camera
4. Connect the 5V power adapter to camera and plug it into a power outlet
3
Software Installation- For Windows
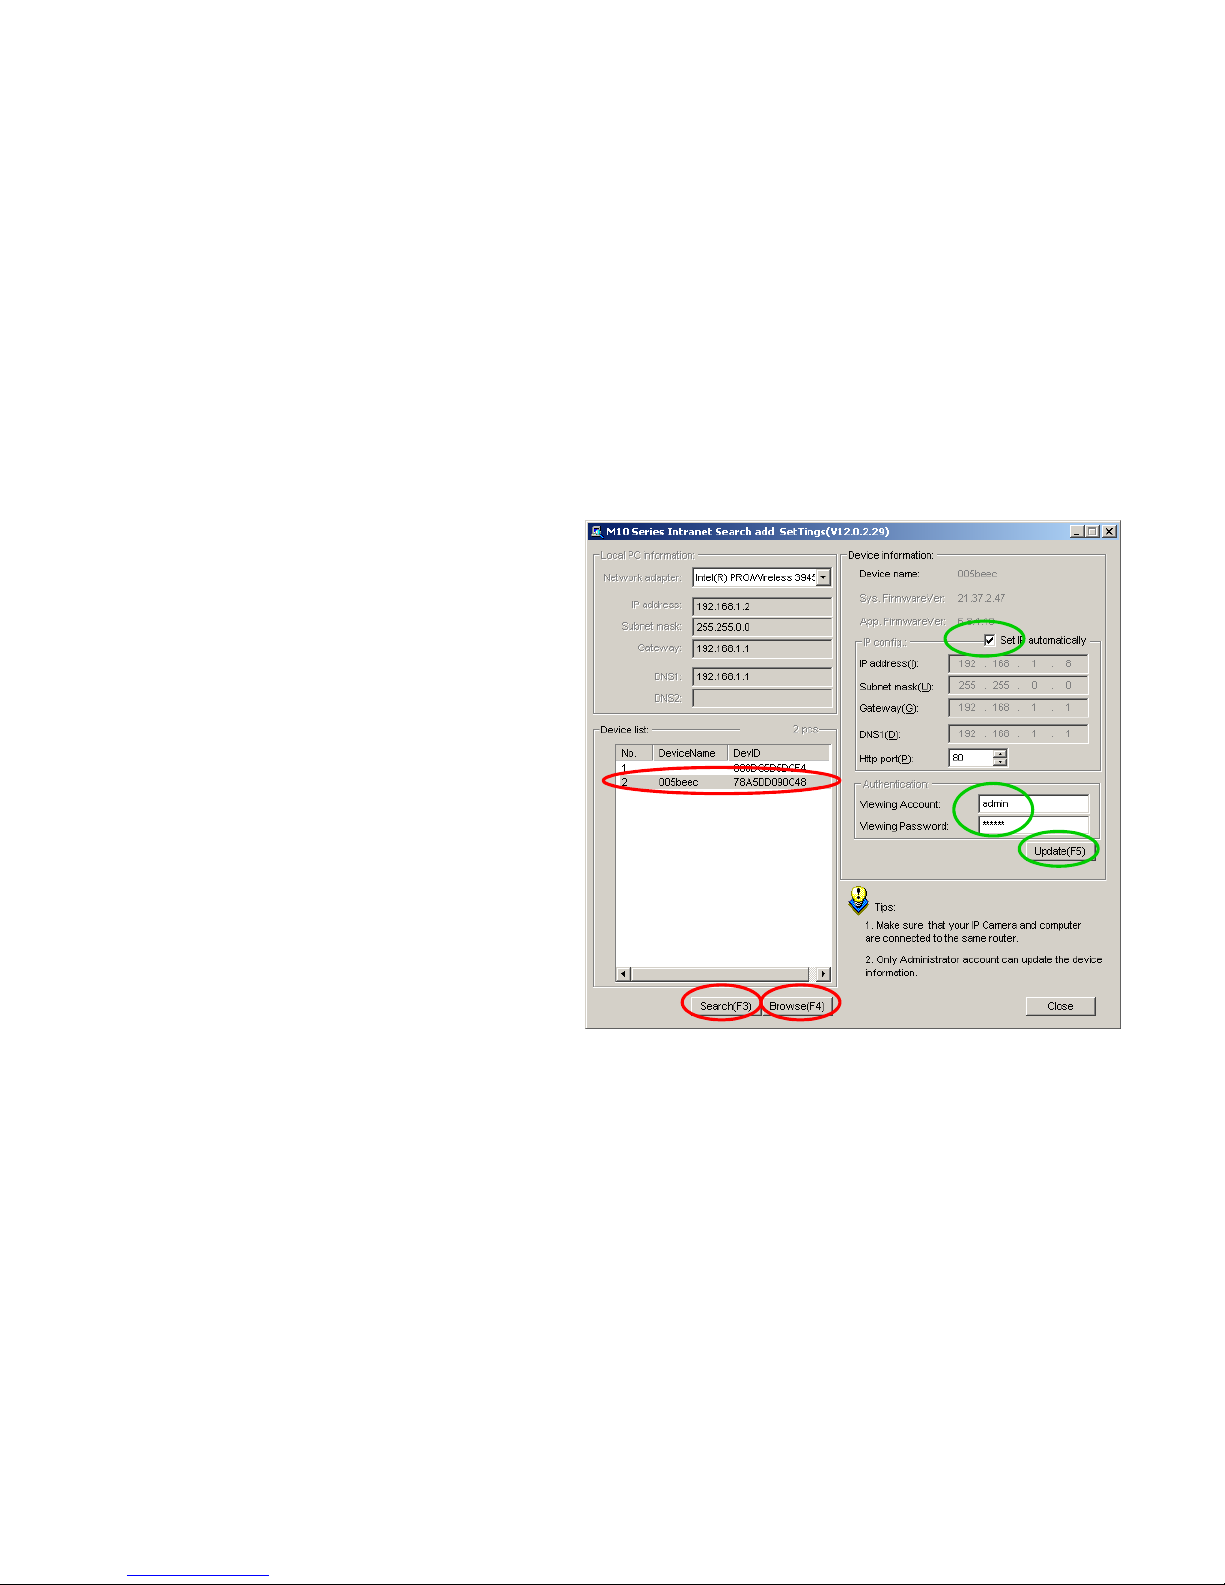
1. Use CD-ROM or visit www.avacomtech.com to find “M10 Search_en.exe”.
2. Double click “M10 Search_en.exe”, then click “Search(F3)”. The Camera name and
Device ID will show up.
3. Choose your camera.
4. Click “Browse (F4)”.
Setup IP address automatically if need:
5. Check “set IP automatically”.
6. Enter user name and password,
the default is “admin” and “123456”.
7. Click ‘update’. Device will restart.
Setup IP address manually if need:
8. Un-check “set IP automatically”.
9. Input IP address etc. parameters.
10. Enter user name and password,
the default is “admin” and “123456”.
11. Click ‘update’. Device will restart.
12. After restarting, click “Search (F3)”, choose the device again and click “Browse
(F4)”. The web browser will show up , Choose ‘Mode 1’, and enter user name and
password and log in to the camera to view the video.
The default user name is “admin”, default password is “123456”.

Software Installation- For Windows
13. You may need to click the popup window to install ActiveX control
“DVM_IPCam2.exe” to play video and audio.
14. Click the run button, re-login, then the software installation is complete.
4

5
Software Installation- For MAC
1. Use CD-ROM or visit www.avacomtech.com to find the “Mac Search Tool” folder.
2. Run the “IP Camera Tool”, then camera name and IP address will show up.
3. Double click the camera name, the web browser will open.
4. Choose ‘Mode 2’, then enter user name and password and log in to the camera to view
the video. The default user name is “admin”, default password is “123456”.

6
Wi-Fi Settings
1. Click on ‘Network’, then click on ‘Wireless Settings’
2. Click on ‘Scan’ button
3. Click your Wi-Fi hotspot SSID
4. Click ‘Using Wireless LAN’
5. Input Share Key
6. Click “Submit” button, device will start rebooting
7. After rebooting, unplug the Ethernet cable,
Tip: Router may assign different IP address for Ethernet cable or Wi-Fi connection
8. Use the IP Camera Search Tool to search for the camera, highlight the device name, and
click ‘Browse’ .

7
Remote Access Setting
1. For Static IP User
Reference your router manual to set up Port Forward or UPnP
Enable UPnP in camera “UPnP Settings” menu if you use UPnP in router
Use your Static IP address and port number to access to your camera remotely
2. For Dynamic IP User
Use factory default free DDNS account or apply for a DDNS account on the internet
Setup the account into Camera “DDNS Settings” menu
Setup Port Forward or UPnP for your router
Enable UPnP in camera “UPnP Setting” menu if you use UPnP in router
Use your DDNS domain name and port number to remote access to your Camera
Tip: You may need to use your neighbor’s network or your mobile device’s
3G/4G network for DDNS remote access testing most ISPs don’t allow
looping back to the LAN network.
Please reference to M1060W or M1080W IP camera user manual for detailed settings, or
visit www.avacomtech.com support page.
Call 1-619-336-0392 or email directly at support@avacomtech.com for further questions

8
Warranty Information
2 year Limited Hardware Warranty
AVACOM guarantees to the customer that this unit will conform to it’s published specifications and
will be free from defects in material and workmanship at the time of delivery and for a period of two
years thereafter. Without limiting the foregoing, this warranty does not cover any defect resulting
from (a) any unit sold by an entity other than AVACOM, (b) any design or specification supplied by
an entity other than AVACOM, (c) non-observance of technical operating parameters (e.g. exceeding
limiting values) or (d) misuse, abuse, using in abnormal conditions or alterations of any kind.
Please call AVACOM support line to obtain a Return Material Authorization (RMA), customer needs
to provide a copy of Amazon shipping slip and product serial number. Ship the unit with a valid RMA
to below address for repair. Customer needs to bear one way shipping cost.
1 Month Replacement, Refund
For buying from amazon.com or eBay.com, please reference to Amazon or eBay policies.
For buying from avacomtech.com, please reference to our website www.avacomtech.com.
Contact Information:
AVACOMTECH INC.
135 Civic Center Dr, Ste 205, National City, CA 91950 USA
Tel: +1-619-336-0392, Fax: +1-619-336-0492
Email: support@avacomtech.com
Thank you for choosing AVACOM products www.avacomtech.com
 Loading...