

AV123 Home Theater Enjoyment Manual
Your Rocket
Tyke Home
Theater
Enjoyment
Guide
2150 W. 6th Ave. • Suite L • Broomfield, CO 80020 • Toll Free 1-877-543-7500 • e-mail: info@av123.com
Yours exclusively through

A Suggestion
Your Rocket Tyke home theater system is carefully hand-packaged utilizing
molded foam inserts to protect its brushed aluminum finish. When removing
your speakers take care not to exert pressure on the front grilles or subwoofer driver.
We strongly recommend that you save the foam inserts and shipping cartons
to protect your speakers, should ever need to move or ship them to a new
location.
Thank you. And Congratulations!
Our thanks for buying Rocket Series speakers from AV123. We sincerely appreciate your confidence in us and our products.
Although we know these speakers represent extraordinary value, we also
know that the real test is how you feel about your speakers several months
from now. That’s why AV123 will continue to work hard to earn your respect
with technical advice and customer service that is second to none in our industry.
You can visit the AV123 website (www.av123.com) at any time for up-to-date
product information and answers to FAQ’s, as well as seeking advice from the
AV123 community at our new online forum (www.forum.av123.com).
Should you require that personal touch, please don’t hesitate to contact our
support department, toll-free, at (877) 543-7500 option 2. You’ll find our
knowledgeable Technical Services Department eager and willing to help.
We ask you read this owner’s manual first. It contains many tips on getting
your new loudspeaker system set up, connected, configured, and performing
its absolute best in your unique environment. We hope you find it clear, concise, and useful.
Again, thank you for your support.
AV123

Your Rocket Tyke Home Theater
Enjoyment Guide
Table of Contents
Product and Company Introduction
Section 1-Getting Started
Section 2-Placement
2.1 Front Speaker Placement
2.2 Should You “Toe In” Your Speakers
2.3 Center Channel Speaker Placement
2.4 Surround Speaker Placement
2.5 Alternative Speaker Placement Options
• Shelf Mounting
• Wall Mounting
2.6 Your Tyke SW-8 Subwoofer Placement
Section 3-Making the Connections
3.1 Connecting Your Speakers
• 1) A Question of Polarity
3.2 Connecting Your Tyke SW-8 Subwoofer
Section 4-Features and Functions of Your Tyke SW-8 Subwoofer
4.1 Control Panel Features of Your Tyke SW-8
4.2 Tyke SW-8 Setup
• Frequency
• Gain
Section 5-Setting Up Your Receiver
5.1 Simple Calibration
• *What is Reference Level?
5.2 Setting “Small” or “Large”
Section 6-Proper Care and Feeding
6.1 Speaker Break In
6.2 Speaker Care
6.3 Stay in Touch
Section 7-Specifications and Your Tyke Warranty
7.1 AV123 Warranty Policy and Registration
7.2 Specifications
• Satellite
• Center
• Subwoofer
Introduction to AV123 and your new
Rocket Tyke Home Theater System
At AV123, our absolute highest
priority begins and ends with you,
the customer. You can rest assured that if you’re not 100% satisfied with your purchase within 30
days from your original receipt
date, you may return your product(s) for a
prompt refund in full (excluding shipping
charges) with no explanation necessary. Coupled with the expert advice on our website and
through our trained advisors, there is simply not
a safer way or place to buy today. At AV123,
misleading and high-pressure sales tactics have
no place. Not only do we give you the tools and
the resources to fully evaluate your purchase before your order is placed, we back this up after
the fact by allowing you a full month to audition
our products in your own home before your final
decision is made.
We’ve done our best to provide you with products and services meeting or exceeding your expectations. However as good as our products
are, they do not match our dedication to each
and every sale. Should you need any further
assistance in the future with your A/V system,
you can bet that AV123 will be there supporting
and assisting you as you make your way to your
next level of audio/visual enjoyment.
The Onix Rocket Tyke 5.1 system is a very potent and agile loudspeaker system. However,
this being said, the placement tips and suggestions in this manual are vital for proper imaging
and soundstaging. Features of your new system
include a 50-watt powered 8” ported subwoofer,
(4) incredible 2-way, 2-driver satellites, a dedicated 2-way, 3-driver center channel, solid extruded aluminum enclosures with a beautiful
brushed exterior finish, and color matched integrated wall-mounts. We hope you enjoy your
new home theater, and thank you again for your
support of AV123!
Section 1-Getting Started
Your new Tyke loudspeaker system includes just
about everything to get you up and running in a
few short minutes. However, listed below are a
few things you will need to complete proper installation. Should you have any questions about
those items below or where to find them, feel
free to call our support staff at any time.
• Home theater receiver or preamp/
processor and amplifier.
• An audio source such as a DVD / CD
player.
• Speaker wire – 14 gauge or higher
(smaller #).
• Source Interconnects – A digital coaxial
or fiber optic cable and possibly standard
analog RCA cables depending on your
equipment (if DVD-A or SACD is going to
be used, you will need both digital and
analog connections. See your player’s
manual for more information).
• Subwoofer Connection – You will need a
single mono RCA cable to make this
connection.
Section 2-Placement
To achieve the best performance your Tyke system has to offer, there are several tips, suggestions, and guidelines to follow when setting up
your system in its new environment. Details for
the most common placement techniques are
listed below. However, at the end of this section
you will also find more information on placement
alternatives in unique situations.
2.1-Front Speaker Placement
Try to place your main speakers (Left, Center,
and Right) along the same wall of your listening/
viewing room. Although we've seen successful
installations that didn't follow this guideline,
they're generally more problematic in terms of
system response and accurate theater sound reproduction.
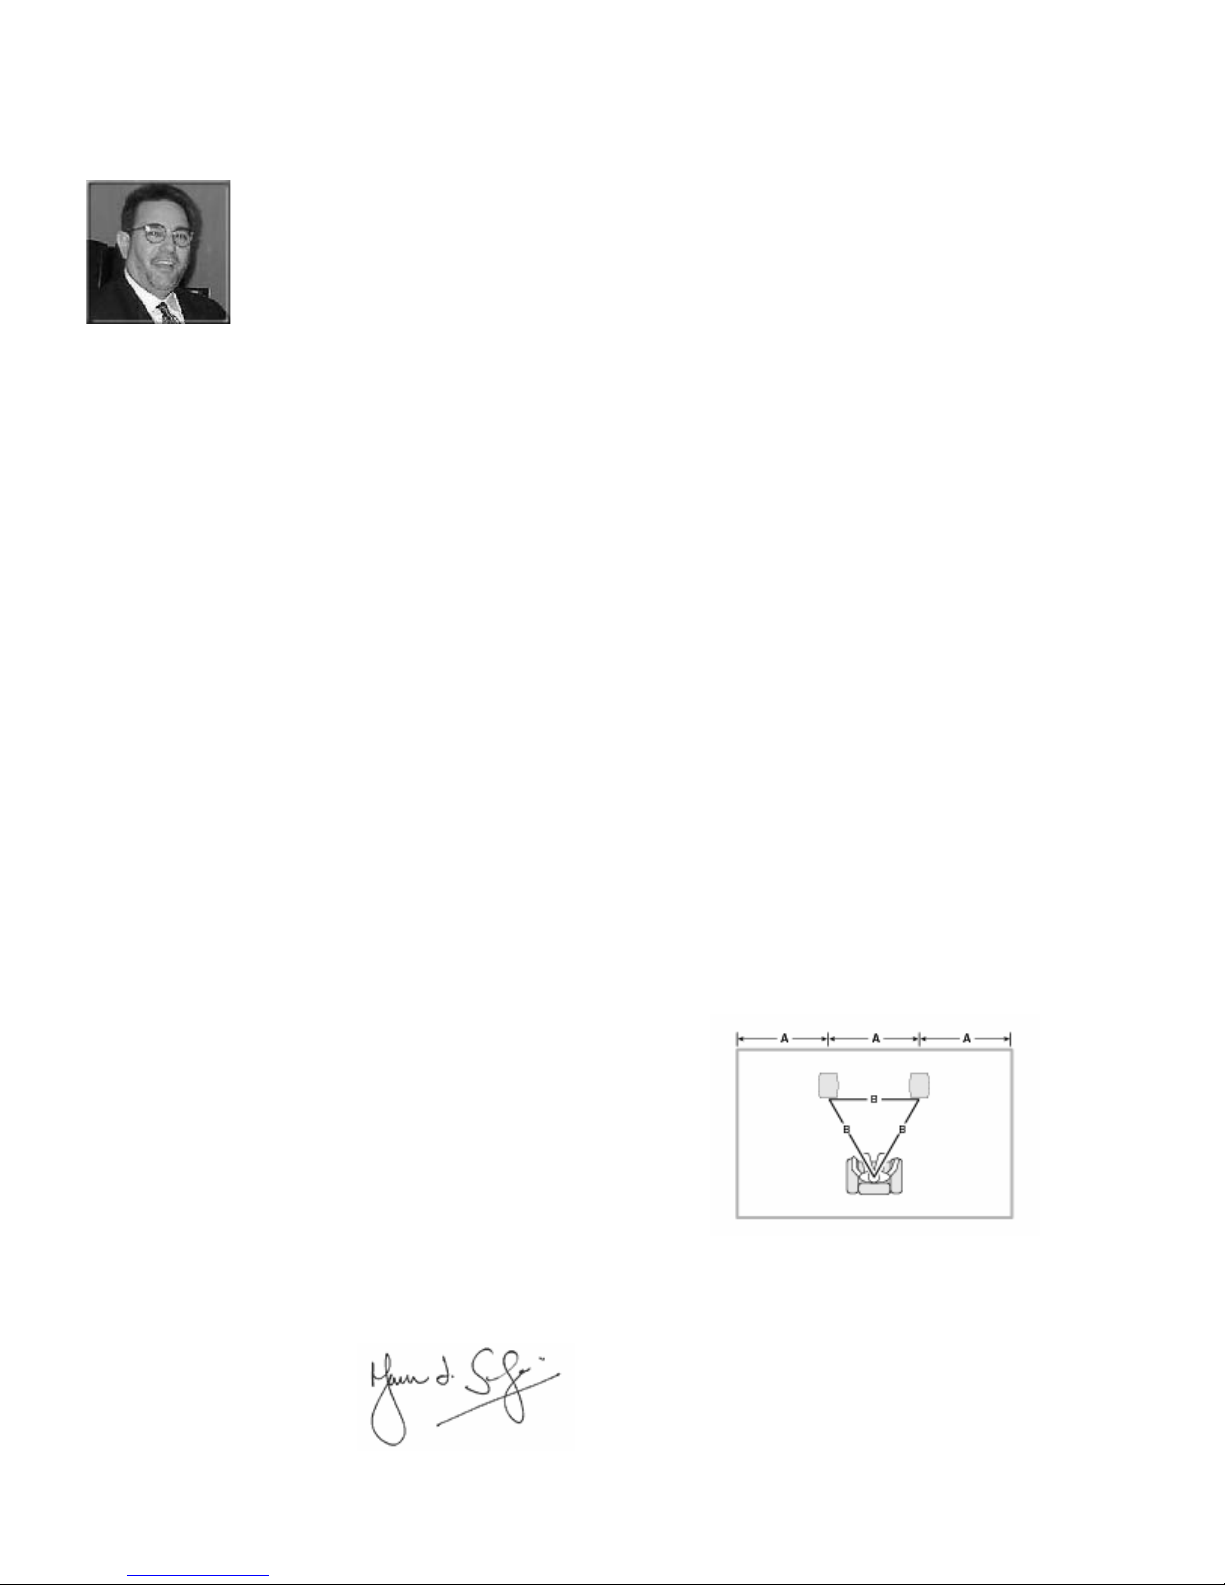
Use the "Rule of Thirds" whenever possible as a
starting guide. This suggests that the best placement for your Left speaker is approximately 1/3 of
the way along the wall behind your speakers.
Similarly, the best place for the Right speaker is
usually 2/3 of the way across the same wall.
Whatever distance you finally select, use a tape
measure to make sure that each speaker is placed
at the same distance from the back wall. With
that same tape measure, make sure the speakerto-listening/viewing position is the same for each
speaker as well. If there's a conflict here (as
would happen with an irregular wall behind the
speakers), we suggest that you equalize the distance between the front of the speakers and your
favorite listening/viewing position. If that places
one speaker closer to the wall behind it than the
other, don't be too concerned.
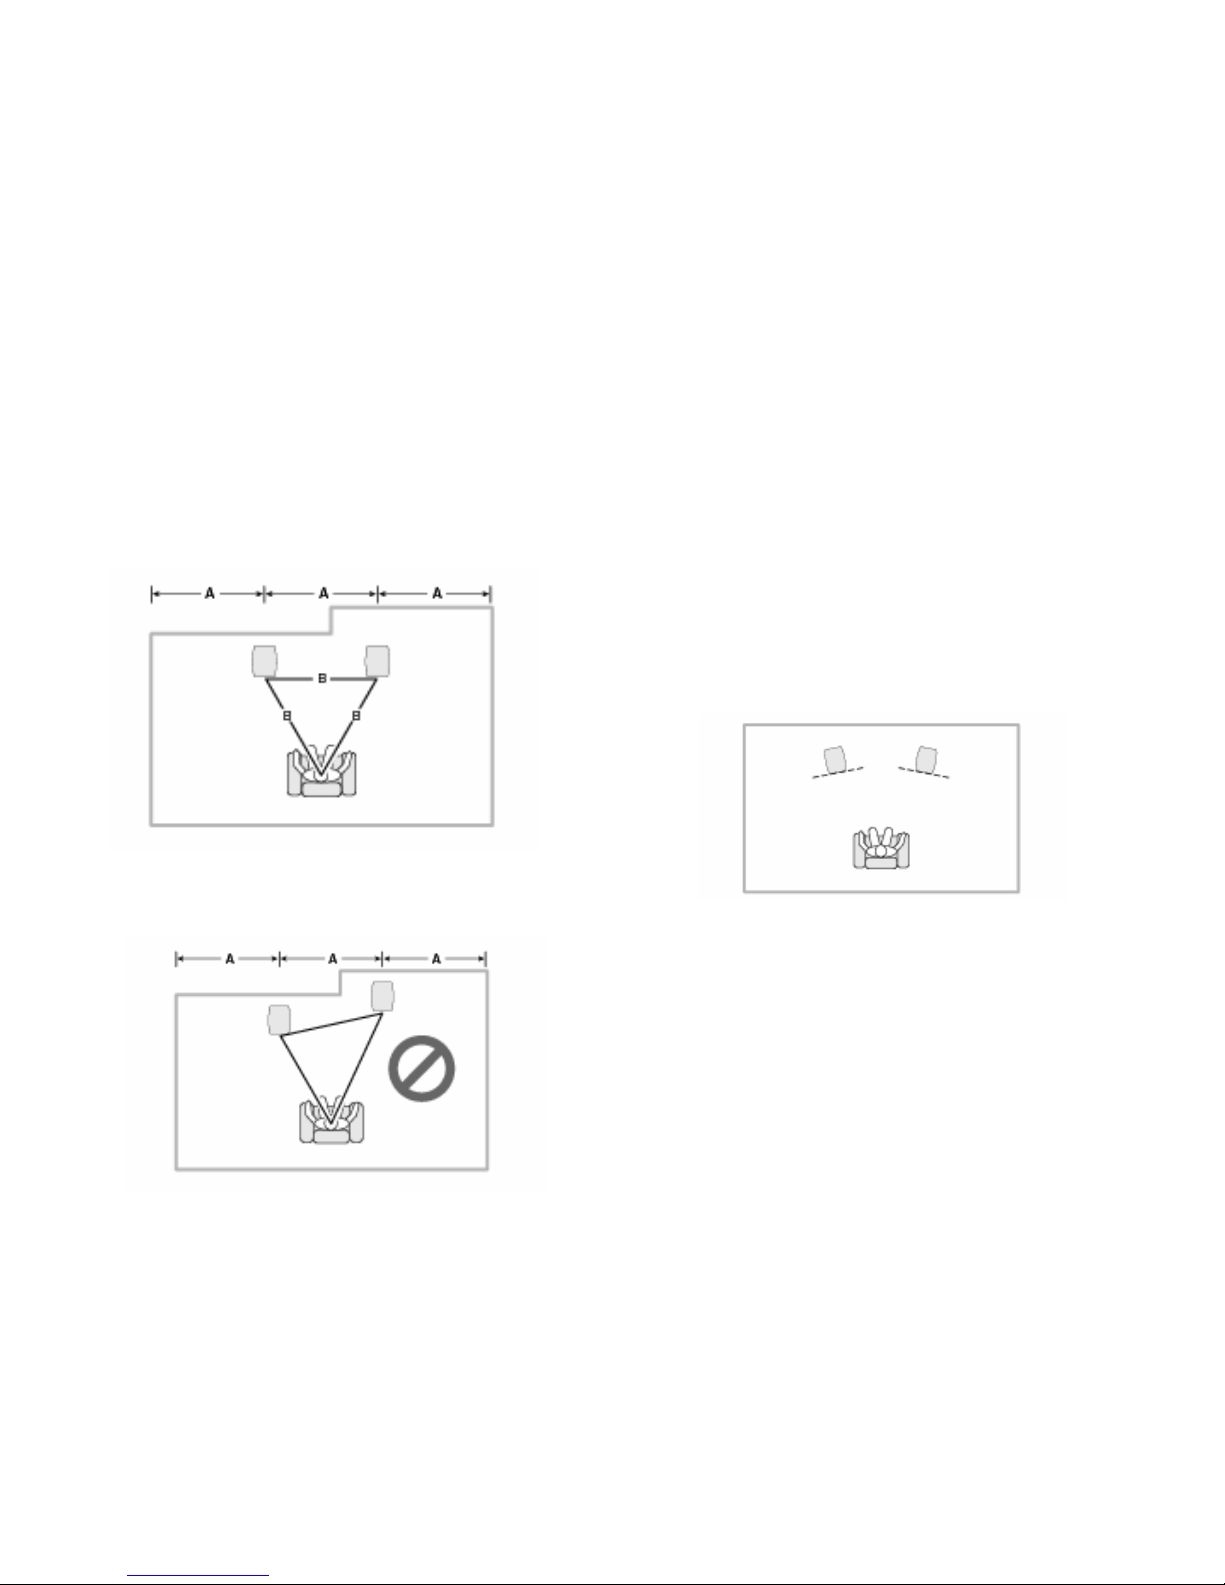
In other words, this…
Is generally preferable to this…
Remember that the "Rule of Thirds" is a basic
guideline only. Some acousticians recommend
placing the main (Left and Right) speakers so that
they form an equilateral triangle with the prime
listening/viewing position. It's worth trying for
this ideal, but don't get overly concerned if your
room doesn't allow this precision.
Side walls have a major impact on the sound you
hear. Ideally, you should not place your main
speakers close to them. Remember that the Rule
of Thirds" gives you a good starting position, but
you should feel free to experiment. Ideally, try
not to place your main speakers so they're ex-
actly the same distance from the closest side
walls. A bit of asymmetry here is actually prefer-
able. Symmetrical placement generally results in
larger standing waves in the room that reinforce
certain frequencies and diminish others. This,
obviously, is not a good idea. Follow the same
guideline with the Right speaker. When you take
the time to place your speakers properly, you'll
realize better "imaging" (the apparent lateral
placement of individual instruments or voices),
and more depth or "layering". You'll hear those
advantages because you'll be avoiding the aural
confusion caused by so-called "first reflections"
that complicate our perceptions when speakers
are too close to a wall's large, flat, reflecting surface.
2.2 Should you “toe-in” your speakers?
Some people like to "toe-in" their main speakers
to get better performance. This simply means
aiming both Left and Right speakers so that they
point towards the prime listening/viewing position rather than straight ahead. This is how
many people aim their speakers. "Toe-in" can
improve imaging and add a sense of spaciousness to the sound. In addition to imaging improvements, toe-in can also change your
speaker's tonal balance (or timbre). For that reason, you may want to play with toe-in to get the
most out of your speakers. Some time experimenting here can yield a better match to your
room's acoustic properties, provide a clearer,
more precise center channel speaker, or just better suit your own listening preferences. Enjoy!
2.3 Center Channel Speaker Placement
Place your center-channel speaker between your
Left and Right speakers as close to your TV
 Loading...