


1
NVR USER MANUAL
Version 3.0

2
Contents
1.Menu Operation........................................................................................ 5
1.1 Local Operation Guide.................................................................. 5
2. Start/ Shutdown System(click Start on the main menu).....................5
2.1 Local Menu-Start setting (Power Off, Reboot, Login and
Logout(admin), User Guide, Device Time and Volume)............ 5
3. Preview.....................................................................................................8
4. IP Channel Setting................................................................................... 8
4.1 Add IPC Automatically................................................................. 8
4.2 Add IPC Manually.........................................................................9
4.3 Channel Parameters Modification...............................................10
4.4 Modify IPC Parameters............................................................... 11
4.5 Delete IPC....................................................................................12
5. System Configuration Setting................................................................13
5.1 Device Parameters Setting...........................................................13
5.2 Channel Parameters Setting.................................................................13
5.2.1 Display Setting................................................................. 13
5.2.2 Video Parameters..............................................................14
5.2.3 Schedule Record...............................................................15
5.2.4 Motion Detection
(Note: Fore-end IP Camera must
support motion detection)......................................................17
5.2.5 Video lost..........................................................................19

3
5.2.6 Tampering Alarm
(Note:Fore-end IP Camera must
support tampering alarm)...................................................... 20
5.2.7 Video Mask Setting..........................................................22
5.3 Network parameters setting.........................................................22
5.3.1 Network Setting................................................................23
5.3.2 DDNS Setting...................................................................26
5.3.3 NTP Setting...................................................................... 26
5.3.4 Email Setting.................................................................... 27
5.4 Alarm&Exception........................................................................28
5.4.1 Alarm Input.......................................................................28
5.4.2 Alarm output.....................................................................29
5.4.3 Exception..........................................................................30
5.5 Account Setting........................................................................... 30
5.5.1 User information Setting...............................................31
5.5.2 User Online Checking...................................................... 31
5.6 System Administration................................................................ 32
5.6.1 Device Log....................................................................... 32
5.6.2 Stream Info....................................................................... 33
5.6.3 HDD Setting..................................................................... 33
5.6.4 System Update..................................................................34
5.6.5 Auto Reboot......................................................................35
5.6.6 Recovery Configuration................................................... 35

4
6. PTZ control............................................................................................36
7. Record.................................................................................................... 37
8. Manual Snapshot................................................................................... 37
9. Video Playback......................................................................................37
10. Display Setting.....................................................................................38
11.Video Backup....................................................................................... 39
12. Alarm Setting.......................................................................................40
13. File Manager........................................................................................41
14. Image Setting....................................................................................... 41
15.Screen Aspect Ratio/Segmentation...................................................... 42

5
1.Menu Operation
1.1 Local Operation Guide
Click right mouse button in the local preview screen,as shown in the
below picture
:
2. Start/ Shutdown System
(click Start on the main menu)
2.1 Local Menu-Start setting (Power Off, Reboot, Login and
Logout(admin), User Guide, Device Time and Volume)

6
1)Power Off: Switch on the power source correctly, press the button and
start up the device
2)Login:Click Login, then enter to NVR login interface, you can input you
own user name , the default user is admin, the default password is empty.
3)User Guide:After login NVR interface, it will automatically enter into
User guide interface, the interface includes four steps, respectively as below
picture:
①
Language: choose usage language, the default language for English,
or click the right key to choose other languages, then click Next to save and
enter into next step, as shown in the below picture:

7
②
Display setting: Select format and set the resolution, the default format
for PAL, resolution 1280×1024 (60HZ), or click the right key to choose other
format and resolution (The resolution must suitable for the displayer ), then
click Next to save and enter into next step, as shown in the below picture:
③
Network setting:
IP: Input corresponding number to set the IP address
Subnet mask: Input corresponding IP subnet mask
Gateway address: Input corresponding gateway address
Click Next to save and login NVR interface directly, as shown in the below
picture:

8
3. Preview
Start up the devices, after successfully login, the following interface
will appear:
4. IP Channel Setting
4.1 Add IPC Automatically
1) At the interface of "IP Channel Setting" , click the Search button, the
Address of IPC that connected to the NVR will appear, as shown below. And
you can also do some basic parameters setting.

9
2) Click "√" in front of the IP camera needed, and the configuration of IP
camera will add to the right channel automatically, then click Save button, as
shown in the below picture:
(Note:Click "ALL" will add all the IPC Address that appear to the right channel window)
4.2 Add IPC Manually
You can also manually add the IP Cameras if you already known the
address, shown in the below picture.

10
1) Select the channel and click "√" in front of "Enable".
2) Select relevant protocol.
3) Input the address of IP Camera.
4) Input the port number.
5) Select the proper Stream Type.
6) Select Network Type.
7) Select the Play Mode.
8) Input the user name of IP Camera.
9) Input the IPC password of IP Camera.
10) Click Save button finally.
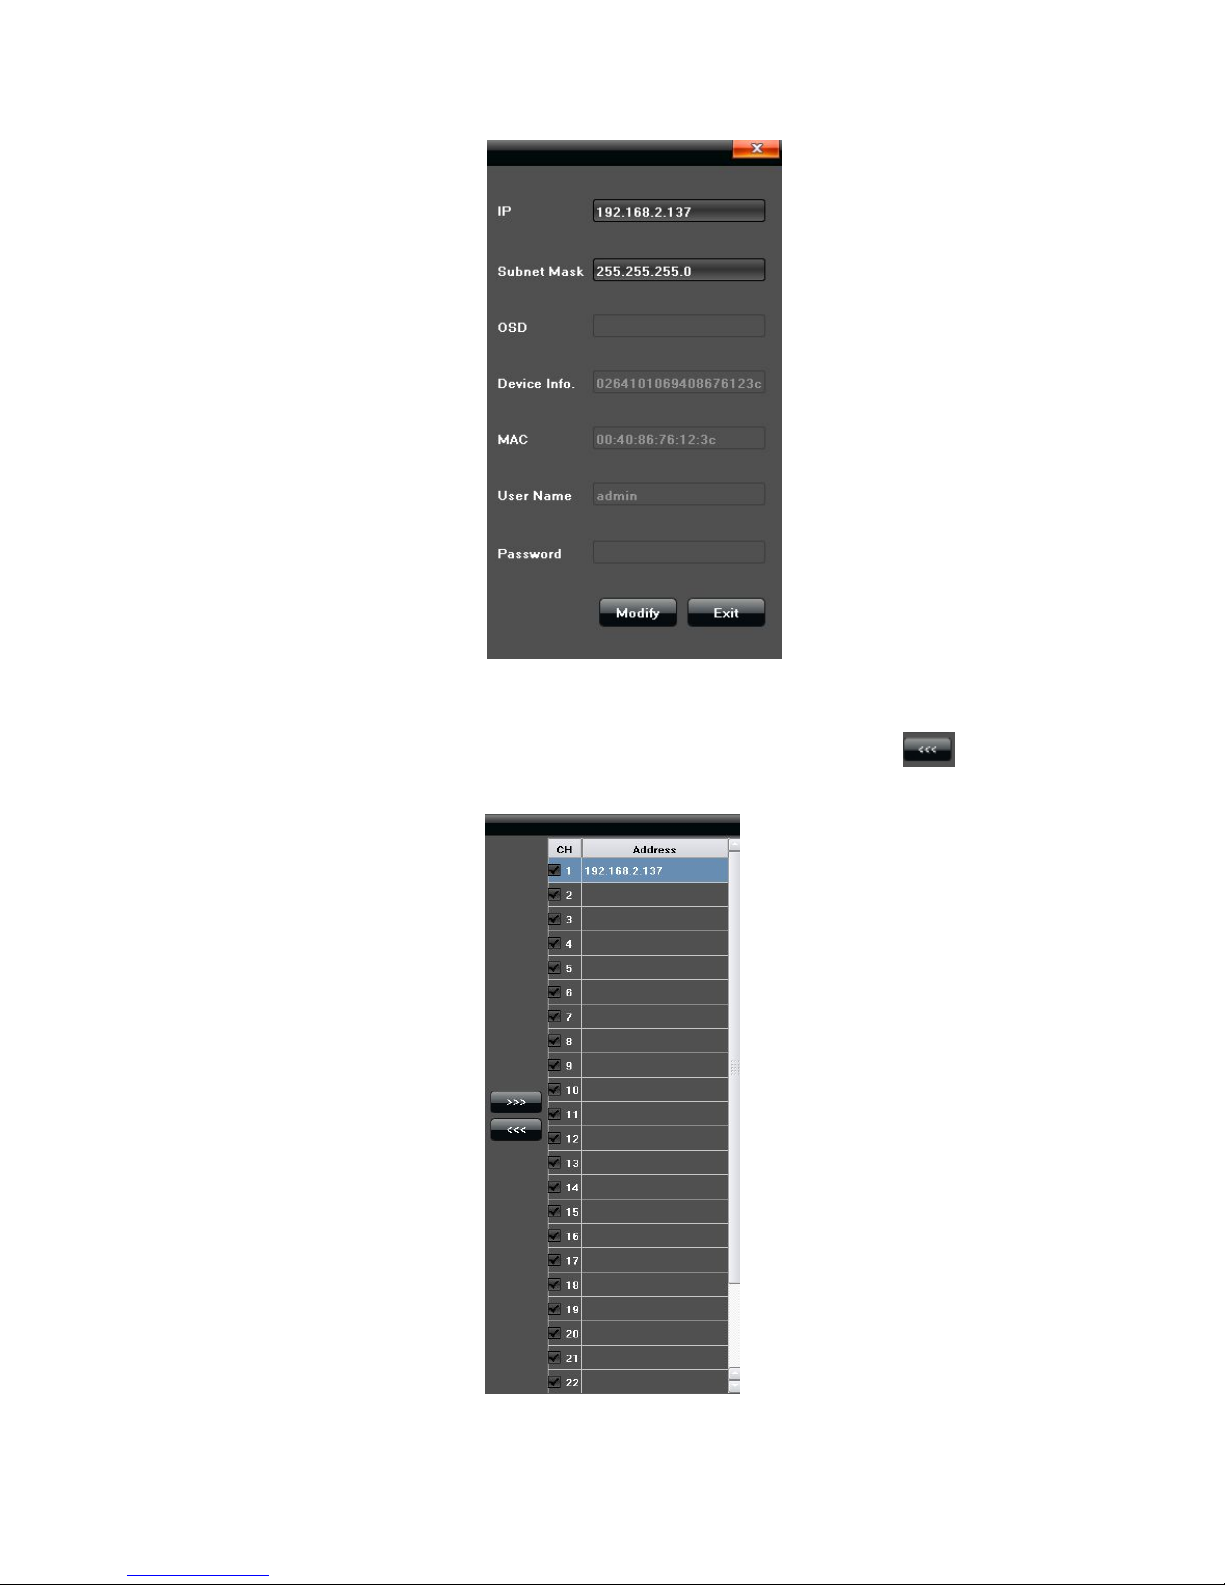
4.3 Channel Parameters Modification
Click the channel parameters which needed to modify on the "Channel
menu", then input relevant parameters, click Save button, as shown in the
below picture:

11
1)Enable: Select the relevant channel, check "Enable"
2)Protocol: Onvif Standard protocol/I8 Private protocol/I9 Private
protocol/RTSP protocol for selection
3)Address:Edit and modify the IP address manually
4)Port:Edit and set the relevant port number
5)Stream Type: Select "Main Stream+Sub Stream" or "Sub Stream"
6)Network type:Select“TCP”or“UDP”
7)User:Input the user name
8)Password:Fill the password in the password field
Note: Address setting of IPC please according to NIC Select.
4.4 Modify IPC Parameters
Double-click the channel parameters which needed to modify on the"
Channel menu", then fill in the relevant parameters, click "Modify", as shown in
the below picture:
12
4.5 Delete IPC
Mark the IPC parameters which needed to delete, then click" ", as
shown in the below picture:

13
5. System Configuration Setting
5.1 Device Parameters Setting
Click Device button, then view and modify the relevant basic information,
as shown in the below picture:
1)Device Info.:Check and modify the basic information
2)System Version:Shows the system version
3)PTZ Setting:Modify the access dome cameras parameters
4)DST Setting: Enable and set DST parameters
5)QR Code:By two-dimensional code scanning mobile client can access
the device
5.2 Channel Parameters Setting
5.2.1 Display Setting
Select the relevant channel and modify the parameters on the "Display
Setting" interface, as shown in the below picture:

14
1)Channel:Modify the specified channel name
2)Local Camera Name:Modify the input devices name for specified
channel
3)Time Format:Select time display mode for the access devices
4)Date Format:Select date display mode for the access devices
5)OSD Position:Set different display position for the access devices
name and display-time
6)Image Setting:Adjust the access devices brightness and contrast
(
Note:Except 1), other options only efficient for privacy protocol equipments)
5.2.2 Video Parameters
Modify the relevant channel video parameters on the "Video Parameters"
interface,as shown in the below picture:

15
1)Channel:Select the channel number
2)Encoding Type: Main Stream / Sub Stream for selection
3)Stream Type:Video&Audio / Video optional
4)Resolution:Several kinds of resolution which IPC supported
5)Bitrate Type: CBR/VBR optional
6)Bitrate: Select relevant bit rate which needed
7) Frame Rate: Select different frame rate from the drop-down list,
"FULL"default.
8)Video quality: Different level video quality optional, "Highest" default.
9)I Frame Interval:You can set the master / sub stream switching screen
the length of time needed,“25”default.
(
Note: " Video setting" will be directly modify the IP cameras parameters, and
only valid for private protocol linkage channel
)
5.2.3 Schedule Record
Modify each video channel parameters on the "Schedule Record"
interface,as shown in the below picture:

16
5.2.3.1 Video Precise Backup
In the video program list, hold down the left mouse button and drag the
mouse to the selected area, double-click the left mouse button in the dialog
box that can be accurately set the time.
(Note:The check box in front of "All Day Recording" can not mark )
5.2.3.2 Record time
Click Setting button to do period time recording on the "Schedule "
interface, as shown in the below picture:

17
(Note:It can set 8 periods video recording mode during one day)
5.2.3.3 Advanced Record
Set relevant advanced recording parameters for each channel on the "
Advance" interface, as shown in the below picture:
5.2.4 Motion Detection(Note:Fore-end IP Camera must support motion
detection)
Modify each video channel parameters on the "Motion" interface,as shown
in the below picture:

18
1)Click "√" in front of "Enable Motion Detection"
2)Set motion areas, as shown in the below picture:
3)Adjust sensitivity volume

19
4)Set arm schedule
5) Select trigger mode, as shown in the below picture:
5.2.5 Video lost
Modify each video channel parameters on the "Video lost" interface,as
shown in the below picture:

20
1)Click "√" in front of "Enable Video Lost"
2)Set arm schedule
3)Select trigger mode, as shown in the below picture:
5.2.6 Tampering Alarm
(Note:Fore-end IP Camera must support
tampering alarm)
Modify each video channel parameters on the "Tampering Alarm"
interface,as shown in the below picture:

21
1)Click "√" in front of "Enable Video Tampering"
2)Adjust sensitivity volume
3)Area setting, as shown in the below picture:
4)Set arm schedule
5)Select trigger mode, as shown in the below picture:

22
5.2.7 Video Mask Setting
Modify each video channel parameters on the "Video Mask" interface,as
shown in the below picture:
1)Click "√" in front of "Enable Video Mask"
2)Set mask areas, as shown in the below picture:
5.3 Network parameters setting
Set the relevant parameters according to the need on the "Network"

23
interface, as shown in the below picture.
5.3.1 Network Setting
Modify the basic network parameters on the "Network setting" interface,
as shown in the below picture:

24
1)NIC Select : This equipment has double NIC. The network segment of
POE port is the same with NIC2.
(1)Select NIC1,as shown in the below picture:
(2)Select NIC2,as shown in the below picture:
2)IP:Input the relevant IP address number
3)DHCP:Click "√" in front of "DHCP", it will acquire a valid IP automatically
25
according to the router DHCP
4)Subnet Mask: Input relevant IP subnet mask number
5)Default Gateway: Input relevant default gateway
6)MAC:Display present MAC address
7) Remote Port: Input relevant remote port number
8)HTTP Port:Input relevant port number(80 default
)
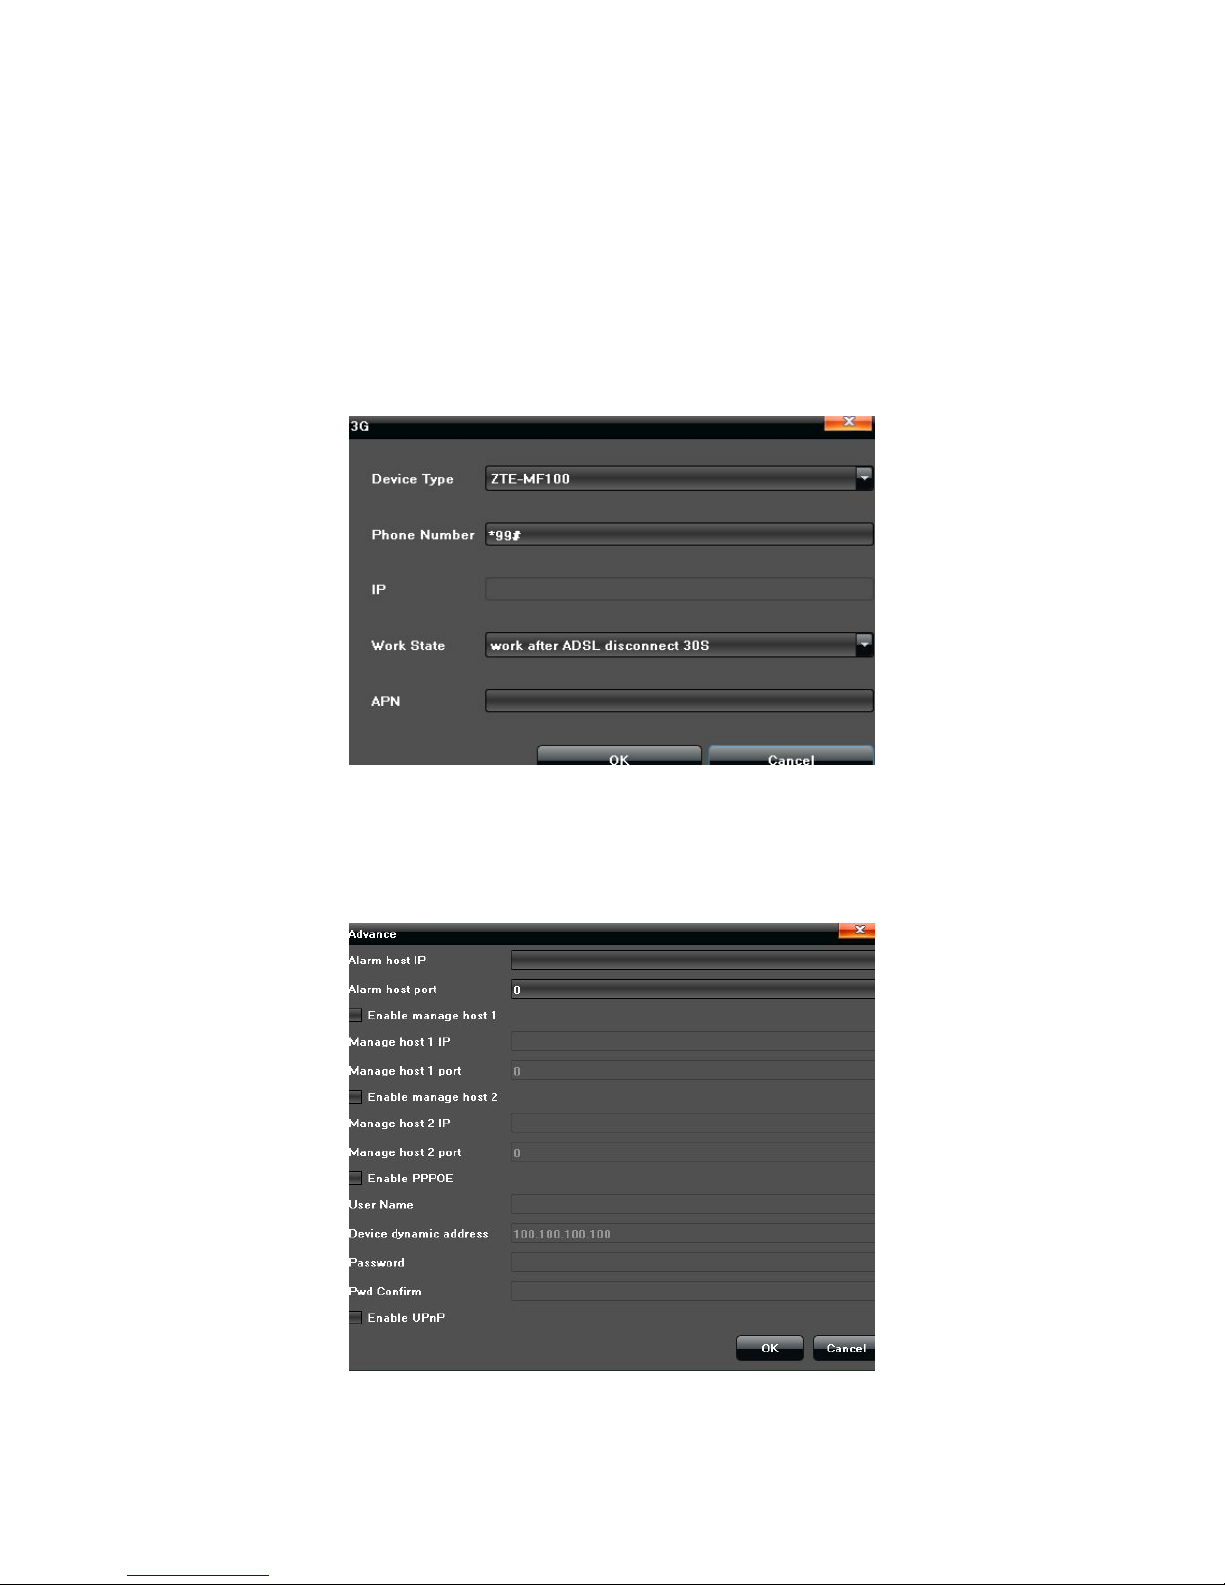
9)3G:Click "√" in front of "Enable 3G" after link 3G external attachment,
relate device type, edit relevant phone number, and select work state, click
"OK" after setting, as shown in the bellow picture:
5.3.1.1 Advanced setting
Set advanced configuration parameters on the "Advance" interface, as
shown in the below picture:
1) Administer main machine to realize NVR register to the servers
automatically

26
2) Enable PPPOE function to achieve NVR dialing
3) Click "√" in front of " Enable UPnP",and setup HTTP port and TCP port
it can match successfully, notice the port number can not conflict with other
devices.
5.3.2 DDNS Setting
Through the DDNS server, there should be a PC with fixed IP address on
the internet, and run this DDNS server on it.
1) Select DDNS server type(There are DnsDynamic, Dyndns, PeanutHull
and No-IP and 3322 for selection)
2) Input the server name“For example:members.3322.org”
3) Input the port
4) Input the user name
5) Input the password
6) Confirm the password
7) Input the standby domain name
5.3.3 NTP Setting

27
1)Server Address: Input the IP of the NTP server
2)NTP Port: This SNTP only supports TCP transmission. It is default to
123
3)Update Frequency:Input the time interval needed to be adjusted
4)Select Time Zone:Select the time zone of different places
5)GMT: Do fine adjustment of time
5.3.4 Email Setting
Set up alarm linkage E-mail on the " Email Setting" interface,as shown in
the below picture:

28
5.4 Alarm&Exception
Set the relevant parameters according to the need on the "Alarm" interface,
as shown in the below picture:
5.4.1 Alarm Input
Set alarm input parameters on the "Alarm Input" interface, as shown in the
below picture:

29
1)Enable alarm processing
2)Set arm schedule
3)Select trigger mode, as shown in the below picture:
5.4.2 Alarm output
Set alarm output parameters on the "Alarm Output" interface, as shown in
the below picture:
1)Set alarm output delay
2)Set alarm schedule

30
5.4.3 Exception
Set abnormality on the "Exception" interface, as shown in the below
picture:
5.5 Account Setting
Set the relevant parameters according to the "Account" interface, as
shown in the below picture:

31
5.5.1 User information Setting
Modify /Add/Delete the user or distribute user permission on the " Account
Setting" interface, as shown in the below picture:
5.5.2 User Online Checking
Check the current user connection status on the "User Online" interface,
as shown on the below picture:

32
5.6 System Administration
Set the relevant parameters according to the "System" interface, as shown
in the below picture.
5.6.1 Device Log
Click "Device Log" on the "System" interface, check device log according
to the video type and date time, as shown in the below picture:

33
1)Main Type of Log: All Type/ Alarm/ Exception/ Operation for selection
2)Sub Type: According to the different main types, have corresponding
sub type for selection
3)From: Select a start time for log query
4)To: Select a end time for log query
5)Export: Export and display all query results
5.6.2 Stream Info
View the stream information of each current channel on the "Stream Info."
interface, as shown in the below picture:
5.6.3 HDD Setting
Click “HDD Setting”, check HDD capacity / free space, and do format by
click “√” in front of HDD No. , as shown in the below picture:

34
5.6.4 System Update
Browsing the upgrade file on the “Update”, click “Upgrade” to do software
Update.

35
5.6.5 Auto Reboot
There are Disable/ Every Day/ Every week/ Once options for selection, the
device will restart according to the maintenance mode.
5.6.6 Recovery Configuration
Click “Export Configuration”/“Import Configuration”/“Default” to make
device do corresponding operation.

36
6. PTZ control
1)"Preset” setting: Rotate the camera to appropriate angle and position
by PTZ directional buttons, select a preset number in the drop-down list, and
click " "button.
Call preset:Select a needed preset number in the drop-down list, and
click" " button.
2)"Cruise" setting:select a cruise number in the drop-down list, and
click " "button, the following interface will pop-up:
On the "Cruise" interface ,Set preset, residence time, cruise speed, and
click "Add" to add new cruise preset( support multiple presets) , click"Delete" to
clear the preset.
Call cruise: Select a needed cruise number in the drop-down list, and
click" " button.
Cruise delete: Select a needed cruise number in the drop-down list,and
click " delete" to clear the cruise.

37
3)"Track" setting: Select a track number in the drop-down list, click track
start buttons to make PTZ operation, and click again to finish, track memory
operate successfully.
Call track: Select a needed track number in the drop-down list, and
click" " button.
7. Record
Manual recording have highest priority, whatever state of each channel at
present,click "Manual" ,then all of the corresponding channel will do ordinary
record,as shown in the below picture:
8. Manual Snapshot
Click Capture button in the main menu, then click in the lower right
corner of the screen to do snapshot on the preview channel, and check the
image picture in the file manager.
9. Video Playback
Click Playback button in the main menu to enter the playback interface,
shown as the picture below.

38
1) Channel Select: Select the playback channel wanted.
2) Date Select: Select the date of playback wanted.
3) Playback interface: You can use the toolbar in the bottom part of
Playback interface to control playing progress, as shown in the table below.
Button
Operation
Button
Operation
Button
Operation
Backward
Play
Stop
Slow Forward
Fast Forward
FramePlay
Snapshot
Backup
Full Screen
Volume
10. Display Setting
Click Display Setting button in the main menu, you will enter the setting
interface, shown as the below picture. Then you can do the following setting:
1) Language:Setting the display language.
2) AutoLogout:Setting the time to logout with no operation.
3) Display
:
Adjust the Brightness, Contrast, Saturation, Hue and

39
Transparency of the display parameters.
4) Resolution: Selecting the proper resolution needed.
5) Rotation Interval: Adjust the interval time needed, click “√” in front of
“ Enable SEQ”, and click Setting button to select the channel. After that, when
you are in the single screen or less than the maximum number of channel, the
video of the selected channel will switch from one channel to the next.
11.Video Backup
Click Backup button in the main menu, you will enter the backup interface,
which shown as the below picture. And do backup according to the following
steps:
1) Click Refresh button after an external storage device plugged into the
USB port normally.
2) Channel Selecting: Click all to select the whole channel or click the
channel NO. Needed.
3) Time Setting: Adjust the From option to select the start time and the end
time in the To option.
4) File Type Selecting: Choose the i8 or AVI.
5) Click the Start button to start the backup process. It is recommended
that to click Unmount USB after finishing.

40
12. Alarm Setting
Click Alarm button in the main menu, you can look up the alarm
information, which shown as the following picture.

41
13. File Manager
Click File Manager button in the main menu, you will enter the File
Manager interface ,shown as the following picture. In which, you can do some
backup using an external storage device.
14. Image Setting
Right click at the preview interface, and click the Image Setting button.
Then you can adjust the video image Brightness,Contrast,Saturation and Hue,
which shown as the below picture:

42
15. Screen Aspect Ratio/Segmentation
The default Screen Aspect Ratio of the device is "4:3". And according to
the NVR version there are 4 screen/6 screen/8 screen/9 screen/ 16 screen/20
screen/ 25 screen for selection.
 Loading...