

Page 1
AUTOTECH
Installation Instructions
Part Number: 10.425.1526K
Description: ClubSport® Lightweight Front Swaybar for VW A4 Chassis
Notes: The ClubSport® adjustable front swaybar directly replaces the factory unit using
factory mounting points. We include new polyurethane bushings for the inner pivot mounts
of the swaybar. The original outer links are to be re-used. The new 2-position mounting
brackets enable simple and quick roll stiffness adjustment - unique in the market.
Because it is neccessary to support, detach, and then lower the front subframe to gain
access to the swaybar, this installation is best performed on a vehicle hoist/lift, but can also
be performed (with some difficulty) on jackstands.
Procedure:
1) Raise the vehicle. Make sure the the front subframe and its attachment points are not
obstructed by the hoist or jackstands.
2) Position a height adjustable support stand beneath the center of the subframe to the rear
of the engine, around where the steering rack attaches. Later, this will be used to gently
lower the subframe away from the chassis.
Phone 949.240.4000 Fax 949.240.045032240-E Paseo Adelanto, San Juan Capistrano, CA 92675
Page 2

3) Removal of the insulation tray:
On gas-engined models, you do not need to remove the tray (that covers the gap between
the front spoiler and the engine). You will need to detach only the two rear-most screws
(Torx® T20) of the left and right side plastic covers where they attach to the subframe.
On TDI models, it is best to remove the center tray entirely.
4) Locate the steering rack. Using a 13mm wrench, remove the four bolts ( 15 ft lb + 90°) that
go up through the subframe and into the steering rack.
5) Using 16mm ( 30 ft lb + 90°) and 13mm ( 15 ft lb + 90°) wrenches, remove the rear support
brace that connects the subframe and the transmission housing.
6) Using a 16mm wrench, remove the nuts ( 22 ft lb ) that hold the swaybar end-links to the
swaybar ends. (note the location on the link on the outside of the swaybar and also the
direction of the bolt)
7) Using a 16mm socket, remove the bolts that hold the end-link to the lower control arm. Set
the end-link aside to be used later in step 5 and 6 of the lower mount instructions.
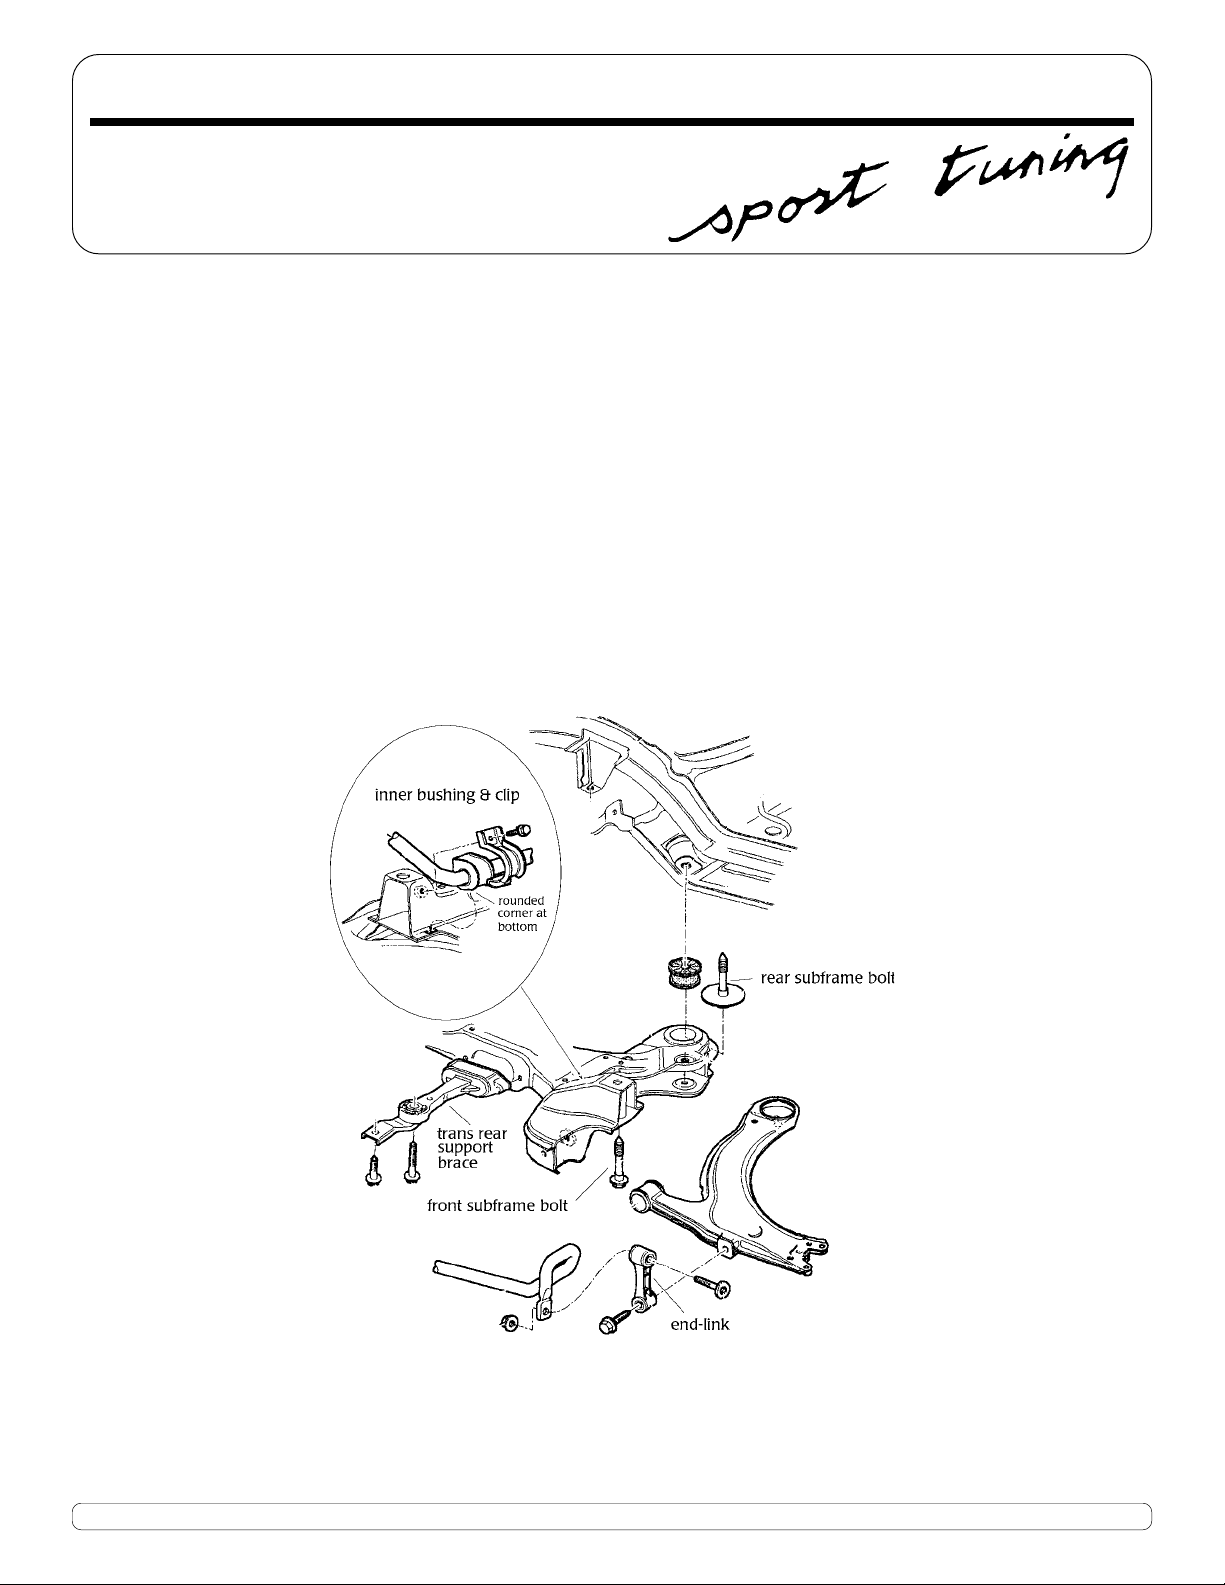
8) Using a 13mm socket, remove the bolts ( 18 ft lb) that hold the inboard swaybar clips
to the subframe. Remove the swaybar clips and set aside.
9) Lowering the subframe:
There are four bolts retaining the subframe to the chassis that must be removed. With
the support stand in place, use an 18mm socket wrench to remove the four subframe
bolts. All four bolts ( 74 ft lb + 90°) run vertically through the subframe and up into the
car's unibody. The front bolts are accessed through an inboard notch in the lower
control arms, just behind the forward pivot points. The rear bolts run behind the rear
pivot points of the arms and have a large diameter washer.
Once unbolted, slowly lower the subframe away from the unibody using the adjustable
support stand. While doing so, make sure that the steering rack comes free from its
mounts. The rack should stay up while the subframe lowers. Continue to lower the
subframe until it is about 4 inches below its original position.
10) Remove the original swaybar from the car. This is most easily achieved by lifting the bar
upward slightly to get the inboard part of the bar up and over the subframe. With the bar
lifted slightly, rotate the bar in order to "unhook" the ends of the bar from each axle, one
at a time. Then, pull the bar out towards the front of the car, going between the subframe
and the body, passing underneath the engine.
11) After applying a layer of waterproof grease to the inside surfaces of the inboard bushings,
install them on the bar with the flat area facing forward (against the subframe) and the
rounded-off corner at the bottom (near the base of the clip) as shown:
< front
rounded off corner at bottom
12) Installation of the AUTOTECH swaybar is the reversal of the removal process just described.
After installing the Autotech swaybar you are ready to begin installation of the adjustable
mounting bracket.
Phone 949.240.4000 Fax 949.240.045032240-E Paseo Adelanto, San Juan Capistrano, CA 92675
Page 3

Bracket Installation:
The supplied brackets are designed to give an adjustment to the already larger front swaybar.
In order to do this they must be mounted onto the lower control arm where the end-link
meets the control arm. The new hole for the lower bolt of the end-link will now be to the
inside of the original and also slightly lower on the control arm, this change in position also
moves the end-link inboard on the control arm (to the inside of the swaybar), thus changing
the fulcrum point and creating a stiffer setting for the front swaybar. The lower bracket
can be left in place with either hole being used, giving you the ability to choose which position
best suits your driving style.
Procedure:
1) Slide the bracket over the lower contol arm with the bends towards the center of the car.
Between the bracket and the control arm you will need to position .120 thick washer on the
top and bottom side as shown in the drawing.
2) The plated 3/4" sleeve will fit up inside of the control arm through the larger hole, then slide
it into position so that all the holes line up.
3) Insert the bolt (M8x1.25x50) from the top through the entire assembly. Starting with the
bracket and then through the .120 washer, next is the control arm and then the sleeve,
through the bottom side of the control and the other .120 washer and finally out the bottom
side of the bracket. The assembly is then tied together with the supplied nylon lock nut.
4) The supplied M10x1.50x20 bolt will go through the front side of the bracket and into the
original threads of the control arm where the end-link was originally positioned.
5) The supplied M10x1.50x45 bolt is now the lower end-link bolt to be used in the inner position
on the new adjustable bracket.
6) The top of the end-link can now be installed on the inside of the swaybar end, using the
factory hardware.
left side
Phone 949.240.4000 Fax 949.240.045032240-E Paseo Adelanto, San Juan Capistrano, CA 92675
 Loading...