

AUTOTECH 10.109.01.109 Installation Instructions Manual

AUTOTECH
Installation Instructions
Part Number: 10.109.01.109
Description: AUTOTECH Sport 270° Hydraulic Camshaft
Note: If the job seems to be beyond your abilities, we recommend that you refer this in-
stallation to a qualified mechanic. Please read through the instructions before starting
your installation to ensure that you have have the tools and understanding of the task.
Procedure for Golf 2 and Jetta 2 models only:
1. Remove the valve cover by removing the eight 10mm valve cover nuts and reinforcing
strips. Remove idle stabilizer and bracket (if your car has one) by removing the 10mm bolts
from the valve cover and manifold, and then taking off the hoses at the throttle body and
intake manifold. Lift off valve cover. Remove the retaining nut on the side of the camshaft
drive belt cover with a 6mm allen wrench and lift off the cover.
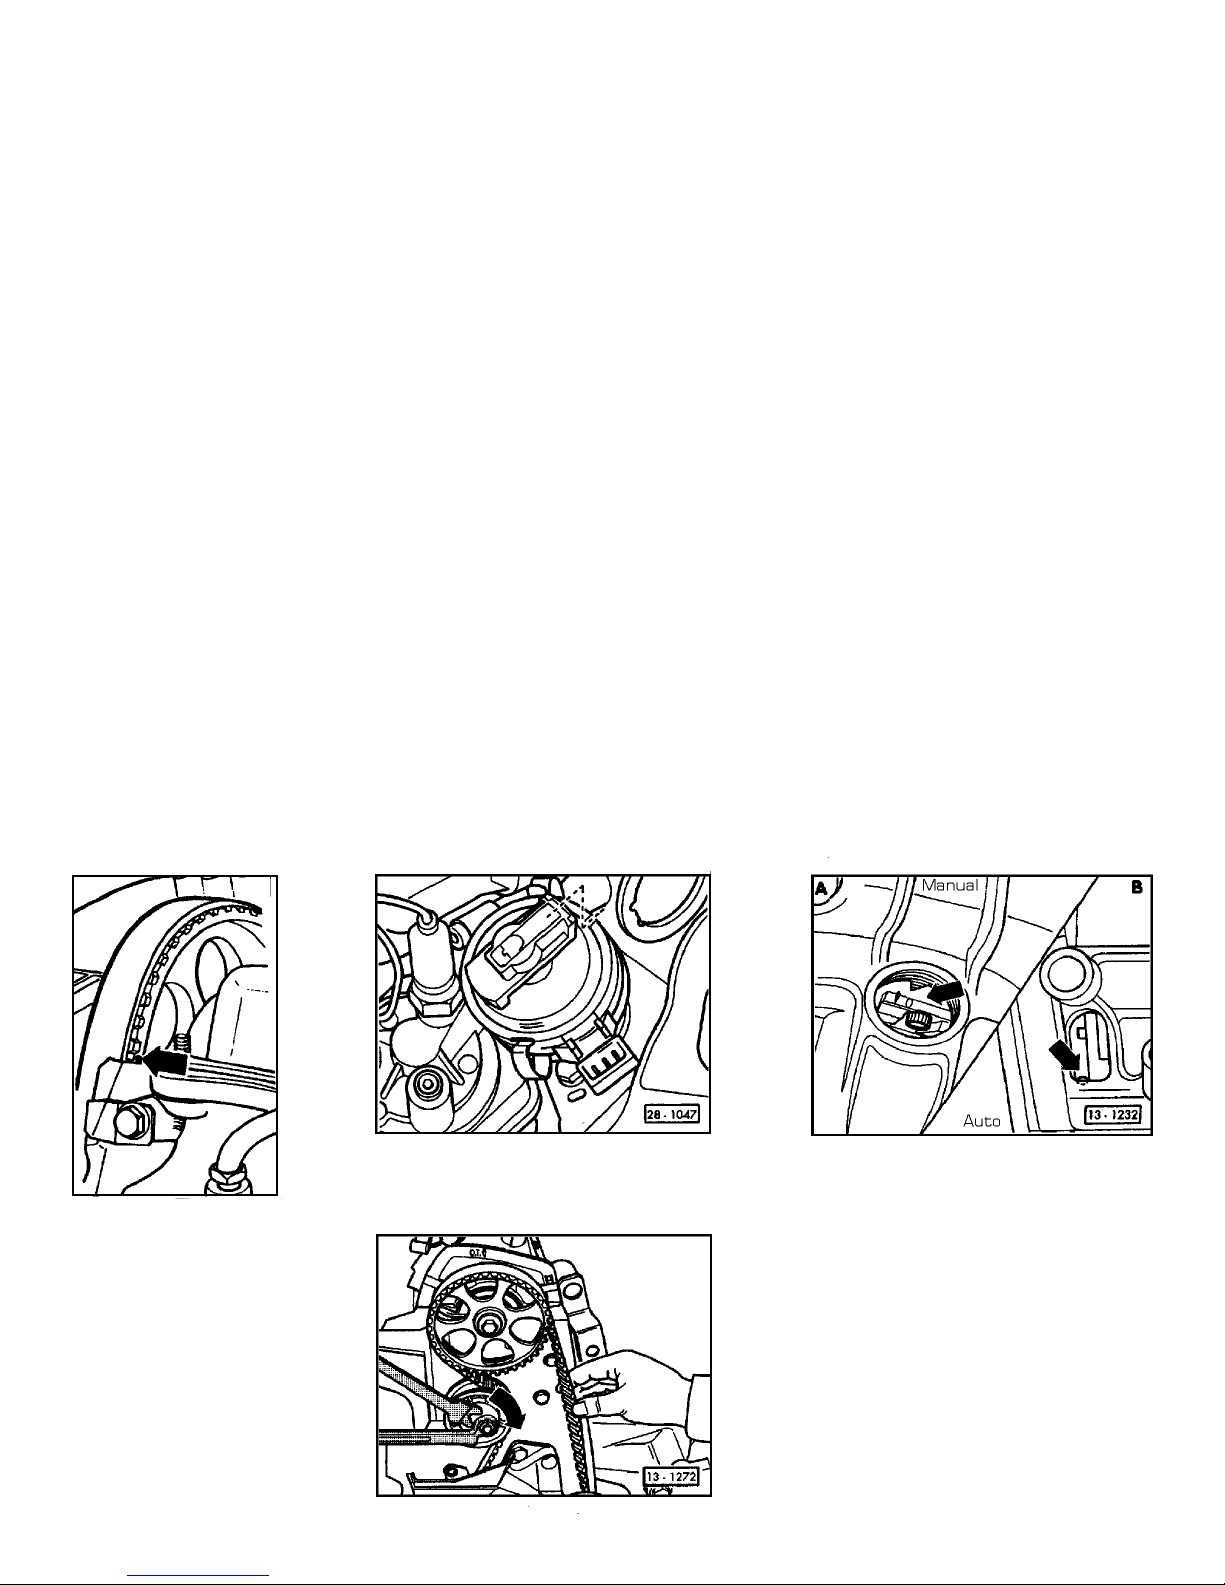
2. Move camshaft sprocket to cylinder number one TDC mark by turning crankshaft clock-
wise with a 19mm socket until the dot on the camshaft pulley lines up with the upper edge
of the camshaft drive belt inner cover (fig. 1). Check TDC by removing the distributor cap
and making sure the rotor lines up with the notch on the distributor (fig. 2), and that the
flywheel is at TDC (fig. 3). If these marks do not line up, you will need to continue to rotate
the crankshaft until they do.
3. Loosen belt tensioner with a 15mm open end wrench and slide off the camshaft drive
belt, while keeping the belt tension on the lower sprockets so that they don't move or slip.
If they do, you will probably have to re-align them in a procedure described later. By tying
the belt via a bungee or other cord to the hood or laying the belt towards the rear using a
weight (wrench etc...) to keep the belt tension, you can install the cam without having to re-
align all of the sprockets.
4. Remove bearing caps one and three, in that order. Take note of which end of each cap is
pointing towards you. Caution: The bearing caps are offset, and will break if re-installed
backwards and tightened down. Next, remove the nuts from bearing caps two and five a
little at a time and crosswise so that the spring tension is evenly relieved. Lift cam with
attached sprocket out of the head.
5. Loosen the camshaft sprocket bolt 1/2 to 3/4 turn and tap the sprocket loose using a
soft faced hammer. Remove the bolt completely and remove the sprocket, woodruff key, and
cam seal. Lightly coat the cam seal with oil and place on the new camshaft. Install the
woodruff key and sprocket onto the new camshaft and torque the cam sprocket mounting
bolt to 59 ft/lb.
Phone 949.240.4000 Fax 949.240.045032240-E Paseo Adelanto, San Juan Capistrano, CA 92675
6. Apply oil to the bearing surfaces, and a small amount of assembly lube to the lobes of
the new camshaft. Lay the camshaft in the head with the lobes for the number one cylin-
der facing up. Install bearing caps two and five, tightening down gradually and crosswise
until the camshaft is pushed completely into the bearing saddles. Install the remaining
bearing caps and torque all nuts to 15 ft/lb.
7. Check to see if the dot on the inside of the cam sprocket lines up with the upper edge
of the camshaft drive belt inner cover (fig. 1). If not, rotate cam slightly until it does.
8. Re-install the valve cover and reinforcing strips, tightening the nuts to 7 ft/lb.
9. Slide camshaft drive belt over cam sprocket.
10 . Using a special spanner wrench (AST P/N 10.012.86400 or equiv.), tighten the drive
belt by rotating the tension pulley in the direction of the arrow (fig. 4). The belt should feel
tight when twisted 90 degrees with the thumb and forefinger, halfway between the cam-
shaft and intermediate shaft pulleys. Tighten the pulley retaining nut to 33 ft/lb.
11. Caution! Before starting engine, turn crankshaft two complete revolutions and check
belt tension, camshaft alignment, crankshaft alignment, and distributor alignment. If every-
thing checks out, re-install distributor cap, timing belt cover, and idle stabilizer valve if so
equipped.
12 . Start engine and run it at around 2000 RPM for twenty minutes. This is the crucial
break-in period for a new cam. It is important that the cam has good oil pressure at this
time! Once twenty minutes are up, you're ready to run.
Fig. 1
Fig. 2
Fig. 4
Fig. 3
 Loading...