

Autopage C3-RS-601, XT-12 Quick Start Installation Manual
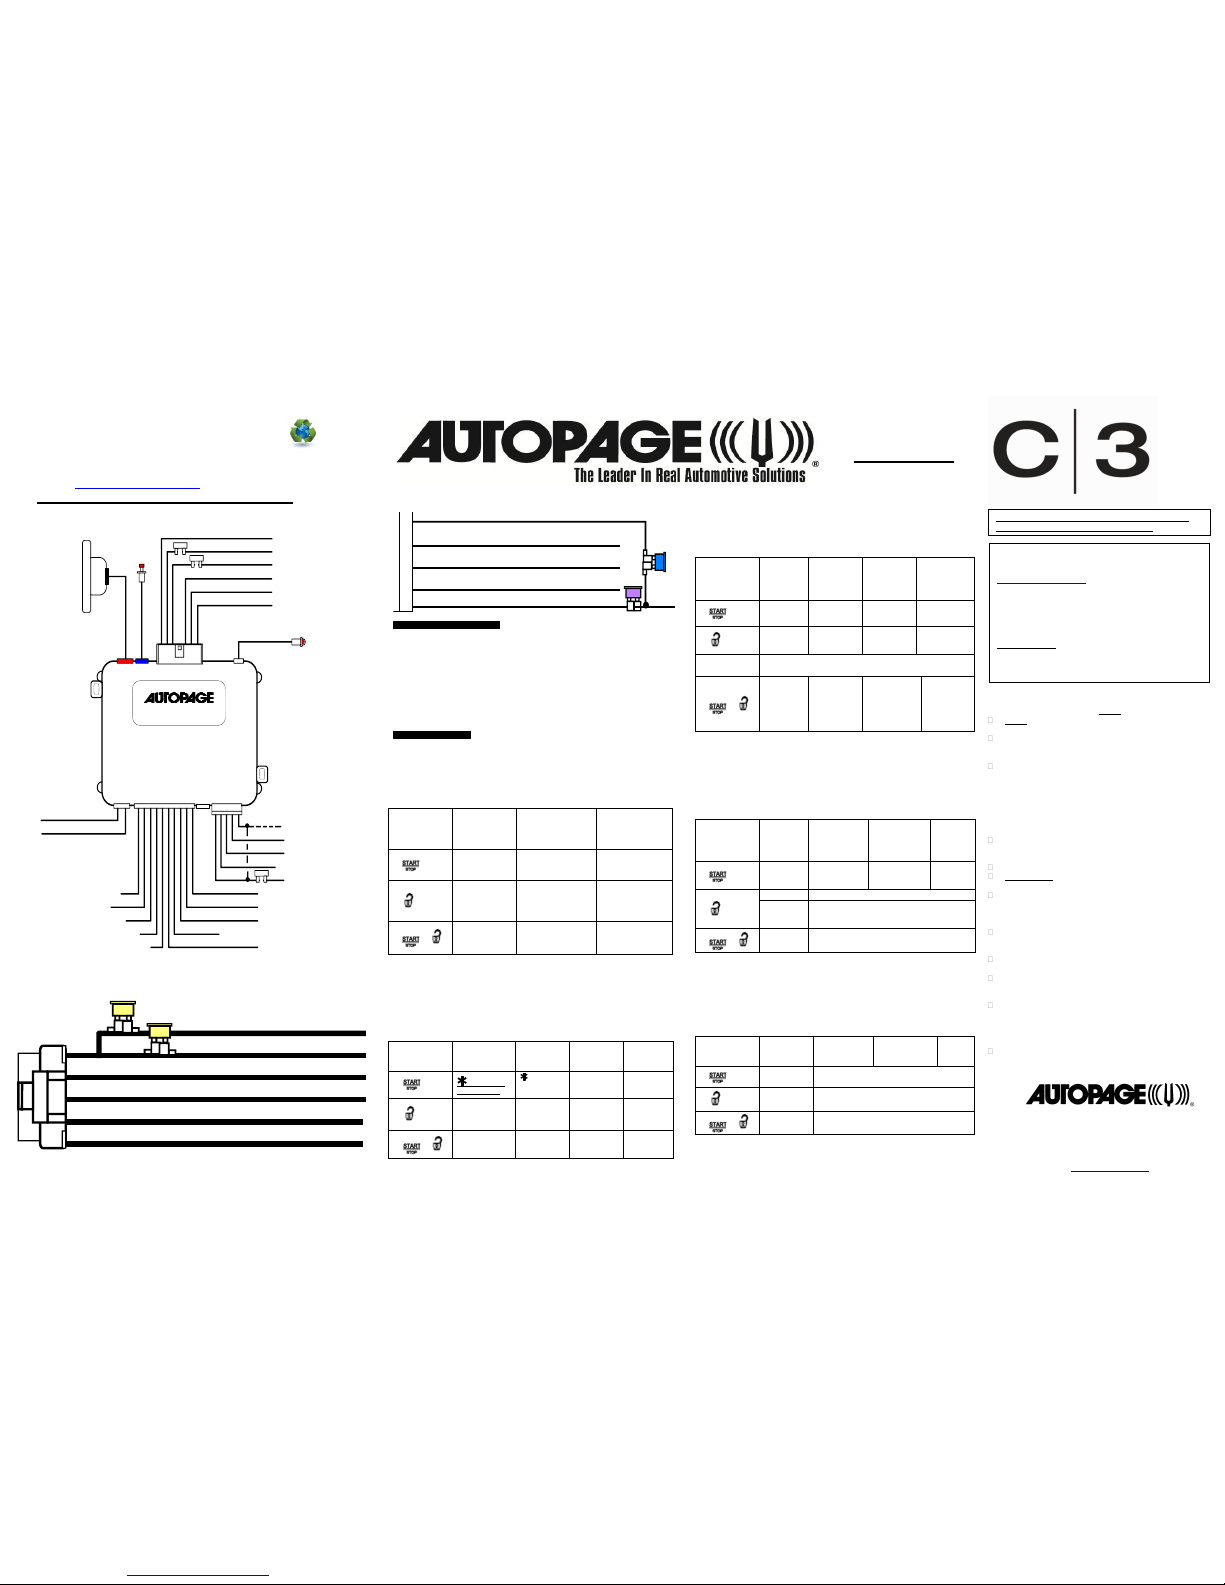
C3-RS-601
H1 6 Pin Wht.
H2 5 Pin
H3 10 Pin White
H4
ValetH5ANT.
H6 DL
H7
LED
RX-300A
Valet
Switch
Violet : Starter Output
Red : 12 Volt Input
Red : 12 Volt Input
Yellow. Ignition 1 Output
Pink : Ignition 2 Output
Brown ACC Output
LED Indicator
FUSE
FUSE
Red/White : Parking light Input
FUSE
White : Parking light Output
Black : System Ground
Brown : Programmable Output (-)
Horn (-) or Factory Rearm (-)
Red : System Power + 12 Volt
Yellow : Ignition 3 Output ( 200 mA - )
Blue/Black : ACC 2 ( 200 mA - )
Pink : 200mA Programmable Output (-)
White : Ground When Running By-pass Control Output
Gray : CH 3 Trunk Release (-)
White/Violet : Safety Shutdown Brake Input (+)
Black/White : Neutral Safety Switch (-) Input
White/Black : Safety, Hood Pin Input (-)
White/Blue : Instant Start (-) Input
White/Red : Tachometer Signal Input
Blue : (-) Unlock
(+) Lock
Green : (-) Lock
(+) Unlock
Door Locks
H8
20A
20A
Red: Remote Start Power 1
Red: Remote Start Power 2
Violet: Starter (+) Output
Pink: Ignition 2 (+) Output
Yellow: Ignition 1 (+) Output
Brown: Acc/Heater (+) Output
Red:
12v + Battery Power
Brown:
Siren (+) Output
Black:
System Main Ground (-)
White:
Parking Light Relay Output
Red/White:
Parking Light Relay Power Input
FEATURE “III” PROGRAMMING:
1. Turn the Ignition 'switch „ON/OFF‟ 3 TIMES and stay in OFF position.
2. Push the Valet switch 3 times (holding in on the 3rd push) until one chirp with one long
chirp is heard, then release the valet switch. You are now in the Alarm feature “A”
programming mode.
3. Press and release the transmitter button corresponding to the feature you want to
program.
Press
Transmitter
Button
One Chirp /
LED one
pulse
Factory
Default
Setting
Two Chirps /
LED two pulse
Three Chirps /
LED three pulse
Four Chirps /
LED four pulse
1.
20 minutes
run time
10 minutes run
time
30 minutes run
time
5 minutes run
time
2.
0.8-second
Door lock &
Unlock.
3.5-second
Door
Lock & Unlock.
0.8 second
lock, 0.35
second unlock
0.8 second dbl
lock,0.8 second
dbl unlock
Five chirps= 0.8 second lock, dbl 0.8 second unlock
Six chirps= dbl 0.8 second lock, 0.8 second unlock
3.
+
Door Lock
before start
Door Lock after
start
Door Lock
before & after
start
* This is the
preferred setting
when using the
optional XT-11
single button
remote
Without this
feature
Exit: Turn Ignition to 'OFF' position, or leave it for 15 seconds. 3 long chirps & 3 parking
light flashes will confirm exit.
FEATURE “IV” PROGRAMMING:
1. Turn the Ignition 'switch „ON/OFF‟ 3 TIMES and stay in OFF position.
2. Push the Valet switch 4 times (holding in on the 4th push) until one chirp with one long
chirp is heard, then release the valet switch. You are now in the Alarm feature “A”
programming mode.
3. Press and release the transmitter button corresponding to the feature you want to
program.
Press
Transmitter
Button
One Chirp /
LED one
pulse
Factory
Default
Setting
Two Chirps /
LED two pulse
Three Chirps /
LED three pulse
Four Chirps
/ LED four
pulse
1.
Tachometer
checking type.
Voltage checking
type
Timer checking
type
DBI TACH
**
DATA
ONLY !!
2.
RPM learning
Start Timer:
0.6-second
0.8-second (2 chirps), 1.0-second (3 chirps), 1.2-second (4
chirps), 1.4-second (5 chirps), 1.6-second (6 chirps), 1.8second (7 chirps), 2.0-second (8 chirps), 3.0-second (9
chirps), 4.0-second (10 chirps),
3.
+
Low ceck
level
Hi check level
Exit: Turn Ignition to 'ON' position, or leave it for 15 seconds. 3 long chirps & 3 parking light flashes will
confirm exit.
FEATURE “V” PROGRAMMING:
1. Turn the Ignition 'switch „ON/OFF‟ 3 TIMES and stay in OFF position.
2. Push the Valet switch 5 times (holding in on the 5th push) until one chirp with one long
chirp is heard, then release the valet switch. You are now in the Alarm feature “A”
programming mode.
3. Press and release the transmitter button corresponding to the feature you want to
program.
Press
Transmitter
Button
One Chirp /
LED one pulse
Factory
Default Setting
Two Chirps /
LED two pulse
Three Chirps /
LED three pulse
Four
Chirps /
LED four
pulse
1.
Second
Accessory
H3/9 Blue/Black
Second Start
H3/9 Blue/Black
2.
+ 50 RPM
DBI ONLY
No RPM learning
3.
+
- 50 RPM
DBI ONLY
No RPM Learning or < 50RPM
Exit: Turn Ignition to 'ON' position, or leave it for 15 seconds. 3 long chirps & 3 parking light flashes will
confirm exit.
C3-RS-601
QUICK START INSTALLATION GUIDE
Help Auto Page protect our environment !
If you are not proficient in the installation of this product or would
like a full version of the installation manual, Please visit our web
site @ www.autopageusa.com
FOR PROFESSIONAL INSTALLATION ONLY!
H1 6 PIN HEAVY GAUGE WIRE HARNESS
H5 5 PIN WIRE HARNESS
PROGRAMMING TRANSMITTER
Note: This model will only retain the last 4 remote transmitters programmed. If the
transmitter memory is exceeded, the security system will start deleting transmitters from
memory in chronological order.
1. Turn the Ignition 'switch „OFF/ON‟ 3 TIMES and stay in ON position.
“Within 15 seconds”.
2. Push the Valet switch 2 times and hold it on the 2nd push until a long chirp is heard
then release the valet switch. You are now in the Transmitter programming mode.
3. Press and hold any button of the transmitter until the siren responds with a confirming
chirp, indicating the signal has been stored into memory.
4. If you have additional transmitters (up to 4) that need to be programmed, repeat step 3
for remaining transmitters.
FEATURE PROGRAMM
FEATURE “I” PROGRAMMING:
1. Turn the Ignition 'switch „ON/OFF‟ 3 TIMES and stay in OFF position.
2. Push the Valet switch 1 times (holding in on the 1st push) until one chirp with one
long chirp is heard, then release the valet switch. You are now in the Alarm feature
“A” programming mode.
3. Press and release the transmitter button corresponding to the feature you want to
program.
Press
Transmitter
Button
One Chirp /
LED one pulse
Factory Default
Setting
Two Chirps /
LED two pulse
Three Chirps/
LED three pulse
1.
H3/2 White/Blue
= 1 Pulse
Remote Start
H3/2 White/Blue = 3
Pulse Remote Start
2.
H3/8 Pink Wire =
Factory Security
Disarm Signal
Output
H3/8 Pink Wire =
Start Status (Shock
Sensor Bypass
Control) Output
H3/8 Pink Wire = 20
Second Ground out
Key Sensor By-pass
3.
+
H2/4 Brown Wire
= Horn Output
H2/4 Brown Wire =
Rearm Signal Output
Exit: Turn Ignition to 'ON' position, or leave it for 15 seconds. 3 long chirps & 3 parking
light flashes will confirm exit.
FEATURE “II” PROGRAMMING:
1. Turn the Ignition 'switch „ON/OFF‟ 3 TIMES and stay in OFF position.
2. Push the Valet switch 2 times (holding in on the 2nd push) until one chirp with one
long chirp is heard, then release the valet switch. You are now in the Alarm feature
“A” programming mode.
3. Press and release the transmitter button corresponding to the feature you want to
program.
Press
Transmitter
Button
One Chirp /
LED one pulse
Factory Default
Setting
Two Chirps /
LED two pulse
Three Chirps /
LED three pulse
Four Chirps /
LED four pulse
1.
Button
Two
Push Remote
Button
One
push
Remote Start
2.
Without ignition
controlled door
locks & unlocks
Ignition
controlled
door locks &
unlocks
3.
+
Gasoline Engine
Diesel Engine
and 10 seconds
warn-up timer
Diesel Engine
and 15 seconds
warn-up timer
Diesel Engine
and 20
seconds warnup timer
Exit: Turn Ignition to 'ON' position, or leave it for 15 seconds. 3 long chirps & 3 parking
light flashes will confirm exit.
960 Knox Street Unit B
Torrance, California 90502
Main Office: 310-323-1800
Technical Support: 800-945-2527
(For Authorized Dealers Only)
www.autopageusa.com
FEATURE “V” MUST BE PROGRAMMED FOR THE
UNIT TO RESPOND TO REMOTE START!
If you are not sure or do not understand any part of
the quick start guide, please download the complete
installation manual available at
www.autopageusa.com . This quick start guide is a
brief outline for professional installers that are
familiar with the installation and operation of this
remote start system. Please test all of your
installation to insure proper operation of the vehicle
before returning it to the customer.
For authorized dealer technical support, please call
800-945-2527 and wait for the first available
technician. Technical support hours are Monday
through Saturday from 8:00 to 5:00 Pacific standard
time.
This Remote Starter with Alarm and Keyless Entry System
has been designed to be installed on fuel-injected vehicles
with an automatic transmission ONLY.
Never install this remote starter on a manual
transmission vehicle.
This system must be installed and wired through a
safety switch so it will not start in any forward or reverse
gear.
Some automatic transmission vehicles mainly older GM
vehicles with a purple starter wire have a mechanical-type
park safety switch instead of electrical safety switch. The
mechanical type does not interrupt the starter circuit when
the transmission is in any gear and does not offer the 100%
level of safety required for remote starting purposes.
Therefore, our system should never be installed on any
vehicle that uses a mechanical type park safety switch.
Once you install this system, you must verify that the
vehicle will not start in any forward or reverse gear,
regardless of the type of vehicle.
Read the operation manual for operating.
Do not install any component near the brake, gas pedal
or steering linkage.
Some vehicles have a factory installed transponder
immobilizer system that can severely complicate the
installation. There is a possibility that this system cannot be
installed on some immobilizer-equipped vehicles.
Most vehicles have an SRS air bag system. Use
extreme care and do not probe any wires of the SRS
system.
Disconnect the car battery before beginning work on the
vehicle.
Check behind panels before drilling any holes. Ensure
that no wiring harness or other components are located
behind the panels that would otherwise be damaged.
Do not use conventional crimp lock, bullet on any wiring.
Poor wiring, i.e. taped joints will possibly introduce
unreliability into the alarm system and may result in false
alarms or incorrect operation. We suggest soldering all
connection points.
Install the wiring neatly under carpets or behind trim to
prevent possible damage to wires.
ACTIVATE UNLOCK:
1. Press button on the transmitter.
2. The horn will chirp twice and parking light will flash twice
to indicating that the keyless system is now unlocked.
The vehicle doors will unlock and dome lights will turn on
for 30 seconds.
TRUNK RELEASE (Additional Installation Required)
Press and hold the + button on transmitter for two
seconds to remote control the trunk release or other electric
devices.
DEACTIVATING WITHOUT A TRANSMITTER
The Override function may be used if the remote transmitter is
lost or inoperative.
1. Enter the vehicle and turn the ignitio n switch to „ON‟
position.
2. Within 10 seconds push and release the valet switch
VALET MODE:
The valet switch allows you to temporarily bypass all system
function, eliminating the need to hand your transmitter to
parking attendants or garage mechanics. When the system
is in valet mode, and remote start functions are bypassed,
Enter Valet Mode:
1. From the Unlock condition, turn the ignition to “ON”
position.
2. Push and hold valet switch for 2 seconds until the LED
turns on. The LED will remain on as long as the system
is in „valet mode‟.
Exit Valet Mode:
1. Return to normal operation, turn ignition „on‟.
2. Push and hold valet switch for 2 seconds, The LED will
turn off indicating the system has exited the valet mode.
IGNITION CONTROL DOOR LOCKS.
If the vehicle‟s door locks have been interfaced t o the
security system, the system will automatically lock the
vehicle‟s doors when the ignition is turned “ON” and /or
unlock the vehicle‟s doors when the ignition is turned “OFF”.
REMOTE START OPERATION:
WARNINGS:
As with any product that performs automatic functions, there
are certain safety precautions that you must practice and be
aware of.
1. Keep the transmitter out of children‟s reach.
2. Do not leave anyone in the vehicle while running on remote
control.
3. Alert servicing personnel that the vehicle can be started
automatically.
4. Do not start the vehicle by remote while it‟s in an enclosed
area or
garage.
5. Always apply the parking brake and lock the vehicle as you
exit the vehicle.
6. Should the unit malfunction, disconnect the fuse until the
problem is corrected.
7. The use and operations of this system is the sole
responsibility of the operator.
8. Some areas may have local ordinances that prohibit
leaving a vehicle
running on public streets.
TO REMOTE START THE VEHICLE:
When you want to start your vehicle,
1. Press button TWICE on either remote transmitter.
2. The parking lights will flash to indicate the remote start
received the signal.
3. The engine will start in approximately 5 seconds.
4. Once the engine is running, after a couple of seconds the
parking light will turn on again and climate controls will
activate and adjust the vehicles interior temperature to your
preset setting.
5. The vehicle will run for 5 to 30 minute cycle and automatically
shut down. The duration of the starting mode is
programmable.
NOTE: The Remote Start Unit will not start the vehicle if any one
of the following conditions exists:
1. The hood is opened.
2. The brake pedal is pressed.
3. The optional remote start enable toggle switch is moved to the
OFF position.
(If installed)
4. The gear selector is in any gear other then “PARK” or
“NEUTRAL”
TO TURN OFF THE REMOTE START:
When the engine is running (by remote start), if you want to stop it,
1. Press button twice on the transmitter.
2. Move the optional remote start enable toggle switch to OFF
position. (If installed)
3. Press the brake pedal, the vehicle will shut down and turn off
the parking light to indicate engine stopped.
TO OVERRIDE VEHICLE FROM REMOTE START CONTROL:
To operate the vehicle while running from a remote start condition.
1. Insert the ignition key and turn it to the “ON” (not the start)
position.
2. Press the brake pedal.
Note: If the brake pedal is pressed before the key is in the ON
position, the engine will shut down.
TEMPORARY STOP FEATURE:
This feature allows the vehicle to remain running after the key has
been removed from the ignition. This feature is useful for
occasions when you wish to exit and lock the vehicle for short
periods of time, but would like to leave the engine running and the
climate control on.
1. Before turning off the engine, press the button twice on
the transmitter. The parking lights will come on and the LED will
flash 3 times to confirm Temporary Stop feature „ON‟
2. Turn the ignition key to OFF position. (The engine will stay
running.)
3. The engine will run until the pre-programmed time elapsed or
shutdown input is received.
SHUTDOWN INPUT FOR REMOTE STARTER:
If any of the following conditions exist while the system is
operating, the engine will not start or will shut down immediately:
1. The hood is opened.
2. The brake pedal is pressed.
3. The optional remote start enable toggle switch is moved to the
OFF position. (If installed)
4. Engine is over-revved. {“Tachometer checking type” only}
5. The pre-programmed run time (5 /10 / 20 / 30 minutes) has
elapsed.
6. Transmitter button is pressed Twice.
7. The vehicle refused to start running after {3} unsuccessful
WARNINGS:
As with any product that performs automatic functions, there are
certain safety precautions that you must practice and be aware of.
1. Keep the transmitter out of children‟s reach.
2. Do not leave anyone in the vehicle while running on remote
control.
3. Alert servicing personnel that the vehicle can be started
automatically.
4. Do not start the vehicle b y remote while it‟s in an enclosed
area or garage.
5. Always apply the parking brake and lock the vehicle as you
exit the vehicle.
6. The vehicle windows must be rolled up.
7. Should the unit malfunction, disconnect the fuse until the
problem is corrected.
8. The use and operations of this system is the sole
responsibility of the operator.
9. Some areas may have local ordinances that prohibit leaving
a vehicle running on public streets.
10.It is not safe to remote start the vehicle if the vehicle is
parked on a steep incline.
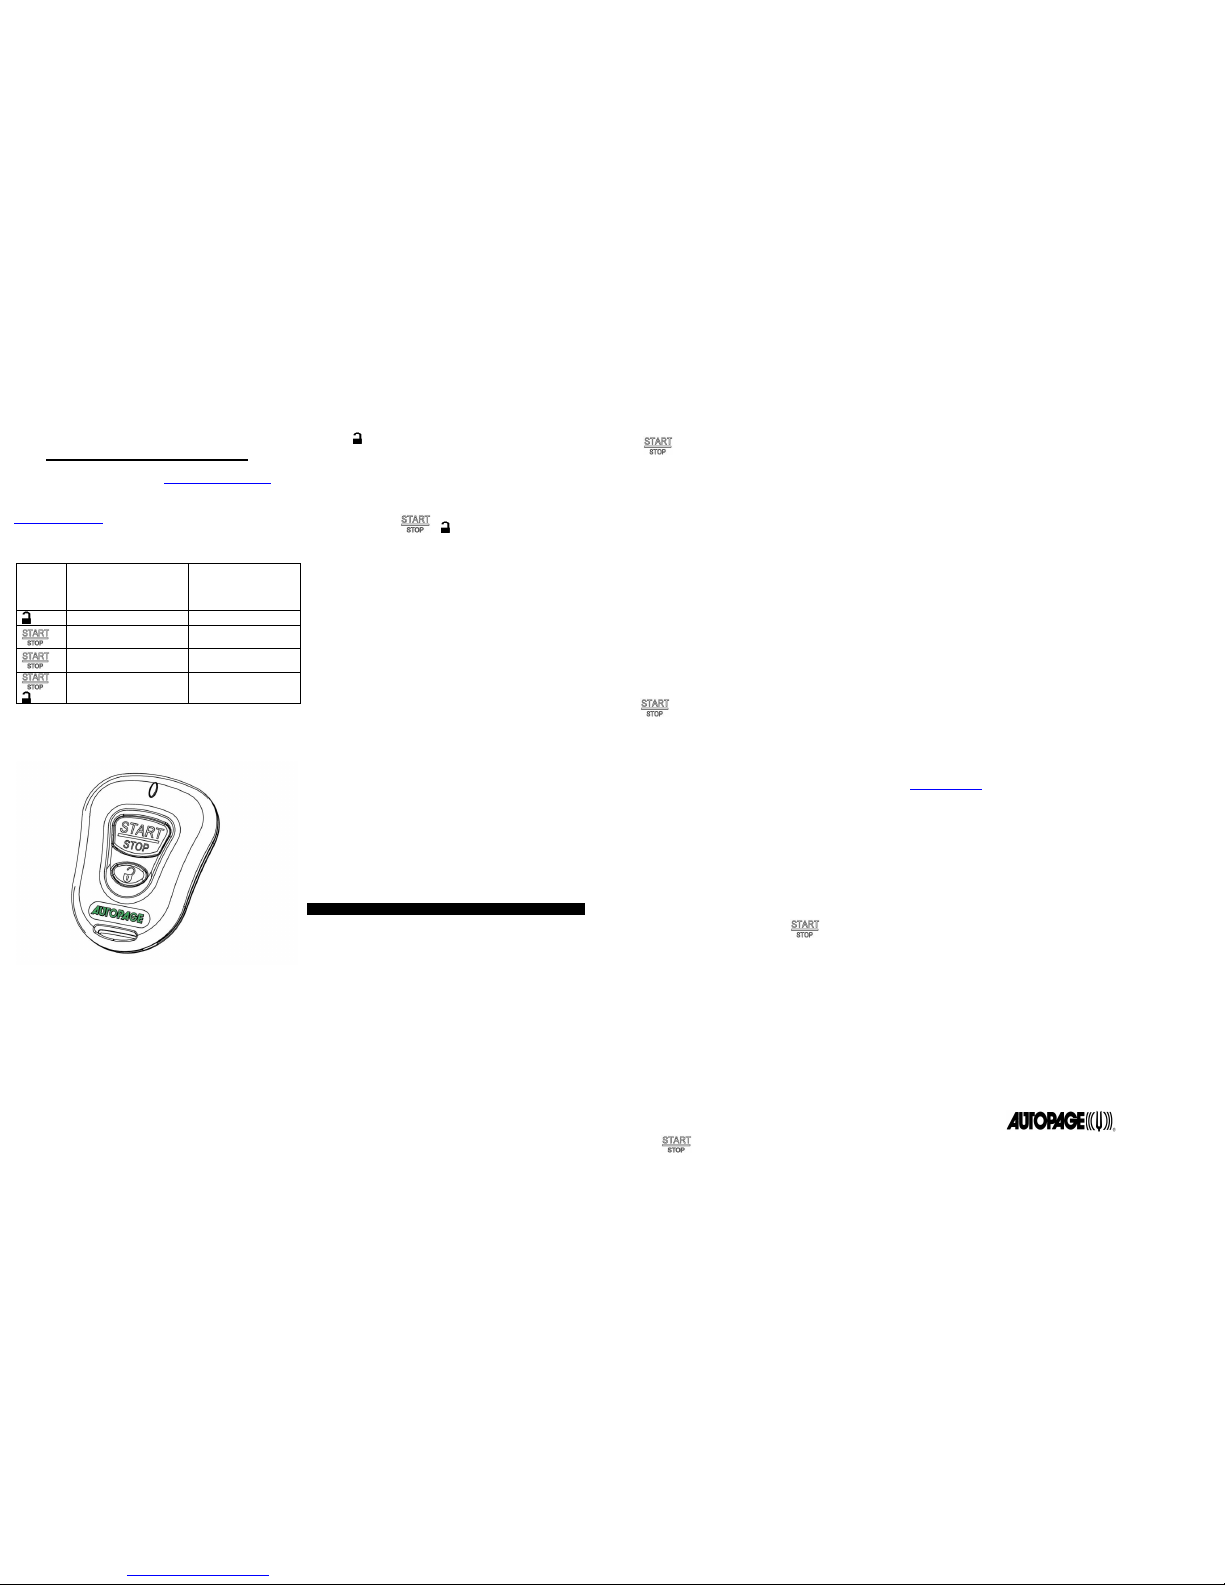
TRANSMITTER OPERATION
XT-12
Transmit
ter
Button
System Function
Remark
Unlock Doors
Activate The Remote
Start
Push twice to start
Stop remote start
operation **
Push Twice to stop
engine
+
Trunk Release
Push and hold for 3
seconds
REMOTE CONTROL TRANSMITTER: XT-12
CHANGING THE BATTERY IN YOUR TRANSMITTERS
XT-12: The XT-12 transmitter uses two (2) 3-volt lithium ion
batteries (#CR2016) To replace the battery, you will need to
use a small flat blade screwdriver. Locate the small notch on
the lower right side of the transmitter case next to the key ring.
Using the flat blade screwdriver, carefully pry the top case from
the bottom case. It should snap apart after breaking the seal.
Place the new batteries in exactly the same manner,
Quick Start
OPERATIONS MANUAL
Please register your product at www.autopageusa.com
If you are not sure or do not understand any part of the quick start
guide, please download the complete installation manual available at
www.autopageusa.com .
LIMITED LIFETIME WARRANTY PROVISIONS
( U.S. ,Continental U.S. and Canada Only)
Auto Page, Inc. WARRANTS that this new unit has been thoroughly inspected and tested at the
factory prior to delivery. Your Auto Page equipment is guaranteed for “life” to the original
purchaser/user of the equipment and the original vehicle in which it was installed by an authorized
installer under the following conditions: If the product proves defective (according to Auto Page's
testing) within the first year, the defective unit may be exchanged or repaired free of charge.
“Proof of Purchase” (dated sales receipt) must accompany all warranty returns; otherwise, your
return will be rejected and sent back. After one (1) year, the purchaser should ship the unit
prepaid to Auto Page with a money order in the amount of $30.00 to cover shipping and handling
charges. Note: The product needs to be registered online at time of installation.
www.autopageusa.com
Exclusion to the Limited Lifetime Warranty Provision: All two-way LCD and two-way OLED remote
transceivers are excluded from the Limited Lifetime Warranty noted in paragraph no.1. All twoway LCD and two-way OLED remote transceivers are guaranteed to the original purchaser for a
period of one year from date of purchase. If the product proves to be defective within the first
year, the defective unit may be exchanged or repaired free of charge. All other provisions stated
on this card apply.
This WARRANTY will be considered void if the equipment has been misused, neglected,
improperly serviced or installed, altered, dropped or damaged by water, contrary to the Auto Page
OPERATIONS MANUAL. Or, if used with accessories not approved by Auto Page, which may
have contributed to the defect. See note below regarding product installation**.
The purchaser‟s remedies u nder this WARRANTY shall be li mited to the repair or replaceme nt of
electronic components only. THE FOLLOWING IS NOT COVERED: Damages or deterioration to
cases, batteries, covers and cabinets; the cost of repairs, replacement and labor of which shall be
borne by the purchaser even if occurring during the WARRANTY period.
Any equipment or parts which are claimed to be defective under this WARRANTY must be sent to
the Auto Page Service center with “proof of purchase” at the purchaser‟s expense prior to such
return, a Return Authorization Number should be obtained. Auto Page will return the equipment,
charges prepaid. Warranty Service can be provided through the dealer where the equipment is
originally purchased.
Any unexpired W ARRANTY shall be applicable to equipment and parts in the possession of the
original purchaser only.
THIS W ARRANTY IS IN LIEU OF ANY AND ALL OTHER WARRANTIES, EXPRESSED OR
IMPLIED, INCLUDING BUT NOT LIMITED TO ANY WARRANTY OF MERCHANTABILITY OR
FITNESS FOR A PARTICULAR PURPOSE.
Auto Page shall not be liable, under the foregoing WARRANTIES or otherwise, for: Any personal
injury of any kind to the purchaser, its employees or agents or anyone else whomsoever resulting
directly or indirectly from the use or presence of the equipment or parts; Consequential damages
of any kind; any inability of the purchaser to use the equipment.
**IMPORTANT NOTE: Any damages to the Auto Page system resulting from an installation
performed by anyone other than a professional installation technician authorized by a
dealer of Auto Page will void the product‟s Limited Lifetime Warranty.
960 Knox Street Unit B
Torrance, California 90502
310-323-1800
www.autopageusa.com
 Loading...