

Page 1
OWNER’S MANUAL
TO BE USED FOR AUTO-ORDNANCE 1911 MODELS
Maker of the world famous
“TOMMY GUN”
Model: 1911PKZ (WWII Parkerized)
Model: T1911 (Standard)
Model: 1911WGS (Deluxe)
Model: 1911C (Mid size, Standard)
™
As the owner of a firearm, you must undertake the full-time
responsibility of safe firearm handling for your own safety and the
safety of those around you. Before handling any firearm read and
understand the information contained in its owner’s manual.
Be certain this owner’s manual is available for reference and is
kept with this firearm if transferred to another party. If the manual
is lost or misplaced, write directly to Kahr Arms for a free
replacement copy.
SAFETY AND SAFE FIREARM HANDLING
IS EVERYONE’S RESPONSIBILITY.
KKAAHHRR AARRMMSS::
Sales & Marketing: 845-353-7770 / Fax: 845-353-7833
Customer Service: 508-795-3919 / Fax: 508-795-7046
Web Address: www.kahr.com / www.tommygun.com
P.O. Box 220, Blauvelt, NY 10913
Page 2

TABLE OF CONTENTS
Contents Page
USER SAFETY WARNINGS & RESPONSIBILITY . . . . . . . . . . . . . . . . . . . . . . . . . . .3
LOCKING DEVICES . . . . . . . . . . . . . . . . . . . . . . . . . . . . . . . . . . . . . . . . . . . . . . . . . .5
NOMENCLATURE (AUTO-ORDNANCE 1911 MODELS) . . . . . . . . . . . . . . . . . . . . . .6
SAFETY FEATURES . . . . . . . . . . . . . . . . . . . . . . . . . . . . . . . . . . . . . . . . . . . . . . . . . .7
AMMUNITION . . . . . . . . . . . . . . . . . . . . . . . . . . . . . . . . . . . . . . . . . . . . . . . . . . . . . .8
LOADING THE MAGAZINE . . . . . . . . . . . . . . . . . . . . . . . . . . . . . . . . . . . . . . . . . . . .9
LOADING THE PISTOL . . . . . . . . . . . . . . . . . . . . . . . . . . . . . . . . . . . . . . . . . . . . . .10
CONDITIONS OF CARRY FOR THE AUTO-ORDNANCE 1911 PISTOL . . . . . . . .10
UNLOADING THE PISTOL . . . . . . . . . . . . . . . . . . . . . . . . . . . . . . . . . . . . . . . . . . . .11
FIRING THE AUTO-ORDNANCE 1911 PISTOL . . . . . . . . . . . . . . . . . . . . . . . . . . . .12
DISASSEMBLY OF THE AUTO-ORDNANCE 1911 MODELS
FOR ROUTINE CLEANING . . . . . . . . . . . . . . . . . . . . . . . . . . . . . . . . . . . . . . . . . . . . . . . .13
REASSEMBLY OF THE AUTO-ORDNANCE 1911 MODELS . . . . . . . . . . . . . . . . . . .14
MAGAZINE INSPECTION AND CARE . . . . . . . . . . . . . . . . . . . . . . . . . . . . . . . . . . .15
CARE AND CLEANING OF THE PISTOL . . . . . . . . . . . . . . . . . . . . . . . . . . . . . . . .17
SERVICE INSTRUCTIONS - PARTS INFORMATION & ORDERS . . . . . . . . . . . . . .18
SHIPPING FIREARMS FOR SERVICE . . . . . . . . . . . . . . . . . . . . . . . . . . . . . . . . . . .19
THE BASIC RULES OF SAFE FIREARMS HANDLING . . . . . . . . . . . . . . . . . . . . . .20
PARTS LIST & EXPLODED VIEW, MODEL: 1911PKZ, T1911, 1911C and 1911WGS
WARRANTY . . . . . . . . . . . . . . . . . . . . . . . . . . . . . . . . . . . . . . . . . . . . . . . .Back Cover
. .22-23
AUTO-ORDNANCE 1911 MODELS AND SPECIFICATIONS
included in this manual
Model: 1911PKZ
(WWII Parkerized)
Caliber: ......................................45 ACP
Barrel: ..................................................5"
Length: .............................8 1/2" overall
Weight: ..........................................39 oz.
Sight: ..................................Blade front,
rear drift adjustable for windage
Grip: ..............Brown checkered plastic
Finish: ...................................Parkerized
Construction (Slide): .....................4140
Construction (Frame): ...................4140
Magazine Capacity: ...................7-shot
chrome-moly steel casting
investment casting
Model: T1911 Model: 1911C
(Standard) (Mid size)
Caliber: ................................... .45 ACP
Barrel (Standard): .............................5"
Barrel (Mid size): ..........................4.25"
Length: .............................8 1/2" overall
Weight: .........................................39 oz.
Sight: ..................................Blade front,
rear drift adjustable for windage
Grip: ..............Brown checkered plastic
Finish: .................................Matte Black
Construction (Slide): .....................4140
Construction (Frame): ...................4140
Magazine Capacity: ...................7-shot
chrome-moly steel casting
with medallion
investment casting
2
Model: 1911WGS
(Deluxe)
Caliber: .................................... .45 ACP
Barrel: ..................................................5"
Length: .............................8 1/2" overall
Weight: .........................................39 oz.
Sight: .....Hi-profile 3 white dot system
Grip: ..............................Black textured,
rubber wrap-around with medallion
Finish: .................................Matte Black
Construction (Slide): .....................4140
Construction (Frame): ...................4140
Magazine Capacity: ...................7-shot
chrome-moly steel casting
investment casting
Page 3

USER SAFETY WARNINGS & RESPONSIBILITY
IMPORTANT “SAFETY WARNINGS’ -- NOTE THE SYMBOL
These safety warnings are for your protection as well as the safety of
others. Disregarding information in this manual may result in serious
injury or death.
STOP! Do not attempt to load or use any firearm until you read and
understand the information contained in its owner’s manual. Before
handling your firearm, you should learn how it operates and how to
maintain it. This includes knowing its basic parts, how the safety
features operate, how to safely open and close the action and how to safely load
and unload ammunition from the firearm. Improper use and handling is dangerous
and could cause severe injury or death to you or those around you. All users of the
firearm must become thoroughly familiar with the instructions in this manual.
Be certain this owner’s manual is available for reference and is kept with this
firearm if transferred to another party. If the manual is lost or misplaced, write
directly to Kahr Arms for a free replacement copy.
As the owner of a firearm, you must undertake the full-time
responsibility of safe firearm handling for your own safety and the
safety of those around you:
• Keep all firearms and ammunition out of the reach of children.
• Store your firearms and ammunition separately.
• Never store a loaded firearm.
• Never leave a loaded firearm unattended.
• Never transport a loaded firearm in a vehicle.
REMEMBER: A firearm’s safety features are mechanical devices which
can never replace safe firearm handling. Safe firearm handling
depends on you!
Always point the muzzle of your firearm in a safe direction, regardless
of whether the firearm is loaded or unloaded. You should become
thoroughly familiar with the function and operation of this firearm and
the instructions supplied with it.
Always treat every firearm as if it were loaded. Always give your
firearm to someone with the action open after you verify the firearm is
unloaded. Insist on the same procedure when receiving a firearm from
someone else. Learn the location of all the safety features of your
firearm and how they operate.
You have a responsibility to obtain proper training on how to use and maintain your
firearm. Certified and reputable safety courses and instructions are offered by the
National Rifle Association (NRA) as well as by state and local organizations. You
also have a responsibility to know and obey all local, state and federal laws governing the use, possession and transportation of firearms.
3
Page 4

To protect yourself and others from injury, use the correct ammunition
referenced by the markings on the barrel. Auto-Ordnance firearms are
designed, manufactured and proof tested to recommended Sporting
Arms and Ammunition Manufacturers Institute (SAAMI) standards for
factory loaded ammunition. We specifically disclaim responsibility for
any damage or injury whatsoever occurring in connection with, or as the result of,
the use in Auto-Ordnance firearms of cartridges other than those for which the
firearm was originally chambered. Additionally, we disclaim any responsibility for
damage or injury which results from any modifications or changes that are not a
part of the firearm as delivered from the factory.
Learn how to clean your firearm thoroughly and make certain no oil,
grease or other materials are blocking the barrel. Obstructions of any
kind can cause damage to the firearm resulting in personal injury.
Practice proper firearm maintenance and safety. Make sure all exposed metal surfaces are coated with a thin film of oil, especially after being exposed to damp
weather. (See proper section of this manual for cleaning instructions). Before using
after storage, follow complete instructions stated in this manual for refamiliarization
with the firearm. A thorough inspection should be performed before shooting the
firearm.
Wear eye and ear protection when shooting. Shooting without proper
ear protection can cause hearing damage. The use of eye protection
during any type of shooting is important to protect your vision.
Never climb or jump over an obstacle with a loaded firearm. Never pull
a firearm toward you by the muzzle. Never shoot towards a flat, hard
surface or water. Always be sure of your target and what is beyond it.
When handling your firearm, never allow fingers or any object to touch
the trigger until you are ready to shoot.
The safety should always be “on” until you are ready to shoot. It is a
mechanical device and should never be used as an excuse for careless
handling or unsafe practices.
Make sure you read, understand and follow the firearm safety rules
that are listed in this manual.
The use of a locking device or safety lock is only one aspect of
responsible firearm storage. Firearms should be stored unloaded and
locked in a location that is both separate from their ammunition and
inaccessible to children and other unauthorized persons.
4
Page 5
LOCKING DEVICES
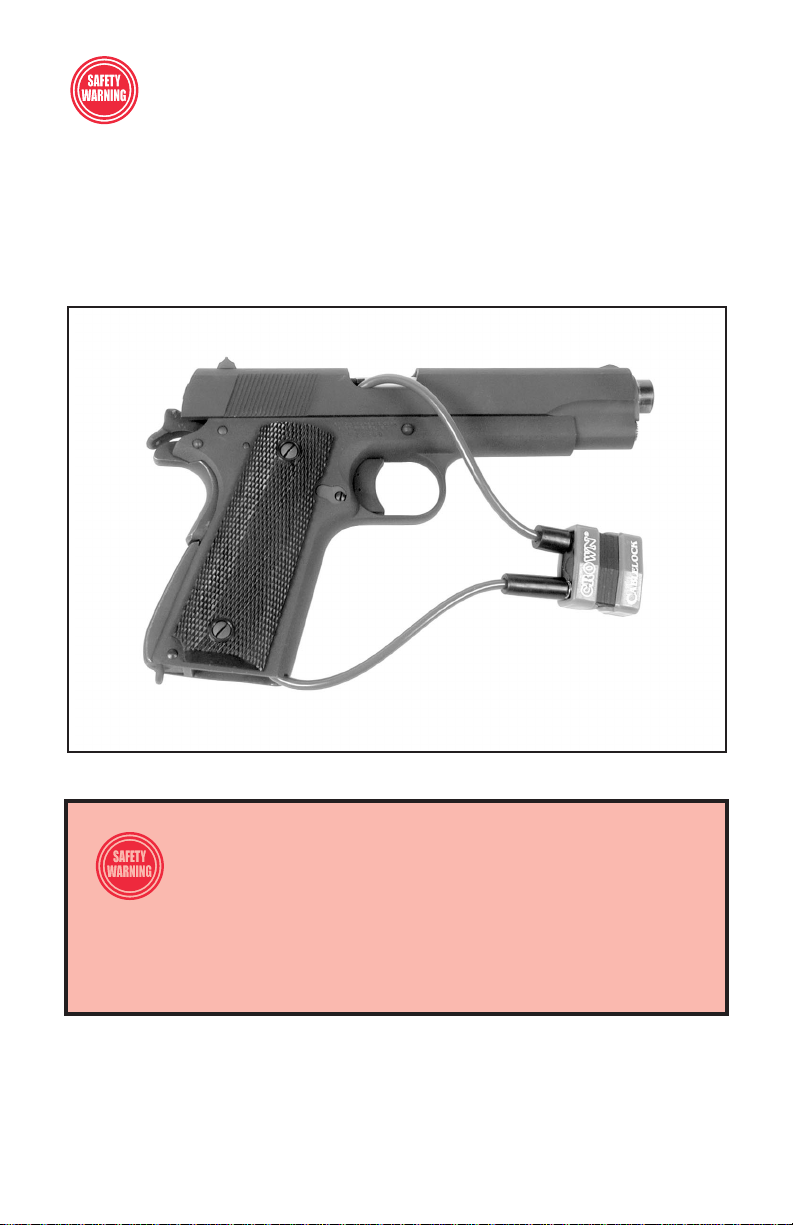
This firearm was originally sold with a key-operated locking device.
While it can help provide secure storage for your unloaded firearm,
any locking device can fail. All guns are designed to fire if they are
loaded and the trigger is pulled. Therefore, never install the locking device inside
the trigger guard or in any way that it can possibly pull the trigger! Do not leave the
keys in the lock.
The ultimate responsibility for secure storage of any firearm must depend upon its
owner and his or her individual circumstances. Guns should be securely stored
unloaded, in a secure location, separate from their ammunition.
PICTURE #1
IT IS IMPERATIVE THAT YOU KEEP THIS FIREARM LOCKED
IN A SECURE PLACE AND TAKE OTHER STEPS NECESSARY
TO LIMIT THE POSSIBILITY OF THEFT OR ACCIDENT.
FAILURE TO TAKE REASONABLE PREVENTIVE STEPS MAY
RESULT IN INNOCENT LIVES BEING LOST AND, IN SOME
CIRCUMSTANCES MAY RESULT IN YOUR LIABILITY FOR THESE
DEATHS.
5
Page 6
Barrel
Bushing
Recoil
Spring
Plug
Slide Stop Notch
Disassembly Notch
Trigger Guard
Barrel
Front Sight
Model: 1911PKZ
(WWII Parkerized)
Slide
Ejection port
(Opposite side)
Slide Stop
Rear Sight
Trigger
Magazine catch
Frame
Grip
Lanyard Loop
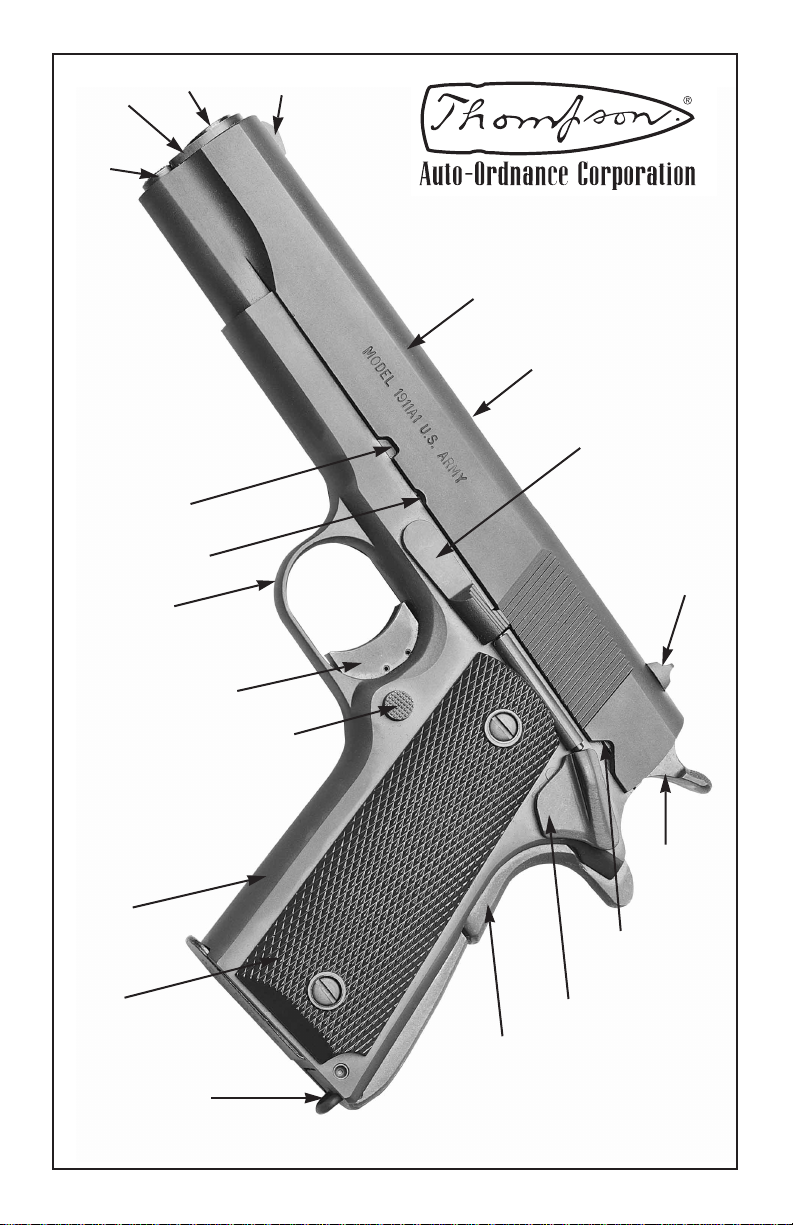
NOMENCLATURE
Hammer
Thumb
Safety Notch
Thumb Safety
Grip Safety
6
Page 7
Safety Features
Auto-Ordnance Model 1911 semi-automatic pistols incorporate several positive
safety devices which, if properly employed, reduces the danger of accidental discharge.
Trigger Guard
The trigger guard is a metal loop that surrounds the trigger, protecting it from damage or accidental discharge.
Thumb Safety
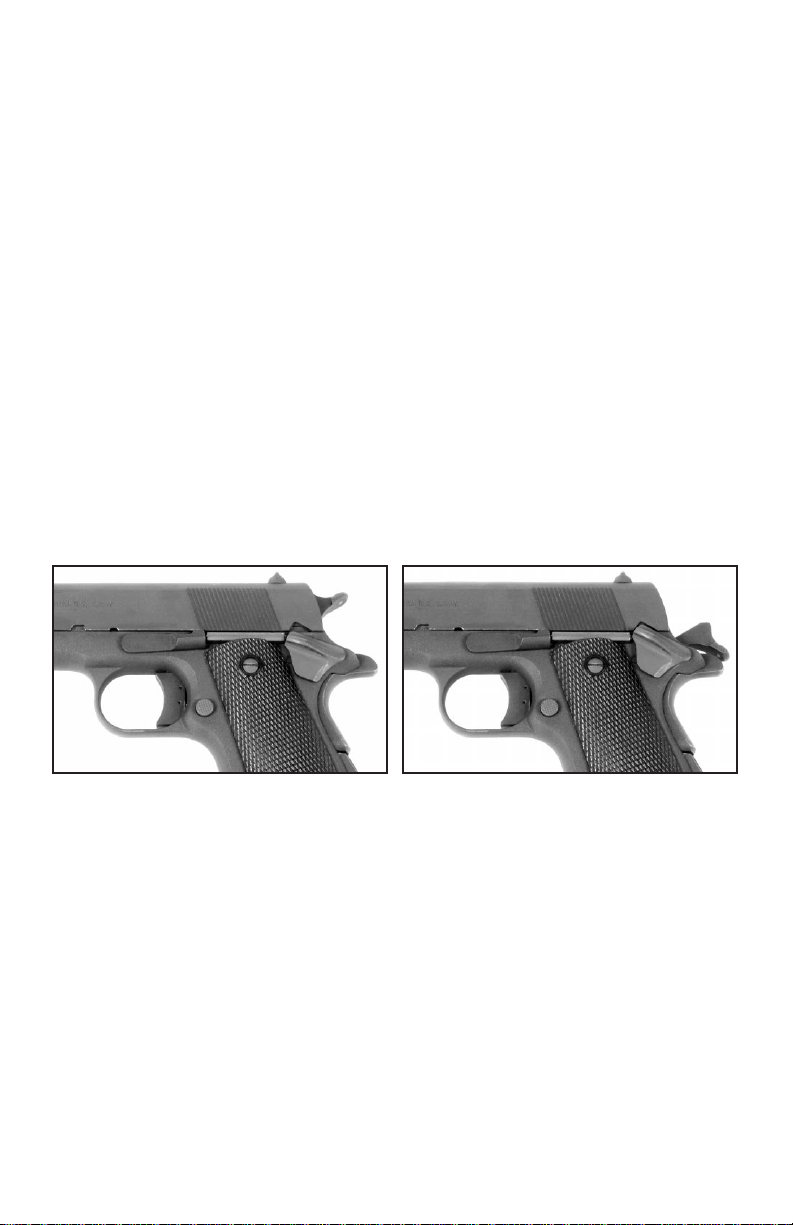
The thumb safety is located on the left rear of the pistol just below the slide. To operate the thumb safety pull the slide to its most rearward position and release. Then
push the thumb safety upward until it fully engages the thumb safety notch (see picture #3). The slide is prevented from moving rearward and an internal cam surface
engages the sear preventing the hammer from moving forward when the trigger is
squeezed. The thumb safety cannot be engaged unless the hammer is fully cocked
and the slide is fully forward.
To disengage, move the thumb safety fully downward until it is completely down.
When the thumb safety is down, the sear is free to release the hammer to fire the
pistol when it is properly gripped and the trigger is squeezed (see picture #2).
PICTURE #2 PICTURE #3
THUMB SAFETY DISENGAGED
THUMB SAFETY ENGAGED
Grip Safety
The grip safety is located on the upper rear part of the frame (see picture on page
6). The grip safety is automatically applied by spring action to prevent rearward
travel of the trigger unless the pistol grip is firmly and properly grasped. The front
of the grip safety (inside the pistol frame) is in contact with the rear of the trigger to
prevent it’s rearward travel. When the pistol grip is positively grasped, the grip safety is rotated out of contact with rear of trigger to allow trigger movement.
Disconnector
This safety device prevents a round from being fired before it is in the chamber with
the slide and barrel locked. When the slide is not fully forward, the disconnector is
depressed; its lower part disengages the sear, so that the hammer cannot be
released if the trigger is squeezed. However, when the slide and barrel are locked,
a spring pushes the disconnector up into a recess in the slide. This links the trigger
and sear so that the pistol can be fired by squeezing the trigger.
7
Page 8
NEVER ATTEMPT TO CHECK OR DEMONSTRATE THE
DISCONNECTOR FUNCTION WITH A LOADED PISTOL. PUSHING ON
THE MUZZLE WITH YOUR HAND OR ANY OTHER PORTION OF THE
BODY IS EXTREMELY DANGEROUS AND COULD RESULT IN
ACCIDENTAL DISCHARGE CAUSING INJURY, DEATH OR DAMAGE TO PROPERTY.
Hammer Safety Stop
The hammer safety stop is a notch on the hammer which prevents it from falling
fully forward in the event of a primary sear notch failure. It also prevents the hammer from hitting the firing pin should your fingers slip from the slide or hammer
while cocking the pistol, provided the hammer has been moved past the stop. The
safety stop is not a manual safety. Never under any circumstances use the safety
stop as a “half cock” position. This misuse can result in damage to the sear, and/or
unintentional discharge of the pistol. The safety stop position is an automatically
engaging safety feature and should never be engaged by hand.
CONTROL HAMMER WITH YOUR THUMB AND ALWAYS POINT
PISTOL IN A SAFE DIRECTION WHEN SQUEEZING THE TRIGGER TO
LOWER THE HAMMER. THIS WILL PREVENT ACCIDENTAL INJURY OR
DEATH IN THE UNLIKELY EVENT OF A PISTOL DISCHARGE.
LOWERING THE HAMMER IN THIS WAY SHOULD BE DONE ONLY WHEN THE
CHAMBER IS EMPTY.
Inertia Firing Pin
The firing pin, which is shorter than its housing, is held to the rear by a spring and
cannot protrude through the breech face unless a hammer blow overcomes the
spring force and the inertia of the pin.
Ammunition
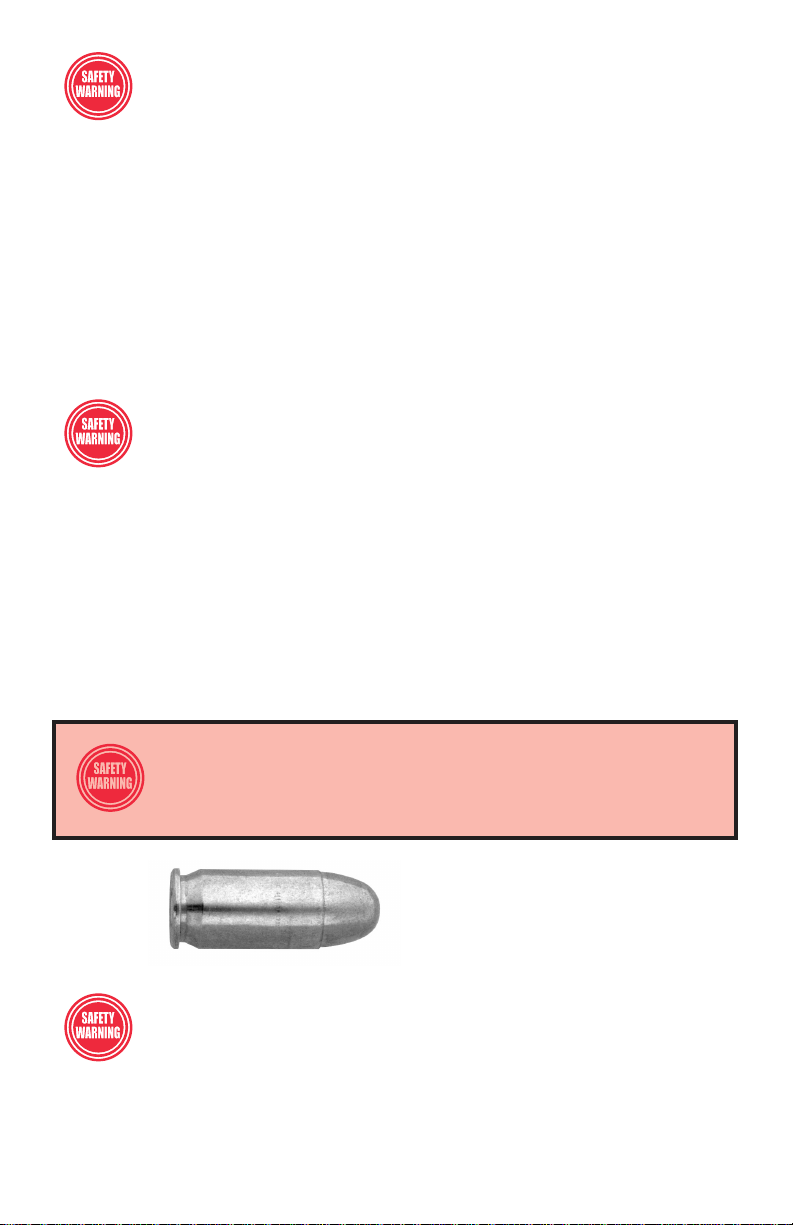
FOR PROPER FUNCTIONING IN ALL AUTO-ORDNANCE .45
CALIBER HANDGUNS WE RECOMMEND THE USE OF 230
GRAIN .45 ACP BALL AMMUNITION ONLY.
Recommended Ammunition
230 grain .45 ACP BALL ammunition
AMMUNITION (CARTRIDGE) NOTICE
Death, serious injury, and damage can result from the use of wrong
ammunition, bore obstructions, powder overloads, or incorrect
cartridge components. Even the strongest firearm can be “blown up” as
a result of excess pressure. Always wear shooting glasses and hearing protectors.
We specifically disclaim responsibility for any damage or injury whatsoever occurring in connection with, or as the result of, the use in Auto-Ordnance firearms of cartridges other than those for which the firearm was originally chambered.
8
Page 9
LEAD EXPOSURE
Discharging firearms in poorly ventilated areas, cleaning firearms, or
handling ammunition may result in exposure to lead and other
substances known to the state of California to cause birth defect,
reproductive harm, and other serious physical injury. Have adequate ventilation at
all times. Wash hands thoroughly after exposure.
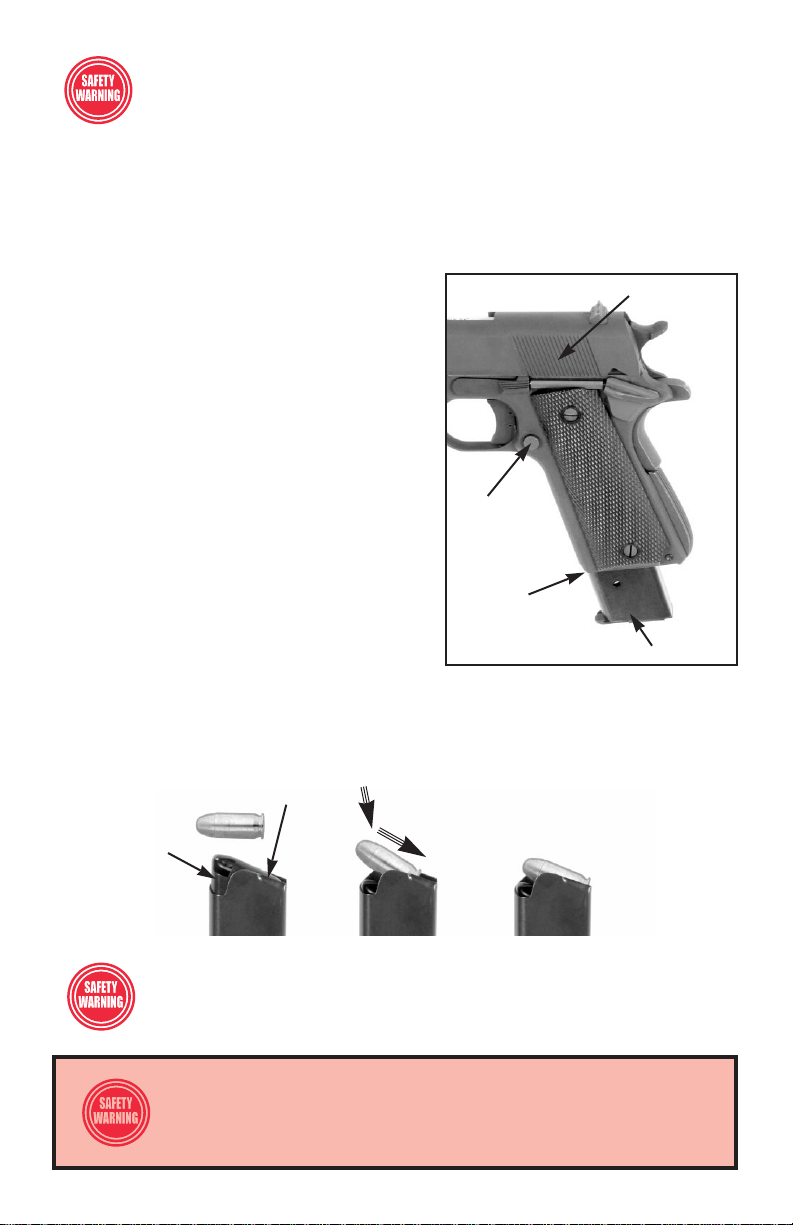
Loading the Magazine
Use only factory loaded ammunition of the
proper caliber manufactured to US Industry
Serrated finger
grips
and SAAMI specifications, referenced by
markings on barrel. (See Notice and
Warnings on page 4 of this manual pertaining to Ammunition).
Examine the recommended ammunition, particularly on and around the primer. Look for
dents, scratches, and other signs of damage.
Do not load damaged ammunition.
Magazine
catch
To release the empty magazine from the
frame, hold your hand under the magazine
and push the magazine catch which is located on the left side of the frame behind the
trigger. This will cause the magazine to fall
free of the magazine well. (See picture #4)
Magazine
well
PICTURE #4
Magazine
To load the magazine, place the round at the top (open end), push down and back
making sure that the back of the cartridge is facing the rear of the magazine.
Repeat until magazine is loaded, but do not exceed its capacity. For magazine
capacity, see page 2 under Specifications.
Retaining lip
Magazine
follower
TO MINIMIZE RISK OF UNINTENTIONAL DISCHARGE, LOAD LIVE
AMMUNITION INTO PISTOL ONLY WHEN YOU ARE READY TO
SHOOT.
DAMAGED, NON-STANDARD, OR IMPROPERLY ASSEMBLED
MAGAZINES SHOULD NEVER BE USED. THEY CAN CAUSE A
MALFUNCTION, SERIOUS INJURY OR DEATH.
9
Page 10
Loading the Pistol
Practice this important aspect of firearm handling with an unloaded handgun until
you can perform each of the steps described below. This procedure begins with an
empty handgun with the magazine out.
1. Be certain the muzzle is pointed in a safe direction.
2. Hold pistol grip with one hand. Keep other hand clear of ejection port and grasp
serrated finger grips on both sides of slide. Pull slide back approx. 1/4” and look in
chamber to ensure it is empty; allow slide to return fully forward. In the case of the
slide going fully to the rear, release cocked hammer by squeezing trigger after
ensuring chamber is empty.
3. Insert loaded magazine into magazine well with bullets pointing forward, and
push up until the magazine is fully seated. A click will be heard when this is done
properly as the magazine catch engages.
4. When you are ready to shoot, grip the slide as described in step 2 above and pull
it fully rearward to cock the hammer and then release. Do not “ride” the slide down
to the forward position. Allow the slide to snap forward under full tension of the
recoil spring. Keeping your hand on the slide may cause a misfeed or prevent the
slide from fully closing. Racking the slide back and releasing it will cock the hammer, strip off the top round in the magazine and chamber it. The pistol is now
loaded, cocked and ready to fire.
5. Keep muzzle pointed in a safe direction and engage the thumb safety until you
are ready to shoot. Always unload immediately after use and before storage.
NEVER LEAVE THE PISTOL COCKED AND READY TO FIRE, AS IN
STEP 4 ABOVE, AS THIS CONDITION IS EXTREMELY
DANGEROUS; THE PISTOL COULD EASILY BE ACCIDENTALLY
DISCHARGED, CAUSING INJURY, DEATH, OR DAMAGE TO
PROPERTY.
Conditions of Carry for the Auto-Ordnance 1911 Pistol
This pistol may be carried in any one of the following three conditions according to
your needs:
Condition One - Magazine empty, Chamber empty.
The pistol cannot be discharged in Condition One.
Use Condition One for storage, transporting, cleaning, repair, demonstrating and
dry practice.
Condition Two - Magazine loaded, chamber empty, hammer down.
The pistol cannot be fired until the slide is racked and the trigger is squeezed.
Use Condition Two when carrying the pistol ready for use.
10
Page 11
Condition Three - Magazine loaded, chamber loaded, hammer cocked, safety on.
Proper training from NRA certified firearm instructors must be received prior to carrying the firearm in this condition. The pistol can be fired when the thumb safety is
off and the trigger is squeezed. Use Condition Three when you must be prepared to
use the pistol immediately without warning.
Unloading the Pistol
WARNING: THE UNLOADING SEQUENCE MUST BE FOLLOWED
EXACTLY AS SPELLED OUT. FAILURE TO DO SO CAN RESULT
IN THE HANDGUN’S CHAMBER BECOMING UNINTENTIONALLY
LOADED WITH A CARTRIDGE.
1. Always keep the muzzle pointed in a safe direction at all times and keep the fingers outside the trigger guard. Keep hands away from muzzle and ejection port.
WARNING: EVEN THOUGH THE MAGAZINE HAS BEEN REMOVED,
A CARTRIDGE REMAINING IN THE CHAMBER CAN STILL BE FIRED.
ALWAYS VISUALLY CHECK THE CHAMBER.
2. Place your hand under magazine to prevent it from falling and press magazine
catch to release and eject magazine.
(NOTE: If the slide is fully rearward, step 3 does not apply.)
3. Using the serrated finger grips pull the slide sharply rearward to extract and eject
a round from the chamber. Keep your hands clear of the ejection port to allow the
round to eject without obstruction. Examine the previously chambered round for any
damage; if damaged, dispose of ammunition properly.
4. Keep the pistol pointing in a safe direction, allow the slide to return forward on
an empty chamber and squeeze the trigger to allow the hammer to fall forward. If
the slide is held to the rear by the slide stop, pull the slide back slightly, then ease
the slide forward. Repeatedly allowing the slide to slam closed on an empty chamber will cause premature wear and should be avoided.
5. To remove any remaining rounds from the magazine, push the cartridges forward
until they clear the retaining lips.
IT IS IMPERATIVE THAT YOU KEEP THIS FIREARM LOCKED IN
A SECURE PLACE AND TAKE OTHER STEPS NECESSARY TO
LIMIT THE POSSIBILITY OF THEFT OR ACCIDENT. FAILURE TO
TAKE REASONABLE PREVENTIVE STEPS MAY RESULT IN
INNOCENT LIVES BEING LOST AND, IN SOME CIRCUMSTANCES MAY
RESULT IN YOUR LIABILITY FOR THESE DEATHS.
11
Page 12

Firing the Auto-Ordnance 1911 Pistol
ALWAYS WEAR EYE AND EAR PROTECTION WHEN SHOOTING.
1. Point the muzzle in a safe direction and do not touch the trigger.
2. Load the pistol as previously described on page 10.
3. Grasp pistol by the grip and, with the index finger resting along the outside of the
trigger guard, take aim. Aim by aligning the target with the front and rear sights.
After identifying your target and seeing that it is clear to shoot, focus on the front
sight. Be sure of the bullet stop behind your target. Take the time to be absolutely
certain of your target and what is beyond it before you pull the trigger.
4. Release the thumb safety by pressing it down out of engagement with the thumb
safety notch.
5. Keeping a steady aim, place the index finger on trigger and squeeze gently until
the hammer falls.
6. This is a semi-automatic pistol and will recock the hammer, eject the empty cartridge and chamber a new round. It will continue to fire with each subsequent pull
of the trigger until all the rounds in the magazine have been fired.
7. Continue procedure until the magazine is empty and the slide is locked open.
THIS PISTOL DOES NOT HAVE A MAGAZINE DISCONNECT AND CAN
BE FIRED WITHOUT A MAGAZINE IN PLACE.
8. If all the rounds have not been fired and you wish to stop shooting, immediately
engage thumb safety and follow procedures for unloading as previously described
on page 11. However, if you have fired the last round from the magazine the slide
will stay to the rear and you will be unable to apply the thumb safety.
IF THE PISTOL FAILS TO FIRE, HOLD IT, KEEPING IT POINTED
TOWARD THE TARGET OR SAFE OPEN AREA AND WAIT 30
SECONDS. IF A HANG FIRE OR SLOW IGNITION HAS OCCURRED,
THE ROUND WILL FIRE WITHIN 30 SECONDS. IF THE ROUND DOES
NOT FIRE, REMOVE THE MAGAZINE, EJECT THE ROUND AND INSPECT PRIMER.
IF THE FIRING PIN INDENT ON THE PRIMER IS LIGHT, OFF CENTER OR
NONEXISTENT, HAVE THE PISTOL EXAMINED BY A COMPETENT GUNSMITH
BEFORE FIRING AGAIN. IF THE FIRING PIN INDENT APPEARS NORMAL ASSUME
FAULTY AMMUNITION AND SEGREGATE THE MISFIRED ROUND FROM OTHER
LIVE AMMUNITION.
12
Page 13
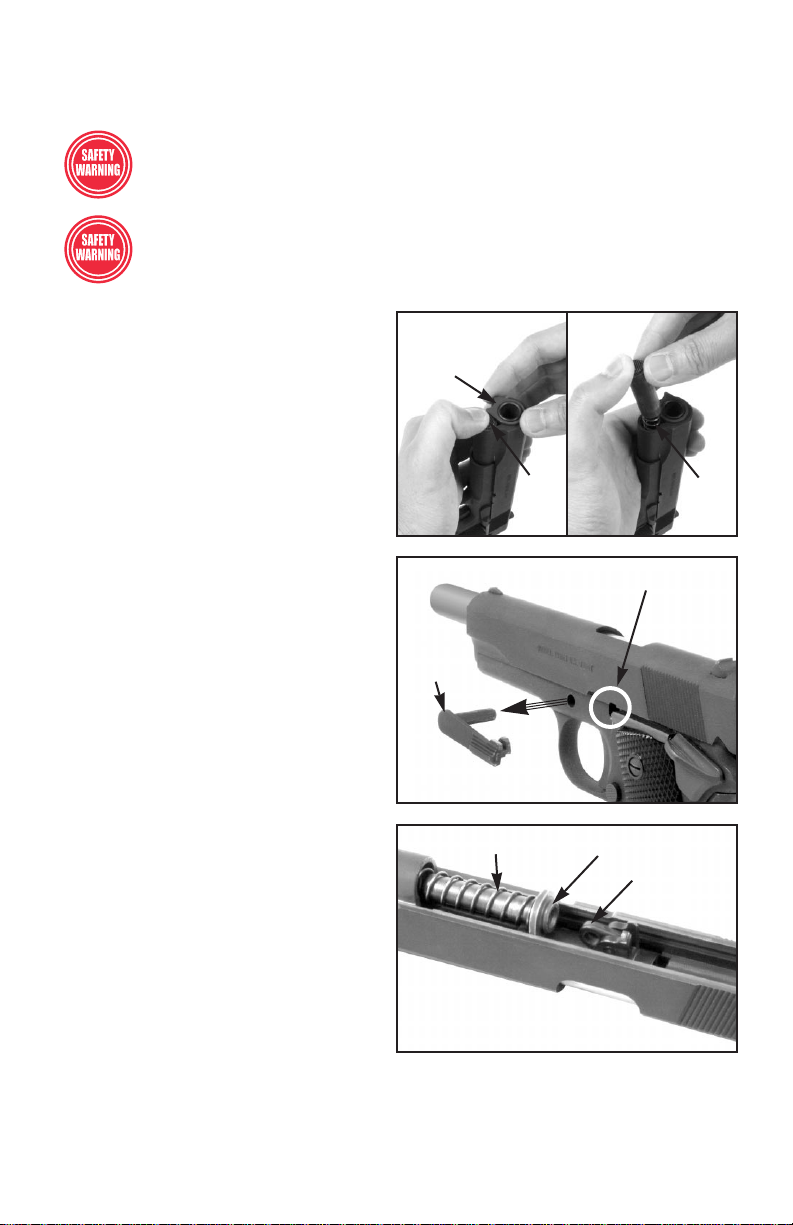
Disassembly of the Auto-Ordnance 1911 Models for Routine Cleaning
WARNING: MAKE SURE YOUR HANDGUN IS UNLOADED BEFORE
STARTING THIS PROCEDURE.
WEAR SAFETY GLASSES IN CASE YOU LOSE CONTROL OF A
SPRING LOADED COMPONENT SUCH AS THE RECOIL SPRING OR
PLUG WHICH COULD INJURE YOUR EYES.
1. Always make sure the magazine is
removed and the pistol is not loaded.
The pistol should be cleaned after
every use and when exposed to dirt,
sand, etc.
2. With the muzzle pointing upward,
rest the pistol on heel of butt and the
grip safety on a table or bench.
3. Push the slide back about 1/4 inch,
press down on recoil spring plug (located just below the muzzle) and at the
same time rotate the barrel bushing
clockwise about 1/4 turn, using a barrel
bushing wrench if necessary; this will
free the plug and recoil spring. Keep
pressure on the plug to prevent it from
being ejected by the spring. Then allow
plug and spring to gradually extend
out of the slide. (See picture #5).
4. Remove the plug from the spring.
5. Cock hammer by pulling back on the
hammer spur.
6. Pull slide to rear until lug on slide
stop is opposite disassembly notch
(see picture #6) and push inward on
the end of the slide stop shaft on the
right side of the pistol and remove the
slide stop from the left side.
7. Push slide forward off the frame.
PICTURE #5
Barrel bushing
(Clockwise)
Slide stop
PICTURE #6
PICTURE #7
Recoil
spring
plug
Recoil spring
Recoil
spring
Disassembly notch
Recoil spring guide
Barrel link
forward
8. Turn the slide upside down and lift the recoil spring and guide and pull them rearward out of the slide (see picture #7).
13
Page 14
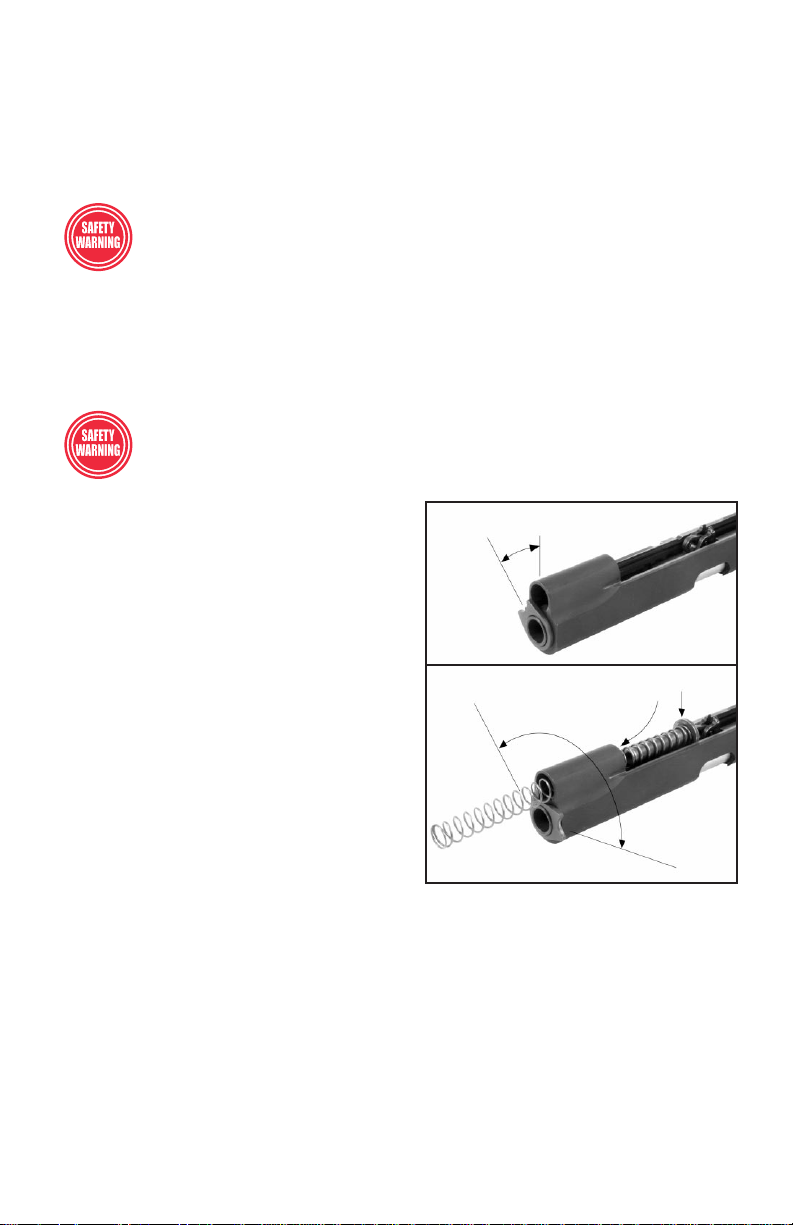
9. Turn barrel bushing counterclockwise, push barrel and barrel bushing forward
until bushing is clear of the slide, then remove bushing from the barrel.
10. Push barrel link forward and remove barrel from the slide.
NOTE: Do not drop the hammer while slide is removed from the frame.
DO NOT STRIP YOUR PISTOL ANY FURTHER THAN PREVIOUSLY
DESCRIBED. DO NOT REMOVE OR ALTER PARTS, PARTICULARLY
SAFETY PARTS. IF ADDITIONAL MAINTENANCE IS REQUIRED SEE
“SHIPPING FIREARMS FOR SERVICE ” ON PAGE 19.
Reassembly of the Auto-Ordnance 1911 Models after Routine Cleaning
WARNING: ONCE AGAIN MAKE SURE YOUR AUTO-ORDNANCE
HANDGUN AND MAGAZINE IS UNLOADED BEFORE STARTING THIS
PROCEDURE.
1. With the slide upside down and the barrel link forward, assemble barrel into the
STEP 1
slide (see picture #8).
2. Place barrel bushing over muzzle of barrel and into slide until it is flush with the
face of the slide (STEP 1). Turn bushing
clockwise as far as it will go (STEP 2).
STEP 4
3. Place the recoil guide into the recoil
spring so that the open end of the spring is
STEP 3
up against the collar of the guide.
Assemble the recoil spring and guide into
the slide by pushing the end of the spring
through the slide from the rear (STEP 3).
Position the arched portion of the recoil
spring guide over the outside surface of the
barrel directly in front of the barrel link
PICTURE #8
STEP 2
(STEP 4).
4. Cock the hammer. Look through the slide stop hole in the side of the frame. Move
the slide along the frame until you see the hole in the barrel link line up with the hole
in the side of the frame. Insert the slide stop through the hole until it is almost fully
inserted. Continue pushing the slide rearward until the disassembly notch lines up
with the rear part of the slide stop. Now push the slide stop up and in against the
slide stop plunger until the slide stop is fully inserted.
5. Bring the slide fully forward and rest the pistol on a table or bench with the muzzle pointing upward.
14
Page 15

6. Insert the recoil spring plug onto the recoil spring. Push the slide back about 1/4
inch, press down on the recoil spring plug, compressing the recoil spring into the
slide until the plug is fully home, then rotate the barrel bushing. Align the arched
part of the bushing so that it straddles the recoil spring plug and locks in place.
YOU COULD DAMAGE YOUR PISTOL WHEN YOU FIRE, OR ATTEMPT
TO FIRE IF THE RECOIL SPRING PLUG IS NOT CORRECTLY SEATED
AND LOCKED AS DESCRIBED IN #6 ABOVE.
7. After assembling the pistol, check its function as follows:
With the magazine removed, pull the slide back fully and let it go. It should fly forward and close over the empty chamber. The hammer should stay cocked. Push the
safety up and squeeze the trigger. The hammer should stay cocked. Push the safety down and squeeze the trigger. The hammer should fall. Pull the hammer back
slightly without touching the trigger. You should hear a click as the sear slips on to
the safety shelf. Now squeeze the trigger again and note that the hammer should
stay cocked.
Insert an empty magazine. Pull the slide back fully and let it go. It should NOT fly
forward. Look into the ejection port at the breech face. Make sure the firing pin is not
sticking through the hole. Hold the slide, push down on the slide stop and ease the
slide fully forward. Put your thumb on the hammer, squeeze the trigger and ease the
hammer forward.
IF YOU FIND THE FIRING PIN STICKING FORWARD OR IF YOUR
PISTOL DISCHARGES WHEN YOU CLOSE THE SLIDE, DO NOT USE
IT. RETURN IT TO THE FACTORY.
Do these checks only after you strip and assemble the pistol. Do not slam the slide
forward at any other time, except when loading. If you rack the slide when the pistol is unloaded, control it with your hand.
Magazine Inspection and Care
Check your magazine frequently to insure it is in proper working condition. The follower must move freely and have adequate spring tension so that each cartridge is
quickly lifted to the feeding position.
To check the spring tension, load one cartridge into the magazine and then firmly
press against the cartridge case. Remove your finger quickly. The cartridge should
instantly and fully move into the feeding position. If it does not, the magazine should
be cleaned. If cleaning does not restore proper spring tension do not use the magazine.
Should cleaning be necessary use a high quality gun cleaning solution that will not
corrode or rust the metal. To do so, remove the magazine follower and spring and
clean all components, taking care to remove carbon deposits from the lips of the
magazine and the magazine follower. Wipe components with a lightly oiled cloth
and reassemble.
15
Page 16
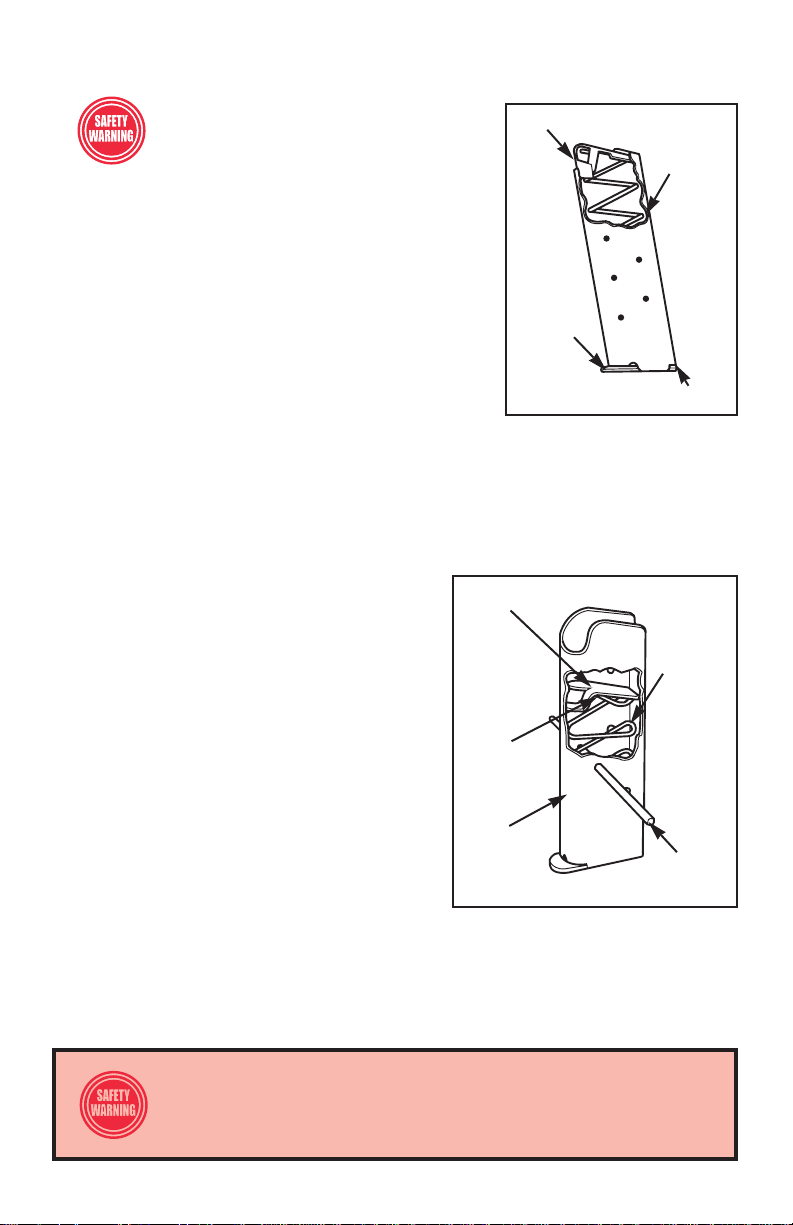
1. Removable baseplate magazine
CAUTION: The magazine spring is
under tension and could come out
causing injury.
Magazine follower
Magazine
spring
To remove the base, push in the base lock which
sticks out through a hole in the base, and slide the
base off towards the front of the magazine. Then
remove the base lock by sliding it towards the front
of the magazine. The spring and follower can now
be removed through the bottom of the magazine.
(See picture #9)
Base
To reassemble this magazine, insert the follower and
spring through the bottom of the magazine. Be sure
that the top coil of the spring is installed towards the
PICTURE #9
Base lock
front of the magazine. Compress the spring and
slide the base lock under the two tabs on the bottom of the magazine. Depress the
base lock and slide the base under the two tabs and towards the rear of the magazine. Carefully align the protrusion on the base lock with the hole in the base until
the base lock sticks out through the hole.
2. Non-removable baseplate magazine
To remove this magazine follower and spring,
depress them with a piece of wood, such as a
Magazine follower
pencil, approx. two to two one-half inches into the
magazine and insert a thin rod or small screwdriver through the lower of the front two witness
Magazine
spring
holes in the magazine tube. This will retain the
spring under tension. (see picture #10)
Turn the magazine upside down and lightly
(Spring loop)
tap it so that the follower falls away from the
spring; lift out the follower from the magazine
body. Push down on the spring to take up the
spring tension, remove the thin rod and carefully allow the spring to extend, then remove it
completely from the magazine tube.
Magazine
PICTURE #10
Thin rod or
screwdriver
To reassemble this magazine, place the spring correctly oriented, i.e. with the
uppermost loop pointing forward into the magazine tube, compress the spring and
insert a thin rod to hold the spring under tension. Place the follower in the magazine and take up the spring tension by removing the thin rod and allow the spring
to push the follower up and seat it against the feed lips.
DAMAGED, NON-STANDARD, OR IMPROPERLY ASSEMBLED
MAGAZINES SHOULD NEVER BE USED. THEY CAN CAUSE A
MALFUNCTION, SERIOUS INJURY OR DEATH.
16
Page 17

Care and Cleaning of the Pistol
BEFORE CLEANING, BE CERTAIN THE HANDGUN AND ITS
MAGAZINE CONTAIN NO CARTRIDGES.
At regular intervals, after firing or whenever the handgun has been exposed to
sand, dust, extreme humidity, condensation, immersion in water, or other adverse
conditions, disassemble, clean and oil it. Proper periodic maintenance is essential
to the reliable functioning of any firearm.
To clean the handgun, proceed as follows:
1. Disassemble (field-strip) the handgun to the extent described on page 13.
2. Using a cleaning rod, run a patch wetted with a high quality gun cleaning solution through the bore several times. Then attach a bristle brush wetted with a high
quality gun cleaning solution to the rod and run it back and forth the full length of
the bore and chamber. Clean bore with dry patches and examine. Bore fouling can
contribute to reduced accuracy, and grease accumulation in the chamber can interfere with proper feeding of cartridges from the magazine.
3. Using a high quality cleaning solvent on a clean patch or bristle brush, remove
powder residue from all components of the pistol. After cleaning, run a dry patch
through the bore, then follow with a patch that is very lightly oiled. Wipe all surfaces
clean with cloth, then wipe all surfaces with a patch or cloth that has been very lightly oiled.
4. NOTE: Only a light application of oil is needed to provide adequate lubrication
of moving parts and to prevent rust. Excess accumulations of oil tend to attract particles of dust and dirt and may congeal in cold weather which can interfere with the
safe and reliable function of the handgun.
LUBRICATION
FIRING A HANDGUN WITH OIL, GREASE, OR ANY OTHER
MATERIAL EVEN PARTIALLY OBSTRUCTING THE BORE MAY
RESULT IN DAMAGE TO THE HANDGUN AND SERIOUS INJURY
TO THE SHOOTER AND THOSE NEARBY. DO NOT SPRAY OR APPLY
LUBRICANTS DIRECTLY ON AMMUNITION. IF THE POWDER OF A
CARTRIDGE IS AFFECTED BY THE LUBRICANT, IT MAY NOT BE IGNITED,
BUT THE PRIMER FIRING MAY PUSH THE BULLET INTO THE BORE WHERE
IT MAY BE LODGED. FIRING A SUBSEQUENT BULLET INTO THE
OBSTRUCTED BORE MAY DAMAGE THE HANDGUN AND CAUSE SERIOUS
INJURY OR DEATH TO THE SHOOTER AND THOSE NEARBY. USE
LUBRICANTS PROPERLY. YOU ARE RESPONSIBLE FOR THE PROPER CARE
AND MAINTENANCE OF YOUR FIREARM.
17
Page 18

WARNING!
BEFORE SHIPPING ANY FIREARM, BE ABSOLUTELY CERTAIN THAT IT
AND ITS MAGAZINE ARE UNLOADED.
DO NOT SHIP CARTRIDGES WITH A FIREARM.
IMPROPER FITTING PARTS MAY RESULT IN
A DANGEROUS MALFUNCTION, DAMAGE TO THE FIREARM,
AND INJURY TO THE SHOOTER AND OTHER PERSONS.
It is the responsibility of the purchaser to be absolutely certain that parts
ordered from the factory are correctly fitted and installed. The purchaser
and installer of parts must accept full responsibility for the correct
adjustment and functioning of the firearm after such installation.
Ordering Parts and Accessories
To order parts by Part Name and Part Number refer to page 22 and page23.
Please refer to the separate order sheet and price list included with the firearm
packaging to place orders. Orders for Auto-Ordnance parts can be processed by
mail, fax or Internet. We do not process phone orders. Prices and availability can
be verified by phone. Then orders must be mailed or faxed. When ordering specify the model, caliber, finish and entire serial number of the firearm - including all
letters and numbers. Note: many parts are common to all firearms regardless of
model finish.
Order accessories by Item Name and Item Number. All parts and accessory
orders should be mailed or faxed to:
Kahr Arms - Parts Dept.
P.O. Box 220, Blauvelt, NY 10913
Phone: (845) 353-7770 / Fax: (845) 353-7833
Online ordering for parts and accessories at www.tommygun.com.
Payment for Parts and Accessories
All orders require prepayment - by check, money order or credit card authorization. Parts and accessories can be ordered online at www.tommygun.com.
KAHR ARMS cannot offer individuals open account or COD requests. Include
$5.00 for shipping and handling on parts orders totaling $50.00 or less. Include
$8.00 on parts orders totaling more than $50.00 except as noted on price sheet.
18
Page 19

WARNING!
TO AVOID PERSONAL INJURY A FIREARM CONTAINING MODIFIED,
BROKEN, BADLY WORN OR MALFUNCTIONING PARTS
SHOULD NEVER BE FIRED!
Shipping Firearms For Service
Auto-Ordnance handguns returned to the factory for service or repair should be
sent to:
K.A.I.
130 Goddard Memorial Drive
Worcester, MA 01603
Contact Kahr Arms Customer Service Dept. at: (508) 795-3919 to receive a “Return
Authorization” Number before shipping a firearm to the factory.
Firearms shipped to the factory must be sent prepaid. THE KAHR SERVICE
DEPARTMENT CAN NOT ACCEPT COLLECT SHIPMENTS.
The Federal Firearm Control Act does not prohibit an individual from shipping
a firearm directly to the manufacturer for service or repair.
However, some states or localities prohibit this. If you live in such a location,
have a Federally Licensed Firearms dealer ship the firearm. It will be returned
to the dealer after being serviced.
Handguns must be shipped prepaid via UPS AIR or FEDEX. Persons who do not
hold a Federal Firearms License are prohibited by federal law from shipping a
handgun by mail. Handguns mailed in violation of the law are impounded by
the Post Office.
Enclose a letter that includes reference to the factory “Return Authorization”
Number, your name, address, telephone number, and serial number and model
of the firearm. Describe in detail the trouble you have experienced with your
firearm, or the work you wish to have done. Stating only that the firearm “needs
repair” is inadequate information. Please enclose copies of any previous correspondence.
Please do not include holsters, custom grips, or accessories with any firearm
being shipped to the factory for service.
Service work performed, other than approved Warranty repairs, will carry a
minimum charge of $15.00 plus a $15.00 return shipping and handling charge.
19
Page 20

THE BASIC RULES OF SAFE FIREARMS HANDLING
We believe that Americans have a right to purchase and use firearms for lawful purposes. The private ownership of firearms in America is traditional, but that ownership imposes the responsibility on the firearm owner to use his firearm in a way
which will ensure his own safety and that of others. When firearms are used in a
safe and responsible manner, they are a great source of pleasure and satisfaction,
and represent a fundamental part of our personal liberty.
Firearms do not cause accidents! Firearms accidents are almost always found to
have been the result of carelessness, or ignorance on the part of the shooter of the
basic rules of safe firearm handling.
The following rules must be observed by firearm users at all times. Safe firearm
handling is not just desirable, it is absolutely essential to your safety, the safety of
others, and the continuation of firearm ownership and sport shooting as we know it
today.
1. ALWAYS TREAT EVERY FIREARM AS IF IT WERE LOADED.
2. LEARN THE MECHANICAL AND HANDLING CHARACTERISTICS OF THE
FIREARM YOU ARE USING.
Not all firearms are the same. The method of carrying and handling firearms varies
in accordance with the mechanical provisions for avoiding accidental discharge
and the various proper procedures for loading and unloading. No person should
handle any firearm without first having thoroughly familiarized himself with the particular type of firearm he is using, and with safe firearm handling in general.
3. ALWAYS KEEP THE MUZZLE POINTED IN A SAFE DIRECTION.
Be sure of the bullet stop or area behind your target, even when dry-firing.
Always be sure the area beyond your target is safe. Never let the muzzle of a firearm
point at any part of your body or at another person. This is particularly important
when loading or unloading a firearm. In the event of an accidental discharge, no
injury can occur as long as the muzzle is pointing in a safe direction. A safe direction means a direction which will not permit a discharged bullet to strike a person,
or to strike an object from which the bullet may ricochet.
A safe direction must take into account the fact that a bullet may penetrate a wall,
ceiling, floor, window, etc., and strike a person or damage property. Make it a habit
to know exactly where the muzzle of your firearm is pointing whenever you handle
it, and be sure that you are always in control of the direction in which the muzzle is
pointing, even if you fall or stumble. Keep your finger off the trigger until you are
ready to shoot.
4. FIREARMS SHOULD BE UNLOADED WHEN NOT IN USE.
Firearms should be loaded only when you are in the field or on the target range or
shooting area, ready to shoot. Firearms and ammunition should be securely locked
in a rack, cabinets or a safe when not in use. Ammunition should safely be stored
separate from firearms in a locked container. Store your firearms out of sight of visitors and children. It is the firearm owner’s responsibility to be certain that children
and persons unfamiliar with firearms cannot gain access to firearms, ammunition,
or components.
20
Page 21

5. BE SURE THE BARREL IS CLEAR OF OBSTRUCTIONS BEFORE SHOOTING.
Even a bit of mud, snow or excess lubricating oil or grease in the bore may cause
the barrel to bulge, or even burst on firing, and can cause serious injury to the shooter and bystanders. Be sure that you are using ammunition of the proper caliber and
loading designated on the barrel for the firearm you are using. If the report or recoil
on firing seems weak, or doesn’t seem quite right, CEASE FIRING IMMEDIATELY,
unload your firearm, and check to be sure that no obstruction has become lodged
in the barrel. Never try to shoot out an obstruction! Have the firearm inspected by a
professional gunsmith or return it to the factory.
6. BE SURE OF YOUR TARGET BEFORE YOU SHOOT.
Don’t shoot unless you know exactly where your bullet is going to strike. Be sure of
the bullet stop behind your target, even when dry-firing with an unloaded firearm.
If you are in the field hunting, do not fire at a movement or noise. Take the time to
be absolutely certain of your target and what is beyond before you pull the trigger.
7. WEAR SHOOTING GLASSES AND HEARING PROTECTORS WHEN YOU
SHOOT.
All shooters should always wear protective shooting glasses and adequate hearing
protectors when shooting. Exposure to shooting noise can damage hearing, and the
use of adequate eye protection when shooting is essential.
8. NEVER CLIMB A TREE OR FENCE WITH A LOADED FIREARM.
Put the firearm down carefully before climbing a fence, and unload it before climbing or descending a tree or jumping over a ditch or other obstruction. Never pull or
push a loaded firearm toward yourself or another person. When in doubt always
unload your firearm!
9. DON’T SHOOT AT A HARD SURFACE, OR AT WATER.
Bullets can glance off many surfaces like rocks or the surface of water and travel in
unpredictable directions with considerable velocity.
10. NEVER TRANSPORT A LOADED FIREARM.
Firearms should always be unloaded before being placed in a vehicle. A suitable
carrying case or scabbard with a lock should be used to carry an unloaded firearm
to and from the shooting area.
11. NEVER USE ALCOHOLIC BEVERAGES WHEN SHOOTING OR HANDLING
FIREARMS.
Don’t drink when handling firearms. Handling firearms while under the influence of
alcohol in any form, or medications that could affect your judgement or co-ordination, constitutes a criminal disregard for the safety of others.
12. FIREARMS SHOULD BE STORED UNLOADED AND LOCKED IN A LOCATION
THAT IS BOTH SEPARATE FROM THEIR AMMUNITION AND INACCESSIBLE TO
CHILDREN AND OTHER UNAUTHORIZED PERSONS.
21
Page 22

AUTO-ORDNANCE MODELS:
1911PKZ, T1911, 1911C and 1911WGS PARTS LIST
Key DESCRIPTION Parts#
1. Slide.....................................................G1
2. Rear Sight ...........................................G2
3. Extractor ..............................................G3
4. Firing Pin Spring..................................G4
5. Firing Pin .............................................G5
6. Firing Pin Stop Plate ...........................G6
7. Magazine Catch Lock..........................G7
8. Magazine Catch Spring.......................G8
9 Magazine Catch ..................................G9
10. Slide Stop Plunger.............................G10
11. Plunger Spring...................................G11
12. Safety Catch Plunger ........................G12
13. Grip Safety ........................................G13
14. Trigger ...............................................G14
15. Mainspring Cap .................................G15
16. Mainspring.........................................G16
17. Mainspring Housing Pin Retainer......G17
18. Mainspring Housing...........................G18
18A. Mainspring Housing
with Lanyard Loop ..........................G18A
19. Mainspring Cap Pin...........................G19
20. Sear Spring .......................................G20
21. Magazine...........................................G21
22. Mainspring Housing Pin ....................G22
23A. Grip Left...........................................G23
23B. Grip Right ........................................G23
24. Grip Screw.........................................G24
25. Stock Screw Bushing ........................G25
26. Thumb Safety....................................G26
27. Hammer Pin ......................................G27
28. Sear and Disconnector Pin ...............G28
29. Slide Stop..........................................G29
30. * Frame (Receiver)............................G30
31. Recoil Spring Guide ..........................G31
32. Recoil Spring.....................................G32
33. Plug ...................................................G33
34. Barrel Bushing...................................G34
35. Barrel, 5”............................................G35
35A. Barrel, 4.25” (Mid size)..................G35A
36. Barrel Link Pin...................................G36
37. Barrel Link .........................................G37
38. Disconnector......................................G38
39. Sear...................................................G39
40. Hammer.............................................G40
41. Hammer Strut....................................G41
42. Hammer Strut Pin..............................G42
43. Front Sight.........................................G43
44. Plunger Tube.....................................G44
45. Ejector ...............................................G45
46. Ejector Pin.........................................G46
47. Medallion ...........................................G47
(Models: T1911, 1911C & 1911WGS)
*FFL DEALERS ONLY
PLEASE SPECIFY MODEL
22
Page 23
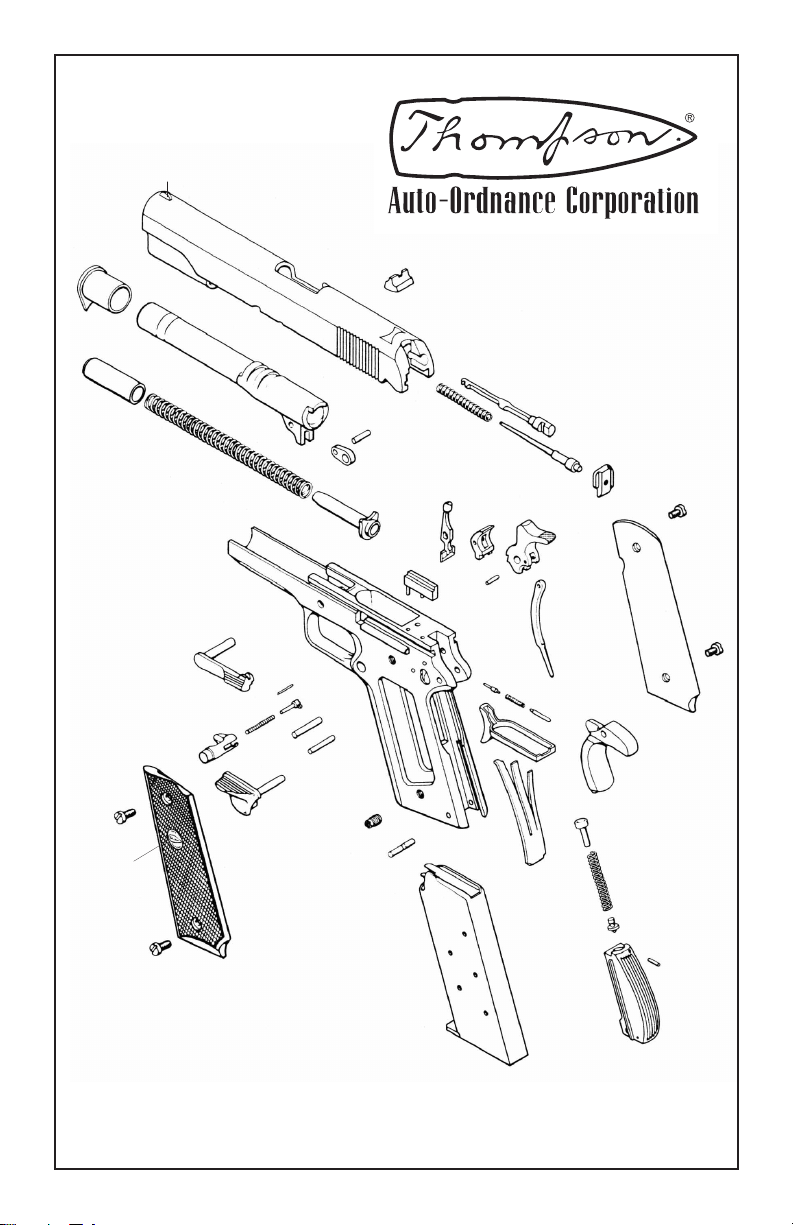
34
24
33
47
23A
43
29
1
2
35
35A
3
32
30
46
8
9
26
36
37
31
44
7
27
28
25
22
45
38
4
12
41
14
15
13
6
24
23B
24
16
42
39
5
40
10
11
20
24
21
17
19
18
18A
EXPLODED VIEW, Models: 1911PKZ, T1911, 1911C and 1911WGS
23
Page 24

Limited One-Year Warranty
Thompson Rifles & Auto-Ordnance Handguns
This “LIMITED ONE-YEAR WARRANTY” has been drafted to comply with
the MAGNUSON-MOSS WARRANTY FEDERAL TRADE COMMISSION
IMPROVEMENT ACT which is effective for goods manufactured on or
after December 31, 1976.
KAHR ARMS / AUTO-ORDNANCE warrants that this firearm was originally manufactured free of defects in material or workmanship. For one
year from date of purchase of the original purchaser, KAHR ARMS
agrees to correct any defect in this firearm for the original purchaser by
repair or replacement (with same or comparable quality model). A service and/or handling charge may be applied.
THIS WARRANTY IS VOID IF THE FIREARM HAS BEEN ABUSED,
MISUSED, DAMAGED BY ACCIDENT, FIRED WITH HANDLOADED AND/OR
RELOADED OR IMPROPER AMMUNITION OR WITH AN OBSTRUCTION IN
THE BARREL, OR DAMAGED THROUGH FAILURE TO PROVIDE
REASONABLE AND NECESSARY MAINTENANCE AS DESCRIBED IN THIS
MANUAL. THIS WARRANTY DOES NOT APPLY TO NORMAL WEAR OF ANY
PARTS, INCLUDING METAL, WOOD, PLASTIC, RUBBER AND OTHER
MATERIAL’S SURFACE FINISH OR IF UNAUTHORIZED REPAIR AND/OR
ALTERATION HAS BEEN PERFORMED.
The terms of the Warranty cannot be changed except in writing by an
officer of KAHR ARMS.
Wholesalers and Dealers (unless a KAHR ARMS authorized Warranty
repair station) are not authorized to make any Warranty repair or adjustment on behalf of KAHR ARMS.
This Warranty gives only the original retail purchaser specific legal rights.
Other rights may also be available which may vary from state to state.
Should repair be required for this firearm, refer to page 19 Shipping
Firearms For Service. Send the unloaded firearm, prepaid via UPS AIR or
FEDEX for handguns or UPS GROUND for rifles, including the “Return
Authorization” Number to:
K.A.I.
130 Goddard Memorial Drive
Worcester, MA 01603
E-mail Address: kahrcs1@ aol.com
Web Address: www.kahr.com / www.tommygun.com
© 2001, Kahr Arms 09015KAP
 Loading...