

Page 1

INSTALLATION INSTRUCTIONS
12V BA
TTER
Y
DIGITAL PRESSURE GAUGES
2650-1241-00
QUESTIONS ?
If after completely reading these instructions you have questions regarding the operation or installation of your instrument(s),
please contact Auto Meter Technical Service at 815-899-0801.
You may also email us at service@autometer.com.
Additional information can also be found at http://www.autometer.com
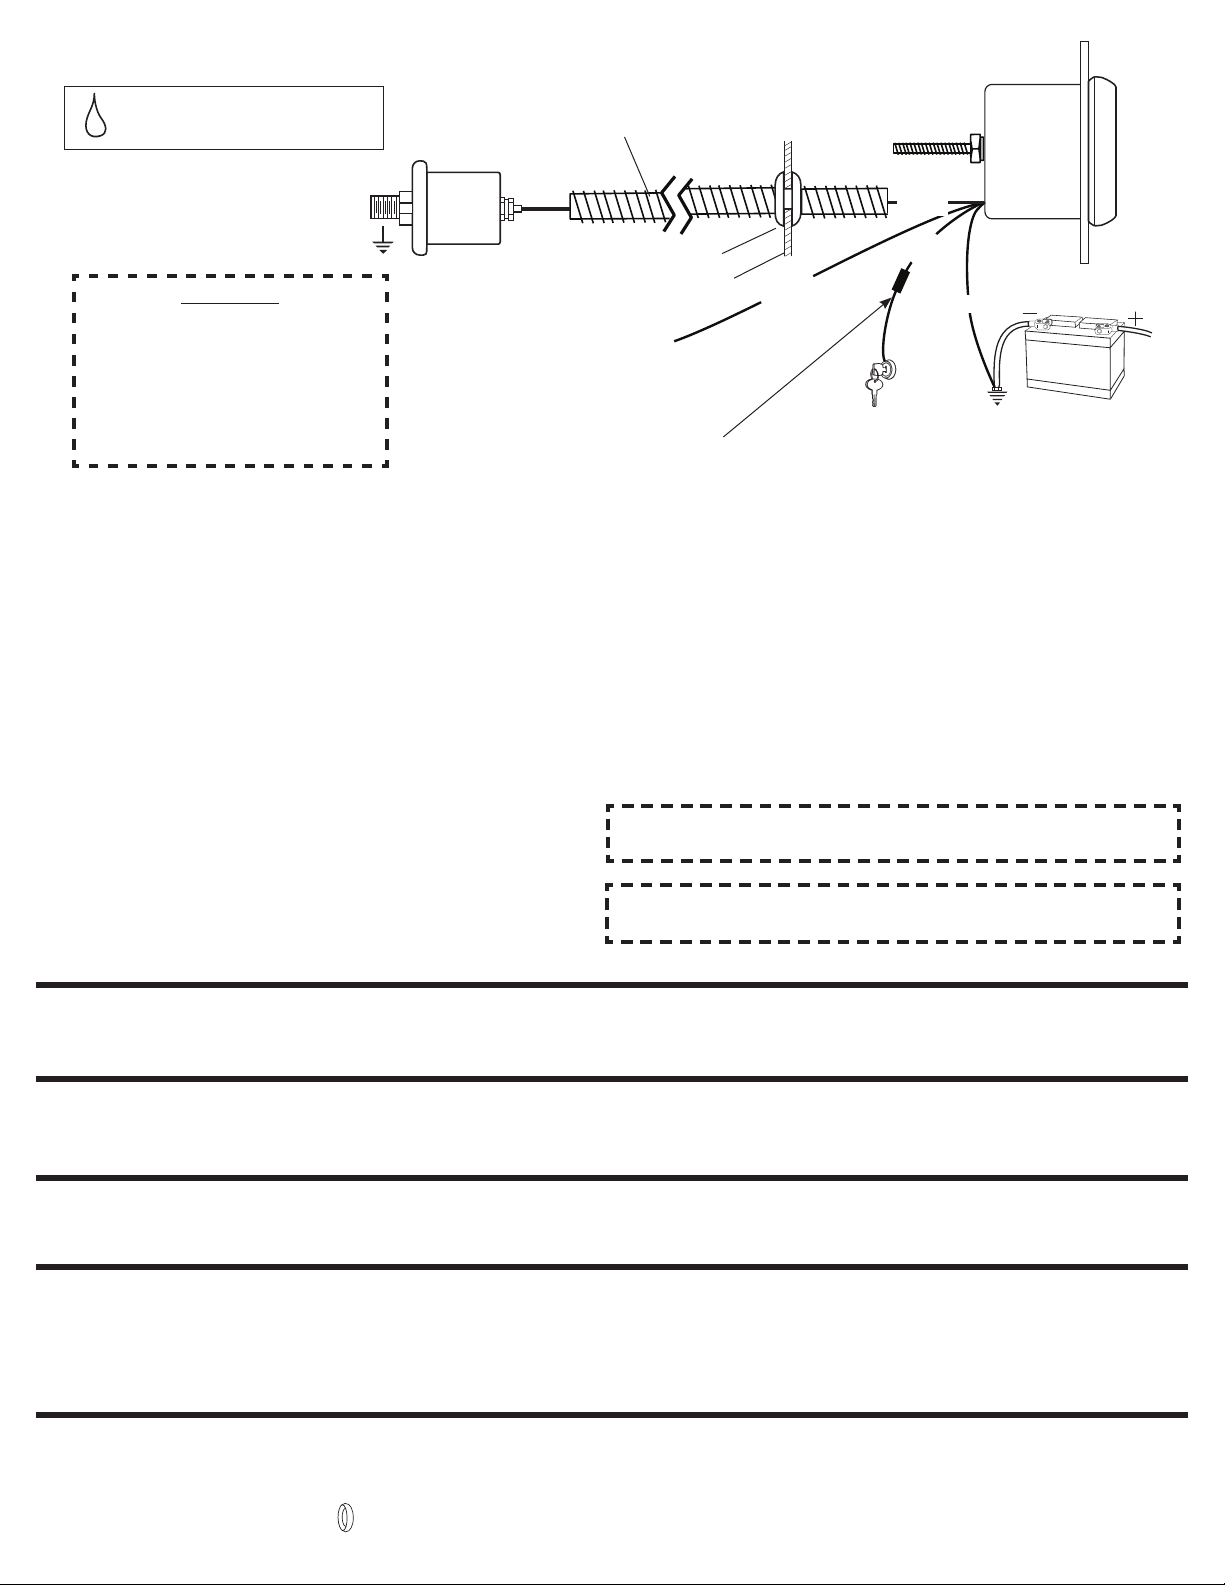
Use teflon sealing compound sparingly
where symbol indicates. (Tape not
recommended on these threads.)
OPTIONAL SLIT TUBING RECOMMENDED
(AVAILABLE AT MOST HARDWARE STORES)
CAUTION!
As a safety precaution, the +12V
terminal of this product should be
fused before connecting to the 12V
ignition switch. We recommend
using a 1 Amp, 3AG fast-acting type
cartridge fuse (Littlefuse
®
# 312 001
SENDER
WIRING
HARNESS
or an equivalent).
Installation - Fuel & Boost Pressure
The fuel system is pressurized and often retains this pressure for an
extended period of time. Properly vent your fuel system before installing
the fuel pressure sender. If you are not familiar with the proper method
of venting, you MUST have this done by an experienced mechanic.
1. Check that you have all parts required for installation, and the
engine is cool.
2. Disconnect the negative (-) battery cable.
3. Gauge mounts in a 2
secure gauge to dash.
4. Drill 1" diameter hole where wires pass through sheet metal
(such as firewall) and install rubber grommet provided.
(Grommet will require slit.)
5. Connect the white wire to dash lighting or switchable 12v light source,
the red wire to switched +12V source and the black wire to ground.
(see diagram for details) Digital display will dim when power is applied
to white wire.
WARNING: Not compatible with Nitromethane, Methanol,
or 100% MTBE.
WARNING:
1
⁄16" hole. Use supplied brackets and nuts to
GROMMET
FIREWALL
WHITE
+12V
DASH
FUSE
(SEE CAUTION LEFT)
+ 12V
CONNECTION
6. For fuel pressure gauge, install the
RED
BLACK
GOOD
ENGINE
GROUND
1
⁄8" NPT pressure sender into
the fuel system (See warning in next column). For Ford fuel injected
applications with a Schrader valve in the fuel rail, use adapter 3280
between the fuel rail and pressure sender.]
If unit is to be installed on a high vibration application such as a full race
engine or engine capable of high RPM, it is strongly recommended that
the sender be remote mounted to either the fenderwell or firewall, to
insulate from vibration. Failure to remote-locate pressure senders
on such an application could result in gauge failure and potential
damage to vehicle and/or operator injury. Braided stainless steel lines
are sold separately by Auto Meter, and can be used to accomplish this.
8. Reconnect negative (-) battery cable.
NOTE: Test all fittings and hoses for any leakage. If any leaks are
detected, determine the cause of the leak and repair. Do not operate
vehicle if any leaks are detected.
CAUTION:
If you will be working with the fuel system, take care to insure no sparks
or flames occur. Do not smoke while installing the fuel pressure sender.
Installation - Nitrous Pressure
1. Check that you have all parts required for installation, and the
engine is cool.
2. Disconnect the negative (-) battery cable.
3. Gauge mounts in a 2
secure gauge to dash.
4. Drill 1
" diameter hole where wires pass through sheet metal
(such as firewall) and install rubber grommet provided.
5. Connect the white wire to dash lighting or switchable 12v light
source, the red wire to switched +12V source and the black wire
to ground. (see diagram for details) Digital display will dim when
power is applied to white wire.
6.
Make sure the nitrous bottle valve is closed and there is no
pressure in the system.
7. Remove the main nitrous feed line from the bottle or the nitrous
solenoid. Install on in-line gauge adapter either on the nitrous
bottle or nitrous solenoid. Re-install the main nitrous feed line.
Install pressure sender and wiring harness. For mounting off
bottle in rear of car, use 20’ sender harness model 5223.
8. Open the nitrous bottle valve.
NOTE:
Test all fittings and hoses for any leakage. If any leaks
are detected, determine the cause of the leak and
repair. Do not operate vehicle if any leaks are detected.
1
⁄16" hole. Use supplied brackets and nuts to
Use teflon sealing
compound where
symbol indicates.
(Tape not
recommended on
these threads.)
In-Line
Gauge Adapter
Check with
your nitrous kit
manufacturer
for availability
of this adapter.
Main Nitrous Feed
Nitrous
Solenoid
IN
OUT
Nitrous
Bottle
Page 2
12V
BA
T
TER
Y
Installation - Oil Pressure
Use teflon sealing compound sparingly
where symbol indicates. (Tape not
recommended on these threads.)
PRESSURE
SENDER
OPTIONAL SLIT TUBING RECOMMENDED
(AVAILABLE AT MOST HARDWARE STORES)
CAUTION!
As a safety precaution, the +12V
terminal of this product should be
fused before connecting to the 12V
ignition switch. We recommend
using a 1 Amp, 3AG fast-acting type
cartridge fuse (Littlefuse
or an equivalent).
NOTE: Some late model vehicles use electronic sensors in their
pressure and temperature senders for engine control
functions. Before removing the original sender, we
recommend that you contact your automotive dealer to be
sure no critical functions will be disrupted.
1. Check that you have all parts required for installation,
and the engine is cool.
2. Disconnect the negative (-) battery cable.
3. Gauge mounts in a 2 nuts to secure gauge to dash.
4 Connect the white wire to dash lighting or switchable 12v light
source, the red wire to switched +12V source and the black wire to
ground.(see diagram for details) Digital display will dim when power
is applied to white wire.
5. Install sender into pressure port of appropriate type. If unit is
to be installed on a high vibration application such as a full
race engine or engine capable of high RPM, it is strongly
recommended that the sender be remote mounted to either
the fenderwell or firewall, to insulate from vibration. Failure to
remote-locate pressure senders on such an application could
result in gauge failure and potential damage to vehicle and/or
operator injury. Braided stainless steel lines are sold separately by
Auto Meter, and can be used to accomplish this. Sender features
1
⁄8" NPT male fitting and comes with ¼" NPT adapter. Sender
®
# 312 001
1
/16
" hole. Use supplied brackets and
VIOLET
GROMMET
FIREWALL
+12V
DASH
FUSE
(SEE CAUTION LEFT)
WHITE
+ 12V
CONNECTION
RED
BLACK
GOOD
ENGINE
GROUND
should automatically be grounded when installed into a grounded
component.
If not, or if remote relocation of sender is required, a ground
connection to sender “body” may need to be made. (but not to
sender terminal)
6. Route the violet wire through the firewall. If a new hole is drilled in
the firewall, a gromet is recomended. Connect the violet wire to the
terminal post on the pressure sender.
7. Reconnect negative (-) battery cable.
NOTE:
Test all fittings and connections for leaks. If any leaks are
detected, Determine the cause of the leak and repair.
Do not operate vehicle if any leaks are detected.
Caution: LUBRIPLATE® DS-ES is a non-hazardous substance.
However, it is recommended to wash hands thoroughly after use.
NOTE: Do not remove factory temp sender to install temp sender. If no
location found, a hose adapter can be used.
Sender Error
If no sender is connected, the gauge will display “EØ”. Approximately 4 seconds after the sender is connected, the gauge will display the
fuel level and resume normal operation. If sender is hooked up and “EØ” is displayed, check sender for improper ground or open circuit.
Power-Up
When power is applied to the gauge, the display will light up with all eights immediately followed by the gauge firmware version. After the
firmware version is momentarily displayed, the gauge will begin normal operation and display real time sender readings.
For service send your product to Auto Meter in a well packed shipping carton. Please include a note explaining what the problem is along with your phone number. Please specify when you
need the product back. If you need it back immediately mark the outside of the box “RUSH REPAIR,” and Auto Meter will service product within two days after receiving it. ($10.00 charge will be
added to the cost of “RUSH REPAIR.”) If you are sending product back for Warranty adjustment, you must include a copy (or original) of your sales receipt from the place of purchase.
12 MONTH LIMITED WARRANTY
Auto Meter Products, Inc. warrants to the consumer that all Auto Meter High Performance products will be free from defects in material and workmanship for a period of twelve (12) months from date of the
original purchase. Products that fail within this 12 month warranty period will be repaired or replaced at Auto Meter’s option to the consumer, when it is determined by Auto Meter Products, Inc. that the product
failed due to defects in material or workmanship. This warranty is limited to the repair or replacement of parts in the Auto Meter instruments. In no event shall this warranty exceed the original purchase price of
the Auto Meter instruments nor shall Auto Meter Products, Inc. be responsible for special, incidental or consequential damages or costs incurred due to the failure of this product. Warranty claims to Auto Meter
must be transportation prepaid and accompanied with dated proof of purchase. This warranty applies only to the original purchaser of product and is non-transferable. All implied warranties shall be limited in
duration to the said 12 month warranty period. Breaking the instrument seal, improper use or installation, accident, water damage, abuse, unauthorized repairs or alterations voids this warranty. Auto Meter
Products, Inc. disclaims any liability for consequential damages due to breach of any written or implied warranty on all products manufactured by Auto Meter.
FOR SERVICE SEND TO: AUTO METER PRODUCTS, INC. 413 W. Elm St., Sycamore, IL 60178 USA (815) 899-0801
Email us at service@autometer.com
© 2007 Auto Meter Products, Inc.
The Super Bezel is a registered trademark of Auto Meter Products, Inc.
SERVICE
http://www.autometer.com
2650-1241-00 5/17/07
 Loading...