

Page 1

2650-1128A
INSTALLATION INSTRUCTIONS
Digital Pro Shift System
Level 2 & 3 Gauges and Tubes
If after completely reading these instructions you have questions regarding the operation or installation of your instrument(s),
Additional information can also be found at http://www.autometer.com/tech_faq.aspx
please contact Auto Meter Technical Service at 815-899-0801.
You may also email us at service@autometer.com.
INTRODUCTION
QUESTIONS:
Thank you for your purchase of the Digital Pro Shift System (DPSS) from Auto Meter Products, Inc. The new technology in this product makes it possible to do
away with traditional plug-in chips while providing a combination of features only previously available on our larger Shift-Lite and playback tachometers.
The following basic features are included on this product:
• Single precise user-programmable set point • Digital RPM display • RPM display blanking
• Quick-reacting, intensely-bright LED shift light • User selectable dimming function
• Multiple shift point settings • Color change progressive shift light capability
• User selectable shift light coloration • Full engine RPM playback capability with 80 secs. of record time (Level 3 only).
Please read and follow the instructions below regarding the installation and operation of your DPSS to receive maximum benet and accuracy from this product.
Failure to follow the information below will void the product warranty and may result in damage to your vehicle, this product, and/or personal injury.
NOTE: This product features INTENSELY-BRIGHT LEDS! This feature is intended for maximum driver visibility during daytime operation and high glare
situations. Usage of this product at full brightness during nighttime or extremely dark settings may adversely affect driver’s vision. Auto Meter strongly
recommends that you familiarize yourself with the dimming function of this product and that you do not operate the product at full brightness during
dim or dark lighting conditions.
INSTALLATION
1. Disconnect the negative (-) battery cable.
2. Gauge can be mounted in a 2 1/16" dia. hole with the bracket supplied. Gauge can also be mounted in an Auto Meter Mounting Cup, Panel,
or Auto Meter Gauge Works Pod.
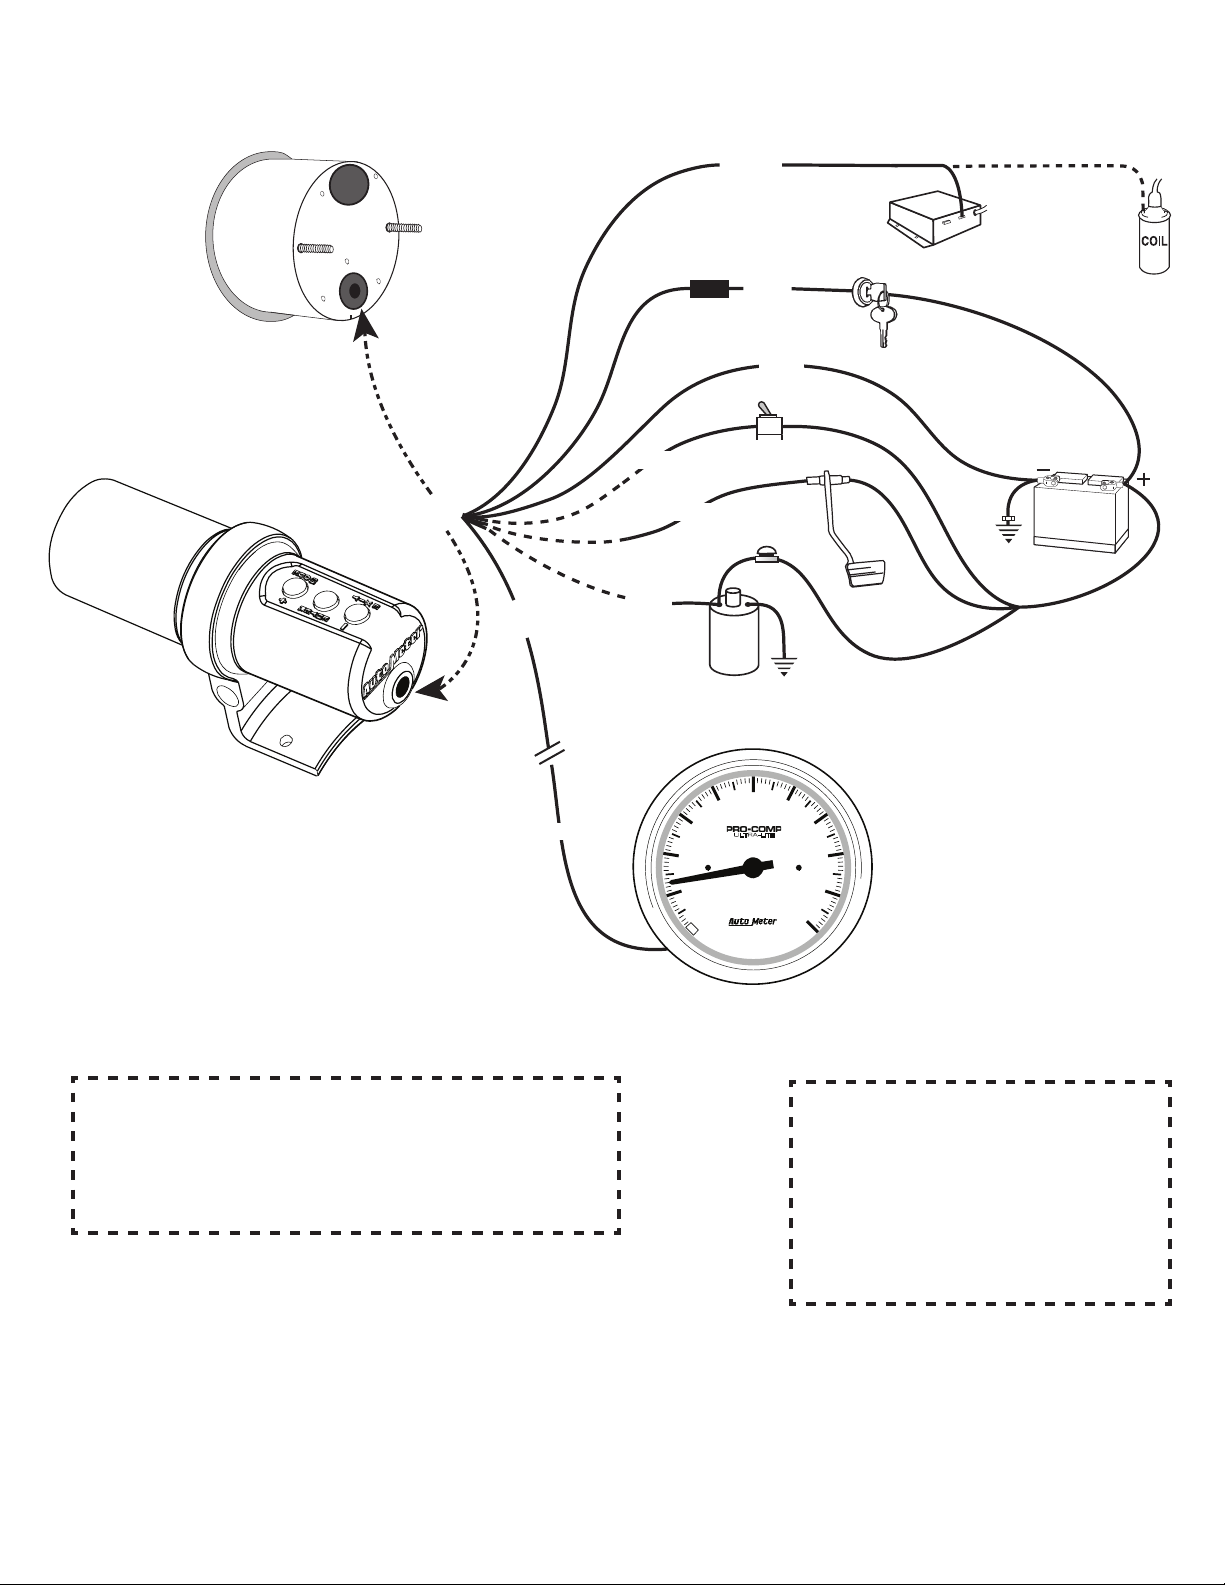
3. Wire gauge as indicated. See schematic on following page for more info:
Red Wire: Connect to a fused and switched 12V positive source that is turned on and off with the ignition switch.
Black Wire: Connect to a good engine, chassis, or battery ground.
Green Wire: Connect to the negative terminal of a standard ignition coil, or to the “Tach Output” terminal on the Electronic Ignition Module. (See diagram)
Blue Wire: (Optional) Connect to positive terminal of Trans-Brake or Line Lock Solenoid. Alternatively, connect to the Brake Light Switch, Clutch Switch,
or a dedicated Remote Start Switch (normally open, momentary closed).
Violet Wire (Level 3 - active only during playback): Connect this wire to the input (green wire) of a standard Auto Meter tachometer.
QUICK SET OPTIONS:
Day/Night Dimming control: This product is extremely bright at the maximum setting for best visibility for drivers during high glare situations. Auto Meter
does not recommend operating this product at full brightness during extremely dark or night time driving conditions. To adjust this product from the daytime or
“High” brightness setting to the nighttime or “Low” brightness setting do the following:
• Press and hold the MENU (+) button for 2 seconds. The shift light will display the new brightness level and the display will indicate
what mode you are changing into with “Hi” or “Lo”.
Preset Mode Quick Set: To quickly activate the preset mode required for the start of the multi-stage shift light function and recording function. Press the
EXIT (–) button. The right-most decimal should now be blinking indicating that the unit is in Preset Mode and awaiting the appropriate trigger to start the
multi-stage shift light function and/or recording process.
Launch RPM Quick Set – If you need to change your Launch Light Setting quickly, do so when the vehicle engine is running and the Digital Pro Shift is in “Tach
Mode” by raising the engine RPM until you have reached the desired set point. Press the ENTER button to conrm your new Launch Light Setting. You should
see the Decimal indicator ash quickly to conrm.
Remove RPM Display – Sometimes fewer distractions are better for a driver. If you want to be able to focus on just the shift light when you’re making a performance run and don’t want to be distracted by the digital RPM display, you can disable the display function. To turn on/off the display function, from “Tach
Mode,” press and hold the ENTER button for 2 seconds. The display will indicate “on” or “off” to indicate which mode you will be changing to.
NOTE: This function only takes affect in all modes. The Shift-Lite LEDS and the “Preset/Record” indicator LED will be the only active elements on the display.
Page 2
12V BA
TTER
Y
(-)
(-)
(+)
(+)
A
U
T
O
M
E
T
E
R
P
R
O
D
U
C
T
S
I
N
C
.
©
2
0
0
5
S
Y
C
A
M
O
R
E
I
L
U
S
A
4
4
9
7
ULTRA-LITE
RPM
THOUSANDS
10
1
0
2
4
5
6
7
8
9
3
OR
OR
OR
OR
WIRING
See “Warning” below
Green
Violet
(Optional Level 3 Only)
Green
Blue
Blue
Fuse
(See
Caution
Below)
Remote Start or
Manual Arm Switch
Blue
Trans Brake
or
Line lock
Solenoid
Red
Black
Good
Engine
Ground
Brake or
Clutch
Switch
Ignition
Switch
Tach output on
Electronic Ignition
Good
Engine
Ground
12V Battery
Caution!!!
As a safety precaution the RED wire of this product should be
fused before connecting it to the positive (+) side of the 12V DC
battery. We recommend using a 4 Amp, 3AG fast-acting type
cartridge fuse (Littlefuse® #312 004 or an equivalent) inline with
the RED wire of our product.
Tach
WARNING
Warranty will be void if connected to coil
when using an aftermarket ignition box such
as, but not limited to products from the following manufacturers: MSD, Crane, Jacobs,
Mallory, Holley, Etc.. Prior to installation of
your tachometer, check with the ignition box
manufacturer for recommended tachometer
signal location.
Page 3

SETUP and OPERATION MODES
A.) MENU MODE – To Select Menu Mode, press the MODE (+) button. To exit setup mode and return to
Real Time display, press EXIT (–).
B.) RUN MODE/RECORD MODE
Record mode (Level 3) can be started. This is accomplished by pressing the EXIT (–) button while the
DPSS is in Tach mode. The right most decimal point should now be blinking indicating that you have
entered “Preset” mode. Pressing EXIT (–) again turns off the “Preset” mode.
While in Preset mode, the Launch Lite function will become active. In this mode, the Shift-Lite will
perform as follows:
When the RPM is below the Launch RPM Set Point: the Shift-Lite will be off.
When the RPM is at the Launch RPM set point +/-100 RPM: the Shift-Lite will be on.
When the RPM is above the Launch RPM set point: the Shift-Lite will ash. Once the unit enters
Record mode, the Launch Lite function will no longer be active.
To enter Run mode (Level 2) or start a recording (Level 3) from Preset mode, press MODE (+) or
apply and remove +12 volts to the blue wire. This can be done with a remote start switch, trans brake
or line lock solenoid, brake switch or clutch switch. The right-most decimal indicator will change to a
constant lit state indicating recording is in progress.
NOTE: Any previously recorded run information will be over-written.
The device will continue to record for the specied maximum time period (80 seconds), or until EXIT (–) is pressed, which ever
comes rst. The decimal indicator will turn off at the end of the recording.
• 450 RPM “Short Shift Protection” is provided. This will advance the shift-lite setting from one shift point to the
next when the engine drops 450 RPM or more. For example, if shift point #1 is set at 6,000 RPM and you short
shift at 5,000 RPM the tach will automatically advance to shift point #2 even though you never reached
6,000 RPM and the light never turned on.
• During a run, after the last shift point, the Shift-Lite will remain off.
If the unit is powered off during the “Preset” mode, the tach will return to the “Preset” mode when power is applied and the
engine is running.
If the unit is powered down during a recording, the tach will return to “Tach” mode when power is applied and the engine is
running. The recording will be available for playback up to the point that power was removed.
C.) PLAYBACK MODE (Level 3 only) – Press and release the MODE (+) . The display will indicate “PLaY.” Press ENTER to conrm
your choice and begin “playing back” the run stored in the memory on the display at 1⁄3 real time.
To “Rewind” the current run being played back, press and hold the EXIT (–) button. The display will play the run backwards from its current position in real
time, for as long as Rewind/Pause is pressed. Once Rewind/Pause is released, playback will be “Paused”.
To resume playback at 1⁄3 real time, press and release the MODE (+) button. Pressing and holding the MODE (+) will play the run forward in real time.
When the MODE (+) is released, playback will resume at 1⁄3 real time. During Playback, the Tach Output on the violet wire will be active.
D.) SHIFT POINT SET – Once “SptS” is shown on your display, press ENTER to conrm that you would like to set your shiftpoint or points. “SP1” will now be
displayed. On Level 1 models you will only be able to set one shift point. To set your shift point, press ENTER to conrm the shiftpoint you would like to
set. The display will now show you the current shift point setting. Use the MODE (+) and EXIT (–) buttons to raise and lower this number. A single press
results in a 10 RPM increment change. Push and hold each button to scroll more quickly through the RPM scale. Once you have dialed in the desired set
point, press ENTER to conrm your choice. Navigate to additional shift point settings by pressing the MODE (+) button. Set these additional points using
the process described above.
NOTE: It is recommended that you set the shift point to 3000 RPM (or a similarly mid to low point in your engine’s rev range) to conrm proper installation.
With the DPSS on and in Tach mode, bring the revs of the vehicle to 3000 RPM and verify that the light activates as specied. Once this test is
completed dial up your shift point to your desired, or engine builder specied RPM setting.
NOTE: If a set point has been changed, all higher Shift-Lite set points will also be changed to the same value. All lower Shift-Lite set points will be left
unchanged. For example, if Shift-Lite set point #2 is changed to 6,000 RPM, set points #3 and #4 will also be changed to 6,000 RPM.
Set point #1 will not be changed. Set point #5 is the Launch RPM and will not change when set points #1-4 are changed.
E.) *LAUNCH LITE SET – The Digital Pro Shift System has a Launch Lite setting for drag racing applications and other
forms of motorsport that can benet from a precise launch RPM from a dead stop. When the Launch Lite is active, the shift light will perform as follows:
• When the RPM is below the Launch RPM Set Point: the shift light will be off.
• When the RPM is at the Launch RPM set point +/-100 RPM: the shift light will be on.
• When the RPM is above the Launch RPM set point: the shift light will ash.
Press the MODE (+) button until “SptS” is displayed, press ENTER to conrm this choice and then press MODE (+) until “LnCH” is displayed.
Press ENTER to conrm your choice to set your launch light RPM. Use the MODE (+) and EXIT (–) buttons to scroll up and down until your desired RPM
set point is displayed. Press ENTER to conrm your Launch Lite set point.
* LAUNCH RPM QUICK SET – If you need to change your Launch Light Setting quickly, you can do so when the vehicle engine is running and the Digital
Pro Shift is on by raising the engine RPM in “Tach Mode” until you have reached the desired set point. Press the ENTER button to conrm your new
Launch Light Setting. You should see the Decimal indicator ash quickly to conrm your new setting.
F.) PULSE PER REVOLUTION SET (CYL. CALIBRATION) – Use this feature to calibrate your Digital Pro Shift System to your engine and ignition type. To
enter Pulse Per Revolution Set, press the MODE (+) button until “PPr” is displayed, then press ENTER to conrm your selection. You may now use the
“+” and “–” buttons to cycle up and down through the pulse settings available on this product. Pulse per revolution settings refer to the number of pulses
or “plug rings” provided by the ignition to the device per engine crank revolution. For example a single coil ignition on a 4-cylinder engine will typically re
two cylinders per crank revolution. If your ignition matched this type, you would need to set your PPr value to “2” ( † See below). Below is a list of common
ignition pulse settings. If you need further assistance calibrating this unit for your application please visit our Tech Tips and FAQ section on our website
(http://www.autometer.com/tech_faq.aspx) or contact Auto Meter tech support personnel via the information included with the warranty information
shown later on this sheet.
† The available ignition pulse settings are .5, 1, 1.5, 2, 2.5, 3, 4, 5 & 6.
– The DPSS must be in “Preset” mode before the Run mode (Level 2) or
Page 4

G.) * SHIFT LIGHT COLOR SET – To adjust the color of the light on your Level 2 or 3 product, press the MODE (+) button until “CoLr” is displayed, then press
ENTER to conrm your choice.
• If this is your rst time selecting the color, your factory programmed preset is RED. When you enter “CoLr” from the menu, the display should
indicate “1” and the shift lite should illuminate RED. Use the MODE (+) and EXIT (–) buttons to cycle up and down the color choices. Use the
chart below for your reference.
Display Indicated Shift Light Color
0 White
1 Red
2 Yellow
3 Green
4 Teal
5 Blue
6 Magenta
• Press ENTER to conrm your color choice and return to Menu Mode.
• NOTE: If yellow is chosen as shift light color, progressive early warning light color changes to Magenta, see Progressive Shift Light set for more info.
H.) SHIFT LIGHT BRIGHTNESS SET – To adjust the high and low brightness settings of your Digital Pro Shift System, press the MODE (+) until “L LV”
(Light LeVel) is displayed and press ENTER to conrm your choice.
• “Lo” is displayed. Factory programmed preset is the lowest setting, “1.” To adjust, use the MODE (+) and EXIT (–) buttons. Max brightness setting
for the Low level from the factory is “11.”
NOTE: Low brightness setting cannot be set higher than 4 light levels below the High setting (i.e. if the High brightness setting is changed to “11” the
new default Low level setting will be “7” and cannot be increased until the High setting is increased).
• Press ENTER to conrm your Low (dim) level setting and proceed to your High (bright) level setting.
• “Hi” is displayed. Factory programmed preset is the brightest setting, “15.” To adjust, use the MODE (+) and EXIT (–) buttons. Lowest brightness
setting for the High setting from the factory is “5”.
NOTE: High brightness setting cannot be set lower than 4 light levels above the Low setting (i.e. if the Low setting is “7”, the High setting cannot be
set lower than “11” without rst lowering the Low setting.).
• Press ENTER to conrm your High (bright) level setting and return to menu select option.
I.) PROGRESSIVE SHIFT LIGHT SET – The progressive shift light feature of this product enables a color change and blink feature to alert the driver of the
approaching shift point as well as a potential over-rev situation. To adjust this settings of this feature or turn it on or off, press the MODE (+) button until
“PSL” is displayed, then press ENTER to conrm your choice.
• “PSL 1” should now be displayed. This is the early warning point and is indicated by a solid yellow light. To adjust this point, press ENTER. Use the
MODE (+) and EXIT (–) buttons to adjust the percentage of the current shift point set that you would like the progressive early warning color to
activate. The factory programmed preset for this point is 60%. This entry may be set as low as 10% of the current shift point, or as high as 1 below the
PSL 2 setting. Setting this feature to one below PSL 2 disables this feature. Once you have selected the desired value, press ENTER to conrm.
• “PSL 2” will be displayed if you press the MENU button once after “PSL 1” is displayed. This is the shift point approaching warning indicated by a
blinking yellow light. To adjust this point, press ENTER. Use the MODE (+) and EXIT (–) buttons to adjust the percentage of the current shift point set
that you would like the progressive early warning color to activate. The factory programmed preset for this point is 80%. This entry may be set as
low as 1 above PSL 1, or as high as 100%. Setting this feature to 100% disables the blinking yellow light feature of the progressive shift light function.
Once you have selected the desired value, press ENTER to conrm.
• “PSL 3” will be displayed if you press the MODE (+) button twice after “PSL1” is displayed. This is the over-rev warning and is indicated by a blinking
red light. To adjust this point, press ENTER. Use the MODE (+) and EXIT (–) buttons to adjust the percentage of the current shift point set that you
would like the progressive over-rev warning color to activate. The factory programmed preset for this point is 110%. This entry may be set as low as
101% or as high as 150% of the current shift point setting. Once you have selected the desired value, press ENTER to conrm.
• “on” / “oFF” Press the MODE (+) button three times after the display shows “PSL 1” in order to be able to turn on or off the progressive shift light function.
The factory programmed preset for this function is off. Use the ENTER button to toggle this setting on or off, the MODE (+) button to conrm or the
EXIT button to cancel.
• *NOTE: If you have selected yellow as your chosen shift light color, your early warning progressive light color will change to Magenta.
It will default to yellow for all other color options. The over rev feature remains blinking red even if red is selected as the chosen
shift light color.
J.) PEAK Recall – The DPSS features a “peak” recall or memory to recall the highest RPM reached during a particular run. Scroll through the Menu
Mode [MODE (+)] until the display reads “PEAC” then press ENTER. This will display the highest RPM achieved. To clear the peak press MODE (+).
SERVICE
For service send your product to Auto Meter in a well packed shipping carton. Please include a note explaining what the problem is along with your phone number. Please specify
when you need the product back. If you need it back immediately mark the outside of the box “RUSH REPAIR,” and Auto Meter will service product within two days after receiving it.
($10.00 charge will be added to the cost of “RUSH REPAIR.”) If you are sending product back for warranty adjustment, you must include a copy (or original) of your sales receipt from
the place of purchase.
Auto Meter Products, Inc. warrants to the consumer that this product will be free from defects in material and workmanship for a period of twelve (12) months from date of the original purchase. Products that fall within
this 12 month warranty period will be repaired or replaced at Auto Meter’s option to the consumer, when it is determined by Auto Meter Products, Inc. that the product failed due to defects in material or workmanship. This warranty is limited to the repair or replacement of parts in the Auto Meter instruments. In no event shall this warranty exceed the original purchase price of the Auto Meter instruments nor shall Auto Meter
Products, Inc. be responsible for special, incidental or consequential damages or costs incurred due to the failure of this product. Warranty claims to Auto Meter must be transpotation prepaid and accompanied with
dated proof of purchase. This warranty applies only to the original purchaser of product and is non-transferable. All implied warranties shall be limited in duration to the said 12 month warranty period. Breaking the
instrument seal, improper use or installation, accident, water damage, abuse, unauthorized repairs or alterations voids this warranty. Auto Meter Products, Inc. disclaims any liability for consequential damages due
to breach of any written or implied warranty on all products manufactured by Auto Meter.
12 MONTH LIMITED WARRANTY
FOR SERVICE SEND TO: AUTO METER PRODUCTS, INC. 413 W. Elm St., Sycamore, IL 60178 (815) 899-0801
The “Super Bezel” is a registered trademark of Auto Meter Products, Inc.
For Email: Service@autometer.com
© 2006 Auto Meter Products. Inc. 2650-1128A 9/19/06
 Loading...