

Page 1
IMPORTANT
WEAR
SAFETY GLASSES
INSTALLATION INSTRUCTIONS
D-PIC: DIGITAL PERFORMANCE
INFORMATION CENTER
®
2650-1055
Questions?
If after reading the instructions you have questions regarding the operation or installation of your instrument(s),
please contact Auto Meter Technical Service at 815-899-0801. You may also email us at service@autometer.com.
Additional information can also be found at http://www.autometer.com
Introduction
represents a leap forward in performance meter technology making it possible to monitor G forces, 0-60mph times, 60-0mph distances, 1/4 mile
data including reaction time, and peak wheel horsepower from the self contained electronics held within a standard 2 1/16” gauge casing.
Please read and follow the instructions that follow regarding the installation and operation of your D-PIC to receive maximum benefit and
accuracy from this product. Failure to follow the information below will void the warranty of this product and may result in damage to your
vehicle, the product, or personal injury.
is not intended for use in, or contributing to use in any vehicular activity that violates Federal or State laws, or any local ordinances such as, but
not limited to, street racing, speeding, reckless driving, or any other activity or usage that puts either the vehicle operator, passengers or any
other persons or property at risk.
on the street, and always wear your seat belt.-
Thank you for your purchase of the Digital Performance Information Center (D-PIC) from Auto Meter Products, Inc. The D-PIC
Notice: This device is intended for usage in professional applications; racetracks, or other controlled courses or settings. This device
Enjoy your new purchase responsibly, and benefit from the power of information. Always obey all traffic laws while driving your vehicle
Installation
D-PIC may be mounted in all the same fashions that you would mount any other gauge within your vehicle’s interior (panels, pods, pillars, cups, in
the dash, etc.). Visit www.autometer.com to view possible mounting solutions for your vehicle. When installing D-PIC please bear in mind that
despite its extreme mounting versatility, in general when you mount the gauge, the back of the gauge should be facing the front arc of the vehicle,
and the front of the gauge should be facing the rear arc of the vehicle. Following this mounting suggestion will ensure the most accurate readings.
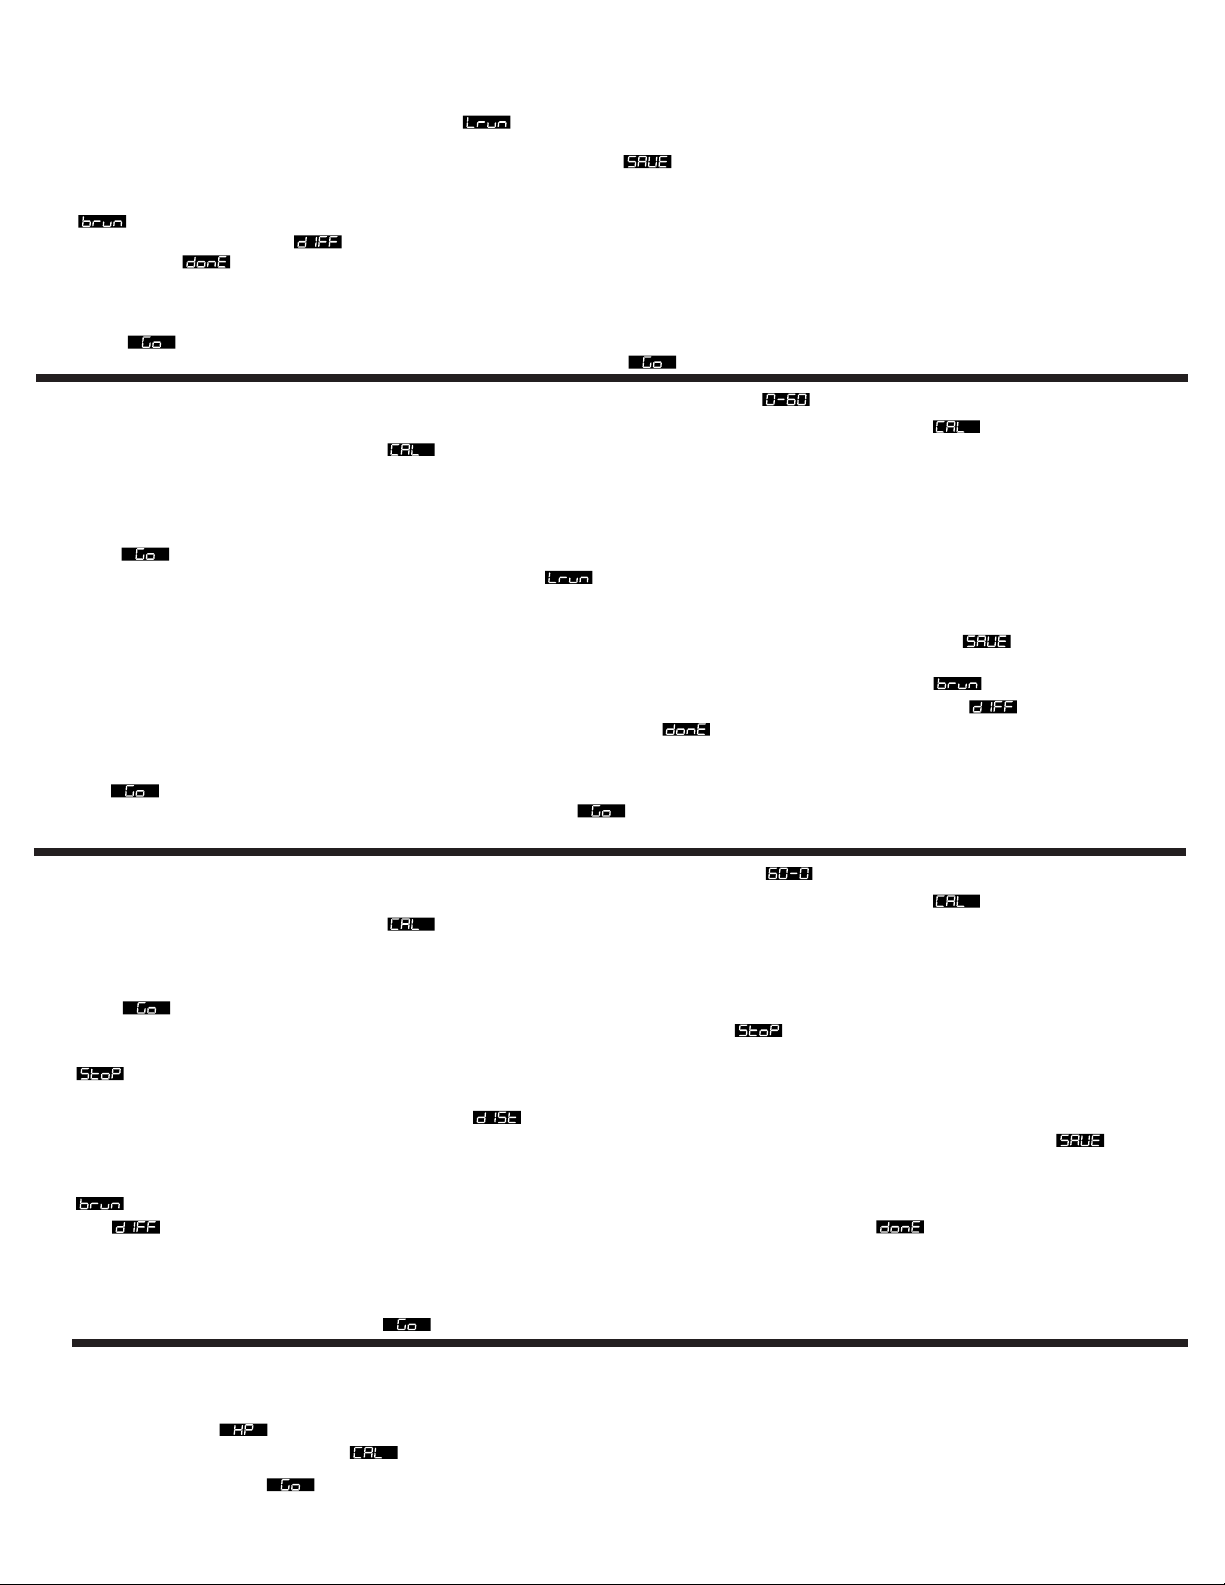
Wiring
Dimming Wire – D-PIC offers an optional
dimming/nighttime illumination wire for adjusting
brightness while driving. Supplying 12v to this wire will
cause D-PIC to dim to half of its normal operating
brightness. It is suggested that you connect this wire
to your headlight switch or vehicle dimmer circuit so
that D-PIC dims when you turn your headlights on.
newer vehicles with Pulse Width Modulated (PWM)
dimming (such as but not limited to 2000 and
newer GM models) it will be necessary to connect
to parking lamps or taillight circuit.
1 AMP Fuse
Red
White
On
Black
Good Engine
Ground
12V Ignition
Switch
12V Dash Lighting
Battery
The D-PIC is ready to go
After installing the D-PIC, you are ready to make performance runs. The D-PIC does not need to be calibrated, adjusted or tuned in any way to
provide accurate performance mode information. The D-PIC is factory calibrated to sense forward and lateral G forces in the flat and level
mounting position. If your D-PIC installation is not flat and level the G forces displayed in Real Time mode may be high or low by some
percentage. T
Mode) in which the D-PIC learns how it is mounted in your vehicle and corrects itself for not level installations.
o correct for this you will need to perform a simple vehicle calibration procedure (see V
ehicle Calibration section under Set Up
Performance Modes
A.) 1/4 Mile Mode – To enter 1/4 Mile Mode, press the MODE button until is displayed. Make sure the vehicle is at a complete
stop at the beginning of your course, and then press the ENTER button to confirm. Display will show to indicate mode has been
entered. Do not move your vehicle while the gauge displays or you will obtain false readings. When the gauge lights the LED array and
displays
from to and then the bar graph will light from blue to red. When the graph is fully lit display will change to . Try to launch
your vehicle at the precise moment is displayed in order to score a perfect reaction time.
you may begin your 1/4 mile acceleration. Note: if you have Reaction Time turned on in the Set Up mode, the display will change
During 1/4 mile mode operation, D-PIC will calculate your vehicle’
mode), and peak G’
you with results.
operation.
During 1/4 mile acceleration, D-PIC will display an increasing number which is your calculated speed in MPH. When 1/4 mile distance has been
reached gauge will display indicating last run followed by if reaction time is enabled, or elapsed time, and then
s in all four axes. You will need to accelerate your vehicle through the entire 1/4 mile distance in order for D-PIC to provide
Note: A straight, level surface, free of obstructions and with adequate braking distance should be used for best
s 1/4 mile time (ET) and speed (MPH), reaction time (if activated in the Set Up
Page 2
followed by your mile per hour at the end of the 1/4 mile. At this point, safely bring your vehicle to a controlled stop
to check your results.
Gauge will display results once and then display and flash LED bar graph. To review your results again,
press the B button and the gauge will display your reaction time, elapsed time, 1/4 mile speed, and peak G’s. To
save your results as your new Best, press the A button once to display , then press the B button to confirm.
Note: Saving a run as your new Best run will overwrite (erase) your previous best run. D-PIC will automatically
save/overwrite your last run file each time you make a new pass. To view your best run, press the A button until
is displayed and then press the B button to view
run, press the A button until is displayed and then press enter to view. To exit to Real Time mode, press the
A button until is displayed then press the B button to confirm, or just press EXIT button.
You may view results at any time by entering 1/4 Mile Mode and then pressing the C button to display results.
When is displayed1/4 mile mode may be exited prior to beginning acceleration by pressing the EXIT button. 1/4 mile mode will time out
and return to Real Time mode if acceleration is not started 1 minute after is displayed.
. To view the difference between your last run and your best
B.) 0-60 MPH Mode – To select 0-60 MPH Mode, press the Mode button until is displayed. Make sure the vehicle is at a
complete stop at the beginning of your course, and then press the ENTER button to confirm. Display will show
been entered. Do not move vehicle while
During 0-60 MPH mode, D-PIC will determine your vehicle’s 0-60 MPH acceleration time in seconds and also G-force. You will need to
accelerate your vehicle from 0 to 60 MPH for D-PIC to make these calculations.
Once is displayed and LED bar lit, accelerate your vehicle to 60 MPH. During acceleration, D-PIC will display increasing MPH. When 60
MPH has been reached, gauge will flash LED bar and display . At this time, bring your vehicle to a stop in a controlled fashion for D-PIC
to view your results.
To view your results, press the B button. To save your results as your new Best, press the A button once to display , then press the B
button to confirm. Note: Saving a run as your new Best run will overwrite (erase) your previous best run. D-PIC will automatically
save/overwrite your last run file each time you make a new pass. To view your best run, press the A button until is displayed and then
press the B button to view. To view the difference between your last run and your best run, press the A button until is displayed and
then press enter to view. To exit to Real Time mode, press the A button until is displayed, then press the B button to confirm, or press
the EXIT button.
You may view results at any time by entering 0-60 Mode and then pressing the C button to display results.
When is displayed 0-60 mode may be exited prior to beginning acceleration by pressing the EXIT button. 0-60 mode will time out and
return to Real Time mode if acceleration is not started 1 minute after is displayed.
is displayed or you will obtain false readings.
to indicate mode has
C.) 60-0 MPH Mode – To select 60-0 MPH Mode, press the MODE button until is displayed. Make sure the vehicle is at a
complete stop at the beginning of your course, and then press the ENTER button to confirm. Display will show to indicate mode has
been entered. Do not move vehicle while is displayed or you will obtain false readings.
During 60-0 MPH mode, D-PIC will determine your vehicle’s 60-0 MPH braking distance in feet. You will need to accelerate your vehicle from 0
to 60 MPH and then safely bring your vehicle to a stop for D-PIC to make these calculations.
Once is displayed and LED bar lit, accelerate your vehicle to 60 MPH. During acceleration, D-PIC will display increasing MPH. When
slightly more than 60 MPH has been reached, gauge will flash LED bar and display . At this time, bring your vehicle to 0 MPH in a
controlled fashion for D-PIC to calculate your braking distance.
is displayed on the D-PIC will cause no results to be calculated and displayed.
When 0 MPH has been reached, D-PIC will display followed by your results for 60-0 MPH braking distance. The result is displayed in
o view your results again, press the B button. T
feet. T
press the B button to confirm.
automatically save/overwrite your last run file each time you make a new pass. To view your best run, repeatedly press the A button until
is displayed and then press the B button to view. To view the difference between your last run and your best run, press the A button
until is displayed and then press enter to view. To exit to Real Time mode, press the A button until is displayed then press the B
button to confirm, or just press the EXIT button.
ou may view results at any time by entering 60-0 Mode and then pressing the C button to display results.
Y
60-0 mode may be exited prior to beginning acceleration by pressing the EXIT button. 60-0 mode will time out and return to Real Time mode if
acceleration is not started 1 minute after is displayed.
Note: Saving a run as your new Best run will overwrite (erase) your previous best run. D-PIC will
o save your results as your new Best, press the A button once to display
Note: Y
ou must reach or exceed 60 MPH, stopping the vehicle before
, then
D.) Horsepower Mode – Note: In order to obtain the most accurate numbers possible from this mode it will be necessary to
input precise vehicle weight with driver under the V
weight will result in false calculations, see Vehicle Weight under Set Up for more information.
MODE button until is displayed. Make sure the vehicle is at a complete stop at the beginning of your course, and then press the ENTER
button to confirm. Display will show to indicate mode has been entered.
When the display reads lightly accelerate your vehicle through first gear. Shift smoothly between gears at approximately halfway to
redline. When you have reached 2nd gear (ideally starting at about 2k RPM), accelerate under full throttle up to but not exceeding your
s engine redline. Once redline has been reached in 2nd gear let of
vehicle’
ehicle Weight section under Set Up mode. Failure to enter a correct vehicle
To select Horse Power Mode, press the
f the accelerator and safely bring the vehicle to a stop to view your
Page 3

results. With an automatic transmission you may need to adjust this procedure so you don't downshift under full throttle
in second gear
is anywhere near its peak horsepower rpm.
When the vehicle has been brought to a stop, D-PIC will display your Horse Power results. The result is displayed in
terms of Horse Power (HP). To view your results again, press the B button. To save your results as your new Best,
press the A button once to display , then press the B button to confirm.
run will overwrite (erase) your previous best run.
time you make a new pass. To view your best run, press the A button until is displayed and then press the B
button to view. To view the difference between your last run and your best run, press the A button until is
displayed and then press the ENTER button to view. To exit to Real Time mode, press the C button.
. The important point here is that when you are in 2nd gear you should be at full thottle when the engine
Note: Saving a run as your new Best
D-PIC will automatically save/overwrite your last run file each
Wheel Horsepower – Static vs. Dynamic – What’s the difference?
Static Wheel Horsepower
But, what is the difference between Static and Dynamic Wheel Horsepower? On a chassis dyno, vehicles are not in motion, and as a result,
additional horsepower losses that are present in an actual drag race due to wind speed, aerodynamic drag, rolling resistance and non-level
driving surfaces are not taken into consideration.
Dynamic Wheel Horsepower – is measured while the vehicle is in motion. W
resistance can all slow a car down. The D-PIC measures the absolute acceleration of the vehicle, including the affects of those factors.
- We all know that wheel horsepower is lower than engine horsepower due to power losses in the drivetrain.
ind speed and direction, aerodynamic drag and rolling
Which is more important? – Dynamic Wheel Horsepower is a true representation of your car’s acceleration ability, taking all factors into
account, including things not found on a chassis dyno, such as traction, rolling resistance, aerodynamic drag, etc. If your engine has 1,000
horsepower on the engine dyno, but you can’t apply that to acceleration, or you don’t account for all the air that you have to move, what does that
really tell you about your acceleration ability? D-PIC measures Dynamic Wheel Horsepower which accounts for all of the real world forces that
aren’t accounted for on a chassis or engine dyno and is the most comprehensive overall indicator of your vehicle’
s performance on a race rack.
E.) Real Time – After initial power-up, D-PIC will perform an animated opening sequence and then default to Real Time mode. Note: If
you have just installed D-PIC you will need to perform a vehicle calibration to ensure that D-PIC will provide you accurate readings in
Real Time mode. All other performance modes will auto calibrate during initiation and do not require this additional step for accurate
operation.
to provide inaccurate readings in Real Time mode only. During real time operation, the gauge will display the operator’s choice of
acceleration/deceleration or lateral G-forces on LED bar graph array and alphanumeric display. The default mode of operation for real time is
the front/rear axis display. Acceleration forces will be displayed on the bar graph array to the right of center. Deceleration forces will be
displayed on the bar graph array to the left of center. To change the display to the lateral axis press the B button. To change the range of G
forces capable of being displayed on the LED array see
Please see additional information about Vehicle Calibration under Set Up. Failure to perform this calibration will cause the D-PIC
Bar Graph Forward/Lateral High/Low under Set Up.
Peak Recall – While in any mode, D-PIC will record the highest or peak G-force values for all four axes (accel, decel, left, & right). To view
these values, press the C button during Real Time mode. To move to the next value, press the A button. To clear the value, press the B button.
Gauge will return to real time operation if no buttons are pressed for 4 seconds. Peak G forces are displayed and cycled in the following order
with the codes shown below.
– Peak Acceleration G Forces – Peak Deceleration G Forces
– Peak Lateral Left G Forces – Peak Lateral Right G Forces
F.) Setup Mode – To Select Setup Mode repeatedly, press the MODE button until is displayed. Press the ENTER button to
confirm. To exit setup mode and return to Real Time display, press EXIT (C button).
Roll Out: This function only af
dragstrip this distance is how far a car must move before it “rolls out” of the starting beams and starts the timer. By dialing your Roll Out
distance on the D-PIC to match your roll out distance at the dragstrip, the D-PIC calculation should be very close to the timing equipment at the
strip. With a Roll Out of zero, D-PIC will give you a slower ET reading than a dragstrip timer, as the D-PIC will start the timer the instant the car
moves, whereas the dragstrip timer does not start until after the car fully rolls out of the start beams. A zero Roll Out will however be the most
accurate indication of how long it takes your car to cover a standing 1/4 mile. The factory default setting for Roll Out is 6” as this seems to
match the average staging practices at most dragstrips. Increasing your Roll Out distance will decrease the ET readings that D-PIC will display
as you are essentially giving your vehicle a head start up to 18” before the timer starts. We recommend that you dial in D-PIC to match your
local track by following the procedure below and adjusting your Roll Out distance up and down until the D-PIC and your track timing equipment
are in sync.
To select Roll Out, enter Set Up mode as described above and then press the A button until is displayed, then press the B button to
confirm. The number displayed represents Roll Out distance in inches, and may be adjusted from 0 to 18. To increase the value shown, press
the A button, to decrease, press the C button. When the desired Roll Out value is displayed press the ENTER button to confirm your setting.
Vehicle Weight: Accurate vehicle weight is necessary for D-PIC to make a correct Horsepower calculation. Vehicle
weight should be entered in pounds to the nearest whole number
most accurate horsepower reading. Underestimating or inputting a lower than actual vehicle weight will cause D-PIC to calculate a much lower
than actual Horse Power value. For example, if you enter your car’s weight of 3,000 lbs with 1/4 tank of gas and only you in it, and then make a
HP measurement with a full tank of gas and 2 friends in the car (+500 more pounds) the HP number will likely be lower than a run with less
weight in the car
Horsepower. Visit your local track or other appropriate vehicle scales to receive an accurate vehicle weight that you can enter into the D-PIC
following the procedure outlined below
To select Vehicle Weight, enter Setup as described above, then press the A button until is displayed. Press ENTER to confirm. The
value displayed is total vehicle weight in pounds (lbs). To increase the value either press or press and hold the A button. To decrease, press or
. Likewise, overestimating or inputting a higher than actual vehicle weight will cause D-PIC to exaggerate your vehicle’
fects the 1/4 mile function. Roll Out is the distance that your vehicle travels before the ET timer starts. At a
. The value entered should be total weight of the vehicle and driver for the
.
s
Page 4

press and hold the C button. Weight is adjusted in 10lb increments, and can be set to any value from 500 to
8,000lbs. When the correct value is displayed, press the B button to confirm.
Reaction Time: Enabling this function allows the D-PIC to test your reaction time while in
the 1/4 mile mode only
then measure the time it takes between when it displays and when the vehicle starts to move.
To enable or disable Reaction Time, enter Set Up mode as described above, then press the A button until
is displayed, then press Enter to confirm. The display will then read if reaction time feature is enabled, or
if it is disabled. To enable reaction time, press the A button, to disable, press the C button. When the
desired result is displayed, press ENTER to confirm.
.
With Reaction time on, D-PIC will perform a dragstrip “Christmas Tree” start and
Bar Graph Forward High Setting: The bar graph forward high mode allows you to adjust the G force scale for forward acceleration as
shown on the D-PIC when operating on the forward axis in Real Time mode. For example, if you set the to 1g, when the bar is fully lit
on the right hand (acceleration) side, the vehicle is achieving 1g of acceleration force or more.
To select Bar Graph Forward High Mode, enter Set Up as described above, then press the A button until is displayed, then press
ENTER to confirm. The current setting should be displayed, and can be adjusted up and down from .3 to 2.0 G’s using the A and C buttons.
When the desired result is displayed, press ENTER to confirm.
Bar Graph Forward Low Setting: The bar graph forward low mode allows you to adjust the G force scale for rearward acceleration
(deceleration or braking) as shown on the D-PIC when operating on the forward axis in Real Time mode. For example, if you set the to
1g, when the bar is fully lit on the left hand (deceleration) side, the vehicle is achieving 1g of force or more during braking.
To select Bar Graph Forward Low Mode, enter Set Up as described above, then press the A button until is displayed, then press
ENTER to confirm. The current setting should be displayed, and can be adjusted up and down from .3 to 2.0 G’s using the A and C buttons.
When the desired result is displayed, press ENTER to confirm.
Bar Graph Lateral Setting: The bar graph lateral mode allows you to adjust the G force scale for lateral acceleration (cornering) as
shown on the D-PIC when operating on the lateral axis in Real Time mode. For example, if you set the to 1g, when the bar is fully lit on
either side, the vehicle is achieving 1g of force or more during cornering.
To select Bar Graph Lateral Mode, enter Set Up as described above, then press the A button until is displayed, then press ENTER to
confirm. The current setting should be displayed, and can be adjusted up and down from .3 to 2.0 G’s using the A and C buttons. When the
desired result is displayed, press ENTER to confirm.
Start G’s: The D-PIC is designed to work on a wide variety of vehicles from mild to wild. For each vehicle, the level of performance
modifications that have been made to the engine such as whether solid engine mounts are used or not can have a large affect on vibrations
that are transmitted throughout the vehicle. For nearly-stock vehicles that do not vibrate that much, you can set the starting G setting lower (.1-
.2) to accurately sense when the vehicle begins to move. On higher vibration vehicles, a setting of .1 to .2 could cause the D-PIC to false start
due to engine vibration. In those higher performance applications, set the starting G setting to .3 to .4. By adjusting the starting G setting you
can achieve the best combination of sensitivity without false starting (triggering the D-PIC too early). Remember, with a higher starting G
setting, if you launch the car soft, the D-PIC may not sense the start of the run. Choose the best setting for your vehicle and the way you
launch the car most of the time.
Vehicle Calibration: Performing this operation will be necessary in order to obtain correct readings from the D-PIC while operating in Real
Time mode. The Vehicle Calibration function allows the D-PIC to determine its angle, pitch, and general location in your vehicle, and to
compensate accordingly, allowing you to mount it virtually anywhere in any position, and still get accurate readings.
o select V
T
ehicle Calibration Mode, enter Set Up as described above, then press the A button until
confirm. should display. At this point bring the vehicle to a stop on a flat and level surface, then press ENTER. will display, at this
point, D-PIC is taking a stationary reading. Do not move the vehicle at this time or your calibration will be incorrect and you will need to re-
calibrate. Next D-PIC will light all LEDs on the radial bar graph and display . Launch your vehicle forward in a good, hard, straight path,
as if you were starting a 1/4 mile or 0-60 run. Accelerate forward, shifting smoothly if necessary. When finished with the calibration procedure
the D-PIC will display done for 3 seconds and then return to Real Time Mode. It is very important while performing the acceleration part of the
Vehicle Calibration that the vehicle not bounce up and down or move side to side.
Do Not: spin the tires, slide the vehicle sideways,
powershift, lug, jerk, bounce or turn the vehicle during this process or the calibration will be incorrect and you will need to repeat the
calibration process again. T
o check your calibration, change your display to Real T
ime Lateral mode (see Real T
accelerate and brake in a straight line you should see very minimal if any lateral G force displayed. If you do, repeat calibration process as
outlined above. If problem persists, contact Auto Meter Tech Support for further assistance.
is displayed, then press ENTER to
ime Mode). When you
For service send your product to Auto Meter in a well packed shipping carton. Please include a note explaining what the problem is along with your phone number. Please specify when you
need the product back. If you need it back immediately mark the outside of the box "RUSH REPAIR," and Auto Meter will service product within two days after receiving it. ($10.00 charge will be
added to the cost of "RUSH REP
Auto Meter Products, Inc. warrants to the consumer that all Auto Meter High Performance products will be free from defects in material and workmanship for a period of twelve (12) months from date of the
original purchase. Products that fail within this 12 month warranty period will be repaired or replaced at Auto Meter's option to the consumer, when it is determined by Auto Meter Products, Inc. that the product
failed due to defects in material or workmanship. This warranty is limited to the repair or replacement of parts in the Auto Meter instruments. In no event shall this warranty exceed the original purchase price of
the Auto Meter instruments nor shall Auto Meter Products, Inc. be responsible for special, incidental or consequential damages or costs incurred due to the failure of this product. Warranty claims to Auto Meter
must be transportation prepaid and accompanied with dated proof of purchase. This warranty applies only to the original purchaser of product and is non-transferable. All implied warranties shall be limited in
duration to the said 12 month warranty period. Breaking the instrument seal, improper use or installation, accident, water damage, abuse, unauthorized repairs or alterations voids this warranty. Auto Meter
Products, Inc. disclaims any liability for consequential damages due to breach of any written or implied warranty on all products manufactured by Auto Meter.
AIR.") If you are sending product back for W
arranty adjustment, you must include a copy (or original) of your sales receipt from the place of purchase.
12 MONTH LIMITED WARRANTY
FOR SERVICE SEND TO: AUTO METER PRODUCTS, INC. 413 W. Elm St., Sycamore, IL 60178 USA (815) 899-0801
SERVICE
© 2005 Auto Meter Products, Inc.
Email us at service@autometer
.com
2650-1055 5/15/05
 Loading...