

Page 1
INSTALLATION INSTRUCTIONS
ALTERNATOR ACTUATED
DIESEL TACHOMETER
2650-608
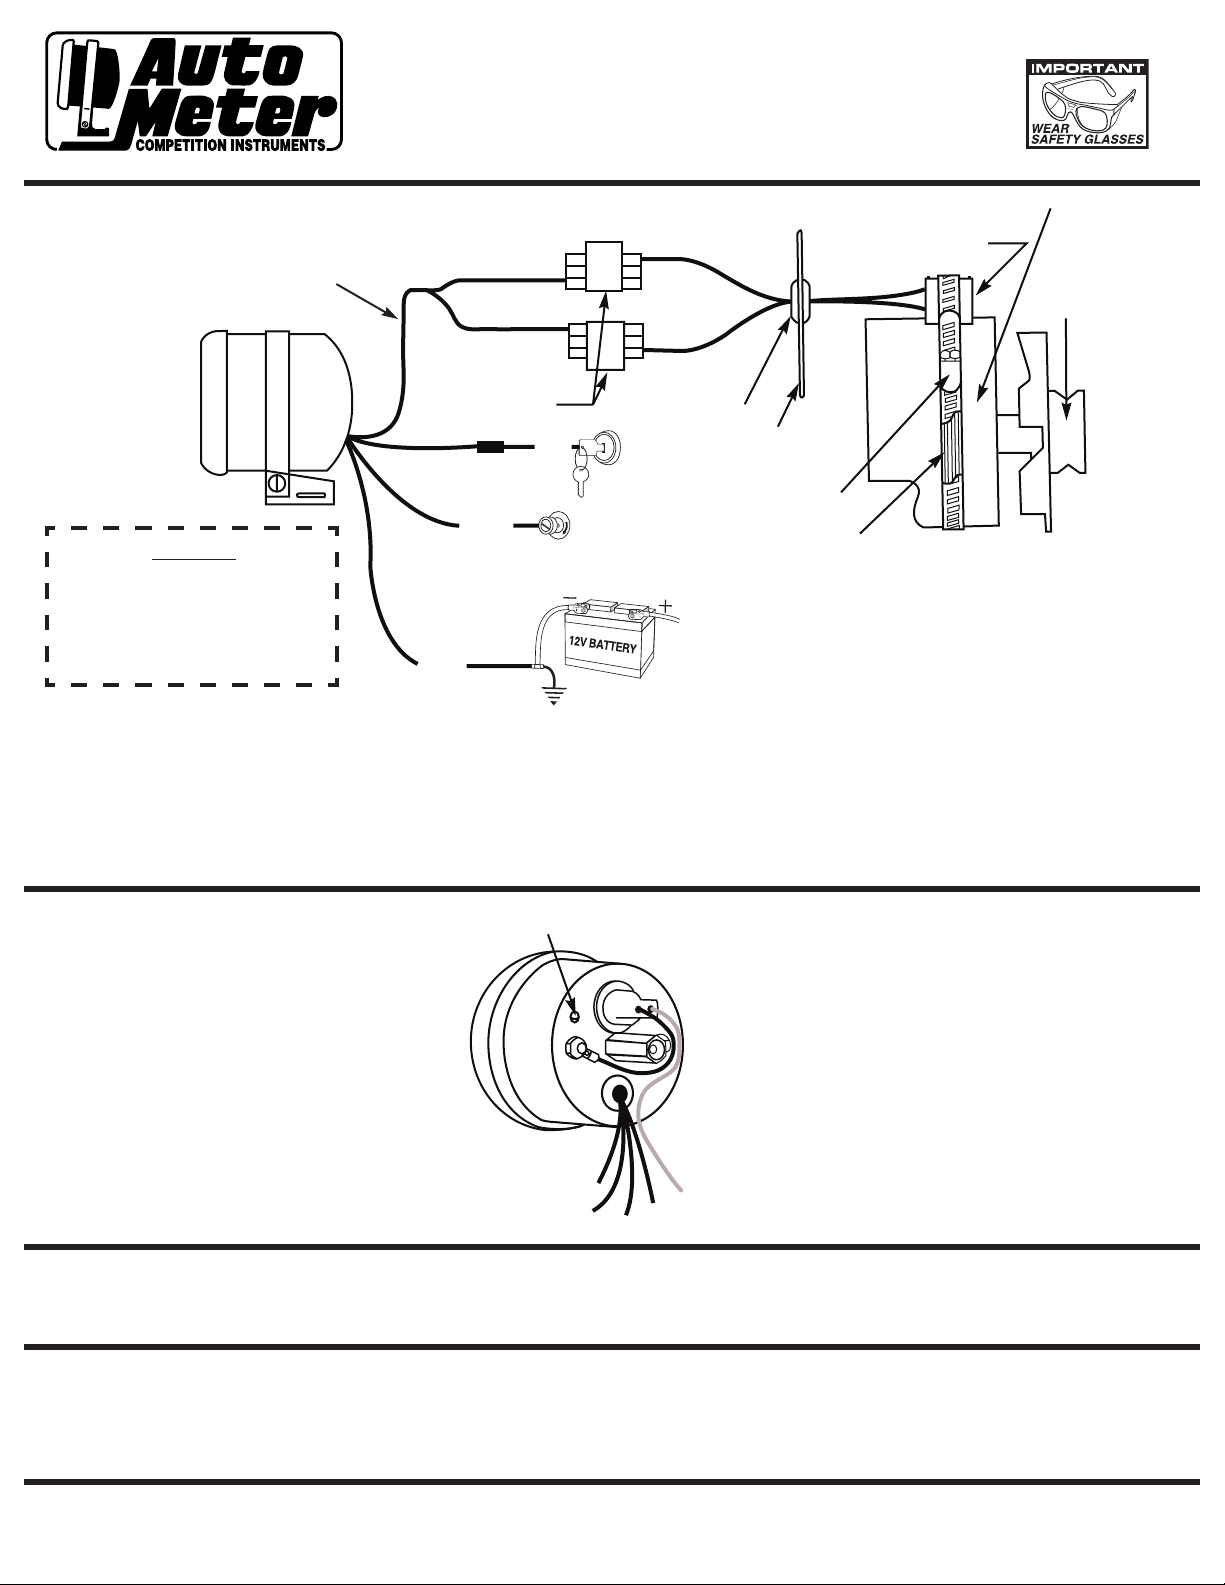
WIRING
TWIN
CONDUCTOR
BLACK WIRE
Caution
As a safety precaution the RED wire of this
product should be fused before connecting
it to the positive (+) side of the 12V DC
battery. We recommend using a 1 Amp,
3AG fast-acting type cartridge fuse
®
(Littlefuse
inline with the RED wire of our product.
#312 001 or an equivalent)
1. Mount probe trigger on alternator by centering trigger over
alternator laminations. Strap trigger securely to alternator
using hose clamp provided.
2. After mounting probe trigger, route both black probe wires through
rewall, using grommet provided. If possible, avoid running trigger
wire alongside other wires.
RIDGED
WHITE STRIPED
(2) SCOTCH LOX
SPLICERS
CAUTION
WHITE
BLACK
SMOOTH
BLACK
FUSE
(SEE
LEFT)
Good
Engine
Ground
®
RED
12V DASH LIGHTING
RIDGED
WHITE STRIPED
SMOOTH
BLACK
12V IGNITION
SWITCH (+)
ALTERNATOR
PROBE TRIGGER
PULLEY
GROMMET
FIREWALL
HORSE CLAMP
ALTERNATOR
LAMINATIONS
3. Determine a safe, visible location for tachometer. After mounting
tach, cut off stripped ends or extra length of the twin conducter
black wire. Connect the ends of the twin conductor black wire
with the ends of the probe trigger wires (smooth to smooth and
ridged/white stripped to ridged/white stripped), using the Scotch
Lox® splicers provided. Connection must be tight for tach
to operate properly.
4. Connect the red wire to battery positive (+) accessory terminal
on ignition switch or fuse box. Connect white wire to 12V dash
lighting. Connect the black wire to good engine round. The meter
should register with the engine running.
TACH CALIBRATION
TO CALIBRATE: Remove the hex head screw at
the rear of the cup. Carefully slide the cup back
along the wires to expose the inner case. Locate
5
the
/32" hole to the left of the snap light socket
CALIBRATION HOLE
IMPORTANT: This Tachometer has a new, improved
meter movement. The tach pointer may
not rest at zero with engine off. This
is normal. When engine is started the
pointer will position on the correct rpm.
assembly. The calibration adjustment is accessed
through this hole. Use a small, slotted screwdriver
to turn the calibration adjustment to achieve the
proper reading.
NOTE: This Tachometer must be calibrated to the pulley
drive ratio and the number of poles on the
CALIBRATE TACH AT HIGHWAY CRUISE
RPM AND NOT AT IDLE RPM. THIS WILL
REDUCE ERROR IN CALIBRATION
For service send your product to Auto Meter in a well packed shipping carton. Please include a note explaining what the problem is along with your phone number. Please specify
when you need the product back. If you need it back immediately mark the outside of the box “RUSH REPAIR,” and Auto Meter will service product within two days after receiving it.
($10.00 charge will be added to the cost of “RUSH REPAIR.”) If you are sending product back for warranty adjustment, you must include a copy (or original) of your sales receipt from
the place of purchase.
Auto Meter Products, Inc. warrants to the consumer that this product will be free from defects in material and workmanship for a period of twelve (12) months from date of the original purchase. Products that fall within
this 12 month warranty period will be repaired or replaced at Auto Meter’s option to the consumer, when it is determined by Auto Meter Products, Inc. that the product failed due to defects in material or workmanship. This warranty is limited to the repair or replacement of parts in the Auto Meter instruments. In no event shall this warranty exceed the original purchase price of the Auto Meter instruments nor shall Auto Meter
Products, Inc. be responsible for special, incidental or consequential damages or costs incurred due to the failure of this product. Warranty claims to Auto Meter must be transpotation prepaid and accompanied with
dated proof of purchase. This warranty applies only to the original purchaser of product and is non-transferable. All implied warranties shall be limited in duration to the said 12 month warranty period. Breaking the
instrument seal, improper use or installation, accident, water damage, abuse, unauthorized repairs or alterations voids this warranty. Auto Meter Products, Inc. disclaims any liability for consequential damages due
to breach of any written or implied warranty on all products manufactured by Auto Meter.
12 MONTH LIMITED WARRANTY
SERVICE
alternator of your vehicle. We suggest you
calibrate using test equipment found at many
stations or car dealers.
FOR SERVICE SEND TO: AUTO METER PRODUCTS, INC. 413 W. Elm St., Sycamore, IL 60178 (815) 899-0801
© 2005 Auto Meter Products. Inc.
For Email: Service@autometer.com
2650-608 1/29/05
 Loading...