

Page 1
INSTALLATION INSTRUCTIONS
IN-DASH ELECTRIC TACHOMETER
For Use on Early Model & Most Electronic Ignitions
2650-1165-00 Rev. C
If after completely reading these instructions you have questions regarding the operation or installation of your instrument(s),
please contact Auto Meter Technical Service at 866-248-6357.
You may also email us at service@autometer.com.
Additional information can also be found at http://www.autometer.com/tech_faq.aspx
Calibration
IMPORTANT: This tachometer is factory calibrated to
operate on 8 cylinder engines. For 4 or 6
cylinder engines, it is necessary to make
the proper adjustments to adapt this
tachometer to your cylinder range.
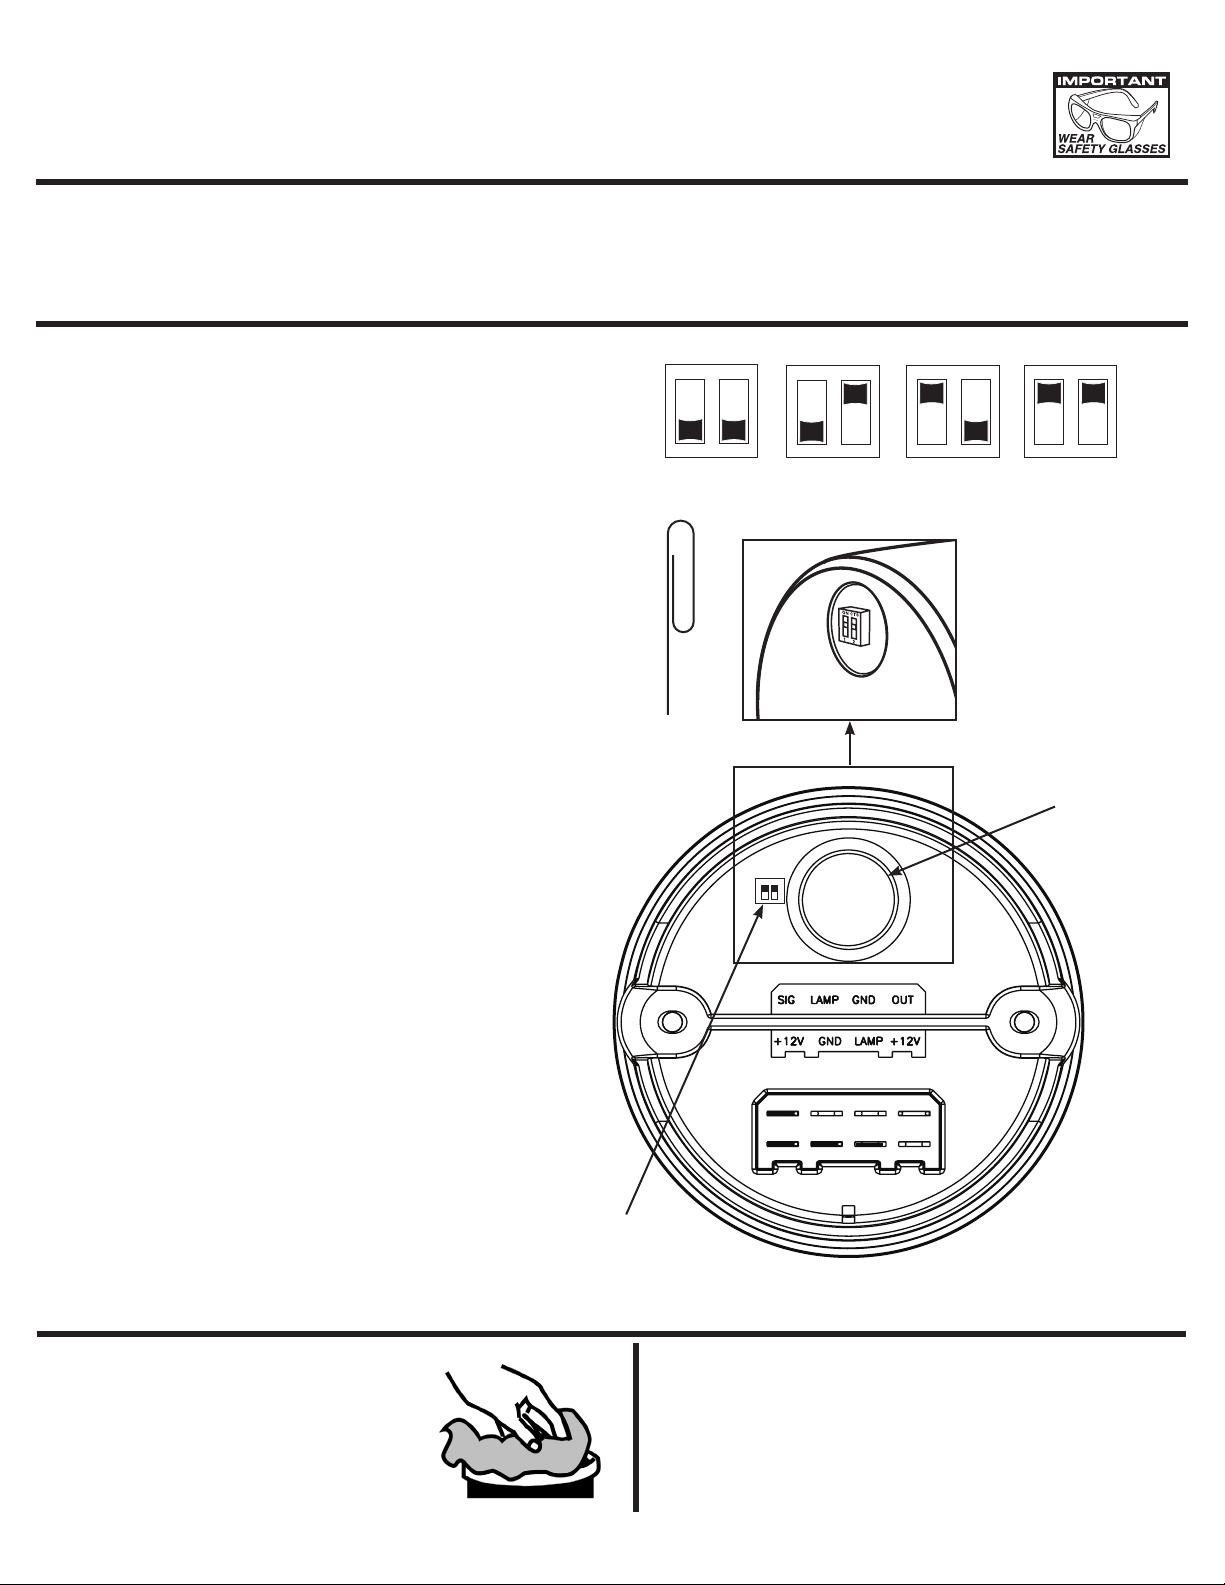
Locate the access hole on the back of the tachometer.
Move each of the two switches to the proper cylinder
selection according to the diagram illustration on the
right. Use a small screwdriver or an unwound paper
clip to change the switch settings.
NOTE: This tachometer has an air core meter. With
power off, it is normal for the pointer to leave
zero. When power is applied, the pointer will
move to the correct position.
Figure A.
8 CYL. (4 pulse)- Both switches up.
6 CYL. (3 pulse)- Switch One up, Switch Two down.
4 CYL. (2 pulse)- Switch One down, Switch Two up.
4 CYL. (1 pulse)- Both switches down.
QUESTIONS:
Figure A.
4 CYL. / 1 PULSE
4 CYL. / 2 PULSE 6 CYL. / 3 PULSE
112
DN DN
(Angle view through access hole)
1
2
2
DN UP UP DN
12
8 CYL. / 4 PULSE
12
UP UP
Access switch
through
access hole.
If you are unsure of your vehicle’s pulse(s) per revolution
or specific calibration requirements, contact Auto Meter
Technical Service Dept. at (866) 248-6357, or go to
www.autometer.com/hp/techtips for information.
Lens Cleaning
To prevent scratching the lens when
cleaning, use a mild, soapy solution to
clean. Wipe lightly with a soft cloth.
Switch may not be
visible from this angle,
shown for location only.
33⁄8" SIZE SHOWN
Note:
This tachometer operates on most early
model ignitions, factory electronic and high
performance electronic racing ignitions.
Page 2

Mounting
1. Mount the 33⁄8” tachometer in a 33⁄8” dia.
hole and a 5” tachometer in a 4-5/8” dia.
hole in the dashboard.
(Be careful not to cut the hole too large.)
2. Cut a 3⁄8” dia. hole in the firewall for
the tachometer wires. Place a rubber
grommet in the hole and route the
connector wires through the grommet to
the engine compartment.
3. Connect the tachometer wires as shown
in the Wiring Section.
4. Secure the tachometer to the dashboard
using the provided bracket & hardware.
WIRING
3
5
33⁄8
" Models
3
1
⁄ 4"
19
4
3
⁄ 4"
12V IGNITION
SWITCH
11
3
⁄ 32"
⁄ 32"
" Models
3
2
⁄ 8"
4
5
⁄ 8"
WARNING
Warranty will be void if connected to
coil when using an aftermarket ignition
box such as, but not limited to products
from the following manufacturers: MSD,
Crane, Jacobs, Mallory, Holley, Etc.. Prior
to installation of your tachometer, check
with the ignition box manufacturer for
recommended tachometer signal location.
Fuse
SEE WARNING BELOW
12V BATTERY
- OR -
GROMMET
IN FIREWALL
LIGHT WIRE
- DASH
LIGHTING
CIRCUIT OR
12 VOLT (+)
_
+
COIL
ELECTRONIC IGNITION
EARLY
MODEL
IGNITION
CAUTION!
As a safety precaution, the +12 V terminal of this product should be fused
before connecting it to the 12V ignition switch. We recommend using a 3 Amp,
automotive fuse or equivalent to help protect this product.
TACH
TERMINAL
For service send your product to Auto Meter in a well packed shipping carton. Please include a note explaining what the problem is along with your phone number. Please specify when you
need this product back. If you are sending product back for warranty adjustment, you must include a copy (or original) of your sales receipt from the place of purchase.
12 MONTH LIMITED WARRANTY
Auto Meter Products, Inc. warrants to the consumer that all Auto Meter High Performance products will be free from defects in material and workmanship for a period of twelve (12) months from date of the
original purchase. Products that fail within this 12 month warranty period will be repaired or replaced at Auto Meter’s option to the consumer, when it is determined by Auto Meter Products, Inc. that the product
failed due to defects in material or workmanship. This warranty is limited to the repair or replacement of parts in the Auto Meter instruments. In no event shall this warranty exceed the original purchase price of
the Auto Meter instruments nor shall Auto Meter Products, Inc. be responsible for special, incidental or consequential damages or costs incurred due to the failure of this product. Warranty claims to Auto Meter
must be transportation prepaid and accompanied with dated proof of purchase. This warranty applies only to the original purchaser of product and is non-transferable. All implied warranties shall be limited in
duration to the said 12 month warranty period. Breaking the instrument seal, improper use or installation, accident, water damage, abuse, unauthorized repairs or alterations voids this warranty. Auto Meter
Products, Inc. disclaims any liability for consequential damages due to breach of any written or implied warranty on all products manufactured by Auto Meter.
SERVICE
FOR SERVICE SEND TO: AUTO METER PRODUCTS, INC. 413 W. Elm St., Sycamore, IL 60178 USA (866) 248-6357
©2011 Auto Meter Products, Inc.
Email us at service@autometer.com
2650-1165-00 Rev. C 11/28/11
 Loading...