

Page 1
Thermal Overload Relay
Current transformer operated
RTD180
Operating instructions
9307391
Ind Mod. 33119
Fig. 1
WARNING: Hazard of electrical shock. Installation and
maintenance by qualified personnel only.
Isolate before servicing. Follow the operating instructions.
Protection degree IP00 with links, IP10 with MR3 terminal box and IP20
without links.
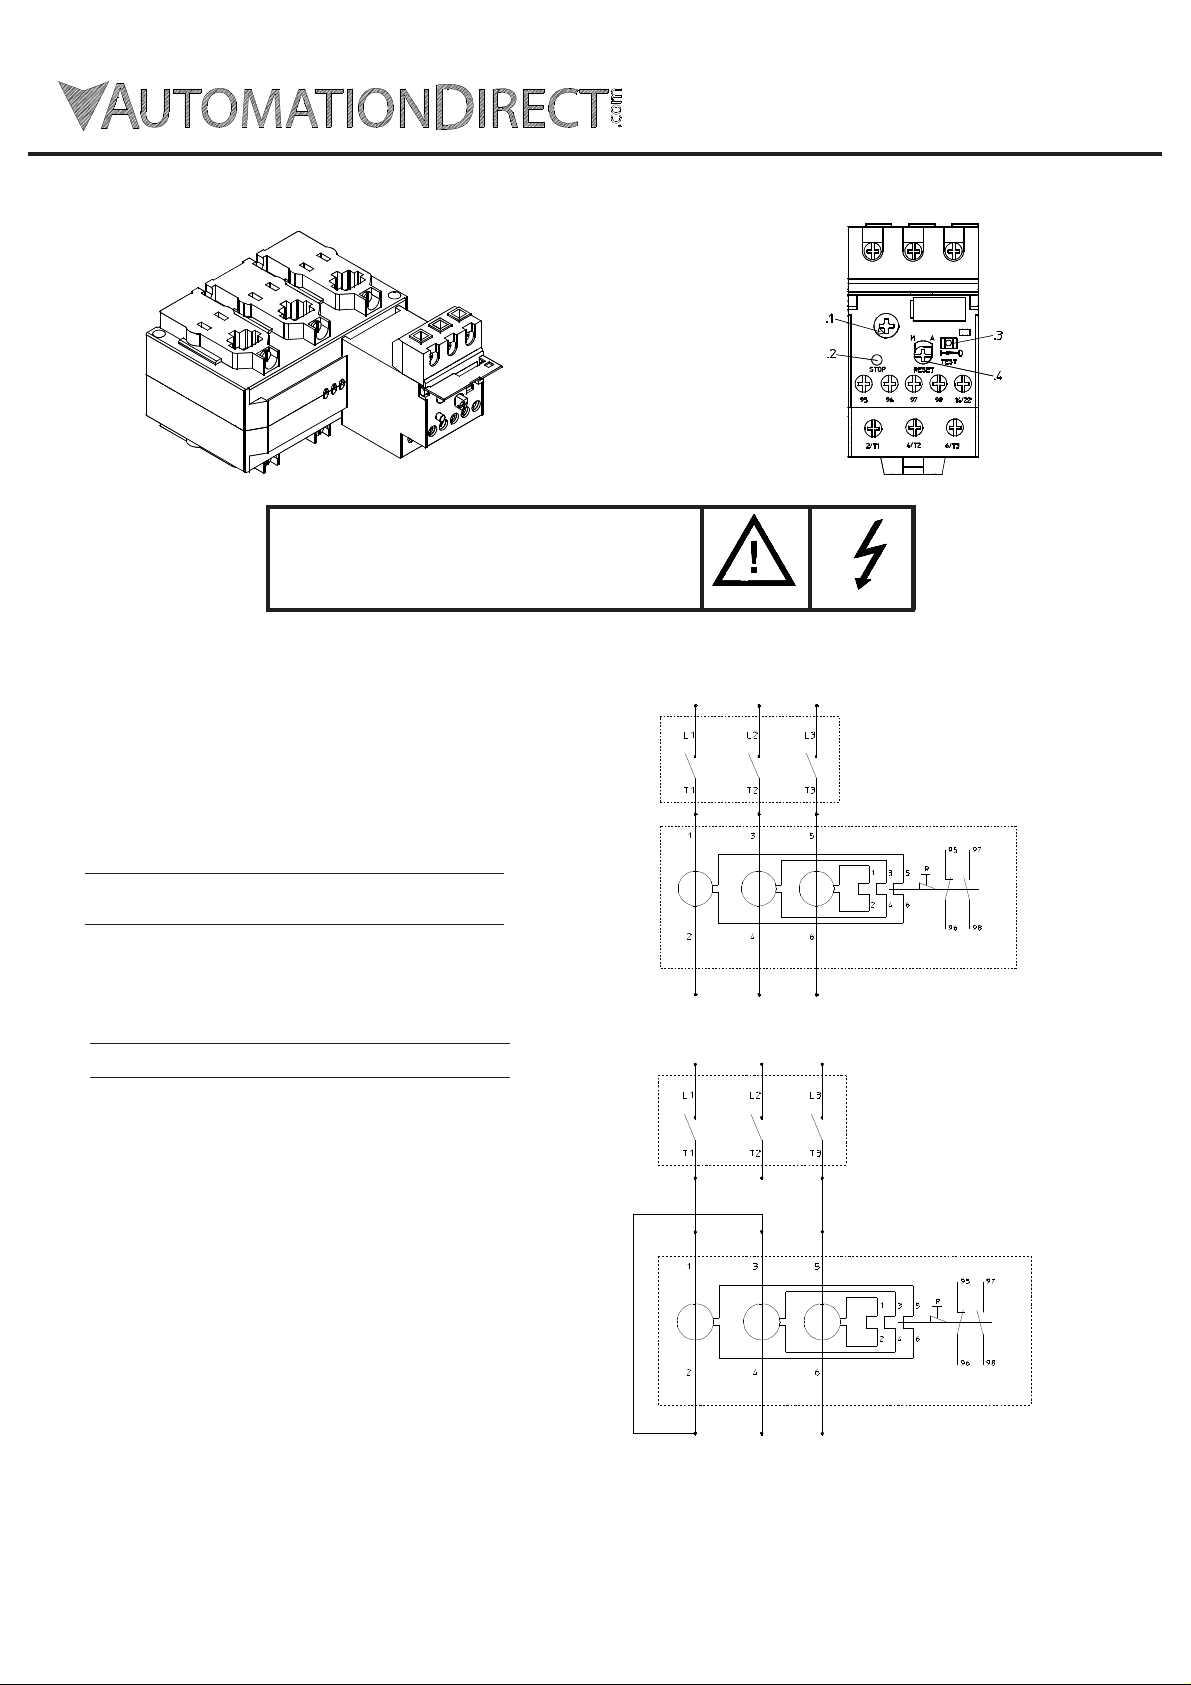
1. Configuration
The current transformer overload relay unit is supplied as independetly
mounted assembly. It is provided with four fixings for panel mounting,
see fig.3.
The thermal overload relay is a factory connected unit, being permanently
sited on top of the 3 phase current transformer assembly mouldings.
Mounting position: any vertical plane orientation within ±30°.
The relay is suitable only for a.c. current 50-60Hz.
Trip class to IEC 60947-4-1: class 10A.
2. Cabling
Fig. 2
Three phase wiring diagrams
Contactor
Main Connection size
60-90A Up to 50mm
80-120A
Up to 120mm2 (AWG4/0) with links for
120-180A
Auxiliary Connection size
2.1. Main connection
Torque:M8 screws = 17Nm (150 lb.in)
For current up to 120A the current transformer unit permits the use of
conductors through the central core hole for each phase connection.
For higher current suitable connecting links are available.
For single phase loads the three main circuits must be series connected.
2.2. Control connection
Torque: M3.5 screws =1-1.3Nm (7 lb.in)
Using correctly size cable, connect the operating coil of the associated
contactor in series with the NC contact of the relay i.e. 95-96.
If a signalling device has to be energized when the relay trips, connect it in
series with the NO contact, i.e. 97-98.
The NC circuit is electrically separate from the NO circuit up to 440V
(150 V AC for UL standard).
3. Setting to full load current of the motor
The relay is set to the full load current of the motor (primary current) by
rotating the adjustment dial .1 (fig.2) until the arrow head correspond to the
value of current.
The secondary current for the adjustment of the relay is one hundredth of
primary current.
Example: rated load current 120A
connection as indipendent unit or to GH15NT
and GH15PT contactors
With terminal box MR3-AD (optional) for
connection with cable of 16-120mm
(AWG5 -4/0) section
Flexible or stranded cable 2 x 0,75-
2,5mm2(AWG 18-14)
Flexible with multicore cable end
2 x 0,5-1,5mm2 (AWG20-16)
setting of relay 1.2A
2
(1AWG)
2
Specifications are subject to change without notice
O/L
Single phase wiring diagrams
Contactor
O/L
Page 2

4. Manual or automatic reset
Set the adjustment dial.4 (fig.2) in the position of arrow as follows:
M= manual reset by means of pushbutton .4 (fig.2)
A= automatic reset
By operating the pushbutton .4 (fig.2) contact (95-96) closes, if tripped.
Automatic reset is not suggested for permanent contact control devices as, when the
tripping occurs, the motor is automatically reenergized after the cooling time of the relay.
5. Function of the red stop pushbutton
Stop button .2 (fig.2) allow to open momentarily the contact (95-96) but it can't be used
to reset the relays when tripped.
6. Test before commissioning
Press pushbutton .4 (fig.2) to reset relay. Move the actionator .3 (fig.2) in direction
of arrow marked "TEST", the relay trips. NC contact (95-96) opens and NO contact (97-
98) closes. Trip indicator .3 (fig.2) shows yellow for tripped condition.
7. Fuse protection
Short circuit protection of the main poles is achieved by a back up fuse as indicated
on rating table.Short circuit protection of auxiliary contacts: 6AgG.
8. Permissible ambient temperature
-25°C to +55°C temperature compensated.
Relays type
RTD180.90
RTD180.120
RTD180.180
Setting range Links type supplied with O/L relays
60-90A without links (fig .3)
80-120A
120-180A
Optional links type BRX180 are available for
independent use (fig.4).
Links BRX180 for independent use
BRP180 for direct connection to
GH15NT, GH15PT (fig.5)
Fig. 3
Fig. 4
3ph typical tripping characteristics
Average values at 20°C ambient
temperature, tripping three-phase from cold
condition.
Proceeding from service condition the times
decrease to 20-30% of the characteristic
values.
Current (multiples of setting current)
Links BRP180 for direct connection to GH15NT and GH15PT contactors
Fig. 5
Specifications are subject to change without notice
 Loading...