

Page 1
©2017 Autogrow Systems Ltd V5.4
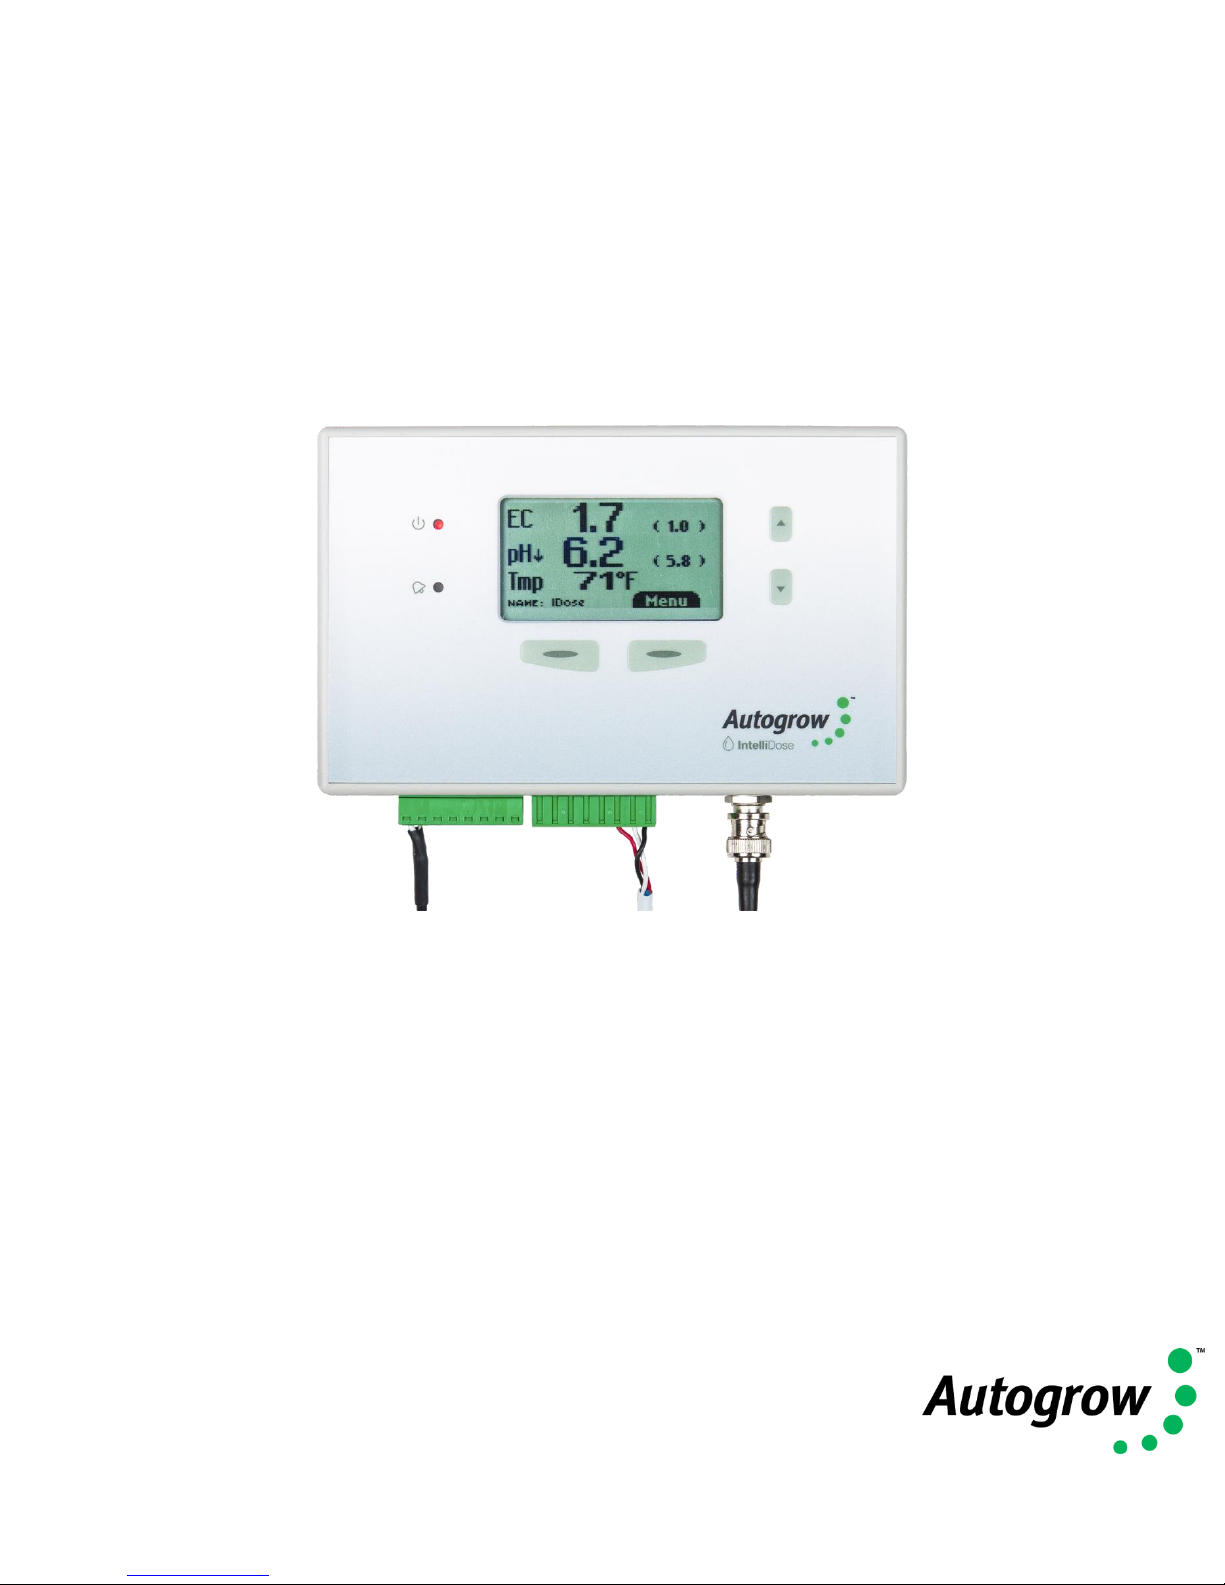
IntelliDose
Installation and User Guide
• Doses up to 9 parts of nutrient, additives and pH
• Measures Conductivity, pH, Temperature
• Displays EC, CF, TDS, oC, oF, pH
• USB – PC/Mac Interface (USB cable supplied)
• Variable ratios for nutrient part (change from vegetative to generative)
• Auto schedule of nutrient ratios and EC’s
• Proportional Dosing (for rapid dosing between irrigations)
• Direct drive dosing pumps (keeps costs down)
• Irrigation with day/night control – precision timer
• Day/Night EC levels
• Water level control – to lower EC
Page 2

IntelliDose Manual
©2017 Autogrow Systems Ltd V5.4 2
Contents
Quick-start page with helpful hints
Important notice:
When using automatic dosing equipment all chemicals must be in dilute
form especially acids and alkalis.
Acids and alkalis should be diluted to a maximum strength of 2% or less. We
recommend diluting your nutrients 1 part nutrients to 4 parts water while
dialling in your dosing settings.
Section A
Introduction to the IntelliDose
TM
Hydroponic doser
Section B
Settings
Section C
Settings for simple 1- or 2-part doser
Section D
Settings for three-part doser
Section E
Proportional dosing (default OFF)
Section F
Sequential dosing (default ON)
Section G
Installation
Section H
Software installation
Section I
Maintenance
Section J
Fault finding
Section K
Specification
Section L
Advanced Irrigation Features
Page 3
IntelliDose Manual
©2017 Autogrow Systems Ltd V5.4 3
Quick-start
This is not a substitute for reading the relevant sections of the manual but is
included to emphasise some important and useful points.
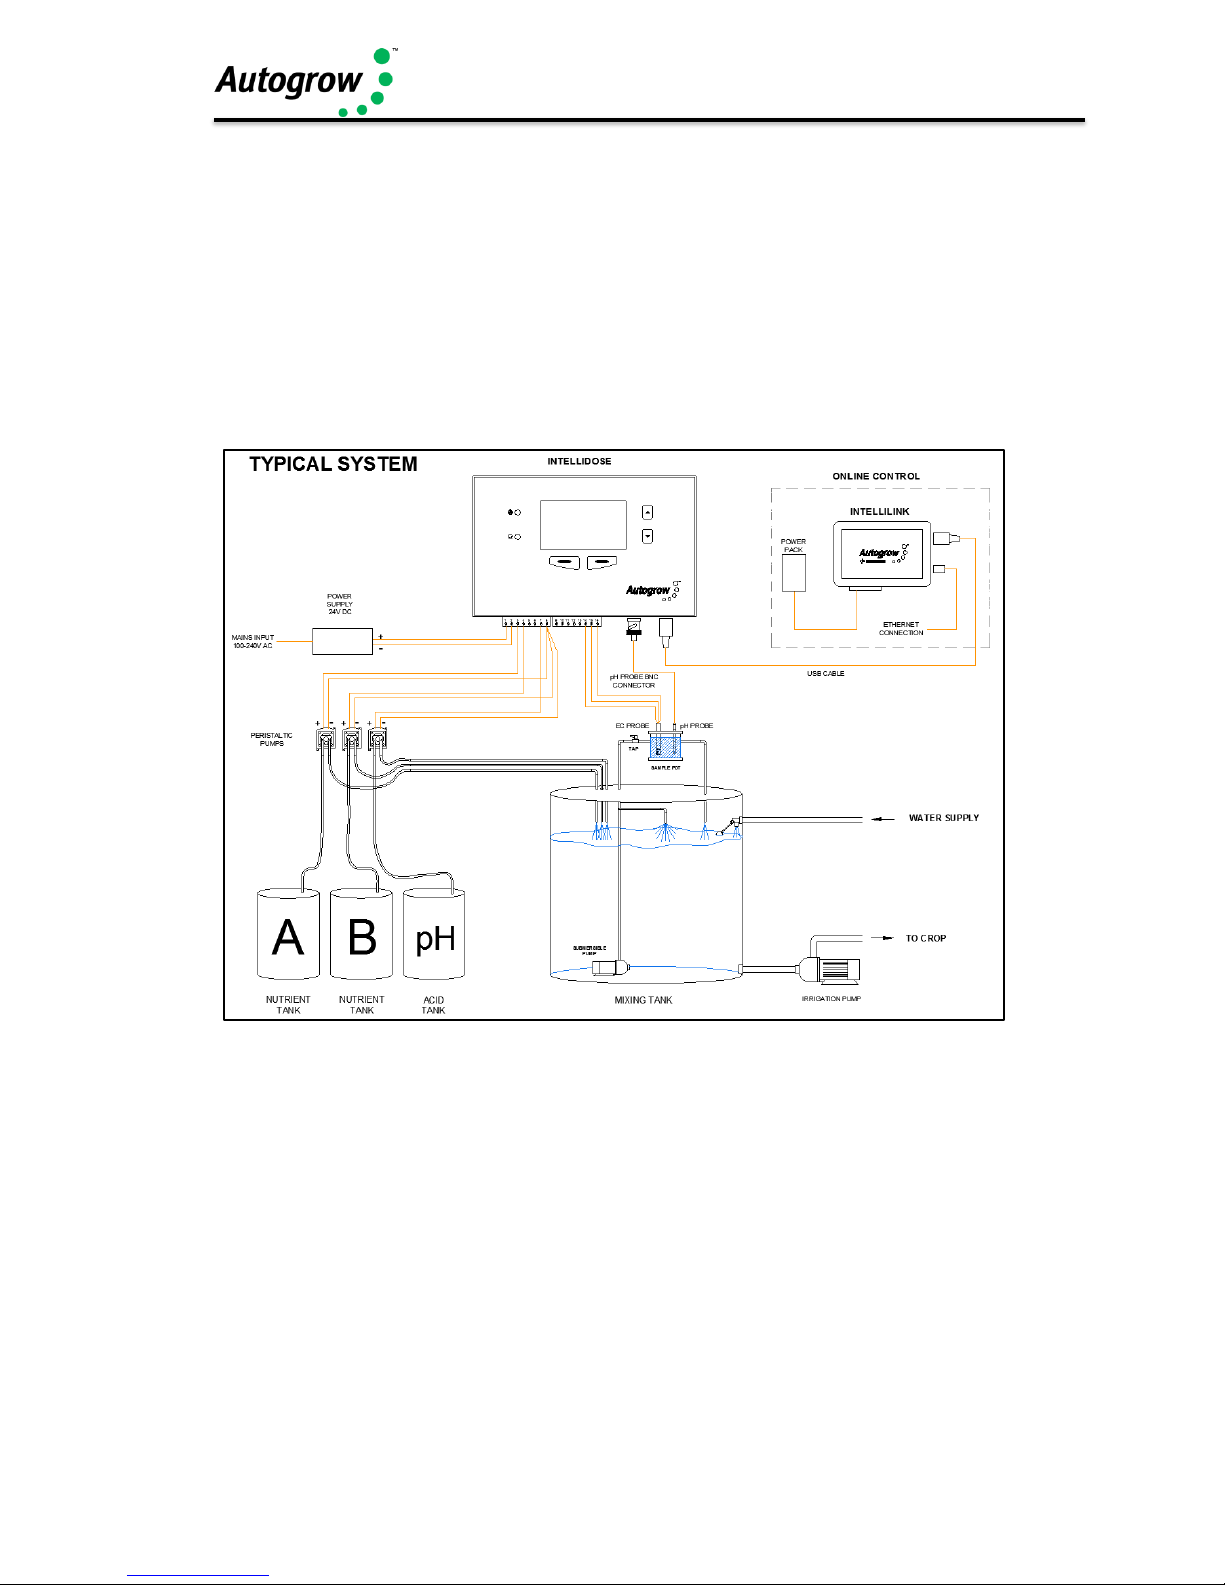
Install the controller to one side of the mixing tank where it will not be exposed to
splashes and vapours (especially acid vapour). Remember that the sensor leads
must be able to reach the sample pot which should be mounted low down just above
the top of the mixing tank. See section H for detailed installation notes.
Typical installation using peristaltic pumps
HINTS:
(1) Keep sample pot low down just above top of tank as
many small pumps have quite low head pressure
capability
(2) Mount IntelliDose away from spray and humidity from tank
and stock solution, preferably just outside grow room
(3) Adjust the valve in the pipe to the sample pot to achieve a
steady flow without excessive turbulence or air bubbles in the
sample pot
Clean the EC sensor and calibrate all sensors before use – see section J for details
Fill all stock tanks and mix tank with plain water and run for a day to check for leaks
and observe operation is correct. (This saves the hassle of emptying a stock tank of
nutrient or acid if a leak is found).
Page 4

IntelliDose Manual
©2017 Autogrow Systems Ltd V5.4 4
IMPORTANT:
When using an automatic doser, the stock solutions and acid/alkali must be
very dilute. This is particularly important if a small mixing tank (e.g. under
250gal)
NB: The acid or alkali for pH adjustment must be diluted to no more than 2%
You may need to experiment with the dilution rate of the nutrients so that a 3 to 8
second dose results in a TDS change of 50ppm (0.1EC or 1CF) and for pH a 3 to 8
second dose results in a pH change of about 0.1pH. In any event, the acid should be
diluted to below 2% strength to ensure that it does not react adversely with your
nutrient and this will also increase the life of tubing and solenoid valves etc.
It is also important that the tank is continually stirred while dosing and there is a
continuous gentle flow through the sample pot. If the sample pot is mounted too high
there is a danger of the flow ceasing if the pump loses pressure (head) for any
reason such as wear or partially clogged input filter.
Software installation
When installing software, it may be necessary to temporarily turn off your virus
checker if you get an error message when the installer tries to copy files into the
program files folder.
Windows XP note. It has been found that whenever a new USB controller is
connected to Windows XP it detects the new hardware and requests that the drivers
are reloaded. When this happens click to allow it to reload drivers and allow it to
search for new software and then to install automatically.
Windows 2000 note: Older machines running under windows 2000 may
occasionally experience the USB going off-line. We have found that some older
machines have USB difficulties if the USB lead is over 2m (6ft) in length. If a cable
longer than this is required we suggest using an “active” USB cable. These are
available from most computer/electronics stores.
Page 5

IntelliDose Manual
©2017 Autogrow Systems Ltd V5.4 5
Section A - Introduction to the IntelliDoseTM Hydroponic doser
The IntelliDose hydroponic doser is, without doubt, the most advanced and user
friendly doser on the market. It has a wide range of possible applications which we
will discuss briefly in this section. To keep the user interface as simple as possible,
only the readings and settings relevant to the selected features are displayed on the
controller’s LCD and on the computer. To add extra features, you must select them
by going into the configure menus on either the controller or the computer.
Features
A full specification is attached as appendix 1. Here we will review the features
available to you. Remember, to enable any feature mentioned here you will need
to go into the configuration menus on either the controller or IntelliGrow to select
them. When the controller is supplied it is set up as a simple two-part nutrient plus
pH lower, timed dosing controller.
Please head to our online Help, found here: help.autogrow.com/intelligrow.
Software
Please head to our online Help, found here: help.autogrow.com/intelligrow.
Selection of units
You may select either EC, CF or TDS (ppm) units for the nutrient strength and either
degrees C or degrees F for temperature. The acidity or alkalinity is always measured
in pH. In this manual, we will use EC (electrical conductivity) to denote either EC, CF
or TDS. The date format is selectable between mm/dd/yy and dd/mm/yy formats.
(The TDS standard used for this controller is EC x 500 but it is also possible to
select ECx640 and ECx700)
Mixing nutrients - IMPORTANT - PLEASE READ THIS CAREFULLY!
When using any automatic doser it is important that the nutrients and acid/alkali are
very dilute. The instructions on many dry powdered nutrients tell you to prepare the
stock solutions to quite a concentrated level (100:1 or more). Liquid nutrients are also
very concentrated. For a small mixing tank, this will be too strong and even if very
short doses are given the system will overshoot. If using powdered nutrient mix them
into water so that for each 1Kg of powder you obtain at least 20ltrs of solution. Liquid
nutrients should be diluted with water to make up at least 5 times their original
volume. Acids and alkalis should be diluted to be less than 2% strength. (if using
strong acids, always wear goggles, gloves and add the acid to the water then stir
well).
When you have the dilution right you should get a 0.1 mS/cm change in EC when
you add around 25ml of A and B stock solutions. In a similar way, the pH should
change by about 0.1pH when 25mL of stock solution is added. If it changes by less
than this – that is fine but if it changes by more - then you will need to dilute the stock
solution further.
Page 6

IntelliDose Manual
©2017 Autogrow Systems Ltd V5.4 6
One part or two-part dosing
For one part dosing, only one dosing pump is used to add nutrient to the mixing tank.
When two-part dosing is selected then two dosing pumps will be used to add part A
and part B stock solutions. In this case it is sometimes found the part A and part B do
not dose at exactly the same rates (one tank empties quicker than the other). There
are a number of reasons why this may occur including different pipe arrangements,
filters partly blocked, tanks or dosing valves mounted at different heights and even
the fact that the two solutions may have different specific densities. To compensate
for this, you may adjust the two dose rates electronically by reducing either A or B
dose rates below 100%. For example, if you set A at 100% and B at 95% then B will
dose a little less than A each time that a dose is added to the tank. This is set by trial
-and-error starting with both A and B at 100%. (Always leave one at 100% and
reduce the other)
Multi-part dosing
With 3 to 8-part dosing, the ratios may be varied to suit a feeding schedule as
recommended by the nutrient supplier. In this case the ratios between all the
nutrient parts can be individually varied. A schedule may be added with IntelliGrow
which will automatically vary the nutrient ratios and EC as required. This can be
used to gradually and automatically change the mix from vegetative to generative
whilst at the same time gradually changing the EC. Note, on each date specified,
the settings change to the new values and then stay at these settings until the next
date in the schedule is reached. Once the last entry is reached the settings just stay
at those values permanently. It is important to note, that when using variable ratios
for the various nutrient part, the dose time must be set to be long enough that the
part with smallest ratio still gets a dose of at least one second. When set for more
than 2 nutrient parts the dose interval must be set for greater than 0 seconds.
Sequential dosing (default ON)
This causes the dosing pumps or valves to activate in sequence, one after the
other and allows high current valves or pumps are connected to the unit without
fear of overloading the controller or its power adapter. If in doubt about the
current required to drive the pumps then always select sequential dosing. If 3
or more nutrient parts are selected sequential dosing is enforced to avoid
damage to the controller.
Proportional dosing (default OFF)
This causes the dose size to automatically vary in proportion to the error and is
useful when you want the tank to dose up quickly. If this is selected then the dose
size is specified as both a maximum and minimum dose time. The controller then
looks at the size of the error and if large gives large doses but as the EC or pH
setpoint is approached, the controller will give smaller and smaller doses
approaching the minimum size. This is useful in irrigating (drip) systems that do not
re-circulate as it allows rapid dosing after each irrigation occurs. This feature is not
available with more than 2 part mixes.
Page 7

IntelliDose Manual
©2017 Autogrow Systems Ltd V5.4 7
Different EC for day and night
This feature is useful for crops needing a weaker solution during the heat of the day
and a stronger mix when it cools down at night time. (e.g. to help prevent tip burn in
lettuce) The user can define when “day” starts and ends and this does not have to
align in any way with actual day time i.e. you can set day to start at 11am and end
at 3:30pm if you wish. Note that the controller is able to both strengthen the mixture
(by dosing) and weaken the mixture by adding water.
Automatic addition of water
By installing a mixing tank (reservoir tank) with two water level ball valves, one at a
low level and the other at a high level it is possible for the controller to dilute the
nutrient tank by adding water. This is done by operating a solenoid valve in line with
the high-level valve. See diagram later in this manual. This function is mainly of
interest to lettuce growers.
Irrigation
This allows a pump to be switched on periodically for a set time to irrigate plants in
pots or bags. The irrigation can be specified to operate in the “day only” mode or it
can have a different interval set for day and night. For example, you could set it to
irrigate for 4 minutes every 1 hours 35 minutes during the day and for 4 minutes
every 5 hours at night. (or not at all during the night)
Alternatively, it can be set to come one once every day at the same time. This
could even be used to operate lighting (instead of irrigation) for indoor crops.
If the pump is a mains voltage pump then a relay will be needed to re-power the
24V DC so that it can supply mains power to the pump. Your distributor should
have convenient relay boxes available for this
Fail safe dosing
Dosing may be inhibited if any of the following is detected.
- EC probe failure
- pH sensor module failure
- EC of zero measured
- pH outside limits detected
Alarms
The alarms can be enabled to operate on the controller buzzer or to text/email you
when using IntelliGrow. Each of these can be silenced or enabled. Any enabled
alarm will sound when a relevant reading deviates outside user set limits. For
humour, we have a selection of alarm sounds including regular, fun and adult.
These can be selected on IntelliGrow under setup.
Outputs
The outputs voltages for dosing and irrigation control are all dependent on the
power supply adapter used.
Page 8

IntelliDose Manual
©2017 Autogrow Systems Ltd V5.4 8
Power supply
The controller requires a power supply between 12V and 24V either AC or DC.
Whatever power is applied will appear at the outputs (when they are ON). The
default power adapter included with this controller is compatible with the solenoid
valves or pumps supplied. Note that the outputs are limited to a current of 1.2A
inductive load and 3A resistive load. The power supply should be sized according to
the maximum load that can be applied at any one time. The maximum total draw at
any one time should not exceed 4A. Normally we supply a 24V DC power supply.
How to use this manual
The IntelliDose has a number of advanced modes of operation and so we have
divided this manual into sections, each of which represents a particular feature.
Please start by reading section C which gives basic setting information for the one or
two-part nutrient doser and then refer to the chapters covering features you require.
For installation advice, go to the installation section at the back of this manual.
Getting Started
Follow the installation instructions in the installation section and when everything is
installed and connected do the following.
Switch on the power. Check that the power light on the front panel is on and that the
LCD display has some information on it.
From here, you need to create your IntelliGrow account. Please head to our online
Help, found here: help.autogrow.com/intelligrow
Once you have your IntelliGrow account setup, you can install the IntelliGrow
Installer. You’ll need to select either Windows or Mac setup, depending on what
computer/operating system you are using.
Please head to our online Help, found here: help.autogrow.com/intelligrow.
If you have more than one new controller, connect their USB cables one-at-a-time
and when the software asks, provide the requested information. For new or
replacement controllers, you'll be asked which grow room it's located in and then to
give the controller a name.
Use a short meaningful name like Doser1, Climate2 etc so that understanding which
device is located in which area is simple to understand as you add more devices.
IntelliGrow will automatically detect any connected controllers and will communicate
immediately. You will also see information from the controller(s) on your computer
screen.
Page 9

IntelliDose Manual
©2017 Autogrow Systems Ltd V5.4 9
Section B – Settings
B1 – Setting from the PC/Mac
ORDER OF SETTING UP A NEW CONTROLLER
1) Visit autogrow.com/intelligrow to get online
2) Set the configuration of the controller to match the physical
equipment. Print the wiring diagram and connect the dosing valves
accordingly.
3) If using scheduling set this or load a ready-made file from disk
4) At the controller, clean the EC probe
5) At the controller calibrate both EC (TDS) and pH
6) At the status tab set dose times
7) Enable all functions that you wish to use
8) Check the time/date on the computer and on the controller
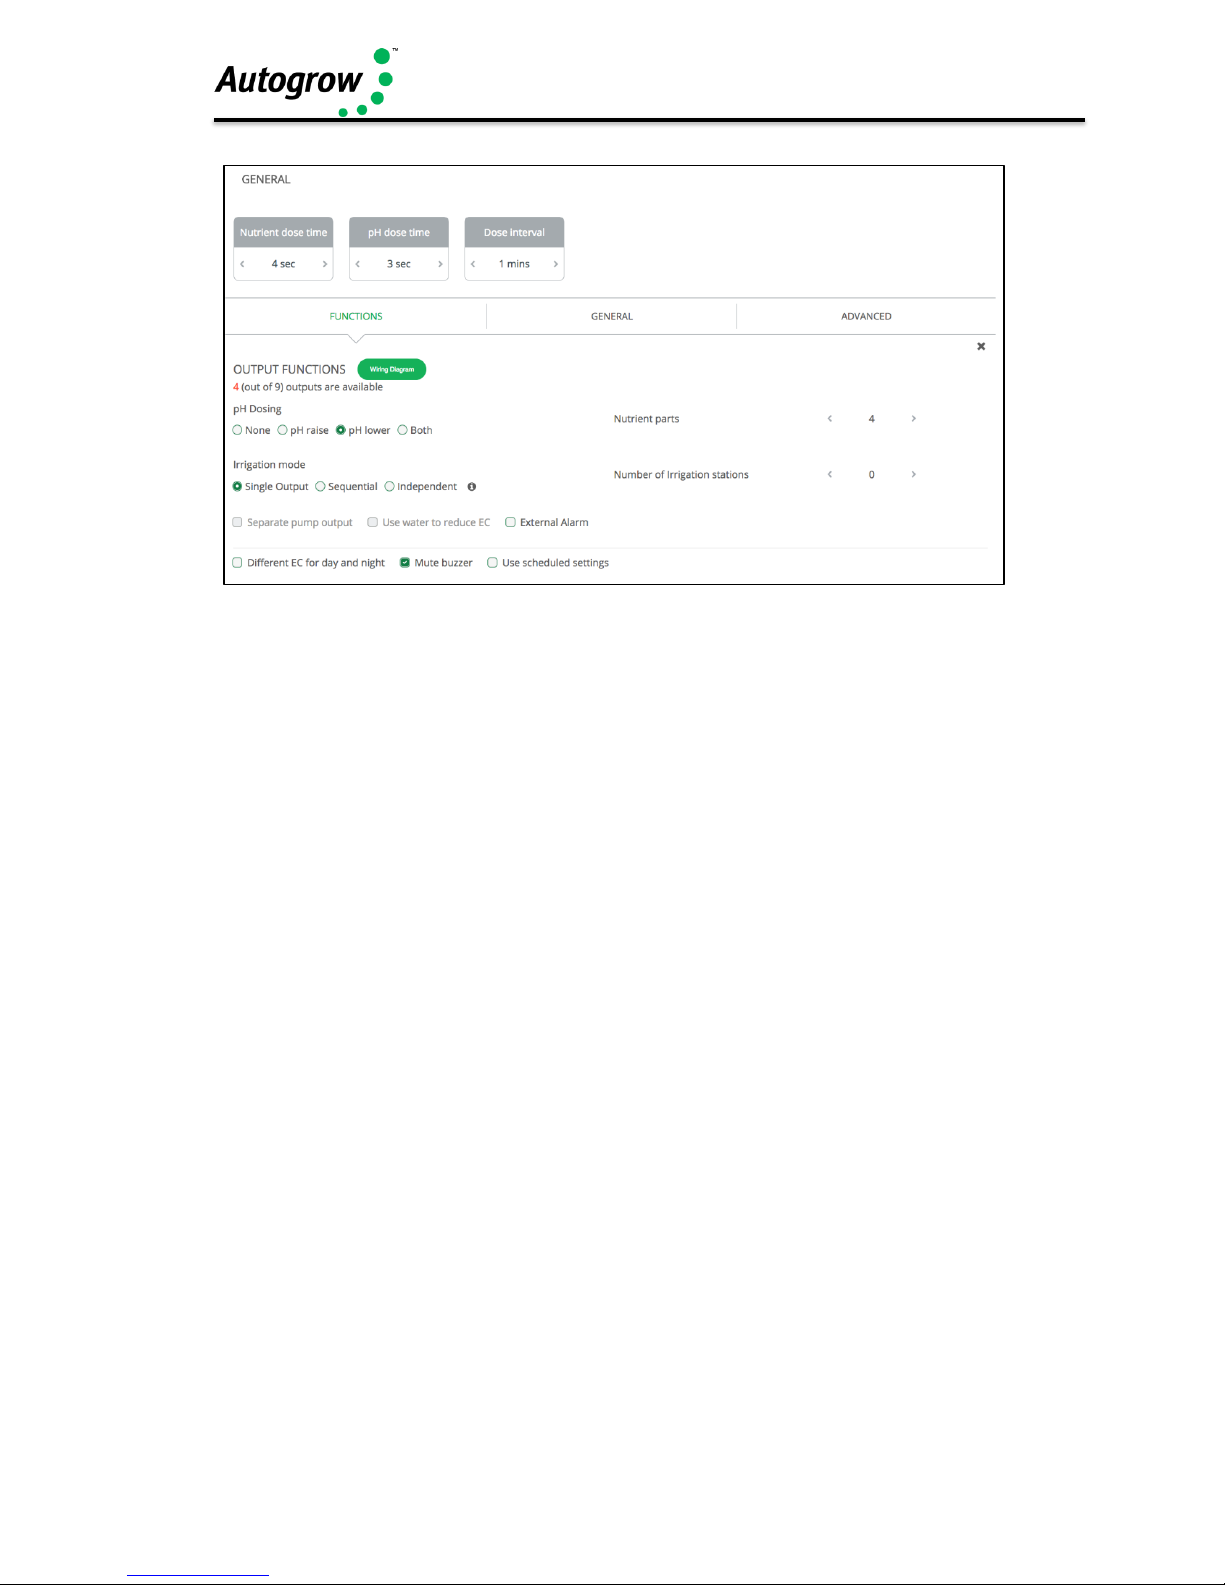
Configuration
Next are the dawn and dusk time settings. These are only needed if you select
“Irrigate during day only” or “different EC for day/ night”. The times entered here do
not have to align with the actual day time and for indoor growing they will be set to
reflect the period that the lights are on. After changing any settings, you must click
the save button at the bottom to send them to the controller.
Next, select the number of nutrient parts that you wish to automatically dose. This
needs some careful consideration. For example, there is no need to include an
additive that is used only once in the initial tank of water.
Similarly, a flushing agent which is added to a fresh tank of water for the last day or
two certainly does not need to be automatically dosed.
Remember also, that you have a total of 8 outputs (9 from version 3.03) and the
more you use for nutrients, the less will be available for pH dosing and irrigation.
Having selected the number of nutrients that are to be dosed continue by selecting
the pH dosing required, then whether irrigation output is required.
If you wish to have a different EC (TDS) for day and night then this can also be
selected and if selected you can also chose to add water automatically to reduce EC.
As soon as you have used all the 8 available outputs (9 from version 3.03) the
options will appear greyed out and will be un-selectable. The only way to select them
is to go back and deselect some previous choices.
Then you can select “scheduling” if desired. This gives you the opportunity to set up
a complete growing schedule by specifying the nutrient ratios and EC for each stage
of growth. This schedule or table is very easy to modify and so if the plant growth is
slower or faster than expected you can easily make alterations at any time.
Note that it is possible to save the schedule to disk so that it can be used for future
grows. We supply a standard schedule based on the recommendations as published
by various manufacturers of three part nutrients.
This should be modified to suit the particular species of crop that you are growing
and to suit your climatic conditions.
Page 10
IntelliDose Manual
©2017 Autogrow Systems Ltd V5.4 10
In the Advanced section, you can select proportional dosing if required. This will only
work satisfactorily on systems that irrigate large quantities of water from the tank and
therefore need very rapid dosing to get the EC and pH back to correct levels. If this is
not the case then deselect this option.
Sequential dosing should always be selected unless there is a good reason not to. In
fact, if you select more than 3 nutrient parts it will be enforced anyway. It should only
be used with 1 or 2 part mixes and where you intend setting the dose interval to zero
to achieve continuous dosing. This is sometimes used on very large irrigated
systems so that continuous dosing occurs while irrigation takes place and fresh
make-up water is entering on a continuous basis.
The fail-safe disables for dosing should always be enabled for safety. These prevent
dosing if the controller suspects that a probe has become faulty or if the EC/pH are
too far out.
The “Save current settings to disk” and “Restore settings from disk” do exactly that.
They fetch all settings from the controller and store them in a file on your computer's
hard drive. This allows you to quickly reset the controller to a previously saved setup
that was known to work well for a particular season, for example.
Dose times
Note that if scheduling has been selected then settings like the nutrient set points and
nutrient dose ratios will appeared “greyed out” on this tab as they are derived from the
entries on the schedule tab and cannot be altered here.
Dosing times and intervals can be set by trial and error.
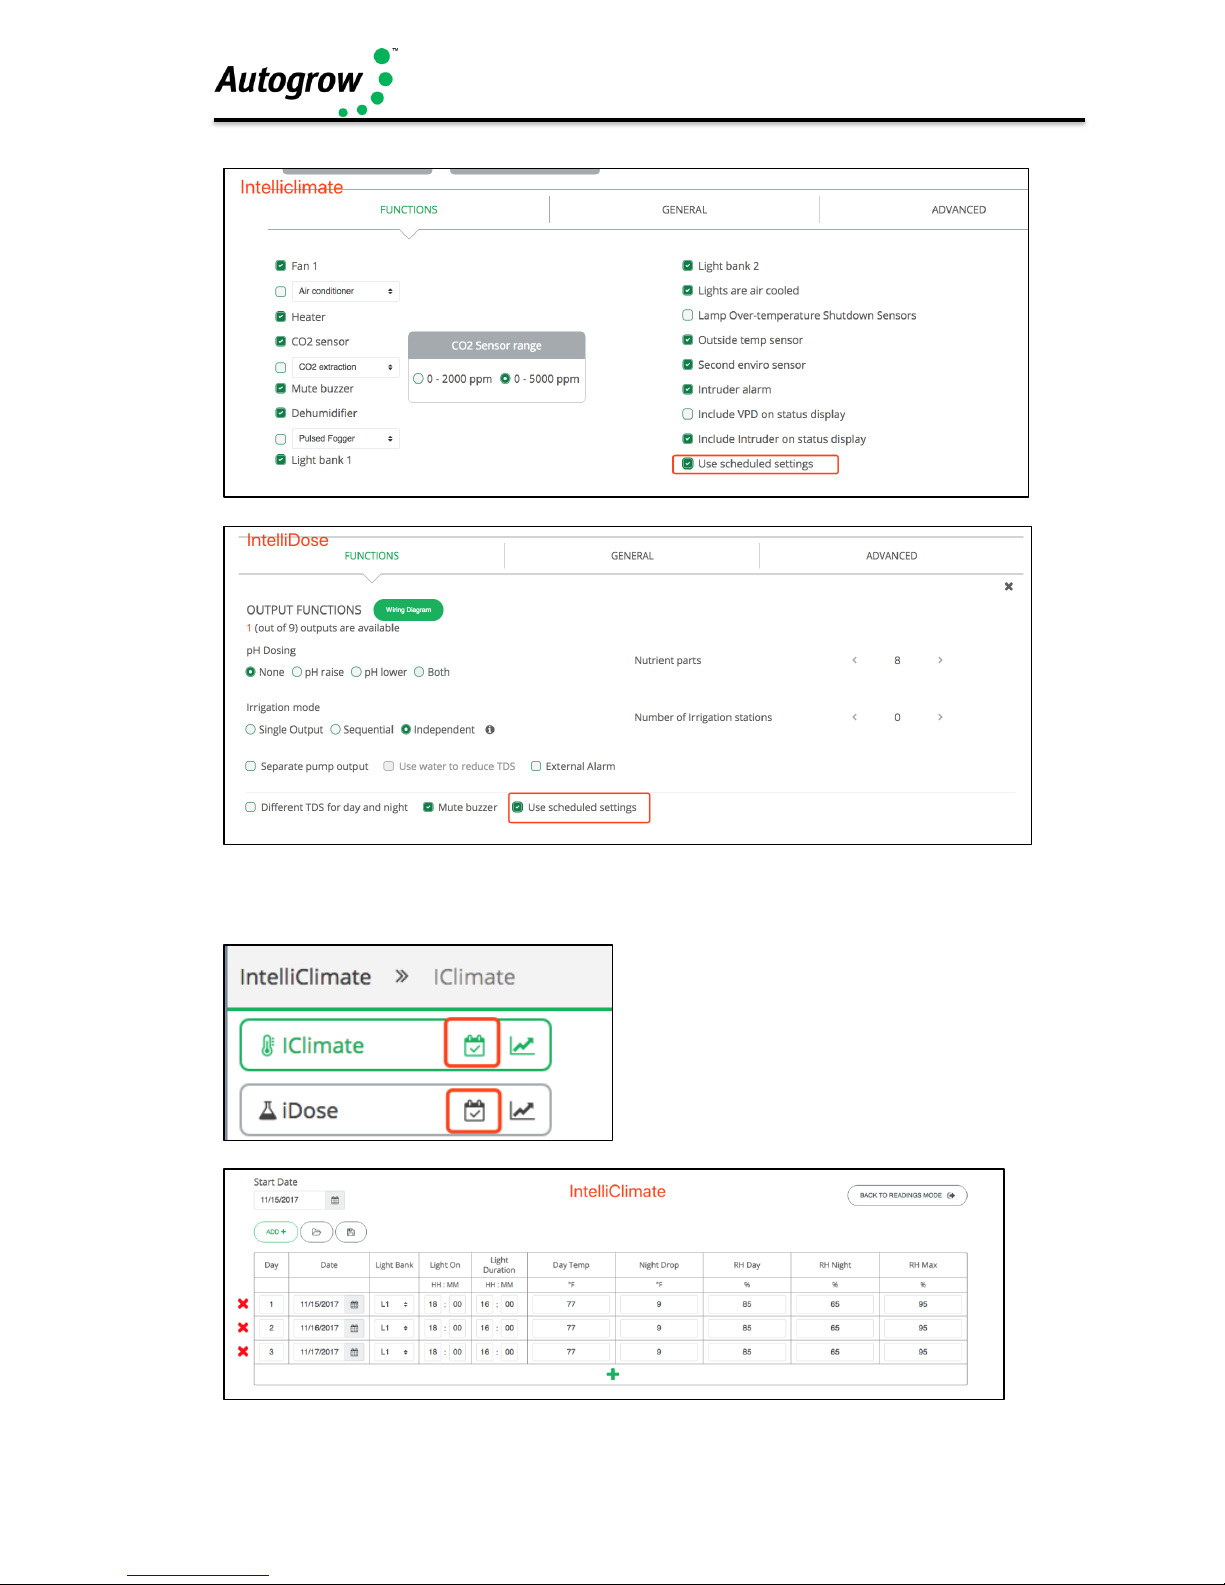
Scheduling tab
To set up the scheduling function, scroll down the page to Functions and tick the
"Use scheduled settings".
Page 11
IntelliDose Manual
©2017 Autogrow Systems Ltd V5.4 11
After saving, you'll see the scheduling icon showing up by your device name where
you can manage your Schedules.
Page 12

IntelliDose Manual
©2017 Autogrow Systems Ltd V5.4 12
If you need any help with setting Schedules, feel free to send us a message by
clicking on the toggle to the right or emailing us directly -
help.autogrow.com/intelligrow.
Page 13

IntelliDose Manual
©2017 Autogrow Systems Ltd V5.4 13
History tab
This history tab allows you to graphically view all data logged from the controller.
This is very useful for diagnosing problems.
The pop-up calendar allows you to easily view records from previous days, months
or years.
Export the data
You have the option to export the data as a csv file if needed.
Variable Options
If you only wish to look at some key grow variables, you can do so by using the
options and save it as your preference
Page 14

IntelliDose Manual
©2017 Autogrow Systems Ltd V5.4 14
B2 – Setting from the controller key pad
Just about all settings available at IntelliGrow are also available from the keypad.
Exceptions are the scheduling which is not available without IntelliGrow and the
calibrations which are only available at the controller.
Operation of the keypad is similar to a cell phone. The two keys at the bottom of the
display are “soft keys”. This means that their function at any particular time is shown
on the screen above them. After switching on, you will find that the right-hand key
has the label “menu” on the LCD above it and the left-hand key is unused at this
point. To the right of the LCD screen are two arrow keys. These are for moving down
or back up, through the menus and when you are in a screen which allows you to
edit a numeric value they are used for incrementing or decrementing the values.
They are also used to select between different options.
On first pressing the “menu” button, you will find yourself in the main menu. Use
the down arrow to move down through this and you will find the following items
DOSING
CALIBRATION
OVERRIDES
IRRIGATION
ALARMS
CLOCK
CONFIGURE
If you wish to make a change to, say, irrigation timings, you would move down to
irrigation and then press the “enter” key to enter the Irrigation sub-menu. Now
again by pressing the down and/or up arrows move through this sub-menu to find
the item that you wish to change and then press enter to access this item. After
making any changes the soft keys will allow you to either save the new setting or
to cancel and exit out of that screen.
The setting order is the same as when using IntelliGrow and the settings that you
will access are also the same, so we suggest that you use the previous pages on
IntelliGrow settings to guide you through the setting procedure.
Page 15

IntelliDose Manual
©2017 Autogrow Systems Ltd V5.4 15
General section - Dose and dose interval timings.
Dose times and interval are set by trial and error. The smaller the reservoir the
smaller the dose times need to be. The strength or concentration of your stock
solutions will also affect the dose time setting. Obviously, the stronger the stock
solution, the shorter the time the pump runs. If you are using a small reservoir tank
you must ensure that your stock solutions are very dilute.
Ideally, you are trying to achieve a dose time such that the EC(TDS) goes up by
about 0.1EC (50 ppm) for each dose. If you need to set the dose time to a very small
number to achieve this then you need to dilute the stock solution. The minimum time
that any pump should run for is 1 second, so, if at any stage you have a ratio for one
of the nutrient parts set for, say 20%, then the minimum dose time has got to be at
least 100/20 = 5 seconds. This is because 5 seconds corresponds to a 100% dose
and 20% is only 1/5th of this so the pump for this nutrient part will only run for 1
second. The process is similar for pH dosing where you are trying to achieve a
change of, about, 0.1pH for each dose.
The dose interval is set to allow time for a dose to fully mix in before the controller
makes the decision as to whether another dose is required. Normally set to 1
minute for a small tank and up to 10 minutes for very large systems.
If the dose interval is set to zero then the valves will open continuously while the
measured EC and pH are below the set point and close as soon as they exceed the
setpoint. This feature can be used as a simple in-line injection system in which
irrigation water is rapidly taken from a small tank and fresh water is added
simultaneously such that rapid dosing is required to maintain the EC and pH.
Irrigation intervals and durations for day and night are also set here as is the water
ON time for each addition of water. This should be set so that each time it adds water
it dilutes the nutrient by about 0.1EC (1CF or 50ppm).
Page 16

IntelliDose Manual
©2017 Autogrow Systems Ltd V5.4 16
Section C - Settings for simple 1 or 2 part doser
In the advanced menu on the IntelliDose or the advanced tab on IntelliGrow,
select the units that you wish to use and then select one or two-part dosing.
If you wish to use AutoSet then turn to Section A in this manual, alternatively, to set
up manually, continue below. (You cannot use AutoSet for 3 part nutrients).
To set manually
1) Calibrate the EC and pH sensors as described below
2) In “Configure” on the controller or IntelliGrow select one or two-part nutrient
3) In Dosing settings set the desired EC, pH and pH raise or lower
4) In Dosing settings set the EC dose time. This should be set so that each
dose raises the EC by about 0.1mS/cm (1CF or 50ppm)
5) In Dosing set the pH dose time so that each dose alters the pH by about
0.1pH
6) In Dosing settings select either pH raise or pH lower. The most usual
selection is pH lower (acid dosing) and if you are unsure then select this. If
you find that the pH continually drifts down below 5.5pH then change this to
pH raise and ensure that you have a dosing pump connected the pH raise
output and to a stock tank containing pH raise (alkali)
7) In Dosing settings set the dose interval. This is the time taken for each dose
to mix in and for the EC and pH readings to stabilise. For a small system, 2
or 3 minutes is typical. Larger systems may require 10 minutes or more. Note
that dosing will not occur unless the reading has been below the setpoint
continuously for this amount of time
Calibrate EC sensor
1) Clean the face of the probe. Remove the shroud from the end of the probe
and use a little kitchen liquid scouring cleaner such as “Jif" or "SoftScrub” on
a clean “Scotchbrite” nylon scouring pad. Alternatively, use 600 grit wet-and-
dry paper with the cleanser. Use a circular motion to scour the face of the
probe and then rinse well in running water. Do not touch the face of the probe
but shake off any residual water.
2) Replace the shroud and then place in the calibrating solution. The solution
supplied has an EC of 2.77mS/cm (CF=27.7, ppm = 1382). Allow about 5
minutes for the temperature compensation to fully kick-in and then press the
menu button to get down to the Calibrate screen. Then press “Enter” to get to
the Calibrate sub-menu where you will again press menu to step through this
sub menu until you reach the “Calibrate EC” screen. Then press “Enter”
again, to get into the “Calibrate EC screen”.
3) Now press either the UP or Down arrow keys to get the calibrated reading to
correspond with the Standard calibrating solution (normally 2.77mS/cm,
27.7CF or 1382ppm). When this is achieved, press the save button to save
this in permanent memory.
Page 17

IntelliDose Manual
©2017 Autogrow Systems Ltd V5.4 17
Calibrate pH sensor
1) The glass bulb at the end of the pH electrode should be shiny and clear.
If necessary, clean the glass bulb at the tip of the sensor with a very soft
“child’s” toothbrush or a special cleaning tool with a little liquid scouring
agent such as “Jif”or "SoftScrub”. The bulb is very delicate – TAKE
CARE.
2) Rinse thoroughly in water and then place in the pH 7 buffer solution. NOTE
THAT YOU MUST ALWAYS CALIBRATE AT pH 7 BEFORE pH 4.
3) Allow a few minutes for the reading to stabilise and then press the menu
button to reach the Calibration screen. Press Enter to get into the Calibration
sub-menu and then “Enter” the Calibrate pH 7 screen. Now press the up and
down arrows until the reading matches the calibration solution (e.g. pH 7.0).
Press “Save” to store the calibration.
4) Rinse the probe and place in pH 4 buffer solution. Allow to stand for a few
minutes until there is no further change in the pH reading. Now use the Menu
and Enter keys to navigate to the Calibrate pH 4 screen. Press the up and
down arrows to get the calibrated reading to match the calibration solution
and then press “Save” to save the calibration and exit from that screen.
The EC probe should be cleaned regularly and calibrated every other week. The
pH probe should be calibrated weekly. In addition, it is advisable to use a hand-held
meter to check the EC and pH every day. If ever the hand-held instrument and
controller readings differ then all probes should be cleaned, checked and
recalibrated.
Page 18

IntelliDose Manual
©2017 Autogrow Systems Ltd V5.4 18
Section D – Settings for three part doser
General
Best dosing accuracy is achieved with larger dose sizes and if any of the ratios of
a multi-part mix is set to a small value then it important to ensure that its dose time
is still above 1 second.
For example, say a dose time is set to 5 seconds and one part is set to a ratio of
10%. This means that a ratio of 100% = 5 seconds and so a ratio of 10% will equal
only ½ second. This is not sufficient time for a pump to run so the dosing of this part
will be very inaccurate if it manages to dose at all. The solution is to increase the
dose time to 10 or even better 20 seconds. At ten seconds the 10% component will
dose for 1 second (just long enough but still not very accurate) while at 20 seconds
it will dose for 2 seconds which should be much more accurate.
However, you may now find that each of these larger nutrient doses raises the EC
by more than the desired 0.1 EC (50ppm). The only solution to this is either to 1)
dilute the stock solutions, or 2) use a larger reservoir tank or even a combination of
both. If diluting the stock solutions, it is important to dilute them all in exactly the
same ratio. E.g. 1 part nutrient to 3 parts of water (makes a 25% solution). This
would result in each dose casing the EC to rise by ¼ of its previous value.
Another approach is to dilute only the nutrient parts that require the low % ratios. For
example, a recipe recommends 100:50:10. If the dose size was set to 5 seconds the
part A would dose for 5 seconds, part B for 2.5 and part C for only 1/2 second. By
diluting part C in water with one part C to 4 parts water we will reduce its strength to
1/5th of the original. Then we would schedule 100:50:50 which would be much more
accurate.
Using a schedule
Using IntelliGrow, it is possible to schedule automatic changes in a two or threepart dosing regime. To do this please head to our online Help, found here:
help.autogrow.com/intelligrow.
Note that changes can be on a daily basis or less often as necessary. It is usually
required to make frequent changes during the cutting or seedling stage and then
less frequently as the crop matures.
Of course, every crop develops at a different rate and so the table is very easy
to modify. Days can be added, or deleted at will and dates can easily be
changed.
Changes will only happen if IntelliGrow is connected and on line. If the controller is
taken “off-line” then when it is next connected if any change is required it will be
made straight away. Normally, changes will take place at midnight preceding the
date specified.
Page 19

IntelliDose Manual
©2017 Autogrow Systems Ltd V5.4 19
Section E – Proportional Dosing (default OFF)
Proportional dosing allows rapid dosing toward the set point. A maximum dose time must
be entered as well as a minimum dose time. The maximum time should be set so that a
dose of this size would raise the EC from its raw water value to 80% of the setpoint value in
a single dose. The minimum dose time should be set to achieve a rise in EC of 0.1mS/cm
(CF=1, ppm=50). The controller will then select the most appropriate dose size within this
range depending on the measured EC. This means that when starting with a tank of pure
water, the controller will make one very large dose followed by smaller and smaller doses
as the setpoint is approached.
Note that proportional dosing is not available for use with 3 (or more) part mixes.
Section F – Sequential Dosing (default ON)
By selecting sequential dosing, the dosing outputs will operate in sequence, one after the
other. This allows a small power supply to be used with dosing devices that draw a heavy
current. For example, small peristaltic pumps typically draw 1.2 Amps or so at 24V DC. If
three-part dosing was used and three pumps were allowed to come on at the same time the
power supply would need to be rated at about 4 or 5 Amps. By selecting sequential dosing
a 2Amp supply could be used.
Page 20

IntelliDose Manual
©2017 Autogrow Systems Ltd V5.4 20
Section G - Installation
Mount the IntelliDose controller within 1.5 metres of the sample pot but in a position well
away from water splashes or mist/vapour rising from the reservoir tank. It should be
mounted in a cool, dry place out of direct sunlight. Remove the screws holding the back on
and fit the mounting feet, then screw to the wall. If using the dry wall (plaster board) anchors
use the longer screws supplied but if fixing to a ply back board use the shorter screws.
Typical installation using peristaltic pumps
HINT:
(1) Keep sample pot low down just above top of tank as many small
pumps have quite low head pressure capability
(2) Mount IntelliDose away from spray and humidity from tank and
stock solutions
Typical installation using solenoid valves
Page 21

IntelliDose Manual
©2017 Autogrow Systems Ltd V5.4 21
Note that a small jet of water may be directed over the surface of the tank to stir and
aerate the nutrient solution. This can be achieved by heating and squeezing with pliers
an outlet from a Tee fitting. Ensure that your pump has excess capacity before doing
this.
Layout showing use of high and low water levels
NOTES
1) If irrigation is used then a second small pump should be used to
continuously circulate the solution through the sample pot and keep the tank
stirred. The irrigation pump would then need a “pump start relay” with a 24V
DC coil to switch it on only when an irrigation is called for.
2) If the irrigation water is returned to the reservoir tank then allowance must
be made for the level to rise a little above the float valve level.
Page 22

IntelliDose Manual
©2017 Autogrow Systems Ltd V5.4 22
The power supply to the IntelliDose must be between 12V and 24V either AC OR
DC. The outputs to the solenoid valves or pumps will be the same as the
supply going into the controller. This means that if 24V AC solenoid valves are
used then the supply adapter must provide 24V AC. Never connect a power supply
exceeding 24V to the controller. A 24V DC power supply adapter is normally
supplied together with either 24V DC solenoid valves or 24V DC peristaltic pumps
Connection diagram for 1,2 or 3 part nutrient dosing
The low voltage power from the adapter is connected to the two-left connection on
the left-hand connector. With many power supplies the cable is a screened “co-axial”
type. In this case the screen should be connected to the “Common” and the centre
wire to the 24V line connection on the controller.
The connection diagram for more than three part nutrients must be printed by
IntelliGrow software AFTER configuration has been complete.
Please head to our online Help, found here: help.autogrow.com/intelligrow.
If you are not intending to use IntelliGrow, please ask your supplier if they are
able to pre-configure and print out the wiring diagram for you.
Solenoid valves
Secure the solenoid valve panel to the wall. If using the plaster board anchors,
screw the anchors in firmly until they are flush with the wall. The anchors supplied
are self-drilling and so there is no need to predrill the wall. Just position them, give
them a light tap to get started and then turn to drill/screw in with a Phillips or pozi
screw driver. Use the longer metal screws to fix the valve plate to the nylon anchors
or if fixing to a solid wood back board, use the shorter screws supplied.
Next connect the valve using the cable supplied to the outputs as shown above.
Check that the voltage rating of the valves matches the voltage rating of the
power supply e.g. if the valves are 24V DC then the supply should also be 24 V
DC.
The solenoid valves are installed as shown overleaf.
Peristaltic pumps
You can direct drive 24V DC peristaltic pumps if you have the appropriate power
supply. The small pumps available from our distributors draw a current of up to 1.2
Amps and so to run three pumps at the same time, you will need a 4 or 5A, 24V
Page 23

IntelliDose Manual
©2017 Autogrow Systems Ltd V5.4 23
DC power supply. To avoid the necessity of such a powerful supply you may select
the “Sequential dosing” option (in the configure menu). In this case, pumps are run
one after the other and so at any one time there is only one pump running. A 2A,
24V DC supply is sufficient for this. We have available a 2.5A supply that allows 2part (but NOT 3 part) dosing to run simultaneously or 3-part dosing to run
sequentially.
To install stock tanks and solenoid valves
1) If the stock tanks are to be installed on a raised shelf this must be attached to
the wall in a very strong way as full stock tanks can be very heavy and if the
shelf was to give way could result in a serious injury. If in doubt, get a skilled
tradesman to install the shelf.
2) Carefully drill clean holes near the bottom of the stock tanks. Insert the tank
fittings and tighten securely. Thoroughly clean out the drums. Attach the flexible
hose to the tank fittings and lead down to the solenoid valve board. Push the
tubes on to the inlet at the front of the valves
3) Fit the reducers and thin tubes to the bottom outlet pipes. Thin 5mm tube is
used here to restrict the flow through the solenoid valves, which might
otherwise be too great for small systems. If you shorten these pipes ensure that
they are of equal length or the flow rates from the A, B, C tanks will be unequal.
4) After filling the stock tanks leave the lids loose to allow air to enter the tank
as the stock solution is drawn off via the solenoid valves (or drill a small
hole through the lid)
Page 24

IntelliDose Manual
©2017 Autogrow Systems Ltd V5.4 24
1) Thoroughly clean tanks to ensure that no plastic shavings are left in them
2) Test with water first to ensure no water leaks and system operates
correctly then fill tanks with the stock solutions
3) For acids and alkalis, ensure that they are diluted to less than 2% strength
4) Some valves have breather pipes that must reach the top of the stock tanks.
These pipes ensure that the tubes are fully emptied after each dose. Note
that although some valves have tube shapes moulded on the side these
might be closed off in which case no breather is required. If in doubt, check
by blowing through the side tubes to see if they are blanked off.
5) Wire the two solenoid valves to their respective connections on the
controller as shown in the wiring diagram
Page 25

IntelliDose Manual
©2017 Autogrow Systems Ltd V5.4 25
Wiring Diagrams
Note that all the connections marked 24V common are connected together
internally and you may connect the return from any solenoid valve or pump to any
of these commons
The common wire from the power supply is the bare silver wire.
IMPORTANT
The voltage at the outputs will always be the same as the voltage from the
power adapter. We normally supply 24V DC unless a different voltage or AC
has been specifically requested.
Page 26

IntelliDose Manual
©2017 Autogrow Systems Ltd V5.4 26
Wiring Peristaltic pump wiring
Note that all the connections marked 24V common are connected together
internally and you may connect the return from any solenoid valve or pump to any
of these commons.
IMPORTANT
The connection diagram for more than three part nutrients must be printed
by IntelliGrow software AFTER configuration has been complete.
Please head to our online Help, found here: help.autogrow.com/intelligrow.
If you are not intending to use IntelliGrow, please ask your supplier if they
are able to pre-configure and print out the wiring diagram for you.
Page 27

IntelliDose Manual
©2017 Autogrow Systems Ltd V5.4 27
Section H – Software installation
Please head to our online Help, found here: help.autogrow.com/intelligrow.
Section I – Maintenance
Clean EC probe
Remove shroud from end of probe. Clean the face of the probe, use a little kitchen
liquid scouring cleaner such as “Jif" or "SoftScrub” on a clean “Scotchbrite” nylon
scouring pad. Alternatively, use 600 grit wet-and-dry paper with the cleanser. Use a
circular motion to scour the face of the probe and then rinse well in running water.
Do not touch the face of the probe but shake off any residual water..
Replace the shroud and check calibration.
Calibrating the EC probe
After cleaning and rinsing the probe, shake vigorously to remove any surplus water.
Now place the probe in EC standard solution and allow the temperature
compensation to take full effect by leaving for 5 minutes or more. Calibration
solutions are usually 2.76mS/cm referenced to 25oC but any calibration solution may
be used.
The reading should settle to within 0.1 EC (1 CF or 5ppm) of the value stated on the
bottle. If not then navigate to the EC calibration screen on the controller (not
available on IntelliGrow) and press the up/down arrows until the reading exactly
matches the value printed on the bottle. Note that calibration solutions are easily
contaminated or changed by evaporation and should be replaced with fresh solutions
every 3 months or more frequently if high accuracy is required.
Cleaning the pH electrode
The pH electrode is supplied with a protective cap or cover over its active
end. Its purpose is to keep the glass bulb moist during storage and transit.
This cover must be removed before use.
The glass bulb at the end of the pH electrode should be shiny and clear. If not then
it may be cleaned by brushing with a soft toothbrush or special cleaning tool
together with a little liquid scourer such as Jif or Soft Scrub. Do this very carefully as
the glass bulb is extremely delicate. Rinse thoroughly with clean water.
Calibrating the pH electrode
Every week you should check the pH calibration. To do this place the probe in the
pH7 buffer solution and allow to stand for 10 minutes. The reading should be 7.0 +/-
0.1 pH. If not then navigate to the pH 7 calibration screen and use the up/down
arrows to correct the displayed reading. When correct, press save.
Next rinse the probe in fresh water and shake off excess water. Now place in the
pH 4 buffer solution and allow to stand for 10 minutes. The reading should be 4.0
+/-0.1. If not navigate to the pH 4 calibration screen and use the up/down arrows to
correct. Now press save to store the calibration.
IMPORTANT: The pH 7 calibration MUST be carried out before the pH 4
calibration.
Page 28

IntelliDose Manual
©2017 Autogrow Systems Ltd V5.4 28
pH electrodes last for between 6 months and two years. As soon as the
electrode shows signs of drifting or slow response it should be renewed. For
storage, the tip of the pH probe must always be kept wet, if they dry out, they
will not work.
Page 29

IntelliDose Manual
©2017 Autogrow Systems Ltd V5.4 29
Peristaltic pump maintenance
These require very little maintenance other than occasional greasing of the
rubber tubes (using special rubber grease from the manufacturer). The grease
may be applied via the two greasing access points in the clear plastic pump
covers. When the tubes become flattened they should be replaced.
Hint: it is sometimes possible to extend the life of the tube by sliding the tube
around a little so that a new section of tube is exposed to the rollers. To do this,
loosen the two screws in the front cover, slide tube and then retighten. Finally, add
extra grease via the two greasing points in the front cover.
Solenoid valves
These need very little maintenance but if the flow rates of the A and B solutions
becomes unequal the valves can easily be opened up for inspection and cleaning. If
a valve stops working completely there is a possibility that the solenoid coil has
become defective. The coils can be replaced.
General maintenance
Frequently inspect your system for leaks and repair these as soon as possible.
Water dripping onto solenoids or pumps will soon cause them to fail. Ensure the
controller, pump unit and solenoids are kept clean and shielded from all water
splashes and vapours.
Section J - Fault finding
1) Unit is completely dead – i.e. no display, no power light and no outputs
Check that the power pack is functioning (by measuring with a voltmeter if
possible) and that it is plugged in, switched on and properly connected to
the controller. If the unit still fails to function then the probability is that the
internal 4A fuse (20mm x 5mm miniature glass fuse) may have been blown.
The most likely cause of this happening is that wires connecting to the
solenoid valves or pumps have touched together and shorted out. To fix this
it is important to clear the fault first. Inspect all wiring and ensure that all
wires are well insulated right to the point where they enter the connector.
Also check the connections at the solenoid valves. Then replace the fuse
with a genuine 4A fuse. DO NOT ATTACH WIRE OR ALUMINIUM FOIL
ACROSS IT.
2) Cannot calibrate pH. Replace the pH electrode with a standard BNC gel
filled electrode.
3) EC calibration out or EC reading varies. Ensure that there is a small non-
turbulent flow of solution past the face of the EC probe. Ensure probe has
been properly cleaned and is free from grease or oil. (water should easily
wet the face and should not bead).
4) pH fails to dose. Ensure that the controller is set for raise or lower to match
the solution used. i.e. if you are using acid (pH down) then set the controller
to pH lower and ensure that that pump/solenoid is connected to the pH
lower output.
Page 30

IntelliDose Manual
©2017 Autogrow Systems Ltd V5.4 30
5) pH overdoses. Check that the controller is set for pH raise or lower as
described in 4 above. Also, check that the dose time is not excessive.
Each dose should change the pH by about 0.1pH
6) EC overdoses. Check that there is adequate flow through the sample pot
and that the EC dose time is not excessive. Each dose should change the
EC by 0.1 (CF1 or 50ppm)
Section K – Specification
8 outputs (9 from version 3.03) which can be flexibly configure to operate 1 to 8-part
variable ratio nutrient dosing, pH raise, pH lower, Irrigation, add water and alarm
Output voltage same as supplied voltage 12V to 24V AC or DC. Normally 24V DC
supplied Nutrient measurement units EC, CF or ppm (EC x 500)
Measured range 0.00 to 9.99EC, 0.1 to 99.9CF, 0 to 4999 ppm Nutrient resolution
0.01 mS/cm, 0.1 CF, 5ppm
Nutrient measurement accuracy +/- 0.1 EC, 1.0 CF or 50ppm - temperature
compensated Nutrient dosing range 0.10EC to 5.99EC, 0.1 to 59.9CF, 50ppm to
2999 ppm
pH resolution and accuracy – 0.1 pH pH measurement range 2pH to 12pH pH
dosing range 4.5pH to 8pH
Temperature resolution and accuracy 1oC, 2oF
Temperature measuring range 0-50oC,
32-125 oF
Operating temperature range 0-45oC,
32-110oF
(and not in direct sunlight)
Power source – mains transformer pack supplied; specify mains voltage and pin
type (power to controller can be between 12V and 24V either AC or DC to suit the
output devices) Outputs will have the same voltage as the supplied voltage from the
power pack.
Large graphics display using simple four key interface
Nutrient sensor uses DiPulseTM technique to resist fouling
Dosing fail safe shut-off (can be disabled)
- if nutrient is below 0.1EC, 1CF, 50ppm
- if pH below 4.5pH or above 8.0pH
- if sensor fault detected (some pH faults cannot be
detected) USB connection and software supports multiple
controllers Sample pot supplied.
Valves available separately with cables and flow restricting
pipes Valves chemically resistant to 5% Phosphoric acid,
2% Nitric acid
Compatible triple peristaltic pumps available separately as an alternative to solenoid
valves.
Page 31

IntelliDose Manual
©2017 Autogrow Systems Ltd V4.0 31
Section L – Advanced Irrigation Features
IntelliDose firmware version 3.01 released March 2015 expands on the original irrigation
functionality by providing the ability to control up to 4 irrigation stations with an optional
master pump.
Each station is assigned its own duration and control is either:
➢ Sequential - where each station is run in turn, all being triggered by a single trigger
(day/night interval or time of day) or
➢ Independent – where each station is completely independent, each having its own
trigger (day/night interval or time of day).
If a master pump is selected then this output will run each time any of the station outputs is
run, to accommodate having a single irrigation pump with each station being watered by
opening a solenoid valve.
Irrigation outputs are configured on the IntelliDose by navigating through the following
menus:
Menu > Configure > Advanced > Output
➢ Irrigation – to enable all irrigation functionality
➢ Station Outputs Use Station Outputs – select No to provide backwards
compatibility with pre-version 3.01 wiring configurations; Yes enables up to 4 outputs
to be assigned to irrigation stations
➢ Station Outputs No. Station Outputs – select from 1 to 4 stations
➢ Pump Output – Select Yes/No for a separate pump output which is activated each
time any of the stations is activated
➢ Station Mode – chose between Independent and Sequential
Irrigation settings for each station in Independent Mode are accessed by navigating through
the following menus:
Menu > Irrigation >
Irrig Stn 1 – access irrigation settings for station 1
➢ Irrig Run Time – specify how many hours/minutes/seconds the station will run
➢ Irrigate every – specify the daytime irrigation interval days/hours/minutes (if Irrigate
at same time each day is No)
➢ Irrigate every – specify the night-time irrigation interval days/hours/minutes (if
Irrigate at same time each day is No)
➢ Irrigate at: - specify the time of day to start irrigation (if Irrigate at same time each
day is Yes)
➢ Irrigation Enabled/Disabled – temporarily enable or disable the station (note the
output remains assigned to this station even if disabled)
➢ Irrigate during – specify if irrigation will occur during both Day & Night or Day Only
➢ Irrigate at same time each day – specify if the irrigation for this station is triggered
at a single time of day only (or triggered using daytime/nightie interval)
Each station’s settings can be accessed in a similar manner.
Page 32

IntelliDose Manual
©2017 Autogrow Systems Ltd V4.0 32
Irrigation Overrides are accessed by navigating through the following menus:
Menu > Overrides > Force Irrig. 1 – immediately start irrigating station 1
Menu > Overrides > Force Irrig. 2 – immediately start irrigating station 2
Menu > Overrides > Force Irrig. 3 – immediately start irrigating station 3
Menu > Overrides > Force Irrig. 4 – immediately start irrigating station 4
Irrigation settings in Sequential Mode are accessed by navigating through the following
menus:
Menu > Irrigation >
➢ Irrig 1 Run Time – specify how many hours/minutes/seconds the station will run
➢ Irrig 2 Run Time – specify how many hours/minutes/seconds the station will run
➢ Irrig 3 Run Time – specify how many hours/minutes/seconds the station will run
➢ Irrig 4 Run Time – specify how many hours/minutes/seconds the station will run
➢ Irrigate every – specify the daytime irrigation interval days/hours/minutes (if Irrigate
at same time each day is No)
➢ Irrigate every – specify the night-time irrigation interval days/hours/minutes (if
Irrigate at same time each day is No)
➢ Irrigate at: - specify the time of day to start irrigation (if Irrigate at same time each
day is Yes)
➢ Irrigation Enabled/Disabled – temporarily enable or disable irrigation (note the
outputs remains assigned to stations/pump even if disabled)
➢ Irrigate during – specify if irrigation will occur during both Day & Night or Day Only
➢ Irrigate at same time each day – specify if irrigation is triggered at a single time of
day only (or triggered using daytime/nightie interval)
In Sequential mode the whole irrigation cycle can be forced on by navigating to the menu:
Menu > Overrides > Force Irrig. 1 – immediately start irrigating all stations, one at a time
IMPORTANT
If Station Outputs is set to Use Station Outputs then a different wiring strategy is used
compared to previous firmware versions. It is therefore critical when wiring up an IntelliDose
using firmware version 3.01 or later to verify the wiring diagram using IntelliGrow software.
Please head to our online Help, found here: help.autogrow.com/intelligrow.
This is especially important if upgrading an existing IntelliDose to the new firmware or if
replacing an older IntelliDose with a newer one.
Please also note that with this revision the irrigation cycle is now taken from the start of the
cycle (previously it was taken as the interval from the end of one irrigation to the start of the
next).
This means that if you set an irrigation interval of 1 hour then the irrigation will start exactly
one hour apart.
So for example, if the interval is 1 hour and the duration is 20 minutes and irrigation begins
at the start of the day at 6am then irrigation will be as follows:
0600-0620
0700-0720
Page 33

IntelliDose Manual
©2017 Autogrow Systems Ltd V4.0 33
Using the advanced Irrigation Features in IntelliGrow PC software
Configure Tab
Irrigation Mode - chose between:
➢ Single Output (for backwards compatibility – only one output is used for irrigation)
➢ Sequential (for single trigger and each irrigation station runs in turn)
➢ Independent irrigation (up to 4 irrigation stations with own triggers and durations)
Number of irrigation stations - 0 to 4, where 0 means no irrigation is configured
Separate pump output – indicate if a main pump output should be activated along with
each station
For Single output or Sequential irrigation, you can specify whether the trigger is 'Irrigate at
same time each day' OR 'Irrigate during day only'
For Independent irrigation, these settings can be set for each station
The wiring diagram has been updated to accommodate the new irrigation scheme:
IMPORTANT
When using sequential or independent irrigation stations and a Separate pump output
there will be one additional output allocated to the irrigation pump. This is to accommodate
the scenario where a single pump drives the irrigation while individual solenoid valves are
operated for watering each station. This additional output is labelled as 'Irrig pump' on the
wiring diagram and only needs to be used if using a single irrigation pump.
If individual irrigation pumps are used for watering each station then it is not necessary to
use the Separate pump output.
Page 34

IntelliDose Manual
©2017 Autogrow Systems Ltd V4.0 34
Status Tab
Each independent irrigation station can be disabled or forced on:
Each independent irrigation station can be set to use a different duration and trigger:
When using single output or sequential irrigation then only one irrigation trigger can be
specified:
Upgrade
If the firmware version of your IntellIDose is prior to 3.01 and you would like to take
advantage of this new functionality please contact your local Autogrow distributor to find out
how you can upgrade your controller.
Latest Manual
To access the latest version of your instruction manual, please head to
help.autogrow.com/intelligrow.
 Loading...