

Page 1
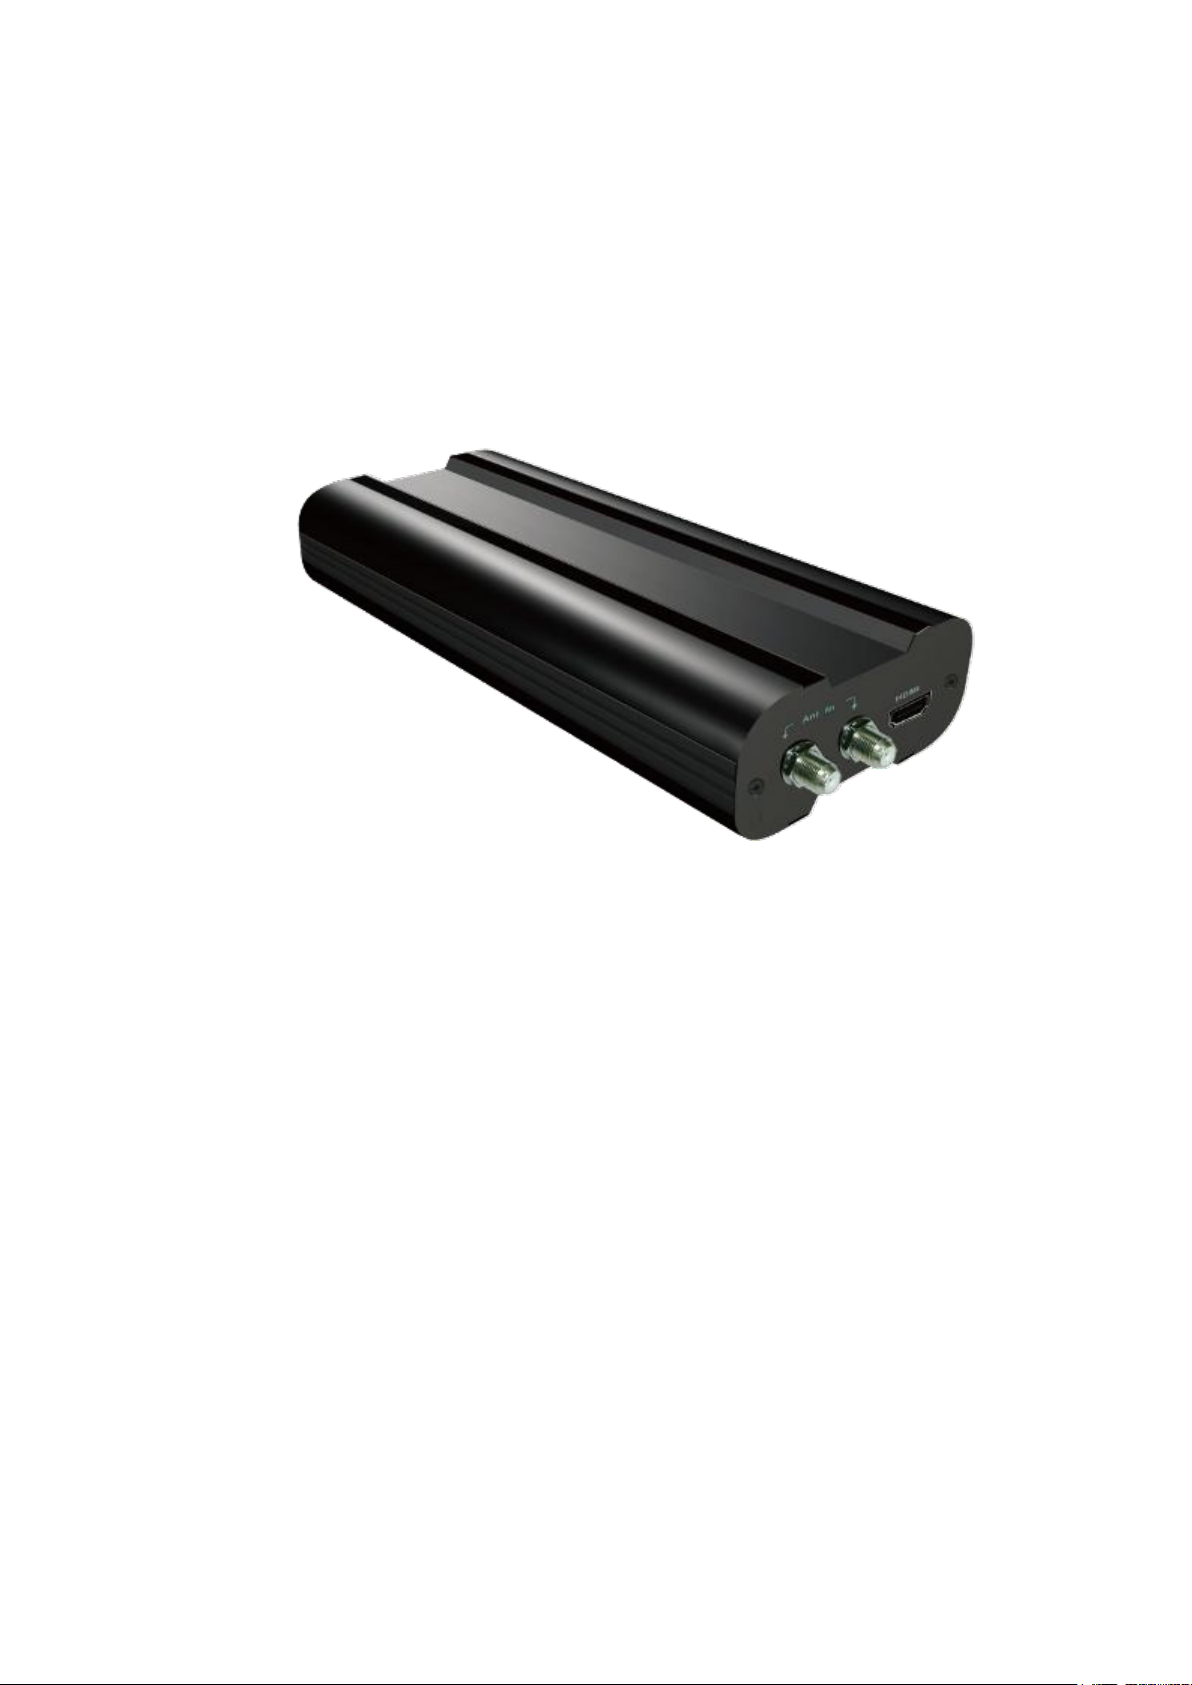
ARA-HD2
Car-use HD DVB-T
Diversity Receiver
User Manual
Page 2
CAUTION: TO REDUCE THE RISK OF ELECTRIC SHOCK –
DO NOT REMOVE COVER (OR BACK)
NO USER-SERVICEABLE PARTS INSIDE REFER SERVICING
TO QUALIFIED SERVICE PERSONNE;
The lighting flash with arrowhead symbol within an
equilateral triangle is intended to alert the user to the
presence of uninsulated dangerous voltage within the
product’s enclosure that may be of sufficient magnitude to
constitute a risk at electric shock to persons.
The exclamation point within an equilateral triangle is
intended to alert the user to the presence of important
operating and maintenance (servicing) instructions in the
literature accompanying the appliance
Please read all information in this manual thoroughly. Familiarize yourself with the capabilities and the usage of
your appliance before attempting to operate or maintain this unit. Taking a minute to do this now will help to
prevent any damages or loss in the future.
Keep this manual handy as a reference for operating procedures and safety information.
Do not insert any kind of irrelevant objects into this device through the openings as they may touch
dangerous voltage points that could result in the fire or electric shock.
Avoid placing this unit near the liquids since it could result in the electric shock. Furthermore, the liquid
splashes could damages the device and might cause smoke and overheat.
Always submit yourself into the safe driving rules and follow all traffic regulation. If you experience any
difficulties while operating the system or reading the monitor display, please stop your car and make any
necessary adjustment.
The Safety
Do not attempt to install or service your device on your own. Installation or serving by the people without
proper training and experience in the electronic equipment and the automotive accessories may be
dangerous and could lead into the risk of the electric shock or the other hazards.
If the receiver does not work properly, please disconnect the power plug for your safety and contact your
local dealer immediately for further technical support.
If any solid objects or liquids fall into the cabinet, please disconnect the unit and make it checked by the
qualified person before operating it any further.
Do not install the in-car DVB-T/T2 receiver where it may
obstruct the driver’s vision,
impair with the performance of any vehicle’s operating system or the head unit, and
impair with the driver’s ability to safely operate the vehicle.
2
Page 3

Table of Contents
Unit Description & Installation Guide ...........................................................4
AV I/O Ports Definition ..............................................................................8
Remote Control Operations .......................................................................9
I. Home Menu .................................................................................... 10
II. Quick Guide for First-time User ........................................................... 11
II.1. DVB-T TV Watching .............................................................................................. 11
II.2. DVB-T Radio Listening .......................................................................................... 13
II.3. Record Function .................................................................................................. 14
II.4. Movie Watching ................................................................................................... 15
II.5. Music Listening ................................................................................................... 16
II.6. Photo Viewing ..................................................................................................... 17
III. Using the Menu ............................................................................... 19
III.1. DVB-T TV/Radio Menu ........................................................................................... 19
III.1.1 Channel List .................................................................................................. 19
III.1.2 Channel Management ...................................................................................... 20
III.1.3 Auto Search .................................................................................................. 21
III.1.4 DVB-T Audio Settings ...................................................................................... 21
III.1.5 Channel Information ........................................................................................ 22
III.1.6 Aspect Ratio .................................................................................................. 22
III.1.7 Subtitle ........................................................................................................ 23
III.1.8 Teletext ........................................................................................................ 23
III.1.9 AFS Setting* .................................................................................................. 23
III.1.10 CONAX CA ................................................................................................. 24
III.2. System Settings .............................................................................. 25
III.2.1 Country/Language .......................................................................................... 25
III.2.2 Display Setting .............................................................................................. 25
III.2.3 Monitor Port Setting ........................................................................................ 26
III.2.4 HDMI Setting ................................................................................................. 26
III.2.5 Antenna Power Output (+5V) ............................................................................. 26
III.2.6 Version Upgrade ............................................................................................ 27
III.2.7 Reset Default ................................................................................................. 27
III.3. Photo Menu ........................................................................................................ 28
III.4. Music Menu ........................................................................................................ 28
III.5. Movie Menus ....................................................................................................... 29
III.5.1 Menu ........................................................................................................... 29
IV. Trouble Shooting Q&A ...................................................................... 30
V. Specification ................................................................................... 31
3
Page 4
Unit Description & Installation Guide
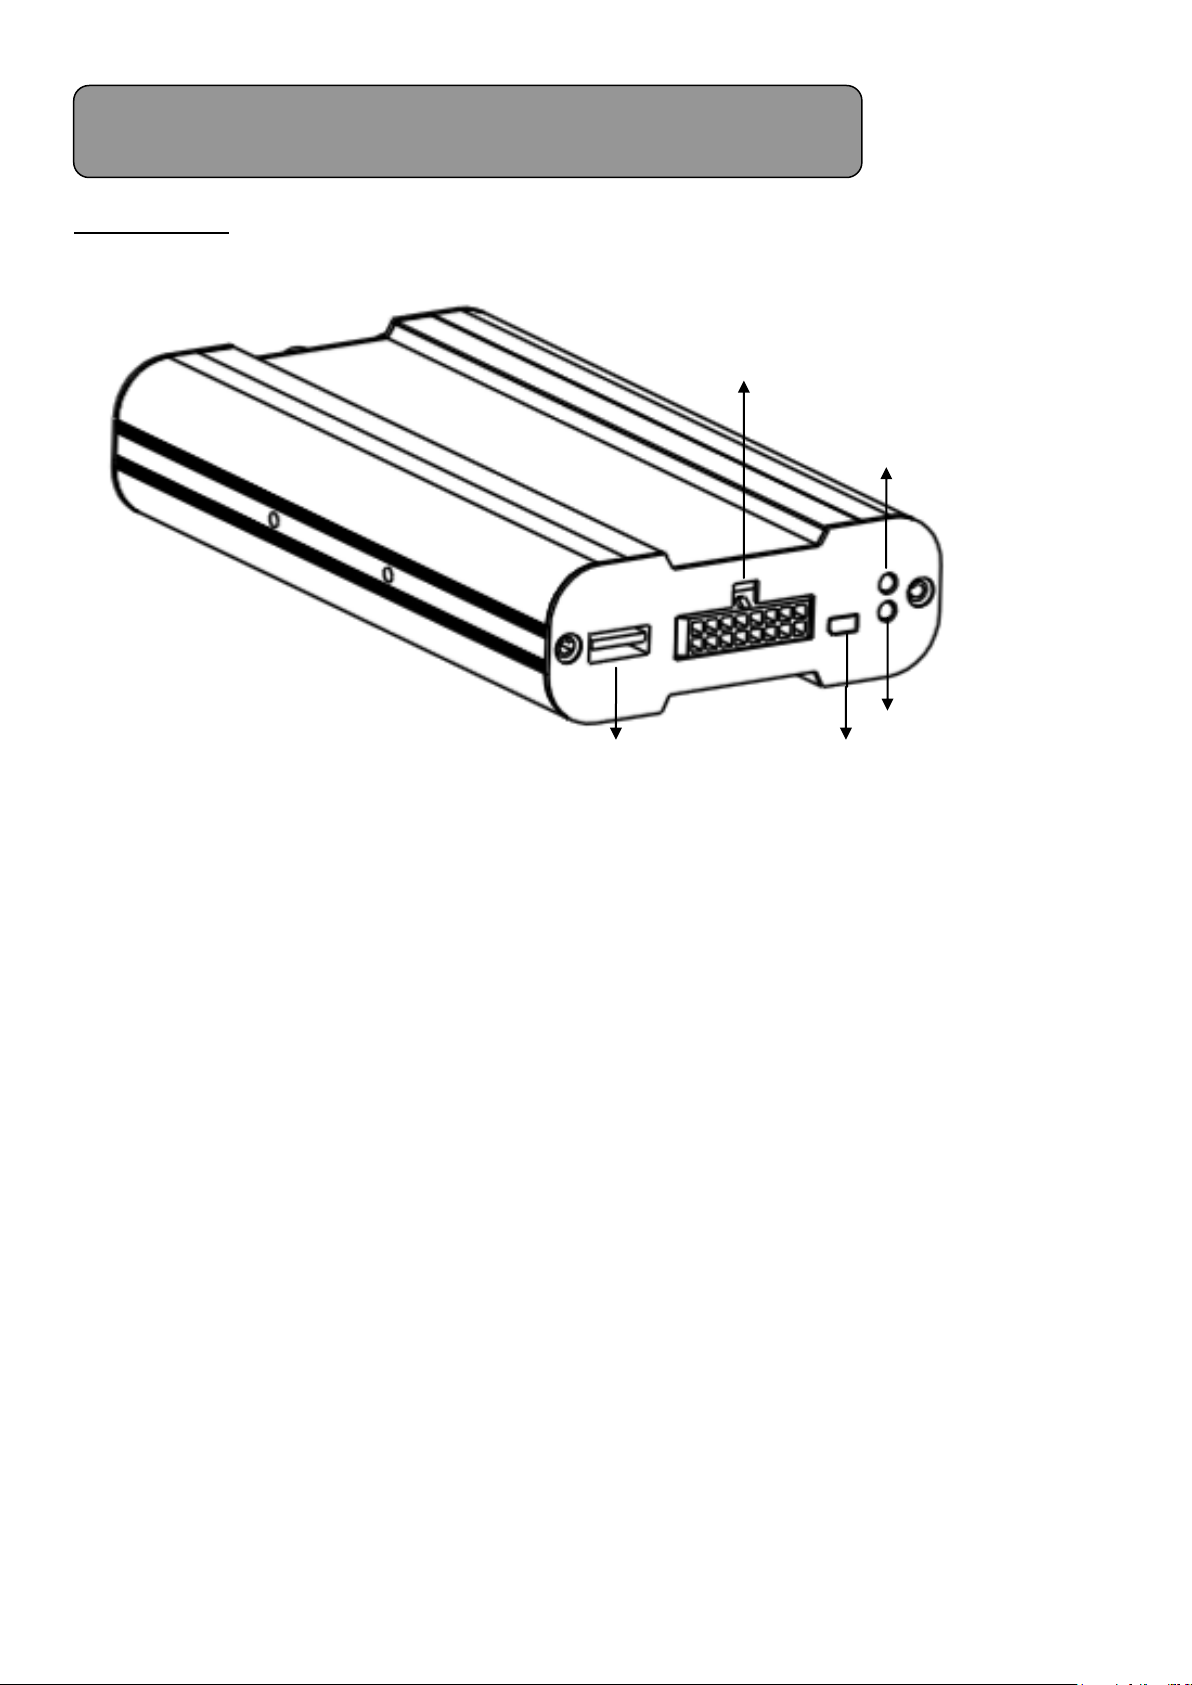
(3) Power
(2) Operating
(5) USB
(4) Conax Slot extension port
(1) AV I/O port
Front Side
(1) AV I/O port: Combination of power input, ACC input, IR , URAT, CVBS,
Video/Audio GND and RGB output.
(2) Operating: the “Operating” LED indicates if the system is working.
(3) Power: the “Power” LED indicates if the 12V or 24V power supply has been
successfully applied to the device.
(4) Conax Slot extension port: Extension port for external Conax smart card slot
to enable pay-TV service
(5) USB port: Plug the USB memory stick and HDD to USB port for multimedia
playback and TV recording.
4
Page 5
Back Side
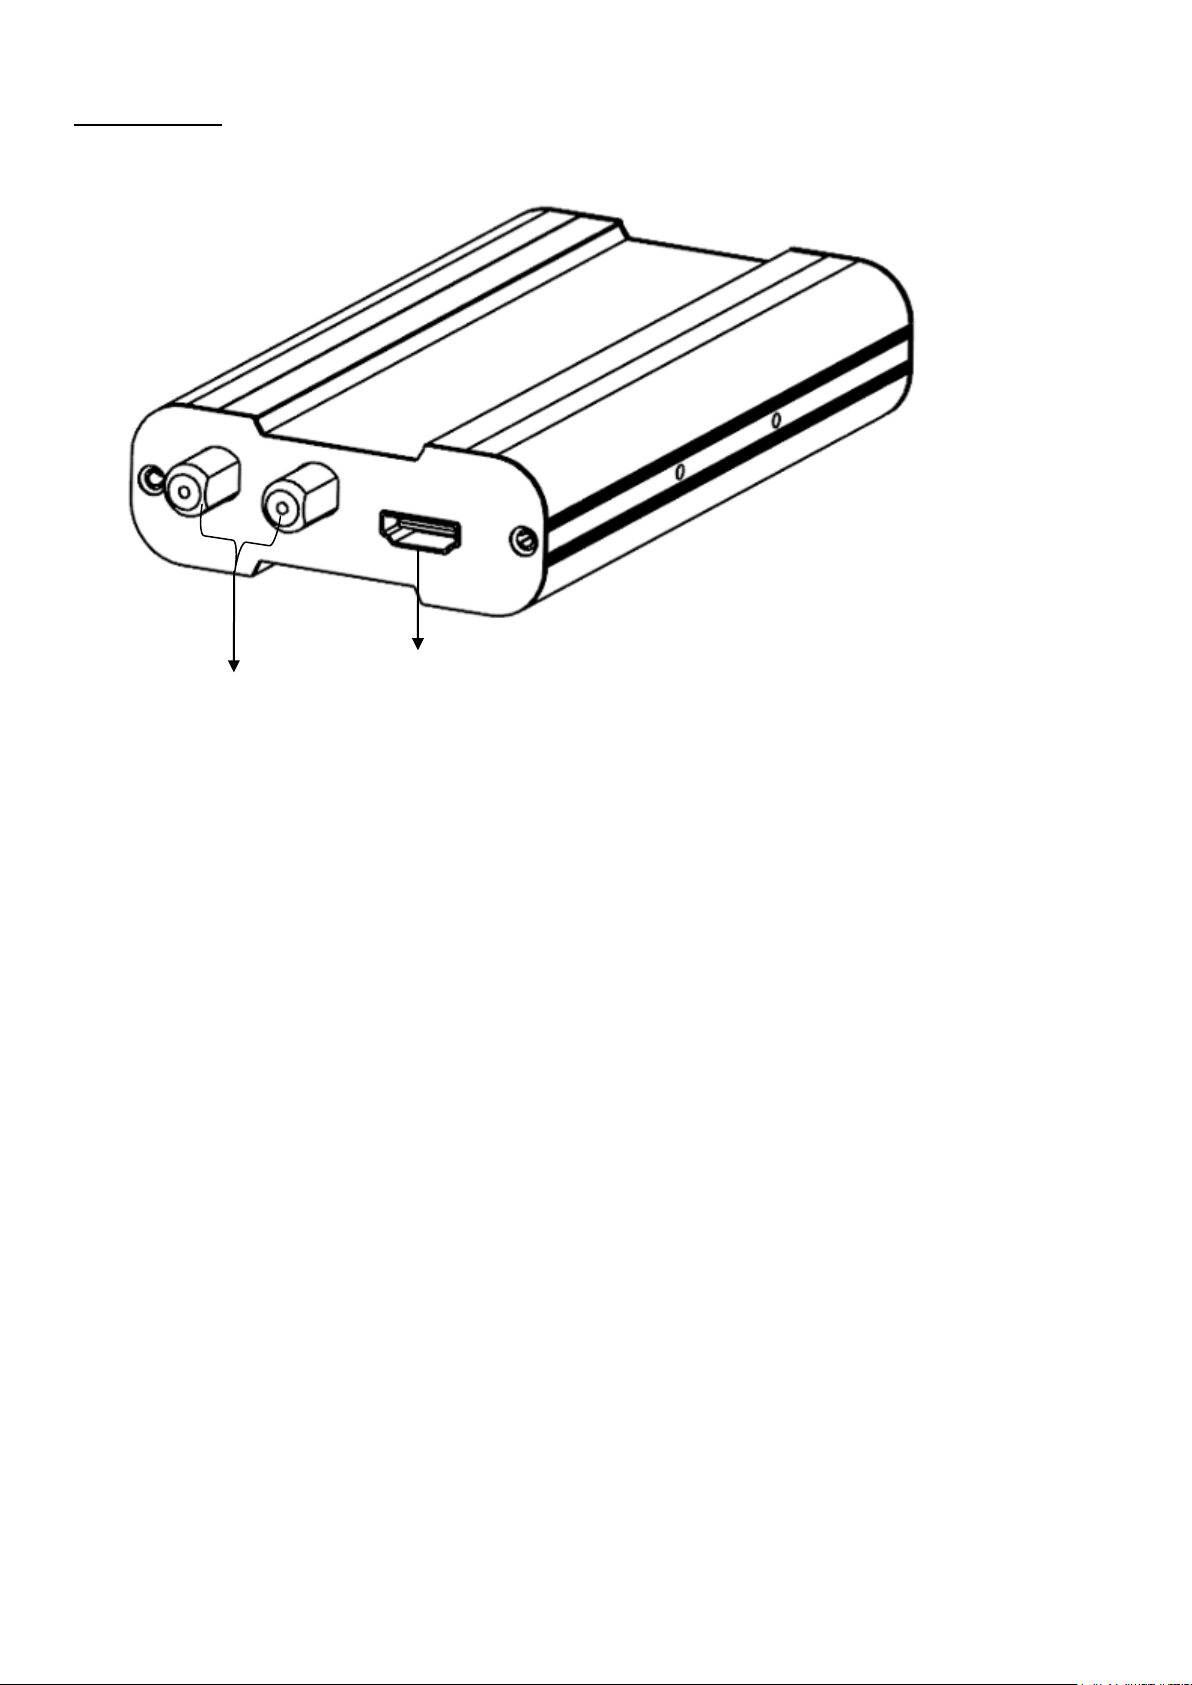
(6) Ant-in
(7) HDMI port
(6) Ant. In: antenna connection port (NOTE: this unit provides +5V antenna power
through this connection port.)
(7) HDMI Port : HDMI output port.
5
Page 6
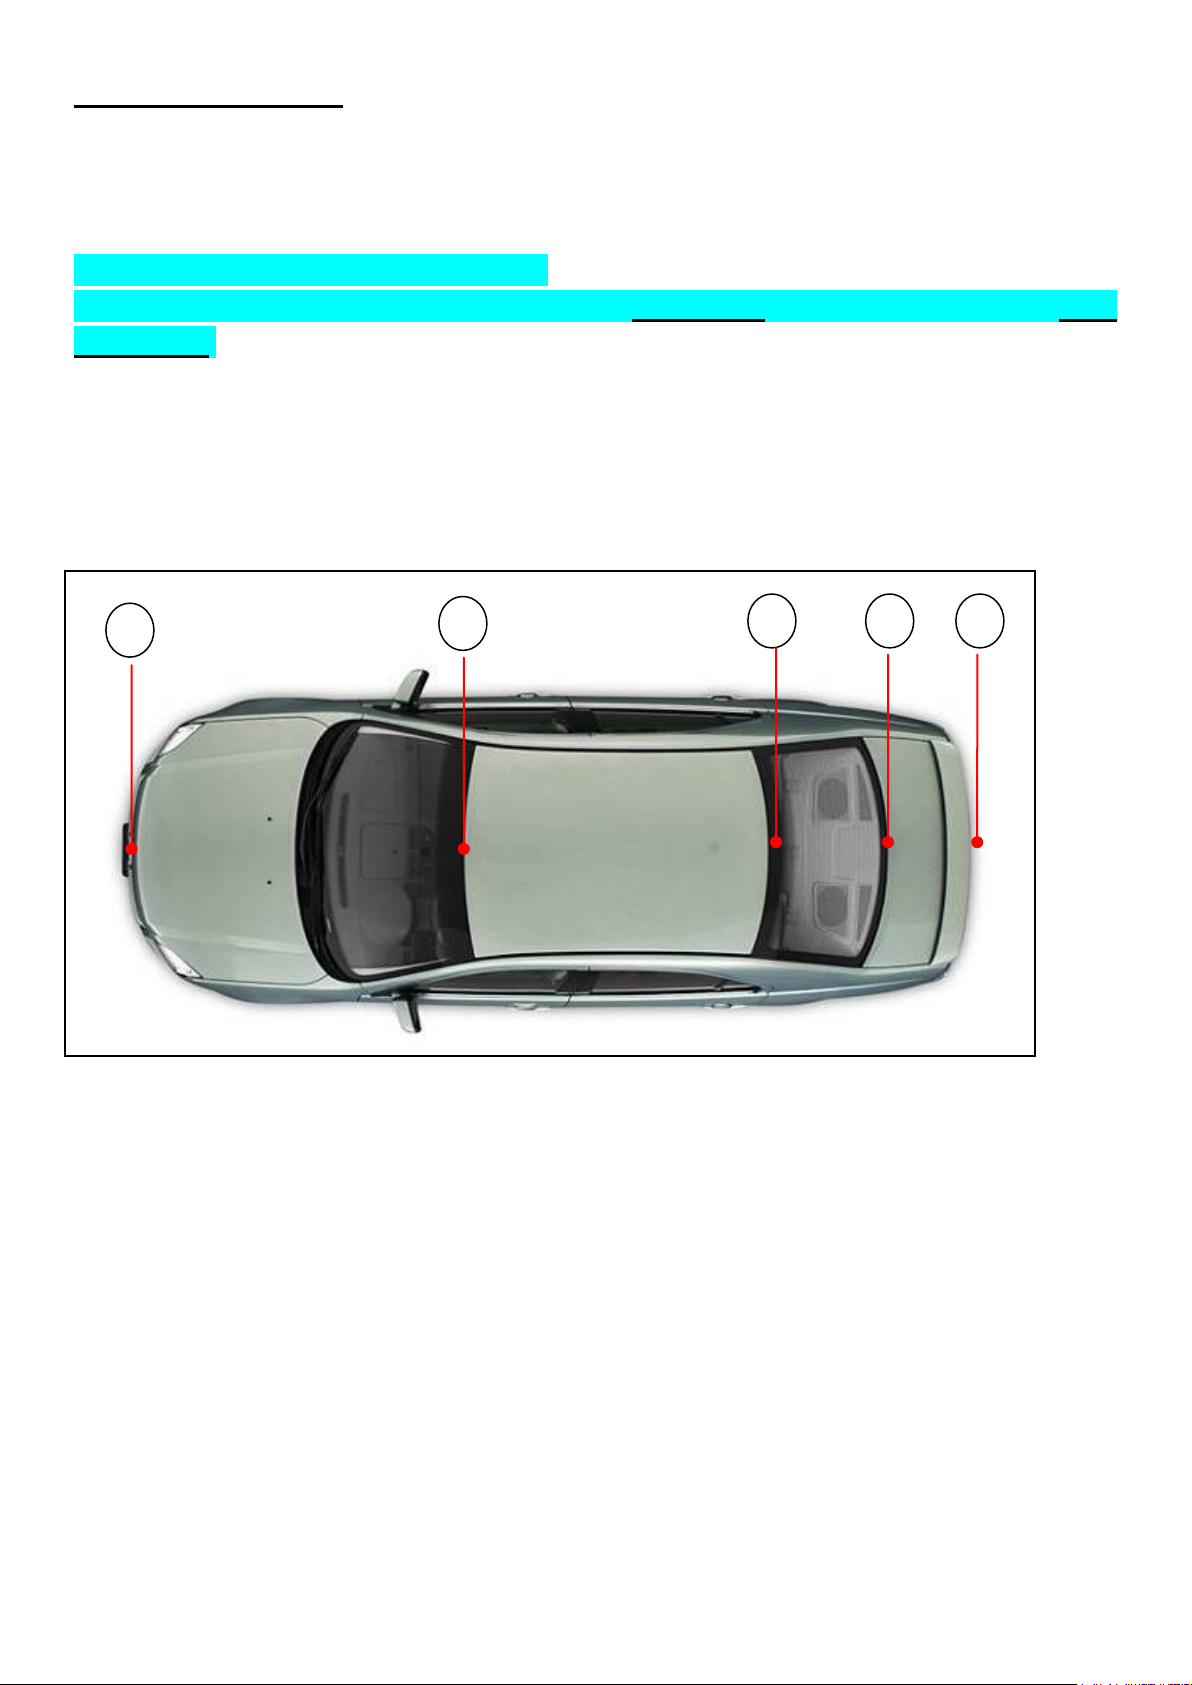
Antenna connection
1
2
3 4 5
In-car digital TV reception situation will vary from vehicle to vehicle and the installer may need
to try anetnna mounting positions to determine the best position for most stable signal reception in
vehicles.
Important Notes on Antenna Installation:
For a better reception, please place the rod antenna horizontally, and keep the rod antenna away
from metals.
Antenna Position
To optimize the TV reception performance, we recommend that one antenna is mounted at the
front and one at the rear of the vehicle. Please refer to the diagram below for some recommended
locations.
(1) Behind the Front Bumper. Note: Please make sure the bumper is not made of metal
(2) Top of the Front Windscreen, but at least 5cm away from the metal body of the car
(3) Top of the Rear Windscreen, but at least 5cm away from the metal body of the car
(4) Bottom of the Rear Windscreen, at least 5cm away from the metal body of the car
(5) Behind the Rear Bumper (note: make sure rear bumper is not made of metal)
*Noted: For position (2) ~ (4), because the windshields of many cars are usually equipped with film
coating (that contains metal), the actual signal reception may be degraded, depending on the amount of
the metal embedded within the film.
6
Page 7
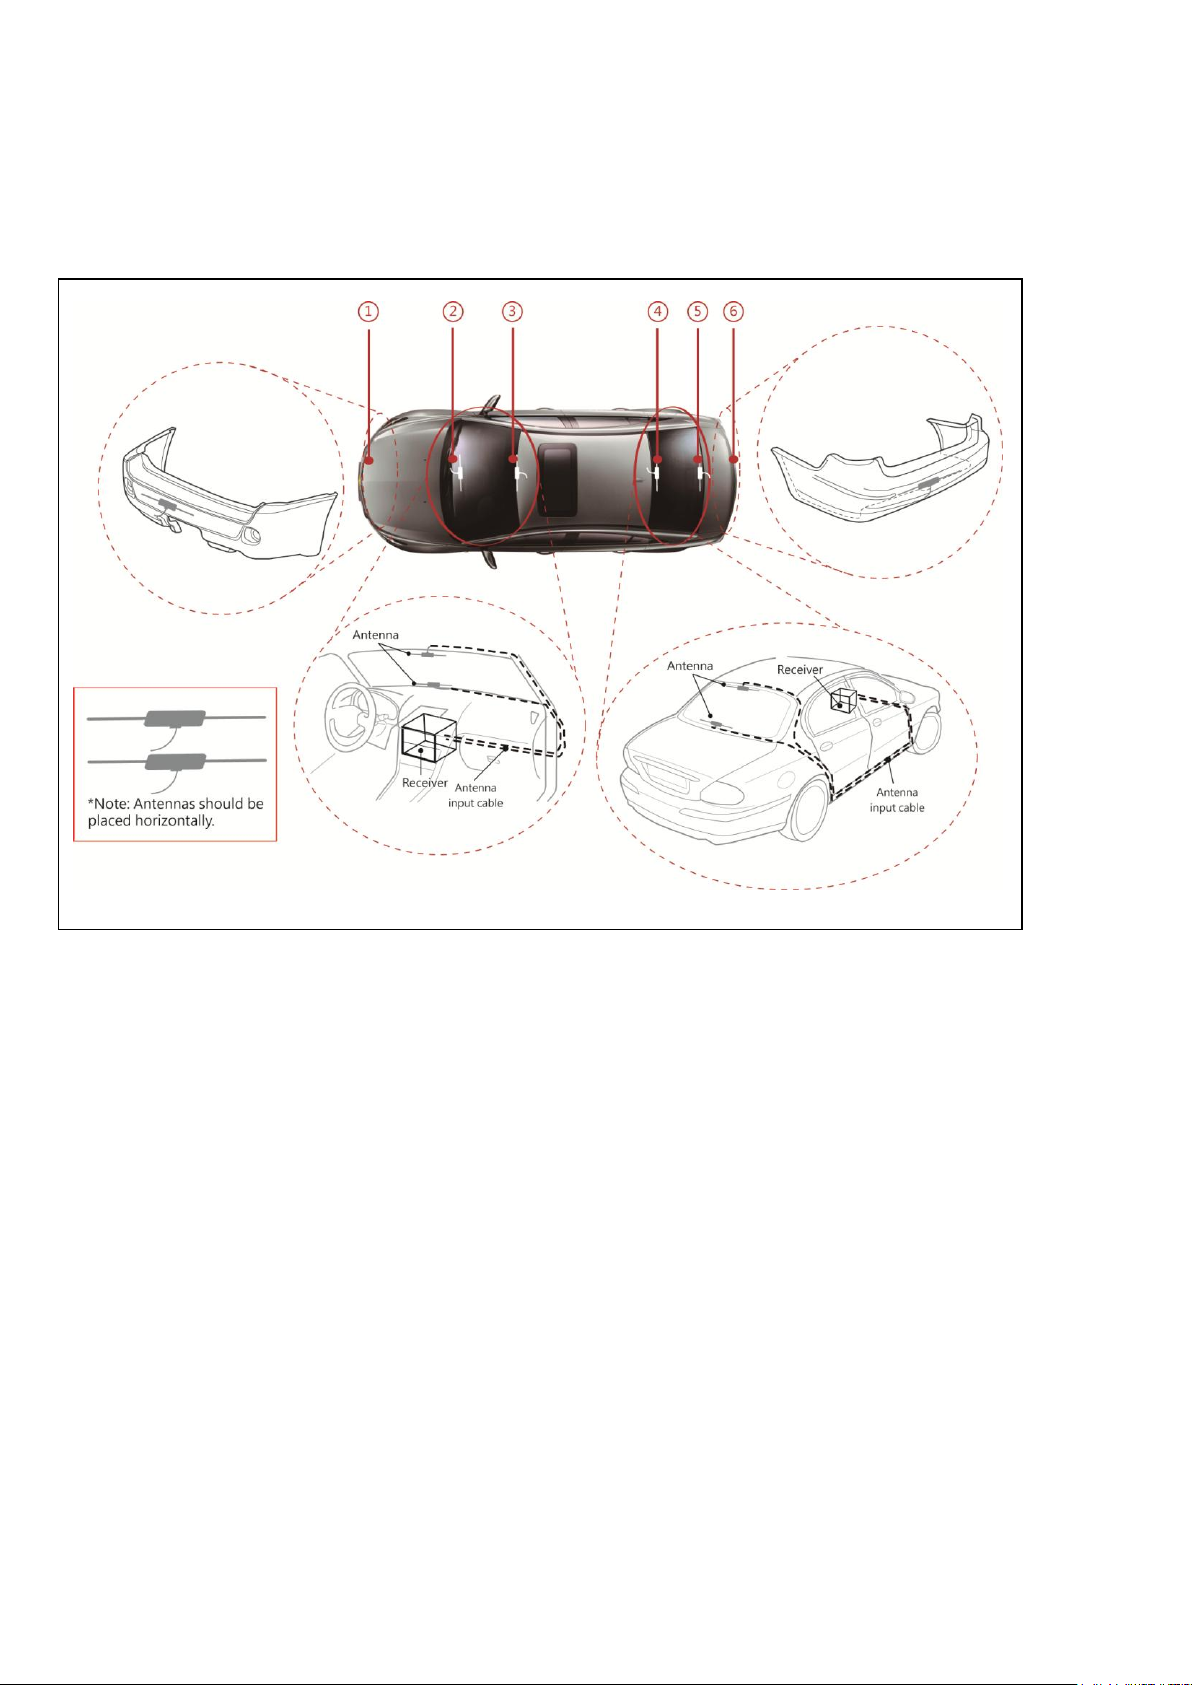
Antenna Cable Routing
Once a suitable position of antenna placement is found, carefully route the antenna cables to the
receiver unit and then connect to the Antenna Inputs on DTV receiver.
7
Page 8
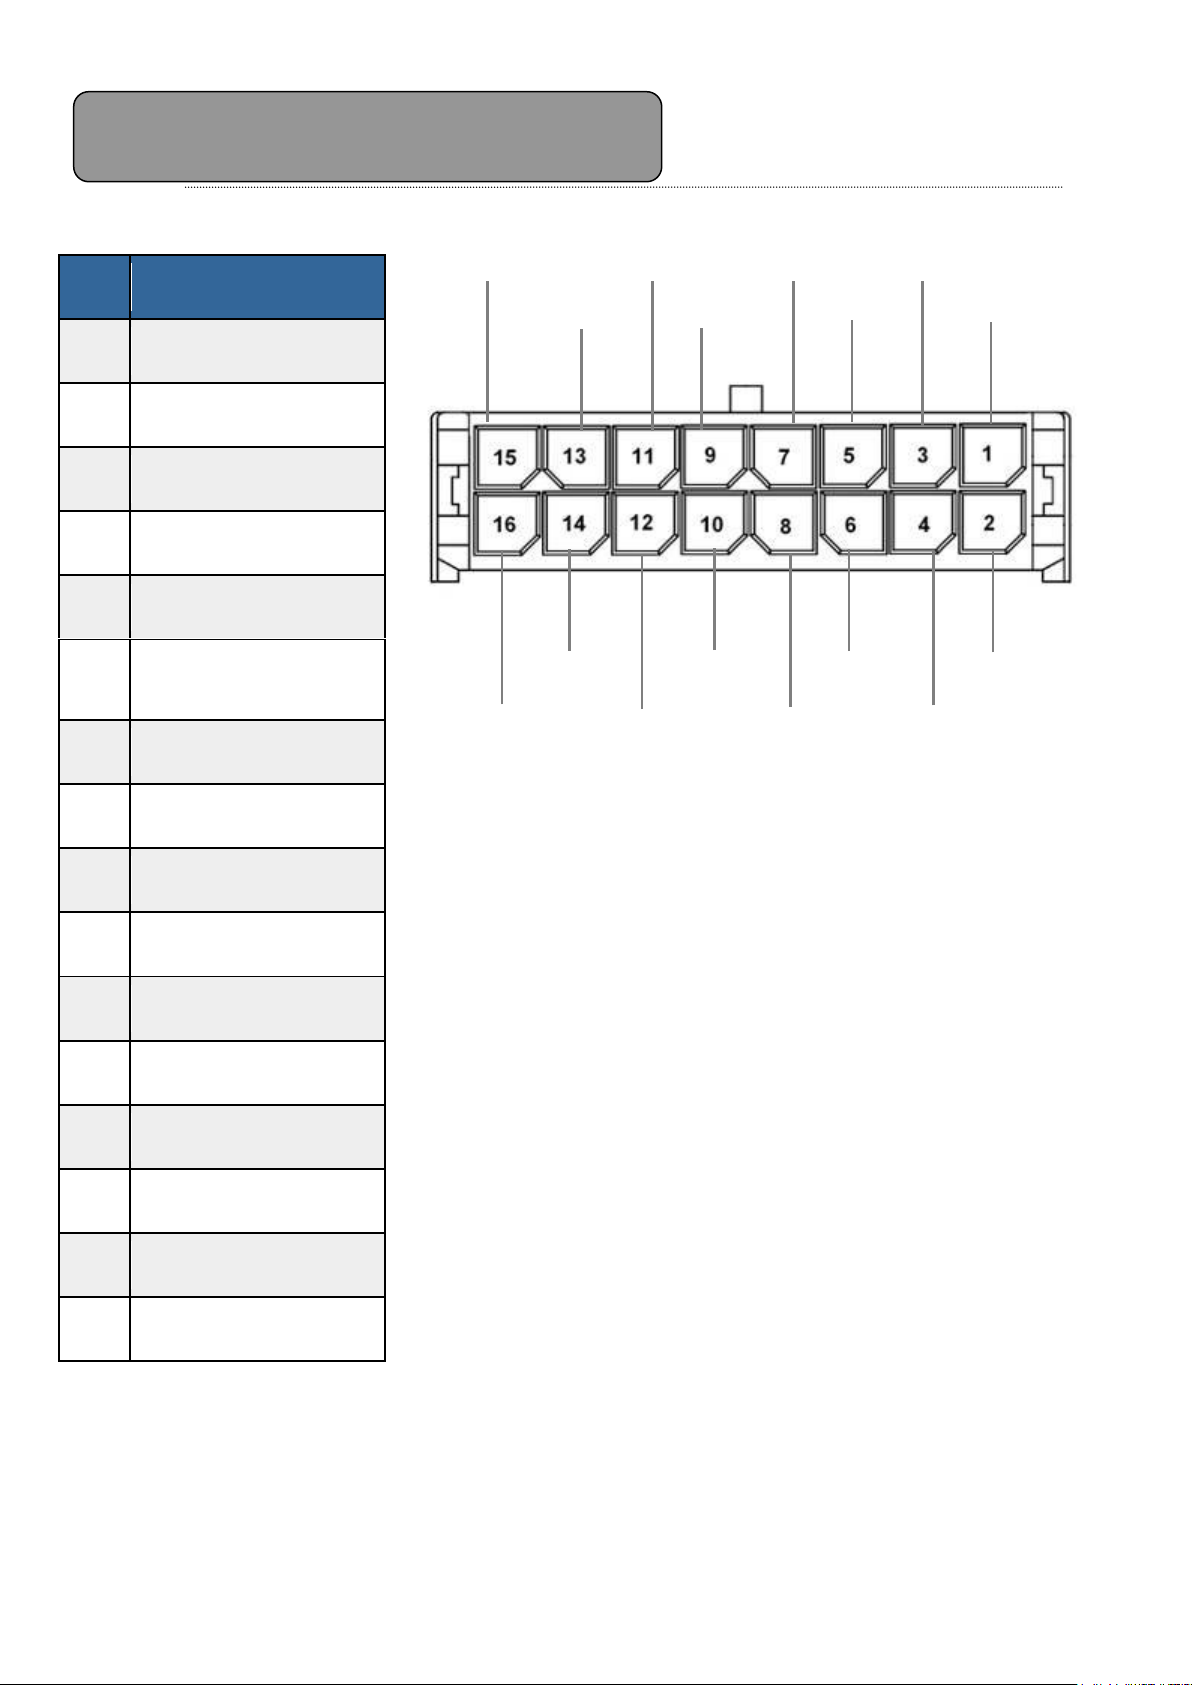
Pin
Description
1
B output
2
R output
3
G output
4
VIDEO_GND
5
AUDIO_GND
6
CVBS Videoutput
7
AUDIO L output
8
Audio R output
9
UART Rx input
10
UART Tx input
11
IR data intput
12
LED_EN
13
IR power output
14
PWR_GND
15
+12V input
16
ACC input
AV I/O Ports Definition
B out
G out
GND
Audio L out
Rx in
IR data input
IR power out
+12V in
R out
CVBS out
Tx in
GND
GND
Audio R out
IR LED EN
ACC
8
Page 9
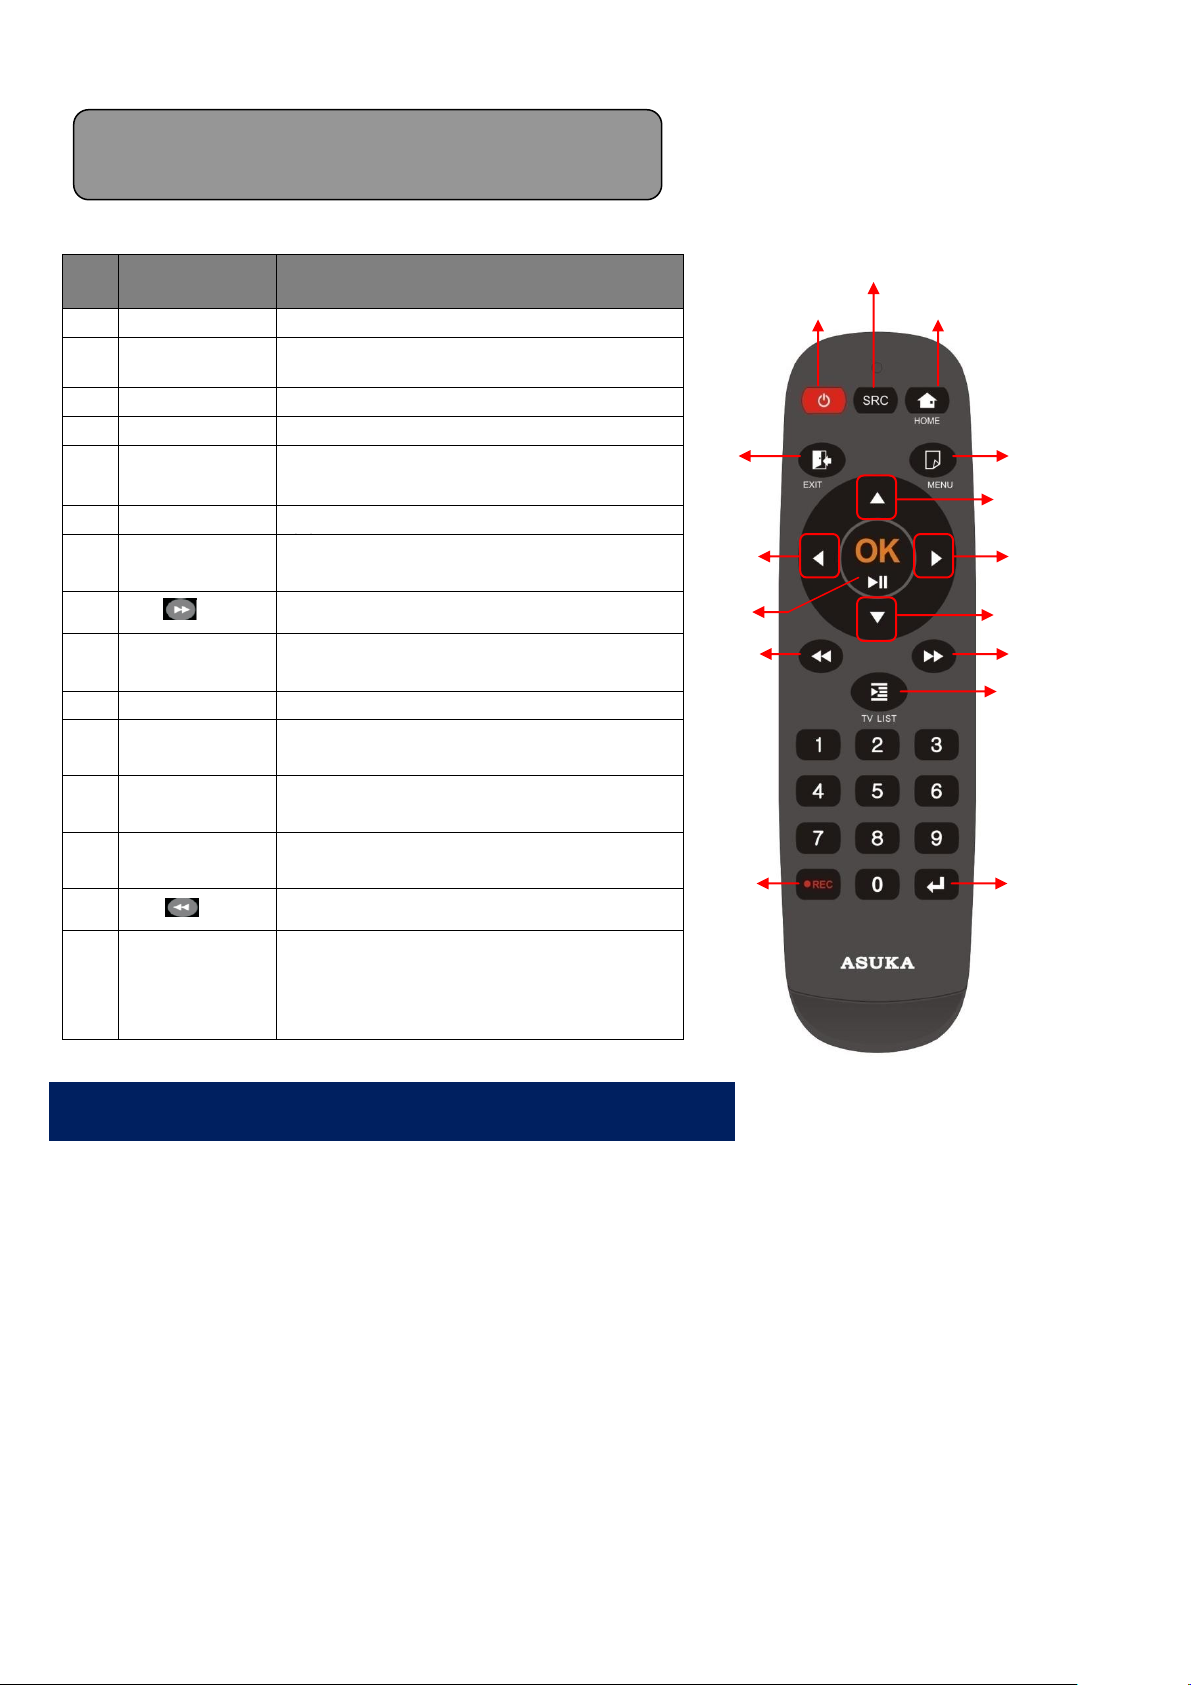
No
Button name
Function
1
POWER
Select the power-on or stand-by
2
SRC
Select a video source from
DTV/AV1/CCD/DVR
3
HOME
Go to the home screen
4
MENU
Enter the setup menu
5
CH▲
Select the channel up or move the cursor
up
6
VOL
Select the volume up or move the cursor
7
CH▼
Select the volume up or move the cursor
right
8
FF
Fast Forward
9
TV LIST
TV Program List
10
ENTER
To enter the selected item
11
EXIT
Exit the current setup
12
VOL
Select the volume down or move the cursor
left
13
OK
Select the highlighted item or select
play/pause
14
FR
Fast Rewind
15
REC●
-Start to record the TV/Radio program or
exit the recording
- Subtitle key in the normal operation mode
Remote Control Operations
- Remote Control Battery Installation
[1]
[2]
[3]
[4]
[5]
[6]
[7]
[8]
[9]
[10]
[11]
[12]
[14]
[13]
[15]
If the battery power in the remote controller becomes low, please follow the steps below to replace
a new battery:
1. Slightly push the battery case from the down to the up and pull out the battery case from the
remote control.
2. Replace the original battery with the new one.
3. Insert back the battery and the case into the remote control.
9
Page 10
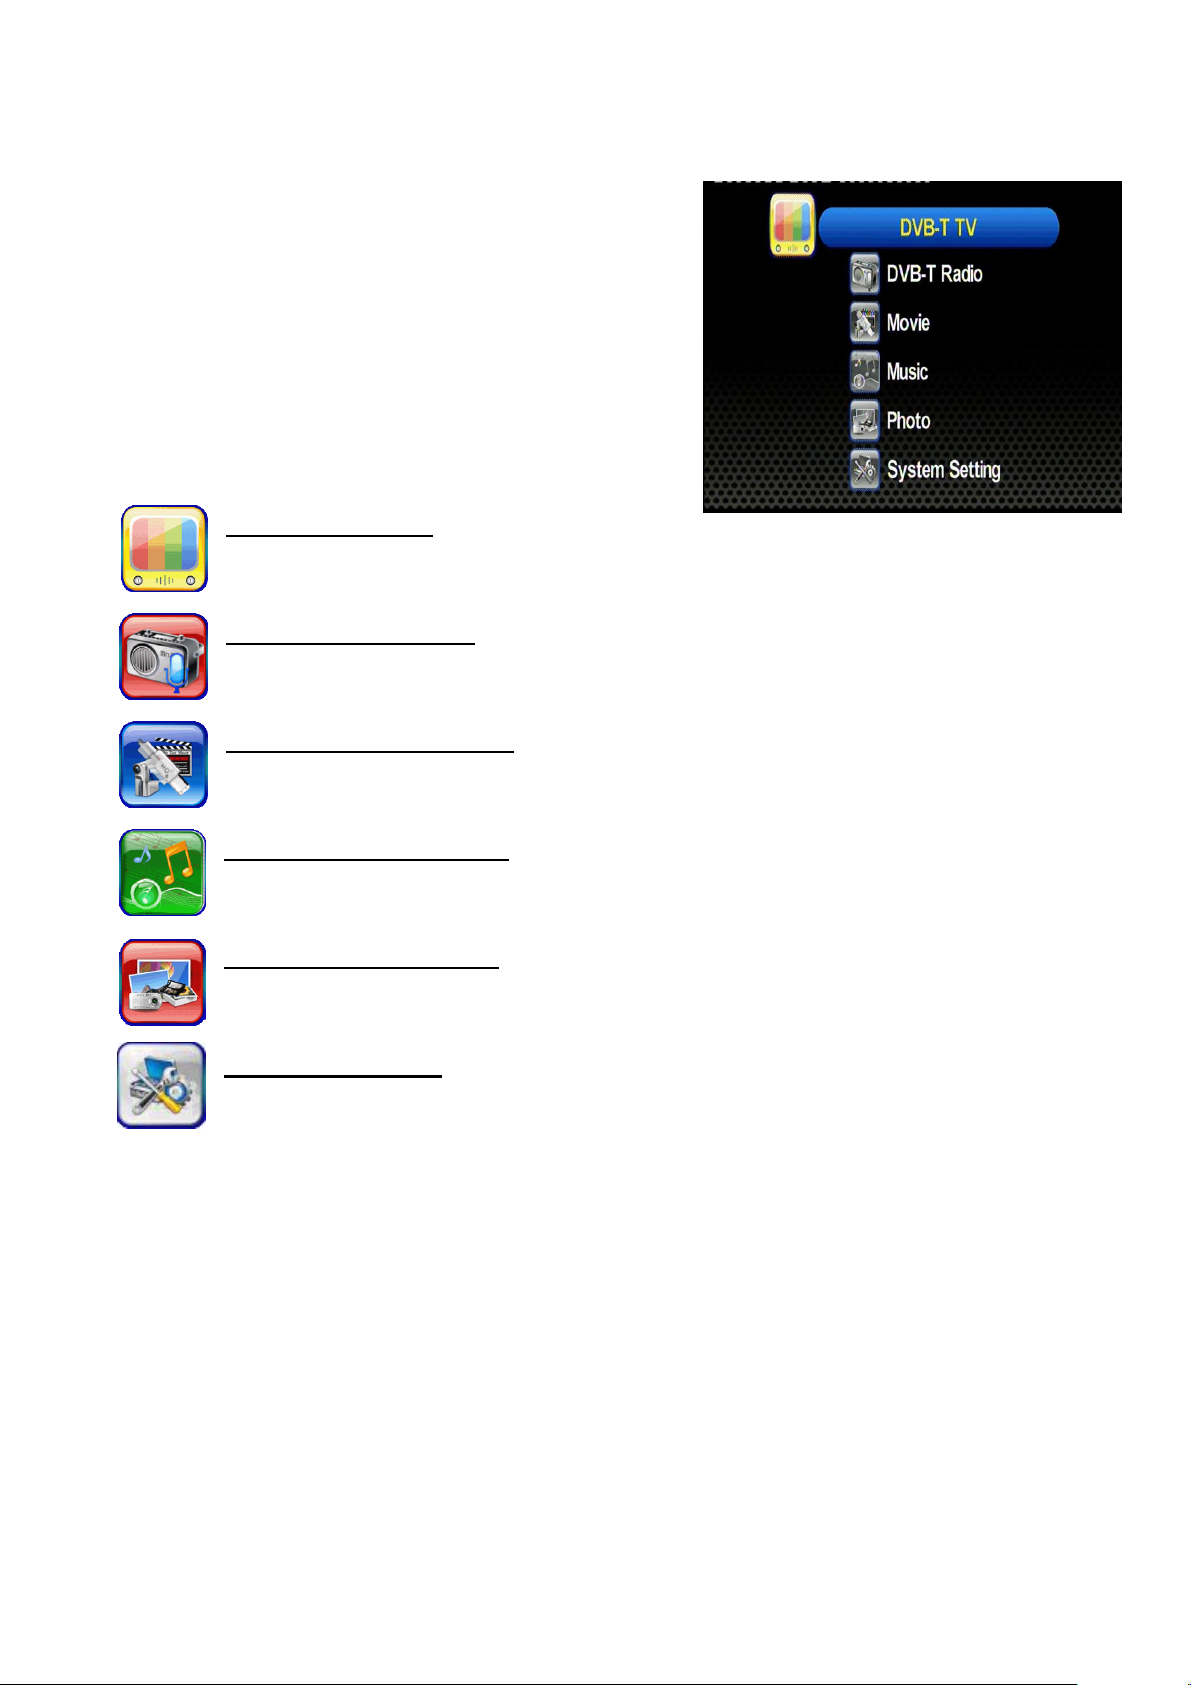
I. Home Menu
This is the home menu screen. You can highlight
the DVB-T TV mode, the DVB-T Radio mode, the
video playback mode, the music playback mode,
the picture viewing mode, and the system settings.
Use [CH] and [CH] buttons to highlight the
desired item and press [OK] button to select it.
DVB-T TV Mode
To enter DVB-T TV mode.
DVB-T Radio Mode
To listen to DVB-T radio broadcasting.
Movie Playback Mode
To enter movie playback mode and watch movie files.
Music Playback Mode
To enter audio playback mode and listen to music.
Photo Viewing Mode
To enter photo viewing mode and watch pictures.
System Settings
To configure the device settings.
Note: Press the [HOME] key to go back to the home screen anytime.
Press the [SOURCE] key to switch AV source anytime.
10
Page 11
II. Quick Guide for First-time User
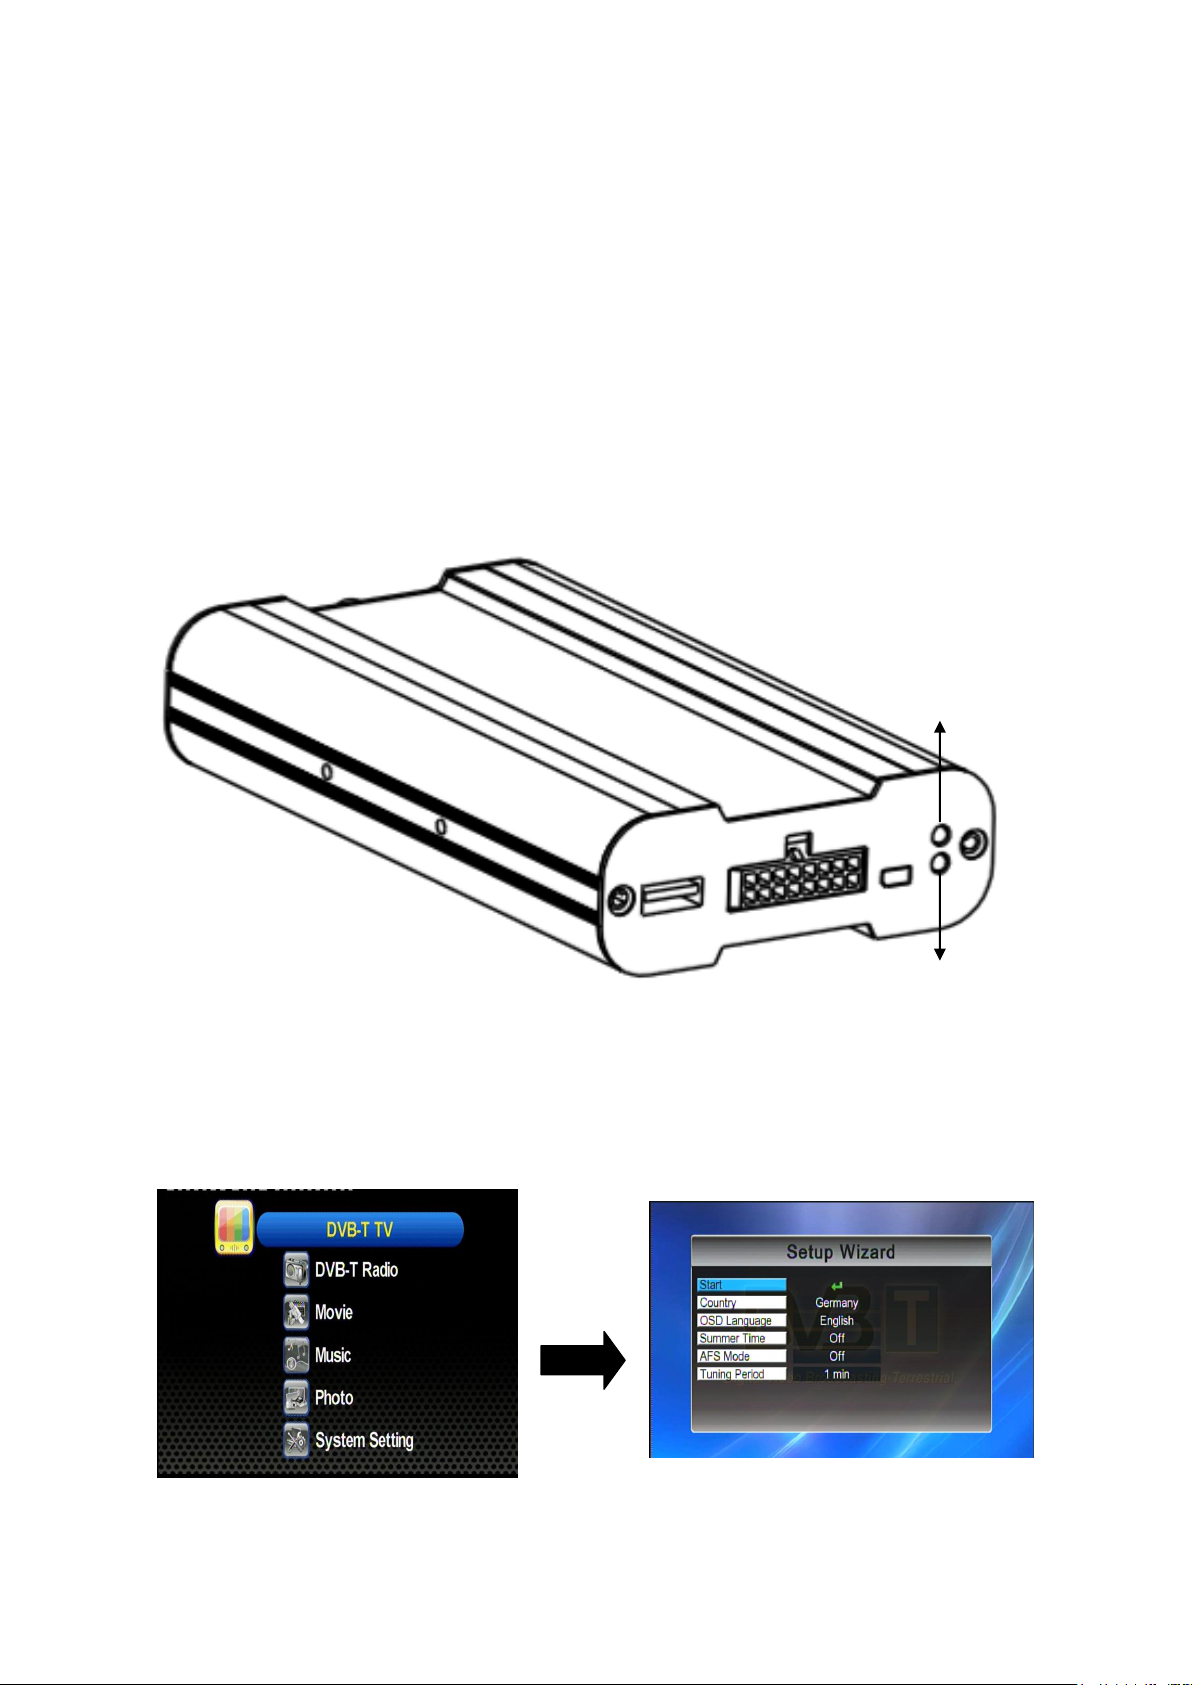
Press [OK]
Operating LED
Power LED
II.1. DVB-T TV Watching
Step 1: Turn on the device
1. Turn on the vehicles ACC or IGN. (or start the vehicle)
2. When the unit is powered, the POWER LED indicator will be illuminated in RED as shown
below.
3. When the system is activated, the Operating LED on the unit will be illuminated in Green.
Step 2: Highlight the “TV” option and press [OK] to enter the TV mode. The “Setup Wizard”
will show up if it’s the 1st time to use the device in which there are no TV Channel info have
been previously stored.
11
Page 12
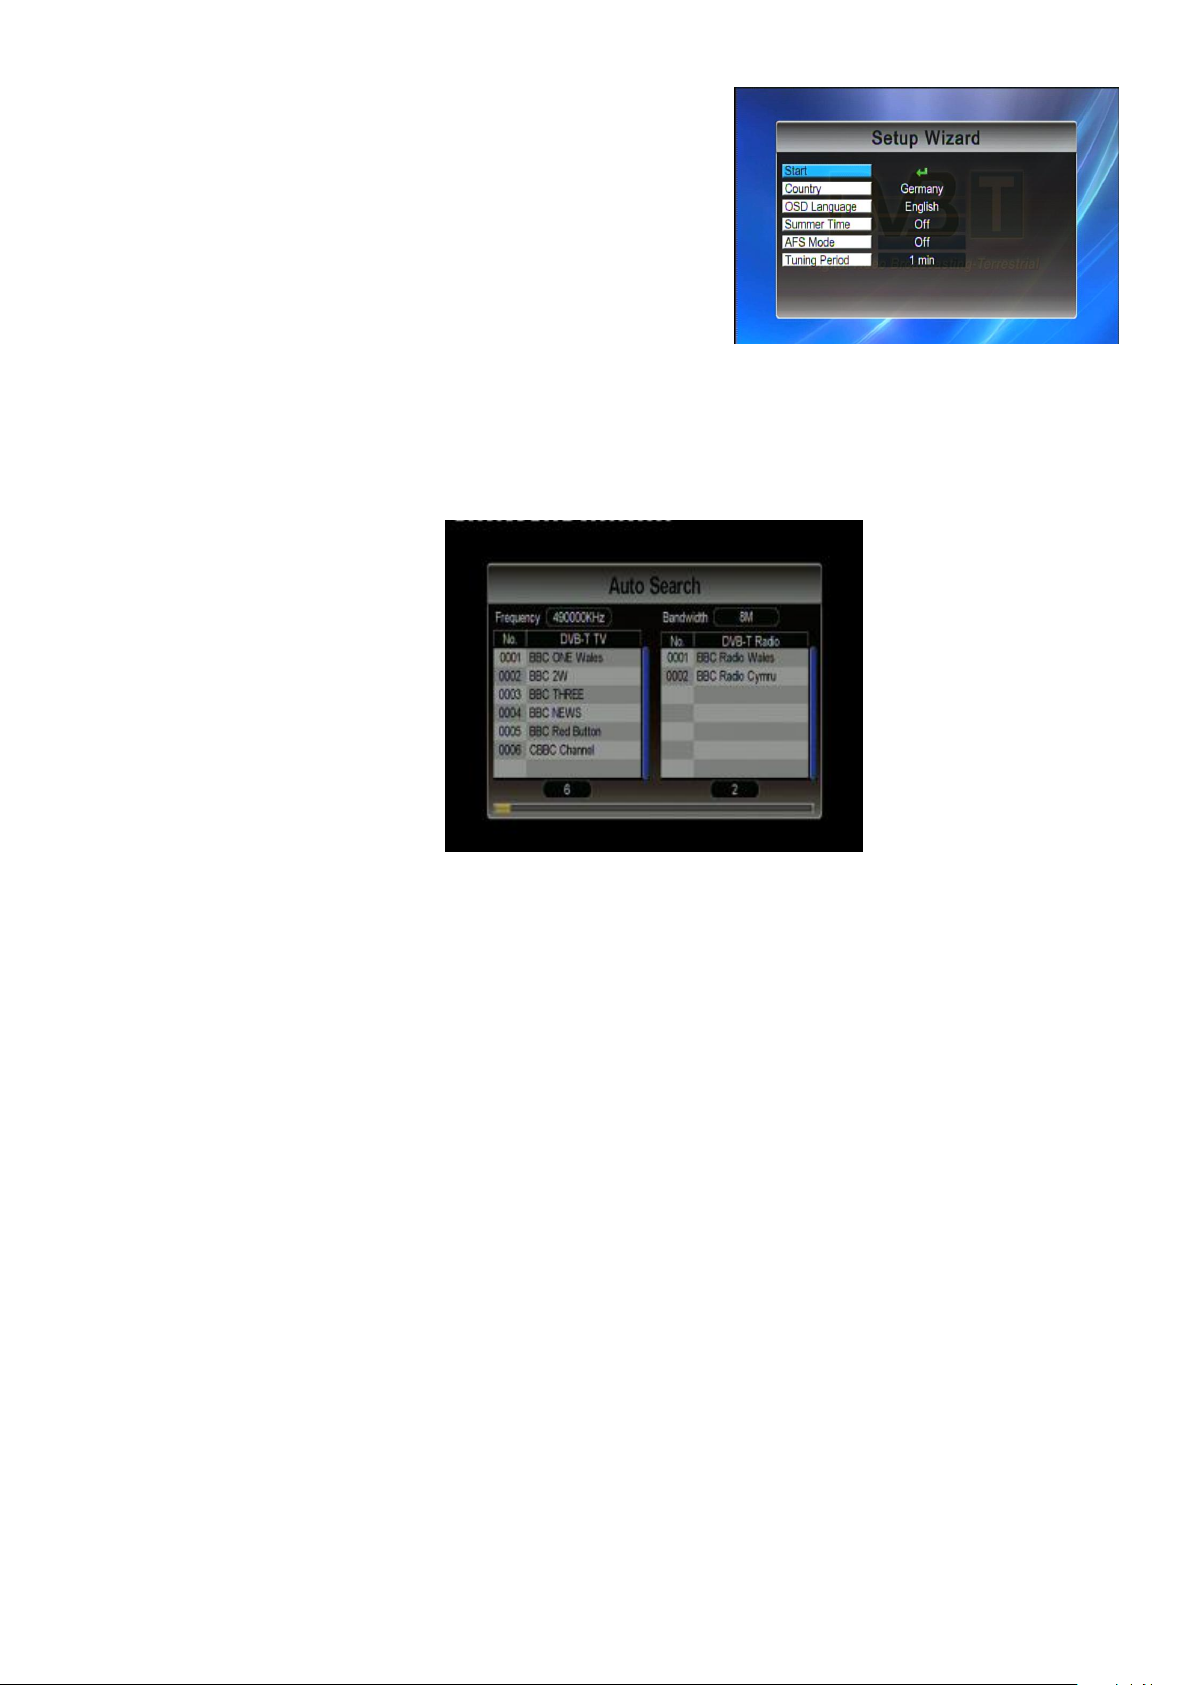
Step 3: Set your country, preferred OSD language,
Summer Time (optional) and LCN option.
NOTE: Time zone setting will be automatically updated once
the Region setting is changed.
Step 4: Perform auto search to find available TV channels.
1. Select “Start” on Setup Wizard and press OK to active it.
2. The device will show "Scan screen" as below and perform searching the available TV
channels in your area.
Step 5: Job well-done! You can now sit back and enjoy your mobile TV.
NOTE: Keep [OK] button pressed to change the aspect ratio of current TV program.
12
Page 13
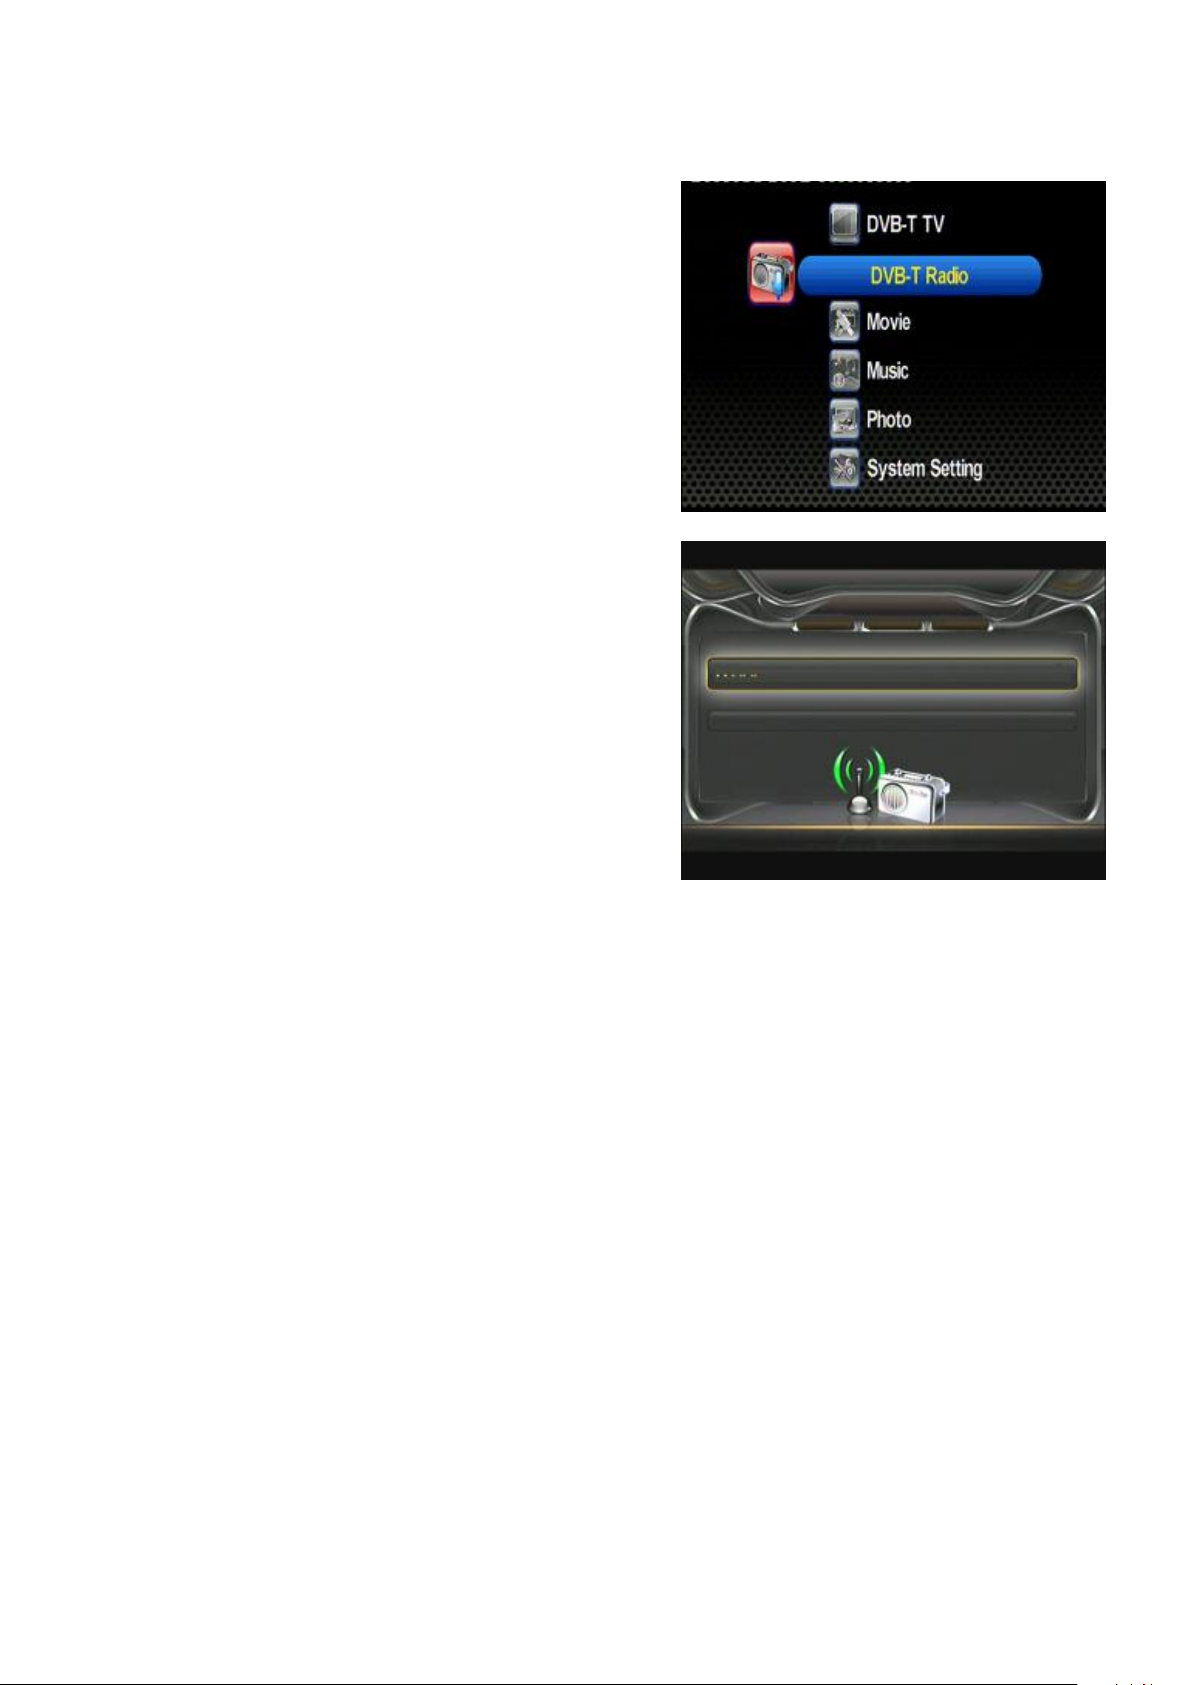
II.2. DVB-T Radio Listening
1. Press [CH]/[ CH]buttons to select the
Ratio item and then press [OK] button to
enter the radio mode.
2. Press [CH]/[CH]buttons to select your
preferred radio channel.
3. The radio service will start instantly.
13
Page 14

II.3. Record Function
NOTE: ARA-HD2 supports both DVB-T TV and DVB-T Radio recording.
1. During TV or Radio mode, press [REC] to start recording TV/Radio programs. When the unit
starts to record, icon will appear on the upper left screen & the timer menu (disappear
in 10 sec without control) will appear on the lower left screen simultaneously.
NOTE:
a. Please ensure that a USB Storage device is connected to the unit before recording.
b. To ensure successful recording on storage device with NTFS system, please plug the
storage in Windows operated computer and perform "Safely Remove Hardware"
application before using it with HR-V
2. Recorded TV programs can be played back in Movie mode. And the recorded Radio programs
can be played back in Music mode.
Important notes:
i. A recorded program will be stored in a default folder named “Recorded_Program”. The file
types will be “.TSV” file for TV program and “.TSA” file for Radio.
ii. The file is named as (Channel Name) + (Recorded Date Recorded Time)
iii. Maximum file size of FAT/FAT32 is 4 GB, if the file exceeds this size, the system will cut
the recorded file into 2 parts.
iv. 1 GB storage can record TV program for approximately up to 45 minutes.
v. Storage files system can support FAT/FAT32/NTFS format.
vi. Generally all USB 2.0 flash drive can be used as recorded file storage. However, there are
cases when the USB flash drive can’t store recorded programs from DVB-T receiver unit.
It’s strongly suggested to format the USB storage device by PC or laptop before it’s
inserted into the DVB-T receiver unit.
vii. WARNING! Please do not edit the “*.PLT” & “RECORD.TMP” files. Modifying/deleting this
file will cause error on recorded file.
14
Page 15
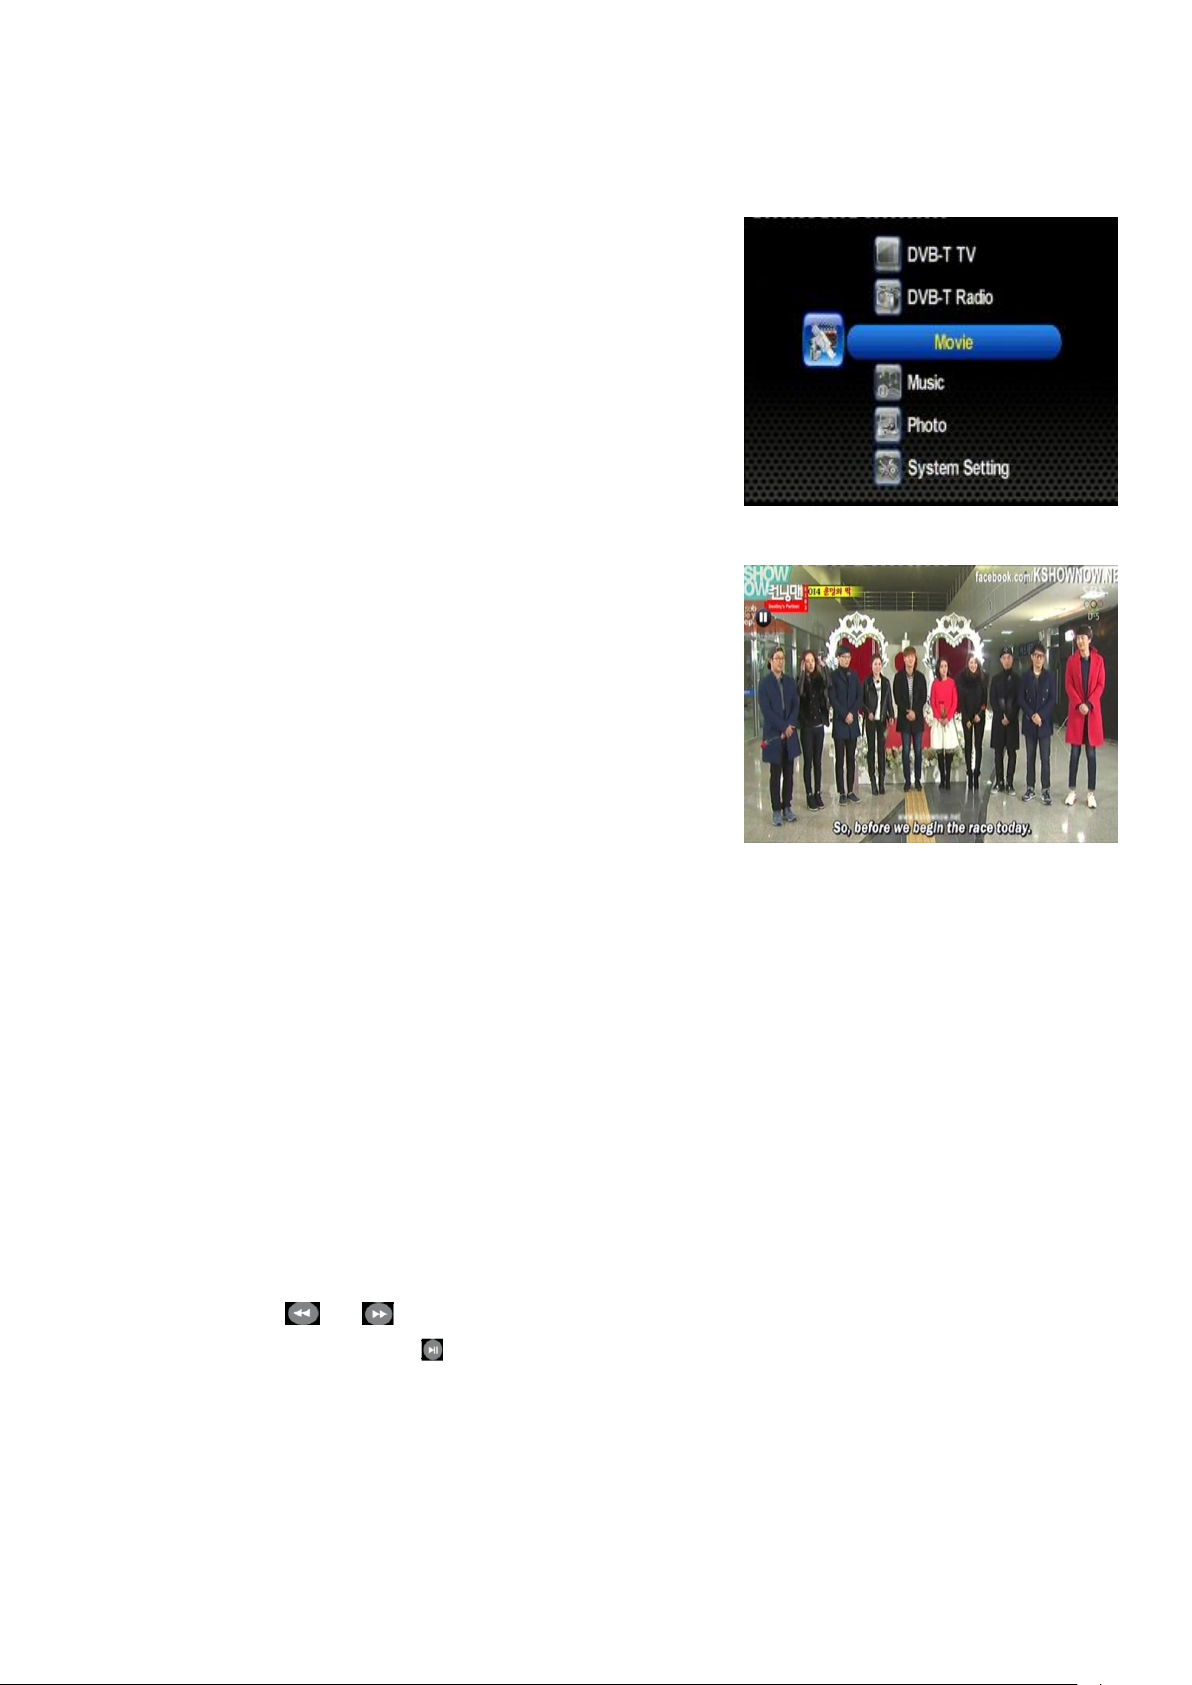
II.4. Movie Watching
This section below will explain how to quickly play a video file stored on USB device.
1. After selecting movie playback mode on the home
screen, file browser screen will appear. Press [OK]
button to select the root folder.
2. The available video files will appear on screen. Use
[CH] and [CH] buttons to scroll up and down
through files, and then select the desired file by
pressing [OK] button. The video file will instantly start
playing.
NOTE: Users can only choose video files under this mode.
System will not support music or photo files under this
mode.
3. Press [EXIT] button to return.
NOTE:
1. Press the FR / FF button to increase or decrease the playing speed.
2. Press the [PLAY/PAUSE] button to pause or resume music playing.
3. Press [RED] button to delete highlighted file/folder.
15
Page 16
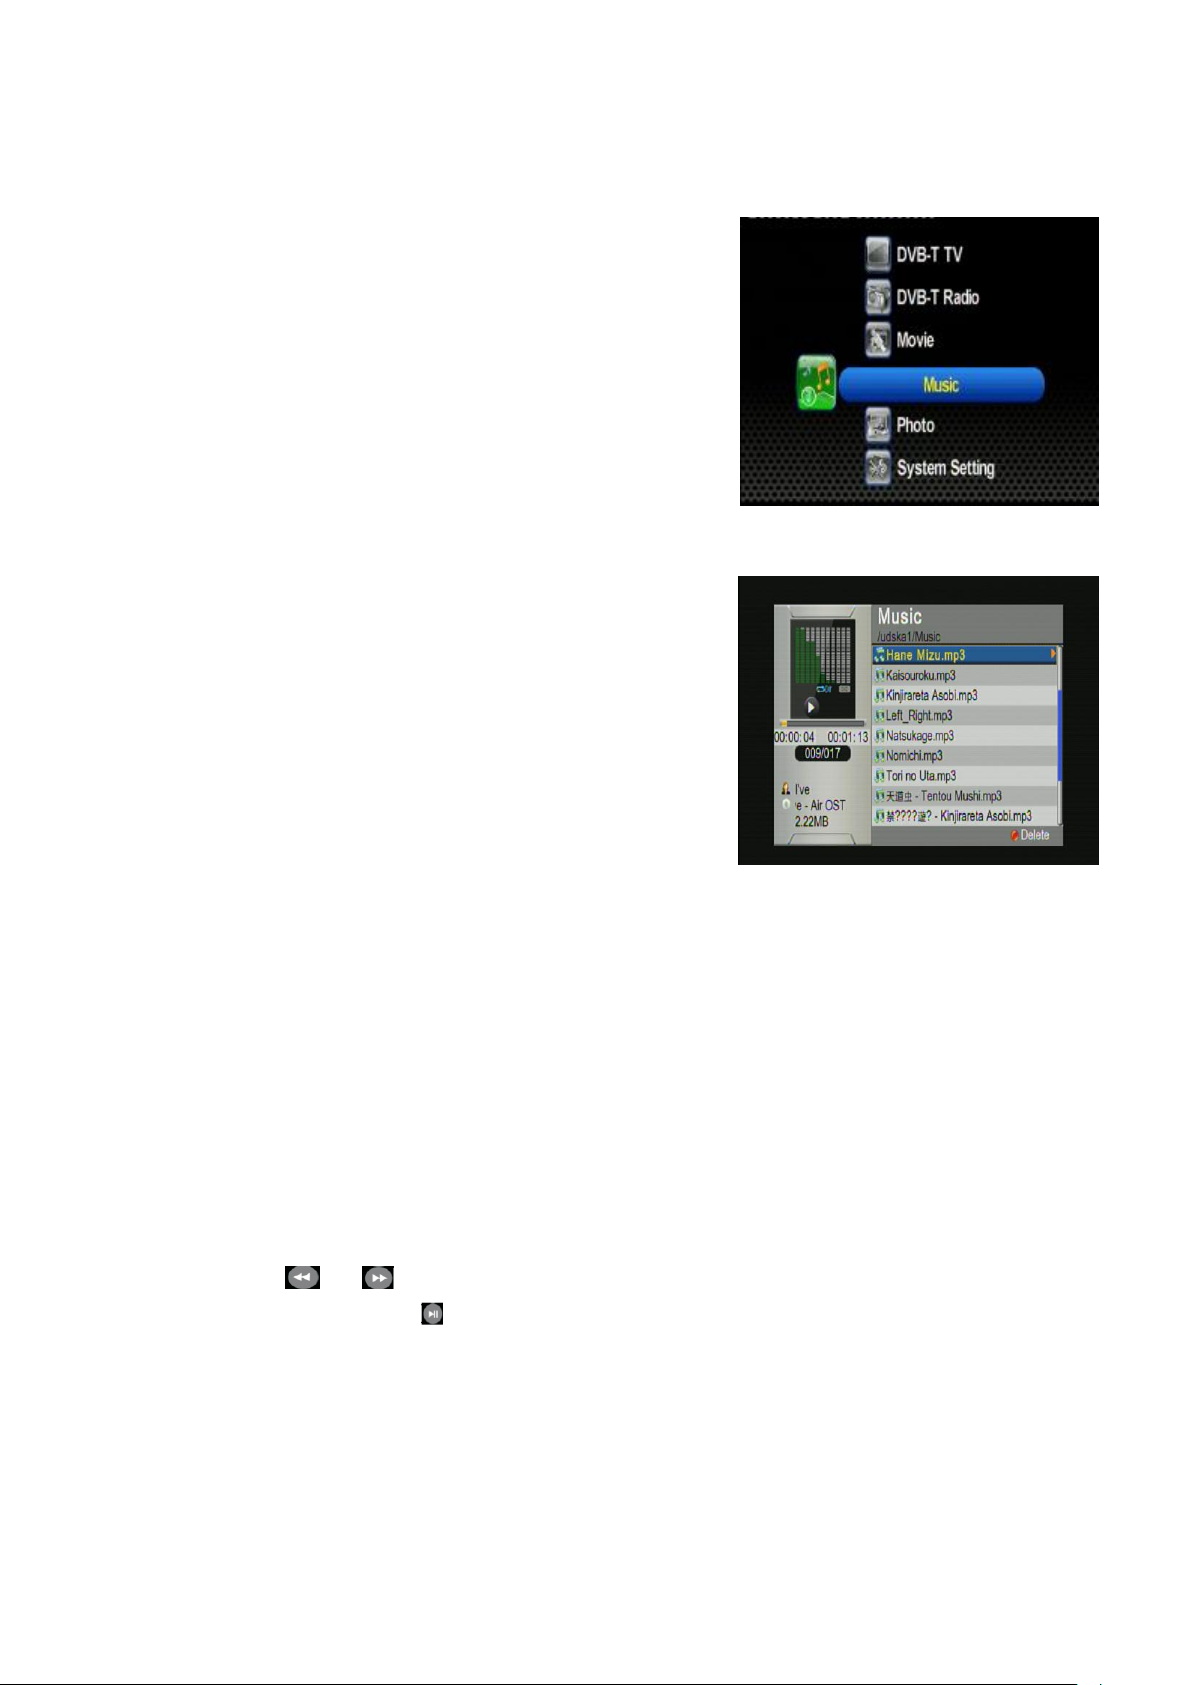
II.5. Music Listening
The section below will explain how to quickly play a music file stored on USB device.
1. After selecting music playback mode on the home
screen, file browser screen will appear. Press [OK]
button to select the root folder.
2. The available audio files will appear on screen. Use
[CH] and [CH] buttons to scroll up and down
through files, and then select the desired file by
pressing the [OK] button. The audio file will instantly
start playing.
NOTE: users can only choose music files under this mode.
Video or photo files are not supported under this mode
3. Press [EXIT] button to return.
NOTE:
1. Press the FR / FF button to increase or decrease the playing speed
2. Press the [PLAY/PAUSE] button to pause or resume music playing.
3. Press [RED] button to delete highlighted file/folder.
16
Page 17
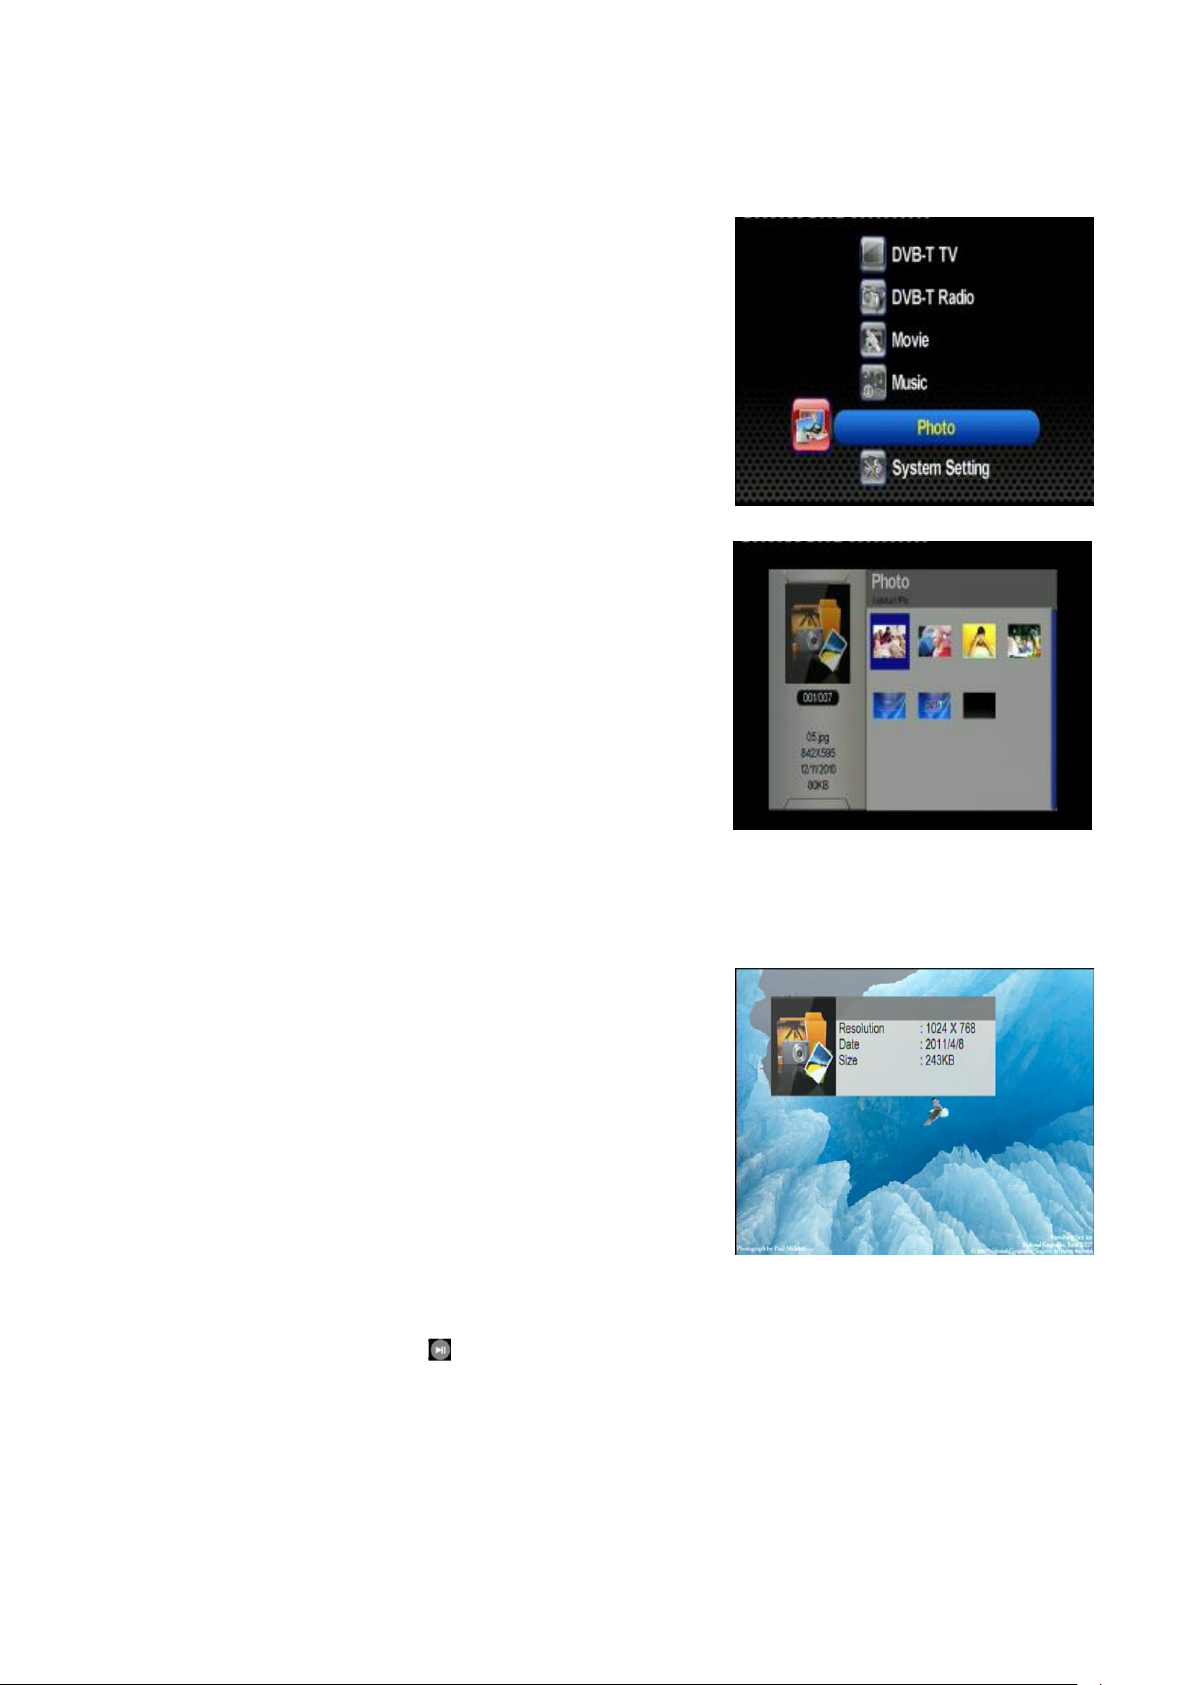
II.6. Photo Viewing
The section below will explain how to view a picture file stored on USB device.
1. After selecting photo viewing mode on the home
screen, file browser screen will appear. Press [OK]
button to select the root folder.
2. Available picture and folders will appear on screen.
Use [CH]/[CH]/[VOL]/[VOL] buttons to
browse the folder, and then select the desired one by
pressing [OK] button.
Note: users can only choose photo files under this
mode. If users choose music or video files, the
system will not support.
3. A picture preview will appear. Press
[CH]/[CH]/[VOL]/[VOL] to select a picture,
and press [OK] button to display the picture in full screen mode.
4. Press [EXIT] button to return.
NOTE: Press the [PLAY/PAUSE] button to pause or resume photo slideshow.
17
Page 18
Photo Viewing – Advanced Functions
Rotating picture
Press [VOL] button to rotate the picture clockwise, and press [VOL] button to rotate it
counterclockwise.
Slideshow
Press [PLAY/PAUSE] to start/stop photo slideshow.
Zoom
1. When viewing a picture, press [OK] to enter zoom mode.
2. Press [FF] to zoom in or press [FR] to zoom out.
3. Use [CH]/[CH]/[VOL]/[VOL] to navigate the picture.
4. Press [EXIT] button to exit the zoom function.
18
Page 19
III. Using the Menu
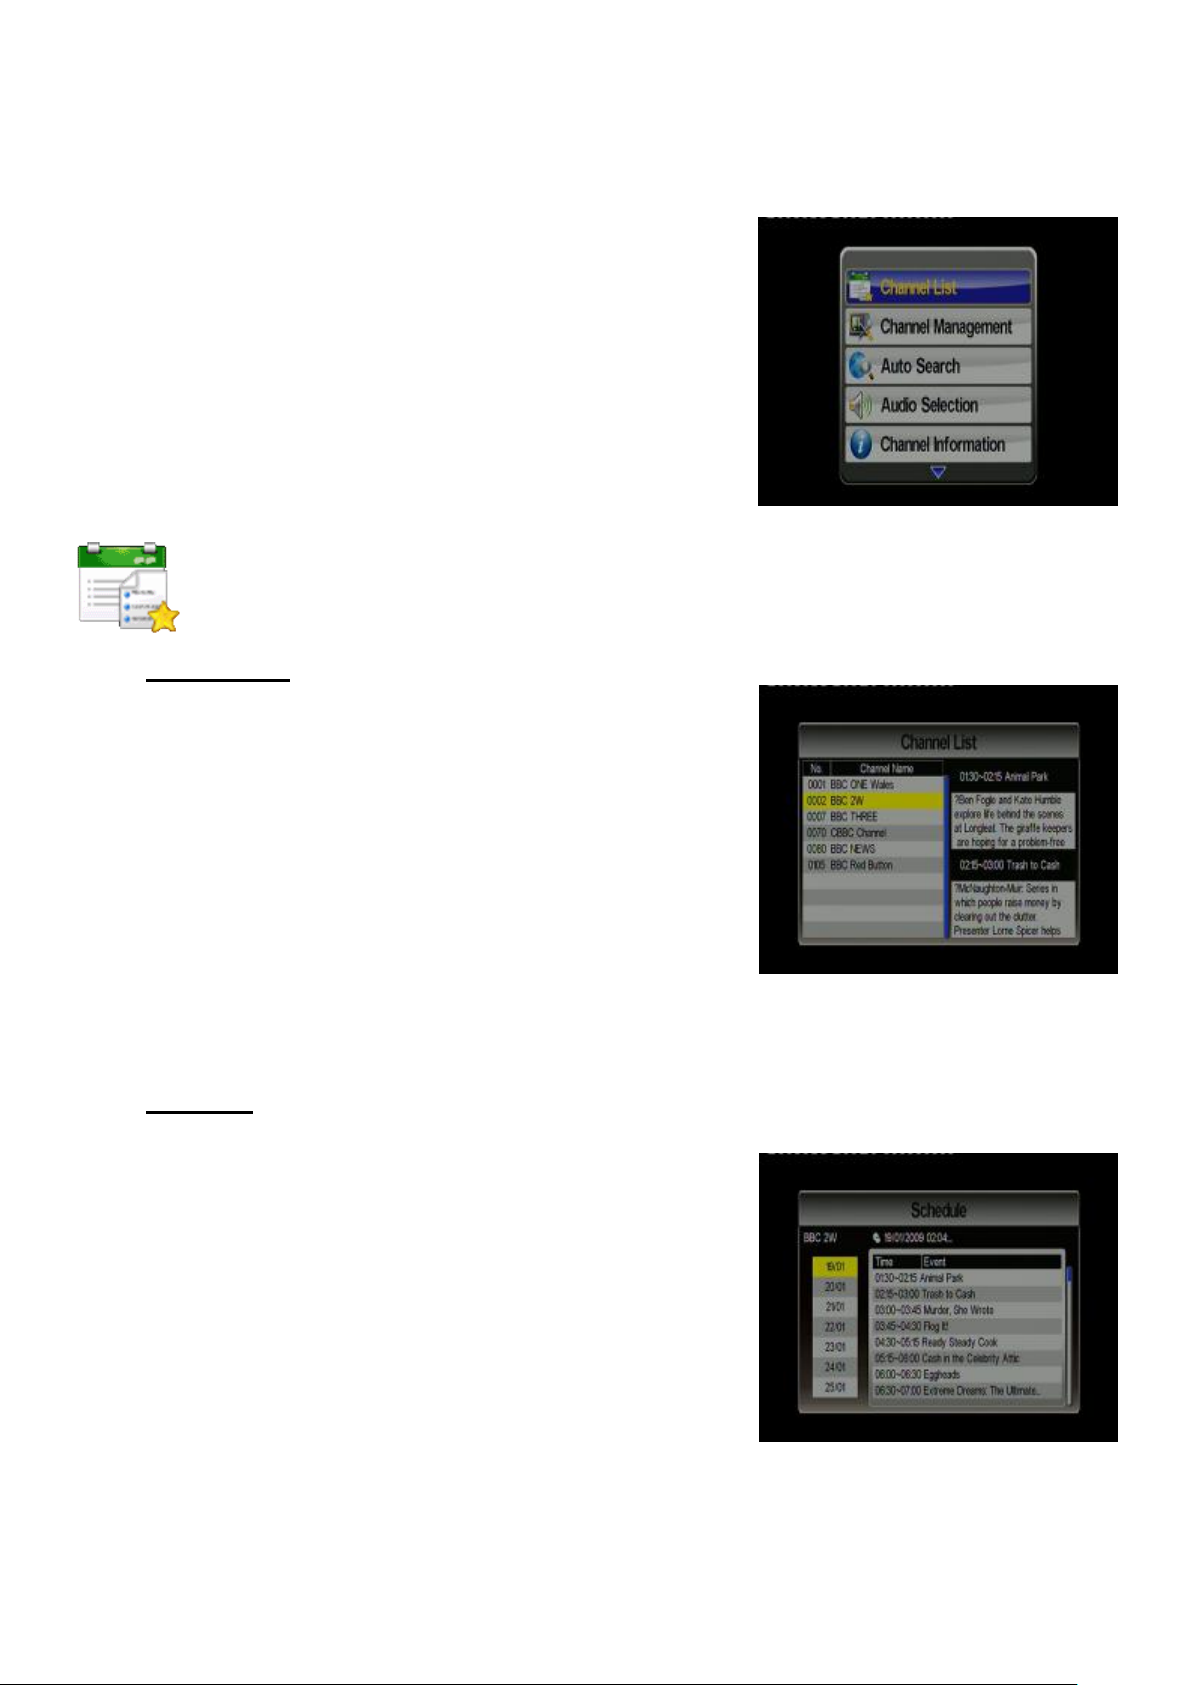
III.1. DVB-T TV/Radio Menu
After entering the DVB-T TV or Radio service, press [MENU]
button to make the menu appear. By navigating through
different options, you can have access to channel list, channel
management, automatic channel search function, DVB-T audio
settings, channel info, aspect ratio, subtitle function, teletext,
AFS setting, and CONAX CA information.
III.1.1 Channel List
To display channel information, preview the program, and to access the
Electronic Program Guide (EPG)
a. Channel List
1. Select “Channel List” in the TV menu and press [OK]
button. The “Channel List” will appear on screen.
NOTE: you can also press [EPG] button on remote
controller to enter “Channel List” while enjoying
DVB-T TV/Radio.
2. Press [CH]/[CH] buttons to scroll up/down the
channel list to preview the program.
3. Press [VOL] button to show the details of the
channel.
4. Press [EXIT]/[MENU] button to exit.
b. Schedule
1. Press [CH]/[CH] buttons to scroll up/down the date list to see program schedule of
the corresponding date.
2. Press [VOL] button to activate program schedule.
3. Press [CH]/[CH] buttons to scroll up/down the
program schedule to see previous/next program on
the selected date.
4. To return back to date list, please press [VOL]
button
5. While in program schedule list, press [OK] button to
see more information of the selected program.
6. Press [EXIT]/[MENU] button to return “Channel List” screen.
19
Page 20
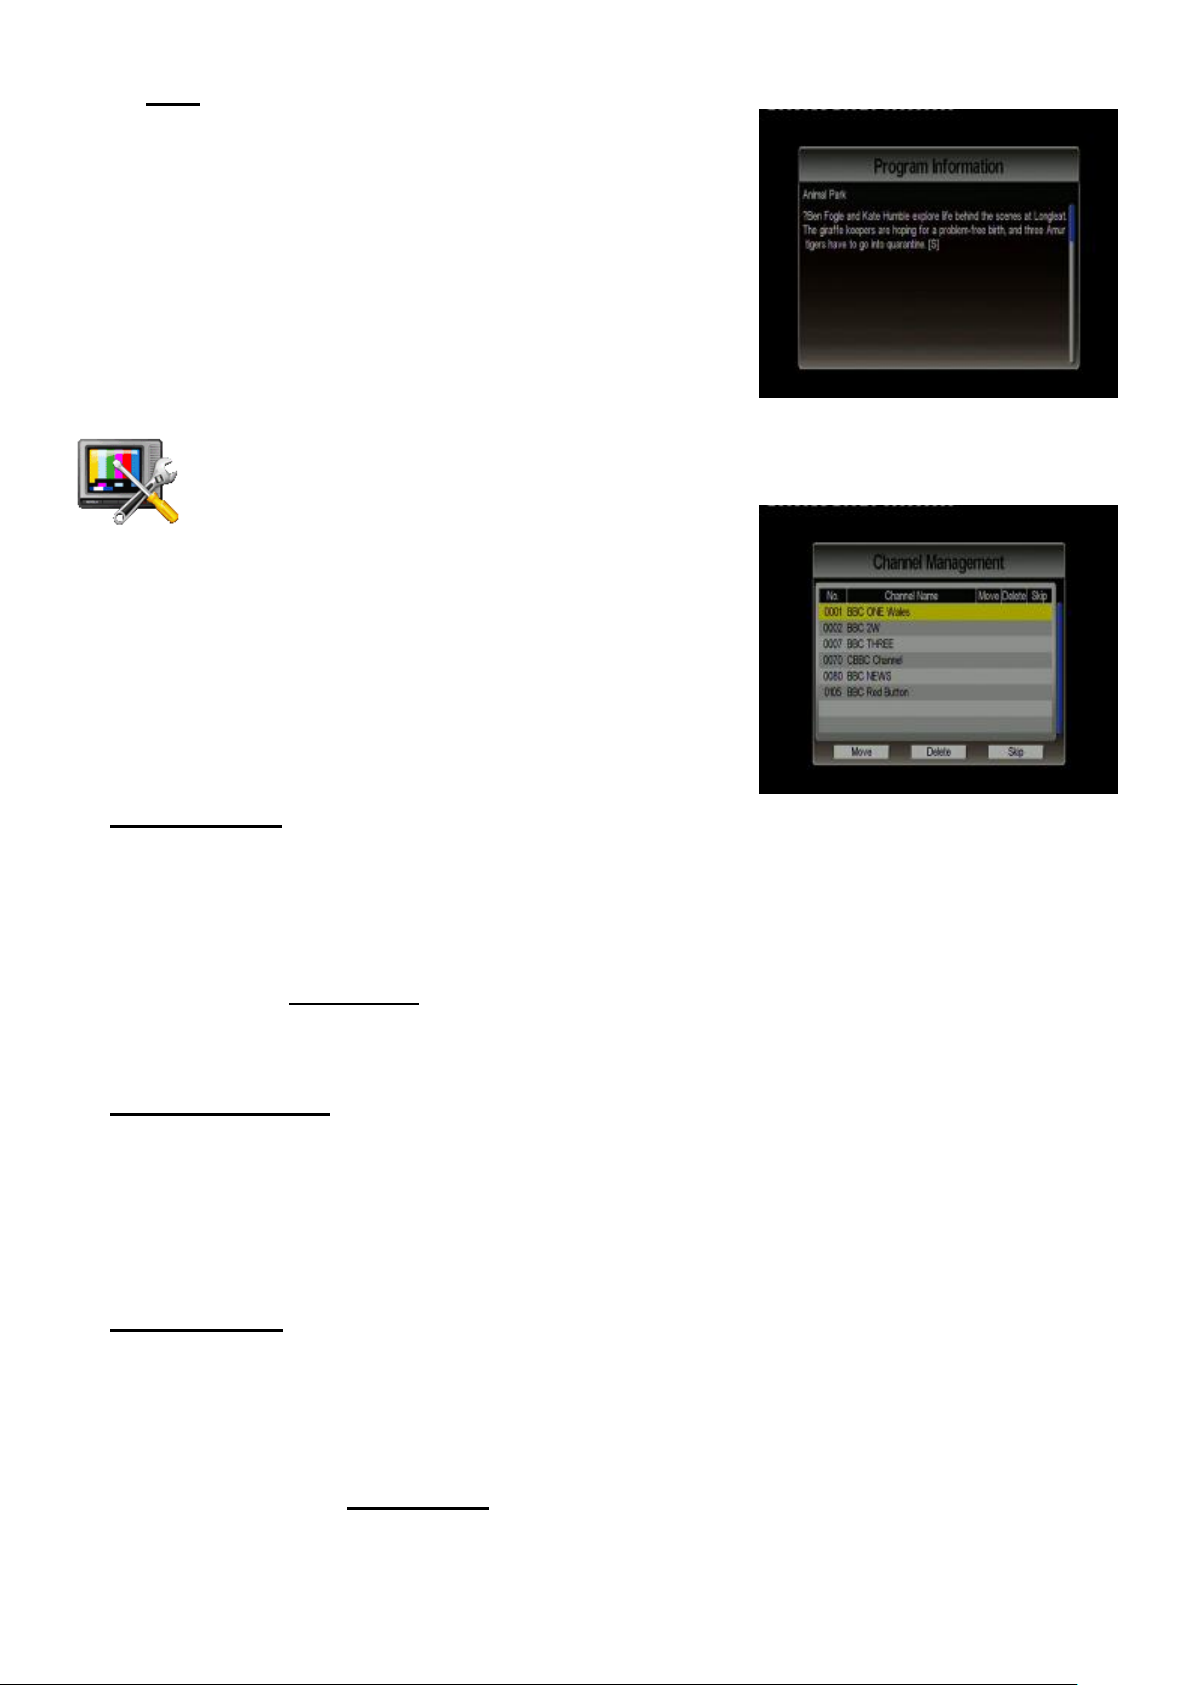
c. Brief
1. Press [EXIT]/[MENU] to return to “Schedule” screen.
III.1.2 Channel Management
To rearrange and to edit the TV channel list by skip, move, and delete functions.
1. Select “Channel Management” in the TV
Menu and press [OK] button. The management screen
will appear as on the picture on the right.
2. Press [CH]/[CH] buttons to scroll up/down the
channel list. Press [OK] button to enter the editing menu
for a chosen channel.
3. Press [EXIT]/[MENU] button to exit anytime.
Skip a Channel
1. After entering the channel editing menu, select the “SKIP” visual-button on screen by
pressing [VOL]/[VOL] buttons.
2. Press [OK] button to activate or deactivate it.
NOTE: this function temporarily removes the channel from the program list. Users can restore the
channels by deactivating this function.
Channel Movement
1. After entering the channel editing menu, select the “MOVE” visual-button on screen by
pressing [VOL]/[VOL] buttons.
2. Use [CH]/[CH] buttons to move the channel up or down in the list.
3. Press [OK] button to save the new listing.
Channel Delete
1. After entering the channel editing menu, select the “DELETE” visual-button on screen by
using [VOL]/[VOL] buttons.
2. Press [OK] button to delete the channel.
NOTE: this function will permanently delete the channel from the current program list. Users
restore the channels only by performing auto search.
20
Page 21
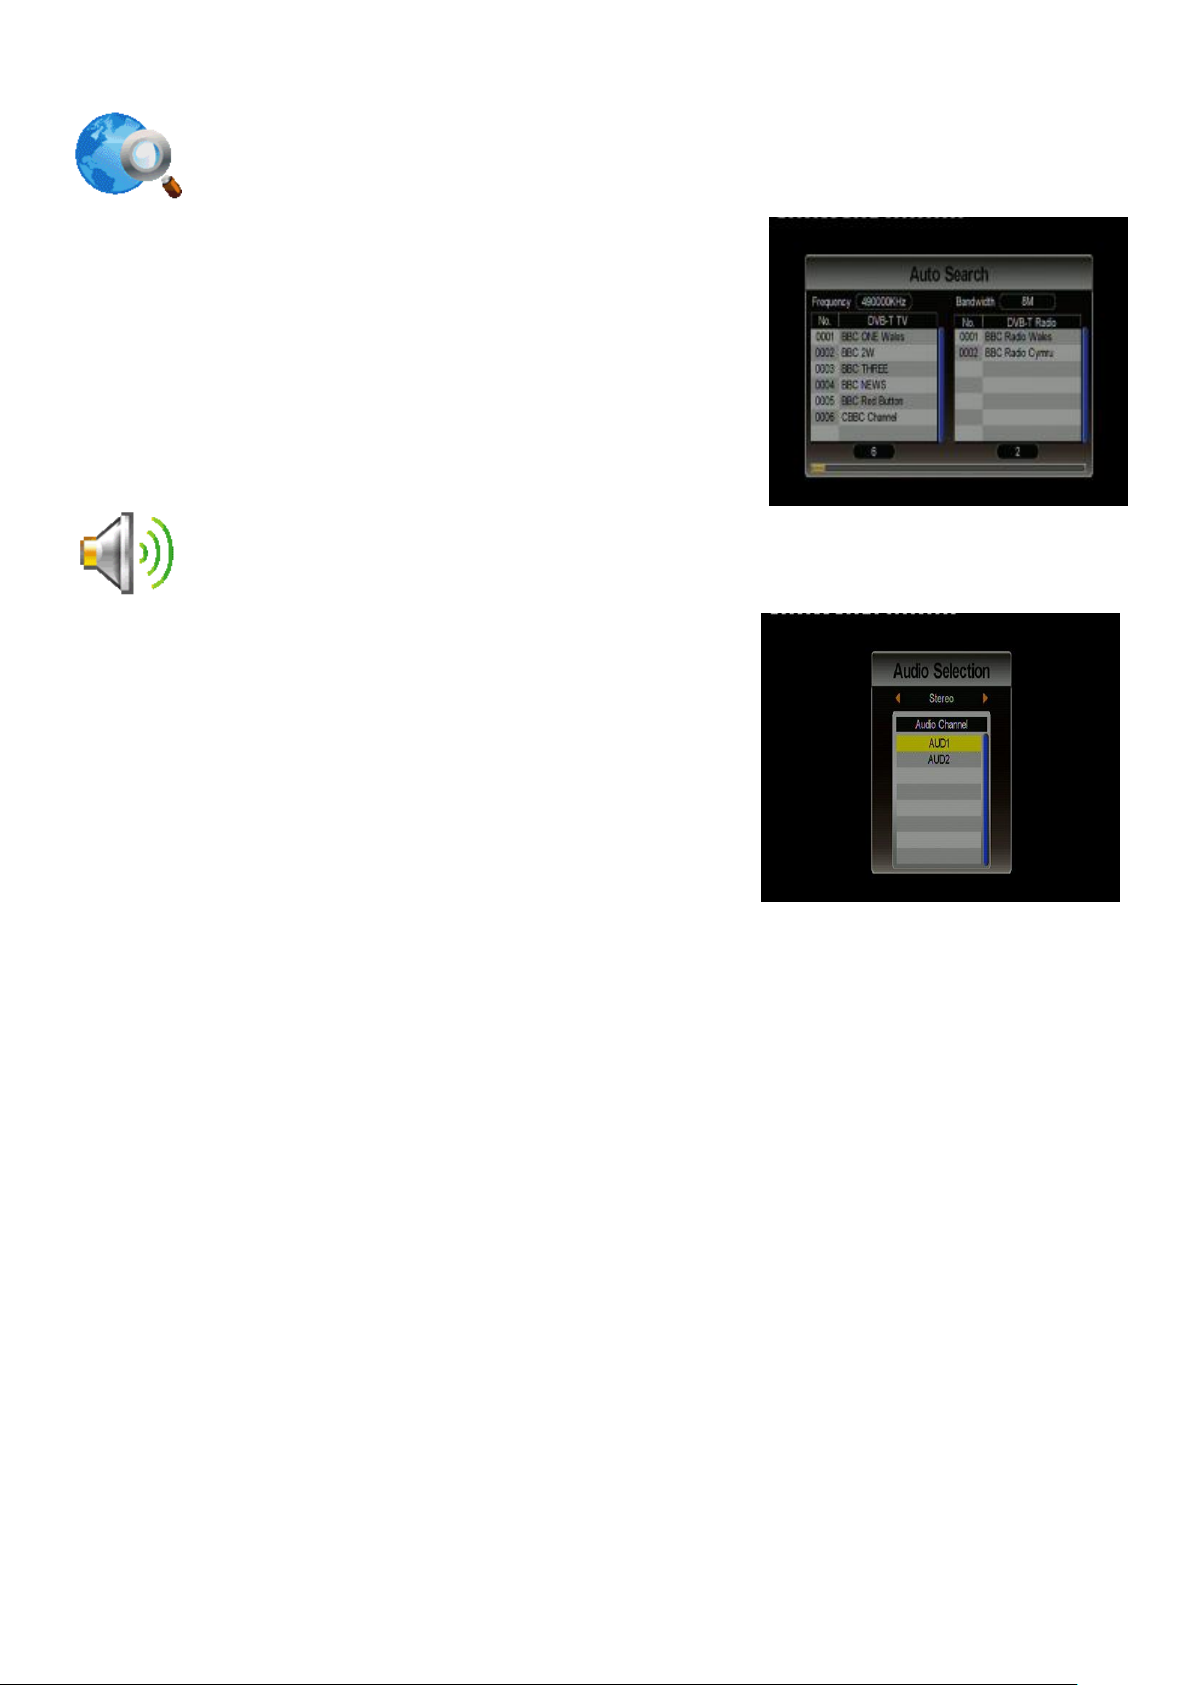
III.1.3 Auto Search
To search the available channels automatically.
1. Browse the TV menu screen using [CH]/[CH] buttons
to highlight the “Automatic Search” option.
2. Press [OK] button to start the channel search.
III.1.4 DVB-T Audio Settings
To select either master or secondary language
as well as the audio channel of current service.
1. Browse the TV menu screen using [CH]/[CH]
buttons to highlight the “Audio” option. Press [OK] button
to enter the “Audio” menu.
2. Use [VOL]/[VOL] buttons to select stereo/left/right
audio channel. Scroll through the available language
using [CH▲]/[CH▼] buttons. Press [OK] button to select
the language.
3. Press [EXIT]/[MENU] key to exit.
21
Page 22
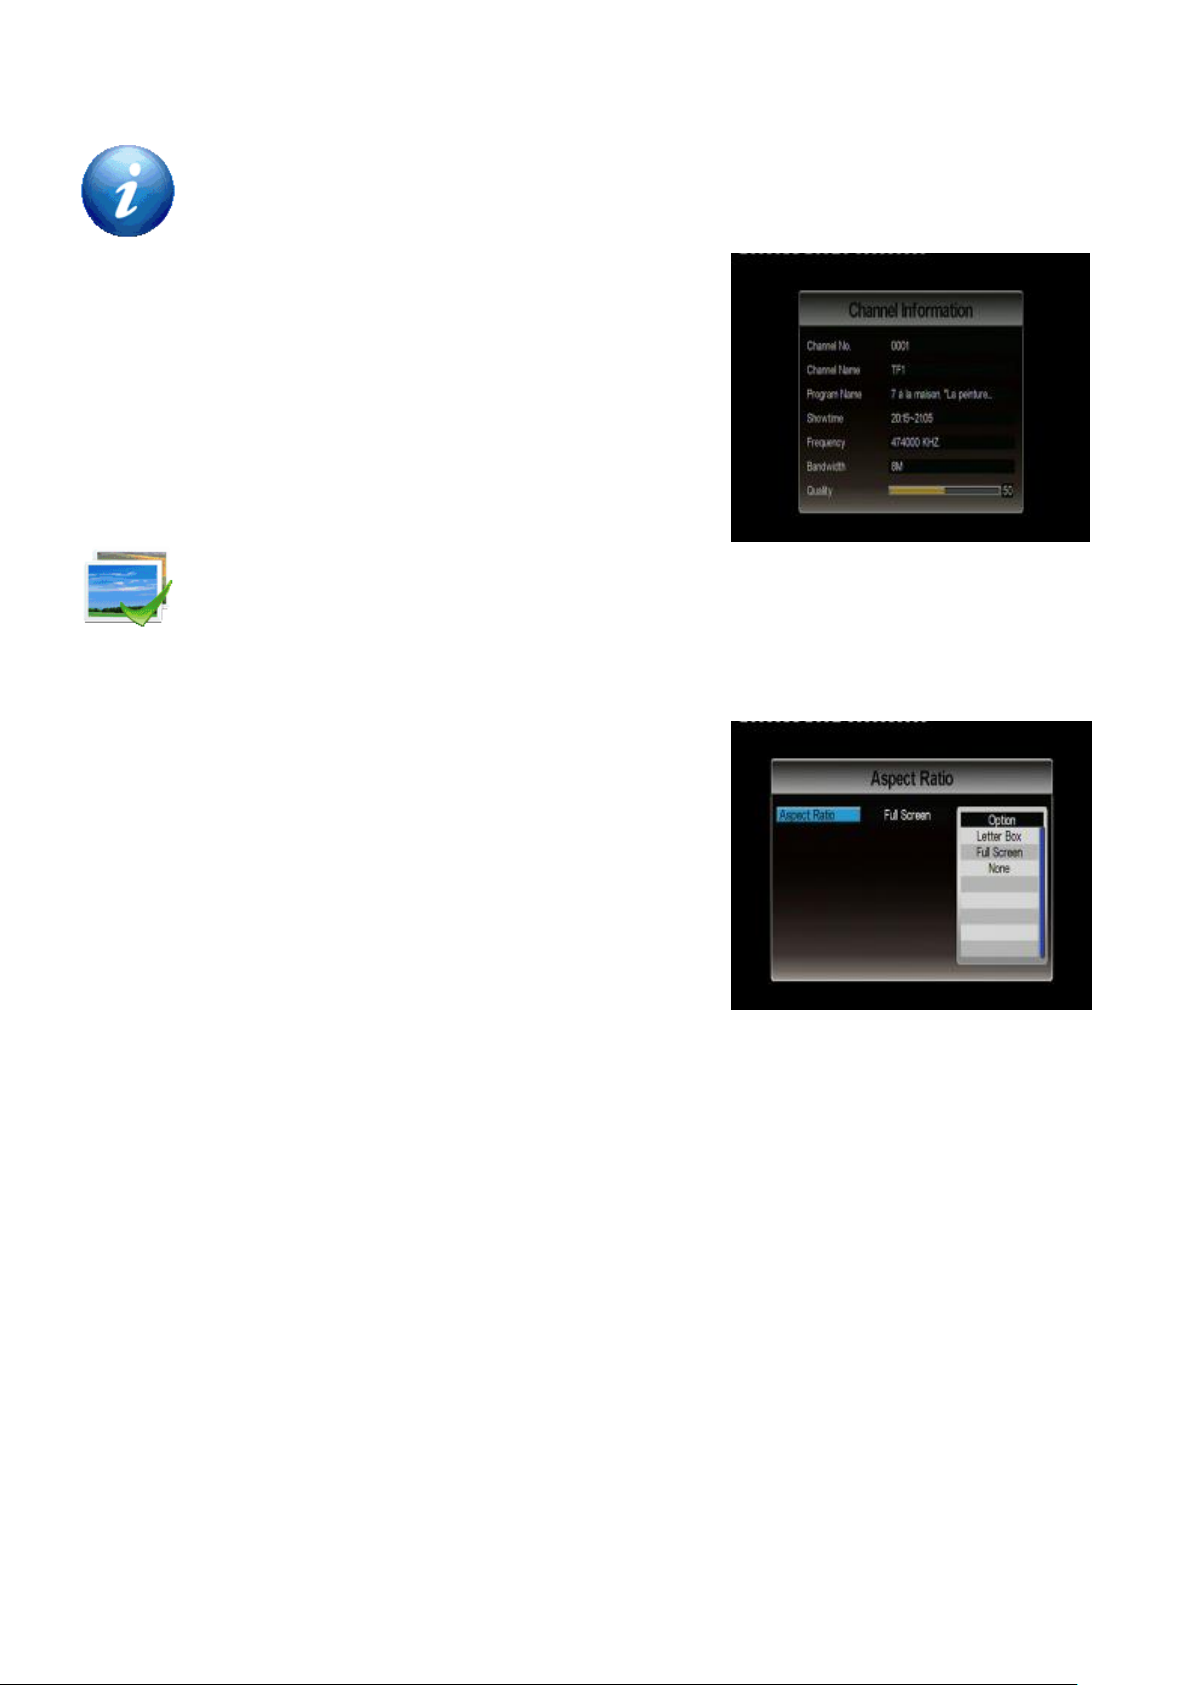
III.1.5 Channel Information
Provide the information of current service’s system parameters and signal
information.
1. Browse the TV menu screen using [CH]/[CH]
buttons to highlight the channel information option.
2. Press [OK] button to display the channel information.
3. Press [EXIT]/[MENU] button to exit
III.1.6 Aspect Ratio
To adjust image aspect ratio into full-screen,
letter-box, and none
1. Browse TV menu using [CH]/[CH] button and press [OK] button to enter “Aspect Ratio”
2. Press [VOL] button and use [CH]/[CH] to scroll
up/down the options.
3. Select one by pressing [OK] button or exit the setting
by pressing [MENU]/[EXIT] button.
4. After adjusting, press [MENU]/[EXIT] button to leave
“Aspect Ratio” menu.
22
Page 23
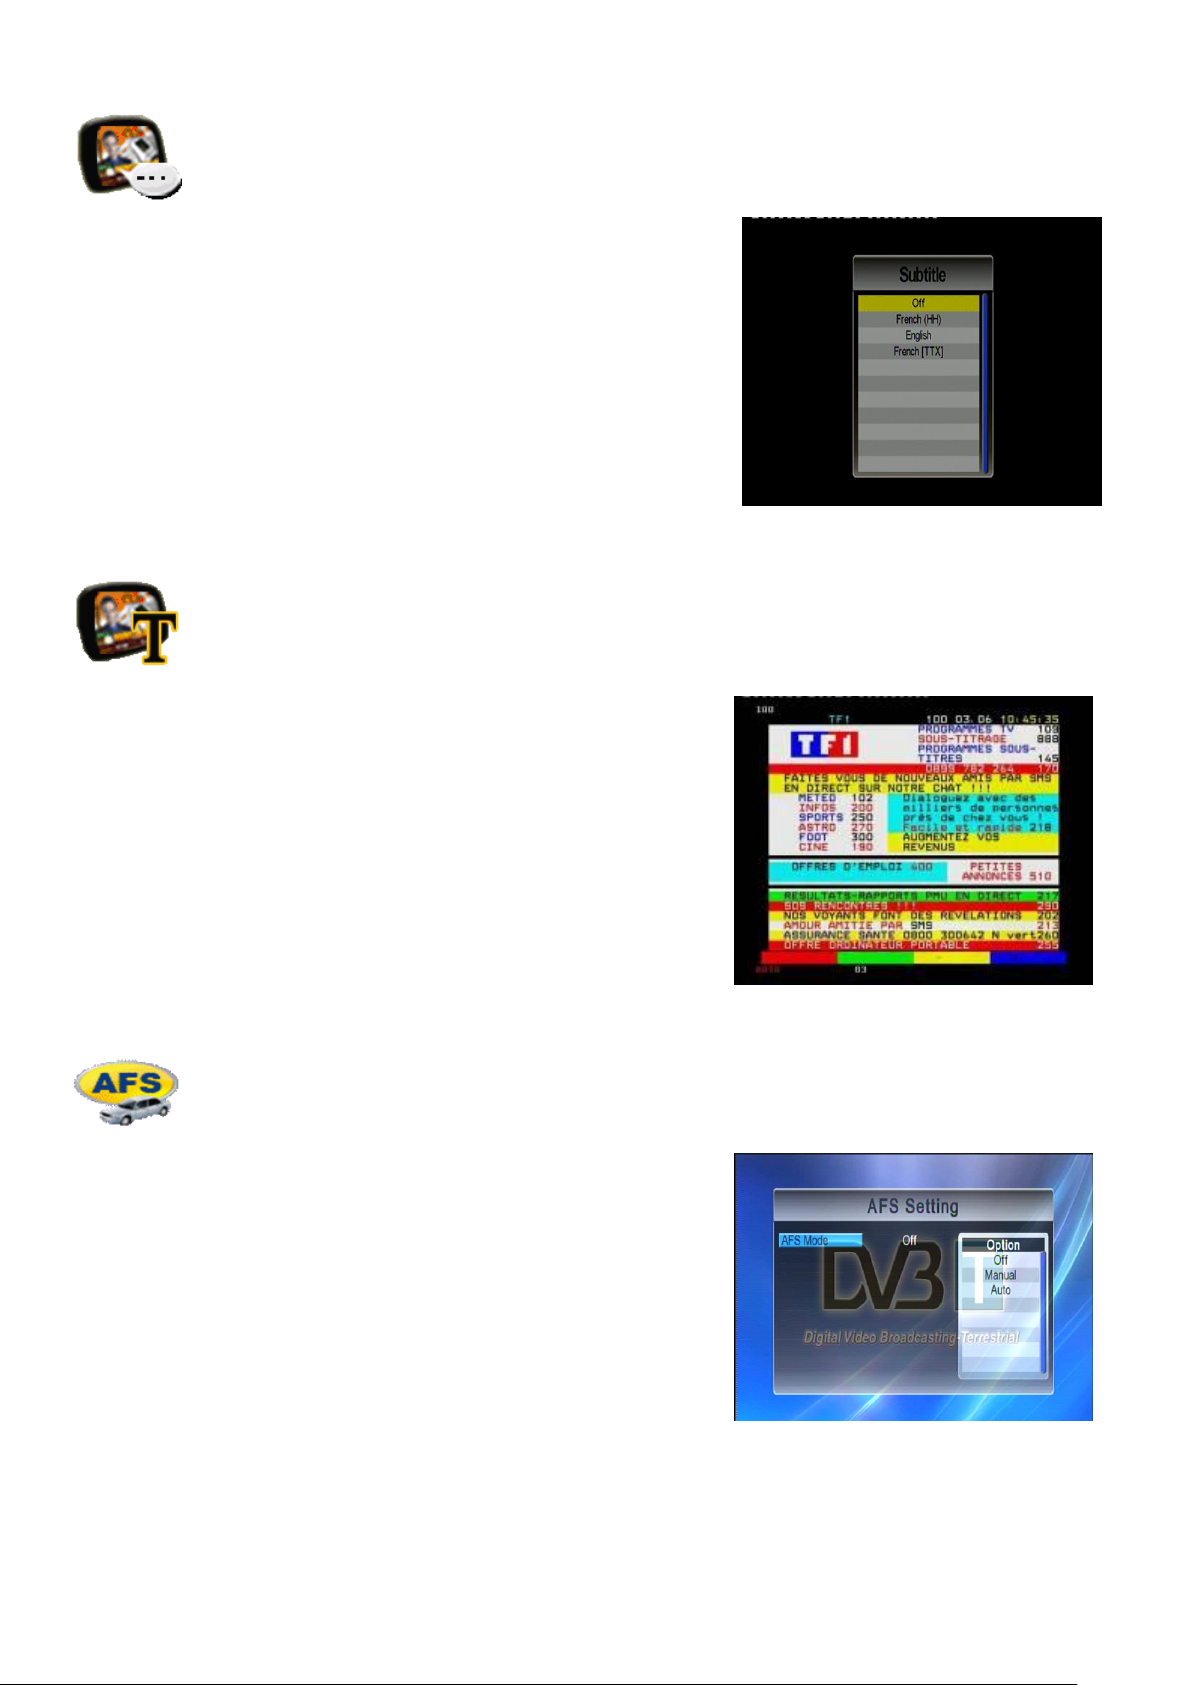
III.1.7 Subtitle
To activate or deactivate the subtitle function.
1. Browse the TV menu screen using [CH]/[CH]
buttons to highlight the “Subtitle” option. Press [OK]
button to enter the “Subtitle” menu.
2. Use [VOL]/[VOL] buttons to select stereo/left/right
audio channel. Scroll the available language using
[CH▲]/[CH▼] buttons. Press [OK] button to activate
the subtitle.
3. Press [EXIT]/[MENU] key to exit.
III.1.8 Teletext
To enter the teletext menu.
1. Using [CH]/[CH] buttons, browser TV menu to
highlight the “Teletext” option. Press [OK] button to
enter “Teletext” menu.
2. Press [CH] button to view next page or [CH] to
view previous teletext page.
3. Press [MENU]/[EXIT] to leave.
III.1.9 AFS Setting*
To set up AFS mode.
1. Browse TV menu using [CH]/[CH] button and
press [OK] button to enter “AFS Setting”
2. Press [VOL] button and use [CH]/[CH] to scroll
up/down the options.
3. Select one by pressing [OK] button or exit the setting
by pressing [MENU]/[EXIT] button.
4. After adjusting, press [MENU]/[EXIT] button to leave
“AFS Setting” menu.
NOTE: There are three AFS mode available:
1. OFF: turning OFF AFS function
2. Manual: when signal is weak, after certain seconds AFS period time, for the continuous
23
Page 24
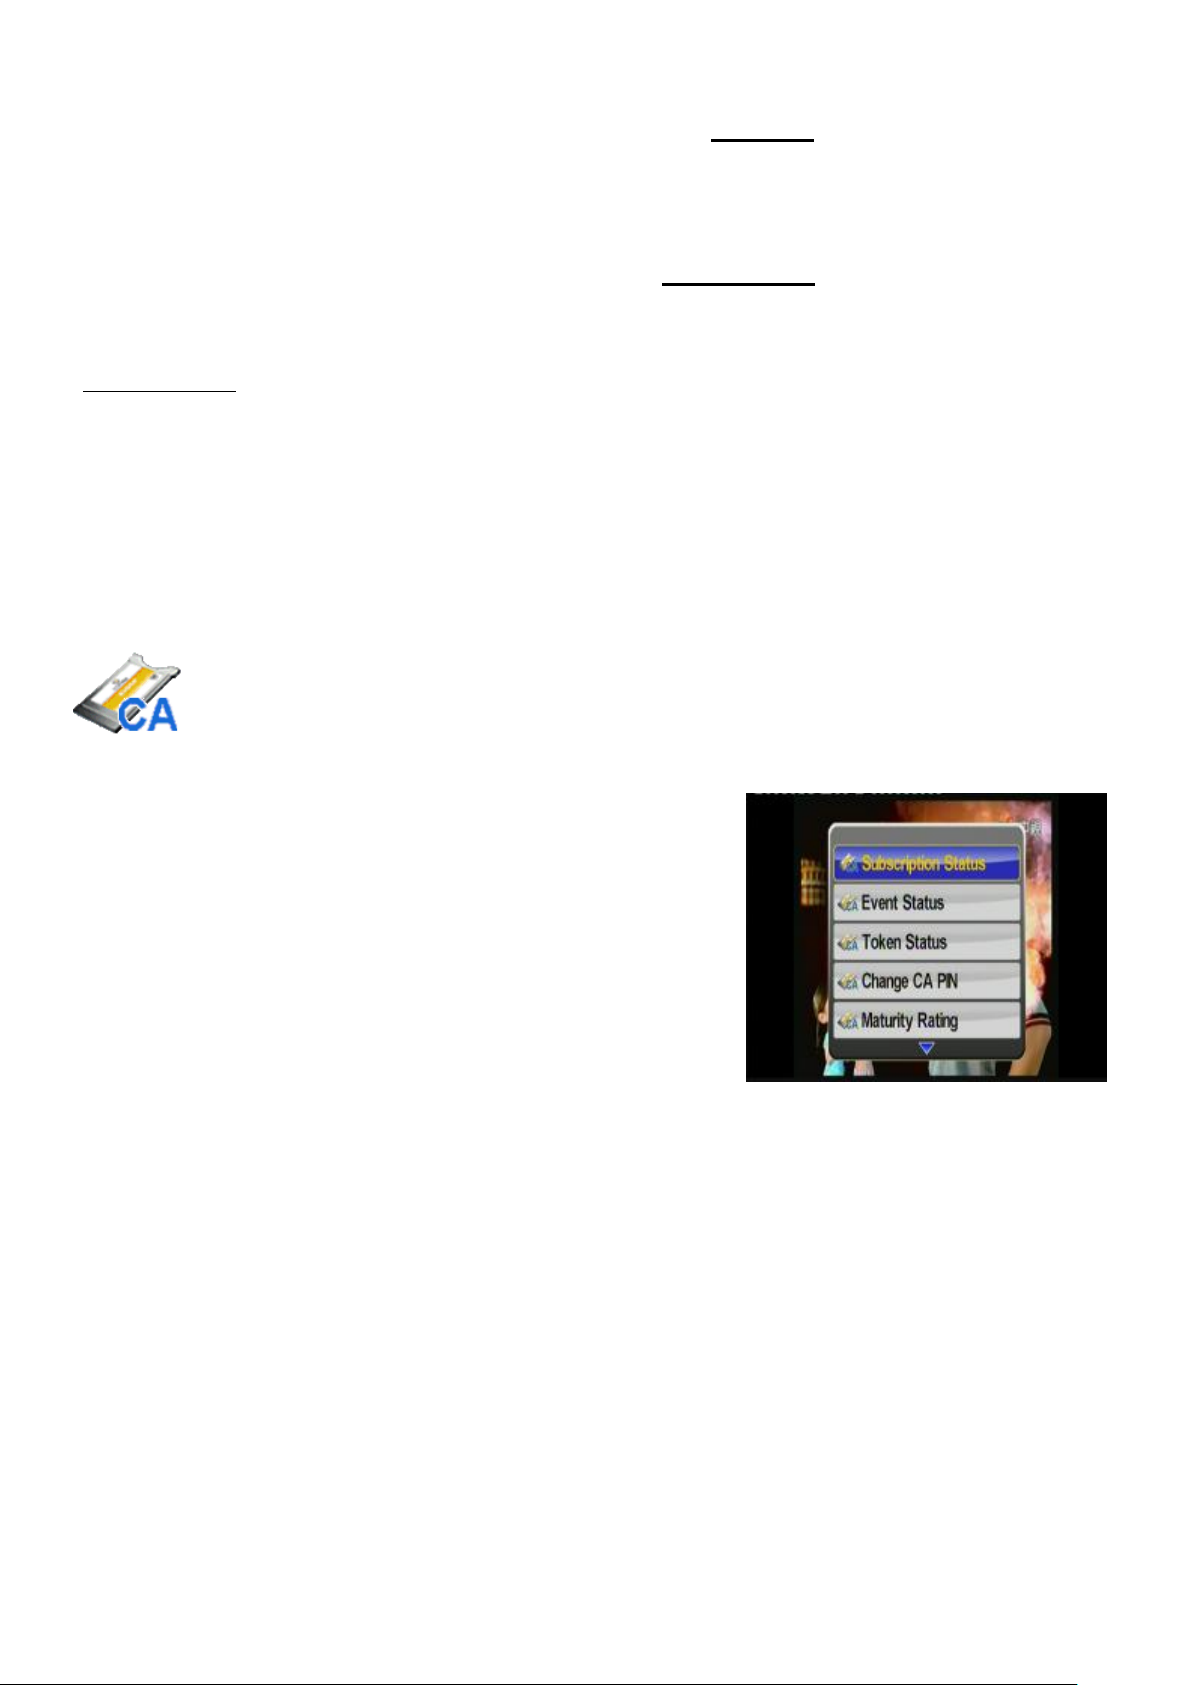
reception of current TV program the unit will first search a new available frequency from
existing database. If none was found, user has to manually perform channel search
procedures either via DVB-T menu option “Auto Search”.
3. Auto: when signal is weak, after certain seconds AFS period time, for the continuous
reception of current TV program the unit will first search a new available frequency from
existing database. If none was found, unit will automatically perform channel search
procedures after user-defined tuning period time.
*What is AFS? AFS or Auto Frequency Switch is a smart feature that allowing user to watch a
channel when moving between 2 cities/areas where the channel is broadcasted in different
frequencies. For example, channel “ABC” in city A is broadcasted in frequency 474MHz. In city B,
this channel “ABC” is broadcasted in frequency 490MHz. With this feature, when user moving from
city A to city B or vice versa, user can keep watching the channel “ABC” without having lost the
signal neither performing auto search to find the new frequency in city B.
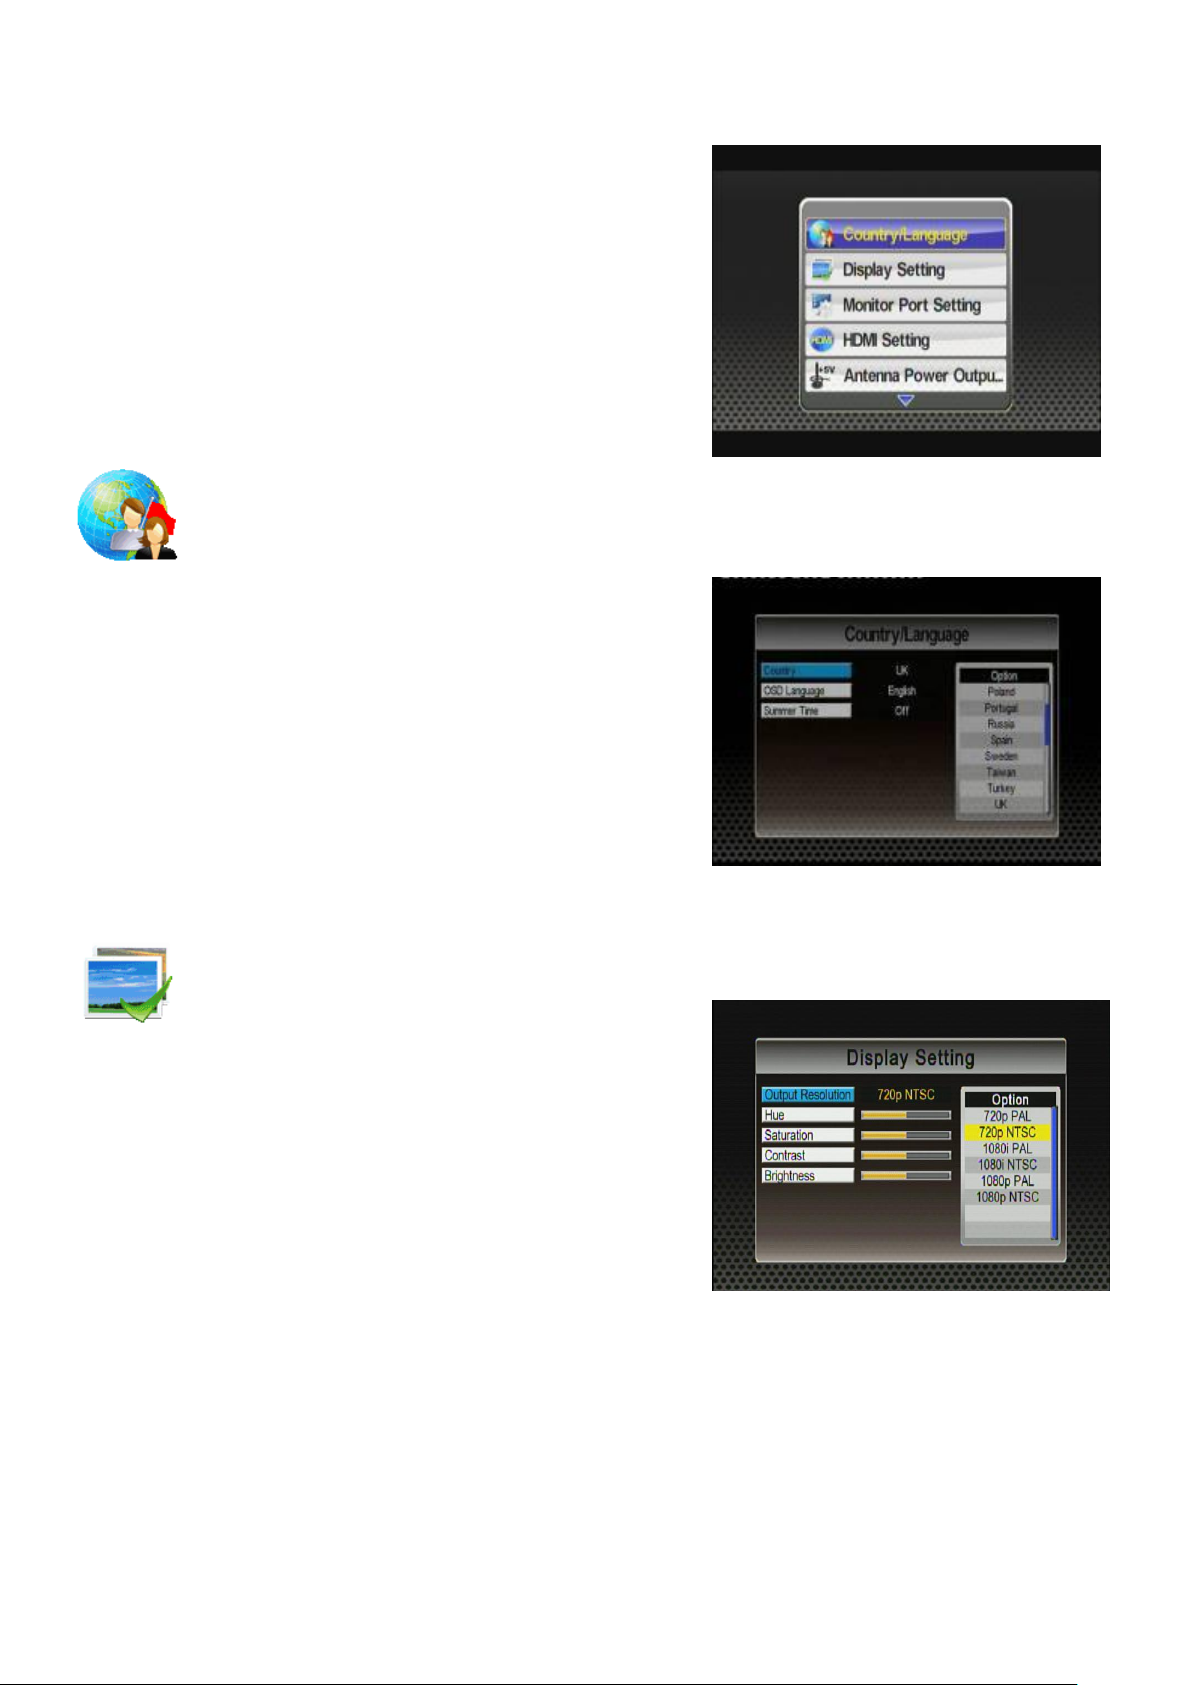
III.1.10 CONAX CA
To access CONAX CA card menu. In this menu, you can check subscription
status, check event status, check token status, change CA PIN, change maturity
rating, get Conax CA information and get CA message.
1. Using [CH]/[CH], browse TV Menu to highlight
“CONAX CA” option.
2. Press [OK] to enter “CONAX CA” menu.
3. Use [CH]/[CH] button to browser CONAX CA
menu.
4. Press [OK] to enter highlighted menu.
5. Press [MENU]/[EXIT] to exit.
24
Page 25
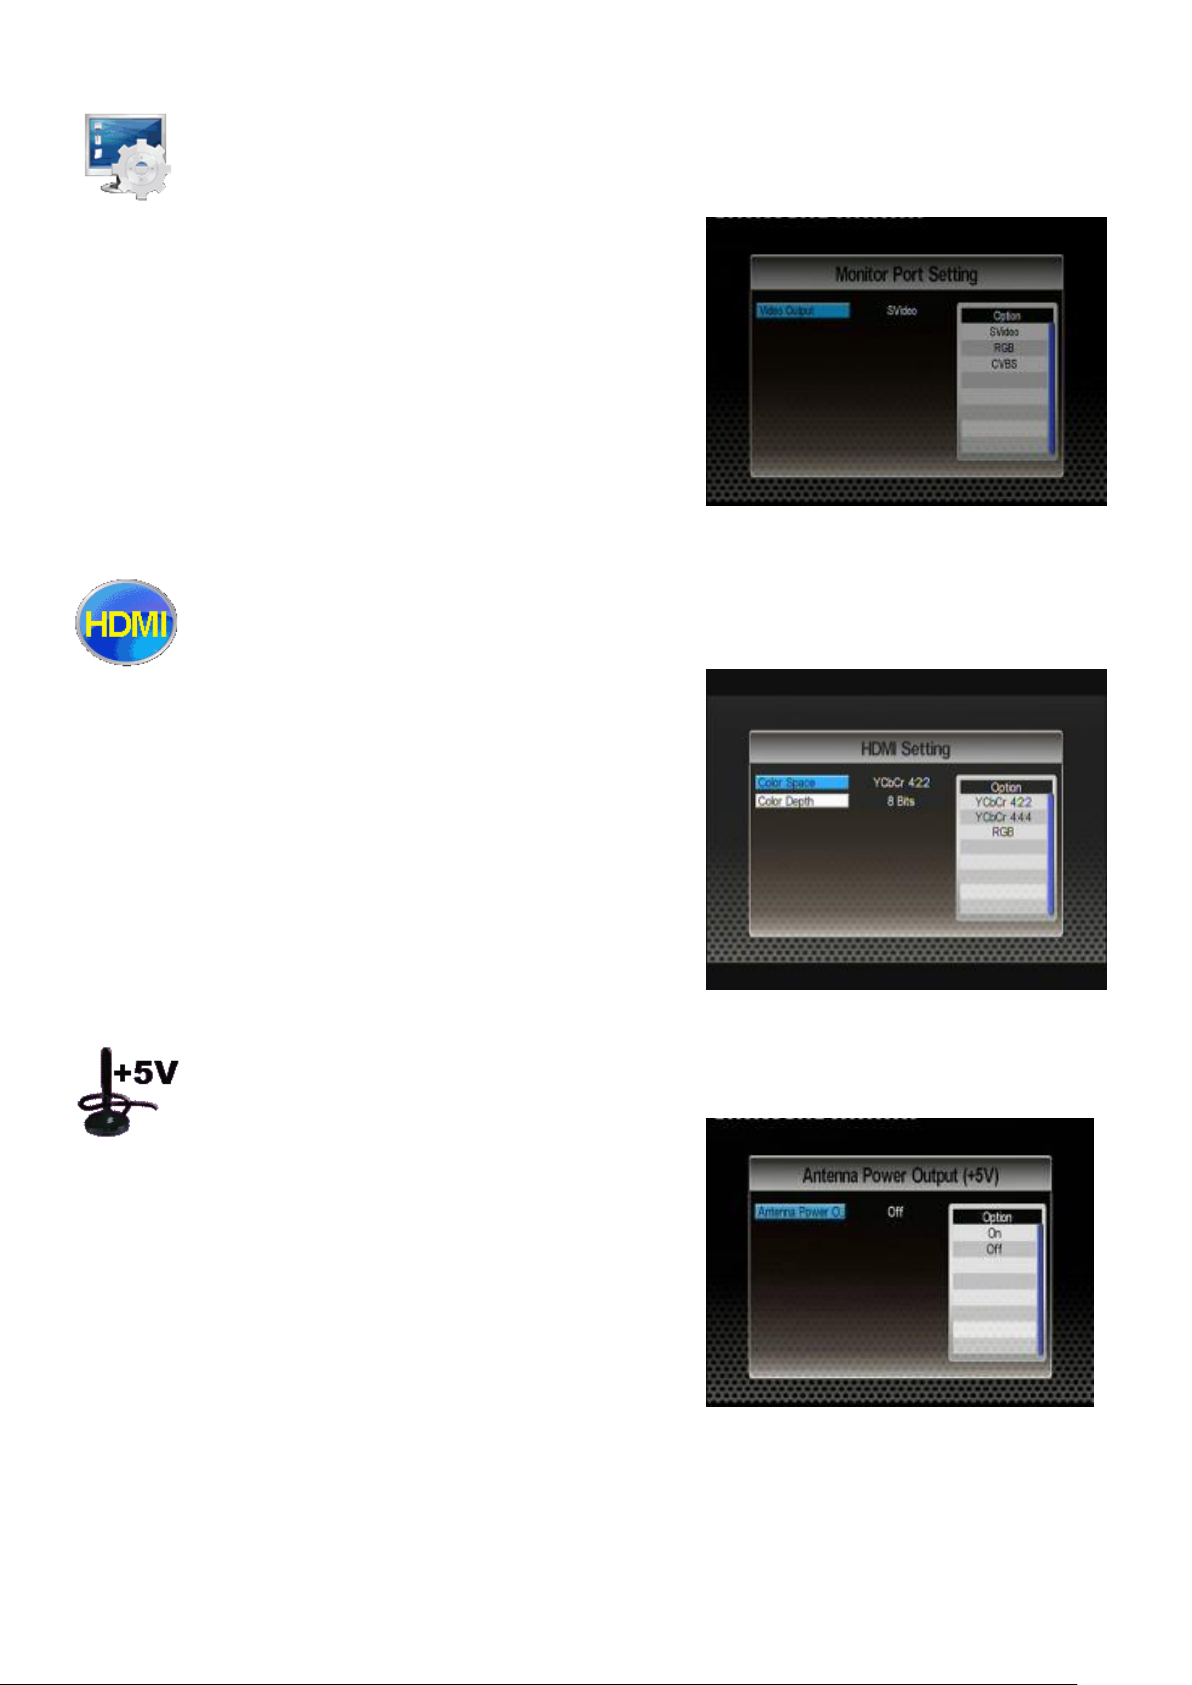
III.2. System Settings
This is the menu screen of system settings. Users can
adjust the country/language setting, picture quality,
monitor port setting, HDMI setting, antenna power output,
reset default, and proceed to a software upgrade. Use
[CH] and [CH] buttons to highlight the desired item
and press [OK] button to select one.
III.2.1 Country/Language
To set up the OSD language and DVB-T regional settings.
1. Press [CH]/[CH] buttons to highlight the item
you want to adjust.
2. Press [VOL] button and use [CH]/[CH] to
scroll up and down the options.
3. Select one by pressing the [OK] button or exit the
setting by pressing the [EXIT]/[MENU] button.
4. After adjusting, press [EXIT]/[MENU] button to exit
the “Region/Language” menu.
III.2.2 Display Setting
To adjust picture brightness and colour setting (hue, contrast, and saturation)
1. Press [CH]/[CH] buttons to
highlight the item you want to adjust.
2. Press [VOL]/[VOL] button to adjust item
highlighted.
3. Press [EXIT]/[MENU] button to exit the “Display
Setting” menu.
25
Page 26
III.2.3 Monitor Port Setting
To set up the video output format through monitor port
1. Press [CH]/[CH] buttons to highlight the item
you want to adjust.
2. Press [VOL] button and use [CH]/[CH] to
scroll up and down the options.
3. Select one by pressing the [OK] button or exit the
setting by pressing the [EXIT]/[MENU] button.
4. After adjusting, press [EXIT]/[MENU] button to exit
the “Monitor Port Setting” menu.
III.2.4 HDMI Setting
To set up the image type of HDMI output
1. Press [CH]/[CH] buttons to highlight the item
you want to adjust.
2. Press [VOL] button and use [CH]/[CH] to
scroll up and down the options.
3. Select one by pressing the [OK] button or exit the
setting by pressing the [EXIT]/[MENU] button.
4. After adjusting, press [EXIT]/[MENU] button to exit
the “HDMI Setting”.
III.2.5 Antenna Power Output (+5V)
To provide/stop providing antenna phantom power
1. Press [CH]/[CH] buttons to highlight the item
you want to adjust.
2. Press [VOL] button and use [CH]/[CH] to
scroll up and down the options.
3. Select one by pressing the [OK] button or exit the
setting by pressing the [EXIT]/[MENU] button.
4. After adjusting, press [EXIT]/[MENU] button to exit
the “Display Setting”.
26
Page 27
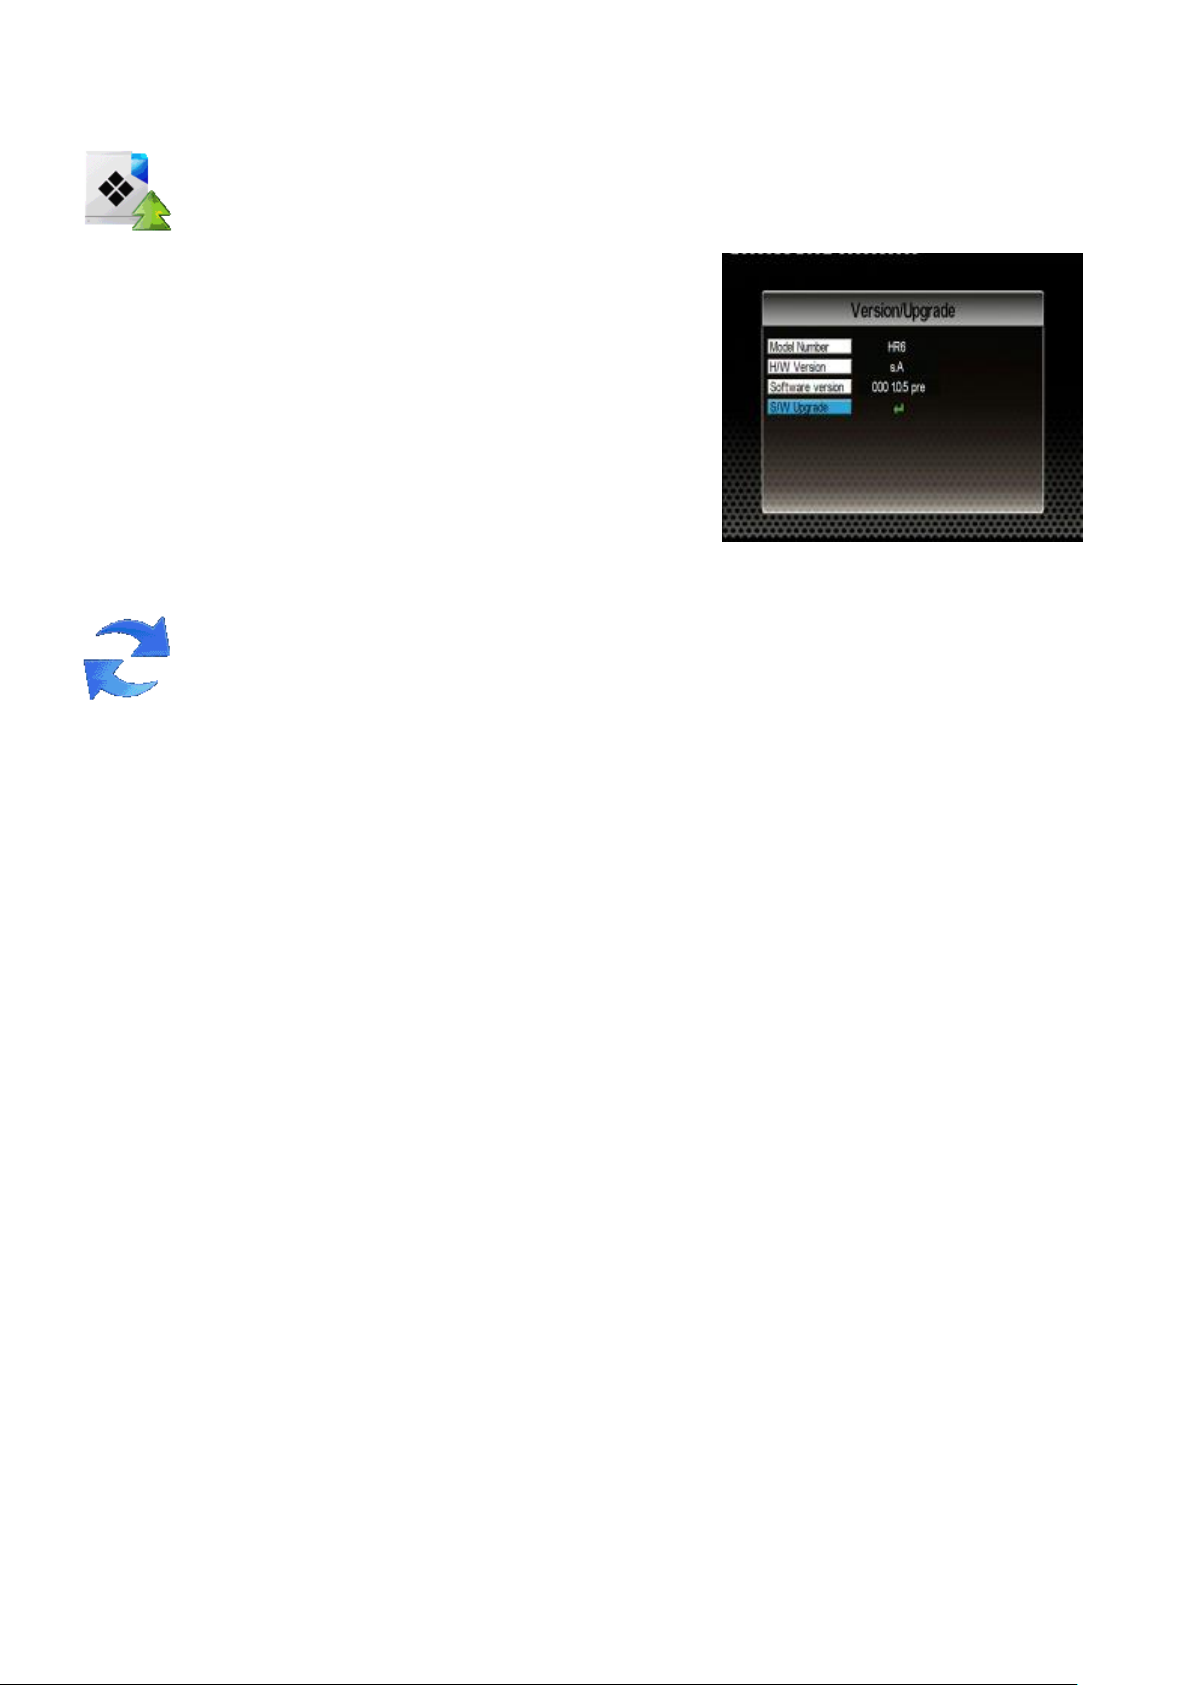
III.2.6 Version Upgrade
To upgrade the user interface software version.
1. Insert the USB device containing the software
upgrade file into the card slot.
2. After entering the Version/Upgrade menu, press [OK]
button to start the upgrade.
III.2.7 Reset Default
To reset all settings to factory default.
1. Press [CH]/[CH] buttons to highlight “Reset Default” option and press [OK] to enter.
2. Press [OK] to reset system’s settings to factory default.
3. Press [EXIT] to exit.
27
Page 28
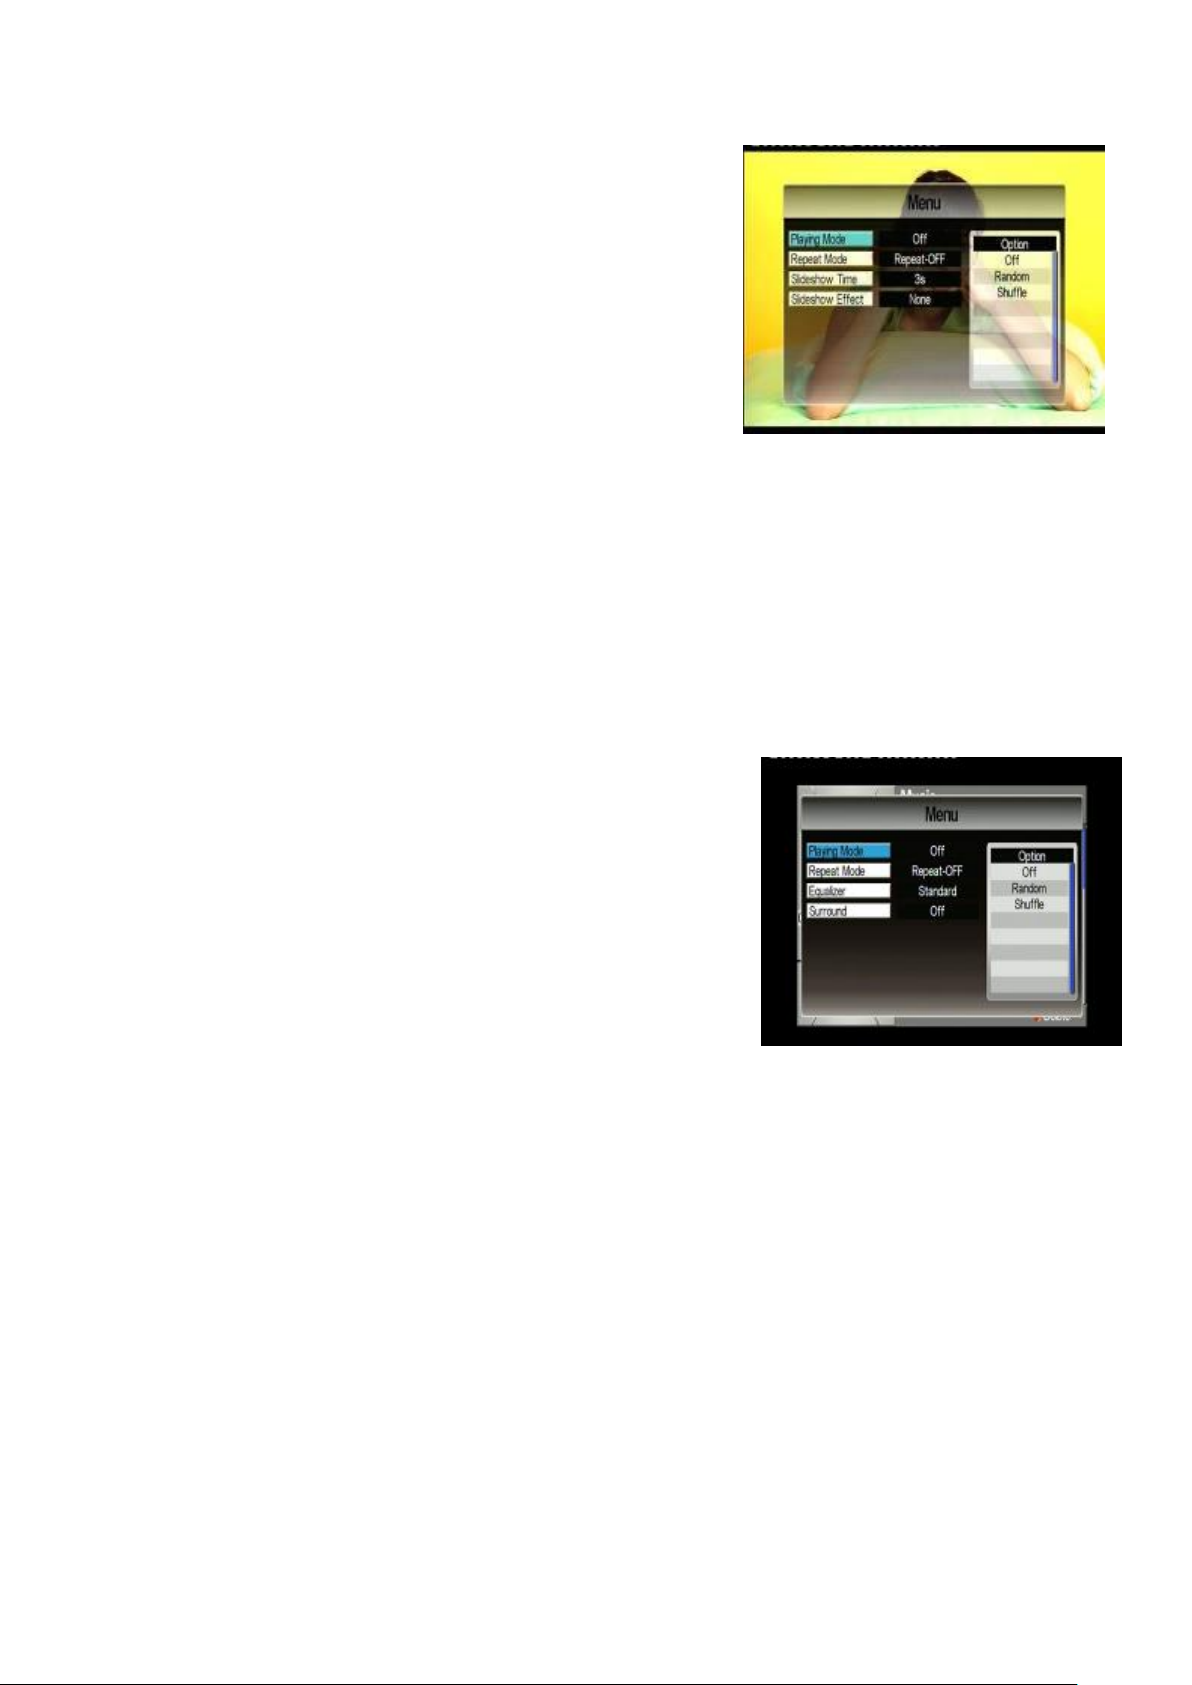
III.3. Photo Menu
On entering Photo service, press [MENU] button to invoke
photo menu. Through this menu, user can adjust playing
mode, repeat mode, slideshow time, and slideshow effect.
1. Press [CH]/[CH] buttons to highlight the item you
want to adjust.
2. Press [VOL] button and use [CH]/[CH] to scroll up and down the options.
3. Select one by pressing the [OK] button or exit the setting by pressing the [EXIT]/[MENU]
button.
4. After adjusting, press [EXIT]/[MENU] button to exit.
III.4. Music Menu
On entering Music service, press [MENU] button to invoke
music menu. Through this menu, user can adjust the sound
effect, set up the equalizer, set the play mode and repeat
mode.
1. Press [CH]/[CH] buttons to highlight the item you
want to adjust.
2. Press [VOL] button and use [CH]/[CH] to scroll up and down the options.
3. Select one by pressing the [OK] button or exit the setting by pressing the [EXIT]/[MENU]
button.
4. After adjusting, press [EXIT]/[MENU] button to exit.
28
Page 29
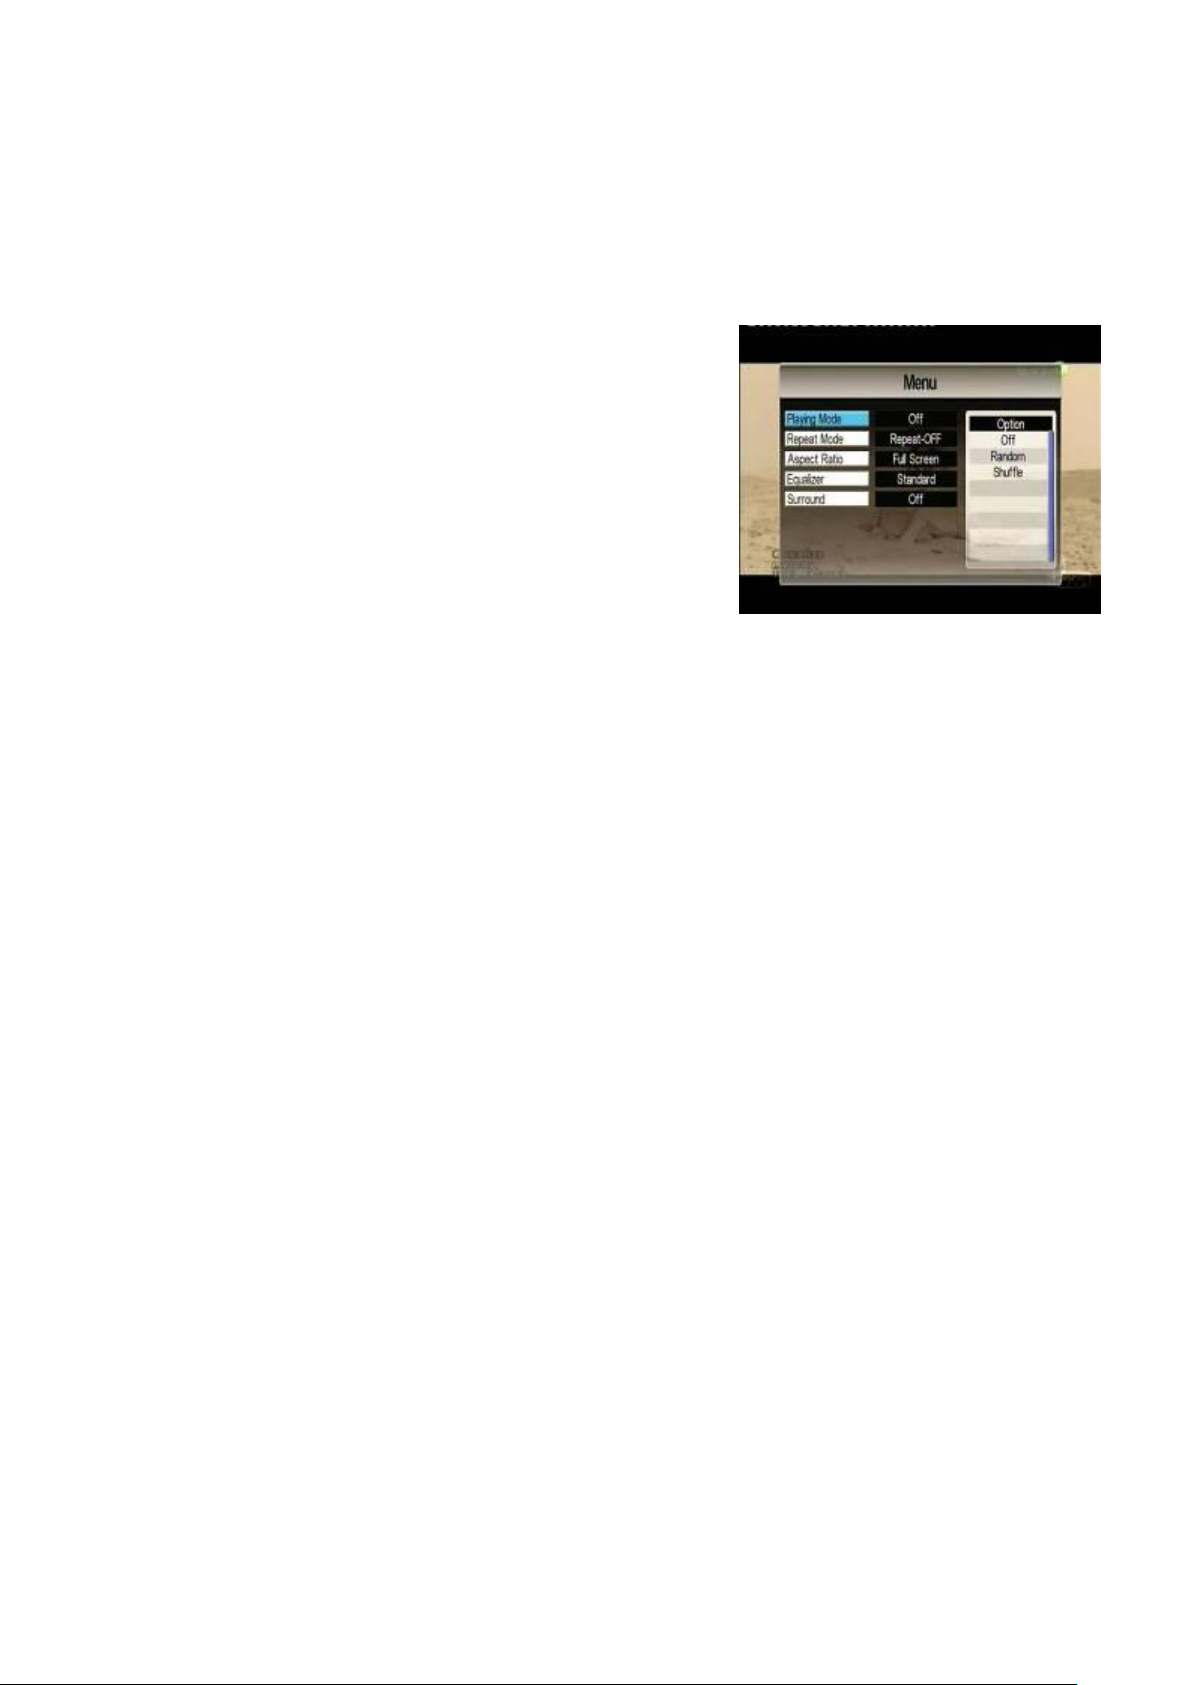
III.5. Movie Menus
On entering Movie service, user can manipulate aspect ratio, sound effect, set up the equalizer, the
play mode, change audio, and subtitle.
III.5.1 Menu
1. Press [MENU] to enter “Menu”.
2. Press [CH]/[CH] buttons to highlight the item you
want to adjust.
3. Press [VOL] button and use [CH]/[CH] to scroll
up and down the options.
4. Select one by pressing the [OK] button or exit the
setting by pressing the [EXIT]/[MENU] button.
5. After adjusting, press [EXIT]/[MENU] button to exit the
“Movie Menu”.
29
Page 30
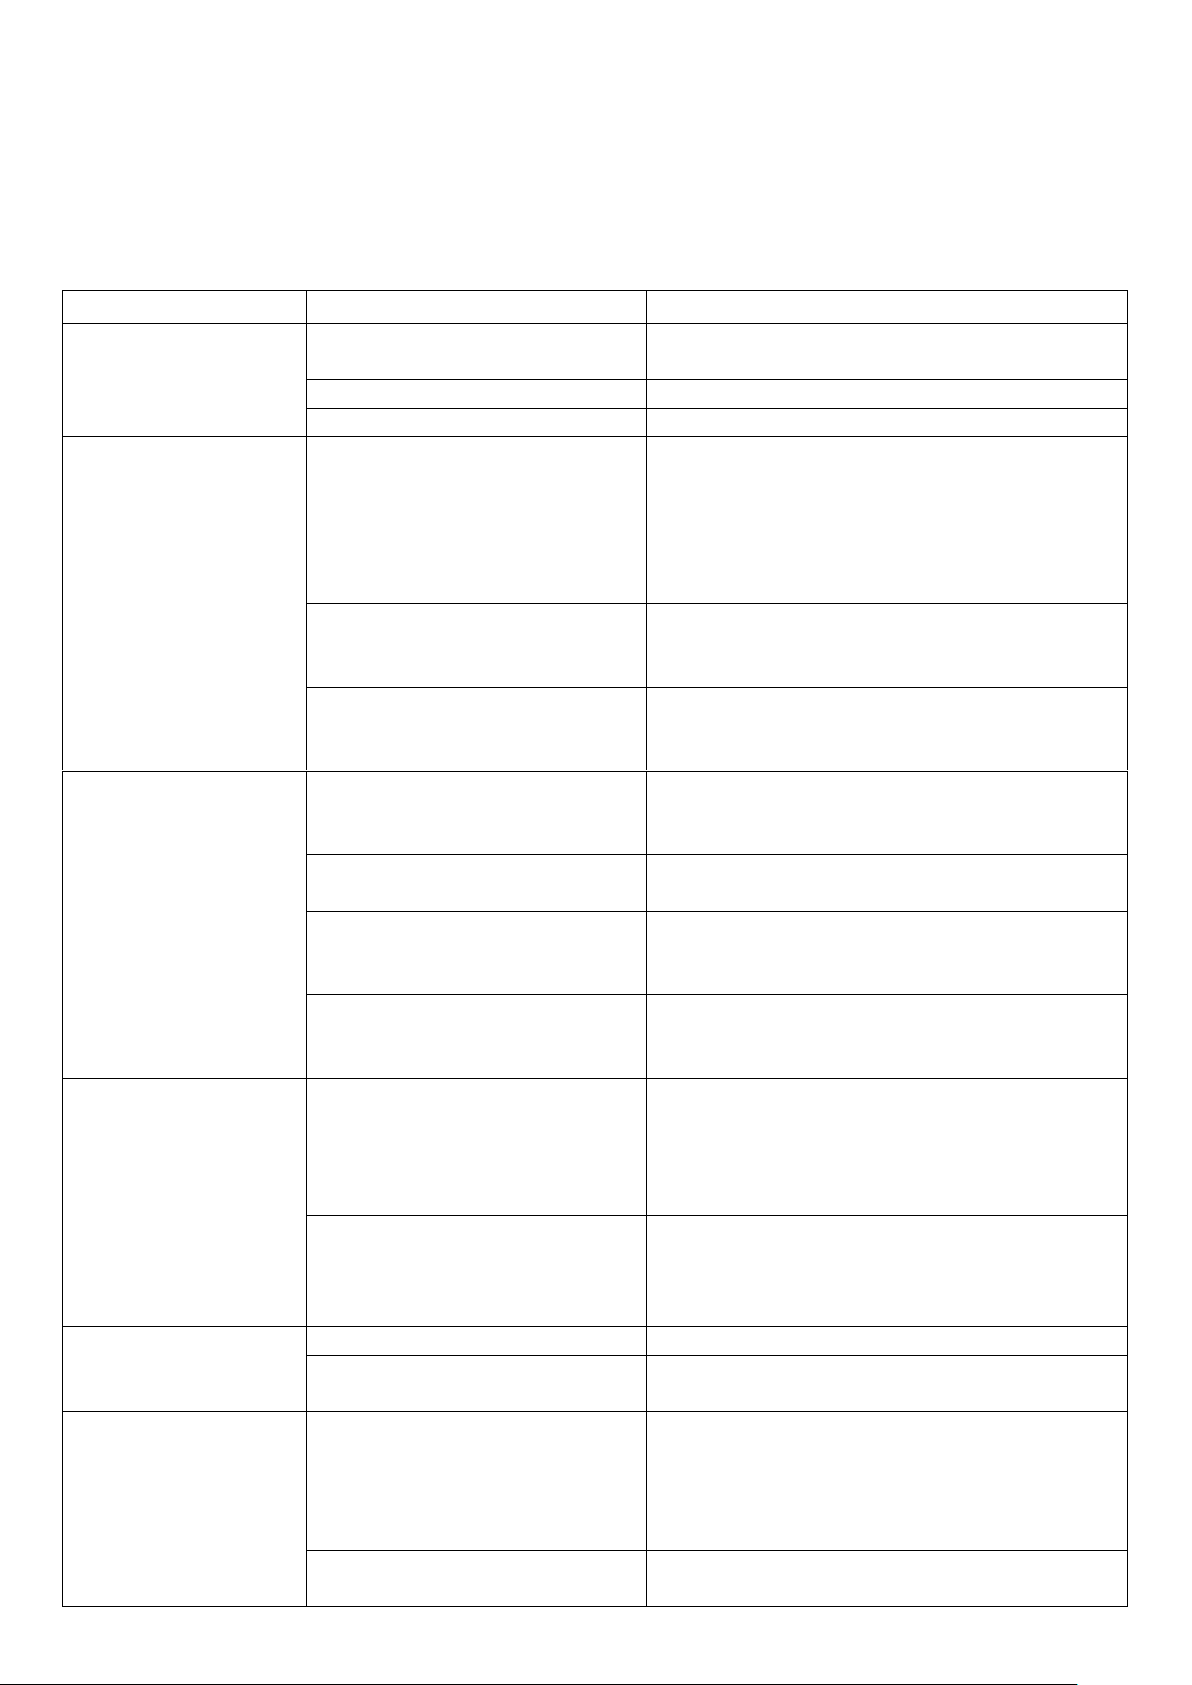
IV. Trouble Shooting Q&A
Problem
Possible Reason
Solution
No picture, no audio.
The power cord is not
properly inserted into the unit.
Check the power wire connection.
The unit is not switched on.
Press [POWER] button.
Unit is in stand-by mode.
Press [POWER] button.
In DVB-T mode, the
number of DVB-T
channels is not as
much as we
expected.
The number of available
channels is limited due to the
local broadcasting
environment. The available
channels can vary depending
on the area.
Perform “Auto Search” or “Manual Search”
to rescan all the channels.
The signal quality of some TV
channels is too low.
Please use active antennas instead of
passive antennas for better reception
quality.
Some TV channels are not
available.
Only the locally free broadcasted channels
can be viewed. They can differ depending
on the area.
In DVB-T mode, all
of the channels
show “no signal” or
random mosaic tiles
appear on the
display.
Some TV channels signal
quality is too low.
Please use active antennas instead of
passive antennas for better reception
quality.
The antennas are not
properly connected.
Please check the connection of the
antennas.
No DVB-T service is provided
in the area.
Check your country DVB-T coverage map.
It is not possible to watch digital TV/listen to
digital radio in non-covered areas.
Incorrect Regional Setting
Please check whether “Regional Setting” is
correct, and perform “Auto Search” to
rescan all of the channels.
In DVB-T mode, no
video or audio and
“Scrambled”
message appears
on the screen
No Smart card is inserted
“Scrambled” message will appears when
the TV/Radio signal received is paid-TV. To
watch these channels, please insert a valid
smart card into CA slot on front panel.
Smart card is out of date
Please check your subscription date. If
your subscription date is already
out-of-date, please contact your service
provider to extend your subscription.
The video is fine but
there is no sound.
The audio volume is too low.
Press [VOL] button to raise the volume.
The audio is muted.
Press [MUTE] button to disable the mute
function.
The remote control
does not work
No power.
Check the remote control battery. NOTE:
the new remote control might be supplied
with a small plastic insulator to avoid
discharge of battery power. Check that the
plastic insulator has been removed.
No “line-of-sight” between unit
and controller
Ensure there are no obstacle between the
controller and the unit.
Most of the troubleshooting issues can be easily resolved. The most common cases and their
respective solutions are listed in the table below. If the problem persists, please contact the after
sales service.
30
Page 31
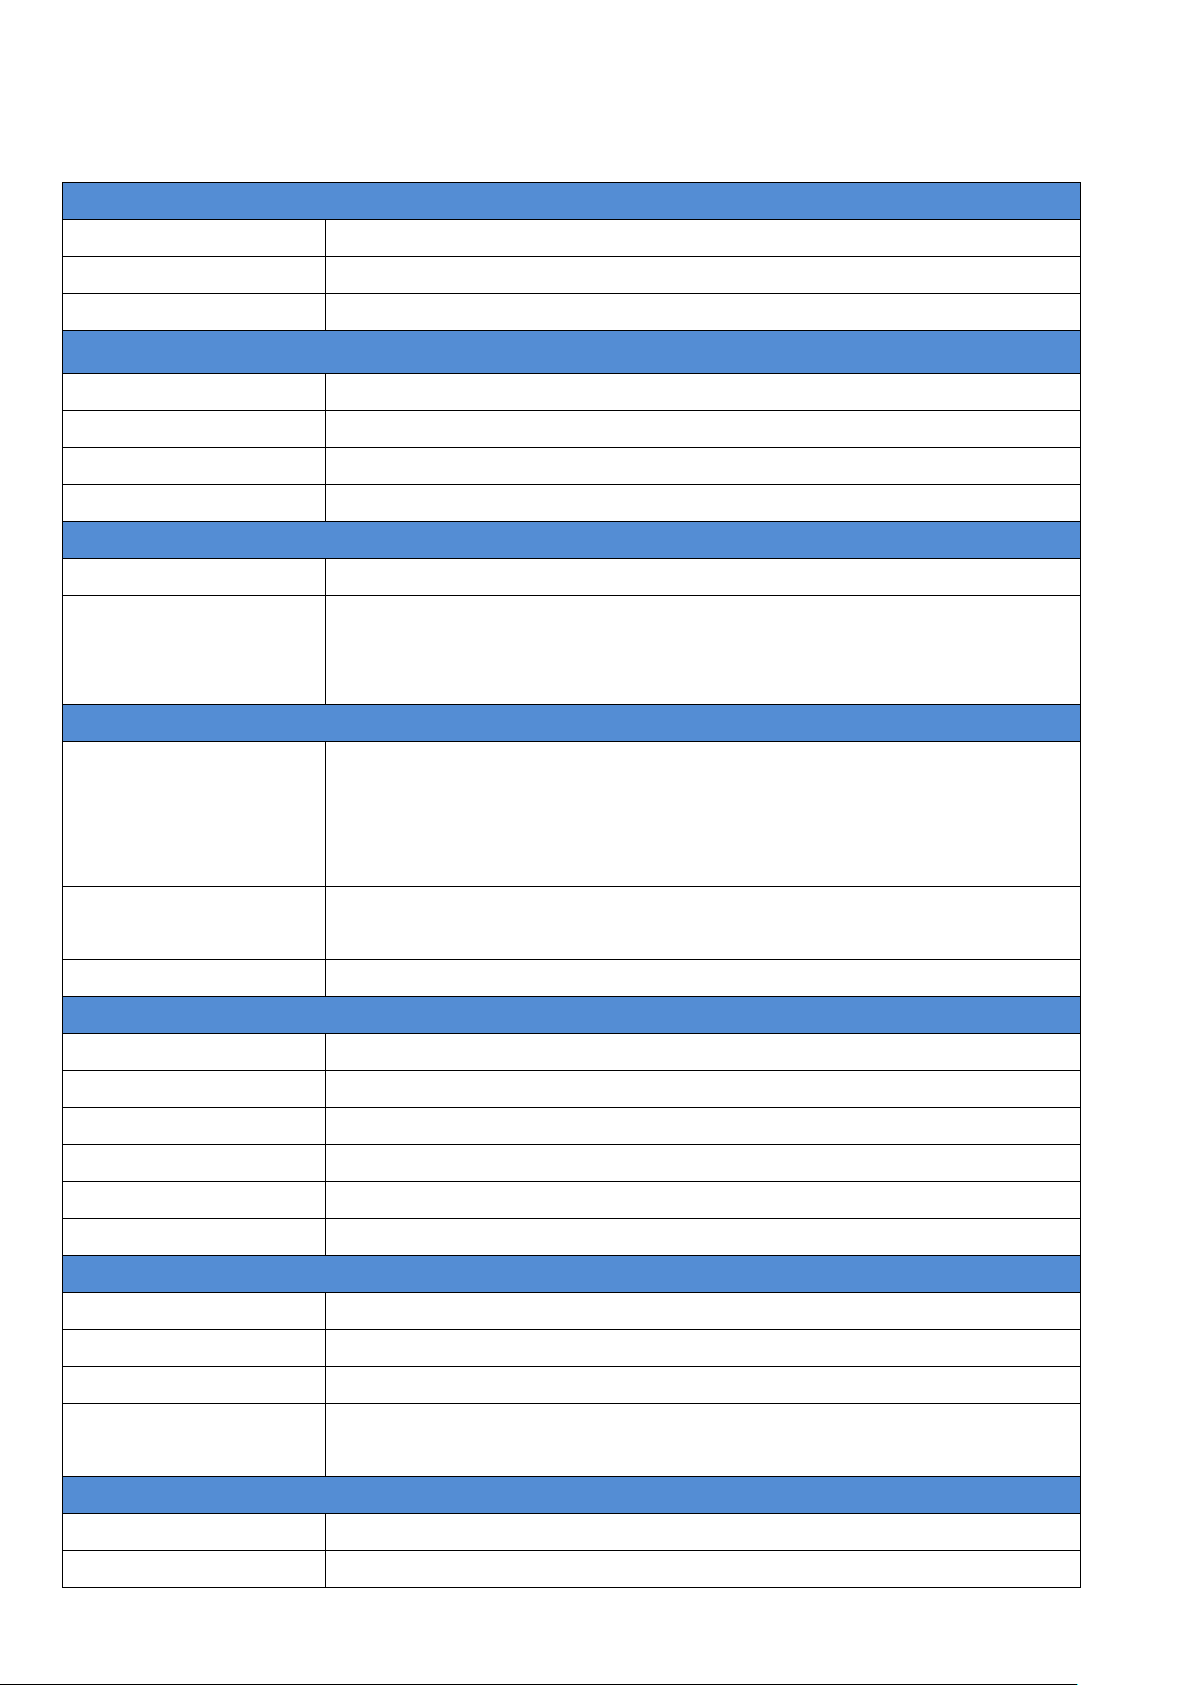
Features
DVB-T Reception
Best in class performance of DVB-T TV reception (Diversity-2)
Multimedia playback
MP3, MPEG4, JPEG multimedia playback through USB device
Advanced functions
Support Pay TV, TV-recording , and AFS function
RF Input
Antenna
Active antenna supported (F-Connector type)
Frequency range
VHF (170-230 MHz) and UHF band (470-862 MHz)
RF input impedance
75 Ohm
Channel bandwidth
6/7/8 MHz
TV System
Transmission standard
ETS 300 744 DVB-T compliance
Video/Audio decoder
Real time 1080 Full-HD Video Decoder:
MPEG-2(ISO/IEC 13818-2) SD& HD
H.264 (MPEG-4 AVC, ISO/IEC 14496-10) SD & HD
S/W Feature
OSD Language
English, French, Deutsch, Italian, Spanish, Portuguese, Holland, Russian, Polish,
Swedish, Finland, Turkish, Czech, Greece, Danish, Arabic, Thai, Traditional
Chinese, Hungarian, Simplified Chinese,
Vietnamese, Indonesian
Features
DVB-T TV/Radio, Auto Channel Search, Multi–Language EPG, Teletext, Subtitle,
Auto Frequency Switch (AFS)
TV/Radio Recording
Record TV/ Radio programs on USB device
Media format
Media port
USB
Audio format
MP3, WAV, AAC
Video format
MPEG-I/II/IV, VOB, AVI, DivX, Xvid, MKV, TS, MOV, RMVB
Photo format
JPEG, BMP, GIF, PNG, TIFF
Subtitle format
SRT, SUB, SSA, ASS, SMI, PSB, TXT, IDX
Recorded file format
*.TSV (TV recording) and *.TSA (Radio recording)
Interface
HDMI port
HDMI 1.3 transmitter 1080p supported
Conax extension port
Extension port for external CONAX smart card reader to enable pay-TV service
USB port
USB 2.0 host supported (for playback and for TV/Radio recording)
AV I/O port
Combination of 12V power input, ACC input, IR input, URAT, CVBS and RGB
output.
Power
Input voltage
+12-24 V DC
Power consumption
5.5 W
V. Specification
31
Page 32
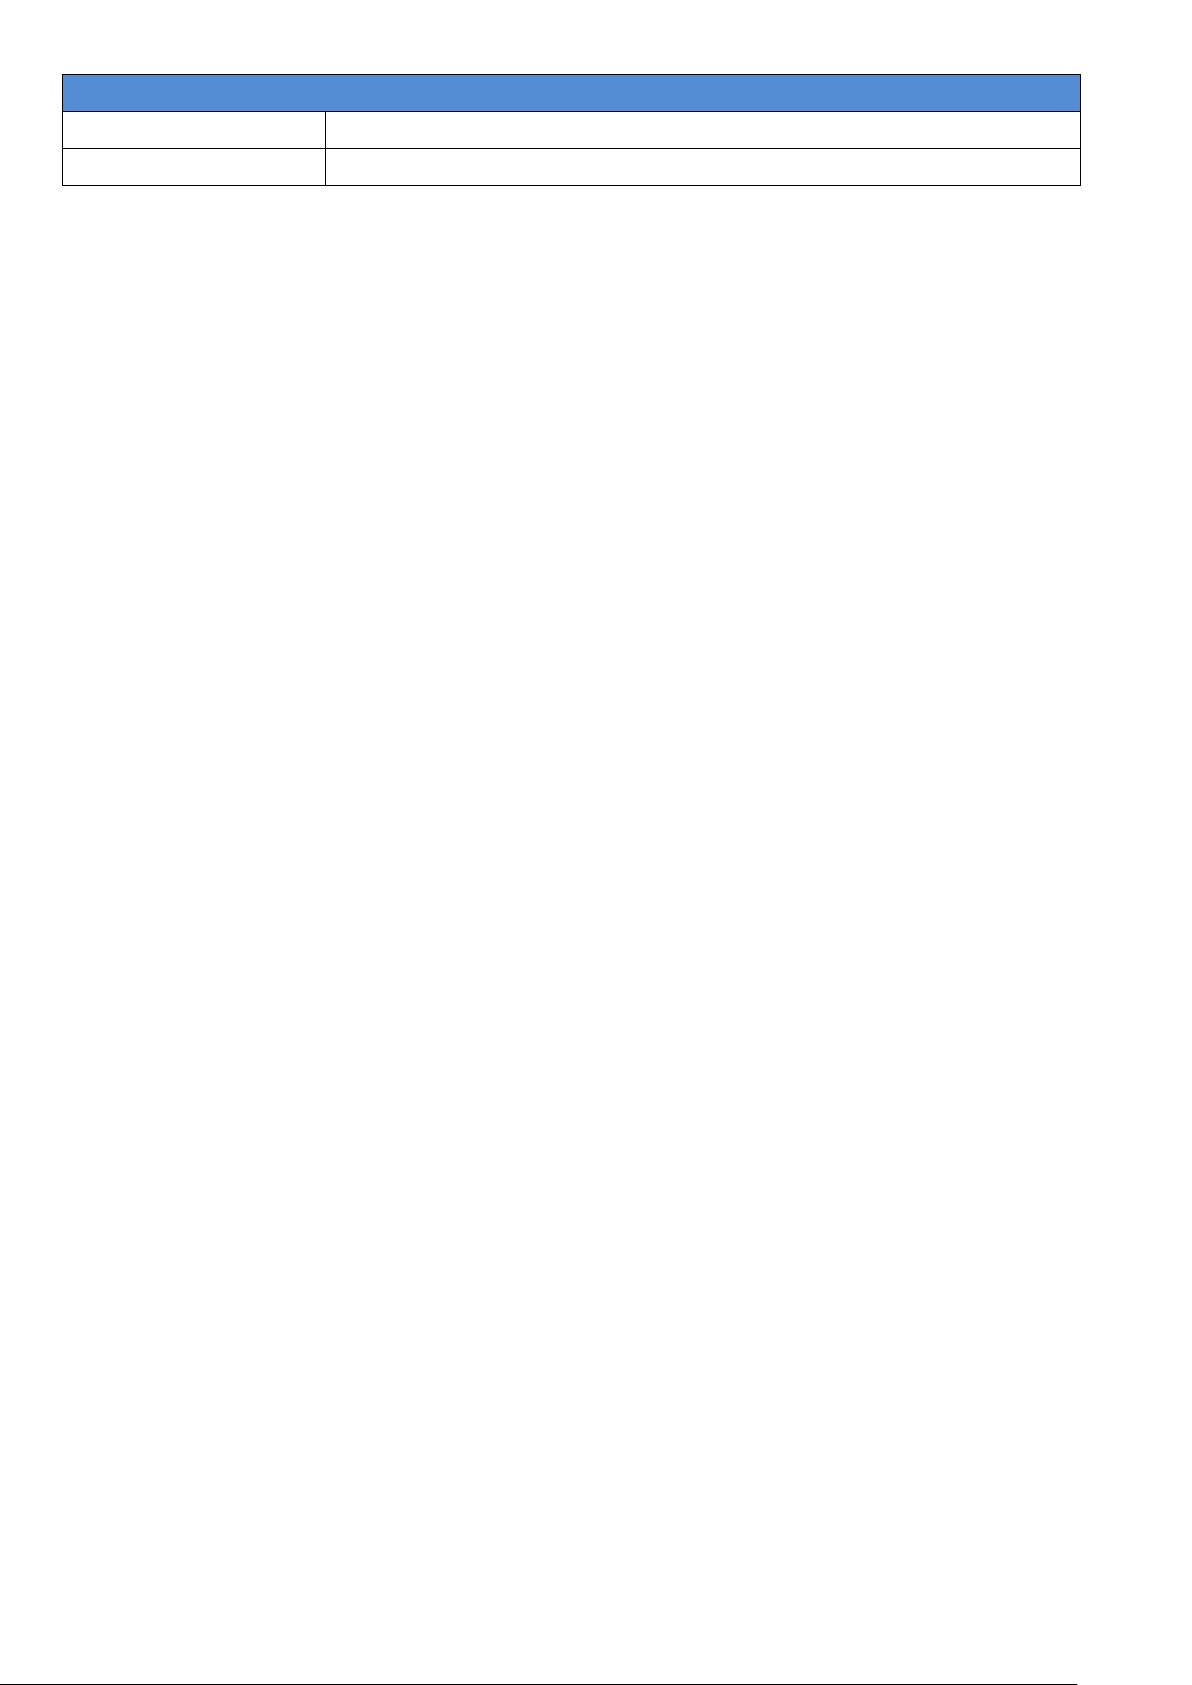
Dimension and Weight
Dimension
80 x 28.5x 137.5 mm
Weight
242 g
32
 Loading...