Page 1
User Guide
Autodesk
®
Stitcher™ Unlimited 2009
Page 2

© 2008 Autodesk, Inc. All rights reserved. Except as otherwise permitted by Autodesk, Inc., this publication, or parts thereof, may not be reproduced in any form, by any method, for
any purpose.
Certain materials included in this publication are reprinted with the permission of the copyright holder.
Portions related to Jpeg6b are copyright ©1991-1998, Thomas G. Lane.
All Rights Res erved except as specified b elow. Permission is hereby granted to use, copy, modify, and distribute this software (or porti ons thereof ) for any purpose, without fee, subject to
these conditions: (1) If any part of the source code for this software is distributed, then this README file must be included, with this copyright and no-warranty notice unaltered; and
any additions, deletions, or changes to the original files must be clearly indicated in accompanying documentation. (2) If only executable code is distributed, then the accompanying
documentation must state that “this software is based in part on the work of the Independent JPEG Group”. (3) Permission for use of this software is granted only if the user accepts full
responsibility for any undesira ble consequences; the authors accept NO LIABILITY for damages of any kind. ansi2knr.c is included in this distribution by permission of L. Peter Deutsch,
sole proprietor of its copyright holder, Aladdin Enterprises of Menlo Park, CA. ansi2knr.c is NOT covered by the above copyright and conditions, but instead by the usual distribution
terms of the Free Software Foundation; principally, that you must include source code if you redistribute it. (See the file ansi2knr.c for full details.) However, since ansi2knr.c is not
needed as part of a ny program generated from the IJG cod e, this does not limit you more than the foregoing paragraphs do. The Unix conf iguration script “configure” was produced with
GNU Autoconf. It is copyright by the Free Software Foundation but is freely distributable. The same holds for its supporting scripts (config.guess, config.sub, ltconfig, ltmain.sh).
Another support script, install- sh, is copyright by M.I.T. but is also freely distributable. It appears that the arithmetic coding option of t he JPEG spec is c overed by patents owned by IBM,
AT&T, and Mitsubishi. Hence arithmetic coding cannot legally be used without obtaining one or more licenses. For this reason, support for arithmetic coding has been removed from
the free JPEG software. (Since arithmetic coding provides only a marginal gain over the unpatented
Huffman mode, it is unlikely that very many implementations will support it.) So far as we are aware, there are no patent restrictions on the remaining code. The IJG distribution
formerly included code to read and write GIF files. To avoid entanglement with the Unisys LZW patent, GIF reading support has been removed altogether, and the GIF writer has been
simplified to produce “uncompressed GIFs”. This technique does not use the LZW algorithm; the resulting GIF files are larger than usual, but are readable by all standard GIF decoders.
We are required to state that “The Graphics Interchange Format © is the Copyright property of CompuServe Incorporated. GIF(sm) is a Ser vice Mark property of CompuServe
Incorporated”.
Portions related to Libtiff are Copyright ©1988-1997 Sam Leffler. Copyright ©1991-1997 Silicon Graphics, Inc. Permission to use, copy, modify, distribute, and sell this software and its
documentation for any purpose is hereby granted without fee, provided that (i) the above copyright notices and this permission notice appear in all copies of the software and related
documentation, and (ii) the names of Sam Leffler and Silicon Graphics may not be used in any advertising or publicity relating to the software without the specific, prior written
permission of Sam Leffler and Silicon Graphics. THE SOFTWARE IS PROVIDED “AS IS” AND WITHOUT WARRANTY OF ANY KIND, EXPRESS, IMPLIED OR OTHERWISE,
INCLUDING WITHOUT LIMITATION, ANY WARRANTY OF MERCHANTABILITY OR FITNESS FOR A PARTICULAR PURPOSE. IN NO EVENT SHALL SAM LEFFLER OR
SILICON GRAPHICS BE LIABLE FOR ANY SPECIAL, INCIDENTAL, INDIRECT OR CONSEQUENTIAL DAMAGES OF ANY KIND, OR ANY DAMAGES WHATSOEVER
RESULTING FROM LOSS OF USE, DATA OR PROFITS, WHETHER OR NOT ADVISED OF THE POSSIBILITY OF DAMAGE, AND ON ANY THEORY OF LIABILITY, ARISING
OUT OF OR IN CONNECTION WITH THE USE OR PERFORMANCE OF THIS SOFT WARE.
Portions related to F2c are Copyright 1990 - 1997 by AT&T, Lucent Technologies and Bellcore. Permission to use, copy, modify, and distribute this software and its documentation for
any purpose and without fee is hereby granted, provided that the above copyright notice appear in all copies and that both that the copyright notice and this permission notice and
warranty disclaimer appear in supporting documentation, and that the names of AT&T, Bell Laboratories, Lucent or Bellcore or any of their entities not be used in advertising or
publicity pertaining to distribution of the software without specific, written prior permission. AT&T, Lucent and Bellcore disclaim all warranties with regard to this software, including
all implied warranties of merchantability and fitness. In no event shall AT&T, Lucent or Bellcore be liable for any special, indirect or consequential damages or any damages whatsoever
resulting from loss of use, data or profits, whether in an action of contract, negligence or other tortuous action, arising out of or in connection with the use or performance of this
software.
The following are registered trademarks or trademarks of Autodesk, Inc., in the USA and other countries: 3DEC (design/logo), 3December, 3December.com, 3ds Max, ADI, Alias, Alias
(swirl design/logo), AliasStudio, Alias|Wavefront (design/logo), ATC, AUGI, AutoCAD, AutoCAD Learning Assistance, AutoCAD LT, AutoCAD Simulator, AutoCAD SQL Extension,
AutoCAD SQL Interface, Autodesk, Autodesk Envision, Autodesk Insight, Autodesk Intent, Autodesk Inventor, Autodesk Map, Autodesk MapGuide, Autodesk Streamline, AutoLISP,
AutoSnap, AutoSketch, AutoTrack, Backdraft, Built with ObjectAR X (logo), Burn, Buzzsaw, CAiCE, Can You Imagine, Character Studi o, Cinestream, Civil 3D, Cleaner, Cleaner Central,
ClearScale, Colour Warper, Combustion, Communication Specification, Constructware, Content Explorer, Create>what’s>Next> (design/logo), Dancing Baby (image), DesignCenter,
Design Doctor, Designer's Toolkit, DesignKids, DesignProf, DesignServer, DesignStudio, Design|Studio (design/logo), Design Web Format, DWF, DWG, DWG (logo), DWG Extreme,
DWG TrueConvert, DWG TrueView, DXF, Ecotect, Exposure, Extendi ng the Design Team, FBX, Filmbox, FMDesk top, Freewheel, GDX Driver, Gmax, Green Building Studio, Heads-up
Design, Heidi, HumanIK, IDEA Server, i-drop, ImageModeler, iMOUT, Incinerator, Inventor, Inventor LT, Kaydara, Kaydara (design/logo), Kynapse, Kynogon, LandXplorer,
LocationLogic, Lustre, Matchmover, Maya, Mechanical Desktop, MotionBuilder, Movimento, Mudbox, NavisWorks, ObjectARX, ObjectDBX, Open Reality, Opticore, Opticore Opus,
PolarSnap, PortfolioWall, Powered with Autodesk Technology, Productstream, ProjectPoint, ProMaterials, RasterDWG, Reactor, RealDWG, Real-time Roto, REALVIZ, Recognize,
Render Queue, Retimer,Reveal, Revit, Showcase, ShowMotion, SketchBook, SteeringWheels, Stitcher, StudioTools, Topobase, Toxik, TrustedDWG, ViewCube, Visual, Visual
Construction, Visual Drainage, Visual Landscape, Visual Survey, Visual Toolbox, Visual LISP, Voice Reality, Volo, Vtour, Wiretap, and WiretapCentral.
The following are registered trademarks or trademarks of Autodesk Canada Co. in the USA and/or Canada and other countries: Backburner, Discreet, Fire, Flame, Flint, Frost, Inferno,
Multi-Master Editing, River, Smoke, Sparks, Stone, and Wire.
The following are registered trademarks or trademarks of Moldflow Corp. in the USA and/or other countries: Moldflow MPA, MPA (design/logo), Moldflow Plastics Advisers, MPI,
MPI (design/logo), Moldflow Plastics Insight, MPX, MPX (design/logo), Moldflow Plastics Xpert.
All other brand names, product names or trademarks belong to their respective holders.
Disclaimer
THIS PUBLICATION AND THE INFORMATION CONTAINED HEREIN IS MADE AVAILABLE BY AUTODESK, INC. “AS IS.” AUTODESK, INC. DISCLAIMS ALL
WARRANTIES, EITHER EXPRESS OR IMPLIED, INCLUDING BUT NOT LIMITED TO ANY IMPLIED WARRANTIES OF MERCHANTABILITY OR FITNESS FOR A
PARTICULAR PURPOSE REGARDING THESE MATERIALS.
Page 3

Stitcher
User Guide
Chapter 1 Introduction............................................................................................... 1
What is Autodesk®StitcherTM? .............................................................................................. 3
About this guide ......................................................................................................................... 4
Minimum system requirements ............................................................................................ 5
Software .........................................................................................................................................5
Hardware ........................................................................................................................................ 5
Installing Stitcher ........................................................................................................................ 6
Uninstalling Stitcher .................................................................................................................. 6
Autodesk Stand-Alone Licensing.......................................................................................... 7
Manage Your Stand-Alone License .................................................................................... 8
Check Product Information ..................................................................................................... 8
License usage types ...........................................................................................................8
License behaviors ................................................................................................................8
View Product Information ........................................................................................................ 9
To view product information ..........................................................................................9
Update Your Serial Number ..................................................................................................10
To update your serial number ......................................................................................10
Register and Activate Stitcher ..............................................................................................11
Online Registration and Activation ....................................................................................11
To activate Stitcher ...........................................................................................................11
Offline Registration and Activation ....................................................................................11
To register Stitcher offline ..............................................................................................12
iii
TM
Chapter 2 Quick Start to Stitcher Projects ..............................................................13
The Stitcher Interface ..............................................................................................................15
The 5-phase Stitcher Workflow............................................................................................16
Phase 1: Loading images ........................................................................................................17
Phase 2: Automatic and Semi-Automatic Stitching .....................................................25
Working with thumbnails ..............................................................................................19
Working in the Stitching Window ...............................................................................19
Create and Organize Stacks ...........................................................................................22
Page 4

Contentsiv
Automatic stitching ......................................................................................................... 25
Semi-automatic stitching .............................................................................................. 25
Phase 3: Alignment ..................................................................................................................26
Phase 4: Lighting equalization .............................................................................................27
Modifying exposure ........................................................................................................ 28
Phase 5: Projection Types and Rendering ........................................................................30
Snapshot projection ........................................................................................................ 30
Cylindrical projection ...................................................................................................... 31
Cubical projection ............................................................................................................ 32
Spherical projection ........................................................................................................ 33
Cylindrical and Cubic QTVR projection .................................................................... 34
Rendering your panorama ............................................................................................ 35
Saving your project ......................................................................................................... 36
Stitcher Command shortcuts ...............................................................................................37
Essential shortcuts ....................................................................................................................37
General Stitcher Operational shortcuts ............................................................................39
Customizing keyboard shortcuts ........................................................................................41
Chapter 3 User Guide................................................................................................43
Shooting photographs ...........................................................................................................45
Recommended equipment ...................................................................................................45
Planning your shots .................................................................................................................45
Photograph overlap ........................................................................................................ 49
Shooting the panorama ......................................................................................................... 50
Camera settings ................................................................................................................51
Tips for taking shots ................................................................................................................. 51
Stitcher projects ........................................................................................................................53
The Stitcher workflow .............................................................................................................54
Preferences .................................................................................................................................55
Setting the temporary files directory ................................................................................56
To set the temporary files directory: ......................................................................... 56
Setting the blending application ........................................................................................57
Page 5

Stitcher
User Guide
Editing in an external application .......................................................................................57
Modifying the display of images .........................................................................................58
Changing the frame color ..............................................................................................58
Moving images as a frame .............................................................................................59
Changing the texture size ..............................................................................................61
Changing the Stitching Window background color .............................................62
Adjusting the transparency of images ......................................................................63
Displaying HDR images ..........................................................................................................64
Changing the exposure ..................................................................................................64
Displaying the Live Preview ..................................................................................................65
Managing memory ..................................................................................................................66
Setting the Cache Size .....................................................................................................67
Managing the Undo Buffer ............................................................................................67
Setting the Manual Stitch Magnifier ..................................................................................68
Setting the GPU preferences ................................................................................................68
v
TM
The interface ...............................................................................................................................71
The Main Menu ..........................................................................................................................72
The Toolbar .................................................................................................................................72
The Stitching Window ............................................................................................................. 72
Thumbnail View .................................................................................................................73
Status Indicators ................................................................................................................73
General Information .........................................................................................................74
The Live Preview ........................................................................................................................ 75
The Image Strip .........................................................................................................................76
Preparing images for stitching.............................................................................................77
Loading images .........................................................................................................................77
Loading HDR images .......................................................................................................80
Loading fisheye images ..................................................................................................80
Setting the camera parameters ...........................................................................................81
Image resolution .......................................................................................................................82
Relationship between image property values ...............................................................82
Rectilinear lens properties .....................................................................................................83
Page 6

Contentsvi
Film back values ................................................................................................................ 83
Focal length ....................................................................................................................... 83
Sensor shift values .......................................................................................................... 85
Distortion values ..............................................................................................................85
Fisheye lens properties ...........................................................................................................87
Flat stitch properties ................................................................................................................88
Manipulating images .............................................................................................................. 89
About thumbnail lines and markers .......................................................................... 89
Indicator markers ............................................................................................................. 89
Indicator lines .................................................................................................................... 92
Filtering thumbnails ........................................................................................................ 93
Deleting thumbnails ....................................................................................................... 93
Modifying the display of thumbnails ........................................................................ 94
Displaying thumbnail information ............................................................................ 95
Moving images to the Stitching Window ........................................................................95
Working in the Stitching Window .......................................................................................96
Improving redraw performance ................................................................................. 96
Selecting images in the Stitching Window .............................................................96
Aligning images in the Stitching Window ............................................................... 97
Rotating images in the Stitching Window .............................................................. 98
Centering images in the Stitching Window ............................................................ 99
Setting the camera orientation ......................................................................................... 100
Bookmarking the current viewpoint .............................................................................. 100
Fisheye images ....................................................................................................................... 101
Why use a fisheye lens? ....................................................................................................... 101
Types of fisheye images ....................................................................................................... 101
Calibrating fisheye images ................................................................................................. 102
Stitching images .................................................................................................................... 105
Automatic stitching ............................................................................................................... 105
Semi-automatic stitching .................................................................................................... 106
Manual stitching ..................................................................................................................... 110
Force-stitching Images ........................................................................................................ 113
Page 7

Stitcher
User Guide
Unstitching, detaching, and deleting images ............................................................. 114
Unstitching images ........................................................................................................114
Detaching images .......................................................................................................... 114
Deleting images .............................................................................................................. 115
Tips for stitching images ..................................................................................................... 115
Overlapping and aligning images ...........................................................................115
Stitching highly distorted images ................................................................................... 116
Evaluating focal length ................................................................................................117
Calibrating the Camera Response Curve ...............................................................118
Closing the first row of a panorama ........................................................................120
Camera Profiles .......................................................................................................................123
Saving a camera profile ................................................................................................123
Loading a camera profile .............................................................................................123
Render preview ...................................................................................................................... 124
The Quick Preview .........................................................................................................124
The Live Preview .............................................................................................................124
vii
TM
Stencils....................................................................................................................................... 126
Creating a stencil polygon .................................................................................................. 126
Selecting, duplicating, and moving stencil polygons .............................................. 129
Selecting stencil polygons ..........................................................................................129
Moving stencil polygons .............................................................................................129
Copying stencil polygons ............................................................................................129
Changing the shape of stencil polygons ...............................................................129
Deleting stencil polygons ...................................................................................................129
Blending polygons ................................................................................................................ 130
Creating a PSD stencil .......................................................................................................... 130
Viewing stencils ...................................................................................................................... 132
Aligning the panorama........................................................................................................ 133
Setting the horizon in the Align Panorama mode ..................................................... 133
Panning relative to the horizon .................................................................................135
Re-aligning the panorama with the horizon ........................................................135
Centering a panorama ......................................................................................................... 135
Page 8

Contentsviii
Aligning the panorama using the Display Grid .......................................................... 136
To change the Display Grid .........................................................................................138
To change the color of the Display Grid: ................................................................138
Equalizing images ................................................................................................................. 139
To equalize images: .......................................................................................................139
Hotspots.................................................................................................................................... 141
Creating hotspots .................................................................................................................. 141
Selecting, duplicating, and moving hotspots .............................................................. 142
Selecting hotspots .........................................................................................................142
Duplicating hotspots .................................................................................................... 143
Moving hotspots ............................................................................................................ 143
Changing the shape of hotspots ..............................................................................143
Deleting hotspots .................................................................................................................. 143
Linking hotspots .................................................................................................................... 144
Setting QuickTime movie options ...................................................................................145
Viewing hotspots ................................................................................................................... 145
Hotspots and panorama conversion .............................................................................. 146
Render Area ............................................................................................................................. 147
Rendering Your Project ....................................................................................................... 149
Choosing projection types .................................................................................................151
Snapshot projection ...................................................................................................... 151
Cubical projection .......................................................................................................... 151
Understanding the naming of cubical images ....................................................153
Cylindrical projection ....................................................................................................154
Spherical projection ...................................................................................................... 154
Cylindrical and Cubic QTVR projection ..................................................................154
Setting QTVR output options .....................................................................................155
VRML projection .............................................................................................................155
HDR and Tone Mapping ...................................................................................................... 156
Add EXIF Data ..................................................................................................................156
Calibrating the Camera Response Curve ...............................................................157
Render options ....................................................................................................................... 158
Page 9

Stitcher
User Guide
Tips for rendering .................................................................................................................. 164
Understanding width and height value constraints ......................................... 165
Understanding interpolation .....................................................................................165
QuickTime output setup ..................................................................................................... 167
Compression Settings ...................................................................................................168
Rendering Quality .......................................................................................................... 168
Tiling (for Cubic QTVR only) ........................................................................................168
Preview ...............................................................................................................................168
Annotations... ...................................................................................................................169
Authoring Tool ................................................................................................................ 170
QuickTime scripting ......................................................................................................172
Movies........................................................................................................................................ 173
Launching the animation tool .......................................................................................... 173
Defining the camera path ................................................................................................... 174
Checking the animation ...................................................................................................... 175
Editing key frames ................................................................................................................ 175
Setting the frame gap ..........................................................................................................177
ix
TM
Publishing HTML/KML.......................................................................................................... 178
Publishing your panorama ................................................................................................. 178
Setting the html options ..................................................................................................... 179
Setting the kml options ....................................................................................................... 181
Sharing your panorama ....................................................................................................... 182
Creating an *.html template .............................................................................................. 183
Panorama conversion .......................................................................................................... 184
Loading a panorama .............................................................................................................184
Conversion possibilities .......................................................................................................186
Aligning the panorama ........................................................................................................ 187
Creating hotspots during a conversion ......................................................................... 188
Saving and loading hotspots ............................................................................................. 189
Rendering a converted panorama ................................................................................... 189
Choosing a Quicktime panorama viewpoint ............................................................... 189
Templates ................................................................................................................................. 190
Page 10

Contentsx
Saving a project as a template .......................................................................................... 190
Opening a template .............................................................................................................. 191
Troubleshooting .................................................................................................................... 193
Stitching problems ................................................................................................................ 196
Glossary ..................................................................................................................................... 198
Page 11

1
Introduction
Page 12

Page 13

TM
Stitcher
User Guide
What is Autodesk®StitcherTM?
Using Autodesk Stitcher, you can build high-quality panoramas for the Web, film, print, and 3D animations.
With advanced features, such as the automatic stitching engine, automatic color-matching, and real-time
previewing, Stitcher gives photographers and artists the power to deliver the most impressive panoramas in all
the popular formats. Stitcher
horizontally and vertically overlapping photos. You can create new image sets from the panorama using a
virtual camera that is equipped with zoom, pan, and roll motion. Your panorama can be rendered as a cube,
plane, cylinder, spherical projection, and in QuickTime
ImmerVision
®
Pure Player, Java, and HTML (version dependent). This means that you can create panoramic
images for definition mattes, environment maps, 3D models, high-impact Web pages including publishing in
Google
TM
Earth.
Images that are loaded into Stitcher are displayed as thumbail images. You can drag
thumbnail images into the work area and stitch them manually, or, using the default
workflow, Stitcher automatically stitches the loaded images together and then displays
them in the display area.
quickly creates wide-angle, high-resolution 360° × 180° panoramic images from
®
(Cylindrical QTVR and Cubic QTVR), VRML,
3
If the automatic process fails you can do semi-automatic stitching by placing the
images in an overlapping position to match features in each of the images.
Stitcher calibrates the camera focal length and distortion parameters from original
images. No information is required about the camera or the scale of the scene.
However, an approximate value for the camera’s focal length improves the panorama.
Results are accurate to within one pixel.
Stitcher automatically blends colors along the edges of each image to provide color
consistency throughout your panorama. In addition, the application wraps each image
to exactly match all adjacent images and to remove distortion. These processes are
rapid with precise, high-quality results.
Your high-quality panoramas can then be quickly produced and rendered to various
formats (such as QuickTime VR) for web viewing or to animation software format for
use as matte paintings (which can be used as backgrounds), or occlusions. Entire
panoramas can also be environment mapped onto animated objects. You can use the
Page 14

4
Chapter 1
Introduction
resulting panoramas to create new image sets by filming in the image using a virtual
camera.
About this guide
This guide uses type conventions to help you quickly find and understand information.
Key combinations are capitalized with bold type. For example, press Ctrl+Z
(Windows®) or Command+Z (Mac®).
For a complete list of keyboard combinations, see “Stitcher Command shortcuts” on
page 37.
“Click” means to click the left mouse button and “right-click” means to click the right
mouse button (Windows only).
Words referring to items within Stitcher menus and pop-up menus are shown with
the symbol > indicating the path to a menu item. For example, when you see
Edit > Properties, Select the Edit menu and select Properties.
Page 15
Minimum system requirements
Software
Autodesk® Stitcher™ Unlimited 2009 is supported on the following operating systems:
Microsoft® Windows XP Professional, (SP2 or higher) 32-bit operating system
Microsoft® Windows Vista® Business, (SP1) 32-bit operating system
Apple® Mac OS® X 10.4.11 and 10.5.2 (Intel version only) operating system
NOTE Apple QuickTime® 7 is also required.
Hardware
Stitcher Unlimited 2009 requires a system with the following hardware:
Stitcher
User Guide
5
TM
Intel® Pentium® 4 (or equivalent) processor, 1GHz or faster
Macintosh®: Intel®-based Macintosh® computers
512 RAM for Windows XP / 1 GIG RAM for Windows Vista (2GB recommended)
200 MB free hard drive space (for installation) – 2 GB recommended
Ethernet adapter
Qualified hardware-accelerated OpenGL® 1.2 professional graphics card with latest
graphics driver available from vendor’s site.
Two-button mouse with mouse driver software
DVD-ROM drive
Page 16

6
Chapter 1
Introduction
Installing Stitcher
Autodesk recommends that you uninstall previous or evaluation versions of Stitcher
before installing Stitcher Unlimited 2009 (see
you are installing an upgrade.
1 Close all open applications.
2 Follow the onscreen installation instructions.
Uninstalling Stitcher
Select Programs > Autodesk > Stitcher Unlimited> Uninstall Stitcher.
Select Settings > Control Panel and do the following:
1 Double-click Add/Remove Programs.
“Uninstalling Stitcher” on page 6), unless
2 From the list of programs, select Stitcher.
3 Click Change/Remove.
4 At the prompt, click Ye s to confirm the removal of the application. The program
removes the program files, folders, shortcuts, and registry entries.
5 When the files are removed, the Uninstall program indicates the completion of the
process. Click OK.
Page 17

Autodesk Stand-Alone Licensing
This guide provides information and instructions for managing an Autodesk standalone license on a single-user workstation.
A stand-alone license allows you to run Stitcher on a single workstation. To obtain a
license, you register your product.
You can use Stitcher in trial mode for a given number of days from the first time you
launch the product. The number of days that a trial mode is active differs between
Autodesk products. You can register your license at any time before the trial period
expires. After the trial period expires, you cannot run Stitcher until you register the
product.
When you register Stitcher, you receive an activation code. If you register online, your
activation code is automatically retrieved from Autodesk and Stitcher starts. If you
register offline, you request an activation code from Autodesk. Upon receipt, you
manually enter the activation code in the Product Activation wizard. The Product
Activation wizard is displayed every time you launch a product that has not been
registered.
Stitcher
User Guide
7
TM
NOTE If you are installing and using Stitcher on both operating systems of a dual-boot
operating system, you must obtain a separate activation code for each operating system.
The license file stays on your workstation when you uninstall Stitcher. If you reinstall
Stitcher on the same workstation, the license information is still valid. You do not have
to reactivate Stitcher.
Page 18

8
Chapter 1
Introduction
Manage Your Stand-Alone License
This section provides information about advanced stand-alone licensing tasks such as
license types and behaviors, viewing product information, saving your license file as a
text file, updating your serial number, registering and activating Stitcher, and moving a
license.
Check Product Information
You can view detailed information about Stitcher and your license (such as the license
usage type and the license behavior).
License usage types
Commercial A license for a product that was purchased commercially.
Not for Resale A license for a product that is not sold commercially.
Educational (EDU)/Institution A license designed specifically for educational
institutions.
Student Portfolio A License for students who are using an Autodesk product as part of
their curriculum.
License behaviors
Tria l A license that allows individuals to try the product in trial mode for a specified
number of days. The trial period starts the first time you launch your product. When
the trial period expires, the product must be registered and activated in order to
continue use.
Permanent Allows permanent use of an Autodesk product.
Ter m E x te nd abl e Allows access to an Autodesk product for a limited period of time.
The term can be extended at any time.
Page 19

TM
Stitcher
User Guide
Term Non-Extendable Allows access to an Autodesk product for a limited period of
time. The term cannot be extended.
View Product Information
You can view detailed information about Stitcher and your product license, such as the
license usage type and the license behavior.
To view product information
1 Launch Stitcher.
2 From the Help menu, click About Stitcher.
3 In the About Stitcher window, view details about your product and product license.
4 In the About Stitcher window, click OK.
9
Page 20

10
Chapter 1
Introduction
Update Your Serial Number
If you installed Stitcher with the trial serial number (000-00000000), you should update
that trial serial number with a valid serial number. Your valid serial number is located
in the Autodesk Upgrade and Licensing Information email you received when you
purchased or upgraded Stitcher online.
When you register and activate Stitcher, you are asked for the product serial number, which
gets automatically updated upon completion of the activation process.
If you have a multi-product bundle of software that uses a single serial number, only
the first product you register and activate displays the updated serial number. For other
products to display the serial number, you need to update them from the Help menu.
NOTE In order for the updated serial number to display, you need to be logged into the
system with Administrator rights.
To update your serial number
1 Launch Stitcher.
2 Select Help > Activate.
3 In the Stitcher Activation window, enter your product serial number.
4 Click Activate.
NOTE If you have lost your serial number, contact the Autodesk Business Center (ABC) at
800-538-6401 for assistance.
5 Click Close.
6 Exit Stitcher and restart for the updated activation to take effect.
NOTE To see the updated serial number in Vista, exit the product, right-click the product
icon, and click Run as an Administrator.
Page 21

TM
Stitcher
User Guide
Register and Activate Stitcher
Before you can activate the license for Stitcher, you need to go through the registration
process. Once registered, the activation process is greatly simplified. You can register
and activate Stitcher either when you start the program or while you are running
Stitcher.
There are two ways to register and activate Stitcher: Online and Offline.
Online Registration and Activation
Online registration and activation requires that you have Internet access. This process
allows you to create one or more password protected user accounts that can be accessed
when activating any Autodesk product(s).
To activate Stitcher
1 Launch Stitcher
11
2 Select Help > Activate
3 In the Stitcher Activation dialog box, enter your user account information and
click Next.
4 Onscreen instructions will inform you of registration and activation status. Click
Close.
5 Restart Stitcher for the activation to take effect.
Offline Registration and Activation
If online registration and activation is not possible, you can still register and activate
Stitcher offline. Your registration data can be submitted by email, fax, or phone
(Americas only). Within two business days, your activation code is sent back to you by
email or fax.
Offline registration and activation is necessary under the following conditions:
An online request has timed out
Page 22

12
Chapter 1
Introduction
A processing error occurred such as an invalid serial number
To register Stitcher offline
1 If you are unable to register online, the Register Today’s Connect to the Internet
page indicates the reason why online registration and activation failed. Click the
Use Another Method link.
2 On the Product Registration page, specify the following:
Whether Stitcher will be registered to a company or individual.
The country or region where Stitcher will be used.
Whether the product is an upgrade. If it is, you also need the previous Stitcher serial
number.
Click Next.
3 Enter your personalization data on the Customer Information page and choose how
you’d like to receive your activation code - email, fax, or postal mail. Click Next.
4 Review your personalization data on the Customer Information page and choose
the method you’ll use to submit your request. Your request can be sent by email, fax
or phone.
If you choose Send My Request by Email, an email message will display for you to
complete. If you choose to forward your request by fax or phone, the Contact
Autodesk page will display with pertinent contact information.
You will be sent your activation code by the method you specified on the Customer
Information page.
5 If you want to print a copy of your registration information, select the Select Open
Activation Request Form. When you are finished, click Close.
Page 23

2
Quick Start to Stitcher Projects
Page 24

Page 25
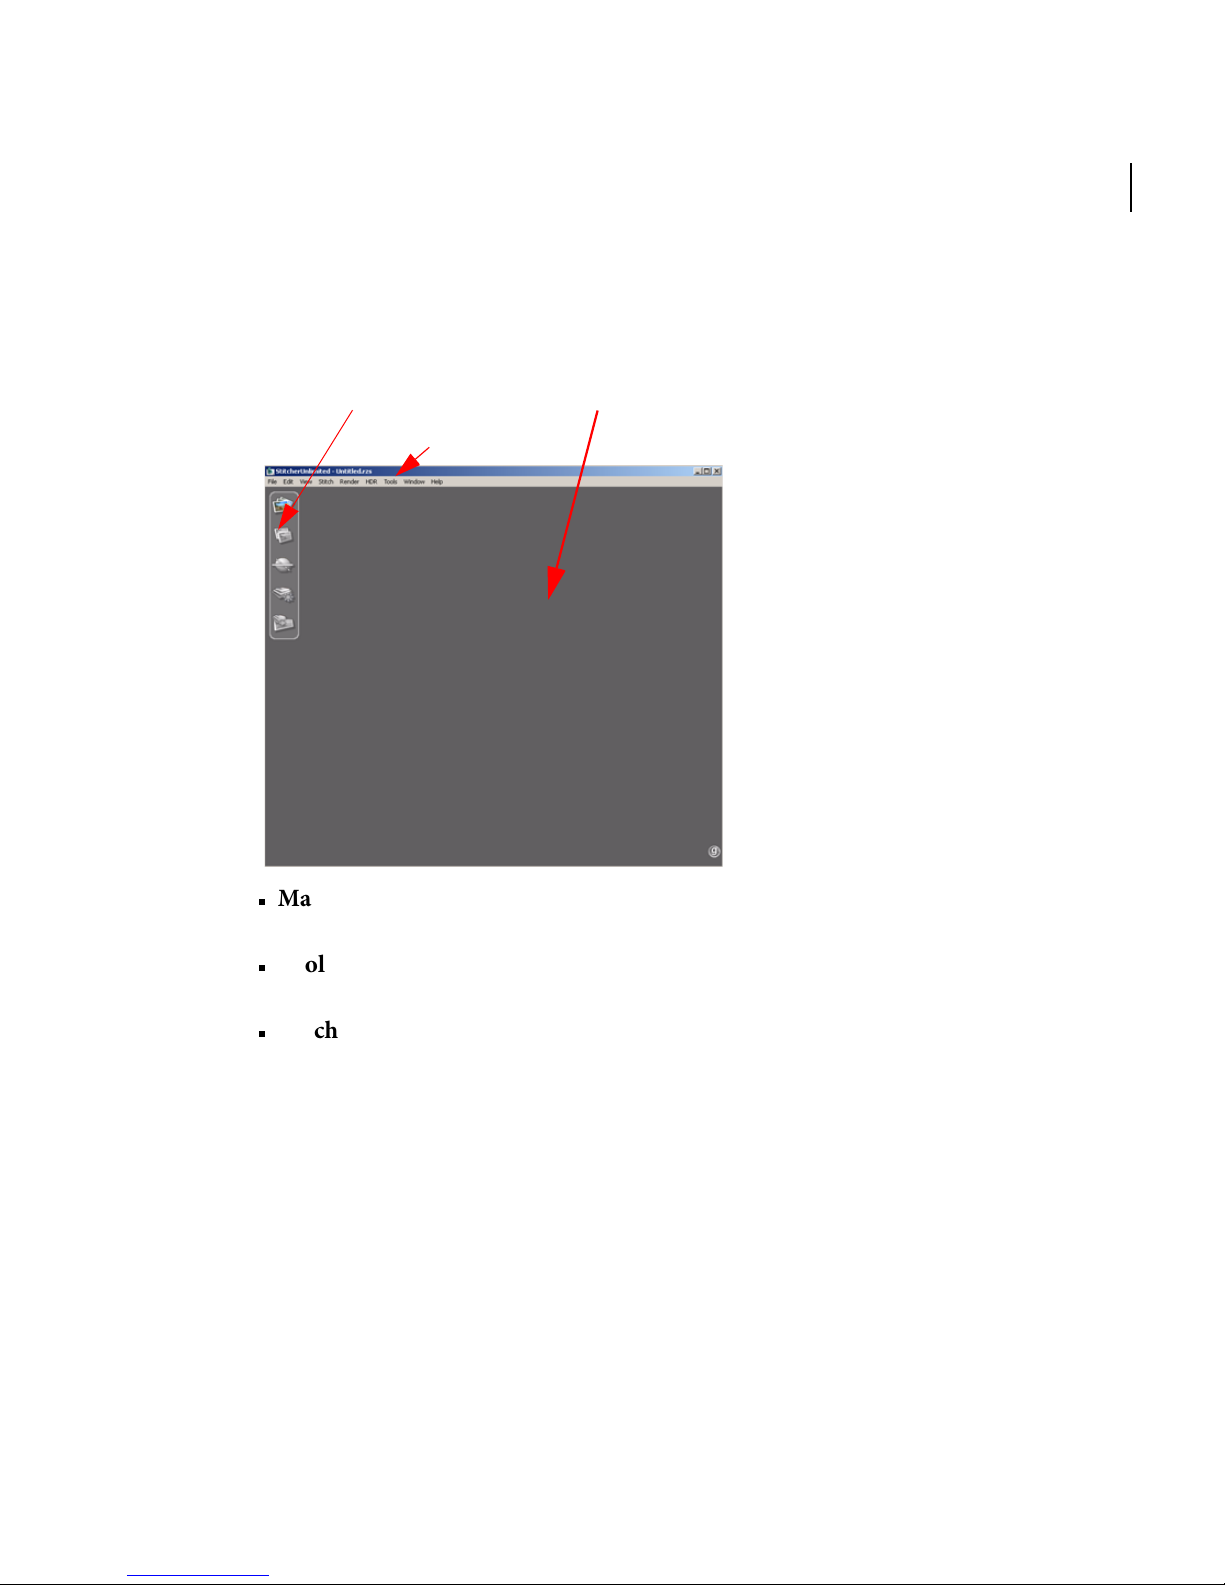
The Stitcher Interface
Stitching Window
Main Menu
To o lb a r
The Stitcher interface is composed of the following elements:
Stitcher
User Guide
15
TM
Main Menu: If a shortcut is available, it is shown next to the functions in the Main
Menu.
To o lb a r : The To ol b a r contains a set of contextual toolbars for working through the
Stitcher five-phase workflow.
Stitching Window: The Stitching Window is the 3D environment that you use to
build your panoramic view.
The size of the sphere is determined by the focal length of the camera used to shoot
your images.
Page 26
16
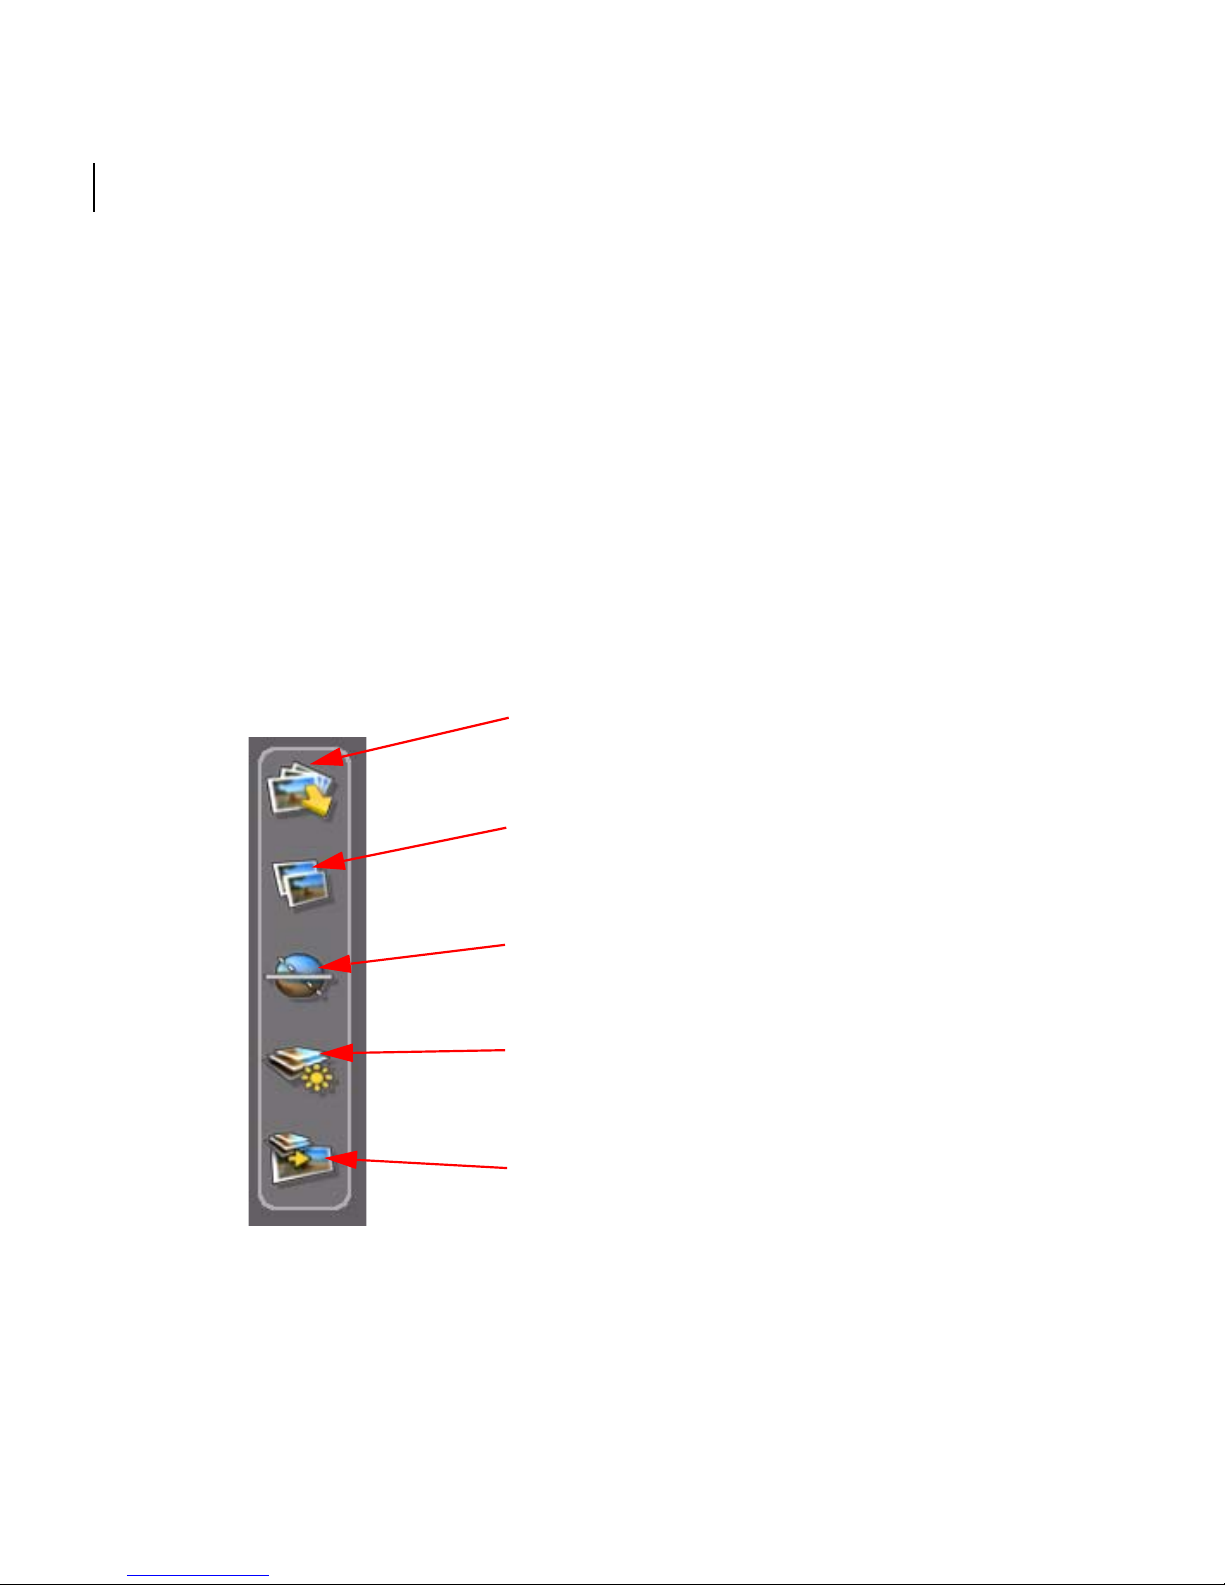
Phase 1. Load images into the project
(for detailed information, see “The
interface” on page 71).
Phase 2. Automatically stitch the images
(see “Stitching images” on page 105).
Phase 3. Automatically align the viewing
horizon (see “Setting the horizon in the
Align Panorama mode” on page 133).
Phase 4. Equalize the lighting or
brightness (see “Equalizing images” on
page 139).
Phase 5. Render and export the final
panorama (see “Rendering Your Project”
on page 149).
Chapter 2
Quick Start to Stitcher Projects
The 5-phase Stitcher Workflow
1 Load your image files (see “Phase 1: Loading images” on page 17 for the complete
list of the supported file formats).
2 Stitch your images using the automatic stitch function. If there are inconsistencies in
your shots for which you will need to compensate, you can manually stitch or forcestitch your images.
3 Align the viewing horizon. Sticher can center the panorama automatically, or flip it
upside down (or the right way up, depending on how your images were loaded
before the auto-stitch command was executed).
4 Equalize the brightness of your panorama. Stitcher can compensate for contrast in
the lighting between the stitched images and automatically make the lighting in the
panorama more uniform.
5 Render your panorama into a variety of formats for external publication.
Page 27
TM
Stitcher
User Guide
Phase 1: Loading images
All images used in a panorama must be the same size in pixels (height and depth), and
they must be shot with the same focal length. Stitcher reads any EXIF data in the
images and displays the information for you to keep or edit (the edited values are only
used by Stitcher - the EXIF data in the images remains the same).
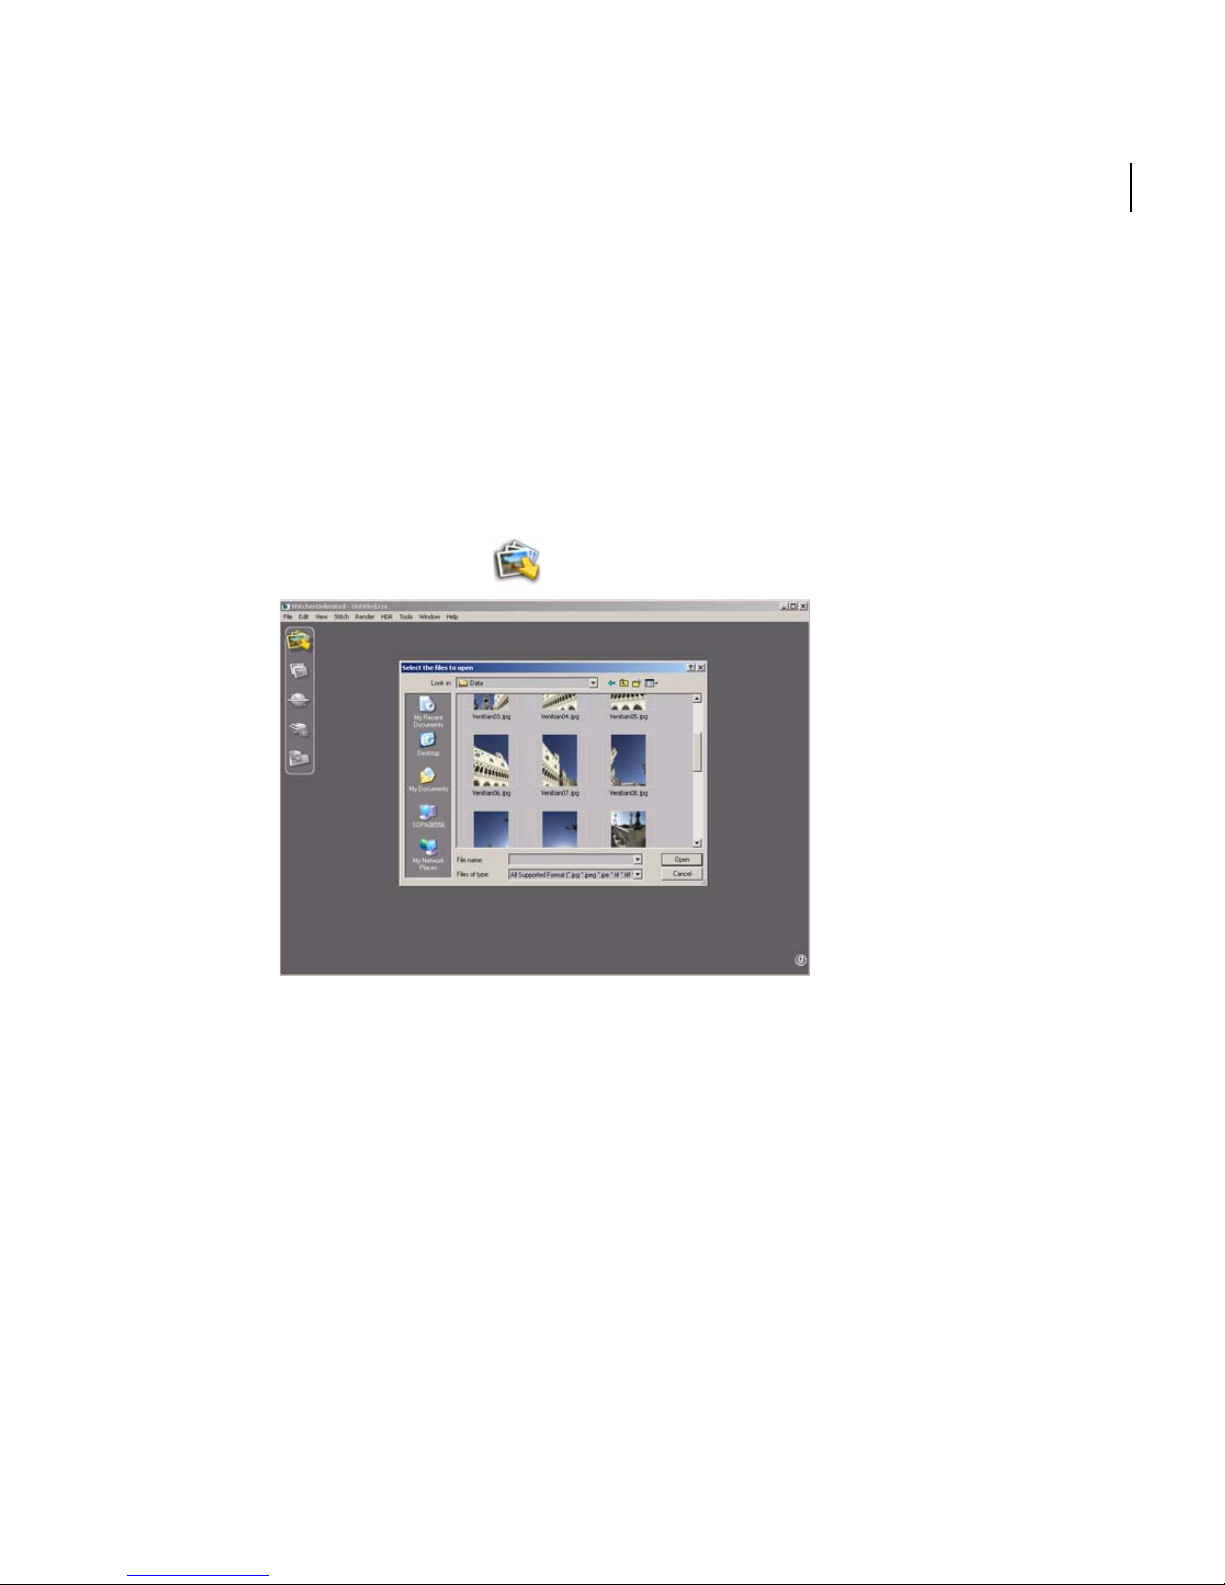
To load your images:
1 Click Load Images . The Load Images browser opens.
17
2 Select one or more image files to load.
3 Click Open to load the images in the Stitcher Thumbnail View.
Page 28
18
Chapter 2
Quick Start to Stitcher Projects
TIP Alternatively, drag the images directly from Explorer (Windows) or Finder (Mac) into the
Stitching Window.
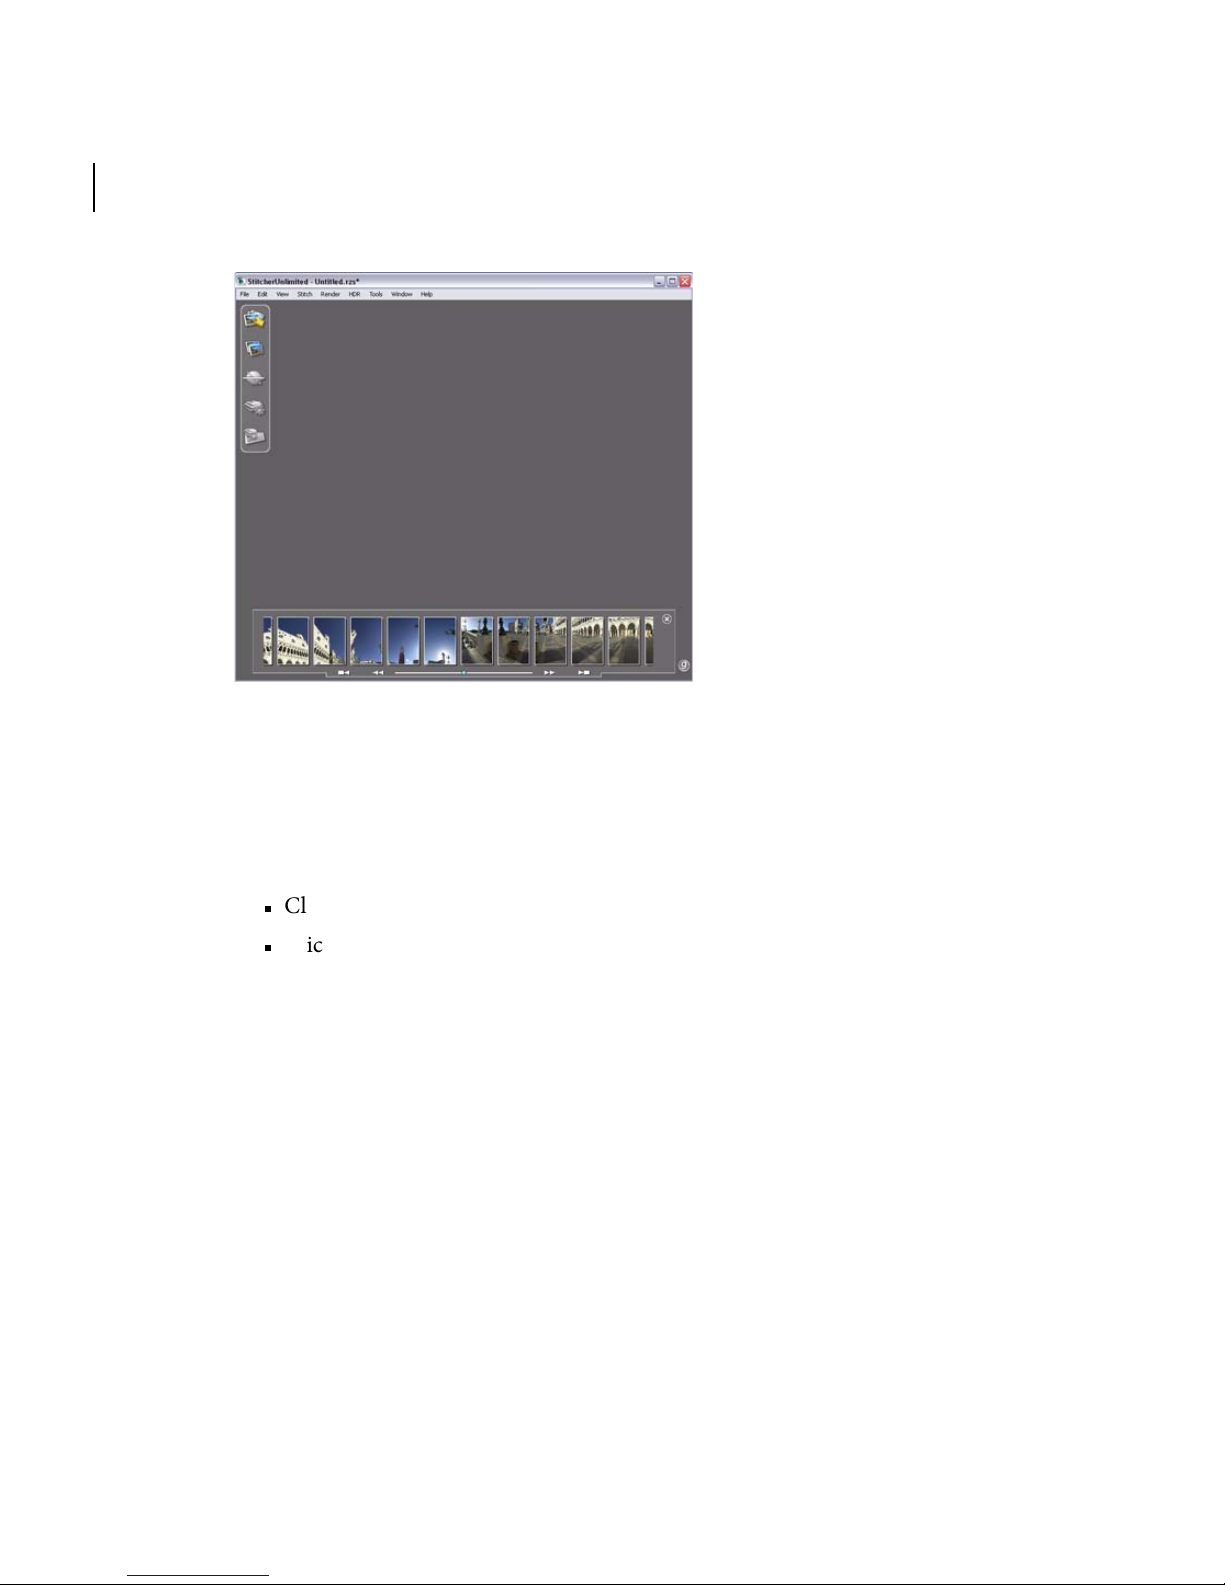
4 Stitcher reads the EXIF information in the images and asks whether you want to
keep the settings.
Click Ye s to keep the EXIF data settings.
Click No to open the EXIF data properties box and edit the settings.
TIP Select Edit > Properties to change your data settings (such as the focal length) at any
time after loading the images into your project.
Page 29
TM
Stitcher
User Guide
Working with thumbnails
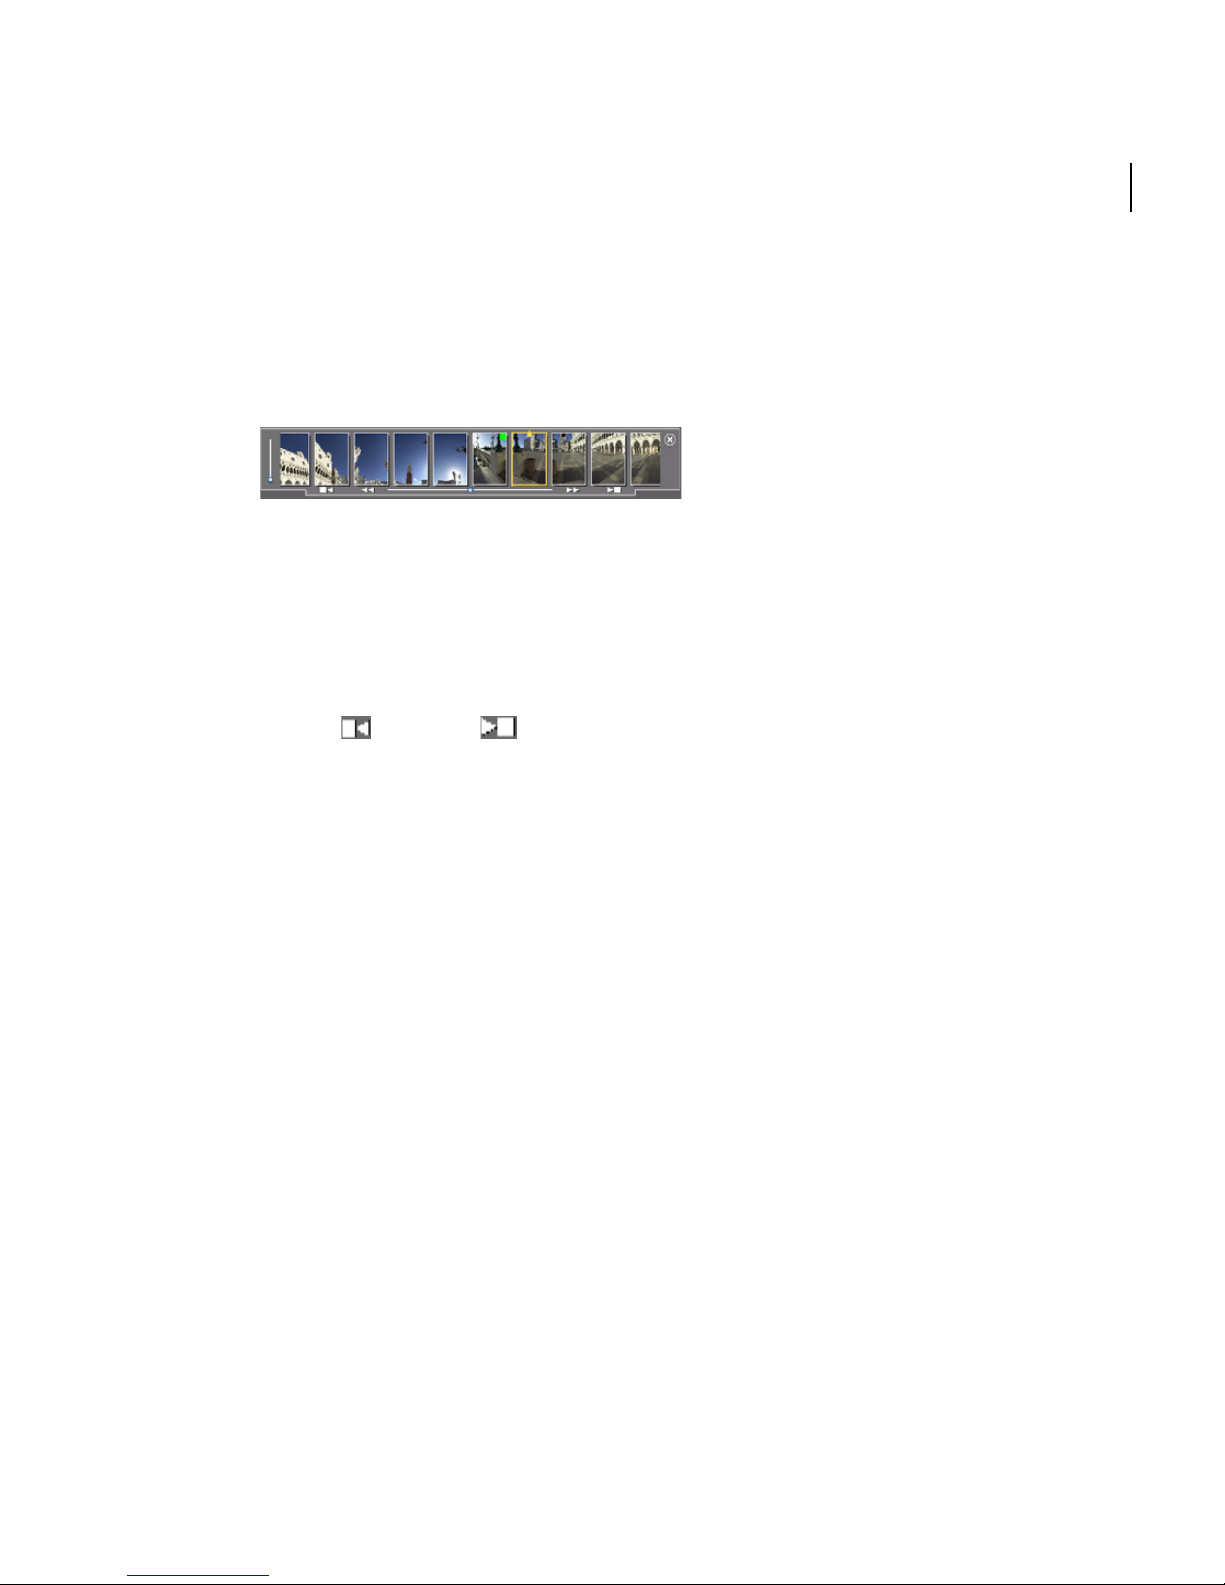
When you first load images into your project, they appear in the Thumbnail View. In
the Thumbnail View you can select an image, modify its rotation, and view
information about it.
You can zoom in and out of the thumbnails by moving the vertical slider at the top of
the Thumbnail View - when you move the cursor over the top of the Thumbnail View,
it changes to arrows and you can drag the view to the size you prefer.
If you have a large number of images loaded into your project, a horizontal slider
appears below the thumbnails to allow you to scroll through them. You can also click
19
the left
TIP Click an image in the Thumbnail View and drag it to the left or right to scroll quickly
your loaded images.
or right arrows to move to the right or left end of the thumbnail list.
Indicators in the thumbnails display the status of the corresponding image in the
Stitching Window (showing whether the images are stitched, not stitched, or manually
stitched).
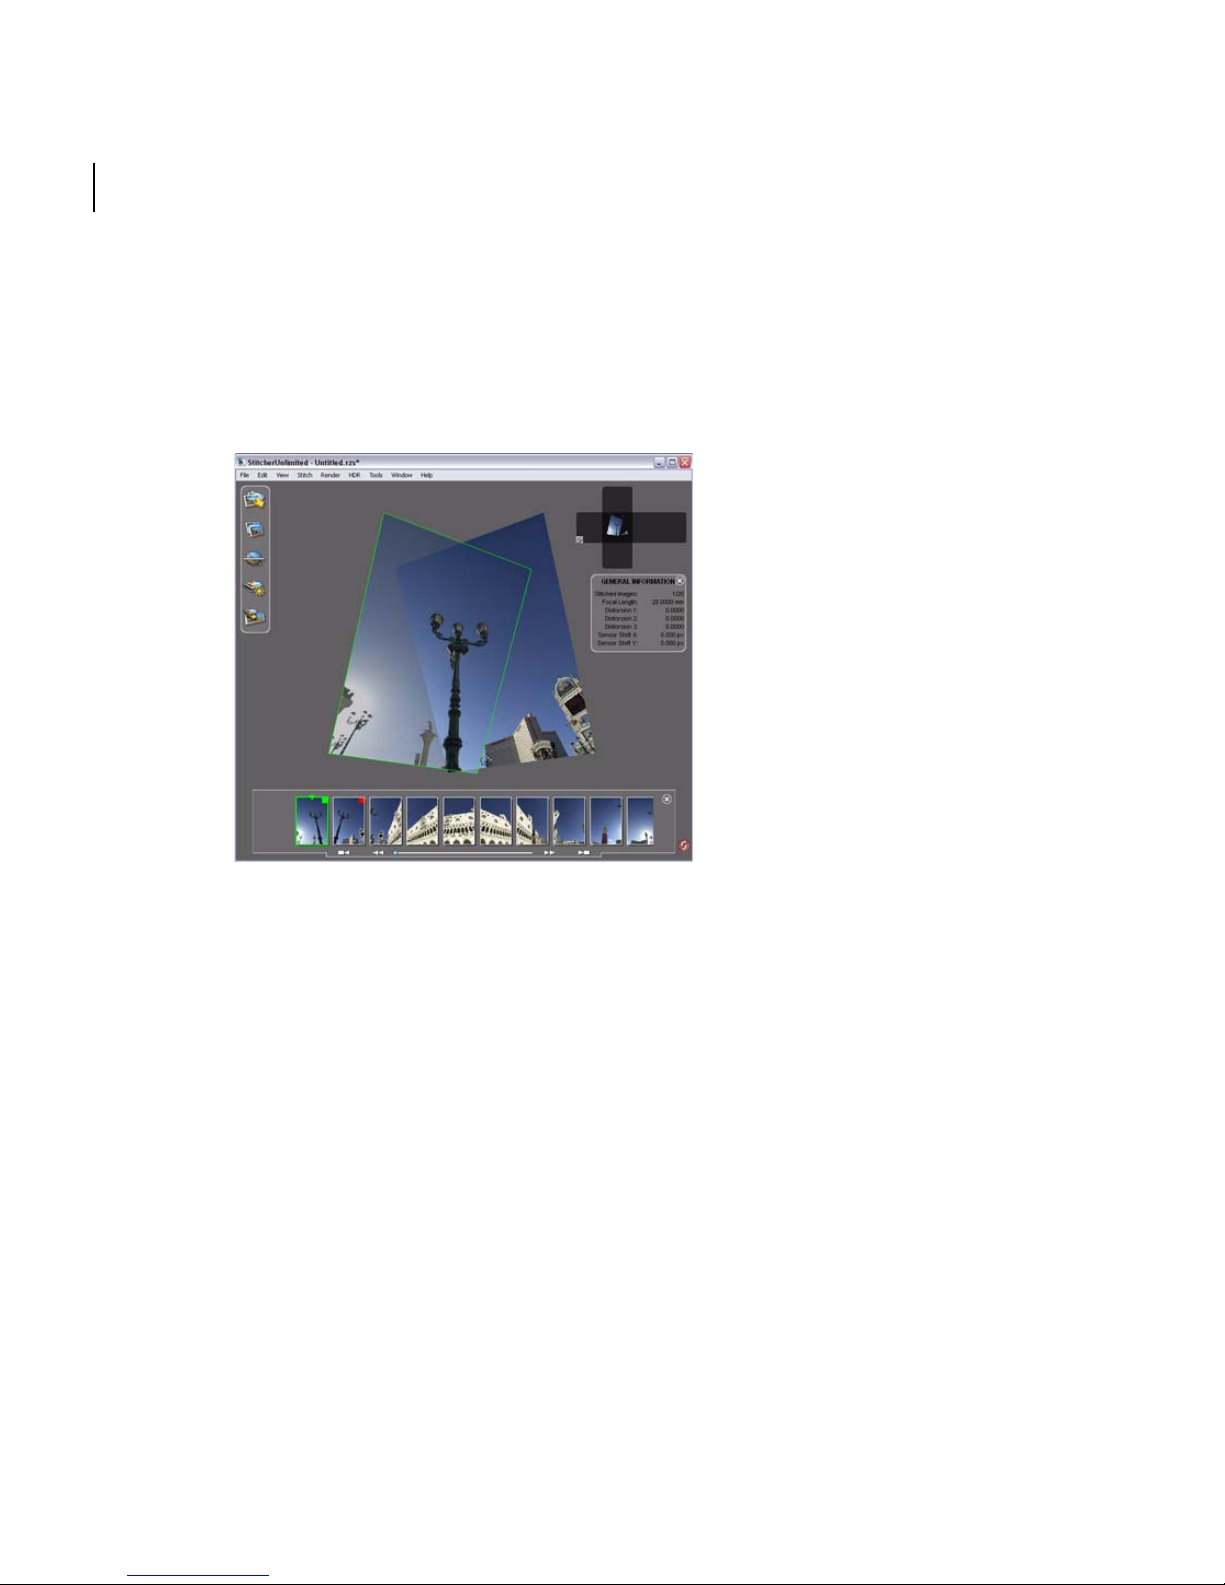
Working in the Stitching Window
The Stitching Window is the sphere in which your panorama is created. To begin
stitching your images together, drag each image from the Thumbnail View into the
Stitching Window.
By default, the first image you put into the Stitching Window is centered and stitched
in place. As you place and stitch more images in the Stitching Window, colored
markers and lines in the thumbnails show you the status of images and the relationship
between them.
Page 30
20
Chapter 2
Quick Start to Stitcher Projects
Using the navigation controls, you can view your panorama as you place images in the
Stitching Window and stitch them together. You can also set the camera orientation
precisely with numerical values.
To select an image, click the image. The selected image is highlighted.
Press Ctrl+click (Windows) or Shift+click (Mac) to add images to the selection.
Page 31

Before stitching images, you can:
Stitcher
User Guide
21
TM
Move the selected image to overlap and align it with another so that you can stitch
them together.
Rotate the selected image by pressing Shift+right-click (Windows) or
Shift+Ctrl+click (Mac) in the Stitching Window to designate the pivot point.
Center the selected image by selecting View > Look At or pressing =.
Page 32

22
Chapter 2
Quick Start to Stitcher Projects
Create and Organize Stacks
To create an HDR panorama (32-bit image), you can have stacks in which to hold
however many exposures you have for each shot. You can also shuffle each stack to
change the exposure that is displayed on top, or (if you have no images selected) you
can change a panorama’s whole exposure value.
1 Load your images (see Phase 1: Loading images)
2 To determine how your exposures are stacked, do one of the following:
Select HDR > Stack exposure by and choose the number of exposures (brackets)
you have for your shots.
Page 33

TM
Stitcher
User Guide
TIP For example, if you have shots in 6 positions for your panorama, with three exposures for
each position, you will have 18 images loaded. Choose Stack exposure by 3 and Stitcher
will automatically create 6 stacks of 3 adjacent images.
Select all the exposures you want to stack together, then right-mouse click one of the
thumbnails and choose Stack exposure by > Selection from the context menu.
3 To change the display image for a stack, select the stack, right-mouse-click it and
select HDR menu, then select one of the following:
Exposure UP
Exposure DOWN
Exposure RESET
TIP To unstack images, either right-mouse click directly on the current thumbnail and
choose HDR > Unstack Selection
or from the HDR menu, select Unstack Selection.
23
Page 34

24
Chapter 2
Quick Start to Stitcher Projects
TIP Stitcher can load 32-bit images (EXR and HDR format) generated by external software
and it can render the panorama either as a 32-bit image or a tone-mapped image.
For more information about 32-bit or tone-mapped images, see “Displaying HDR images”
on page 64.
Page 35

Stitcher
User Guide
Phase 2: Automatic and Semi-Automatic Stitching
You use the Stitcher automatic stitching or semi-automatic options to stitch your
images together. If you use the semi-automatic option, you need to add images to the
Stitching Window and then place them as you want them before stitching them.
Automatic stitching
You can use the automatic stitching option to stitch all of the loaded images, or only
selected images. If you select thumbnails, then only the corresponding images are
stitched. If you do not select any thumbnails, then all images are stitched.
To automatically stitch your images, click . Stitcher assembles all images in the
Stitching Window.
Semi-automatic stitching
25
TM
1 After you load images, you drag them into the Stitching Window.
2 Move and rotate images so that they are aoverlapping and aligned with each other.
For best results, ensure that 15% of each image is overlapping with the image next to
it.
3 When you are satisfied with the alignment of the images, either click or press
Enter.
4 If a green (by default) border appears around the image, the image is stitched, and
you can begin to stitch another image.
If you get a “Cannot adjust images. Do you want to re-adjust it yourself?” message,
choose Re-adjust and re-align your images.
TIP Press Tab to toggle between adjacent images and to check the quality of the stitching.
Press Ctl + P to preview the panorama.
Page 36

26
Chapter 2
Quick Start to Stitcher Projects
Phase 3: Alignment
Before equalizing and rendering your panorama, you can align it based on what
appears in the Stitching Window.
To automatically align the panorama, do one of the following:
Select Tools > Auto-Align Panorama.
Click .
The alignment command is best used on a single row of at least three or four images.
You can view your panorama upside down or correct your panorama’s rotation by
selecting Too l s > F l ip P an o r am a .
Use the navigation controls in the Render Preview window to select a viewpoint for
QVTR renders.
Page 37

TM
Stitcher
User Guide
Phase 4: Lighting equalization
If your images vary in their brightness or contrast, you can use the Stitcher equalization
process tomake the image lighting more uniform for the panorama.
To automatically equalize the brightness setting in the panorama, do one of the
following:
SelectRender > Equalize All Images.
Click .
NOTE You can undo an equalization command, adjust the equalization level settings and
run the command again. See “Equalizing images” on page 139 for more detailed
information.
27
Page 38

28
Chapter 2
Quick Start to Stitcher Projects
Modifying exposure
To change the exposure of the panorama, make sure no image is selected and select
HDR menu, then select one of the following:
Exposure UP
Exposure DOWN
Exposure RESET
Exposure example 1
Page 39

TM
Stitcher
User Guide
TIP You can also change the exposure of the panorama by right-mouse-clicking anywhere
in the Stitching Window and selecting Exposure UP, DOWN, or RESET.
29
Exposure example 2 - after changing the panorama’s exposure value.
Page 40

30
Chapter 2
Quick Start to Stitcher Projects
Phase 5: Projection Types and Rendering
The type of projection you choose to render your panorama depends on how it will be
used (for example, the Web, film production, or product packaging) and whether or
not you will edit the stitched images in an external graphics application. You can select
from the following types of projections.
Snapshot projection
The snapshot projection renders a flat map, without deforming it, making the panoram
look similar to a photograph.
This type of render is useful for creating images for the Web and for print. Be aware
that what you see in the Stitching Window is what is rendered. So, to adjust the
content of your snapshot render, reposition the image view in the Stitching Window.
Snapshot projections work best for a maximum of four to five images. If you are
rendering more than five images, use the cylindrical projection.
To choose a snapshot projection, select Snapshot Image from the Typ e list in the
Render Parameters dialog box.
Page 41

TM
Stitcher
User Guide
Cylindrical projection
The cylindrical projection creates a cylinder that accurately shows a row panorama
without distorting the top and bottom of the original image.
This projection is ideal for print or for creating Internet banners. Be sure to reposition
your view in the Stitching Window if you want to adjust the center of the cylindrical
panorama. Zoom in or out to adjust the height of the images in the projection.
To choose a cylindrical projection, select Cylindrical Image from the Type list in the
Render Parameters dialog box.
31
Page 42

32
Chapter 2
Quick Start to Stitcher Projects
Cubical projection
The cubical projection creates six images that correspond to the six sides of a cube
(front, back, right, left, top, and bottom). Using this type of projection, your panorama
will look as if it is being projected onto the inside surfaces of a cube.
Cubical renderings are particularly good for rendering backgrounds in 3D scenes and
for producing Cubic QTVR movies that you will edit in external graphics applications.
To choose a cubical projection, select Cubical Image from the Type list in the Render
Parameters dialog box.
Page 43

TM
Stitcher
User Guide
Spherical projection
Like cubical projections, spherical projection shows an entire 360°×180º panorama in a
single image.
Choose spherical projection to create:
printed panoramas
33
environment maps for 3D packages
JPG files to be used by Java spherical viewers on the Web
cubic QTVR movies that need to be modified as one image
To choose a spherical projection, select Spherical Image from the Typ e list in the
Render Parameters dialog box.
Page 44

34
Chapter 2
Quick Start to Stitcher Projects
Cylindrical and Cubic QTVR projection
Cylindrical QTVR and Cubic QTVR projection types render cylindrical and cubical
movies, respectively, which can be viewed in QuickTime. These projections are useful
for publishing your panoramas on the Web or inclusion on a CD-ROM.
To choose cylindrical QTVR or cubic QTVR projections, select Cylindrical QTVR or
Cubical QTVR from the Typ e list in the Render Parameters dialog box.
Page 45

Stitcher
User Guide
Rendering your panorama
To r end e r a p ro ject i on:
1 Select Render > Render from the menu or click . The Render Parameters
dialog appears.
35
TM
2 In the Render Parameters dialog box, do the following:
Browse to the directory to which you want to save your rendered projection, a
filename (avoid special characters).
From the type list, select the projection type, a file type (see “Snapshot projection” on
page 30, “Cylindrical projection” on page 31, “Cubical projection” on page 32,
“Spherical projection” on page 33, and “Cylindrical and Cubic QTVR projection” on
page 34)
Set the image resolution (in pixels) by adjusting Width and Height.
3 Click Render.
Page 46

36
Chapter 2
Quick Start to Stitcher Projects
TIP Avoid special characters such as & # * % ! “ / < > \ | and accented letters and spaces,
when naming rendered files.
Saving your project
To s ave a pro je c t:
1 Select File > Save As from the main menu. The Save As dialog box opens.
2 Enter a file name, select the destination directory for your project and click Save.
NOTE To revert to the last saved version of your project, Select File > Revert.
TIP After you have saved your project once, click to re-save it.
Page 47

Stitcher Command shortcuts
Stitcher provides the following types of shortcuts:
Contextual (shortcut) menus
The contextual (shortcut) menus contain commands for the image or thumbnail
in the Stitching Window.
To access the contextual menus:
Right-click (Windows) or Ctrl+click (Mac) in either the Stitching Window or
on the thumbnails to open the contextual menu.
The Toolbar
The To o l b a r contains icons for working through the Stitcher five-phase
workflow. See “The 5-phase Stitcher Workflow” on page 16 for details.
Keyboard shortcuts
The keyboard shortcuts are shown next to the main menu commands or actions.
Stitcher
User Guide
37
TM
Essential shortcuts
There are several shortcuts to help when you are using Stitcher. The following table lists
Stitcher project actions and their keyboard shortcuts:
Action Shortcut
Auto-align
panorama
Detach image Backspace
Equalize All
Images
Go Back to
Horizon
Load Images Ctrl+L (Windows)
A
Ctrl+E (Windows)
Command+E (Mac)
H (Windows) or Command+H (Mac)
Command+L (Mac)
Page 48

38
Chapter 2
Quick Start to Stitcher Projects
Action Shortcut
Look At =
Maximize/
Spacebar
Minimize Live
Preview
Pan Alt+click
Preferences P (Windows)
Command+, (Mac)
Proof Preview Ctrl+P (Windows)
Command+P (Mac)
Properties Alt+Enter (Windows)
Command+I (Mac)
Render Ctrl+R (Windows)
Command+R (Mac)
Rotate (image) Shift+right-click (Windows)
Shift+Ctrl+click (Mac)
Save Ctrl+S (Windows)
Command+Shift+S (Mac)
Save As Ctrl+Shift+S (Windows)
Stitch image Enter
Zoom Alt+Ctrl+click (Windows)
Command+S (Mac)
or +/- keys
Command+click (Mac)
Page 49

General Stitcher Operational shortcuts
Action Shortcut
Stitcher
User Guide
39
TM
Change
Shift+Page Up, Shift+Page Down
exposure
Delete Delete
Duplicate Ctrl+D (Windows) or Command+D (Mac)
Exit Stitcher
TM
Alt+F4 (Windows)
Command+Q (Mac)
Flip panorama F
Focal length
Shift+(-)
decrease
Focal length
Shift+(+)
increase
Full Screen Ctrl+Shift+F (Windows)
Command+Shift+F (Mac)
Select
B (Windows) or Command+B (Mac)
Bookmark
Help Contents F1 (Windows)
Live Preview Shift+L
Manipulate Click
New Project Ctrl+N (Windows)
Open Project Ctrl+O (Windows)
Command+? (Mac)
Command+N (Mac)
Command+O (Mac)
Page 50

40
Chapter 2
Quick Start to Stitcher Projects
Action Shortcut
Open
Te mp la te
Prev/Next
Ctrl+T (Windows)
Command+T (Mac)
Page Up/Page Down
Image in
Stencil Mode
Redo the last
action
Reset the
Ctrl+Y (Windows)
Command+Y (Mac)
Shift+Home
exposure
Related menu Right-click (Windows)
Ctrl+click (Mac)
Roll
(panorama)
Alt+right-click (Windows)
Ctrl+Alt+click (Mac)
Select All Ctrl+A (Windows)
Command+A (Mac)
Set Bookmark Ctrl+B (Windows)
Shift+Command+B (Mac)
Show/Hide
Display Grid
Show/hide
image
information
Undo the last
action
Unstitch image Shift+Enter
G (Windows) or Command+G (Mac)
Shift+I
Ctrl+Z (Windows)
Command+Z (Mac)
Page 51

Stitcher
User Guide
Customizing keyboard shortcuts
You can create and edit custom Stitcher keyboard shortcuts from the Preferences
dialog box. Select Edit > Preferences.
41
TM
To create and edit keyboard shortcuts:
1 From the Preferences dialog box, select Shortcut Management.
2 Select an action from the Functions list (you will see a short description of the
function). If a shortcut has already been assigned, the key combination is shown in
the Current information field (no shortcut will be displayed if the action has not yet
had one assigned to it).
3 If you want to change the shortcut, click in the text field and enter your shortcut.
Onscreen instructions will inform you about whether your chosen shortcut is free
to use or not. Click Assign to activate the shortcut.
4 Click Delete to clear the text field. You can now define a new key combination for
the shortcut in the blank text field. Click Assign to activate.
5 Click Get Default Shortcut to reset the shortcut back to the original system value.
Click Assign to activate.
Page 52

42
Chapter 2
Quick Start to Stitcher Projects
Page 53

3
User Guide
Page 54

Page 55

Shooting photographs
The following sections provide guidelines for photo shoots that will help achieve the
best results in Stitcher.
Recommended equipment
You can use any high-resolution digital camera. Whenever possible, use a tripod and
panoramic pan head for capturing panoramas. This not only prevents parallax, but also
ensures sufficient overlap between images. If you use a traditional camera, either scan
or have a photo lab digitize images to transfer them to your computer. Make sure the
images are scanned at the same resolution and size in pixels.
Planning your shots
To capture a full 360° × 180° view of the scene you need to capture your images in rows.
That is, in addition to capturing images in a 360° circle as you normally would to make
a panorama, you also need to capture rows of images with the camera tilted up and
down.
Stitcher
User Guide
45
TM
Here is an outline of the procedure:
Top R ow : Tilt the camera up +45° and capture an image. Rotate the pan head by 30°
and capture another image. Continue capturing images at 30º increments until the row
is complete.
Middle Row: Level the camera to 0° pitch. Capture an image. Rotate the pan head by
30° and capture another image. Continue until the row is complete.
Bottom Row: Tilt the camera down by –45°. Capture an image. Rotate by 30° and
capture another image. Continue until the row is complete.
For example, a panorama might consist of three rows of images. Each row of images
consists of 12 shots. The images in each row are captured at 30° increments:
Page 56

46
Chapter 3
User Guide
The top row is captured with the camera tilted up at 45° pitch.
The middle row is captured with the camera leveled at 0° pitch.
The bottom row is captured with the camera tilted down at –45° pitch.
This creates a total of 36 images.
Figure A (side view) shows three rows of images captured at –45°, 0°, +45° pitch and
figure B (top view) shows 12 images per row captured at 30° increments.
The number of images, rows, and spacing needed to capture a panorama depends on
the FOV of the lens being used.
Page 57

User Guide
The tables below show the approximate FOVs for some common lenses and the
number of images needed to capture a full 360° × 180° view. You can use this
information as a guide when planning your shots..
Focal length Image FOV Images required
15 mm 14
Image layout One image at +90° pitch; six images every 60° at
+30° pitch; six images every 60° at –30° pitch; one
image at –90° pitch
Focal length Image FOV Images required
Stitcher
47
TM
20 mm 26
Image layout One image at +90° pitch; eight images every 45° at
+60° pitch; eight images every 45° at 0° pitch; eight
images every 45° at –60° pitch; one image at –90°
pitch
Focal length Image FOV Images required
17 mm 18
Page 58

48
Chapter 3
User Guide
Image layout One image at +90° pitch; eight images every 45° at
+30° pitch; eight images every 45° at –30° pitch;
one image at –90° pitch
Focal length Image FOV Images required
24 mm 29
Image layout One image at +90° pitch; nine images every 40° at
+50° pitch; nine images every 40° at 0° pitch; nine
images every 40° at –50° pitch; one image at –90°
pitch
Focal length Image FOV Images required
28 mm 32
Image layout One image at +90° pitch; ten images every 36° at
+45° pitch; ten images every 36° at 0° pitch; ten
images every 36° at –45° pitch; one image at –90°
pitch
Page 59

Stitcher
User Guide
Focal length Image FOV Images required
35 mm 50
Image layout One image at +90° pitch; 12 images every 30° at
+60° pitch; 12 images every 30° at 20° pitch; 12
images every 30° at –20° pitch; 12 images every 30°
at –60°; one image at–90° pitch
49
TM
Focal length Image FOV Images required
8 or
10.5 mm
3-8 depending on the
camera
(fisheye lens)
Image layout 3 or 6 images at 0 pitch; 1 at +90° pitch; 1 at –90°
pitch
Photograph overlap
Stitcher requires an overlap of about 30% between adjacent images. The number of
images you need to take to achieve 30% overlap will depend on the FOV of the lens you
are using. Wide-angle lenses are usually preferred for capturing spherical panoramas
because they reduce the total number of images required.
Page 60

50
Chapter 3
User Guide
Shooting the panorama
In addition to your rows of images, in most cases you will also want to capture one
image straight up (+90°) and one straight down (–90°). By taking a shot straight up,
you ensure that the upper region of the panorama blends well with the images that
compose the topmost row.
Taking a shot straight up will also guarantee that your panorama does not end up with
a hole (black space) at the zenith.
By capturing a handheld shot downward, without the tripod, you can eliminate the
tripod from your scene. These images will be stitched together just like all the other
images in your panorama. If the tripod is visible in some of your shots, you can remove
it using the Stencil Tool (see
Figures A and B demonstrate the technique for capturing straight up and down images.
In figure A, capture a shot straight up to make sure you get complete coverage of the
scene; in figure B, take a handheld shot straight down without the tripod. Keep the
camera at the same height it was when mounted on the tripod.
“Stencils” on page 126).
You may need to try capturing a panorama without using a tripod or pan head. To
guarantee good results from a handheld panorama, you should be aware of the
following points:
Use a wide-angle lens to reduce the number of images required
Capture sufficient overlap between images
Page 61

Stitcher
User Guide
Avoid parallax. When you reposition the camera for each shot, try to pivot your body
around the camera (as opposed to standing in the same spot and pivoting the camera
around you)
The goal is to photograph the scene while keeping the camera at the same point in
space. Reducing parallax will ensure that the images stitch properly.
Figures A and B below demonstrate the handheld shots technique for reducing
parallax:
51
TM
Figure A shows the incorrect position. Do not pivot the camera around your body - this
will cause parallax between images. Figure
B shows the correct position. Keep the
camera in the same place, and pivot your body around the camera.
Camera settings
To achieve optimal results, all images in your panorama should be shot consistently. Set
your camera to manual exposure and manual focus and make sure the white balance
setting is not on automatic mode. This is to ensure that the images blend together
seamlessly in the final panorama. If you are scanning film, be sure to scan each image
using the same settings.
Tips for taking shots
Avoid the following when you take your shots:
Trees with moving leaves
Blue skies without clouds or with moving clouds
Page 62

52
Chapter 3
User Guide
Zooming between your shots
In interiors, if you have white walls and ceiling, incr ease the overlap to have he more
textures in common.
Also, interior panoramas could have stark lighting natural lighting contrast between
the backs of rooms and windows. In this situation it is best to try to shoot HDR
images (see “Loading HDR images” on page 80)
Page 63

Stitcher projects
A Stitcher project is any set of stitched images. Any Stitcher session can be a project and
can be saved withSelect the file extension *.rzs (Windows).
To start a new project, do one of the following:
Select File > New.
Click .
To open a project:
1 Do one of the following:
Select File > Open.
Click .
Stitcher
User Guide
53
TM
2 Select the project that you want to open.
3 Click Open.
NOTE Select File > Recent Files and choose from the four last saved files (Windows).
To s ave a pr oj e c t:
1 Select File > Save As. The Save As browser opens.
2 Enter a file name, select the destination directory for your project and click Save.
TIP When you have saved your project once, click to re-save it.
NOTE To revert to the last saved version of your project, Select
File > Revert.
Page 64

54
Chapter 3
User Guide
The Stitcher workflow
The Stitcher workflow takes you through the stages to create a panorama, including
removal of artifacts, color adjustment, and the creation of hotspots for the Web. For more
information, see
During the workflow, you can:
Define Stencil regions for images that contain artifacts (see “Stencils” on page 126).
Drag images and stitch them together using automatic stitching (see “Automatic
stitching” on page 105).
“The 5-phase Stitcher Workflow” on page 16.
Adjust the camera regularly (see “Evaluating focal length” on page 117).
Close the panorama (see “Closing the first row of a panorama” on page 120).
Run the luminosity correction tool (see “Equalizing images” on page 139).
Define hotspots (see “Hotspots” on page 141).
Align the panorama (see “Aligning the panorama” on page 133).
Render and export the final panorama (see “Rendering Your Project” on page 149).
Page 65

Preferences
You can set various project and display preferences in the Preferences dialog. For
example, in the Colors page, you can change the default colors of the interface and in
the Display page, you can define the thumbnail and maximum texture size.
To s how t he Preferences dialog, select Edit > Preferences or press P:
Stitcher
User Guide
55
TM
Changes in the Preferences settings are automatically saved in an initialization file in
the local settings folder.
If you are running Stitcher from a network drive and you do not have permission to
write on that drive, you will be prompted for a location to save the preferences file.
Page 66

56
Chapter 3
User Guide
Setting the temporary files directory
Stitcher needs to create temporary files to operate. By default, these files use the default
system temporary directory, but you can change it and choose specifically where you
want to put the temporary files.
To set the temporary files directory:
1 Select Edit > Preferences and select External Links.
2 Click Temporary files ... to set the temporary files directory.
3 Browse to the directory and click OK. Stitcher
“RzTempFiles” folder to your selected directory.
4 Select Default to return to the default temporary file directory.
NOTE When you render a PSD or multi tiff file and you do not specify a temporary file
directory, Stitcher
your files will be saved in the specified temporary directory. You can also delete the
temporary directory each time you close Stitcher by checking the Clean Temporary Files
on Exit
option.
creates these files in the same directory as your rendered files. Otherwise,
will automatically add a
Page 67

Stitcher
User Guide
Setting the blending application
You can use an external tool for blending your images. To set the external blending
editor:
1 Select Edit > Preferences and select External Links.
57
TM
2 Click Blending Software ... to set the blending software directory.
3 Browse to the external blending editor (only Enblend (XBlend) and Smartblend are
supported).
4 Click Open. The external application is set.
Editing in an external application
You can edit your images in an external application before rendering by following a
similar process as for blending. To set the external image editor:
1 Select Edit > Preferences.
2 Click the External Links tab.
3 Click Image Editor ... to set the image editor directory.
4 Browse to the external image editor.
5 Click Open. The external application is set.
Page 68

58
Chapter 3
User Guide
Modifying the display of images
After you have loaded images into Stitcher (see “Loading images” on page 77), colored
frames appear around the images as you select, move, and stitch them. These colors can
be set in preferences. You can also have Stitcher move an image as a frame rather than
redrawing the entire image. Or you can decrease the size of the texture, which reduces the
amount of processing power required to redraw.
You can also adjust the transparency of images to be able to see through them to better
overlap and align them.
NOTE All of these modifications affect only the display of the images, not the images
themselves.
Changing the frame color
To change the frame color of a selected or stitched image:
1 Select Edit > Preferences:
2 In the Colors tab, select either: Stitched Frame, Selected Frame or Manual
Stitched Frame.
3 Pick a new color, then click OK to close the Color dialog.
4 Click OK to close the Preferences dialog.
Page 69

TM
Stitcher
User Guide
Moving images as a frame
Moving images as a frame temporarily removes the content of the images to speed up
the redrawing process as you move images or pan, zoom, or roll your view.
59
NOTE To retain the content of images, but reduce the drain on processor performance,
change the texture size (see “Changing the texture size” on page 61).
Page 70

60
Chapter 3
User Guide
To move images as a frame:
1 Select Edit > Preferences.
2 In the Display tab, click Move As Frame:
3 Click OK.
Page 71

TM
Stitcher
User Guide
Changing the texture size
The quality of display depends on the resolution of your images and the quality of your
graphics card. The higher the resolution, the better the display quality, but performance
suffers since large amounts of video memory are required to redraw the image.
NOTE Reducing the texture size affects only the display and not the quality of the stitching
or the rendered panorama.
To c han ge t h e te xtu re s ize :
1 Select Edit > Preferences.
2 In the Display tab, select an option from the Max. Texture Size drop-down list:
61
NOTE Max. Texture Size defines the image definition display quality as stored in the buffer
of your video card. A low value gives better movement but lower definition. The default
value is 512.
3 Click OK.
Page 72

62
Chapter 3
User Guide
Changing the Stitching Window background color
The background appears gray by default. To change the Stitching Window background
color:
1 Select Edit > Preferences. The Preferences dialog appears.
2 Select Colors.
3 Click the Stitching Window box to show the Color dialog.
NOTE If you want to change the color of the Stitching Window in either the
Hotspot, Close Panorama, or Align Panorama modes, click the Interactive Modes
box.
4 Pick a new color, then click OK.
5 Click OK to close the Preferences dialog.
Page 73

TM
Stitcher
User Guide
Adjusting the transparency of images
Adjust the transparency of images to be able to see through them. A value of 1 gives an
opaque image. To reduce the opacity of the image, reduce the value in this field.
To adjust the transparency of images:
1 Select Edit > Preferences.
2 Select Display, and then enter a value between 0 and 1 in the Blending field.
63
3 Click OK.
Page 74

64
Chapter 3
User Guide
Displaying HDR images
An HDR image cannot be displayed correctly on modern monitors because the image
dynamics are too large. To be able to visualize this kind of image, the entire dynamics
need to be reduced to display only a part of them. Stitcher uses a special feature of a
computer’s video graphics card that is able to display 32-bit (HDR) images. You will
only see a subset of the image dynamics at one time, but you can change this subset.
Another way to display HDR images is to use a tone mapping algorithm, which maps
the entire HDR dynamics on a low dynamic image, i.e., an 8-bit image, which can be
displayed on any monitor.
WARNING If you want to display a 32-bit image, make sure that your video card is able to do
so. You need at least 128 Mb of video memory. You can change the display type in
Preferences > HDR with the Display 32-bit images option.
Changing the exposure
You can change the exposure of one or several selected HDR images or all HDR images
if none are selected by pressing Shift+Page Up to increase the exposure and
Shift+Page Down to decrease the exposure.
If you want to go back to the initial, press Shift+HOME.
You can set the exposure step in Preferences > HDR.
NOTE Regenerating a large number of HDR image textures can take a long time. Select at
least one image and do a test to see if the calculating time is acceptable.
Page 75

TM
Stitcher
User Guide
Displaying the Live Preview
The Display Live Preview option in the Preview page of the Preferences dialog toggles
the display of the Live Preview in the Stitching Window (press Spacebar as a
shortcut).
65
Settings in the Preview page of the Preferences dialog determine the display of the
Live Preview as either a flat cubic, cylindrical, or spherical panorama and the size of
the preview window as small, normal, or large.
You can switch on the different modes (cubical, spherical, cylindrical, snapshot) by
right clicking in the Live Preview and choosing the mode.
You c an resi z e t h e Live Preview by dragging the small arrows at the bottom left of the
Live Preview. A double-click on the small arrows displays the Live Preview in full
screen. Another double-click takes it back to its original size.
Page 76

66
Chapter 3
User Guide
Managing memory
After installing Stitcher, you should set the Stitcher memory management preferences.
Settings in the Memory page of the Preferences dialog determine the memory
management.
Page 77

TM
Stitcher
User Guide
Setting the Cache Size
Use the Image Cache Size sliding scale in the Memory page of the Preferences dialog
to set the maximum usage of your RAM by Stitcher. The default setting should be
sufficient for your projects. This memory cache contains the input images. Sometimes
before rendering, it will be helpful to decrease its value toward 0% to leave more
memory for the render, but it is not recommended that you change this setting unless
you are an advanced user.
Stitcher reserves some memory for its own internal use. This slider takes this internal
memory into account.
Managing the Undo Buffer
In Stitcher, Select Edit > Undo or Edit > Redo to undo or redo the last action
performed.
The Undo Buffer holds data required to undo/redo actions. However, the number of
actions is unlimited and the Undo Buffer can take up a large proportion of your
system’s memory.
67
To reduce the demand that the Undo Buffer makes on the memory cache, the Clear
Undo Buffer on Save option in the Memory page of the Preferences dialog is checked
by default. This option flushes the Undo Buffer every time you save your project to
disk.
Page 78

68
Chapter 3
User Guide
Setting the Manual Stitch Magnifier
In the Other tab of the Preferences dialog, you can set the zoom and the size of the
Magnifier display when you do a manual stitch:
Setting the GPU preferences
The GPU (Graphic Processor Unit) is the processor of the graphics card. The GPU can
do real time blending of the stitched images in the Stitching Window and in the Live
Preview if the Real Time Linear Blending is checked.
NOTE To see the real time blending, no image should be selected. To unselect all the
images, press Shift+D.
The Render GPU Tile Size option allows you to define the size of the tiles you want
processed by your GPU. Images will be broken down into tiles so that the processor can
render images in smaller pieces, using the memory more efficiently.
Page 79

Stitcher
User Guide
The following image shows stitched images in the Stitching Window without GPU
Real Time Linear Blending:
69
TM
Page 80

70
Chapter 3
User Guide
The following image shows stitched images in the Stitching Window with GPU Real
Time Linear Blending
A appears at the bottom right of the Stitching window if your graphics card includes
a powerful enough GPU. The icon appears crossed ( ) if:
the GPU Real Time Linear Blending option is disabled (Preferences > GPU)
your graphics card’s GPU is not powerful enough
also if you have one or more images selected
Page 81

The interface
Stitching Window
Status
Indicators
Main Menu
To o l b a r
Thumbnails
Live Preview
General
Information
The Stitcher interface is composed of the following elements:
Stitcher
User Guide
71
TM
NOTE Toggle Full Screen mode by going to Windows > Full Screen or
press CTRL + Shift + F.
Page 82

72
Chapter 3
User Guide
The Main Menu
The main menu contains all of Stitchers commands. Shortcuts available to main menu
options are shown next to the function. See
“Stitcher Command shortcuts” on page 37
for more information about shortcuts.
NOTE Some main menu functions are available directly through toolbar icons.
The Toolbar
The Too lb a r contains a set of contextual toolbars for working through the Stitcher fivephase workflow (see
“The Stitcher workflow” on page 54):
The Stitching Window
The Stitching Window comprises the entire Stitcher interface. The Stitching Window
is the environment that you use to build your panoramic view.
The size of the sphere is determined by the focal length of the camera you used to shoot
your images.
Page 83

TM
Stitcher
User Guide
Thumbnail View
When you load images, the image thumbnails appear in the bottom half of the Stitcher
interface. You can drag thumbnails to the Stitching Window to stitch them. See “Phase
1: Loading images” on page 17 for more information.
Status Indicators
The and the symbols to the right of the Thumbnail View indicate the status of
how you’re working with your image files and your panorama (the symbols are not
displayed at all unless they’re relevant to what you’re doing). The
shows whether
you’re using your computer’s GPU for processing (see “Setting the GPU preferences”
on page 68 for more information), and the shows whether you’ve aligned your
panorama and locked your vertical and horizontal panning option (see “Setting the
horizon in the Align Panorama mode” on page 133 for more information).
73
Page 84

74
Chapter 3
User Guide
General Information
The General Information box provides useful image information right in the 3D
working area (Stitching Window).
To display or hide the general information box, do one of the following:
Select View > Display > General Info
From the Live Preview, click the white plus symbol to display General Info, or click
the white cross symbol to hide General Info.
Page 85

TM
Stitcher
User Guide
The Live Preview
The Live Preview window displays a cubic, cylindrical, spherical, or snapshot preview
of your panorama in the top right corner of the Stitching Window:
As you stitch and manipulate your images in the Stitching Window, the Live Preview
also updates, giving you an idea of your final panorama in real time.
75
The Live Preview is a real time visualization of your working area according to the
projection chosen.
Use the shortcut Shift+L to switch on/switch off the Live Preview.
You can switch on the different modes (cubical, spherical, cylindrical, snapshot) by
right-clicking in the Live Preview and choosing the right mode.
You c an resi z e t h e Live Preview by dragging the small arrows at the bottom left of the
preview. Press the spacebar to toggle between full screen Live Preview and its original
size.
Page 86

76
Chapter 3
User Guide
The Image Strip
As in previous versions of Stitcher, the Image Strip appears in the bottom half of the
Stitcher
the Thumbnail View or the Image Strip to the Stitching Window and stitch them and
undock the Image Strip to place it in the Stitching Window.
The Image Strip is also used with the smart blending function to find automatically
the image containing the most information in the overlap area between the images.
To rearrange thumbnails in the Image Strip, see “Modifying the display of thumbnails”
on page 94.
To clo se the Image Strip, click Close in the left corner of the Image Strip (Windows)
or the right corner (Mac).
interface when you select Window > Image Strip. You can drag images from
Toggle the Image Strip display by selecting Window > Image Strip from the menu.
Double-click the left side bar of the Image Strip to undock it.
To change the background color of the Image Strip:
1 Select Edit > Preferences.
2 Click the Colors tab.
3 Click on the Image Strip color box and select a new color.
4 Click OK to select it and close the Color dialog.
5 Click OK to close the Preferences dialog.
Page 87

Preparing images for stitching
Loading images
The first step when using Stitcher is to load the image files that Stitcher supports.
Import formats Extension
Stitcher
User Guide
77
TM
Cineon
#
*.cin
JPEG *.jpg, *.jpeg
Maya® Image Files
#
*.iff, *.tdi
OpenEXR *.exr
Photoshop
Portable Network
Graphics
®
*.psd
*.png
#
Portable Pixelmap *.ppm,
*.pgm, *.pnm
Radiance *.hdr
SGITM Image Files
Softimage® Picture
#
*.sgi, *.rgb
*.pic
Files
Tagged Im age Fi le
Format
#
*.tiff, *.tif
Tru ev is ion Ta rga *.tga
Windows Bitmap *.bmp
#
8-bit and 16-bit images; n/a, not applicable
Page 88

78
Chapter 3
User Guide
Images must be the same size in pixels and the same pixel depth. They must have been
shot with the same focal length. To load your images:
1 Do one of the following:
Select File > Load Images.
Click .
The Load Images browser opens:
2 Use the drop-down list of the Files of type (Windows) or Show (Mac) field to show
only the image files of the type that you want to load, or select All Files to view all
the files in the folder.
3 Select an image to load it or select more than one image file to load by doing one of
the following:
To load more than one image, click one image file you want to load, then Ctrl+click
(Windows) or Shift+click (Mac) the other image files you want to load. The image
files are highlighted.
Page 89

TM
Stitcher
User Guide
To load all images in the Load Images list, press Ctrl+A (Windows) or
Command+A (Mac). All images files are highlighted.
4 Click Open to load the images into the Thumbnail View.
TIP Alternatively, drag the images directly from Explorer (Windows) or Finder (Mac) directly
into the Stitching Window.
NOTE The time taken to load images depends on the size of the images.
If you want to stop loading images, click Cancel in the Loading Images dialog.
When loading finishes, Stitcher displays the images in the Thumbnail View and in the
Image Strip.
79
If Stitcher can read the EXIF data, a popup appears asking you if the automatic choice is
satisfactory. If not, click No to edit the settings.
Page 90

80
Chapter 3
User Guide
Loading HDR images
Stitcher can load high-dynamic range (HDR) images in the OpenEXR (.exr) and
Radiance (.hdr) file formats.
HDR images are created in a software such as Photomatix® from several photographs
with various exposures, for example, one shot with dark light intensity, one with
medium light intensity, and another with high light intensity. You can then import the
image into Stitcher.
Depending on the display mode (see Preferences > HDR), the images are displayed as
a tone-mapped version (8 bits) or a full 32-bit image. The thumbnails are always
displayed as a tone-mapped image.
NOTE An icon appears in the bottom right corner indicating that the images are HDR
images.
Loading HDR image (.hdr or .exr) is the same as for another format image. The image
displayed is at an intermediate exposure. You can increase or decrease the exposure
with Shift+PageUp or PageDown. The step is defined in the Preferences > HDR page.
Loading fisheye images
When you load fisheye images, if you have checked in the preferences Read focal from
EXIF data, the software tries automatically to calibrate the images and asks if you want
to keep the setting or not.
The Properties dialog opens and you can then calibrate the fisheye image with the red
circle (see
“Fisheye images” on page 101).
Page 91

Setting the camera parameters
The camera parameters are modified using the Properties dialog.
To open the Properties dialog, Select Edit > Properties.
The Properties dialog opens in the Camera tab.
Stitcher
User Guide
81
TM
The Camera page represents the properties relevant to the camera with which you
took your images. You need to choose the lens type that you used to take the shots:
rectilinear, or fisheye circular or fisheye full-frame or sunex. Rectilinear is the default
value (see “Fisheye images” on page 101 for information on full-frame and circular
images).
The Viewing Camera page allows you to modify your on-screen display. You can
rotate and magnify your images.
The Hotspot page allows you to link hotspots to any URL and define pan, tilt, and
zoom parameters for a target panorama.
Page 92

82
Chapter 3
User Guide
Image resolution
The Properties dialog shows three read-only fields: Width, Height, and Ratio that
describe the size of the loaded image. Ratio is the value of the width divided by the
height. When an image is displayed on different screens, the aspect ratio must be kept
the same to avoid stretching in either the vertical or the horizontal plane.
Relationship between image property values
Field of view (FOV) is determined by the focal length of the lens and the size of the film
back. For instance, a 25 mm lens for a 24 × 36 camera would be exactly equivalent to a
50 mm for a 48 × 72 camera.
The same lens produces a different FOV for different film back values.
For example, the figure below shows the default film back and focal length values:
In the next figure, increasing the film back value decreases the focal length and
increases the FOV. If you increase the focal length, but keep the same film back value,
the FOV decreases:
Page 93

TM
Stitcher
User Guide
Rectilinear lens properties
If you choose rectilinear in the drop-down menu of the Camera Properties box, the
following parameters can be set.
Film back values
The film back value is the size of your film. For instance, a Reflex camera has a film
back height of 24 mm and a film back width of 36 mm. Digital cameras do not have
film, but they have a CCD sensor that plays the same role. However, to be able to
compare the focal length of the lenses, this value is converted to an equivalent film back
size.
The default settings for Stitcher film back height and width values are 24 mm and
36
mm, respectively. You can change these values according to your project.
NOTE Modifing these values is not recommended unless you are an advanced user.
83
Focal length
The focal length is the distance from the lens to the film back.
When you load an image, Stitcher assigns the focal length defined in the Preferences
dialog.
The focal length value has a direct effect on the angle and the size of the sphere in the
Stitching Window: a larger focal length gives a larger sphere size.
You may want to change the focal length if you have an idea of its value, but in most
cases, you can run Adjust Camera Parameters and Stitcher
will calculate it for you (see
“Evaluating focal length” on page 117).
To change the focal length:
Page 94

84
Chapter 3
User Guide
1 In the Properties dialog, set the Focal Length parameter type to Fixed if you know
the exact value. If you do not know the exact value, select Initialized and Stitcher
will estimate the parameter value.
2 Enter a value in the Focal Length field and press the Ta b key on the keyboard.
As the focal length and the angle are proportional, Stitcher automatically computes the
values in the text field degrees and adjusts your images.
NOTE If you prefer to work with the Viewing Angle, you can modify this value directly. The
focal length in millimeter will be calculated automatically by Stitcher.
The default focal length is set in the Preferences dialog. If camera information is
available for the images, you can select the Read Focal from EXIF data checkbox and
Stitcher will initialize the focal length value for each new project:
Page 95

TM
Stitcher
User Guide
Sensor shift values
The sensor shift value helps to compensate the displacement of the sensor with regard
to the optical center of the lens. In modern digital cameras, the sensor is not usually
exactly centered with the camera axis.
To change the sensor shift values:
1 If you know the exact value for the Sensor Shift select the parameter type Fixed
from the drop-down list. Otherwise, select Initialized.
2 Enter a value in the x and y fields to set the displacement and press the Tab key on
the keyboard.
NOTE The parameters are calculated automatically when the camera is adjusted. The
parameters can change from one panorama to another; the adjustment is specific to each
project.
85
Distortion values
Lens distortion causes straight lines in images to appear curved. If a picture is taken of
a square that almost fills the film area, the edges of the box are rarely perfectly straight
and the center of each side of the image will bow slightly inward or outward.
Zoom lenses may typically exhibit a positive linear distortion at their shortest focal
length and a negative one at the longest focal length. The default value is set to no
distortion. However, taking distortion into account improves the accuracy of the
camera calibration.
TIP If your images are too distorted, calibrate them first (see “Stitching highly distorted
images” on page 116). In this case, the distortion edit field shows the residual distortion that
calibration failed to correct.
Page 96

86
Chapter 3
User Guide
To change the distortion value:
1 If you know the exact value for the Distortion select the parameter type Fixed from
the drop-down list. Otherwise, select Initialized.
2 Enter a value in the Distortion field and press the Tab key on the keyboard.
To toggle distortion display:
By default, the images are displayed with their own distortion, and the values are shown
in the Properties dialog. Even without changing these values, you can display the
images without any distortion.
1 Select Edit > Preferences. The Preferences dialog appears with the Display tab
shown.
2 Uncheck the View Distorted Images option to display images without distortion:
NOTE If you choose fisheye lens in the drop-down menu of the Camera Properties box, see
“Fisheye images” on page 101 for information on full-frame and circular images.
Page 97

Stitcher
User Guide
Fisheye lens properties
Before stitching fisheye images, you need to define the camera lens type and the
associated properties: the radius, the angle, the distortion, and the circle center.
The camera parameters are modified using the Properties dialog.
1 Click on an image and Select Edit > Properties to open the Properties dialog:
The Camera page represents the properties relevant to the camera with which you
took your images.
87
TM
2 The default setting in the Camera Lens Type drop-down list is Rectilinear. Change the
option to either Fisheye Full Frame, Fisheye Circular or Sunex. The Circular, Radius,
Angle, and Distortion values are updated accordingly.
NOTE An appears in the Stitching Window signifying that you are in Fisheye Mode.
Page 98

88
Chapter 3
User Guide
Flat stitch properties
The Stitcher engine works best on images taken in the same plane, for example,
scanned images. A flat stitch is a series of images, where the camera moves in parallel to
the plane of the object being captured.
This type of stitch can be simulated using images that have a very high focal length.
The stitching workflow is the same as for stitching images not taken on the same plane.
However, before stitching any images, you should set the Focal Length status in the
Properties dialog to Flat Stitch.
This option is not available for fisheye lens.
NOTE You can only render flat images as a snapshot projection. The Adjust Camera
Parameters, Close Panorama, Align Panorama, and Hotspot Creation Mode options are
disabled.
To set the focal length:
1 Select Edit > Properties.
2 In the Camera page, select Flat Stitch from the Focal Length drop-down list:
3 Continue the stitch as usual.
Page 99

Manipulating images
16-bit
image
unstitched, stitched,
or manual stitched
image with
stencil polygon
image with
psd stencil
The Stitching Window is a sphere and as you place and stitch images, you can look
around in it by using navigation controls. You can also set the camera orientation
precisely with numerical values.
About thumbnail lines and markers
As you work with images, colored frames, lines, and markers show the status of images
and the relationship between them.
Indicator markers
Indicator markers in the thumbnails display the status of the corresponding image in
the Stitching Window:
Stitcher
User Guide
89
TM
Page 100

90
Chapter 3
User Guide
Stitched images - A green indicator marker indicates that the image in the Stitching
Window is stitched (see “Changing the frame color” on page 58).
Unstitched images - Thumbnails that you select in the Stitching Window have a red
indicator marker until you stitch the image, then the marker changes to green.
Manually stitched images - Manually stitched images have a yellow indicator
marker in the corresponding thumbnails (see “Manual stitching” on page 110).
Force-stitched images - Force-stitched images have an orange indicator marker in
the corresponding thumbnails (see “Manual stitching” on page 110).
 Loading...