

Autodesk 15606-011408-9320 - MAPGUIDE R6.3 CPU MODEL-UPG 4/5 MIN 2 CPUS INITL, MAPGUIDE User Manual
Page 1
USER’S GUIDE
15505-010000-5020 July 2000
Page 2

Copyright © 2000 Autodesk, Inc.
All Rights Reserved
This publication, or parts thereof, may not be reproduced in any form, by any method, for any purpose.
AUTODESK, INC. MAKES NO WARRANTY, EITHER EXPRESSED OR IMPLIED, INCLUDING BUT NOT LIMITED TO ANY IMPLIED
WARRANTIES OF MERCHANTABILITY OR FITNESS FOR A PARTICULAR PURPOSE, REGARDING THESE MATERIALS AND MAKES
SUCH MATERIALS AVAILABLE SOLELY ON AN "AS-IS" BASIS.
IN NO EVENT SHALL AUTODESK, INC. BE LIABLE TO ANYONE FOR SPECIAL, COLLATERAL, INCIDENTAL, OR CONSEQUENTIAL
DAMAGES IN CONNECTION WITH OR ARISING OUT OF PURCHASE OR USE OF THESE MATERIALS. THE SOLE AND EXCLUSIVE
LIABILITY TO AUTODESK, INC., REGARDLESS OF THE FORM OF ACTION, SHALL NOT EXCEED THE PURCHASE PRICE OF THE
MATERIALS DESCRIBED HEREIN.
Autodesk, Inc. reserves the right to revise and improve its products as it sees fit. This publication describes the state of this product at
the time of its publication, and may not reflect the product at all times in the future.
Autodesk Trademarks
The following are registered trademarks of Autodesk, Inc., in the USA and/or other countries: 3D Plan, 3D Props, 3D Studio, 3D Studio
MAX, 3D Studio VIZ, 3DSurfer, ActiveShapes, Actrix, ADE, ADI, Advanced Modeling Extension, AEC Authority (logo), AEC-X, AME,
Animator Pro, Animator Studio, ATC, AUGI, AutoCAD, AutoCAD Data Extension, AutoCAD Development System, AutoCAD LT,
AutoCAD Map, Autodesk, Autodesk Animator, Autodesk (logo), Autodesk MapGuide, Autodesk University, Autodesk View, Autodesk
WalkThrough, Autodesk World, AutoLISP, AutoShade, AutoSketch, AutoSurf, AutoVision, Biped, bringing information down to earth,
CAD Overlay, Character Studio, Design Companion, Drafix, Education by Design, Generic, Generic 3D Drafting, Generic CADD, Generic
Software, Geodyssey, Heidi, HOOPS, Hyperwire, Inside Track, Kinetix, MaterialSpec, Mechanical Desktop, Multimedia Explorer, NAAUG,
ObjectARX, Office Series, Opus, PeopleTracker, Physique, Planix, Powered with Autodesk Technology, Powered with Autodesk
Technology (logo), RadioRay, Rastation, Softdesk, Softdesk (logo), Solution 3000, Tech Talk, Texture Universe, The AEC Authority, The
Auto Architect, TinkerTech, VISION*, WHIP!, WHIP! (logo), Woodbourne, WorkCenter, and World-Creating Toolkit.
The following are trademarks of Autodesk, Inc., in the USA and/or other countries: 3D on the PC, ACAD, Advanced User Interface, AEC
Office, AME Link, Animation Partner, Animation Player, Animation Pro Player, A Studio in Every Computer, ATLAST, Auto-Architect,
AutoCAD Architectural Desktop, AutoCAD Architectural Desktop Learning Assistance, AutoCAD Learning Assistance, AutoCAD LT
Learning Assistance, AutoCAD Simulator, AutoCAD SQL Extension, AutoCAD SQL Interface, Autodesk Animator Clips, Autodesk
Animator Theatre, Autodesk Device Interface, Autodesk Inventor, Autodesk PhotoEDIT, Autodesk Software Developer's Kit, Autodesk
View DwgX, AutoFlix, AutoPAD, AutoSnap, AutoTrack, Built with ObjectARX (logo), ClearScale, Combustion, Concept Studio, Content
Explorer, cornerStone Toolkit, Dancing Baby (image), Design 2000 (logo), DesignCenter, Design Doctor, Designer's Toolkit, DesignProf,
DesignServer, Design Your World, Design Your World (logo), Discreet, DWG Linking, DWG Unplugged, DXF, Extending the Design
Team, FLI, FLIC, GDX Driver, Generic 3D, Heads-up Design, Home Series, iDesign, i-drop, Kinetix (logo), Lightscape, ObjectDBX,
onscreen onair online, Ooga-Chaka, Photo Landscape, Photoscape, Plugs and Sockets, PolarSnap, Pro Landscape, QuickCAD,
SchoolBox, Simply Smarter Diagramming, SketchTools, Suddenly Everything Clicks, Supportdesk, The Dancing Baby, Transform Ideas
Into Reality, Visual LISP, Visual Syllabus, VIZable, Volo, Where Design Connects, and Whereware.
Third Party Trademarks
Apple and Macintosh are trademarks of Apple Computer, Inc., registered in the U.S. and other countries
ColdFusion is a registered trademark of Allaire Corporation. All rights reserved.
Java and all Java-based trademarks and logos are trademarks or registered trademarks of Sun Microsystems, Inc. in the United States and
other countries.
Netscape and Netscape Navigator are registered trademarks of Netscape Communications Corporation in the United States and other
countries.
Microsoft and ActiveX are registered trademarks of Microsoft Corporation in the United States and/or other countries.
All other brand names, product names or trademarks belong to their respective holders.
Third Party Software Program Credits
Copyright © 2000 Microsoft Corporation. All rights reserved.
Portions of this product are distributed under license from D.C. Micro Development, © Copyright D.C. Micro Development. All rights
reserved.
InstallShield ™ Copyright © 2000 InstallShield Software Corporation. All rights reserved.
Portions Copyright Qualitative Marketing Software Inc., 2000. All rights reserved.
This product includes software developed by the Apache Software Foundation (http://www.apache.org/).
GOVERNMENT USE
Use, duplication, or disclosure by the U. S. Government is subject to restrictions as set forth in FAR 12.212 (Commercial Computer
Software-Restricted Rights) and DFAR 267.7202 (Rights in Technical Data and Computer Software), as applicable.
1 2 3 4 5 6 7 8 9
Page 3

Contents
Chapter 1 Introduction 9
Overview 10
Key Features of Autodesk MapGuide 10
Autodesk MapGuide Viewer Key Features 10
Autodesk MapGuide Author Key Features 11
Autodesk MapGuide Server Key Features 12
What’s New in Release 5? 12
What’s New in Autodesk MapGuide Author 5? 13
What’s New in Autodesk MapGuide Server 5? 14
What’s New in Autodesk MapGuide Viewer 5? 15
System Requirements 16
Autodesk MapGuide Author Requirements 16
Autodesk MapGuide Server Requirements 16
Autodesk MapGuide Viewer Requirements 17
What’s the Fastest Way Through This Book? 18
Conventions Used in This Manual 21
Where to Get More Information 22
Autodesk MapGuide Documentation 22
Third-Party Documentation 24
Autodesk MapGuide Web Site 24
Online Discussion Groups 25
Autodesk Developer Network 25
Chapter 2 Understanding Autodesk MapGuide 27
What Is Autodesk MapGuide? 28
Understanding Layers 28
How Autodesk MapGuide Works 29
How Autodesk MapGuide Components Work Together 30
Map Authoring Components 31
Autodesk MapGuide Author 31
Autodesk MapGuide Data Extensions 31
Autodesk MapGuide SDF Loader 31
Autodesk MapGuide SDF Component Toolkit 32
Autodesk MapGuide Raster Workshop 32
iii
Page 4

Map Viewing Components 33
Web Browser 33
Autodesk MapGuide Viewer 33
Autodesk MapGuide LiteView Extension 34
Map Serving Components 34
Web Server 34
Autodesk MapGuide Server 34
Application Development Components 35
Client-Side Application Components 36
Server-Side Applications 38
What Is Autodesk MapGuide Application Development? 40
Overall Strategy 41
Phase One: Installation and Testing 41
Phase Two: Planning and Design 42
Phase Three: Implementation 43
Chapter 3 Designing Your System 45
Planning Your Directory Structure 46
Directory Structure Guidelines 46
Security 48
Using Windows NT or Windows 2000 Security 48
Using Web Server Security 48
Using Autodesk MapGuide Security 49
Architecture and Performance 51
Which MapAgent to Install 51
Using a Remote MapAgent 52
Using Multiple Servers 53
Additional Performance Considerations 57
Choosing a Viewer/Browser Environment 59
Chapter 4 Assembling and Administering Your Server 63
Setting Up Your Server 64
Before You Install Autodesk MapGuide Server 64
Installing Microsoft Internet Information Server 66
Installing a Netscape Web Server 66
Testing Your Web Server 67
Setting Up the MapAgent 67
Installing a Report Engine 71
Configuring Autodesk MapGuide Server under a Different Account 71
Autodesk MapGuide Server Admin Overview 71
Starting and Stopping the Server 72
Setting Autodesk MapGuide Server Properties 73
iv | Contents
Page 5

Setting General Server Properties 74
Setting Up Your Data Sources 74
Managing Your Data Sources 75
Managing Server Security 76
Access Keys Versus User IDs and Passwords 76
Choosing the Best Security Method 77
Creating and Modifying Users and Groups 78
Assigning Users to the Authors Group 79
Creating and Modifying Access Keys 80
Restricting Access to Resources 81
Taking Data Sources Offline 82
Tracking Server Requests 83
Log Files 83
Usage Reports 84
Renaming Log Files 85
Rotating the Log Files 85
Customizing the Access Log 86
Customizing the Map Layer Access Log 86
Adding Geocoding Data 87
Chapter 5 Working with Data in Autodesk MapGuide 89
Basic Steps for Working with Data 90
Working with Spatial Data 90
Map Features 91
Creating a Spatial Data File 92
Working with Attribute Data 93
Linking Attribute Data to SDFs 93
Linking Attribute Data to Another Database 94
Preparing Attribute Data for Themes 94
Setting Up Your Attribute Database 95
Zoom Goto Data 96
Working with Raster Images 97
Raster Image File Formats 97
Tiled TIFFs 98
Raster Image Catalog Files 98
Georeference File Formats 100
Exporting from ER Mapper 104
Adding Raster Images to Your Map 104
Working with Symbols 104
Working with Other Types of Spatial Data 105
Spatial Data Providers 105
VISION* Theme Data 105
Contents | v
Page 6

Chapter 6 Planning and Designing Maps 109
Planning the Data 110
Planning Layers 110
Designing the Map 112
About Coordinate Systems 112
About Coordinate Precision 113
Choosing a Coordinate System 113
Creating a Design Spreadsheet 114
General Guidelines 115
Information You Need from Your Autodesk MapGuide Server
Administrator 116
Chapter 7 Getting Familiar with Autodesk MapGuide Author 117
Installing Autodesk MapGuide Author 118
Starting Autodesk MapGuide Author 119
About Map Window Files (MWFs) 120
Introduction to the Program Window Layout 120
Using the Map Window Popup Menu 121
Using the Toolbar 123
Setting Preferences 125
Opening a Map 126
Moving Around on a Map 126
Zooming to a Location 128
Zooming to a US Street Address or ZIP Code 128
Using Bookmarks to Save the Current Map View 129
Using the Map Explorer 129
Using the Design Tab 130
Using the View tab 131
Changing the Width of the Map Explorer 132
Viewing Map Information 132
Measuring Distances 133
Selecting Map Features 134
Creating Buffers around Map Features 135
Printing a Map 135
vi | Contents
Page 7

Chapter 8 Creating and Publishing a Map 137
Creating a New Map 138
Changing the File to Use for New Maps 138
Specifying a Coordinate System 138
Specifying a Password to Protect a Map 139
Creating and Modifying Zoom Goto Location Categories 140
Data Source Format for Zoom Goto Location Categories 140
The US Street Address Location Category 141
Customizing the Popup Menu 142
Working with Reports 142
Viewing a Report 143
Tracking User Access to a Map 144
Saving a Map 144
Publishing a Map 145
Chapter 9 Working with Map Layers 147
About Map Layers 148
Working with Map Layers in the Map Explorer 149
Creating a Vector Layer 150
Creating a Raster Layer 151
Creating a VISION* Theme Layer 152
Creating an AutoCAD DWG Layer 152
Creating a Layer Group 152
Specifying General Properties for Layers 153
Specifying Data Source Properties for Layers 153
Setting Style Properties for Layers 155
Setting Style Properties for Raster Layers 156
Specifying Display Ranges for Layer Styles 157
Specifying Map Layer Styles 158
Creating Themes 163
Specifying Layer Feature Labeling and Overposting 163
Specifying Security for Layers 164
Modifying Multiple Layers Simultaneously 165
Saving a Layer 165
Adding a Saved Layer to the Current Map 166
Rebuilding a Layer or Layer Group 166
Deleting a Layer or Layer Group 167
Glossary 169
Index 177
Contents | vii
Page 8

viii
Page 9

Introduction
This chapter provides you with general informa-
®
tion about Autodesk MapGuide
introduction to the new features in Release 5.
as well as an
In This Chapter
Overview
Key features of
Autodesk MapGuide
What’s new in
Release 5?
1
This chapter also includes an overview of how the
Autodesk MapGuide products work together, what
to do first, and where to go for more information.
This chapter may be helpful to:
All Autodesk MapGuide users
New Autodesk MapGuide users
System requirements
What’s the fastest way
through this book?
Where to get more
information
9
Page 10

Overview
Autodesk MapGuide is a suite of products that allows you to create, publish,
and display maps, drawings, designs, schematics, facilities management
plans, and associated attribute data over the Internet, an intranet, or an
extranet. Autodesk MapGuide
create maps, and Autodesk MapGuide
they view the maps on a web site. Autodesk MapGuide
requests from both types of users and provides the data as specified by the
map and as allowed by built-in security settings.
®
Author users access the data when they
®
Viewer users access the data when
®
Server handles
Key Features of Autodesk MapGuide
Autodesk MapGuide Viewer Key Features
Access to live, secured, vector and raster data
Versions available for Microsoft® Windows®, Apple® Macintosh®, and
Sun
™
SPARCstation
™
Familiar browser interface
Full zoom/unzoom/pan functionality, including zooming to specific map
features
Ability to measure distances between indicated points on a map
Print capability
Note This guide does not include instructions for using Autodesk MapGuide
Viewer. For information about using Autodesk MapGuide Viewer, refer to the
Autodesk MapGuide Viewer Help included with the Viewer and available from the
Autodesk MapGuide documentation page at
http://www.autodesk.com/mapguidedocs
10 | Chapter 1 Introduction
Page 11

Autodesk MapGuide Author Key Features
Accurate display of authored maps
Map and resource security control
Style display by scale
Thematic map settings and symbology
Complete layer setup and definition, including support for layer groups
Multiple Document Interface (MDI) support
Global property settings, including projection information and map
extents
Interactive Map Explorer for creating and updating maps, drawings,
designs, and schematics
Full zoom/unzoom/pan functionality, including zooming to specific features
Multiple feature selection by list/radius/polygon
Map bookmarking
Point feature posting
Intelligent map caching
Support for multi-server connection
Buffer zone creation
Arbitrary X,Y coordinate system support for CAD designs, drawings, or
schematics
Support for both vector and raster data types, overlaid, georeferenced, or
not georeferenced
Ability to link map features to web applications
Control over map width/scale
Ability to measure distances between indicated points on a map
Ability to copy to Windows Clipboard
Print capability
Key Features of Autodesk MapGuide | 11
Page 12

Autodesk MapGuide Server Key Features
Integrates easily with existing web sites
Easy to configure and manage
Scalable, multi-threaded architecture
Standard CGI interface for Netscape® Internet servers and Microsoft Internet Information Server
Custom NSAPI interface for Netscape Internet servers
Custom ISAPI interface for Microsoft Internet Information Server
GUI-based Server administration and monitoring utility
Comprehensive access, trace, error, and tracking logs
Built-in security access restriction controls
Support for data extensions, allowing direct access to Oracle8i™ Spatial or
VISION* databases
Serves intelligent, interactive maps and drawings to users who have
installed an Autodesk MapGuide Viewer
Serves non-intelligent maps and drawings without requiring installation
of an Autodesk MapGuide Viewer (requires Autodesk MapGuide LiteView
Extension)
What’s New in Release 5?
Autodesk MapGuide Release 5 includes the new features described in the following sections. In addition to the changes listed here, Release 5 includes
enhancements to the Autodesk MapGuide Viewer API. For details, refer to the
Autodesk MapGuide Viewer API Help.
Warning After you open and save a map in Autodesk MapGuide Author
Release 5, you cannot open the map in earlier releases of the program. Users of
older Autodesk MapGuide Viewer versions can easily upgrade to Release 5 by
downloading the new Viewer from the following location:
http://www.autodesk.com/mapguideviewerdownload
12 | Chapter 1 Introduction
Page 13

What’s New in Autodesk MapGuide Author 5?
Map Explorer and Layer Groups
The new Map Explorer interface is designed to help you author maps with
easy access to layer controls, reports, zoom goto definitions, and frequently
used dialog boxes. You can now organize layers into layer groups, which
appear in the Map Explorer and in the Viewer legend.
Continuous Panning and Zooming
Now, you can click the Pan toolbar button or the Zoom toolbar button just
once, and then pan and zoom repeatedly without needing to click the button
again.
Enhanced Printing
You can now use the entire page for printing a map, and you can control
which elements print on the map. When you print a map, you can include a
title, a legend, the map’s scale, a North arrow, the map’s URL, and the current
date and time. Also, you can specify the scale of the map you want to print,
or you can have Autodesk MapGuide automatically scale the map to fit the
printed page.
Support for Multiline Text and Labels on Maps
Autodesk MapGuide Author now supports multiple lines of text in text map
features and labels. This enhances the readability of the display.
Enhanced Symbol and Text Support
You now have greater control over the display of symbols and text. You can
specify symbol and text sizes in ground units (such as miles) as well as screen
units (such as inches), and you can have symbols with independent heights
and widths. You can also control the symbol size and rotation, as well as the
text alignment by specifying OLE DB table columns that contain these
values.
Custom URL for Viewer Help
If you create help content for your customized Autodesk MapGuide Viewer,
you can have the Viewer’s Help Help Contents command go to the URL
for your help file.
What’s New in Release 5? | 13
Page 14

What’s New in Autodesk MapGuide Server 5?
Easy Installation
The new Autodesk MapGuide Server installation program eliminates the
manual configuration of your server. Just follow the on-screen instructions
to set up your server.
Support for OLE DB Providers
Autodesk MapGuide Server now serves point and text spatial data from any
OLE DB provider rather than from ODBC data sources. Please note that the
ODBC tab in the Autodesk MapGuide Server Admin Properties dialog box has
been replaced with the Data Sources tab.
Support for Data Extensions
Autodesk MapGuide Server now supports new Data Extensions, which
enable Autodesk MapGuide to serve spatial and attribute data directly from
a variety of traditional GIS, CAD, or relational spatial databases through the
new SDP (spatial data provider) architecture. If you purchase a Data Extension for your specific data type, such as Oracle8i Spatial or VISION*, you do
not need to convert data to SDF format before using it with Autodesk
MapGuide. For information about these and additional forthcoming data
extensions, contact your nearest authorized Autodesk reseller.
Support for Autodesk OnSite
Autodesk MapGuide Server now supports the Autodesk Onsite software,
enabling users of mobile devices to view interactive maps and other data on
handheld computers. For more information, see the Autodesk Onsite documentation.
Support for Autodesk MapGuide LiteView Extension
Autodesk MapGuide Server now supports Autodesk MapGuide LiteView
Extension by serving maps in a raster format so that users are not required to
install an Autodesk MapGuide Viewer. For more information, see the
Autodesk MapGuide LiteView documentation.
14 | Chapter 1 Introduction
Page 15

What’s New in Autodesk MapGuide Viewer 5?
Redlining
The Autodesk MapGuide Viewer API offers Viewer users the ability to digitize
features or create redline notations on a new spatial data layer. For more
information, see the Autodesk MapGuide Viewer API Help.
Continuous Panning and Zooming
Now, you can click the Pan toolbar button or the Zoom toolbar button just
once, and then pan and zoom repeatedly without needing to click the button
again.
Layer Groups
Layers can now be part of layer groups, which appear in the Viewer legend.
Help Available from the Toolbar
Autodesk MapGuide Viewer now includes a Help button on the toolbar for
quick access to the Autodesk MapGuide Viewer Help or to a customized help
URL.
Enhanced Printing
You can now use the entire page for printing a map, and you can control
which elements print on the map. When you print a map, you can include a
title, a legend, the map’s scale, a North arrow, the map’s URL, and the current
date and time. Also, you can specify the scale of the map you want to print,
or you can have Autodesk MapGuide automatically scale the map to fit the
printed page.
Improved API
The Autodesk MapGuide Viewer API has been improved to include full
support for the Autodesk MapGuide Java
line and fill styles, layer groups, and Spatial Data Provider (SDP) layers as well
as printing enhancements. For complete information, refer to the Autodesk
MapGuide Viewer API Help.
™
edition Viewer, client redlining,
What’s New in Release 5? | 15
Page 16

System Requirements
Following are the system requirements for using Autodesk MapGuide Server
and Autodesk MapGuide Author.
Autodesk MapGuide Author Requirements
Autodesk MapGuide Author requires the following:
Microsoft Windows 98, Windows NT 4.0, or Windows 2000 Professional
Pentium-based PC
32 MB of RAM
Minimum 20 MB of free hard disk space
Super VGA or better video display
Mouse or compatible pointing device
In addition, we recommend the following:
Web browsers: Netscape Navigator® 4.0 or later or Microsoft Internet
Explorer 4.0 or later
Internet connection, if retrieving data from remote Autodesk MapGuide
Servers
Autodesk MapGuide Server Requirements
Autodesk MapGuide Server requires the following:
Microsoft Windows NT 4.0 Server with Service Pack 4, 5, or 6, or Microsoft
Windows 2000 Server
Web server: Netscape Enterprise Server 3.5 or later, or Microsoft Internet
Information Server 4.0 or later (included with Windows 2000)
Web browser: Netscape Navigator 4.0 or later, or Microsoft Internet
Explorer 4.0 or later
MDAC 2.1 Service Pack 2 or later (MDAC version 2.5 included with
Autodesk MapGuide Server installation)
Pentium-based PC
128 MB of memory (192 MB if using multiple releases of Autodesk
MapGuide Server on the same computer)
22 MB of free disk space (25 MB plus data files space recommended);
38 MB required during installation
Sufficient disk space for SDF, MWF, and raster image files
VGA or higher resolution video adapter
16 | Chapter 1 Introduction
Page 17

Microsoft mouse or compatible pointing device
OLE DB providers required for access to relational data sources that contain map data
TCP/IP network protocol installed on the Windows NT/2000 computer
(TCP/IP provided on the Windows NT/2000 installation CD)
IP address assigned to the server computer
Autodesk MapGuide Viewer Requirements
The three versions of Autodesk MapGuide Viewer (Plug-In, ActiveX Control,
and Java edition) each require different configurations.
Autodesk MapGuide Plug-In Viewer Requirements
Microsoft Windows 95, Windows 98, Windows NT 4.0, or Windows 2000
Professional
Minimum of a 486-based PC with 16 MB of memory
Mouse or compatible pointing device
Web browser: Netscape Navigator 4.0 or later
Autodesk MapGuide ActiveX Control Viewer
Requirements
Microsoft Windows 95, Windows 98, Windows NT 4.0, or Windows 2000
Professional
Minimum of a 486-based PC with 16 MB of memory (24 MB required if
using Windows NT 4.0 or Windows 2000)
Mouse or compatible pointing device
Web browser: Microsoft Internet Explorer 4.0 or later.
Autodesk MapGuide Viewer Java Edition Requirements
Microsoft Windows 95, Windows 98, Windows NT 4.0, or Windows 2000
Professional
Minimum of a 486-based PC with 16 MB of memory (24 MB required
if using Windows NT 4.0 or later and Microsoft Internet Explorer)
Mouse or compatible pointing device
Web browser: Netscape Navigator 4.0 or later, or Microsoft Internet
Explorer 4.0 or later, with MRJ 2.2
System Requirements | 17
Page 18

Mac® OS 8.5 or 9
Apple Macintosh computer with 32 MB of memory (64 Mb or more recommended)
Web browser: Microsoft Internet Explorer 4.x, with MRJ 2.2 (Microsoft
Internet Explorer 5 not supported)
Sun Solaris™ 2.6
Sun SPARCstation with 64 MB of memory
Web Browser: Netscape Navigator 4.5 or later
What’s the Fastest Way Through This Book?
This guide is designed for all different stages of Autodesk MapGuide development and for different kinds of Autodesk MapGuide users. To determine
which parts of this guide you should read, review the following information.
I’m just getting started with Autodesk MapGuide.
Read the rest of this chapter to determine the types of people you will need
to work on your project and the skills they will need, and where to go for
more information. Then, follow the steps in “Overall Strategy” on page 41
for information about how to set up Autodesk MapGuide and develop applications that interact with it. Depending on your role in Autodesk MapGuide
projects, you can then decide which chapters to read.
I already have Autodesk MapGuide up and running.
If you already have data that you are using, read Chapter 5, “Working with
Data in Autodesk MapGuide,” for information about how to optimize your
data to improve performance. If you want to evaluate how well you have set
up your project, whether to use multiple servers instead of a single server,
and other system design considerations, read Chapter 3, “Designing Your
System.” Finally, read “Where to Get More Information” on page 22 for
information that is beyond the scope of this guide.
I just want to know what tasks to do for my job.
Depending on your role, you will need to perform different tasks from other
people working on the project with you. The scope of implementing
Autodesk MapGuide can vary widely. In some cases, one or two people can
create and post a map. In others, several contributors work together to create
18 | Chapter 1 Introduction
Page 19

an Autodesk MapGuide web site. The following list explains the possible
roles involved in an Autodesk MapGuide implementation and describes the
tasks and skills required of each role.
Note that one person might perform more than one of these roles, or you
might divide the responsibilities of a single role among several people. If you
are a project manager trying to determine whom you need to hire, or a developer trying to determine what training you need, information in this section
can help you plan for your next Autodesk MapGuide implementation.
Data Engineer
The data engineer is responsible for gathering and managing all spatial data
resources, such as vector mapping data and raster images, as well as attribute
data, such as tables of population and other demographic information that
is linked to the spatial data. If you will not be using a data extension to access
VISION*, Oracle8i Spatial, DWG, or SHP data directly, the data engineer
needs to convert vector data from other formats into SDF (spatial data file)
files, uses Autodesk MapGuide
and then provides those files to the server administrator. The data engineer
might use AutoCAD Map to create spatial data, or use Autodesk MapGuide
SDF Loader to convert spatial data from other sources. Data engineers need
to work with the map authors to determine what spatial data is needed for
the maps, and then either create or acquire that data.
®
Raster Workshop to work with raster images,
®
Data engineers will find information they need in Chapter 5, “Working with
Data in Autodesk MapGuide” and Chapter 6, “Planning and Designing
Maps.”
If you do not have the expertise to create or convert the data you need, go to
http://www.autodesk.com/mapguidepartners for a list of data providers and data
conversion firms.
Map Author
The map author uses the resources provided by the data engineer to create
maps in Autodesk MapGuide Author. Map authors need to be familiar with
coordinate systems and with GIS or CAD in general. They should have a good
understanding of what information to show in the map and how to display
information cartographically. They will work closely with the data engineer
to get the data that they need. They will also work with the server administrator to make sure they are given authoring privileges and have access to the
data through the server.
What’s the Fastest Way Through This Book? | 19
Page 20

Map authors need to decide the type of maps to deliver:
Unintelligent maps with limited interactivity that do not require a Viewer
installation (requires Autodesk MapGuide LiteView Extension).
Intelligent, highly interactive maps requiring a Viewer installation.
A combination of both types of maps, offering limited maps initially, with
the opportunity to install a Viewer for increased interactivity
Map authors will find information they need in Chapters 5 through 9.
Server Administrator
The server administrator oversees the Autodesk MapGuide Server and the
Windows NT Server or Windows 2000 Server computer on which it runs. This
person is responsible for setting up the server architecture, security (password
access and access keys), network connections, database access, and search
paths for data sources and image files. The server administrator also installs
the web server, Autodesk MapGuide Server, and MapAgent software, as well
as OLE DB providers, geocoding data and, in some cases, Allaire ColdFusion
and/or Active Server PagesÔ (ASP). Server Administrators need to maintain
the Autodesk MapGuide Server using Autodesk MapGuide Server Admin.
Server administrators will find information they need in Chapters 2, 3, and 4.
®
Webmast er
The webmaster is responsible for all web site content, including HTMLembedded maps. Webmasters need to be able to build and maintain a web
site. The webmaster will work with the application developer when creating
a map-enabled web site that extends the functionality of Autodesk
MapGuide Viewer. Webmasters will find information they need in
“Publishing a Map” on page 145.
Application Developer
The application developer uses programming skills to build custom Autodesk
MapGuide Viewer applications and server-side scripts and reports. Application developers need to be able to perform the following tasks:
Create HTML pages with embedded JavaÔ, JavaScript, JScript, or VBScript
code that accesses the objects of the Autodesk MapGuide Viewer API. For
example, you might create an HTML form containing a button that turns
a layer on and off, or a drop-down list that selects map features.
Create custom reports with ColdFusion, Active Server Pages, or another
third-party application.
In some cases, create server-side applications with Autodesk MapGuide
SDF Component Toolkit. A server-side application created with the SDF
20 | Chapter 1 Introduction
Page 21

Component Toolkit can dynamically update SDF files posted on an
Autodesk MapGuide Server. For example, you could create an application
that lets users add polygon lot lines to a map from their local browser.
Application developers should be very familiar with Autodesk MapGuide and
will find information they need in Chapter 2, “Understanding Autodesk
MapGuide,” Chapter 3, “Designing Your System,” (with particular attention
to “Choosing a Viewer/Browser Environment” on page 59), and in the
Autodesk MapGuide Developer’s Guide.
You can download the Autodesk MapGuide Developer’s Guide free of charge, or
you can order the printed copy from the product documentation page at:
http://www.autodesk.com/mapguidedocs
Conventions Used in This Manual
The following table describes conventions used in this manual.
This word or phrase... Indicates this...
Choose Edit Properties Click the Edit menu, and then choose Properties from
the Edit menu. If three levels of menus are shown, it
means that there is a secondary or submenu.
For example, the text:
Click Start
indicates that when you click the Settings menu item in
the Start menu, a submenu appears, from which you
choose Control Panel.
the <Netscape
home>\<Computer
name>\config directory
Click Press and release the left-hand or primary mouse but-
Right-click Press and release the right or secondary mouse button.
Drag Hold down the mouse button while you move the
Text in italics indicates directories, file names, URLs
(web addresses), and keys in the Windows Registry.
ton.
mouse.
Settings Control Panel
What’s the Fastest Way Through This Book? | 21
Page 22

Online Help Index
maps
Where to Get More Information
Note When you see text in the left margin of this guide with the heading “Help
Index” as shown to the left of this paragraph, this indicates that there is additional, related information in the Autodesk MapGuide Help, which is available
when you choose Help Contents and click the Index tab in either Autodesk
MapGuide Author or Autodesk MapGuide Server Admin.
In addition to this guide, there are a number of helpful resources, both
printed and online.
Autodesk MapGuide Documentation
Following is a list of all of the guides and help systems available with
Autodesk MapGuide. To view or download any of these documents, go to
http://www.autodesk.com/mapguidedocs.
Autodesk MapGuide Help
This help system provided with Autodesk MapGuide Author and Autodesk
MapGuide Server includes general information about using Autodesk
MapGuide products, specific step-by-step procedures, and reference information. You can access the help by choosing Help Contents, by clicking the
Help button on the toolbar, or by clicking the Help button in any Autodesk
MapGuide Author or Autodesk MapGuide Server Admin dialog box.
Autodesk MapGuide Viewer API Help
This help system contains references to the objects, properties, methods, and
events of the Autodesk MapGuide Viewer API. The API Help highlights differences between the three versions of the Viewer (ActiveX Control, Plug-In,
Java edition), and it contains conceptual information about Viewer scripting
topics.
Autodesk MapGuide SDF Loader Help
This help system documents the Autodesk MapGuide SDF Loader commandline utility. It contains conceptual and reference information about SDF files,
including parameters for converting from specific formats.
22 | Chapter 1 Introduction
Page 23

Autodesk MapGuide SDF Component Toolkit Help
This help system is provided with Autodesk MapGuide SDF Component
Toolkit. The SDF Component Object Model is of interest to advanced application developers, who will want to refer to the list of objects, properties, and
methods.
Autodesk MapGuide Raster Workshop Help
This help system is provided with Autodesk MapGuide Raster Workshop. It
provides overall information as well as detailed descriptions of how to use
the Raster Workshop to convert images to TIFF and tiled TIFF format, create
raster image catalogs, and more.
Autodesk MapGuide Viewer Help
This help system is provided with Autodesk MapGuide Viewer. It includes
information about using Autodesk MapGuide Viewer but does not include
information for developers. You can also get a Microsoft Word version
(MGViewerHelp.doc) of the Autodesk MapGuide Viewer Help from the
root level of the Autodesk MapGuide Author and Viewer CD. The
MGViewerHelp.doc file is useful if you want to print the entire help
contents for Viewer users.
Autodesk MapGuide User’s Guide
This guide is included with Autodesk MapGuide Author and Autodesk
MapGuide Server. You can install a copy of this guide in Adobe Acrobat
(.PDF) format when you install Autodesk MapGuide Author or Autodesk
MapGuide Author. To view the guide in PDF format, you need to install
Adobe Acrobat Reader, which is available on the Autodesk MapGuide Author
and Autodesk MapGuide Server CDs in the following location:
\Acrobat Reader\Acrd4enu.exe
Autodesk MapGuide Developer’s Guide
This guide, available for purchase or for download from the Autodesk
MapGuide web site, includes information about developing Autodesk
MapGuide applications.
Where to Get More Information | 23
Page 24

Autodesk MapGuide ReadMe File
The ReadMe file for all of the Autodesk MapGuide products includes a list of
installed files and directories for each of the Autodesk MapGuide products.
Third-Party Documentation
Many excellent third-party books are available. Your tastes may vary, but here
are some that we found useful:
Cold Fusion Web Application Construction Kit, by Ben Forta et al. (Que Corporation)
Programming Active Server Pages, by Scot Hillier and Daniel Mezick
(Microsoft Press)
HTML Sourcebook, 4th Edition, by Ian S. Graham (John Wiley & Sons, Inc.)
JavaScript: The Definitive Guide, 3rd Edition, by David Flanagan (O’Reilly
and Associates)
Java in a Nutshell, 2nd Edition, by David Flanagan (O’Reilly and Associates)
Additionally, there are many books that discuss GIS, its history, and its applications. Because these books vary in scope, quality, and price, you should
take the time to browse through them in your bookstore and select the one
that suits your needs. One title you might try is Principles of Geographical
Information Systems by Peter A. Burrough and Rachael A. McDonnell (Oxford
University Press).
Autodesk MapGuide Web Site
To get late-breaking information about the Autodesk MapGuide products, or
for links to technical notes and white papers that discuss various topics, go
to the Autodesk MapGuide web site (http://www.autodesk.com/mapguide).
There is also a link to the online Autodesk MapGuide demos, which walk you
through the process of using sample applications. Many of the demos use
JavaScript to access the Viewer API; you might find it useful to view the
HTML source used in these examples.
Tip From Autodesk MapGuide Author, you can go directly to the Autodesk
MapGuide web site by choosing Help Autodesk MapGuide Web Site.
24 | Chapter 1 Introduction
Page 25

Online Discussion Groups
The Autodesk online discussion groups, located at
http://www.autodesk.com/discussion, are open forums for Autodesk customers,
partners, or anyone with an interest in Autodesk’s products. You can post
information or questions, answer other members’ questions, or just browse
messages to gather information and learn tips and tricks from other users.
Your questions will be answered by other discussion group members or
Autodesk staff
.
For best results when posting a question, please be sure to provide as much
information about the situation as possible. This includes your hardware
configuration (how many servers, how much RAM, etc.), your operating
system, the release number of the specific product, what steps you took
immediately prior to the problem, the exact error message that was
displayed, and any other information that would help us to understand the
issue. Providing this information will improve our ability to answer your
question immediately.
Autodesk Developer Network
Autodesk Developer Network (ADN) is a developer-support organization that
provides its members with services including the following:
A quarterly CD containing Autodesk products, documentation, and
sample code
Technical training
Direct, comprehensive technical support
Marketing support
Developer consulting services
Access to private newsgroups
ADN membership is open to experienced professional software developers
who develop products and services that interface or integrate with Autodesk
products. For more information about membership requirements and fees,
go to the Autodesk developers web site at:
http://www.autodesk.com/developers
Where to Get More Information | 25
Page 26

26
Page 27

Understanding Autodesk
MapGuide
This chapter includes an overview of the Autodesk
MapGuide product suite, as well as information
about planning a strategy for using the Autodesk
MapGuide products.
This chapter may be especially helpful to:
Server administrators
Application developers
New Autodesk MapGuide users
In This Chapter
What is Autodesk
MapGuide?
How Autodesk
MapGuide
components work
together
Map authoring
components
Map viewing
components
Map serving
components
Application
development
components
2
What is Autodesk
MapGuide
application
development?
Overall strategy
27
Page 28

What Is Autodesk MapGuide?
Before you use Autodesk MapGuide, you need to understand some basic
concepts, how to use the Autodesk MapGuide product suite as a whole, and
how to access your Autodesk MapGuide Server and data resources.
Autodesk MapGuide is a geographic information system (GIS). Unlike a
typical map or drawing, which shows only spatial data such as roads, cities,
and country borders, a GIS links attribute data such as population statistics
to the spatial data. This link between the map data and the attribute data
makes a GIS very powerful, because it allows you to use data in a whole new
way.
For example, you could create a map of restaurants that allows users to zoom
in to an area of interest, click a restaurant, and then view that restaurant’s
menu, pricing information, phone number, and address. Or you could create
a map of all power transformers in an area, so that your technicians could
quickly generate a report of all customers affected by a particular transformer
when it goes out of service. You could also create a facilities map of your
company, including information about personnel in each office, such as telephone extension, title, department, and so on.
Keep in mind that when you use Autodesk MapGuide, you are not limited to
using geographically projected maps—you can also use drawings, floor plans,
schematics, or others kinds of spatial data.
Understanding Layers
A key feature of Autodesk MapGuide is the use of layers. Layers are like separate transparent sheets on which different spatial data is drawn. By separating data into different layers, you can work with your data more efficiently. For example, if you have a map displaying roads, rivers, and parks,
you could organize the map into three layers for each of these types of
features. Then, when you want to change the color of all of the rivers to blue,
you would change the color for the rivers layer. This would redraw all of the
rivers in blue, without affecting the colors of the parks and roads, which are
on separate layers.
Layers are also useful for your users when they want to select specific data.
For example, if you have highways and streets on individual map layers that
overlap, and the user wants to select a highway, users can turn off the streets
layer so that they can more easily select the highway without accidentally
clicking a street instead.
28 | Chapter 2 Understanding Autodesk MapGuide
Page 29
How Autodesk MapGuide Works
To create an interactive map or drawing, you use Autodesk MapGuide Author
to combine resource data, such as spatial data (spatial data files and raster
image files), and attribute data (from databases) in a map window file (MWF).
The MWF contains the complete specifications of how the map will look and
function.
To publish the map, you copy the MWF file to a location where the web
server can access it. Web page authors can then embed the file in their web
pages or create links to it. To view the map, users can install Autodesk
MapGuide Viewer free of charge. When the user opens a web page that
contains an MWF file or clicks a link to an MWF file, the web browser automatically loads Autodesk MapGuide Viewer to display the map. The Viewer
displays the map according to the MWF settings specified in Autodesk
MapGuide Author.
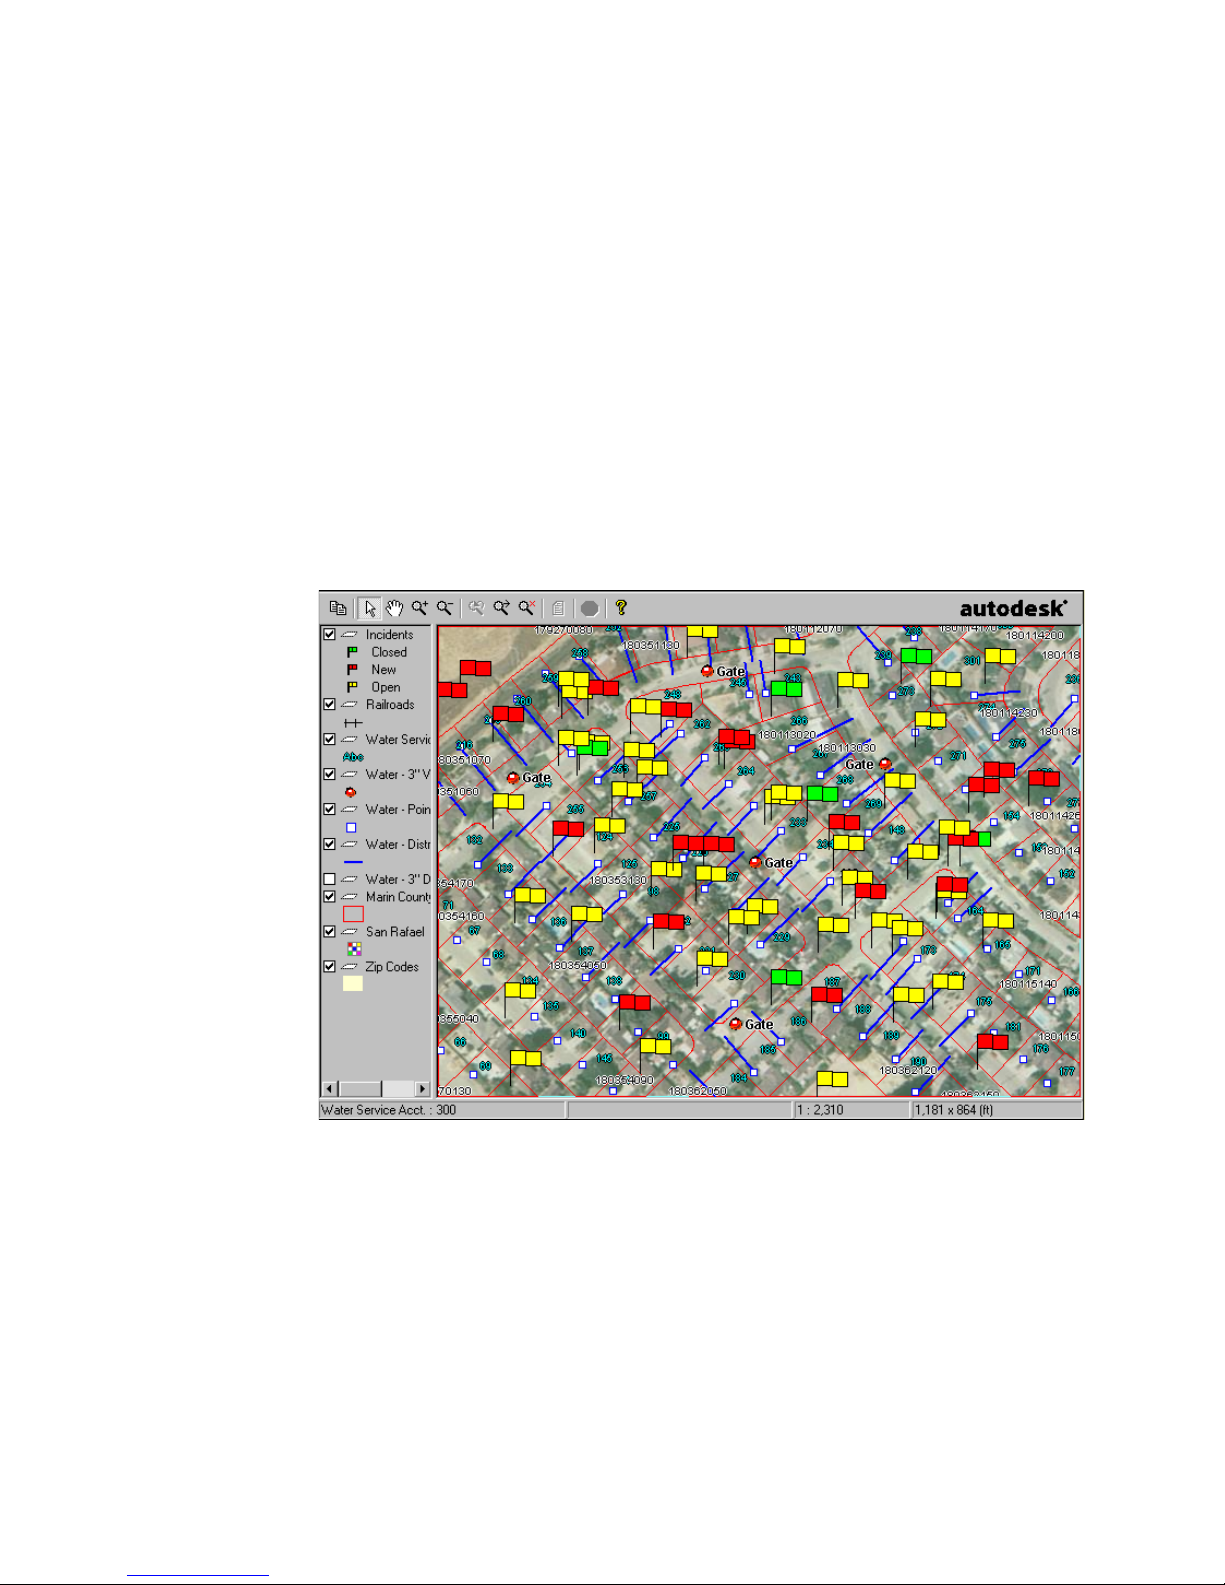
A map displayed with Autodesk MapGuide Viewer
When you use either Autodesk MapGuide Author to create a map or
Autodesk MapGuide Viewer to view a map, requests are made to Autodesk
MapGuide Server to provide the required data in that map via the Internet,
an intranet, or an extranet using the services of a web server and a web
browser.
What Is Autodesk MapGuide? | 29
Page 30
How Autodesk MapGuide Components Work
To g e t h e r
The following diagram provides an overview of how the Autodesk MapGuide
products work together.
Applications
Clients
Application
Servers
Data Servers
Data
Utilities
Any Browser
Autodesk MapGuide
LiteView Extension
Servlet
Raster
Images
Raster
Workshop
Autodesk OnSite
Client
Autodesk OnSite
Servlet
GIS/CAD
Files
DWG
SHP
VISION*
Cache
Java
Viewer
SDF Loader
ActiveX
Viewer
(Autodesk MapGuide Server/Web Server)
Data Extensions
VISION*
Plug-In
Viewer
Servers
Oracle8i
Spatial
ORACLE SDF MWF
SDF Com
Toolkit
Autodesk MapGuide
Author
30 | Chapter 2 Understanding Autodesk MapGuide
Page 31

Map Authoring Components
This section describes the programs and data resources used to create a map.
Autodesk MapGuide Author
Autodesk MapGuide author allows you to create maps by setting up map
window files (MWFs). You can then embed one or more MWF files (or create
a link to them) in a web page. When a user opens that web page (or clicks the
link in the web browser), Autodesk MapGuide Viewer appears and displays
the map.
Autodesk MapGuide Data Extensions
Autodesk MapGuide data extensions enable Autodesk MapGuide to serve
spatial and attribute data directly from a variety of traditional GIS, CAD, or
relational spatial databases. When you use an Autodesk MapGuide data
extension, you do not need to convert data to SDF format before using it with
Autodesk MapGuide. You can purchase Autodesk MapGuide data extensions
for VISION*, Oracle8i Spatial, and Autodesk DWG. For information about
these and additional forthcoming data extensions, contact your nearest
authorized Autodesk reseller. If you are not accessing spatial data through a
data extension, you will need to convert your data into one of the supported
formats.
Autodesk MapGuide SDF Loader
Autodesk MapGuide SDF Loader is a command-line utility that converts
spatial map data from a variety of formats into Spatial Data Files (SDFs), one
of the native formats read by Autodesk MapGuide Server. Specifically, some
of the formats that you can convert are AutoCAD Map
MapInfo MID/MIF files, ESRI Arc/Info Coverage files, Intergraph DGN files,
ArcView Shapefile files, and Atlas BNA files, as well as ASCII comma-delimited CSV files. The SDF Loader can convert the coordinates from their original coordinate system into latitude/longitude, but it cannot perform datum
shifts—all data must be based on the same datum.
The SDF Loader can also generalize your map data if it will be displayed at
smaller scales (zoomed out), which improves performance and reduces
required storage space. The SDF Loader is distributed on the Autodesk
MapGuide Author and Autodesk MapGuide Server CDs. For more information, refer to Autodesk MapGuide SDF Loader Help (SDFLOAD.HLP) located in
the SDF Loader directory.
Map Authoring Components | 31
®
DWG and DXF files,
Page 32

Autodesk MapGuide SDF Component Toolkit
Autodesk MapGuide SDF Component Toolkit is a set of COM (Common
Object Model) objects for reading and writing Spatial Data Files (SDF), Spatial
Index Files (SIF), and Key Index Files (KIF), the native spatial data file formats
of Autodesk MapGuide products.
You can access SDF Component Toolkit objects in development languages
and environments such as C++, Visual Basic, VBA, VBScript, Java, JScript,
ASP, CGI, and ColdFusion. Using these languages and environments, you can
do the following:
Write applications that convert spatial data to SDF files.
Write applications that modify SDF files generated by AutoCAD Map,
Autodesk World, or Autodesk MapGuide SDF Loader.
Create server-side applications that read and modify existing SDF files.
These applications can interact with client-side scripts, allowing for
dynamic updates based on user input.
The SDF Component Toolkit is distributed on the Autodesk MapGuide
Author and Autodesk MapGuide Server CDs. For more information, refer to
Autodesk MapGuide SDF Component Toolkit Help (SDFCOMTK.HLP) located in
the \Help directory under your SDF Com Toolkit directory.
Autodesk MapGuide Raster Workshop
Autodesk MapGuide Raster Workshop is a utility that allows you to optimize
your raster images, which improves performance when they are accessed by
Autodesk MapGuide. You can generate TIFF files and tiled TIFF files (tiled
TIFF files improve performance) from standard image formats, create raster
image catalog (RIC) files, and manipulate the images that are referenced by
the RIC. You can then use the TIFF and RIC files with Autodesk MapGuide,
or use the TIFF files with other Autodesk products that support raster images.
The Raster Workshop is distributed on the Autodesk MapGuide Author CD.
For more information, refer to Autodesk MapGuide Raster Workshop Help
(RASTER.HLP) located in the Raster Workshop directory.
32 | Chapter 2 Understanding Autodesk MapGuide
Page 33

Map Viewing Components
This section describes how your web browser works with Autodesk
MapGuide Viewer to display maps.
Web Browser
A web browser is a client application that reads hypertext data in the form of
HTML pages containing text, graphic, and programmatic content. Web pages
are usually posted on the Internet, an intranet, or an extranet. An intranet
uses internet technology, but is used internally by a company or other organization; information on an intranet is not available to outside users. An
extranet extends an intranet to outside users who have been given access
rights, such as customers who access a site with a password.
In addition to reading and displaying web pages, a web browser can also
perform file transfers using file transfer protocol (FTP) and run helper
programs such as Autodesk MapGuide Viewer.
Autodesk MapGuide Viewer
Autodesk MapGuide Viewer displays a map in your web browser when you
open a web page that contains an embedded MWF or when you click a link
to an MWF.
Autodesk MapGuide Viewer is available in three versions:
A Plug-In for use with Netscape Navigator on Windows systems
An ActiveX Control for use with Microsoft Internet Explorer on Windows
systems
A Java edition for use with Sun Solaris and Apple Macintosh systems. It
can also be used on Windows, but we recommend that you use the PlugIn or ActiveX Control on Windows.
All are available for download free of charge from the Autodesk MapGuide
web site (http://www.autodesk.com/mapguide).
Note If you want to distribute maps without requiring that users install one of
the Viewers, you can do so using the Autodesk MapGuide LiteView Extension. For
more information, see the next section and the Autodesk Mapguide LiteView
documentation.
Map Viewing Components | 33
Page 34

You can also write a stand-alone C++, Visual Basic, or Java application that
hosts Autodesk MapGuide Viewer without a web browser. For details about
supported platforms, see “Choosing a Viewer/Browser Environment” on
page 59.
Autodesk MapGuide LiteView Extension
Autodesk MapGuide LiteView Extension serves maps in a raster format, with
limited interactivity, so that users are not required to install an Autodesk
MapGuide Viewer. For more information, see the Autodesk Mapguide
LiteView documentation.
Map Serving Components
This section describes the software components that process and serve data
to the map.
Web Ser ve r
Online Help Index
web server
A web server is an application that runs on a host computer. In response to
requests from other computers, the web server software processes and sends
various types of files, such as web pages and map window files (MWFs).
When a user requests map data, that request is received by the web server and
passed to Autodesk MapGuide Server. Autodesk MapGuide supports two
types of web servers: Microsoft Internet Information Server (IIS) 4.0 and later
through the standard CGI and ISAPI interfaces, and Netscape Enterprise
Server 3.51 through the standard CGI and NSAPI interfaces.
Autodesk MapGuide Server
Autodesk MapGuide Server serves map data in response to requests from
Autodesk MapGuide Author and Autodesk MapGuide Viewer when a user is
displaying a map in those programs.
When a request is made, Autodesk MapGuide Server reads the request to
determine which data to provide, and then sends the data from the spatial
data source, raster image file, or OLE DB data source according to the specifications made in the request. Autodesk MapGuide Server allows you to
control access to the data sources by checking for passwords, user IDs, and
other optional settings you specify.
34 | Chapter 2 Understanding Autodesk MapGuide
Page 35

Autodesk MapGuide Server consists of three components: MapAgent, Server
Service, and Server Admin.
MapAgent
The Autodesk MapGuide Server Agent (or MapAgent) is an interface between
your web server and Autodesk MapGuide Server. It receives requests for map
data from Autodesk MapGuide Author or Autodesk MapGuide Viewer via a
web server. The Agent queues the requests as they are received and distributes
them to Autodesk MapGuide Server. There are three different MapAgent files
that you can use with Autodesk MapGuide Server; for more information, see
“Which MapAgent to Install” on page 51.
Server Service
The Autodesk MapGuide Server Service is a Windows NT/2000 service that
receives and processes the requests for map data distributed by the
MapAgent, formats the data as requested by the map layer, and then sends
the data back across the web to Autodesk MapGuide Author or Autodesk
MapGuide Viewer.
Autodesk MapGuide Server Admin
Autodesk MapGuide Server Admin gives you complete operational control
over Autodesk MapGuide Server. You can set security, generate log files,
configure data source directories and database access, integrate with your
web server, and start and stop the server.
Application Development Components
This section describes the products and technologies used to create an
Autodesk MapGuide application.
An Autodesk MapGuide application can be as simple as an HTML page that
displays an embedded map window file (MWF), or it can be as complex as a
CGI application, coded in C++, that modifies data files on the server and
refreshes the browsers of everyone viewing the map. Usually it is something
between the two, such as a map embedded in a web page that has buttons
and other controls on it that interact with the map.
Application Development Components | 35
Page 36

Example of an Autodesk MapGuide application
Autodesk MapGuide applications can be client-side or server-side. A client-side
application runs in the user’s browser, using the processing power of the
user’s (client) computer. It is typically an HTML page that hosts Autodesk
MapGuide Viewer and contains code to access the objects of the Autodesk
MapGuide Viewer API. A server-side application runs on the server, and is
typically used for generating custom map reports, generating dynamic HTML
pages, and updating map resources such as databases, GIS, or CAD files. In
most cases, applications are a combination of both client-side and server-side
applications, but for the sake of simplicity, the following sections discuss the
components as being one or the other.
Client-Side Application Components
Client-side applications run in the user’s browser. A client-side application is
usually made up of the following components:
A web browser and an HTML page that hosts Autodesk MapGuide Viewer
An MWF that is read by Autodesk MapGuide Viewer and displayed as a
map
Web browser scripts that access the APIs for the browser and Autodesk
MapGuide Viewer
36 | Chapter 2 Understanding Autodesk MapGuide
Page 37

HTML Pages
Usually, a client-side application is an instance of Autodesk MapGuide
Viewer that is displayed in an HTML page by means of the <EMBED>,
<OBJECT>, or <APPLET> tag. (<EMBED> is used for the Netscape Plug-In,
<OBJECT> for the ActiveX Control, and <APPLET> for the Java edition.) The
HTML page might contain form elements (such as buttons and list boxes)
and code that access the web browser API and the Autodesk MapGuide
Viewer API. You can also display the map full-screen (not embedded in an
HTML page) by using the
to the MWF. For more information, refer to the Autodesk MapGuide Viewer API
Help.
Web Browser Scripts
Autodesk MapGuide supports the following HTML scripting languages:
JavaScript. JavaScript is a full-featured scripting language that supports the
Netscape Plug-In on the Windows platform and the Java edition on the
Windows and Sun Solaris platforms.
JScript. JScript is Microsoft’s variant of the JavaScript language. It supports
the ActiveX Control and Java edition for Internet Explorer on Windows
platforms. Throughout this book, we will often refer to JScript and
JavaScript collectively as JavaScript.
<A HREF> tag in an HTML page and creating a link
VBScript. VBScript is a Visual Basic-derived language that supports the
ActiveX Control for Internet Explorer on Windows platforms.
You can use these scripting languages to access the Autodesk MapGuide
Viewer API and the Netscape and Internet Explorer browser APIs. The scripts
can range from a single line to complex client-side map applications. For
more information, see “Choosing a Viewer/Browser Environment” on
page 59, and refer to the Autodesk MapGuide Viewer API Help.
Autodesk MapGuide Viewer API
Autodesk MapGuide Viewer exposes an object-oriented programming interface (API) that gives you programmatic access to Autodesk MapGuide Viewer
functionality. For example, you could create a redlining application that
would give users the ability to digitize features and add notations to a map.
You can access the Autodesk MapGuide Viewer API from a browser script or
from a stand-alone application you create that hosts the Viewer. The API is
available when you install any of the Autodesk MapGuide Viewers. For more
information, refer to the Autodesk MapGuide Viewer API Help.
Application Development Components | 37
Page 38

Web Browser APIs
The Netscape and Internet Explorer APIs give you programmatic access to
browser and document functionality. The APIs include a Document Object
Model (DOM) that exposes the elements in an HTML page.
With the browser APIs, you could write a script that creates a new window or
frame and then outputs HTML to it dynamically. You could also create HTML
pages that change dynamically on user interaction. (This is called Dynamic
HTML.)
Note The Document Object Models for Netscape and Internet Explorer vary
somewhat. Therefore, when writing a single script for both browsers, be sure to
test your script carefully in both browsers.
Stand-alone Applications
You can write a stand-alone C++, Visual Basic, or Java application that hosts
Autodesk MapGuide Viewer without a web browser. For details about
supported platforms, see “Choosing a Viewer/Browser Environment” on
page 59.
Server-Side Applications
Server-side applications run on the server (or host), creating or processing
data and serving it to the client machine. A server-side application (also
known as a server app) might be a counter that shows how many times a site
has been visited, or it might be a database that builds and serves HTML pages
dynamically. The Autodesk MapGuide LiteView Extension, used to display
raster maps without a browser, is also an example of a server-side application.
In Autodesk MapGuide, server-side applications are typically used to
generate and serve reports or to allow map data on the server to be updated
by a user from his or her browser. Please note that these applications are typically a combination of client-side and server-side applications, but for the
sake of simplicity, they are discussed here as server-side applications.
38 | Chapter 2 Understanding Autodesk MapGuide
Page 39

Reports
You can design customized reports for your map. A report is an HTML page
generated by a script you create using a third-party tool like ColdFusion by
Allaire Corporation or Microsoft Active Server Pages (ASP). Report scripts
combine database queries and HTML tags to dynamically generate pages on
the server. These pages are then sent to the browser as standard HTML.
Because the design of the HTML page is specified as part of the report script,
the author of the report controls the way the page displays in the browser.
In an Autodesk MapGuide Application, the report typically provides information about the selected map features or about a point the user specifies,
depending on the settings the map author specified in the MWF. In some
cases, database resources might be queried directly, bypassing the MWF
completely. When a user views the report, Autodesk MapGuide Server sends
the feature or point information to the report script, which extracts the
appropriate content from a database and then displays an HTML page with
the results in your web browser. Examples of reports might be demographic
data for the specified layers or the latitude/longitude coordinate of the specified point. For more extensive information about reports, refer to the
Autodesk MapGuide Developer’s Guide.
User-Updatable Map Resources
You can create server applications that give users the ability to update map
resources from their browsers. These resources can be database map layers,
attribute data associated with a feature, or even the SDFs themselves.
Updating a database from the browser uses the same mechanisms as reports
use.
For example, you could create a “crime watch” application. The application
would include an HTML form where users could add map points representing crime incidents, as well as attribute data describing details of the incidents. Subsequent users could use the form to add their own comments to
the database. In another example, you could create a redlining tool for
surveyors. Using this tool, workers in the field could add polylines representing lot lines to the SDF files so that the changes would be visible to
anyone else viewing the map. For more information, refer to the Autodesk
MapGuide Developer’s Guide.
Application Development Components | 39
Page 40

What Is Autodesk MapGuide Application
Development?
The Autodesk MapGuide application development process allows you to add
Autodesk MapGuide functionality to your web site. The entire process
includes writing the client-side and server-side code, as well as the steps
involved in designing your Autodesk MapGuide project and server layout,
setting up an Autodesk MapGuide Server and a web server, gathering your
data, and creating your HTML pages.
There are eight main tasks involved in setting up your Autodesk MapGuide
site and developing applications.
1 Familiarize yourself with GIS and the Autodesk MapGuide product
architecture.
2 Design your system, by deciding which web server to use, whether to use
multiple servers, the directory structure for your project, how you will
implement security, and so on. Determine whether you will require users
to install Autodesk MapGuide Viewer, or whether you want to use
Autodesk MapGuide LiteView Extension to serve maps with limited
interactivity.
3 Set up your server. This includes installing and configuring your web
server, installing Autodesk MapGuide Server, installing a reporting engine,
setting up a development environment, and adding files to the server.
4 Decide on your data strategy and work with your data. You will need to
determine whether to use a data extension to access data directly or
whether to convert your data. This includes creating spatial data, attribute
data, raster images, symbols, Zoom Goto categories, and reports, and then
adding this data to your map. It also includes optimizing the data you
create and ensuring that you’re using the correct coordinate system and
precision.
5 Create your maps using Autodesk MapGuide Author, and post them on
the server.
6 Add the maps to web pages, and develop client-side applications to
interact with the maps.
7 Develop report scripts that either display data for selected features on the
map or dynamically update the databases when the user clicks the map or
enters information.
40 | Chapter 2 Understanding Autodesk MapGuide
Page 41

8 Optionally, use Autodesk MapGuide SDF Component Toolkit to develop
applications that allow you to modify your spatial data files (SDFs) by editing, deleting, or adding geographic features from the browser.
Overall Strategy
Setting up Autodesk MapGuide and developing an application is much like
cooking: rather than working on one task at a time, you need to work on
several of them at once, going back and forth between the tasks as needed.
This section uses this approach and outlines the best strategy for setting up
Autodesk MapGuide and developing applications. The process includes three
main phases: installation and testing, planning and design, and
implementation.
The following sections describe these phases. For more information about
the second phase, planning and design, see Chapter 3, “Designing Your
System.”
Phase One: Installation and Testing
This phase involves installing and testing all of the components to make sure
that your system is ready. You can take two approaches to this phase. The first
approach is to read through Chapter 3, “Designing Your System,” to determine exactly how you want to set up your system before you install. The
other approach is to do a basic installation to get an idea of how everything
works together and make sure it all works properly, and then use that knowledge in Phase Two when you plan and design your complete Autodesk
MapGuide application. In either case, the data and map layer you create in
this phase should be very basic and for testing purposes only.
To install and test the components
1 Install your web server and web browser, and then type your web server
URL in the web browser to make sure that the browser is communicating
with the web server.
2 Create OLE DB data sources for your attribute data, and then test them
with Access, Excel, or another database application to make sure that you
can access the data through the OLE DB data source names you created. If
you are not sure which attribute data you will be using yet, skip this step
for now and return to it during Phase Three when you create your data.
Overall Strategy | 41
Page 42

3 Install Autodesk MapGuide Server, and then type your Autodesk
MapGuide Server URL in the web browser to make sure that the browser
is communicating with the Server.
4 Install Autodesk MapGuide Author, and then open tutorial.mwf to make
sure you can access the Internet through Autodesk MapGuide Author. If
you will be using Autodesk MapGuide on an intranet only, skip this step.
5 If you are using a data extension to access data directly, install the data
extension as described in the data extension’s documentation. If you are
not using a data extension, install Autodesk MapGuide SDF Loader, and
then convert one file to SDF file format.
6 In Autodesk MapGuide Author, create a new layer based on the SDF you
created in the previous step or based on the data you are accessing
through a data extension.
7 If the layer links to an OLE DB data source, create the link and then test
the link by pausing the mouse over features on the layer to make sure the
MapTips are displaying the feature names.
8 Save the MWF.
9 Create an HTML page that references the MWF and post it in the web
server directory.
10 Install the Autodesk MapGuide Viewers you will be supporting, and then
in your web browser, type the URL to the HTML page you created in the
previous step to verify that the map loads in Autodesk MapGuide Viewer.
Phase Two: Planning and Design
This is a critical phase, during which you determine how you need your
Autodesk MapGuide application to function and design it accordingly.
To plan and design your application
1 Determine your performance needs, and whether you should install mul-
tiple servers.
2 Determine which data you will need for the map, including what types of
reports and Zoom Goto categories you will need.
3 Decide how to design the layers. Ask yourself the following questions:
What name do you want to display in the legend for each layer?
What name do you want to use for each legend for programmatic
access (that is, access through the Viewer API)?
Should users be able to select features on this layer?
42 | Chapter 2 Understanding Autodesk MapGuide
Page 43

Do you want to display more or less data depending on the current
scale? If so, create multiple layers of the same area that turn on and off
at particular display ranges.
Will the data on this layer be used in any reports? If so, make a note to
add this layer to the Report tab when you set up your reports.
4 Design your Autodesk MapGuide application. This involves determining
the following:
How will the user interact with Autodesk MapGuide Viewer and the
web page? For example, will the user have to select features on the map,
or will you add a list box to the web page that allows the user to select
a map feature from the list?
Depending on which functionality you want to add to the web page,
which Autodesk MapGuide functions do you need to use in order to
provide this functionality?
Do you need to create other applications and scripts, such as CGI
scripts? For example, if you want to allow the user to digitize points on
the map and update the database with the new locations, you need to
write a script to handle this.
Phase Three: Implementation
In Phase Three, you implement your Autodesk MapGuide application
according to the plan you developed in Phase Two.
To implement your application
1 If you will be installing additional servers, do so now and test them as you
did in Phase One.
2 Create a skeleton of your application (without the MWF), creating place-
holders and pseudo-code for your features and functions.
3 If you are not using a data extension to access data directly, perform data
conversion, and then put the converted files in necessary locations. If you
create any additional databases, go back to Phase One and create and test
OLE DB data sources for each database you add.
4 Create the report scripts or applications that Autodesk MapGuide will use
to generate reports.
5 Create the Zoom Goto data.
6 Build the map according to your plan. This includes creating the layers,
and then adding the reports and Zoom Goto categories to the Map Window Properties dialog box.
Overall Strategy | 43
Page 44

7 Add the MWF to the application skeleton, then test all layers, reports,
Zoom Goto categories, and so on.
8 Build the placeholder functions and test them.
44 | Chapter 2 Understanding Autodesk MapGuide
Page 45

Designing Your System
This chapter covers topics that you need to take
into consideration before you set up your Autodesk
MapGuide Server, author your map, or develop
In This Chapter
Planning your
directory structure
Security
Architecture and
performance
3
your Autodesk MapGuide Viewer application. Read
this chapter to decide how you want to design your
system, what type of security you need, and what
type of Viewer and browser environment you want
to support before you install or configure any
software.
This chapter may be especially helpful to:
Server administrators
Application developers
Choosing a
viewer/browser
environment
45
Page 46

Planning Your Directory Structure
The first step in designing your system is planning the structure of files and
directories you will have on your server. For example, will you have all of
your files under one main directory, or will you split them into project directories? Will you have all of your data in one directory to be used by all
projects, or will you have a separate data directory for each project? Part of
planning your directory structure comes from your own understanding of
how many projects and how much data you have, and a major consideration
is setting up the structure so that your files are secure.
Note This chapter assumes you are familiar with Windows NT/Windows 2000
and web server administration. If you are not, look up “Windows NT,”
“Windows 2000,” and “web server” in the Autodesk MapGuide help index.
Directory Structure Guidelines
You will need to create a directory structure for any of the file types you use
with Autodesk MapGuide. In some cases you will also have to create virtual
directories that map to physical directories. Your main security strategy is to
locate files above and below your web root directory and to create virtual
directories when necessary.
Autodesk MapGuide includes a sample project called Sample_World, which is
installed in a recommended directory structure, as shown in the following
illustration.
Sample project with
recommended directory
structure.
46 | Chapter 3 Designing Your System
Page 47

This setup is designed for maximum portability and security as well as ease
of maintenance. By setting up your projects in this way, you can easily move
an entire project from one computer to another, as all of the necessary data
is under the project directory. You can also add additional directories and
subdirectories, as needed.
Use the following guidelines for setting up your directory structure.
Group your files into projects, with project directories. For instance, if you
post two projects on your Autodesk MapGuide Server, create /project1 and
/project2 under your web root:
/web root/project1/
/web root/project2/
You must place HTML files under the web root. For instance:
/web root/project1/web/map1.html
/web root/project2/web/map2.html
For security reasons, we recommend that you place data source files above
the web root.
You need to place your MWFs, MLFs, report files, and server-side scripts in
directories that have web server Execute permission. If you are running
Microsoft Internet Information Server, and you want to give a directory
Execute permissions, you must create a virtual directory that maps to it,
regardless of whether that directory is under the root or not. For instructions on creating a virtual directory, refer to the documentation that came
with your web server.
You can locate your MapAgent files anywhere on the server where they
can be accessed by the web server software.
If you are running Internet Information Server, we recommend that you
use the default directory that it provides for your MapAgent files. This way
you do not need to create a virtual directory. If you choose to create a different directory for your MapAgent files, you must create a virtual directory that maps to that directory.
Netscape Enterprise Server does not create a default directory. If you use
the NSAPI version of the MapAgent, you must enter a pointer in the
Netscape configuration file that points to the MapAgent_NSAPI.dll file.
Typically, the MapAgent_NSAPI.dll directory is:
C:/Program Files/Autodesk/MapGuideServer5/MapAgents
If you are going to use the CGI agent, you must create a CGI directory and
create a mapping to that directory in the Netscape Administrator.
Planning Your Directory Structure | 47
Page 48

Security
Security is an important consideration when setting up any kind of server
application. With Autodesk MapGuide, you can implement security for your
server computer at a number of different levels. There are three main
methods for setting up security:
Using Windows NT or Windows 2000 Security
Use the Windows NT or Windows 2000 Administrator tools to set security
for files and directories on the server computer.
Use your web server to set security for virtual directories. Plan your directory structure so that files requiring security are above the web root.
Use Autodesk MapGuide to set up user IDs and passwords, access keys, and
passkeys to protect resources (such as SDFs and databases), maps, and map
layers.
Online Help Index
Windows NT, security
Windows 2000, security
Online Help Index
web server
security
We recommend that you review the security settings for all folders on your
server and adjust them appropriately, depending on the files they contain. If
your Autodesk MapGuide Server directories are on a drive that uses the file
allocation table (FAT) file system, you do not need to set Windows permissions, because all users have access to all files and directories. If these directories are on a drive that uses a Windows NT File System (NTFS), you must
set the appropriate permissions on these directories for each account
intended to access these directories.
In addition to setting security for individual files and directories, you can also
set security for all directories controlled by your web server. The next section
discusses this approach.
Using Web Server Security
When you create a web publishing directory, you can set access permissions
for the defined home directory or virtual directory and all of the directories
below it. The World Wide Web (WWW) service provides the access permissions, which are in addition to the permissions provided by the NTFS file
system. Note that ColdFusion template files (.cfm files) interact with the web
server in a similar manner to a CGI scripting process, so any directory
containing these files must also have Execute access.
48 | Chapter 3 Designing Your System
Page 49

The security considerations for your Autodesk MapGuide site are the same as
those for any other web site that provides data. With that in mind, we recommend that you create an organized directory structure with permissions that
appropriately protect the files on your Autodesk MapGuide-enabled web site.
In addition to the Windows NT/Windows 2000 and web server security
methods just discussed, you can also use a variety of methods in Autodesk
MapGuide Server to set up security.
Using Autodesk MapGuide Security
Autodesk MapGuide Server and Autodesk MapGuide Author provide you
with the following methods for keeping your data resources and maps secure:
User IDs and passwords to control access to maps, map layers, and data
sources
Access keys to control map layer access to data sources and map feature
coordinate values
Passkeys to control Viewer API access to layer setup data and map feature
coordinate values
You can use one or more of these methods depending on your security needs.
Online Help Index
passwords
setting for maps
Online Help Index
layers
restricting access
Controlling Access to Maps
In addition to controlling access to your map using the standard security
features of your web server, you can add password protection to your maps
through Autodesk MapGuide Author. Password protection prevents other
Autodesk MapGuide Author users from opening a proprietary Internetpublished map and accessing the information stored in the MWF. You must
enter the correct password each time you open a password-protected map.
If you have a public site, another way to add security to your MWFs is to store
the MWFs on a server inside of your firewall and have the MapAgent and
HTML files on a server outside of the firewall. For more information, see
“Using a Remote MapAgent” on page 52 and “Firewalls” on page 69.
Controlling Map Layer Access to Data Sources
You can control access to data sources (resources) by assigning access keys to
them using Autodesk MapGuide Server Admin. An access key is a unique
string that can include a start and end date. To use a resource that has an
access key assigned to it, the map author embeds the access key in the layer
or Zoom Goto definition that will access that resource.
Security | 49
Page 50

Each time a user attempts to access that map layer (such as by panning or
zooming) or Zoom Goto definition, the access key is automatically sent to
the server along with the request for the data. Autodesk MapGuide Server
verifies the key and its start/end dates (if any) against the list of access keys
assigned to that resource before providing the data. If the key is verified,
Autodesk MapGuide Server loads the layer’s data; otherwise, the program
displays a message indicating that access to the data is denied.
When assigning access keys to map layers, you need to coordinate with the
person administering Autodesk MapGuide Server to make sure that the
access key is properly assigned to the specific resource that provides data to
that map layer. For more information, see “Creating and Modifying Access
Keys” on page 80 and “Specifying Security for Layers” on page 164.
Controlling User Access to Resources
Online Help Index
resources
restricting access to
You can control which users can access resources (SDFs, raster image files,
databases, and so on) by assigning user IDs and passwords to resources using
Autodesk MapGuide Server Admin. Whenever Autodesk MapGuide Viewer
or Autodesk MapGuide Author requests data from a resource, the user is
prompted to enter a user ID and password. Autodesk MapGuide Server then
verifies that this user ID and password has been assigned to the resource and
provides the data.
Additionally, you can assign users to the Authors user group using Autodesk
MapGuide Server Admin. When authors create maps, they can browse for
available resources only if they are assigned to the Authors user group. This
provides only a minimal level of security, because authors can still use a
resource by typing its path, but they cannot browse for available resources
without the recognized user ID and password that you specified in Autodesk
MapGuide Server Admin. For more information, see “Creating and Modifying Users and Groups” on page 78.
Note Be sure to run Autodesk MapGuide Server and Autodesk MapGuide Server
Admin under the same account (the System account or a user account). Otherwise, the resources you see in Autodesk MapGuide Server Admin might not be
the same resources that are available to Autodesk MapGuide Server. See “Config-
uring Autodesk MapGuide Server under a Different Account” on page 71 for
more information.
50 | Chapter 3 Designing Your System
Page 51

Accessing Data from the Autodesk MapGuide Viewer API
Map authors can control whether developers can access coordinate values
and map layer setup data using the API getVertices() and getLayerSetup()
methods. You control the security of this data from the Map Layer Properties
dialog box in Autodesk MapGuide Author. If you allow API access, you can
also specify that the application must send a specific passkey first, which the
application developer passes in with the unLock method. The developer can
then use the getVertices() and getLayerSetup() methods to access the coordinate values and layer setup data. For more information, refer to the Autodesk
MapGuide Viewer API Help.
We do not recommend hard coding the passkey in your HTML application
script because users can always view the source code of an HTML page. One
option is to prompt users for their user IDs and passwords when they attempt
to view secured data and then authenticate the user ID and password against
a database on your server.
Map authors can also control whether developers have access to the
tracking ID using the getTrackingID() and setTrackingID() methods. You
control the security of this data from the Map Window Properties dialog box
in Autodesk MapGuide Author.
Architecture and Performance
This section discusses the different server agents and distributed architectures that you can implement for your Autodesk MapGuide Server and how
they affect performance. On installation, Autodesk MapGuide Server selects
a map agent based on the web server it detects. You can, however, go back to
the installation program and install a different map agent at any time.
Which MapAgent to Install
There are three types of Autodesk MapGuide Server agents (MapAgents) that
you can install:
CGI This agent works on any type of web server and is easy to install.
Therefore, if this is your first time building a web server, you might want
to install the CGI agent instead of the ISAPI or NSAPI agents to avoid complications. However, you should note that CGI applications do not scale
well on Windows NT/2000, meaning that they will not be able to take
Architecture and Performance | 51
Page 52

advantage of multiple servers. If your server receives numerous client
requests for Autodesk MapGuide, you will end up with many separate
instances of the CGI agent communicating with Autodesk MapGuide
Server. This can adversely affect your performance.
ISAPI The ISAPI (Internet Server Application Programming Interface)
agent is an alternative to CGI. It is an API that extends the capabilities of
Microsoft Internet Information Server. (If your web server is Netscape, use
CGI or NSAPI instead.) The ISAPI agent is in the form of a DLL (Dynamic
Link Library). The ISAPI DLL resides on the computer, so it is faster than
the CGI agent. It is also fairly easy to install. However, you can install the
ISAPI agent only on a Microsoft Internet Information Server.
NSAPI The NSAPI (Netscape Server API) agent is similar to the ISAPI agent
except that it works on the Netscape Enterprise Server. Like ISAPI, it is
faster than CGI, making it better for your server’s performance.
Using a Remote MapAgent
The Autodesk MapGuide MapAgent uses RPCs (remote procedure calls) to
forward client requests for map data to Autodesk MapGuide Server. Because
RPC calls can be made across a network, the MapAgent does not need to
reside on the same computer as Autodesk MapGuide Server. This is useful for
enhancing security, because it allows you to publish maps from your public
server while keeping your data, Autodesk MapGuide Server, and the communication between them secure on your private internal LAN.
For example, you could have your web server, MapAgent, HTML files, and
supporting files for the HTML files (such as bitmaps that appear in the web
page, not within the map) all on a public server outside of the firewall or
other Internet security mechanism you are using. Inside the firewall, you
would have Autodesk MapGuide Server and your resources (databases, SDFs,
and raster images that appear within the map). With this setup, not only is
all of your data behind the firewall, but all communication between
Autodesk MapGuide Server and your data takes place behind the firewall.
This approach allows the whole world to use your maps, but it minimizes the
possibility of hackers accessing your data files or taking advantage of the
communication between Autodesk MapGuide Server and your databases.
The only hole in the firewall is between the MapAgent and Autodesk
MapGuide Server, and the data passed between them is only useful for
display in Autodesk MapGuide Viewer. For more information, see “Data File
Placement” on page 57.
52 | Chapter 3 Designing Your System
Page 53

To use a remote MapAgent, you need to make sure the MapAgent can
communicate to your Autodesk MapGuide Server through your firewall. For
more information, see “Setting Up the MapAgent” on page 67.
Standardizing on UDP or TCP
Different versions of Windows use either UDP ports or TCP ports for RPC by
default. When you use the MapAgent on a different computer from the
Autodesk MapGuide Server, be sure that the computers are using compatible
operating systems. Otherwise, if the Autodesk MapGuide MapAgent
computer attempts to communicate with the Autodesk MapGuide Server
computer using a different protocol, there will be a 30—45 second delay. At
the end of the delay, an attempt will be made to connect with the alternate
protocol. This delay will occur unless the last working protocol type (UDP or
TCP) is cached by the operating system on the Autodesk MapGuide
MapAgent computer.
Using Multiple Servers
Autodesk MapGuide Server is scalable, meaning that it has mechanisms built
in to take advantage of multiple servers, which improves performance.
Autodesk MapGuide Server can process multiple requests simultaneously,
balance the load of requests across the available servers, and use data that is
distributed across different servers. This section discusses how Autodesk
MapGuide Server takes advantage of multiple servers and helps you determine which is the best strategy for you.
Understanding Multiple Simultaneous Server Requests
Autodesk MapGuide Server is a multi-threaded application, meaning that it
can process multiple requests for data in parallel, as opposed to serially
processing each request one after another. This means that instead of using
one server to process a large request, or sending smaller requests one at a
time, you can have multiple servers processing smaller requests all at the
same time. You do this by setting up your map layers to use data from
different Autodesk MapGuide Servers. Autodesk MapGuide Viewer will then
send off requests for data from all of those layers in parallel, where they are
processed all at the same time. Therefore, if you have three servers,
processing time could be up to three times faster than using one server.
Architecture and Performance | 53
Page 54

For example, in the following illustration, there are requests coming from
layers 1 through 6. In this example, layers 1 and 3 make the requests to server
A, layers 2 and 4 send the requests to server B, and layers 5 and 6 send the
requests to server C. The requests to these servers go out all at the same time,
so the servers process the requests simultaneously. Each server then sends its
processed data back to the Viewer. The Viewer always draws layer 1 first, and
then draws all of the rest of the layers simultaneously once it has received all
of the data.
Autodesk
MapGuide
Viewer
request layers 1 & 3
request layers 2 & 4
request layers 5 & 6
return data
draw layer 1
draw layers
2, 3, 4, 5, & 6
Autodesk
MapGuide
Server A
Simultaneous request model
process
request
return data
Autodesk
MapGuide
Server B
process
request
return data
parallel process
serial process
Autodesk
MapGuide
Server C
process
request
Distributed Data vs. Mirrored Systems
There are two approaches to using multiple servers: distributed data and
mirrored systems. In the distributed data model, the servers contain different
resource files so that the map data is distributed across the servers. In the
mirrored model, you have multiple servers with identical setups and data
so that the additional servers act as backups if the first server is busy or
unavailable.
54 | Chapter 3 Designing Your System
Page 55

The distributed data model requires less maintenance than the mirrored
systems model. However, this approach is not fault tolerant—if one Autodesk
MapGuide Server goes down, map viewers cannot access the data on that
server. The mirrored systems model is safer than the distributed data model
because it does have fault tolerance, which provides a backup server so that
the data is still available. However, mirrored systems can require more maintenance than distributed data systems if you need to update the servers.
The following diagrams illustrate the two different multiple server architectures. In the first diagram, notice that there are three web server computers,
each with its own Autodesk MapGuide Server. Each contains different data.
In this case, requests are distributed among the servers based solely on which
data is requested; if repeated requests are made for the same data, only the
server containing that data will be processing the requests. To make this
model work, you must plan the placement of your data carefully so that
requests are distributed equally among the servers.
raster data
Web Server 1
Map
Agent
MapGuide
Server 1
spatial
data...
Example of distributed data
Web Server 2
Map
Agent
MapGuide
Server 2
...more
spatial data...
Web Server 3
Map
Agent
MapGuide
Server 3
...still more
spatial data
OLE DB
Attribute Data
Architecture and Performance | 55
Page 56

In the next diagram, a web server has a MapAgent that points to several
Autodesk MapGuide Servers, each of which has exactly the same data as the
others. In this case, requests made to this server will be distributed among the
Autodesk MapGuide Servers based on their availability, so if one of the
Autodesk MapGuide Servers is busy processing another request, the request
will go to the next server.
Web Server 2
Map
Agent
MapGuide
Server 3
raster
data
spatial
data
attribute
data
raster
data
spatial
data
MapGuide
Server 1
attribute
data
MapGuide
Server 2
spatial
raster
data
data
attribute
data
Example of mirrored data
For maximum benefit, you can use a combination of the two approaches. For
example, in the mirrored data illustration, Web Server 2 might be one of
several web servers that is used only when requests are made for its particular
data. However, when requests are made to Web Server 2, all requests it
receives are distributed among three Autodesk MapGuide Servers for
processing, each of which contains exactly the same data. Thus, in this
example, several web servers use the distributed data model, and one of the
distributed web servers also uses the mirrored data model to handle its individual requests.
Setting up Multiple Servers
If you choose to have multiple Autodesk MapGuide Servers on your network,
you must configure their TCP/IP settings to operate correctly through your
Internet connection configuration. Also, to maximize performance, be sure
to set up your MapAgent for load balancing between the servers.
56 | Chapter 3 Designing Your System
Page 57

Data File Placement
When using remote and/or multiple servers, it is important to know where
to store your data so that the server(s) can access it. The following table
describes whether each type of data needs to be available to the Autodesk
MapGuide Server(s) or the web server. Note that the MapAgent does not need
access to data files, as it simply relays whatever data is sent to it from the
Autodesk MapGuide Server.
This type of
data...
Map source data
(SDFs, data
accessed using a
data extension,
raster images,
OLE DB data
sources)
Raster images in
web page (outside of map)
MWFs and MLFs Web server The web server processes these files; the
Must be available
Comments
to...
All Autodesk
MapGuide Servers
Web server The web server processes these files
The Autodesk MapGuide Server(s) process the data, then send it to the
MapAgent to be relayed to Autodesk
MapGuide Author or Viewer.
because they are outside of the map.
Therefore, the Autodesk MapGuide
Server(s) do not need access to them.
Autodesk MapGuide Server(s) do not
need access to them.
Additional Performance Considerations
In addition to using multiple servers, there are several ways in which you can
improve performance. Keep the following tips in mind when setting up your
site, authoring your maps, and preparing your data.
Site Configuration
Bandwidth is a critical factor. This includes internal and external bandwidth, as well as network traffic (particularly at peak hours on the
Internet).
Your hardware has many factors that affect performance, including
processor speed, memory, and disk space.
Architecture and Performance | 57
Page 58

Map Authoring
Show only the layers that users really need. You can make the layers available but not visible when the user first displays the map, reducing the
amount of data that needs to be processed when the map is first loaded.
Create static layers for small, frequently accessed data that does not need
to be kept secure. Static layers are loaded only once; zooming in and out
on the layer does not send requests to the server. For larger data sets, data
that changes frequently, and data that needs to be kept secure, use
dynamic layers instead.
Use the Display Ranges option and pyramid the data. This involves creating multiple layers that show the same data but at different resolutions.
You might have one layer that displays very detailed data and appears
only when the user is zoomed in close, a second layer that displays less
detail and appears only when the user is zoomed out farther, and a third
layer that shows very generalized data and displays only when the user is
zoomed out quite far.
Data Preparation
For point and text layers, rather than creating an SDF for the points and
linking it to a SQL table for the attribute data, consider storing the points
in the SQL table as well and using that table as the source for the layer.
Whenever you link an SDF to a SQL table, it takes longer to process than
a layer based on just an SDF or a SQL table. This is not true of themes, however. When setting up a theme, it doesn’t matter whether the data source
and theme source are the same SQL table, or the data source is an SDF and
the theme source is a SQL table—performance will be the same in both
cases.
If there are multiple theme categories for a layer, consider using separate
layers that reference separate SDFs. If possible, you could also export the
information in a SQL table to a comma-separated (CSV) file and import it
into its own SDF, rather than including it as a theme category of a layer
based on another SDF.
Generalize data as much as possible. This involves reducing the resolution
of the data so that there is less data to process. You can generalize SDFs
using Autodesk MapGuide SDF Loader or Autodesk MapGuide SDF Component Toolkit; you can sub-sample raster images using Autodesk
MapGuide Raster Workshop. Note that generalization reduces the amount
58 | Chapter 3 Designing Your System
Page 59

of detail you will see when you zoom in, so you might want to create multiple layers of the same area using different resolutions for different display ranges. Also, data with complex shapes, such as parcel data, might
not generalize well, because their boundaries might not line up properly
afterwards.
Trim feature names if they are not used. You can use the /NULLNAME
switch in Autodesk MapGuide SDF Loader to do this. Also, use the /LINK
switch to specify the URL column(s) only if you plan to use the URLs.
For raster images, use Autodesk MapGuide Raster Workshop to create
uncompressed, sub-sampled, tiled TIFF files.
Choosing a Viewer/Browser Environment
As you plan your Autodesk MapGuide application, there are four major
components you need to consider:
Operating system—Will your users be running Windows, Mac OS, or
Solaris to view maps?
Web browser—Will your users be running Netscape Navigator or
Microsoft Internet Explorer? Or do you want to create a stand-alone application to run the Viewer, so that a browser is not necessary?
Autodesk MapGuide Viewer/Autodesk MapGuide LiteView Extension—
Depending on which operating system and browser your users have, they
will use the ActiveX Control, Plug-In, or Java edition. If all of your users
are running the same operating system and browser (such as on a corporate intranet), you can develop your application for one Autodesk
MapGuide Viewer. However, if your users all have different setups and
thus use all of the Autodesk MapGuide Viewers, you will need to develop
your application to handle all three. If you do not need the full interactivity of Autodesk MapGuide Viewer and you need complete cross-platform
support, you can consider using Autodesk MapGuide LiteView Extension
to deliver raster-based maps with limited interactivity.
Scripting language—Which language will you use to develop your application? Each Autodesk MapGuide Viewer is accessible from one or more
specific languages.
Choosing a Viewer/Browser Environment | 59
Page 60

The following table is designed to help you consider each of these factors.
Components for Choosing a Viewer/Browser Environment
Operating
System
Windows
Browser Viewer Language
Internet Explorer ActiveX Control HTML, VBScript,
Jscript, Java
Internet Explorer Java edition HTML, JScript, Java
Netscape
Navigator
Netscape
Navigator
Any browser that
supports PNG file
format
none
(stand-alone
application)
Plug-In HTML, JavaScript,
Java
Java edition HTML, JavaScript,
Java
LiteView Extension ColdFusion (CF),
Active Server
Pages (ASP), Java
Server Pages (JSP)
or Perl
ActiveX Control Visual Basic, C++,
Java
Mac OS
Internet Explorer Java edition HTML, Java
Any browser that
supports PNG file
format
none
(stand-alone
application
60 | Chapter 3 Designing Your System
LiteView Extension ColdFusion (CF),
Active Server
Pages (ASP), Java
Server Pages (JSP)
or Perl
Java edition Java
Page 61

Components for Choosing a Viewer/Browser Environment (continued)
Operating
Browser Viewer Language
System
Solaris
Netscape
Navigator
Any browser that
supports PNG file
format
none
(stand-alone
application)
Java edition HTML, JavaScript,
Java
LiteView Extension ColdFusion (CF),
Active Server
Pages (ASP), Java
Server Pages (JSP)
or Perl
Java edition Java
ActiveX Control for Internet Explorer
The ActiveX Control works only within the Internet Explorer 4.01 and later
browser for Windows. It exposes an API that is accessible from VBScript,
JScript (Microsoft’s implementation of JavaScript), and Java. The ActiveX
Control API is exposed through ActiveX/COM/Automation technology. If
you develop an application only for the ActiveX Control version of the
Viewer, users can access that application with Internet Explorer only; if
someone tries to view your application with Netscape, it will fail. You can
also write stand-alone applications for the ActiveX Control with Visual Basic
or C++. In this case, no browser is required, as your stand-alone application
takes the place of a browser.
Netscape Plug-In
The Plug-In version of the Viewer works within Netscape Navigator 4.5 and
later for Windows. It exposes an API that is accessible from JavaScript and
Java. The Plug-In Viewer API objects are exposed via Netscape LiveConnect
technology.
If you develop an application only for the Plug-In version of the Viewer, users
can access that application with Netscape only; if someone tries to view your
application with Internet Explorer, it will fail.
Choosing a Viewer/Browser Environment | 61
Page 62

Java Edition
The Java edition works with certain combinations of both browsers on
Windows, Mac OS, and Solaris (see previous table). It is accessible from
JScript, JavaScript, and Java. Internet Explorer 4.01 (for Windows
98/95/NT/2000 and Mac OS 8.0 using MRJ 2.1) exposes the Java edition API
through a combination of the Java bean and ActiveX/COM/Automation
technology. Netscape Communicator 4.5 (for Windows 98/95/NT/2000 and
Solaris 2.6) exposes the Java edition API through a combination of Java introspection and LiveConnect technology. The API classes are defined in the
com.autodesk.mgjava package, which is typically contained in the
mgjavabean.exe file. All configurations expose the Java edition API to other
Java code if it has been compiled to directly instantiate MGMapApplet or
MGMapComponent.
For more information, see “Implementing the Java Edition” in the Autodesk
MapGuide Viewer API Help.
Autodesk MapGuide LiteView Extension
Autodesk MapGuide LiteView Extension is a Java program that runs on the
server side (a servlet). It converts an MWF file into a PNG image and returns
it as an HTTP response to a request. It extends the capabilities of Autodesk
MapGuide to quickly display maps as raster images in Netscape Navigator,
Internet Explorer, or any other browser that supports the PNG image format.
Application users do not have to download a plug-in to display the maps.
Third-party integrators can create a custom Autodesk MapGuide LiteView
Extension viewer, using the sample application provided with the servlet as
an example. For more information, see the Autodesk MapGuide LiteView
Extension documentation.
62 | Chapter 3 Designing Your System
Page 63

Assembling and
Administering Your Server
In This Chapter
4
This chapter includes information about setting up
and administering your server. Before you begin,
please read Chapter 3, “Designing Your System,” to
help you decide how to set up your server security
and architecture.
This chapter may be especially helpful to:
Server administrators
Application developers
Setting up your server
Autodesk MapGuide
Server Admin
overview
Setting general server
properties
Setting up your data
sources
Managing server
security
Tracking server
requests
Adding geocoding
data
63
Page 64

Setting Up Your Server
To enable your computer to serve maps over the web, you must install and
configure your web server software. Autodesk MapGuide Release 5 supports
Microsoft Internet Information Server (IIS) 4.0 and later and Netscape Enterprise 3.5 and later.
Before You Install Autodesk MapGuide Server
Before installing Autodesk MapGuide Server, be sure to do the following:
Log On with Administrative Rights
Before you install Autodesk MapGuide Server, log on to Windows as an
administrator or as a user who has administrative privileges.
Verify Your System Requirements
If you are running Microsoft Windows NT, make sure that you have
installed Service Pack 4 or later.
Make sure that you have Microsoft Data Access Components (MDAC) 2.1
SP2 or later installed on your computer. MDAC 2.5 is included on the
Autodesk MapGuide Server CD in the following location:
\MDAC2.5\MDAC_TYP.EXE)
The Autodesk MapGuide Server installation program requires that the
Microsoft Install Engine (MSIE) be present on your computer. MSIE is
included with Microsoft Windows 2000. If you do not have MSIE on your
computer, the Autodesk MapGuide Server installation program will install
the MSIE software for you. You will then need to restart your computer and
manually restart the Autodesk MapGuide Server installation.
64 | Chapter 4 Assembling and Administering Your Server
Page 65

Remove Autodesk MapGuide Server 4.1 for VISION*
If you have Autodesk MapGuide Server 4.1 for VISION* installed on your
computer, follow these steps before installing Autodesk MapGuide Server
Release 5.
1 Use Autodesk MapGuide Server Admin to stop the Autodesk MapGuide
Server Service.
2 Close Autodesk MapGuide Server Admin.
3 Using the Add/Remove Programs Control Panel, uninstall Autodesk
MapGuide Server for VISION*.
Install Your Web Server Software
Install and configure the web server software, as described in “Installing
Microsoft Internet Information Server” on page 66 and “Installing a
Netscape Web Server” on page 66.
During the Autodesk MapGuide Server installation, you will be asked to
select one or more map agents to install (see “Which MapAgent to Install”
on page 51). If, during the installation, you select a map agent for which you
have not yet installed a web server, you will need to perform the following
steps after you finish installing Autodesk MapGuide Server:
1 Copy each map agent listed in the MapAgents Not Supported screen of the
Autodesk MapGuide Server installation from the <installation direc-
tory>\MapAgent directory to a virtual directory for the web server.
2 Enable Scripting and Execute permissions for the virtual directory.
3 Configure the web server MIME type for MWF files.
This process varies with each new web server. Typically, you specify the
content type as application/x-mwf and the file extension as .mwf (sometimes omitting the period).
Setting Up Your Server | 65
Page 66

Installing Microsoft Internet Information Server
If you plan to run Microsoft Internet Information Server (IIS) on Windows
NT, you need to install the Windows NT Option Pack 4.0. This is not necessary with Windows 2000 because IIS is included with Windows 2000.
To install the Option Pack
1 Install Microsoft Internet Explorer 4.0 or later.
2 Install Option Pack 4.0. When you install the Option Pack, select the
Upgrade Plus option and be sure to select Internet Information Service as
a component to install.
Installing a Netscape Web Server
Before installing a Netscape web server, you must first have the following:
A Microsoft Windows NT Server 4.0 machine with Service Pack 4, 5, or 6
on it, or a Microsoft Windows 2000 Server machine.
Netscape Navigator installed on your machine. Either install Netscape
Navigator from the Netscape Developer’s CD or download it from the web:
http://www.netscape.com.
An entry in a DNS server. Make sure that the administrator of the DNS
server in your network enters the computer on which you are installing
Autodesk MapGuide Server into the domain.
A user account set up on the computer.
After you have met all of these criteria, you are ready to install the Netscape
Enterprise Server software from the Netscape CD.
To install Netscape Enterprise Server
1 Insert the Netscape CD, and then follow the instructions on the screen to
start the installation.
2 The installation program prompts you to specify whether or not you want
to use LDAP (Lightweight Directory Access Protocol). Because you do not
need LDAP, leave the box unchecked and go on to the next dialog box.
3 When prompted for user information, enter the name and password of
the user you created in the User Manager.
4 The installer generates numbers for the administrator and web server
ports. Accept these defaults and write them down for future use.
66 | Chapter 4 Assembling and Administering Your Server
Page 67

5 Optionally, specify the default home directory for your web documents
instead of using the default content directory.
You should now be able to access the index.html file. If you cannot, refer
to the Netscape Server documentation for troubleshooting tips.
Testing Your Web Server
You can test your web server by connecting to it from another computer on
your network. Make sure that a default HTML file (such as index.html) is
located in your server’s default document directory. Then, start a browser on
a different computer and enter the server’s name in the browser URL window.
You should be able to access the default HMTL file on your server from the
other computer. If you cannot, refer to your web server documentation for
troubleshooting tips.
Setting Up the MapAgent
Typically, to set up the MapAgent, you first decide which MapAgent you
want to use (see “Which MapAgent to Install” on page 51) and then select
that MapAgent during the Autodesk MapGuide Server installation process.
However, if you want to use the MapAgent on a different computer from
Autodesk MapGuide Server, or if you want to take advantage of load
balancing for multiple servers, read the following sections for configuration
information.
Setting Up a Remote MapAgent
The Autodesk MapGuide MapAgent uses DCOM to forward client requests
for map data to the Autodesk MapGuide Server. DCOM is built upon the RPC
(remote procedure calls) transport. Because DCOM calls can be made across
a network, the MapAgent does not need to reside on the same computer as
Autodesk MapGuide Server.
To configure the MapAgent to use a remote server
1 Run the Autodesk MapGuide Server Setup program on the machine where
you want to install the MapAgent.
2 In the Select Components panel, deselect the Server Service item, and
verify that the correct MapAgent is selected.
You will be prompted to enter the IP address for the Autodesk MapGuide
Server machine. When the installation is complete, the MapAgent is ready
to route requests to the remote Autodesk MapGuide Server.
Setting Up Your Server | 67
Page 68

If necessary, you can move the MapAgent executable file to a different CGI
script directory after you finish the installation. You can also change the
remote Autodesk MapGuide Server’s IP address by manually editing the
REG_SZ registry, as described in the following procedure.
Warning Whenever you edit your registry, be sure to use great caution. We
recommend that you make a backup of your registry before you proceed.
To edit a remote server’s IP address
1 Run the Windows NT REGEDT32.EXE tool. You can do this by clicking the
Start button, choosing Run, and then typing REGEDT32 in the Open box.
We do not advise that you use the Windows NT tool REGEDIT.EXE,
because currently it does not have a friendly interface for editing REG_SZ
values.
2 In the Registry Editor, navigate to the key
HKEY_LOCAL_MACHINE\SOFTWARE\Autodesk\MapGuide Server
Agent\5.0, and then double-click the REG_SZ value Mapserver_IP.
3 By default, the value is blank, which directs the MapAgent to the local
computer. To direct the MapAgent to Autodesk MapGuide Server on a
remote computer, enter that computer’s IP address. If your Autodesk
MapGuide Server’s IP address is assigned via DHCP, the IP will vary over
time; in this case, enter the DNS host name of the Autodesk MapGuide
Server instead of the IP address.
While you are editing the value for this key, you can also set up Autodesk
MapGuide to take advantage of load balancing.
Configuring for Load Balancing
You can specify multiple Autodesk MapGuide Servers by entering each IP, or
DNS host name, on a separate line in the REG_SZ value Mapserver_IP. The
MapAgent will balance the processing requirements by distributing the map
requests among the Autodesk MapGuide Servers specified in this value. Note
that when you add IP addresses or DNS host names to this value, the local
computer is no longer included by default, so you must also enter the IP or
DNS host name of the local computer if you want the MapAgent to continue
to use it along with the other servers specified.
68 | Chapter 4 Assembling and Administering Your Server
Page 69

If you are using the ISAPI or NSAPI version of the MapAgent, the requests are
distributed to the servers in a rotating manner. If you are using the CGI
version of the MapAgent, it has no persistent memory between requests, so
it distributes the requests randomly among the servers.
You may also want to consider purchasing a third-party load-balancing
solution such as Microsoft Windows NT Load Balancing Service (WLBS), F5
Networks’ 3DNS® Controller, or RADWARE’s Web Server Director™ (WSD)
products.
Firewalls
When you use a remote MapAgent, you need to configure your firewall to
permit DCOM penetration from the outside to the inside. First, you must
limit the DCOM port range on the Autodesk MapGuide Server computer. By
default, a DCOM server uses port 135 for handshaking and uses any port in
the range of 1,024 through 65,535 to service the DCOM call. To limit the
range of DCOM, you must again use REGEDT32.EXE.
Add the following three values to the key
HKEY_LOCAL_MACHINE\SOFTWARE\Microsoft\Rpc\Internet (the Internet
key does not exist by default, so you might need to create it):
Autodesk MapGuide Server RPC Values
Value Name Data Type Text
PortsInternetAvailable REG_SZ Y
UseInternetPorts REG_SZ Y
Ports REG_MULTI 6600-6610
The value in “Ports” specifies the range of ports on the server that are valid
for use by RPC. (The value “6600-6610” is simply an example.) You can
specify multiple ranges for availability by entering each range on a separate
line. You will need to restart Windows for the changes to take effect.
Now that you have specified which ports are available for use by RPC (port
135 and the ports you specified in the “Ports” value), you must configure
your firewall to allow the MapAgent computer to establish a connection with
the Autodesk MapGuide Server computer on these ports.
Setting Up Your Server | 69
Page 70

The following diagram provides a basic overview of how the MapAgent and
Autodesk MapGuide Server communicate over the firewall.
RPC communication via firewall
Online Help Index
data source properties
For information about the configuration of your particular firewall, please
consult the firewall’s documentation or your network administrator.
Warning This section does not address any security concerns regarding the configuration of your firewall. As with all changes to your firewall’s configuration,
your network administrator should assess the risks that a change may bring.
If you set up more than one MapAgent (see “Using Multiple Servers” on
page 53), be sure to specify the correct MapAgent when you set up the map
layers. You do this on the Data Sources tab of the Map Layer Properties dialog
box in Autodesk MapGuide Author.
70 | Chapter 4 Assembling and Administering Your Server
Page 71

Installing a Report Engine
If you will include reports in your maps, you need to install a reporting
engine, such as ColdFusion or Active Server Pages. You can install ColdFusion
Application Server from the Autodesk MapGuide Server CD. If your web
server is on the computer where developers are going to work, install ColdFusion Studio there as well. For details about installing ColdFusion, refer to
the ColdFusion documentation.
Configuring Autodesk MapGuide Server under a
Different Account
The Autodesk MapGuide Server service runs under the default System
account. However, if you have data sources on another computer that you
want to serve from Autodesk MapGuide Server, you need to run them under
a user account that has access to that computer. Follow these steps after
installing Autodesk MapGuide Server.
To change the account for the Autodesk MapGuide Server service
1 In the Windows Control Panel, double-click Services.
2 In the Services window, select the Autodesk MapGuide Server service, and
click Startup.
3 In the Log On As area, select This Account, and then specify a user account
and password that has access to the data sources on the remote computer.
4 Click OK, and then close the Services window.
Autodesk MapGuide Server Admin Overview
You use Autodesk MapGuide Server Admin to do the following tasks:
Start and stop the server
Set general server properties
Set up data sources
Manage server security
Track server requests and generate log files
Autodesk MapGuide Server Admin Overview | 71
Page 72
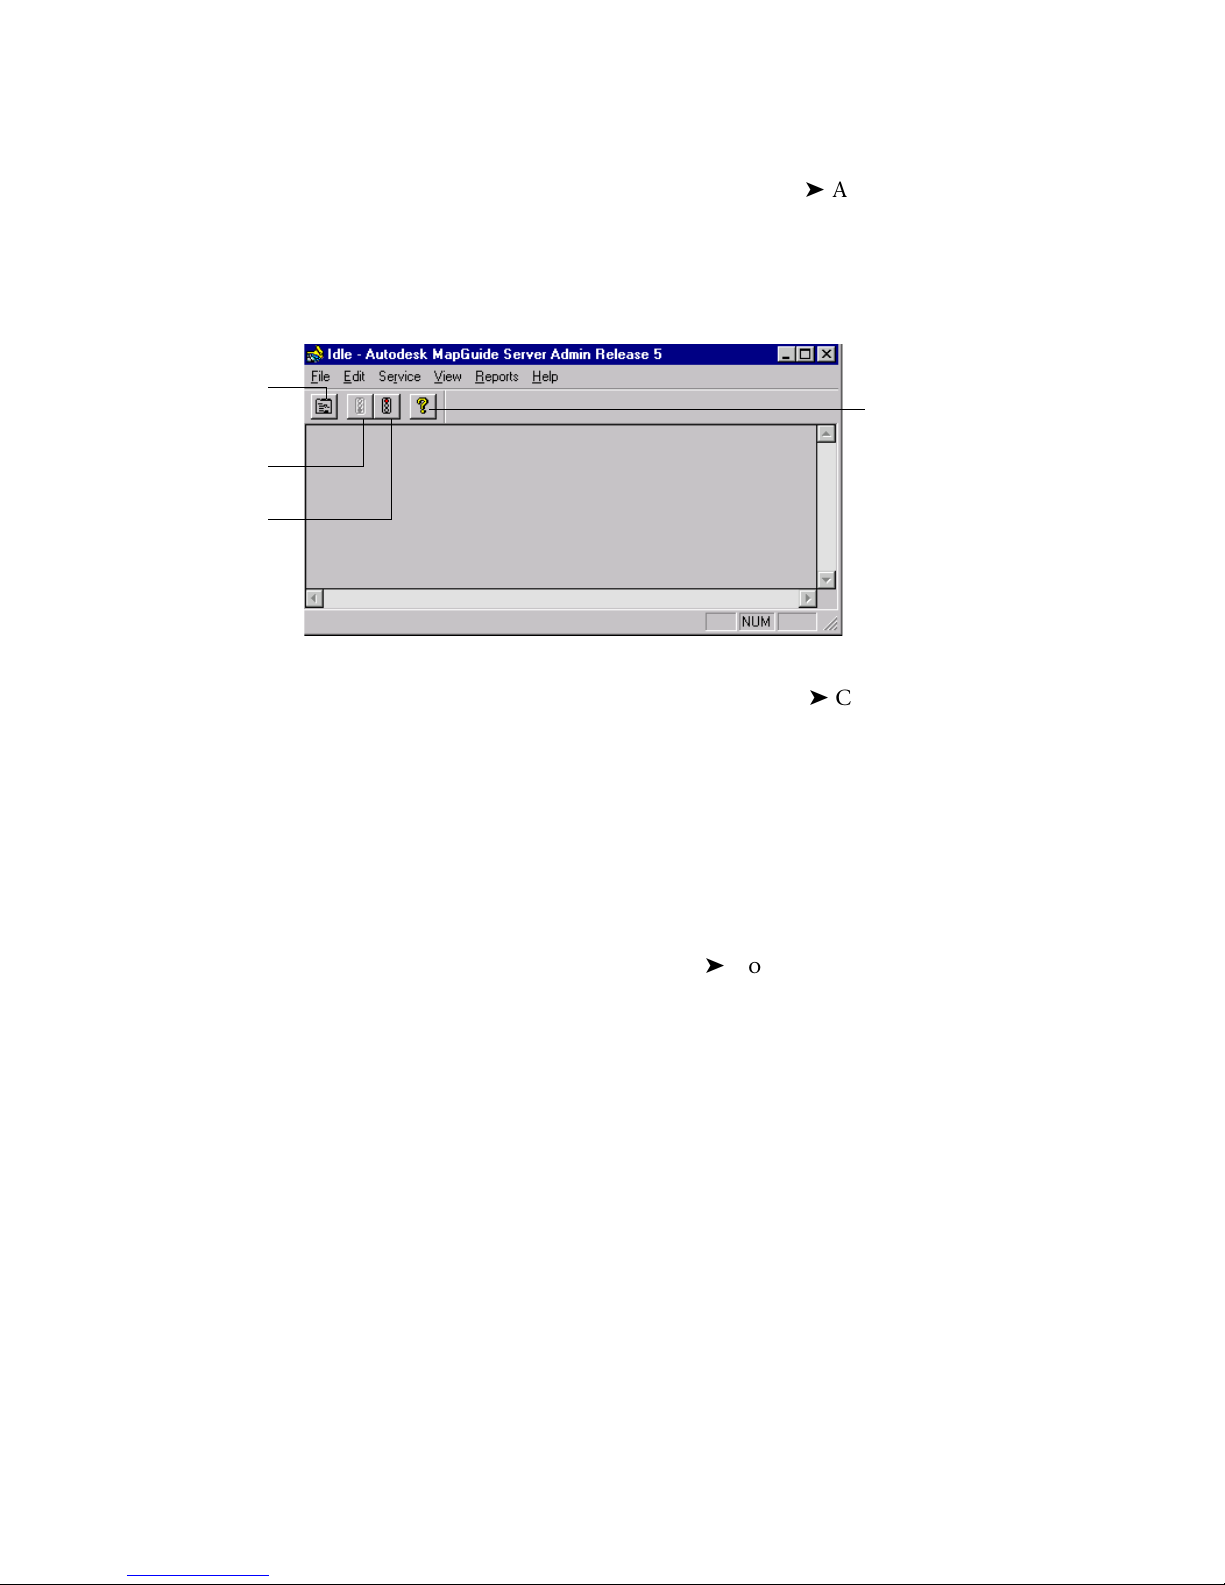
Click to set
properties for
the server.
Click to start
the server.
Click to stop
the server.
To start Autodesk MapGuide Server Admin
1 From the Windows Start menu, choose ProgramsAutodesk MapGuide
Release 5.
2 In the Autodesk MapGuide Release 5 program group, click Autodesk
MapGuide Server Admin.
The Autodesk MapGuide Server Admin window appears.
Click for Autodesk
MapGuide help.
The complete, step-by-step procedures for using Autodesk MapGuide Server
Admin are included in the online help. Choose Help Contents, then refer
to the topics listed under “Administering Your Autodesk MapGuide Server.”
Online Help Index
server
starting and stopping
Starting and Stopping the Server
You can start and stop the server using Autodesk MapGuide Server Admin.
Starting the server brings it online so that is ready to accept and process
requests. Stopping the server takes it offline so that it cannot accept or
process requests.
For step-by-step instructions, choose Help Contents, click the Index tab,
and look up “server, starting and stopping.”
72 | Chapter 4 Assembling and Administering Your Server
Page 73

Setting Autodesk MapGuide Server Properties
You use the Properties dialog box to control how the server operates.
To open the Properties dialog box
In Autodesk MapGuide Server Admin, choose Edit Properties.
The Properties dialog box appears.
Click for details
about the options
in this dialog box.
You use the six tabs in this dialog box to specify all of the properties for the
Autodesk MapGuide Server. This chapter includes basic information about
each tab. You can find complete, step-by-step procedures in the online help.
Autodesk MapGuide Server Admin Overview | 73
Page 74

Setting General Server Properties
Online Help Index
server
general properties
Setting Up Your Data Sources
On the General tab in the Properties dialog box, you can specify the
following properties for Autodesk MapGuide Server:
Server administrator’s e-mail address
Maximum number of simultaneous requests to the server
Search path for raster image files
Autodesk MapGuide for VISION* configuration data source
Services that must start before starting Autodesk MapGuide Server
Autodesk MapGuide Server needs access to the data sources containing the
spatial and attribute data for your maps. To communicate with these data
sources, Autodesk MapGuide Server uses Microsoft’s OLE DB (Object Linking
and Embedding Database) technology. OLE DB provides communication
between client applications and a variety of database systems using components called data providers.
Autodesk MapGuide Server can access attribute data from any standard OLE
DB data provider such as Microsoft Access, SQL Server, Oracle, or any ODBC
data source (using the Microsoft OLE DB Provider for ODBC Drivers). In addition, Autodesk MapGuide Server can access spatial data from OLE DB Spatial
Providers (SDPs), such as Autodesk MapGuide SDF, Autodesk VISION*, and
Oracle8i Spatial, by using data extensions. These OLE DB providers enable
direct access to the native data sources, which eliminates the need to convert
your data before using it with Autodesk MapGuide.
The Autodesk MapGuide Data Extension for SDF is automatically installed
when you install Autodesk MapGuide Server. You can purchase the following
additional data extensions:
Autodesk MapGuide Data Extension for VISION*
Autodesk MapGuide Data Extension for Oracle8i Spatial
Autodesk MapGuide Data Extension for DWG
Autodesk MapGuide Data Extension for SHP
74 | Chapter 4 Assembling and Administering Your Server
Page 75

The following OLE DB providers are installed with MDAC 2.1 or later:
Microsoft OLE DB Provider for SQL Server
Microsoft OLE DB Provider for Oracle
Microsoft Jet 3.51 OLE DB Provider
Microsoft OLE DB Provider for ODBC
MDAC 2.5 is included on the Autodesk MapGuide Server CD in the following
location: \MDAC2.5\MDAC_TYP.EXE)
Tip If a native OLE DB provider is not available for your data source (for example,
if you are using Lotus Notes), you can use the Microsoft OLE DB Provider for
ODBC Drivers.
Managing Your Data Sources
Online Help Index
data sources
managing
Using Autodesk MapGuide Server Admin, you can view a list of your data
sources, make data sources available or unavailable, create new data sources,
rename existing data sources, delete data sources, and specify where the
server looks for data sources. Autodesk MapGuide Server Admin also links to
the Microsoft Data Link Properties dialog box where you can configure your
data sources.
You use the Data Sources tab of the Properties dialog box to manage your data
sources. For step-by-step instructions, choose Help Contents, click the
Index tab, and look up “data sources, managing.”
Click for details
about the options
in this dialog box.
Setting Up Your Data Sources | 75
Page 76

Managing Server Security
In addition to setting Windows permissions and using the access control
tools provided with your web server to control access to individual maps
(MWF files) at your site, you can add another level of security by using
Autodesk MapGuide Server to control access to the resources (SDF files, raster
image files, SQL data tables, and Zoom Goto Address definitions) used by
these published maps. This means that you can set up Autodesk MapGuide
Server to require additional authorization before providing resources
requested by a map, even if a user has access to the map. You can do this in
two ways:
Use access keys to provide time-sensitive, map-embedded, passive, transaction-based security.
Use user-group/password security to provide map-independent, active,
session-based security.
Access Keys Versus User IDs and Passwords
Access keys are passwords that the author of a map embeds in the definition
of the map layer. Each time the map layer requests map data, Autodesk
MapGuide Server verifies the embedded access key against the list of valid
access keys for the resource before fulfilling the request. Because this process
takes place automatically and invisibly every time the map layer requests
data, access keys are a convenient way to provide greater resource security
with no impact on the user. Additionally, access keys can be preset to be valid
for only a certain period of time, adding an additional level of control.
User passwords require the user to enter a valid user name and password at
the first request of map data from Autodesk MapGuide Server. Just like the
typical web server security model, the user name and password are required
only once for each layer that uses the restricted resource, providing a high
level of security without unnecessary impact on the user.
Together, access keys and user passwords provide a great deal of
flexibility in solving security problems over a variety of Internet/intranet
implementations.
76 | Chapter 4 Assembling and Administering Your Server
Page 77

The following table provides a summary of the differences between the two
security methods.
Users/Groups/Passwords Access Keys
Time Period
End-User
Interaction
Implementation
Authorization
Frequency
Active until deleted. Preset time periods.
User must enter correct name
and password.
Use Autodesk MapGuide Server
Admin to enter and maintain
users, groups, and passwords.
Checked once per resource per
layer request (until the user
exits the current browser
session).
No end-user interaction.
Use Autodesk MapGuide
Author to enter access keys in
MWFs; use Autodesk
MapGuide Server Admin to
link access keys to resources
at the server level.
Checked by Autodesk
MapGuide Server for every
layer request.
Choosing the Best Security Method
The following table offers recommendations about when each security
method is most appropriate.
Goal Method
Provide MWF files for a certain
group of users only.
Allow user of Autodesk
MapGuide Author to change
styles but not map content.
Use the security protection in your HTTP server to
provide the MWF files to only a defined user
group.
Use access keys. You may want to allow a specific
group of map authors to change styles and display
ranges without being able to create new layers or
add layer files. In this case, you can protect your
resources with access keys. When you save a layer
to an MLF (Map Layer File), do not select the
Include Access Key In Map Layer File option. If
users want to add that layer to a map or create a
new layer, they must enter the correct access key
for the resource, or Autodesk MapGuide Server will
not respond to a request for that resource.
Managing Server Security | 77
Page 78

Goal (continued)Method (continued)
Limit access to confidential
data to a specific list of users.
Provide secure access that can
be disabled for a casual and
changing group of users.
Allow users to create maps and
to query Autodesk MapGuide
Server for a list of the resources
that are available to facilitate the
setup of map layers.
Assign users to a group, and assign that group to
the confidential resources, changing the passwords regularly.
Assign access keys to the resources. Access key
security is transaction-based (every request
requires authentication) and requires no client-side
action. This makes it easier to allow distribution to
casual or public user groups without requiring
them to know and enter the name/password for
every layer in a published map.
Add users to the group called Authors. All mem-
bers of this group will have map authoring privileges and full access to map data resources.
To implement any or all of these techniques for controlling access to the map
data resources at your site, you use Autodesk MapGuide Server Admin.
Creating and Modifying Users and Groups
Online Help Index
users and groups
In order to control access to resources, you set up users and groups using the
Users/Groups tab of the Properties dialog box. To display the Properties
dialog box, choose Edit Properties. Then, click the Users/Groups tab.
78 | Chapter 4 Assembling and Administering Your Server
Page 79

Click for details
about the options
in this dialog box.
First, you create users by specifying their names and passwords. Then, you
create groups. Finally, you assign users to the groups as members. For stepby-step instructions, choose Help Contents, click the Index tab, and look
up “users and groups.”
Assigning Users to the Authors Group
Autodesk MapGuide Server contains a predefined group called Authors.
When creating a map layer in Autodesk MapGuide Author, members of the
Authors group can query Autodesk MapGuide Server for a list of the available
data sources. Such queries elicit a prompt for a user name and password,
which are validated against the Authors group list. Although a user can enter
a data source’s full path name to include it in a map layer, it is much easier
to be able to choose from a list of available resources.
Online Help Index
Authors user group
Warning Before Autodesk MapGuide Author users attempt to create map layers,
they must be assigned to the Authors group.
For step-by-step instructions on assigning users to the Authors group, choose
Help Contents, click the Index tab, and look up “Authors user group.”
Managing Server Security | 79
Page 80

Creating and Modifying Access Keys
When you author maps, you can embed a hidden access key within each map
layer or Zoom Goto definition. Then, each time a user attempts to access that
map layer or Zoom Goto definition, the access key is automatically sent to
the server along with the request for the data. Autodesk MapGuide Server
then verifies that the access key is on the list of access keys assigned to that
resource before providing the data.
For example, you could specify in Autodesk MapGuide Server Admin that the
text string FL1WMTD is an access key for the SDF file lakes.sdf. An author
creating a map could then embed that string in a map layer that uses data
from lakes.sdf. Then, whenever a user zooms in or out on the map or works
with a feature on that layer, the Viewer sends the access key along with the
request for data. This happens automatically without the user ever being
aware of the access key or needing to enter any information. Autodesk
MapGuide Server verifies that the access key is on the list of access keys
assigned to the resource lakes.sdf in Autodesk MapGuide Server Admin, and
then provides the data. Thus, the map author needs to coordinate with the
Autodesk MapGuide Server administrator to make sure that the access key
the author enters in a map layer is properly assigned to the specific resource
that provides data to that map layer.
Online Help Index
access keys
creating
Access keys are also useful for creating maps that are valid for only a specific
period of time, as you can change the values of access keys and their start and
end dates. Access keys also make it easy to stop serving data from a specific
resource quickly. For step-by-step instructions on creating access keys, choose
Help Contents, click the Index tab, and look up “access keys, creating.”
You assign access keys using the Access Keys tab in the Properties dialog box.
To display the Properties dialog box, choose Edit Properties. Then, click the
Access Keys tab.
80 | Chapter 4 Assembling and Administering Your Server
Page 81

Click for details
about the options
in this dialog box.
Restricting Access to Resources
You can restrict access to your resources (data sources) by adding the
resources to the Resources tab in the Properties dialog box. To display the
Properties dialog box, choose Edit Properties. Then, click the Resources tab.
Click for details
about the options
in this dialog box.
Managing Server Security | 81
Page 82

The Resource tab lists any resources you have added to the server administrator. A resource can be a spatial data file (SDF), a raster image file, or a directory containing multiple SDF or raster image files. A resource can also be an
OLE DB data source and all of its tables, one specific table in the data source,
or it can be a Zoom Goto definition. Note that you add resources on this tab
only if you wish to restrict access to those resources.
Warning When you run Autodesk MapGuide Server Admin, you are always
logged in under a user account. If Autodesk MapGuide Server is running under
the System account, it will not be able to access the User DSNs you can access in
Autodesk MapGuide Server Admin. In this case, you need to ensure that any
DSNs you configure through the Admin are System DSNs. Otherwise, database
resources will not be set up correctly. Likewise, if Autodesk MapGuide Server is
running under a user account, be sure to log on to that same user account before
running Autodesk MapGuide Server Admin so that the Server and Server Admin
can access the same User DSNs.
Online Help Index
resources
adding
To change the access properties of a resource, you must first add the resource
to the Resources tab of the Properties dialog box. For step-by-step instructions on adding resources, choose Help Contents, click the Index tab, and
look up “resources, adding.”
Taking Data Sources Offline
When you need to update or replace a data source, you must ensure that no
users are accessing the data source. To do this, you need to take the data
source offline. You can take only OLE DB and SDP data sources offline.
To take a data source offline
1 On the Data Sources tab, select the data source you want to disconnect.
Note that you cannot take a single table offline. The resource must be a
data source.
82 | Chapter 4 Assembling and Administering Your Server
Page 83
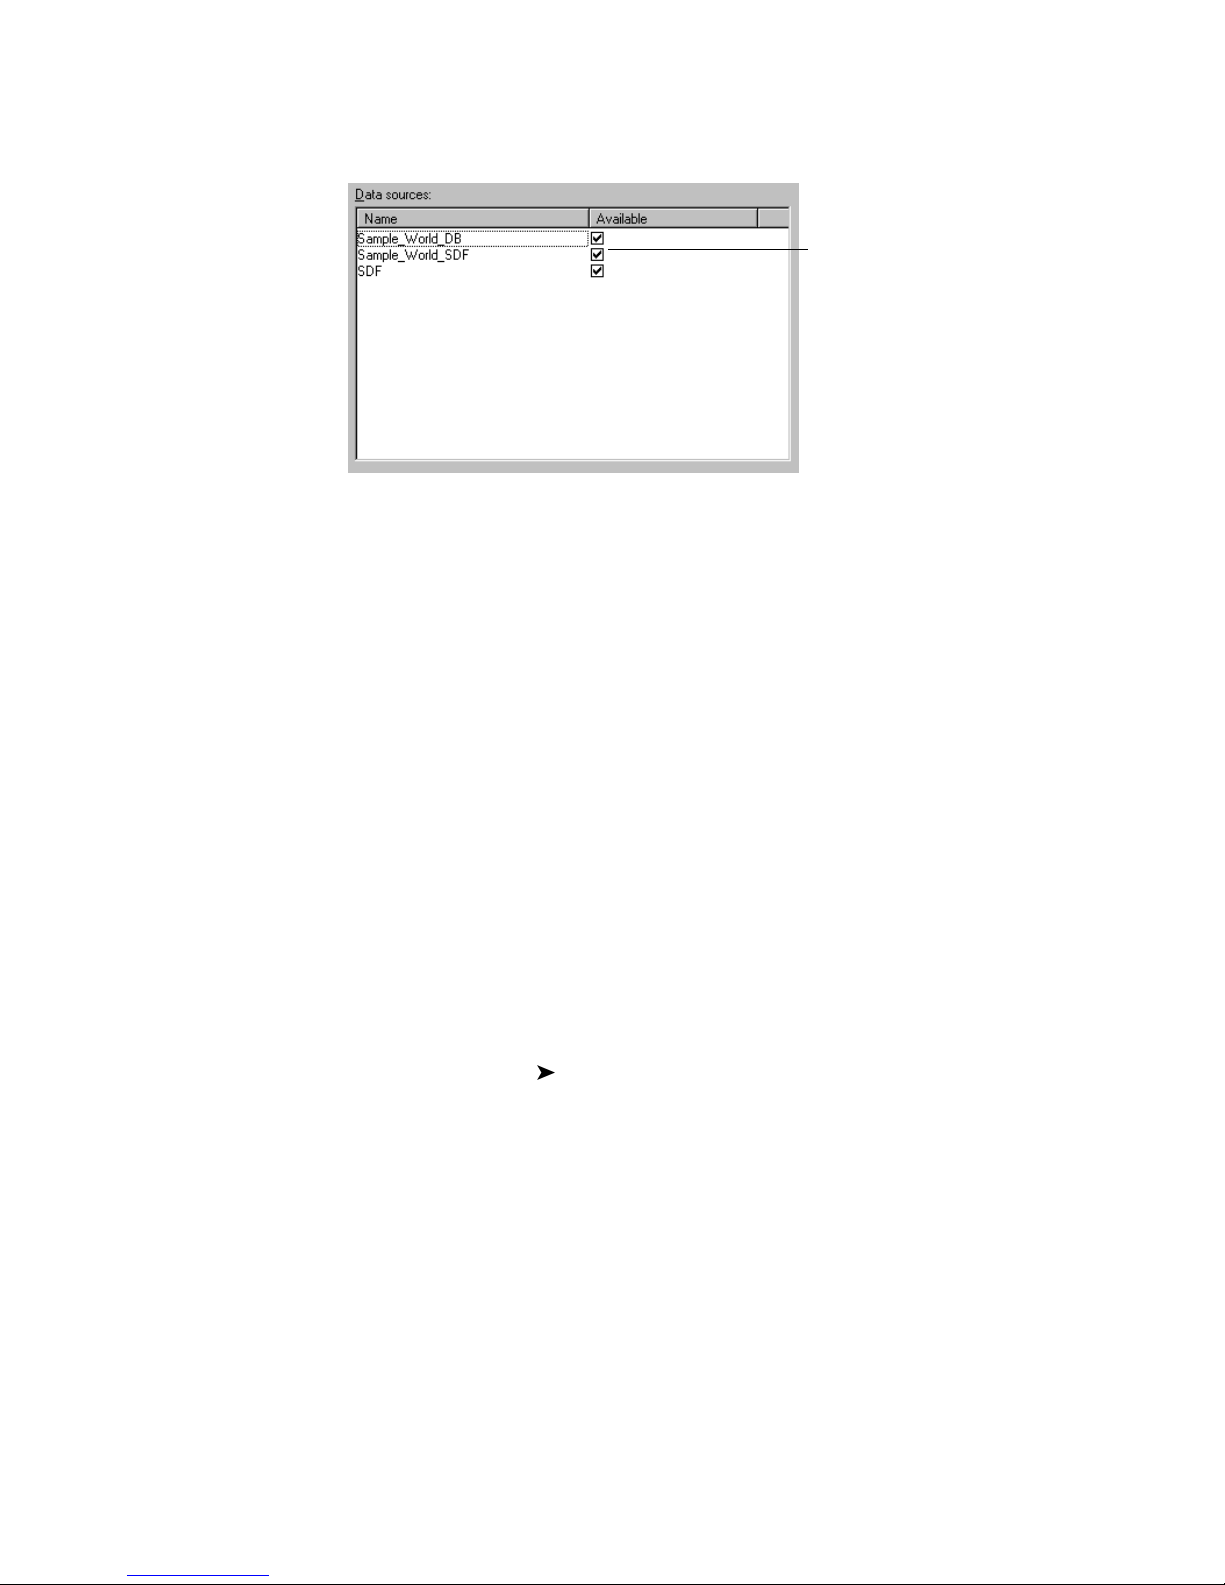
2 Clear the Available check box.
Clear a check box to take a data
source offline. Select the check
box to put the data source back
online.
When you take a data source offline, all current connections to the data
source are removed and no new connections are allowed. Users cannot access
the data source again until you put it back online by selecting the Available
check box.
Keep in mind that taking a data source offline affects only the current server.
If other servers have access to this data source, you must take the data source
offline on each of those servers as well.
Tracking Server Requests
Online Help Index
log files
viewing
When Autodesk MapGuide Server is running, its status is displayed on the
Autodesk Server Admin title bar, and the number of requests currently being
processed is shown in parentheses. You can view additional usage information by displaying one of the log files or running a usage report.
Log Files
The following log files are available. For step-by-step instructions on viewing
log files, choose Help Contents, click the Index tab, and look up “log files,
viewing.”
Tracking Server Requests | 83
Page 84

Access Log
The access log file records all requests to Autodesk MapGuide Server and gives
you an idea of the activity at your site. An access log record is created for each
request as the request is completed. For information about customizing the
access log file for map layer data requests, see “Customizing the Access Log”
on page 86.
Error Log
The error log file records errors that occur during Autodesk MapGuide Server
requests.
Tr a c e L o g
The trace log file records the details of each request to Autodesk MapGuide
Server. Because any request can include data for several map layers, each
record in the trace log displays the details of the request for each layer. Entries
in the trace log are created as soon as a request comes in, before it is serviced.
Map Layer Access Log
Online Help Index
usage reports
viewing
The map layer access log records all requests to Autodesk MapGuide Server
for each map layer. A map layer access log record is created for each request
as the request is completed. For information about customizing the map
layer access log, see “Customizing the Map Layer Access Log” on page 86.
Usage Reports
You can run usage reports to track Autodesk MapGuide Server usage. The
Standard Usage and Mobile Device Usage reports display the number of
unique Viewers for each day of the past twelve months, and the total number
of unique Viewers for each month. The Summary Usage report displays the
total number of bytes, requests, and users served each month. Like the viewer
tracking log, these usage reports are not designed to provide absolute
numbers—they can help you spot trends in usage. This helps you determine
when you might need to improve performance as your number of users
increases. For step-by-step instructions on viewing usage reports, choose
Help Contents, click the Index tab, and look up “usage reports, viewing.”
84 | Chapter 4 Assembling and Administering Your Server
Page 85

Renaming Log Files
Online Help Index
log files
renaming
You can rename the access log, error log, and trace log using the Logging tab
of the Properties dialog box. For step-by-step instructions, choose Help
Contents, click the Index tab, and look up “log files, renaming.”
Online Help Index
log files
rotating
Rotating the Log Files
For the access log, error log, and trace log, you can automatically create a new
file for each log every day at midnight, allowing you to have a different log
file every day. This is useful if you need to go back to check the information
in the log files for a particular day.
To rotate the log files, you include a date format string in the log file names
to indicate which date information will be used in the name of the log files.
For a complete list of format codes you can use, choose Help Contents,
click the Index tab, and look up “log files, rotating.”
Tracking Server Requests | 85
Page 86

Customizing the Access Log
Online Help Index
access log
customizing
Online Help Index
map layer access log
customizing
When a user sends a request to build map layer data in Autodesk MapGuide
Author or the Viewer, the program sends a map layer data (MLData) request.
Autodesk MapGuide Server site administrators can customize the information that is recorded in the access log file for MLData request types by modifying values in the Windows registry. The MLData values are in the following
key:
HKEY_LOCAL_MACHINE\SOFTWARE\Autodesk\Autodesk MapGuide
Server\5.0\Log\MLData\
For a complete list of parameters that you can use to customize the access log
file, choose Help Contents, click the Index tab, and look up “access log,
customizing.”
Customizing the Map Layer Access Log
The map layer access log records all requests to Autodesk MapGuide Server
for each map layer. Autodesk MapGuide Server site administrators can
customize the information that is recorded in the map layer access log file by
modifying values in the Windows registry. The map layer data values are in
the following key:
HKEY_LOCAL_MACHINE\SOFTWARE\Autodesk\Autodesk MapGuide
Server\5.0\Log\MapLayerAccessLog\
For a complete list of parameters that you can use to customize the map layer
access log file, choose Help Contents, click the Index tab, and look up
“map layer access log, customizing.”
86 | Chapter 4 Assembling and Administering Your Server
Page 87

Adding Geocoding Data
Before you can enable zooming to a US street address or ZIP code, Autodesk
MapGuide Server must have access to a geocoding database. When the user
enters an address or ZIP code, Autodesk MapGuide finds that address and its
corresponding coordinates in the database, and then zooms to that location
on the map. For more information, see “Zoom Goto Address (Geocoding)
Data” on page 96.
For information about obtaining a geocoding database, go to the Autodesk
MapGuide data web site:
http://www.autodesk.com/mapguidedata
Online Help Index
geocoding database
After you have obtained the geocoding files, you need to set them up on the
server so that Autodesk MapGuide Server can properly serve them to
Autodesk MapGuide Author or Autodesk MapGuide Viewer.
Adding Geocoding Data | 87
Page 88

88
Page 89

Working with Data in
Autodesk MapGuide
In This Chapter
5
This chapter discusses the basic steps for working
with data and includes information about the dif-
ferent kinds of data you can use with Autodesk
MapGuide.
This chapter may be especially helpful to:
Data engineers
Map authors
Basic steps for
working with data
Working with spatial
data
Working with
attribute data
Working with raster
images
Working with
symbols
Working with other
types of spatial data
89
Page 90

Basic Steps for Working with Data
In order to gather or create data, and then add it to map layers, you need to
follow these basic steps.
1 Determine the coordinate precision and coordinate system to use. See
“Designing the Map” on page 112 for more information.
2 Create spatial data files and add them to layers. See the next section,
“Working with Spatial Data,” and see “Specifying Data Source Properties
for Layers” on page 153 for more information.
3 Create attribute data and link it to spatial data. See “Working with
Attribute Data” on page 93 for more information.
4 Create raster images and add them to layers. See “Working with Raster
Images” on page 97.
5 Create symbols and add them to layers. See “Working with Symbols” on
page 104 for more information.
6 Create Zoom Goto categories. See “Zoom Goto Data” on page 96 for more
information.
7 Create reports and add them to the map. See “Working with Reports” on
page 142 for more information.
This chapter is designed to give you an understanding of the different types
of data you can use with Autodesk MapGuide, and how you create or procure
the data. For information about using the data in map layers, see Chapter 9,
“Working with Map Layers.”
Working with Spatial Data
Coordinates that represent the geographic features on a map are called spatial
data. When you create a layer in a map, you specify which file contains the
spatial data to display on that layer.
Spatial data can be in a variety of formats. The native Autodesk MapGuide
format is SDF. However, Autodesk MapGuide can read spatial data from other
formats as well (such as Oracle 8i Spatial) if you have a data extension
installed for that specific format. For more information, see “Working with
Other Types of Spatial Data” on page 105. If you are creating a point or text
layer, you can specify an OLE DB data source, such as a table that contains
coordinates and text. For more information, see “Working with Attribute
Data” on page 93.
90 | Chapter 5 Working with Data in Autodesk MapGuide
Page 91

Map Features
Map features are the geographic features that appear on a map. In Autodesk
MapGuide, map features are points, such as fire hydrants and cities,
polylines, such as rivers and roads, and polygons, such as lakes and land
parcels. Each map feature has a name, an optional URL link, and geometric
data specified by one or more coordinate pairs.
The files containing the spatial data can also contain compound map
features such as polypolylines and polypolygons. Polypolylines are multiple
polylines grouped as one to represent compound line features such as road
networks and river systems. Polypolygons represent compound area features
such as islands in a lake.
The following sections describe each of the types of map features you might
have in your spatial data files.
Points
A point is single place on a map, such as a fire hydrant or a city. Every point
corresponds to a single coordinate pair that locates the point’s symbol or text
on the map. To use the points from a spatial data file in a map, you create a
point layer.
Lines/Polylines/Polypolylines
A line represents a linear feature, such as a street, river, or sewer pipes. A
polyline is simply a line with multiple segments, such as a winding road. A
polypolyline is a single feature that includes two or more polylines; this is a
convenient way to group related polylines into one map feature so that they
can be selected or linked to a database as a single entity. The starting point
and the ending point of each line segment in a line, polyline, or polypolyline
each has a coordinate pair, so that a polyline with several line segments, for
example, will have several coordinate pairs that define the polyline.
Autodesk MapGuide treats lines, polylines, and polypolylines the same
way—to use the lines, polylines, and polypolylines from a spatial data file in
a map, you create a polyline layer.
Polygons/Polypolygons
A polygon represents a filled area on a map, such as a country or a lake. A
polypolygon is a map feature consisting of two or more polygons, for
example, a house with a detached garage. Although the polygons forming
the house and the garage are not connected, you may still want to treat them
Working with Spatial Data | 91
Page 92

as a single map feature. You can achieve this by making them both part of
the same polypolygon. Each vertex on a polygon or polypolygon is a coordinate pair, and all of the coordinate pairs make up the polygon. Autodesk
MapGuide treats polygons and polypolygons the same way—to use the polygons and polypolygons from a spatial data file in a map, you create a polygon
layer.
Te x t
Also known as annotations in other applications, text features are blocks of
text placed at specific coordinates on the map. Like points, each text feature
has a single coordinate pair associated with it.
Creating a Spatial Data File
Typically, you use an application like AutoCAD Map to create your data, then
export it to an Autodesk MapGuide SDF. If the application you are using does
not support the SDF file format, you can use Autodesk MapGuide SDF Loader,
Autodesk MapGuide SDF Component Toolkit, or AutoCAD Map to convert
the data to SDF. Then, Autodesk MapGuide Server reads the SDF data and
sends it to Autodesk MapGuide Author and Autodesk MapGuide Viewer to
be displayed.
When creating SDF files, you should use only one type of data in each SDF
file, if possible. For example, an SDF might contain only points,
lines/polylines, polygons, or annotations (text) from your AutoCAD Map
data. This optimizes performance in Autodesk MapGuide.
Note When naming the SDF, make sure that the file name does not contain any
of the following characters: double quote ("), asterisk (*), colon (:), slash (/), back
slash (\), less than (<), greater than (>), question mark (?), pound sign (#), or vertical bar (|).
For points/symbols and text, you can store coordinates in a database instead
of an SDF. You can update coordinates in a standard database application
quite easily, and you can rotate, align, and size text based on fields in the
database.
You should also be aware of the coordinate precision you will need (see
“About Coordinate Precision” on page 113), and then choose the best
conversion tool for your needs. The following sections explain the information you need to know about using each of the conversion applications.
92 | Chapter 5 Working with Data in Autodesk MapGuide
Page 93

Autodesk MapGuide SDF Loader
You can use the SDF Loader to convert several file formats as individual files,
or you can create batch files to convert multiple files. The batch file can run
the SDF Loader and any necessary third-party programs to convert the files.
This is an efficient way to set up your source data and create your SDFs. For
complete information, refer to the Autodesk MapGuide SDF Loader Help.
Autodesk MapGuide SDF Component Toolkit
You can use the SDF Component Toolkit and a programming language such
as Visual Basic or C++ to create an application that works with SDFs. The SDF
Component Toolkit provides powerful access to SDFs, including the ability
to work with individual features within an SDF. This means that your
program could convert individual features in the SDF rather than the whole
file at once, so you have more control of your conversion than you do with
the SDF Loader.
Working with Attribute Data
Attribute data is data that can be linked to the spatial data in maps to provide
information about those spatial features to the user. Examples of attribute
data are population, area, name, total sales, a URL link to a related web page,
style data, and any other data you want to associate with a spatial feature.
When you link attribute data to your spatial data, the data can be used in one
of four ways: it can display the names of the features, it can be used to set the
width (of symbols), height and rotation (of symbols and text), and alignment
(of text), it can be used to create themes, or it can be used to generate reports.
The following sections describe how to prepare and use your attribute data.
Linking Attribute Data to SDFs
To link the attribute data to the spatial data, you simply specify the OLE DB
database table you want to use when setting up the layer. Autodesk
MapGuide Author matches the records in the table to the spatial features in
the SDF from which the layer was created by means of a key. A key is a string
that uniquely identifies each spatial feature in the SDF and each record in the
database. When a record in the attribute database and a spatial feature in the
SDF have the same key, the record is linked to the spatial feature.
You can also use a database table for theme information. For example, you
might have three sources of data: an SDF of coordinates that represent lakes,
Working with Attribute Data | 93
Page 94

a secondary OLE DB database table containing the name and linked URL for
each lake, and another OLE DB database table containing theme information, such as the size of each lake, water purity, and more. When you create
the layer in the Map Layer Properties dialog box in Autodesk MapGuide
Author, you would specify the secondary table on the Data Sources tab, and
specify the theme table from the Styles tab when adding a theme. Note that
neither of the tables need to contain coordinates—they are linked to the
polygons in the SDF only by their keys. For more information, see “Creating
Themes” on page 163.
Online Help Index
troubleshooting
problems creating themes
To avoid potential conversion problems, be careful when creating the key
field. Depending on the type of database, you might not be able to use the
attribute data unless the key field in the database is exactly the same size as
the key field in the SDF to which you are linking it. Some databases, when
queried, will append the keys with blank space characters to make them the
exact length you specified for the field, so the database keys will not match
those in the SDF. For more information, choose Help Contents, click the
Index tab, and look up “troubleshooting, problems creating themes.”
Linking Attribute Data to Another Database
You can create point layers and text layers from OLE DB data sources instead
of SDFs. For these layers, you can still use an OLE DB database table for
creating themes. For example, if you are setting up a layer of cities, you might
have two tables: one that contains basic information about each city, such as
the key, coordinates, name, and a URL link, and a second table that contains
data on which you want to create themes, such as the population, majority
political party, and so on. The second table would also contain the same key
values as the first table; Autodesk MapGuide uses these keys to assign the
theme values in the second table to the corresponding cities in the first table.
Preparing Attribute Data for Themes
As mentioned in the previous sections, you can use the data in a linked
attribute table as the basis for themes. Themes draw the map features on a
layer according to particular values. For example, on a map layer that
contains cities, you could use different symbols to represent cities that fall
within different population ranges. Themes also help to differentiate features
in a layer. For example, on a roads layer, you could draw interstate highways
differently from city streets, even though they’re on the same layer.
94 | Chapter 5 Working with Data in Autodesk MapGuide
Page 95

When setting up your attribute data, you should consider whether you will
be creating themes, and whether the data in the table lends itself easily to
this task. For example, for a roads layer, do you already have a column that
contains the text “Interstate” or “City Street” for each feature in the table? If
so, it will be very simple to specify this column as the theme column and
specify that if the column contains “Interstate”, the feature will be drawn as
a thick yellow line, and if the column contains “City Street”, the features will
be drawn as a thin black line. However, if you want your roads to be drawn
in such a way as to show how heavy the traffic is, a column indicating
whether it’s an interstate highway or city street will not be useful—you will
need a column that indicates how much traffic each road has. You can then
use this third column to specify how the roads are drawn to show traffic.
For example, you might create four theme categories: fewer than 200 cars per
month, between 201 and 5,000, between 5,001 and 10,000, and greater than
10,000. You can then specify the display attributes separately for each of
these categories, so that roads with the lightest traffic are drawn in thin black
lines and roads with heaviest traffic are drawn in thick red lines, and so on.
If you are using point or text data, you need to consider which symbols you
will want to use for each theme category. For more information, see
“Working with Symbols” on page 104.
Setting Up Your Attribute Database
You need to take the following points into consideration when setting up
your attribute database:
Before Autodesk MapGuide can use your databases, you must set them up
and configure them as OLE DB data sources. See “Setting Up Your Data
Sources” on page 74 for more information.
You can limit users’ access to data sources by setting up passwords for users
or for groups or by assigning access keys to the resource.
When naming your attribute data sources, avoid using the ampersand (&)
in the names of databases, tables, and columns. This character is unsupported in all names in Autodesk MapGuide, including SDF names, layer
names, user names, access keys, tracking IDs, and passwords.
Make sure that the fields containing the coordinates, keys, names, and
URLs are all in the same table, view, or query in the OLE DB data source.
Your theme data can be located in a different table, but it must contain
keys that match those in the source data.
Working with Attribute Data | 95
Page 96

When setting up the layer, you can use a SQL Where clause to filter and
customize the data. For example, if this layer will display cities, you could
specify that the layer include only those cities with a population greater
than 10,000. For more information see Chapter 9, “Working with Map
Layers.”
When setting up a theme, the Theme Column text box will accept a simple expression in addition to the field.
Zoom Goto Data
You can use Zoom Goto categories to allow users to zoom in on specific
features in the layer. There are two types of Zoom Goto data: Zoom Goto
Location categories, and Zoom Goto Address data.
Zoom Goto Location Categories
A Zoom Goto category enables users to zoom in on a specific location that
falls within the current category. For example, if you have a category called
Airports, the user would be able to select from a list of airports and zoom to
it on the map.
Features that need to be part of a Zoom Goto category must have their coordinates and category value entered into fields in an OLE DB data source.
Unlike other types of attribute data, Zoom Goto categories do not require a
feature key, so you do not need to include it in your Zoom Goto category
database. For instance, if you have a polygon layer of parcels that you want
users to be able to zoom to, you could store all of your parcel IDs and coordinate values in an OLE DB database. You could then use Autodesk
MapGuide Author to create a Zoom Goto category called “parcels” with a
SQL statement that retrieves coordinates from the database based on a parcel
ID that is passed in. The Zoom Goto dialog box in Autodesk MapGuide
Viewer would let users enter the ID of the parcel they want to zoom to, and
the SQL statement would retrieve the coordinate values, enabling the Viewer
to zoom to that feature.
Zoom Goto Address (Geocoding) Data
With a geocoding database installed on your server, map authors can add the
Zoom Goto US Street Address category to their maps. Autodesk MapGuide
Author comes with a predefined location category called “US Street Address.”
When map authors activate this category, they access the geocoding database
that you installed on your server (see “Adding Geocoding Data” on page 87).
96 | Chapter 5 Working with Data in Autodesk MapGuide
Page 97

When the category is in place, users can type an address or ZIP code and
zoom directly to that location on the map. For more information, see
“Creating and Modifying Zoom Goto Location Categories” on page 140.
Working with Raster Images
Raster images are pixel-based images, such as digital photographs (satellite
images, for example). Raster images are very useful as background images
underneath your vector data, for example, an aerial photograph of a city with
a layer of streets overlaying it.
Autodesk MapGuide supports various raster image file formats. The following
section contains a complete list of supported file formats.
Raster Image File Formats
The following table provides a brief description of the raster image file
formats supported by Autodesk MapGuide Author and Autodesk MapGuide
Server.
Format File
Extension
GIF .GIF Graphics Interchange Format (North America only)
TGA .TGA TrueVision Targa 2.0 Format
CALS .CAL CALS MIL-R-28002A Type 1 Format
PNG .PNG Portable Network Graphic
BMP .BMP Microsoft Windows Bitmap
JPEG .JPG, .JPEG Joint Photographic Experts Group
TIFF .TIF, .TIFF Tagged Image File Format
GeoSPOT .BIL Band Interleaved (GeoSPOT, others)
Description
Note that GeoSPOT files need their associated color
index files, which have a .CLR file extension. The CLR
file should be in the same directory as the BIL file.
Working with Raster Images | 97
Page 98

Tiled TIFFs
Because raster images can be quite large, they can slow down performance.
To improve performance significantly, use tiled TIFF files. A tiled TIFF file
allows Autodesk MapGuide to access only specific portions of the image. This
greatly improves access speed, because Autodesk MapGuide Server does not
need to load the entire image every time—just the specific portion requested.
The difference in performance between using standard TIFF files and tiled
TIFF files is dramatic. You can use Autodesk MapGuide Raster Workshop to
generate tiled TIFFs from other raster file formats.
Raster Image Catalog Files
In addition to individual raster image files, Autodesk MapGuide supports
raster image catalog (RIC) files. A RIC is a list of raster image files and their
lower-left and upper-right coordinates. When creating a raster map layer, you
can reference an individual raster image, in any of the supported formats
shown on page 97, or in a RIC file. Each raster image file (whether an individual image or a RIC) must be accompanied by a georeferencing file, which
provides additional information about how to position the raster image on
the map.
When you access a layer that references a RIC file, Autodesk MapGuide Server
scans through the RIC file to determine the images or portions of images that
correspond to the area being viewed, and then sends only the data for that
area. This greatly increases performance, as only the necessary data is stored
in memory instead of the entire image.
It is important to keep in mind that the RIC file only determines which
images might be visible. Georeferencing information for each individual
raster image must still be available, as this information (not the information
in the RIC file) is used to place them in the correct position on the map. Note
that the raster image must be based on the same coordinate system as the rest
of the data on the map, and it cannot be converted automatically if you
change the coordinate system for the map.
If Autodesk MapGuide Server is running under the System account, please
note the following:
All of the image files in the RIC must be on the same server as the RIC.
The RIC must reference the raster image files using relative paths. If you
use a computer name in the path, Windows NT/2000 will not be able to
recognize it.
98 | Chapter 5 Working with Data in Autodesk MapGuide
Page 99

Raster Image Catalog File Format
Raster image catalog files are ASCII, comma-delimited (CSV) files with the
following format:
"<Name of the raster image file1>",<xMin>,<yMin>,<xMax>,<yMax>
"<Name of the raster image file2>",<xMin>,<yMin>,<xMax>,<yMax>
"<Name of the raster image file3>",<xMin>,<yMin>,<xMax>,<yMax>
...
"<Name of the raster image filen>",<xMin>,<yMin>,<xMax>,<yMax>
Note that the names of the raster image files may not contain commas (,),
and the quotation marks (“) around the raster image file names are optional.
The names of the individual raster image files entered in the RIC may be
specified using the full absolute path name, the path relative to the RIC file
location, or only the file name itself. If only the file name of the raster image
is specified, the search will start in the directory where the RIC is located
before using the Raster Image Search Path (specified in Autodesk MapGuide
Server Admin) to locate the file.
All images in a RIC must be of the same color depth (1, 8, 24, or 32 bits);
combinations of different color depths are not supported. However, images
of different resolutions are supported. For example, you could mix 1- and 2meter resolution data. Also, images in a RIC can be in different formats, such
as TIFF, TGA, PNG, and so on.
Online Help Index
raster layers
creating
Images are processed in the same order in which they are listed in the RIC.
Therefore, if two images overlap each other, the image specified later in the
list will cover the image specified earlier in the list. When you create a layer,
you can specify a transparent background for bitonal images, so bottom
images can show through the background area of the top image. For detailed
information about creating a raster layer, choose Help Contents, click the
Index tab, and look up “raster layers, creating.”
The extents (outer boundary) of each raster image must be specified using the
xMin, yMin, xMax, and yMax parameters. These parameters specify the
center or middle position of the lower-left and upper-right pixels of the
image (as opposed to the corners of the pixel), and they must be specified in
the same coordinate system as that used by the map and any other images in
the RIC. Autodesk MapGuide Server uses the extent parameters to quickly
determine if an image is within the viewing area without having to open the
georeference file associated with each raster image.
Working with Raster Images | 99
Page 100

Generating Raster Image Catalog Files
The simplest way to generate raster image catalog (RIC) files is to use
Autodesk MapGuide Raster Workshop, a utility available from the Autodesk
MapGuide Author CD. You can use this utility to create a RIC, add raster
image files to it, sub-sample and merge the files, and more.
You can also generate RICs manually by using an ASCII text editor or by
exporting the data in CSV format from a database. However, in many cases
the extents of the raster image file may not be readily available. For example,
ESRI world files use the coordinates of one corner and the width of each
pixel. You would have to open the image itself to determine how many pixels
it contained, and then calculate the extents for each image.
Another way to generate a RIC manually is to use Autodesk MapGuide
Author to obtain the coordinates of the image extents. First, display each
image on a layer, and then zoom to opposite corners of the image (lower-left
and upper-right), reading the coordinates from the status bar. These coordinates indicate the extents of the image. They do not have to be exact, only
greater than the extents of the actual image. The extents in the RIC are used
only to determine if an image might be visible. The georeferencing information from each image will be used to georeference the image within the tiled
suite.
Georeference File Formats
A georeference file indicates how to place a raster image on a map. Autodesk
MapGuide Author supports four georeference file formats: ESRI world files,
MapInfo tab files, GeoTIFF files, and header files.
ESRI World File
An ESRI world file is an ASCII text file that uses the following format:
Format Example
<x dimension of a pixel> 2.0
<x rotation factor> 0.0
<y rotation factor> 0.0
100 | Chapter 5 Working with Data in Autodesk MapGuide
 Loading...