

Page 1
View & Print
Publish
Review & Mark Up
DWFTM
Tips &Tricks
Page 2

Publish
Sharing complex design information has never been
easy. Since design files are large, sending sheet sets and
3D models to printers, or sharing work with extended
team members, has taken a lot of time and effort, not to
mention bandwidth. DWF™ technology changes all that.
DWF-based designs are compact, secure, and easy-to-
use. In fact, because sharing rich 2D and 3D design
information is a snap with DWF, completely digital
workflows become possible—streamlining the flow of
information across the entire project team.
This handy pocket guide of DWF Tips and Tricks provides
individual users and entire project teams with the infor
-
mation needed to get the most from DWF. To learn more
about DWF visit www.autodesk.com/dwf.
Publish
The ability to publish DWF files is built
into every Autodesk® design application and available free* of charge when
using third-party applications with the
Autodesk® DWF™ Writer.
• Information on how to publish
DWF files from Autodesk products is
available in the product documentation.
Information is also available online at
www.autodesk.com/dwf-publishing.
*This produ ct is subject to the ter ms and conditions
of the end-us er license agreement tha t accompanies
download of th is software.
Publish 3D DWF Files from
AutoCAD- Based Products
Create and publish DWF files of 3D models with the 3D DWF PUBLISH command,
available only if you have installed the 3D
DWF Publishing feature with AutoCAD®
2006 –based products.
1. On the command line, enter
3ddwfpublish.
2. In the 3D DWF Publish dialog box,
under DWF File Name, change the
name and location of the DWF file
to be saved, or use the [...] button
to navigate to a new location for the
3D DWF file.
3. Under Objects to Publish, click one of
the following:
• All Model Space Objects. All model
space objects are published to the
3D DWF file.
• Selected Model Space Objects.
Create a selection set of model space
objects, which are published to the
3D DWF file.
Page 3
4. If the drawing contains xrefs, the
Group By Xref Hierarchy option is
selected by default. Clear the check
box if you do not want to display the
objects grouped by xref hierarchy in
the published DWF file.
5. Under Group Individual Object s By,
select one of the following options to
group individual object s in the DWF
file for viewing. Click OK.
• Layer. Group individual objects
by layer.
• Objec t Type. Group individual
objects by object type (for example,
by block).
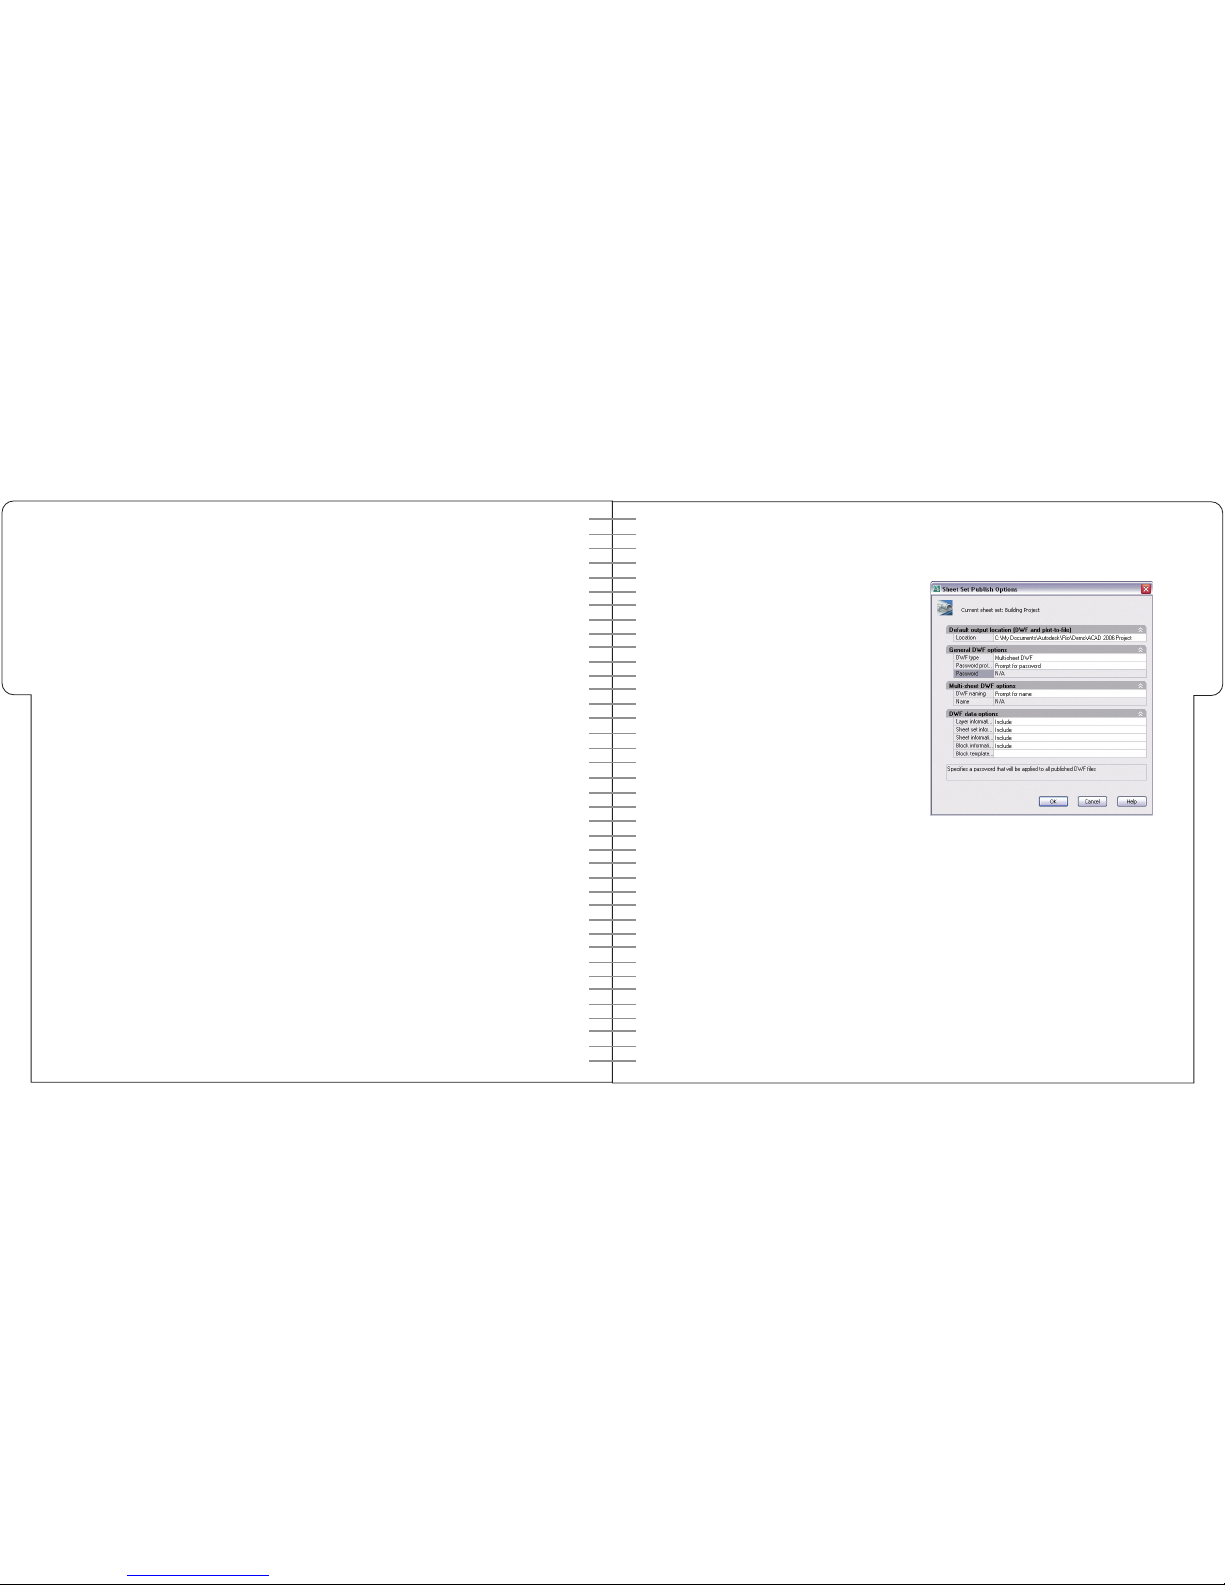
Add Object Proper ties from
AutoCAD Blocks
Enable team members to access
AutoCAD block properties in the DWF
file by setting DWF publishing options.
1. From the File menu, choose Publish.
2. In the Publish dialog box, under Pub
lish To, click DWF File, and then click
Publish Options.
3. In the Publish Options dialog box,
under DWF Data Options , Block
Information, selec t Include from the
drop-down list.
Note: By default, Blo ck Information is
set to Don’ t Include. If you change the
setting to include block information, you
can use the viewer to view or print block
property and attribute information in
the DWF file.
4. Click OK.
5. In the Publish dialog box, either con
tinue with publishing tasks or close the
dialog box.
Increase the Precision of
the DWF File
Specify the pixel resolution for vector
and raster graphics when creating DWF
files. The higher the resolution, the
greater the precision but the larger the
file size.
1. From the File menu, choose Plot to
display the Plot dialog box.
2. Ensure that DWF 6 ePlot.pc 3 is
selected. Click Properties to display
a tree control.
3. Select Graphics from the tree, and
expand it. Select Custom Properties
in the tree control, and then click the
Custom Properties button.
4. Set Vector Resolution to the desired
value. You can leave the other DPI
values (Gradient Resolution, Color
and Grayscale Resolution, and Black
and White Resolution) as they are.
Valid values from the pull-down menu
are between 150 and 4800. Use the
keyboard to enter a custom value, such
as 30270.
Publish
Publish
Page 4
Pass It On: Publish DWF and Email
Easily email a DWF file when using
Autodesk DWF Writer.
1. Select the file to be published, and
choose Publish DWF and Email.
• The default email application opens,
automatically creating a new email
message.
• The subject displays the name of
the published DWF file.
• The DWF file is automatically
attached to the file.
• The URL to download the free
Autodesk DWF Viewer is provided
to streamline the process.
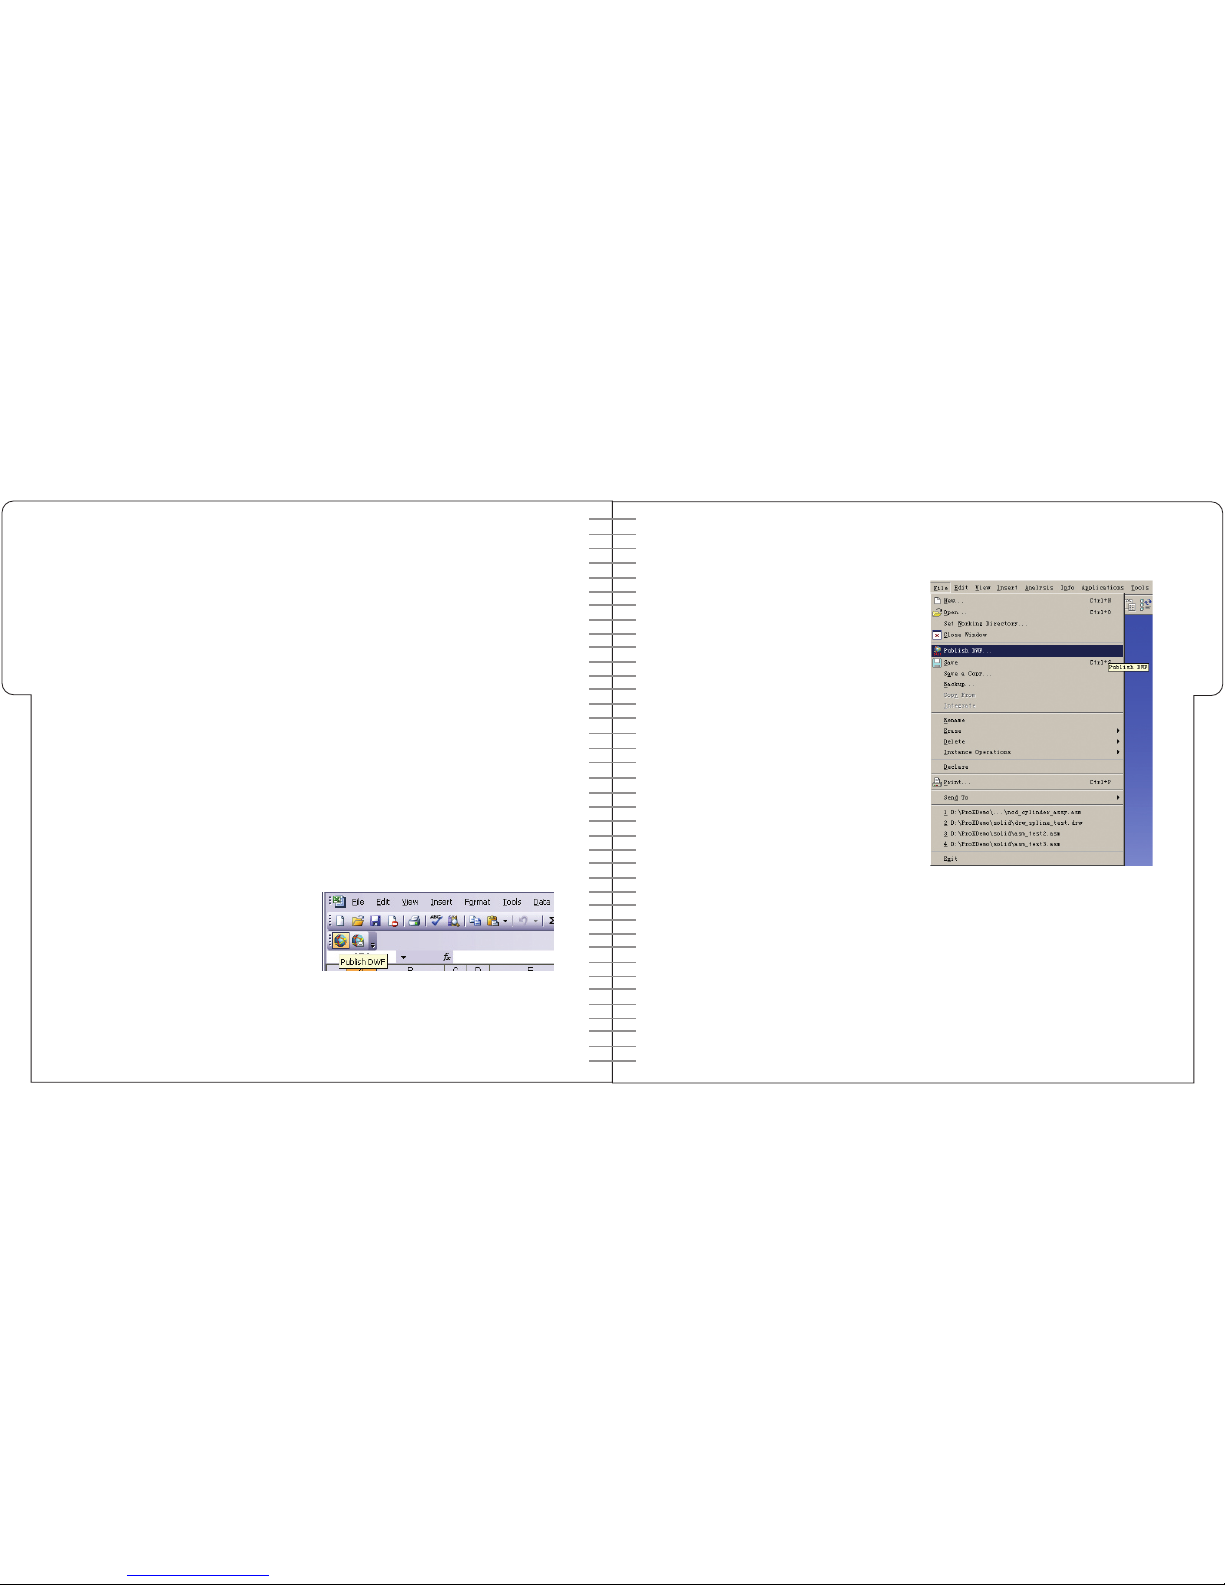
Publish from Microsoft Office
Documents
With Autodesk DWF Writer installed,
users can publish DWF files from
Microsoft® applications (PowerPoint®,
Word, Excel®, Visio®, Outlook, and
Internet Explorer) and share them as
part of the projec t set.
1. Click the Publish DWF button on the
Microsoft application toolbar, or from
the File menu, choose Print and then
select Autodesk DWF Writer in the list
of available printers.
2. Specify a file name and location for
the published DWF file.
3. Choose Print.
Publish from SolidWorks® 2005 or
Pro/ENGINEER
®
Wildfire 2.0
Install Autodesk DWF Writer 3 to publish
3D models and design data from SolidWorks® 2005 or Pro/ ENGINEER® Wildfire
2.0 soft ware.
1. From the file menu, selec t Publish
DWF to automatically turn your 2D
drawing or 3D model into DWF.
• Learn about publishing from
other applications, by visiting
www.autodesk.com/dwf-publishing.
Publish
Publish
Page 5

View & Print
In the past, viewing rich design data
required the purchase of CAD software.
Now, the free*, downloadable Autodesk®
DWF™ Viewer means that everyone on
the team can navigate sheet sets , access
design information, and print whatever
they need.
Download the free Autodesk DWF
Viewer at www.autodesk.com/
dwfviewer-download.
*This produc t is subject to the ter ms and conditions
of the end-use r license agreement tha t accompanies
download of th is software.
Pull Apart a 3D Model
Autodesk DWF Viewer users can navigate 3D models published from Autodesk
applications or with the free Autodesk
DWF Writer. Follow these steps to rotate
and pull apart individual pieces of a
model:
1. From the Tools menu, choose Move
and click Rotate.
2. In the Model palette or view area,
click the parts that you want to move
or rotate.
Remove a Part from the S election
Press and hold the Ctrl key and click
the part again (Ctrl+click) . In the
Model palette, use Shift+click to selec t
consecutive parts by clicking the first
and last parts in the series.
Move Along an Axis
On the axis along which you want to
move the part, click that axis near the
origin. Drag in either direction along the
axis. Alternatively, press the Up Arrow
key to move away from the origin or the
Down Arrow to move toward the origin.
Move Within a Plane
Roll the cursor over a plane defined by
two axes until a plane icon with arrows
appears, and click. Drag the part in any
direction.
Move Parallel to the Sc reen
Click the origin, and drag the part in any
direction. Or use the keyboard arrows to
move left, right, up, or down.
Rotate
On the axis around which you want to
rotate the part, click near the end of the
axis and drag the part around the axis.
Or press the Down Arrow key to rotate
1 degree clockwise or the Up Arrow key
to rotate 1 degree counterclockwise. To
rotate the part in 45 degree increments,
press and hold the Shif t key while using
the keyboard arrows.
Result
Begin Move
View & Print
View & Print
Page 6

Cut 3D Cross Sections
Cut through a model with a sec tion
plane and manipulate the view in various
ways by moving and rotating the section
plane and flipping the view.
1. Open a model and from the Tools
menu, choose Cross Section>
XY Section, YZ Section, or XZ Sec tion.
2. A transparent purple sheet (the section plane) and a tripod drop into the
center of the model, cutting through
the model to reveal a cross section.
Move or rotate the section plane to
reveal a different cross section each
time.
3. The three legs, or axes, of the tripod
meet at a central point called the
origin. To change the cross section
revealed, move or rotate the section
plane by moving the cursor over
the tripod. Hot spots appear, each
enabling the user to move the section
plane in a different way.
Before
After
Use Flexible Printing Options
Preview the job before sending it to the
printer. Partnerships with printer manufacturers like HP and Océ help assure
fast, high-quality output.
Print to Spec
Customize the settings that affect
output from standard to large format.
Choose from among the following options:
1. Full Page or the Current View
2. Paper Size or select Use DWF
Paper Size
• Landscape or Portrait
• Fit to Page or Print to Scale
• Tile across multiple pages
Move Along an Axis
On the axis along which you want to
move the section plane, click the axis
near the origin. Drag in either direction
along the axis. Click the Up Arrow key to
move away from the origin or the Down
Arrow key to move toward the origin.
Move Within a Plane
Roll the cursor over a plane defined by
two axes until a plane icon with arrows
appears, and click. Drag the section
plane in any direction.
Move Parallel to Scre en
Click the origin. Drag the section plane in
any direction.
Rotate
On the axis around which you want to
rotate, click near the end of the axis.
Drag the section plane around the axis.
If you press and hold the Shift key while
using the keyboard arrows to rotate,
the section plane rotates in 45 degree
increments.
View & Print
View & Print
Page 7

Preview What You Print
1. From the File menu, choose Print to
open the Print dialog box.
2. Choose the settings that affect your
preview, like paper size or landscape
view.
3. Click the Show Print Preview button.
Print Instantly to HP P rinters
1. Click the HP Instant Printing
button.
Note: The button automatically
appears if you are connected to a
supported HP® Designjet™ printer.
• The optimal print settings are chosen
automatically based on the properties
of the DWF file.
Access Design Intelligence
Publish detailed design information from
Autodesk® Architectural Desk top 2004
and later versions, AutoCAD® 2006 –
based product s, and Autodesk Inventor®
software, for viewing in Autodesk DWF
Viewer or Autodesk® DWF™ Composer.
View and Sor t Object Properties
Click the Properties window.
Access Block Info rmation
In the Content Browser, select the Properties window, and then choose Object
Properties from the drop-down menu.
Click the selector button, and
then click the block to display
the block data.
Search for Desig n Data
In Microsoft® Windows® Explorer, select
Search, and enter your search string to
find data within the DWF file such as
doors, bolt s, and more.
Navigate Sheet s or Views Using
Hyperlinks
From the main menu, choose
View>Show>Hyperlinks (Ctrl+H) to
display hyperlinks in blue. To follow a
hyperlink, hold down the Ctrl key and
click the hyperlink (Ctrl+ click). The
drawing, file, or web page to which it
was linked opens.
Present in Microsoft Office
Applications
Share the full design intent in Microsoft
PowerPoint, Excel, or Word whether it’s a
client presentation, product documentation, or bill of materials.
1. Drag the file from Windows Explorer
into the document.
2. Alternatively, from the Insert menu,
choose Object and Autodesk DWF
Viewer Control, then right-click and
select Autodesk DWF Viewer Control
Object and then Properties to embed
an interactive DWF.
Note: To view the document, the user must
have Autodesk DWF Viewer installed.
View & Print
View & Print
Page 8

Bonus Autodesk DWF Viewer Tips
1. Use the mouse wheel button to zoom
in and out. To pan, hold the button
down and move the mouse.
2. Select Options in the Content Browser
to show thumbnails, list views, or
bookmarks of the original DWF data.
3. When rotating 3D objects, keep the
triad at least slightly oblique to the
screen to move or rotate. You cannot
move or rotate the axis that points
directly toward you.
Review & Mark Up
No more looking through faxes and
emails to incorporate feedback by
hand. With Autodesk DWF Composer
software, team members can review,
measure, and mark up designs, and then
round-trip redlines and changes back
to the original design application. All
changes are automatically tracked and
kept in the context of the design.
Post Files to Autodesk Buzzsaw
Autodesk DWF Viewer and Autodesk
DWF Composer are fully integrated into
the Autodesk® Buzzsaw® collaborative
project management solution.
Follow these steps to efficiently share
your designs:
1. Drag DWF files into the project folder.
2. Notif y the project team using the
Buzzsaw notification system. Updates
and versions are automatically tracked.
View & Print
Review & Mark Up
Page 9

Color Code Reviews
Use different markup colors to indicate
different users.
1. Select from the 48 predefined colors
or one of your own.
2. Change the Text Color and Line Color
on the main menu, and then click your
chosen color.
Work with Advanced Redlines
and Markups
Autodesk DWF Composer includes easyto-use shapes, text, freehand, stamp, and
custom symbol tools in addition to
markup tools.
Control Markup S hape
Hold down the Shift key to constrain the
range of movement when marking up
drawings.
1. To start again, press the Esc key and
try again.
2. To delete a markup, use the Selection
tool and press Delete.
Review & Mark Up
Review & Mark Up
Measure Accurately
The dimension tools with the AutoSnap™
feature help project team members
determine lengths, polylines, and areas.
Snap to Endpoint s
Set the measure tools to snap to endpoints, midpoints, and lines for precision
measurement of design elements in the
DWF file. Click the Tools command, and
turn on the Snap to Geometr y feature.
Zoom In for Greater Acc uracy
To achieve greater accuracy, zoom in to
the section of the drawing to which you
are applying the starting and ending
points of the dimension.
Save a New Markup Vie w
When you create a markup, the current
view of the page is stored with that markup. To change and automatically store a
new view, pan and zoom to the desired
view, and then move the markup slightly
or modify it in some way.
Page 10

Drag and Drop
Combine DWF files, raster images, and
other project information into a single
DWF file or send it out for review:
1. Drag and drop, or use File>Open to
view and mark up many different types
of image files, such as JPEG or GIF
files.
2. Drag a page or pages into an email
or onto the desktop to create a new
DWF file.
Use Custom Symbols and Stamps
Use symbols to annotate and mark up
information in the office or in the field.
Create Custom Symbol C atalog
Publish the 2D drawings, images, or text
to a DWF file using the Autodesk DWF
Writer. In Autodesk DWF Composer,
import this file into the symbol catalog.
1. From the toolbar, click the
Stamps and Symbols button.
2. Select Import DWF as Symbol
Catalog.
3. Browse for and select the DWF file
that contains your symbols, and click
Open or press Enter.
Create Your Own Stamp
Create custom annotations and stamps
by double-clicking a stamp and typing to
insert text, or highlight the text you want
to change.
Manage Your Project Information
in One Place
Work with multiple document types in
one multisheet DWF sheet set, combining images, sketches, project timelines,
specifications, bills of materials, and
other project information.
Capture Informa tion with
Snapshot Tool
Add a snapshot to an existing DWF file,
or create a new DWF file by adding one
or more snapshots to a blank file.
1. Click the Snapshot
button.
2. Set up the subject of your screen shot.
3. Click the Capture button on
the Snapshot window title bar.
Review & Mark Up
Review & Mark Up
Page 11

Advanced Tips
Take advantage of these advanced DWF
tips from the experts.
Install Across Your Company
Install Autodesk DWF Viewer or
Autodesk DWF Composer across your
company easily, using command-line
scripting and the Tarma installation
software.
Note: De tailed information about the
Tarma installation sof tware is available
at www.tarma.com/suppor t/index.htm#/
support/cmdline.htm.
1. Dwf ViewerSetup.exe /q: Per form a
silent (quiet, unattended) installation.
During silent installations, the Setup
wizard is suppressed and the entire
installation, registration, or uninstalla
tion process is performed without user
intervention. This feature is intended
for unattended installations and
removals.
2. Dwf ViewerSetup.exe /q2 : Perform
an invisible installation. In this mode,
the entire installation, registration, or
uninstallation process is per formed
without user intervention and with
a completely hidden user interface.
(Note, though, that the Setup process
still appears in the Windows Task
Manager’s list of running processes.)
Embed Autodesk DWF Viewer
in HTML Documents
Autodesk DWF Viewer is available as an
ActiveX® control that is embedded in
Microsoft® Internet Explorer, providing a
smooth installation of the free Autodesk
DWF Viewer in web pages.
1. Embed DWF files directly in web pages
by using the <object > element tag.
2. Access an HTML sample that demonstrates how to embed a DWF file at
www.autodesk.com/dwf-developers
and click on Code Samples .
Note: Microsoft Internet Explorer 5 .01 or
later is required.
Additional Resources
Visit the DWF Center
www.autodesk.com/dwf
Participate in th e Discussion Groups
www.autodesk.com/dwf viewer-discussion
www.autodesk.com/dwfcomposer-discussion
www.autodesk.com/dwf-discussion
Get Free Download s
www.autodesk.com/dwf viewer-download
www.autodesk.com/dwfcomposer-trial
www.autodesk.com/dwf writer
Purchase Autode sk DWF Composer
www.autodesk.com/store
Find Product Info rmation
www.autodesk.com/dwfcomposer
www.autodesk.com/dwf viewer
www.autodesk.com/dwf-publishing
Find Developer Tools and In formation
www.autodesk.com/dwf-developers
www.autodesk.com/dwf toolkit
Save DWF Files That You View
Follow these steps to save a local copy
of a DWF file published to a website:
1. Right-click the DWF file and choose
Save As. Alternatively, click the Save
As button on the toolbar.
2. To save a local copy of the DWF file
you are viewing, specify a file name.
Use API to Customize and Extend
Functionality
Use the Autodesk DWF Viewer and
Autodesk DWF Composer application
programming interface (API) documentation to integrate DWF Viewer or DWF
Composer within websites or thirdparty applications. The documentation
provides instruction on features such
as navigation to a specific page or view,
control over layer visibility, the ability to
show and hide the toolbar and contex t
menus, as well as control of the viewer
behavior. Visit www.autodesk.com/
dwf-developers to download the API
documentation.
Advanced Tips
Advanced Tips
Page 12

Additional Resources
Autodesk, AutoCAD, AutoSnap, Buzzsaw, and DWF are registered
trademarks or trademarks of Autodesk, Inc., in the USA and other
countries. All other brand names, product names, or trademarks
belong to their respective holders. Autodesk reserves the right to
alter product offerings and specifications at any time without notice,
and is not responsible for typographical or graphical errors that may
appear in this document. © 2005 Autodesk, Inc. All rights reserved.
000000000000116346
“ DWF is an intelligent design format,
meaning that engineering data is not lost
when drawings are converted from DWG.
DWF allows us to zoom in on drawings with
vector precision and view all the intelligence
built into the files. DWF out-performs all the
other available formats so drastically that
there’s hardly a comparison between them.”
— Chas Thompson, Senior AutoCAD Support Engineer,
Siemens Logistics and Assembly Systems Inc.
Advanced Tips
View & Print
 Loading...