

Autodesk 18507-051452-9325 - UPG ARCH DESKTOP 2007, Design Academy 2007 Installation Manual
Page 1

Autodesk Design Academy 2007
Installation Guide
20007-010000-2720A June 2006
Page 2

All Rights Reserved
Copyright© 2006 Autodesk, Inc.
This publication, or parts thereof, may not be reproduced in any form, by any method, for any purpose.
AUTODESK, INC., MAKES NO WARRANTY, EITHER EXPRESS OR IMPLIED, INCLUDING BUT NOT LIMITED TO ANY
IMPLIED WARRANTIES OF MERCHANTABILITY OR FITNESS FOR A PARTICULAR PURPOSE REGARDING THESE
MATERIALS, AND MAKES SUCH MATERIALS AVAILABLE SOLELY ON AN "AS-IS" BASIS.
IN NO EVENT SHALL AUTODESK, INC., BE LIABLE TO ANYONE FOR SPECIAL, COLLATERAL, INCIDENTAL, OR
CONSEQUENTIAL DAMAGES IN CONNECTION WITH OR ARISING OUT OF PURCHASE OR USE OF THESE MATERIALS.
THE SOLE AND EXCLUSIVE LIABILITY TO AUTODESK, INC., REGARDLESS OF THE FORM OF ACTION, SHALL NOT
EXCEED THE PURCHASE PRICE OF THE MATERIALS DESCRIBED HEREIN.
Autodesk, Inc., reserves the right to revise and improve its products as it sees fit. This publication describes the state of the
product at the time of publication, and may not reflect the product at all times in the future.
Autodesk Trademarks
The following are registered trademarks of Autodesk, Inc., in the USA and other countries: 3DEC (design/logo), 3December,
3December.com, 3D Studio, 3D Studio MAX, 3D Studio VIZ, 3ds Max, ActiveShapes, Actrix, ADI, AEC-X, Alias, Alias (swirl
design/logo), Alias|Wavefront (design/logo), ATC, AUGI, AutoCAD, AutoCAD LT, Autodesk, Autodesk Envision, Autodesk
Inventor, Autodesk Map, Autodesk MapGuide, Autodesk Streamline, Autodesk WalkThrough, Autodesk World, AutoLISP,
AutoSketch, Backdraft, Bringing information down to earth, Buzzsaw, CAD Overlay, Can You Imagine, Character Studio,
Cinepak, Cinepak (logo), Civil 3D, Cleaner, Combustion, Create>what’s>Next (design/logo), DesignStudio, Design|Studio
(design/logo), Design Your World, Design Your World (design/logo), EditDV, Education by Design, FBX, Filmbox, Gmax, Heidi,
HOOPS, i-drop, IntroDV, Kaydara, Kaydara (design/logo), Lustre, Maya, Mechanical Desktop, ObjectARX, Open Reality,
PortfolioWall, Powered with Autodesk Technology (logo), ProjectPoint, RadioRay, Reactor, Revit, SketchBook, Visual, Visual
Construction, Visual Drainage, Visual Hydro, Visual Landscape, Visual Roads, Visual Survey, Visual Toolbox, Visual Tugboat,
Visual LISP, Voice Reality, Volo, WHIP!, and WHIP! (logo).
The following are trademarks of Autodesk, Inc., in the USA and other countries: AutoCAD Learning Assistance, AutoCAD
Simulator, AutoCAD SQL Extension, AutoCAD SQL Interface, AutoSnap, AutoTrack, Built with ObjectARX (logo), Burn, CAiCE,
Cinestream, Cleaner Central, ClearScale, Colour Warper, Content Explorer, Dancing Baby (image), DesignCenter, Design
Doctor, Designer's Toolkit, DesignKids, DesignProf, DesignServer, Design Web Format, DWF, DWFit, DWG Linking, DWG
TrueConvert, DWG TrueView, DXF, Extending the Design Team, GDX Driver, Gmax (logo), Gmax ready (logo), Heads-up
Design, HumanIK, Incinerator, jobnet, LocationLogic, MotionBuilder, ObjectDBX, Plasma, PolarSnap, Productstream, RealDWG,
Real-time Roto, Render Queue, StudioTools, Topobase, Toxik, Visual Bridge, Visual Syllabus, and Wiretap.
Autodesk Canada Co. Trademarks
The following are registered trademarks of Autodesk Canada Co. in the USA and/or Canada and other countries: Discreet,
Fire, Flame, Flint, Flint RT, Frost, Glass, Inferno, MountStone, Riot, River, Smoke, Sparks, Stone, Stream, Vapour, Wire.
The following are trademarks of Autodesk Canada Co., in the USA, Canada, and/or other countries: Backburner, Multi-Master
Editing.
Third Party Trademarks
All other brand names, product names or trademarks belong to their respective holders.
Third Party Software Program Credits
ACIS Copyright © 1989-2001 Spatial Corp. Portions Copyright © 2002 Autodesk, Inc.
HLM is a trademark of D-Cubed Ltd. HLM © Copyright D-Cubed Ltd. 1996-2004.
AnswerWorks 4.0 ©; 1997-2005 Vantage Software Technologies, Inc. All rights reserved.
Portions Copyright © 1997 Microsoft Corporation. All rights reserved.
Libpng is copyright © 2004 Glenn Randers-Pehrson.
Libtiff is Copyright © 1988-1997 Sam Leffler And Copyright © 1991-1997 Silicon Graphics, Inc.
Active Delivery™ 2.0. © 1999-2004 Inner Media, Inc. All rights reserved.
Produced under a license of data derived from DIC Color Guide ® from Dainippon Ink and Chemicals, Inc. Copyright
Dainippon Ink and Chemicals, Inc. All rights reserved. DIC and DIC Color Guide are registered trademarks of Dainippon Ink
and Chemicals, Inc.
International CorrectSpell™ Spelling Correction System © 1995 by Lernout & Hauspie Speech Products, N.V. All rights reserved.
InstallShield™ 3.0. Copyright © 1997 InstallShield Software Corporation. All rights reserved.
Macromedia ® and Flash ® are registered trademarks or trademarks of Adobe Systems Incorporated in the United States or
other countries.
©
Page 3

PANTONE ® Colors displayed in the software application or in the user documentation may not match PANTONE-identified
standards. Consult current PANTONE Color Publications for accurate color.
PANTONE ® and other Pantone, Inc. trademarks are the property of Pantone, Inc. © Pantone, Inc., 2002.
Pantone, Inc. is the copyright owner of color data and/or software which are licensed to Autodesk, Inc., to distribute for use
only in combination with certain Autodesk software products. PANTONE Color Data and/or Software shall not be copied onto
another disk or into memory unless as part of the execution of this Autodesk software product.
Portions Copyright © 1991-1996 Arthur D. Applegate. All rights reserved.
Portions of this software are based on the work of the Independent JPEG Group.
RAL DESIGN © RAL, Sankt Augustin, 2002
RAL CLASSIC © RAL, Sankt Augustin, 2002
Representation of the RAL Colors is done with the approval of RAL Deutsches Institut für Gütesicherung und Kennzeichnung
e.V. (RAL German Institute for Quality Assurance and Certification, re. Assoc.), D-53757 Sankt Augustin."
Typefaces from the Bitstream ® typeface library copyright 1992.
Typefaces from Payne Loving Trust © 1996. All rights reserved.
Printed and Help produced with Idiom WorldServer
™
Portions Copyright © 1996-2006 Macrovision Corporation. All rights reserved.
Stingray is Copyright 1995-2005, Quovadx, Inc. All Rights Reserved. Protected by copyright and licenses restricting use,
copying, distribution and decompilation. The Rogue Wave name and logo and the Stingray name and logo are either registered
trademarks or trademarks of Quovadx, Inc. in the United States and/or other countries.
Xerces is Copyright © 1999-2005, The Apache Software Foundation. Licensed under the Apache License, Version 2.0; you
may not use this file except in compliance with the license. You may obtain a copy of the license at the following web address:
http://www.apache.org/licenses/LICENSE-2.0.
The Director General of the Geographic Survey Institute has issued the approval for the coordinates exchange numbered
TKY2JGD for Japan Geodetic Datum 2000, also known as technical information No H1-N0.2 of the Geographic Survey Institute,
to be installed and used within this software product (Approval No.: 646 issued by GSI, April 8, 2002).
MrSID image compression format is Copyright © 2005, LizardTech, a division of Celartem,Inc. All rights reserved. MrSID
technology is protected by U.S. Patent No 5,710,835 and patents pending.
Portions of this computer program are Copyright ©; 2000 Earth Resource Mapping, Inc.
The OSTN97 coordinate transformation is © Crown Copyright 1997. All rights reserved.
The OSTN02 coordinate transformation is © Crown copyright 2002. All rights reserved.
The OSGM02 coordinate transformation is © Crown copyright 2002, © Ordnance Survey Ireland, 2002.
FME Objects Engine © 2005 SAFE Software. All rights reserved.
Libcurl is Copyright © 1996 - 2006, Daniel Stenberg, <daniel@haxx.se>. All rights reserved.
The Redland RDF Application Framework is Copyright © 2000-2005 Institute for Learning and Research Technology, University
of Bristol. Licensed under the Apache License, Version 2.0; you may not use this file except in compliance with the license.
You may obtain a copy of the license at the following web address: http://www.apache.org/licenses/LICENSE-2.0.
GDAL is Copyright © 2000, Frank Warmerdam.
GOVERNMENT USE
Use, duplication, or disclosure by the U.S. Government is subject to restrictions as set forth in FAR 12.212 (Commercial
Computer Software-Restricted Rights) and DFAR 227.7202 (Rights in Technical Data and Computer Software), as applicable.
Page 4

Page 5

Contents
Chapter 1 Introduction . . . . . . . . . . . . . . . . . . . . . . . . . . . . 1
Chapter 2 Prepare for Installation . . . . . . . . . . . . . . . . . . . . . . . 3
Overview of Installation . . . . . . . . . . . . . . . . . . . . . . . . . . 4
Installation Prerequisites . . . . . . . . . . . . . . . . . . . . . . . . . . 5
Installation Support and Types . . . . . . . . . . . . . . . . . . . . . . 13
Chapter 3 Installation Quickstarts Overview . . . . . . . . . . . . . . . . . 17
Summary of Quickstarts . . . . . . . . . . . . . . . . . . . . . . . . . . 18
Chapter 4 Network Licensing Quickstart . . . . . . . . . . . . . . . . . . . 21
Install the Network License Manager . . . . . . . . . . . . . . . . . . . 23
Install the Network License Activation Utility . . . . . . . . . . . . . . 25
Run the Network License Activation Utility . . . . . . . . . . . . . . . 27
Manually Obtain a License . . . . . . . . . . . . . . . . . . . . . . . . 35
Configure a License Manager . . . . . . . . . . . . . . . . . . . . . . . 36
Combine Multiple License Files . . . . . . . . . . . . . . . . . . . . . . 41
Chapter 5 Deployment Wizard Quickstart . . . . . . . . . . . . . . . . . . 45
Installer File Location . . . . . . . . . . . . . . . . . . . . . . . . . . . 46
Run the Deployment Wizard . . . . . . . . . . . . . . . . . . . . . . . 46
v
Page 6

Run the Installed Deployment Wizard (optional) . . . . . . . . . . . . 56
Chapter 6 Other Product Quickstart . . . . . . . . . . . . . . . . . . . . . 63
Autodesk Revit Deployment . . . . . . . . . . . . . . . . . . . . . . . 65
Stand-Alone Products . . . . . . . . . . . . . . . . . . . . . . . . . . . 70
Chapter 7 Product Distribution . . . . . . . . . . . . . . . . . . . . . . . 73
Installation by Deployments . . . . . . . . . . . . . . . . . . . . . . . 74
Distribution by Imaging Software . . . . . . . . . . . . . . . . . . . . . 75
Chapter 8 Product Activation and Removal . . . . . . . . . . . . . . . . . 79
Overview of Activation . . . . . . . . . . . . . . . . . . . . . . . . . . 80
Product Activation . . . . . . . . . . . . . . . . . . . . . . . . . . . . 80
Product Removal . . . . . . . . . . . . . . . . . . . . . . . . . . . . . 81
Chapter 9 Education Curricula . . . . . . . . . . . . . . . . . . . . . . . . 83
Curricula Overview and Installation . . . . . . . . . . . . . . . . . . . 84
Chapter 10 Troubleshooting Guide . . . . . . . . . . . . . . . . . . . . . . 89
System Issues . . . . . . . . . . . . . . . . . . . . . . . . . . . . . . . 90
Network Licensing Issues . . . . . . . . . . . . . . . . . . . . . . . . . 90
Deployment Issues . . . . . . . . . . . . . . . . . . . . . . . . . . . . 90
Activation Issues . . . . . . . . . . . . . . . . . . . . . . . . . . . . . . 91
Refresh Issues . . . . . . . . . . . . . . . . . . . . . . . . . . . . . . . 91
Chapter 11 Contacts and Contents . . . . . . . . . . . . . . . . . . . . . . 93
Contact Information . . . . . . . . . . . . . . . . . . . . . . . . . . . 94
Product Contents . . . . . . . . . . . . . . . . . . . . . . . . . . . . . 95
vi | Contents
Page 7

Introduction
Autodesk Design Academy 2007
Autodesk® Design Academy offers a comprehensive
pre-engineering, pre-architecture, and cross-discipline
curriculum that helps students learn the fundamentals of the
design process while using popular Autodesk design tools. The
curriculum meets national standards and includes a course
syllabus, student exercises and projects, online learning
resources, and cross-curricular projects for physics, science,
and chemistry. The curriculum engages educators and students
in real-life projects, while developing skills in teamwork,
design, mathematics, science, and technology.
In addition to purchasing the Autodesk Design Academy
package, you may purchase Autodesk Media and Entertainment
Design Academy products, which are licensed separately from
the Autodesk Design Academy products and are sold either
through Autodesk Media and Entertainment Academic Value
Added Resellers or directly from Autodesk.
1
Design Academy Products
Autodesk Design Academy contains an extensive collection of
products available to educational sites. Each set of CDs in the
package represents an individual Autodesk product. The
collection includes the following products.
1
Page 8

AutoCAD 2007
Autodesk Design Review 2007
Autodesk VIZ 2007
Autodesk Architectural Desktop 2007
Autodesk Building Systems 2007
Autodesk Revit Building 9
NotesProduct
Autodesk Inventor Professional 11
Autodesk Civil 3D 2007
Contains Autodesk® Mechanical
2007, Mechanical Desktop 2007
and Vault 5
Includes Autodesk Land Desktop
Companion 2007
2 | Chapter 1 Introduction
Page 9

Prepare for Installation
2
This section provides background information regarding the
installation of Autodesk Design Academy products, prerequisite
conditions that need to be met before installation begins, the
types of installations, and a general understanding of the
installation workflow.
In this chapter
■ Overview of Installation
■ Installation Prerequisites
■ Installation Support and Types
3
Page 10

Overview of Installation
Most Autodesk products offer three installation options. These include
stand-alone, multi-seat stand-alone, and network licensed installations.
Autodesk Design Academy 2007 contains eight individual Autodesk products.
Each of those products has its own installer that offers at least one of the three
types of installation options.
The installation you’ll use depends on which products you want to install.
The recommended installation method for classroom or lab environments is
network licensed or multi-seat stand-alone. Both of these methods require
that you use the Deployment wizard. The Deployment wizard can be run
directly from the product CD or installed on the local drive.
NOTE While all products can be installed using the stand-alone method, the type
of license you’ve purchased should dictate the installation method you use. Some
products only allow you to use the stand-alone installation method. See Other
Product Quickstart (page 63) for a list of stand-alone products.
Site Configuration
Each Design Academy site uses its own configuration of product deployments
and installations. The installation process can be greatly simplified by only
installing the products that are required for the classroom or lab to operate.
For example, one site might use the Deployment wizard to install
network-licensed versions of Autodesk Architectural Desktop 2007 and
Autodesk VIZ 2007 on 20 computers. Another Design Institute site might use
the Deployment wizard to install multi-seat stand-alone versions of AutoCAD
2007, Autodesk Architectural Desktop 2007, and Autodesk Civil 3D 2007 on
40 computers. Still another site might use the Deployment wizard to install
Autodesk Inventor Professional 11 as a multi-seat stand-alone product on 15
computers in a computer lab, and might also do manual installations of
Autodesk Design Review 2007 on the same 15 computers, one by one.
TIP To reduce installation time, only install what is necessary.
4 | Chapter 2 Prepare for Installation
Page 11

Installation Prerequisites
Before installing any of the products in the Design Academy package, it is
recommended that you make sure the following conditions have been met:
■ You understand the product licenses you’ve ordered. See Understand and
Verify Your Product Licensing (page 5).
■ For each product you plan to install, you have reviewed the system
requirements. See Review the System Requirements (page 9).
■ You have an understanding of administrative permissions. See Understand
Administrative Permissions (page 9).
■ You have closed all other programs and disabled anti-virus software. See
Unsuccessful Installations (page 9).
■ You have created a distribution plan for products once they’re installed
on your primary system. See Deployment Plan (page 10).
■ If you are using imaging software, you have properly cleaned your primary
system in preparation for creating a master image. See Clean a Primary
System and Restore the Operating System (page 10).
■ You know how you’re going to personalize the products during activation.
See Consistent Personalization Data (page 11).
■ You have created shared folders for each product you plan to install using
the Deployment wizard. See Create Shared Folders for the Deployment
Wizard (page 11).
■ If you are using the Deployment wizard, you have checked for the presence
of an older version of the Deployment wizard. See Check for Older Versions
of the Deployment Wizard (page 12).
Understand and Verify Your Product Licensing
The type of licensing you purchased for your package of Autodesk Design
Academy determines the installation and deployment options that you have
available. There are three types of product licenses: network, multi-seat
stand-alone and stand-alone.
Network License
■ Purchasing network licensed products is recommended for large
drafting/design facilities, classrooms, and lab environments. When you
Installation Prerequisites | 5
Page 12

install network licensed products, you do not have to worry about
activation. Systems running products that use a network license do not
require activation because the Network License Manager manages all
requests for running a networked application.
This means, for example, that you can purchase a network license for 25
seats. The product is installed on 30 systems in the classroom. Once the
network license manager is installed, activated, configured and started on
the server, students can log on to any of the 30 systems up to a maximum
of 25 (the number of licenses). If someone exits the program on one of the
25 systems, the server frees a license for someone on one of the remaining
five systems.
The administrative image created by the Deployment wizard must be used
to install networked applications on a workstation.
If you are installing network licensed products, the following table shows
you which products use the network license manager and which chapters
you should reference in order to install, deploy and activate your facility.
License Manager
Refer to These ChaptersProducts that use the Network
■ AutoCAD 2007
■ Autodesk VIZ 2007
■ Autodesk Architectural Desktop
2007
■ Autodesk Building Systems 2007
■ Autodesk Inventor Professional 11
■ AutoCAD Civil 3D 2007 (includes
Land Desktop Companion 2007)
■ Autodesk Revit Building 9
Network Licensing Quickstart (page 21)
Deployment Wizard Quickstart (page 45)
Product Distribution (page 73)
Product Activation (page 80)
Network Licensing Quickstart (page 21)
Autodesk Revit Deployment (page 65)
Product Distribution (page 73)
Product Activation (page 80)
Multi-Seat Stand-Alone License
■ If your facility is not networked, but all the systems can connect to the
Internet, you can opt for multi-seat stand-alone licensed products. The
Deployment wizard is used to create deployment images. Contained within
the deployment images are shortcuts that are double-clicked to install the
6 | Chapter 2 Prepare for Installation
Page 13

products. This type of licensing means that your products each use the
same single serial number for activation. But, unlike network licensed
products, you can only install the products on the maximum number of
systems that the license allows.
Furthermore, registration information is pre-configured during the creation
of the deployment image which ensures duplicate registration data for all
the workstations. As long as a product is installed using the deployment
image shortcut and all the systems have Internet access, they are
automatically activated the first time a product is launched.
For example, you purchased a multi-seat stand-alone license for 25 seats.
You have 30 systems in your classroom that can communicate over the
Internet but they are not networked. Even though you could install software
on all 30 systems, only the first 25 systems you start will have their licenses
activated. Because the licenses are tied to each specific system, the
remaining five systems will never be able to run the software unless you
purchase an additional five licenses.
The following table shows you multi-seat stand-alone licensed products
and which chapters you should reference in order to install, deploy and
activate your facility.
Installation Prerequisites | 7
Page 14

Stand-Alone Licenses
Refer to These ChaptersProducts that use Multi-Seat
■ AutoCAD 2007
■ Autodesk VIZ 2007
■ Autodesk Architectural Desktop
2007
■ Autodesk Building Systems 2007
■ Autodesk Inventor Professional 11
■ AutoCAD Civil 3D 2007 (includes
Land Desktop Companion 2007)
■ Autodesk Civil 3D - Civil Design
Companion 2007
■ Autodesk Revit Building 9
Deployment Wizard Quickstart (page 45)
Product Distribution (page 73)
Product Activation (page 80)
Autodesk Revit Deployment (page 65)
Product Distribution (page 73)
Product Activation (page 80)
Stand-Alone License
■ Stand-alone licensed product differ from multi-seat stand-alone licensed
products in that they must be installed directly from the product CD.
Registration of stand-alone products occurs the first time the application
is launched and registration information must be entered manually during
the registration process. In a classroom or lab environment there are two
ways to handle these products.
■ Move from system to system, installing on each from the product CD.
■ If the systems are networked, copy the product CD to a shared folder
on the primary server and then run the setup.exe file in the shared folder
on the server from each satellite system.
8 | Chapter 2 Prepare for Installation
Page 15

The following table shows the products in your package that are only
available as stand-alone licensed products and which chapters you should
reference in order to install your facility.
Licenses
■ Autodesk Design Review 2007
You request a change to the licensing you’ve purchased by contacting your
Academic Value Added Reseller. You can change from multi-seat stand-alone
licensing to network licensing and you can also increase the number of seats
for your existing license.
Refer to These ChaptersProducts that use Stand-Alone
Stand-Alone Products (page 70)
Product Distribution (page 73)
Review the System Requirements
Make sure that the systems on which you plan to install any of the Design
Academy products meet the system requirements for each product being
installed. If your systems do not meet the system requirements, problems can
occur.
Each product has its own set of system requirements. System requirements
can be accessed directly from the Media Browser of each product you plan to
install or from www.autodesk.com.
Understand Administrative Permissions
To install Design Academy products, you must have administrative privileges
on each workstation where the products are to be installed. If you are unsure
of your permission level, see your system administrator for more information.
Unsuccessful Installations
The installation process of many of the Design Academy products may stop
if some applications (such as Microsoft® Outlook® or virus-checking programs)
are running. Close all running applications and temporarily disable virus
checking utilities.
TIP If you encounter any MSI errors during installation, further information can
be found in the Autodesk Support Knowledgebase or the Microsoft Support
Knowledgebase.
Installation Prerequisites | 9
Page 16

Deployment Plan
Before installing any products, you should have a good idea about how you’re
going to deploy products from your primary system to all the other systems
in your facility.
The Deployment wizard is a tool supplied by Autodesk that can be used with
a majority of the products. The Deployment wizard creates a deployment
image for each product and places that image in a shared folder you’ve created.
Another option for installing software on multiple systems is to use imaging
software, such as Norton Ghost. Imaging software uses a master image of the
primary system that you duplicate on all the workstations. If you are going
to perform network or multi-seat stand-alone installations, you must set up
a shared folder. The shared folder should be a network share and not part of
the local workstation. Furthermore, it is strongly recommended that you have
a clean system before installing any products.
Deployment methods are covered in the Product Distribution chapter (page
73).
Clean a Primary System and Restore the Operating System
If you have previously run Autodesk products on the primary system, the
primary system should be properly cleaned before any master images are
created.
1 Clean the hard drive, including the boot sector.
For example, if you use the Norton GDISK utility, use the following
command; gdisk 1 /diskwipe.
Where 1 is the hard disk that is being wiped.
NOTE If you use imaging software other than Norton Ghost, make sure that
it cleans the boot sector; otherwise, you will not be able to activate Autodesk
products.
2 Use your restore CD or create a new partition and use the product CD to
install the operating system.
NOTE A clean system is one that has not had previous Autodesk software
installed or run.
10 | Chapter 2 Prepare for Installation
Page 17

Consistent Personalization Data
It is very important that the personalization data (for example, your facility
name and contact information) you supply when registering and activating
your products is consistent across all Autodesk products that you install. When
you register and activate products, you are required to enter information on
the electronic registration (EREG) site. If you enter this data incorrectly or
inconsistently, you can run into activation problems.
For example, Mr. J. Smith works at a school and has received his software. He
decides to install AutoCAD on his personal system and activates the product
using his personal information. He then gives the same AutoCAD package to
a system administrator to install on the school’s network. The system
administrator attempts to register and activate the product using the school’s
personalization data. Since the software license has already been registered
and activated by Mr. Smith, the software on the school’s network cannot be
registered and activated unless Mr. Smith’ s exact personalization data is re-used.
You can avoid this situation by always using the original personalization data.
If you do not know your personalization data, you should contact your
Academic Value Added Reseller or the Autodesk Business Center. Refer to
Contact Information (page 94).
Create Shared Folders for the Deployment Wizard
You use the Deployment wizard for both network license and multi-seat
stand-alone methods of installation. They both require shared folders. A shared
folder (network share) is a folder that you make available to users' computers
over a network. The shared folder is created before you run the Deployment
wizard and is where product deployments are stored.
It is recommended that you name the network share folder Autodesk. You can
then add subfolders inside the shared Autodesk folder that clearly convey the
names of products you plan to deploy. For example:
Any subfolders that are placed inside a shared folder are automatically shared.
Installation Prerequisites | 11
Page 18

TIP You must have Full Control permissions set for your shared folder when you
are creating your deployment images. Read permissions are necessary to access
the network share and administrative permissions on the workstation where the
program is deployed.
To create a shared folder
1 On a network server, create a folder named Autodesk.
2 Right-click the Autodesk folder. Click Sharing and Security (or Sharing).
3 In the Properties dialog box, Sharing tab, select Share This Folder.
4 In the Permissions dialog box, click the Permissions button. Make sure
Full Control is active. Click OK.
This is important when creating your deployment images.
5 Click OK to close the Properties dialog box.
6 For each product you plan to install, create a subfolder in the Autodesk
folder. Name each folder with the pertinent product name.
Check for Older Versions of the Deployment Wizard
While the Deployment wizard can be used to create the deployments of
multiple products, older versions of the wizard cannot be used with current
releases of Autodesk products. If you are planning to use the Deployment
wizard for network licensed or multi-seat stand-alone installations, first check
to see if the Deployment wizard is already installed on your system.
If you find that the Deployment wizard is already installed on your system,
and you haven’t installed it recently, it is recommended that you run the
Deployment wizard directly from the Media Browser.
Otherwise, you should uninstall the current Deployment wizard and then
install the Deployment wizard found on your 2007-based product CD.
For more information regarding the Deployment wizard, refer to the
Deployment Wizard Quickstart chapter (page 45).
12 | Chapter 2 Prepare for Installation
Page 19

Installation Support and Types
Before installing any products, you should know which products support the
Deployment wizard and Network License Manager, and the types of installation
options you can choose from.
Installation Support by Product
When installing a combination of Autodesk products on the same computer,
it’s beneficial to know which products support the Deployment wizard and
which products support the Network License Manager. The following table
lists the products categorized by discipline and if they provide Deployment
wizard and/or Network License Manager
Products
General Design & Drafting Discipline
Visualization
Supports the
Deployment
Wizard
Supports the Network License
Manager
YesYesAutoCAD 2007
NoNoAutodesk Design Review 2007
YesYesAutodesk VIZ 2007
Installation Support and Types | 13
Page 20

Products
Building Design Discipline
Manufacturing Design Discipline
Infrastructure Design Discipline
Desktop Companion 2007)
Installation Types
Supports the
Deployment
Wizard
Supports the
Network License
Manager
YesNoAutodesk Revit Building 9
YesYesAutodesk Architectural Desktop 2007
YesYesAutodesk Building Systems 2007
YesYesAutodesk Inventor Professional 11
YesYesAutodesk Civil 3D 2007 (includes Land
The type of licensing you’ve purchased often dictates what type of installation
method you’ll use. For products that support the Deployment wizard, you
will be prompted to specify one of the following installation types.
Network Licensed Installation
If you have a network license you’ll use this type of installation. You install
the program to workstations with the files and registry entries that allow the
program to communicate with the Network License Manager. You also define
the location of the Network License Manager so that the licenses can be
accessed.
The main advantage is that you can install products on more systems than
the number of licenses you have purchased. For example, purchasing 25
licenses but installing on 40 workstations. At any one time, products will run
on the maximum number of systems for which you have licenses. This means
you get a true floating license.
14 | Chapter 2 Prepare for Installation
Page 21

Stand-Alone Installation (Multi-Seat Stand-Alone)
The concept of multi-seat stand-alone installation is a variation of the
stand-alone installation. Multi-seat stand-alone installations do not rely upon
a network license manager to manage product licenses, however, you can still
use the Deployment wizard to create administrative images and deployment
shortcuts.
When prompted for installation type in the Deployment wizard, you choose
the Stand-Alone option and use the deployment shortcut to install the products
to all the other systems. After the first activation, using the multi-seat
stand-alone serial number, activation for all systems occurs automatically
based on this deployment, as long as all your systems are connected to the
Internet.
Stand-Alone Installation (Stand-Alone)
A stand-alone installation differs from a multi-seat stand-alone primarily in
that stand-alone products require you to install, register, and activate each
program individually on each workstation while the multi-seat stand-alone
installation is more automated. In order to install stand-alone products, you
have to move from system to system, installing from the product CD.
Installation Support and Types | 15
Page 22

Page 23

Installation Quickstarts
Overview
The quickstart procedures are set up to give you efficient,
step-by-step instructions for installing your facility. They cover
what is necessary to successfully install network licensed,
multi-seat stand-alone licensed, and stand-alone licensed
products.
3
In this chapter
■ Summary of Quickstarts
17
Page 24

Summary of Quickstarts
The purpose of each quickstart is to guide you through and expedite the
installation process of any of the products that are included with Autodesk
Design Academy 2007.
NOTE Keep in mind that the installation panels shown in the quickstarts may
differ from product to product. Where differences occur, review the options on
the panel and proceed or consult the product documentation for specifics.
Network Licensing Quickstart
The Network Licensing Quickstart describes the installation and use of the
Network License Manager and the Network License Activation Utility. It also
describes how to configure a license server and manually obtain an activation
code.
TIP The network license manager must be installed, activated, configured, and
running in order to run network licensed application.
Use the Network Licensing Quickstart if you have network licenses for the
following products:
Products
■ AutoCAD 2007
■ Autodesk VIZ 2007
■ Autodesk Architectural Desktop 2007
■ Autodesk Building Systems 2007
■ Autodesk Revit Building 9
■ Autodesk Inventor Professional 11
■ AutoCAD Civil 3D 2007 (includes Land
Desktop Companion 2007)
Deployment Wizard Quickstart
Most AutoCAD-based products require that you use the Deployment wizard
in order to perform network license or multi-seat stand-alone installations.
This quickstart steps you through running the Deployment wizard to create
18 | Chapter 3 Installation Quickstarts Overview
Page 25

deployment images for the products you need installed. An optional procedure
shows you how to install the Deployment wizard to your local drive.
Use the Deployment Wizard Quickstart to create deployment images for the
following products:
Products
■ AutoCAD 2007
■ Autodesk VIZ 2007
■ Autodesk Architectural Desktop 2007
■ Autodesk Building Systems 2007
■ Autodesk Inventor Professional 11
■ AutoCAD Civil 3D 2007 (includes Land Desktop
Companion 2007)
■ Autodesk Civil 3D - Civil Design Companion 2007
Other Product Quickstart
The Other Product Quickstart is divided into three procedures that are used
for products that have special deployment methods, or for products where
you can only perform stand-alone installations.
Use the Other Product Quickstart and pertinent procedures to install the
following products:
Procedure to followProduct
■ Autodesk Design Review 2007
■ Autodesk Revit Building 9
Stand-Alone Products
Autodesk Revit Deployment
Summary of Quickstarts | 19
Page 26

Page 27

Network Licensing
Quickstart
If you plan to install your products on a network and those
products support network licensing, use the Network License
Manager and the Network License Activation Utility.
The Network License Manager determines whether a license
is granted or denied to an application that is requesting a
license. If a license is available the application starts and a
license is checked out. If a license is not available, the
application will not start and you will not be able to run the
application until a license is returned to the license manager.
4
In this chapter
■ Install the Network License
Manager
■ Install the Network License
Activation Utility
■ Run the Network License
Activation Utility
■ Manually Obtain a License
■ Configure a License Manager
■ Combine Multiple License Files
Upon closing a network licensed application, the license is
returned to the license manager.
The Network License Activation Utility helps you activate and
register the network license manager over the Internet.
21
Page 28

The Network License Manager is used in conjunction with the
Deployment wizard. You can use the Network License Manager
with the following products:
Product
■ AutoCAD 2007
■ Autodesk VIZ 2007
■ Autodesk Architectural Desktop 2007
■ Autodesk Building Systems 2007
■ Autodesk Revit Building 9
■ Autodesk Inventor Professional 11 (with Autodesk Mechanical 2007 / Mechan-
ical Desktop 2007)
■ Autodesk Civil 3D 2007 (includes Land Desktop Companion 2007)
22 | Chapter 4 Network Licensing Quickstart
Page 29
Install the Network License Manager
You use the Network License Manager to control the administration of licenses
as applications make license requests.
NOTE You need to use the 2007-based version of the Network License Manager.
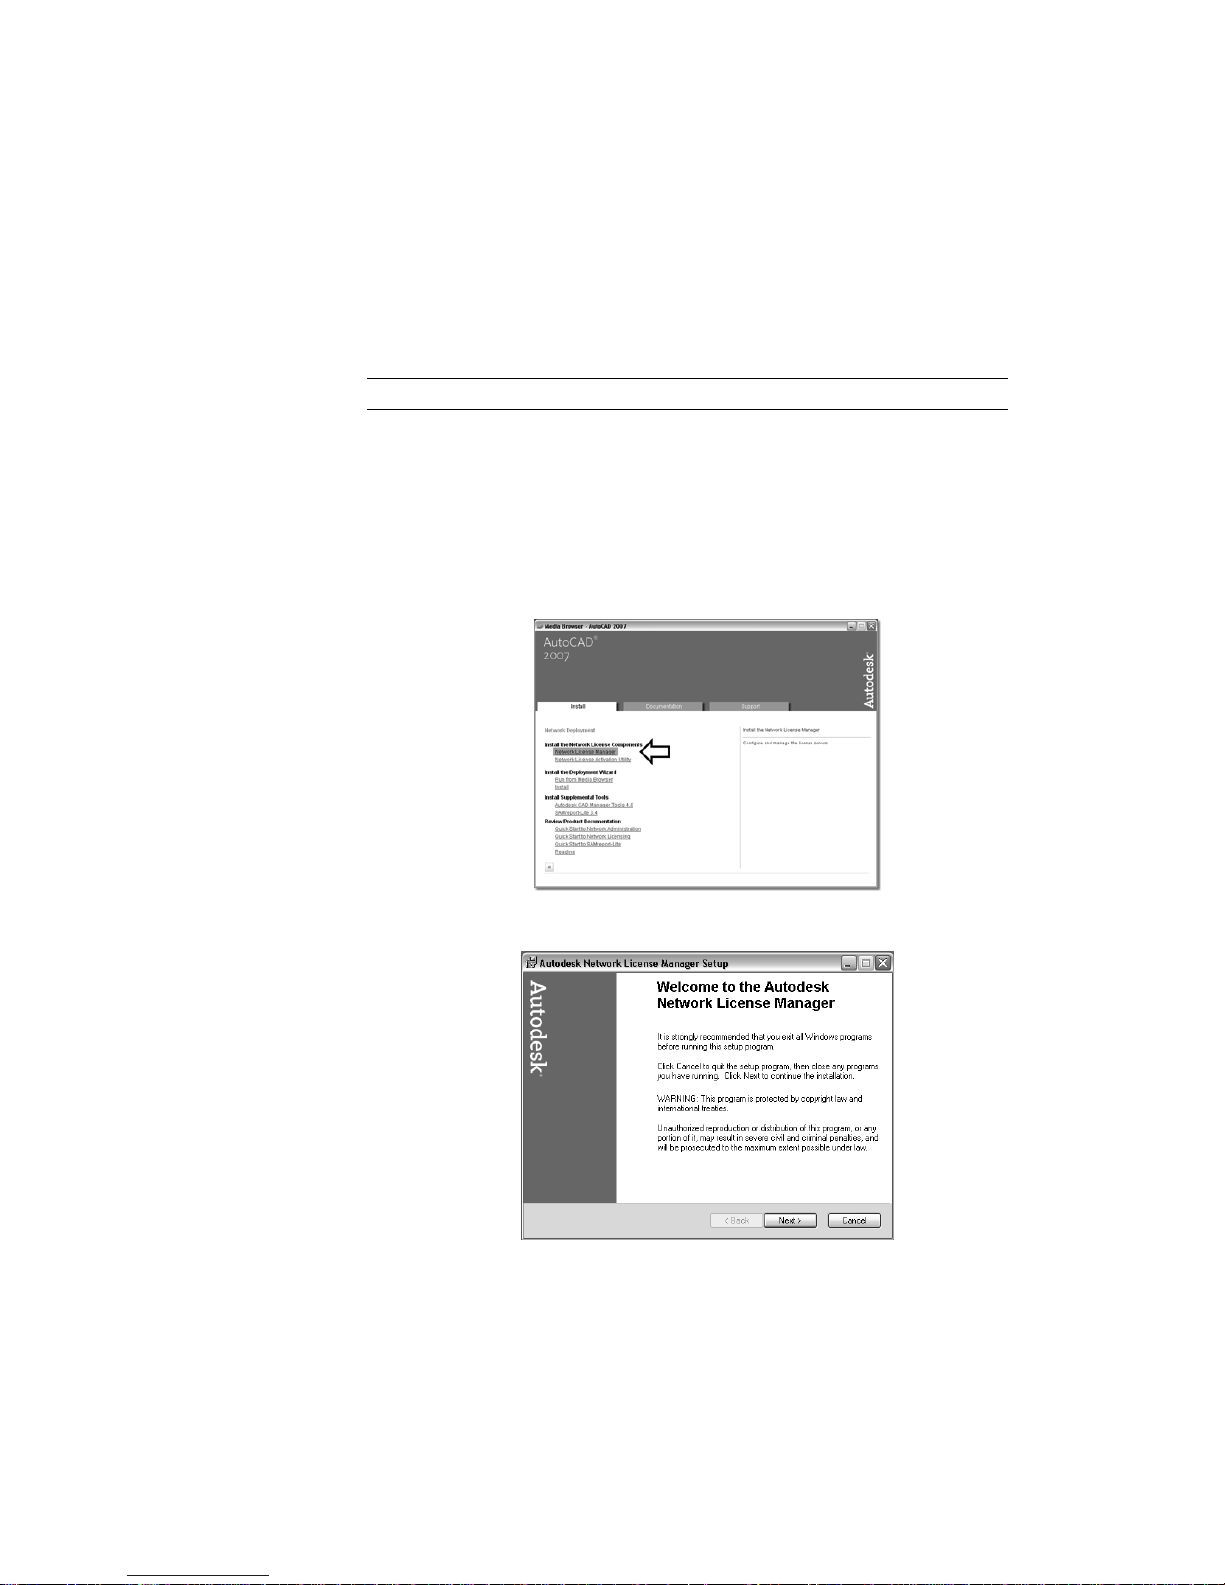
1 Insert the Autodesk product CD into the CD drive of the computer where
you want to install the Network License Manager.
2 In the Media Browser, click the Install tab.
3 On the Install tab, click Network Deployment.
4 Under the Network License Components heading, click Network License
Manager.
5 On the Welcome panel, click Next.
Install the Network License Manager | 23
Page 30
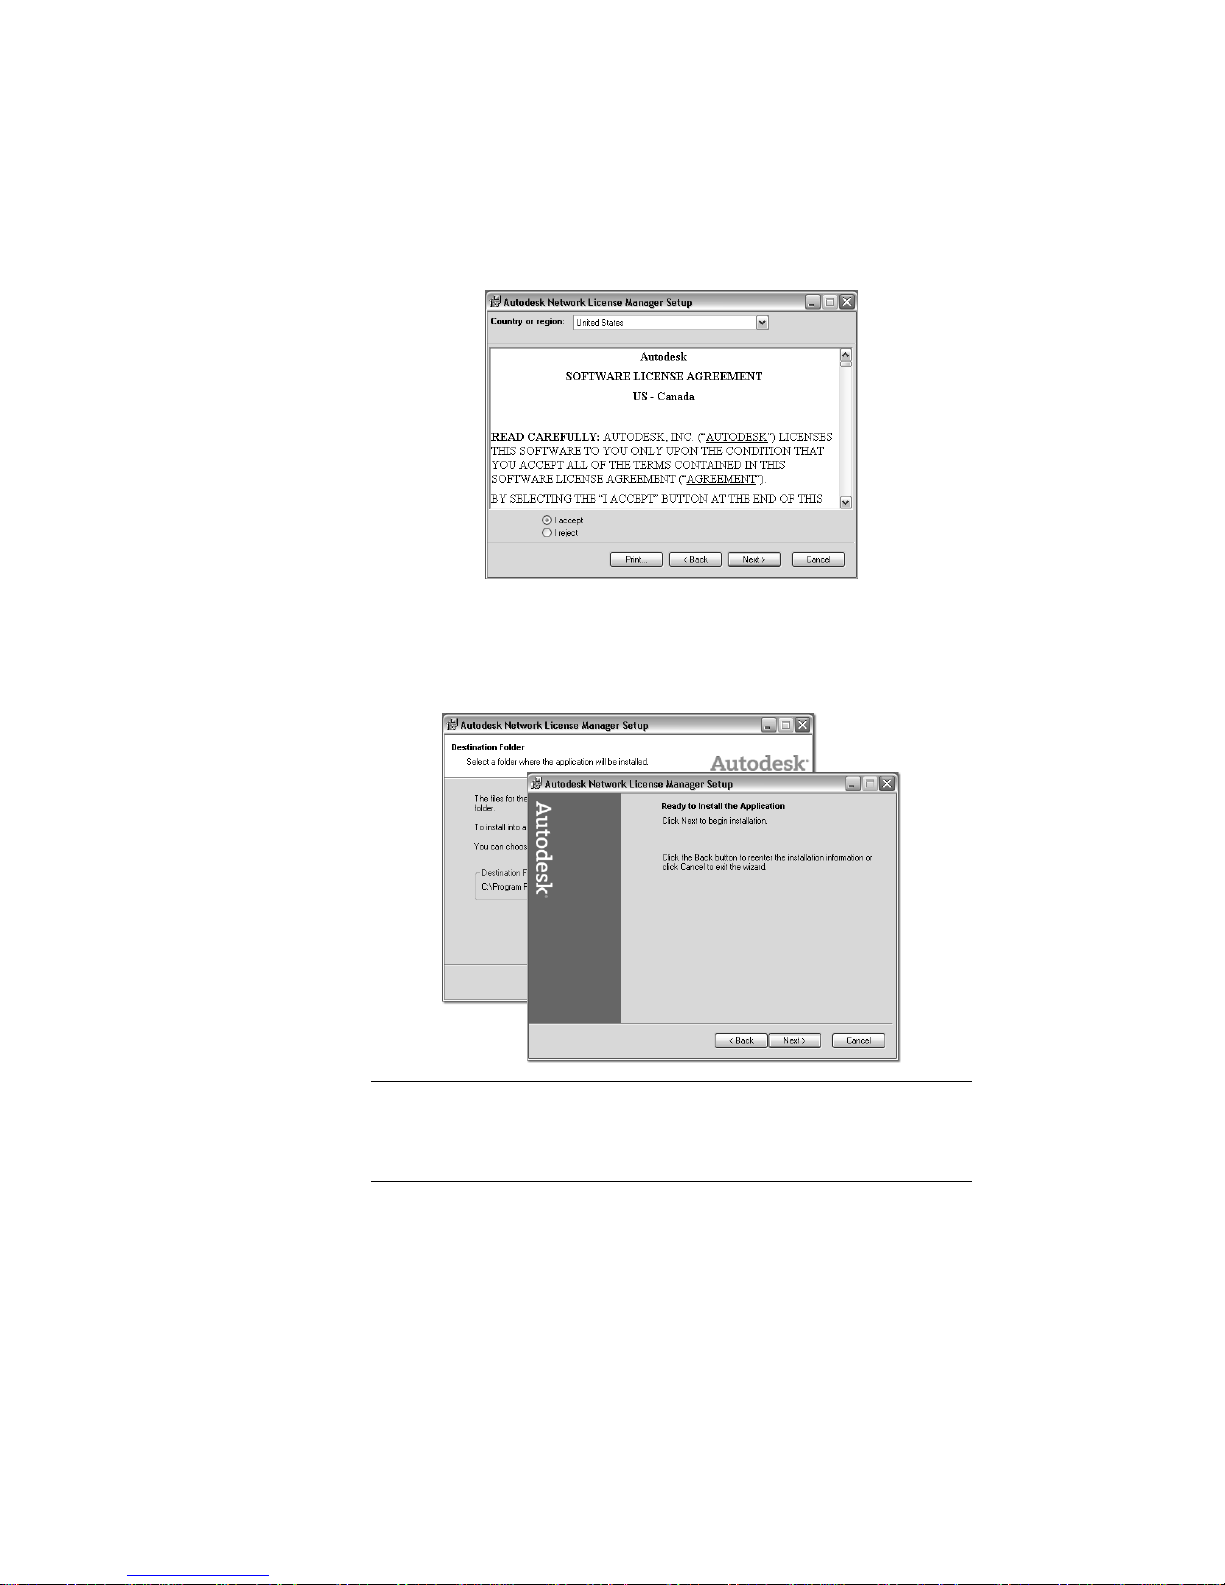
6 On the Software License Agreement panel, choose I Accept. Click Next.
7 On the Destination Folder and the Ready to Install the Application panels,
click Next.
This accepts the default installation folder. Installation of the Network
License Manager begins.
NOTE Do not install the Network License Manager on a remote drive. When
you install the Network License Manager files, you must provide a path to a
local drive. You must specify the drive letter; the universal naming convention
(UNC) is not supported.
24 | Chapter 4 Network Licensing Quickstart
Page 31

Install the Network License Activation Utility
With the Network License Activation Utility, you can obtain a license file for
the Network License Manager over the Internet, which saves time and effort
in setting up the Network License Manager. In addition, you can manually
register your products, use automated email registration if you cannot obtain
a license over the Internet.
NOTE Revit-based products do not support the Network License Activation utility.
Each product has its own Network License Activation utility that must be used
to obtain a license for that specific product. The Network License Activation
utility is installed from the product CD.
1 In the Media Browser, click the Install tab.
2 On the Install tab, click Network Deployment.
3 Under the Network License Components heading, click Network License
Activation Utility.
NOTE If the Network License Activation Utility for another Autodesk product
is already installed, you may be prompted to repair or remove it. Remove the
existing utility, and then install the Network License Activation utility for the
product you are activating.
4 On the Welcome panel, click Next.
Install the Network License Activation Utility | 25
Page 32

5 On the Software License Agreement panel, choose I Accept. Click Next.
6 On the Destination Folder and the Ready to Install the Application panels,
click Next.
This accepts the default installation folder. Installation of the Network
License Activation Utility begins.
26 | Chapter 4 Network Licensing Quickstart
Page 33

Run the Network License Activation Utility
After installing the Network License Activation Utility, you can use the utility
to activate your Network License Manager.
NOTE You cannot use the Network License Activation utility to obtain license files
for Revit-based products. See the Manually Obtain a License section (page 35).
1 On the Start menu, click Programs > Autodesk > Network License Manager
> AutoCAD 2007 Network License Activation Utility.
2 On the Obtain a Network License page, review how this utility works and
the requirements for using it, and then click Next.
Run the Network License Activation Utility | 27
Page 34

3 On the Server Information page, enter the product serial number, the
type of License Server Model, the Server Host Name and Host ID of the
system where the Network License Manager is installed.
Your server host name and host ID of the system(s) where the network
license manager is installed. The host ID is also known as the Ethernet
address, MAC address, or physical address. It is not the IP address. You
can obtain the host name and host ID by running Start menu > Programs
> Autodesk > Network License Manager > LMTOOLS on the computer where
the network license manager is installed. The information is found on
the System Settings tab under Host name and Ethernet address.
28 | Chapter 4 Network Licensing Quickstart
Page 35

NOTE If you are modifying an existing license file or obtaining a new license
for an existing product, your previously entered information might be
displayed. Make sure that the serial number that is displayed is the one you
want to license. If it is not, enter the correct product serial number.
4 On the Confirm Server Information page, review the server information
you entered, and click Next.
Run the Network License Activation Utility | 29
Page 36

5 On the Register and Activate Your Autodesk Product page, do all of the
following, and then click Next.
■ Specify if this product is going to be registered to a Company or
Individual.
■ In the Select Country or Region section, select your country or region
of residence.
NOTE It is important to use the same registration data for all products that
you install.
30 | Chapter 4 Network Licensing Quickstart
Page 37

6 On the Customer Information page, enter your personal information,
and then click Next.
NOTE It is important to use the same registration data for all products that
you install.
Run the Network License Activation Utility | 31
Page 38

7 On the Confirm Information panel, review your registration information
and click Next.
NOTE It is important to use the same registration data for all products that
you install.
32 | Chapter 4 Network Licensing Quickstart
Page 39

8 If the Connecting page is displayed, click Next to connect to the Internet
to obtain your network license.
9 On the Licenses Received page, in the Save License File for [computer
name] section, enter the location where you want to save your license
file, or click Browse to navigate to the location.
Run the Network License Activation Utility | 33
Page 40

NOTE It is recommended that you save the license file to the license folder
where you installed the Network License Manager.
If you have an existing license file from another Autodesk product, select
Insert the New License Information Into It. This option adds the new
license information into the existing license file. Click Next.
10 On the License Activation Successful page, click Print to save a printed
copy of the license information, or click Done to complete the transaction
and exit the Network License Activation Utility.
34 | Chapter 4 Network Licensing Quickstart
Page 41

NOTE You can open the .lic file in an ASCII text editor, such as Notepad,
and verify that the license information for the product has been added. Do
not use a word processor to open and save a .lic file.
Manually Obtain a License
Some customers prefer to obtain the license file for the network license
manager without using the Network License Activation utility. If you are
installing Revit-based products, you must manually obtain your license file.
If you want to do this, you must provide the following information:
■ Your server host name and host ID of the system(s) where the network
license manager is installed. The host ID is also known as the Ethernet
address, MAC address, or physical address. It is not the IP address.
You can obtain the host name and host ID by running Start menu > Programs
> Autodesk > Network License Manager > LMTOOLS on the computer where
Manually Obtain a License | 35
Page 42

the network license manager is installed. The information is found on the
System Settings tab under Host name and Ethernet address.
NOTE You may find multiple ethernet addresses in which case you have to
ensure you are using a physical ethernet address. Enter IPCONFIG /all at a
Command prompt to obtain the physical ethernet address.
■ Your Design Academy serial number.
■ The number of licenses that you want the network license manager to
administer.
■ The products for which you want to obtain licenses.
With this information available, you can manually request a license file:
■ By visiting: http://register.autodesk.com
■ By email: authcodes@autodesk.com
■ By phone: 800-551-1490
■ By fax: 800-225-6490 or 415-507-4937
Configure a License Manager
You configure a license manager so that you can manage the Autodesk product
licenses you received when you either obtained the license files manually or
36 | Chapter 4 Network Licensing Quickstart
Page 43

ran the Network License Activation Utility. Configure the license manager
with the lmtools.exe utility.
1 On the Start menu, click Programs > Autodesk > Network License Manager
> LMTOOLS.
2 On the Service/License File tab, make sure that the Configure Using
Services option is active.
3 Click the Config Services tab.
4 In the Service Name list, do one of the following:
■ If a service name is selected, verify that it is the one you want to use
■ If no service name exists, enter the service name you want to use to
to manage licenses.
manage licenses.
Configure a License Manager | 37
Page 44

NOTE By default, the Service Name is Flexlm Service 1. Your service name
might be different.
NOTE If you have more than one software vendor using FLEXlm for license
management, the Service Name list contains more than one option. Make
sure that only one Autodesk service is listed.
5 In the Path to Lmgrd.exe File box, enter the path to the Network License
Manager daemon (lmgrd.exe), or click Browse to locate the file.
By default, this daemon is installed in the \Program Files\Autodesk Network
License Manager\License folder.
38 | Chapter 4 Network Licensing Quickstart
Page 45

6 In the Path to the License File box, enter the path to your license file, or
click Browse to locate the file.
This is the path to the license file obtained by the Network License
Activation utility or the location where you placed the license file if you
obtained it manually.
7 In the Path to the Debug Log File box, enter a path to create a debug log,
or click Browse to locate an existing log file.
It is recommended that you save to the \Program Files\Autodesk Network
License Manager folder. The log file must have a .log file extension. For
new log files, you must enter the .log extension manually.
Configure a License Manager | 39
Page 46

8 Activate Use Services (1) and Start Server At Power Up (2) and then click
Save Service (3) to save the new configuration under the service name
you selected in step 4.
Click Yes when prompted if you would like to save the settings to the
service.
9 Click the Start/Stop/Reread tab.
10 Click Start Server to start the license manager. The license manager starts
running and is ready to respond to client/workstation requests.
NOTE You must ReRead License File from the Start/Stop/Reread tab if the
license file is updated for additional network licensed products. Rereading
the license ensures that the workstations can access licenses.
40 | Chapter 4 Network Licensing Quickstart
Page 47

11 Check the Server Status tab and choose Perform Status Enquiry on the
network license manager.
This creates a snapshot of current license usage on the network license
manager.
12 Close lmtools.exe.
Combine Multiple License Files
In order to activate each network licensed product you install, it is issued its
own license file by Autodesk. You can manage license files for more than one
Autodesk product by combining license files. To combine multiple license
files for Autodesk products, you must add lines from the new license file to
the existing license file.
NOTE Do not configure a separate service for the new Autodesk product.
For example, you have installed and activated your network licensed copy of
AutoCAD 2007 and you’ve recently installed a network licensed copy of
Architectural Desktop 2007.
1 Open an ASCII text editor, such as Microsoft Notepad.
Do not use a word processor because it will add extra data to the license
file that will make the license invalid.
2 Open your AutoCAD 2007 license file.
You’ll see something like this.
Combine Multiple License Files | 41
Page 48

3 Next, open the Architectural Desktop 2007 license file.
4 Select all the text starting at the line beginning with ‘INCREMENT’.
5 Copy the text and paste into the AutoCAD 2007 license file.
The resulting file should look like this.
42 | Chapter 4 Network Licensing Quickstart
Page 49

When combining additional licenses for the same Autodesk product, you
must obtain a new license file for the total number of licenses with that
feature code, not just the new ones. For example, do not combine two
different AutoCAD 2007 license files into one file. Obtain one new license
file that contains the required total number of AutoCAD 2007 licenses.
NOTE If a server has more than one network adapter installed, all of the
Autodesk products should be bound to the same adapter.
6 Once the license files are combined, open LMTOOLS and click the
Start/Stop/Reread tab.
7 Click the Reread License File button to make the changes to the license
file effective.
Combine Multiple License Files | 43
Page 50

8 Close lmtools.exe.
44 | Chapter 4 Network Licensing Quickstart
Page 51

Deployment Wizard
Quickstart
Most Autodesk products support the Deployment wizard that
sets up an administrative image and deployment shortcut that
helps you install products throughout your facility.
In order to use the Deployment wizard, you can run it directly
from the Media Browser or install it before running. The
Deployment wizard is universal and can be used with all
applications that support it.
You cannot use an older version of the Deployment wizard to
5
In this chapter
■ Installer File Location
■ Run the Deployment Wizard
■ Run the Installed Deployment
Wizard (optional)
create deployments of currently released programs. The
Deployment wizard only needs to be installed once, however,
it is recommended that you run the deployment wizard from
the Media Browser.
45
Page 52

Installer File Location
The Deployment wizard requires you to specify the location of the installer
(.msi) file that is located on the product CD. The following table shows which
products support the Deployment wizard and the path to its corresponding
installer file.
Desktop Companion 2007)
Path the MSI File on the Product CDProducts
\bin\acadFeui\acad.msiAutoCAD 2007
\bin\vizFeui\viz2007.msiAutodesk VIZ 2007
\install\adt.msiAutodesk Architectural Desktop 2007
\install\abs.msiAutodesk Building Systems 2007
\bin\acadFeui\inventor\inventor.msiAutodesk Inventor Professional 11
\bin\cadadeui\mdt\acad.msi
\bin\acadefeui\vault\client\vault.msi
\bin\installer\c3d.msiAutoCAD Civil 3D 2007 (includes Land
\Bin\installer\ldt.msi
\bin\installer\civildesign.msiAutodesk Civil 3D - Civil Design Compan-
ion 2007
Run the Deployment Wizard
The Deployment wizard is accessed from the Media Browser. You can either
run the wizard directly from the Media Browser or install the wizard and then
46 | Chapter 5 Deployment Wizard Quickstart
Page 53

run it from your hard drive. It is recommended that you run the Deployment
wizard from the Media Browser.
1 Insert the Autodesk product CD into the CD drive of the computer where
you want to run the Deployment wizard.
2 In the Media Browser, click the Install tab.
3 On the Install tab, click either Multi-Seat Stand-Alone Deployment or
Network Deployment.
This quickstart follows a stand-alone installation path that is used when
you have multi-seat stand-alone or stand-alone license.
4 Under the Deployment Wizard heading, click Run From The Media
Browser.
5 On the Welcome panel, accept the default to create an administrative
image. Click Next.
Run the Deployment Wizard | 47
Page 54

6 Specify the path to the installer (.msi) file of the product you want to
install and set the location for the administrative image (the shared folder
you created). Click Next.
7 On the Create or Modify Deployment panel, enter a name for your
deployment. Click Next.
TIP Make sure the name clearly conveys the product you are deploying. This
name is given to the deployment shortcut you will use when you install the
product on each workstation.
8 On the Write to Log panel, click Next to accept the default settings.
9 On the Select Installation Type panel, select the type of installation you
want to perform.
You can choose from two installation types: Network or Stand-Alone. If
you’ve purchased multi-seat stand-alone licenses, use the Stand-Alone
48 | Chapter 5 Deployment Wizard Quickstart
Page 55

installation. If you’ve purchased a network license for multiple seats of
software, use the Network installation.
10 On the Client Installation Location and Client Setup Type panels, click
Next to accept the default settings.
TIP On the Client Installation Location panel, make sure the silent mode
check box is selected to ensure that all workstations are installing the product
with identical installation options. Turning this off is useful when
troubleshooting.
Run the Deployment Wizard | 49
Page 56

NOTE Depending upon which product you’re deploying, some panels may
differ throughout the remainder of that product’s deployment process.
11 On the Install Optional Tools panel, specify whether you want to Install
Express Tools or Material Libraries. Click Next.
12 On the Additional Client Settings, Search Path and File Location, and
Install Additional Files panels, click Next to accept the default values.
13 On the Serial Number panel, enter your Design Academy serial number.
Click Next.
50 | Chapter 5 Deployment Wizard Quickstart
Page 57

14 On the Personal Information panel, enter your personal information.
Click Next.
NOTE The information you enter here is permanent and is displayed when
you access Help > About for the product you’ve installed.
15 On the Live Update, Customer Error Reporting, DC Online, and
Subscription Center Access panels, click Next to accept the default values.
Run the Deployment Wizard | 51
Page 58

Electronic registration and activation automatically starts after this
sequence of panels.
16 On the Multi-Seat Stand-Alone panel click Next.
52 | Chapter 5 Deployment Wizard Quickstart
Page 59

17 On the Begin Registration - Activation panel, specify where Design
Academy will be registered to along with your country or region and click
Next.
18 On the Customer Information panel, enter the personalization data you
have for your facility and click Next.
Run the Deployment Wizard | 53
Page 60

19 On the Registration Data Saved panel, you are informed where your
registration data is being saved on your local drive. Click Finish.
54 | Chapter 5 Deployment Wizard Quickstart
Page 61

20 On the Setup Confirmation panel, scroll through the list of information
to verify that it is correct. Click Next.
TIP For troubleshooting purposes, select and copy this information. Paste it
into a text file for future reference.
Run the Deployment Wizard | 55
Page 62

For subsequent products, insert the next product CD and run the Deployment
wizard from the Media Browser. When specifying the installer file, you’ll
indicate the path to the MSI file for that product.
Run the Installed Deployment Wizard
(optional)
The Deployment wizard can also be installed to your hard drive from the
Media Browser.
1 On the Start menu, click Programs > Autodesk > Deployment Wizard.
2 On the Welcome panel, accept the default to create an administrative
image. Click Next.
56 | Chapter 5 Deployment Wizard Quickstart
Page 63

3 Specify the path to the installer (MSI) file of the product you want to
install and set the location for the administrative image (the shared folder
you created). Click Next.
4 On the Create or Modify Deployment panel, enter a name for your
deployment. Click Next.
TIP Make sure the name clearly conveys the product you are deploying. This
name is given to the deployment shortcut you will use when you install the
product on each workstation.
5 On the Write to Log panel, click Next to accept the default settings.
6 On the Select Installation Type panel, select the type of installation you
want to perform.
You can choose from two installation types: Network or Stand-Alone. If
you’ve purchased a network license for multiple seats of software, use the
Run the Installed Deployment Wizard (optional) | 57
Page 64

Network installation. If you’ve purchased multi-seat stand-alone licenses,
use the Stand-Alone installation. Network Installation is the recommended
method.
7 On the Server Configuration panel, click Next to accept the Single Server
option. On the Single Server Configuration panel, specify the pertinent
server name and server host ID. Click Next.
NOTE For detailed information regarding license server models, refer to the
Network Licensing Guide located in the Help system and on the
Documentation panel of the Media Browser.
(Only accessed during Network Installation.)
58 | Chapter 5 Deployment Wizard Quickstart
Page 65

8 On the Client Installation Location and Client Setup Type panels, click
Next to accept the default settings.
TIP On the Client Installation Location panel, make sure the silent mode
check box is selected to ensure that all workstations are installing the product
with identical installation options. Turning this off is useful when
troubleshooting.
NOTE Depending upon which product you’re deploying, some panels may
differ throughout the remainder of that product’s deployment process.
9 On the Install Optional Tools panel, specify whether you want to Install
Material Libraries. Click Next.
Run the Installed Deployment Wizard (optional) | 59
Page 66

10 On the Additional Client Settings, Search Path and File Location, and
Install Additional Files panels, click Next to accept the default values.
11 On the Personal Information panel, enter your personal information.
Click Next.
60 | Chapter 5 Deployment Wizard Quickstart
Page 67

NOTE The information you enter here is permanent and is displayed when
you access Help > About for the product you’ve installed.
12 On the Live Update, Customer Error Reporting, DC Online, and
Subscription Center Access panels, click Next to accept the default values.
13 On the Setup Confirmation panel, scroll through the list of information
to verify that it is correct. Click Next.
Run the Installed Deployment Wizard (optional) | 61
Page 68

TIP For troubleshooting purposes, select and copy this information. Paste it
into a text file so you can verify system and personal information in case you
have problems later when activating.
62 | Chapter 5 Deployment Wizard Quickstart
Page 69

Other Product Quickstart
6
With several Autodesk products, you set up deployments that
don’t exactly match the methods used by AutoCAD-based
products. Each of these quickstarts point out the differences
and steps you through the deployment processes.
Several products only allow for stand-alone installations. For
those products, follow the Stand-Alone Products Quickstart.
The products covered in this chapter include the following:
In this chapter
■ Autodesk Revit Deployment
■ Stand-Alone Products
63
Page 70

Quickstart to UseProduct
Stand-Alone ProductsAutodesk Design Review 2007
Autodesk Revit DeploymentAutodesk Revit Building 9
64 | Chapter 6 Other Product Quickstart
Page 71

Autodesk Revit Deployment
Autodesk Revit products are unique in that the Deployment wizard is part of
the install process.
1 Insert the Autodesk Revit CD into the CD drive.
2 On the CD Navigator, under Main Menu, click Install Autodesk Revit
Building 9.
3 Click Install Autodesk Revit Building 9 to start the Installation wizard.
Autodesk Revit Deployment | 65
Page 72
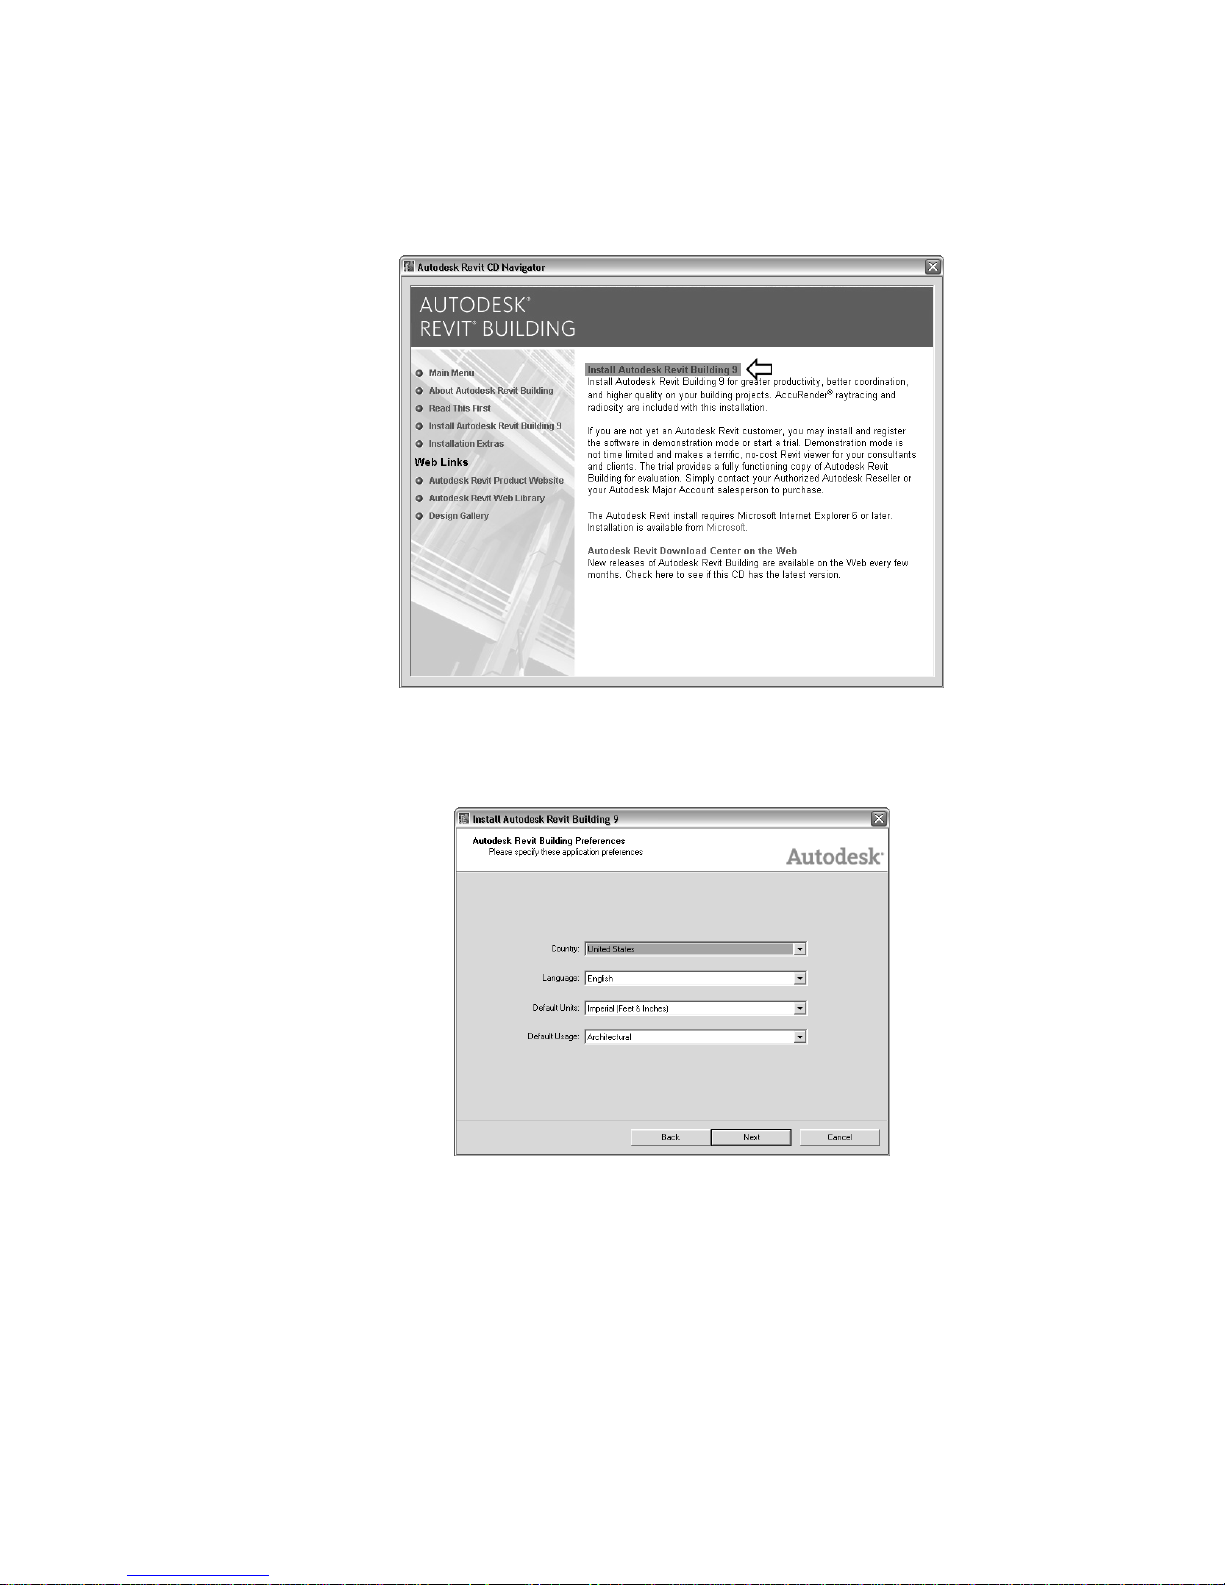
4 On the Welcome panel, click Next.
5 On the Preferences dialog box, select the application preferences. Click
Next.
6 On the License Agreement panel, choose I Accept.
66 | Chapter 6 Other Product Quickstart
Page 73

7 On the Destination Locations panel, do the following:
■ Enter an installation location.
■ Select Prepare Network Deployment from this Installation.
■ Enter a deployment source folder using the universal naming
convention (UNC) path to the shared folder, for example
\\MySystem\Autodesk\Revit Building 9 and should be accessible to all
workstations on which Revit Building 9 will be installed.
NOTE The deployment source folder must be on a network device.
Autodesk Revit Deployment | 67
Page 74

Click Next.
8 On the Choose Content panel, in the Content Folder box, enter the path
for the location of the content folder. This is the path to the shared folder
where the Revit content will be stored and the folder must be accessible
to all users that will run Revit Building 9.
Click Next.
9 On the Install Licenses page, enter your serial number. Choose one of
the following license types, depending on the type of deployment you
are planning to implement. Then click Next.
■ Standalone - For multi-seat stand-alone deployment. No network
license manager is required. Enter the serial number only.
■ Network - For network-licensed deployment. If you choose this option,
you choose a license server type, enter the server name where the
network license manager is installed, configured and running. Enter
a serial number.
68 | Chapter 6 Other Product Quickstart
Page 75

10 On the Edit Installation Settings, Edit CAD Manager Control Settings and
Ready To Install panels, click Next to accept the defaults.
11 Click Finish when informed that the installation is complete.
Autodesk Revit Deployment | 69
Page 76

A complete version of Autodesk Revit Building is installed on the system
along with a deployment shortcut and link being added to the shared
folder you created for Revit.
Stand-Alone Products
Autodesk Design Review does not use a deployment wizard or support network
license management. This product requires manual installation on each
computer in your facility.
This product does not have a Media Browser and immediately launches an
installation wizard. There are two ways to install stand-alone products.
■ Using the product CD, move from system to system installing the product.
■ If the environment is networked, create a network share for the product
and copy the contents of the CD to the shared folder. From each satellite
system, run the setup.exe file from the primary server.
NOTE Some installation panels may differ depending upon the product you’re
installing. Where differences occur, always follow the directions on installer panel.
To install products on each system
1 Insert the Autodesk product CD into the CD drive.
70 | Chapter 6 Other Product Quickstart
Page 77

2 On the Welcome panel of the Installation wizard, click Next.
3 On the License Agreement panel, click I Accept, and then click Next.
4 On the User Information panel, fill out your personal information. Click
Next.
5 On the Destination Folder panel, click Next. On the Ready To Install
Application panel, click Install.
Stand-Alone Products | 71
Page 78

6 When informed that the installation is complete, click Finish.
NOTE Some programs may prompt you to restart your system. If you have
more programs to install, complete those installations and then restart your
system.
72 | Chapter 6 Other Product Quickstart
Page 79

Product Distribution
7
Once products have been installed on the primary system, it’s
time to distribute the products throughout the classroom or
lab. There are two common ways to do this
■ Run the shortcuts contained within the deployments
created by the Deployment wizard on each computer.
■ Run the shortcut contained within the deployment created
by the deployment wizard and then use imaging software,
such as Norton Ghost to create a master image that can be
replicated to additional computers.
In this chapter
■ Installation by Deployments
■ Distribution by Imaging Software
73
Page 80

Installation by Deployments
After you’ve created all the administrative images of the products you need
to install in your classroom or lab, you can begin the distribution process.
You use the deployment shortcuts that were created by the Deployment wizard.
TIP You must have local administrative permissions on each system where you
want to distribute Autodesk products.
Install Network-Deployed Products to a System
1 Log on to one of the systems in the classroom or lab.
2 Browse to where the shared folder (Autodesk) resides.
3 Browse to the shared folder of the product you want to install.
4 Double-click the deployment shortcut icon to install the product.
5 Run the product before moving to the next system.
6 Move to the next system and repeat these steps.
Install Multi-Seat Stand-Alone Products to a System
1 Log on to one of the systems in the classroom or lab.
You must have local administrative permissions on each system where
you want to install Autodesk products.
2 Browse to where the shared folder (Autodesk) resides.
3 Browse to the shared folder of the product you plan to install.
4 Double-click the deployment shortcut icon to install the product.
5 Repeat this on each system in the classroom or lab.
Install Autodesk Revit-Based Products to a System
1 Log on to one of the systems in the classroom or lab.
You must have local administrative permissions on each system where
you want to install Autodesk products.
2 Browse to the network drive where the shared folder resides containing
the Revit-based product (\\MySystem\Autodesk\Revit Building 9).
74 | Chapter 7 Product Distribution
Page 81

3 Double-click the deployment shortcut icon to install the product.
Distribution by Imaging Software
Imaging software, such as Norton Ghost, is used to create a master image of
a computer where Autodesk products have been installed. The master image
is then replicated to other computers throughout your facility.
Using imaging software can result in the following situations:
■ Conflicts with product licensing
■ Incomplete product installations
NOTE If you are experiencing licensing instability in a SATA RAID environment,
using imaging software to distribute Autodesk products can cause product
activation problems. You may receive an “Activation code limit exceeded” message
if you attempt to activate products in a SATA RAID environment.
Use a Master Image to Distribute Network Licensed Products to
Multiple Systems
A master image can be used to distribute network licensed products to multiple
systems in your classroom or lab environment.
1 Following the quickstarts for your network licensed product, create a
network deployment for installing network applications.
2 Using the deployment shortcut that was created for the product, install
the Autodesk product on the system to be imaged.
NOTE A license server must be running, and each system must be connected
to the network in order to run the application.
3 After the Autodesk product has been installed, use imaging software to
create a master image of the system's hard drive.
4 Apply the master image to the other systems.
Distribution by Imaging Software | 75
Page 82

Use a Master Image to Distribute Multi-Seat Stand-Alone Products
to Multiple Systems
A master image can be used to distribute multi-seat stand-alone products to
multiple systems in your classroom or lab environment.
NOTE When using Norton Ghost, you must use the -ib switch to include the boot
sector in your master image. Consult your imaging software for more details on
including the boot sector as part of the master image.
1 Following the quickstarts for your multi-seat stand-alone products, create
a stand-alone deployment for installing multi-seat stand-alone products.
2 Using the deployment shortcut that was created for the product, install
the Autodesk product on the system to be imaged.
NOTE If you anticipate the need to re-image computers, do not run or
activate any products on the primary system until the master image has been
created, distributed, and tested on at least one other system.
If you want to test an application, you can create a temporary master
image. For example, create a test image after the multi-seat stand-alone
application has been installed, but not run. After the test image is created,
run the application. If the test is successful, restore the image so the
system is returned to a state before the application was run.
3 After the Autodesk product has been installed, use imaging software to
create a master image of the system's hard drive, including the boot sector.
4 Apply the master image to your first satellite system so you can test the
master image.
5 Launch the products on the test system and activate them.
Initially, each product has a 30-day grace period. During that grace period,
you must register and activate the products you want to continue using.
Once activated, the products on satellite systems are automatically
activated as long as they are connected to the Internet. Satellite systems
that are not connected to the Internet must be manually registered and
activated.
6 If the products on the test system operate correctly, distribute the master
image to all the other satellite systems so you can run and activate the
programs throughout the facility.
76 | Chapter 7 Product Distribution
Page 83

Restore Products Using the Master Image
Should you ever have to reinstall one or more of your products, it may prove
expedient to restore them using the master image.
NOTE Before attempting this, make sure you have saved a copy of each system’s
Software Licenses folder to another system.
1 Exit the application. Do not run the application again until you have
completed this procedure.
2 Open Windows Explorer and copy the Software Licenses folder from the
appropriate path shown below to a location other than the drive that
will be restored.
c:\Documents and Settings\All Users\Application Data\Autodesk\Software
Licenses
3 Restore the master image.
4 Restore the Software Licenses folder (and Product Licenses folder, if
appropriate) that you created in step 2 to its original system and location
on that system.
Because the licensing folders were copied to a location other than the
drive being restored, they were protected during the restoration process.
Once the licensing folders are copied back the system they came from,
the products can be run and no reactivation is necessary.
Distribution by Imaging Software | 77
Page 84

Page 85

Product Activation and
Removal
Activation is software-based license management technology
that allows customers who have purchased legitimate software
licenses to run the Autodesk software. The technology is
designed to deter casual copying and unauthorized use of
Autodesk products.
8
In this chapter
■ Overview of Activation
■ Product Activation
■ Product Removal
79
Page 86

Overview of Activation
Activation is software-based license management technology that allows
customers who have purchased legitimate software licenses to run the Autodesk
software. The technology is designed to deter casual copying and unauthorized
use of Autodesk products.
Activation verifies the validity of the serial number and the eligibility of the
computers for which the software has been installed. You will find that product
activation is a secure, process that does not change the way the software works
for licensed users.
Product Activation
All Design Academy products are pre-configured as multi-seat stand-alone
products. If you want to deploy your software on a network, you must call
Autodesk Customer Service Center at 800-551-1490 to request that the Design
Academy serial number be changed from multi-seat stand-alone to network.
When ready, the Autodesk Customer Service Center can then provide you
with your network activation code. For stand-alone products, installed from
the CD, registration and activation are not automated; instead, when you run
the product for the first time on each workstation, you must manually enter
the registration information.
NOTE The registration data you enter must match exactly at each workstation,
or product activation will not work. The information entered needs to be the same
for all products.
For multi-seat stand-alone products on a workstation, if you attempt to activate
a product and you receive the activation dialog box with the message, “Do
you want to launch the product or activate?” exit the product, and then restart
it. Your product should already be activated. If you receive this message after
relaunching and you have not activated the product before, you can manually
activate the product. If the product fails to activate, this could indicate that
the registration information does not match the registration information
Autodesk has on record. If the product is not activated, follow the activation
process again.
If you get locked out of online activation, you must call Autodesk Customer
Service Center (800-551-1490) for your code.
80 | Chapter 8 Product Activation and Removal
Page 87

If you have problems with the automated process or if you are activating
products manually, you can use one of the following methods:
■ By visiting http://register.autodesk.com
■ By email: authcodes@autodesk.com
■ By phone: 800-551-1490
■ By fax: 800-225-6490 or 415-507-4937
Product Removal
If you need to uninstall any of the Design Academy products, you should do
so from the Add/Remove Programs utility in the Control Panel.
Product Removal | 81
Page 88

Page 89

Education Curricula
9
Your Design Academy package includes pre-architecture and
pre-engineering curriculum created specifically for the
secondary school classroom. The curriculum includes a
ready-to-use course syllabus, student exercises and projects,
Autodesk software quick start tutorials and more. The Design
Academy Curriculum provides up to one year of instruction
material that can be customized to meet the needs of your
classroom. Install the curriculum today and help your students
master the fundamentals of pre-architecture and
pre-engineering design.
In this chapter
■ Curricula Overview and
Installation
83
Page 90

Curricula Overview and Installation
The Design Academy curriculum begins with a Getting Started section that
provides:
■ Product installation overview
■ Desktop navigation tools, including instructions for creating an AutoCAD
icon
■ File management techniques
■ Quick Start guides for each product
Following the Getting Started section is the Instructor Resources section, with
an outline of the project-based learning and the design process, an explanation
of how to map your curriculum to state and national standards, syllabi for
architectural design, civil design, mechanical design, and evaluation rubrics.
The Design Basics, Pre-Architecture, Pre-Civil, and Pre-Mechanical student
projects sections are the core of the curriculum. They include units subdivided
into lessons, exercises, projects, a summary, and self-test questions. The student
projects also include corresponding standards for science, math, language arts,
and technology content, as well as key terms and objectives. One unit is based
on the FIRST Robotics Competition, another on the F1 in Schools Challenge.
Also included are cross-curricular projects in science and physics.
Finally, a resource section contains web-based reference points and a glossary
that defines key terms.
New and experienced teachers are invited to use the curriculum in the way
that best meets their classroom needs. A new teacher may benefit from
following the curriculum step by step from start to finish; a seasoned design
instructor may find it more suitable to customize the curriculum by selecting
specific sections, and by complementing Design Academy with their own
material.
The curriculum is also available as printable PDF files, included on the
curriculum CD. To print the PDF files, you must install Adobe® Reader
software, available on the CD or by free download from www.adobe.com.
To view the curriculum, you need to have both Microsoft Internet Explorer 5
or later and Windows Media® Player installed.
84 | Chapter 9 Education Curricula
®
Page 91

Design Academy Curriculum Installation
The curriculum is provided in compiled HTML (CHM) format.
To install Design Academy curriculum files
1 Insert the Design Academy Curriculum CD Disc 1 into the CD-ROM (or
DVD-ROM) drive.
2 On your computer, create a new folder (for example: \Design Academy
2007).
3 Copy the ADA2007\Content folder from the Design Academy Curriculum
CD Disc 1 and paste it into the folder you created in step 2.
4 Copy the ADA.ico file from the Design Academy Curriculum CD Disc 1
and paste it into the folder you created in step 2.
The curriculum CHM files should not be run from the network server.
Download the necessary files to each node on the network, or copy the
files to a shared network drive and assign read access to the files. Students
should copy the files to their local computer before working with them.
5 To complete the installation, copy the \Data Files folder from the Design
Academy Curriculum CD Disc 2 to your local Design Academy folder.
TIP For faster setup, copy only the datasets required for the immediate
session.
Design Academy Curriculum Data Files
The data files for exercises are located in the \Data Files folder of the Design
Academy Curriculum media. The files have the same structure as the table of
contents.
To use the data files, copy them from the Curriculum CD to each computer.
If the computers are on a network, copy the data files to a shared network
drive and assign read access to the files. Students should copy the files to their
local computer before working with them.
NOTE When the data files are copied from the CD, they will be read-only. Turn
off the read-only attribute on the data files so the files can be modified in the
lessons.
Curricula Overview and Installation | 85
Page 92

To turn off the read-only attribute
1 In Windows Explorer, locate and select the file or folder whose properties
you want to change.
2 From the File menu, click Properties.
3 In the Properties dialog box, on the General tab, clear the Read Only
check box.
NOTE When changing the attributes of a folder, you will be asked if you
want to apply the change to any subfolders and files that reside in the selected
folder. Click OK.
4 Click OK.
To create a Design Academy Curriculum shortcut on your desktop
1 Right-click anywhere on your desktop and choose New > Shortcut from
the right-click menu.
2 In the Create Shortcut dialog box, click Browse and navigate to the folder
where you installed the Design Academy Curriculum (for example: \Design
Academy 2007).
3 Open the \ADA2007\Content folder, select ADA_Main.chm. Click OK.
4 On the Create Shortcut dialog box, click Next.
5 In the Select A Title For The Program dialog box, enter Design Academy.
Click Finish.
6 On the desktop, right-click the new shortcut icon, and click Properties.
7 On the Shortcut tab, click the Change Icon button.
8 Click Browse and navigate to the folder where you installed the Design
Academy Curriculum.
9 Choose ADA.ico, and then click Open. Click OK to close the Change Icon
dialog box.
10 Click OK to close the Design Academy Properties dialog box.
11 Double-click the shortcut icon to access the Design Academy curriculum.
86 | Chapter 9 Education Curricula
Page 93

Design Academy Curriculum Documentation
If you need hard copies of the lessons, print content directly from the Design
Academy Curriculum CD or PDF files.
Printing from the Curriculum:
To print from the curriculum, open the page you want to print, and then click
Print.
Printing a PDF File:
PDF files for exercises are located in the Printable Lessons folder of the Design
Academy Curriculum CD. The files are organized in folders with the same
structure as the table of contents. Use this method for printing a large number
of pages. Design Academy users may make a reasonable number of copies of
the Design Academy curriculum for classroom instruction. Refer to the Design
Academy License Agreement for more guidelines. Use the Adobe Reader
software to open, view, and print the PDF files.
Curricula Overview and Installation | 87
Page 94

Page 95

Troubleshooting Guide
10
This chapter contains a collection of solutions for common
problems that you may encounter when managing the software
in a classroom or lab environment.
In this chapter
■ System Issues
■ Network Licensing Issues
■ Deployment Issues
■ Activation Issues
■ Refresh Issues
89
Page 96

System Issues
This section outlines common system or hardware issues and their solutions
that may arise while setting up your facility.
I’m working on a system using a SATA RAID environment and receive an
"Activation code limit exceeded" message when I try to restart my
application. This situation can be solved by installing the Hotfix - Autodesk
Activation Update that is posted
http://usa.autodesk.com/adsk/servlet/ps/dl/item?siteID=123112&id=5620053&linkID=2475161
Network Licensing Issues
This section outlines common issues and their solutions that may arise while
working with network licensing.
Why is it a bad idea to use Microsoft Word to edit my .lic file? When you
save a .lic file after editing it with a word processor, like Microsoft Word, extra
data gets saved with the file. This results in an invalid .lic file. You should
always use an ASCII text editor like Notepad to ensure that no extraneous data
is saved with the file.
How can I get my network license manager to administer licenses for my
2006-based products as well as my 2007-based products? You can do this
by first updating your network license manager most recent version. See the
Network License Manager section (page 23).
Then, follow the instructions for combining license files in the Combine
Multiple License Files section (page 41).
Deployment Issues
This section outlines common issues and their solutions that may arise while
using the Deployment wizard or when deploying products throughout your
facility.
The Deployment wizard asks you to specify an MSI file. What is that file
and where is it located? The MSI file is a Microsoft Installer file that each
product uses during the installation process. The location of MSI files differs
from product to product. Refer to the Installer File Location section (page 46).
90 | Chapter 10 Troubleshooting Guide
Page 97

I deploy products in my facility by means of imaging software. However,
I’ve had to run software on my the system where I create the master
image. How do I clean the system in preparation for creating a new master
image? A procedure for cleaning your main system can be found in the Clean
a Primary System and Restore the Operating System section (page 10).
Activation Issues
This section outlines common issues and their solutions that may arise while
activating products that you’ve installed at your facility.
Before I create my master image shouldn’t I activate and run the
applications? You should not run and activate stand-alone products if you
anticipate re-imaging computers often, for example, once a month.
Refresh Issues
This section outlines common issues and their solutions that may arise when
it is necessary to refresh the software at your facility.
I sometimes have to re-image our facility. Do I need to be concerned about
breaking my software licenses? When you create your master image, you
need to make sure you have a clean boot sector. If you’re using Norton Ghost,
this is done with the -IB switch.
If your going to re-image frequently, you need to be sure to backup your
authorization data. You need to copy the license files to a different system
and then copy them back after you restore the master image. This ensures
that the application will run without re-activation. Refer to the Restore Products
Using the Master Image section (page 77).
Activation Issues | 91
Page 98

Page 99

Contacts and Contents
11
This chapter contains contact information and an inventory
of what you should have received with your package.
In this chapter
■ Contact Information
■ Product Contents
93
Page 100

Contact Information
The information in this section is intended for the individual who administers
the Autodesk Design Academy program at your institution.
Autodesk Contacts
The following table contains key contact information for Autodesk, the
Autodesk Education team, Autodesk Customer Service, and the Design Academy
program.
DescriptionContact
Autodesk, Inc.
Autodesk, Inc.Shipping Address
45169 Industrial Drive
Fremont, CA. 94538
www.autodesk.comWebsite
www.autodesk.com/supportTechnical Support web-
site
View a list of support resources; find valuable technical
solutions.
Autodesk Education Team
Autodesk, Inc.Mailing Address
Attn: Autodesk Education Team
111 McInnis Parkway
San Rafael, CA. 94903
www.autodesk.com/educationWebsite
Autodesk Customer Service
94 | Chapter 11 Contacts and Contents
 Loading...