

Page 1

Quick Guide Autocue Teleprompter
Dalet SiteóAutocue Integration
OCTOBER 2008
ACI0002007-07-08-02 www.dalet.com
Page 2

Quick Guide Autocue Teleprompter
Revision History
July 2007 Document version 1 for Dalet 1.5
Oct. 2008 General Revision
Copyright (c) 1992-2008
Dalet Digital Media Systems
All rights reserved.
Printed in France.
All products other than those developed by Dalet Digital Media Systems
that are mentioned in this document are registered trademarks of their
respective companies.
If this document is distributed with software that includes an end user
agreement, this document, as well as the software described in it, is
furnished under license and may be used or copied only in accordance with
the terms of such license. Except as permitted by any such license, no
part of this document may be reproduced, stored in a retrieval system, or
transmitted, in any form or by any means, electronic, mechanical,
recording, or otherwise, without the prior written permission of Dalet.
Please note that the content in this document is protected under copyright
law even if it is not distributed with software that includes an end user
license agreement.
The content of this document is furnished for informational use only, is
subject to change without notice, and should not be construed as a
commitment by Dalet.
This document can also be used for earlier builds of Dalet. In some cases,
screen-shots may differ or some functions may not be available.
Dalet assumes no responsibility or liability for any errors or inaccuracies
that may appear in the informational content contained in this guide.
The goal of this document is to provide you with a clear step by step set
of instructions to use the software modules produced by Dalet. If you find
an error or require further information, please contact Dalet.
You can access updates and newer documents from Dalet’s online library
on the Dalet website. You need to have a registered name and password to
access these documents. If you do not have an account, please contact
your Dalet representative or send your request to support@dalet.com.
www.dalet.com
Page 3

TTTaaabbbllleee ooofff CCCooonnnttteeennntttsss::
:
STEP 1: INSTALLATION OF THE SOFTWARE ..............................................5
STEP 2: DALET SIDE.........................................................................5
STEP 3: AUTOCUE SIDE .....................................................................7
ADDITIONAL SETTINGS IN SCREENSHOTS ...................................................10
Quick Guide AutoCue @ Dalet page 3 of 16
Page 4

Page 4 of 16 Quick Guide AutoCue @ Dalet
Page 5
Step 1: Installation of the Software
In order to be able to create an instance of the Autocue device instance on
the Dalet side, make sure that:
Exchange and Distribution setup has been run, with the option
Integration Gateway checked, on the computer(s) which will host the
MOS server. You have to end all Dalet applications, including Dalet
Service, as well as the name server in order to run this setup.
Install the Autocue software.
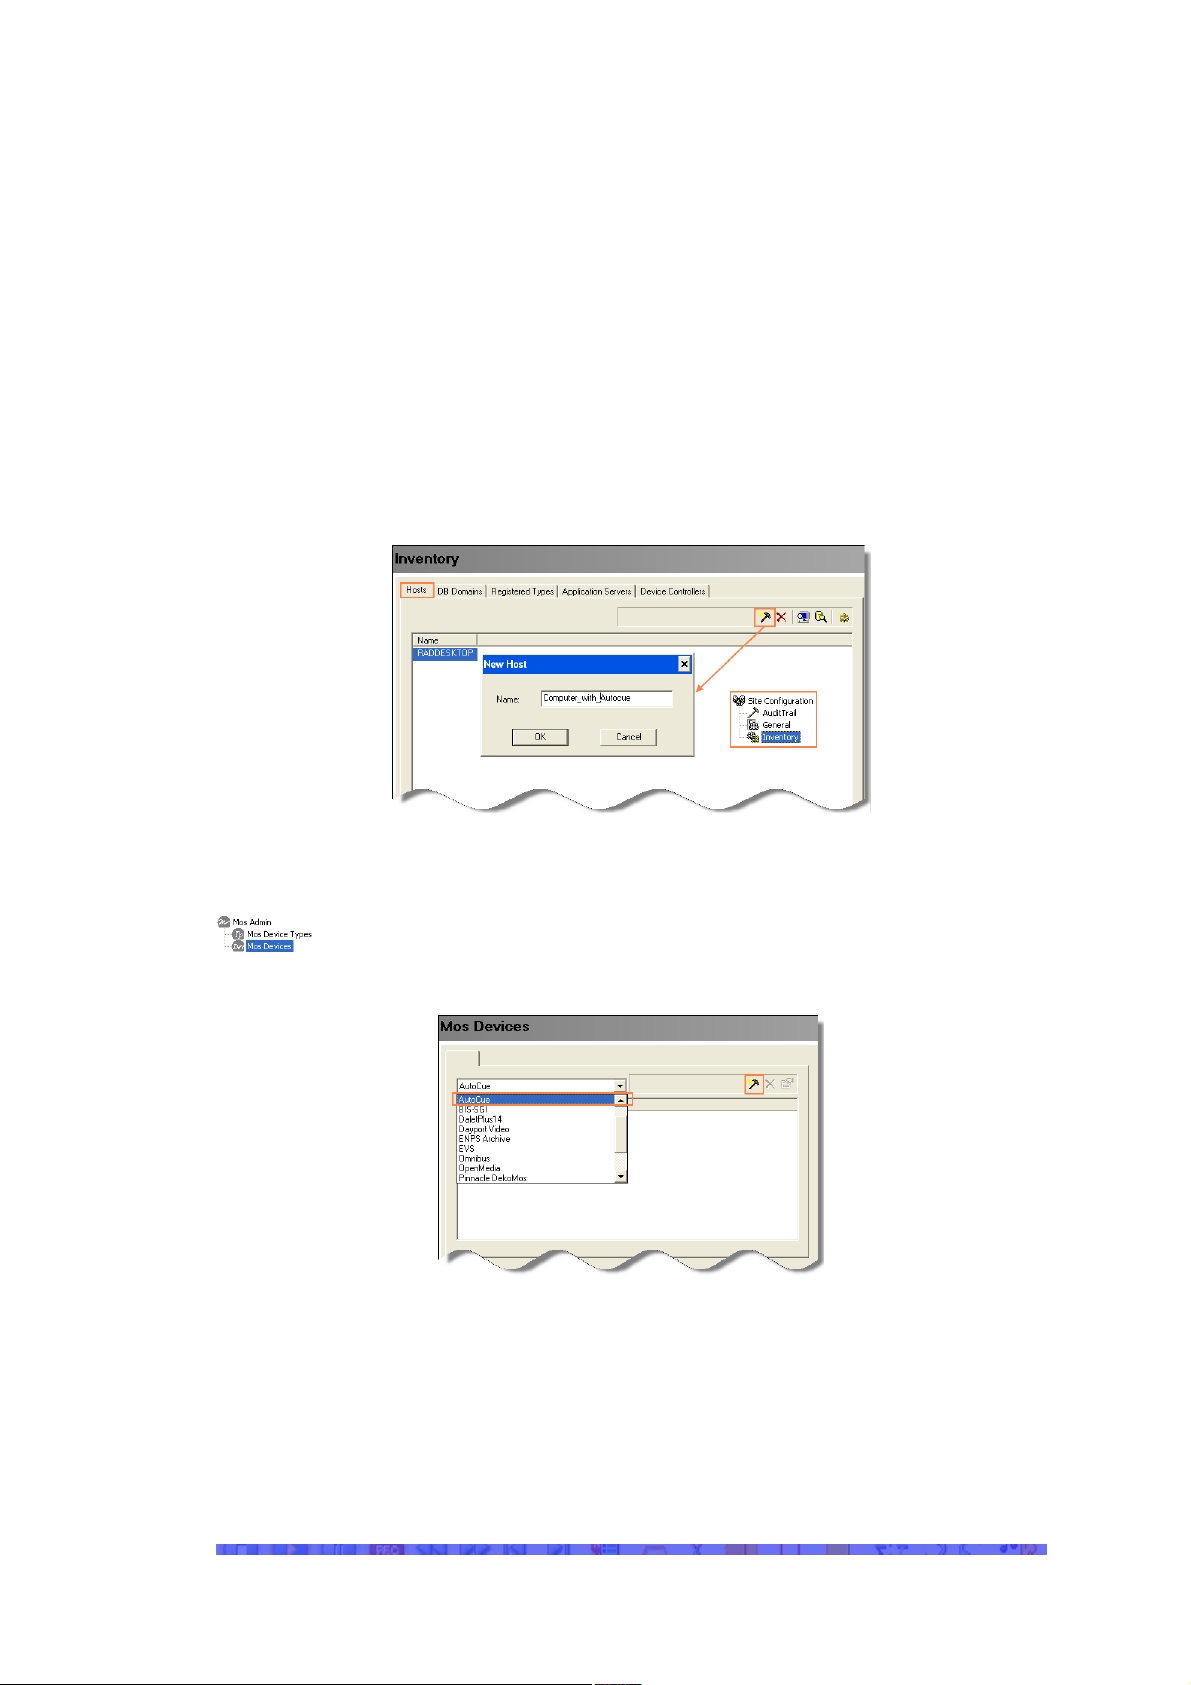
The computer running the Autocue software has to be registered as a host
in the Dalet site.
Step 2: Dalet Side
Open the MOS AdminðMOS Device branch of the Admin module
and create an instance of the Autocue teleprompter.
Fill in a name for the device instance (and a description ). Make sure you
select the computer of the Autocue as a host.
The port number has to match the settings on the Autocue-side (2001 by
default).
Enable the Incremental checkbox, otherwise the teleprompter, once
loaded will not automatically update when changes are made to the
rundown/story content.
Make sure you select ASCII, since Autocue does not support UTF 16.
Quick Guide AutoCue @ Dalet page 5 of 16
Page 6

Open SchedulingðStudio1. Mark the target studio for which to use the
teleprompter. Open the external devices tab. Assign the device instance
to the Assigned devices list.
Open Site ConfigurationðInventoryðApplication Server
tab. Create an instance of the MOS server2 and for this server,
check the box next to the Autocue entry.
1
Dalet 1.4 sites go to Broadcast PlatformðStudio
2
If the MOS Server is not listed, you have to enable its use Site
ConfigurationðInventoryðRegistered Types [Application Servers]. You enable a
server by selecting Use in Site from the contextual menu.
Page 6 of 16 Quick Guide AutoCue @ Dalet
Page 7

Step 3: Autocue Side QMaster
After having installed the Autocue software QMaster, place the Nexus
Download Profile file into the ADR profiles folder which is located in
\...\AutoCue\ Configuration.
Make sure that you have licensed your software for “Active Data Receiver”.
Run the application and disable in the File menu “Stop Receiving
Downloads”.
Open the Autocue configuration and open News InterfacesðActive Data
Receiver.
In the General tab, enable Start Sequences Only.
Quick Guide AutoCue @ Dalet page 7 of 16
Page 8

In the Port Configuration tab, click Add and in the pop-up window, fill in
the info according to the screenshot: Name: Dalet, Protocol: TCP/IP, Port
2001, and Profile: Nexus Download Profile.
Page 8 of 16 Quick Guide AutoCue @ Dalet
Page 9

In the Profiles tab, Nexus should be selected, from the Add button.
Go to online editing Check the first and the last box while leaving all others
unchecked.
In the Logging tab, there should not be any checked boxes.
Go to online editing
Quick Guide AutoCue @ Dalet page 9 of 16
Page 10

To enable interaction with Dalet, enable Start Receiving Downloads in
the File menu.
Additional Settings in Screenshots
Page 10 of 16 Quick Guide AutoCue @ Dalet
Page 11

Quick Guide AutoCue @ Dalet page 11 of 16
Page 12

Page 12 of 16 Quick Guide AutoCue @ Dalet
Page 13

Quick Guide AutoCue @ Dalet page 13 of 16
Page 14

Page 14 of 16 Quick Guide AutoCue @ Dalet
Page 15

Quick Guide AutoCue @ Dalet page 15 of 16
Page 16

Page 16 of 16 Quick Guide AutoCue @ Dalet
 Loading...