

Page 1

New ZN551
Front Cover Art
Page 2

Table of Contents
Introduction .................................................................. 2
Setup ............................................................................. 4
Battery Installation ..................................................... 4
Battery Saver............................................................. 4
Code Saver ............................................................... 4
Power-On default ...................................................... 5
TV Punch Through..................................................... 5
VCR Punch Through.................................................. 5
Code Setup ............................................................... 5
Button Functions............................................................. 6
Advanced DVD and SA T Button Functions..................... 8
TV/VCR Punch-Through ................................................ 9
TV/VCR and TV/DVD Combo units .............................. 9
Code Entry................................................................... 10
Direct Code Entry.................................................... 10
Code Search ........................................................... 11
Code Identification................................................... 12
Sleep Timer .................................................................. 13
Code Learning.............................................................. 13
Tips on Learning ...................................................... 14
Learning Commands ................................................ 14
Clearing Learned commands for a mode................... 15
Master Clear ........................................................... 15
Code List ..................................................................... 16
Product Operation........................................................ 22
Wireless Receiver ......................................................... 23
Troubleshooting ............................................................ 23
Introduction
Congratulations on your purchase of a Zenith Universal Remote
Control. Zenith Universal Remotes let you replace a broken or lost
remote or combine more than one remote into one. In addition, this
remote is equipped with a command learning feature which lets the
remote learn commands from your original equipment remote
control!
This remote control operates the common features of most but not
all models and brands of IR Infrared Controlled Video Equipment.
This remote may provide functions that are not available on your
equipment. Some functions of your particular equipment (e.g.
menu functions) may not be controlled by this remote.
In such cases, use the original remote control for your equipment.
Please use this manual to become familiar with your Zenith
Universal Remote. After you are familiar with your remote the first
thing you need to do is to install batteries and setup your remote
for your particular product and brand.
The remote also transmits wireless radio Frequency (RF) commands. The wireless receiver (included) receives these commands
and converts them to regular Infrared (IR) commands. These IR
commands are then emitted from the IR Extender (also included) to
control your A/V components. This lets you control your A/V
components from ANY room in your home - you don’t need to aim
the remote at your component!
Thank you for buying a Zenith remote and we hope it will give you
many years of service.
FCC Caution
THIS DEVICE COMPLIES WITH PART 15 OF THE FCC
RULES. OPERATION IS SUBJECT TO THE FOLLOWING
TWO CONDITIONS:
(1) THIS DEVICE MAY NOT CAUSE HARMFUL INTERFERENCE, AND
(2) THIS DEVICE MUST ACCEPT ANY INTERFERENCE
RECEIVED, INCLUDING INTERFERENCE THAT MAY
CAUSE UNDESIRED OPERATION.
This equipment generates and uses radio frequency energy, and if
not installed and used properly, that is, in strict accordance with the
manufacturers instructions, it may cause interference to radio and
television reception. It has been type tested and found to comply
with the limits for remote control devices in accordance with the
specifications in Sub-Parts B and C of Part 15 of FCC Rules,
which are designed to provide reasonable protection against such
interference in a residential installation. However, there is no
guarantee that interference will not occur in a particular installation. If this equipment does cause interference to radio or television
reception, which can be determined by unplugging the equipment,
try to correct the interference by one or more of the following
measures.
• Reorient the antenna of the radio/TV experiencing the interference.
• Relocate the interface with respect to the radio/TV.
• Move the interface away from the radio/TV.
• Plug the interface into an outlet on a different electrical circuit
from the radio/TV
experiencing the interference.
• If necessary, consult your local Dealer for additional suggestions.
NOTE: Modifications to any of the components in this kit will void
the user’s authority to operate this equipment.
32
Page 3
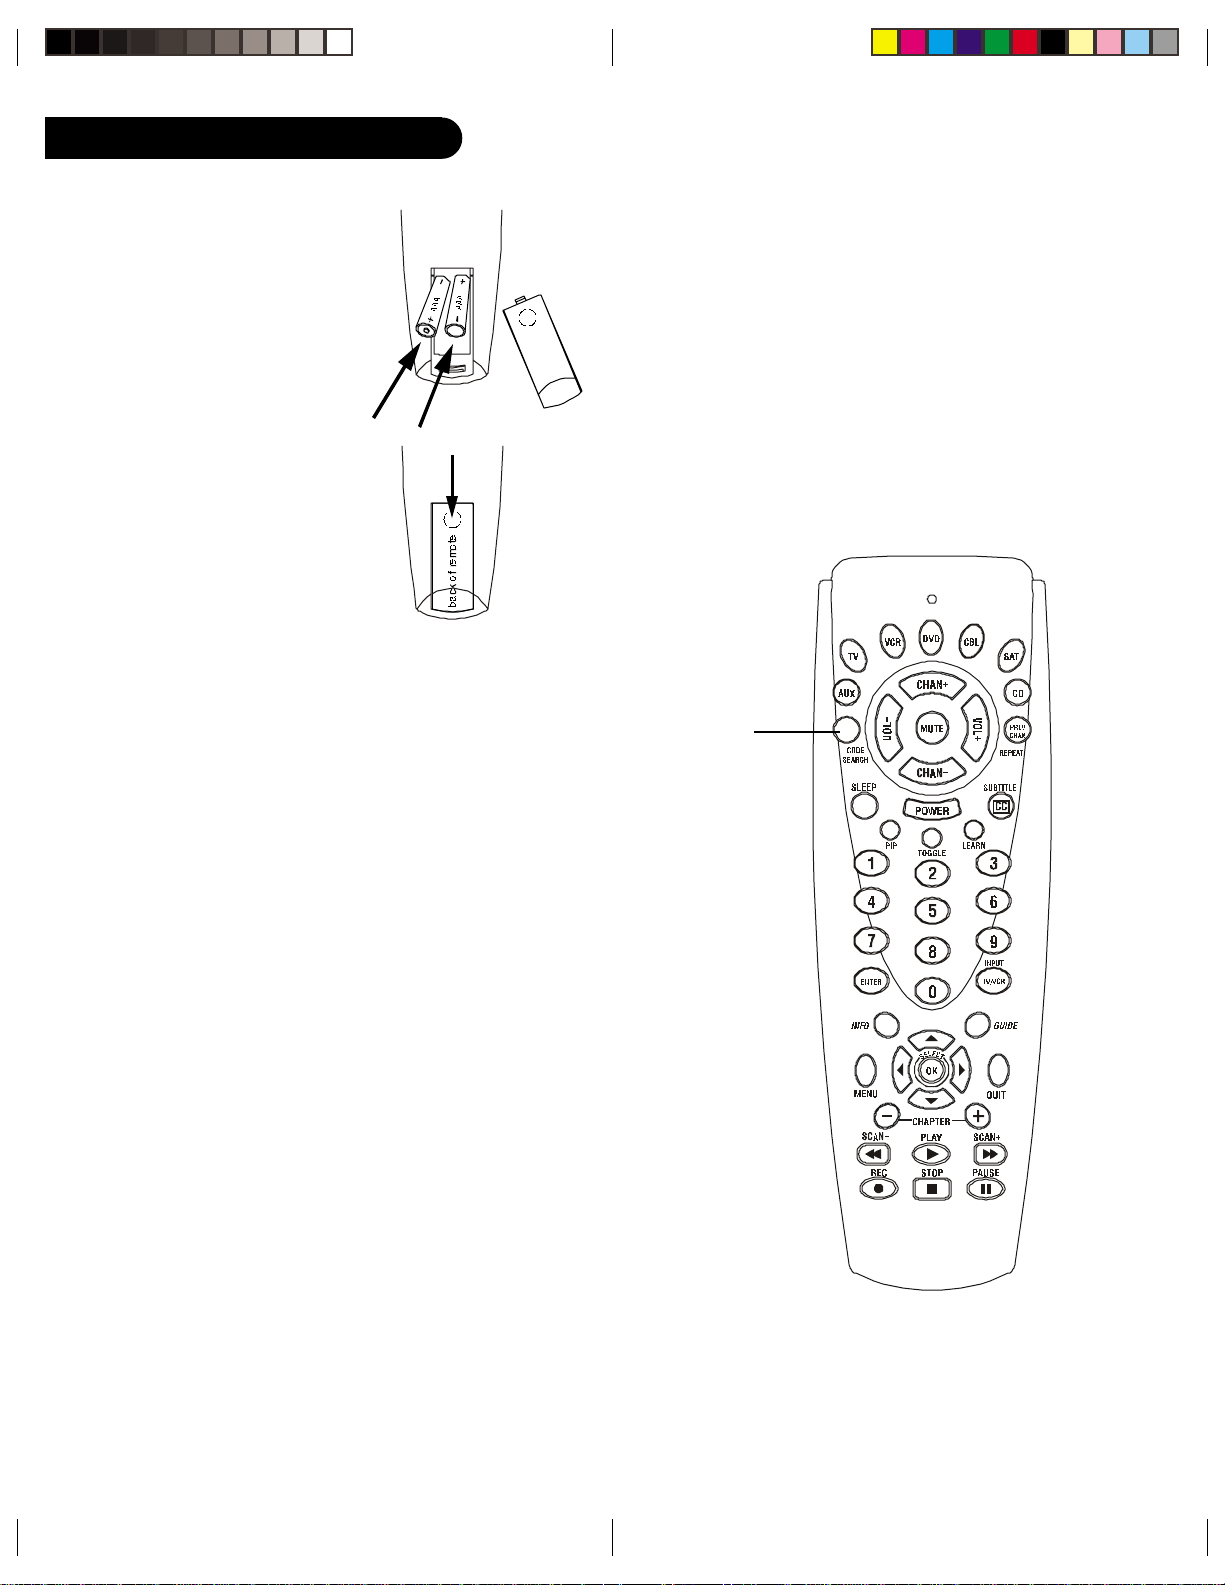
Setup
Battery Installation
1. On the back of the remote, push
down on the tab and lift the cover
off.
2. Match the batteries to the + and marks inside the battery case, then
insert 2 AAA Alkaline batteries.
3. Press the battery cover back into
place.
Battery Saver
Y our remote automatically times out
if the buttons are depressed more than
30 seconds. This will save your
batteries should your remote get stuck
in a place where the buttons remain
depressed (e.g., between the sofa
cushions).
Code Saver
Code Setup
The Code Search button is used to setup the remote. You can
either setup the remote using the code for your brand of product,
from the code tables, or you can search through the library of
codes until you find a code that works for your product.
NOTE: You can store any kind of code under any mode (except
TV). I.E. you can store a VCR code under the CBL key, or a DVD
code under the VCR key, etc. You can store ANY kind of code
under the AUX key. However, you can only store TV codes under
the TV key.
Code Search.
Codes are stored in permanent memory while you are changing
batteries so you will not lose any codes stored in the remote while
you are changing batteries. If you do want to delete any stored
codes, see page 15.
Power-On Default
The remote powers on in TV mode.
TV V olume/Mute Punch-Through
The TV Volume/Mute punch-through feature lets you control the
Volume and Mute function of your TV in any mode programmed to
be a VCR, DVD, Cable or SAT device, without needing to change
to TV mode. This feature is also available if AUX mode is
programmed to control a second VCR, Cable or SA T device.
VCR Punch-Through
Punch-through to VCR mode is only allowed in TV, VCR and
Cable modes. SAT/DBS and CD/Audio are dedicated to their
modes.
54
Page 4

INFO/
GU IDE
Button Functions
Button Functions, cont.
Some buttons on the remote might have functions that are referred
to by different names on the device you are controlling. E.G. Prev.
Ch. may be called RECALL, or ENTER may be called DISPLA Y.
These differences depend on the brand and model of your product.
Also, this remote can only operate features that exist on your
product. E.G., your product must be equipped with Prev. Ch. ability
for the Prev. Ch. button to operate this feature.
MUTE Turns off
the TV sound
while the picture
TV, VCR, DVD, CBL,
SAT, CD, AUX Selects
product to be operated.
Indicator light
Lights when any
button is pressed.
remains.
Code Search
For setup.
POWER Turns
product On or Off.
SLEEP Turns off the TV
after a period of 1 to 99
PIP TV Picture-inPicture control.
NUMBERS
Enter numbers for direct
channel selection. Some
products require Enter to be
pressed after channel selection.
CHANNEL Up/
Down Changes
the channels.
SELECT
VOLUME Up/
Down Changes the
volume level of
the product,
normally the TV .
Prev. Ch.
Returns to the previously
selected channel, or DVD
repeat toggle.
CC (Subtitle)
TV Closed Caption (if
your TV has this feature)
or DVD Subtitle toggle.
Learn Used to setup
learning functions.
TOGGLE Swaps
TV PIP screens.
TV/VCR/input toggle For
some TVs, press repeatedly
to select from available
viewing sources (antenna,
cable box, VCR, etc.).
GUIDE displays onscreen program guide.
ENTER
Used after direct channel
number entry to immediately
change to the selected channel.
INFO/Select displays/
selects on-screen channel
information, etc.
MENU Access the Menu
functions of the device
you are controlling.
INFO/
SELECT
OK
Selects menu items for the
device you are controlling.
GU IDE
QUIT Used to exit
menu functions.
CHAPTER +/- controls DVD/
CD track selection i.e. DVD/
CD Track Skip Up/Down (in
DVD and SA T modes). Note
the VCR Transport keys also
control DVD when in DVD
RECORD, PLAY, STOP,
REW, FF , PAUSE VCR
control buttons operate your
VCR even when the remote
is set to operate the TV. Also
operates DVD Scan -/+.
Mode.
Note: The REC button must be pressed TWICE to record from your
VCR. For some brands of VCRs, you might need to press the REC
button once, then press it again for three seconds.
76
Page 5

Advanced Button Functions
DVD
Scan+ and Scan- buttons control the speed of Fast Forward and
Reverse Playback respectively.
Chapter+ and Chapter- buttons respectively locate the succeeding
or preceding Chapters or Tracks on a disc.
Subtitle button brings up DVD Subtitle Menu for Subtitle selection
and display.
Repeat button performs DVD players “A-B Repeat” (or RPT A.B)
function for repeat play of current Chapter or Track.
Info/Select button brings up DVD Display or Control Menu for
Chapter/Track/Title number, Time remaining/elapsed indication,
system information, etc.
Menu brings up the DVD disc Menu screen - use with the Up,
Down, Left & Right navigation buttons.
OK button is used for on-screen Menu selection. Note some DVD
players require the Play button to be used.
Quit button is used to Exit or Clear on-screen Menu displays.
Play button is used to start Disc playback and for Menu selection
on some DVD players.
Stop button stops Disc playback.
Pause button will pause Disc playback - press Play to resume.
Note - in DVD Mode the INPUT button activates the DVD Players
SETUP Menu.
TV/VCR Punch-Through
VCR Punch-through is automatically available in TV and Cable
Modes only i.e. the 6 VCR keys (Play, Pause, Stop, Record, FF and
Rewind) will punch-through to the device programmed under VCR
when in either TV or Cable Modes.
The TV/VCR/INPUT button performs the TV/VCR antenna switch
function when in VCR Mode.
The TV/VCR/INPUT button performs the A.B switch function
when in Cable Mode.
The TV/VCR/INPUT button performs the TV/SA T switch function
when in SAT Mode.
The TV/VCR/INPUT button performs the INPUT source switch
function when in TV Mode.
The TV/VCR/INPUT button performs the DVD Setup function
when in DVD Mode.
The TV/VCR/INPUT button performs nonspecific functions when
in CD/Audio Mode.
SAT
Guide button displays on-screen Satellite Channel Guide.
Chapter+ and Chapter- buttons perform the “Page+” and “Page-”
function for on-screen Guide Menus used by some Satellite
systems.
Info/Select button brings up Satellite Display screen for current
Channel and system information.
Menu brings up the Satellite Menu screen - use with the Up,
Down, Left & Right navigation buttons.
OK button is used for on-screen Menu selection.
Quit button is used to Exit or Clear on-screen Menu displays.
Input button performs the Satellite TV/SA T function.
Misc.
SELECT means same as OKAY - some manufacturers use OKAY
label and others use SELECT label on their remotes.
CC will activate the Closed Caption feature if your device has that
feature.
PIP (Picture-in-Picture) and TOGGLE buttons operate your
television’s Picture-in-Picture features. Use PIP to activate the
feature and TOGGLE to swap between the displayed pictures on
your TV .
TV/VCR and TV/DVD Combo units
Note that for some TV/VCR and TV/DVD combo units you might
need to set up two different buttons to control both parts of the
combo unit. E.G., (referring to the Direct Code Entry section on the
following page) you might need to set up a code under the TV
button to control the TV part of the combo unit AND a separate
code for the VCR or DVD under any other button you choose.
98
Page 6
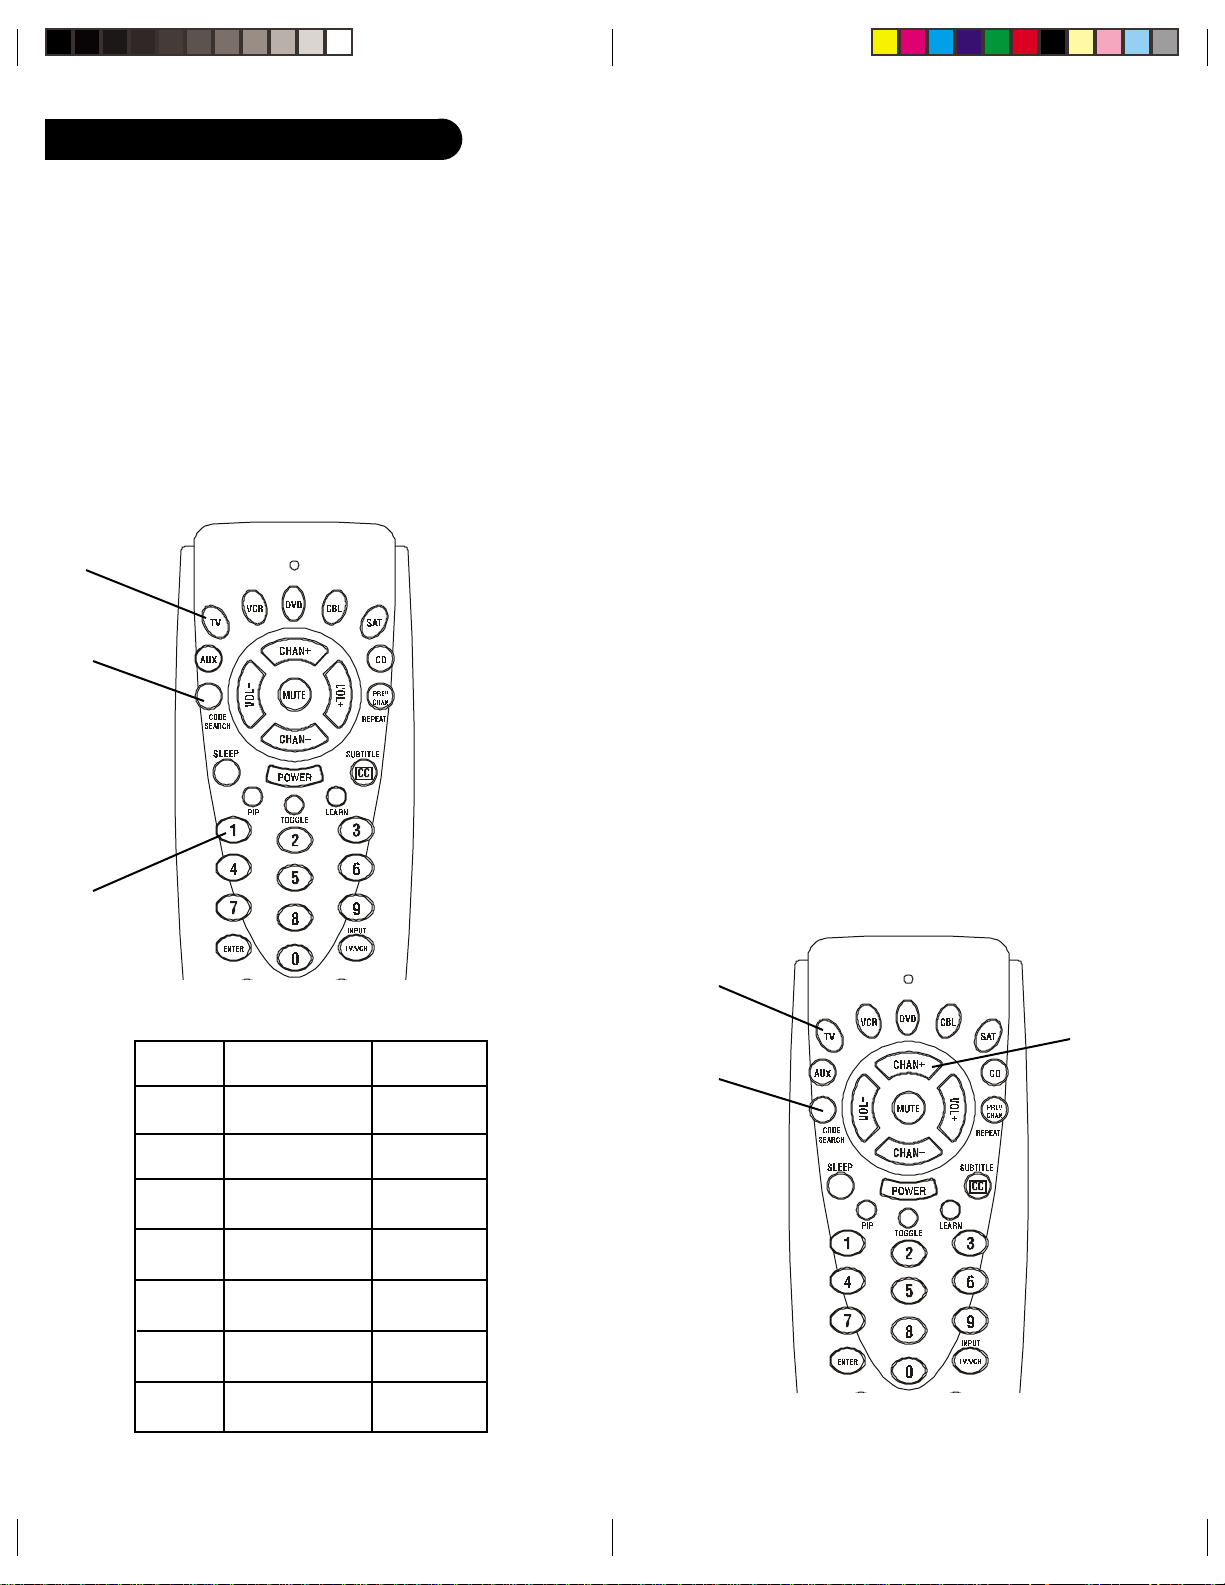
Code Entry
Programming with Code Search
Direct Code Entry
1. Press and hold the Code Search button until the red indicator
stays on. Release the Code Search button.
2. Press and release the desired mode button (TV, VCR, etc.).
The red indicator blinks, then stays lit.
3. Enter the 3 digit code from the code tables. Note: after a valid
code entry, the red indicator turns off. For an invalid code, the
red indicator flashes.
4. With your device on, press CHANNEL Up. If the device
responds, no further programming is required. Note: If some
buttons do not operate your equipment, try one of the other
codes for your brand.
2.
1.
3.
1. Manually turn on the device (TV , VCR, etc.) to be controlled.
2. Press and hold Code Search button until the red indicator
stays on. Release the Code Search button.
3. Press and release the desired mode button (TV, VCR, etc.).
The red indicator blinks, then stays lit.
4. Press the Channel Up button repeatedly (up to 300 times) until
the device to be controlled changes channel. The red indicator
blinks, then stays lit. If you accidentally overshoot the code
required, press the Channel Down button to backtrack through
the library until the device changes channel. Pressing Channel
Up changes direction to forward again. Press and release the
Mute button to install the code.
The above assumes that you want to store VCR codes under the
VCR button, Cable codes under CBL, etc. If you want to store a
VCR code under CBL, etc., first follow the procedure on page 10
and try ANY CBL code from the code tables, e.g. press CBL in step
2, page 10, and then enter ANY VCR code. Then follow the steps
above.
Note: If the device does not have a Channel Up button, use Play
(VCR only) or Power instead. Code Search starts from the currently
stored three digit number under that mode e.g. if the mode has 100
codes and the currently stored code is 050 then the Code Search
starts from 051 continuing to 100 before looping back to 000 and
finishing at 050. This simplifies the process if you find that
several preprogrammed codes operate your device by allowing
you to bypass codes already tried.
Write your codes down here for easy reference later.
Type Type stored Code
TV TV
VCR
Cable
AUX
SAT
DVD
CD
3.
4.
2.
1110
Page 7

Code Identification
Sleep Timer
Code Identification
1. Press and hold Code Search button until the red indicator
stays on. Release the Code Search button.
2. Press and release the desired mode button (TV, VCR, etc.).
The red indicator blinks, then stays lit.
3. Press and release the Code Search button. The indicator light
blinks off.
4. To find the first digit for the code stored under the mode key
pressed in step 2, press each numeric key from 0-9 in turn.
When the indicator light blinks off the number you pressed is
the first digit for the code you are searching for.
5. To find the second digit, repeat step 4, this time when the
indicator light blinks off this is the second digit.
6. Repeat step 4 again to find the third digit.
The Sleep feature enables the remote to turn off the TV after a
period of 1 to 99 minutes. Remote is to be in TV mode to set a
Sleep Timer. This feature works even if your TV does not have this
feature.
2.
1. Press and release the TV Mode key.
2. Press and hold the Sleep button until LED remains on (occurring after approx. 2-3 seconds).
3. Release Sleep button.
4. Press and release the numeric keys (01-99) for the time
required. The LED will blink off to indicate keypress acceptance and remain off after second keypress.
5. TV Sleep Timer now set.
6. Leave the Remote pointing towards the TV with an unobstructed path.
To cancel the Sleep Timer, press and hold the Sleep key until the
LED blinks or press and release the Power key in TV Mode.
Code Learning
1, 3.
4.
INFO/
SELECT
GU IDE
Tips On Learning
1. Use fresh batteries for both the Learning Remote and the
Original Remote.
2. Perform a Master clear (see page 15) before learning.
3. Place the original remote end-to-end with the Learning Remote
so the IR transmitters on both remotes are directly in line with
each other. Keep the two remotes approximately one inch away
from each other .
4. Experiment by learning 2 or 3 commands initially (to ensure
compatibility and familiarity) and then carry out a Master Clear
before completely learning your original remote’s commands.
5. Do not try to learn directly under an incandescent or lowenergy light as these can cause interference with learning. Keep
at least three feet away from any such light sources.
1312
Page 8

Code Learning, cont.
Code Learning, cont.
Learning Commands
1. Press and hold the Code Search button until the red indicator
stays on. Release the Code Search button.
2. Press the mode button for the type of device you want to learn
(TV , VCR, Cable, etc.). The indicator lights blinks off once.
3. Press the Learn button.
4. Press the button on the Learning Remote that you want to
teach, e.g. Power.
5. Point both remotes at each other (see tips on page 11). Press
and hold the Original Remote button that you want to learn,
e.g. Power, until the indicator light turns off. If there is a
problem with learning, the indicator light blinks for three
seconds but the remote remains in the Learning mode. If this
happens, repeat from Step 4.
6.. Repeat Steps 4 and 5 for other buttons you want to learn.
7. Press and release the Code Search button when all desired
original remote commands are learned. Code Learning is now
complete.
Note :- No functions may be stored under the Code Search
button, any mode button, AUX button, or the Learn button.
To Clear all Learned Commands under a mode
1. Press and hold the Code Search button until the indicator light
turns on. Release the Code Search button.
2. Press and release the button for the mode you want to clear
(TV, VCR, etc.). The indicator blinks off.
3. Press and release the Learn button TWICE. The indicator
blinks off.
4. Press and release Code Search. The indicator blinks off.
All learned Commands under that mode are now cleared.
2.
1, 4.
3.
Master Clear - To Clear all Learned Commands, i.e.
return to factory defaults
5.
1. Press and hold the Code Search button until the indicator light
Approx. 1 inch apart
2.
1.
4.
3.
turns on. Release the Code Search button.
2. Press and release the Learn button TWICE. The indicator
blinks off.
3. Press and release Code Search. The indicator blinks off.
All Learned commands in the remote are now cleared.
1, 3.
2.
1514
Page 9

Code List
TV
ABEX............................................ 120
ADMIRAL ........................... 701 918
ADVENTURA ............................. 019
AIKO ............................................ 407
ALLERON ................................... 206
AMARK ........................................ 603
AMTRON..................................... 906
AKAI ............................................ 801
AMSTRAD................................... 520
ANAM NATIONAL ........... 104 805
....................................... 901 906 920
AOC ...................... 002 003 102 119
............................... 217 302 502 814
ARCHER ...................................... 603
AUDIOVOX................................. 906
BANG & OLUFSEN .................... 6 2 0
BELCOR....................................... 002
BELL & HOWELL ..................... 506
............................................... 601 701
BRADFORD................................. 906
BROKSONIC ........................ 215 316
BROKWOOD ............................... 002
CANDLE .............. 002 019 402 502
CAPEHART ................................. 119
CELEBRITY................................ 801
CENTURION............................... 502
CETRONIC .................................. 805
CITIZEN .............. 002 112 402 407
................ 502 512 701 805 906 319
CLAIRTONE ............................... 003
CLASSIC ....................................... 805
CLP ............................................... 016
CLP CLASSIC .............. 013 012 001
COLORTYME ............. 002 502 602
CONCERTO......................... 002 502
CONCIERGE................................ 713
CONTEC/CONY ................. 003 802
....................................... 805 902 906
CRAIG................................... 805 906
CROWN ................................ 805 906
CURTIS MATHES ............... 002 103
........ 112 502 506 512 601 701 704
CXC ....................................... 805 906
DAEWOO ............ 002 102 110 214
........................ 303 3 11 314 403 40 7
................ 502 503 611 805 809 909
DAYTRON........................... 002 502
DIMENSIA........................... 601 704
DUMONT ............................ 002 713
DYNASTY ................................... 805
ELEKTRA ................................... 701
ELECTROBAND ................ 003 801
ELECTROHOME ............... 002 502
....................................... 803 901 914
EMERSON .... 002 003 00 4 005 1 04
........ 105 106 115 204 205 206 213
........ 304 305 316 319 405 502 505
................ 506 519 604 605 705 804
........................ 805 9 03 904 905 90 6
ENVISION............................ 002 502
FISHER ................. 506 606 619 902
FUJITSU....................................... 206
FUNAI .......................... 206 805 906
FUTURETEC ...................... 805 906
GE ................... 002 0 06 007 018 107
................ 114 3 10 312 502 601 704
................ 719 8 03 806 810 901 911
GIBRALTER ........................ 002 713
GOLDSTAR.......... 002 102 117 207
........................ 217 3 07 502 818 914
GRUNDY .............................. 206 906
HALLMARK ....................... 002 502
HARVARD.................................... 906
HITACHI .............. 002 016 116 216
................ 315 5 02 507 515 519 607
........ 615 701 707 715 815 902 915
IMA ............................................... 906
INFINITY .................................... 807
INTEQ .......................................... 713
JANEIL......................................... 019
JBL ................................................ 807
JCB ................................................ 801
JC PENNY .... 002 007 102 107 112
................ 310 3 12 402 502 512 601
................ 704 7 19 803 806 818 907
JENSEN ................................ 002 502
JVC . 007 107 108 308 510 607 902
KAWASHO................... 002 502 801
KAYPANI ..................................... 119
KEC ............................................... 805
KENWOOD ................. 002 502 914
KLOSS NOVABEAM .................. 0 1 9
............................................... 408 508
KONKA . 203 208 219 306 317 417
KTV .............................. 003 213 319
............................... 608 703 805 906
LODGENET ........................ 601 701
LOEWE ........................................ 807
LOGIK .................................. 601 701
LUXMAN............................. 002 502
LXI ........................ 002 312 502 506
........................ 512 6 01 704 719 807
MAGNAVOX ............... 002 009 109
........................ 118 2 09 309 402 408
................ 502 5 08 510 807 914 917
MAJESTIC ........................... 601 701
MARANTZ .................. 002 502 807
MATSUI ....................................... 807
MEGATRON ................ 002 502 507
MEI ............................................... 003
MEMOREX.......... 002 115 206 502
............................... 506 601 701 706
MGA.............................. 002 102 206
............................... 502 619 803 914
MIDLAND ................... 007 107 312
....................................... 713 719 818
MINUTZ...................................... 806
MITSUBISHI ....................... 002 102
............................... 206 502 510 619
............................... 709 803 814 914
MONTGOMERY WARD ........... 601
....................................................... 701
MOTOROLA ....................... 901 918
MTC.............................. 002 003 102
....................................... 112 502 512
MULTITECH .............................. 906
MULTIVISION ............................ 010
NAD ...................... 002 120 502 512
NEC ....................... 002 102 110 111
............................... 502 510 602 901
NIKEI ........................................... 805
NIKKO ......................... 002 407 502
NTC .............................................. 407
ONKING....................................... 805
ONWA .................................. 805 906
OPTIMUS ............................ 120 618
OPTONICA ......................... 111 918
ORION.......................... 105 115 713
PANASONIC ................ 007 107 516
........................ 608 6 18 718 807 90 1
PHILCO................ 002 009 102 109
............................... 309 402 408 502
............................... 508 807 901 914
PHILIPS ............... 002 009 109 202
........................ 209 2 10 310 402 40 8
................ 50 8 510 8 07 901 914 91 7
PILOT ......................................... 0 02
PIONEER ............................. 002 120
....................................... 502 519 610
PORTLAND ........ 002 102 407 502
PRECISION .................................. 218
PRICE CLUB ............................... 112
PRISM ........................................... 107
PROSCAN ............ 312 601 704 719
PROTON .............................. 002 119
....................................... 220 502 910
PULSAR ....................................... 713
PULSER ........................................ 002
QUASAR .............. 007 107 516 608
............................... 618 718 807 901
RADIO SHACK/REALISTIC ..... 002
............... 111 117 406 502 506 601
........ 618 704 705 805 818 906 914
RCA ........ 0 02 011 102 211 302 31 2
........ 318 320 406 409 411 420 502
........ 511 514 519 601 702 711 719
........ 809 811 901 909 911 912 914
RHAPSODY................................ 00 3
RUNCO......................................... 713
SAMPO................. 002 119 502 818
SAMSUNG ............ 002 012 102 103
................ 11 2 212 5 02 512 818 91 4
SAMSUX ...................................... 502
SANSUI ................................. 115 215
SANYO .......... 002 412 50 6 619 9 02
SCOTCH............................... 002 502
SCOTT ......................... 002 004 105
............................... 206 502 805 906
SEARS ............ 00 2 112 2 06 312 502
........................ 506 5 12 520 601 61 2
........................ 619 7 04 719 902 91 4
SHARP........... 00 2 013 0 14 111 502
........................ 712 8 12 813 913 91 8
SHOGUN ...................................... 002
SIGNATURE ................ 601 701 903
SIMPSON ..................................... 402
SONIC ........................................... 003
SONY ............................ 202 708 801
SOUNDESIGN ............. 002 206 402
....................................... 502 805 906
SPECTRAVISION ....................... 921
SQUAREVIEW ............................ 520
SSS ................................. 002 805 906
STARLITE ................................... 906
SUPREMACY.............................. 019
SUPREME.................................... 801
SYLVANIA ........... 002 009 109 209
............................... 309 402 408 502
........................ 508 7 17 807 914 91 7
SYMPHONIC ............... 520 904 906
TANDY ........................................ 918
TATUNG ...................................... 901
TECHNICS........................... 007 107
TECHWOOD....................... 002 007
............................................... 107 502
TEKNIKA ............ 002 019 102 112
................ 20 6 209 402 407 502 512
................ 60 1 618 701 805 902 906
TELECAPTION ......................... 313
TELERENT ......................... 601 701
TERA .................................... 002 220
TMK ..................................... 002 502
TOSHIBA ............. 112 313 413 506
............................... 510 512 613 902
UNIVERSAL ........................ 310 806
VICTOR ........................................ 607
VIDTECH ..................... 002 102 502
VIKING ......................................... 019
WARDS ..........0 02 004 009 10 2 109
................ 11 1 206 209 310 408 502
508 513 601 701 704 806 807 914
WHITE WESTINGHOUSE ..............
............................................... 311 611
YAMAHA............. 002 102 502 914
YUPITERU.................................. 805
ZENITH ............... 002 008 115 215
........ 405 407 601 701 713 903 916
VCR
ADMIRAL ................................... 224
ADVENTURA ............................. 726
AIKO ............................................ 826
AIWA.................... 126 324 528 726
AKAI .................... 027 235 335 424
............................... 524 624 724 924
ALLEGRO.................... 326 534 925
AMERICAN HIGH .............. 130 226
ASHA ............................................ 425
AUDIO DYNAMICS ........... 025 436
AUDIOVOX................................. 525
BELL & HOWELL ..................... 428
BEAUMARK ............................... 425
BROKSONIC ........................ 227 325
....................................... 530 626 632
CALIX .......................................... 525
CANDLE ...................... 025 026 425
............................... 525 625 725 825
CANNON ............. 130 226 535 635
CAPEHART ......................... 135 534
CARVER ....................................... 330
1716
Page 10

CCE ....................................... 230 826
CITIZEN .............. 025 026 425 525
............................... 625 725 825 826
COLORTYME ............................. 025
COLT ............................................ 230
CRAIG................... 230 425 426 525
CURTIS-MATHES .............. 025 124
........ 130 226 324 425 526 635 725
CYBERNEX................................. 425
DAEWOO ............ 026 135 625 626
............................... 726 825 826 926
DAYTRON................................... 135
DBX ..................................... 025 436
DIMENSIA................................... 124
DYNATECH ........................ 324 726
ELECTROHOME ............... 027 525
ELECTROPHONIC .................... 525
EMERSON ........... 027 028 127 128
........ 130 226 227 228 324 325 327
........ 427 428 525 526 527 528 625
........ 626 627 628 630 634 724 726
........................ 727 7 35 827 828 92 7
FISHER ................. 025 029 129 328
............................... 330 426 428 928
FUJI............................... 130 226 524
FUNAI .......................... 324 726 924
GARRARD ................................... 726
GE.......................... 124 130 136 226
............................... 425 429 635 835
GOLDSTAR.................. 025 236 525
GRADIENTE ............................... 726
GO-VIDEO ........................... 438 537
HARLEY DAVIDSON ................ 72 6
HARMAN KARDON .......... 025 930
HARWOOD .................................. 230
HEADQUARTER ........................ 428
HITACHI .............. 136 235 324 336
........................ 538 6 29 638 829 83 4
HI-Q .............................................. 426
INSTANT REPLAY .................... 130
............................................... 226 924
INTEQ .......................................... 525
JCL ........................................ 130 226
JC PENNEY ......... 025 130 235 425
........ 428 436 525 629 635 834 935
JENSEN ................................ 235 629
JVC ................. 025 235 32 6 428 4 36
KENWOOD ......................... 025 235
....................................... 428 436 725
KLH ...................................... 230 237
KODAK ........................ 130 226 525
LLOYD................................. 324 726
LOGIK .......................................... 230
LXI ................................................ 525
MAGNAVOX ............... 130 226 330
............................... 534 536 635 734
MAGNIN ...................................... 425
MARANTZ .......... 025 130 226 330
........................ 428 4 36 530 535 72 5
MARTA ........................................ 525
MASUSHITA ....................... 130 226
MEI ....................................... 130 226
MEMOREX.................. 130 224 226
............................... 324 335 425 426
............................... 428 525 534 726
MGA...................................... 027 630
MGN TECHNOLOGY ................ 425
MIDLAND ................................... 429
MINOLTA ............................ 629 834
MITSUBISHI ............... 027 031 131
........................ 229 2 31 329 431 436
........................ 531 6 29 630 730 930
MONTGOMERY WARD ........... 224
....................................................... 631
MOTOROLA ............... 130 224 226
MTC.............................. 324 425 726
MULTITECH ...................... 324 425
....................................... 726 429 230
NEC ................ 025 235 428 526 530
........................ 725 7 31 831 931 436
NIKKO ......................................... 525
NOBLEX ...................................... 425
OLYMPUS ........................... 130 226
OPTIMUS .................... 035 224 525
............................... 537 737 837 937
OPTONICA ......................... 537 631
ORION.......................................... 227
PANASONIC ................ 035 039 130
........................ 226 6 35 636 937 938
PENTAX.............. 136 629 725 834
PENTEX RESEARCH ................ 025
PHILCO................ 130 226 330 635
PHILIPS ....................... 130 226 330
............................... 536 631 734 738
PILOT .......................................... 525
PIONEER ............. 132 232 436 629
PORTLAND ........ 026 135 725 825
PROSCAN .................................... 124
PROTEC ...................................... 230
PULSAR ....................................... 534
QUARTER ................................... 428
QUARTZ ...................................... 428
QUASAR .............. 130 226 635 636
RCA ................ 033 124 130 133 136
................ 226 2 33 332 424 425 432
........ 532 629 636 732 832 834 932
RADIOSHACK/REALISTIC.............
........ 027 029 035 124 129 130 224
........ 226 324 335 425 426 428 525
................ 631 6 35 726 737 837 937
RADIX.......................................... 525
RANDEX...................................... 525
REPLAY....................................... 938
RICOH .......................................... 936
RUNCO......................................... 534
SAMSUNG ............ 037 335 425 427
........................ 429 5 37 624 625 629
SANKY ................................. 224 534
SANSUI ......................... 235 333 436
SANYO ................. 328 425 426 428
SCOTT ................. 325 327 433 625
............................... 626 630 735 927
SEARS ............ 02 9 129 130 226 330
........ 426 428 525 629 834 928 935
SHARP.................. 027 224 324 338
............................... 631 637 737 825
SHINTOM............................ 230 337
....................................... 524 629 936
SHOGUN ...................................... 425
SIGNATURE ................................ 324
SINGER ......................... 130 226 230
SONY ............................ 034 038 138
............................... 238 524 838 936
STS ........................ 130 226 629 834
SYLVANIA ................... 130 324 330
............................... 536 630 635 726
SYMPHONIC ............... 225 324 726
TANDY ................................ 324 428
TASHIKO..................................... 525
TATUNG ...................................... 235
TEAC ............................ 235 324 726
TECHNICS................... 035 130 226
TEKNIKA .................... 130 134 226
....................................... 324 525 726
TiVo ...................................... 738 838
TOSHIBA ..................... 029 330 433
............................... 625 629 630 735
TOTEVSION ....................... 425 525
TMK ............................. 425 526 828
UNITECH .................................... 425
VECTOR RESEARCH ........ 025 436
............................................... 625 725
VICTOR ........................................ 436
VIDEO CONCEPTS ............ 025 027
....................................... 436 625 725
VIDEOSONIC .............................. 425
WARDS................. 027 130 224 226
................ 23 0 234 3 24 425 426 52 5
................ 62 5 629 6 31 726 735 83 4
WHITE WESTINGHOUSE 324 924
XR-1000 ............... 130 226 230 726
YAMAHA............. 025 235 428 436
ZENITH ............... 030 036 125 326
........................ 436 4 37 524 525 53 4
........................ 632 8 24 925 929 93 6
Cable
ABC ............................... 048 148 248
............................... 348 747 847 947
ALLEGRO............................ 054 154
AMERICAST ............................... 354
ANTRONIX......................... 448 548
ARCHER .............. 448 548 648 748
CABLETENNA........................... 448
CABLEVIEW ............................... 448
CENTURY ................................... 748
CITIZEN ...................................... 748
COLOUR VOICE ................. 848 948
COMTRONICS .................... 049 149
CONTEC/CONY ......................... 249
EASTERN .................................... 349
GARRARD ................................... 748
GC ELECTRONICS .................... 5 48
GEMINI ................................ 449 549
GE.................................................. 556
GENERAL INSTRUMENT ..............
........................ 053 4 53 454 552 55 4
........................ 654 7 52 754 947 95 2
HAMLIN ...................... 649 749 849
HITACHI ...................................... 947
HYTEX ........................................ 847
JASCO ........................................... 748
JERROLD ..................... 048 050 148
........................ 254 3 48 449 454 55 2
........................ 554 6 52 747 752 94 7
MAGNAVOX ............................... 1 50
MEMOREX.................................. 250
MOVIE TIME ..................... 350 847
NSC ....................................... 350 847
OAK .............................. 249 550 847
PACE ............................................ 854
PANASONIC ........................ 452 647
PARAGON ................................... 250
PHILIPS ............... 150 549 650 748
............................... 750 848 850 948
PIONEER ..................... 051 451 950
PULSAR ....................................... 250
RADIO SHACK ........................... 1 5 2
RCA ....................................... 352 647
REALISTIC .................................. 548
REGAL ......................................... 849
REGENCY.................................... 349
REMBRANDT............................. 947
RUNCO......................................... 250
SAMSUNG ............................ 049 051
SCIENTIFIC ATLANTA ........... 248
....................................... 251 351 451
SIGNAL ................................ 049 449
SIGNATURE ................................ 947
SL MARX ..................................... 049
SPRUCER ..................................... 647
STANDARD COMPONENTS ... 5 51
STARCOM ................... 348 449 747
STARGATE .......................... 049 449
STARSIGHT ................................. 653
STAR SIGHT CABLE SERVICE 3 52
STARQUEST ............................... 449
STAR TRAK ................................ 253
TANDY ........................................ 651
TELEVIEW ................................. 049
TELEWEST ................................ 854
TEXSCAN.................................... 551
TOCOM....................... 048 751 952
TOSHIBA ..................................... 250
TUSA ............................................ 449
TV86 ............................................. 350
UNIKA ......................... 448 548 748
UNITED ARTISTS ..................... 847
UNITED CABLE ........................ 747
UNIVERSAL ........................ 448 548
....................................... 648 748 851
VIDEOWAY................................. 052
VIEWSTAR.......... 149 150 350 651
VIDEO TECH .............................. 656
ZENITH ........ 054 154 25 0 353 3 54
........ 450 553 653 753 853 951 953
SAT
AMPLICA.................................... 159
CHANNEL MASTER ................. 359
............................................... 459 559
CHAPPARAL .............. 657 659 757
CHEYENNE ................................ 757
DRAKE......................... 059 360 857
DISH NETWORK ............... 366 460
............................... 464 560 660 962
DX ANTENNA ................... 458 859
ECHOSPHERE ............................ 464
ECHOSTAR.................. 366 460 464
....................................... 560 660 962
FUJITSU............................... 760 860
GE.......................................... 265 863
1918
Page 11

GENERAL INSTRUMENTS ..... 058
........ 066 158 166 258 865 960 965
DSS HITACHI ...................... 765 864
DSS HUGHES SATELLITE ....... 465
............................... 564 664 864 964
JANEIL......................................... 261
JERROLD ..................................... 361
JVC ................................................ 466
KENWOOD ................................. 461
LUXOR......................................... 561
DSS MAGNA VOX ....... 259 565 862
MACOM STATE ......................... 661
NORSTAT ............................ 761 861
DSS PANASONIC ................ 260 264
PRIMESTAR ................................ 364
PHILIPS ....................... 259 565 862
PHILIPS/MAGNAVOX .............. 259
............................................... 565 862
PIONEER ..................................... 060
PROSCAN ............................ 265 863
DSS RCA ....................... 265 866 966
REALISTIC .......................... 358 961
SAMSUNG .................................... 061
SCIENTIFIC ATLANTA ........... 362
SHARP.......................................... 062
SIERRA I II III .......................... 75 7
DSS SONY ............................ 160 963
STAR SIGHT ................................ 9 64
STAR TRAK ................................ 462
STS ........................ 458 558 658 758
SUPER GUIDE ............................ 5 62
TOSHIBA ..................................... 858
TOSHIBA DSS ............. 064 164 764
UNIDEN............................... 762 958
DSS UNIDEN ............................... 964
VIDEO CIPHER II ...................... 059
ZENITH ....................... 059 065 165
............................... 266 360 857 957
CD
ADC .............................................. 667
ADCOM ................................ 073 767
AIWA.................... 787 867 885 967
AKAI ............................ 173 375 684
AUDIO TECHNICA ................... 168
CALIFORNIA AUDIO LABS .... 2 7 3
CAPETRONIC ............................ 568
CARVER ............... 184 268 368 468
CASIO ........................................... 379
CITIZEN ...................................... 284
CURTIS MATHES ....................... 379
DENON ........................................ 668
EMERSON ................... 767 868 968
FISHER .......... 169 269 36 8 369 4 73
GE.................................................. 174
GENEXXA ........... 469 573 868 968
GOLDSTAR.................................. 673
HARMON KARDON .......... 669 770
HITACHI ...................................... 469
INKEL .......................................... 769
JC PENNEY ......................... 379 670
JVC ........................................ 869 982
KENWOOD ................. 070 170 374
....................................... 474 484 969
KRELL ......................................... 268
KYOCERA ................................... 667
LUXMAN............. 270 370 475 574
LXI ........................................ 379 868
MAGNAVOX ............... 268 681 774
MARANTZ .......... 268 470 570 874
MCS....................................... 379 670
MGA.............................................. 770
MISSION ...................................... 268
MITSUBISHI ....................... 770 870
NAD .............................................. 773
NAKAMICHI ............... 071 784 970
NEC ............................................... 670
NIKKO ......................... 168 269 968
NSM .............................................. 268
ONKYO ................ 171 271 782 873
OPTIMUS ..... 07 0 076 368 371 376
........ 468 469 471 571 671 776 868
PANASONIC ................ 273 675 974
PHILIPS ....................... 184 268 774
PIONEER ...... 385 4 69 573 771 871
PROTON ...................................... 268
QUASAR ...................................... 273
RCA ....................... 086 181 368 767
............................... 868 971 973 988
REALISTIC .......... 368 371 469 568
........................ 570 5 71 767 868 968
ROTEL......................................... 268
RS ORIGINAL ..................... 272 468
SAE ............................................... 268
SAMSUNG .................................... 775
SANSUI .......... 072 075 268 868 973
SANYO .......... 172 175 368 473 875
SCOTT ......................... 767 868 968
SEARS ................... 070 379 570 868
SHARP.......................... 070 569 570
SHERWOOD . 272 471 570 587 769
SHURE .......................................... 670
SONY ............. 081 372 472 681 880
STS ................................................ 667
SYLVANIA ................................... 268
SYMPHONIC ............................... 572
TEAC ............................ 269 287 570
............................... 571 572 672 772
TECHNICS........... 273 683 887 974
THETA DIGITAL ....................... 774
TOSHIBA ..................................... 773
VICTOR ........................................ 869
YAMAHA...... 074 168 286 872 972
ZENITH ........ 080 269 577 674 686
DVD
AIWA............................................ 043
AKAI ............................................ 141
APEX ............................................ 044
DENON ................................ 641 743
ELTA .................................... 045 145
EMERSON ................................... 241
FISHER ......................................... 243
GE.................................................. 644
GO-VIDEO ........................... 342 244
HITACHI ...................... 042 543 545
HARMAN/KARDON.................. 344
JVC ........................................ 242 443
INTEGRA ..................................... 843
KENWOOD ......................... 641 544
KONKA ................ 642 742 842 942
MAGNAVOX ....................... 441 442
MARANTZ .......................... 441 442
MITSUBISHI ............................... 841
MUSTEK...................................... 744
NAD .............................................. 944
NAKAMICHI ............................... 844
ONKYO ........................................ 843
ORITRON .................................... 143
PANASONIC ........................ 641 741
PHILIPS ....................... 441 442 943
PIONEER ............................. 042 545
PROSCAN .................................... 941
RCA ....................................... 941 644
SAMSUNG .................................... 342
SAMPO......................................... 343
SEG................................................ 444
SHARP.......................................... 341
SHERWOOD ................................ 144
SHINCO ........................................ 644
SONY ............................................ 541
TEAC .................................... 042 545
TOSHIBA ............................. 441 245
ZENITH ....................... 241 142 345
YAMAHA............................. 641 643
YAMAKAWA .............................. 445
Laser Disc
DENON ........................................ 132
PIONEER ..................................... 132
PROSCAN .................................... 432
RCA ............................................... 432
SANYO ......................................... 824
SONY ............................................ 933
ZENITH ....................................... 824
Audio
AIWA.................... 585 687 786 885
CARVER ....................................... 184
CITIZEN ...................................... 284
DENON ................................ 383 981
FISHER ................................. 083 783
GOLDSTAR.................................. 278
HARMON KARDON .......... 082 483
JVC ................................ 583 680 982
KENWOOD .. 283 482 484 884 969
MAGNAVOX ....................... 083 281
MARANTZ .......................... 084 470
NAD ...................................... 575 773
ONKYO ........................ 182 782 882
OPTIMUS ............ 077 368 376 476
........................ 576 6 76 776 876 98 0
PANASONIC ........................ 183 682
PHILIPS ............... 083 084 184 983
PIONEER ..................................... 385
RCA ....................... 181 373 384 688
............................... 779 788 878 888
REALISTIC .................................. 883
RS ORIGINAL ..... 077 272 282 980
SANYO ......................................... 172
SCOTT ......................................... 478
SHARP.......................... 070 582 768
SHERWOOD ........ 272 282 487 587
SONY .................... 085 180 185 285
........................ 381 4 79 481 581 98 4
TEAC ............. 18 7 287 3 82 387 672
TECHNICS................... 088 183 682
....................................... 780 983 987
VENTURER................................. 176
YAMAHA............. 286 386 485 486
........................ 586 6 85 781 785 88 1
ZENITH .............. 080 083 178 269
........................ 278 5 76 577 674 68 6
2120
Page 12

Product Operation
INFO/
SELECT
GUIDE
Wireless Receiver
After the batteries are installed and you have programmed the
remote for the codes that operate your products, you can use your
remote to operate a TV , VCR, Cable Box, CD Player , or Satellite
System, etc.
TV (Press TV First)
VCR
(Press VCR First)
DVD Player
(Press DVD first)
The remote transmits wireless radio Frequency (RF) commands.
The wireless receiver (included) receives these commands and
converts them to regular Infrared (IR) commands. These IR
commands are then emitted from the IR Extender (also included) to
control your A/V components. This lets you control your A/V
components from ANY room in your home - you don’t need to aim
the remote at your component!
Connect the plug-in power
supply (included) to this jack
and plug the power supply
into any 120V AC outlet.
Antenna
Satellite System
(Press SAT first)
To Operate:
1. Press the TV , VCR, CBL, SAT, etc.
button (depending on which product
you want to operate).
2. Aim the remote at the product.
3. Press POWER to turn on the product.
4. Press other buttons to operate the
features of your product.
CD Player
(Press CD first)
Connect the IR Extender
cord (included) to this
socket and attach the IR
emitters to the front of the
components you want to
IR emitters
control.
Troubleshooting
Remote does not operate your product.
• Press the mode button of the product you want to control.
• Program the remote with a new code.
• Install new batteries. (You might have to reprogram your
remote after installing new batteries.)
• Remote may not be compatible with your product.
Remote does not operate some features of your product.
• Program remote with a new code.
• Remote may not be able to operate all features of your product
or button names might be different than your product.
Indicator light blinks after you program a product code.
• Remote did not accept the code.
• Try to program the code again or try a different code.
2322
Page 13

90 Day Warranty
This product is manufactured to ZENITH specifications and is free
from defects in material, workmanship and assembly. This warranty extends only to the original purchaser and is nontransferable.
Should a defect occur under normal operating conditions within 90
days from the date of purchase, ZENITH will provide a comparable replacement free of charge within the warranty period, to the
original purchaser. Defective product must be returned, with the
dated proof of purchase, to the place of purchase for replacement.
This warranty does not extend to the product if it has been damaged or rendered defective as a result of accident, misuse, abuse,
tampering with or modification. THIS WARRANTY IS IN LIEU
OF ALL OTHER WARRANTIES, EXPRESS OR IMPLIED,
INCLUDING THE IMPLIED WARRANTIES OF MERCHANTABILITY OR FITNESS FOR A PARTICULAR PURPOSE. IN
NO EVENT SHALL ZENITH BE LIABLE FOR SPECIAL,
INDIRECT, INCIDENTAL OR CONSEQUENTIAL DAMAGES,
WHETHER IN CONTRACT, TORT OR NEGLIGENCE. Some
States do not allow limitations on how long an implied warranty
lasts, so the above limitation may not apply to you. Some States do
not allow exclusion or limitation of incidental or consequential
damages, so the above limitation or exclusion may not apply to
you. This warranty gives you specific rights and you may also have
other rights, which vary from State to State.
Made in China-TC, Quality Assured in USA
Clifton, NJ 07014-1115
New
ZN551
Back
Cover Art
 Loading...