

Page 1
Introduction: The Wireless Audio/Video Sender kit includes a
Sender and a Receiver. You connect the Sender to the A/V
outputs on your primary TV (that your Satellite Receiver, VCR,
DVD Player, Cable Box, etc., is connected to). You connect
the Receiver to a secondary TV in another room, up to 100
feet away. The Sender converts the A/V signals from your
VCR, Cable Box, etc., into wireless signals and transmits them
(even through walls) to the Receiver. The Receiver converts
the wireless signals back to an A/V signal and feeds it through
a cable to your TV’s A/V or COAX jacks. The IR control jack
lets you remotely control the device connected to the Sender.
FCC Caution
THIS DEVICE COMPLIES WITH PART 15 OF THE FCC RULES.
OPERATION IS SUBJECT TO THE FOLLOWING TWO CONDITIONS:
(1) THIS DEVICE MAY NOT CAUSE HARMFUL INTERFERENCE, AND
(2) THIS DEVICE MUST ACCEPT ANY INTERFERENCE RECEIVED,
INCLUDING INTERFERENCE THAT MAY CAUSE UNDESIRED
OPERATION.
NOTE: Modifications to this product will void the user’s authority to operate this
equipment.
X10 Wireless Technology, Inc. Limited One Year Warranty
X10.com, a division of X10 Wireless Technology, Inc. (X10) warrants X10 products
to be free from defective material and workmanship for a period of one (1) year from
the original date of purchase at retail. X10 agrees to repair or replace, at its sole
discretion, a defective X10 product if returned to X10 within the warranty period
and with proof of purchase. If service is required under this warranty:
Call 1-800-442-5065, visit www.x10.com, or e-mail support@x10.com.
For help or more information on setup, please visit:
http://www.x10.com/support
X10.com, a division of X10 Wireless Technology, Inc.
VK80A-com_h14139-021106
3824 North 5th St., Suite C,
North Las Vegas, NV 89032
VV
ideo Senderideo Sender
V
ideo Sender
VV
ideo Senderideo Sender
WW
irir
eless eless
W
ir
eless
WW
irir
eless eless
SystemSystem
System
SystemSystem
AA
udio/Vudio/V
A
udio/V
AA
udio/Vudio/V
ideo Extenderideo Extender
ideo Extender
ideo Extenderideo Extender
OWNER’S MANUAL
Model VK80A
(includes VT44A Audio/Video Sender
and VR40A Audio/Video Receiver)
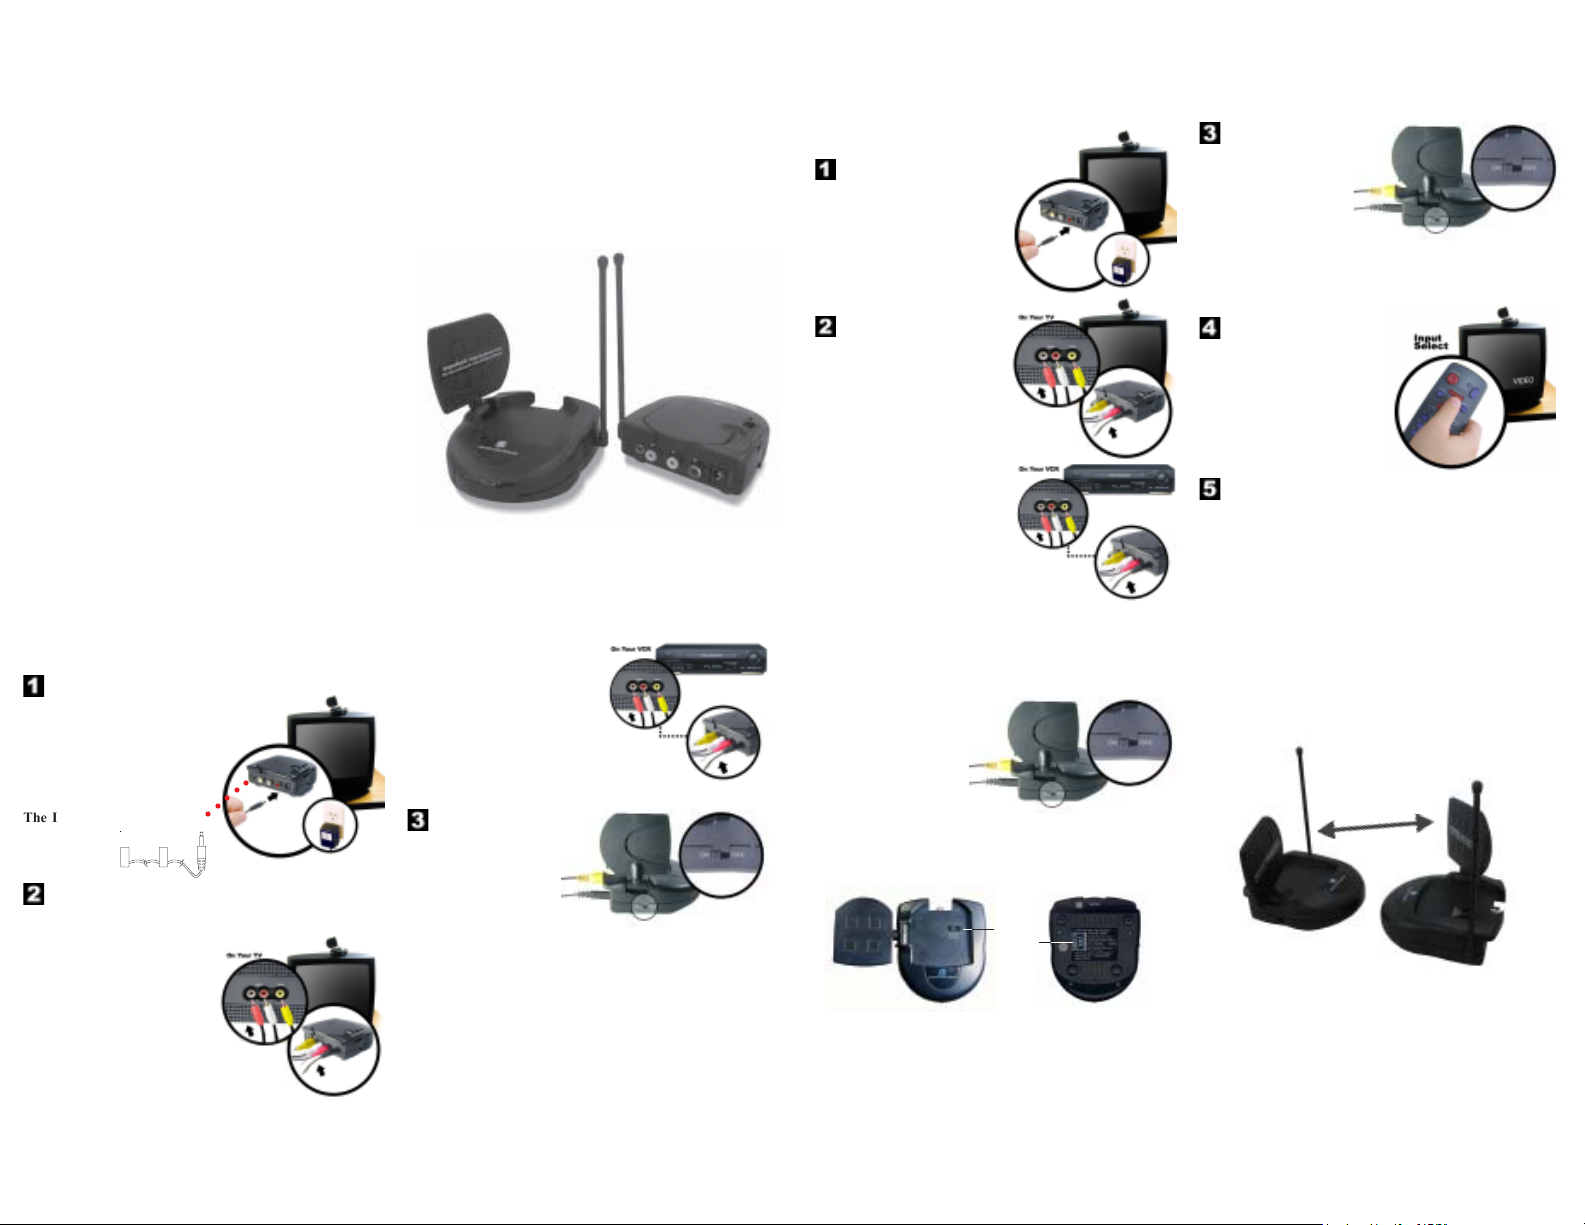
Connecting the Receiver
Connect the Receiver to power.
Put your Receiver in a
convenient place near or on your
secondary TV. Plug its power
supply into a standard wall outlet
and the other end into the
Receiver.
Connect the Receiver to
your secondary TV.
Connect an audio/video cable to
the audio and video jacks on the
Receiver and to the audio and
video IN jacks on your secondary
TV. Use yellow for video and the
red and white plugs for audio. Or
use the COAX connector.
If a VCR or other A/V component
is connected to the TV using A/V
cables, you can connect the
Receiver to the free LINE IN
jacks on the component.
Turn on the Receiver.
Make sure the power switch on the Receiver is set to “ON.”
Turn on your secondary TV.
Make sure you can see the appropriate picture from your
DVD Player, VCR, Satellite Receiver etc., on your
primary TV that you connected the Sender to. Select the
video input on your secondary TV. Use the Video or
Select buttons on your TV remote control, or try channel 0
and then Channel Down. The same picture you see on
your primary TV should appear on your secondary TV.
Connecting the Sender
Connect the Sender to power.
Put your Sender in a convenient
place near or on your primary TV.
Plug its power supply into a
standard wall outlet and the other
end into the Sender.
The IR control jack
(See separate sheet).
Connect the Sender to your primary TV.
Connect an audio/video cable
to the audio and video jacks on
the Sender and to the audio
and video OUT jacks on the
TV you want to send the
picture and sound from. Use
yellow for video and the red
and white plugs for audio.
○○○○○
If your TV does not have audio
and video OUT jacks, and you
have a VCR or other A/V
component connected to the TV
using A/V cables, you can connect
the VCR to the TV using a
COAX Cable, and connect the
Sender to the A/V OUT jacks on
the VCR, etc.
Turn on the Sender.
Make sure the power switch on the Sender is set to “ON.”
Turn on your primary TV and the DVD Player, VCR, etc.,
connected to it, that you want to use as a source to transmit to
your secondary TV.
Troubleshooting
If you do not see any picture on your TV:
There is a power light on
the front of each unit.
Check that the power
switch on the side of
each unit is ON.
Check that the Sender and the Receiver are on the same letter
channel (A, B, C, or D). The channel switch is on the bottom of
the Receiver and on the top under the flip-up antenna on the
Sender.
channel
switch
Verify that your connections to the TV are correct. Make sure
you are using the appropriate input mode for your TV, try pressing
the A-B button or Video button on your TV’s remote control to
change the input mode (consult your TV’s owner’s manual, if
necessary).
If the picture on your TV isn’t clear:
First, adjust the antennas on the Sender and Receiver so that
the side marked with four squares point towards each other.
You can also try moving the Sender and/or Receiver to another
location near the TV. Sometimes moving either unit just a foot
can make a big difference.
Point the flat antennas
at each other
Transmitter
If the picture still doesn’t improve after adjusting the antennas
and Sender/Receiver positions, try changing the channels on
the Sender and Receiver, making sure they are set to the same
letter (A, B, C, or D). Try different letter settings to see if the
picture improves.
For more help with setup please visit:
http://www.x10.com/support
Receiver
 Loading...