

Page 1

PH750
Owner’s Manual
Page 2

Table of Contents
Introduction .................................................................... 2
Setup ............................................................................. 4
Battery Installation ..................................................... 4
Battery Saver ............................................................. 4
Code Saver ............................................................... 4
Power-On default ...................................................... 5
TV Punch Through Feature ........................................ 5
VCR Punch Through Feature ..................................... 5
Code Setup ............................................................... 5
Button Functions ............................................................. 6
Advanced DVD and SAT Button Functions ..................... 8
VCR/DVD Punch-Through Feature ................................ 9
TV/VCR and TV/DVD Combo units .............................. 9
Code Entry ................................................................... 10
Direct Code Entry .................................................... 10
Code Search ........................................................... 11
Code Search by Brand ............................................ 12
Code Identification ................................................... 14
Sleep Timer .................................................................. 15
Code Learning .............................................................. 16
Tips on Learning ...................................................... 16
Learning Commands ................................................ 17
Clearing Learned commands for a mode ................... 18
Master Clear ........................................................... 19
Product Operation ........................................................ 20
Wireless Receiver ......................................................... 21
Troubleshooting ............................................................ 22
Introduction
Congratulations on your purchase of a Philips Universal Remote
Control. Philips Universal Remotes let you replace a broken or lost
remote or combine more than one remote into one. In addition, this
remote is equipped with a command learning feature which lets the
remote learn commands from your original equipment remote
control!
This remote control operates the common features of most but not
all models and brands of IR Infrared Controlled Video Equipment.
This remote may provide functions that are not available on your
equipment. Some functions of your particular equipment (e.g. menu
functions) may not be controlled by this remote.
In such cases, use the original remote control for your equipment.
Please use this manual to become familiar with your Philips
Universal Remote. After you are familiar with your remote the first
thing you need to do is to install batteries and setup your remote
for your particular product and brand.
The remote also transmits wireless radio Frequency (RF) commands. The wireless receiver (included), see page 21, or a video
sender (sold separately) receives these commands and converts
them to regular Infrared (IR) commands. These IR commands are
then emitted from the IR Extender to control your A/V components.
This lets you control your A/V components from ANY room in
your home - you don’t need to aim the remote at your component!
Thank you for buying a Philips remote and we hope it will give you
many years of service.
FCC Caution
THIS DEVICE COMPLIES WITH PART 15 OF THE FCC RULES.
OPERATION IS SUBJECT TO THE FOLLOWING TWO CONDITIONS: (1) THIS DEVICE MAY NOT CAUSE HARMFUL INTERFERENCE, AND (2) THIS DEVICE MUST ACCEPT ANY INTERFERENCE RECEIVED, INCLUDING INTERFERENCE THAT MAY
CAUSE UNDESIRED OPERATION.
This equipment generates and uses radio frequency energy, and if
not installed and used properly, that is, in strict accordance with
the manufacturers instructions, it may cause interference to radio
and television reception. It has been type tested and found to
comply with the limits for remote control devices in accordance
with the specifications in Sub-Parts B and C of Part 15 of FCC
Rules, which are designed to provide reasonable protection against
such interference in a residential installation. However, there is no
guarantee that interference will not occur in a particular installation.
If this equipment does cause interference to radio or television
reception, which can be determined by unplugging the equipment,
try to correct the interference by one or more of the following
measures.
• Reorient the antenna of the radio/TV experiencing the
interference.
• Relocate the receiver with respect to the radio/TV.
• Move the receiver away from the radio/TV.
• Plug the receiver into an outlet on a different electrical circuit
from the radio/TV experiencing the interference.
• If necessary, consult your local Dealer for additional
suggestions.
NOTE: Modifications to any of the components in this kit will
void the user’s authority to operate this equipment.
32
Page 3
Setup
Setup, cont.
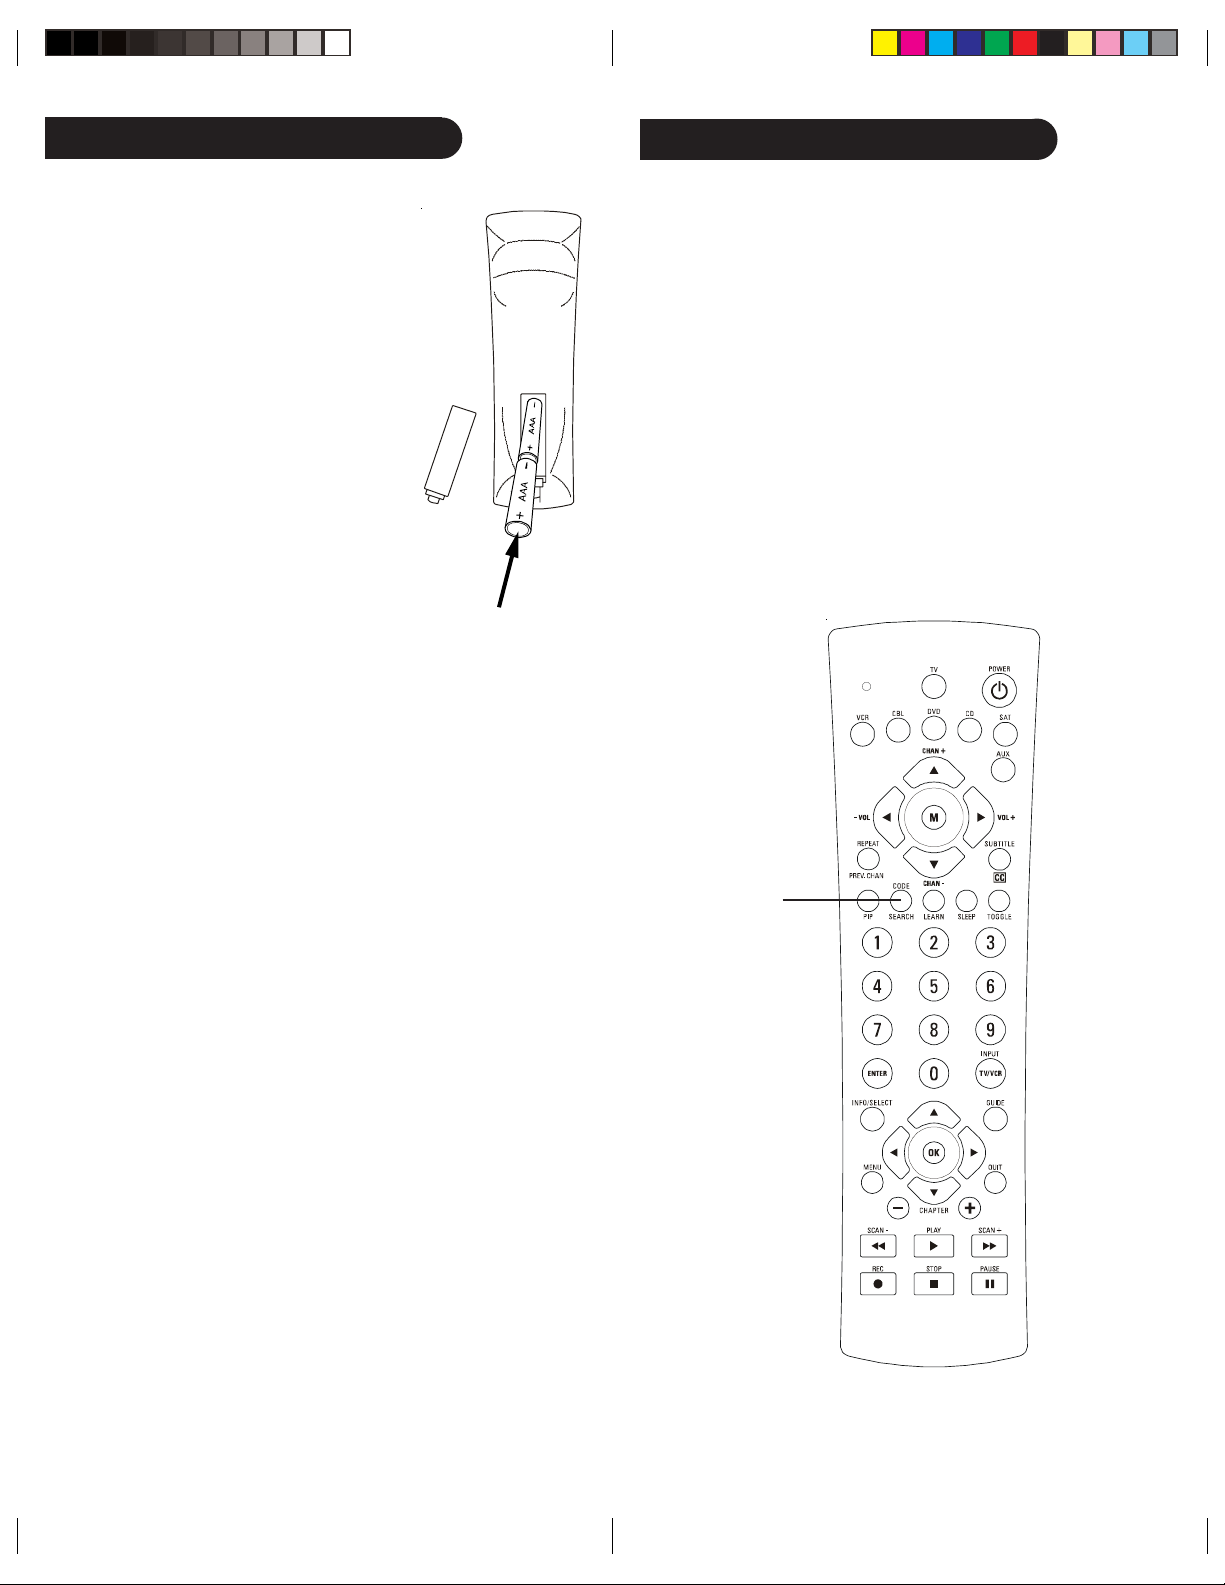
Battery Installation
1. On the back of the remote, push down
on the tab and lift the cover off.
2. Match the batteries to the + and marks inside the battery case, then
insert 2 AAA Alkaline batteries.
3. Press the battery cover back into
place.
Battery Saver
Your remote automatically times out if the
buttons are depressed more than 30
seconds. This will save your batteries
should your remote get stuck in a place
where the buttons remain depressed (e.g.,
between the sofa cushions).
Code Saver
Code Setup
The CODE SEARCH button is used to setup the remote. You can
either setup the remote using the code for your brand of product,
from the code tables (on separate sheet), or you can search
through the library of codes until you find a code that works for
your product.
Please refer to “Programming with Code Search” on page 11 for
more information on using the code search feature to learn how to
search through the library of codes for your products.
NOTE: You can store any kind of code under any mode (except
TV). I.E. you can store a VCR code under the CBL button, or a
DVD code under the VCR button, etc. However, you can only
store TV codes under the TV button.
Codes are stored in permanent memory while you are changing
batteries so you will not lose any codes stored in the remote while
you are changing batteries.
Power-On Default
The remote powers on in TV mode.
TV Volume/Mute Punch-Through Feature
The TV Volume/Mute punch-through feature lets you control the
Volume and Mute function of your TV in any mode programmed to
be a VCR, DVD, CABLE or SAT device, without needing to change
to TV mode.
VCR/DVD Punch-Through Feature
Punch-through to VCR/DVD mode i.e. the 6 keys (PLAY, PAUSE,
STOP, FF, REWIND, and REC) is only allowed in modes pro-
grammed for TV or Cable codes.
CODE SEARCH
54
Page 4
Button Functions
Button Functions, cont.
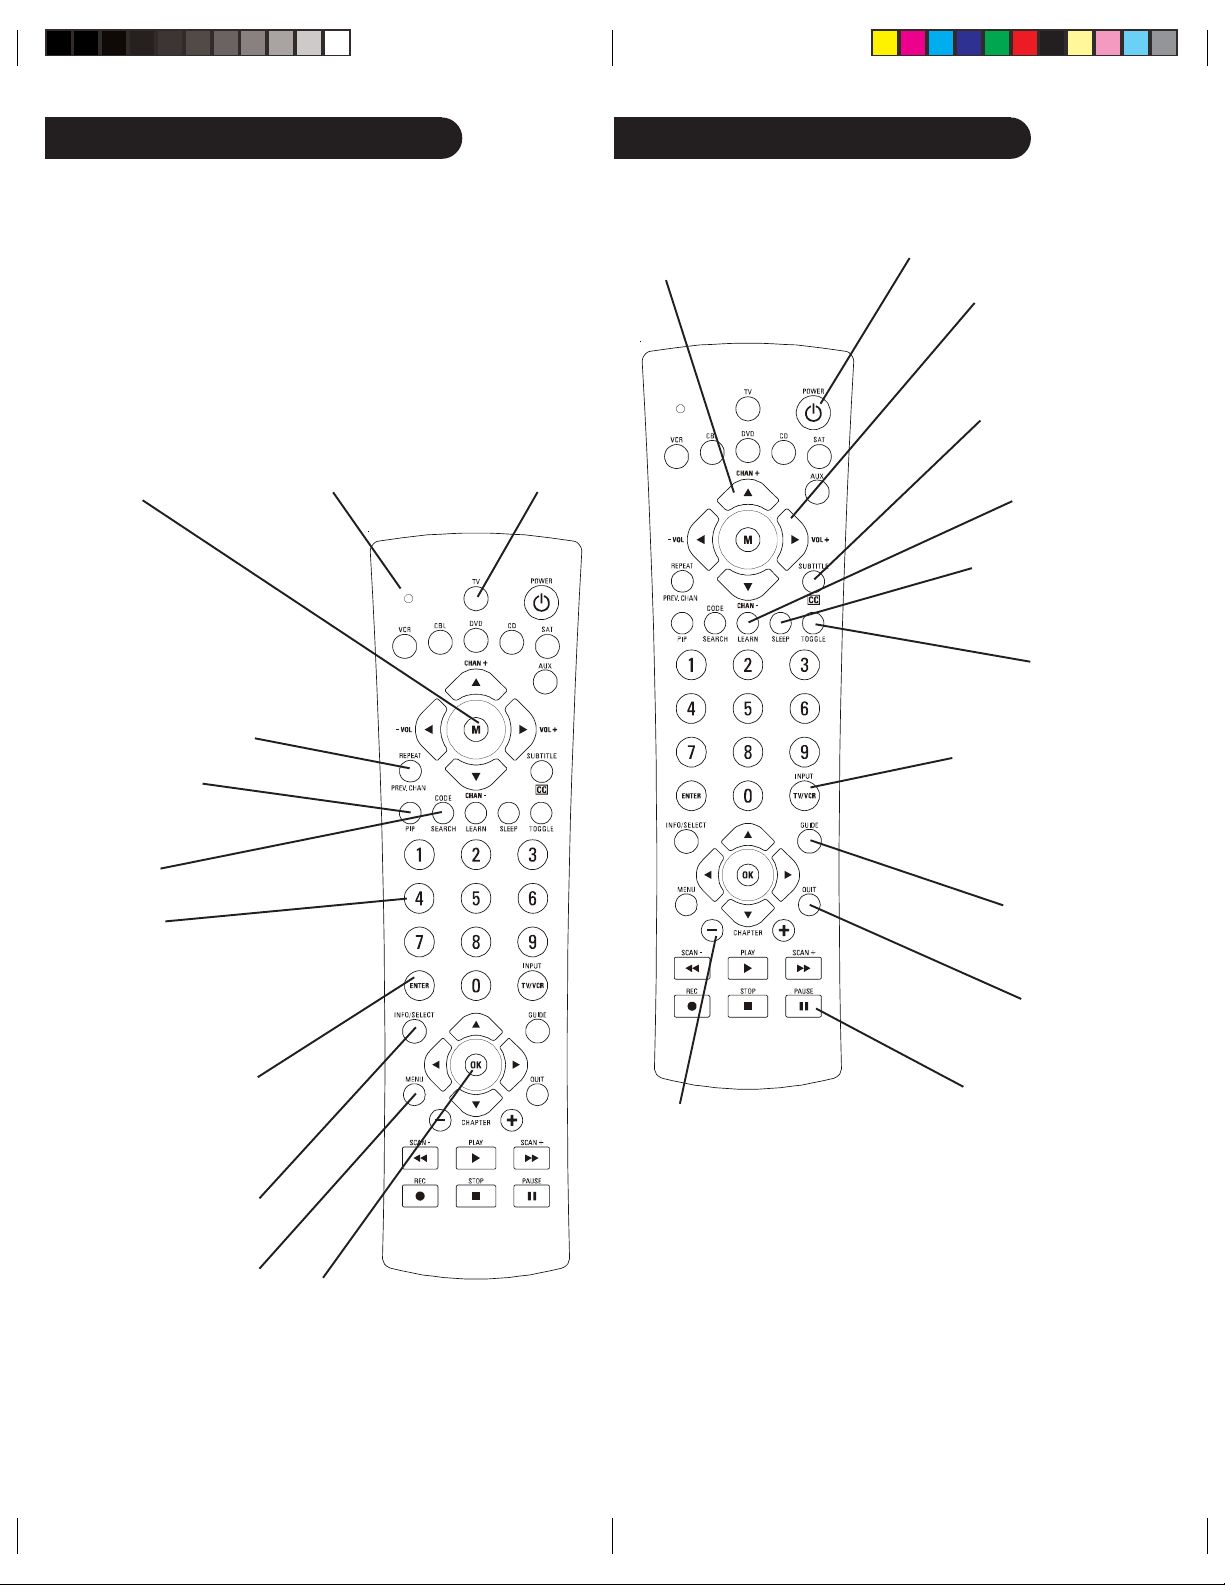
Some buttons on the remote might have functions that are referred
to by different names on the device you are controlling. E.G.
PREV.CHAN may be called RECALL, or ENTER may be called
DISPLAY. These differences depend on the brand and model of your
product. Also, this remote can only operate features that exist on
your product. E.G., your product must have PREV.CHAN ability for
the PREV.CHAN button to operate this feature.
MUTE Turns off
the TV sound
while the picture
remains.
PREV.CHAN Returns
to the previously selected
channel, or DVD repeat
toggle. REPEAT performs
DVD players “A-B
Repeat” (or RPT A.B)
function for repeat play of
current Chapter or Track.
PIP TV Picture-inPicture control.
CODE SEARCH
For setup.
Indicator light
Lights when any
button is pressed.
TV, VCR, CBL, DVD,
CD, SAT, AUX Selects
product to be operated.
CHANNEL Up/
Down Changes
the channels.
POWER Turns
product On or Off.
VOLUME Up/Down
Changes the volume
level of the product,
normally the TV.
CC (Subtitle)
TV Closed Caption (if
your TV has this feature)
or DVD Subtitle toggle.
LEARN Used to setup
learning functions.
SLEEP Turns off the TV
after a period of 1 to 99
minutes.
TOGGLE Swaps
TV PIP screens.
TV/VCR/INPUT For some
TVs, press repeatedly to
select from available
viewing sources (antenna,
cable box, VCR, etc.).
NUMBERS
Enter numbers for direct channel
selection. Some products require
Enter to be pressed after
channel selection.
ENTER
Used after direct channel
number entry to immediately
change to the selected channel.
INFO/SELECT displays/
selects on-screen
channel information, etc.
MENU Access the Menu
functions of the device
you are controlling.
OK
Selects menu items for the
device you are controlling.
GUIDE displays on-
screen program guide.
QUIT Used to exit
menu functions.
RECORD, PLAY, STOP,
CHAPTER +/- controls DVD/
CD track selection i.e. DVD/CD
Track Skip Up/Down (in DVD
and SAT modes). Note the VCR
Transport keys also control
DVD when in DVD Mode.
Note: The REC button must be pressed TWICE to record from
your VCR. For some brands of VCRs, you might need to press the
REC button once, then press it again for three seconds.
76
REW, FF, PAUSE VCR
control buttons operate
your VCR even when the
remote is set to operate the
TV. Also operates DVD Scan
-/+.
Page 5

Advanced Button Functions
Advanced Functions, cont.
DVD Functions
SCAN+ and SCAN- buttons control the speed of Fast Forward and
Reverse Playback respectively.
CHAPTER+ and CHAPTER- buttons respectively locate the
succeeding or preceding Chapters or Tracks on a disc.
SUBTITLE button turns the subtitles on or off.
REPEAT button performs DVD players “A-B Repeat” (or RPT A.B)
function for repeat play of current Chapter or Track.
INFO/SELECT button brings up DVD Display or Control Menu for
Chapter/Track/Title number, Time remaining/elapsed indication,
system information, etc.
MENU brings up the DVD disc Menu screen - use with the UP,
DOWN, LEFT & RIGHT navigation buttons.
OK button is used for on-screen Menu selection. Note some DVD
players require the PLAY button to be used.
QUIT button is used to Exit or Clear on-screen Menu displays.
PLAY button is used to start Disc playback and for Menu selection
on some DVD players.
STOP button stops Disc playback.
PAUSE button pauses Disc playback - press PLAY to resume.
INPUT button activates the DVD Player’s SETUP Menu.
SAT Functions
GUIDE button displays on-screen Satellite Channel Guide.
CHAPTER+ and CHAPTER- buttons perform the “Page+” and
“Page-” function for on-screen Guide Menus used by some
Satellite systems.
INFO/SELECT button brings up Satellite Display screen for
current Channel and system information.
MENU brings up the Satellite Menu screen - use with the UP,
DOWN, LEFT & RIGHT navigation buttons.
OK button is used for on-screen Menu selection.
QUIT button is used to Exit or Clear on-screen Menu displays.
INPUT button performs the Satellite TV/SAT function.
VCR/DVD Punch-Through Feature
This remote lets you Punch-through to the last VCR or DVD device
used. Normally other types of remotes only punch-through (from
another Mode) on the 6 VCR buttons, to the device programmed
under the VCR Mode button. This is not much use if you are using
a DVD programmed under a Mode other than VCR. This remote
punches-through to the last VCR or DVD device you used. For
example, if you have 3 DVD/VCR devices programmed into this
remote, the last one you accessed on the remote will be the one
that has control of the 6 VCR/DVD buttons when in any other
mode.
TV/VCR/INPUT
When in TV mode the TV/VCR/INPUT button performs the
INPUT source switch function.
When in a mode that has been programmed for VCR the TV/VCR/
INPUT button performs the TV/VCR antenna switch function.
When in a mode that has been programmed for Cable the TV/VCR/
INPUT button performs the A.B switch function.
When in a mode that has been programmed for SAT the TV/VCR/
INPUT button performs the TV/SAT switch function.
When in a mode that has been programmed for DVD the TV/VCR/
INPUT button performs the DVD Setup function.
TV/VCR and TV/DVD Combo units
Note that for some TV/VCR and TV/DVD combo units you might
need to set up two different buttons to control both parts of the
combo unit. E.G., (referring to the Direct Code Entry section on the
following page) you might need to set up a code under the TV
button to control the TV part of the combo unit AND a separate
code for the VCR or DVD under any other button you choose.
Misc.
SELECT means same as OKAY - some manufacturers use OKAY
label and others use SELECT label on their remotes.
CC will activate the Closed Caption feature if your device has that
feature.
PIP (Picture-in-Picture) and TOGGLE buttons operate your
television’s Picture-in-Picture features. Use PIP to activate the
feature and TOGGLE to swap between the displayed pictures on
your TV.
98
Page 6

Direct Code Entry
Programming with Code Search
1. Press and hold the CODE SEARCH button until the red
indicator stays on, then release the CODE SEARCH button.
2. Press and release the desired mode button (TV, VCR, etc.). The
red indicator blinks, then stays lit.
3. Enter the 3 digit code from the code tables (on separate sheet).
Note: after a valid code entry, the red indicator turns off. For
an invalid code, the red indicator flashes.
4. With your device on, press CHANNEL UP. If the device
responds, no further programming is required. Note: If some
buttons do not operate your equipment, try one of the other
codes for your brand.
2.
1.
If your product does not respond after you have tried all the codes
for your brand, or if your brand is not listed, try searching for your
code by following these steps.
1. Manually turn on the device (TV, VCR, etc.) to be controlled.
2. Press and hold the CODE SEARCH button until the red
indicator stays on, then release the CODE SEARCH button.
3. Press and quickly release the desired mode button (TV, VCR,
etc.). The red indicator blinks off once.
4. Press the CHANNEL UP button repeatedly (up to 300 times)
until the device to be controlled changes channel. The red
indicator blinks off with each button press. If you accidentally
overshoot the code required, press the CHANNEL DOWN
button to backtrack through the library until the device
changes channel. Pressing CHANNEL UP changes direction to
forward again.
5. Press and release MUTE to install the code.
Most users will store VCR codes under the VCR button, Cable
codes under CABLE, etc. If (for example) you want to store a VCR
code under CABLE, first follow the procedure for Direct Code Entry
(page 10) and press CABLE in step 2 of Direct Code Entry, then
enter ANY VCR code in step 3 of Direct Code Entry. Then follow
the steps above for Code Search (or Brand Search, page 12).
3.
Write your codes down here for easy reference later.
Type Type stored Code
TV TV
VCR
CABLE
DVD
CD
SAT
AUX
Note: If the device does not have a CHANNEL UP button, use
PLAY (VCR only) or POWER instead. Code Search starts from the
currently stored three digit number under that mode.
3.
4.
5.
2.
1110
Page 7

Code Search By Brand
Brand Search Table
Lets you search for a code for a specific Brand within the Code
Library for a particular manufacturer.
1. Turn on the device (TV, VCR, etc.) to be controlled.
2. Press and hold the CODE SEARCH button until the red indicator remains on, then release CODE SEARCH button.
3. Press and quickly release the desired mode button (TV, VCR,
etc.). The red indicator blinks off once.
4. Press and release the numeric button (0-9) corresponding to
desired Manufacturer (see table on next page). The red
indicator blinks off once. Note, pressing “0” performs a full
library search same as normal Code Search Method on previous
page.
5. Press the CHANNEL UP button ((or POWER or PLAY (VCR
only)) repeatedly until the device to be controlled changes
channel. The red indicator blinks off with each button press. If
you accidentally overshoot the code required, press the
CHANNEL DOWN button to backtrack through the library until
the device changes channel. Pressing CHANNEL UP changes
direction to forward again.
6. Press and release MUTE to install the code.
Brand Search Method entry is now complete.
Note: When all codes under a Brand have been searched the red
indicator flashes rapidly for 3 seconds.
Look up your brand in the appropriate column (TV, VCR, etc.).
Look to see what digit (1, 2, 3, etc.) applies to your brand, and
enter it in step 4 of “Code Search by Brand” on the previous page.
CD/AUDIO
RCA, GE, PROSCAN
ZENITH
PHILIPS, MAGNAVOX,
MARANTZ
SONY, PANASONIC,
TECHNICS, SHARP,
TOSHIBA
HITACHI, SANYO, JVC,
LG-GOLDSTAR,
SAMSUNG, MITSUBISHI
SYLVANIA, CURTIS-
MATHES, FISHER,
EMERSON, OPTIMUS
PIONEER, TEAC, NAD
KENWOOD, YAMAHA,
DENON, ONKYO
N/A
ALL
SAT/DBS
RCA, GE, PROSCAN,
PIONEER
ZENITH, GEMINI
PHILIPS, MAGNAVOX
SONY, PANASONIC,
TOSHIBA, SHARP
HITACHI, JVC,
SAMSUNG
GENERAL
INSTRUMENT,
ECHOSTAR, DISH,
HUGHES, PRIMESTAR
N/A
N/A
N/A
ALL
CABLE
SCIENTIFIC ATLANTA
JERROLD
GENERAL
INSTRUMENT, TOCOM
RCA, GE, PROSCAN,
PIONEER
ZENITH, GEMINI
PHILIPS, MAGNAVOX
N/A
N/A
N/A
ALL
VCR/DVD/DVR
RCA, GE, PROSCAN
ZENITH, APEX
PHILIPS, MAGNAVOX,
MARANTZ
SONY, PANASONIC,
SHARP, TOSHIBA,
DAEWOO, YAMAHA,
DENON
HITACHI, SANYO,
JVC, LG-GOLDSTAR,
SAMSUNG,
MITSUBISHI
SYLVANIA, CURTIS-
MATHES, FISHER,
EMERSON
N/A
N/A
N/A
ALL
3.
5.
TV
RCA, GE, PROSCAN
DIGIT12
ZENITH
PHILIPS, MAGNAVOX
3
SONY, PANASONIC,
SHARP, TOSHIBA,
DAEWOO
4
HITACHI, SANYO,
JVC, LG-GOLDSTAR,
SAMSUNG,
MITSUBISHI
5
SYLVANIA, CURTIS-
MATHES, FISHER,
EMERSON
6
N/A
7
N/A
8
N/A
9
ALL
0
6.
2.
4.
1312
Page 8

Sleep TimerCode Identification
The Code Identification Feature allows you to identify the three
digit library code stored under your device key. For example, if you
want to find out what three digit code is stored under your TV
device key, follow the six steps below:
1. Press and hold the CODE SEARCH button until the red
indicator stays on. Release the CODE SEARCH button.
2. Press and release the desired mode button (TV, VCR, etc.). The
red indicator blinks, then stays lit.
3. Press and release the CODE SEARCH button. The red indicator
blinks off.
4. To find the first digit for the code stored under the mode key
pressed in step 2, press each numeric key from 0-9 in turn.
When the red indicator blinks off the number you pressed is
the first digit for the code you are searching for.
5. To find the second digit, repeat step 4, this time when the red
indicator blinks off this is the second digit.
6. Repeat step 4 again to find the third digit.
2.
1, 3.
The Sleep feature enables the remote to turn off the TV after a
period of 1 to 99 minutes. Remote is to be in TV mode to set a
Sleep Timer. This feature works even if your TV does not have
this feature.
1. Press and release the TV Mode button.
2. Press and hold the SLEEP button until red indicator remains on
(occurring after approx. 2-3 seconds).
3. Release the SLEEP button.
4. Press and release the numeric buttons (01-99) for the time
required. The red indicator blinks off to indicate button press
acceptance and remains off after the second button press.
5. TV Sleep Timer now set.
6. Leave the Remote pointing towards the TV with an
unobstructed path.
To cancel the Sleep Timer, press and hold the SLEEP button for 2-3
4.
seconds until the red indicator blinks or press and release the
POWER button in TV Mode.
1514
Page 9

Code Learning, cont.Code Learning
Tips On Learning
1. Use fresh batteries for both the Learning Remote and the
Original Remote.
2. Perform a Master Clear (see page 19) before learning, then try
learning 2 or 3 commands initially. Then carry out a Master
Clear before completely learning your original remote’s
commands.
3. Place the original remote end-to-end with the Learning Remote
so the IR transmitters on both remotes are directly in line with
each other. Keep the two remotes about one inch away from
each other. For some brands you might need to place the
remotes a bit closer, so some experimentation might be needed.
See troubleshooting on page 22.
4. Keep at least three feet away from incandescent or low-energy
lights when learning.
Note 1: Only learn TV codes under TV mode, VCR codes under
VCR mode, etc.
Note 2: No functions may be stored under SLEEP, LEARN, CODE
SEARCH
Note 3: Some functions from some types of remotes might not be
able to be learned.
, or any Mode button.
Learning Commands
The learning feature allows you to “learn” functions from your
original remote control. For example - you may want to use your
remote to operate the RANDOM PLAY feature from your original
CD remote control. This remote is equipped with an “easy learning”
feature that allows you to “learn” features (such as RANDOM
PLAY
from your original CD remote) by following the steps below,
and on the next page:
1. Press and hold the CODE SEARCH button until the red
indicator turns on, then release the button.
2. Press and release the desired mode button (TV, VCR, etc.), the
red indicator blinks then stays on.
3. Press and release the LEARN button, the red indicator blinks
then stays on.
4. Press and release the Learning Remote button that you want
to teach (e.g. POWER).
5. Point both remotes facing each other by approximately 1 inch
apart (see tips on page 16).
6. Press and hold the Original Remote button (e.g. Power) until
the red indicator blinks once and stays on. If there is a learning
problem, the indicator blinks for three seconds and stays on. If
this happens, repeat Steps 4 to 6.
7. Repeat Steps 4-6 for other buttons you want to learn.
8. Press and release the
remote commands are learned. Code Learning is now complete.
CODE SEARCH button when all desired
6.
Line up your remotes (that you’re learning from) in front of the
Learning remote, on a hard surface approx. 1 inch apart.
2.
1.
1716
4.
3.
Page 10

Code Learning, cont.
Code Learning, cont.
To Clear all Learned Commands under a mode
Clearing learned commands is helpful if, for example, you replace
your CD player with another brand or model. If you had learned a
feature from your old CD player’s original remote on to this remote
(such as RANDOM PLAY), that feature would no longer work for
your new CD player. Should you wish to remove or clear one or
more “learned” Modes, follow the steps below:
1. Press and hold the CODE SEARCH button until the red
indicator turns on. Release the CODE SEARCH button.
2. Press and release the button for the mode you want to clear
(TV, VCR, etc.). The red indicator blinks off.
3. Press and release the LEARN button TWICE. The red indicator
blinks off.
4. Press and release the CODE SEARCH button. The red indicator
turns off. All learned Commands under that mode are now
cleared.
2.
Master Clear - To Clear all Learned Commands
under all modes
1. Press and hold the CODE SEARCH button until the red
indicator turns on. Release the CODE SEARCH button.
2. Press and release the LEARN button TWICE. The red indicator
blinks off.
3. Press and release the CODE SEARCH button. The red indicator
turns off. All Learned commands in the remote are now cleared.
1, 3. 2.
1, 4.
3.
1918
Page 11

Product Operation
Wireless Receiver
After the batteries are installed and you have programmed the
remote for the codes that operate your products, you can use your
remote to operate a TV, VCR, Cable Box, CD Player, or Satellite
System, etc.
TV (Press TV First)
VCR
(Press VCR First)
DVD Player
(Press DVD first)
The remote transmits wireless Radio Frequency (RF) commands.
The wireless receiver (included) receives these commands and
converts them to regular Infrared (IR) commands. These IR
commands are then emitted from the IR Extender (also included) to
control your A/V components. This lets you control your A/V
components from ANY room in your home - you don’t need to aim
the remote at your component!
Connect the plug-in power
supply (included) to this jack
and plug the power supply
into any 120V AC outlet.
Antenna
Satellite System
(Press SAT first)
To Operate:
1. Press the TV, VCR, CBL, SAT, etc.
button (depending on which product
you want to operate).
2. Aim the remote at the product.
3. Press POWER to turn on the product.
4. Press other buttons to operate the
features of your product.
CD Player
(Press CD first)
Connect the IR Extender cord
(included) to this socket and
attach the IR emitters to the
front of the components you
want to control.
IR emitters
2120
Page 12

Troubleshooting
Lifetime Warranty
Remote does not operate your product.
• Press the mode button of the product you want to control.
• Program the remote with a new code.
• Install new batteries. (You might have to reprogram your
remote after installing new batteries.)
• Remote may not be compatible with your product.
Remote does not operate some features of your product.
• Program remote with a new code.
• Remote may not be able to operate all features of your product
or button names might be different than your product.
Red Indicator blinks after you program a product code.
• Remote did not accept the code.
• Try to program the code again or try a different code.
Problems with Learning
Please note that you can only learn one device type under any
Mode key. E.G. you can only learn TV codes under the TV mode,
VCR codes under the VCR mode, etc. If you are trying to learn
from a “Universal” remote, it might have more than one code type
stored under a mode. Also, some functions from some types of
remotes might not be able to be learned. So try learning from
another remote to see if there’s a problem with the type or brand of
remote you are trying to learn from.
1. Use fresh batteries for both the Learning Remote and the
Original Remote.
2. Perform a Master Clear (see page 19) before learning.
3. Place the original remote end-to-end with the Learning Remote
so the IR transmitters on both remotes are directly in line with
each other. Keep the two remotes about one inch away from
each other. For some brands you might need to place the
remotes a bit closer, so some experimentation might be needed.
4. Do not try to learn directly under an incandescent or lowenergy light as these can cause interference with learning. Keep
at least three feet away from any such light sources.
Philips warrants that this product shall be free from defects
in material, workmanship and assembly, under normal use, in
accordance with the specifications and warnings, for the life
of the product. This warranty extends only to the original
purchaser and is nontransferable. Defective products must
be returned with the dated proof of purchase to the place of
purchase for replacement. THERE ARE NO OTHER
EXPRESS OR IMPLIED WARRANTIES. Incidental or
consequential damages are disclaimed where permitted by
law.
Made in China, Quality Assured in USA
Clifton, NJ 07014-1115
Note: No functions may be stored under SLEEP, LEARN, CODE
SEARCH
For help with setup, please call: 919-573-7854.
, or any Mode button.
2322
Page 13

Made in China, Quality Assured in USA
Clifton, NJ 07014-1115
 Loading...