

Page 1

FCC PART 15, Warnings: Information to user:
Note: This equipment has been tested and found to comply with the limits for a Class
B digital device, pursuant to Part 15 of the FCC Rules. These limits are designed to
provide reasonable protection against harmful interference in a residential installation.
This equipment generates, uses and can radiate radio frequency energy and, if not
installed and used in accordance with the instructions, may cause harmful interference
to radio communications.
However, there is no guarantee that interference will not occur in a particular
installation. If this equipment does cause harmful interference to radio or televi-sion
reception, which can be determined by turning the equipment off and on the user is
encourages to try to correct the interference by one or more of the following
measures:
• Reorient or relocate the receiving antenna.
• Increase the separation between the equipment and receiver.
• Connect the equipment into an outlet on a circuit different from that to which the
receiver is connected.
• Consult the dealer or an experienced radio/TV technician for help.
Caution:
Changes or modifications not expressly approved by Shenzhen Autel Intelligent Tech. Co.,
Ltd. could void the user’s authority to operate the equipment.
Page 2

Table of Contents
1. Safety Precautions and Warnings.......................................1
2. Tool Information ..................................................................2
2.1 Tool Description .........................................................2
2.2 Specifications ..............................................................3
2.3 Accessories ..................................................................3
2.4 Navigation Characters...............................................3
2.5 Battery Replacement .................................................4
2.6 Product Setup .............................................................4
2.7 Tool Information........................................................6
2.8 Language Setup..........................................................7
3. Diagnostics ............................................................................8
3.1 Activating....................................................................8
3.2 Viewing Data ............................................................12
3.3 Deleting Data ............................................................13
4. Printing and Updating .......................................................14
5. Warranty and Service ........................................................16
5.1 Limited One Year Warranty ..................................16
5.2 Service Procedures...................................................16
Page 3

1. Safety Precautions and Warnings
To prevent personal injury or damage to vehicles and/or the
TPMS tool, read this instruction manual first and observe the
following safety precautions at a minimum whenever working on
a vehicle:
z Always perform automotive testing in a safe environment.
z Wear safety eye protection that meets ANSI standards.
z Keep clothing, hair, hands, tools, test equipment, etc. away
from all moving or hot engine parts.
z Operate the vehicle in a well ventilated work area: Exhaust
gases are poisonous.
z Put blocks in front of the drive wheels and never leave the
vehicle unattended while running tests.
z Use extreme caution when working around the ignition coil,
distributor cap, ignition wires and spark plugs. These
components create hazardous voltages when the engine is
running.
z Put the transmission in PARK (for automatic transmission) or
NEUTRAL (for manual transmission) and make sure the
parking brake is engaged.
z Keep a fire extinguisher suitable for gasoline/chemical/
electrical fires nearby.
z Don’t connect or disconnect any test equipment while the
ignition is on or the engine is running.
z Keep the TPMS tool dry, clean, free from oil/water or grease.
Use a mild detergent on a clean cloth to clean the outside of the
code reader, when necessary.
1
Page 4
2. Tool Information
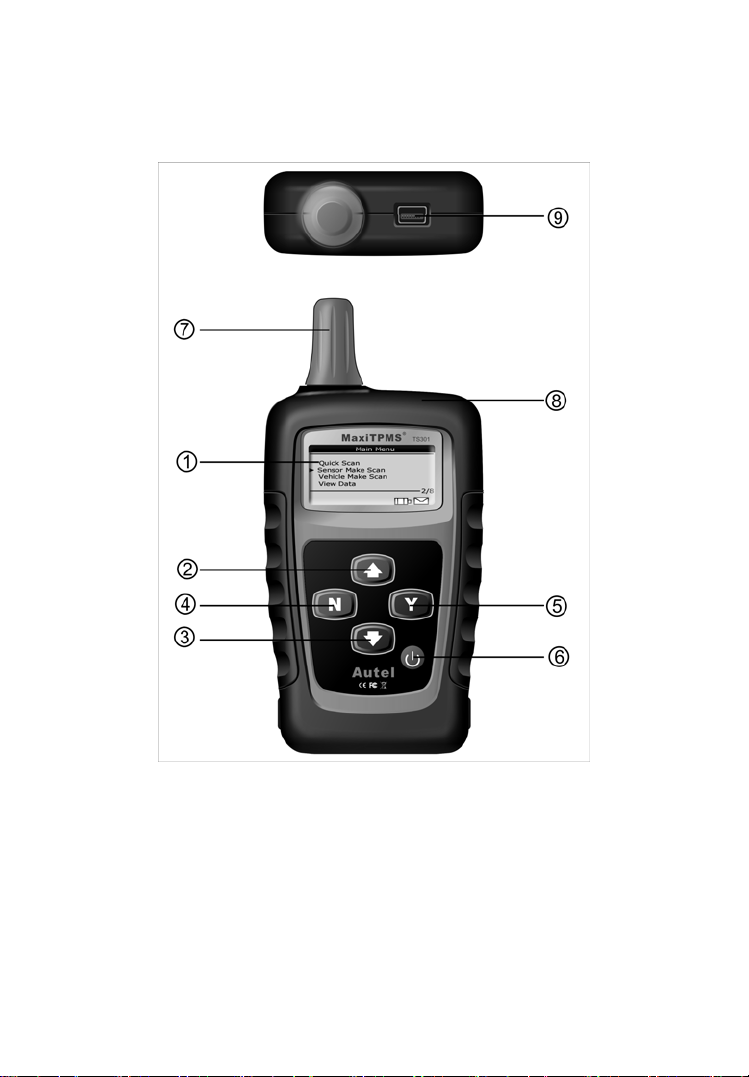
2.1 Tool Description
○1 LCD DISPLAY -- Indicates test results. Backlit, 128 x 64 pixel
display with contrast adjustment.
2
UP SCROLL BUTTON -- Moves up through menu and submenu
○
items in menu mode. When more than one set of data were retrieved,
moves down to next screens for additional data.
3
DOWN SCROLL BUTTON -- Moves down through menu and
○
submenu items in menu mode. When more than one set of data were
retrieved, moves down to next screens for additional data.
2
Page 5

○4 N BUTTON -- Cancels a selection (or action) from a menu or
returns to previous menu.
○5 Y BUTTON -- Confirms a selection (or action) from a menu, or
returns to previous menu.
6
○
POWER BUTTON -- Turns on/off the tool.
7
○
ANTENNA -- Sends signals to tire sensor to activate sensor.
○8 RUBBER BOOT -- Protects the TPMS tool from drop, abrasion
and etc.
9
USB PORT -- Used to connect the TPMS tool to your computer for
○
updates and data printing.
2.2 Specifications
1) Display: Backlit, 128 x 64 pixel display
2) Operating Temperature: 0 to 50°C (32 to 122 F°)
3) Storage Temperature: -20 to 70°C (-4 to 158 F°)
4) Power: 9V battery
5) Dimensions:
Length Width Height
178.3 mm (7.02”) 82 mm (3.23”) 28.8 mm (1.34”)
6) NW: 0.5kg (1.1lb), GW: 0.7kg(1.54lb)
2.3 Accessories
1) Molded plastic case
2) USB cable
3) Magnet (For early model TPM sensors)
4) One 9-volt battery
5) User’s Manual
6) CD software
2.4 Navigation Characters
Characters used to help navigate the TPMS tool are:
1) “►” -- Indicates current selection.
3
Page 6

2) “x/x” -- Indicates total items in a menu and their sequence.
3) “ ” -- Indicates there is data stored in the tool.
4) “ ” -- Indicates battery volume.
2.5 Battery Replacement
The tool requires a 9V cell battery to operate. When the icon
appears, replace the battery as instructed below:
1) Locate the battery cover on the back of the tool.
2) Remove the battery cover screw and slide the battery cover off.
3) Insert a 9V cell battery into the compartment.
4) Reinstall battery cover by sliding battery cover on and installing
screw.
• Replace battery in time; otherwise the test results may be
incorrect.
• If the tool is not used for a long period, remove the battery to
prevent damage from battery leakage.
2.6 Product Setup
The tool allows you to make the following adjustments and settings:
1) Contrast: Adjusts the contrast of the LCD display.
2) Backlighting: Turns on/off backlighting.
• The Settings of the unit will remain until change to the existing
settings is made.
To enter the setup menu
Use UP/DOWN scroll button to select System Setup from Main
Menu, and press Y button.
4
Page 7

Main Menu
Delete Data
►System Setup
Tool Information
Language
6/8
Contrast Adjustment
1) From System Setup menu, use UP/DOWN scroll button to select
Contrast, and press Y button.
System Setup
► Contrast
LCD Backlighting
1/2
2) Use UP/DOWN scroll button to adjust contrast.
Contrast
Contrast (11%)
Use ↑or↓ to change
No Yes
3) Press Y button to save your settings and return to previous menu.
Backlighting
1) Use UP/DOWN scroll button to select LCD Backlighting and
press Y button.
5
Page 8

System Setup
Contrast
► LCD Backlighting
2/2
2) A message comes up asking your confirmation.
Are you sure to turn
on LCD Backlighting?
No Yes
3) Press Y button to turn on backlighting or N button to turn it off.
2.7 Tool Information
The Tool Information function allows viewing of some important
information such as serial number and software version number of the
TPMS tool.
1) Use UP/DOWN scroll button to select Tool Information from
Main Menu, and press Y button
Main Menu
Delete Data
System Setup
►Tool Information
Language
7/8
2) View tool information on unit screen.
6
Page 9

Tool Information
Serial No.: xxxxxxxx
Burn Date: xx/xx/xx
S/W Ver : Vx.xx
H/W Ver : Vx.xx
2.8 Language Setup
The Language is used to change the language of the menus and test
results. The default language is English.
1) Use UP/DOWN scroll button to select Language from Main
Menu, and press Y button
Main Menu
Delete Data
System Setup
Tool Information
►Language
8/8
2) Use UP/DOWN scroll button to select the desired language and
press Y button to save your selection and return to previous
menu.
Language
Deutsch
►English
Français
Nederlands
2/4
7
Page 10

3. Diagnostics
3.1 Activating
The sensor activation function allows activating of TPM (Tire
Pressure Monitoring) sensor to view sensor data such as sensor ID,
frequency. It also send the sensor data to vehicle ECU to let the
ECU learn the positions of sensors whenever tires and wheels are
rotated or sensors are replaced.
There are three means of activating a TPM sensor:
A: Sensor make: to activate the sensor by selecting sensor
manufacturer.
B: Vehicle make: to activate the sensor by selecting vehicle
manufacturer, and model year.
C. Quick scan: to activate the sensor by using the wave signal of the
latest trigger event.
1) Press POWER button to turn on the tool, and wait until the
Main Menu comes up.
2) Point the antenna at a tire near the valve stem.
To activate by selecting sensor make
1) Use UP/DOWN scroll button to select Sensor Make Scan from
Main Menu, and press Y button to confirm.
Main Menu
Quick Scan
► Sensor Make Scan
Vehicle M ake Scan
View Data
2/8
2) Use UP/DOWN scroll button to select the sensor manufacturer
from Select Sensor Make menu, and press Y button to confirm.
8
Page 11

Select Sensor Make
Beru
► Ford
Lear
Pecific
2/9
z If you do not know the sensor make your vehicle uses, use
UP/DOWN button to select Auto Scan to detect the sensor
automatically.
Select Sensor Make
► Auto Scan
9/9
3) Wait a few seconds till the tool makes an audible alarm.
4) View retrieved data on screen.
ID: 0X216843
Frequency: 315MHz
Mode: ASK
z If the sensor can not be detected, a “No sensor detected!”
message shows on the screen.
z The tool automatically records retrieved data in html format.
5) Press N button to return to previous menu.
9
Page 12

To activate by selecting vehicle make
1) Use UP/DOWN scroll button to select Vehicle Make Scan from
Main Menu, and press Y button to confirm.
Main Menu
Sensor Mak e Scan
► Vehicle Make Scan
View Data
Quick Scan
3/8
2) Use UP/DOWN scroll button to select vehicle manufacturer, and
press Y button.
Select Vehicle Make
► Acura
Audi
BMW
Buick
1/38
3) Use UP/DOWN scroll button to select vehicle model, and press
Y button.
Select Model
► MDX
RDX
RL
TL
1/5
4) Use UP/DOWN scroll button to select year.
10
Page 13

Select Year
►2004-06
2007
1/2
TRW
5) Press Y button to activate the sensor.
6) Wait a few seconds till the tool makes an audible alarm.
7) View retrieved data on screen.
ID: 0x216843
Freq: 315MHz
Mode: ASK
8) Press N button to return to previous menu.
To activate by quick scan
The TPMS tool is able to memorize the make of the latest
activated sensor. So the Quick Scan function is very useful for
technicians to activate sensors of the same vehicle.
1) Use UP/DOWN scroll button to select Quick Scan from Main
Menu, and press Y button to confirm.
11
Page 14

Main Menu
► Quick Scan
Sensor Mak e Scan
Vehicle M ake Scan
View Data
1/8
2) Wait a few seconds till the tool makes an audible alarm.
3) View retrieved data on screen.
ID: 0x216843
Frequency: 315MHz
Mode: ASK
4) Press N button to return to previous menu.
3.2 Viewing Data
The View Data function allows viewing of previously recorded
sensor data. The tool is able to keep a maximum of 16 sets of
sensor data. When more than 16 records are retrieved, it
overwrites the oldest one automatically.
1) Use UP/DOWN scroll button to select View Data from Main
Menu, and press Y button to confirm.
12
Page 15

Main Menu
Quick Scan
Sensor Mak e Scan
Vehicle Make Scan
► View Data
4/8
2) View stored data on screen.
ID: 0X216843
Frequency: 315MHz
Mode: ASK
1/16
z If no record is stored by the tool, a “No record!” message
shows on the screen.
3) If there is more than one set of data were recorded by the tool,
use UP/DOWN scroll button to view additional data.
4) Press N button to return to Main Menu.
3.3 Deleting Data
The Delete Data function allows deleting of all previously
recorded sensor data.
1) Use UP/DOWN scroll button to select Delete Data from Main
Menu, and press Y button to confirm.
13
Page 16

Main Menu
► Delete Data
System Setup
Tool Information
Language
5/8
2) A prompt comes up asking your confirmation.
Are you sure to
delete records?
No Yes
z If no record is stored by the tool, a “No record!” message
shows on the screen.
3) If you want to delete records, press Y button to delete, and a
message “Deleted!” comes up on the screen.
4) If you do not want to delete records, press N to return to Main
Menu.
4. Printing and Updating
The tool allows user to update software and print out recorded
sensor data.
• To and update software and print out retrieved data, you need
the following tools:
TPMS tool
A PC or laptop with USB ports
A USB cable
A 9V cell battery
14
Page 17

Printing
The TPMS tool can be used as a plug-and-play USB device to
view and print recorded reports.
1) Connect the tool to computer with the USB cable supplied.
2) View and print reports via the printer connected to your
computer.
Updating
CAUTION: DO NOT try to update the tool when battery low.
1) Place included CD into CD-Drive, or download applications from
our website:
2) Download the latest update file from our website:
www.auteltech.com or our distributors’ websites, and save it in
your computer disk.
3) Follow onscreen instructions on your computer to install
applications and drivers.
4) Launch Maxi-Link, and start updating application by selecting
TPMS Diagnostic and Service Tools.
5) Hold Y button on the tool, and connect the scanner to computer
with the USB cable supplied. Release Y button till the “Program
Mode” message shows on tool screen.
6) Click Select File button to locate the latest update file you have
recently downloaded.
7) Click Update button to start updating.
www.auteltech.com or our distributors’ websites.
15
Page 18

5. Warranty and Service
5.1 Limited One Year Warranty
Autel warrants to its customers that this product will be free from all
defects in materials and workmanship for a period of one (1) year from
the date of the original purchase, subject to the following terms and
conditions:
1) The sole responsibility of Autel under the Warranty is limited to
either the repair or, at the option of Autel, replacement of the code
reader at no charge with Proof of Purchase. The sales receipt may
be used for this purpose.
2) This warranty does not apply to damages caused by improper use,
accident, flood, lightning, or if the product was altered or repaired
by anyone other than the Manufacturer’s Service Center.
3) Autel shall not be liable for any incidental or consequential
damages arising from the use, misuse, or mounting of the code
reader. Some states do not allow limitations on how long an implied
warranty lasts, so the above limitations may not apply to you.
4) All information in this manual is based on the latest information
available at the time of publication and no warranty can be made
for its accuracy or completeness. Autel reserves the right to make
changes at any time without notice.
5.2 Service Procedures
If you have any questions, please contact your local store, distributor or
visit our website at
If it becomes necessary to return the code reader for repair, contact
your local distributor for more information.
www.auteltech.com.
16
 Loading...