

Page 1

Table of Contents
1. SAFETY PRECAUTIONS AND WARNINGS .............................................. 1
2. TOOL INFORMATION .................................................................................. 2
2.1 TOOL DESCRIPTION ...................................................................................... 2
2.2 SPECIFICATIONS ............................................................................................ 4
2.3 ACCESSORIES INCLUDED............................................................................... 4
2.4 ICONS ............................................................................................................ 4
2.5 KEYBOARD .................................................................................................... 5
2.6 BATTERY CHARGING .................................................................................... 5
2.7 POWER UP BY DLC....................................................................................... 6
2.8 SYSTEM SETTING .......................................................................................... 6
2.9 PRODUCT TROUBLESHOOTING.................................................................... 14
3. ACTIVATING & DIAGNOSING ................................................................. 15
3.1 SENSOR ACTIVATION .................................................................................. 15
3.2 TPMS RELEARN ......................................................................................... 27
3.3 REVIEW DATA ............................................................................................. 34
4. RKE & RF MONITOR .................................................................................. 37
5. PRINT AND UPDATE................................................................................... 39
5.1 PRINT DATA ................................................................................................ 39
5.2 SOFTWARE UPDATE ..................................................................................... 40
6. WARRANTY AND SERVICE ...................................................................... 47
6.1 LIMITED ONE YEAR WARRANTY ................................................................ 47
6.2 SERVICE PROCEDURES ................................................................ ................ 47
Page 2

1
1. Safety Precautions and Warnings
To prevent personal injury or damage to vehicles and/or the scan
tool, read this instruction manual first and observe the following
safety precautions at a minimum whenever working on a vehicle:
Always perform diagnosis or service in a safe environment.
Wear safety eye protection that meets ANSI standards.
Keep clothing, hair, hands, tools, test equipment, etc. away from
all moving or hot engine parts.
Operate the vehicle in a well ventilated work area: Exhaust gases
are poisonous.
Put blocks in front of the drive wheels and never leave the vehicle
unattended while running tests.
Use extreme caution when working around the ignition coil,
distributor cap, ignition wires and spark plugs. These
components create hazardous voltages when the engine is
running.
Keep a fire extinguisher suitable for gasoline/chemical/electrical
fires nearby.
Put the transmission in PARK (for automatic transmission) or
NEUTRAL (for manual transmission) and make sure the parking
brake is engaged.
Always turn the ignition off before connecting/disconnecting the
OBDII Cable to/from the TPMS tool; otherwise it may cause the
Malfunction Indicator Light (MIL) to turn on.
Refer to the user‟s manual for the vehicle being serviced and
adhere to all diagnostic procedures and precautions. Otherwise
personal injury or unneeded repairs may result.
Keep the TPMS tool dry, clean, free from oil, water and grease.
Use a mild detergent on a clean cloth to clean the outside of the
TPMS tool when necessary.
Page 3
2
2. Tool Information
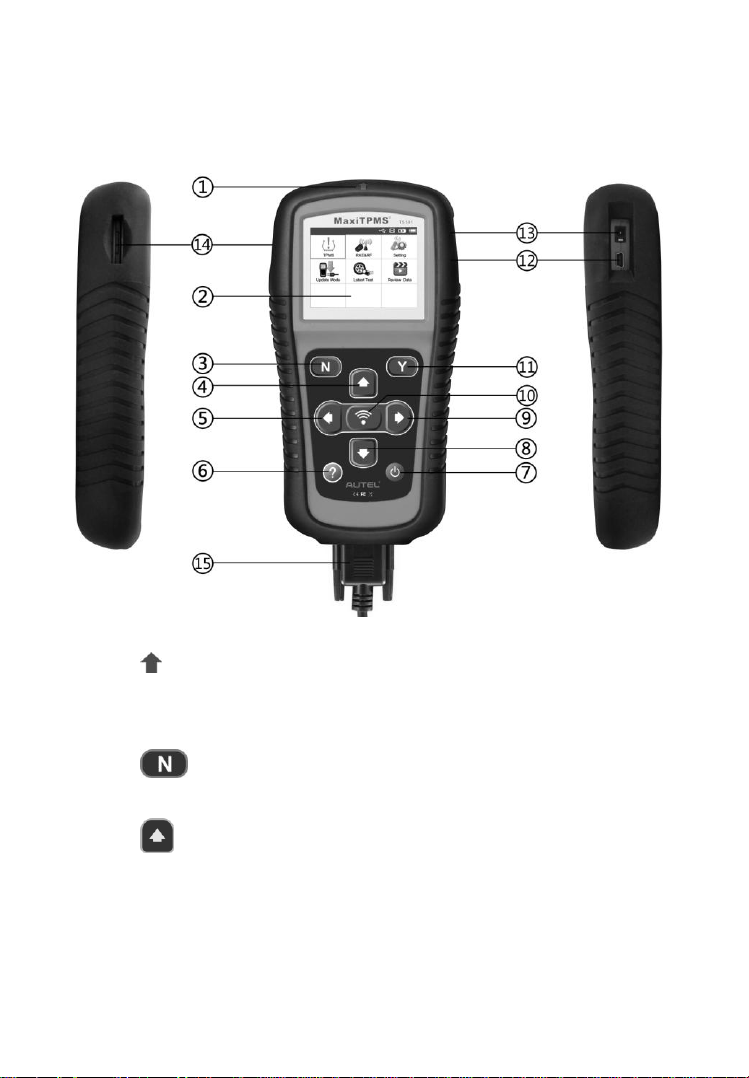
2.1 Tool Description
1) SIGNAL MARK – Indicates where the tool sends or
receives signals.
2) LCD DISPLAY – Displays the menus and test screens.
3) N BUTTON – Cancels a selection (or action) from a menu
or return to previous menu.
4) UP SCROOL BUTTON – Moves up through menu and
submenu items in menu mode. When more than one set of data
are retrieved, use this button to move up to previous screens for
additional data. It is also used to view previous trouble code
when viewing DTCs.
Page 4

3
5) LEFT SCROLL BUTTON –When scroll through a screen
of data or text, moves to previous character and views additional
information on previous screens if recorded data content covers
more than one screen.
6) HELP BUTTON – Provides help information.
7) POWER BUTTON – Long press the button to turn on/off
the tool; short press the button to return Home screen.
8) DOWN SCROOL BUTTON – Moves down through menu
and submenu items in menu mode. When more than one set of
data are retrieved, use this button to move down to next screens
for additional data. It is also used to view next trouble code
when viewing DTCs.
9) RIGHT SCROLL BUTTON – When scroll through a
screen of data or text, moves to next character and view
additional information on next screens if recorded data content
covers more than one screen.
10) TEST BUTTON – Commences a TPMS Test.
11) Y BUTTON – Confirms a selection (or action) from a
menu.
12) USB PORT – Connects the TPMS tool to PC for software
update, data printing or battery charging.
13) POWER PORT – Connects the TPMS tool to the mains with
the charger supplied for battery charging.
14) SD CARD SLOT – Holds SD card.
15) OBD II CONNECTOR – Connects the TPMS tool to the
vehicle‟s Data Link Connector (DLC).
NOTE: When using external power, the scan tool stays on
until you turn it off. When using internal battery power, the
scan tool turns off automatically after a set time of inactivity
(see 2.8 System Setting).
Page 5

4
2.2 Specifications
1) Display: TFT color display (320 x 240 dpi)
2) Power: 3.7V Li-polymer battery
3) Operating Temperature: 0 to 50°C (32 to 122 °F)
4) Storage Temperature: -20 to 70°C (-4 to 158 °F)
5) Dimensions:
Length Width Height
202.2 mm (7.96") 106.7mm (4.20") 37.7 mm (1.48")
6) Weight: 0.4kg (0.88lb)
2.3 Accessories Included
1) User’s Manual -- Instructions on tool operations
2) OBDII Cable -- Provides power to tool and communicates
between tool and vehicle
3) USB Cable -- Allows easy online update, data printing, and
power charging via PC connection
4) Carry Case -- A case to store the tool when not in use
5) Magnet -- Used to trigger magnetically activated sensors (early
model TPMS sensors)
2.4 Icons
6) Charger -- Charges or recharges the built-in battery
7) CD -- Includes user‟s manual, MaxiLink II Kit, etc.
8) SD Card -- Used to store data
1) “ ” – Indicates battery charging.
2) “ ” -- Indicates there is data stored in the tool.
3) “ ” -- Indicates battery volume.
Page 6

5
4) “ ” -- Indicates USB communication with the computer is
established.
5) “ ” -- Indicates magnet is required when activating TPMS
sensor.
6) “ ”-- Indicates deflation is required when activating TPMS
sensor.
7) “ ” -- Indicates test mode One Wheel of Wheels to Test in
the system setting is selected.
8) “ ” -- Indicates test mode ALL Wheels of Wheels to Test in
the system setting is selected.
9) “ ” – Indicates the TPMS tool is sending signals to the tire
sensor for activation and test.
10) “ ” – Indicates tool communication with the vehicle‟s OBDII
DLC.
2.5 Keyboard
No solvents such as alcohol are allowed to clean the keypad or
display. Use a mild nonabrasive detergent and a soft cotton cloth. Do
not soak the keypad as the keypad is not waterproof.
2.6 Battery Charging
The TPMS tool has a 3.7V built-in Lithium-Ion polymer rechargeable
battery. There are two means of battery charging:
To charge battery by adapter.
1) Locate the power port of the device.
2) Connect the device and the power source with the adapter.
To charge battery by USB cable
1) Locate the USB port of the device.
Page 7
6
2) Connect the device and the computer with the USB cable.
IMPORTANT: Charge battery in time, otherwise the test results
may be incorrect.
2.7 Power Up by DLC
The tool can also be powered via the vehicle Data Link Connector
(DLC). Just follow the steps below to turn on the TPMS tool:
1) Connect the OBDII Cable to the TPMS tool.
2) Find DLC on vehicle.
A plastic DLC cover may be found for some vehicles and
you need to remove it before plugging the OBDII cable.
3) Plug OBDII cable to the vehicle‟s DLC.
4) Power up the TPMS tool by pressing the Power Button,
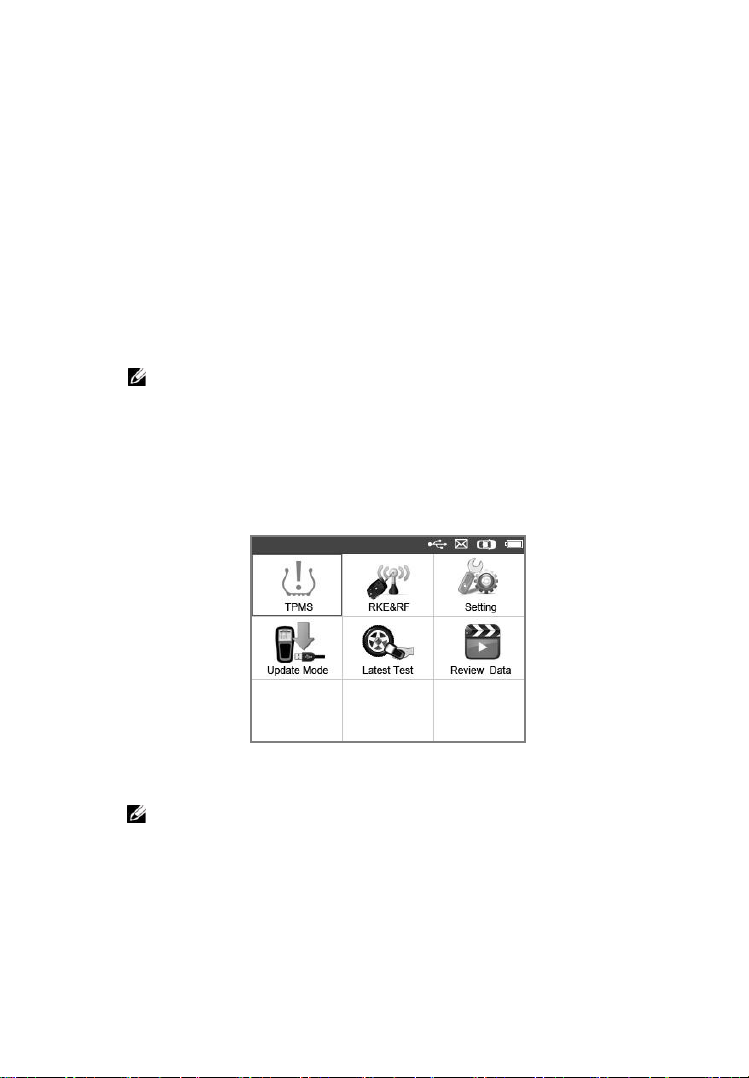
and wait for the Main Menu to appear. (Figure 2.1)
OBDII connection does not support battery charging.
2.8 System Setting
The tool allows you to make the following adjustments and settings.
1) Language: Selects the desired language.
2) Beep Set: Turns on/off key-press beep.
Figure 2.1
Page 8
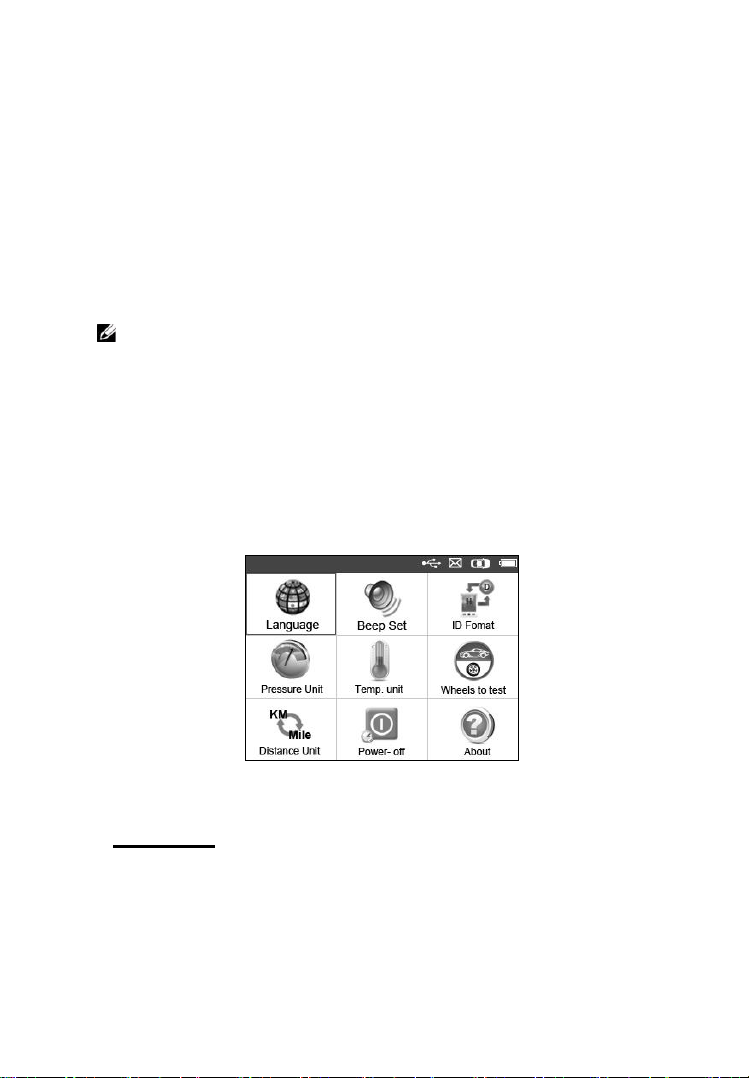
7
3) ID Format: Sets the ID displaying in Hexadecimal or Decimal.
4) Pressure Unit: Sets the pressure unit in Kpa, Psi or Bar.
5) Temperature Unit: Sets the temperature unit in degree Celsius
or Fahrenheit.
6) Wheels to Test: Gives the operator the choice to test One wheel
or All wheels.
7) Power-off: Sets the time to power off automatically.
8) About: Views important information of the tool.
Settings of the unit will remain until change to the existing
settings is made.
To enter the Setting menu
From the Main Menu: Use the UP/DOWN and LEFT/RIGHT
scroll button to select Setting, and press the Y button. Following the
instructions to do adjustments and settings could make TPMS testing
more convenient and easy. (Figure 2.2)
Figure 2.2
Language
English is the default language.
1) From System Setting screen, use the UP/DOWN scroll button
and LEFT/RIGHT scroll button to select Language, and
press the Y button.
Page 9

8
2) Use the UP/DOWN scroll button and LEFT/RIGHT scroll
button to select the desired language and press the Y button to
save your selection and return to previous menu. (Figure 2.3)
Figure 2.3
Note: The current version of TS501 TPMS tool supports only the
English language, and there will be more languages to come with
new updates released.
Beep Set
This function allows you to turn on/off the build-in speaker for key
pressing.
1) From System Setting screen, use the UP/DOWN scroll button
and LEFT/RIGHT scroll button to select Beep Set, and press
the Y button.
2) From Beep Set menu, use the LEFT/RIGHT scroll button to
select ON or OFF to turn on/off the beep.(Figure 2.4)
Page 10
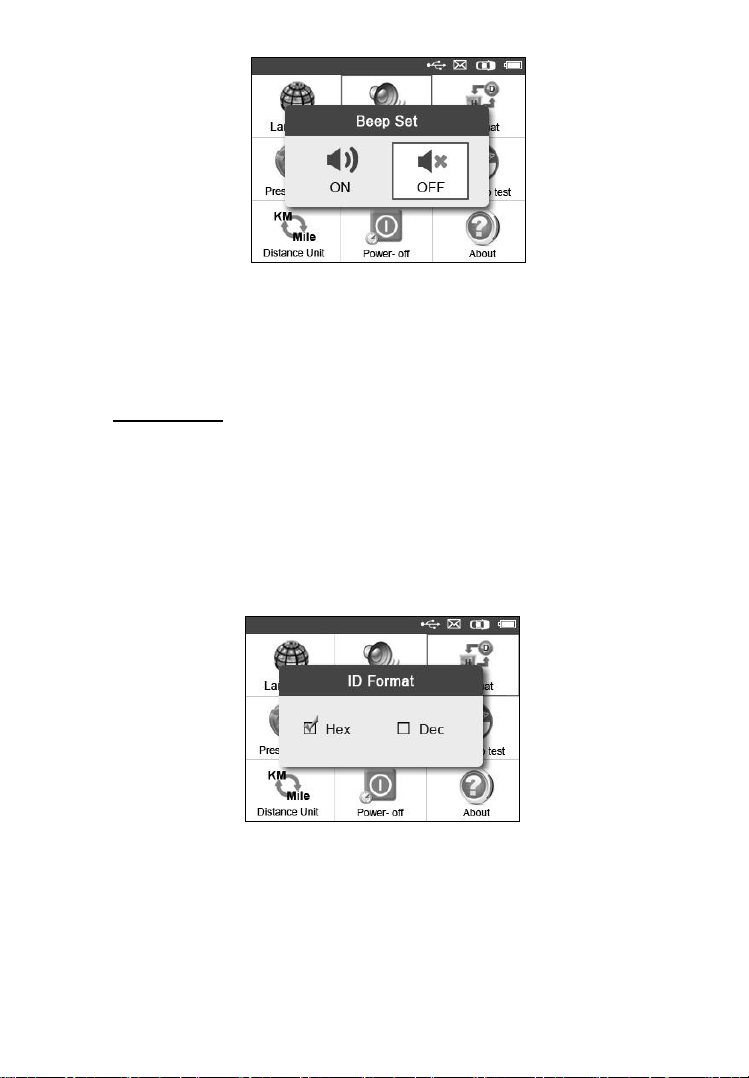
9
Figure 2.4
3) Press the Y button to save your selection or the N button to
exit without change.
ID Format
1) From System Setting screen, use the UP/DOWN scroll button
and LEFT/RIGHT scroll button to select ID Format, and
press the Y button.
2) From ID Format screen, use the LEFT/RIGHT scroll button
to select the desired format of ID. (Figure 2.5)
Figure 2.5
3) Press the Y button to save your settings and return to previous
menu, or press the N button to exit without change.
Page 11

10
Pressure Unit
1) From System Setting screen, use the UP/DOWN scroll button
and LEFT/RIGHT scroll button to select Pressure Unit, and
press the Y button.
2) From Pressure Unit screen, use the LEFT/RIGHT scroll
button to select the desired unit: Kpa, Psi or Bar. (Figure 2.6)
Figure 2.6
3) Press the Y button to save your settings and return to previous
menu, or press the N button to exit without change.
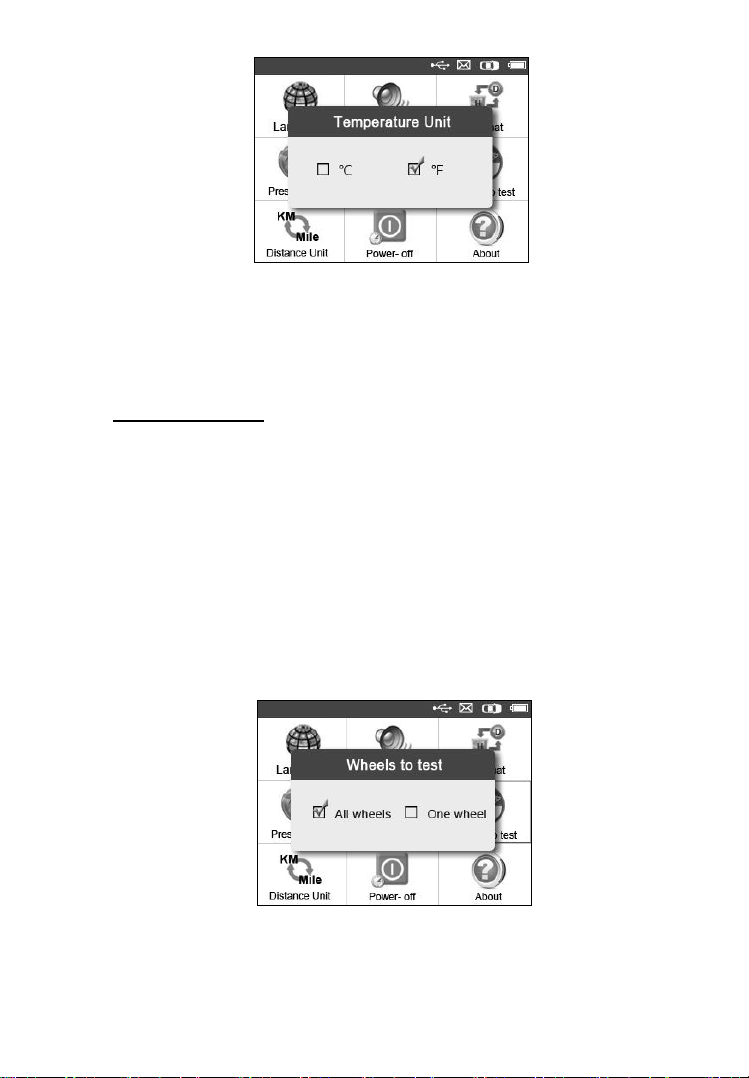
Temperature Unit
1) From System Setting screen, use the UP/DOWN scroll button
and LEFT/RIGHT scroll button to select Temperature Unit,
and press the Y button.
2) From Temperature Unit screen, use the LEFT/RIGHT scroll
button to select the desired unit of temperature. (Figure 2.7)
Page 12
11
Figure 2.7
3) Press the Y button to save your settings and return to previous
menu, or press the N button to exit without change.
Wheels to Test
This function gives you choice to test TPMS sensor in ALL Wheels
mode or One Wheel mode.
1) From System Setting screen, use the UP/DOWN scroll button
and LEFT/RIGHT scroll button to select Wheels to Test, and
press the Y button.
2) From Wheel to test screen, use the LEFT/RIGHT scroll
button to select All Wheels or One Wheel mode for TPMS
sensor testing. (Figure 2.8)
Figure 2.8
Page 13
12
3) Press the Y button to save your selection or the N button to exit
without change.
NOTE: In All Wheels mode, the tool will determine if a
duplicate sensor ID has been read. In this case, the tool will display
a message “Sensor ID Duplicate.” In One Wheel mode, the tool will
not check the duplicate sensor ID.
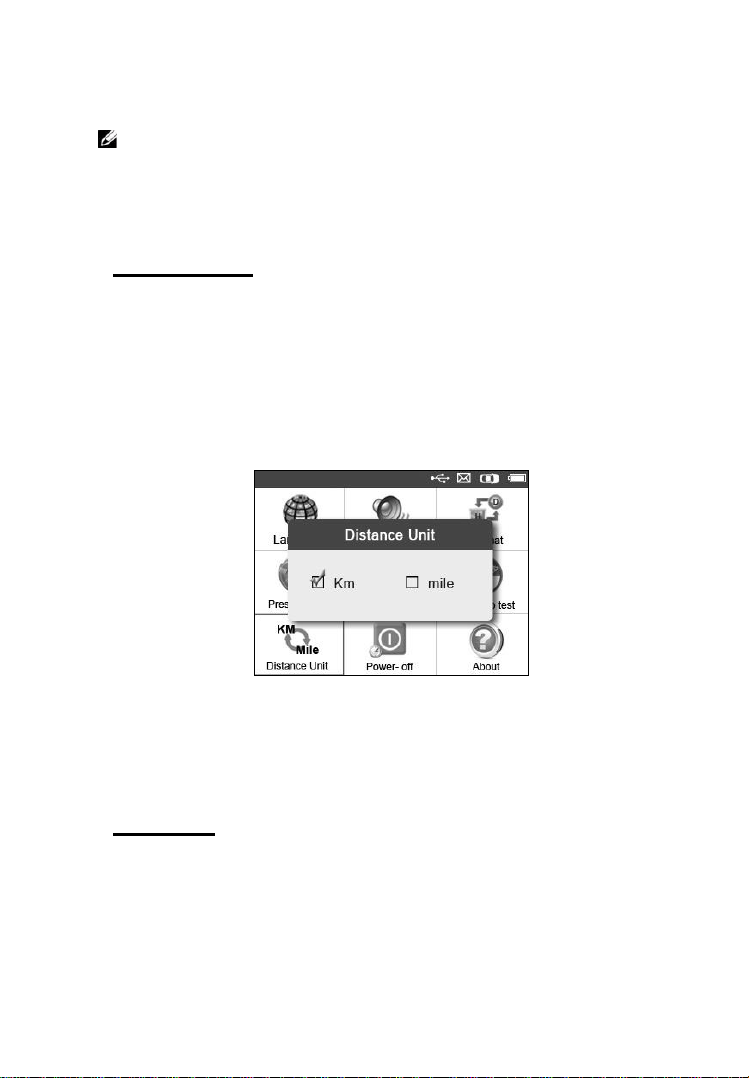
Distance Unit
1) From System Setting screen, use the UP/DOWN scroll button
and LEFT/RIGHT scroll button to select Distance Unit, and
press the Y button.
2) From Distance Unit screen, use the LEFT/RIGHT scroll button
to select the desired unit of distance: Km or mile. (Figure 2.9)
Figure 2.9
3) Press the Y button to save your settings and return to previous
menu, or press the N button to exit without change.
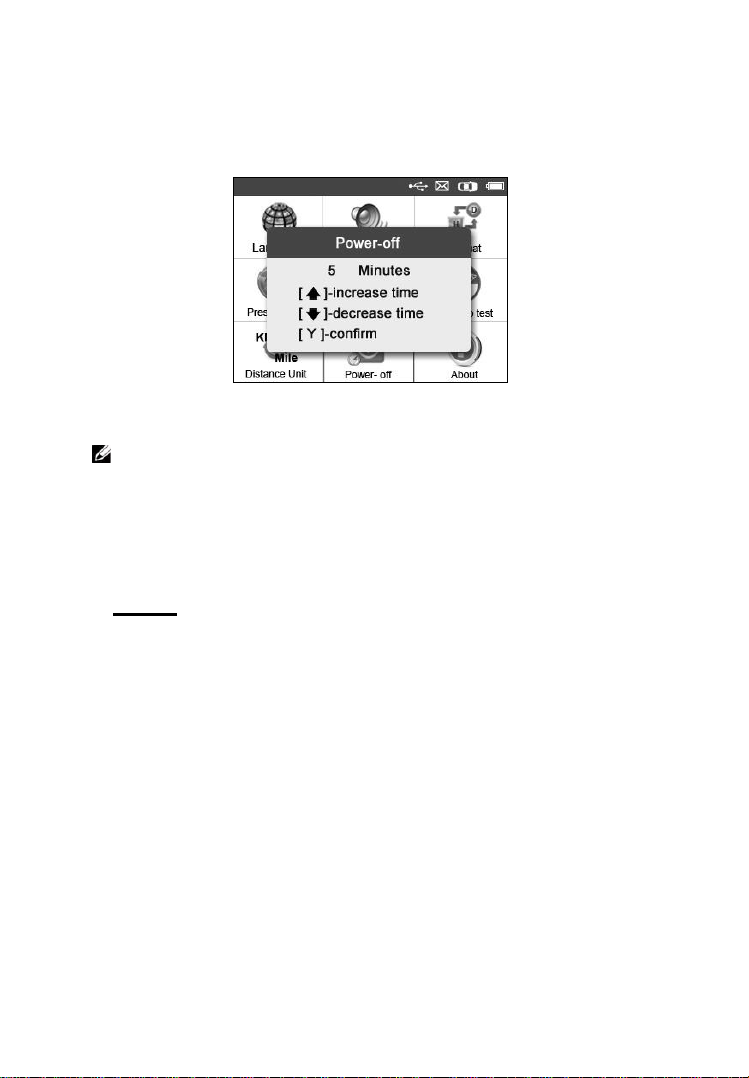
Power-off
1) From System Setting screen, use the UP/DOWN scroll button
and LEFT/RIGHT scroll button to select Power-off, and
press the Y button.
Page 14
13
2) Press UP/DOWN SCROLL button to increase or decrease
the time to auto power-off the tool, and then press the Y
button to confirm your change or the N button to exit without
change. (Figure 2.10)
Figure 2.10
NOTE: Before the tool powers off automatically, it will save all
the TPMS test data. Next time when the tool is powered on, you
may retrieve the recorded data. If the tool automatically power
off during a test operation, next time when the tool is powered
on, it will automatically turn to the previous operation screen.
About
This function allows viewing of some important information such
as serial number and software version number of the tool.
1) From System Setting screen, use the UP/DOWN scroll button
and LEFT/RIGHT scroll button to select About, and press the
Y button; wait for the About screen to appear.
2) View tool information on screen. (Figure 2.11) Press the N
button to exit.
Page 15

14
Figure 2.11
2.9 Product Troubleshooting
This part describes problems that you may encounter while using the
TPMS tool.
Vehicle Linking Error
A communication error occurs if the TPMS tool fails to communicate
with the vehicle‟s ECU (Electronic Control Unit) when running the
diagnostic function. You need to do the following to check up:
Verify that the ignition is ON.
Check if the TPMS tool‟s OBD II connector is securely
connected to the vehicle‟s DLC.
Verify that the vehicle is TPMS compliant.
Turn the ignition off and wait for about 10 seconds. Turn the
ignition back to on and continue the testing.
Verify the control module is not defective
Page 16

15
3. Activating & Diagnosing
The MaxiTPMS® TS501 is a new generation TPMS diagnostic &
service tool specially designed to activate all known OEM/Universal
TPMS sensors, as well as provide users with direct access to the
vehicle‟s ECU through OBDII connection, thus allowing users to
reprogram sensor IDs and retrieve/clear TPMS DTCs, helping
technicians to quickly find out faulty TPMS and turn off MILs.
NOTE: All software screens shown in this manual are
examples, actual test screens may vary for each vehicle being
tested. Observe the menu titles and onscreen instructions to
make correct option selections.
3.1 Sensor Activation
The sensor activation function allows activating of TPMS sensor to
view sensor data such as sensor ID, tire pressure, tire temperature,
sensor battery, sensor position, frequency. It also sends the sensor
data to vehicle‟s ECU to let the ECU learn the positions of sensors
whenever tires and wheels are rotated or sensors are replaced.
There are two means to activate TPMS sensors:
A. Direct Test
Users can start activating sensors directly by selecting the specific
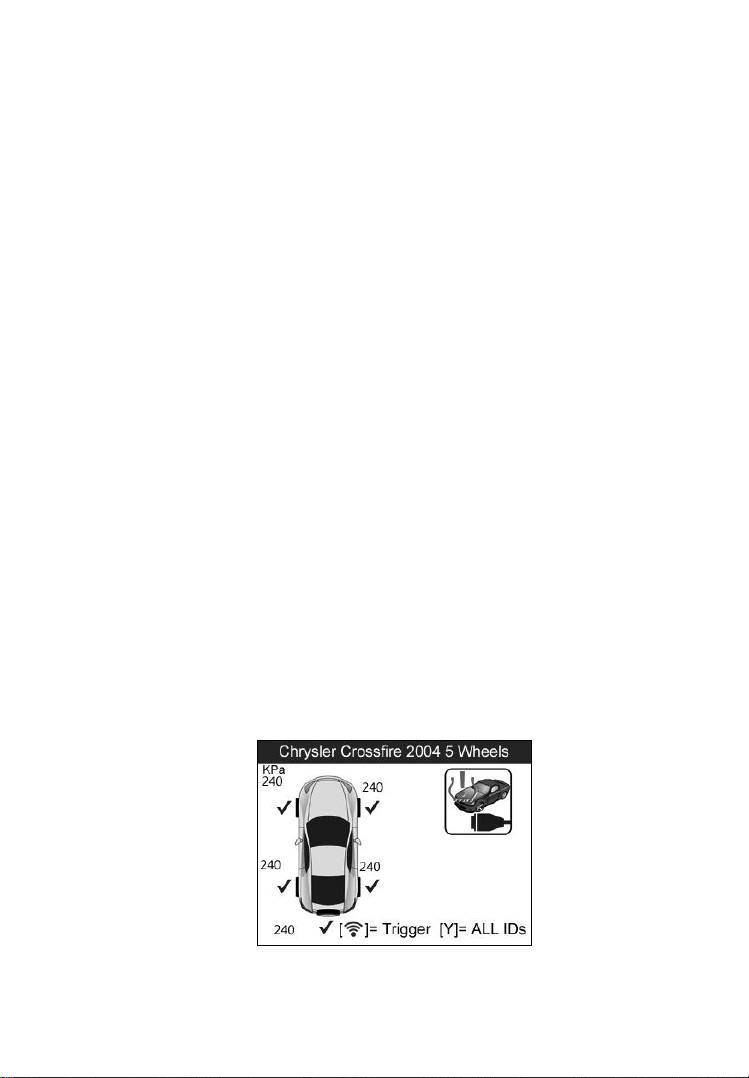
vehicle make, model and year. The graphed vehicle with 4 or 5 wheels
makes the sensor activation process more simple and convenient.
1) Use the UP/DOWN scroll button and LEFT/RIGHT scroll
button to select TPMS from Main Menu (Figure 2.1), and press
the Y button to confirm.
2) Select a specific vehicle manufacture‟s regional coverage. (Taking
Chrysler as an example)
Page 17

16
Figure 3.1
3) From the vehicle make screen, select a specific vehicle
manufacture and press the Y button. (Figure 3.2)
Figure 3.2
4) Observe the menu title and use UP/DOWN SCROLL button to
select by model and year to identify the vehicle being tested,
place the device alongside the valve stem and press the Y button.
The selected vehicle is remembered by the tool when a test is
commenced.
Page 18

17
Select by Model:
Select by Year:
Figure 3.3
Figure 3.4
5) For some vehicle types an option screen will show up to let users
choose between 4 Wheels test and 5 Wheels test mode. (Figure
3.5)
Page 19

18
Figure 3.5
Depending upon the reading mode (All Wheels or One Wheel),
results are displayed in different manners.
All Wheels Mode
In this mode, a function menu screen will show up (Figure 3.6), use
the UP/DOWN and LEFT/RIGHT scroll button to select a desired
wheel and press the TEST BUTTON to start sensor activation (Figure
3.7).
In the sensor activating menu screen (Figure 3.6), there‟s an option for
the TPMS Relearn function on the upper right side, which provides
users access to the vehicle‟s ECU to reprogram the sensor data and
retrieve/clear DTCs, please refer to 3.2 TPMS Relearn for more
information.
NOTE: Not all vehicles support the Relearn function, so the
sensor activating screen may vary a little for some vehicles
being tested, but the sensor activating process remains the
same.
Page 20

19
Figure 3.6 (Without Relearn)
Figure 3.7 (Without Relearn)
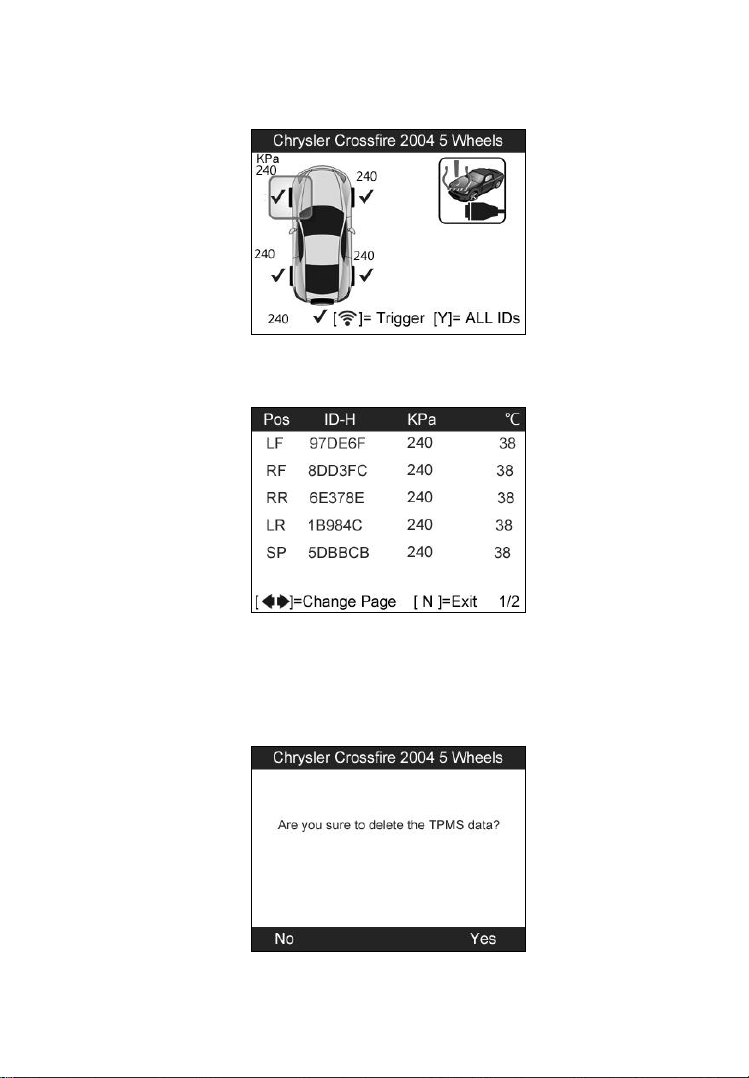
The tool will do TPMS test in a sequence of LF (Left Front), RF
(Right Front), RR (Right Rear), LR (Left Rear) and SPARE, if the
vehicle has the option for the spare. Use UP/DOWN or
LEFT/RIGHT scroll button to move to the desired wheel for testing.
Place the tool alongside the valve stem and point toward the sensor
location and then press TEST BUTTON.
Once the first sensor test is completed, the screen will hold for 3
seconds for data viewing and then switch to next sensor test. Follow
the same procedure for the rest of the three or four wheels by pressing
UP/DOWN scroll button and then TEST BUTTON.
The tool will send LF signal to trigger the sensor. Depending on the
sensor type, the tool will activate the sensor on the first or last step.
Once the sensor is successfully activated and decoded, the tool will
display as below with an audible beep. (Figure 3.8)
Page 21

20
Figure 3.8 (Without Relearn)
After the sensor is activated, a test result icon will display alongside
the wheel, indicating the wheel test is completed, otherwise there‟s no
result icon displayed.
The “KPa” at the upper left side of the screen (Figure 3.8) indicates
the tire pressure unit, and the number shown by the result test icon
indicates the specific tire pressure value.
Sensor data is stored and can be accessed by pressing the Y button.
One Wheel Mode
In this mode the screen will show as below.
Figure 3.9
Page 22

21
In one wheel mode, the tool will do TPMS test for single wheel. Place
the tool alongside the valve stem and point toward the sensor location
and then press TEST BUTTON.
The tool will send LF signal to trigger the sensor. Depending on the
sensor type, the tool will activate the sensor on the first or last step.
Once the sensor is successfully activated and decoded, the tool will
display as below with an audible beep. (Figure 3.10)
Figure 3.10
Once the first sensor test is completed, the screen will hold for 3
seconds for data viewing and then switch to next sensor test. Follow
the same procedure for the other sensor tests by pressing UP/DOWN
SCROLL button and then TEST BUTTON.
The tool can save up to 5 TPMS sensor data records at each time. Press
UP/DOWN or LEFT/RIGHT scroll button to turn over data screens
while viewing. If sensors being tested are more than five pieces, the
latest record will overwrite the first one.
Page 23

22
TABLE 1 POSSIBLE RESULTS FOR TESTING
Icon
Test Results
Description
√
Successful
Sensor Read
TPMS sensor is successfully activated and
decoded. The tool displays the sensor
information.
X
Failed Sensor
Read
If the search period expires and no sensor is
activated or decoded, it may be wrong
sensor fitment or non-functioning sensor.
The tool displays a message “No sensor
detected.”.
In this case, repeat testing to confirm the
TPMS failure.
X
Wrong Sensor
Type
A TPMS sensor is activated and decoded,
but does not match the protocol for the
Make, Model or Year that the tool was
set-up for. The tool displays a message
“Sensor triggered but cannot be known.”.
In this case, verify the Make, Model or Year
you have selected as well as the sensor part
number that was fitted.
D
Duplicate ID
(only checked
in All Wheels
mode)
A sensor with a duplicate ID has been read.
The tool displays a message “Sensor ID
Duplicated.”.
In this case, clear data and re-read again.
NOTE: With Ford Banded sensors, the tool should be held 180 degree
away from the stem. Please refer to vehicle user’s manual.
Page 24

23
If the TPMS sensor requires a magnet, place the magnet over the
stem and then place the tool alongside the stem, and press TEST
BUTTON.
Figure 3.11
If the TPMS sensor requires tire deflation (of the order of
10PSI), then deflate the tire and place the tool alongside the
stem while pressing the TEST BUTTON.
Figure 3.12
Anytime while doing the TPMS test, press BUTTON to
read the sensor make, OEM part no., and relearn information
for the vehicle being tested. Use the UP/DOWN scroll button
to view all details if the data information covers more than one
page.
Page 25

24
Figure 3.13
Sensor activation can be aborted at any time by pressing the N
button. When the activation is aborted, the user will be
returned to the previous menu.
By pressing the Y button, you may review information of all
sensors tested. Press the LEFT/RIGHT scroll button to turn
over data screens while viewing.
Figure 3.14
Page 26

25
Figure 3.15
[Pos] – Indicates the wheel sensor position.
[ID-H/D] – Shows sensor ID data.
[KPa/Psi/Bar] – Indicates wheel pressure.
[℃/℉] – Indicates wheel temperature.
[BAT] – Indicates battery condition.
[Mode] – Defines tire sensor working mode or status.
[Modulation] – Indicates sensor signal frequency.
NOTE: Different ID format, pressure and temperature units will
display at the title bar according to the device’s system setting,
please refer to 2.8 System Setting for detailed guidance.
B. Latest Test
This function allows you to review the last tested sensor data and
activate the sensor by using the wave signal of the latest trigger event,
which is very useful for technicians to wake up sensors of the same
vehicle.
1) Use the UP/DOWN scroll button and LEFT/RIGHT scroll
button to select Latest Test from Main Menu (Figure 2.1).
2) A function menu screen with the previously activated sensor
information will show up (Figure 3.16), use the UP/DOWN or
LEFT/RIGHT scroll button to select a scanned wheel, and then
Page 27
26
press the TEST BUTTON to reactivate the sensor, or press Y
button to view all detailed sensor data (Figure 3.17).
Figure 3.16
Figure 3.17
3) Before reactivating the sensor, a prompt will come up asking
your confirmation. (In our example, this is Chrysler)
Figure 3.18
Page 28
27
4) Press the Y button to delete test records and enter test mode. For
detailed procedure, please refer to section 3.2Vehicle Selection.
5) Press the N button to wake up the scanned wheel while keeping
the previous sensor data, and then use the UP/DOWN or
LEFT/RIGHT scroll button to select the remaining wheels, and
press the TEST BUTTON to reactivate, or press the N button to
exit.
3.2 TPMS Relearn
This function, which provides users with quick access to the vehicle‟s
ECU, supports TPMS Diagnosis for sensor data writing/reading &
DTCs retrieving/clearing, and saves data for later reviews and
printing.
1) Connect the TPMS tool to the vehicle‟s DLC with the OBDII
cable. Press the POWER BUTTON to turn on the tool.
2) Turn the ignition on but do not start the engine.
3) Make sure the testing mode is set to All Wheels mode in
System Setting.
4) Follow the same process in Direct Test to the All Wheel Mode
function menu screen, use the UP/DOWN scroll button and
LEFT/RIGHT scroll button to select the Relearn function.
(Figure 3.19)
Figure 3.19
Page 29

28
1) An option screen will appear, use UP/DOWN scroll button to
select TPMS Diagnosis function in the menu, and press the Y
button to continue. (Figure 3.20)
Figure 3.20
For some vehicles users may be asked to choose the specific
engine model or other features before turning to the function
menu.
If you wish to read the sensor make, OEM part no., and relearn
information for the vehicle being serviced, please select TPMS
Sensor Information in the above screen. (Figure 3.20)
NOTE: In this manner, the scan tool will communicate with
the vehicle being tested. If there is a linking error, a notice
screen will show up, please refer to 2.9 Product
Troubleshooting for more details.
A. Write IDs to Vehicle
1) From the TPMS Diagnosis menu, use UP/DOWN scroll button
to select the Write IDs to Vehicle function item. (Figure 3.21)
Page 30

29
Figure 3.21
2) Then an information screen will prompt to show the activated
sensor ID data for confirmation, press Y button to continue the
process, or N button to exit. (Figure 3.22)
Figure 3.22
3) Once the sensor IDs are successfully written, a confirm screen
will show up, press any key to continue the TPMS Diagnostic
procedure. (Figure 3.23)
Page 31

30
Figure 3.23
NOTE: The sensor writing procedure may vary for different
vehicles being serviced, please follow the onscreen instruction
and take appropriate measures and selections to complete the
process.
a) When users try to run the Write IDs to Vehicle function before
all sensors‟ activation is completed or successful, the ID
information screen will display the sensor IDs as Untested, and
require users to reactivate the sensors. (Figure 3.24) Press the Y
button to continue the process, or press the N button to exit.
Figure 3.24
b) An instruction screen will then show up asking users to turn the
ignition off and disconnect the tool from the OBDII Cable. By
doing so, press the Y button to continue, or press the N button to
exit.
Page 32

31
c) Confirm there‟s no vehicle with TPMS sensors around the
vehicle being served within 3 meters (9 feet). Press the Y button
to continue or the N button to exit.
d) Follow the same sensor testing procedure in All Wheel Mode to
finish sensors activation.
e) After the sensors are successfully activated, follow the
instruction screen to connect the tool with the vehicle‟s DLC
again through the OBDII Cable and turn the ignition on, then
press the Y button to continue, or press the N button to exit.
(Figure 3.25)
Figure 3.25
f) Then an information screen will prompt to show the activated
sensor ID data for confirmation, press Y button to continue the
process, or N button to exit. (Figure 3.22)
g) Once the sensor IDs are successfully written, a confirm screen
will show up, press any key to continue the TPMS Diagnostic
procedure. (Figure 3.23)
IMPORTANT: Make sure to turn the ignition off before connecting
/disconnecting the OBDII Cable to/from the TPMS tool; otherwise it
may cause the Malfunction Indicator Light (MIL) to turn on.
Page 33

32
B. Read IDs from Vehicle
1) From the TPMS Diagnosis menu, use UP/DOWN scroll button
to select the Read IDs from Vehicle function item. (Figure
3.21)
2) An information screen will show up with the retrieved tire IDs,
press the Y button to Save data for future review, or the N
button to exit without saving. (Figure 3.26)
Figure 3.26
C. Read Codes
1) From the TPMS Diagnosis menu, use UP/DOWN scroll button
to select the Read Codes function item. (Figure 3.21)
2) A data list of TPMS DTCs retrieved from the vehicle‟s ECU
will show up, if the data covers more than one screen, use the
UP/DOWN scroll button to view DTC information, and press
the Y button to Save data for future review, or press the N
button to exit without saving. (Figure 3.27)
Page 34

33
Figure 3.27
The saved DTC and sensor data will be stored to the Review
Data function in the Main Menu (Figure 2.1), which supports
easy data playback and printing, please refer to 3.3 Review
Data for more information.
D. Erase Codes
1) From the TPMS Diagnosis menu, use UP/DOWN scroll button
to select the Erase Codes function item. (Figure 3.21)
2) A notice screen will prompt up to let you confirm the vehicle
state, check if the ignition is on and the engine is stopped. Press
the Y button to continue, otherwise press the N button to exit.
(Figure 3.28)
Figure 3.28
3) A confirm screen will prompt up to inquire further
acknowledgment for data clearing, press the Y button to
Page 35

34
continue, otherwise press the N button to exit. (Figure 3.29)
Figure 3.29
4) If the erase command is successfully sent, a notice screen will
show up, press any button to confirm and continue the TPMS
diagnostic function. (Figure 3.30)
3.3 Review Data
The Review Data function allows viewing data of the latest TPMS
diagnostic recordings retrieved from the vehicle‟s ECU by the service
tool.
1) Use the UP/DOWN and LEFT/RIGHT scroll button to select
Review Data from Main Screen (Figure 2.1), and wait for the
stored data menu to appear. (In our example this is Chrysler.)
Figure 3.30
Page 36

35
Figure 3.31
NOTE: If no data from the previous TPMS diagnosis is
recorded, a message “No data available!” will show on the
screen.
2) To review the saved sensor IDs retrieved from the vehicle‟s
ECU, select Read IDs from Vehicle in the menu and press the
Y button. A list of retrieved sensor IDs will show on the screen,
press the corresponding FUNCTION BUTTON to „Print‟ the
IDs to your computer and then the printer, or press the N button
to exit. (Figure 3.32)
Figure 3.32
3) To review DTC data saved in the TPMS Diagnosis function,
select Read Codes in the menu and press the Y button. A list of
retrieved data will show on the screen, press the corresponding
FUNCTION BUTTON to „Print‟ the DTC data to your
computer and then the printer, or press the N button to exit.
(Figure 3. 50)
Page 37

36
Figure 3.33
NOTE: For more printing details, please refer to chapter 5.1
Print Data.
Deleting Data
Follow the onscreen instruction and press the RIGHT scroll button to
Delete the selected data. Review the recordings thoroughly before
erasing. You could also Delete All recordings by pressing the LEFT
scroll button. (Figure 3.31)
NOTE: Don’t use Delete All unless you are definitely sure what
you are going to proceed.
Page 38

37
4. RKE & RF Monitor
Today's keyless remotes -- also known as key fobs -- make life easier.
But when your key fob stops working or starts to perform
sporadically, it will be particularly frustrating. Check your key fob to
make sure it is in top condition so it will work when you really need
it.
Since a key fob is attuned to a special frequency that is only detected
by the car for which it was issued, you will need to have your vehicle
to test the fob. Otherwise you will have to take it to a dealership or an
automotive locksmith to have them tested for the right frequency. But
with our TPMS tool, the key fob testing becomes easy and
convenient.
1) Use the UP/DOWN scroll button and LEFT/RIGHT scroll
button to select RKE & RF Monitor from Main Menu (Figure
2.1), and press the Y button to confirm.
2) Hold the key fob very close to the tool and press the function
buttons on key fob to test. If the button works and the key fob is
sending a signal, the tool will beep and the screen shows as
below. If the button does not work, the tool will do nothing. To
make sure each button is working properly, please follow the
process to test each button in turn.
Figure 4.1
Page 39

38
The progress bar indicates the approximate power level of
the key fob.
The stronger the signal, the higher the beep tone.
The tool only tests 315MHz and 433MHz key fobs.
3) Press the N button to return to previous menu.
Page 40

39
5. Print and Update
To print out retrieved data or update software, you will need the
followings:
TS501 tool with SD card inserted
PC or laptop with USB ports
USB cable
5.1 Print Data
The Print Data function allows printing out TPMS DTC data
recorded by the service tool by connecting the scan tool to a PC
or laptop with the USB cable supplied.
1) Install the PC Suit program to the PC from the supplied CD.
2) Connect the scanner to computer with the USB cable supplied.
3) Run Printer software on computer.
4) Select Review Data function in Main Screen of the TPMS tool.
In data menu screen, use the UP/DOWN scroll button to select
the data you want to print. Wait for the reviewing window to
display (Figure 3.32/3.33), and then select Print function by
pressing the Y button. The selected file will be uploaded to your
computer. For more detailed instructions, please refer to 3.3
Review Data.
5) The Printer will show as below.
Page 41

40
Figure 5.1
6) The selected data will display on the textbox of Printer. By
selecting the function keys on the right, you could execute the
following operations:
Print – Print all data in the textbox to a printer connected to
your computer.
Edit – Once clicked, the software will automatically open a
NOTEPAD window with all recorded data showing on.
Copy – Copy all data in the textbox to the clipboard.
Clear – Delete all data in the textbox.
Exit – Quit the operation.
7) You are also allowed to edit, copy, and delete the data in the
Printer window.
5.2 Software update
This function allows you to update the scan tool software
through a computer.
Register the Tool
User could update the scan tool ONLY after you had registered the
tool on our website: www.maxidas.com. Then you could download
Page 42
41
software, update online, retrieve information and get warranty
service.
NOTE: Prior to registration, please confirm your network is
working properly.
1. Log on the website www.maxidas.com.
2. Click on the Update tool bar at the top of the screen, and then
select User Register, or click on the Updates column in the
lower right corner of the screen, and select Register.
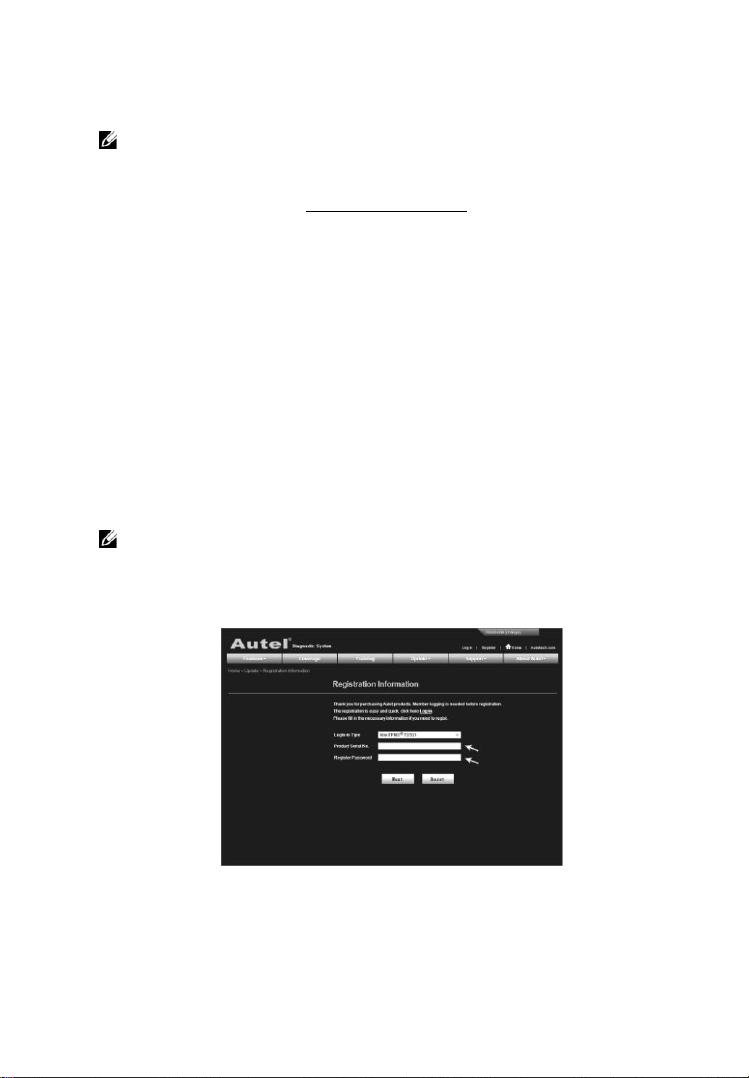
3. The screen of Register Information appears. Please read through
the instructions, and click on Agree to continue.
4. Put in the Product Serial No. and Register Password, and click
on Next. (Figure 5.2)
5. Follow the instructions on screen to finish the registration.
NOTE: Please use the About function to find out the Product
Serial No. and Register Password. For details, please refer to
the Section 2.8 System Setting.
Figure 5.2
Page 43
42
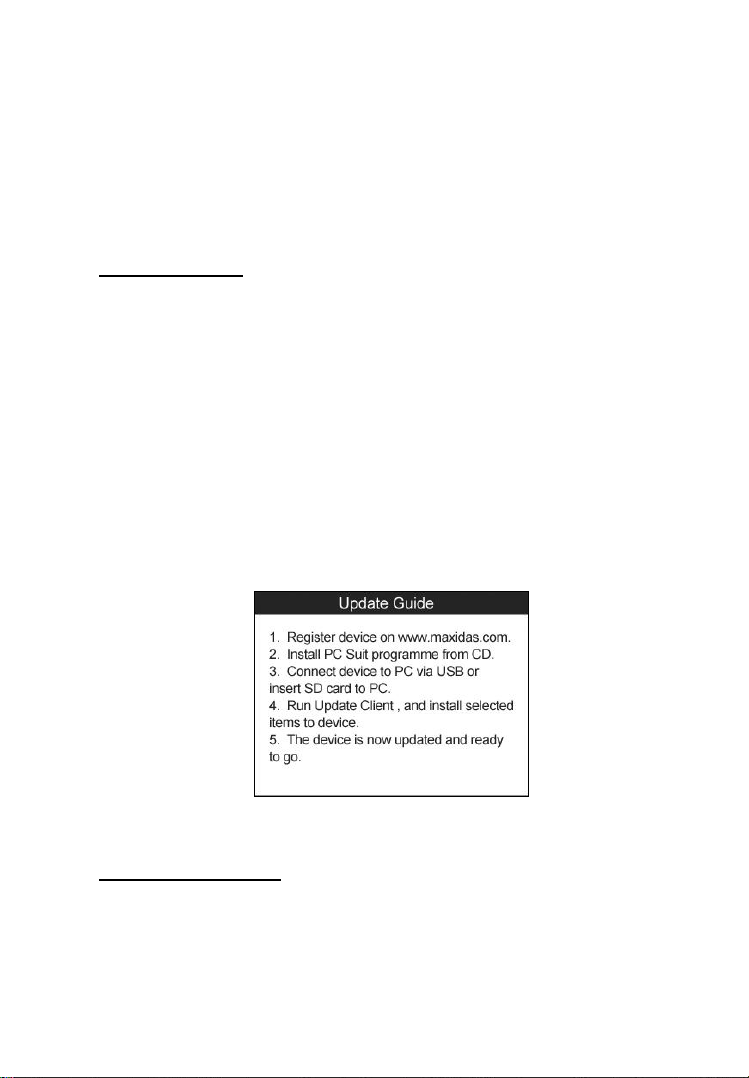
Update Procedure
Autel frequently releases software updates that you can download.
The Update feature makes it very easy to determine and get exactly
what you need.
Users could either choose to update the TPMS tool via USB
connection, or simply save the update programme to the SD card.
Update via USB
1) Install the PC Suit program to the PC from the supplied CD.
2) Connect the TPMS tool to the computer with the USB cable.
3) Switch on the tool, use the UP/DOWN scroll button and
LEFT/RIGHT scroll button to select Update Mode from Main
Menu. (Figure 2.1)
4) A brief guide for the tool‟s updating will prompt up, follow the
onscreen instructions and see the Updating section in 5.2
Software Update for more details. (Figure 5.3)
(Figure 5.3)
Update via SD Card
1) Install the PC Suit programme to the PC from the supplied CD.
Page 44
43
2) Switch off the TPMS tool and remove the SD card from the
card slot.
3) Connect the SD card to your PC, and follow the procedure
below to finish the update procedure.
Updating
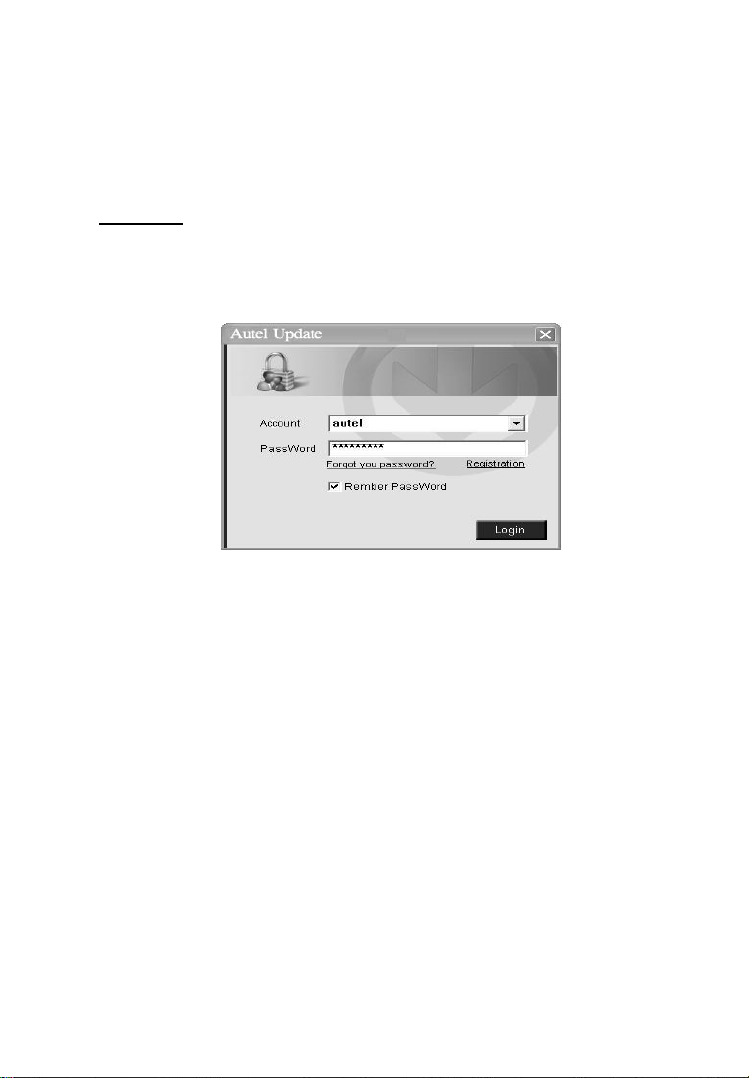
1) Run Update Client in the PC Suit programme. Wait for the Log
In window to pop up. (Figure 5.4)
Figure 5.4
2) Put in the user name and password and wait for the Update
window to display. If you forget your password unintentionally,
you may always click the [Forget your password?] to link to
our website and find your password back.
3) In the Update window, select the items you want to install.
Usually, you should install all available updates.
Page 45

44
Figure 5.5
Generally there are two ways to update the programs:
Batch updating
Select the programs that you would update by clicking on the
check boxes next to those items. Then click the Update
Selected Items button on the right side of screen.
Or click on the SELECT ALL checkbox on the right side of
screen and all updatable items will be selected automatically.
Then click the Update Selected Items button on the right side
of screen.
Check the updating process by observing the upper left progress
bar [downloading] and upper right progress bar [installing]. You
may also find progress information in the Status column of
updated items.
Anytime you could click the Pause button on the right side of
screen to suspend all progresses, and the state of those
suspended items would change to STOPPED.
To resume updating process, you may need to select those
suspended items again, and then click the Update Selected
Items button. The progress will resume from the break point.
When the downloading is completed, the downloaded programs
will be installed automatically. The new version will replace the
old version.
Page 46

45
Single updating
Find the desired updating item and click the INSTALL button
in the same line. With updating in progress, the INSTALL
button changes to STOP.
Check the updating process by observing the upper left progress
bar [downloading] and upper right progress bar [installing]. You
may also find progress information in the Status column of
updated items.
Anytime you could click the Pause button in the line to suspend
this progress, and the state of this item would change to
STOPPED.
To resume updating process, click the INSTALL button in the
line again. The progress will resume from the break point.
When the downloading is completed, the downloaded program
will be installed automatically. The new version will replace the
old version.
4) Once the update is complete, disconnect the tool from the
computer. It is now updated and ready to go.
5) For users who choose to update by SD card, please insert the SD
card into the scan tool, and switch on the TPMS tool. It‟s now
updated and ready to go.
View or Delete Programs
To view the list of installed programs or to delete an installed
program, please follow these steps:
Click on the Installed Programs tag entry and the page will
show the list of programs installed.
Select the program(s) that you would delete.
Batch delete: Select the programs that you would delete by
clicking on the check boxes to the left of those items. Then
click the DELETE button on the right side of screen.
Page 47

46
Single delete: Click the UNINSTALL button in the line of
your would-be-deleted program.
A window asking “Are you sure to delete the software?” will
pop up for your confirmation.
Figure 5.6
Click on Yes to delete the program(s) selected, or on No to
cancel the action.
The deleted program will automatically add to the end of
program list in the UPDATE page in case you would like to
install again.
Theoretically, all programs in latest versions will be automatically
compatible with the older versions, but if your TPMS tool do have a
compatible problem and want to retrieve the older version for some
programs, you may need to delete them first then install the older
version again. Choose older version from the pull-down menu of
program version.
Figure 5.7
Page 48

47
6. Warranty and Service
6.1 Limited One Year Warranty
Autel warrants to its customers that this product will be free from all
defects in materials and workmanship for a period of one (1) year from
the date of the original purchase, subject to the following terms and
conditions:
1) The sole responsibility of Autel under the Warranty is limited to
either the repair or, at the option of Autel, replacement of the
TPMS tool at no charge with Proof of Purchase. The sales receipt
may be used for this purpose.
2) This warranty does not apply to damages caused by improper use,
accident, flood, lightning, or if the product was altered or repaired
by anyone other than the Manufacturer‟s Service Center.
3) Autel shall not be liable for any incidental or consequential
damages arising from the use, misuse, or mounting of the TPMS
tool. Some states do not allow limitations on how long an implied
warranty lasts, so the above limitations may not apply to you.
4) All information in this manual is based on the latest information
available at the time of publication and no warranty can be made
for its accuracy or completeness. Autel reserves the right to make
changes at any time without notice.
6.2 Service Procedures
If you have any questions, please contact your local store, distributor
or visit our website at www.auteltech.com.
If it becomes necessary to return the tool for repair, contact your
local distributor for more information.
Page 49

9. Declaration of Conformity
This device complies with Part 15 of the FCC Rules.
Operation is subject to the following two conditions:
1. This device may not cause harmful interference.
2. This device must accept any interference received,
including interference that may cause undesired
operation.
Warning: Changes or modifications not expressly approved by the party
responsible for compliance could void the user's authority to operate the
equipment.
NOTE: This equipment has been tested and found to comply with the
limits for a Class B digital device, pursuant to Part 15 of the FCC Rules.
These limits are designed to provide reasonable protection against harmful
interference in a residential installation.
This equipment generates uses and can radiate radio frequency energy and,
if not installed and used in accordance with the instructions, may cause
harmful interference to radio communications. However, there is no
guarantee that interference will not occur in a particular installation. If this
equipment does cause harmful interference to radio or television reception,
which can be determined by turning the equipment off and on, the user is
encouraged to try to correct the interference by one or more of the
following measures:
Reorient or relocate the receiving antenna.
Increase the separation between the equipment and receiver.
Connect the equipment into an outlet on a circuit different from that
to which the receiver is connected.
Consult the dealer or an experienced radio/TV technician for help
RF warning statement:
76
Page 50

The device has been evaluated to meet general RF exposure requirement.
Substance
Conclusion on RoHS
Pb
comply
Cd
comply
Hg
comply
Cr(VI)
comply
PBBs
comply
PBDEs
comply
The device can be used in portable exposure condition without restriction.
This device is declared to be in compliance with the
European RoHS Directive 2011/65/EU which
restricts the following substances in electrical and
electronic equipment:
This product is declared to conform to the
essential requirements of the following Directives
and carries the CE mark accordingly:
EMC Directive :2004/108/EC
EN 55022:2010;
EN 55024:2010 ;
EN 61000-3-2:2006+A1:2009+A2:2009;
EN 61000-3-3:2008
R&TTE Directive 1999/5/EC
77
Page 51

ETSI EN 300 330-1 V1.7.1 (2010-02)
ETSI EN 300 330-2 V1.5.1 (2010-02)
ETSI EN 301 489-1 V1.9.2 (2011-04)
ETSI EN 301 489-3 V1.4.1 (2002-08)
Low Voltage Directive 2006/95/EC
EN 60950-1:2006+All:2009+A1 :2010+A12 :2011
The wireless radio of this device complies with RSS
210 Industry Canada. This Class B digital complies
with Canadian ICES-003
RSS-Gen Issue 3:2010
Disposal Information
This product should be disposed of separately from
household waste. When the product reaches its end of
life, dispose of it according to local laws and
regulations.
78
 Loading...