

Page 1
INSTRUCTION MANUAL
PMD1 & PMD1S
Handheld Microphone
Congratulations on purchasing your new Australian Monitor microphone.
The PMD1 and PMD1S premium dynamic supercardioid microphones feature neodymium motors with
aluminium voice coils, ensuring super-fast transient response. Both models also feature an isolation transformer
which ensures RF and electrical noise isolation. The incorporated capsule isolation system keeps handling noise
to a bare minimum. While the PMD1 and PMD1S are tailored for vocal reproduction, both models can also be
used to reproduce instruments as well.
These premium microphones are highly recommended for presentations, stage vocal performance, instrument
reproduction, percussion reproduction, and many other applications.
What’s in the box?
1 x PMD1 or PMD1S Microphone
1 x Microphone Clip
1 x 5/8 – 3/8 thread adaptor
1 x Microphone Pouch
The instruction manual
you are now reading
Features
Supercardioid polar pattern
High SPL operation
Exceptional gain before feedback
Low handling noise
Transformer Isolated
Magnetic lockable reed switch
(PMD1S only)
Rugged design
PMD1S
PMD1
Page 2
Connecting your Microphone
The PMD1 and PMD1S microphones accept an XLR Female 3 pin connector. The XLR pin out required for
correct polarity is Pin 2 + , Pin 3 – and Pin 1 shield.
Phantom power is not required for these dynamic microphones to operate. If your mixing console features
global phantom power don’t worry, the PMD1 and PMD1S microphones contain isolation transformers which
block phantom power.
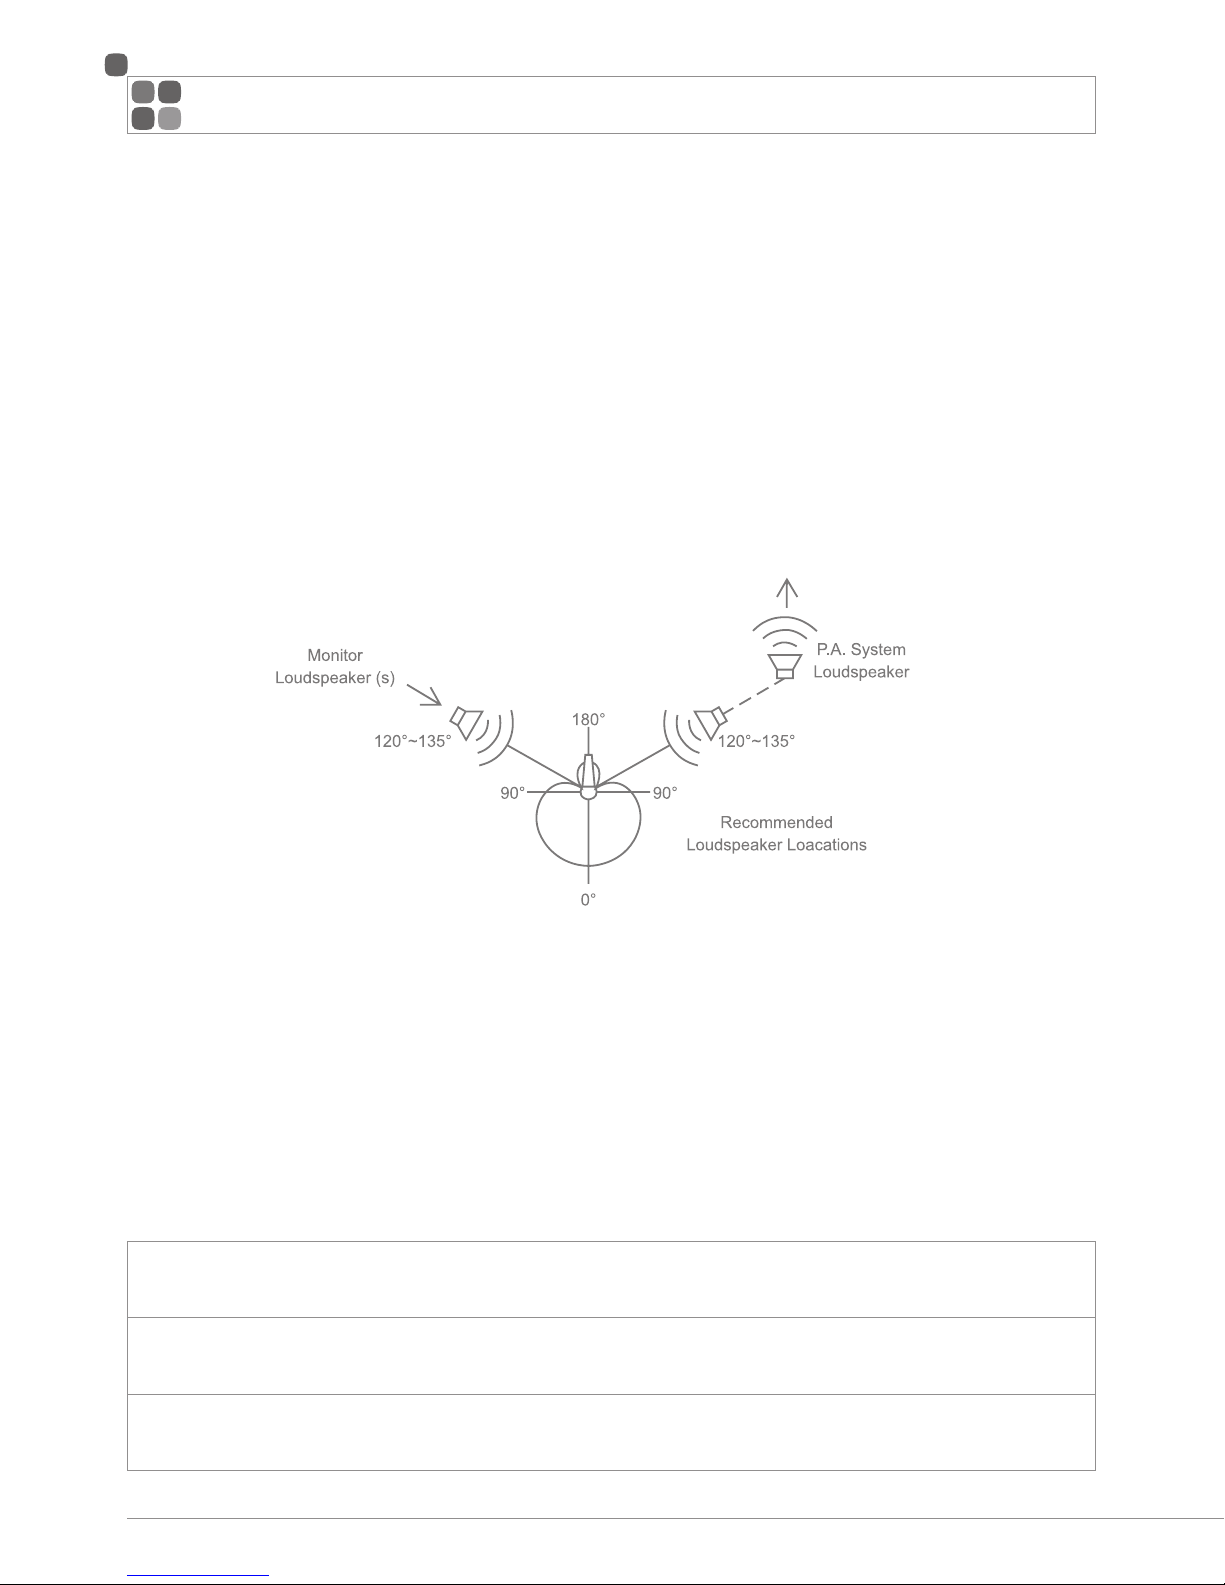
Loudspeaker Monitor Positioning
To ensure maximum gain before feedback, as well as crosstalk reduction, position loudspeaker monitors in
the null of your microphone’s supercardioid pick pattern. Positioning the loudspeakers at 120°–135° behind
the microphone will ensure you are in the microphone’s greatest null point (see Figure 1).
LOUDSPEAKER MONITOR POSITIONING (Figure 1)
Proximity effect
Due to their capsule design, many microphones feature what is known as proximity effect. Essentially the closer
the talent is to the microphone when performing or speaking the more low frequency content is reproduced.
Many stage performers use the proximity effect as part of their act by increasing and decreasing the distance
of the microphone from their mouth depending on what phrases and/or words they are performing. Female
vocalists in particular take advantage of the proximity effect to increase the low frequency content in their vocals.
A rough guide of microphone distance and controlling the proximity effect is as follows:
0 – 4 cm = Very strong low frequency content.
Provides a powerful and direct sound with little external noise spill.
4 – 10 cm = Neutral pickup response and balanced sound, however the microphone may
pick up some room ambience and possibly spill from other sound sources.
10 > cm = A reduction in bass response. Much greater room ambience will be pickd up and
possibly a large amount of unwanted spill from other sound sources may be reproduced.
Specifications
Transducer Type Dynamic – Neodymium, aluminium voice coil with dual diaphragm
Polar Pattern Supercardioid
Frequency Response 40Hz – 16Khz
Sensitivity 2 mV/Pa -54 dBV
Electrical Impedance 300 Ω
Min. Load Impedance 300 Ω
Max. SPL 136dB @ 1% THD
Finish Matte Black
PMD1S Switch Magnetic silent lockable reed switch
Connection Balanced 3 pin XLR Male Pin 2 +, Pin 3 –, Pin 1 shield
Dimensions Ø54mm x L 180mm
Net Weight 340g
Included Accessories Microphone clip, 5/8 – 3/8 thread adaptor, microphone pouch
PAGE 2 PAGE 3PMD1 & PMD1S HANDHELD MICROPHONE INSTRUCTION MANUAL
USING YOUR PMD1 OR PMD1S
Page 3

Specifications
Transducer Type Dynamic – Neodymium, aluminium voice coil with dual diaphragm
Polar Pattern Supercardioid
Frequency Response 40Hz – 16Khz
Sensitivity 2 mV/Pa -54 dBV
Electrical Impedance 300 Ω
Min. Load Impedance 300 Ω
Max. SPL 136dB @ 1% THD
Finish Matte Black
PMD1S Switch Magnetic silent lockable reed switch
Connection Balanced 3 pin XLR Male Pin 2 +, Pin 3 –, Pin 1 shield
Dimensions Ø54mm x L 180mm
Net Weight 340g
Included Accessories Microphone clip, 5/8 – 3/8 thread adaptor, microphone pouch
PMD1 < DIMENSIONS > PMD1S
TYPICAL POLAR PATTERN
TYPICAL FREQUENCY RESPONSE
Page 4

Congratulations on purchasing your new Australian Monitor microphone.
The PMD1 and PMD1S premium dynamic supercardioid microphones feature neodymium motors with
aluminium voice coils, ensuring super-fast transient response. Both models also feature an isolation transformer
which ensures RF and electrical noise isolation. The incorporated capsule isolation system keeps handling noise
to a bare minimum. While the PMD1 and PMD1S are tailored for vocal reproduction, both models can also be
used to reproduce instruments as well.
These premium microphones are highly recommended for presentations, stage vocal performance, instrument
reproduction, percussion reproduction, and many other applications.
What’s in the box?
1 x PMD1 or PMD1S Microphone
1 x Microphone Clip
1 x 5/8 – 3/8 thread adaptor
1 x Microphone Pouch
The instruction manual
you are now reading
1. Read these instructions.
2. Keep these instructions.
3. Heed all warnings.
4. Follow all instructions.
5. Do not use this apparatus near water.
6. Clean only with dry cloth.
7. Do not block any ventilation openings. Install in accordance
with the manufacturer’s instructions.
8. Do not install near any heat sources such as radiators, heat
registers, stoves, or other apparatus (including amplifiers)
that produce heat.
9. Do not defeat the safety purpose of the polarized or groundingtype plug. A polarized plug has two blades with one wider than
the other. A grounding type plug has two blades and a third
grounding prong. The wide blade or the third prong are provided
for your safety. If the provided plug does not fit into your outlet,
consult an electrician for replacement of the obsolete outlet.
10. Protect the power cord from being walked on or pinched
particularly at plugs, convenience receptacles, and the point
where they exit from the apparatus.
11. Only use attachments/accessories specified by the manufacturer.
12. Use only with the cart, stand, tripod, bracket, or
table
specified by the manufacturer, or sold with the
apparatus.
When a cart is used, use caution when
moving the cart/apparatus combination to avoid
injury from tip-over.
13. Unplug this apparatus during lightning storms or when unused
for long periods of time.
14. Refer all servicing to qualified service personnel. Servicing is
required when the apparatus has been damaged in any way,
such as power-supply cord or plug is damaged, liquid has been
spilled or objects have fallen into the apparatus, the apparatus
has been exposed to rain or moisture, does not operate normally,
or has been dropped.
15. This appliance shall not be exposed to dripping or splashing
water and that no object filled with liquid such as vases shall
be placed on the apparatus.
16. Plug this apparatus to the proper wall outlet and make the plug
to be disconnected readily operable.
17. Mains plug is used as disconnected device and it should remain
readily operable during intended use. In order to disconnect the
apparatus from the mains completely, the mains plug should be
disconnected from the mains socket outlet completely.
18. Warning: To reduce the risk of fire or electric shock, do not
expose this apparatus to rain or moisture.
19. An appliance with a protective earth terminal should be
connected to a mains outlet with a protective earth connection.
20. The apparatus should be disconnected from the mains
completely before speaker wiring. The speaker output should
be proper protected from direct contact and pay attention to
speaker connections, terminals and speaker wiring during
normal operation.
IMPORTANT SAFETY INFORMATION
WARNING!
TO PREVEN T FIRE OR SHOCK HAZARD, DO NOT USE THE PLUG WITH AN EXTENSION CORD, RECEPTACLE
OR OTHER OUTLET UNLESS THE BLADES CAN BE FULLY INSERTED TO PREVENT BLADE EXPOSURE.
TO REDUCE THE RISK OF FIRE OR ELECTRIC SHOCK, DO NOT EXPOSETHIS APPLIANCE TO RAIN OR MOIS TURE.
TO PREVEN T ELEC TRICAL SHOCK, MATCH WIDE BL ADE PLUG TO WIDE SLOT & FULLY INSERT.
CAUTION
THESE SERVICING INS TRUCTIONS ARE FOR USE BY QUALIFIED SERVICE PERSONNEL ONLY.
TO REDUCE THE RISK OF ELECTRIC SHOCK DO NOT PERFORM ANY SERVICING OTHER THAN THAT CONTAINED
IN THE OPERATING INST RUCTIONS UNLESS YOU ARE QUALIFIED TO DO SO.
CAUTION
RISK OF E LECTRIC S HOCK
DO NOT OPEN
The lightning flash with
arrowhead symbol, within an
equilateral triangle, is intended to
alert the user to the presence of
uninsulated “dangerous voltage”
within the product’s enclosure
that may be of sufficient
magnitude to constitute a risk
of electric shock to persons.
WARNING:
TO REDUCE THE RISK OF
ELECTRIC SHOCK, DO NOT
REMOVE COVER (OR BACK).
NO USER SERVICEABLE PARTS
INSIDE. REFER SERVICING
TO QUALIFIED SERVICE
PERSONNEL.
The exclamation point
within an equilateral
triangle is intended to alert
the user to the presence of
important operating and
maintenance (servicing)
instructions in the literature
accompanying the
appliance.
For European Union countries: This symbol on the
product or its packaging indicates that this product must
not be disposed of with other waste.
Instead, it is your responsibility to dispose of your waste
equipment by handing it over to a designated collection point
for the recycling of waste electrical and electronic equipment.
Please contact your local authority for further details
of your nearest designated collection point.
ENGINEERED BY AUSTRALIAN MONITOR
Address: 1 Clyde St, Silverwater NSW 2128 Australia.
Website: www.australianmonitor.com.au
International enquiries email: international@australianmonitor.com.au
ABN 35 007 573 417
Rating plate and caution marking are marked on the back enclosure of the apparatus
 Loading...