

Austin SEVEN Handbook
'i"-
"
=
,
=
~~
HANDBOOK
OF THE
-
"SEVEN"
J
11
'"
f
r
~
PUBqCATION No.
PRICE
ONE SHILLING.
.'tHE
AUSTIN MOTOR CO. LTD.
LONGBRIDGE :: BIRMINGHAM
.
1725
j
I
.
,
t1
-;iT
,
,
':S'
'1i%1~
,
,
"
>:
HANDBOOK
OF THE
,
"SEVEN"
,>
PRICE - ONE SHILLING
THE AUSTIN MOTOR CO. LTD.
G.P.O. BOX 41
LONGBRIDGE - BIRMINGHAM
T.I.,h"" . PRIORY 2101
Toi.gwm" "SPEEDILY.TELEX. NORTHFlELD"
C"bl,." "SPEEDILY.BIRMINGHAM.ENGLAND" Cod" BENTLEY'S
LONDON SHOWROOMS.
479~ 483, Oxford Street, W.1.
Tel,ph"".
MAYFAIR 7620
"Tel.gwm"
"AUSTlNETTE. TELEX. LONDON"
AND
HOLLAND PARK HALL
HOLLAND PARK AVENUE, W.ll
Tel"h"",. PARK 8001
RepairandServieeDepotfor "Seven" and"Ten" Cars:-
25, NORTH ROW, LONDON, W.!.
Toi.ph"", MAYFAIR 6211
S.p"mb". 1938
I, "{"",, W of", Book 1725
/
P!eM. quo" {h. "mb"
'""'m," ,"'CA'"
~
-
A .FOREWORD
T
HEinlormation contained in this Handbook is intended only
to guide and assist the owner or driv~r 01an Austin car to preserve
the car in its proper satislactory running condition. The publi-
cation must not be considered as a complete manual.
... The handbook does not in any manner vary or extend the liability
01 the Company. which is limited to the Warranty jssued with the car.
Where no inlormation is given for a particular adjustment it may be
regarded as one which the average owner would entrust to a garage.
When the occasion for adjustments 01 this character arises the owner
should seek the aid of the local Austin dealer.
Both owner and dealer are encouraged 10call upon Ihe Service Depart-
ment 01 the Company lor advice, whether upon the management of the
car, the eHecting 01 adjustment, or methods 01 repair. Owners need
nol suppose that they will have to apply all the attentions given in this
book, but careful notice should be taken 01 the chapters dealing with
maintenance.
CAUTION,
P
arts of genuine Auslin manufacture only should be used when a
replacemenl is made, 10 ensure Ihal Ihe service given by Ihe original
shall be maintained by the replacement. Imilations cannol be relied upon
10 do Ihis.
If imilations are used, Ihe Company's guarantee is infringed and
becomesnull and void.
Always gel your replacemenlsfrom authorised Austin Dealers, as(they
stock only genuine Austin Spare Parts.
Should repairs be executed by other than an authorised Austin Dealer,
for safety's sake always oblain a guarantee Ihat genuine Austin Spare
Paris are used.
See Ihe slalemenl 01 the end of Ihis book with reference 10
Accessories.
In correspondencealways quote your car number; body number will
befound on the scuttle under Ihe bonnet 011the nearside, chassis number on
chassis under the bonnel on offside.
AFTER
SALES SERVICE
Every Austin Dealer is under agreement to give to Austin Cars
purchased Irom him "Alter Sales Service" during the period 01 the lirst
1,000 miles running of such <.a(S. (See page 70).
2
CONTENTS
AMMETER READINGS
ATTENTIONS. D.ily, W"kly. M.m,hly. O"",ionolly
BATTERY. The
.
BODYWORK. Co" of
BRAKES, Adi""ing. Rdining. ek
BRAKE GEAR. Luh,i,,'ion of
CABRIOLET
CARBURETTER. Adj",'men'. ,le.
CHASSIS LUBRICATION CHART
CLUTCH. Luh,i,,'iou of Mech.ni,m
CLUTCH. Taking up wear
COMBUSTION CHAMBER. CIoanio,
CONTROL OF THE CAR
COOLING SYSTEM
DYNAMO, The
DOOR KEYS
ELECTRICAL EQUIPMENT, The
ENGINE, Lubri,,',on of ..
S'arting,he
.
FAN
FUEL SYSTEM
FUSE. Adion 01,he
GEARBOX,Lub,i",ion of
GREASE GUN. How '0 u" ,he
HOOD (Co" 00 .. ..
HUBS (Fmn' ondRoad Luh,i",ion of
IGNITION, Timing
" Sy,'em, The
INFLATING SEAT INTERIORS
LAMPS. Co" of ..
LUBRICANTS. Choi" of
LUBRICATION CHART
PETROL PUMP
REAR AXLE, Lub,i,,',on of
ROAD SPRINGS
RUNNING ADJUSTMENTS
SHOCK ABSORBERS..
SPEEDOMETER DRIVE
STEERING. Adju,'men' of .
STEERING GEAR. Lub,i",ion of
THE NEW CAR
TOOLS
TYRES, Th,
VALVE TAPPETS. Adju,'m,n' 01
WHEEL, Changing a
WIRING. Diagram
~
'.
3
",
'"
PAGE
10,46
14
47
66
54
41
67
22
36 and 37
39
65
58
12
26
44
69
44
36and 37
7
61
20,22
44,51
39
43
66
41
31
28
68
51
34
36 .nd 37
20
40
41
58
64
42
62
40
7
70
16
58
16
'3
.
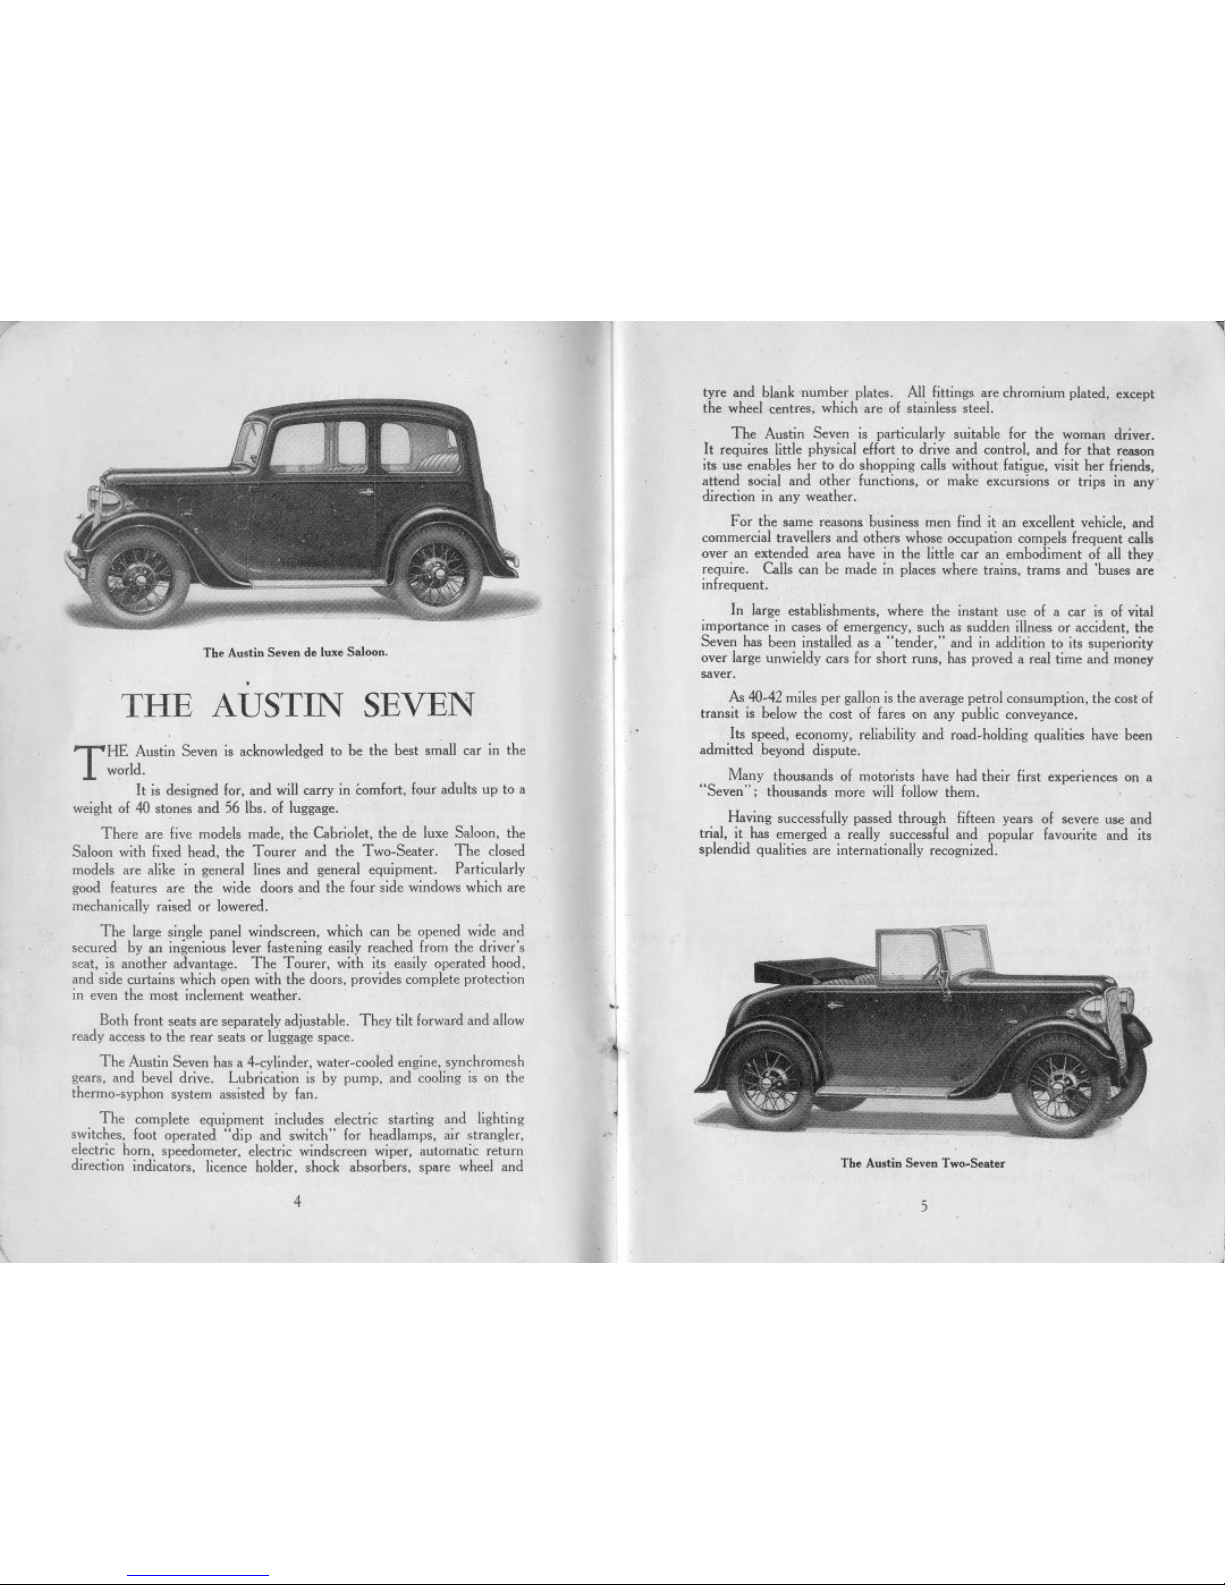
The Au,tin Seveu de lux. Saloou.
THE AUSTIN SEVEN
T
HE Austin Seven is acknowledged to be the best small car in the
world.
It is designed lor, and will carry in comlort, lour adults up to a
weight 01 40 stones and 56 Ibs. 01 luggage.
There are live models made, the Cabriolet, the de luxe Saloon, the
Saloon with lixed head, the Tourer and the Two-Seater. The closed
models are alike in general lines and general equipment. Particularly
good leatures are the wide doors and the lour side windowswhichare ~
mechanically raised or lowered.
The large single panel windscreen, which can be opened wide and
secured by an ingenious lever lastening easily reached from the driver's
scat, is another advantage. The Tourer, with its easily operated hood,
and side curtains which open with the doors, provides complete protection
in even the most inclement weather. '
Both Iront seats are separately adjustable. They tilt lorward and allow
ready access to the rear seats or luggage space.
The Austin Seven has a 4-cylinder, water-cooled engine, synchromesh
gears, and bevel drive. Lubrication is by pump, and cooling is on the
thermo-syphon system assisted by lan.
The complete equipment includes electric starting and lighting
switches, loot operated "dip and switch" lor headlamps, air strangler,
electric horn, speedometer, electric windscreen wiper, automatic return
direction indicators, licence bolder, shock absorbers. spare wheel and
4
,
tyre and blank 'number plates. All littings are chromium plated, except
the wheel centres, which are 01 stainless steel.
The Austin Seven is particularly suitable lor the woman driver.
It requires little physical ellort to drive and control, and lor that reason
its use enables her to do shopping calls without latigue, visit her lriends,
attend social and other !unctions, or make excursions or trips in any'
direction in any weather.
For the same reasons business men lind it an excellent vehicle, and
commercial travellers and others whose occupation compels Irequent calls
over an extended area have in the little car an embodiment 01 all they
require. Calls can be made in places where trains, trams and 'buses are
inlrequent.
In large establishments, where the instant use 01 a car is 01 vital
importance in cases 01 emergency, such as sudden illness or accident, the
Seven has been installed as a "tender," and in addition to its superiority
over large unwieldy cars lor short runs, has proved a real time and money
saver.
As40-42miles per gallon is the average petrol consumption, the cost 01
transit is below the cost 01 lares on any public conveyance.
Its speed, economy, reliability and road-holding qualities have been
admitted beyond dispute.
Many thousands of motorists have had their lirst experiences on a
"Seven"; thousands more will lollow them.
Having successlully passed through lilteen years 01 severe use and
trial, it has emerged a really success!ul and popular lavourite and its
splendid qualities are internationally recognized.
"
'I
The Austin Seven T wo.Seater
5
7
~
Th, dim,n,ion, 01 the modd, 'a<y. M.»mum I,ngth 10ft. 7in.
(3,260mm.) Width 4ft.3in.(I,295mm.); H,ight 5ft.3in.(1,600mm.);
Wh,dh.." 6ft. 9in. (2,057mm.); Tm,k, fcont, 3ft. 4in. (1.016 mm.)
ma<,3ft. 7in. (1,092 mm.). wound d,a<.n", 6,in., 61in. .nd 7tin.,
mo,ding to mod,1.
.. Fom.cylindm, w.t".rool,d, with d,tach,hl, hood.
Bo", 2.2in. (56 mm.); Stook"~3in. (76 mm.) ;
Cuhi, """,ity, 7475 cc.. RAC. mting, 7.8.
B"k, ho",.pow", 17.t 3,800'.p.m.
Ignition, Coi!.
Oil ,i"ul.tion, hy pump: Sump """,ity 4 pin".
Cooling, Th,nno..yphon with film "di.to, .nd Ion. Cooling .y,t,m
"p"ity 10 pint'. Th", i. . 'p,ing Io.d,d "Ivc in top tank to
p,mnt o",lIow hy ,pl"h.
C,onbhafth",ing" Fcont,hall; Cout", pl.in; R"" colI"
THE NEW CAR.
It will Repay YOll to Read these Notes
Carefully.
CHASSIS SPECIFICATIONS
Dimensions..
'"Engin.
Fuol Feed
Start.r
Clutch ..
Gaarbox
Rear Axl.
Spring...
Frout Axle
Brak..
Wbeel. ..
Control.
Ligbting
Bodywork
Luggage
\
I
F you are not familiar with Austin cars
carefully.
Give the new car a general
examination to see that all is in order.
Before running, see the car is
supplied with fuel and water, that the
engine and gearhox have the neces-
sary quantities of oil and that the
battery contains tbe proper amount
of acid.
Cars delivered by road are ready
for running. There is no oil,
fuel or water in cars crated for over-
seas and the batteries are empty and
uncharged.
please read this Handbook
5 gallon(22.75Ii"",) tank at "". Fud ,upply hyA.C. pump.
EI,ct,i",!.
. . Flexihl,,ingl,-pI.t" ,p,ingload,d, the pI.t, ""..,.ing the Idction ,ing..
Fom ,O',d, Io<""d, .nd . 'mm; Th, top, thi,d .nd ",ond g""
hove ,yn,h,om"h ,ng.g,m,nt. which ,n,u'" ,mouth, noi"I""
wt,in g'" ,h.ng" to ,uit "..,.ing ,O',d,. Fi"t g", i. , Iow on'
to h, used in ,tarting with, lulllo.d, up .n indin,. 0' m,noeuvoing
the m in.n .wkw"d pi.". Th, mtio, of ,ngin"o co.d wheel. ""
top,5.125to I; thi,d, 851 to I; soeond,I353to I,.nd fint, 22.4tiii"
,m'", 28.8 to 1. B.II hea,ingsthcoughout.Oil",p"ity Iloin".
.. 1.lIo",ing.withdiff",nti.1 .nd 1o<qu,tuh,.
B.1Ih",ings .nd th,.." thcoughout. Fin.1d,ivchy,h,ft .nd 'pi,,1
hm!. Oil cop"ity t pint.
A
j
I
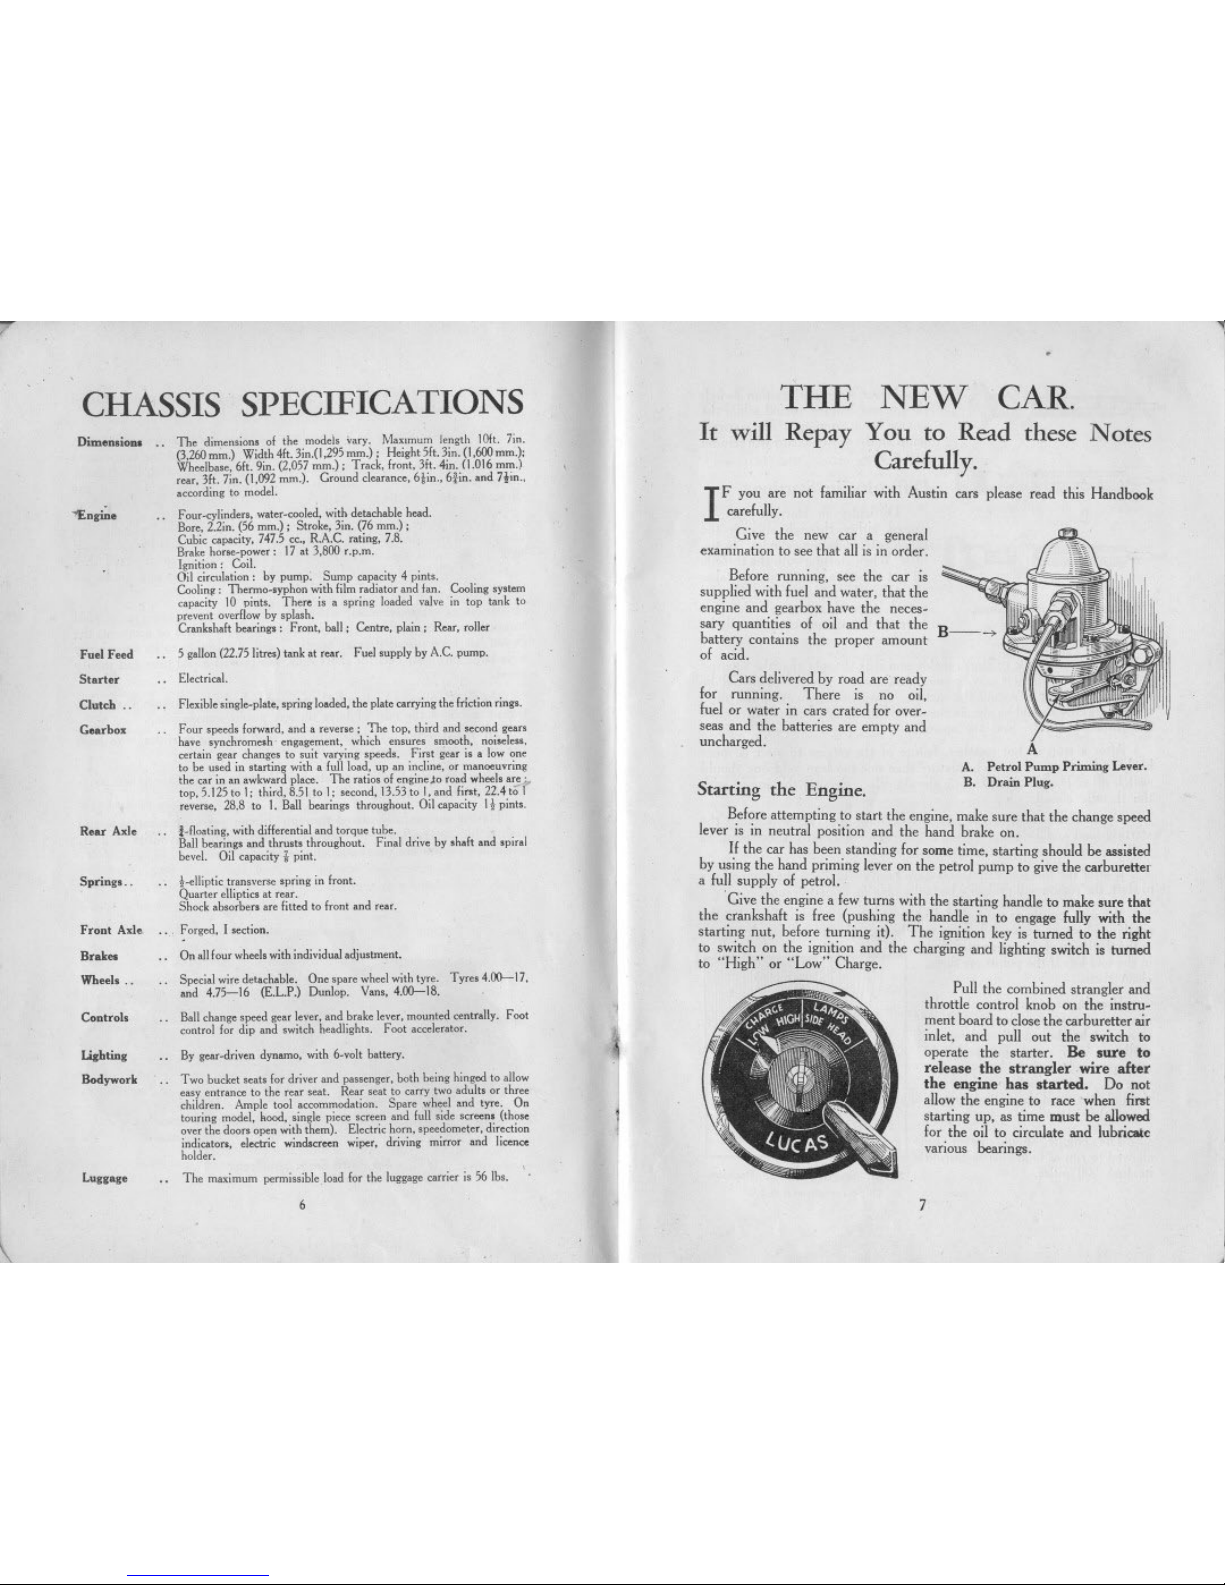
A. P,trol Pump Priming Lever.
S
.
th
E
. B. DrainPlug.
tartmg e ngme.
Before attempting to start the engine, make sure that the change speed
lever is in neutral position and the hand brake on.
II the car has been standing for some time, starting should he assisted
by using the hand priming lever on the petrol pump to give the carburetteI
a full supply of petrol.
.Give the engine a few turns with the starting handle to make sure that
the crankshaft is free (pushing the handle in to engage fully with the
starting nut, before turning it). The ignition key is turned to the right
to switch on the ignition and the charging and lighting switch is turned
to "High" or "Low" Charge.
t.dlipti, t"nsvcr" ,p,ing in hont.
Qu.rt"dlipti".t "".
Shock .hso,hm .m fitt,d to f,ont ,nd m".
.. . Fo,g,d, I "ction.
.. On.1Ifomwhool,withindividusl,dj..tm,nt.
.. SO'".I wimd,t"h,hl,. On"p", whooIwithtyre. Ty'" 4.00-17,
.nd 4.75-16 (E.L.P.) Dunlop. V.n" 4.00-18.
Th, m""imump"mi"ihI,lo.d fo, the lugg.g,coni" i, 56Ih..
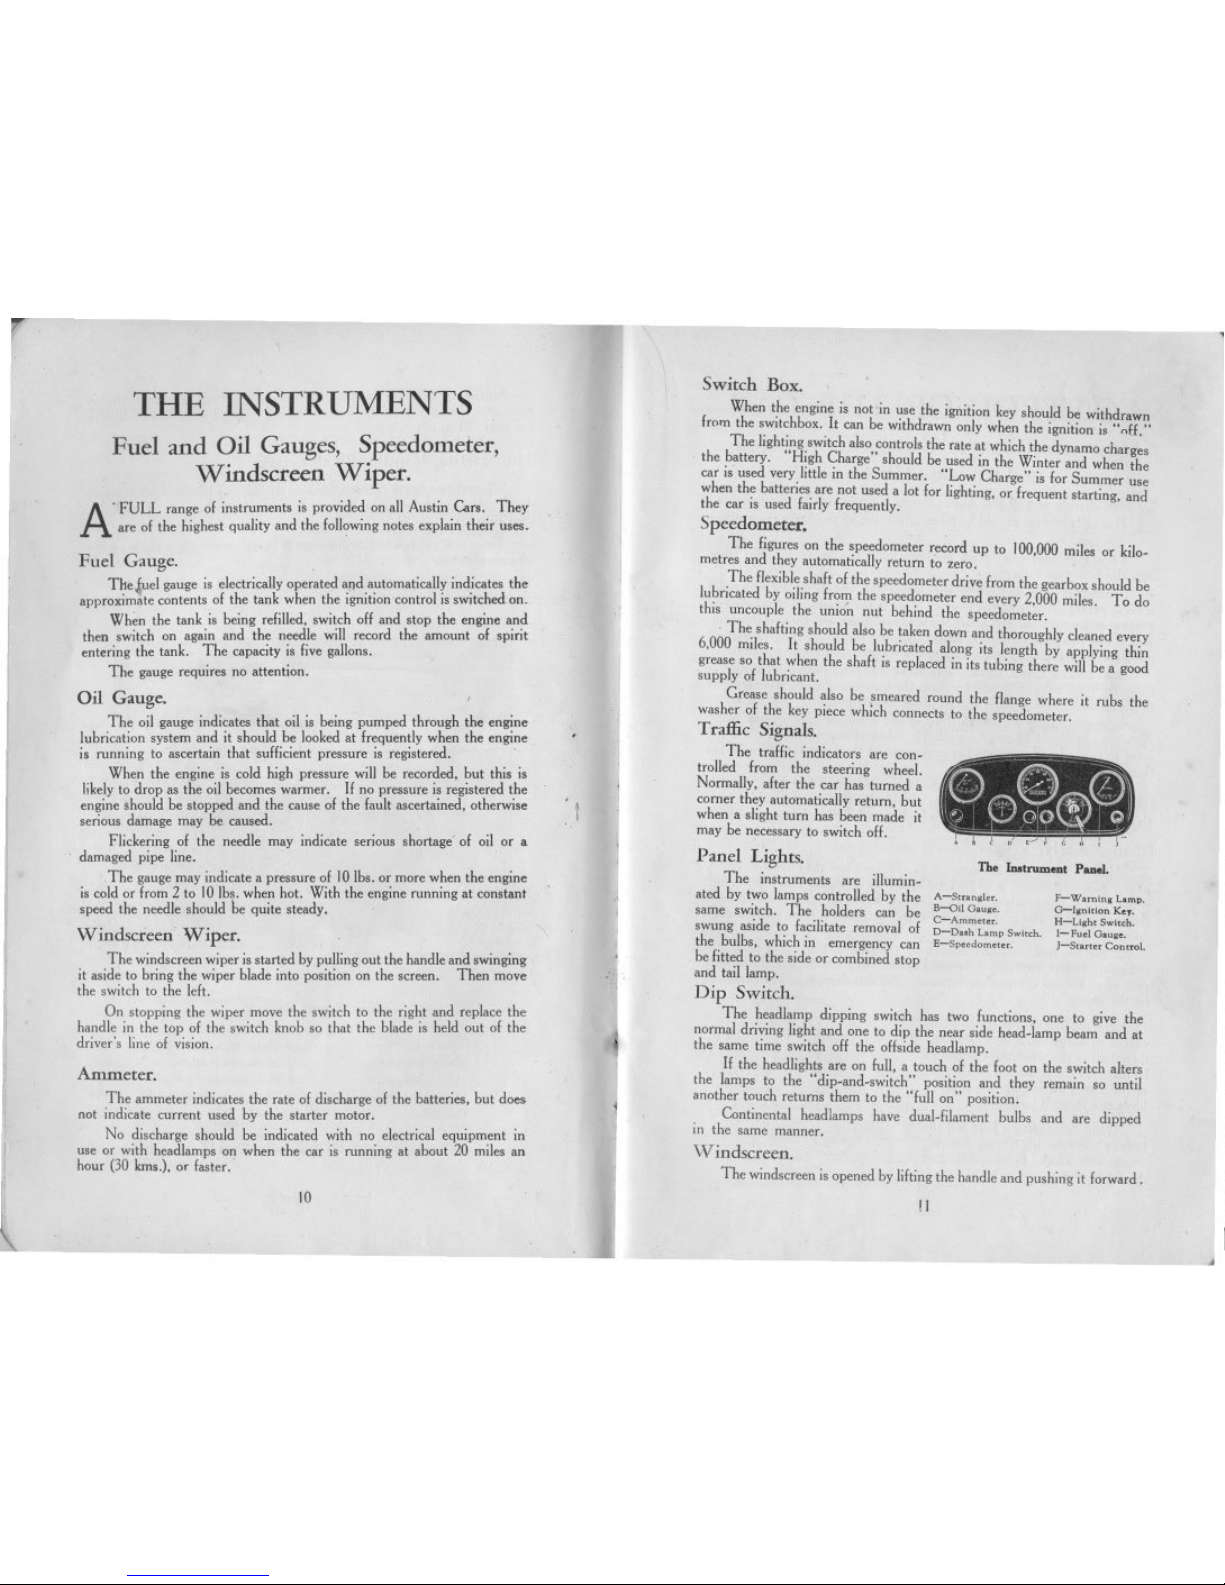
Pull the combined strangler and
throttle control knob on the instru-
ment board to close the carburetter air
inlet, and pttll out the switch to
operate the starter. Be sure to
release the strangler wire after
the engine has started. Do not
allow the engine to race when first
starting up, as time must he allowed
for the oil to circulate and lubricate
various hearings.
B.II ,h.ng, 'p,od g,a<Im" .nd hook, Im"mountod "n",lIy. Foot
rontcol fo, dip .nd ,witch h"dlight,. Foot .,,01,,",00.
.. By g",.d,ivcn dyn,,"o, with 6.volt hatt,..,..
Two hu,k,t "", fo, d,iv" .nd p""ng", hoth h,ing hingod to allow
"'y ,nt"n" to the "" ".t. R", "at to ""y two .dul" 0<thm
,hild"n. Ampl, tool ",ommod.tion. Sp", wh,,1 .nd t}T'. On
toming modd, hood, ,ingl, pi", "",n .nd full ,id, ,croon. (tho"
ov" the doo" open with th,m). EI""i, horn, ,p"dom,'", di"ction
indi"to..., dodri, wind"",n wiO'" d,ivin. mino, .nd li"nce
hold,o.
6
7
.

'}"
.
A
Never leave the ignition switch
on for any lengthy period while the
engine is not running. The warning
lamp on the switch board will remind
you of this.
."
Difficulty in Starting.
, Difficulty in starting may he
caused either through 'sucking too
much petrol into the cylinders, or too
little. When starting with the throttle
all but closed, a strong suction takes
effect on the slow running jet. If
petrol is passing through the car-
huretter the suction can generally be
heard.
Str_ler and Throttle Control.
A-No=.l po.I<ion. B-F.., Idlin"
C-W.=in, Up.
If the engine fails to start quickly and it is thought that the mixture
getting into the cylinders may be too rich, the accelerator pedal should be
depressed half-way to reduce the suction. On firing, the engine will race,
and the throttle should be almost closed. If the engine does not fire, close
the throttle entirely, and try again. '
After a stop in hot weather, failure of the engine to start is more
likely to be due to a too rich mixture than one too lean, and one should
switch off only after quite closing tbe throttle. Re-start tbe engine with
the throttle closed.
Depress the clutch pedal before switching on. This ;"ill lessen the
starting load and help the starter to turn the engine at higher speed, as
well as save drain on the batteries.
If after the foregoing measures have been carried out the engine fails
to start, the reason will probably be faulty ignition or carburation.
If faulty ignition is suspected, first examine the wires and see that the
sparking plugs are connected. Then test the gap of the plug points by means'
of the thick end athe gauge provided
in the tool kit. If the points are dirty,
clean them.
If carburation gives trouble, the
slow running jet may be stopped up
or a main jet cboked. Blow them out
orally or with a tyre pump. Never
attempt to clean them by passing a
wire or other small metal object
through tlrem. This will definitely
injure the jets.
The engine should never be
allowed to run at high speeds during
its first 500 miles.
H725.
"Seven" Starting Handle Position.
Oil o""ion.n, " A .nd B.
8
\
Maximum desirable road speeds during the first 500 miles are:-
First gear, 7 m.p.h.: second gear, 11 m.p.h.; third gear, 18 m.p.h. and
top gear, 30 m.p.h.
The Starting Handle (Fixed type).
When the engine is running, see that the starting handle is not hanging
down. It should be replaced in a borizontal position at "9 o'clock."
(See page 8).
There is a catch which will secure it in its proper place there on the
off-sideofthecar. '
The starting handle should be oiled occasionally.
,
2 3 4 5 7 9.060
Au"in "SeveD" Controls.
I. Wind"",n Wip",
2, Ch,ng' Spe,d Lover
3. H,ndbmk, Lover,
4 Dip ,nd Swilcb Con'm!.
5. Clulcb P,d,!.
6. Bmb P,d.!.
7. Accol,mtor P,d,!.
8. Horn Button.
9. Di"ction Indice'or Swi'ch
10.Vi,",
In.trumenr. are lllu.trated ODPage 11.
9
,.
,
r
THE INSTRUMENTS
Fuel and Oil Gauges, Speedometer,
Windscreen Wiper.
A
' FULL range 01 instruments is provided on all Austin Cars. They
are 01 the highest quality and the lollowing notes explain their uses,
Fuel Gauge.
The,luel gauge is electrically operated al)d automatically indicates the
approximate contents 01 the tank when the ignition control is switched on.
When the tank is being relilled, switch 011and stop the engine and
then switch on again and the needle will record the amount 01 spirit
entering the tank. The capacity is live gallons.
The gauge requires no attention.
I
Oil Gauge.
The oil gauge indicates that oil is being pumped through the engine
lubrication system and it should be looked at frequently when the engine
is running to ascertain that sullicient pressure is registered.
When the engine is cold high pressure will be recorded, but this is
likely to drop as the oil becomes warmer. If no pressure is registered the
engine should be stopped and the cause 01 the lault ascertained. otherwise
serious damage may be caused.
Flickering 01 the needle may indicate serious shortage 01 oil or a
damaged pipe line.
The gauge may indicate a pressure 0110 Ibs. or more when the engine
is cold or Irom 2 to 10lbs. when hot. With the engine running at constant
speed the needle should be quite steady.
Windscreen Wiper,
The windscreen wiper is started by pulling out the handle and swinging
it aside to bring the wiper blade into position on the screen. Then move
the switch to the lelt.
On stopping the wiper move the switch to the right and replace the
handle in the top 01 the switch knob so that the blade is held out 01 the
driver's line 01 vision.
.
Ammeter.
The ammeter indicates the rate 01 discharge 01the batteries, but does
not indicate current used by the starter motor.
No discharge should be indicated with no electrical equipment in
use or with headlamps on when the car is running at about 20 miles an
hour (30 kms.), or laster.
I
[
10
~
-- ~ --- -
..,
"
Switch Box.
When the engine is not'in use the ignition key should be withdrawn
Irom the switchbox. It can be withdrawn only when the ignition is "off."
The lighting switch also controls the rate at which the dynamo charges
the battery. "High Charge" should be used in the Winter and when the
car is used very little in the Summer. "Low Charge" is lor Summer use
when the batteries are not used a lot lor lighting, or frequent starting. and
the car is used fairly frequently.
Speedometer.
The figures on the speedometer record up to 100,000 miles or kilo.
metres and they automatically return io zero.
The flexible shaft of the speedometer drive from the gearbox should be
lubricated by oiling from the speedometer end every 2.000miles. To do
this uncouple the union nut behind the speedometer.
The shafting should also be taken down and thoroughly cleaned every
6.000miles. It should be lubricated along its length by applying thin
grease so that when the shaft is replaced in its tubing there will be a good
supply of lubricant.
Grease should also be smeared round the flange where it rubs the
washer of the key piece wh:ch connects to the speedometer.
Traflic Signals.
The trallic indicators are con.
trolled lrom the steering wheel.
Normally. after the car has turned a
corner they automatically return. but
when a slight turn has been made it
may be necessary to switch olf.
Panel Lights.
The instruments are illumin.
ated by two lamps controlled by the
same switch. The holders can be
swung aside to facilitate removal of
the bulbs. whichin emergency can
belitted to the side or combinedstop
and tail lamp.
Dip Switch.
The headlamp dipping switch has two lunctions, one to give the
normal driving light and one to dip the near side head.lamp beam and at
the same time switch 011 the ollside headlamp.
If the headlights are on lull, a touch 01 the loot on the switch alters
the lamps to the "dip.and.switch" position and they remain so until
another touch returns them to the "lull on" position.
Continental headlamps have dual.filament bulbs and are dipped
in the same manner.
Windscreen.
The windscreen is opened by lifting the handle and pushing it lorward.
.
.
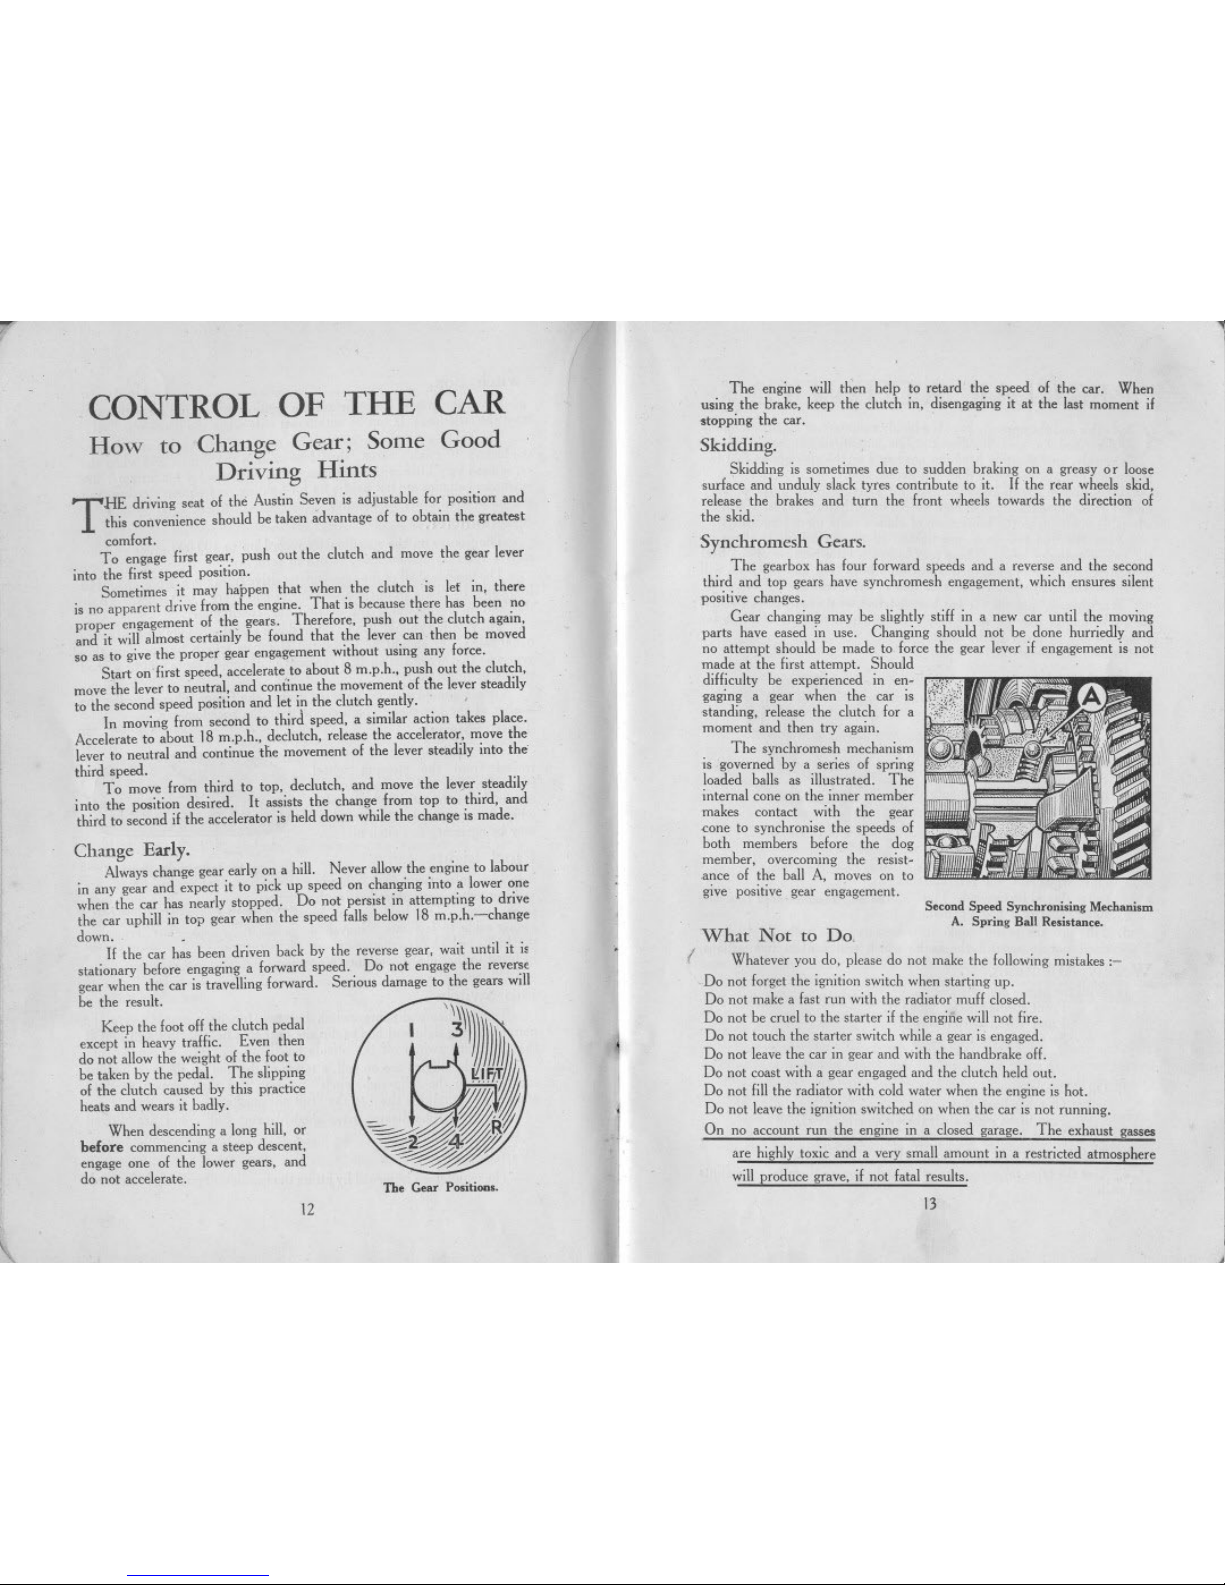
Tb. Im.rumen. PtmeI.
A-S'nn,L". F-W.rnln, L.mp.
B-oil G.u". o-I,nl<lon K.,.
C-Amm"... H-LI,h' Sw""'.
D-D..h L.mp Swl«h. 1- Fu.I G.u,..
E-Sp..dom"", ]-5,..", ConttoL
!I
J
.,.
,
CONTROL OF THE CAR
How to Change Gear; Some Good
Driving Hints
T
HE driving seat 01 the Austin Seven is adjustable lor position and
tbis convenience sbould be taken advantage 01 to obtain tbe greatest
comlort.
To engage lirst gear, pusb out the clutcb and move tbe gear lever
into tbe lirst speed position. .
Sometimes it may bappen tbat wben tbe clutch is let in, tbere
is no apparent drive Irom tbe engine. Tbat is because tbere bas been no
proper engagement 01 tb, gears. Tberelore, pusb out tbe clutcb again,
and it will almost certainly be lound tbat tbe lever can then be moved
so as to give tbe proper gear engagement witbout using any lorce.
Start on'lirst speed, accelerate to about 8 m.p.b., pusb out tbe clutcb,
move tbe lever to neutral, and continue tbe movement 01the lever steadily
to tbe second speed position and let in tbe clutcb gently. '
In moving from second to tbird speed, a similar action takes place.
Accelerate to about 18 m.p.b., declutcb, release tbe accelerator, move tbe
lever to neutral and continue tbe movement 01 tbe lever steadily into tbe
tbird speed.
To move from tbird to top, declutch, and move tbe lever steadily
into tbe position desired. It assists tbe cbange Irom top to third, and
tbird to second il tbe accelerator is held down while the change is made.
I
I
.
Change Early.
Always change gear early on a bill. Never allow tbe engine to labour
in any gear and expect it to pick up speed on changing into a lower one
wben the car has nearly stopped. Do not persist in attempting to drive
the car uphill in top gear wben the speed lalls below 18 m.p.h.-cbange
down.
If the car bas been driven back by tbe reverse gear, wait until it is
stationary belore engaging a lorward speed. Do not engage the reverse
gear when the car is travelling lorward. Serious damage to the gears will
be the result.
Keep the loot 011the clutch pedal
except in heavy trallic. Even then
do not allow tbe weight 01the loot to
be taken by tbe pedal. Tbe slipping
01the clutcb caused by tbis practice
beats and wears it badly.
When descending a long bill, or
before commencing a steep descent,
engage one 01 the lower gears, and
do not accelerate.
The Gear Positi...,.
12
\
~
The engine will tb~n belp to retard the speed 01 tbe car. When
using the brake, keep tbe clutcb in, disengaging it at the last moment il
.topping tbe car.
Skidding.
Skidding is sometimes due to sudden braking on a greasy or loose
surlace and unduly slack tyres contribute to it. If the rear wheels skid,
release the brakes and turn the Iront wbeels towards the direction 01
the skid.
Synchromesh Gears.
Tbe gearbox bas lour lorward speeds and a reverse and the second
third and top gears have synchromesh engagement, which ensures silent
positive cbanges.
Cear cbanging may be sligbtly still in a new car until tbe moving
parts bave eased in use. Cbanging sbould not be done burriedly and
no attempt sbould be made to lorce tbe gear lever il engagement is not
made at tbe lirst attempt. Sbould
dilliculty be experienced in en-
gaging a gear wben tbe car is
.tanding, release tbe clutcb lor a
moment and tben try again.
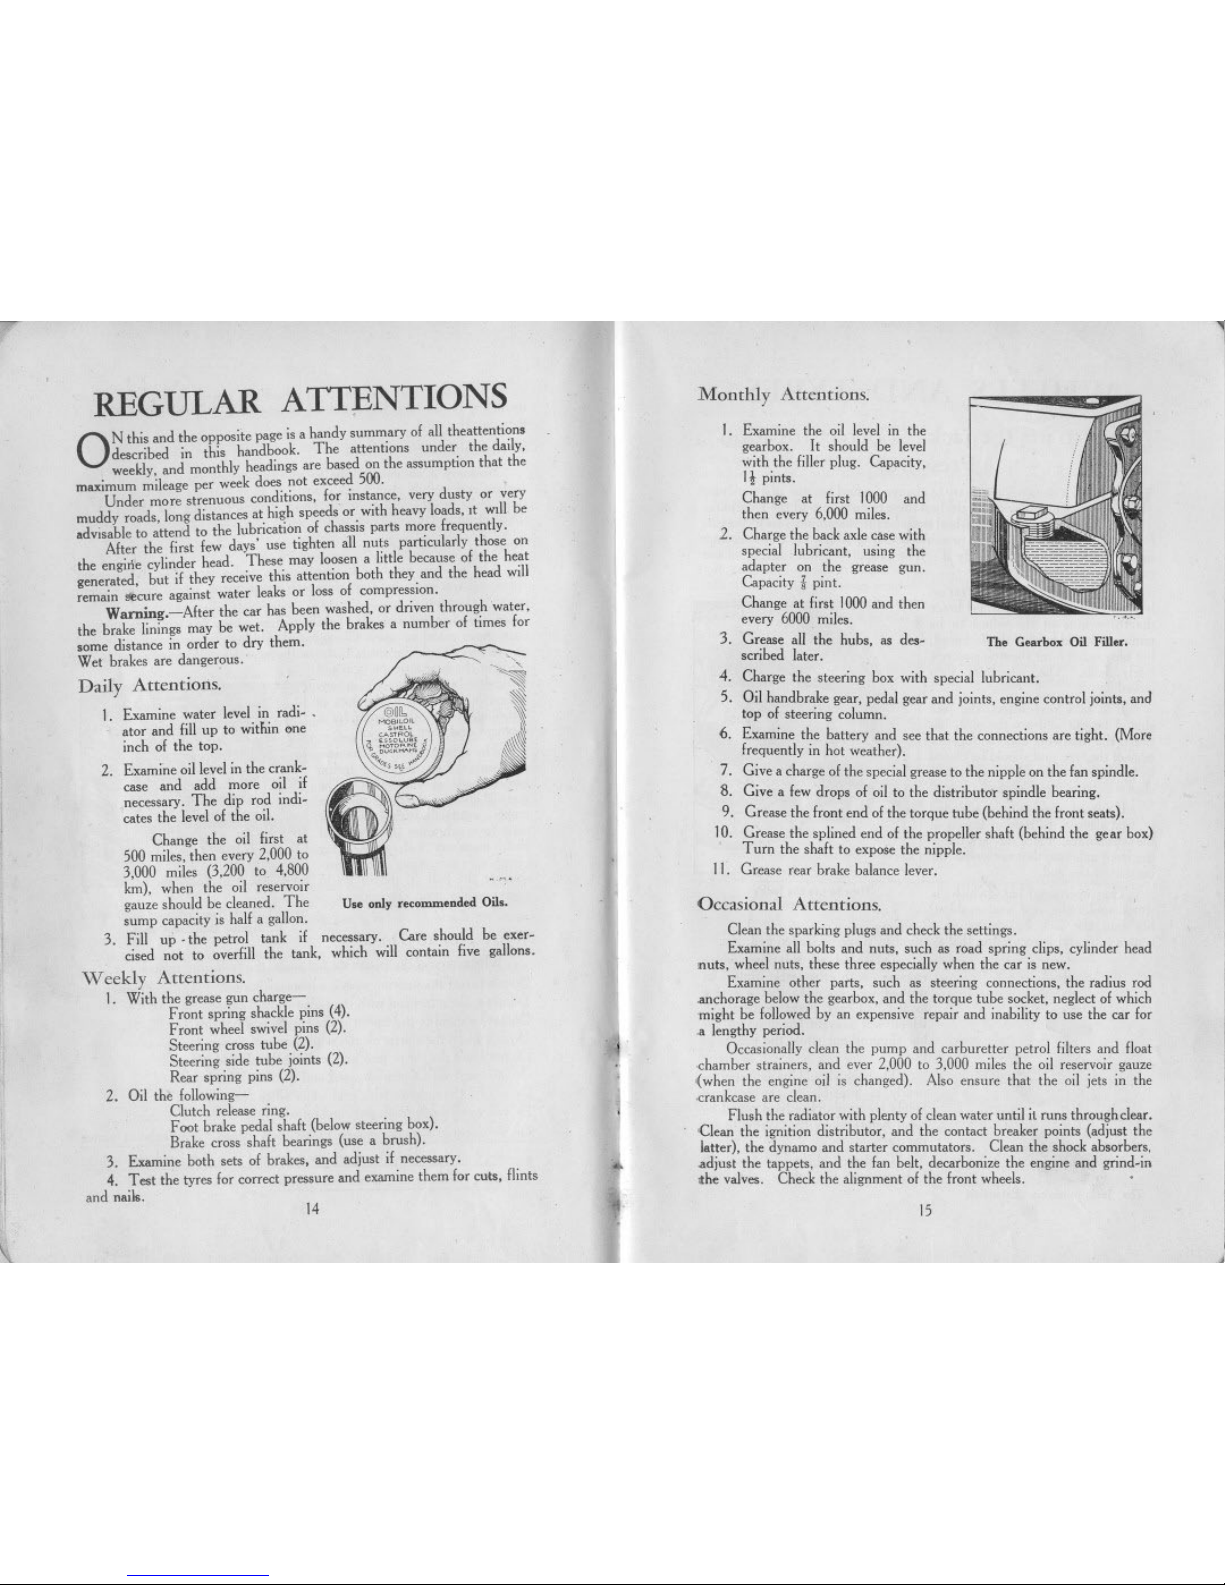
Tbe syncbromesb mecbanism
is governed by a series 01 spring fQtt:',:
loaded balls as illustrated. Tbe
internal cone on tbe inner member
makes contact witb tbe gear
mne to syncbronise tbe speeds 01
botb members belore tbe dog
member, overcoming tbe resist-
ance 01 tbe ball A. moves on to
give positive gear engagement.
What Not to Do.
I
Second Speed Synchroni,ing Mecl.anism
A. Spring Ball Re,iotance.
Whatever you do, please do not make tbe lollowing mistakes :-
Do not lorget tbe ignition switcb wben starting up.
Do not make a last run witb tbe radiator mull closed.
Do not be cruel to tbe starter il tbe engine will not lire.
Do not toucb tbe starter switcb wbile a gear is engaged.
Do not leave tbe car in gear and witb tbe bandbrake 011.
Do not coast witb a gear engaged and tbe clutcb beld out.
Do not lill tbe radiator witb cold water wben tbe engine is bot.
Do not leave tbe ignition switcbed on wben tbe car is not running.
On no account run tbe engine in a closed garage. Tbe exbaust gasses
are bigbly toxic and a very small amount in a restricted atmospbere
will produce grave, il not latal results.
13
,
"I
REGULAR ATTENTIONS
Monthly Attentions.
O
N this and the opposite page is a handy summary of all theattentions
descrihed in this handbook. The attentions under the daily,
weekly, and monthly headings are based on the assumption that the
maximum mileage per week does not exceed 500.
Under more strenuous conditions, for instance, very dusty or very
muddy roads, long distances at high speeds or with heavy loads, It wIll be
advisable to attend to the lubrication of chassis parts more frequently.
After the first few days" use tighten all nuts particularly those on
the engirle cylinder head. These may loosen a little because of the heat
generated, but if they receive this attention both they and the head will
remain !lecure against water leaks or loss of compression.
Waming.-After the car has been washed, or driven through water.
the hrake linings may be wet. Apply the brakes a number of times for
some distance in order to dry them.
Wet brakes are dangerous.'
Daily Attentions.
I.
I. Examine the oil level in the
gearbox. It should be level
with the filler plug. Capacity,
It pints.
Change at first 1000 and
then every 6,000 miles.
2. Charge the back axle case with
special lubricant, using the
adapter on the grease gun.
Capacity f pint. .
Change at first 1000 and then
every 6000miles.
3. Grease all the hubs, as des- The Gearbox Oil Filler.
scribed later.
4. Charge the steering box with special lubricant,
5. Oil handbrake gear, pedal gear and joints, engine control joints, and
top of steering column.
6. Examine the battery and see that the connections are tight. (More
frequently in hot weather).
7. Give a charge of the special grease to the nipple on the fan spindle.
8, Give a few drops of oil to the distributor spindle bearing.
9. Grease the front end ofthe torque tube (behind the front seats).
10. Grease the splined end of the propeller shaft (behind the gear box)
Turn the shaft to expose the nipple.
11. Grease rear brake balance lever,
Examine water level in radi- .
ator and fill up to within one
inch of the top.
2. Examine oil level in the crank-
case and add more oil if
necessary. The dip rod indi-
cates the level of the oil.
Change the oil first at
500 miles, then every 2,000 to
3,000 miles (3,200 to 4,800
km), when the oil reservoir
gauze should be cleaned. The
sump capacity is half a gallon,
3. Fill up' the petrol tank if necessary. Care should be exer-
cised not to overfill the tank, which will contain five gallons.
Weekly Attentions,
I. With the grease gun charge-
Front spring shackle pins (4).
Front wheel swivel pins (2).
Steering cross tube (2).
Steering side tube joints (2).
Rear spring pins (2).
2. Oil the following-
Clutch release ring.
Foot brake pedal shaft (below steering box),
Brake cross shaft bearings (use a brush).
3, Examine both sets of brakes, and adjust if necessary.
4. Test the tyres for correct pressure and examine them for cuts, flints
and nails.
Occasional Attentions.
Clean the sparking plugs and check the settings.
Examine all bolts and nuts, such as road spring dips, cylinder head
nuts, wheel nuts, these three especially when the car is new.
Examine other parts, such as steering connections, the radius rod
JUlchoragebelow the gearbox, and the torque tube socket, neglect of which
might be followed by an expensive repair and inability to use the car for
.a lengthy period.
Occasionally dean the pump and carburetter petrol filters and float
-chamber strainers, and ever 2,000 to 3,000 miles the oil reservoir gauze
(when the engine oil is changed). Also ensure that the oil jets in the
-crankcase are dean.
Flush the radiator with plenty of dean water until it runs through dear.
Clean the ignition distributor, and the contact breaker points (adjust the
latter), the dynamo and starter commutators. Clean the shock absorbers.
.adjust the tappets, and the fan belt, decarbonize the engine and grind-in
the valves. Check the alignment of the front wheels.
D.e only recommended Oil..
14
15
" 4
-
..-
WHEELS AND TYRES.
How to use the Jack; Correct Inflation
Pressures
W
HENit becomes necessary t6 change a wheel hecause of a puncture
or for any other cause. the firstthing to do is to pull the handbrake
"hard on." The spare wheel must be lifted from the rear of the car.
Before it is used test the air pressure and if it is not up to the correct
figure. use the pump to rectify it. The proper pressures are tabulated
on the next page.
It is important~ have the car on
level ground. With the wheel brace
the three nuts of the wheel to be
removed should be slightly slackened.
but only enough for them to unscrew
freely later. The wheel is tb'en
jacked up.
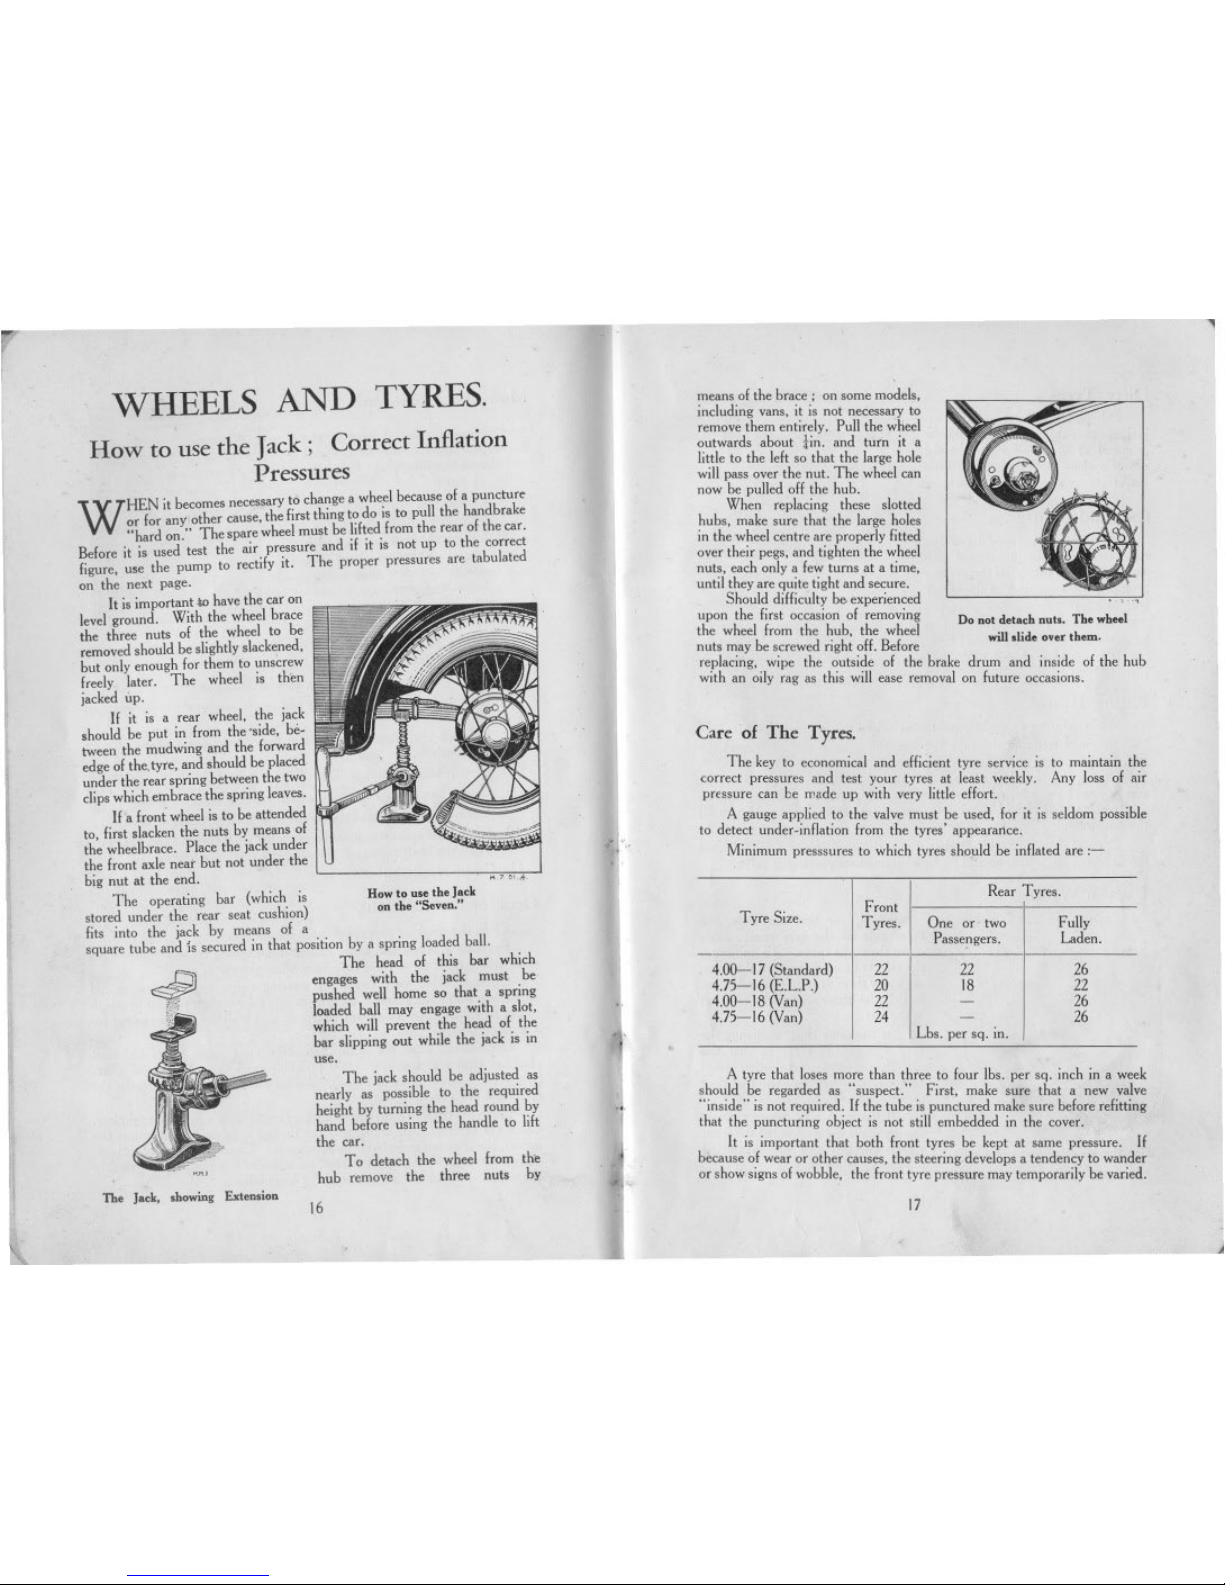
If it is a rear wheel. the jack
should be put in from the'side, be-
tween the mudwing and the forward
edge of the.tyre, and should be placed
under the rear spring between the two
clips which embrace the spring leaves.
If a froni wheel is to be attended
to, first slacken the nuts by means of
the wheelbrace. Place the jack under
the front axle neaf but not under the
big nut at the end.
The operating bar (which is
stored under the rear seat cushion)
fits into the jack by means of a
square tube and 15secured in that position by a spring loaded ball.
The head of this bar which
engages with the jack must be
pushed well home so that a spring
loaded ball may engage with a slot,
which will prevent the head of the
bar slipping out while the jack is in
use.
The jack should be adjusted as
nearly as possible to the required
height by turning the head round by
hand before using the handle to lift
the car.
To detach the wheel from the
hub remove the three nuts by
H' ",.
How to use the Jack
on the "Seven."
~
"".
".'
The Jack, .howing Extension
16
""'..
.-1,
,
means of the brace; on some models,
including vans. it is not necessary to
remove them entirely. Pull the wheel
outwards about tin. and turn it a
little to the left so that the large hole
will pass over the nut. The wheel can
now be pulled off the hub.
When replacing these slotted
hubs, make sure that the large holes
in the wheel centre are properly fitted
over their pegs, and tighten the wheel
nuts, each only a few turns at a time,
until they are quite tight and secure.
Should difficulty b" experienced
upon the first occasion of removing
the wheel from the hub. the wheel
nuts may be screwed right off. Before
replacing, wipe the outside of the brake drum and inside of the hub
with an oily rag as this will ease removal on future occasions.
". .,
Do not detach nut.. The wheel
will.lide over them.
Care of The Tyres.
The key to economical and efficient tyre service is to maintain the
correct pressures and test your tyres at least weekly. Any loss of air
pressure can be made up with very little effort.
A gauge applied to the valve must be used, for it is seldom possible
to detect under-inflation from the tyres' appearance.
Minimum presssures to which tyres should be inflated are :-
I
I
A tyre that loses more than three to four Ibs. per sq. inch in a week
should be regarded as "suspect." First, make sure that a new valve
"inside" is not required. If the tube is punctured make sure before refitting
that the puncturing object is not still embedded in the cover.
It is important that both front tyres be kept at same pressure. If
because of wear or other causes. the steering develops a tendency to wander
or show signs of wobble, the front tyre pressure may temporarily be varied.
17
....
Rear Tyres.
Tyre Size.
Front
Tyres.
One or two
Fully
Passengers.
Laden.
4.00-17 (Standard)
22 22 26
4.75-16 (E.L.P.)
20 18 22
4.00-18 (Van)
22
-
26
4.75-16 (Van)
24
-
26
Lbs. per sq. in.
Dirty Tyres.
Oil. paraffin and grease are in-
jurious to rubber. and should be
removed as soon as possible by the
use of a clean cloth and a very little
petrol.
Cuts and Damage.
Damage affecting only the rubber
tread and walls may be plugged with
a good tread cut filling. If this is done.
promptly an extension of the injury T.ght.n the wheel nuts alternatdy
.
11 b
d
.. and ..cur.ly.
Wl e prevente .
Damage of a more serious nature affecting the collon structure should
be entrusted only to an expert tyre repairer or the tyre manu~acturer.
It is essential that the tyre be removed immediately the damage i.
lustained.
Fitting Hints.
When refitting a tyre attention is called to the following points.
To avoid trapping the tube between the edge of the cover and the
rim, always inflate the tube very slightly before placing it in the cover.
During the final inflation see that the edges of the cover are sea ted
evenly round the edge of the rim. Check this by the moulded line on
the cover. which should be about a quarter of an inch from the rim all
the way round.
Covers are marked with a red spot near the wire edge. This indicates
the lightest part, which should be fitted immediately over the valve.
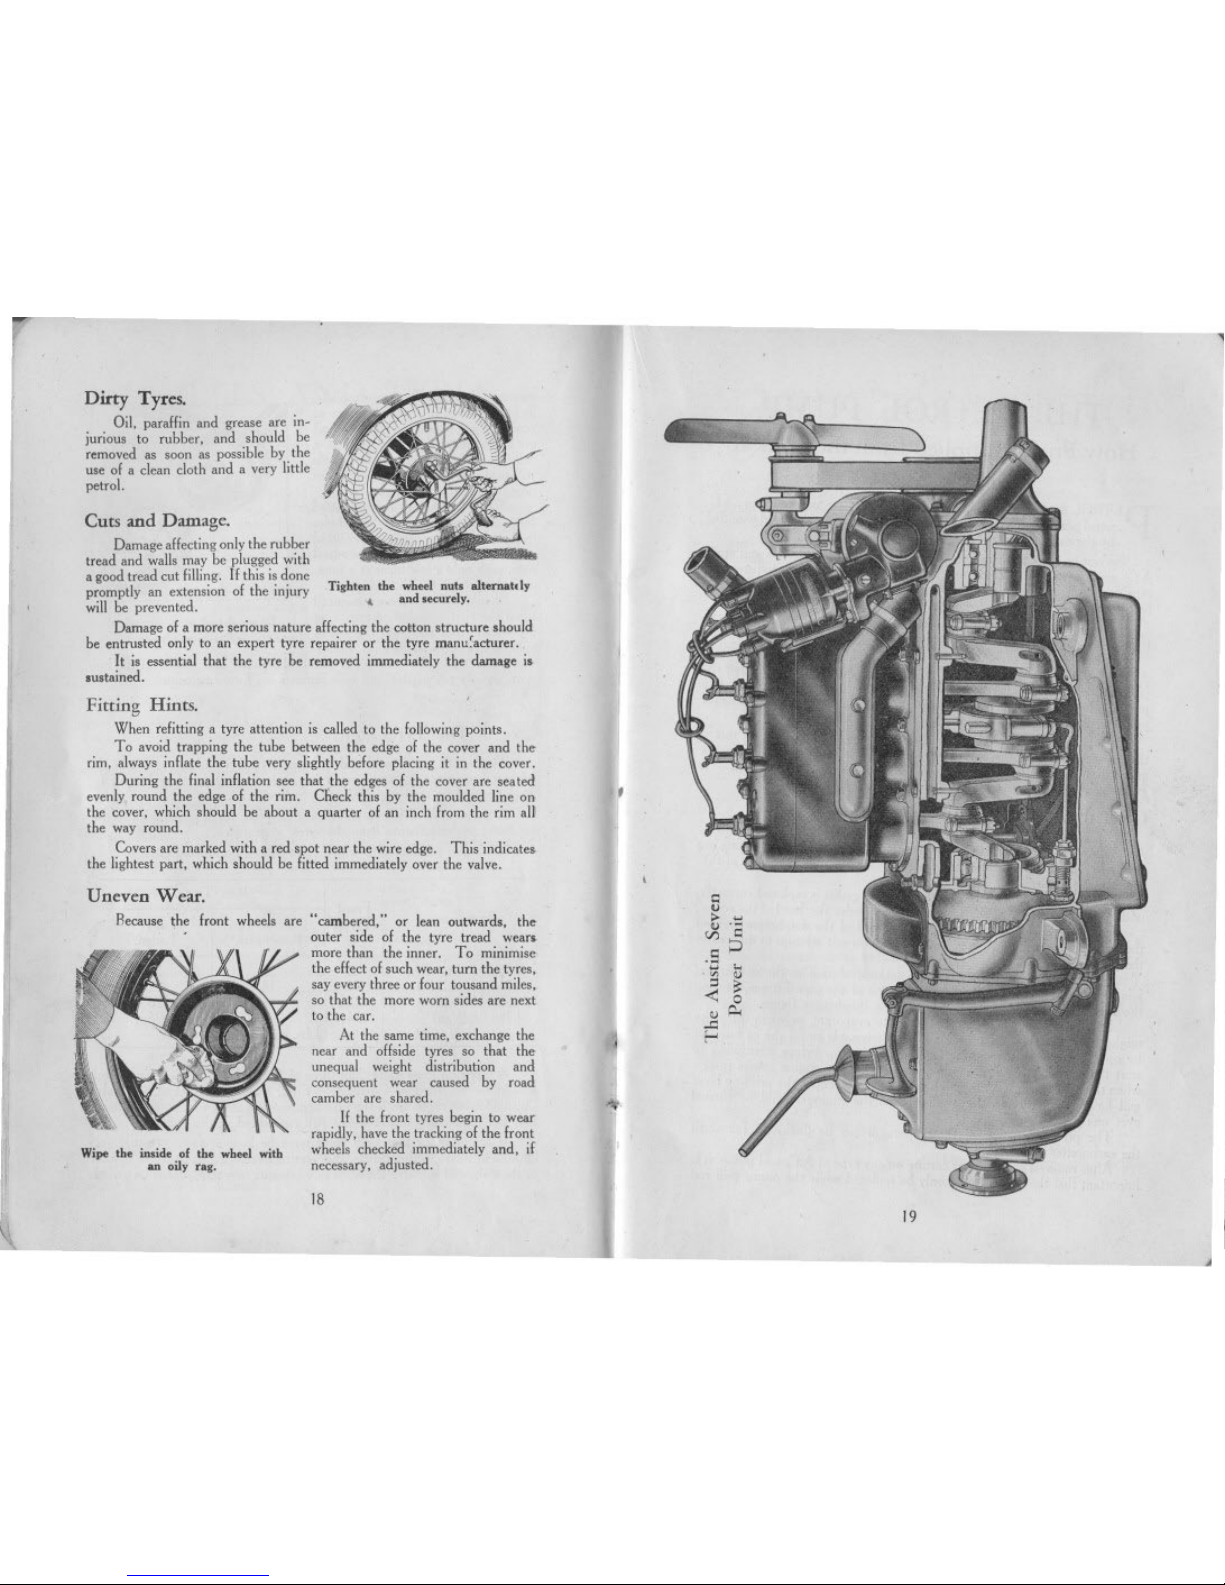
Uneven Wear.
Becausethe front wheelsare
~II
11'
Wipe th. inside of th. wheel with
an oily rag.
\
--
..cambered," or lean outwards, the
outer side of the tyre tread wean
more than the inner . To minimise
the effect of such wear, turn the tyres,
say every three or four tousand miles,
so that the more worn sides are next
to the car.
At the same time, exchange the
near and offside tyres so that the
unequal weight distribution and
consequent wear caused by road
camber are shared.
If the front tyres begin to wear
rapidly, have the tracking of the front
wheels checked immediately and, if
necessary, adjusted.
18
- - --
--
...
I
:::
u
:> '"'
u .~
V) c:
c:P
.~
'"' ....
'" "
=' ~
~ 0
" ~
..<::
I-<
I
19
-
J
THE PETROL PUMP.
How Fuel is supplied from the Tank to
the Carburetter
,
P
ETROL is drawn from the tank at the rear'by means 01 an A.C.
petrol pump which advances the Inel in the correct quantity demanded .
by the carburetter, no more and no less.
Service on the petrol pump is available at all Austin Dealers and at all
A.C. service stations, which are prepared with parts and lixtures lor
repairing and adjusting all pumps il any trouble is experienced with the
Inel supply.
Make sure that any dilliculty is not due to causes apart Irom the
pump belore attempting to do anything to the pump.
11there appears to be lack ollnel at the carburetter. lirst ascertain
if there is any Inel in the tank, and il not. replenish. Make sure that the
pipe and connections between the tank and the pump, and between ,the
pump and the carhuretter, are not leaking. In case 01 broken or damaged
piping replacement should be made.
lt may be that the litter cover of the petrol pump is loose. 11this is
the case, tighten the main nut at the top, lirst ascertaining that the cork
gasket lies lIat in its seat and is not broken or unduly compressed. A
gasket compressed hard may need to be replaced.
Clean the Filter.
Occasionally remove the cover and dean the lilter screen underneath it.
Also remove any sediment Irom the chamher below the lilt er by taking out
the drain plug (F.) Make sure that the libre washer is under the head 01th.
plug belore replacing.
When re-assembling, take care that the cork gasket is replaced correctly,
under the cover, and that the libre washer is under the head 01the screw.
11petrol appears to be leaking at the edge 01 the diaphragm tighten
the cover screws alternately and securely, but do not attempt to dismantle
the pump body.
Sometimes there appears to be a leakage 01 luel at the diaphragm
joint. The leakage may actually exist at one 01 the pipe littings, causi~g
the Inel to run down the pump on to the diaphragm lIange.
In hot weather when petrol is likely to evaporate, or when dilliculty
might be expected on cold mornings, it is advisable to lilI the carburetter
by operating the hand priming lever on the pump before attempting to
start the engine. lt will be appreciated that il the engine comes to rest
when the rocker arm is on the high point 01the eccentric the priming lever
will be inoperative. In the event 01 this the engine should be turned
over one revolution by hand.
The pumping action 01 the diaphragm can be distinctly lelt until
the carburetter bowl is lull.
Alter removal 01the upper casting on any type 01A.C. Inel pump it is
important that the cover should only be replaced while the pump pull rod
20
I.
-
~
I
11
!
I
I
I
i
!
i
I
+
. .
;to.
-
-~
'"'"
is at the top 01its stroke. This is to ensure sullicient lIexing01the dia.
phragm to allow its normal working movement.
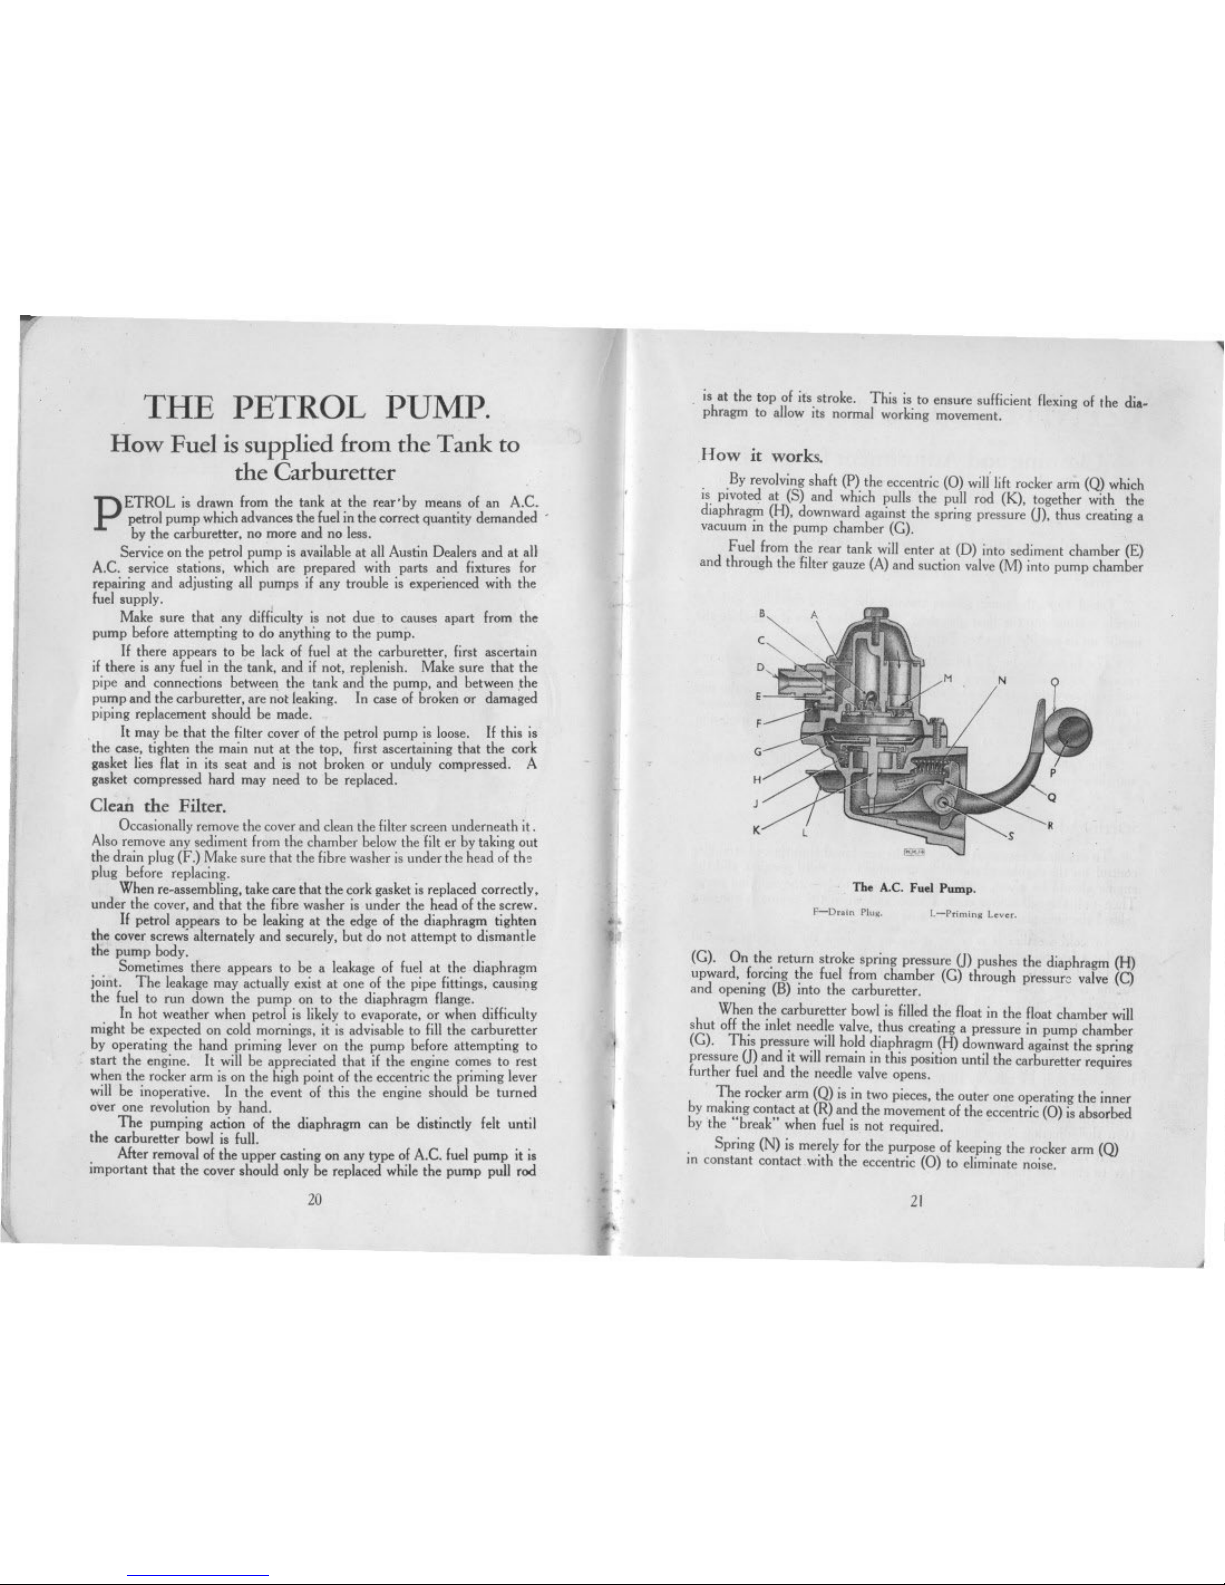
How it works.
By revolvingshalt (P) the eccentric(0) will jilt rockerarm (Q) which
is pivoted at (S) and which pulls the pull rod (K), together with the
diaphragm(H), downwardagainstthe spring pressure U), thus creatinga
vacuumin the pump chamber(C).
Fuellrom the rear tank will enter at (D) into sediment chamber(E)
and through the lilter gauze(A)and suctionvalve(M) into pump chamber
E
F
G
I
H
J
K
,
The A.C. Fuel Pump.
F-D"'n PI",.
L-Prim'n, lm..
(C). On the return stroke spring pressure U)pushes the diaphragm (H)
upward, lorcing the luel Irom chamber (C) through pressure valve (C)
and opening (B) into the carburetter.
When the carburetter bowl is lilled the lloat in the lloat chamber will
shut 011the inlet needle valve, thus creating a pressure in pump chamber
(G). This pressure will hold diaphragm (H) downward against the spring
pressure U)andit willremaininthis positionuntil the carburetterrequires
lurther Inel and the needle valve opens.
The rocker arm (Q) is in two pieces, the outer one operating the inner
by making contact at (R) and the movement 01the eccentric (0) is absorbed
by the "break" when Inel is not required.
Spring (N) is merely lor the purpose 01keeping the rocker arm (Q)
in constant contact with the eccentric (0) to eliminate noise.
21
.J
 Loading...