

Aussie MONARO 7652K1, MONARO 7652K5, MONARO 7652K6 Assembly And Use Manual
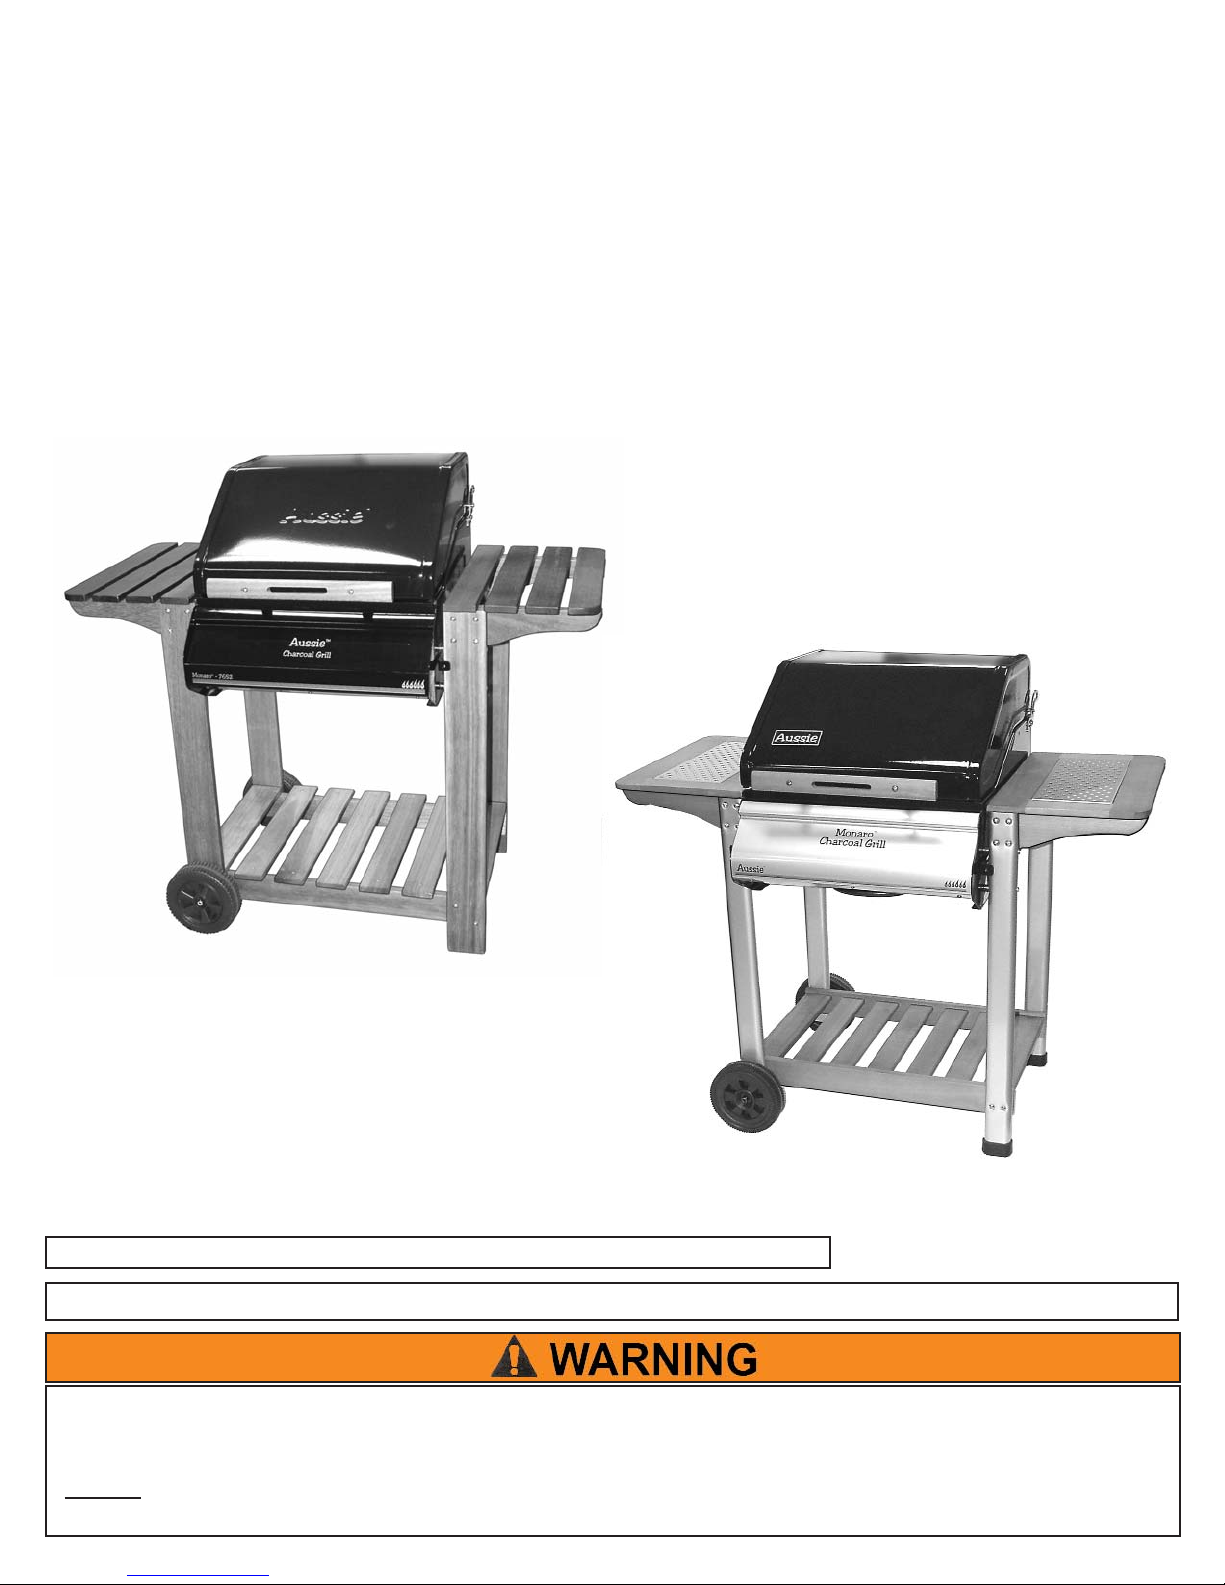
Monaro®Charcoal Grill
by Meco
®
For Customer Service, call 1-800-251-7558 or visit our web site at www.meco.net
FOR OUTDOOR HOUSEHOLD USE ONLY. NOT FOR COMMERCIAL USE.
• Failure to follow these instructions could result in fire or explosion which could cause property
damage, personal injury or death.
• Read and follow instructions carefully before assembly or use.
• Do not
use this product for any other purpose than which it is intended.
• These instructions must be kept with the user. SAVE THESE INSTRUCTIONS.
Assembly and Use Manual
MMooddeell 77665522KK11
Aussie
®®
MMooddeell 77665522KK55 && 77665522KK66
2
© Meco Corporation® 2005
— NOTICE —
MECO CORPORATION STRIVES TO BE A QUALITY SUPPLIER OF CONSUMER PRODUCTS. IF
WE OMITTED ANY PARTS NEEDED FOR ASSEMBLY, OR YOU NEED TROUBLESHOOTING
INFORMATION, PLEASE CONTACT US USING OUR TOLL FREE NUMBER. THANK YOU FOR
PURCHASING A MECO CORPORATION PRODUCT.
1-(800)-251-7558
8 am - 6 pm E.S.T Mon. - Fri.
1-(423)-639-1171 (TELEPHONE)
1-(423)-639-2570 (FAX)
CONSUMER SERVICE DEPARTMENT
MECO CORPORATION
1500 INDUSTRIAL ROAD
GREENEVILLE, TN. 37745 USA
www.meco.net
The use of alcohol, prescription or non prescription drugs could impair the consumer’s ability to
properly assemble or safely operate this appliance.
ASSEMBLY INSTRUCTIONS
PREPARATION FOR ASSEMBLY: Removing parts from carton and some assembly will require
two people. Before starting assembly, read the instructions and your manual.
Remove all the parts from the carton and lay them on a smooth, clean surface. (You may cut the carton,
spread it out, and use it as a pad to protect part finishes.) Look in the Parts List under the model number
to find the exact parts you need. Do not throw away any packaging until you have located all the parts.
Follow instructions of each step in the order they are written as you look at the diagrams.
This will allow
little confusion and easier assembly
. If you have any questions which require help, contact Customer
Service and be sure to mention the model number of your grill.
I. Assembly Instructions........................................................2
Parts Illustrations................................................................3
Parts List..........................................................................4
Step 1-Leg/Side Table Assembly.........................................5
Step 2-Bottom Shelf/Leg Assembly.....................................6
Step 3-Wheel Assembly......................................................7
Step 4-Slide Vent Assembly................................................8
Step 5-Hood Handle Assembly...........................................9
Step 6-Grill Body/Cart Assembly.........................................9
Step 7-Install Drip Pan, Charcoal Grate & Cooking Grid...12
II. Operating and Maintaining Your Charcoal Grill...............13
A) Before Using Your Charcoal Grill..................................13
1) Using Charcoal..........................................................13
2) Selecting a Location.................................................13
3) Operating the Charcoal Grill......................................13
4) Starting a Fire...........................................................13
B) Grill Cooking................................................................14
1) Cooking on the Grids............... ...............................14
2) Smoking .................................. ...............................14
C) End of Cooking Session..........................................15
D) Care and Maintenance..............................................15
1) Cleaning the Grill.................................................15
a) Drip Tray...........................................................15
b) Cooking Grid....................................................15
c) Grill Body..........................................................15
d) Side Tables and Wood parts.............................15
2) Storage.................................................................15
CONTENTS
To reduce the risk of a cut injury:
· Wear protective gloves when handling parts that have sharp edges.
· Some assembly may require help from another person. Observe where noted.

3
PARTS ILLUSTRA
TIONS
1
7 with Item 10 installed
9
6 or 6A
5
4
3
2 or 2A
10-See Item 7
23
22
20
21
19
17
16
15
14
13
12
11
2B
3A
4A
5A
11A
17A
18 or 18A
6B
8
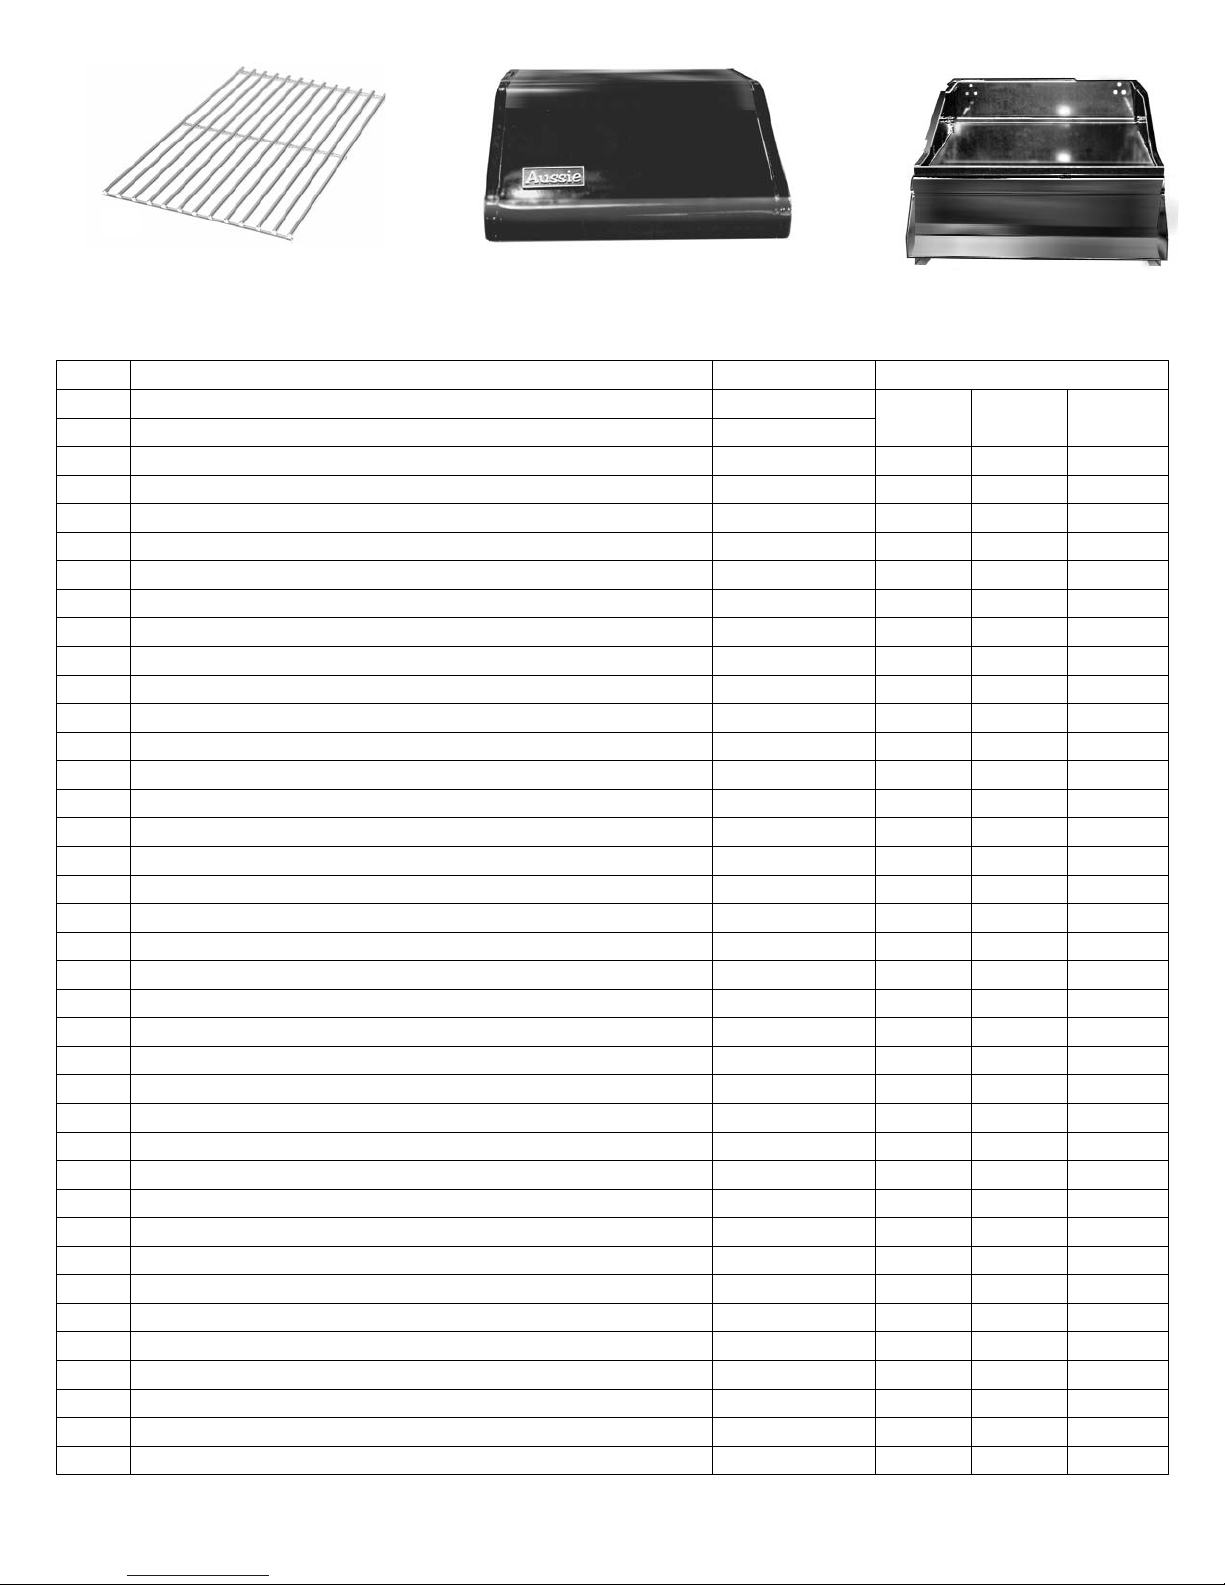
PARTS LIST
ITEM DESCRIPTION PART #
1 Owner's Manual 03.6077.01 1 1 1
2 Side Table (Metal Insert) 03.6495.00 -- 2 2
2A Side Table (Metal Insert ) 03.6597.00 -- -- 2
2B Side Table (All W ood) 03.5845.00 2 -- --
3 Fixed Leg (Metal) 03.6496.00 -- 2 2
3A Fixed Leg (Wood) 03.6066.00 2 -- --
4 Wheel Leg ( Metal) 03.6497.00 -- 2 2
4A Wheel Leg ( Wood) 03.6065.00 2 -- --
5 Bolt, 1/4-20 x 1 3/8" 03.6498.00 -- 24 24
5A Bolt, 1/4-20 x 1 " 03.4062.00 24 -- --
6 Bottom Shelf (Model 7652K5) 03.6499.00 -- 1 -6A Bottom Shelf (Model 7652K6) 03.6598.00 -- -- 1
6B Bottom Shelf (Model 7652K1) 03.6067.00 1 -- --
7 Axle (Assembled with Item 10 Axle Nut) 03.5014.00 1 1 1
8 Steel Washer, (Axle) 03.4072.00 2 2 2
9 Wheel 03.5003.00 2 2 2
10 Axle Nut ( Assembled on Item 7 Axle) 03.4073.00 2 2 2
11 Body Assembly (See 25, 25A & 26 for Replacement) -- 1 1 1
12 Slide Vent 03.6072.00 2 2 2
13 Bolt , 6mm x 16mm 03. 6070. 00 8 8 8
14 Washer, 6mm 03.6501.00 18 18 18
15 Spacer , Sleeve 03.6071.00 8 8 8
16 Locknut, 6mm 03.4070.00 10 10 10
17 Bolt , 6mm x 90mm 03. 6020. 00 2 10 10
17A Bolt, 6mm x 110mm 03.4066.00 8 -- --
18 Handle, Hood (Models 7652K1 & 7652K5) 03.6036.00 1 1 --
18A Handle, Hood (Model 7652K6) 03.6599.00 -- -- 1
19 Spacer , Handle 03.6023.00 2 2 2
20 Spacer , Body 03.4074.00 8 8 8
21 Wing Nut, M6 03.6003.00 8 8 8
22 Dr ip Pan 03.6069.00 1 1 1
23 Char coal Grate 03.6074.00 1 1 1
24 Cooking Grid 03.6075.00 2 2 2
25 Hood ( Em bossed Logo) 03.6502.00 1 -- --
25A Hood (Decal Logo) 03.6503.00 -- 1 1
26 Body 03.6068.00 1 1 1
Model
7652K1
Model
7652K5
Model
7652K6
QTY.
4
24
26
25 Hood w/Embossed Logo
25A Hood w/Decal Logo Shown

· Lay Side Tables upside down on a flat surface. Side tables will fit on either side of grill.
· Attach the two Fixed Legs to one Side Table. Align four recessed holes of a Fixed Leg with four
inserted holes in a Side Table. The four large recessed holes in the Fixed Leg should face away
from Side Table. Attach four 1/4 -20 Bolts (Item 5 or 5A) through each Fixed Leg into the
threaded holes in the Side Table. Do not tighten bolts completely. (NOTE: For easier alignment
and further assembly, final tightening of all bolts will be completed in Step 6).
· Attach the two Wheel Legs to the second Side Table the same way. (Wheel Leg is the short leg
with a large axle hole at one end.)
(ITEM 5) 1/4-20 x 1 3/8” Bolt
STEP 1- Leg/Side Table Assembly
TOOLS:
(ITEM 3 or 3A) Fixed Leg
(ITEM 2 or 2A
Side Table
(ITEM 4 or 4A) Wheel Leg
(ITEM 4) Fixed Leg
(ITEM 3) Wheel Leg
with Axle hole
Recessed
holes face out
5
(ITEM 5A) 1/4-20 x 1” Bolt
Wood Side
Table/Legs
(ITEM 2B)
Side Table
and/or
or
 Loading...