

Aussie 69F6U00KS1 User Manual
LP Gas Grill Assembly and Use Manual
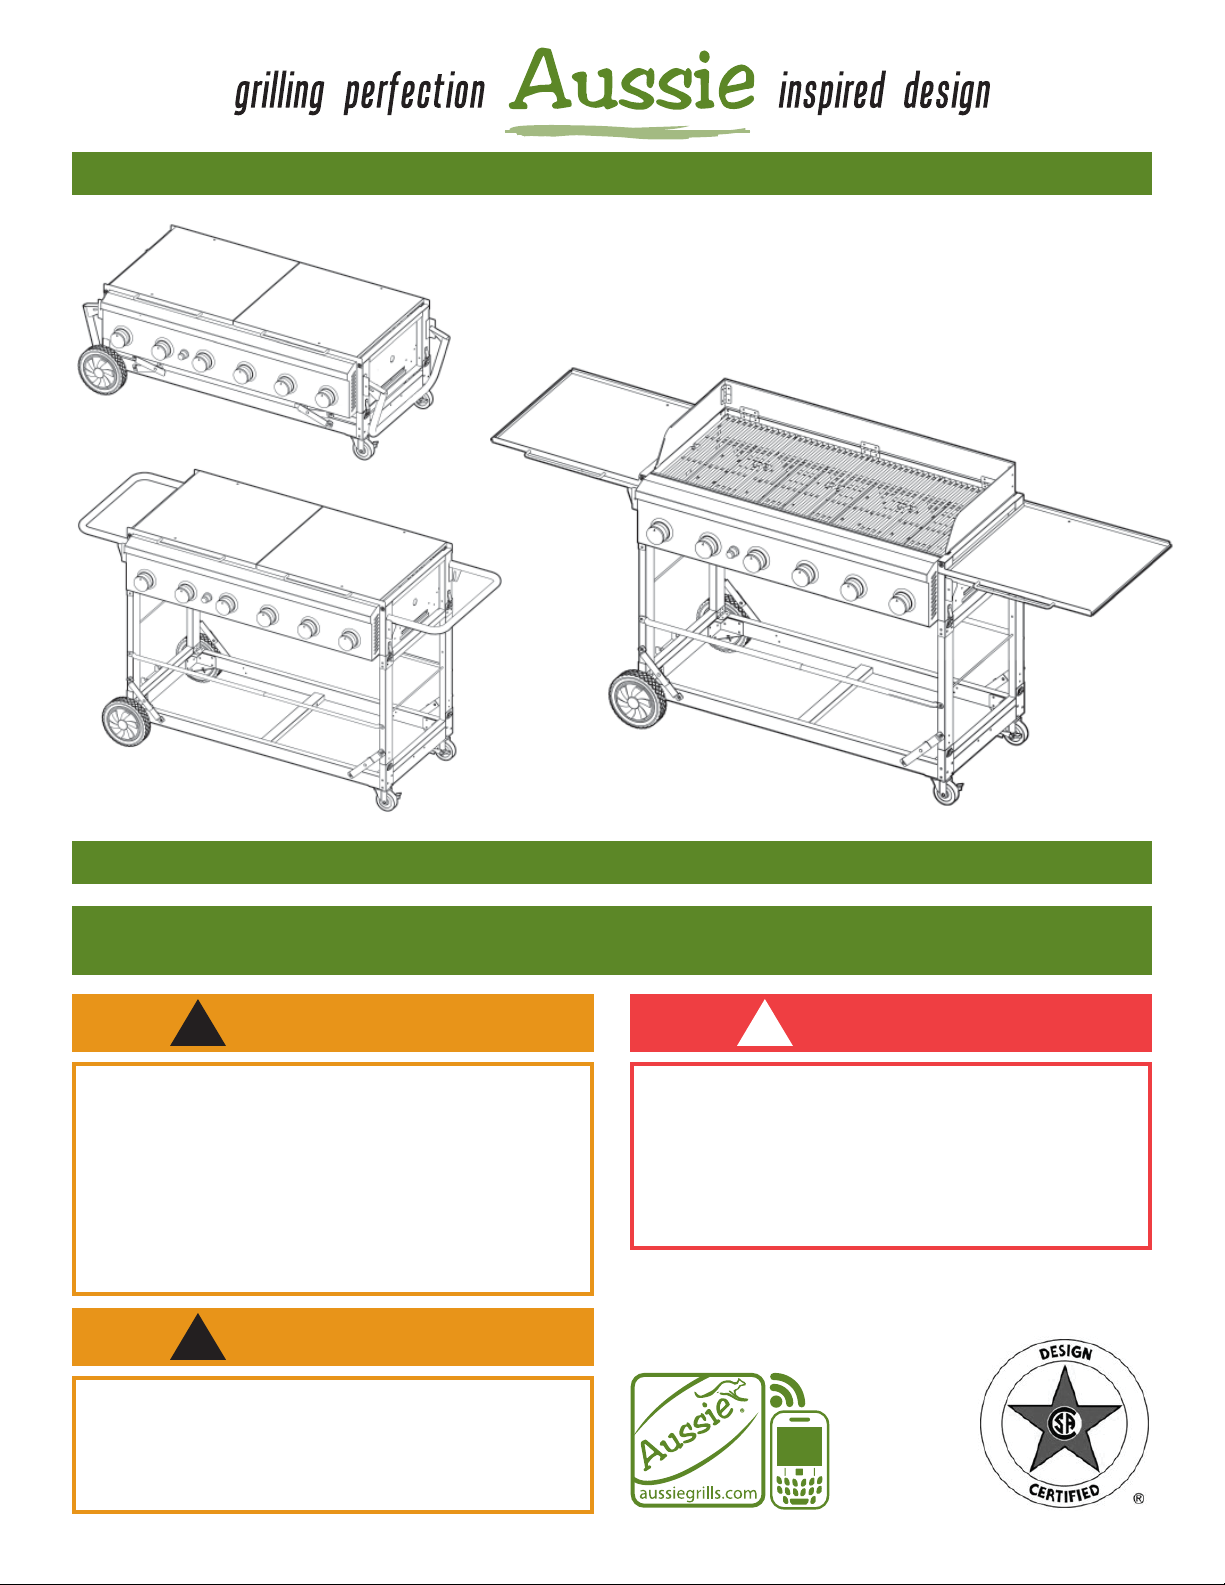
Six Burner Event Grill
Sets Up In Minutes
Great for Every Occasion
69F6U00KS1
For Outdoor Household Use Only. Not for Commercial Use.
Need Help? Need to Register Your Grill? Looking for Aussie Parts & Accessories?
Visit us online at www.AussieGrills.com Or call Aussie Customer Service at 1-800-251-7558
WARNING
!
• Failure to follow these instructions could result in
fire or explosion which could cause death, serious
personal injury, or property damage.
• Read and follow instructions carefully before
assembly or use.
• Do not use this product for any other purpose than
which it is intended.
• These instructions must be kept with the user.
SAVE THESE INSTRUCTIONS.
WARNING
!
• Do not store or use gasoline or other flammable
vapors and liquids in the vicinity of this or any
other appliance.
• An LP cylinder not connected for use shall not be
stored in the vicinity of this or any other appliance.
If you smell gas:
1. Shut off gas to the appliance.
2. Extinguish any open flame.
3. Open lid.
4. If odor continues, keep away from the appliance and immediately call your gas supplier or
your fire department.
DANGER
!
2
DANGER
!
CARBON MONOXIDE HAZARD
This appliance can produce carbon monoxide which
has no odor. Using it in an enclosed space can kill
you. Never use this appliance in an enclosed space,
such as a camper, tent, car, or home.
WARNING
!
To reduce the risk of serious injury or death from fire or explosion:
• Never leave grill unattended
• Never use alcohol, prescription or non-prescription drugs while assembling or safely operating this appliance.
• Keep children and pets away at all times.
• Do not connect to the LP Gas Cylinder until assembly is complete except as noted for “First
Time Use” leak test as detailed on pages 12-13.
• Do not store or use gasoline or other flammable vapors and liquids in the vicinity of this or
any other appliance.
• An LP cylinder not connected for use shall not be stored in the vicinity of this or any other
appliance.
• Always have a type BC or ABC fire extinguisher readily available.
CAUTION
!
To reduce the risk of a laceration hazard, wear protective gloves when handling parts that have sharp edges.
To reduce the risk of bodily injury from lifting, assembly will require two people.
NOTICE
Meco Corporation strives to be a quality supplier of consumer products. If we omitted
any parts needed for assembly, or you need troubleshooting information, please
contact us using our toll free number or visit our web site.
It is important to register your grill and retain your receipt.
1-800-251-7558
8 am - 5 pm E.S.T. Monday - Friday
1-423-639-1171 (Telephone)
1-423-639-2570 (Fax)
Tools Required for Assembly:
Register your grill @
www.aussiegrills.com
Consumer Service Department
MECO CORPORATION
1500 Industrial R o a d
Greeneville, TN 37745 USA
Phillips Screwdriver
Pliers OR Wrench
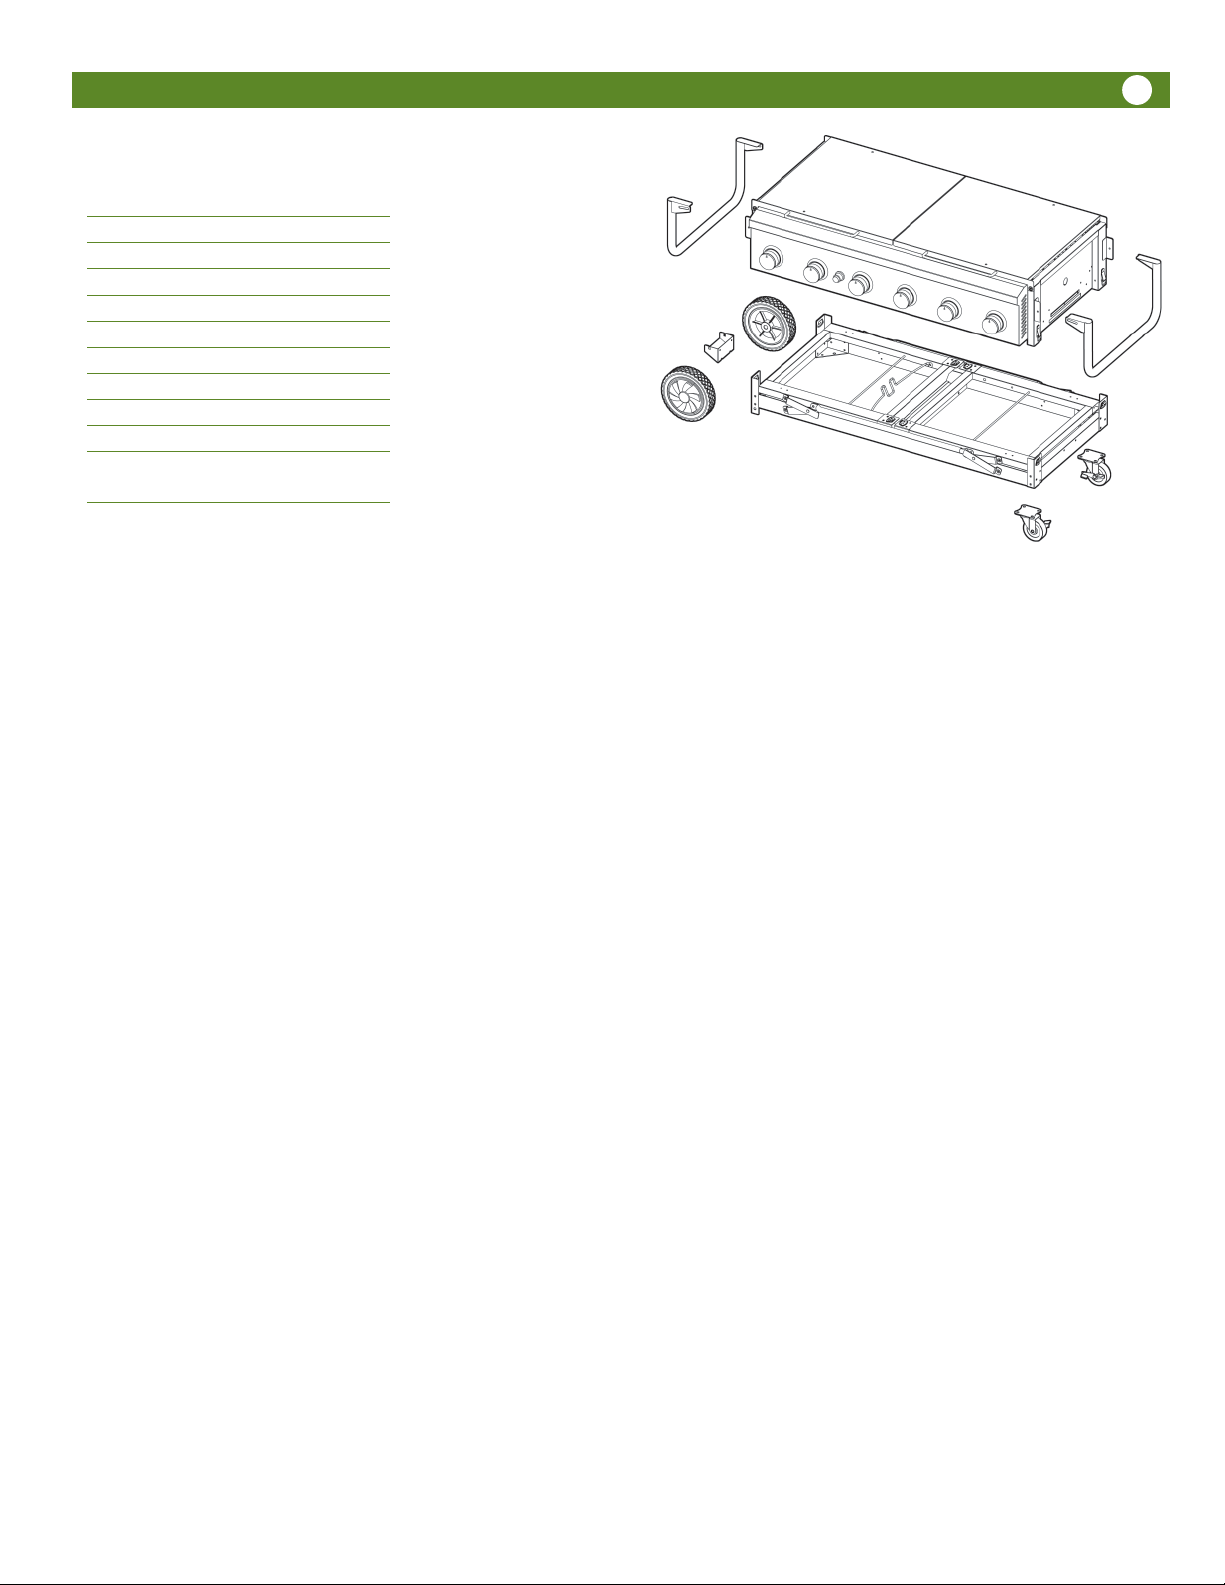
Packing List
Description
Grill Body
Folding Cart
Firebox Handles
Wheels
Casters
Cylinder Bracket
Cooking Grids (not pictured)
Flavor Activators (not pictured)
Grease Pan (not pictured)
Hardware Pack (not pictured)
Owner’s Manual and Warranty
Card (not pictured)
Contents
3
Detailed Parts List and
Illustrations may be
found on pages 26 & 27.
Packing List ..................................................................3
Preparation for Assembly .......................................... 3
Assembly Instructions
Step 1 Attaching Wheels and Casters ...................... 4
Step 1 Attaching Cylinder Bracket ............................4
Step 1 Attaching Firebox Handles ............................4
Set-Up Instructions
Step 1 Unfolding Cart ..............................................5
Step 2 Unfolding Firebox Handles ............................ 5
Step 3 Placing the Grill Body on the Cart .................. 6
Step 4 Opening the Firebox ......................................7
Step 5 Flavor Activator/Cooking Grid Assembly ........7
Step 6 Grease Pan/Foil Pan Installation ....................8
Step 7 Igniter Battery Installation ..............................8
Folding/Preparation for Transport ............................8
Important Reminders ..................................................8
Connecting/Disconnecting the Gas
Using Gas .................................................................... 9
LP Gas Cylinder ............................................................9
LP Hose & Regulator ................................................... 10
Connecting LP Gas Cylinder .......................................10
Disconnecting LP Gas Cylinder ................................... 10
Preparation for Assembly
Before Using Your LP Gas Grill
Installation Codes ....................................................... 11
Selecting a Location ................................................... 11
Performing a Leak Test ............................................... 11
How to Perform a Leak Test ........................................12
Lighting Grill Using the Pulse-Spark Ignitor ................ 14
Manually Lighting the Grill ......................................... 16
Check the Flame ........................................................ 16
Cooking on the Gas Grill
Grill Cooking (Direct Method) ..................................... 17
End of Cooking Session .............................................. 18
Care and Maintenance
Cleaning the Grill .......................................................19
How to Clean the Burners ..........................................20
Bottom Body Panel Removal ....................................... 21
Storage and Transportation ........................................22
Emergencies ............................................................ 23
Troubleshooting.......................................................23
Important Notice- LP Cylinder with OPD ...............25
Replacement Parts
Parts Illustrations ........................................................ 26
Parts List ...........................................................................27
Limited Warranty.......................................................28
Register your grill and retain your receipt.
Remove Grill Body, the Folding Cart and all the packaging from the carton and place on floor. Make sure there are no
loose parts. The Cooking Grids, Flavor Activators, Firebox handles, Grease Pan, Hardware Pack, Wheels and Casters are
wrapped and boxed inside the Grill Body, under the Cooking Grids. Open the grill as described on page 7 and remove
the cooking grids to access the parts. Unpack and inspect these parts as well.
NOTE: Before using your grill, read the instructions and your manual.
For easier set-up, follow instructions of each step in the order they are written as you look at the diagrams.
If you have any questions or need help, go to www.aussiegrills.com or contact Customer Service at 1-800-251-7558.
Be sure to have the grill model number and serial number printed on the black label located on the back face of the bottom
tube of the cart base. If you need replacement parts, look in the Parts List Section to find the exact parts you need. If you
need a replacement part under warranty, a proof of purchase will be necessary. You will be asked to forward
your proof of purchase via e-mail to csr@aussiegrills.com or to fax your proof of purchase to 423-639-1055 and reference your model and serial number. It is important to register your grill and retain your receipt.
4
Assembly Instructions
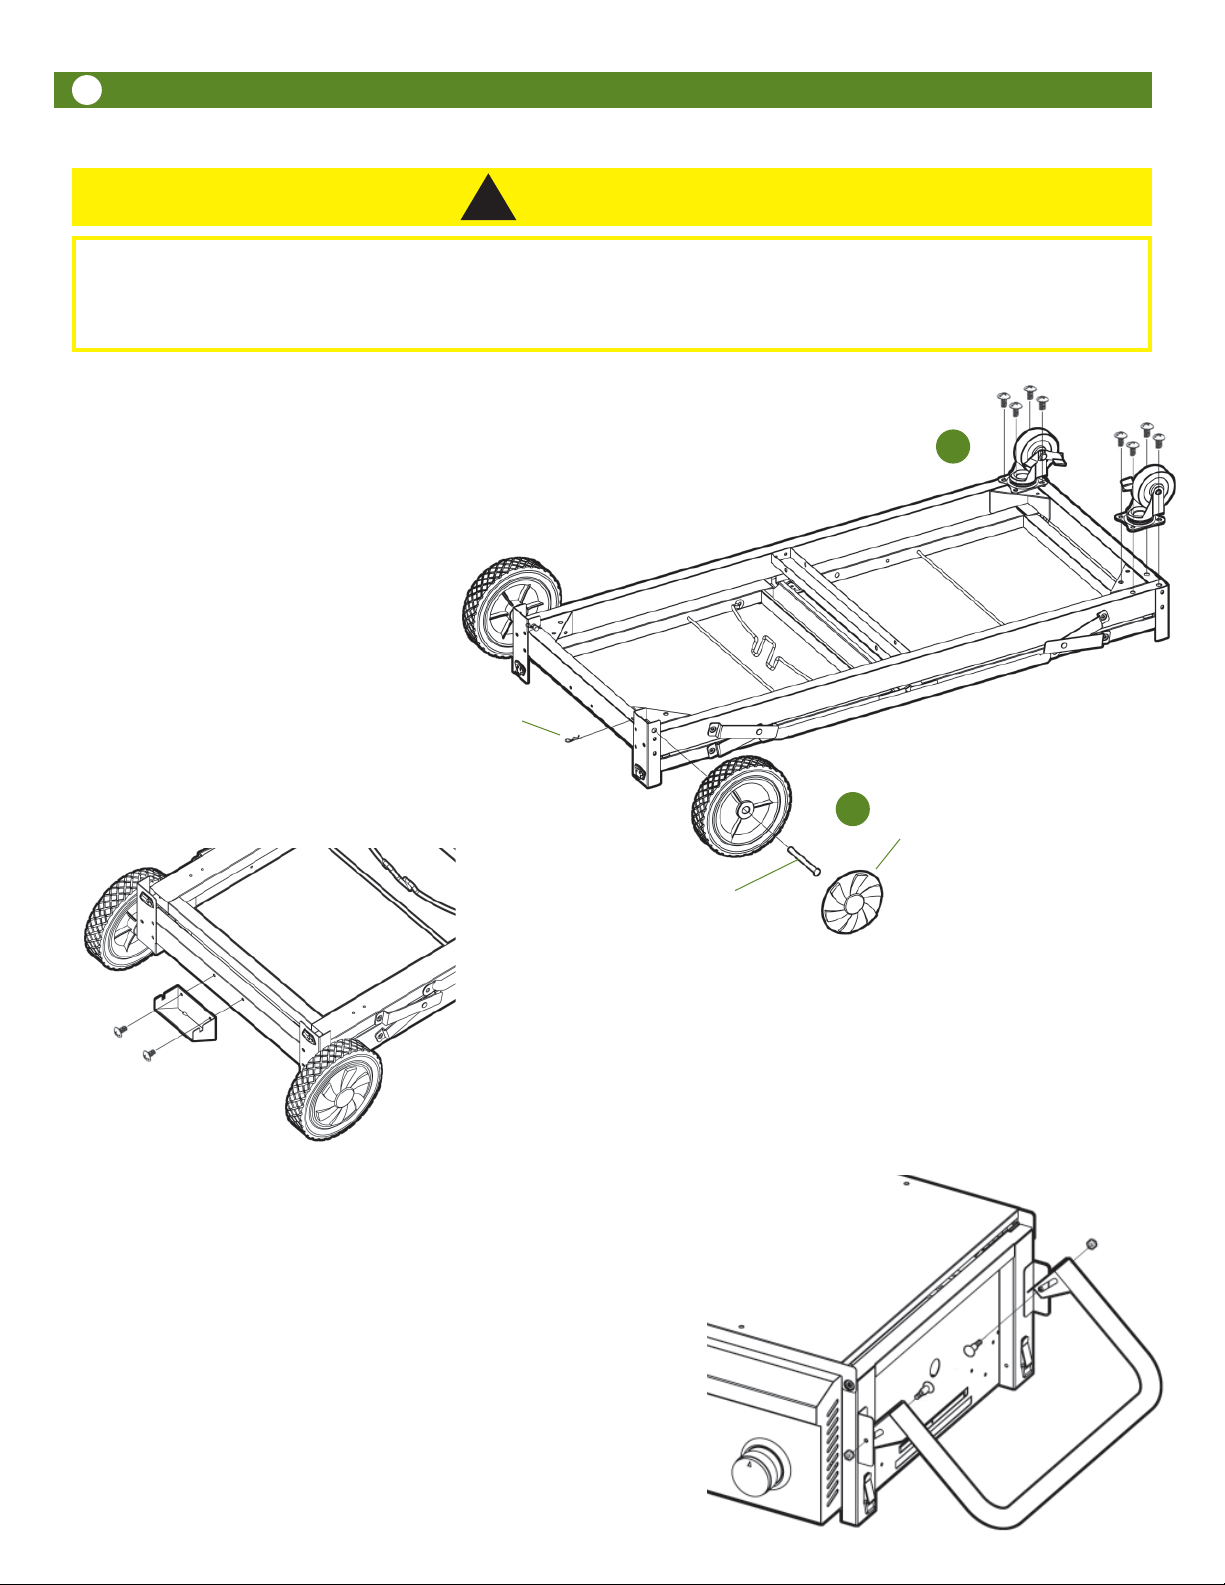
CAUTION
!
P I N C H H A Z A R D
To reduce the risk of bodily injury from pinch hazard, keep hands and fingers away from hinges,
leg pivot points and moving parts. Only open the cart by gripping the top of each leg frame.
Read and follow these instructions to set up your grill.
Step 1
Attaching the Wheels and Casters
Place the cart upside down on a clean flat surface. Insert an Axle through
A.
a Wheel and both walls of the corner channel. Fasten in place by inserting an
Axle Pin through the small hole near the end of the Axle. Snap the Hubcap
on to the Wheel. Repeat for other Wheel.
B. Attach the casters to the bottom of the
cart as shown with 4) 1/4-20 x .5” Bolts
each caster.
B
Step 3
Attaching the Firebox Handles
Axle Pin
A
Hubcap
Axle
Step 2
Attaching Cylinder Bracket
Attach the Cylinder Bracket to the end of the Cart with 2) 1/4-20 x .47” Bolts,
oriented as shown.
Place the Handle between the brackets on the end of the firebox
and align the slot with the hole. For each side of the Handle, insert
a 1/4-20 Shoulder Bolt from the inside so that the shoulder is
through the slot in the handle and tight against the firebox bracket.
Fasten in place on the outside with a 1/4-20 Locking Nut. Repeat
for other Handle.
Set-Up Instructions
Step 1
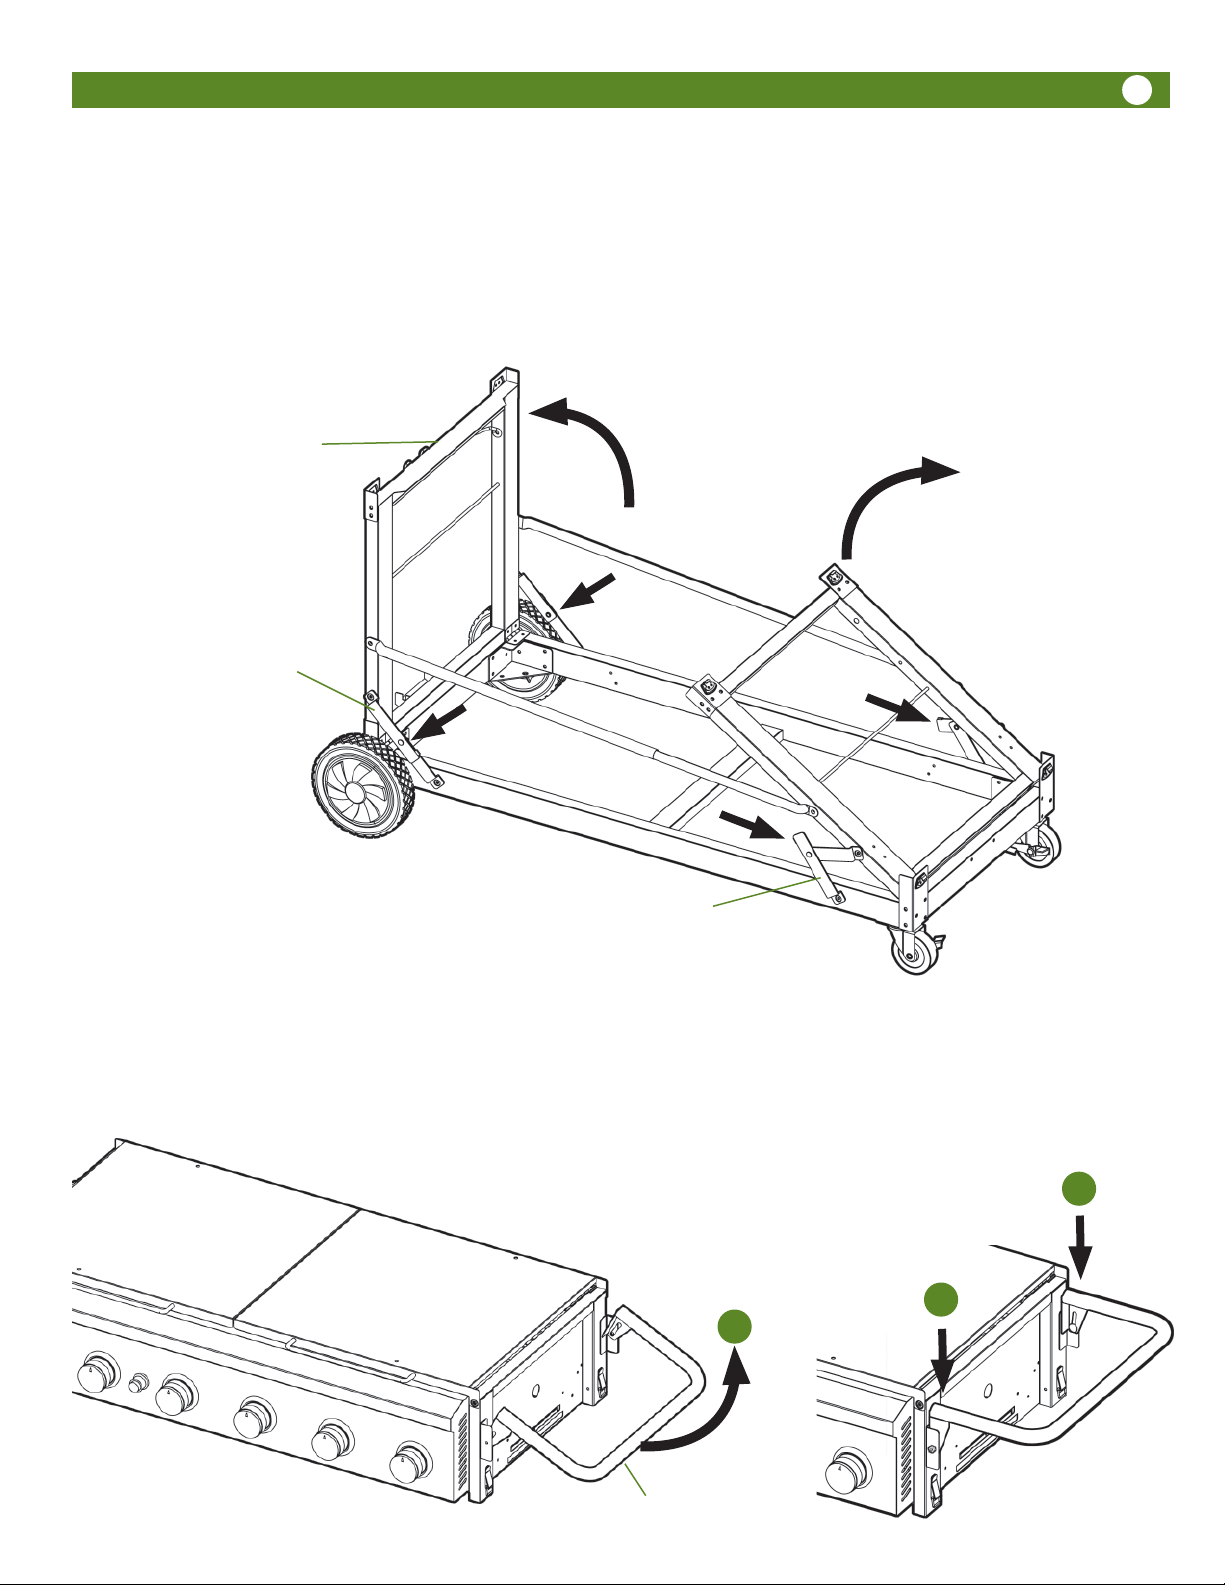
Unfolding Cart
To avoid being pinched by hinges or moving parts, only open the cart by gripping the top of each leg frame.
Gripping at the top, lift up and outwards until the leg frames are straight up. Press down firmly at the center of each
Leg Lock Bracket to insure each is straight and in the locked position.
Top of Leg Frame
Grip here to open
Push
Down
Leg Lock Bracket in
“locked” position
5
Leg Lock Bracket
Step 2
Unfolding Firebox Handles
Grasp the “Gripping Portion” of the Firebox Handle and rotate upwards until it is straight out from the firebox.
A.
B. With the handle straight out, push straight down on both sides of the bracket parts of the handle nearest the firebox.
This seats the handle in place for lifting the firebox.
Push down here when
Handle is all the way up
B
B
A
“Gripping Portion”
of Handle
6
CAUTION
!
To reduce the risk of bodily injury from lifting, the following assembly step will require two people.
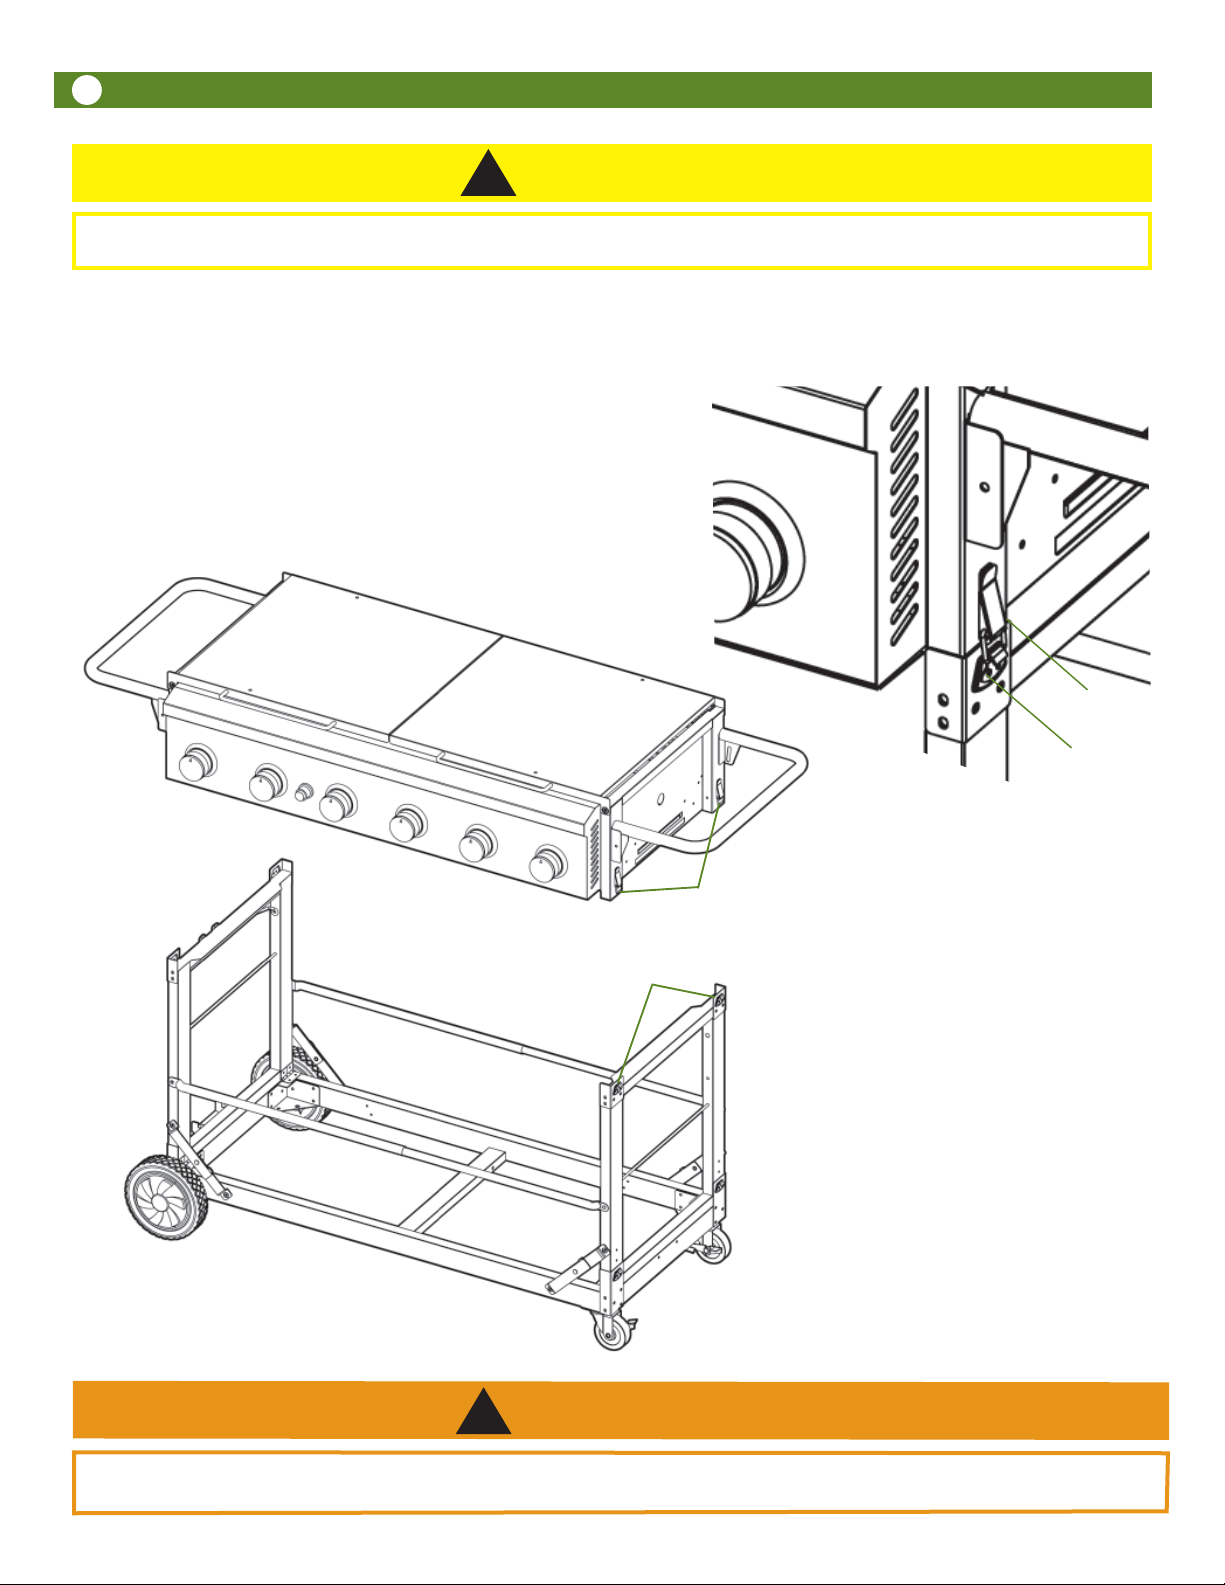
Step 3
Placing the Grill Body on the Cart
With one person at each end, grasp the “Gripping Portion” of the
Tubular Handles and place the Grill Body on Cart. Corners of Firebox
will fit INSIDE brackets on top of legs.
IMPORTANT: Be sure to engage latches at all four corners before
moving grill.
Latch Catch
Latch
Latch Catch
Latch
WARNING
!
To reduce the risk of serious bodily injury or death from fire or explosion:
Never remove guards or devices to prevent storage of spare or oversize LP Gas Cylinders not recommended for this grill.
7
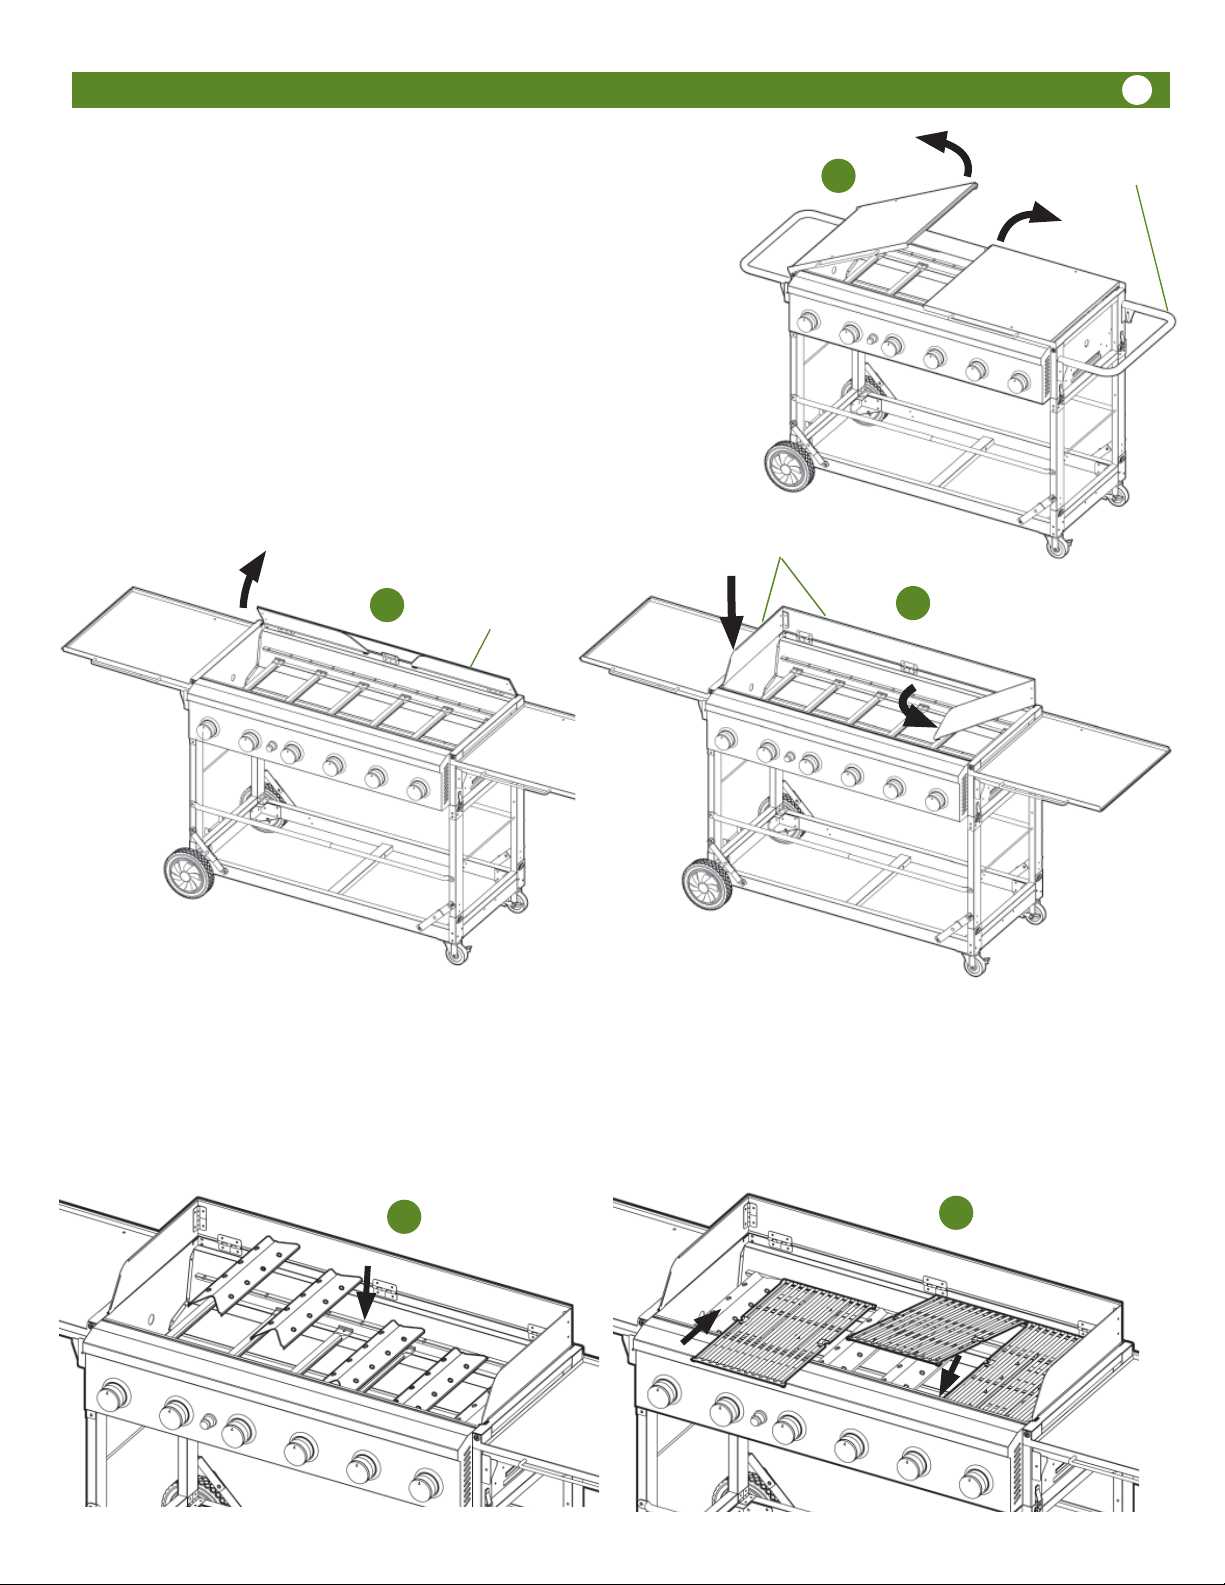
Step 4
Opening the Firebox
IMPORTANT: Be sure the Firebox Handles are in
the Up and Locked position before opening and
using side tables.
First, open the left side table, then open the right. When closing,
A.
first close the right side table so the drainage lip is under the edge
of the left side table.
B. Next, lift up the windscreen at the back until it is straight up.
C. Fold out the side windscreens and snap the tabs at the front into
notches in the firebox. Push gently at the top front edge of the side
windscreen to help lock in position. The lip on the outside bottom of
the side windscreen should rest on top of the side of the firebox.
B
Windscreen
A
Windscreen
C
Firebox Handle in Up
and Locked position
C
Step 5
Flavor Activator / Cooking Grid Assembly
Place a Flavor Activator over each burner. The bottom edges of the Flavor Activators will rest in notches in the
A.
ledges inside the firebox.
B. Place the Cooking Grids over the Flavor Activators on the upper Body ridges.
A
B
8
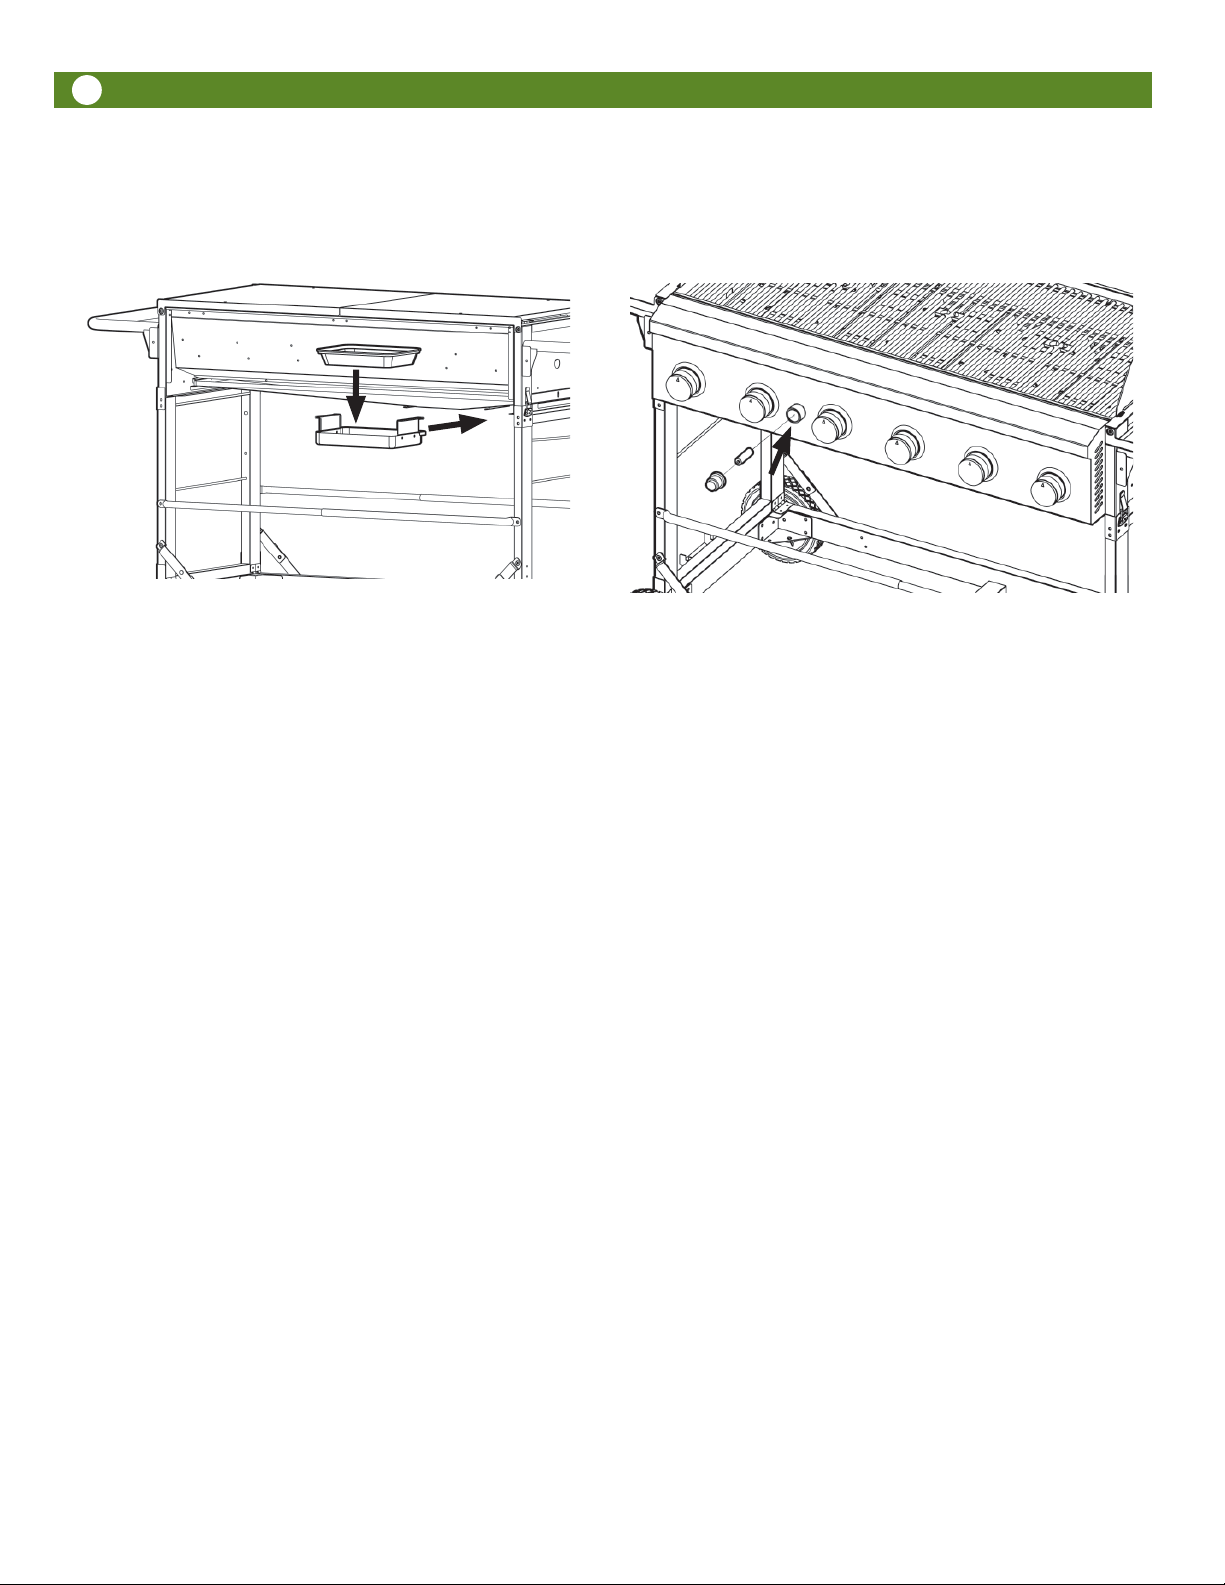
Step 6
Grease Pan / Foil Pan Installation
Insert the Foil Pan into the Grease Pan. Slide the Grease
Pan into the guides under the Bottom Body Panel. This
can be done from the front of the grill as well.
Folding/Preparation for Transport
Folding steps are essentially the reverse of Set-Up.
1. Wait until the grill is cool before folding or preparing for transport.
Step 7
Igniter Battery Installation
Unscrew Igniter Cover and insert AA Battery with the
negative “-“ end going in first. Replace the cover and
tighten securely.
-
+
Important Reminders
To get the most enjoyment and longest life from your
Event Grill, please always remember the following items:
Do not transport the grill in the “Set-Up” position.•
2. Turn off and disconnect the LP cylinder from the regulator and remove from the grill.
3. Remove the Grease Pan and Foil Pan. Empty and clean
then place in the grill body under the cooking grids.
4. Fold the side windscreens against the back then fold all
flat to the cooking grids.
5. Close the side tables. First the right with the drain
channel, then the left
6. Route the regulator hose straight back under the firebox and hang the regulator on the hook on the back
of the firebox.
7. Unlock the latches, grasp the tubular handles by the
“Gripping Portion” and lift the grill body off of the
cart.
8. Carefully pull up slightly on each of the four leg lock
brackets, just enough so they are barely starting to
fold.
9. To avoid being pinched by hinges or moving parts, only
close the cart by gripping the top of each leg frame.
Gripping at the top of each leg frame, lower the leg
frames inward and down until they rest flat on the cart
base.
When folding or unfolding the cart, keep hands and •
fingers away from hinges, leg pivot points and moving parts.
Always be sure latches are securely engaged when in •
either the “Set-Up” or “Transport” position.
Always be sure the firebox handles are in the up and •
seated position before opening or using the side
tables.
Inspect the regulator and hose for damage, kinks or •
cuts before each use.
Remove the grease pan before storage or transport.•
Secure the regulator hose under the grill body with •
the attached hook when transporting.
When transporting an LP cylinder, be sure it is prop-•
erly secured in an upright position, not in the passenger compartment, and follow all pertaining laws.
Do not sit or ride on the grill.•
Cover the grill when stored for any length of time.•
10. Place the grill body on top of the folded cart with the
corners of the firebox inside the corner brackets on
the cart.
11. Engage the latches on the grill body to the latch
hooks on the cart.
Connecting/Disconnecting the Gas
Using Gas
DANGER
!
Carbon Monoxide Hazard
• This appliance can produce carbon monoxide which has no odor. Using it in an enclosed space can kill you.
• Never use this appliance indoors, on recreational vehicles, or boats.
WARNING
!
To reduce the risk of serious bodily injury or death from fire or explosion:
• Use only propane gas with this LP gas grill.
• Do not attempt to convert this LP unit to natural gas.
• Always use a gas appliance outdoors in an open area with good ventilation to avoid breathing toxic fumes from
combustion or leaking gas, explosion, or fire. As with all conventional fuels, the burning process consumes oxygen
and produces toxic gases, including carbon monoxide. In addition, the combustion products of such fuels, including
liquefied petroleum (LP), contain chemicals known to the state of California and other authorities to cause cancer,
birth defects, and other reproductive harm.
9
Any use or alteration of this unit inconsistant with these instructions could be hazardous and will void your warranty.
LP Gas Cylinder
DANGER
!
• If you see, smell, or hear the hiss of LP gas escaping from the cylinder:
1. Do not attempt to light appliance.
2. Extinguish any open flame.
3. Disconnect from fuel supply.
The LP Gas Cylinder, for use with this LP gas grill,
must meet the following requirements:
1. 12” diameter x 18” tall, 20 lb. maximum capacity
2. Overfill Prevention Device (OPD) safety feature
(should be noted on cylinder)
3. Must be constructed and marked in accordance with
Specifications for LP Gas Cylinders of the U.S. Department of Transportation (DOT) or the National
Standard of Canada, CAN\CSA-B339, Cylinders,
Spheres and Tubes for Transportation of Dangerous
Goods; and Commission, as applicable (See collar
for marking)
4. Must have collar to protect LP Gas Cylinder valve.
5. Must be marked “PROPANE.”
6. Must be provided with a cylinder connection device
that is compatible with the grill’s connection.
To reduce the risk of serious bodily injury from fire or
explosion:
• Read and follow all warnings on LP Gas Cylinder.
• Do not operate the LP gas grill without the LP Gas Cylinder secured to the cart and oriented as shown in Assembly Instructions for Connecting the LP Gas Cylinder.
• Never connect or disconnect LP Gas Cylinder or fittings
while grill is in use or is hot.
• When the LP Gas Cylinder is connected, keep the grill
outside in a well-ventilated space.
• Do not use an LP Gas Cylinder if it shows signs of dents,
gouges, bulges, fire damage, corrosion, leakage, excessive rust, or other forms of visual external damage; it
may be hazardous and should be checked by a liquid
propane supplier. Do not use an LP Gas Cylinder with a
damaged valve.
• Use only an LP Gas Cylinder equipped with an OPD
(Overfill Prevention Device).
• Do not store a spare LP Gas Cylinder under or near the
LP gas grill.
• When grill is not in use, turn off all grill Control Knobs, LP
Gas Cylinder valve and disconnect LP Gas Cylinder.
• Never fill the LP Gas Cylinder more than 80% of cylinder
volume. (20 lb. maximum) Do not ask the propane
supplier to over-fill the Cylinder.
• If you obtain LP gas through a cylinder exchange dealer,
make sure you get a safe and adequate cylinder. Use only
a licensed LP Gas Cylinder dealer.
WARNING
!
 Loading...