

Aurum Electronics 939ASD MIC User Manual

Manual Contents:
A. 939ASD kit contents
B. 939ASD overview
C. Definition
D. Programming your 939ASD
E. Mounting the 939ASD
F. Driver installation
G. Viewing image
H. Technical Specifications
I. General Information and Safety
J. FCC information
A. 939ASD kit contents
z Model 939ASD Lighting Camera
z Camera driver: CDROM driver for Windows 98/2000/XP
z User Manual
z 1M USB cable & 1G SD card
z Accessory bag: screws, wall plugs, 1pc allen key, 3pcs 1.5V AAA batteries
B. 939ASD overview
Fig. 1

C. Definition
1. Definition of front view parts (see fig. 1)
Floodlight cover:Open to replace a new halogen lamp.
Floodlight:For lighting purpose
Halogen lamp:For lighting purpose, please use the correct voltage and watts of halogen light for this
product. Halogen lamp, max power is 300W
Cam Lens:this is the digital camera lens, please use a soft cloth to clean if needed.
PIR lens:Passive Infrared Lens.
Low Battery Indicator (hidden inside the lens)
1) Red lamp will start to flash when the battery is going to be out of power.
2) If the battery is out of power, the date of system may be lost and cause the system abnormal.
2. Definition of back view parts (see fig. 2)
Floodlight screw:Used to open or close the flood light case to install the halogen lamp.
Time control knob:For adjusting the illumination time of halogen floodlight power
Adjust to “-” where the minimal time is 40 seconds;adjust to “+” where the maximal time is 7 minutes.
Sensitivity control knob:
Adjust to the range of Passive Infrared Motion Sensor where can be detected.
AC cable outlet:For connecting the external AC cable to 939ASD
8 Positions DIP switch:
256 sets of changeable system code is available
1) To select a system code simply move some of the eight slider-switches in the RF transmitter
unit –leave some in their original position. This is now your system code; the slider-switches in your
RF receiver unit must now be set in the same pattern. Make a note of the settings on a piece of paper,
so you can double-check your code without having to re-open the RF transmitter unit.
Make sure the 8 Positions DIP switch of 939ASD is the same as the setting of receivers and remote control.
2)
Fig. 2
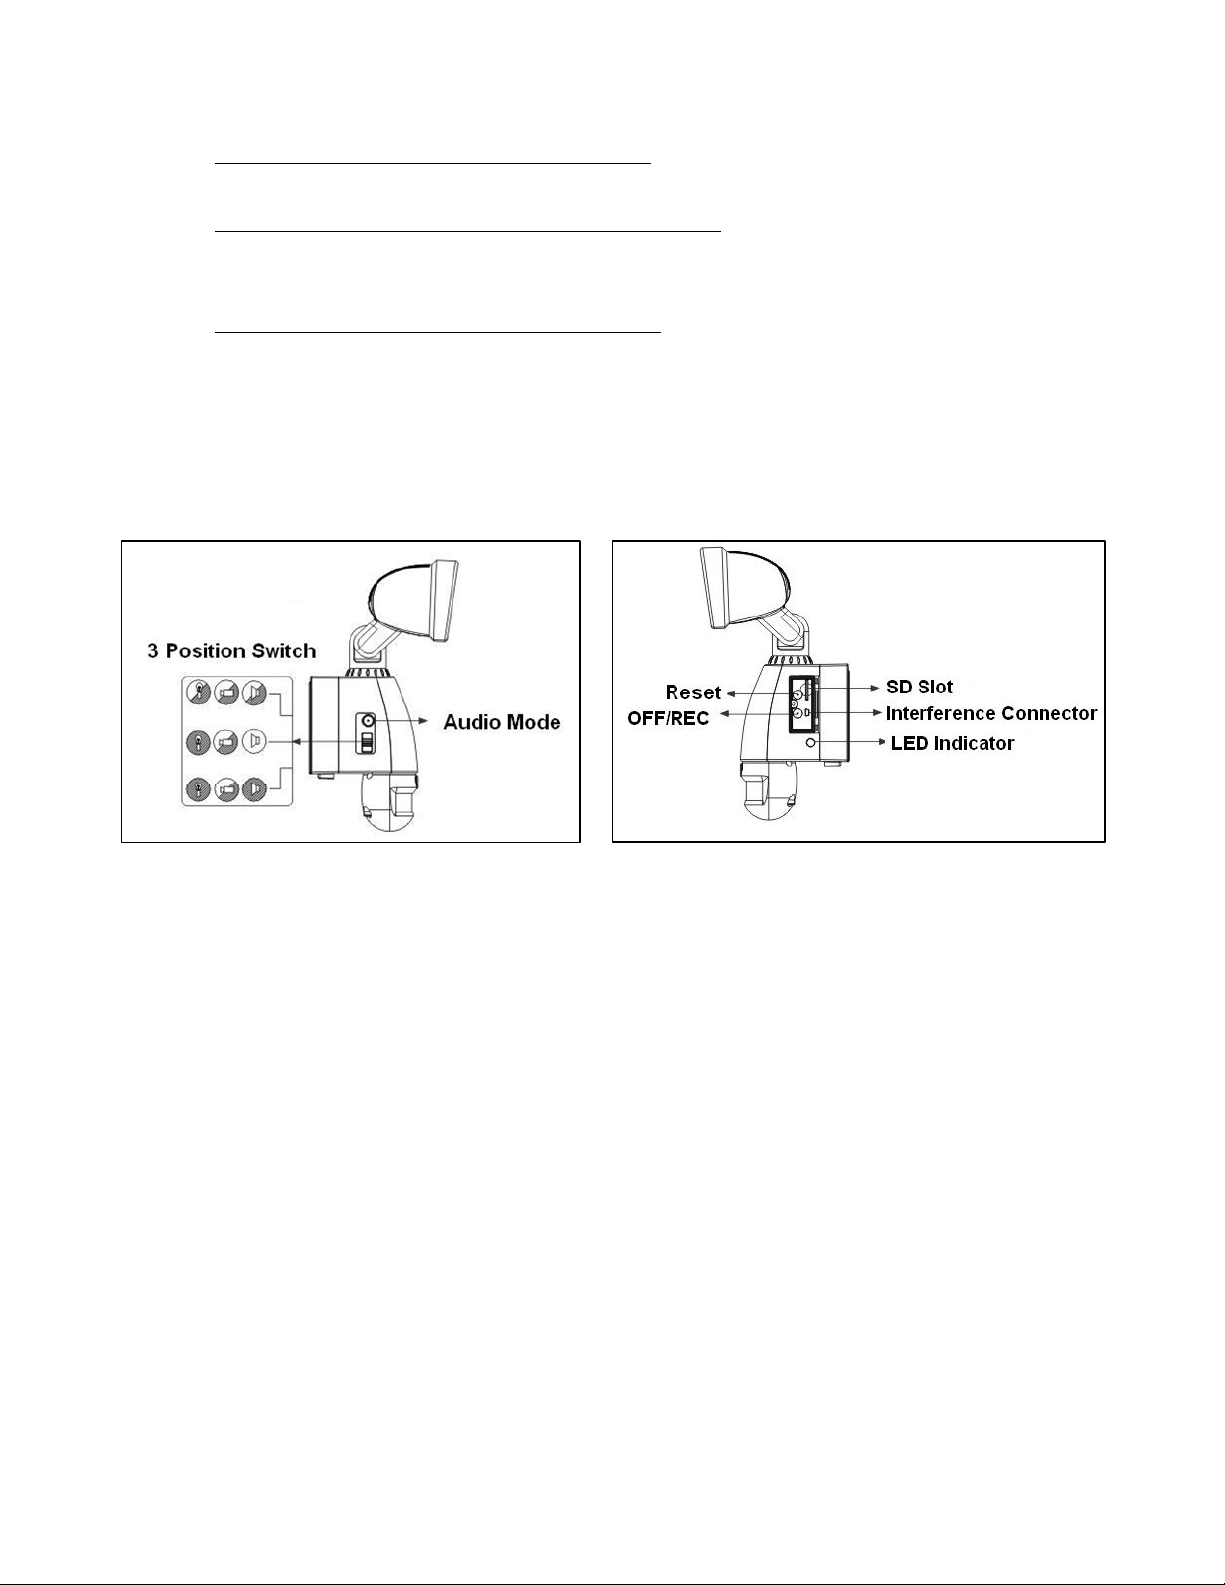
3. Definition of side view parts (see fig. 3 & 4)
3 position switch:for functions selection
1) Light + camera + speaker: detection for all day
Daytime and nighttime: light, camera and speaker are all in operation
2) Light at night + camera all day + speaker in the daytime
Daytime: light is off, camera is on, speaker is on
Nighttime: light is on, camera is on, speaker is off.
3) Light at night + camera all day + speaker at night
Daytime: light is off, camera is on, speaker is off.
Nighttime: light is on, camera is on, speaker is on.
Audio mode:for different sound selection
Pre-set default is “Welcome”. Push one time to ”May I help you”, push again to “dog barking”.
Push one more time to turn off this function. Control operates in above circular pattern.
Fig. 3 Fig. 4
LED indicator:for indicating the status of function or error situation by different color of LED
1) Red: SD card is not inserted into the SD slot or the system is abnormal
2) Green: 939ASD is recording or USB is inserted and connecting with the computer
3) LED off: stand by(SD card is inserted into the slot), when off button is pressed
* Please note when off button is pressed, remove SD card within 30 seconds (now the LED will turn
red after SD card is removed from the slot)
Waterproofed cover: protects below-listed contents.
Interference Connector:For connecting the 939ASD to PC by provided USB cable to PC.
SD slot:For inserting the memory card, please push the SD card to the end and make sure that it is
properly seated.
Reset button: restore functions to default settings
1) Press RESET button one time when turn on 939ASD
2) Please press this button if there is any abnormal situation happen.
Off/Rec:Please press OFF button to remove SD card. Please remove card within 30 seconds of
pressing the OFF button to avoid loss of data.
 Loading...