

Page 1
- GB Environment and recycling
Please help us to protect the environment by disposing of the packaging in accordance with
the national
regulations for waste processing.
Recycling of obsolete appliances
Appliances with this label must not be disposed off with the general waste. They must be
collected separately and disposed off according to local regulations.
- I Tutela dell'ambiente e riciclaggio
Affinché il vostro apparecchio non subisca danni durante il trasporto, esso è stato imballato
con cura. Per contribuire alla tutela del nostro ambiente, vi chiediamo di smaltire in modo
appropriato il materiale utilizzato per l'imballaggio dell'apparecchio.
Smaltimento degli apparecchi usati
Gli apparecchi che recano il contrassegno riportato a fianco non devono essere smaltiti
insieme ai rifiuti urbani, ma vanno raccolti e smaltiti separatamente. Lo smaltimento degli apparecchi
usati va eseguito a regola d'arte, in conformità con le prescrizioni e leggi vigenti localmente in materia.
- NL Milieu en recycling
Wij verzoeken u ons bij de bescherming van het milieu behulpzaam te zijn. Verwijder de
verpakking daarom overeenkomstig de voor de afvalverwerking geldende nationale
voorschriften.
Recycling van oude toestellen
Toestellen met dit kenmerk horen niet thuis in de vuilnisbak en zijn apart in te zamelen en te
recyclen. De recycling van oude toestellen moet steeds vakkundig en volgens de ter plaatse
geldende voorschriften en wetgeving plaats vinden.
- F Environnement et recyclage
Nous vous demandons de nous aider à préserver l'environnement. Pour ce faire, merci de
vous débarrasser de l'emballage conformément aux règles nationales relatives au traitement
des déchets.
Collecte et recyclage des produits en fin de vie
Les appareils munis de ce symbole ne doivent pas être mis avec les ordures ménagères,
mais doivent être collectés séparément et recyclés. La collecte et le recyclage des produits en fin de vie
doivent être effectués selon les dispositions et les décrets locaux.
- D Entsorgung von Altgeräten in Deutschland
Geräte mit dieser Kennzeichnung gehören nicht in die Restmülltonne und sind getrennt zu
sammeln und zu entsorgen.
Die Hersteller sorgen im Rahmen der Produktverantwortung für eine umweltgerechte
Behandlung und Verwertung der Altgeräte.
Im Rahmen des Elektro- und Elektronikgerätegesetzes (ElektroG) und zum Schutz unserer
Umwelt ist eine kostenlose Rückgabe bei Ihrer kommunalen Sammelstelle möglich.
- E Medio ambiente y reciclaje
Ayúdenos a proteger el medio ambiente eliminando el embalaje con arreglo a la legislación
nacional sobre tratamiento de residuos.
Eliminación de aparatos viejos
No tirar los aparatos que lleven esta identificación junto con la basura no clasificada. Se
deben recoger y eliminar de forma especial. La eliminación de aparatos viejos se debe
realizar de forma adecuada y competente, de acuerdo con las normas y leyes locales vigentes.
Please retain these instructions in a safe place for future reference.
Si prega di conservare con cura questo libretto di istruzioni per future
consultazioni.
Bewaar deze gebruiksaanwijzing zorgvuldig voor toekomstig gebruik.
Conserver cette notice pour toute consultation ultérieure.
Es wird gebeten, diese Gebrauchsanleitung für ein zukünftiges Nachschlagen
sorgfältig aufzubewahren.
Conservar las instruccione de uso.
HALOS_R2_IT.UK.FR.DE / 20100218
Page 2
(Dim. in mt.)
A C D
B E F
3x
3x
3x3x
2x
2x
1x 5x 4x 2x
1x 5x 4x 2x
2x2x
1x 5x 4x 2x1x 5x 4x 2x
2x
2x
2x2x
4x
4x
4x4x
1
Min
10 cm
2
Min
10 cm
90cm 50cm
Min 10 cm
Min
10 cm
Min
10 cm
Min 10 cm
3
5
4x
4x
4x4x
7
6
1x
1x
1x1x
8
4
9
Page 3
ITALIANO
2
10
11
1
Si prega di leggere attentamente queste istruzioni, prima di utilizzare il prodotto, in modo da
evitare danneggiamenti o comunque il verificarsi di situazioni di pericolo. Qualsiasi utilizzo del
prodotto diverso da quanto indicato nel presente manuale può causare incendi, pericoli elettrici o
ferite e rende nulla qualsiasi garanzia.
La garanzia non si applica ad alcun difetto, deterioramento, perdita, ferimento o danneggiamento
riconducibili ad un uso non corretto del prodotto. Rimangono garantiti tutti i diritti di legge in materia.
Nessuna condizione di garanzia può escludere o modificare le condizioni di garanzia regolamentate da
leggi dello Stato che non possono essere a nessun titolo escluse o modificate.
Prima di ogni operazione, rimuovere con cura l’imballo e controllare la perfetta integrità del prodotto. Nel
caso si evidenziassero dei difetti o danni, non installare né cercare di riparare l’apparecchiatura, ma
rivolgersi al rivenditore.
Non lasciare l’imballo alla portata dei bambini e smaltirne le parti in conformità con le disposizioni vigenti.
1. Il Vostro prodotto
Insieme all’apparecchio che avete acquistato troverete nell’imballo (Vedere figura 1):
- N°1 sacchetto contenente
• n.2 viti 3.5x50mm autofilettanti per il fissaggio a muro del supporto superiore (B);
• n.1 vite 3.5x30mm autofilettante per il fissaggio a muro della staffa inferiore (F);
• n.3 tasselli in plastica da 6.0x25mm
• n.5 viti 3.0x12mm autofilettanti per il fissaggio dei distanziali (E) e della staffa (F) al
prodotto;
• n.4 viti M4x8mm metriche per il fissaggio della staffa (D) al prodotto;
• n.2 viti M6x5mm metriche per il montaggio della staffa (D) alla base (C);
- N°1 supporto murale (B);
- N°1 base del piedistallo (C);
- N°1 asta del piedistallo(D);
12
- N°4 distanziali avvolgicavo (E);
Nel caso manchi qualche componente, rivolgetevi al vostro rivenditore.
ISTRUZIONI PER L’USO
PANNELLO RADIANTE
13
2. Per la Vostra sicurezza
Assicuratevi che l’alimentazione di rete corrisponda ai dati di targa: 230V AC, 50Hz.
Non abbandonate mai la vostra abitazione lasciando il prodotto in funzionamento; in tali casi
assicuratevi sempre che l’interruttore sia in posizione OFF (0) e che il termostato sia in posizione
minima (*).
Durante il funzionamento collocate il prodotto in una posizione sicura:
- rispettando le distanze da oggetti infiammabili o mobili riportate in figura 2;
- se installato a muro, non fissato a pareti di materiale plastico o sintetico;
- mai posizionato immediatamente sotto ad una presa di corrente.
Non lasciate che animali o bambini giochino o tocchino il prodotto. Attenzione! Durante il
funzionamento la griglia di uscita dell’aria può diventare molto calda ( oltre 80°C = 175°F);
IMPORTANTE: per evitare surriscaldamenti non ricoprite mai il prodotto. Non appoggiate mai
alcun oggetto o coperta sull’apparecchio mentre è in funzione. Questo è chiaramente scritto
sull’apparecchio o illustrato dal simbolo
Page 4
Questo prodotto non deve essere utilizzato da persone (bambini inclusi) con capacità fisiche,
sensoriali o mentali ridotte, o con inadeguata esperienza e conoscenze, che non siano sotto la
supervisione di una persona responsabile per la loro sicurezza o che non siano da essa stati
adeguatamente istruiti. I bambini devono essere sorvegliati per assicurarsi che non giochino con il
prodotto.
Non eseguite la pulizia del prodotto quando esso è in funzione e non immergetelo nell’acqua.
Attenzione: per utilizzare l’apparecchio come portatile è necessario prima assemblare il piedistallo
e fissarlo al prodotto. Non appoggiate il prodotto sul pavimento senza il suo piedistallo.
Non avvolgete il cavo di alimentazione attorno o sopra il prodotto mentre è in funzione.
Non utilizzate il prodotto in stanze sature di gas esplosivi o di vapori generati da solventi e vernici o
comunque infiammabili.
Se il cavo è danneggiato e dovete sostituirlo non eseguite questa operazione da soli, riportate
l’apparecchio ad un centro di riparazioni autorizzato perché è richiesto l’intervento di personale
specializzato al fine di evitare qualunque rischio di danneggiamento.
Non utilizzate questo apparecchio nelle vicinanze di docce, vasche da bagno o lavandini.
Il prodotto deve essere posizionato in modo tale che la presa di alimentazione sia sempre
raggiungibile.
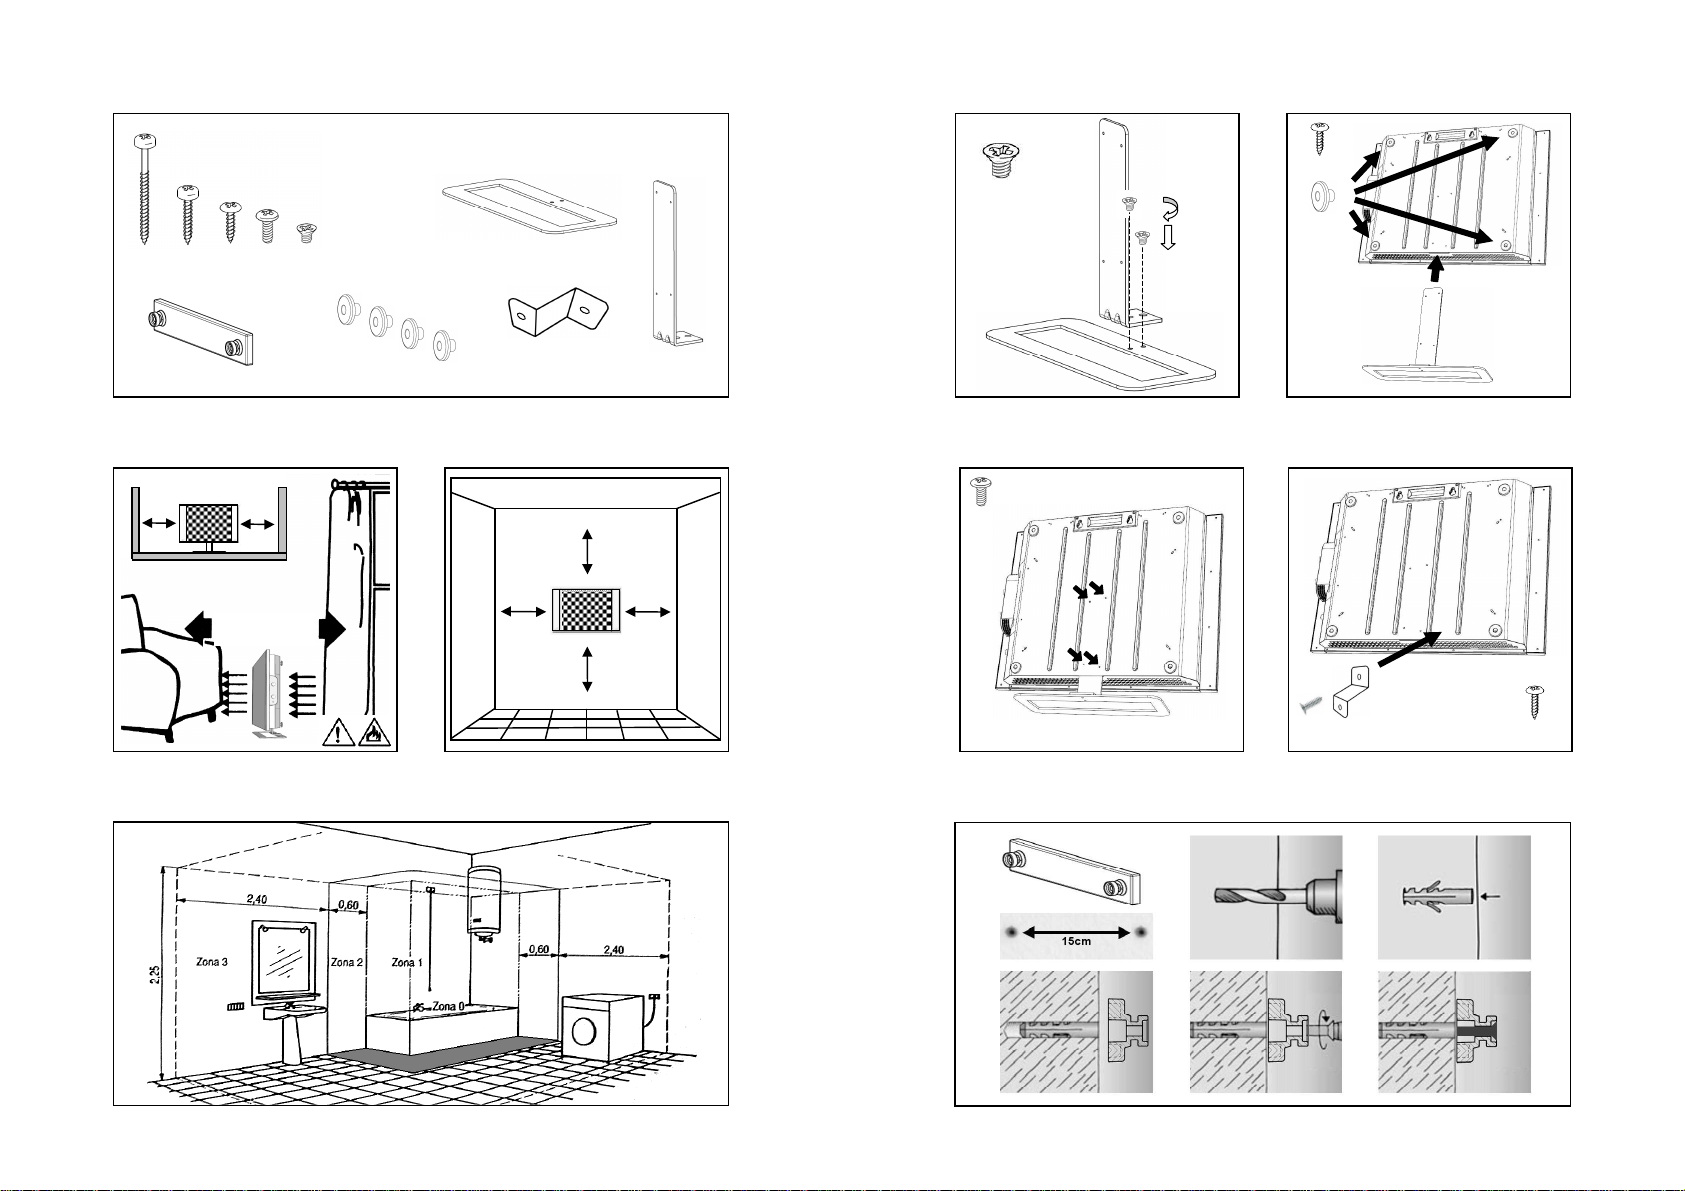
3. Posizionamento sicuro
Utilizzate l’apparecchio solo in posizione orizzontale.
Se lo utilizzate come portatile, rispettate sempre le distanze minime da qualsiasi oggetto
infiammabile indicate in figura 2.
Per l’installazione a muro, rispettate le distanze minime dal soffitto, dal pavimento e dalle pareti
laterali come illustrato in figura 3.
Nei bagni non installate o utilizzate mai l’apparecchio all’interno delle zone 0 o 1 illustrate
in figura 4.
Le manopole di regolazione non devono in nessun caso essere accessibili da parte di persone che
siano all’interno della vasca da bagno o della doccia.
Il prodotto deve essere libero di aspirare ed espellere aria calda.
Per l’uso portatile:
• assemblate il piedistallo avvitando l'asta (figura 1/D) alla base (figura 1/C) con le 2 viti a testa
svasata in dotazione (fig. 5);
• inserite l'asta del piedistallo nell'apposita fessura rettangolare visibile al centro della griglia
inferiore del prodotto (figura 6);
• fissate il piedistallo al prodotto avvitando le 4 viti in dotazione nei punti indicati in figura 7.
Il prodotto è in doppio isolamento elettrico e non richiede collegamento di terra.
4. Fissaggio a muro
Il prodotto può essere installato a muro solo se privo del piedistallo e rispettando le distanze
riportate in figura 3.
Avvitate al prodotto la staffa di sostegno inferiore come indicato in figura 8 usando la vite in
dotazione;
Fissate il supporto murale praticando 2 fori nel muro ad una distanza di 150mm con una punta da
6 mm. Inserite i 2 tasselli e fissate il supporto murale con le 2 viti in dotazione come da figura 9.
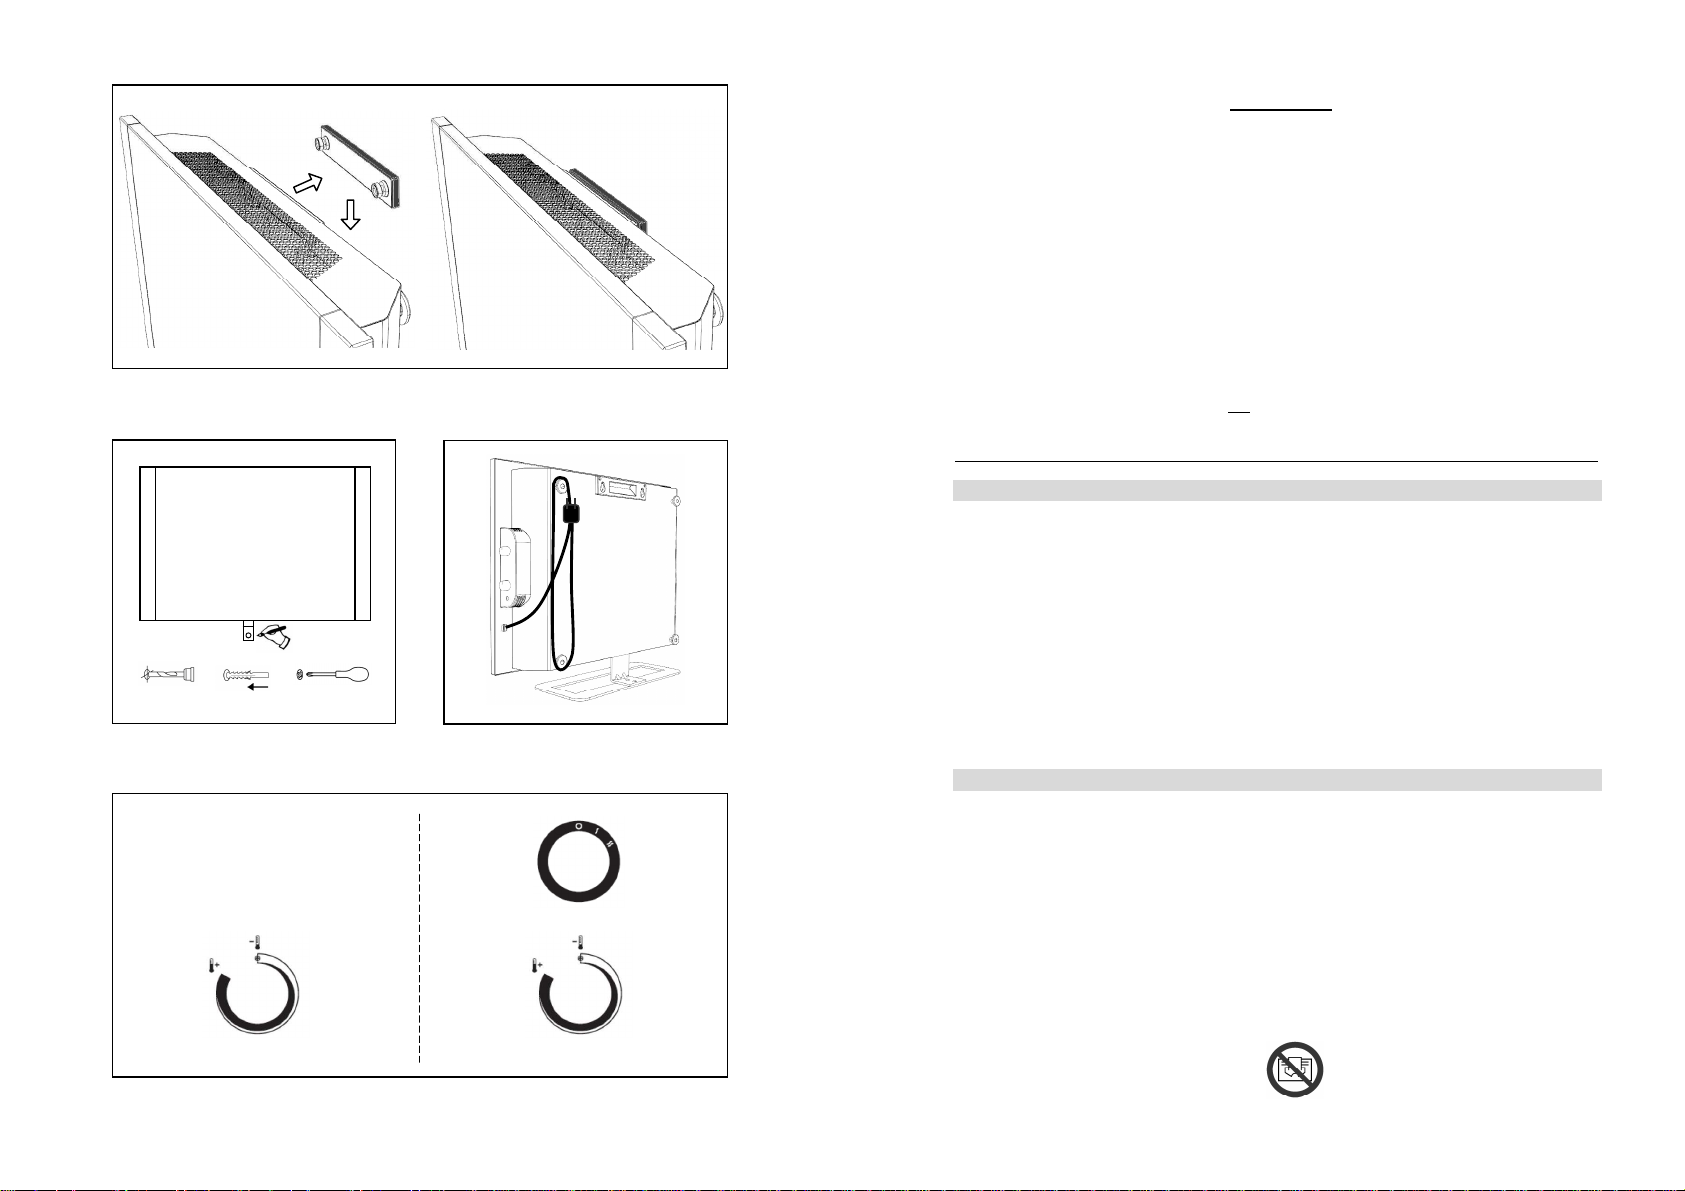
Agganciate il prodotto al supporto murale spingendolo prima verso il muro e poi facendolo scattare
verso il basso (figura 10).
Segnate con una matita il punto in cui effettuare il foro per il fissaggio del sostegno inferiore,
rimuovete il prodotto, forate il muro con una punta del diametro di 6mm e inserite il tassello in
dotazione (fig. 11);
Riagganciate il prodotto al supporto plastico e procedete al fissaggio della staffa inferiore usando
l'apposita vite.
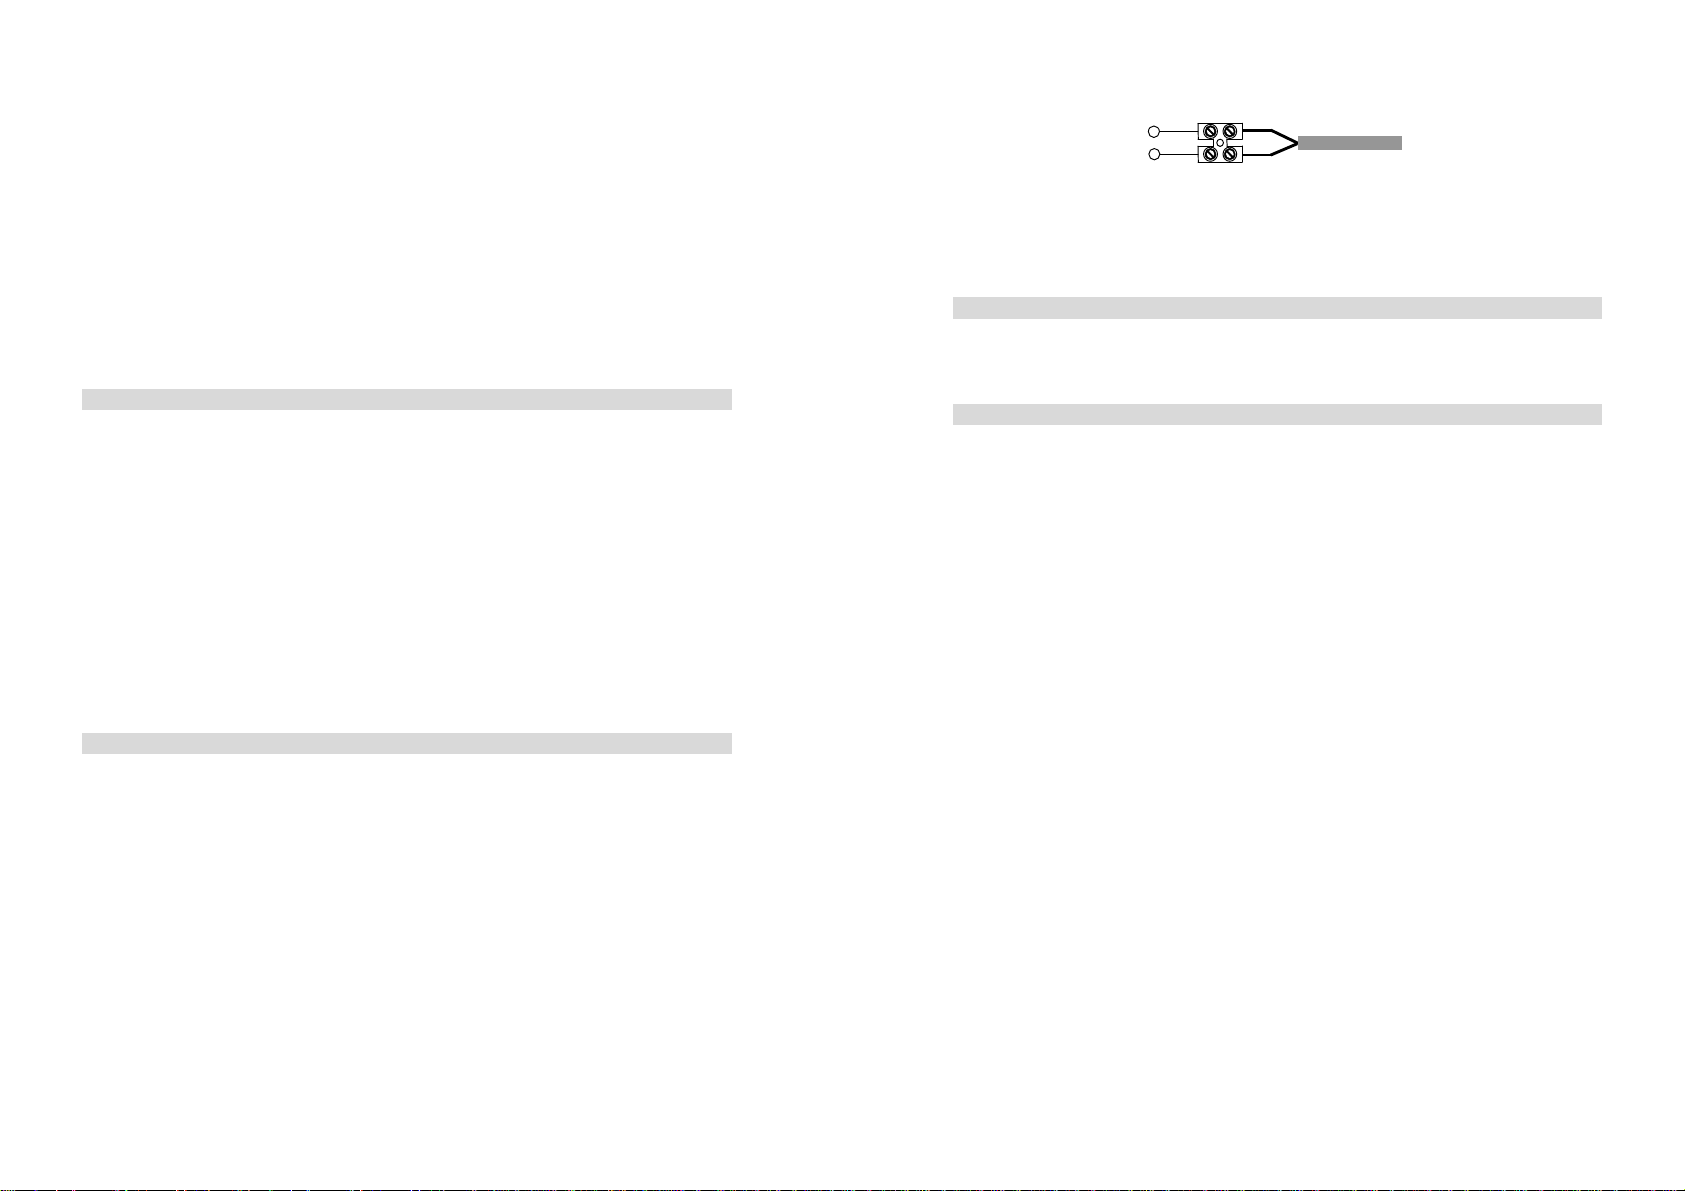
IMPORTANTE PER LA FRANCIA:
Nel caso in cui il prodotto venga installato a muro, il collegamento elettrico con la rete di
alimentazione deve essere eseguito tagliando la spina in dotazione e utilizzando un apposito
morsetto secondo lo schema di seguito illustrato:
Fase = marrone
Rete
In locali umidi, nei bagni o nelle cucine, il morsetto di collegamento deve essere installato ad
almeno 25cm dal pavimento. Il collegamento elettrico con la rete deve inoltre prevedere l’utilizzo
di un interruttore bipolare con una distanza minima di apertura fra i contatti che consenta la
disconnessione completa nelle condizioni della categoria di sovratensione III.
L
N
Neutro = blu
Cavo del prodotto
5. Avvolgicavo
Quando non utilizzate il prodotto il cavo può essere avvolto come illustrato in figura 12.
Ricordatevi che durante l’uso del prodotto il cavo deve essere sempre completamente
srotolato.
6. Uso dell’apparecchio
6.1 Modello solo con termostato (figura 14A)
Girate la manopola del termostato in senso orario sino a quando sentirete un “click”. Il prodotto si
mette in funzione a 1000W.
Il termostato mantiene la temperatura ambiente desiderata accendendo e spegnendo
automaticamente l’apparecchio. Più la manopola è ruotata in senso orario più la temperatura
assicurata sarà elevata. La posizione massima del termostato corrisponde a circa 35°C, quella
minima (*) a circa 5°C.
Durante il funzionamento del prodotto si potrebbero creare delle leggere ondulazioni sulla
superficie dell’elemento riscaldante che si trova all’interno del prodotto. Questo
comportamento è del tutto normale e non pregiudica né il corretto funzionamento
dell’apparecchio né la sua affidabilità nel tempo.
Il produttore non si assume responsabilità per danni causati dal gelo e dovuti ad un isolamento
inadeguato dell’ambiente o da una capacità riscaldante dell’apparecchio non adeguata alle
dimensioni dell’ambiente da riscaldare.
6.2 Uso del termostato
In una stanza ove la temperatura supera i 35°C è no rmale che il termostato, anche se posizionato
al massimo, non accenda il prodotto.
Viceversa, in una stanza con una temperatura troppo bassa (sotto i 5°C) è normale che il
termostato mantenga l’apparecchio continuamente acceso, anche se posizionato al minimo.
Per regolare al meglio il termostato consigliamo questa procedura :
- posizionate il termostato al massimo e fate funzionare l’apparecchio sino al raggiungimento di una
temperatura confortevole;
- girate poi la manopola termostato in senso antiorario sino a che sentirete un “ click” e
l’apparecchio si spegnerà;
- girate poi ancora leggermente (solo un pochino) la manopola del termostato in senso orario;
- in questa posizione il termostato manterrà la temperatura ambiente che avete prescelto.
Quando il prodotto è in funzione e riscalda l'ambiente la relativa spia luminosa di segnalazione si
accende.
6.3 Modello con selezionatore di potenza e termostato (figura 14B)
Questo modello ha 2 manopole, una per la regolazione della potenza di funzionamento ed una per
il termostato.
Il regolatore di potenza permette di selezionare 3 differenti modalità di funzionamento del prodotto:
Page 5

O
= SPENTO
I
= FUNZIONAMENTO A 750W
I I
= FUNZIONAMENTO A 1500W
Girate la manopola del termostato in senso orario sino a quando sentirete “click”. Il prodotto si
mette in funzione alla potenza che avete selezionato.
Il termostato mantiene la temperatura ambiente desiderata accendendo e spegnendo
automaticamente l’apparecchio. Più la manopola è ruotata in senso orario, in posizione con
numero più alto, più la temperatura assicurata sarà elevata. La posizione massima del termostato
corrisponde a circa 35°C, quella minima (*) a circa 5°C.
ATTENZIONE: quando la manopola interruttore è posizionata al massimo (pos. II) non deve
essere ulteriormente ruotata in senso orario.
ATTENZIONE: quando la manopola termostato è posizionata al massimo (pos. MAX) non deve
essere ulteriormente ruotata in senso orario.
Durante il funzionamento del prodotto si potrebbero creare delle leggere ondulazioni sulla
superficie dell’elemento riscaldante che si trova all’interno del prodotto. Questo
comportamento è del tutto normale e non pregiudica né il corretto funzionamento
dell’apparecchio né la sua affidabilità nel tempo.
Per l’uso del termostato si veda la sezione 6.2
7. Sicurezza in caso di funzionamento anormale
In caso di surriscaldamento, il sistema di protezione dell’apparecchio disattiverà automaticamente
gli elementi riscaldanti spegnendo l’apparecchio.
In tale caso :
- girate la manopola del termostato in senso orario per verificare che il termostato non abbia spento
l’apparecchio semplicemente a causa del raggiungimento di una temperatura ambiente elevata;
- nel caso il prodotto non riprenda il normale funzionamento:
- spegnete l’apparecchio;
- rimuovete le eventuali cause di surriscaldamento (per es. ostacoli alla griglia di presa dell’aria
o sulla griglia di uscita dell’aria);
- lasciate raffreddare il prodotto per 15 – 20 minuti;
- accendete nuovamente il prodotto.
8. Manutenzione
Questo apparecchio non richiede una particolare manutenzione.
Ogni sei mesi Vi raccomandiamo solo di eliminare, utilizzando un aspirapolvere la polvere che si
può accumulare sulla resistenza.
In caso di necessità rivolgetevi esclusivamente ad un centro di assistenza autorizzato.
Nel caso in cui si debba sostituire il cavo di alimentazione, vi ricordiamo che è necessario un cavo
HAR mod. 2 x 1 mm2 H05RR-F o H05RN-F.
ENGLISH
RADIATOR PANEL
INSTRUCTIONS FOR USE
Please read these instructions carefully before using the product in order to avoid damage or any
dangerous situations arising. Any use of the product other than that indicated in this manual may
cause fire, electrical danger, or injury and will make the warranty null and void.
The warranty does not cover any defect, deterioration, loss, injury, or damage that is due to incorrect use
of the product. All legal rights in this regard are guaranteed. No warranty condition can exclude or
change the warranty conditions regulated by State laws that may not be excluded or modified for any
reason.
Before doing anything else, remove the packaging carefully and check the integrity of the product.
Should any defects or damage be found, do not install or attempt to repair the equipment, but contact the
dealer.
Do not leave the packaging within reach of children and dispose of the parts in compliance with current
provisions.
1. Your product
Along with the equipment you have bought, the pack also contains (see figure 1):
- N° 1 bag containing:
N° 2 self-tapping 3,5 x 50 mm screws for fixing the upper support (B) to the wall.
N° 1 self-tapping 3,5 x 30 mm screw for fixing the lower support (F) to the wall.
N° 3 plastic 6,0 x 25 mm plastic anchor plugs.
N° 5 self-tapping 3,0 x 12 mm screw for fixing the spacers (E) and bracket (F) to the
product.
N° 4 metric M4 x 8 mm bolts for fixing the bracket (D) to the product.
N° 2 metric M6 x 5 mm bolts for fixing the bracket (D) to the base (C).
- N° 1 wall support (B)
- N° 1 pedestal base (C)
- N° 1 pedestal rod (D)
- N° 4 cable winder spacers (E).
Should any part be missing, contact your dealer.
2. For your safety
Make sure the power supply corresponds to the details shown on the nameplate: 230V AC, 50Hz.
Never leave your home with the product still running. If you do go out make sure that the switch is
always in the OFF (0) position and that the thermostat is in the minimum position (*).
When working, put the product in a safe position:
- Respecting the distances from inflammable or mobile objects indicated in figure 2.
- If fitted on the wall, do not fix it to walls made of plastic or synthetic material.
- Never position it immediately below a power socket.
Do not allow animals or children to play with or touch the product. Warning! When working the air
outlet grille can get very hot (more than 80°C = 175°F).
IMPORTANT: To prevent overheating, never cover the product. Never put any object or
blanket on the equipment while it is working. This is clearly indicated on the equipment or
illustrated by the symbol.
Page 6

This product must not be used by people (including children) with limited physical, sensorial, or
mental capacity or with inadequate experience or knowledge that are not supervised by a person
that is responsible for their safety or until they have been adequately trained. Children must be
supervised to ensure that they do not play with the product.
Do not clean the product while it is working and do not immerse it in water.
Warning! To use this unit as a portable product, first assemble the pedestal and fix it to the
product. Do not stand the product on the floor without its pedestal.
Do not coil the power cable around or on the product while it is working.
Do not use the product in rooms filled with explosive gases or vapours generated by solvents and
paints or that are inflammable.
If the cable gets damaged and has to be changed, do not do this yourself – take the equipment to
an authorised repair centre because the work must be done by specialist personnel to avoid any
risk of damage.
Do not use this equipment near showers, baths, or basins.
The product must be positioned in such a way that the power supply socket can always be
reached.
3. Safe positioning
Only use the equipment in a horizontal position.
If used as a portable unit, always respect the minimum distances from any inflammable object
indicated in figure 2.
For wall mounting respect the minimum distances from the ceiling, floor, and side walls shown in
figure 3.
In bathrooms never install or use the equipment within zones 0 or 1 shown in figure 4.
The regulating knobs must never be accessible to people in a bath or shower.
The product must be free to take air in and expel it.
For portable use:
• Assemble the pedestal by screwing the rod (figure 1/D) to the base (figure 1/C) with the 2
countersunk screws supplied (fig 5).
• Insert the pedestal rod in the relevant rectangular slot that can be seen in the lower grille on the
product (figure 6).
•
Fix the pedestal to the product using the 4 screws supplied at the points indicated in figure 7.
This product has double electrical insulation and does not require an earth connection.
4. Wall mounting
The product can be wall mounted only if the pedestal is not fitted and respecting the distances
shown in figure 3.
Screw the product to the lower support bracket as shown in figure 8 using the screws supplied.
Fix the wall bracket by making 2 holes in the wall 150 mm apart, using a 6 mm drill bit. Insert the 2
wall anchors and fix the wall bracket using the 2 screws supplied as shown in figure 9.
Hook the product to the wall bracket first pushing it towards the wall and then making it click in
downwards (figure 10).
Use a pencil to mark the point at which to drill the hole for fixing the lower support, remove the
product, drill the hole in the wall using a 6 mm drill bit, and insert the wall anchor supplied (fig 11).
Hook the product to the plastic bracket again and fix the lower bracket using the relevant screws.
IMPORTANT FOR FRANCE:
If the product is to be wall mounted the electrical connection to the power supply must be done by
cutting off the plug supplied and using a suitable terminal as per the diagram shown below:
Phase = brown
Net
L
N
Neutral = blue
Product cable
In wet spaces like bathrooms or kitchens, the connection terminal must be installed at least 25 cm
above the floor. The electrical connection to the power supply must also be fitted with a two-pole
switch with a minimum gap between the contacts that allows complete disconnection according to
excess voltage III category conditions.
5. Cable winder
When the product is not in use the cable can be coiled as shown in figure 12.
Remember that when using the product the cable must be completely uncoiled.
6. Using the equipment
6.1 Model with thermostat only (figure 14A)
Turn the thermostat knob clockwise until you hear a “click”. The product starts working at 1000 W.
The thermostat maintains the ambient temperature required by switching the equipment on and off
automatically. The more the thermostat knob is turned clockwise the higher the temperature
ensured. The maximum thermostat position corresponds to about 35°C, while the minimum (*) is
about 5°C.
When the product is working, slight undulations may occur on the surface of the heating
element inside the product. This is completely normal and does not affect correct
functioning of the equipment or its reliability over time.
The producer does not accept any responsibility for damage caused by freezing, due to inadequate
insulation of the space or the equipment’s heating capacity not being adequate for the size of the
space to be heated.
6.2 Using the thermostat
In a room in which the temperature exceeds 35°C it is normal that, even when turned to maximum,
the product does not switch on.
On the contrary, in a room in which the temperature is too low (below 5°C) it is normal that, even
when turned to minimum, the thermostat will keep the equipment switched on all the time.
To make the best thermostat setting, we recommend the following:
- Put the thermostat on maximum and allow the equipment to run until a comfortable temperature is
reached.
- Then turn the thermostat knob anticlockwise until you hear a “click”, and the equipment switches
off.
- Then turn the thermostat knob clockwise again (only a little).
- In this position the thermostat will maintain the ambient temperature you have chosen.
When the product is working and heating the space, the relevant signal LED switched on.
6.3 Model with power and thermostat selector (figure 14B)
This model has 2 knobs, one for adjusting the operating power and one for the thermostat.
The power regulator can be used to select 3 different operating modes for the product:
O
= OFF
I
= 750 W OPERATION
I I
= 1500 W OPERATION
Turn the thermostat knob clockwise until you hear a “click”. The product starts working at the
power selected.
The thermostat maintains the ambient temperature required by switching the equipment on and off
automatically. The more the thermostat knob is turned clockwise to a position with a higher
number, the higher the temperature ensured. The maximum thermostat position corresponds to
about 35°C, while the minimum (*) is about 5°C.
WARNING! When the switch knob is at the maximum position (pos. II) do not turn it further
clockwise.
WARNING! When the thermostat knob is at the maximum position (pos. MAX) do not turn it
further clockwise.
Page 7

When the product is working, slight undulations may occur on the surface of the heating
element inside the product. This is completely normal and does not affect correct
functioning of the equipment or its reliability over time.
For instructions on using the thermostat, see section 6.2.
7. Safety in case of abnormal operation
If the product overheats the protection system will automatically deactivate the heating elements
and switch off the equipment.
If this happens:
- Turn the thermostat knob clockwise to check that the thermostat has not simply switched off the
equipment because a high ambient temperature has been reached.
- If the product does not start working normally again:
- Switch off the equipment
- Remove whatever is causing the overheating (e.g. obstructions at the air intake or air outlet
grilles).
- Allow the product to cool for 15 – 20 minutes.
- Switch the product on again.
8. Maintenance
This product does not require specific maintenance.
Every six months we suggest removing any dust that has accumulated on the coil using a vacuum
cleaner.
If you need any assistance, contact an authorised assistance centre.
If you have to change the power supply cable, remember that you have to use an HAR 2 x 1 mm
H05RR-F or H05RN-F model cable.
FRANÇAIS
PANNEAU RAYONNANT
MODE D’EMPLOI
Veuillez lire attentivement ce mode d’emploi avant d’utiliser l’appareil afin de ne pas
l’endommager et de ne créer aucune situation de danger. Tout usage de cet appareil autre que
celui indiqué dans ce manuel peut provoquer un incendie, un risque d’électrocution ou de
blessure et annule la garantie.
La garantie ne s’applique à aucun défaut, endommagement, perte, blessure ou préjudice imputable à un
usage impropre de l’appareil. Tous les droits garantis par la loi en la matière restent confirmés. Les
conditions de la garantie ne peuvent en aucun cas exclure ni modifier les conditions de garantie prévues
par la loi, qui ne peuvent donc en aucun cas être exclues ni modifiées.
Avant de procéder à une quelconque opération, retirez l’emballage avec précaution et contrôlez si
l’appareil est en parfait état. Si vous remarquez un quelconque défaut ou endommagement, n’installez
pas l’appareil et ne tentez pas de le réparer ; adressez-vous à votre revendeur.
Ne laissez pas l’emballage à la portée des enfants et débarrassez-vous du matériau d’emballage
conformément aux règlements en vigueur.
2
1. Votre appareil
Outre l’appareil que vous avez acheté vous trouverez dans l’emballage (cf. figure 1):
- 1 sachet contenant:
• 2 vis autotaraudeuses de 3,5 x 50 mm pour fixer au mur le support supérieur (B).
• 1 vis autotaraudeuse de 3,5 x 30 mm pour fixer au mur la console inférieure (F).
• 3 chevilles en plastique de 6,0 x 25 mm.
• 5 vis autotaraudeuses de 3,0 x 12 mm pour fixer les entretoises (E) et la console (F) sur
l’appareil.
• 4 vis métriques M4 x 8 mm pour fixer la console (D) sur l’appareil.
• 2 vis métriques M6 x 5 mm pour monter la console (D) sur la base (C).
- 1 support mural (B).
- 1 base du piédestal (C).
- 1 tige du piédestal (C).
- 4 entretoises enroule-câble (E).
S’il manque un composant, veuillez vous adresser à votre revendeur.
2. Pour votre sécurité
Vérifiez si l’alimentation du secteur correspond aux données de la plaque: 230V CA, 50Hz.
Ne quittez jamais votre domicile en laissant l’appareil en marche; vérifiez toujours si l’interrupteur
se trouve sur OFF (0) et si le thermostat se trouve sur le minimum (*).
Pendant le fonctionnement placez l’appareil dans un endroit sûr :
- en respectant les distances des objets inflammables ou des meubles indiquées sur la figure 2.
- en cas d’installation murale, ne le fixez pas sur une cloison en plastique ou en matériau
synthétique.
- ne le placez jamais immédiatement au-dessous d’une prise de courant.
Faites en sorte que les animaux et les enfants ne puissent ni jouer, ni toucher l’appareil. Attention!
Pendant le fonctionnement la grille de refoulement de l’air peut devenir très chaude (plus de 80°C
= 175 °F).
Page 8

IMPORTANT: pour éviter tout risque de surchauffe ne couvrez jamais l’appareil. Ne posez
jamais d’objet, ni de couverture sur l’appareil lorsqu’il est en marche. Ceci est clairement écrit sur
l’appareil ou illustré par le symbole
Accrochez à nouveau l’appareil sur le support en plastique et fixez la console inférieur à l’aide de
la vis prévue à cet effet.
IMPORTANT POUR LA FRANCE:
Si l’appareil est fixé au mur, le branchement électrique sur le secteur doit être accompli en coupant
la fiche fournie et en utilisant une borne adéquate, comme le montre le schéma suivant :
Cet appareil ne doit pas être utilisé par des personnes (y compris les enfants) ayant des capacités
physiques, sensorielles ou mentales réduites, ou n’ayant ni l’expérience ni les connaissances
suffisantes, sans la supervision d’une personne responsable de leur sécurité à moins d’avoir été
correctement instruits sur son usage. Les enfants doivent être surveillés afin de s’assurer qu’ils ne
jouent pas avec l’appareil.
Ne nettoyez pas l’appareil s’il est en marche et ne le plongez jamais dans l’eau.
Attention: pour faire un usage mobile de l’appareil, assemblez au préalable le piédestal et fixez-le
sur l’appareil. Ne posez pas l’appareil au sol sans son piédestal.
N’enroulez pas le câble d’alimentation autour ou au-dessus de l’appareil lorsqu’il est en marche.
N’utilisez pas l’appareil dans des pièces dont l’atmosphère est saturée en gaz explosifs ou en
vapeurs générées par des solvants ou de la peinture, ou inflammables.
Si le câble est endommagé ne le remplacez pas vous-même ; adressez-vous à un service aprèsvente autorisé car l’intervention doit être accomplie par du personnel spécialisé afin d’éviter tout
risque de dommage.
N’utilisez pas cet appareil à proximité d’une douche, d’une baignoire ou d’un lavabo.
L’appareil doit être placé de façon à ce que sa prise d’alimentation soit toujours accessible.
3. Mise en place sûre
N’utilisez l’appareil qu’à l’horizontale.
Si vous en faites un usage mobile, respectez toujours les distances minimum des objets
inflammables, indiquées sur la figure 2.
Pour l’installer au mur, respectez les distances minimum du plafond, du sol et des cloisons
indiquées sur la figure 3.
Dans les salles de bains n’installez et n’utilisez jamais l’appareil à l’intérieur des zones 0 et
1 indiquées sur la figure 4.
Les personnes se trouvant dans la baignoire ou sous la douche ne doivent en aucun cas être en
mesure d’accéder aux molettes de réglage.
L’appareil doit pouvoir aspirer et refouler librement de l’air chaud.
Pour l’usage mobile:
• assemblez le piédestal en vissant la tige (figure 1/D) sur la base (figure 1/C) à l’aide des 2 vis à
tête évasée fournies (fig. 5);
• enfilez la tige du piédestal dans la fissure rectangulaire prévue à cet effet, visible au milieu de
la grille inférieure de l’appareil (figure 6) ;
• fixez le piédestal sur l’appareil en vissant les 4 vis fournies aux endroits indiqués sur la figure 7.
L’appareil est doté d’une double isolation électrique et ne demande aucune mise à la terre.
4. Fixation murale
Vous pouvez fixer l’appareil au mur sans son piédestal, à condition de respecter les distances
indiquées sur la figure 3.
Vissez l’appareil sur la console de support inférieure, de la façon indiquée sur la figure 8, à l’aide
de la vis fournie.
Fixez le support mural en perçant 2 trous dans le mur, espacés de 150 mm, à l’aide d’un foret de 6
mm. Enfilez les 2 chevilles et fixez le support mural à l’aide des 2 vis fournies, de la façon indiquée
sur la figure 9.
Accrochez l’appareil au support mural en le poussant d’abord vers le mur, puis vers le bas
jusqu’au déclic (figure 10).
Marquez au crayon l’endroit où percer le trou de fixation du support inférieur, retirez l’appareil,
percez un trou dans le mur avec un foret de 6 mm et enfilez la cheville fournie (figure 11).
Phase = brun
Réseau
Dans les pièces humides, les salles de bains et les cuisines, la borne de branchement doit être
montée à 25 cm au moins du sol. Le branchement électrique sur le secteur doit prévoir en outre
un interrupteur bipolaire, dont la distance minimum d’ouverture entre les contacts soit en mesure
de garantir le débranchement complet dans les conditions de la catégorie de surtension III.
L
N
Neutre = bleu
câble de l'appareil
5. Enroule-câble
Lorsque vous n’utilisez pas l’appareil, vous pouvez enrouler le câble de la façon illustrée sur la
figure 12.
N’oubliez pas de dérouler complètement le câble lorsque vous utilisez l’appareil.
6. Utilisation de l’appareil
6.1 Modèle avec thermostat seulement (figure 14A)
Faites tourner la molette du thermostat en sens horaire jusqu’à ce que vous entendiez un déclic.
L’appareil se met en marche à 1000 W.
Le thermostat maintient la température ambiante voulue en allumant et en éteignant
automatiquement l’appareil. Plus vous faites tourner la molette en sens horaire, plus la
température garantie sera élevée. La position maximum du thermostat correspond à environ 35°C,
la minimum (*) à environ 5°C.
Pendant le fonctionnement de l’appareil de légères ondulations peuvent se produire à la
surface de l’élément chauffant qui se trouve à l’intérieur de l’appareil. Cela est tout à fait
normal et ne nuit en rien au bon fonctionnement de l’appareil, ni à sa fiabilité dans le temps.
Le fabricant décline toute responsabilité en cas de dommages causés par le gel et imputables à
une mauvaise isolation de la pièce ou à l’utilisation d’un appareil n’ayant pas une capacité
chauffante adaptée aux dimensions de la pièce à chauffer.
6.2 Utilisation du thermostat
Dans une pièce où la température dépasse 35°C il est normal que le thermostat, même réglé sur
le maximum, n’allume pas l’appareil.
Vice-versa, dans une pièce où la température est trop basse (moins de 5°C) il est normal que le
thermostat maintienne l’appareil sans cesse allumé, même s’il est réglé sur le minimum.
Pour bien régler la température nous vous conseillons de procéder de la sorte:
- réglez le thermostat sur le maximum et faites fonctionner l’appareil jusqu’à ce que la température
ambiante soit confortable ;
- faites ensuite tourner la molette du thermostat en sens antihoraire jusqu’à ce que vous entendiez
un déclic et que l’appareil s’éteigne ;
- faites ensuite tourner légèrement (très peu) la molette du thermostat en sens horaire.
- dans cette position, le thermostat maintiendra la température ambiante que vous avez choisie.
Lorsque l’appareil est en marche et qu’il chauffe la pièce, le voyant lumineux s’éclaire.
Page 9

6.3 Modèle avec sélecteur de puissance et thermostat (figure 14B)
Ce modèle a 2 molettes : une pour régler la puissance de fonctionnement et une pour régler le
thermostat.
Le régulateur de puissance permet de sélectionner 3 modes différents de fonctionnement de
l’appareil:
O
= ÉTEINT
I
= FONCTIONNEMENT À 750W
I I
= FONCTIONNEMENT À 1500W
Faites tourner la molette du thermostat en sens horaire jusqu’à ce que vous entendiez un déclic.
L’appareil se met en marche à la puissance sélectionnée.
Le thermostat maintient la température ambiante voulue en allumant et en éteignant
automatiquement l’appareil. Plus vous faites tourner la molette en sens horaire, dans une position
ayant un chiffre plus élevé, plus la température garantie sera élevée. La position maximum du
thermostat correspond à environ 35°C, la minimum (* ) à environ 5°C.
ATTENTION: lorsque la molette interrupteur se trouve sur la position maximum (position II) vous
devez cesser de la faire tourner en sens horaire.
ATTENTION: lorsque la molette thermostat se trouve sur la position maximum (position MAX)
vous devez cesser de la faire tourner en sens horaire.
Pendant le fonctionnement de l’appareil de légères ondulations peuvent se produire à la
surface de l’élément chauffant qui se trouve à l’intérieur de l’appareil. Cela est tout à fait
normal et ne nuit en rien au bon fonctionnement de l’appareil, ni à sa fiabilité dans le temps.
Pour savoir comment utiliser le thermostat, consultez le paragraphe 6.2
7. Sécurité en cas de fonctionnement anormal
En cas de surchauffe, le système de protection de l’appareil désactive automatiquement les
éléments chauffants et éteint l’appareil.
Dans ce cas:
- faites tourner la molette du thermostat en sens horaire pour vérifier si le thermostat n’a pas éteint
l’appareil tout simplement parce qu’une température ambiante élevée a été atteinte;
- si l’appareil ne se remet pas à fonctionner normalement:
- éteignez l’appareil;
- éliminez les éventuelles causes de surchauffe (par ex. obstacles sur la grille d’aspiration de
l’air ou sur celle de refoulement de l’air);
- laissez refroidir l’appareil pendant 15 à 20 minutes;
- allumez à nouveau l’appareil.
8. Entretien
Cet appareil n’a besoin d’aucun entretien particulier.
Nous vous recommandons uniquement d’aspirer, tous les six mois, la poussière qui se dépose
éventuellement sur la résistance.
En cas de besoin, ne vous adressez qu’à un service après-vente autorisé.
Si vous devez remplacer le câble d’alimentation, n’oubliez pas que vous devez utiliser un câble
HAR modèle 2 x 1 mm2 H05RR-F ou H05RN-F.
DEUTSCH
WÄRMEWELLE
GEBRAUCHSANWEISUNGEN
Um Beschädigungen oder Gefahrensituationen zu vermeiden, lesen Sie diese Anweisungen vor
dem ersten Gebrauch des Produktes bitte aufmerksam. Jeder unsachgemäße, nicht in der
vorliegenden Anleitung beschriebene Gebrauch des Produktes, kann Brände, elektrische
Gefahren oder Verletzungen verursachen und macht jegliche Garantie ungültig.
Die Garantie gilt nicht für beliebige Mängel, Abnutzungen, Verletzungen, Verluste oder Beschädigungen,
die auf den unsachgemäßen Gebrauch des Produktes zurückzuführen sind. Die Garantie aller
einschlägigen gesetzlichen Rechte bleibt bestehen. Keine Garantiebestimmung kann die durch
staatliche Gesetze reglementierten Garantiebestimmungen, die aus keinem Grund ausgeschlossen oder
geändert werden können, ausschließen oder ändern.
Vor jedem Vorgang, die Verpackung sorgfältig entfernen und das Produkt auf Unversehrtheit überprüfen.
Bei Auftreten von Mängeln oder Beschädigungen das Gerät nicht installieren oder versuchen es zu
reparieren, sondern sich an den Händler wenden.
Die Verpackung von Kindern fernhalten und die Teile derselben in Übereinstimmung mit den gültigen
Bestimmungen entsorgen.
1. Ihr Produkt
Außer dem von Ihnen erworbenen Gerät beinhaltet die Verpackung (Siehe Abbildung 1):
- Ein Beutel mit:
• 2 Stk. selbstschneidende Schrauben 3.5x50mm für die Wandbefestigung der oberen
Halterung (B);
• 1 Stk. selbstschneidende Schraube 3.5x30mm für die Wandbefestigung des unteren
Bügels (F);
• 3 Stk. Kunststoffdübel 6.0x25mm
• 5 Stk. selbstschneidende Schrauben 3.0x12mm für die Wandbefestigung der
Abstandstücke (E) und des Bügels (F) am Produkt;
• 4 Stk. Feinstellschrauben M4x8mm für die Befestigung des Bügels (D) am Produkt;
• 2 Stk. Feinstellschrauben M6x5mm für die Befestigung des Bügels (D) an der Basis (C);
- 1 Stk. Wandhalterung (B);
- 1 Stk. Sockelbasis (C);
- 1 Stk. Sockelstange (D);
- 4 Stk. Abstandstücke Kabelaufwicklung (E);
Falls eine Komponente fehlen sollte, wenden Sie sich bitte an Ihren Händler.
2. Zu Ihrer Sicherheit
Überzeugen Sie sich, dass die Netzspannung den Angaben auf dem Leistungsschild entspricht:
230 V AC, 50 Hz.
Verlassen Sie Ihre Wohnung nie bei eingeschaltetem Gerät; überzeugen Sie sich in diesem Fall
immer, dass der Schalter in der Stellung OFF (0) und der Thermostat auf der niedrigsten Stufe (*)
eingestellt ist (*).
Gerät während des Betriebes in sicherer Position aufstellen:
- Abstände zu entflammbaren Gegenständen oder Möbelstücken einhalten (siehe Abbildung 2);
- Falls das Gerät an der Wand angebracht wird, dasselbe nicht an Wänden aus Kunststoff- oder
synthetischem Material befestigen;
- Das Gerät niemals direkt unterhalb einer Steckdose positionieren.
Lassen Sie nicht zu, dass Tiere oder Kinder das Gerät berühren oder damit spielen. Achtung!
Während des Betriebs kann das Luftauslassgitter sehr heiß werden ( über 80°C = 175°F);
Page 10

WICHTIG: Um Überhitzung zu vermeiden, das Gerät nie abdecken. Niemals Gegenstände
oder Decken auf das eingeschaltete Gerät legen. Dies ist klar und deutlich auf dem Gerät
widergegeben oder auf dem folgenden Symbol veranschaulicht
Dieses Gerät darf nicht von Personen (Kinder inbegriffen) mit eingeschränkten körperlichen,
wahrnehmerischen oder geistigen Fähigkeiten oder unzureichend Erfahrung und Kenntnis benutzt
werden, wenn sie nicht von einer für ihre Sicherheit verantwortlichen Person beaufsichtigt oder von
letzterer angemessen unterrichtet worden sind. Kinder müssen überwacht werden, um sich davon
zu überzeugen, dass sie nicht mit dem Produkt spielen.
Das Gerät nicht reinigen, wenn es eingeschaltet ist und es nicht in Wasser tauchen.
Achtung: um das Gerät als tragbares Gerät zu benutzen, muss zunächst der Sockel montiert und
am Gerät befestigt werden. Das Produkt nicht ohne seinen Sockel auf den Fußboden legen.
Das Speisekabel nicht um das Produkt wickeln oder auf dasselbe legen, wenn es in Betrieb ist.
Das Produkt nicht in Räumen benutzen, die mit explosiven Gasen oder Dämpfen gesättigt sind,
die von Lösungsmitteln und Lacken oder entflammbaren Substanzen erzeugt wurden.
Wenn ein beschädigtes Kabel auszutauschen ist, führen Sie diesen Vorgang nicht selbst aus,
sondern bringen das Gerät zu einer autorisierten Reparaturstelle, weil dieser Vorgang, um jegliche
Beschädigungsgefahr zu vermeiden, von Fachpersonal ausgeführt werden muss.
Dieses Gerät nicht in der Nähe von Duschen, Badewannen oder Waschbecken benutzen.
Das Produkt muss so positioniert werden, dass die Anschlussdose stets erreichbar ist.
3. Sichere Positionierung
Das Gerät nur in waagerechter Lage benutzen.
Wenn Sie es als tragbares Gerät benutzen, immer die auf Abbildung 2 angegebenen
Mindestabstände von jedem entflammbaren Gegenstand einhalten.
Bei der Wandanbringung die auf Abbildung 3 veranschaulichten Mindestabstände von der Decke,
vom Fußboden und von den Seitenwänden einhalten.
Das Gerät In Badezimmern niemals in den Bereichen 0 oder 1 (s. Abbildung 4) anbringen
oder benutzen.
Die Einstellknöpfe dürfen unter keinen Umständen für Personen zugänglich sein, die sich in der
Badewanne oder in der Dusche aufhalten.
Das Produkt muss ungehindert warme Luft ansaugen und ausstoßen können.
Für die Nutzung als tragbares Gerät:
• Montieren Sie den Sockel, indem die Stange (Abbildung 1/D) mit den 2 im Lieferumfang
inbegriffenen Senkschrauben (Abbildung 5) an die Basis (Abbildung 1/C) geschraubt wird;
• Führen Sie die Sockelstange in den dazu gedachten rechteckigen Schlitz in der Mitte des
unteren Produktgitters (Abbildung 6) ein;
• Sockel am Produkt befestigen, indem die 4 im Lieferumfang inbegriffenen Schrauben an den
auf Abbildung 7 gezeigten Punkten festgeschraubt werden.
Das Produkt ist zweifach elektrisch isoliert und bedarf keiner Erdung.
4. Wandbefestigung
Das Produkt darf nur ohne Sockel und bei Einhaltung der auf Abbildung 3 angegebenen Abstände
an der Wand angebracht werden.
Den unteren Haltebügel mithilfe der im Lieferumfang inbegriffenen Schraube, wie auf Abbildung 8
gezeigt, am Produkt festschrauben;
Wandhalterung befestigen, indem in einem Abstand von 150 mm 2 Bohrungen mit einem 6 mmBohrfutter an der Wand ausgeführt werden. Die 2 Dübel einsetzen und die Wandhalterung wie auf
Abbildung 9 gezeigt, mit den 2 im Lieferumfang inbegriffenen Schrauben befestigen.
Das Produkt an die Wandhalterung hängen, indem man es zunächst in Wandrichtung drückt und
anschließend nach unten gleiten lässt (Abbildung 10).
Mit einem Bleistift den Punkt anzeichnen, an dem die Bohrung für die Befestigung der unteren
Halterung ausgeführt werden soll, das Produkt abnehmen, mit einem 6 mm Bohrfutter eine
Bohrung an der Wand ausführen und den im Lieferumfang inbegriffenen Dübel einsetzen
(Abbildung 11);
Das Produkt wieder an die Kunststoffhalterung hängen und den unteren Bügel mit der dazu
bestimmten Schraube befestigen.
WICHTIG FÜR FRANKREICH:
Wenn das Produkt an der Wand angebracht wird, muss der elektrische Anschluss an das
Versorgungsnetz ausgeführt werden, indem der im Lieferumfang inbegriffene Netzstecker
abgeschnitten und eine dazu bestimmte Klemme gemäß des nachfolgend veranschaulichten Plans
benutzt wird:
Phase = braun
Netz
In feuchten Räumen, in Badezimmern oder in Küchen muss die Anschlussklemme mindestens
25 cm vom Fußboden entfernt angebracht werden. Der Stromanschluss an das Netz muss
außerdem die Benutzung eines zweipoligen Schalters mit einem Mindestöffnungsabstand
zwischen den Kontakten vorsehen, der die vollständige Abschaltung unter den Bedingungen von
Überspannungskategorie III ermöglicht.
L
N
Neutral = blau
produktkable
5. Kabelaufwicklung
Wenn das Produkt nicht benutzt wird, kann das Kabel wie auf Abbildung 12 veranschaulicht,
aufgewickelt werden.
Erinnern Sie sich daran, dass das Kabel während der Benutzung des Produktes immer
vollständig abgewickelt sein muss.
6. Benutzung des Geräts
6.1 Nur mit Thermostat (Abbildung 14A)
Drehen Sie den Thermostatknopf im Uhrzeigersinn, bis Sie ein “Klick” hören. Das Produkt setzt
sich bei 1000 W in Betrieb.
Der Thermostat behält die gewünschte Raumtemperatur bei, indem es das Gerät automatisch einund abschaltet. Je weiter der Knopf im Uhrzeigersinn gedreht wird, desto höher ist die
zugesicherte Temperatur. Der Höchststand des Thermostats entspricht circa 35 °C, der
Mindeststand (*) circa 5 °C. circa 5°C.
Während des Produktbetriebs kann sich die Oberfläche des Heizelementes innerhalb des
Produktes leicht wellen. Diese Erscheinung ist normal und beeinträchtigt weder den
einwandfreien Betrieb des Gerätes noch seine Zuverlässigkeit.
Der Hersteller haftet nicht für Frostschäden, die auf eine unangemessene Isolierung der
Umgebung oder eine Heizleistung des Gerätes zurückzuführen sind, die nicht auf die Größe der zu
beheizenden Umgebung ausgelegt ist.
6.2 Benutzung des Thermostats
In einem Raum, in dem die Temperatur mehr als 35 °C beträgt, ist es normal, dass das Produkt
nicht vom Thermostat, auch wenn er sich auf dem Höchststand befindet, eingeschaltet wird.
Umgekehrt ist es in einem Raum, in dem die Temperatur zu niedrig ist (unter 5 °C) normal, dass
das Gerät vom Thermostat, auch wenn er sich auf dem Mindeststand befindet, ständig
eingeschaltet bleibt.
Für die bestmögliche Einstellung des Thermostats empfehlen wir wie folgt vorzugehen:
- Stellen Sie den Thermostat auf den Höchststand und lassen Sie das Gerät bis zum Erreichen
einer angenehmen Temperatur eingeschaltet;
- Drehen Sie den Thermostatknopf anschließend so lange im Gegenuhrzeigersinn, bis Sie ein
“Klick” hören und das Gerät sich abschaltet;
- Drehen Sie den Thermostatknopf danach erneut (ganz wenig) im Uhrzeigersinn;
- in dieser Stellung behält der Thermostat die von Ihnen zuvor gewählte Raumtemperatur bei.
Page 11

Wenn das Gerät eingeschaltet ist und die Umgebung heizt, leuchtet die entsprechende
Leuchtanzeige.
6.3 Mit Leistungsregler und Thermostat (Abbildung 14B)
Dieses Modell hat 2 Drehknöpfe, einen zur Einstellung der Betriebsleistung und einen für den
Thermostat.
Mit dem Leistungsregler können 3 unterschiedliche Betriebsmodusse des Produktes gewählt
werden:
O
= AUS
I
= BETRIEB BEI 750W
I I
= BETRIEB BEI 1500W
Drehen Sie den Thermostatknopf im Uhrzeigersinn, bis Sie ein “Klick” hören. Das Produkt setzt
sich bei der von Ihnen gewählten Leistung in Betrieb.
Der Thermostat behält die gewünschte Raumtemperatur bei, indem es das Gerät automatisch einund abschaltet. Je weiter der Knopf im Uhrzeigersinn in eine Position mit einer höheren Ziffer
gedreht wird, desto höher ist die zugesicherte Temperatur. Der Höchststand des Thermostats
entspricht circa 35 °C, der Mindeststand (*) circa 5 °C. circa 5°C.
ACHTUNG: Wenn der Leistungsschalter auf dem Höchststand (Pos. II) steht, darf er nicht weiter
im Uhrzeigersinn gedreht werden.
ACHTUNG: Wenn der Thermostatknopf auf dem Höchststand (Pos. MAX) steht, darf er nicht
weiter im Uhrzeigersinn gedreht werden.
Während des Produktbetriebs kann sich die Oberfläche des Heizelementes innerhalb des
Produktes leicht wellen. Diese Erscheinung ist normal und beeinträchtigt weder den
einwandfreien Betrieb des Gerätes noch seine Zuverlässigkeit.
Für die Benutzung des Thermostats siehe Abschnitt 6.2
7. Sicherheit bei Störungen
Bei Überhitzung werden die Heizelemente vom Sicherheitssystem des Geräts automatisch
deaktiviert und das Gerät wird abgeschaltet.
In diesem Fall:
- Drehen Sie den Thermostatknopf im Uhrzeigersinn, um zu überprüfen, dass der Thermostat das
Gerät nicht einfach abgeschaltet hat, weil eine hohe Raumtemperatur erreicht wurde;
- Falls das Gerät den einwandfreien Betrieb nicht wieder aufnehmen sollte:
- Gerät abschalten;
- Eventuelle Überhitzungsursachen beseitigen (z. B. Hindernisse am Lufteintritts- oder am
Luftauslassgitter);
- Produkt 15-20 Minuten abkühlen lassen;
- Produkt wieder einschalten.
8. Wartung
Dieses Gerät bedarf keiner besonderen Wartung.
Die einzige Empfehlung, die wir Ihnen geben, ist alle sechs Monate mithilfe eines Staubsaugers
den Staub zu entfernen, der sich am Widerstand sammeln kann.
Bei Bedarf wenden Sie sich bitte ausschließlich an eine autorisierte Kundendienststelle.
Sollte der Austausch des Speisekabels notwendig sein, weisen wir Sie darauf hin, dass ein Kabel
HAR mod. 2 x 1 mm2 H05RR-F oder H05RN-F erforderlich ist.
 Loading...