


32" LCD HDTV
User Guide
MODEL EQ3288
Explanation of WARNING Symbols
The lightning flash with arrowhead symbol, within an equilateral triangle, is
intended to alert the user to the presence dangerous voltage within the
inside of the product that may be sufficient level to constitute a risk of electric
shock.
The exclamation point within an equilateral triangle is intended to alert the
user to the presence of important operating and servicing instructions.
Safety instructions
1) Read these instructions.
2) Keep these instructions.
3) Heed all warnings.
4) Follow all instructions.
5) Do not use this LCD TV near water.
6) Clean only with dry cloth. Do not use liquid, alcohol, or aerosol cleaners.
7) Do not block any ventilation openings. Install your LCD TV in a well ventilated
area.
8) Keep your LCD TV away from moisture, excessive dust and any heat sources,
such as radiators, heat registers, stoves, or any other apparatus (including
amplifiers) that produce heat.
9) Do not remove the back cover. There are no user-serviceable parts inside.
10) Do not defeat the safety purpose of the polarized or grounding-type plug. A
polarized plug has two blades with one wider than the other. A grounding type plug
has two blades and a third grounding prong. The third prong is provided for your
safety. If the provided plug does not fit into your outlet, consult an electrician for
replacement of the obsolete outlet.
11) Protect the power cord from being walked on or pinched particularly at plugs,
receptacles, and the point where they exit from the LCD TV.
12) Never rest objects on the power cord or place it in high traffic areas.
13) Only use attachments/accessories specified by the
manufacturer.
English
14) Use only with stand, tripod, bracket, or table specified by
the manufacturer, or sold with the LCD TV. When a cart is
used, use caution to avoid injury from tip-over.
15) Unplug this LCD TV during lightening storms or when
unused for long periods of time.
16) Refer all servicing to qualified service personnel-Servicing may be required if the LCD TV has been damaged in any way, such as
power-supply cord or plug damage, liquid has been spilled or objects have fallen
into the LCD TV, the LCD TV has been exposed to rain or moisture, does not
operate normally, or has been dropped.
English
17) Do not expose your LCD TV to dripping or splashing, and do not place objects
filled with liquids on it.
18) The Shock Hazard Marking and Associated Graphical Symbol are provided on the
back panel of unit.
19) This product is only to perform the useful function of entertainment and visual
display tasks are excluded.
20) Wall or ceiling mounting: When mounting the product on a wall or ceiling, be sure
to install the product according to the method recommended by the manufacturer.
Use only the mounting hardware recommended by the manufacturer. This is a
safety feature.
21) The readily operable appliance coupler will serve as the disconnect device of this
apparatus.
22) The apparatus must be connected to a mains socket outlet with a protected
earthling connection.
23) Due to safety concerns, if the VESA mounting kit is purchased separately please
make sure the mounting kit is UL-Listed, and replaceable only by service
personnel.
CAUTION: Any damage caused by incorrectly attempting to mount this
LCD TV is not covered under the terms of the manufacturers warranty.
WARNING: To reduce the risk of fire or electric shock, do not expose this
LCD TV to rain or moisture.

Content
ACCESSORIES................................................................................................................. 1
WALL-MOUNT INSTRUCTION ......................................................................................... 2
FRONT PANEL BUTTONS................................................................................................ 3
BACK PANEL BUTTONS................................................................................................... 4
REMOTE CONTROL......................................................................................................... 5
INSTALLATION.................................................................................................................. 7
Connecting RF antenna and Cable TV....................................................................... 7
Connecting to DVD / Set Top Box............................................................................... 7
Connecting to External Stereo System to Listen to LCD TV Sound............................ 9
Connecting to the Headphone .................................................................................... 9
Connecting to a Computer........................................................................................ 10
Connecting to A/V Device with SPDIF input ............................................................. 10
Connecting with the power cord ................................................................................11
BASIC OPERATION ........................................................................................................ 12
Turning on the LCD TV............................................................................................. 12
Power On/Off............................................................................................................ 12
Initial Setup............................................................................................................... 12
Select input source ................................................................................................... 13
Volume Adjusting ...................................................................................................... 14
Sound Mode Select .................................................................................................. 14
Picture Mode Select.................................................................................................. 14
INFO......................................................................................................................... 14
Electronic Program Guide (EPG).............................................................................. 14
Channel Select ......................................................................................................... 14
Sleep Time Setting.................................................................................................... 15
Zoom ........................................................................................................................ 15
Wide ......................................................................................................................... 15
Freeze Picture .......................................................................................................... 15
Using the OSD function ............................................................................................ 15
ADVANCED OPERATION—OSD MENU ........................................................................ 16
Video Menu............................................................................................................... 16
Audio Menu .............................................................................................................. 17
TV Menu................................................................................................................... 18
Setup Menu .............................................................................................................. 19
Parental Menu .......................................................................................................... 21
TECHNICAL SPECIFICATION ........................................................................................ 26
SAFETY PRECAUTIONS................................................................................................ 27
CARE AND MAINTENANCE ........................................................................................... 28
TROUBLESHOOTING..................................................................................................... 28
English

English
ACCESSORIES
Thank you for purchasing this LCD-TV.
This LCD-TV package comes with:
LCD TV
User’s Guide book
Remote control
Battery AAA x 2
Power Cord
RCA A/V Cable
1
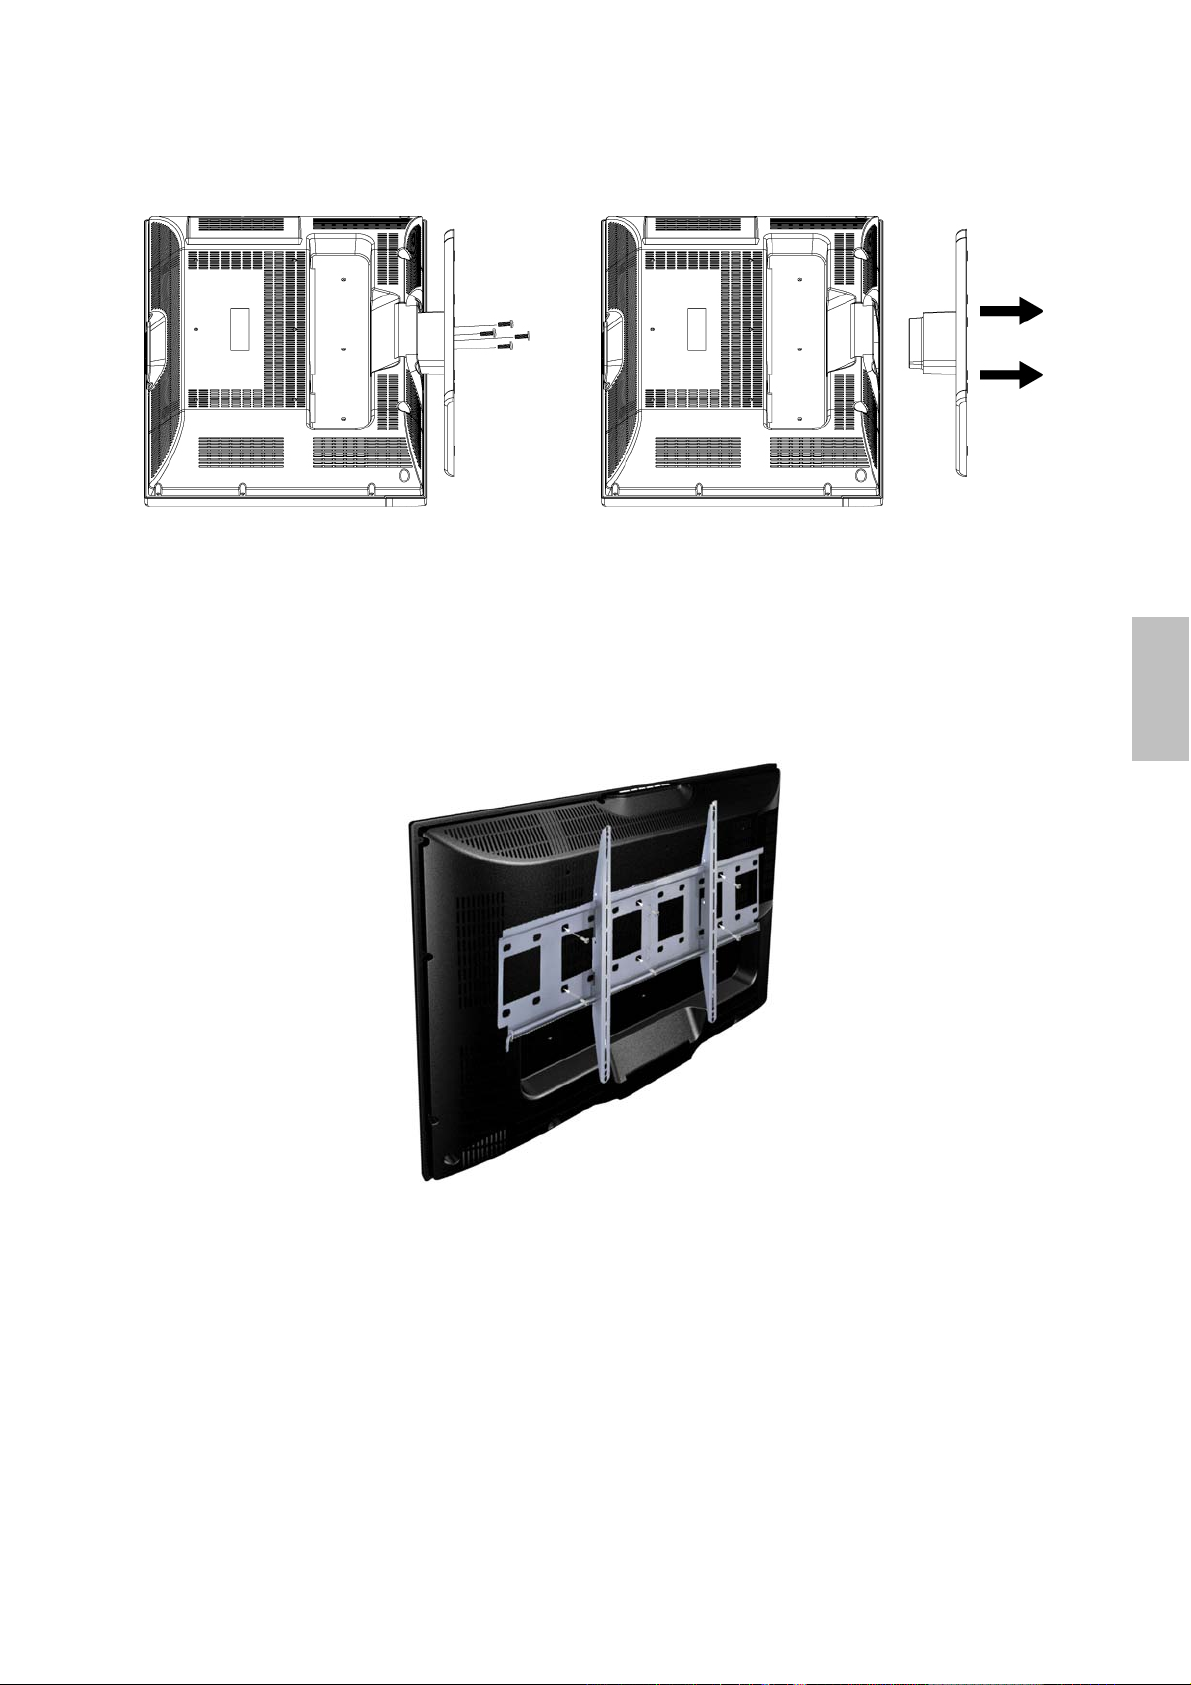
WALL-MOUNT INSTRUCTION
Preparing To Install The Optional Wall Mount Arm (not included)
This TV can be attached to a wall mounting arm you can purchase separately.
Turn the power OFF then disconnect the cables from the TV before performing the procedure
below.
1. Place the TV face down on a soft cloth or cushion on a table.
2. Remove the 4 screws connecting the stand base to the TV.
3. Remove the stand base.
Attaching The Optional Wall Mount Arm (not supplied)
English
Follow these steps to finish installing the wall mounting arm:
1. Place the wall mounting arm onto the back of the TV. Line up the holes of the arm with the
holes in the back of the monitor.
2. Insert the 6 screws into the holes and tighten.
3. Reconnect the cables. Refer to the user’s manual that came with the optional wall mounting
arm for instructions on attaching it to the wall.
NOTE
200 x 200mm VESA high hole (n=6), M6, pitch =1.0 mm screw mounting kit not included.
Due to safety concerns, if the VESA mounting kit is purchased separately please make sure the
mounting kit is UL-Listed, and replaceable only by service personnel.
2
English
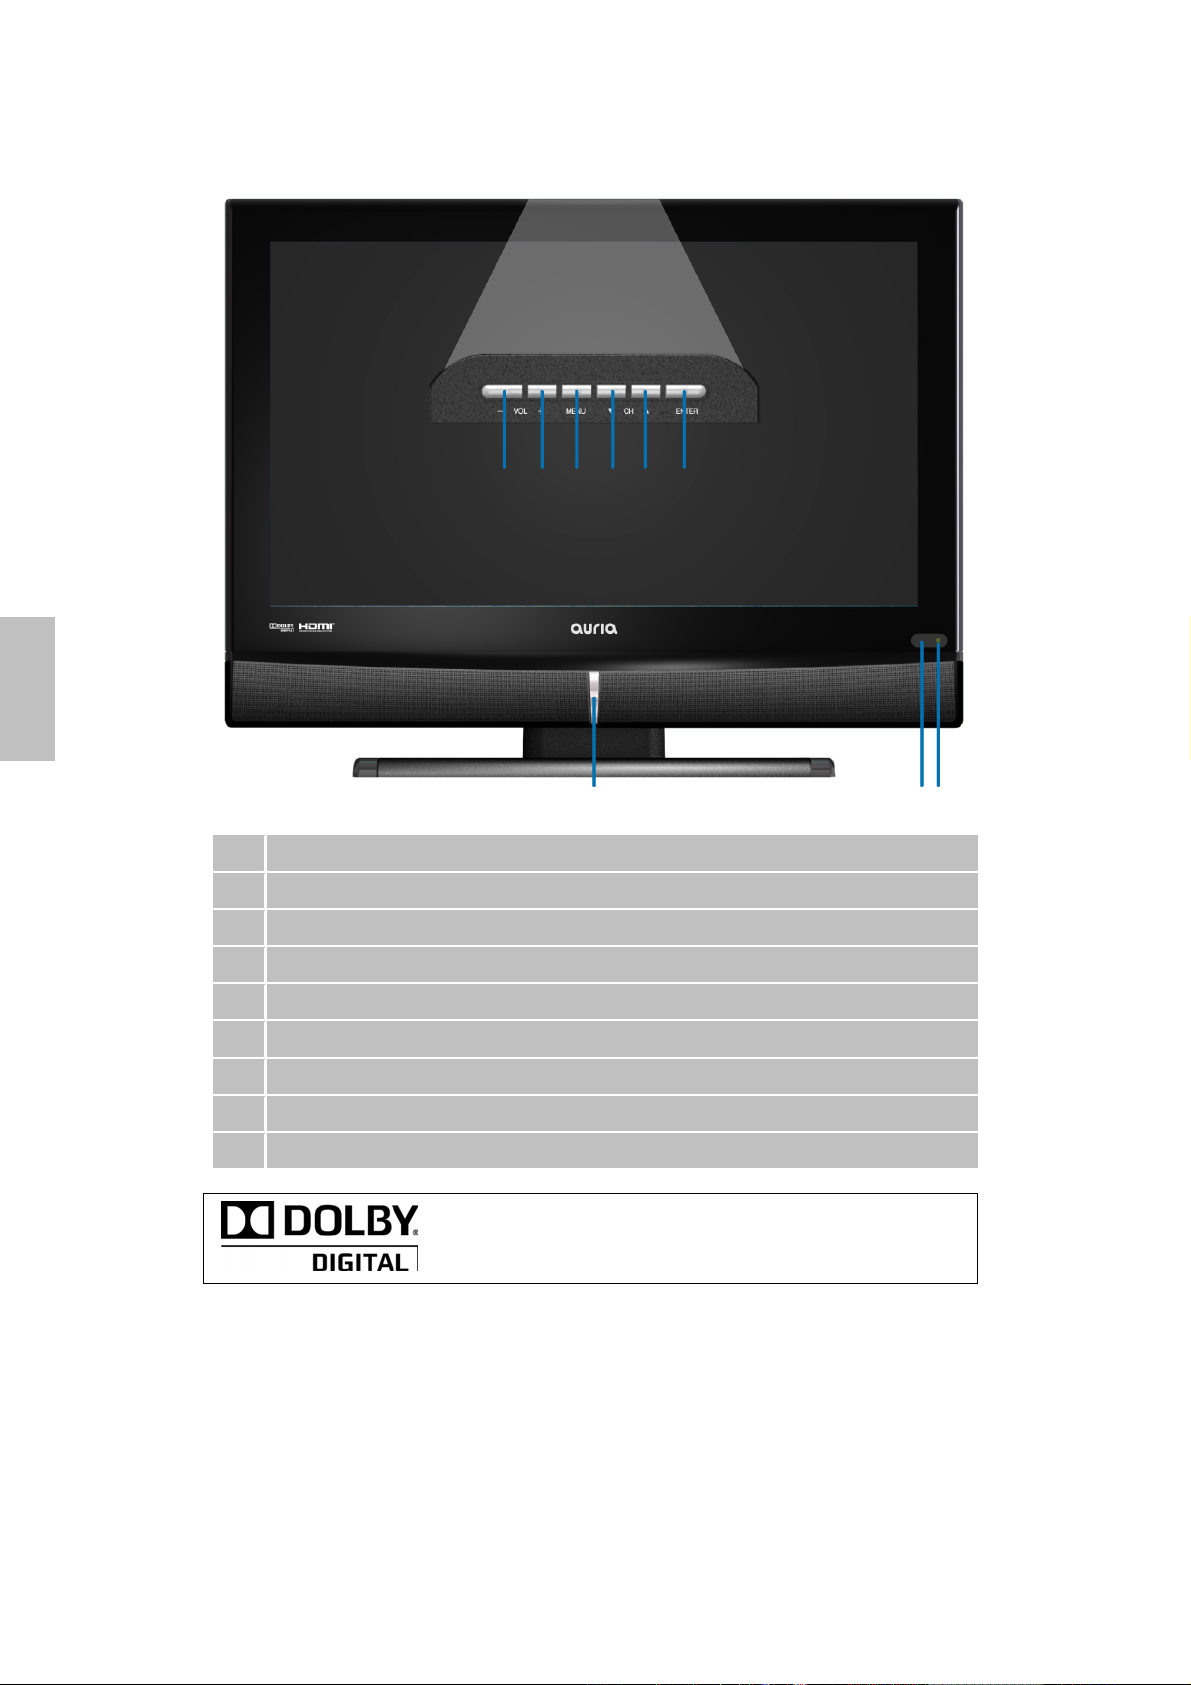
FRONT PANEL BUTTONS
Volume Down
Volume Up
On Screen Display Menu On/Off
CH Down
CH Up
Enter
Power ON/OFF button
Remote Control Receiver
❾ Power LED Indicator
Manufactured under license from Dolby Laboratories.
Dolby and the double-D symbol are trademarks of
Dolby Laboratories.
(Only for DTV source in this model.)
Note:
1. Press
press
VOL+
2. Press
press
VOL-
VOL+
VOL-
and
and
and
and
MENU
MENU
VOL+
VOL+
buttons at the same time to lock power button, and
buttons again to unlock it.
buttons at the same time to lock OSD menu, and
buttons again to unlock it.
3
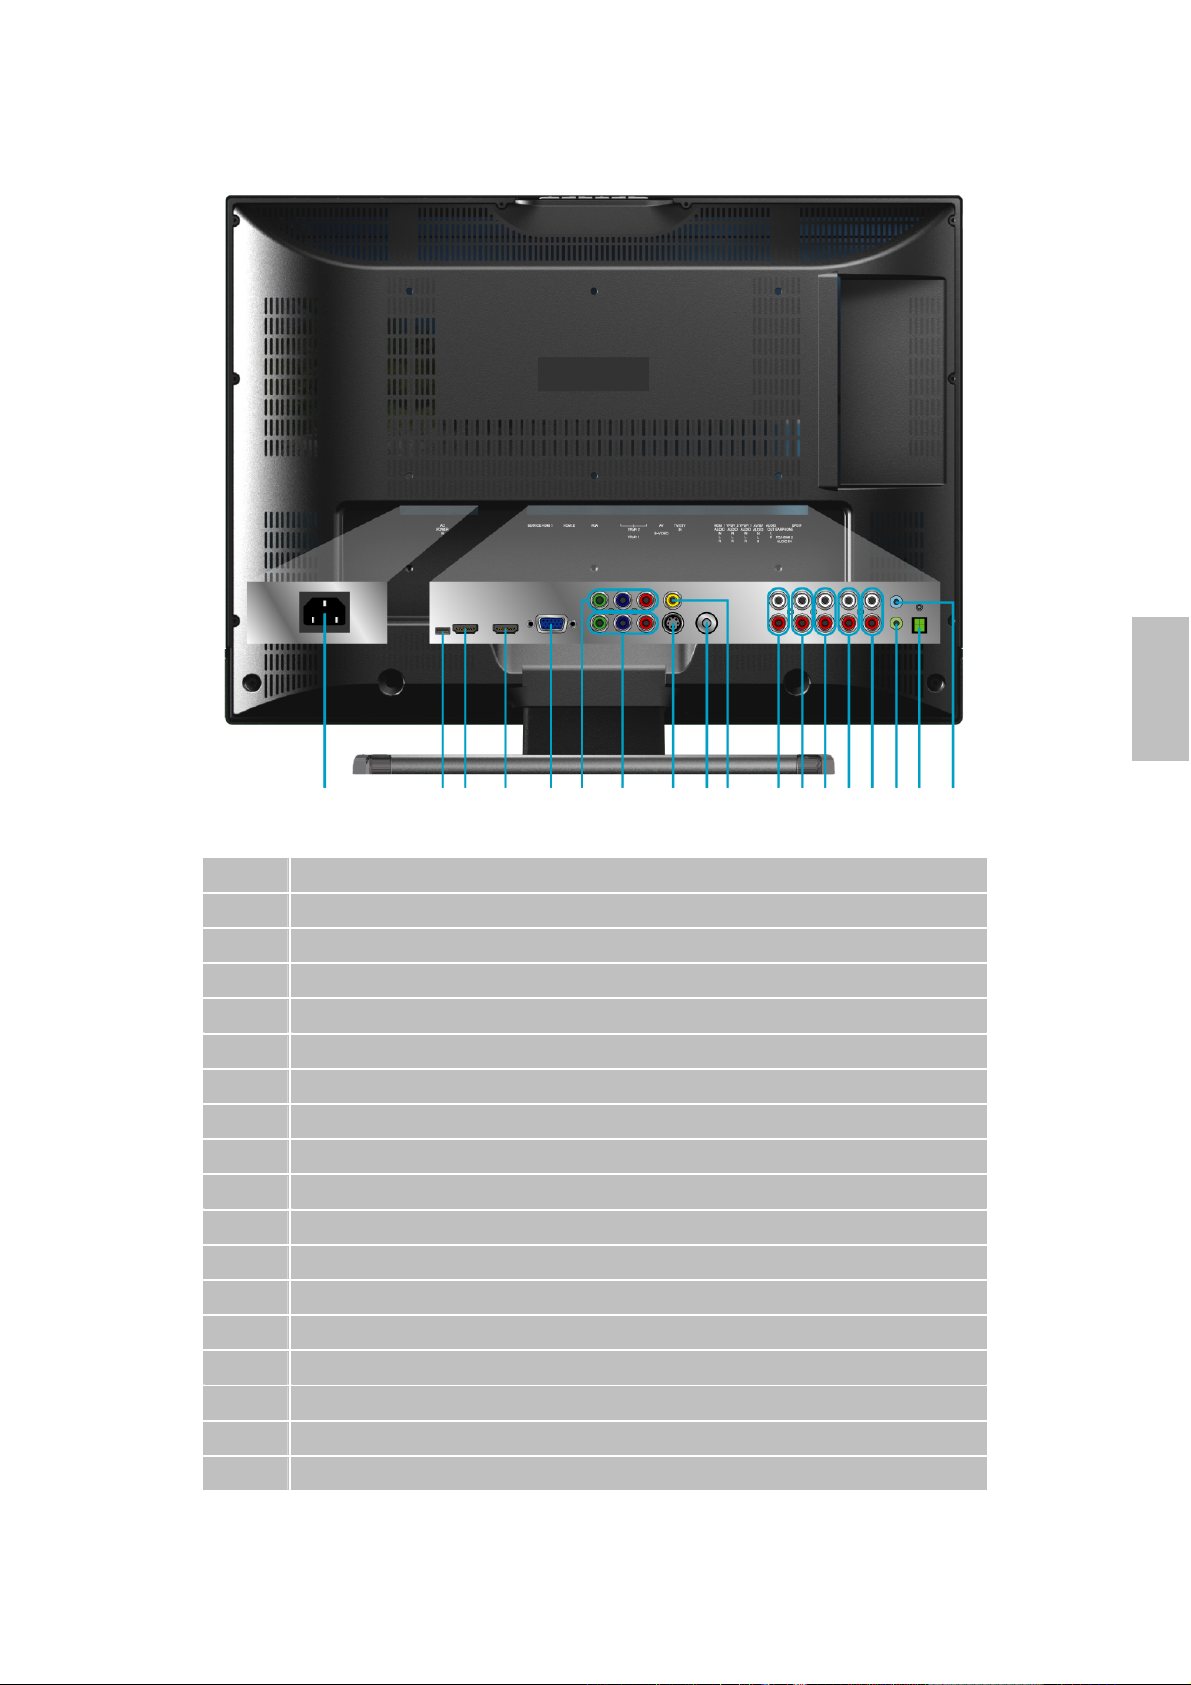
BACK PANEL BUTTONS
English
A B C D E F G H I J K L M N O P Q R
A Power (AC input)
B Service (USB Terminal)
C HDMI 1 Input Terminal
D HDMI 2 Input Terminal
E VGA signal input
F YPbPr 2 signal input
G YPbPr 1 signal input
H S-Video input
I Cable/Air TV input
J Composite Video input
K HDMI 1 signal Audio input (left/right)
L YPbPr 2 signal Audio input (left/right)
M YPbPr 1 signal Audio input (left/right)
N AV/ S-Video signal Audio input (left/right)
O Audio output (left/right)
P Audio Input for VGA or HDMI 2
Q SPDIF Optical output
R Headphone Jack
4
English
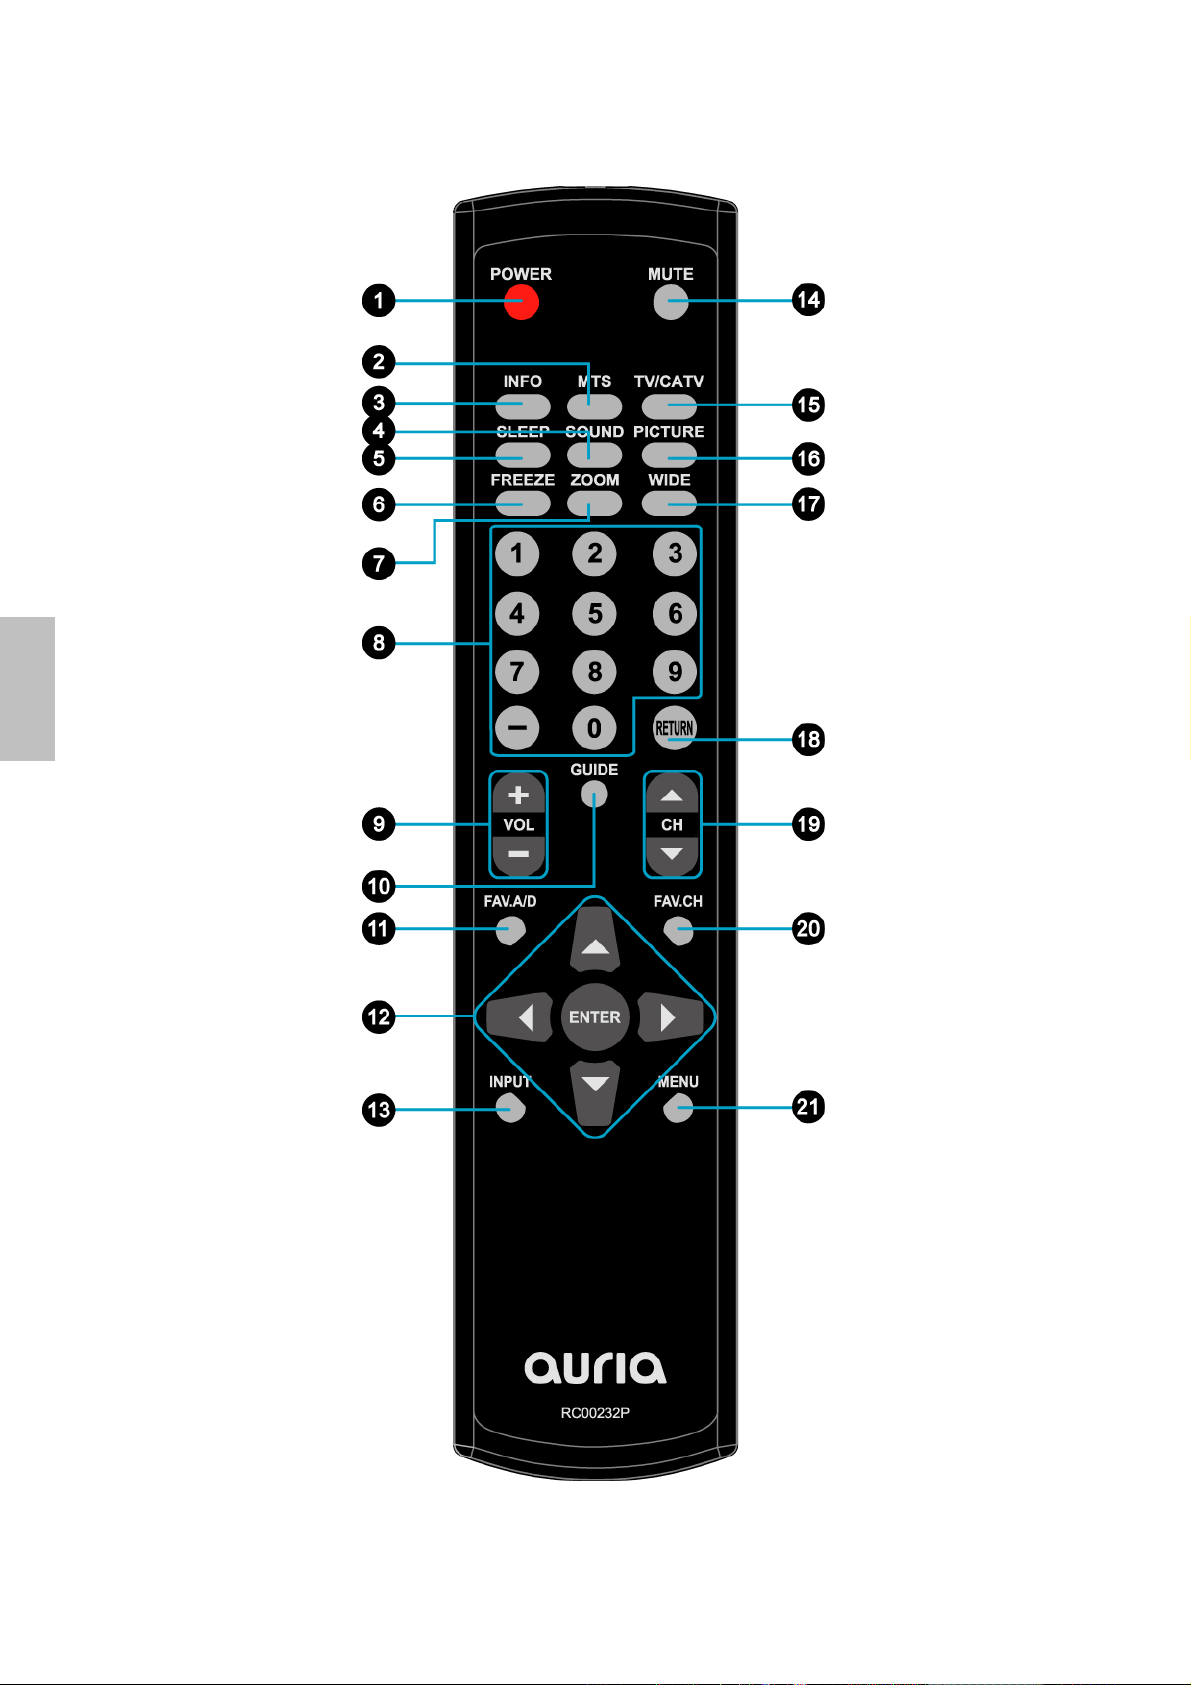
REMOTE CONTROL
5
Remote control button function as follows:
1 POWER Power On/Off
2 MTS Select Mono, Stereo or SAP sound
3 INFO Display current information
4 SOUND Select Sound modes
5 SLEEP Set timer to turn off TV
6 FREEZE “Freeze-Frame” the current screen
7 ZOOM Adjust window size
8 0~9, - number Directly channel select
9 VOL + and VOL - Adjust volume UP/DOWN
10 GUIDE Select electronic program guide (EPG)
11 FAV.A/D To skip or restore Favorite Channels
12 UP/DOWN/LEFT/RIGHT/
ENTER
13 INPUT Input source select
14 MUTE Volume mute ON/OFF
15 TV/CATV Swap between TV/CATV.
16 PICTURE Select Picture modes
17 WIDE Change the image size
18 RETURN
19 CH▲and CH▼
20 FAV.CH
21 MENU
UP/DOWN for OSD function select and LEFT/RIGHT for
function adjust
ENTER: Enter the function setting
Return to previous channel
Adjust channel UP/DOWN
Select from preset Favorite Channels
On Screen Display (OSD) menu ON/OFF
English
6

English
INSTALLATION
Connecting RF antenna and Cable TV
Make sure the power is OFF before installing your LCD TV.
1) AIR TV: Connect the LCD TV to TV antenna with 75-ohm coaxial cable. Preset the air TV
channels into memory with Auto Scan function when using an antenna TV system. This air
input jack both support TV and DTV systems. Besides, the TV system (NTSC) and DTV
system (ATSC) can be found by the scanning of “AIR” in the Auto Scan function. See page 18.
2) Cable TV: Connect the LCD TV to the cable with CATV and Digital cable. Preset the cable TV
channels into memory with Auto Scan function when using a cable TV system. The cable
input jack both support CATV and Digital cable systems. Besides, the CATV system (cable TV)
and Digital cable system (clear QAM) can be found by the scanning of “Cable” in the Auto
Scan function. See page 18.
RF Cable, CATV/ Digital cable
or Adapter (not supplied)
Note: Users can select either Air or Cable TV cable to be connected to the TV/DTV IN jack. To
watch both of them, use an adapter to connect both Air and Cable cables to the jack.
Connecting to DVD / Set Top Box
Connect Video/Audio cables from compatible devices into the back panel of LCD TV.
1) With AV cable:
RCA A/V Cable
VCD or DVD Player
7
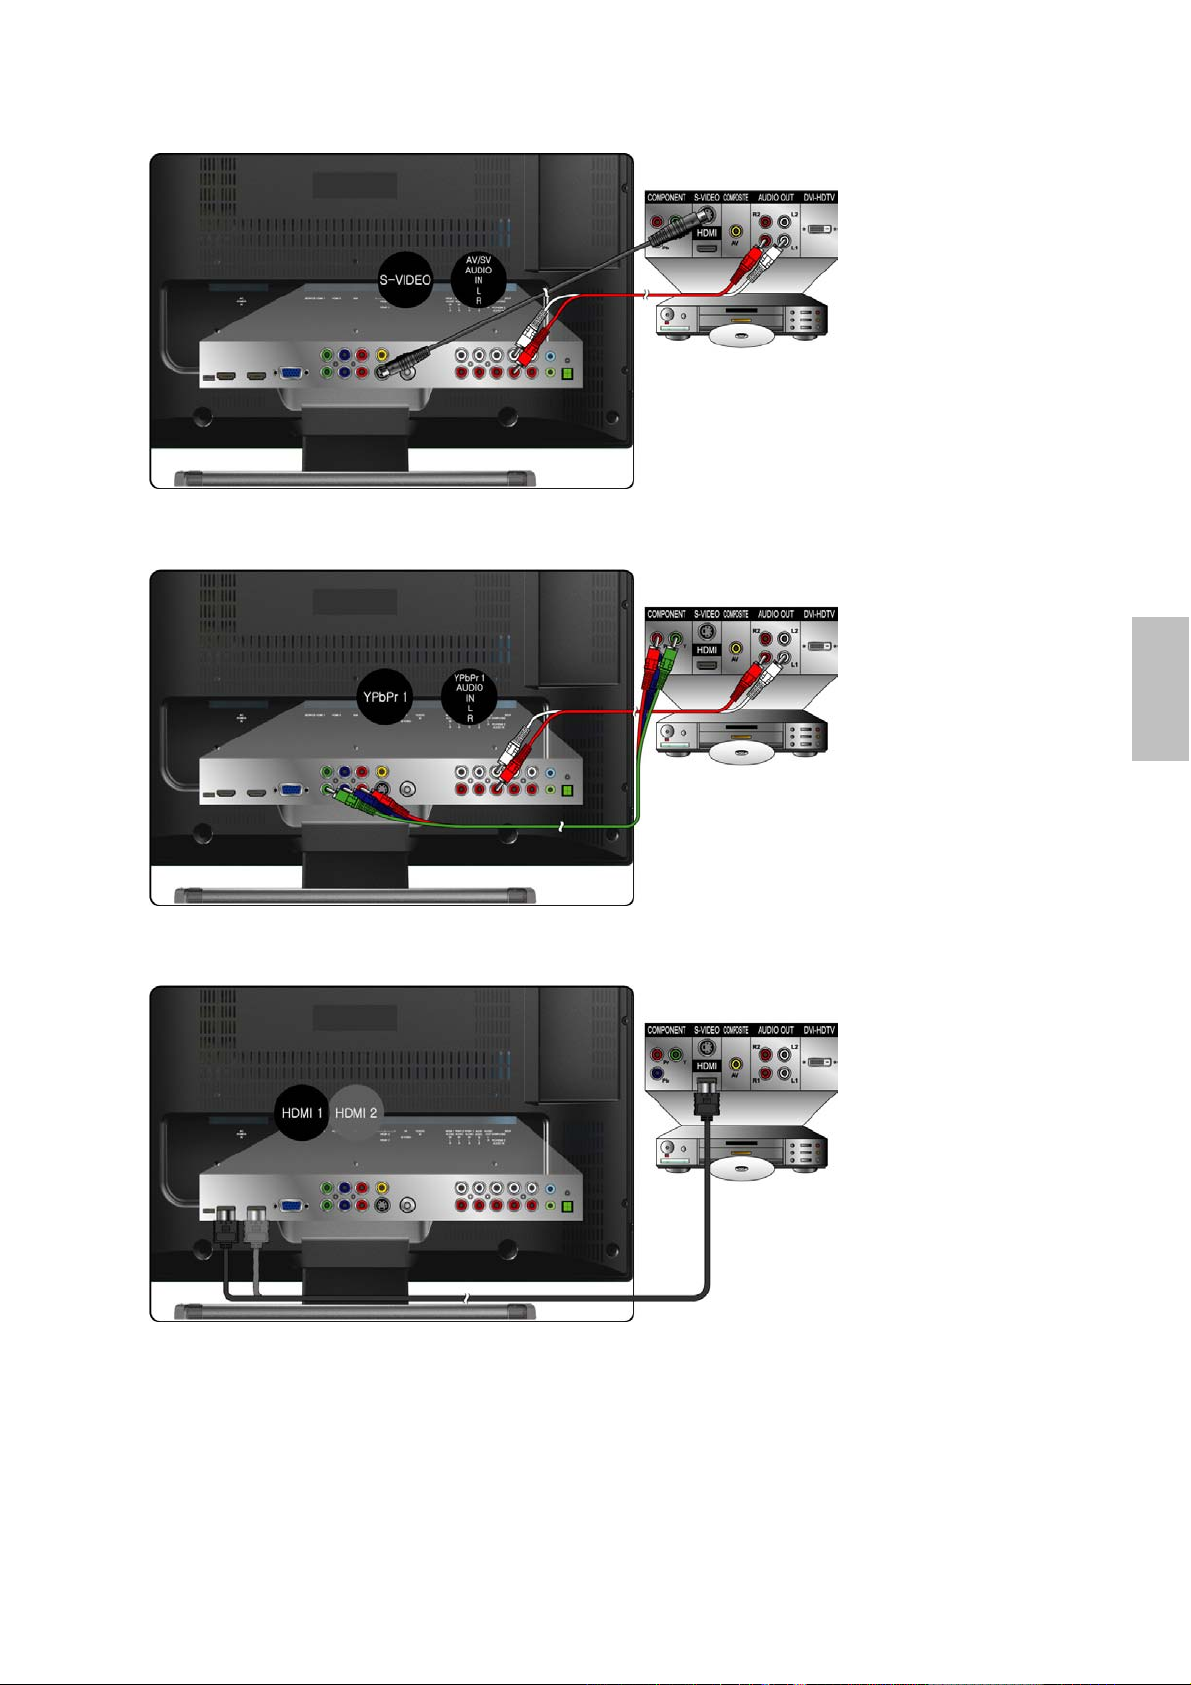
2) With S-Video cable:
r
A
yer
A
p
3) With YPbPr cable:
S-Video Cable (not supplied)
udio in Cable
(not supplied)
VCD or DVD Playe
YPbPr Cable (not supplied)
English
udio in Cable
(not supplied)
4) With HDMI cable:
VCD or DVD Pla
VCD or DVD Player
(DVD Player should
have the HDMI
out
ut terminal)
HDMI Cable (not supplied)
8

5) With HDMI-DVI cable:
(
)
English
Audio Cable
VCD or DVD Player
(DVD Player should
have the DVI output
HDMI-DVI Cable (not supplied)
not supplied
terminal)
Connecting to External Stereo System to Listen to LCD TV Sound
Connect the audio output terminal of the LCD TV to audio in terminal of the stereo system (stereo
system sold separately).
Audio in Cable
(not supplied)
Stereo system
Connecting to the Headphone
Connect the headphone to the headphone output terminal of the LCD TV. (Headphone sold
separately).
Headphone
(not supplied)
9
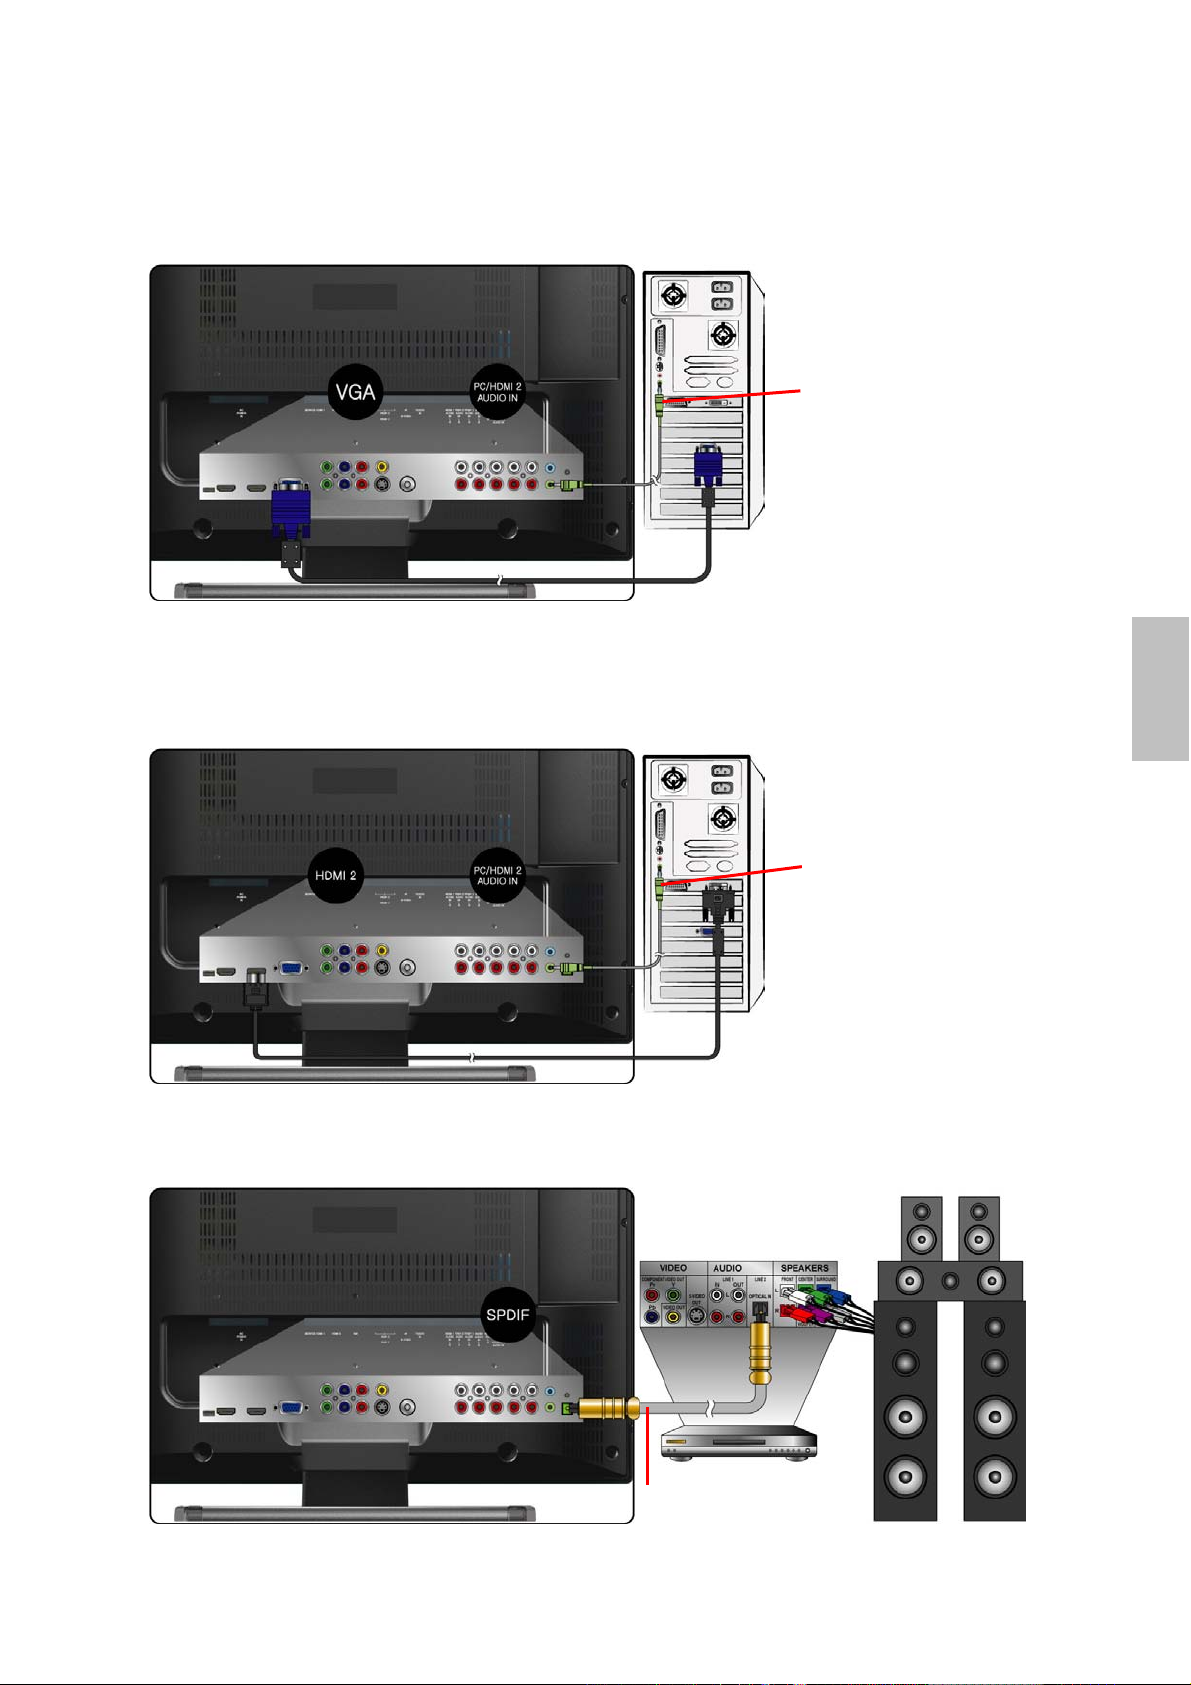
Connecting to a Computer
)
A
A
)
1) With VGA Cable:
Connect the VGA cable from VGA output of the computer to the VGA terminal input of your
LCD TV. Also, connect the Audio In cable (green) from the audio output of your computer to the
audio input terminal (green) of the LCD TV.
PC Audio In Cable (not supplied)
VGA 15 Pin Cable (not supplied
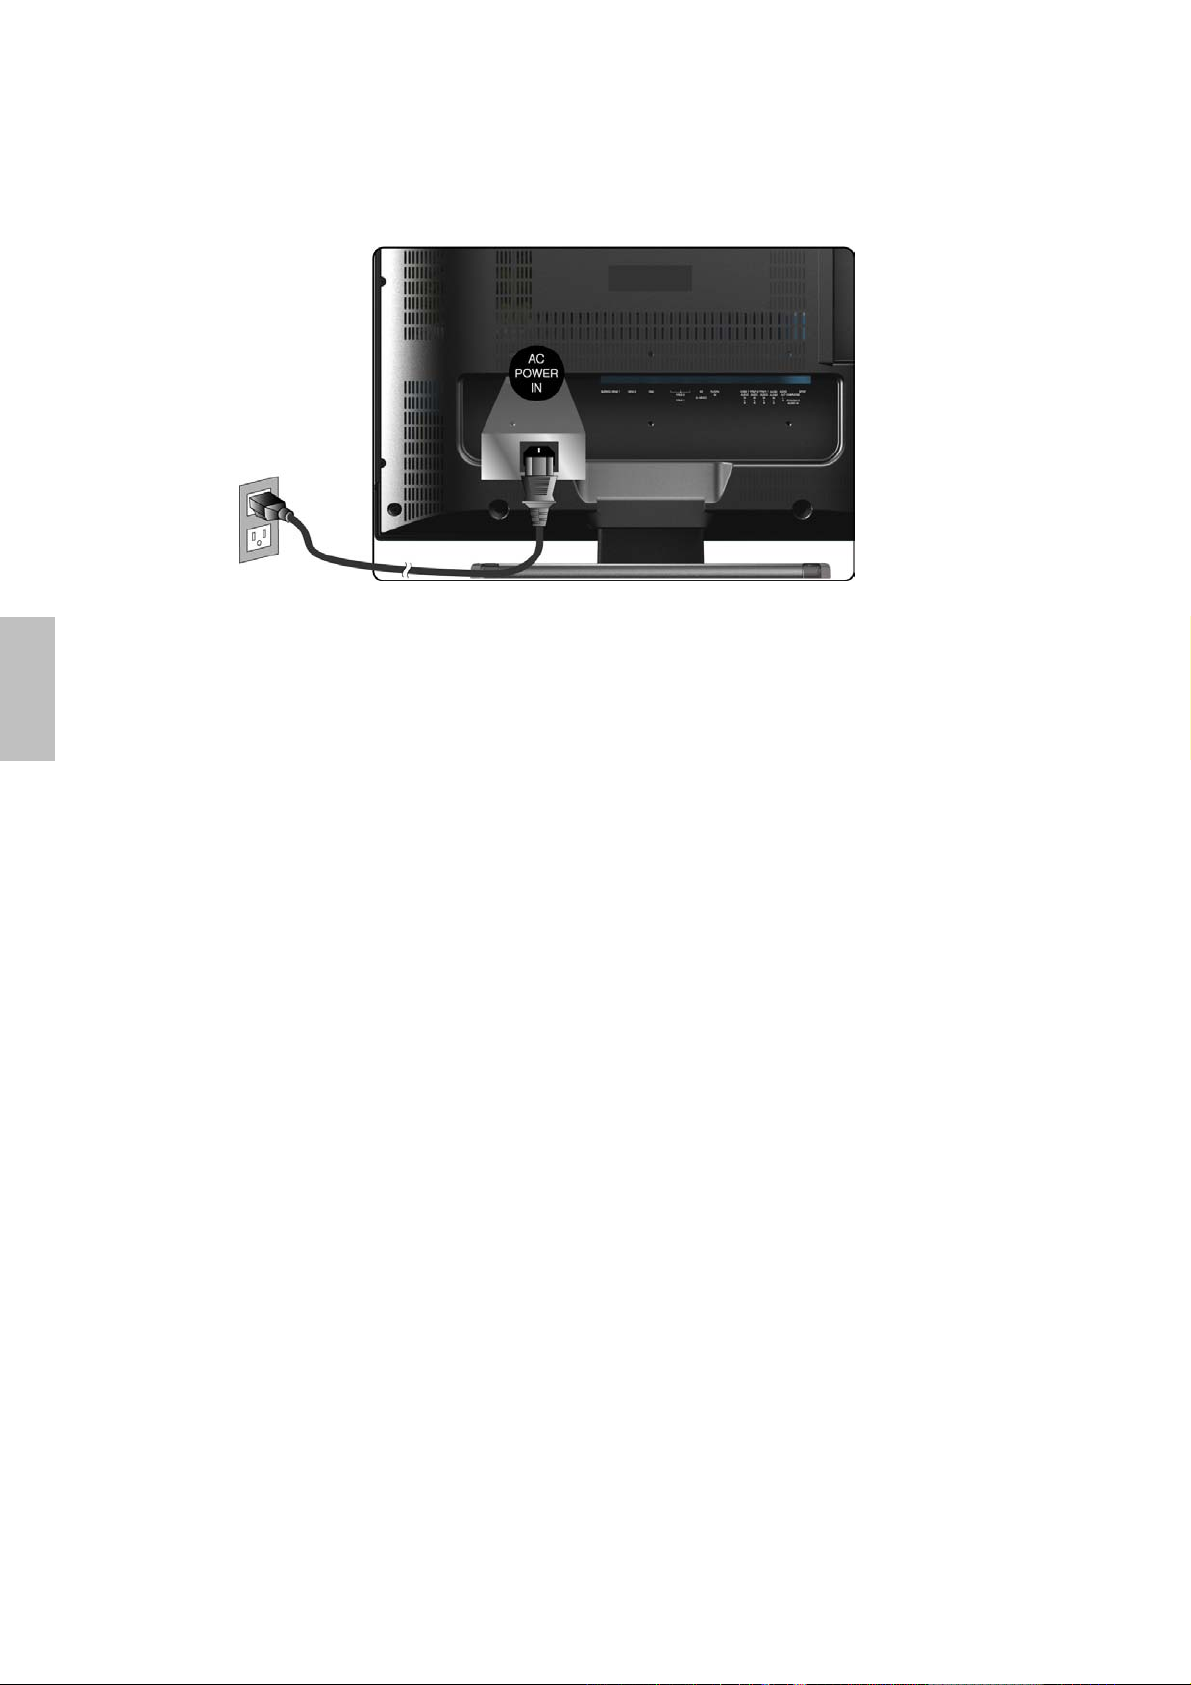
2) With HDMI-DVI Cable:
Connect the HDMI-DVI cable from the DVI output of the computer to the HDMI 2 terminal input
of the LCD TV. Also, connect the Audio In cable (green) from the audio output of your computer
to the audio input terminal (green) of the LCD TV.
HDMI-DVI Cable (not supplied
PC
PC Audio In Cable (not supplied)
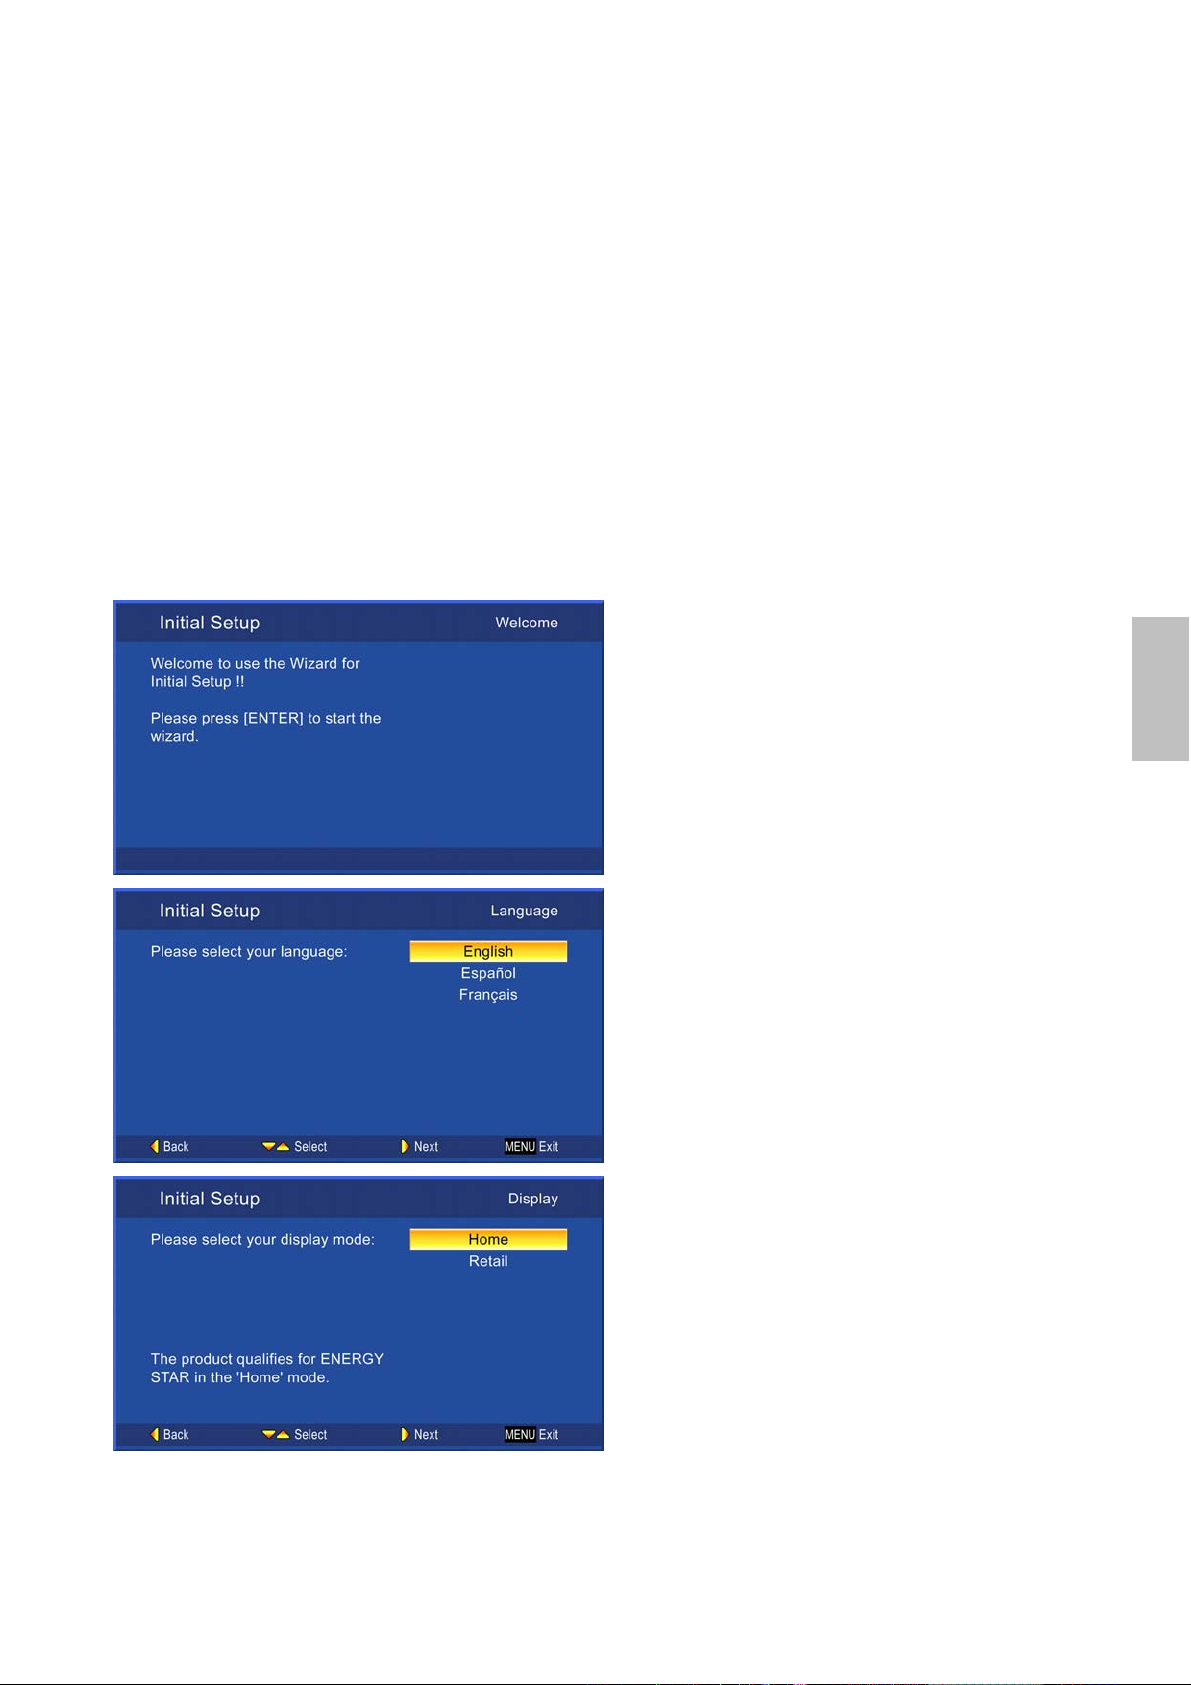
Connecting to A/V Device with SPDIF input
Connect SPDIF optical cable from A/V device into the SPDIF output connector of LCD TV.
English
udio Cable
(not supplied)
/V Device
SPDIF Optical Cable
(not supplied)
Stereo System
10
A
English
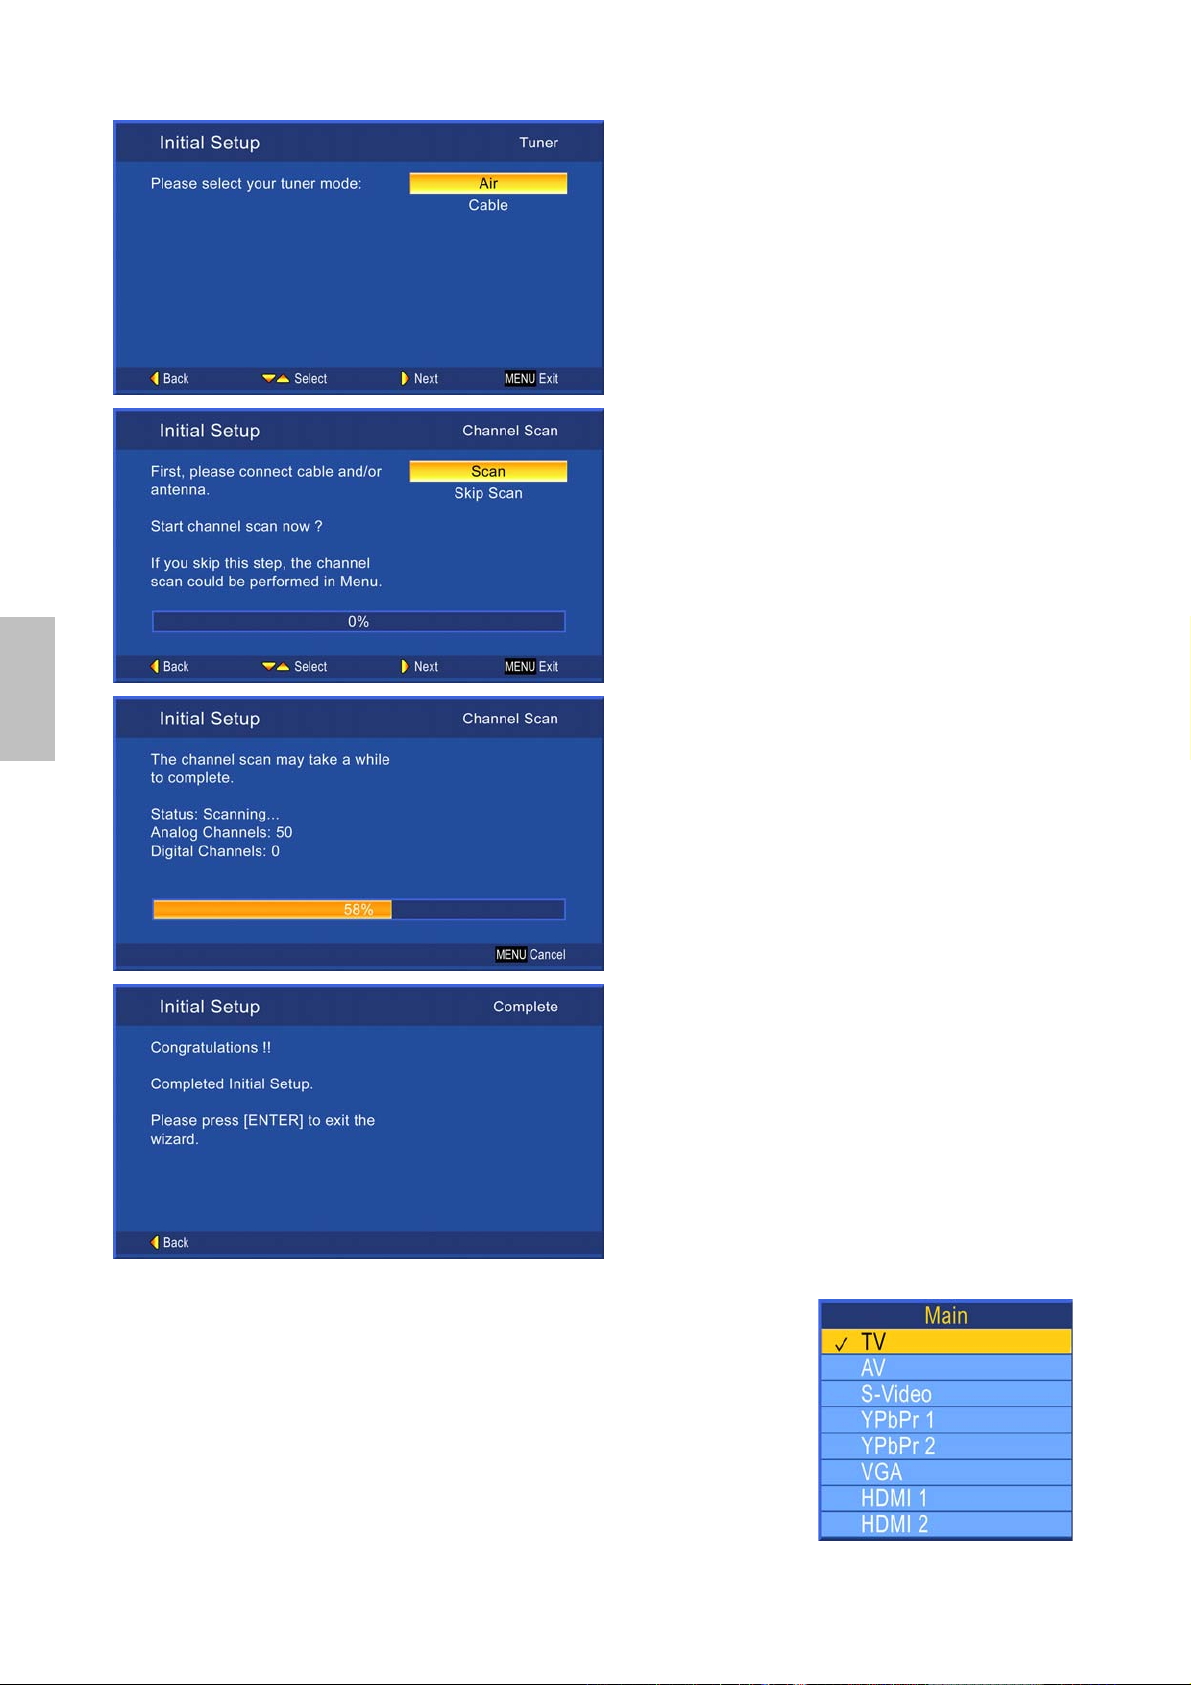
Connecting with the power cord
Connect the power cord to the AC inlet on the back of your LCD TV, after all connections have
been completed, and plug the other end of the power cord into a correctly grounded electrical
outlet.
C power socket
Power Cord
11
BASIC OPERATION
To operate your LCD TV, you may use the TV remote control or top panel buttons to select input
source, change channels, or adjust volume.
Turning on the LCD TV
Before using the LCD TV:
1. Connect external equipment properly.
2. Insert the power plug and the power LED indicator will light red.
Power On/Off
To turn the LCD TV on/off:
Press POWER button under the LCD TV, or press the POWER button on your remote control to
turn on/off the TV. The power LED indicator lights blue when the LCD TV is on.
Initial Setup
When the TV is initially powered on, basic settings proceed automatically and subsequently:
1. Press the POWER button on the remote
control. The Initial Setup wizard window will
be displayed. Press ENTER to start the
wizard.
4. Press ▲ or ▼ to select your language, then
press ► to continue next step. To return to
the previous page, press ◄.
2. Select your display mode from *Home or
Retail, then press ► to continue.
*For normal home use, we suggest that you
select “Home” to achieve energy saving.
However, if you prefer better brightness, select
“Retail”.
English
12
English
4. Select your tuner mode from Air or Cable,
then press ► to continue. Connect cable
and/or antenna, and select Scan or Skip
Scan with ▲ or ▼, then press ► to
continue. If you select Skip Scan at this
step, you can still perform channel scan in
Menu.
5. The channel scanning now starts. To
interrupt scanning, press MENU at any
time.
6. After you complete the Initial Setup, press
ENTER to exit the wizard.
Select input source
To select the required input source:
Press the INPUT button on the remote control, Use ▲▼ to select the
required input source between TV, AV, S-Video, YPbPr 1, YPbPr 2,
VGA, HDMI 1, and HDMI 2.
To confirm the selection, press ENTER.
13
Volume Adjusting
Press VOL +/- to adjust volume.
To turn off the volume, press MUTE.
To restore volume, press MUTE again, or press VOL +/- directly.
Sound Mode Select
Repeatedly press SOUND key to select the sound mode between Off, Concert, Living Room, Hall,
Bathroom, Cave, Arena, or Church.
Picture Mode Select
Repeatedly press PICTURE key to select picture mode between User, Cinema, Sport, Vivid, and
Hi-Bright.
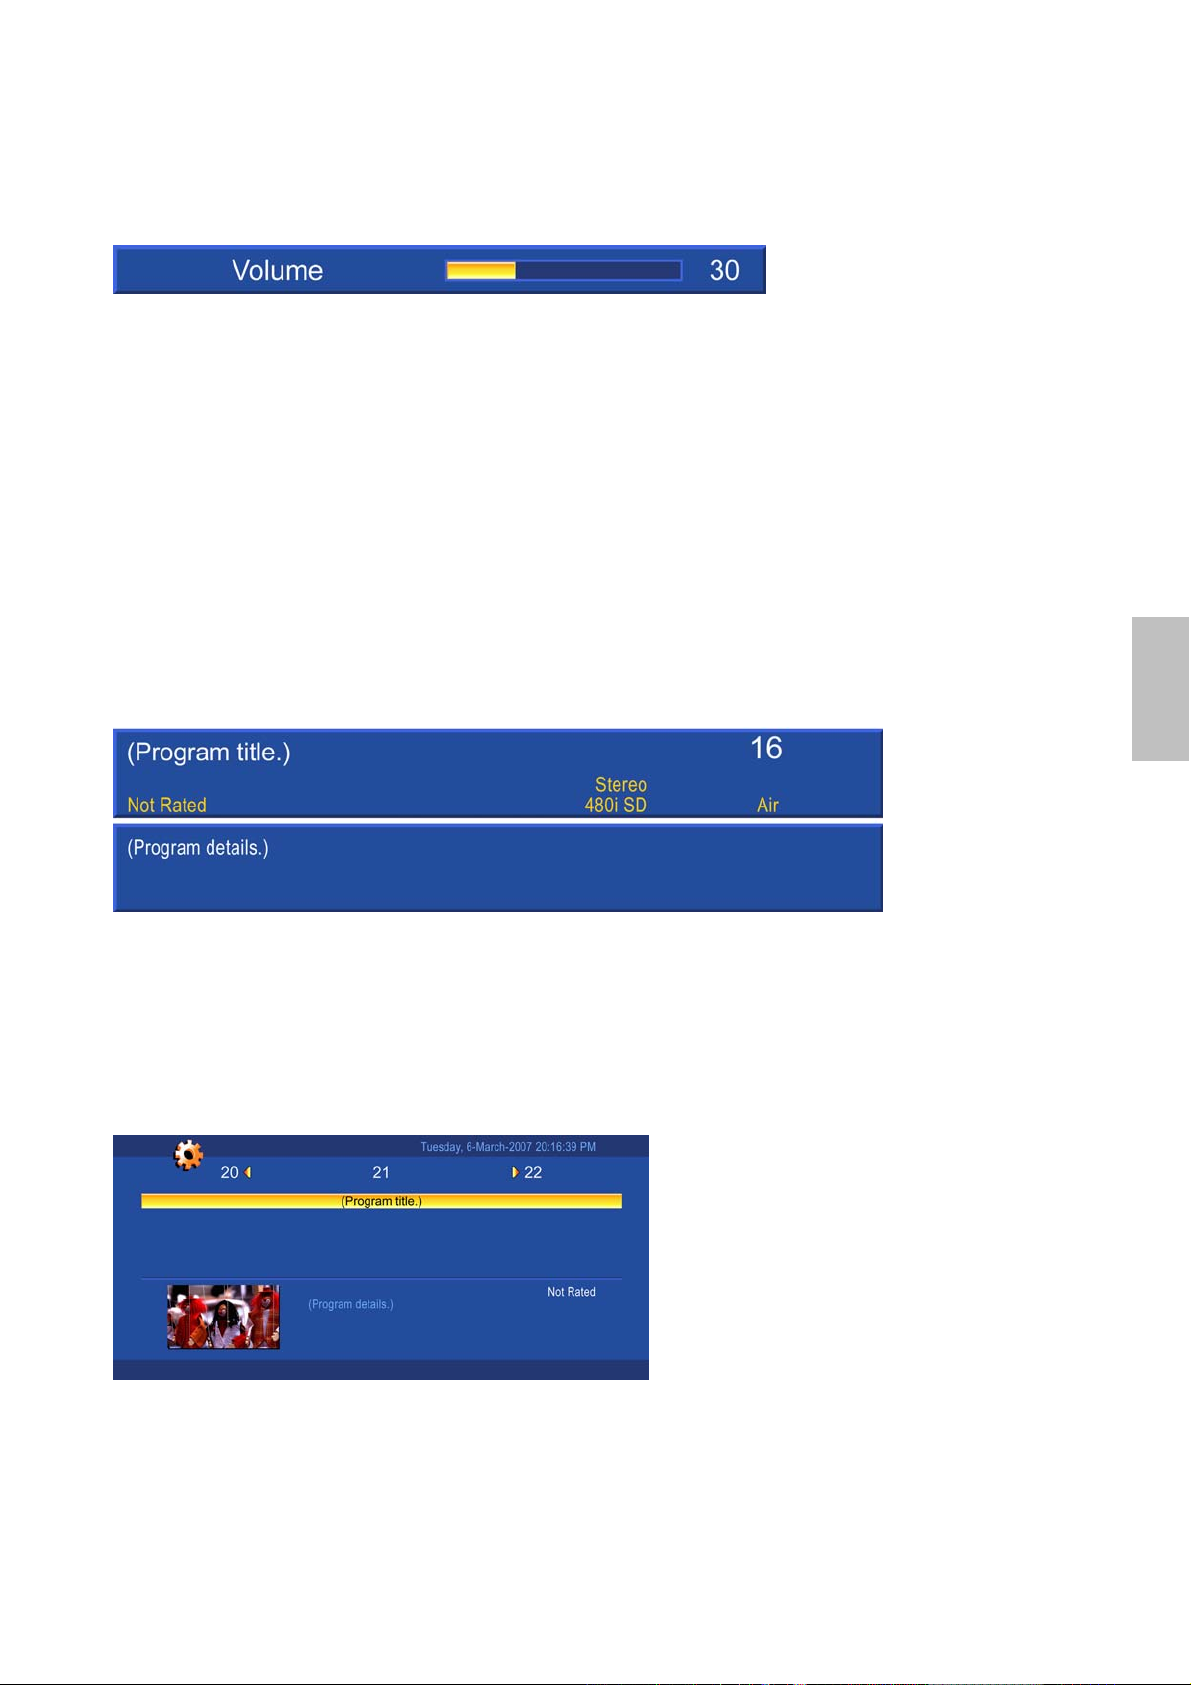
INFO
To display the current information of the LCD TV:
Press INFO, and the current state will be displayed on the screen. (It shows all or some of the
information about Input, Channel, Resolution, Audio Type, etc., depending on what input source it is
in.)
English
Electronic Program Guide (EPG)
Press the GUIDE button on the remote control and the program information for the channel you
are watching will be displayed on the screen.
Press the ◄ or ► button to scroll up or down the channels. Each time you pause at a channel, the
program list will update with the program schedule for that channel. Press the GUIDE button to
EXIT this feature.
Channel Select
Press number key or CH ▲/▼ button to select your desired channel.
1. In ATV mode
The “-“ button has no function in ATV mode. Directly press the number buttons to select
channels.
14

English
2. In DTV mode
Use “-” button to select the sub channel in DTV.
Ex: Your desired number is 80-3.
Press 8 → press 0 → press ”-” → press 3.
• Whether in ATV or DTV, after you input the channel numbers, press ENTER button to direct
to the channel immediately, or wait for 3 seconds to change automatically.
• Return to the previous channel, press RETURN button.
※ How to switch between Air TV and Cable TV?
When in TV mode, press TV/CATV button to switch, or go to the Tuner Mode in the TV menu to
select.
Sleep Time Setting
Repeatedly press SLEEP button to set the off timer. The function is used to automatically shut off
the LCD TV after a preset period of time passed. There are several times for choice –Off, 15
Minutes, 30 Minutes, 45 Minutes, 60 Minutes, 90 Minutes, or 120 Minutes.
Zoom
Press ZOOM button repeatedly to select the screen size. You can select from Zoom1, Zoom2, and
Zoom3 sizes.
Wide
Repeatedly press WIDE button to select the aspect ratio of screen. You can select between No
scale, Normal, Full, Letterbox, Zoom, and Panorama.
Freeze Picture
Press FREEZE button to freeze picture. However, the sound still continues. Press FREEZE button
again to restore.
Using the OSD function
You can use the OSD menus and options to adjust various settings by using the remote control.
The basic operation is as following:
Press MENU to display OSD menu.
Press ▲▼ to select your desired top Menu, and press ENTER or ► to enter it.
Use ▲▼ to select the control you want to adjust.
When selecting the control with II►, press ENTER to enable the function.
Press ◄► to adjust or select the settings.
Press MENU to exit from the OSD menu.
15
ADVANCED OPERATION—OSD MENU
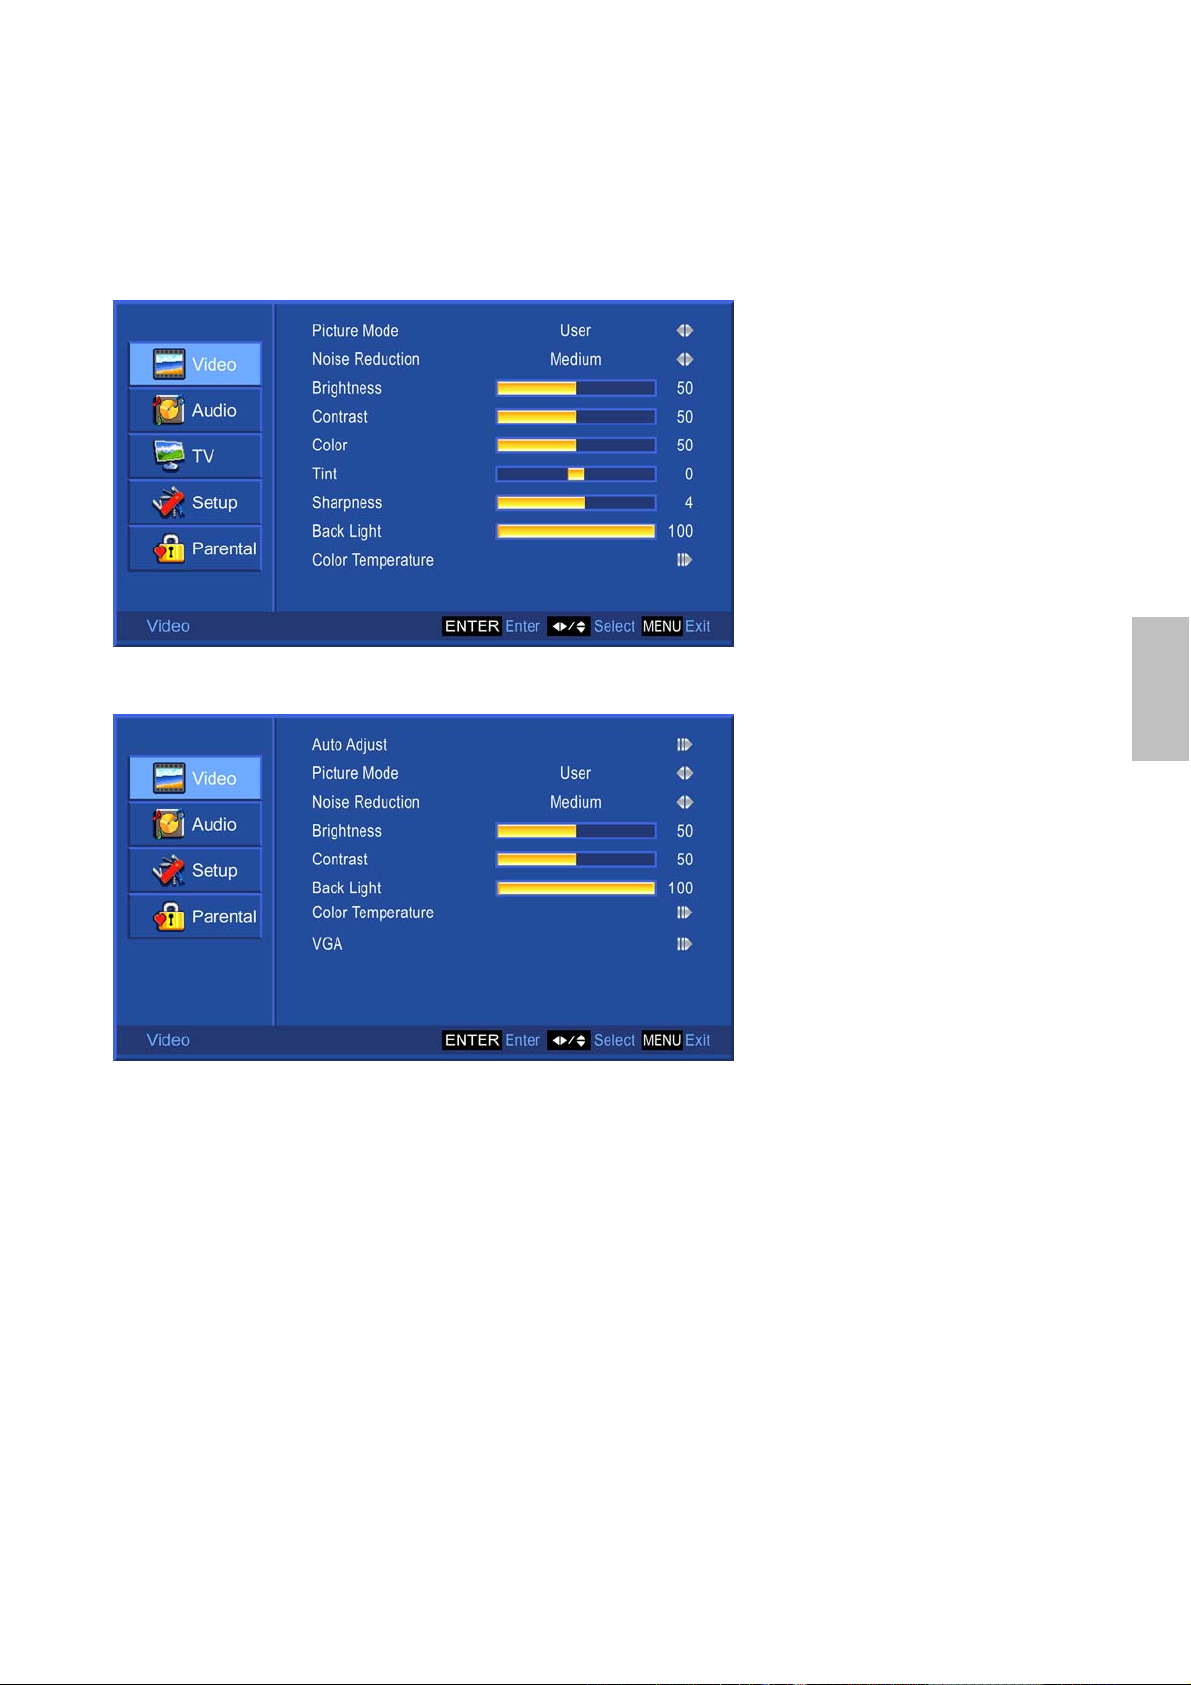
Video Menu
—To adjust the picture quality
In TV, AV, S-Video, YPbPr 1, YPbPr 2, HDMI 1, HDMI 2 source:
(When in AV, S-Video, YPbPr or HDMI source, the TV option on the left does not appear.)
In VGA source:
Picture Mode: To select picture mode between User, Cinema, Sport, Vivid, and Hi-Bright.
Noise Reduction: To reduce the noise level of connected equipment. Select from Low,
Medium, Strong, or Off.
Brightness: To adjust luminance of video. (right: Max, left: Min.)
Contrast: To adjust contrast of video. (right: Max, left: Min.)
Color: To adjust color. (right: brilliant color, left: pale color.)
Tint: To adjust tint level. (right: greenish tone, left: reddish tone.)
Sharpness: To adjust picture sharpness. (right: sharper, left: softer.)
Back Light: To brighten or darken the backlight.
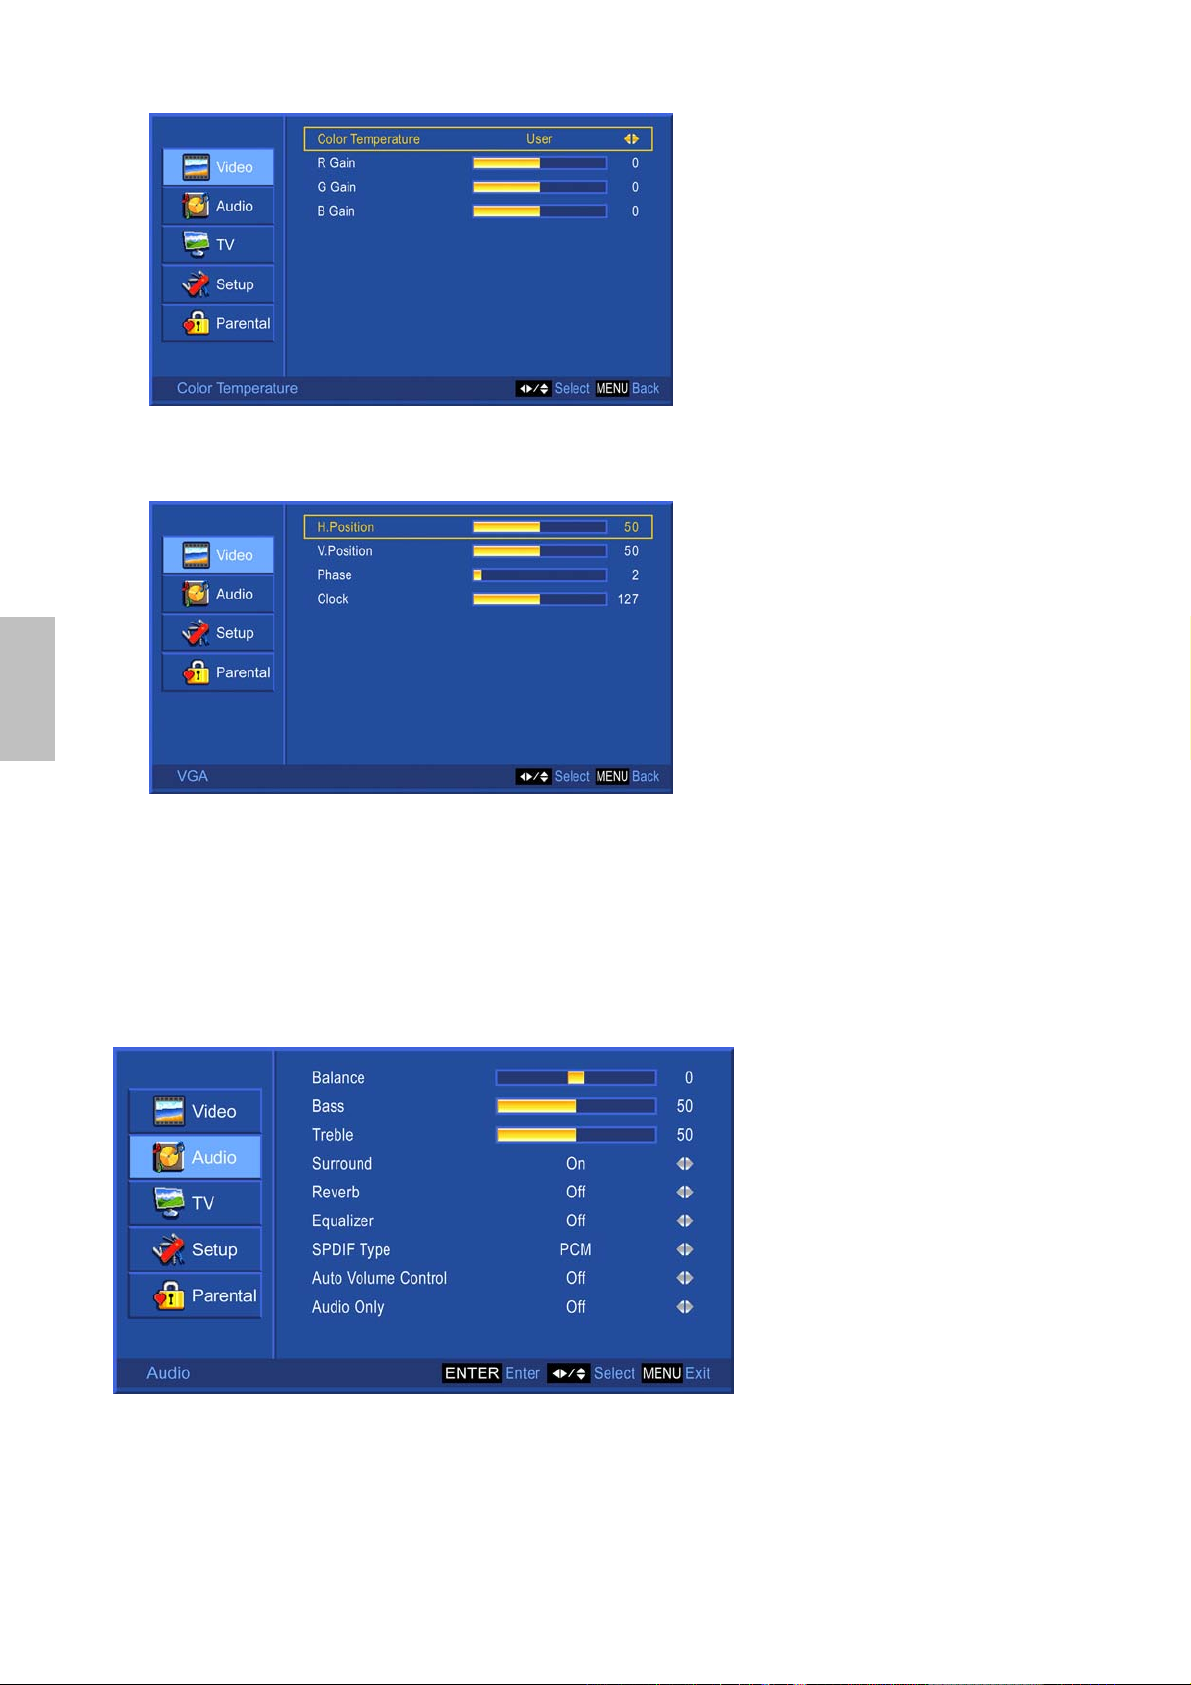
Color Temperature: Press ENTER to select color temperature from User, Cold, Normal, and
Warm. (When Color Temperature is selected to User, the R, G, B Gain level can be adjusted
separately.)
English
16
English
Auto Adjust: Press ENTER to auto adjust picture’s horizontal position, vertical position, fine
tune and H-Size.
VGA: Press ENTER to adjust VGA setting.
H. Position: To adjust the horizontal position of the picture.
V. Position: To adjust the vertical position of the picture.
Phase: To adjust delay time of phase in order to reduce the noise of picture.
Clock: To adjust delay time of clock in order to reduce the noise of picture.
Audio Menu
—To set the audio quality and status
In TV source:
17
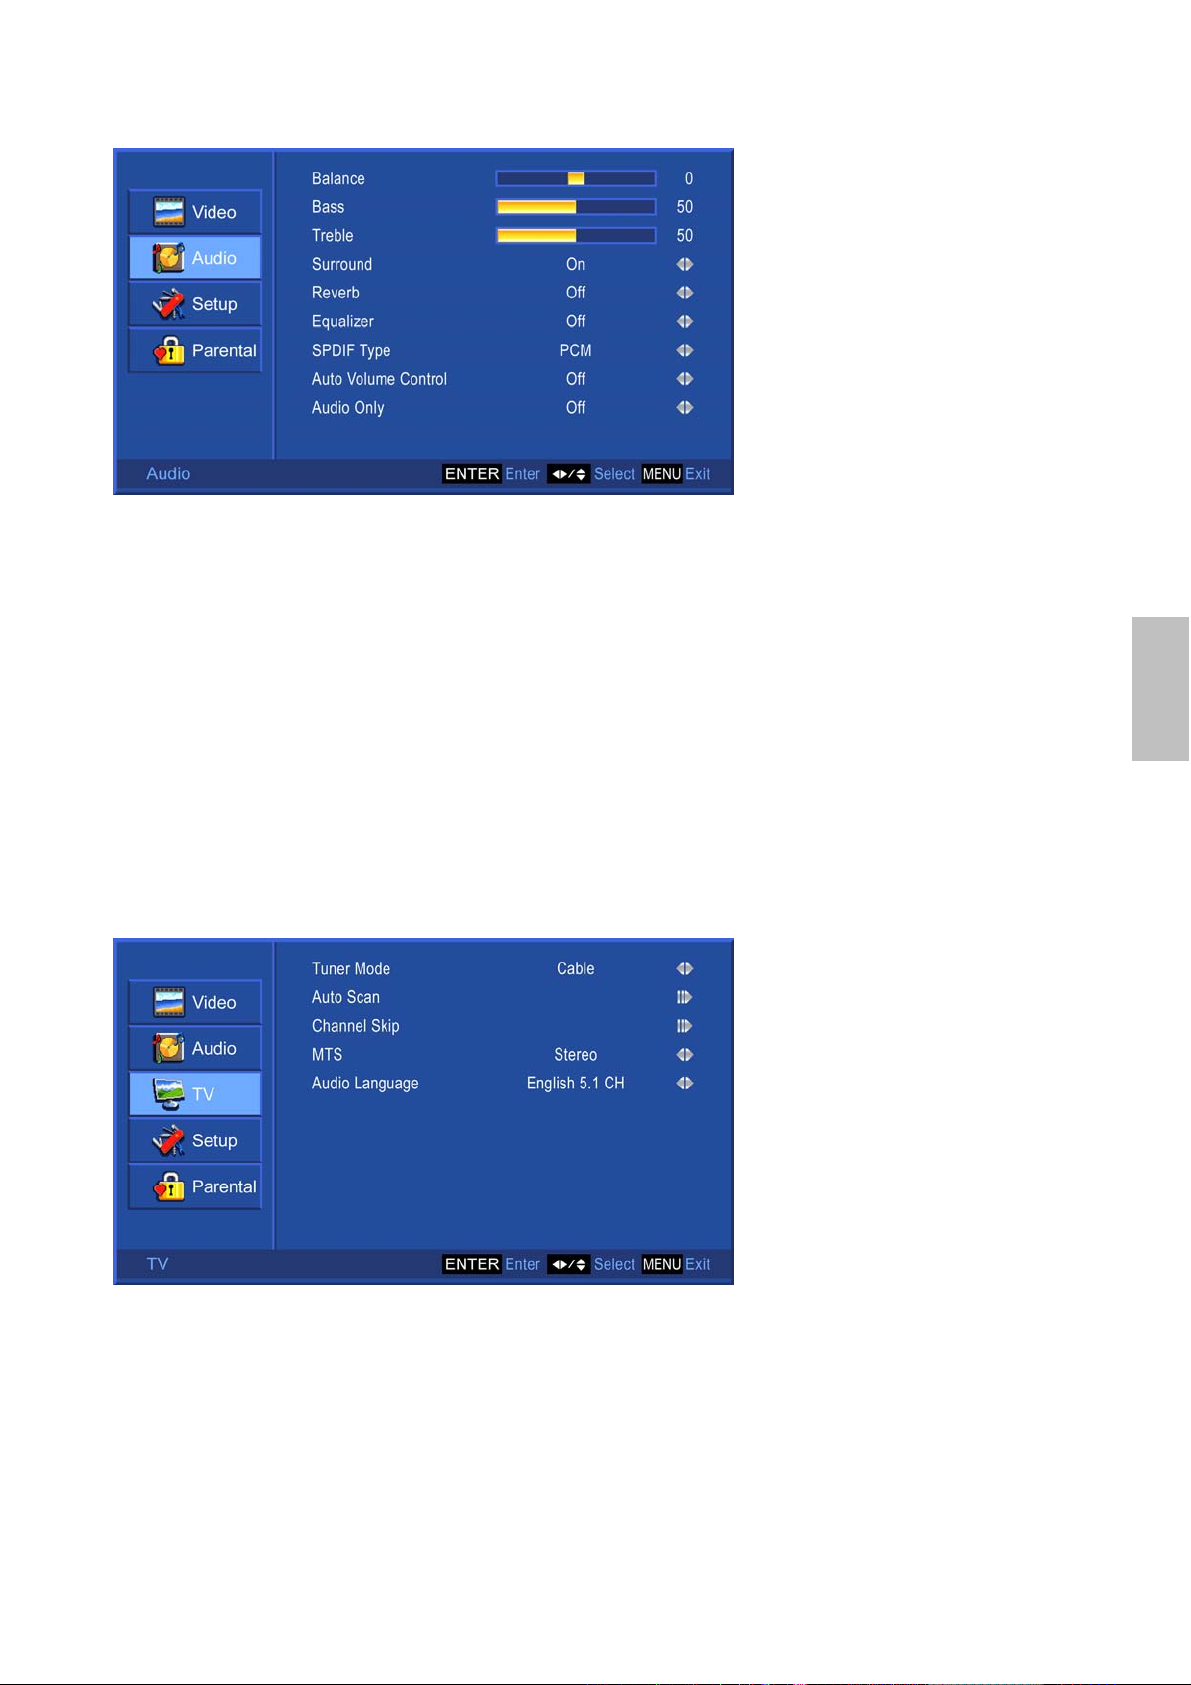
In AV, S-Video, YPbPr 1, YPbPr 2, HDMI 1, HDMI 2, VGA source:
Balance: To adjust left and right audio balance.
Bass: To adjust bass.
Treble: To adjust the treble.
Surround: To enjoy a concert hall effect, select “On” when stereo is playing.
Reverb: To enjoy the reverb sound effect of Off, Concert, Living Room, Hall, Bathroom, Cave,
Arena, or Church.
Equalizer: To select equalizer modes from Off, Rock, Pop, Live, Dance, Techno, Classic, Soft.
SPDIF Type: To select SPDIF Type from Dolby Digital, PCM, or Off.
Auto Volume Control: To turn On or Off Auto Volume control. (This function is only effective in
TV source.)
Audio Only: To turn off the screen picture but keep the sound on.
TV Menu
—To set up for TV
It is only active in TV source.
English
Tuner Mode: To select Cable or Air as the TV source. Select “Cable” if you want to watch
Cable TV channels, and select Air to watch Air TV channels.
Auto Scan: To auto scan the TV and DTV channels. Press ENTER to start auto scanning Air
and Cable TV channels. Press MENU again at any time to interrupt scanning.
18

English
Channel Skip: Press ENTER to skip the channel. To restore the channel, press ENTER again.
MTS: To select audio available mode.
Audio Language: To select available audio language.
Setup Menu
—To set up OSD window
In TV, AV, S-Video, YPbPr 1, YPbPr 2, HDMI 1, HDMI 2 source:
(When in AV, S-Video, YPbPr or HDMI source, the TV option on the left does not appear.)
In VGA source:
OSD Language: To select an OSD language from English, Spanish or French.
Aspect Ratio: To select image size between No scale, Normal, Full, Letterbox, Panorama, and
Zoom. Aspect Ratio function does not support on PC Timings.
Blue Mute: To set the background color to blue when there is no signal.
19
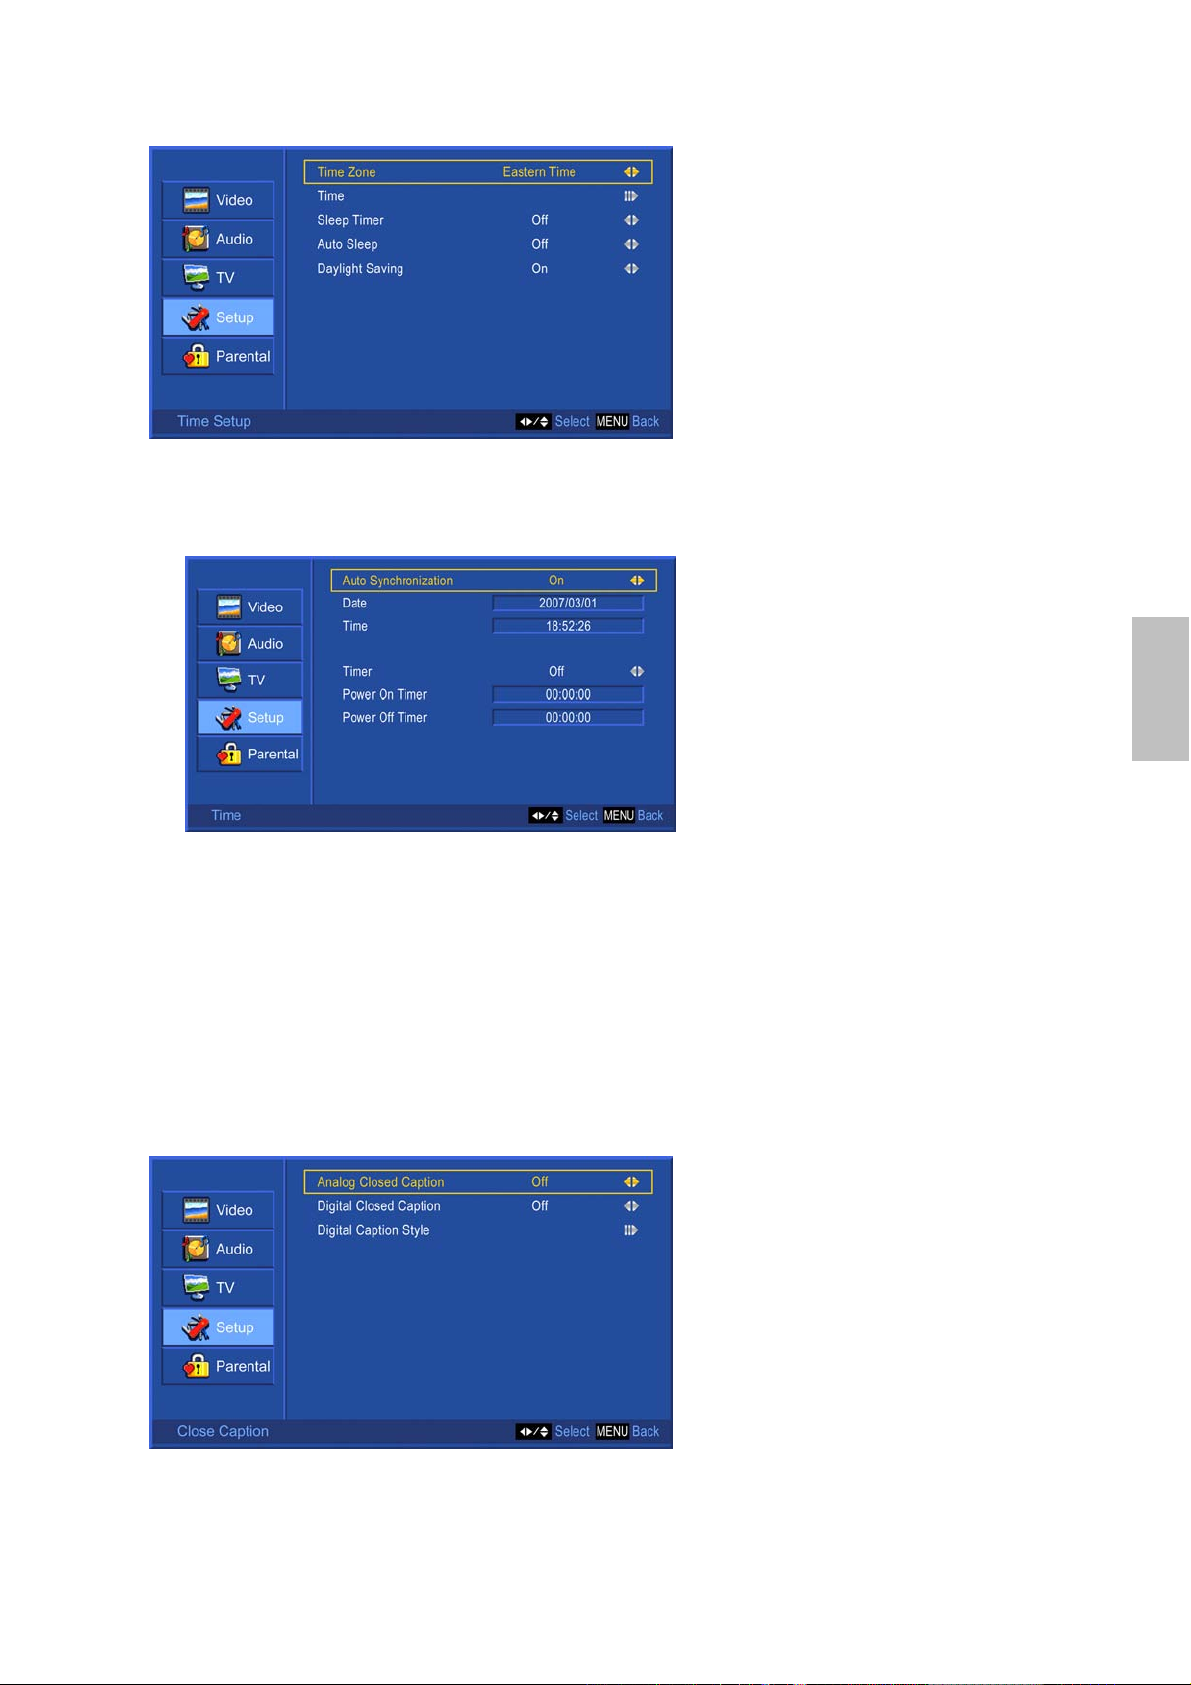
Time Setup: To set Time Zone, Time, Sleep Timer, Auto Sleep, and Daylight Saving.
Time Zone: To select the time zone appropriate to your location. Press ▲ or ▼ to select
“Time Zone”, and select the time zone of your area with ◄ or ►.
Time: To set the current time. Press ▲ or ▼ to select “Time”, then press ENTER to enter
the setting.
English
‧ Auto Synchronization: When “Auto Synchronization” is enabled, the date and time will
be automatically synchronized according to the program content. Select “Off” if you
want to adjust date and time manually, then move the cursor down to adjust with
number keys.
‧ Timer: To set power-on and power-off time. Press ◄ or ► on Timer and select “On”.
Then move the cursor down to set the beginning and ending time of timer. Select “Off” if
you want to cancel the timer function.
Sleep Timer: To set the off timer from 15~120 minutes.
Auto Sleep: To turn off the TV if it has not been operated for the preset time -- 1 hour, 2
hours, or 5 hours.
Daylight Saving: To turn On/Off daylight saving.
Close Caption: To set close caption options.
Analog Closed Caption: To set basic analog closed caption options. (CC1~CC4,
TEXT1~TEXT4, Off)
Digital Closed Caption: To select closed caption signal formats and set up caption modes
for digital TV channels. (Service1~6, Off)
20
English
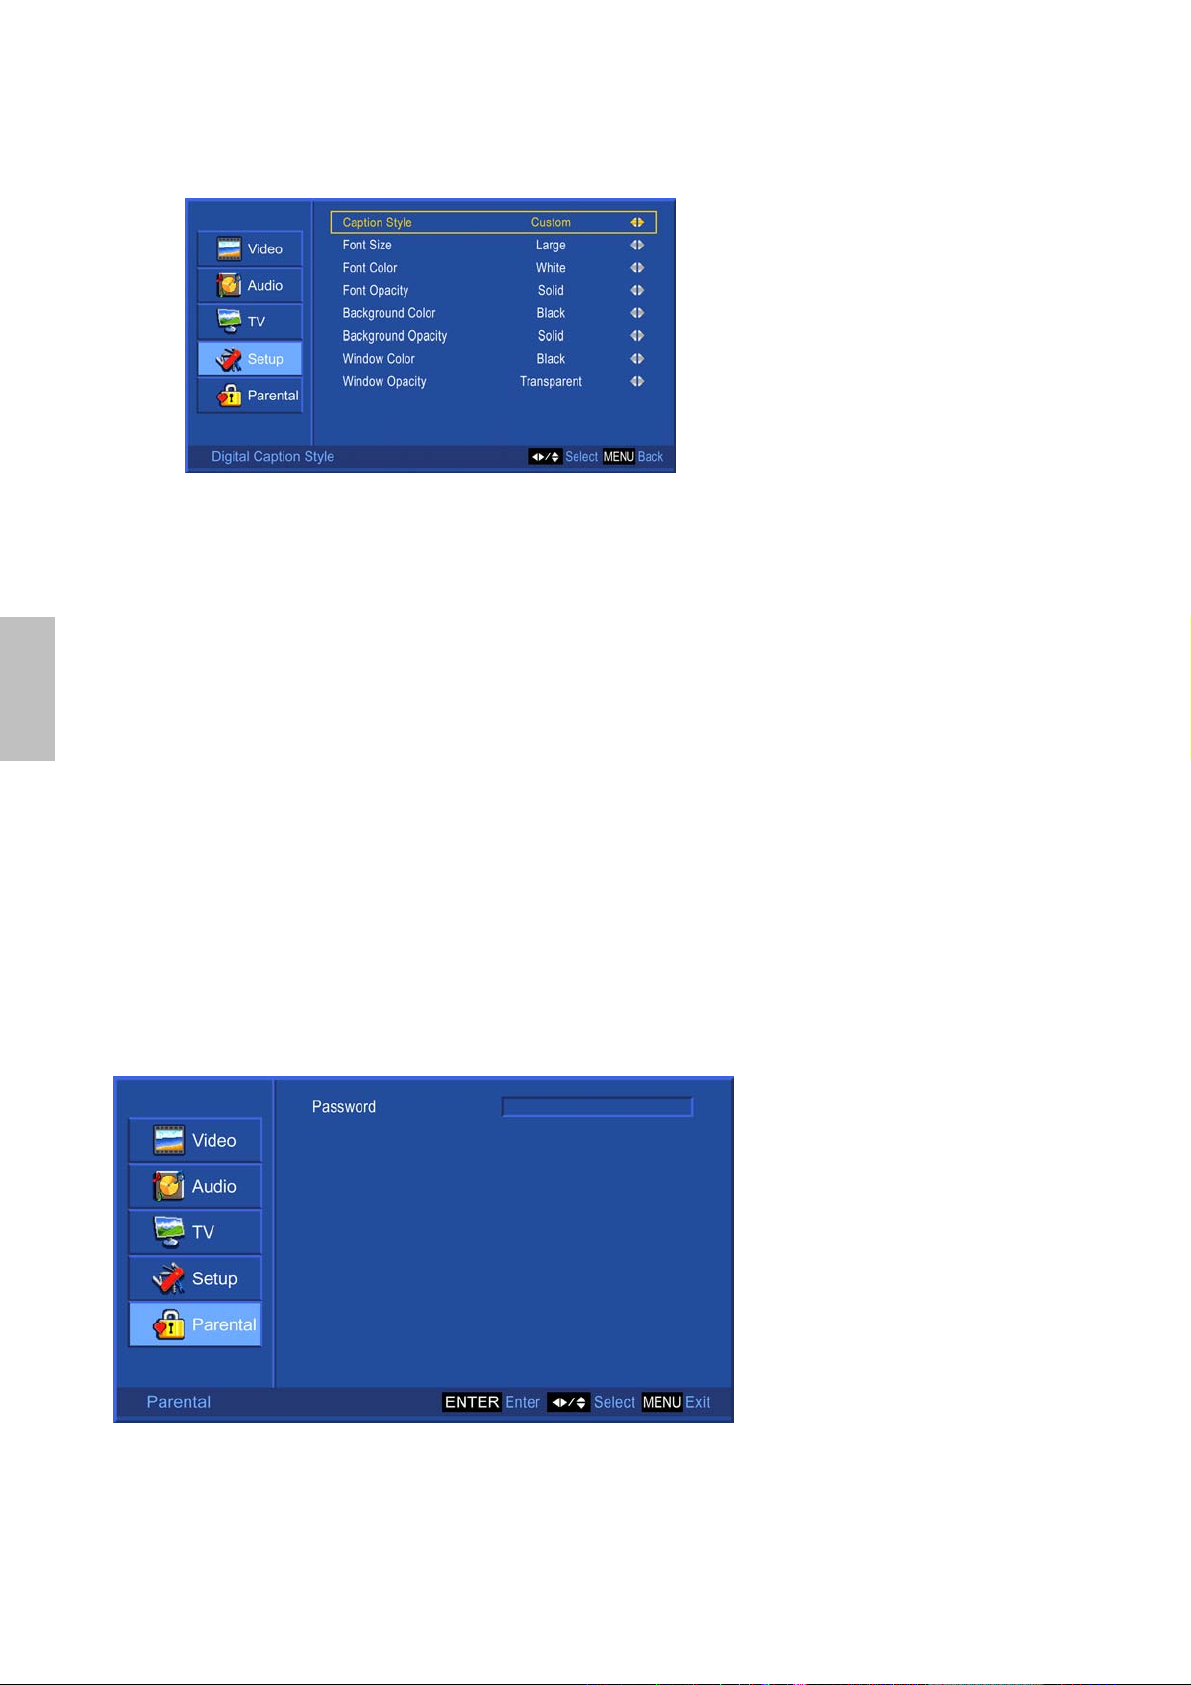
Digital Caption Style: Press ◄► to select Caption Style from “As Broadcaster” or
“Custom”. When “Custom” is selected, use ▲▼ to select the desired controls, ◄► to
adjust detailed settings.
‧ Font Size: To select a font size from Large, Small, or Medium.
‧ Font Color: To select a font color from Black, White, Green, Blue, Red, Cyan, Yellow,
or Magenta.
‧ Font Opacity: To select font opacity from Solid, or Transparent.
‧ Background Color: To select background color.
‧ Background Opacity: To select background opacity.
‧ Window Color: To select window color.
‧ Window Opacity: To select window opacity.
DCR: To turn on/off the DCR (Dynamic Contrast Ratio) function.
Display Mode: To select display mode from Home, Retail, or User.
Note: For normal home use, we suggest that you select “Home” to achieve energy saving. However, if
you prefer better brightness, select “Retail”. When “User” is selected, you can adjust the level of back
light by yourself.
Memory Recall: To restore the factory default settings, press ENTER, and select “OK” to
confirm.
Parental Menu
—To set up Parental Control options
It is active in all input sources.
(When in AV, S-Video, YPbPr 1, YPbPr 2, HDMI 1, HDMI 2, or VGA source, the TV option on the
left does not appear.)
Enter password and the screen below will show. (The default password is 0000.)
21
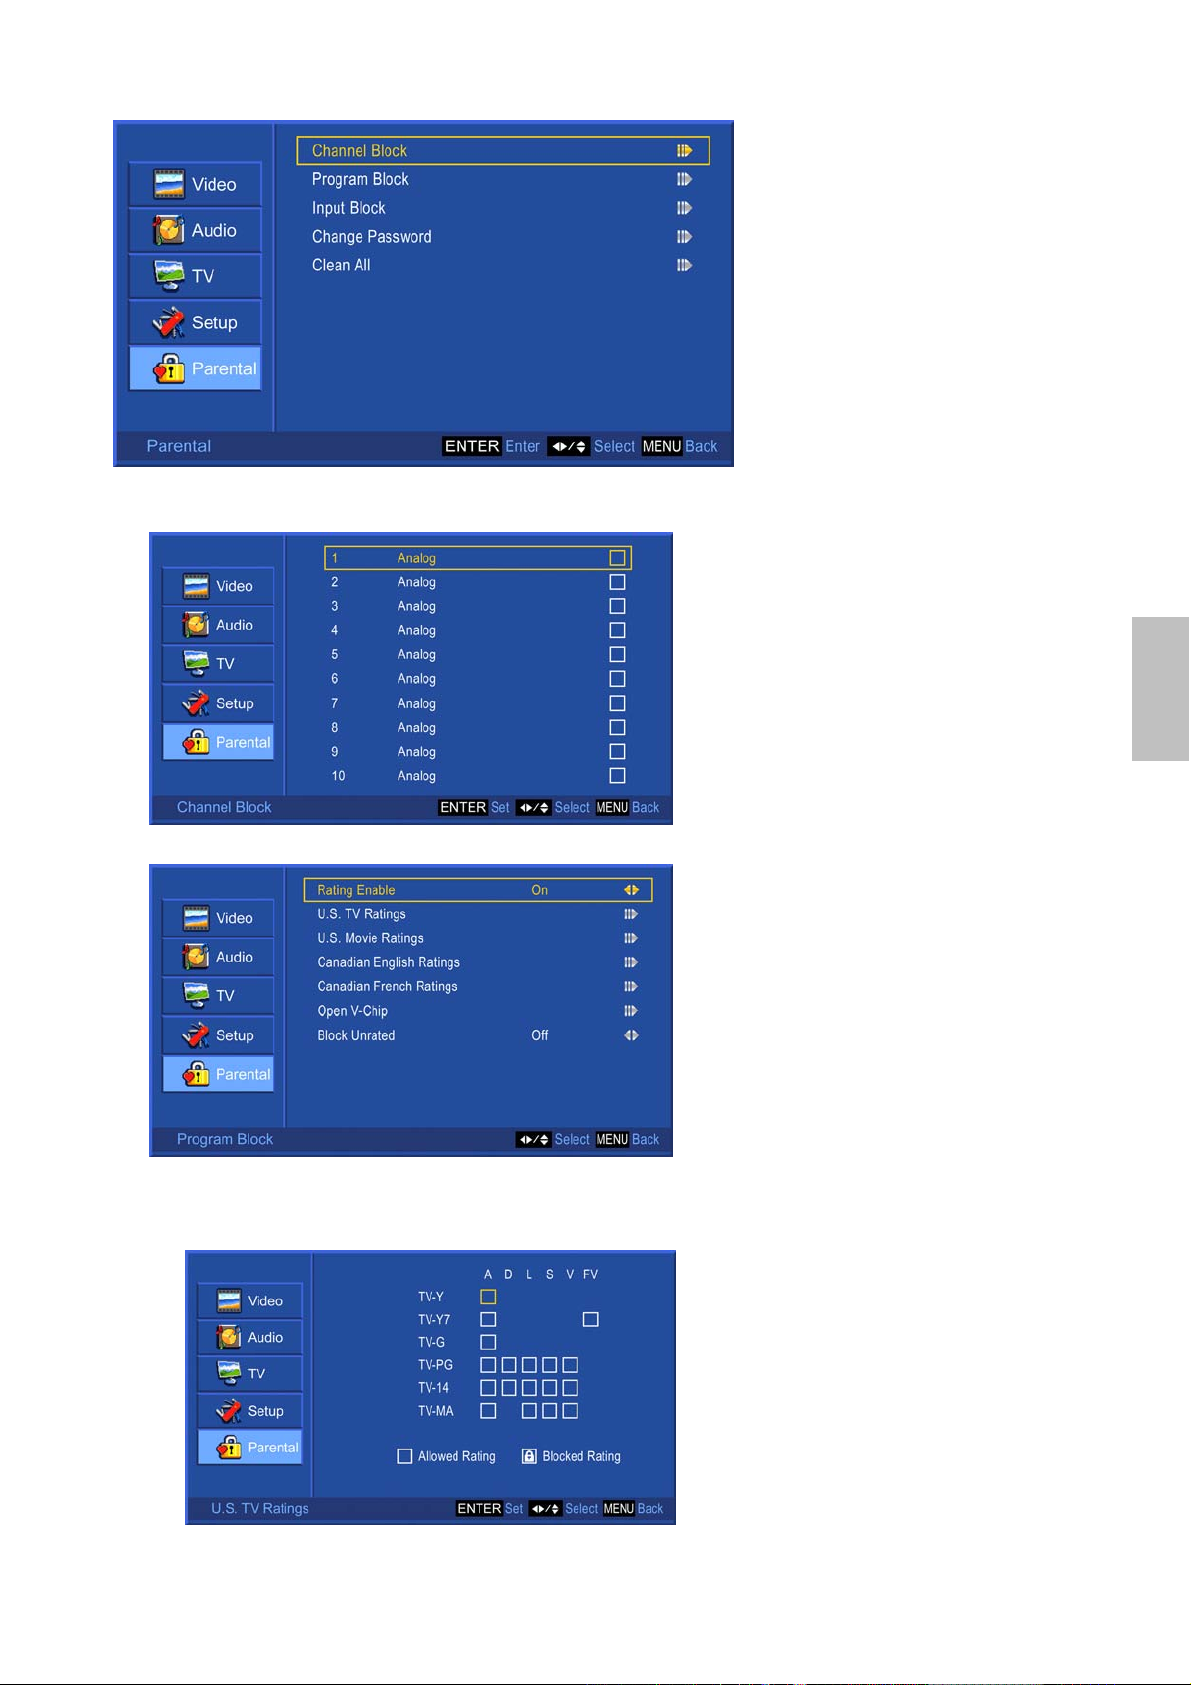
Channel Block: To block channels. Use ▲▼ to select the channel you want to block, and then
press ENTER to block or unblock it. This function is only enabled in TV source.
Program Block: To set TV and Movie Ratings.
English
Rating Enable: Choose “On” to enable the below settings.
U.S. TV Ratings: To adjust TV blocking level in the US. You can select between TV-Y,
TV-Y7, TV-G, TV-PG, TV-14, or TV-MA.
22
English
The TV Ratings in the US are defined as following.
TV-Y All children TV-PG Parental guidance suggested
TV-Y7 Directed to older children: this
program is designed for children
age 7 and above
TV-G General audience TV-MA Mature audience only
Use ENTER button to customize the ratings, and use MENU to exit.
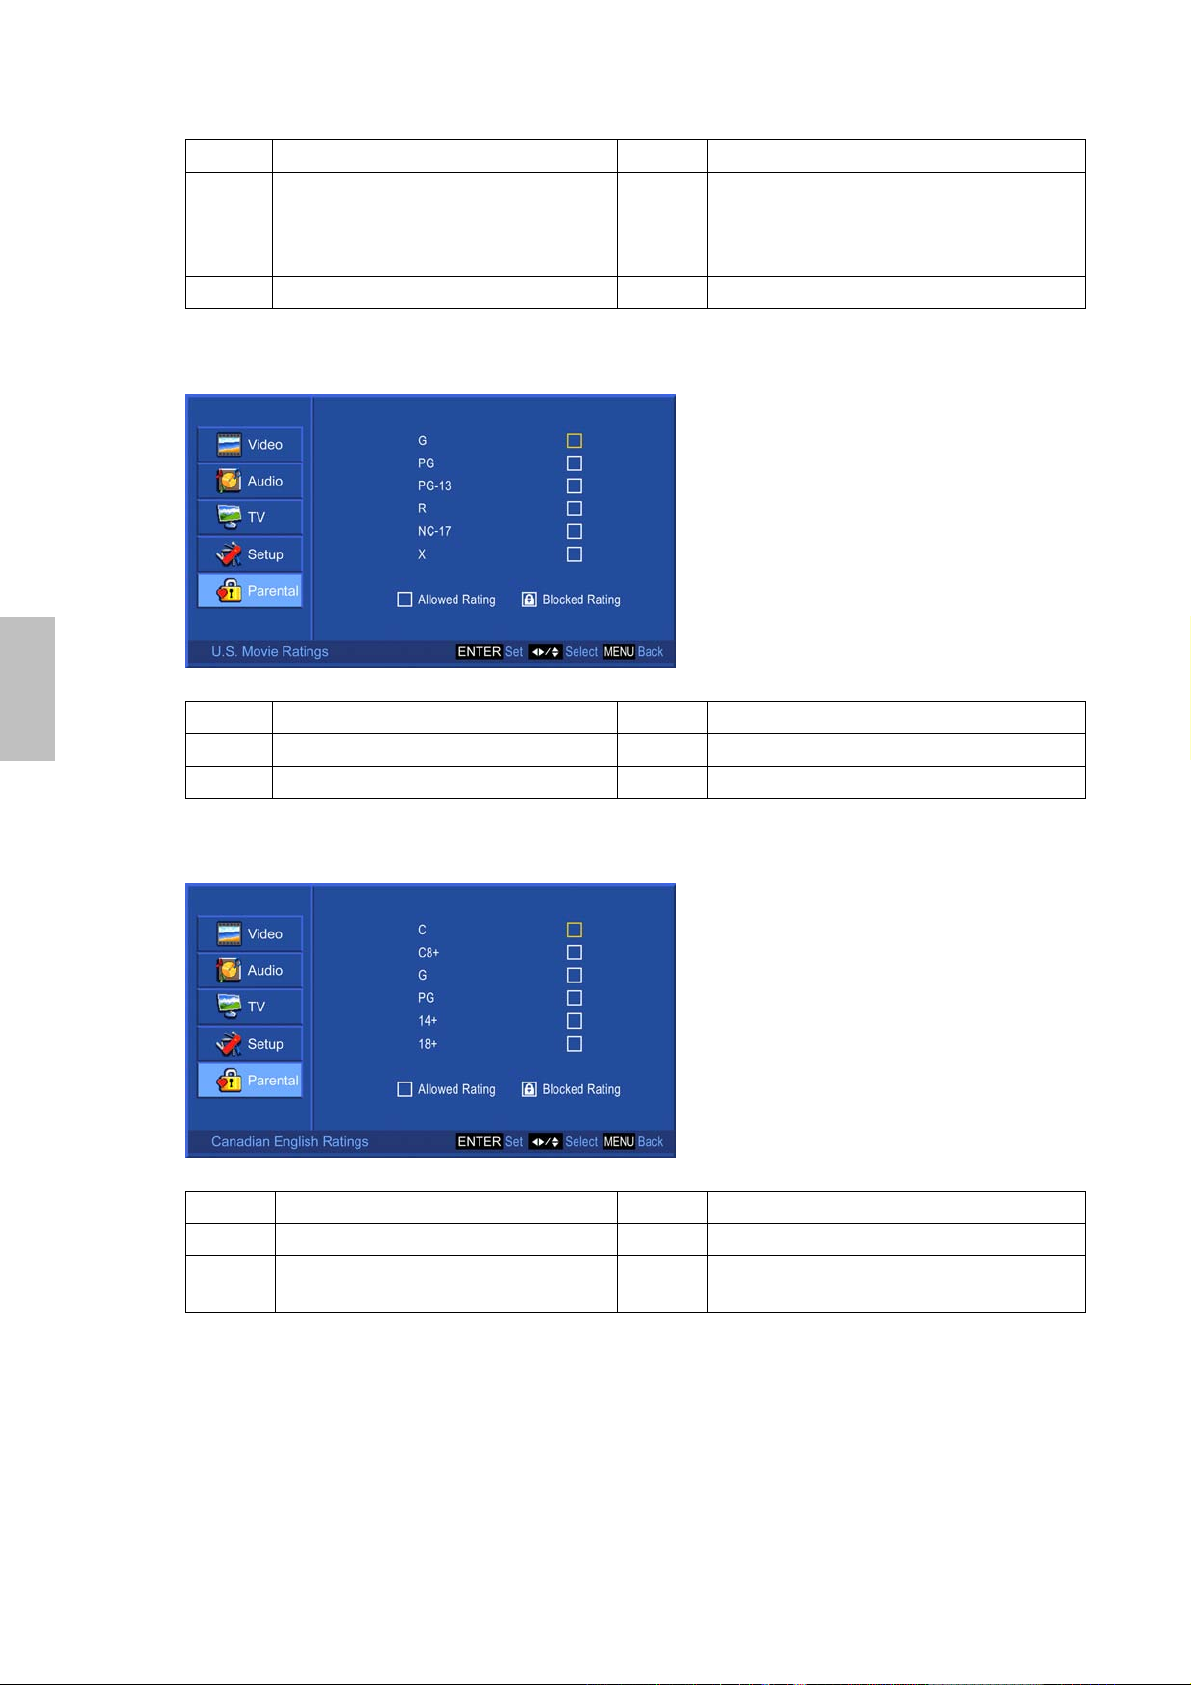
U.S. Movie Ratings: To adjust movie blocking level in the US. You can select between G,
PG, PG-13, R, NC-17, or X.
The Movie Ratings in the US are defined as following.
G General audience R Restricted
PG Parental guidance suggested NC-17 No one 17 and under limited
PG-13 Parents strongly cautioned X Adult audience only
Use ENTER button to customize the ratings, and use MENU to exit.
Canadian English Ratings: To adjust blocking level in English-speaking region of Canada.
You can select between C, C8+, G, PG, 14+, 18+.
TV-14 Parents strongly cautioned: this
program contains some material that
is unsuitable for children under 14
years of age
The Canadian English Ratings are defined as following.
C Children PG Parental guidance
C8+ Children eight years and older 14+ Viewers 14 years and older
G General programming, suitable for
all audiences
Use ENTER button to
23
customize
the ratings, and use MENU to exit.
18+ Adult programming
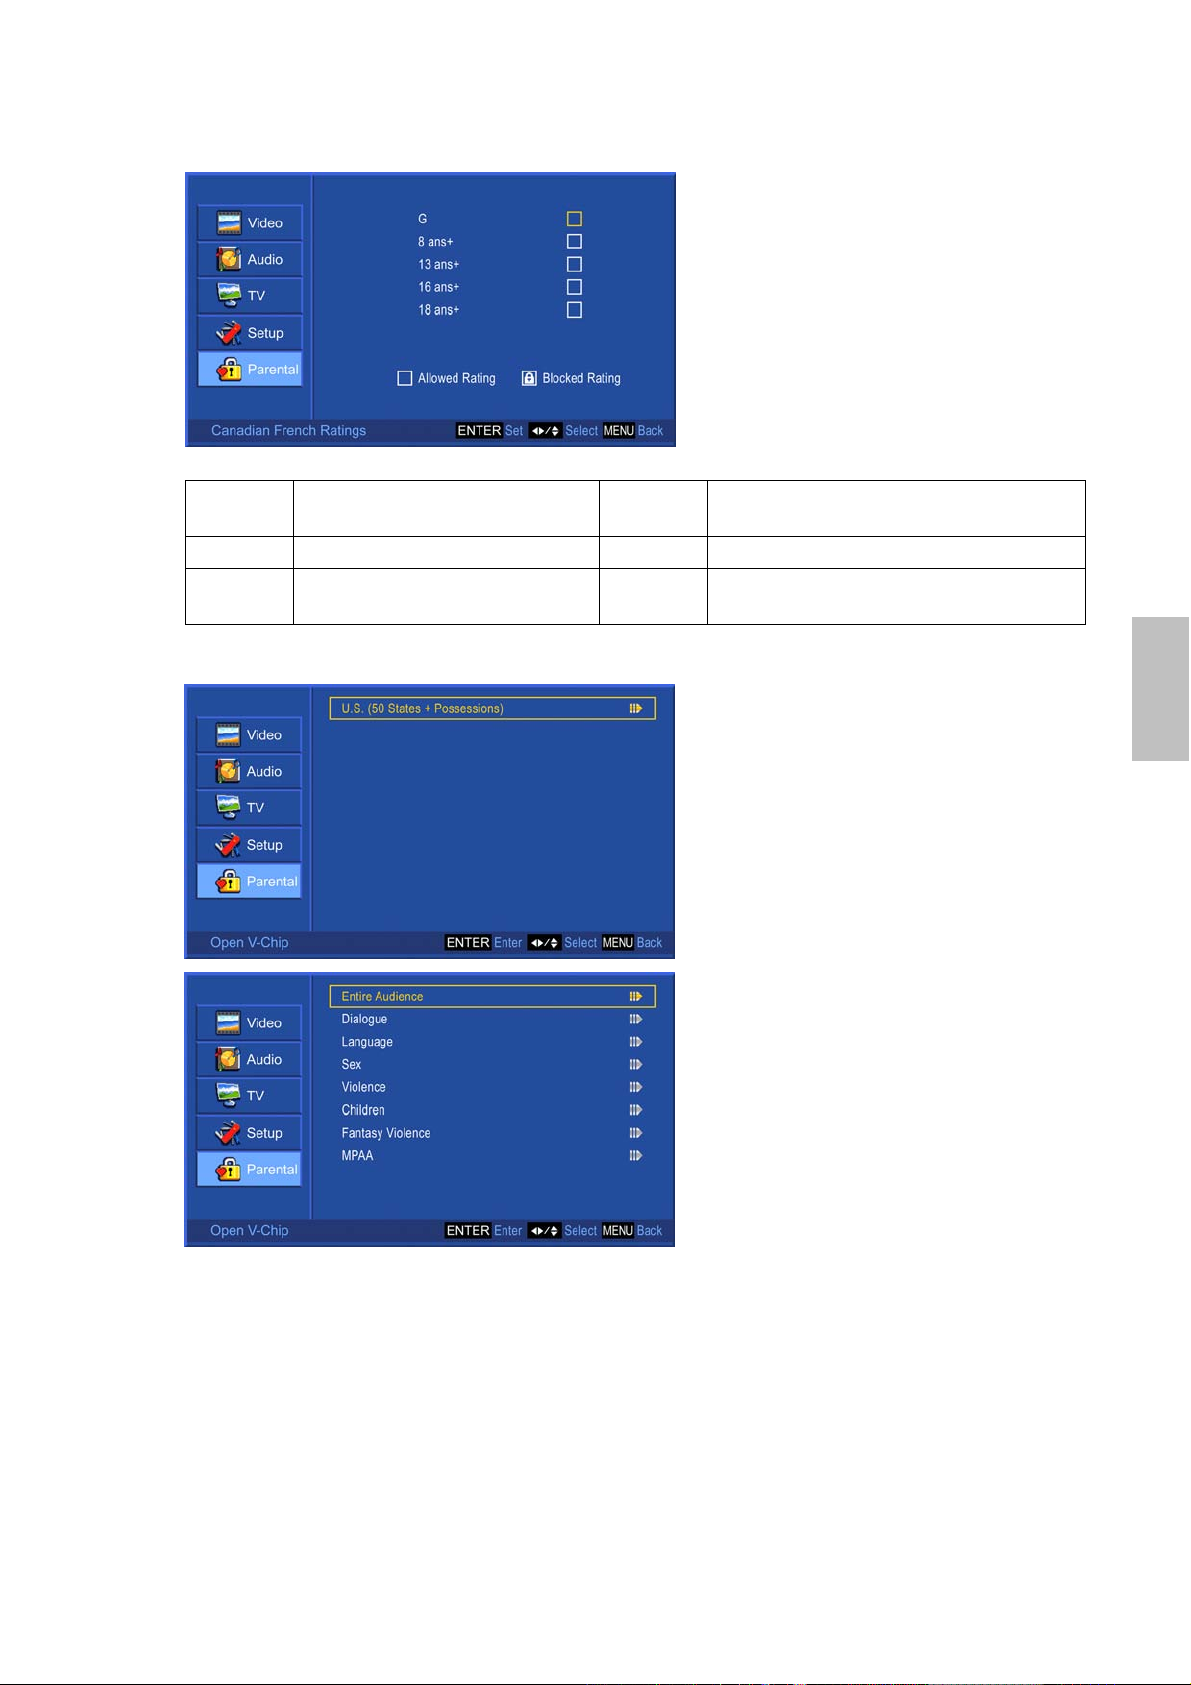
Canadian French Ratings: To adjust blocking level in French-speaking region of Canada.
You can select between G, 8 ans+, 13 ans+, 16 ans+, 18 ans+.
The Canadian French Ratings are defined as following.
G General 16 ans+ Not appropriate for children of less
than 16 years
8 ans+ Children eight years and older 18 ans+ Reserved to adults
13 ans+ Not appropriate for children of
less than 13 years
Use ENTER button to
Open V-Chip: To adjust TV blocking level for DTV programs.
customize
the ratings, and use MENU to exit.
English
Press ENTER, then press ENTER again on U.S. (50 States + Possessions).
Press ▲ or ▼ to select the blocking item, then press ENTER.
Press ENTER to customize the rating, then press MENU to exit.
Block Unrated: To block unrated movie or TV programs.
24
English
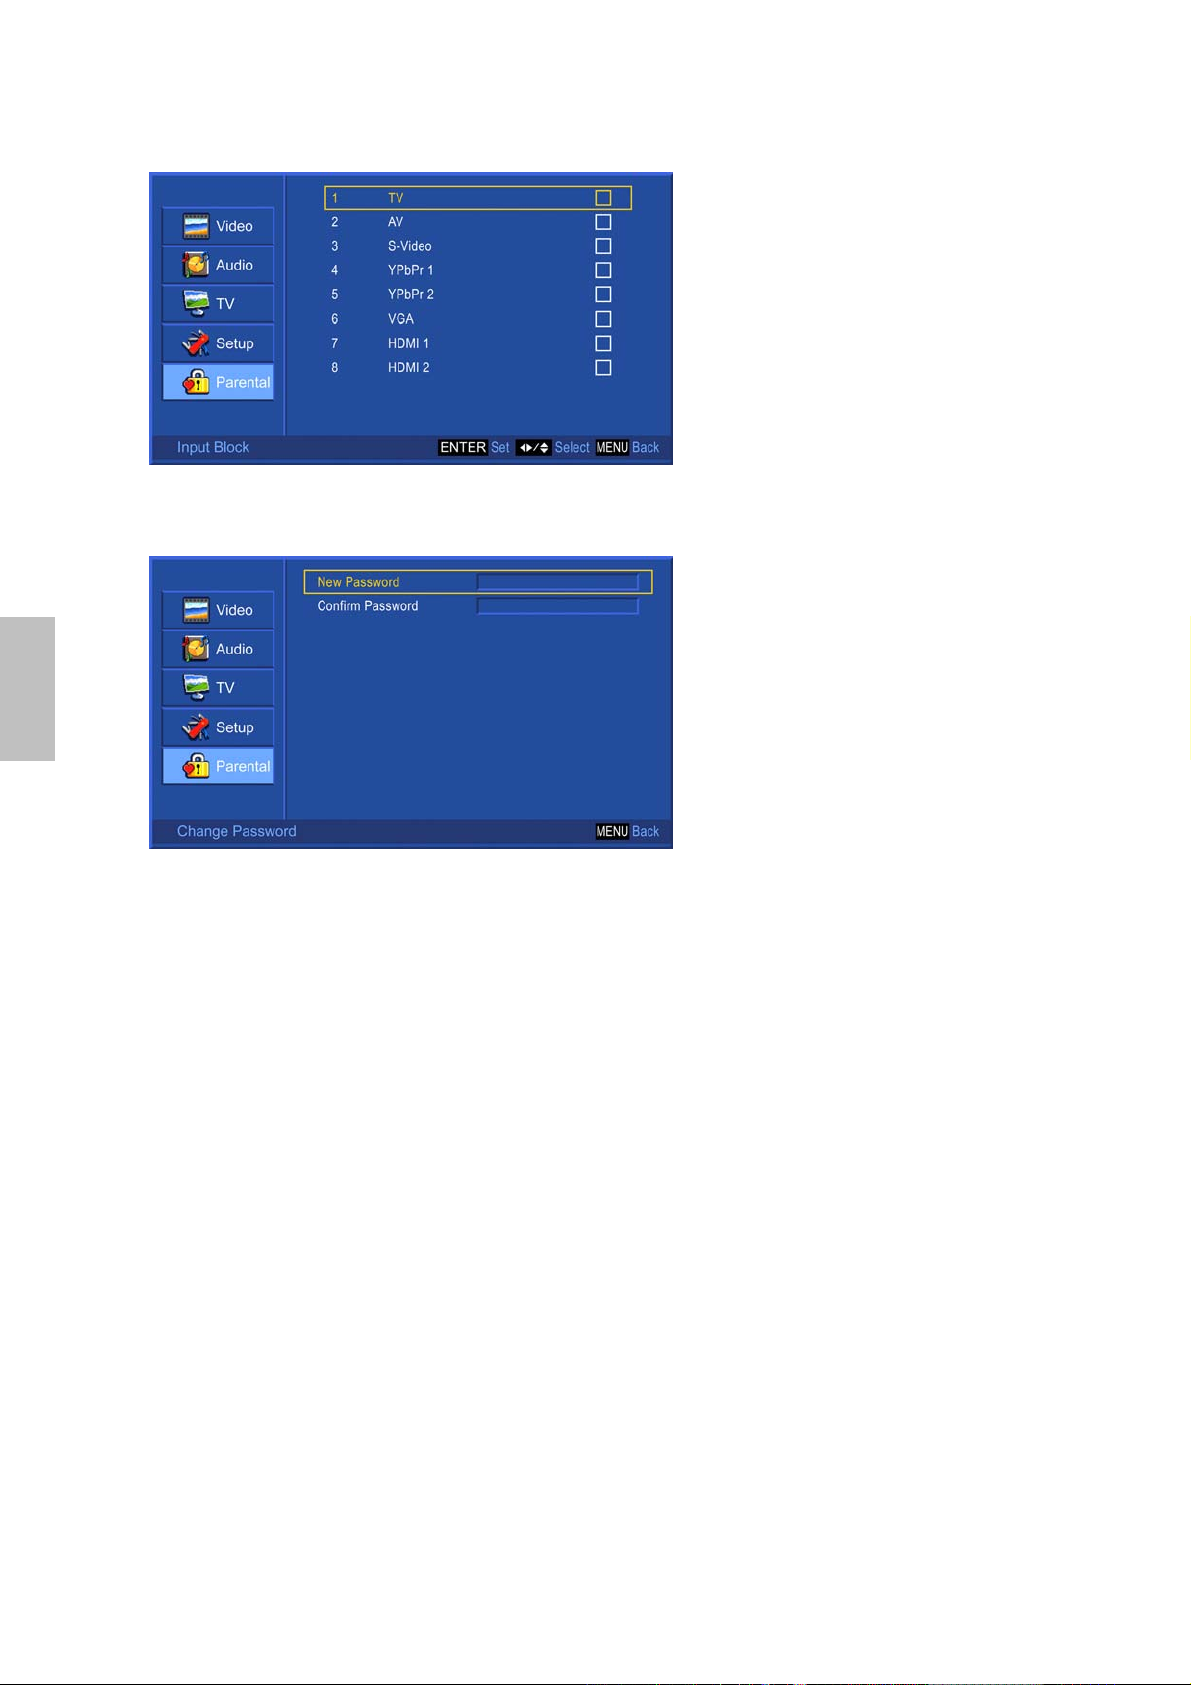
Input Block: To set the input source to be blocked. Users will not be able to watch the content
coming from the blocked input source.
Use ENTER button to block the input source, and press ENTER again to unblock.
Change Password: To change the password, press ENTER, and the following screen
appears.
Enter the new password from the remote control, and then enter the new password again to
confirm.
Note: Please mFake sure you remember your new password after changing, because you cannot recall
the default setting of the password by any selection.
Clean All: To clear all the locks set before, press ENTER, and then select “OK” to confirm.
25

TECHNICAL SPECIFICATION
LCD
Input signal
Audio 1 mini-stereo, 4 pair of RCA (L/R) stereo
Compatibility PC Up to 1360 x 768 Non-interlaced
Resolution Recommended
Speaker Output 10W x 2 @THD≤10%
Audio Output
Type 31.5” TFT Active Matrix
0.51075 (H) x 0.51075 (V) mm pixel pitch
Color Filter RGB vertical stripe
Glass surface Anti-Glare
RGB RGB analog (0.7/1.0 Vp-p, 75 ohms) Separate Sync,
fh: 30-82 kHz, fv:55-76 Hz
RF TV system Antenna / NTSC+ATSC
Video 1 composite RCA, 1 S-Video, 2 YPbPr component,
2 HDMI
1360 x 768 @ 60 Hz
and supported
1280 x 1024 @ 60 Hz
1280 x 960 @ 60 Hz
1024 x 768 @ 60, 75 Hz
800 x 600 @ 60, 72, 75 Hz
640 x 480 @ 60, 72, 75 Hz
1 stereo RCA jack (L/R), 1 SPDIF (optical),
1 Headphone jack
English
Power Voltage 100-240 VAC, 50/60 Hz (auto switch)
Display area Full Scan 697.6845mm (H) x 392.256mm (V)
27.5” (H) x 15.4” (V)
Operating
conditions
Storage condition
Dimensions Physical 800.0mm (W) x 631.6mm (H) x 210.0mm (D)
Weight Net 16.6 kg (36.5 lb)
Regulations UL, FCC-B (Doc-B), Energy Star
Preset Timing Mode (Pre-adjusted to GTF® 1360 x 768 @ 60 Hz)
Warning: Do not set the graphics card in your computer to exceed these refresh rates;
doing so may result in permanent damage to the LCD TV
Temperature 32°F to + 104°F ( 0°C to + 40°C)
Humidity 20% to 65% (no condensation)
Altitude To 6,562 feet (2,000m)
Temperature -4°F to + 140°F (-20°C to + 60°C)
Humidity 10% to 90% (no condensation)
Altitude To 40,000 feet (12,000m)
31.5’’ (W) x 24.9’’ (H) x 8.3’’ (D)
On < 180 W (blue LED) Power Consumption
Stand by < 1 W (red LED) @115Vac
Note: Product Specifications are subject to change without notice.
26

English
SAFETY PRECAUTIONS
This LCD TV is manufactured and tested to insure the user’s safety. Improper use or
installation may result danger to the LCD TV as well as to the user. Carefully go over the
following WARNINGS before installation and keep this guide handy.
WARNINGS
This LCD TV should be operated only at the correct power sources indicated on the label on
the rear end of the LCD TV. If you’re unsure of the power supply in your residence, consult
your local dealer or power company.
Do not try to repair the LCD TV yourself as it contains no user-serviceable parts. The LCD TV
should only be repaired by a qualified technician.
Do not remove the LCD TV cabinet. There is high-voltage parts inside that may cause electric
shock. even when the power cord is disconnected .
Stop using the LCD TV if the cabinet is damaged. Have it checked by a service technician.
Put your LCD TV only in a clean, dry environment. Unplug the LCD TV immediately if gets wet
and consult your service technician.
Always unplug the LCD TV before cleaning it. Clean the cabinet with a clean, dry cloth. Apply
non-ammonia based cleaner onto the cloth, not directly onto the glass screen.
Keep the LCD TV away from magnetic objects, motors, TV sets, and transformer.
Do not place heavy objects on the cable or power cord.
For PLUG CABLE EQUIPMENT, the Socket-outlet shall be installed near the equipment and
shall be easily accessible.
27

CARE AND MAINTENANCE
Care
Avoid exposing your LCD TV directly to sunlight or other heat source.
Place your LCD TV away from the sun to reduce glare.
Put your LCD TV in a well ventilated area. Do not place anything heavy on top of your LCD
TV.
Make certain your LCD TV is installed in a clean and moisture-free area.
Keep your LCD TV away from magnets, motors, transformers, speakers, and TV sets.
Safety Tips
If smoke, abnormal noise or odor came out of your LCD TV, remove the power cord
immediately and call your service center.
CAUTION-Never remove the rear cover of your LCD TV cabinet. The display unit inside
contains high-voltage parts and may cause electric shock to human bodies.
Never try to repair your LCD TV yourself. Always call your service center or a qualified
technician to fix it.
TROUBLESHOOTING
No power
Make sure A/C power cord is securely connected.
Plug another electrical device into the power outlet to verify that the outlet is supplying proper
voltage.
Power on but no screen image
Make sure the video cable supplied with the TV is tightly secured to the video output port on
back of video source (DVD, VCR…). If not, tightly secure it.
Adjust brightness.
Make sure all signal cables are installed.
Wrong or abnormal colors
If any colors (red, green, blue) are missing, check the video cable to make sure it is securely
connected. Loose or broken pins in the cable connector could cause an improper connection.
Connect the TV unit to another video source or use another TVs to make sure the video
source was not causing the problem.
English
28

English

Explication des Symboles d'AVERTISSEMENT
Le flash clignotant avec un symbole de pointe de flèche,dans un triangle
équilatéral, est prévu pour alerter l’utilisateur de la présence de tension
dangereuse non isolée dans l’armoire du produit qui peut être d’intensité
suffisante pour créer un risque de décharge électrique aux personnes.
Le point d’exclamation dans un triangle équilatéral est prévu pour alerter
l’utilisateur de la présence d’instructions importantes de fonctionnement et de
maintenance (entretien) dans la documentation accompagnant l’appareil.
Instructions de sécurité
1) Lisez ces instructions.
2) Conservez ces instructions.
3) Faites attention à tous les avertissements.
4) Suivez ces instructions.
5) N'utilisez pas cet appareil à proximité d'eau.
6) Nettoyez uniquement avec un tissu sec. N'utilisez pas de liquide, d'alcool ou de nettoyants à
pulvériser.
7) Ne bloquez aucun orifice de ventilation. Installez votre TV LCD dans un endroit bien ventilé.
8) Conservez votre TV LCD à distance de l'humidité, de la poussière excessive et de toute
source de chaleur, telle que les radiateurs, les registres de chaleur, les fours, ou tout autre
appareil (incluant les amplificateurs) qui produisent de la chaleur.
9) Ne retirez pas le couvercle arrière. There are no user-serviceable parts inside.
10) Ne défaites pas le but de sécurité de la fiche de type polarisée ou mise à la terre. Une fiche
polarisée a deux lames avec une plus large que l’autre. Une fiche de type mis à la terre a
deux lames et une troisième prise de mise à la terre. La troisième broche est fournie pour
votre sécurité. Si la fiche fournie ne s'adapte pas dans votre prise de courant, consulter un
électricien pour le remplacement de votre prise obsolète.
11) Protéger le cordon d’alimentation contre les piétinements et les pincements particulièrement
à la fiche.
12) Ne posez jamais d'objets sur le cordon d'alimentation ou dans des endroits trop fréquentés. Il
est préférable d'utiliser le point où il sort de l’appareil.
13) Utilisez uniquement les attachements / accessoires spécifiés par le
fabricant.
14) Utilisez uniquement un chariot, un socle, un trépied, une console ou
une table spécifiés par le fabricant, ou vendus avec l’appareil.
Quand un chariot est utilisé, faire attention lors du déplacement de la
combinaison chariot / appareil pour éviter toutes blessures lors d’un
renversement.
Français
15) Débrancher cet appareil pendant les orages ou lors d’une
inutilisation prolongée.
16) Référez l'entretien au personnel d'entretien qualifié - L'entretien est requis chaque fois que
l’appareil a été endommagé et ce de n’importe quelle façon, telle que si le cordon
d’alimentation ou la fiche est endommagé, si du liquide a été renversé ou que des objets

sont tombés à l’intérieur de l’appareil, si ce dernier a été exposé à la pluie ou à l’humidité,
s’il ne fonctionne pas normalement ou qu'il est tombé.
17) Votre TV LCD ne doit pas être mouillé ou exposé aux éclaboussures, et aucun objet rempli
de liquide ne doit être placé dessus.
18) L’indication Danger Risque d’Electrocution et son Symbole Graphique Associé sont illustrés
au dos du panneau de l’unité.
19) Ce produit est uniquement destiné à effectuer la fonction utile de divertissement et les tâches
d’af chage visuel sont exclues.
20) Fixation murale ou au plafond: Lors de la fixation du produit au mur ou au plafond, assurez
vous de l'installer selon la méthode recommandée par le fabricant. Utiliser seulement le
matériel de montage recommandé par le fabricant. Il s’agit d’une caractéristique de sécurité.
21) Le coupleur immédiatement utilisable servira de dispositif de déconnexion pour cet
appareil.
22) Le dispositif doit être connecté à une prise de courant du secteur comportant une
connexion protégée à la terre.
23) Pour des raisons de sécurité, si le kit de fixation VESA est acheté séparément,
assurez-vous que le kit de fixation est certifié UL, et remplaçable uniquement par un
technicien qualifié.
Français
PRÉCAUTION: Tout dommage dû à une tentative de montage incorrecte de
cette TV LCD n’est pas couvert par les termes de la garantie du fabricant.
AVERTISSEMENT: Pour diminuer les risques d’incendie ou d’électrocution,
n’exposez pas cette TV LCD à la pluie ou à l’humidité.

Content
ACCESSORIES................................................................................................................. 1
INSTRUCTION DE FIXATION MURALE ........................................................................... 2
BOUTONS DU PANNEAU AVANT..................................................................................... 3
BOUTONS DU PANNEAU ARRIÈRE ................................................................................ 4
TELECOMMANDE ............................................................................................................ 5
INSTALLATION.................................................................................................................. 7
Connecter l’antenne RF et TV câblée......................................................................... 7
Connecter au DVD / Décodeur ................................................................................... 7
Connecter à un système stéréo externe pour écouter le son de la TV LCD............... 9
Connexion au casque................................................................................................. 9
Connexion à un ordinateur ....................................................................................... 10
Connecter à un périphérique A/V avec l’entrée SPDIF............................................. 10
Connecter avec le cordon d’alimentation...................................................................11
Opération de base ........................................................................................................... 12
Allumer la TV LCD.................................................................................................... 12
Marche/Arrêt............................................................................................................. 12
Réglage initial ........................................................................................................... 12
Sélectionner la source d’entrée ................................................................................ 13
Réglage du Volume .................................................................................................. 14
Sélection du mode Son............................................................................................. 14
Sélection du mode Image......................................................................................... 14
INFO......................................................................................................................... 14
Guide électronique des programmes (EPG)............................................................. 14
Sélection de chaînes ................................................................................................ 14
Paramètre de durée de veille.................................................................................... 15
Zoom ........................................................................................................................ 15
Wide ......................................................................................................................... 15
Figer l’image ............................................................................................................. 15
Utiliser la fonction OSD............................................................................................. 15
UTILISATION AVANCÉE — MENU OSD......................................................................... 16
Menu Vidéo............................................................................................................... 16
Menu Audio............................................................................................................... 17
Menu TV ................................................................................................................... 18
Menu Configuration .................................................................................................. 19
Menu Parental .......................................................................................................... 21
SPÉCIFICATIONS TECHNIQUES................................................................................... 26
CONSIGNES DE SÉCURITÉ .......................................................................................... 27
ENTRETIEN ET MAINTENANCE.................................................................................... 28
DEPANNAGE .................................................................................................................. 28
Français

ACCESSORIES
Merci pour votre achat de cette TV LCD !
L'emballage de cette TV LCD comprend :
TV LCD
Guide de l’utilisateur
Télécommande
Batterie AAA x 2
Cordon d’alimentation
Câble RCA A/V
Français
1

INSTRUCTION DE FIXATION MURALE
Préparation de l’installation du bras à fixation murale en option (non fourni)
Cette TV peut être fixée à un bras à fixation murale que vous pouvez acheter séparément.
Mettez hors tension puis débranchez les câbles de la TV avant d’effectuer la procédure
ci-dessous.
1. Placez la TV la face vers le bas sur un chiffon doux ou un coussin posé sur une table.
2. Retirer les 4 vis fixant le socle au téléviseur.
3. Retirer le socle.
Fixer le bras à fixation murale en option (non fourni)
Suivez ces étapes pour terminer d’installer le bras à fixation murale :
1. Placez le bras à fixation murale au dos de la TV. Alignez les trous du bras avec les trous situés
au dos du moniteur.
2. Insérez les 6 vis dans les trous et serrez.
3. Reconnectez les câbles. Consultez le manuel de l’utilisateur livré avec le bras à fixation murale
en option pour les instructions concernant sa fixation au mur.
NOTE
Trou haut VESA 200 x 200mm (n=6), M6, kit de fixation à vis de pas =1,0 mm non fourni.
Pour des raisons de sécurité, si le kit de fixation VESA est acheté séparément, assurez-vous
que le kit de fixation est certifié UL, et remplaçable uniquement par un technicien qualifié.
Français
2

BOUTONS DU PANNEAU AVANT
Français
Diminuer le volume
Augmenter le volume
Affichage d'écran (OSD) Activé/Désactivé
CH Bas
CH Haut
ENTRÉE
Bouton d’alimentation
Récepteur de télécommande
❾ Indicateur LED d’alimentation
Fabriqué sous licence de Dolby Laboratories.
Dolby et le symbole double D sont des marques
commerciales de Dolby Laboratories.
(Seulement pour la source DTV dans ce modèle.)
Remarque:
1. Appuyez sur les boutons
bouton d’alimentation, et réappuyez sur les boutons
déverrouiller.
2. Appuyez sur les boutons
menu OSD, et réappuyez sur les boutons
VOL-
VOL+
et
et
MENU
VOL+
simultanément pour verrouiller le
simultanément pour verrouiller le
VOL-
et
et
VOL+
VOL+
MENU
pour le déverrouiller.
pour le
3

BOUTONS DU PANNEAU ARRIÈRE
A B C D E F G H I J K L M N O P Q R
Français
A Alimentation (entrée CA)
B Service (Terminal d’USB)
C Terminal d’entrée HDMI 1
D Terminal d’entrée HDMI 2
E Entrée du signal VGA
F Entrée du signal YPbPr 2
G Entrée du signal YPbPr 1
H Entrée S-Vidéo
I Eentrée du Câble/Air TV
J Entrée vidéo composite
K Entrée audio du signal HDMI 1 (gauche/droite)
L Entrée audio du signal YPbPr 2 (gauche/droite)
M Entrée audio du signal YPbPr 1 (gauche/droite)
N Entrée Audio du signal AV / S-Vidéo (gauche/droite)
O Sortie audio (gauche/droite)
P Entrée audio du VGA/ HDMI 2
Q Sortie optique SPDIF
R Prise casque
4

TELECOMMANDE
Français
5

Les boutons de la télécommande fonctionnent de la manière suivante:
1 ALIMENTATION (POWER) Marche/Arrêt
2 MTS Sélectionnez le son Mono, Stéréo ou SAP
3 INFO Afficher les informations actuelles
4 SON (SOUND) Sélectionner les modes Son
5 VEILLE (SLEEP) Définir le temporisateur de veille de la TV
6 FIGER “Figer la trame” de l’écran en cours
7 ZOOM Ajuster la taille de la fenêtre
8 Bouton du pavé
numérique 0~9, 100/-
9 VOL+ et VOL- Augmenter/ diminuer le volume
10 GUIDE Afficher le guide du programme électronique (EPG)
11 FAV.A/D Pour sauter ou rétablir les chaînes favorites
12 HAUT/ BAS/ GAUCHE/
DROITE/ ENTRÉE
(ENTER)
13 ENTRÉE (INPUT) Sélection de la source d’entrée
14 MUET (MUTE) Volume muet Activé/Désactivé
15 TV/CATV
16 IMAGE (PICTURE)
17 LARGE (WIDE) Modifie la taille de l’image
18 RETOURNER (RETURN) Retourner à la chaîne précédente
19 CH ▲ et CH ▼ Régler la chaîne HAUT/BAS
20 CH FAV. (FAV.CH) Sélectionner à partir des Chaîne favorites préréglées
Sélection directe de la chaîne
HAUT/BAS pour sélection de fonction OSD et
GAUCHE/DROIT pour le réglage de fonction
ENTRÉE (ENTER): Entrer le paramètre de fonction
Echange entre TV/CATV
Sélectionner les modes d’image
Français
21 MENU Menu d’affichage d’écran (OSD) Activé/Désactivé
6

INSTALLATION
Connecter l’antenne RF et TV câblée
Vérifiez que l’appareil est éteint avant d’installer votre TV LCD.
1) TV AIR: Connectez la TV LCD à l’antenne TV avec un câble coaxial de 75 ohms. Prérégler les
chaînes Air TV dans la mémoire avec la fonction Scan Automatique quand vous utilisez un
système d’antenne TV. Cette prise d’entrée Air prend en charge à la fois les systèmes TV et
DTV. En outre, vous pouvez trouver le système TV (NTSC) et le système DTV (ATSC) en
explorant “AIR” dans la fonction Scan Automatique. Voir page 18.
2) TV Câblée: Connectez la TV LCD au câble avec CATV et le câble numérique. Préréglez les
chaînes de TV câblée dans la mémoire avec la fonction Scan Automatique quand vous
utilisez un système de TV câblée. La prise d’entrée du câble prend à la fois en charge les
systèmes CATV et câble numérique En outre, vous pouvez trouver le système CATV (câble TV)
et le système de câble numérique (clear QAM) en explorant “Câble” dans la fonction Scan
Automatique. Voir page 18.
Français
Câble ou adaptateur RF
(n on fourni)
Remarque: Les utilisateurs peuvent sélectionner la TV Air ou câblée pour se connecter
à la prise TV IN. Pour regarder les deux, utilisez un adaptateur pour connecter à la fois les
câbles Air et Câble à la prise.
Connecter au DVD / Décodeur
Connectez les câbles Vidéo/Audio des périphériques compatibles au panneau arrière de la TV
LCD.
1) Avec le câble RCA A/V :
Câble RCA A/V
Lecteur VCD ou DVD
7

2) Avec le câble S-Vidéo :
3) Avec le câble YPbPr :
Câble S-Video (non fourni)
Câble d’entrée audio
(non fourni)
Lecteur VCD ou DVD
Câble YPbPr (non fourni)
Câble d’entrée audio
(non fourni)
4) Avec le câble HDMI :
Lecteur VCD ou DVD
Lecteur VCD ou DVD
(Le lecteur DVD doit
comporter le terminal
de sortie HDMI)
Câble HDMI (non fourni)
Français
8

5) Avec le câble HDMI-DVI :
)
Câble d'entrée audio (non fourni)
Lecteur VCD ou DVD
(Le lecteur DVD doit
comporter le terminal
de sortie DVI
Français
Câble HDMI-DVI (non fourni)
Connecter à un système stéréo externe pour écouter le son de la TV LCD
Connecter le terminal de sortie audio de la TV LCD au terminal d’entrée audio du système stéréo
(système stéréo vendu séparément).
Câble d’entrée audio
(non fourni)
Système stéréo
Connexion au casque
Connectez le casque au terminal de sortie du casque de la TV LCD. (Casque vendu
séparément).
Casque
(non fourni)
9

Connexion à un ordinateur
y
)
)
1) Avec le câble VGA :
Connectez le câble VGA depuis la sortie VGA de l'ordinateur à l'entrée du terminal VGA de
votre TV LCD. Connectez aussi le câble d'entrée audio (Audio In) (vert) provenant de la sortie
audio de votre ordinateur au terminal d'entrée audio (vert) de la TV LCD.
PC
Connexion audio du PC (non fourni)
Câble 15 broches VGA (non fourni)
2) Avec le câble HDMI-DVI :
Connectez le câble HDMI-DVI de la sortie DVI de l'ordinateur à l'entrée du terminal HDMI 2 de
la TV LCD. Connectez aussi le câble d'entrée audio (Audio In) (vert) provenant de la sortie
audio de votre ordinateur au terminal d'entrée audio (vert) de la TV LCD.
PC
Câble HDMI-DVI(non fourni
Connexion audio du PC (non fourni
Connecter à un périphérique A/V avec l’entrée SPDIF
Connecter le câble optique SPDIF depuis un périphérique A/V au connecteur de sortie SPDIF de
la TV LCD.
Français
Câble audio
(non fourni)
Périphérique A/V
Câble optique SPDIF
(non fourni)
S
stème stéréo
10

Connecter avec le cordon d’alimentation
A
Connectez le cordon d’alimentation à la prise d’entrée CA située au dos de votre TV LCD, après
avoir effectué toutes les connexions, et branchez l’autre extrémité du cordon d’alimentation à une
prise électrique correctement mise à la terre.
Prise
d’alimentation
C
Cordon d'alimentation
Français
11

Opération de base
Pour utiliser votre TV LCD, vous pouvez utiliser la télécommande de la TV ou les boutons du
panneau supérieur pour sélectionner la source d’entrée, changer de chaîne, ou régler le volume.
Allumer la TV LCD
Avant d’utiliser la TV LCD:
1. Branchez la fiche d’alimentation.
2. Insérez la fiche d’alimentation, l’indicateur LED d’alimentation s’allumera en rouge.
Marche/Arrêt
Appuyez sur le bouton POWER sous la TV LCD ou appuyez sur la bouton POWER de votre
télécommande pour allumer/éteindre la TV. L’indicateur LED d’alimentation s’allume en bleu quand
la TV LCD est allumée.
Réglage initial
A la mise sous tension initiale du téléviseur, les paramètres de base s’effectuent automatiquement
et à la suite:
1. Appuyez sur les boutons POWER sur la
télécommande. La fenêtre initiale de
l’assistant d’installation apparaîtra. Appuyez
sur ENTER pour lancer l’assistant.
2. Appuyez sur ▲ ou ▼ pour sélectionner
votre langue, appuyez ensuite sur ► pour
passer à l’étape suivante. Pour retourner à
la page précédente, appuyez sur ◄.
3. Sélectionnez votre mode d’affichage parmi
*Domicile ou magasin, appuyez ensuite sur
► pour continuer.
*Pour l’utilisation domestique normale, nous
vous conseillons d’utiliser “Domicile” pour
réaliser une économie d’énergie. Cependant,
si vous préférez une meilleure luminosité,
sélectionnez “Magasin”.
Français
12

Français
4. Sélectionnez votre mode de tuner Air ou
Câble, appuyez ensuite sur ► pour
continuer.Connectez le câble et/ou
l’antenne, et sélectionnez Balayage ou
Sauter le balayage avec ▲ ou ▼, appuyez
ensuite sur ► pour continuer. Si vous
sélectionnez Sauter le balayage dans cette
étape, vous pourrez toujours effectuer le
balayage de chaîne dans Menu.
5. Le balayage de chaîne démarre
maintenant. Pour interrompre le balayage,
appuyez sur MENU à tout moment.
6. Après avoir terminé l’installation initiale,
appuyez sur ENTER pour quitter l’assistant.
Sélectionner la source d’entrée
Pour sélectionner la source d’entrée requise:
Appuyez sur le bouton INPUT sur la télécommande pour sélectionner
la source d’entrée requise parmi TV, AV, S-Video, YPbPr 1, YPbPr 2,
VGA, HDMI 1, et HDMI 2.
Pour confirmer la sélection, appuyez sur ENTER.
13

Réglage du Volume
Appuyez sur VOL+/- pour régler le volume.
Pour désactiver le volume, appuyez sur MUTE.
Si vous voulez rétablir le volume, appuyez à nouveau sur MUTE, ou appuyez directement sur
VOL+/-.
Sélection du mode Son
Appuyez à plusieurs reprises sur la touche SOUND pour sélectionner le mode son parmi Off
(Désactivé), Concert, Salon, Hall, Salle de bains, Caverne, Arène, Eglise.
Sélection du mode Image
Appuyez à plusieurs reprises sur la touche PICTURE pour sélectionner le mode image parmi
Utilisateur, Cinéma, Sport, Vif et Fort clair.
INFO
Pour afficher l’information en cours sur la TV LCD :
Appuyez sur INFO, et l’état actuel s’affichera à l’écran. (Cela affiche toutes ou certaines informations
concernant les modes Entrée, Chaîne, Résolution, Type audio, etc. Selon la source d’entrée dans
laquelle il se trouve.)
Guide électronique des programmes (EPG)
Guide électronique des programmes (EPG) Appuyez sur le bouton GUIDE de la télécommande et
les informations de programme pour la chaîne que vous regardez seront affichées à l’écran.
Appuyez sur le bouton ◄ ou ► pour faire défiler les chaînes vers le haut ou vers le bas. Chaque
fois que vous vous arrêtez sur une chaîne, la liste de programmes mettra à jour la planification des
programmes pour cette chaîne. Appuyez sur le bouton GUIDE pour quitter cette fonctionnalité.
Français
Sélection de chaînes
Appuyez sur une touche du pave numerique, ou sur le bouton CH▲/▼ pour selectionner la chaine
desiree.
1. En mode ATV
Le bouton “-” n’a pas de fonction en mode ATV. Appuyez directement sur les touches
14

Français
numériques pour sélectionner les chaînes.
2. En mode DTV
Utilisez le bouton “-” pour sélectionner la chaîne secondaire dans DTV.
Ex : Le numéro désiré est 80-3.
Appuyez sur 8 → appuyez sur 0 → appuyez sur “-” → appuyez sur 3.
• Que ce soit en ATV ou DTV, après avoir entré les numéros des chaînes, appuyez sur le
bouton ENTER pour diriger immédiatement la chaîne, ou patientez 3 sec ondes pour
changer automatiquement.
• Pour retourner à la chaîne précédente, appuyez sur le bouton RETURN.
※ Comment basculer entre Air TV et TV câblée?
En mode TV, appuyez sur le bouton TV/CATV pour changer ou passer en mode Tuner dans le
menu TV à sélectionner.
Paramètre de durée de veille
Appuyez à plusieurs reprises sur le bouton
coupure. La fonction est utilisée pour éteindre automatiquement votre TV LCD après une durée
prédéfinie écoulée. Il y a plusieurs durées de choix –Off, 15 Minutes, 30 Minutes, 45 Minutes, 60
Minutes, 90 Minutes, ou 120 Minutes.
SLEEP
pour définir la minuterie de
Zoom
Appuyez sur le bouton ZOOM de façon répétée pour sélectionner la taille de l’écran. Vous pouvez
sélectionner Bourdonne1, Bourdonne2, et Bourdonne3.
Wide
Appuyez sur le bouton WIDE de façon répétée pour sélectionner le format d’image de l’écran.
Vous pouvez sélectionner entre Aucune échelle, Normal, Plein écran, Boîte aux lettres, Zoom, et
Panorama.
Figer l’image
Appuyez sur le bouton FREEZE pour figer l’image. Cependant le son sera toujours émis. Appuyez
à nouveau sur le bouton FREEZE pour rétablir.
Utiliser la fonction OSD
Vous pouvez utiliser les menus et les options OSD pour ajuster divers paramètres à l’aide de la
télécommande.
L’utilisation de base est la suivante:
Appuyez sur MENU pour afficher le menu OSD.
Appuyez sur ▲▼ pour sélectionner le Menu principal désiré, et appuyez sur ENTER ou sur ►
pour entrer dans le menu de niveau suivant.
Utilisez ▲▼ pour sélectionner le contrôle que vous voulez ajuster.
Quand vous sélectionnez le contrôle avec II►, press ENTER to enable the function.
Appuyez sur ◄► pour ajuster les paramètres.
Appuyez sur MENU pour quitter le menu OSD.
15

UTILISATION AVANCÉE — MENU OSD
Menu Vidéo
—Ajuster la qualité de l’image
En source TV, AV, S-Video, YPbPr 1, YPbPr 2, HDMI 1, HDMI 2 :
(En source AV, S-Vidéo, YPbPr ou HDMI, l’option TV sur la gauche n’apparaît pas)
En source VGA :
Mode Image : Permet de sélectionner le mode image parmi Utilisateur, Cinéma, Sport, Vif et
Fort clair.
Réduction du bruit : Pour réduire le niveau du bruit de l'équipement connecté. Sélectionnez
parmi Faible, Moyen, Fort, ou Off.
Luminosité : Pour ajuster la luminance de la vidéo. (droit : Max, gauche : Min.)
Contraste : Pour ajuster le contraste de la vidéo. (droit : Max, gauche : Min.)
Couleur : Pour ajuster la couleur. (droit : couleur brillante, gauche : couleur pâle.)
Teinte : Pour ajuster le niveau de teinte. (droit : ton de vert, gauche : ton de rouge.)
Netteté : Pour ajuster la netteté de l’image. (droit : plus net, gauche : plus doux.)
Rétroéclairage : Pour éclaircir ou assombrir le rétroéclairage. Le rétroéclairage peut être réglé
seulement quand le mode Affichage dans le menu Install. est paramétré sur Utilisateur.
Température de couleur : Appuyez sur ENTER pour sélectionner la température de couleur
parmi Utilisateur, Froid, Tiède et Chaud. (Quand la température de couleur est sélectionnée
sur Utilisateur, le niveau de gain R, V, B peut être réglé séparément.)
Français
16

Réglage auto : Appuyez sur ENTER pour régler automatiquement la position horizontale, la
position verticale, le réglage précis, et la taille H. de l’image.
VGA : Appuyez sur ENTER pour ajuster le paramètre VGA.
Français
Position H. : Pour ajuster la position horizontale de l’image.
Position V. : Pour ajuster la position verticale de l’image.
Phase : Pour ajuster le retard de la phase afin de réduire les parasites de l’image.
Horloge : Pour ajuster le retard de l’horloge afin de réduire les parasites de l’image.
Menu Audio
—Pour paramétrer la qualité audio et l’état
En source TV :
17

En source AV, S-Video, YPbPr 1, YPbPr 2, HDMI 1, HDMI 2, VGA :
Equilibre : Pour régler la balance audio gauche et droite.
Basse : Pour régler les sons graves.
Aigus : Pour régler les sons aigus.
Contour sonore : Pour bénéficier d’un effet salle de concert, sélectionnez “On” quand la
stéréo est en cours de lecture.
Répercussion : Pour apprécier l’effet écho d’un Off, Concert, Salon, Hall, Salle de bains,
Caverne, Arène ou Eglise.
Egalisateur : Pour sélectionner les modes égaliseur parmi Off, Rock, Pop, Direct, Danse,
Techno, Classique, Doux.
SPDIF Type : Pour sélectionner le type SPDIF parmi Dolby Digital, PCM, ou Off (Désactivé).
Comde du vol. auto : Pour activer ou désactiver le contrôle du volume automatique. (Cette
fonction est effective uniquement en source TV)
Audio seul : Pour éteindre l'image d'écran mais garder le son.
Menu TV
—A installer pour la TV
Actif seulement en source TV.
Français
Mode syntoniseur : Pour sélectionner Câble ou Air comme source TV. Sélectionnez “Câble”si
vous voulez regarder les chaînes TV câblées, et sélectionnez Air pour regarder les chaînes Air
TV.
Scan Automatique : Pour explorer automatiquement les chaînes TV et DTV. Appuyez sur
ENTER pour commencer à explorer les chaînes Air et TV câblée. Appuyez à nouveau sur
MENU à tout moment pour interrompre le balayage.
Saut de chaîne : Appuyez sur ENTER pour sauter la chaîne. Pour rétablir la chaîne, appuyez
à nouveau sur ENTER.
18

Français
MTS : Pour sélectionner le mode audio disponible
Audio Language :
Pour sélectionner la langue audio disponible.
Menu Configuration
—Pour configurer la fenêtre de l’OSD
En source TV, AV, S-Video, YPbPr 1, YPbPr 2, HDMI 1, HDMI 2 :
(En source AV, S-Vidéo, YPbPr ou HDMI, l’option TV sur la gauche n’apparaît pas.)
En source VGA :
OSD Language : Pour sélectionner une langue de l’OSD parmi Anglais, Espagnol, ou Français.
Proportions: Pour sélectionner la taille de l’image parmi No Scale (Aucune échelle), Normal,
Full (Plein écran), Boîte aux lettres, Panorama, et Zoom. La fonction Format d’image ne
supporte pas les synchronisations PC.
Silence bleu : Pour définir la couleur de fond en bleu quand il n’y a pas de signal.
Conf de l’heure : Pour définir Fuseau Horaire, Heure, Minuterie de veille, Veille auto et Heure
d’été.
19

Fuseau Horaire : Pour sélectionner le fuseau horaire approprié pour votre région.
Appuyez sur ▲ ou sur ▼ pour sélectionner “Fuseau horaire”, et sélectionnez le fuseau
horaire de votre région avec ◄ ou ►.
Heure : Pour régler les heure courante. Appuyez sur ▲ ou sur ▼ pour sélectionner
“Heure”, appuyez ensuite sur ENTER pour entrer le paramètre.
‧ Auto-synchronisation : Quand “Auto-synchronisation” est activé, la date et l’heure
seront automatiquement synchronisées selon le contenu du programme. Sélectionnez
“Désactivé” si vous voulez régler la date et l'heure manuellement, puis déplacez le
curseur vers le bas pour régler avec les touches du pavé numérique.
‧ Minuterie : Pour régler l’heure de mise sous tension et hors tension. Appuyez sur ◄
ou ► sur la Minuterie et sélectionnez “On”.
Puis déplacez le curseur vers le bas pour définir l'heure de début et l'heure de fin de la
minuterie. Sélectionnez “Off” si vous voulez annuler la fonction minuterie.
Minuterie de veille : Pour régler la minuterie de mise hors tension entre 15~120 minutes.
Veille auto : Pour éteindre la TV si elle n’a pas été utilisée pendant la durée prédéfinie -- 1
Heure, 2 Heures, ou 5 Heures.
Heure d’été: Pour On/Off l'heure d'été.
Sous-titre : Pour fermer les options de sous-titre.
Français
Sous-titre Analoque : Pour régler les options de sous-titre analogique de base.
(CC1~CC4, Texte1~Texte4, Off)
Sous-titre Numérique : Pour sélectionner les formats de signal de sous-titrage et définir
20

Français
les modes de sous-titrage pour les chaînes TV numériques. (Service1~6, Off)
Style de Sous-titre : Utilisez ◄► pour sélectionner le Style de Sous-titre dans “Comme
téléspeaker” ou “Personnalisé”. Quand “Personnalisé” est sélectionné, utilisez ▲▼ pour
sélectionner les contrôles désirés, ◄► pour ajuster les paramètres détaillés.
‧ Taille : Pour sélectionner une taille de police parmi Grand, Petit ou Moyen.
‧ Couleur du Texte : Pour sélectionner une couleur de police parmi Noir, Blanc, Vert,
Bleu, Rouge, Cyan, Jaune, ou Magenta.
‧ Opacité de Texte : Pour sélectionner l’opacité de police entre Solide ou Transparent.
‧ Couleur du Fond : Pour sélectionner couleur de fond.
‧ Opacité du Fond : Pour sélectionner l’opacité de fond.
‧ Couleur de la Fenêtre : Pour sélectionner une couleur de fenêtre.
‧ Opacité de la Fenêtre : Pour sélectionner l’opacité de la fenêtre.
DCR : Pour activer/désactiver la fonction DCR (Rapport de contraste dynamique).
Mode d'affichage: Pour sélectionner le mode d’affichage parmi Domicile, Magasin, ou
Utilisateur.
Remarque : Pour une utilisation domestique normale, nous vous suggérons de sélectionner “Domicile”
pour des raisons d’économie d’énergie. Cependant, si vous préférez une meilleure luminosité,
sélectionnez “Magasin”. Quand “Utilisateur” est sélectionné, vous pouvez régler vous-même le niveau
du rétroéclairage.
Valeurs par défaut : Pour rétablir les paramètres d’usine par défaut. appuyez sur ENTER, et
sélectionnez “OK” pour confirmer.
Menu Parental
—Pour régler les options de contrôle parental
Actif dans toutes les sources d'entrées.
(En source AV, S-Video, YPbPr 1, YPbPr 2, HDMI 1, HDMI 2, ou VGA, l’option TV sur la gauche
n’apparaît pas.)
Entrer le mot de passe et l’écran ci-dessous apparaîtra. (Le mot de passe par défaut est 0000.)
21

Blocage de chaîne : Pour bloquer les chaînes. Utilisez ▲▼ pour sélectionner la chaîne que
vous voulez bloquer, appuyez ensuite sur ENTER pour la bloquer ou la débloquer. Cette
fonction est activée uniquement en source TV.
Bloc de programmes. : Pour définir les classements TV et Film.
Français
Rating Enable : Choisissez “On” pour activer les paramètres ci-dessous.
Classement TV US : Pour ajuster le niveau de blocage TV aux USA. Vous pouvez
sélectionner parmi TV-Y, TV-Y7, TV-G, TV-PG, TV-14, ou TV-MA.
22

Français
Les classifications TV aux USA sont définies comme suit.
TV-Y Tous les enfants TV-PG Contrôle parental suggéré
TV-Y7 Destiné aux enfants plus grands:
ce programme est destiné à des
enfants de 7 ans et plus
TV-G Tout public TV-MA Réservé aux adultes seulement
Utilisez le bouton ENTER pour personnaliser les classifications, et utilisez MENU pour
quitter.
Classement films US : Pour ajuster le niveau de blocage de film aux USA. Vous pouvez
sélectionner entre G, PG, PG-13, R, NC-17, ou X.
Les classifications des films aux USA sont définis comme suit.
G Tout public R Restreint
PG Contrôle Parental suggéré NC-17 Ne convient pas aux moins de 17
PG-13 Surveillance parentale fortement
recommandée
Utilisez le bouton ENTER pour personnaliser les classifications, et utilisez MENU pour
quitter.
Class. Canada angl. : Pour ajuster le niveau de blocage dans la partie de langue Anglaise
du Canada. Vous pouvez sélectionner parmi C, C8+, G, PG, 14+, 18+.
TV-14 Surveillance parentale fortement
recommandée : ce programme
contient des programmes ne
convenant pas aux enfants de moins
de 14 ans
X Réservé aux adultes
Les classements canadiens et anglais sont définis comme suit.
C
C8+
G
Utilisez le bouton ENTER pour personnaliser les classifications, et utilisez MENU pour
quitter.
23
Enfants
Enfants de huit ans et plus
Programme général tout public
PG
14+
18+
Contrôle parental
Spectateurs de 14 ans et plus
Programmes pour adulte

Class. Canada fran. : Pour ajuster le niveau de blocage dans la partie francophone du
Canada. Vous pouvez sélectionner parmi G, 8 ans+, 13 ans+, 16 ans+, 18 ans+.
*Les classements canadiens et français sont définis comme suit.
G
8 and+
13 and+
Utilisez le bouton ENTER pour personnaliser les classifications, et utilisez MENU pour
quitter.
Général
Généralement déconseillé aux
jeunes enfants
Cette émission ne convient pas
aux enfants de moins de 13 ans
16 and+
18 and+
Cette émission ne convient pas aux
moins de 16 an
Cette émission est reçue par des
adultes
Open V-Chip: Pour ajuster le niveau de blocage du téléviseur pour les programmes DTV.
Appuyez sur ENTER et appuyez à nouveau sur ENTER sur U.S. (50 Etats + Possessions).
Appuyez sur ▲ ou sur ▼ pour sélectionner l'élément de blocage, appuyez ensuite sur
ENTER.
Appuyez sur ENTER pour personnaliser la classification, appuyez ensuite sur MENU pour
quitter.
Class. Bloqu : Pour bloquer les programmes de films ou TV sans classifications.
Français
24

Blocage d’entrée : Pour définir la source d’entrée à bloquer. Les utilisateurs ne pourront pas
regarder le contenu venant d’une source d’entrée bloquée.
Utilisez le bouton ENTER pour bloquer la source d’entrée, et appuyez à nouveau sur le bouton
ENTER pour débloquer.
Changer Le Mot de Passe : Pour changer le mot de passe, appuyez sur le bouton ENTER, et
l’écran suivant apparaîtra.
Français
Entrez le nouveau mot de passe à l’aide de la télécommande, et entrez le nouveau mot de
passe pour confirmer.
Remarque: N’oubliez pas votre nouveau mot de passe après l’avoir modifié, car vous n’auriez plus la
possibilité de rétablir le mot de passe par défaut.
Tout nettoyer : Pour effacer tous les verrouillages définis précédemment, appuyez sur
ENTER, et sélectionnez “OK” pour confirmer.
25

SPÉCIFICATIONS TECHNIQUES
LCD
Signal d’entrée
Audio 1 mini-stéréo, 4 paires de RCA (G/D) stéréo
Compatibilité PC Jusqu’à 1360 x 768 Non-entrelacé
Résolution
Sortie haut-parleur 10W x 2 @THD≤10%
Sortie Audio
Type Matrice active TFT 31.5”
Ecartement de pixels 0,51075 (H) x 0,51075 (V) mm
Filtre Couleur Bande verticale RVB
Surface en verre Anti-reflets
RVB
RF TV Antenne de système / NTSC+ATSC
Vidéo 1 RCA composite, 1 S-Vidéo, 2 YPbPr composantes,
Recommandés
et pris en charge
RVB analogique (0,7/1,0 Vp-p, 75 ohms) Sync. Séparée,
fh: 30-82 kHz, fv:55-76 Hz
2 HDMI
1360 x 768 @ 60 Hz
1280 x 1024 @ 60 Hz
1280 x 960 @ 60 Hz
1024 x 768 @ 60, 75 Hz
800 x 600 @ 60, 72, 75 Hz
640 x 480 @ 60, 72, 75 Hz
1 prise RCA stéréo (G/D), 1 SPDIF (optique),
1 prise casque
Français
Alimentation Voltage 100-240 VAC, 50/60 Hz (commutation auto)
Zone d'affichage Balayage complet 697,6845mm (H) x 392,256mm (V)
27,5” (H) x 15,4” (V)
Utilisation
conditions
Conditions de
Stockage
Dimensions Physique 800,0mm (Larg) x 631,6mm (Haut) x 210,0mm (Prof)
Poids Net 16,6 kg (36,5 livres)
Réglementations UL, FCC-B (Doc-B), Energy Star
d’énergie
Mode de temporisation préréglé (préréglage sur GTF® 1360 x 768 @ 60 Hz)
Avertissement : Ne pas régler la carte graphique de votre ordinateur sur une valeur dépassant ces
vitesses de rafraîchissement, car cela risquerait d’endommager définitivement votre affichage LCD.
Température 32°F à + 104°F ( 0°C à + 40°C)
Humidité 20% à 65% (sans condensation)
Altitude A 6562 pieds (2.000 m)
Température -4°F à + 140°F (-20°C à + 60°C)
Humidité 10% à 90% (sans condensation)
Altitude A 40.000 pieds (12.000 m)
31,5’’ (Larg) x 24,9’’ (Haut) x 8,3’’ (Prof)
Activé < 180 W (LED bleu) Consommation
Activé Désactivé < 1 W (LED rouge) @115Vac
Remarque : Les spécifications du produit peuvent être modifiées sans avertissement.
26

Français
CONSIGNES DE SÉCURITÉ
Cette TV LCD est fabriquée et testée sur un principe de base que la sécurité de
l'utilisateur vient en premier. Cependant, une utilisation ou installation incorrecte peut
résulter en un danger pour la TV LCD aussi bien que pour l'utilisateur. Lire soigneusement
les AVERTISSEMENTS suivants avant l'installation et conservez ce guide à portée de
main.
AVERTISSEMENTS
Cette TV LCD doit fonctionner uniquement à la source d’alimentation correcte qui est indiquée
sur l'étiquette à son dos TV LCD. Si vous n'êtes pas sûr de l'alimentation électrique dans votre
résidence, consultez votre revendeur ou la compagnie d'électricité locale.
Ne tentez pas de réparer la TV LCD vous-même car elle contient des pièces non réparables.
Elle doit être seulement réparée par un personnel d'entretien qualifié.
Ne retirez pas le coffret de la TV LCD. Il y a des pièces à haute tension à l'intérieur qui peuvent
donner lieu à une secousse électrique au corps humain, même si le cordon d'alimentation est
débranché.
Arrêter d'utiliser le TV LCD si le coffret est endommagé. Veuillez le faire vérifier par un
technicien d'entretien.
Installer votre TV LCD dans un endroit propre et sec TV LCD. Si le moniteur est
accidentellement mouillé, débranchez le immédiatement et contactez un technicien d'entretien.
Toujours débrancher la TV LCD avant de la nettoyer. Essuyer alors le coffret avec un tissu sec
doux. Appliquer un nettoyant sans ammoniaque sur le tissu, pas directement sur l'écran en
verre.
Conservez la TV LCD loin des objets magnétiques, des moteurs, des postes TV et des
transformateurs.
Ne pas placer d'objets lourds sur le câble ou le cordon d'alimentation.
Pour tout EQUIPEMENT DE CABLE A BRANCHER, la prise secteur doit être installée à côté
de l'équipement et doit être facilement accessible.
27

ENTRETIEN ET MAINTENANCE
Entretien
Eviter d'exposer la TV LCD à la lumière directe du soleil ou autres sources de chaleur.
Placer la TV LCD loin du soleil pour réduire les reflets.
Installez votre TV LCD dans un endroit bien ventilé. Ne pas placer d'objet lourd sur la TV LCD.
Assurez-vous d'installer votre TV LCD dans un endroit propre et sec.
Conservez la TV LCD loin des objets magnétiques, des moteurs, des transformateurs, des
haut-parleurs et des postes TV.
Astuces de Sécurité
En cas de bruit étrange, fumée ou odeurs, provenant de votre TV LCD, débranchez le
moniteur et contacter immédiatement votre revendeur ou le centre de réparation le plus
proche.
ATTENTION- Ne jamais retirer le couvercle arrière du coffret de votre TV LCD. L'unité
d'affichage à l'intérieur contient des pièces à haute tension qui peuvent donner lieu à une
secousse électrique au corps humain.
Ne jamais tenter de réparer la TV LCD par vous-même. Toujours appeler votre centre de
service ou un technicien qualifié pour la réparer.
DEPANNAGE
Aucune alimentation
Assurez-vous que le cordon d'alimentation C/A est fermement et correctement connecté à
l'adapteur et que la source d'alimentation est fermement connectée à la TV.
Brancher un autre appareil électrique dans la prise secteur pour vérifier que la prise
d'alimentation fourni une tension correcte.
Sous tension mais aucune image à l'écran
Assurez vous que le câble vidéo fourni avec la TV est fermement et correctement branché au
port de la sortie vidéo à l'arrière de la source vidéo (DVD, VCR...) Sinon, le brancher
fermement et correctement.
Régler la luminosité.
S'assurer que tous les câbles de signaux sont installés.
Couleurs erronées ou anormales
Si des couleurs (Rouge, Vert, Bleu) manquent, vérifier le câble vidéo pour s'assurer qu'il
est correctement branché. Des broches desserrées ou cassées dans le connecteur du câble
peut causer une connexion incorrecte.
Connecter le poste TV à une autre source vidéo ou utiliser une autre TV pour s'assurer que la
source vidéo n'est pas un problème.
Français
28

Français

Explicación de los símbolos de AVISOS
El símbolo de seta con el flash de iluminación dentro de un triangulo
equilátero es indicado para alertar al usuario de la presencia de voltaje
peligrosa aislada dentro del producto que puede tener magnitud suficiente
para constituir un riesgo de choque eléctrico para las personas.
El punto de exclamación dentro de un triángulo equilátero é indicado para
alertar el usuario de la presencia de instrucciones de reparo y operación
importantes en la literatura técnica disponible con el aparato.
Instrucciones de seguridad
1) Leer estas instrucciones.
2) Mantener estas instrucciones.
3) Hacer caso de los avisos.
4) Seguir las instrucciones.
5) No usar el aparato acerca de la agua.
6) Limpiar sólo con un pañuelo limpio. No usar líquido, alcohol o limpiador aerosol.
7) No bloquear cualquier abertura de ventilación. Instalar su LCD TV en una área de ventilación.
8) Mantener su LCD TV sin contacto con humedad, polvo excesivo y cualquieres fuentes tales
como radiadores, registros de calor, estufas o cualquier aparato (incluyendo amplificadores)
que produce calor.
9) No eliminar la tapa trasera. No hay ninguna parte reparable en el interior.
10) No cambiar el propósito de seguridad del enchufe de derivación a tierra. Un enchufe
polarizado tiene dos láminas, una más amplia que la otra. Un enchufe de derivación a tierra
tiene dos láminas y una tercera para la conexión con la tierra. La tercera lámina es diseñada
para su seguridad. Si el enchufe proveído no ajustar su salida, contacte un electricista para
obtener la sustitución de la salida obsoleta.
11) Proteja el cable de alimentación y no deje en el camino o que sea pellizcado en los enchufes.
12) Nunca apoye objetos arriba del cable de alimentación y déjelo en áreas de alto tráfico. Es
mejor usar el punto que sale del aparato.
13) Use sólo accesorios/anexos especificados por el fabricante.
14) Use sólo con el carro, soporte, trípode, escuadra o mesa
especificada por el fabricante o vendida con el aparato. Al usar un
carro, tenga cuidado al transportar la combinación carro/aparato
para evitar lesión de una queda.
Español
15) Desenchufe esto aparato durante las tormentas o cuando no usarlo
por un periodo largo.
16) Consulte la asistencia técnica para obtener reparo—esto es
necesario cuando el aparato fue dañado de cualquier forma, tales como cable de
alimentación o enchufe, liquido fue derramado o objetos caerán en la parte interna, fue
expuesto a humedad, no opera correctamente o se cajo.

17) Su LCD TV no debe ser expuesto a salpico y ninguno objeto lleno de liquido será puesto
arriba de su caja.
18) La marca de peligro de descarga y el símbolo grafico asociado son proveídos en la parte
trasera de la unidad.
19) Este producto es solamente para realizar la función útil de entretenimiento, pero no incluye
las tareas de muestra visual.
20) Montaje en la pared o techo. Cuando montar el producto en una pared o techo, verifique si
instala de acuerdo con las instrucciones recomendadas por el fabricante. Use sólo el
hardware de montaje recomendado por el fabricante. Esto es una característica de
seguridad.
21)
El acoplador del dispositivo ya operable servirá para desconectar el dispositivo de
este aparato.
Se debe conectar el aparato a un receptáculo de zócalo de suministros con una
22)
conexión de tierra protegida.
Debido a las preocupaciones de seguridad, si el kit de montaje VESA fue adquirido
23)
por separado, asegurese de que el kit está en UL-Listed, y reemplazado solamente
por el personal de servicio.
PRECAUCIÓN: Daños causados por el montaje incorrecto de este LCD TV no
están cubiertos bajo los términos de la garantía del fabricante.
ADVERTENCIA: Para reducir el riesgo de incendio o electrocución, no exponga
este LCD TV bajo lluvia o humedad.
Español

Contenido
ACCESORIOS................................................................................................................... 1
INSTRUCCIÓN DE MONTAJE DE PARED ....................................................................... 2
BOTONES DEL PANEL FRONTAL.................................................................................... 3
BOTONES DEL PANEL TRASERO................................................................................... 4
CONTROL REMOTO......................................................................................................... 5
INSTALLATION.................................................................................................................. 7
Conectar antena RF y TV Cable................................................................................. 7
Conectar a DVD/ Set Top Box .................................................................................... 7
Conectar al Sistema de Estéreo Externo para Escuchar el Sonido de LCD TV ......... 9
Conectar al Audífono .................................................................................................. 9
Conectar a un Ordenador ......................................................................................... 10
Conectar al Dispositivo A/V con entrada SPDIF ....................................................... 10
Conectar con el cable de alimentación......................................................................11
Operación Básica ............................................................................................................ 12
Encender el LCD TV................................................................................................. 12
ENCENDIDO/APAGADO.......................................................................................... 12
Configuración Inicial ................................................................................................. 12
Seleccionar fuente de entrada.................................................................................. 13
Ajustar Volumen........................................................................................................ 14
Selección de Modo Sonido ....................................................................................... 14
Selección de Modo Imagen ...................................................................................... 14
INFO......................................................................................................................... 14
Guía de Programa Electrónico (EPG)....................................................................... 14
Selección de Canal................................................................................................... 14
Configuración de Cronómetro de Dormir .................................................................. 15
Zoom ........................................................................................................................ 15
Wide ......................................................................................................................... 15
Congelar Imagen ...................................................................................................... 15
Usar la función OSD................................................................................................. 15
OPERACIÓN AVANZADA—MENÚ OSD......................................................................... 16
Menú Vídeo .............................................................................................................. 16
Menú Audio
MENÚ TV ................................................................................................................. 18
Menú Configuración.................................................................................................. 19
Menú Parental .......................................................................................................... 21
ESPECIFICACIÓN TÉCNICA.......................................................................................... 26
PRECAUCIONES DE SEGURIDAD................................................................................ 27
CUIDADO Y MANTENIMIENTO...................................................................................... 28
SOLUCIÓN DE PROBLEMA ........................................................................................... 28
............................................................................................................... 17
Español

ACCESORIOS
Gracias por comprar este LCD-TV.
El paquete del LCD-TV contiene:
LCD TV
Guía de Usuario
Control remoto
Pila AAA x 2
Cable de alimentación
Cable RCA A/V
Español
1

INSTRUCCIÓN DE MONTAJE DE PARED
Preparar a Instalar El Brazo de Montaje de Pared Opcional (no incluído)
Se puede colocar este TV a un brazo de montaje de pared que puede comprar por separado.
APAGUE y desconecte los cables del TV antes de realizar el siguiente procedimiento.
1. Coloque la TV hacia abajo en un paño suave o cojín y sobre una mesa.
2. Quite los 4 tornillos que conectan a la base del estante al TV.
3. Quite la base del estante.
Adherir El Brazo de Montaje de Pared Opcional (no provisto)
Siga estos pasos para terminar de instalar el brazo de montaje de pared:
1. Coloque el brazo en el dorso del TV. Alinee los hoyos del brazo con los hoyos en el dorso del
monitor.
2. Inserte los 6 tornillos en los hoyos y aprietelos.
3. Reconecte los cables. Refiera al manual de usuario que vino con el brazo de montaje de pared
opcional por las instrucciones sobre la colocación.
NOTA
Kit de montaje con tornillos M6, paso de rosca 1,0 mm de orificios profundos (n=6) de 200 x
200 mm VESA, no incluido.
Debido a las preocupaciones de seguridad, si el kit de montaje VESA fue adquirido por
separado, asegurese de que el kit está en UL-Listed, y reemplazado solamente por el personal
de servicio.
Español
2

BOTONES DEL PANEL FRONTAL
Bajar Volumen
Subir Volumen
Español
Encender/Apagar Pantalla (OSD)
Canal Anterior
Canal Posterior
Ingresar
Interruptor
Receptor de Control Remoto
❾ Indicador LED
Manufacturado bajo licencia de los Dolby Laboratories.
Dolby y el símbolo doble D son marcas comerciales de
los Dolby Laboratories.
(Solo para la fuente DTV en este modelo.)
Nota:
1. Pulse los botones
interruptor, y pulse los botones
desbloquearlo.
2. Pulse los botones
OSD, pulse los botones
y
VOL+
y
VOL-
VOL- y VOL+
MENU
VOL+
simultáneamente para bloquear el
VOL+
simultáneamente para bloquear el menú
y
MENU
otra vez para desbloquearlo.
otra vez para
3

BOTONES DEL PANEL TRASERO
A B C D E F G H I J K L M N O P Q R
A Alimentación (entrada AC)
B Servicio (Terminal del USB)
C Terminal de Entrada HDMI 1
D Terminal de Entrada HDMI 2
E Entrada de señal VGA
F Entrada de señal YPbPr 2
G Entrada de señal YPbPr 1
H Entrada S-Video
I Entrada de Cable/Aire TV
J Entrada de Vídeo Compuesto
K Entrada de Audio de señal HDMI 1 (izq/der)
L Entrada de Audio de señal YPbPr 2 (izq/der)
M Entrada de Audio de señal YPbPr 1 (izq/der)
N Entrada de Audio de señal AV/ S-Video (izq/der)
Español
O Salida de Audio
P Entrada de Audio VGA/ HDMI 2
Q Salida Óptica SPDIF
R Clavija de Audífonos
4

CONTROL REMOTO
Español
5

Función de los botones en el control remoto:
1 ENC/APG (POWER) Encendido/Apagado
2 MTS Seleccione sonido Mono, Estéreo o SAP
3 INFO Muestra la información actual
4 SONIDO (SOUND) Selecciona modos de sonido
5 DORMIR (SLEEP) Configura el cronómetro de Dormir TV
6 CONGELAR (FREEZE) “Congela” la pantalla actual
7 ZOOM Ajusta el tamaño de ventana
8 Botón numérico 0~9, 100/- Selección de canal directa
9 VOL+ y VOL- Sube/Baja el volumen
10 GUÍA (GUIDE) Muestra la guía del programa electrónico (EPG)
11 FAV.A/D Para saltar o restituir los Canales Favoritos
12 ARRIBA/ABAJO/
IZQUIERDA/ DERECHA/
INGRESAR (ENTER)
13 ENTRADA (INPUT) Selecciona la fuente de entrada
14 MUDO (MUTE) Enc/Apg el Mudo
15 TV/CATV
16 IMAGEN (PICTURE)
17 ANCHO (WIDE) Cambia el tamaño de imagen
18 VOLVER (RETURN) Vuelve al canal anterior
19 CH▲ y CH▼ Avanza/Retrocede el canal
20 C.FAV. Selecciona de los Canales Favoritos preconfigurados
21 MENÚ ENC/APG del menú Muestra En Pantalla (OSD)
ARRIBA/ABAJO para seleccionar la función OSD y
IZQUIERDA/DERECHA para ajustar la función
INGRESAR: ingresa la configuración de la función
Cambia entre TV/CATV.
Selecciona modos de imagen
Español
6

INSTALLATION
Conectar antena RF y TV Cable
Asegúre de DESCONECTAR la alimentación antes de instalar su LCD TV.
1) TV AIRE: Conecte el LCD TV a la antena TV con el cable coaxial 75-ohm. Preconfigure los
canales de TV por aire en la memoria con la función Exploración Automática al usar un
sistema de TV por antena. Esta clavija de entrada de aire soporta sistemas TV y DTV. Aparte,
se puede encontrar el sistema TV (NTSC) y el sistema DTV (ATSC) con escanear “AIR” en la
función Exploración Automática. Vea la pg. 18.
2) TV Cable: Conecte el LCD TV al cable con el cable CATV y Digital. Preconfigure los canales
del TV cable en la memoria con la función Exploración Automática al usar un sistema de TV
cable. La clavija de entrada de cable soporta sistemas de cable CATV y Digital. Aparte, se
puede encontrar el sistema CATV (TV cable) y el sistema cable Digital (QAM limpio) con
escanear “Cable” en la función Exploración Automática. Vea la pg. 18.
Cable RF o Adaptador
(no provisto)
Español
Conectar a DVD/ Set Top Box
Conecte los cables Vídeo/ Audio de los dispositivos compatibles en el panel trasero del LCD TV.
1) Con cable RCA A/V:
Cable RCA A/V
Reproductor VCD o DVD
7

2) Con cable S-Video:
A
A
3) Con cable YPbPr:
Cable S-Video (no incluído)
udio en Cable
(no incluído)
Reproductor VCD o DVD
Cable YPbPr (no incluído)
udio en Cable
(no incluído)
4) Con cable HDMI:
Reproductor VCD o DVD
Reproductor VCD o DVD
(el reproductor DVD debe
llevar el terminal de salida
HDMI)
Cable HDMI (no provisto)
Español
8

5) Con cable HDMI-DVI:
A
A
)
udio en Cable (no incluído)
Reproductor VCD o DVD
(el reproductor DVD
debe llevar el terminal de
salida DVI
Cable HDMI-DVI (no provisto)
Conectar al Sistema de Estéreo Externo para Escuchar el Sonido de LCD TV
Conecte el terminal de salida de audio del LCD TV al terminal de Audio In del siste ma de estéreo
(el sistema vendido por separado).
Audio en Cable
(no incluído)
Sistema de estereo
Español
Conectar al Audífono
Conecte el audífono al terminal de salida de audífono del LCD TV. (Audífono vendido por
separado).
udífono
(no provisto)
9

Conectar a un Ordenador
(
)
1) Con cable VGA:
Conecte el cable VGA de la salida VGA del ordenador a la entrada del terminal VGA del LCD
TV. También, conecte el Cable de Entrada de Audio (verde) de la salida de audio de su
ordenador al terminal de entrada de audio (verde) del LCD TV.
PC
Conexión de audio de PC
(no provisto)
Cable VGA 15 Pin
not supplied
2) Con cable HDMI-DVI:
Conectar el cable HDMI-DVI de salida DVI del ordenador a la entrada de terminal HDMI 2 del
LCD TV. También, conecte el Cable de Entrada de Audio (verde) de la salida de audio de su
ordenador al terminal de entrada de audio (verde) del LCD TV.
PC
Conexión de audio de PC
(no provisto)
Español
Cable HDMI-DVI (no provisto)
Conectar al Dispositivo A/V con entrada SPDIF
Conecte el cable óptico SPDIF del dispositivo A/V en el conector de salida SPDIF del LCD TV.
Cable Audio
(no incluído)
Dispositivo A/V
Cable óptico SPDIF
(no incluído)
10
Sistema de estereo

Conectar con el cable de alimentación
Conecte el cable de alimentación al receptáculo AC en el dorso del LCD TV, después de
completar todas las instalaciones, conecte el otro extremo del cable en un receptáculo eléctrico
de tierra.
Receptáculo de
pared AC
Cable de alimentación
Español
11

Operación Básica
Para operar su LCD TV, puede usar el control remoto de TV o los botones del panel superior para
seleccionar la fuente de entrada, cambiar canales, o ajustar volumen.
Encender el LCD TV
Antes de usar el LCD TV:
1. Conecte bien al equipo externo.
2. Inserte el enchufe, y el indicador LED se encenderá en rojo.
ENCENDIDO/APAGADO
Para encender/apagar el LCD TV:
Pulse el botón POWER debajo del LCD TV, o pulse el botón POWER con su control remoto para
encender/apagar el TV. El indicador LED se torna azul cuando el LCD TV está encendido.
Configuración Inicial
Cuando este TV está encendido inicialmente, las configuraciones básicas proceden
automáticamente y después:
1. Oprima el botón POWER en el control
remoto. Se mostrará la ventana mago
Configuración inicial. Oprima ENTER para
iniciar el mago.
2. Oprima ▲ o ▼ para seleccionar su idioma,
y oprima ► para continuar el siguiente
paso. Para volver a la página anterior,
oprima ◄.
3. Seleccione el modo de muestra de *Casa o
Minorista, después oprima ► para
continuar.
*Para el uso de casa normal, le sugerimos
seleccionar “Casa” para ahorrar energía. Sin
embargo, si prefiere mejor brillo, seleccione
“Minorista”.
Español
12

4. Seleccione su modo sintonizador de Aire o
Cable, y oprima ► para continuar. Conecte
el cable y/o antena, y seleccione Búsqueda
o Saltar búsqueda con ▲ o ▼, después
oprima ► para continuar. Si selecciona
Saltar búsqueda en este paso, aún puede
realizar el escan de canal en Menú.
5. El escan de canal ahora empieza. Para
interrumpirlo, oprima MENU en cualquier
momento.
Español
6. Después de completar el Configuración
inicial, oprima ENTER para salir del mago.
Seleccionar fuente de entrada
Para seleccionar la fuente de entrada requerida:
Pulse el botón INPUT en el control remoto, Use ▲▼ para
seleccionar la fuente de entrada deseada entre TV, AV, S-Video,
YPbPr 1, YPbPr 2, VGA, HDMI 1, y HDMI 2.
Para confirmar la selección, pulse ENTER.
13

Ajustar Volumen
Pulse VOL+/- para ajustar el volumen.
Para apagar el volumen, pulse MUTE.
Si desea restaurar el volumen, pulse MUTE otra vez, o pulse VOL+/- directamente.
Selección de Modo Sonido
Repetidamente oprima la tecla SOUND para seleccionar el modo de sonido entre Des (Desactiva),
Concierto, Salón, Sala, Baño, Cueva, Ruedo, o Iglesia.
Selección de Modo Imagen
Repetidamente oprima la tecla PICTURE para seleccionar el modo de imagen entre Usuario, Cine,
Deporte, Intenso, y Brillo H.
INFO
Para mostrar la información actual del LCD TV:
Pulse INFO, y el estado actual se mostrará en la pantalla. (Muestra todas o algunas informaciones
de la Entrada, Canal, Resolución, Tipo de Audio, etc., depende de en qué fuente de entrada se
encuentra.)
Guía de Programa Electrónico (EPG)
Oprima el botón GUIDE en el control remoto y la información de programa para que el canal que
está viendo se muestre en la pantalla. Oprima el botón ◄ o ► para desplazar arriba o abajo en
los canales. Cada vez que pausa en un canal, la lista de programa actualizará el horario de
programa para ese canal. Oprima el botón GUIDE para salir de esta característica.
Selección de Canal
Pulse los botones numéricos o CH ▲/▼ para seleccionar los canales deseados.
1. En modo ATV
El botón “-” no tiene función en el modo ATV. Oprima directamente en los botones numéricos
para seleccionar canales.
2. En modo DTV
Use el botón “-” para seleccionar el subcanal en DTV.
Español
14

Pulse 8 → Pulse 0 → Pulse “-” → Pulse 3.
• Sea en ATV o DTV, después de ingresar los números de canal, oprima el botón ENTER
para ir directamente al canal, o aguarde 3 segundos para cambiar automáticamente.
• Para volver al canal anterior, pulse el botón RETURN.
※ ¿Cómo cambiar entre TV Aire y TV Cable?
En el modo TV, oprima el botón TV/CATV para cambiar, o ir al Modo Sintonizador en el menú
TV para seleccionar.
Configuración de Cronómetro de Dormir
Repetitivamente pulse el botón SLEEP para configurar el cronómetro de apagado. Se usa la
función para apagar automáticamente el LCD TV después de expirar el tiempo preconfigurado.
Hay varios tiempos para escoger–Des (Desactiva), 15 Minutos, 30 Minutos, 45 Minutos, 60
Minutos, 90 Minutos, o 120 Minutos.
Zoom
Pulse el botón ZOOM repeatitivamente para seleccionar el tamaño de pantalla. Puede seleccionar
de Zumbido1, Zumbido2, y Zumbido3.
Wide
Pulse el botón WIDE repetidamente para seleccionar la proporción de aspecto de la pantalla.
Puede seleccionar entre Sin escala, Normal, Completo, Buzón, Zoom, y Panorámico.
Congelar Imagen
Pulse el botón FREEZE para congelar la imagen. Sin embargo, el sonido continua. Pulse el botón
FREEZE otra vez para restaurar.
Usar la función OSD
Español
Puede usar los menús y opciones OSD para ajustar las configuraciones con el control remoto.
La operación básica es:
Pulse MENU para mostrar el Menú OSD.
Oprima ▲▼ para seleccionar su Menú más deseado, y oprima ENTER o ► para entrar el menú
de siguiente nivel.
Use ▲▼ para seleccionar el control que desea ajustar.
Al seleccionar el control con II►, Pulse ENTER para activar la función.
Pulse◄► para ajustar las configuraciones.
Pulse MENU para salir del menú OSD.
15

OPERACIÓN AVANZADA—MENÚ OSD
Menú Vídeo
—Ajustar la calidad de imagen
En fuente TV, AV, S-Video, YPbPr 1, YPbPr 2, HDMI 1, HDMI 2:
(En la fuente AV, S-Video, YPbPr o HDMI, la opción TV en la izquierda no aparece.)
En fuente VGA:
Modo de imagen: Para seleccionar el modo de imagen entre Usuario, Cine, Deporte, Intenso,
y Brillo H.
Reducción de Ruido: Para reducir el nivel de impureza del equipo conectado. Seleccione de
Bajo, Mediano, Fuerte, o Des.
Brillo: Ajusta la luminancia de vídeo. (der:Máx, izq: Mín.)
Contraste: Ajusta el contraste de vídeo. (der:Máx, izq: Mín.)
Color: Ajusta el color. (der: color brillante, izq: color pálido.)
Tinte: Ajusta el nivel de tinte. (der: tono verdoso, izq: tono rojizo.)
Nitidez: Ajusta la nitidez de imagen. (der: más nítido, izq: más suave.)
Luz de fondo: Para iluminar u oscurecer la luz de fondo. La Luz de fondo se puede
solamente ajustar cuando el Modo de Muestra en el Menú Configur está configurado en
Usuario.
Temperatura de color: Oprima ENTER para seleccionar la temperatura de color de Usuario,
Fría, Media, y Cálida. (Cuando la Temperatura de color está seleccionada en Usuario, el nivel
de R, V, A puede ajustarse separadamente.)
Español
16

Ajustar automáticamente: Pulse ENTER para ajustar la posición horizontal, posición vertical,
afinar y Tamaño H de la imagen.
VGA: Oprima ENTER para ajustar la configuración de VGA.
Posición H.: Ajusta la posición horizontal de la imagen.
Posición V.: Ajusta la posición vertical de la imagen.
Fase: Para ajustar el tiempo de demora de fase para reducir las impurezas de la imagen.
Reloj: Para ajustar el tiempo de demora de reloj para reducir las impurezas de la imagen.
Español
Menú Audio
—
Para configurar la calidad y el estado de audio
En fuente TV:
17

En fuente AV, S-Video, YPbPr 1, YPbPr 2, HDMI 1, HDMI 2, VGA:
Balance: Ajusta el balance de audio izquierdo y derecho.
Graves: Ajusta el bajo.
Agudos: Ajusta el típle.
Sonido Surround: Para disfrutar el efecto de sala de concierto, seleccione “Act” cuando se
repro duce el estéreo.
Retumbar: Para disfrutar el efecto de sonido eco de Des, Concierto, Salón, Sala, Baño,
Cueva, Ruedo, o Iglesia.
Ecualizador: Para seleccionar los modos de ecualizador de Des, Rock, Pop, Vivo, Dance,
Tecno, Clásica, Suave.
SPDIF Type: Para seleccionar Tipo de SPDIF de Dolby Digital, PCM, o Des (Apagado).
Ctrl volumen auto.: Para Act (Encender) o Des (Apagar) el control Auto Volume. (Solamente
funciona en la fuente TV.)
Audio Solamente: Para apagar la imagen de pantalla pero mantener el sonido.
MENÚ TV
—Configuración para TV
Solamente activo en la fuente TV.
Modo sintonizador: Para seleccionar Cable o Aire como la fuente de TV. Seleccione “Cable”
si desea ver los canales de Cable TV, y seleccione Air para ver los canales de Air TV.
Exploración Automática: Oprima ENTER para empezar autoescanear los canales Air y
Cable TV. Oprima MENU otra vez en cualquier momento para interrumpir el scan.
Saltar canal: Oprima ENTER para saltar el canal. Para restaurar el canal, oprima ENTER otra
vez.
Español
18

MTS: Para seleccionar el modo que dispone el audio.
Lenguaje del Audio: Para seleccionar el idioma de audio disponible.
Menú Configuración
—Para configurar la ventana OSD
En fuente TV, AV, S-Video, YPbPr 1, YPbPr 2, HDMI 1, HDMI 2:
(En la fuente AV, S-Video, YPbPr o HDMI, la opción TV en la izquierda no aparece.)
Español
En fuente VGA:
OSD Language: Para seleccionar el idioma del OSD de Inglés, Francés o Español.
Proporción de Aspecto: Para seleccionar el tamaño de imagen entre No Scale (Sin escala),
Normal, Full (Completo), Buzón, y Panorámico, Zoom. La función Proporción de Aspecto no
soporta PC Timings (Cronometrajes de PC).
Silencio azul: Para configurar el color de fondo en azul donde no hay señal.
19

Configuración de hora: Para seleccionar las Zona Horaria, Hora, Tiempo suspensión,
Descanso auto., y Ahorra de Luz de Día.
Zona Horaria: Para seleccionar la zona de hora adecuada para su ubicación. Oprima ▲ o
▼ para seleccionar “Zona de Hora”, y seleccione la zona de hora de su área con ◄ o ►.
Hora: Para regular la hora actual. Oprima ▲ o ▼ para seleccionar “Hora”, y oprima
ENTER para ingresar en la configuración.
‧ Sincr. automática: Cuando se activa “Sincr. automática”, la fecha y la hora se
sincronizarán automáticamente según el contenido de programa. Seleccione “Des” si
desea ajustar la fecha y hora manualmente, y mueva el cursor hacia abajo para ajustar
con las teclas numéricas.
‧ Programador: Para configurar la hora de encendido y apagado. Oprima ◄ o ► en
Programador y seleccione “Act”.
Y mueva el cursor hacia abajo para configurar la hora incial y final del cronómetro.
Seleccione “Des” si desea cancelar la función de cronómetro.
Tiempo suspensión: Para configurar el temporizador en apagado de 15~120 minutos.
Descanso auto.: Para apagar el TV que no se opera en el momento -- 1 hora, 2 horas, o
5 horas.
Ahorra de Luz de Día: Para encender/apagar la hora veraniega.
Subtítulos: Para configurar las opciones de subtítulo.
Español
Subtítulos Análogos: Para configurar las opciones de subtítulo analógico básico.
(CC1~CC4, TEXTO1~TEXTO4, Des)
20

Subtítulos Digitales: Para seleccionar los formatos de señal de subtítulo y configurar los
modos de subtítulo para los canales de TV digital. (Servicio1~6, Des)
Estilo de Subtítulos: Use ◄► para seleccionar Estilo de Subtítulos de “Como
Presentador” o ”Personalizado”. Al seleccionar “Personalizado”, use ▲▼ para seleccionar
los controles deseados, ◄► para ajustar las configuraciones detalladas.
‧ Tamaño de Fuente: Para seleccionar un tamaño de letra de Grande, Pequeña o
Mediana.
‧ Color de la Fuente: Para seleccionar un color de Negro, Blanco, Verde, Azul, Rojo,
Azul Verde, Amarillo, o Magenta.
‧ Opacidad de la Fuente: Para seleccionar la opacidad de letra de Sólido o
Transparente.
‧ Color de Fondo: Para seleccionar el color de fondo.
‧ Opacidad del Fondo: Para seleccionar la opacidad de fondo.
‧ Color de Ventana: Para seleccionar el color de ventana.
‧ Opacidad de la Ventana: Para seleccionar la opacidad de ventana.
DCR: Para encender/apagar la función DCR (Dynamic Contrast Ratio / Proporción de
Contraste Dinámico).
Modo de Muestra: Para seleccionar el modo de muestra de Casa, Minorista, o Usuario.
Nota: Para el uso de casa normal, sugerimos seleccionar “Casa” para ahorrar la electricidad. Sin
embargo, si prefiere mejor brillo, seleccione “Minorista”. Cuando se selecciona “Usuario”, puede ajustar
Español
el nivel de luz de fondo Ud. mismo.
Rest. predeterm.: Para restituir las configuraciones de fábrica, oprima ENTER, y seleccione
“Aceptar” para confirmar.
Menú Parental
—Para configurar las opciones de Control de Supervisor
Está activo en todas las fuentes de entrada.
(En la fuente
izquierda no aparece.)
AV, S-Video, YPbPr 1, YPbPr 2, HDMI 1, HDMI 2
, o VGA, la opción TV en la
Ingrese la contraseña y la pantalla abajo aparecerá. (la contraseña preconfigurada es 0000.)
21

Bloqueo de canal: Para bloquear los canales. Use ▲▼ para seleccionar el canal que desea
bloquear, y oprima ENTER para bloquear o desbloquearlo. Esta función solamente está
habilitada en la fuente TV.
Bloqueo de programas: Para configurar las Clasificaciones de TV y Película.
Español
Rating Enable: Escoja “Act” (Encendido) para activar las sigtes. configuraciones.
Clasif. TV en EEUU: Para ajustar el nivel de bloqueo de TV en los EE.UU. Pu ede
seleccionar entre TV-Y, TV-Y7, TV-G, TV-PG, TV-14, o TV-MA.
22

La Clasificación de TV en los EE.UU. son.
TV-Y Todos los niños TV-PG Se requiere guía de padres
TV-Y7 Para niños más grandes: este
programa está diseñado para
niños mayores de 7 años
TV-G Toda la audiencia TV-MA Solo para la audiencia madura
Use el botón ENTER para personalizar las clasificaciones, y use MENU para salir.
Clas. películas EEUU: Para ajustar el nivel de bloqueo de películas en los EE.UU. Puede
seleccionar entre G, PG, PG-13, R, NC-17, o X.
Las Clasificaciones de película en los EE.UU son.
G Toda la audiencia R Restringido
PG Se requiere guía de padres NC-17 Para mayores de 17 años
TV-14 Se les advierte a los padres: este
programa contiene algunos materials
no apropiados para niños menores de
14 años
PG-13 Se les advierte a los padres X Solo para la audiencia madura
Use el botón ENTER para personalizar las clasificaciones, y use MENU para salir.
Clasif. ingl. Canadá: Para ajustar el nivel de bloqueo en la región de habla inglesa de
Canadá. Puede seleccionar entre C, C8+, G, PG, 14+, 18+.
Español
La definición de las Clasificaciones de Inglés Canadiense es cuanto sigue.
C Niños PG Guía de padres
C8+ Niños de 8 años y mayores 14+ Audiencia de 14 años o mayores
G Programación general, apta para
toda la audiencia
Use el botón ENTER para personalizar las clasificaciones, y use MENU para salir.
18+ Programa para Adultos
23

Clasif. fran. Canadá: Para ajustar el nivel de bloqueo en la región de habla francesa de
Canadá. Puede seleccionar entre G, 8 ans+, 13 ans+, 16 ans+, 18 ans+.
La definición de las Clasificaciones de Francés Canadiense es cuanto sigue.
G General 16 and+ Esta emisión no se apta para
personas menores de 16 años
8 and+ General-No recomendado para
niños pequeños
13 and+ Esta emisión no se apta para
niños menores de 13 años
Use el botón ENTER para personalizar las clasificaciones, y use MENU para salir.
Open V-Chip: Para ajustar el nivel de bloqueo de TV para los programas de DTV.
18 and+ Esta emisión es reservada para los
adultos
Oprima ENTER, y oprima ENTER otra vez en U.S. (EE.UU) (50 Estados + Territorios).
Oprima ▲ o ▼ para seleccionar el ítem de bloqueo, y oprima ENTER.
Oprima ENTER para personalizar la clasificación, y oprima MENU para salir.
Bloquear no clasificados: Para bloquear la película no clasificada o programas de TV.
Español
24

Bloquear entrada: Para configurar la fuente de entrada a ser bloqueada. Los usuarios no
podrán ver el contenido proveniente de la fuente de entrada bloqueada.
Use el botón ENTER para bloquear la fuente de entrada, y oprima ENTER otra vez para
desbloquear.
Cambiar Contraseña: Para cambiar la contraseña, oprima ENTER, y aparece la siguentes
pantalla.
Ingrese la nueva contraseña del control remoto, después ingrese la nueva contraseña otra vez
Español
para confirmar.
Nota: No olvide su nueva contraseña después de cambiarla, porque no puede volver a llamar
la configuración preconfigurada de la contraseña con otras selecciones.
Limpiar todo: Para borrar todos los bloqueos configurados anteriormente, oprima ENTER,
después seleccione “Aceptar” para confirmar.
25

ESPECIFICACIÓN TÉCNICA
LCD
Señal de entrada
Audio 1 mini-estéreo, 4 pares de estéreo RCA (I/D)
Compatibilidad PC Jusqu’à 1360 x 768 Non-entrelacé
Resolución Recomendada
Salida de
Altoparlantes
Salida de Audio
Alimentación Voltaje 100-240 VAC, 50/60 Hz (autocambio)
Área de muestra Scan Entero
Condiciones de
operación
Condición de
almacenaje
Dimensiones Física 800,0mm (A) x 631,6mm (A) x 210,0mm (P)
Peso Neto 16,6 kg (36,5 Ib)
Regulaciones UL, FCC-B (Doc-B), Energy Star
Tipo 31,5” TFT Matriz Activa
0,17025(H) x 0,51075(V) mm pixel de tono
Filtro de Color Línea vertical de RGB
Supervicie de
Vídrio
RGB RGB analógico (0,7/1,0 Vp-p, 75 ohms)
RF Antena de sistema TV / NTSC + ATSC
Vídeo 1 RCA compuesto, 1 S-Video, 2 componente YPbPr,
y soportada
10W x 2 @THD≤10%
Temperatura 32°F a + 104°F (0°C a + 40°C)
Humedad 20% a 65% (sin condensación)
Altitud A 6,562 pies (2,000 m)
Temperatura -4°F a + 140°F (-20°C a + 60°C)
Humedad 10% a 90% (sin condensación)
Altitud A 40,000 pies (12,000 m)
Encendido < 180 W (LED azul) Consumo de Energía
Apagado Activo < 1 W (LED rojo) @115Vac
Antireflejo
Sincronización separada,
fh: 30-82 kHz, fv:55-76 Hz
2 HDMI
1360 x 768 @ 60 Hz
1280 x 1024 @ 60 Hz
1280 x 960 @ 60 Hz
1024 x 768 @ 60, 75 Hz
800 x 600 @ 60, 72, 75 Hz
640 x 480 @ 60, 72, 75 Hz
1 clavija estéreo RCA (I/D), 1 SPDIF (óptico),
1 clavija de audífono
697,6845mm (H) x 392,256mm (V)
27,5” (H) x 15,4” (V)
31,5’’ (A) x 24,9’’ (A) x 8,3’’ (P)
Español
Modo de Tiempo Preconfigurado (Preajustado en GTF® 1360 x 768 @ 60 Hz)
Advertencia: no configure la tarjeta de gráficas en su ordenador para exceder los índices; puede dejar la
pantalla LCD con daños permanentes.
Nota: Las Especificaciones de Producto son sujeto a cambio sin aviso.
26

PRECAUCIONES DE SEGURIDAD
Este LCD TV es fabricado y testado basado en el principio de que la seguridad está en
primer lugar. Sin embargo, el uso o instalación incorrecta puede resultar en peligro para el
LCD TV bien como para el usuario. Lea cuidadosamente los siguientes AVISOS antes de
instalar y mantener este manual disponible.
Avisos
Esto LCD TV debe ser operado sólo con las fuentes de alimentación correctas indicadas en
la etiqueta colgada en la extremidad trasera del LCD TV. Si no sabe cual es la fuente de
alimentación compatible de su casa,
aparato
No intente reparar el LCD TV usted mismo, una vez que no hay ninguna parte reparable por
el usuario dentro del aparato.
No quita la caja del LCD TV. Hay partes con voltaje elevada dentro que puede causar choque
eléctrico en el cuerpo humano, mismo cuando el cable de alimentación este desconectado.
Interrumpa el uso del LCD TV si la caja esté dañada. Consulte un técnico para obtener
reparo.
Coloque su LCD TV solo en un local limpio y seco. Desconecte el LCD TV inmediatamente si
entrar en contacto con humedad y consulte un técnico.
Desconecte siempre el LCD TV antes de limpiarlo. Limpie la caja con un pañuelo seco y
Español
limpio. Aplique limpiador sin amonio en el pañuelo, no directamente en la pantalla de vidrio.
Mantenga el LCD TV distante de objetos magnéticos, motores, aparato de TV y
transformadores.
Proteja el cable de alimentación y no deje en el camino o que sea pellizcado en los enchufes
Para CONECTAR EQUIPO CON CABLE, la tomada de pared debe ser instalada próximo del
equipo y fácilmente accesible.
o compañía eléctrica.
suelen acudir al establecimiento donde se compró el
.
27

CUIDADO Y MANTENIMIENTO
Cuidado
Evite la exposición de su LCD TV directamente a luz solar u otra fuente de calor.
Coloque su LCD TV fuera del alcance de la luz solar para reducir la iluminación.
Coloque su LCD TV en un área bien ventilada. No coloque ninguno objeto pesado en la parte
superior de su LCD TV.
Certifique que su LCD TV sea instalado en un área limpia y sin humedad.
Mantenga el LCD TV distante de magneto, motores, transformadores, altavoces y aparato de
television.
Sugestión de seguridad
Si humo, ruido anormal u olor salir de su LCD TV, retire con el cable de alimentación
inmediatamente y llame la asistencia técnica.
CUIDADO - nunca retire la tapa trasera de la caja de su LCD TV. La unidad de exhibición
contiene parte con voltaje elevada y puede causar choque eléctrico al cuerpo humano.
No haga la reparación de su LCD TV sin soporte técnico. Llame el centro de servicio o un
técnico cualificado para fijarlo.
SOLUCIÓN DE PROBLEMA
No alimentación
Verifique si el cable de alimentación A/C está conectado correctamente en el adaptador de
alimentación y el cable de alimentación este firmemente conectado a la TV.
Conecte el aparato eléctrico en la tomada de pared para verificar si la tomada está
proveyendo el voltaje correcto.
Alimentación prendida pero no despliega la imagen de pantalla
Verifique si e cable de vídeo proveído con la TV está seguro fuertemente a la puerta de salida
de vídeo en la parte de tras de la fuente de vídeo (DVD, VCR…). lo contrario, apretarlo
fuertemente.
Ajuste el brillo.
Verifique si todos los cables de señal están instalados.
Colores erradas o anormales
Si cualquieres colores (roja, verde, azul) están desaparecidas, verifique si el cable de vídeo
para certificarse de que esta conectado fuertemente. Sueltar o romper los pinos en el conector
del cable puede hacer una conexión inadecuada.
Conecte la unidad de TV a otra fuente de vídeo o use otro aparato de TV para verificar que la
fuente de vídeo no tiene ninguno problema.
Español
28
 Loading...