

Page 1
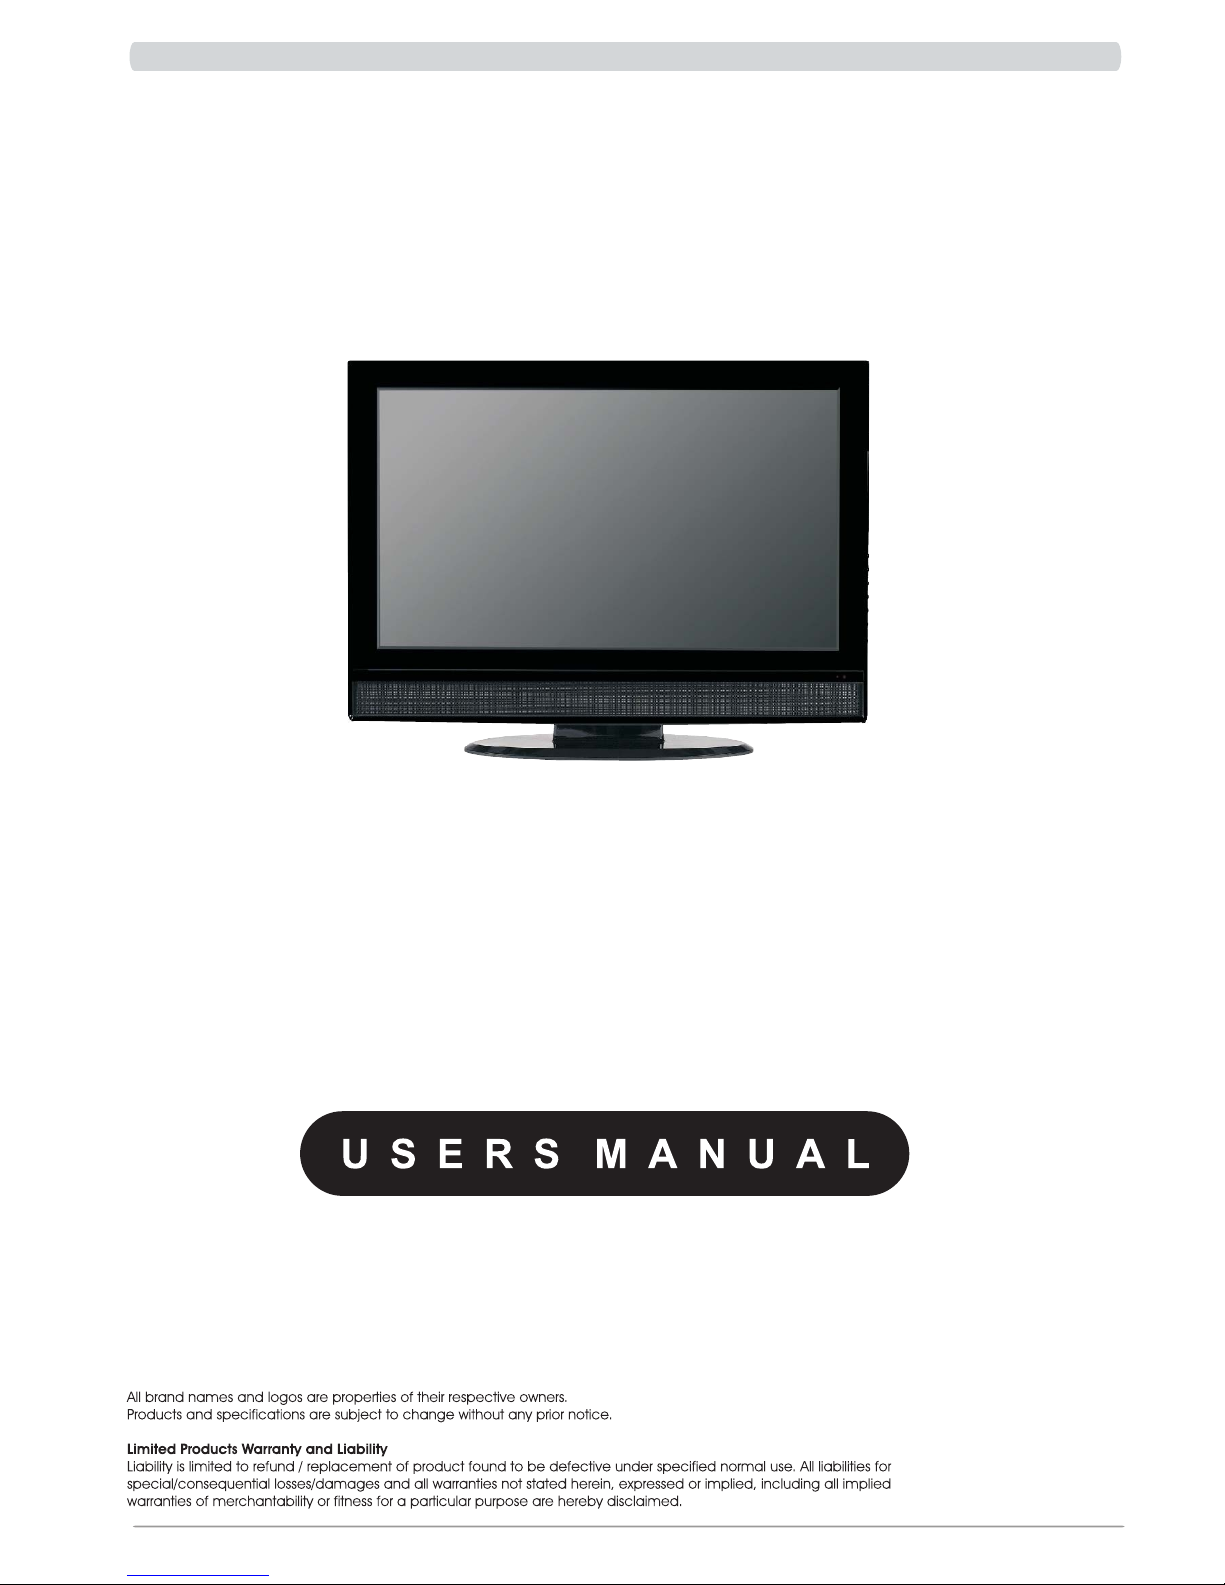
26” Wide Screen
TFT-LCD Monitor
Model : EQ266
EQ 266 User ’s manual
Page 2
FCC
This equipment has been tested and found to comply with limits for Class B digital device
pursuant to Part 15 of Federal Communications Commission (FCC) rules.
CE
This equipment has been tested and found to comply with the limits of the European Council
Directive on the approximation of the law of the member states relating to electromagnetic
compatibility (89/336/EEC) according to EN55022 Class B.
FCC and CE Compliance Statement
These limits are designed to provide reasonable protection against frequency interference
in residential installation. This equipment generates, uses and can radiate radio frequency
energy, and if not installed or used in accordance with the instructions, may cause harmful
interference to radio communication. However, there is no guarantee that interference will
not occur in television reception, which can be determined by turning the equipment off and
on. The user is encouraged to try and correct the interference by one or more of the
following measures:
* Reorient or relocate the receiving antenna
* Increase the separation between the equipment and the receiver
* Connect the equipment into an outlet on a circuit different from that to which the receiver
is connected to .
Caution!
The federal Communications Commission warns the user that changes or
modifications to the unit not expressly approved by the party responsible for compliance
could void the user’s authority to operate the equipment.
EQ 266 User ’s manual
1
Page 3
2
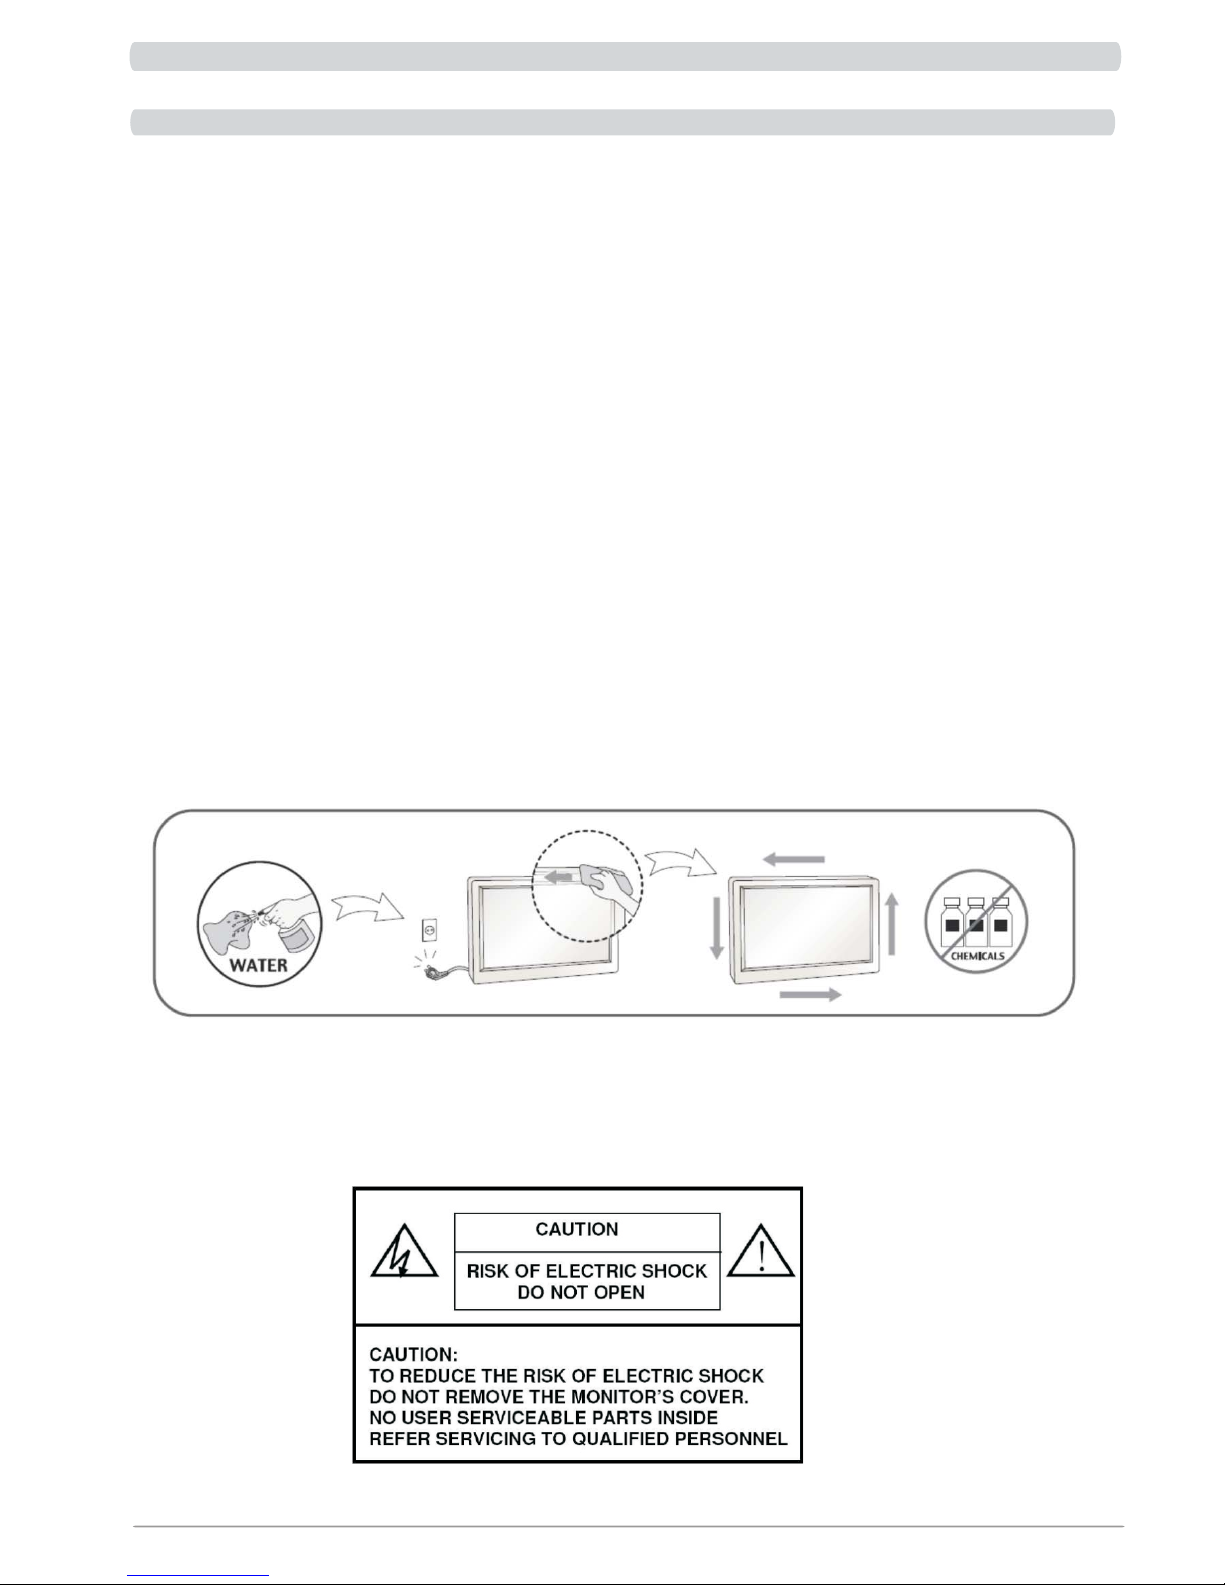
Precaution
Read all of these instructions and save this manual for later use.
Follow all warnings and instructions on the product.
1. Do not cover or block the ventilation holes in the case.
2. Do not insert sharp objects or spill liquid into the LCD monitor through the cabinet slots;
this may cause accidental fire, electric shock or failure.
3. Unplug the unit when not in use for an extended period of time.
4. Do not attempt to service this product yourself, as opening or removing the cover may
expose you to potential electric shock. Only a qualified technician should service this
product.
5. Do not touch the screen directly with your fingers as it may damage the screen ; the oil
from your skin is difficult to remove.
6. Do not apply pressure to the screen, the LCD is very delicate.
7. Keep the monitor away from extreme heat, cold or humid places.
8. Do not place directly under sunlight, dusty surroundings or near equipment, which may
generate strong magnetic fields.
9. Please keep at least 2 seconds between each time turn ON/OFF the monitor.
EQ 266 User ’s manual
Page 4
3
EQ 266 User ’s manual
Introduction
Product Description
Thank you for choosing the Flat Panel TFT-LCD Color Monitor. It combines the features
of a MONITOR with a THIN FILM TRANSISTOR Liquid crystal display ( TFT-LCD).
This new generation of TFT-LCD incorporates a high quality display in lightweight module.
※ Unlike CRT displays, the LCD panel has a fixed pixel format over a set area.
So, for best performance the “native resolution” setting is recommended.
For wide LCD monitor:
The native resolution of the LCD panel is 1920 x 1200
Recommended resolution is 1920 x 1200 @ 60Hz
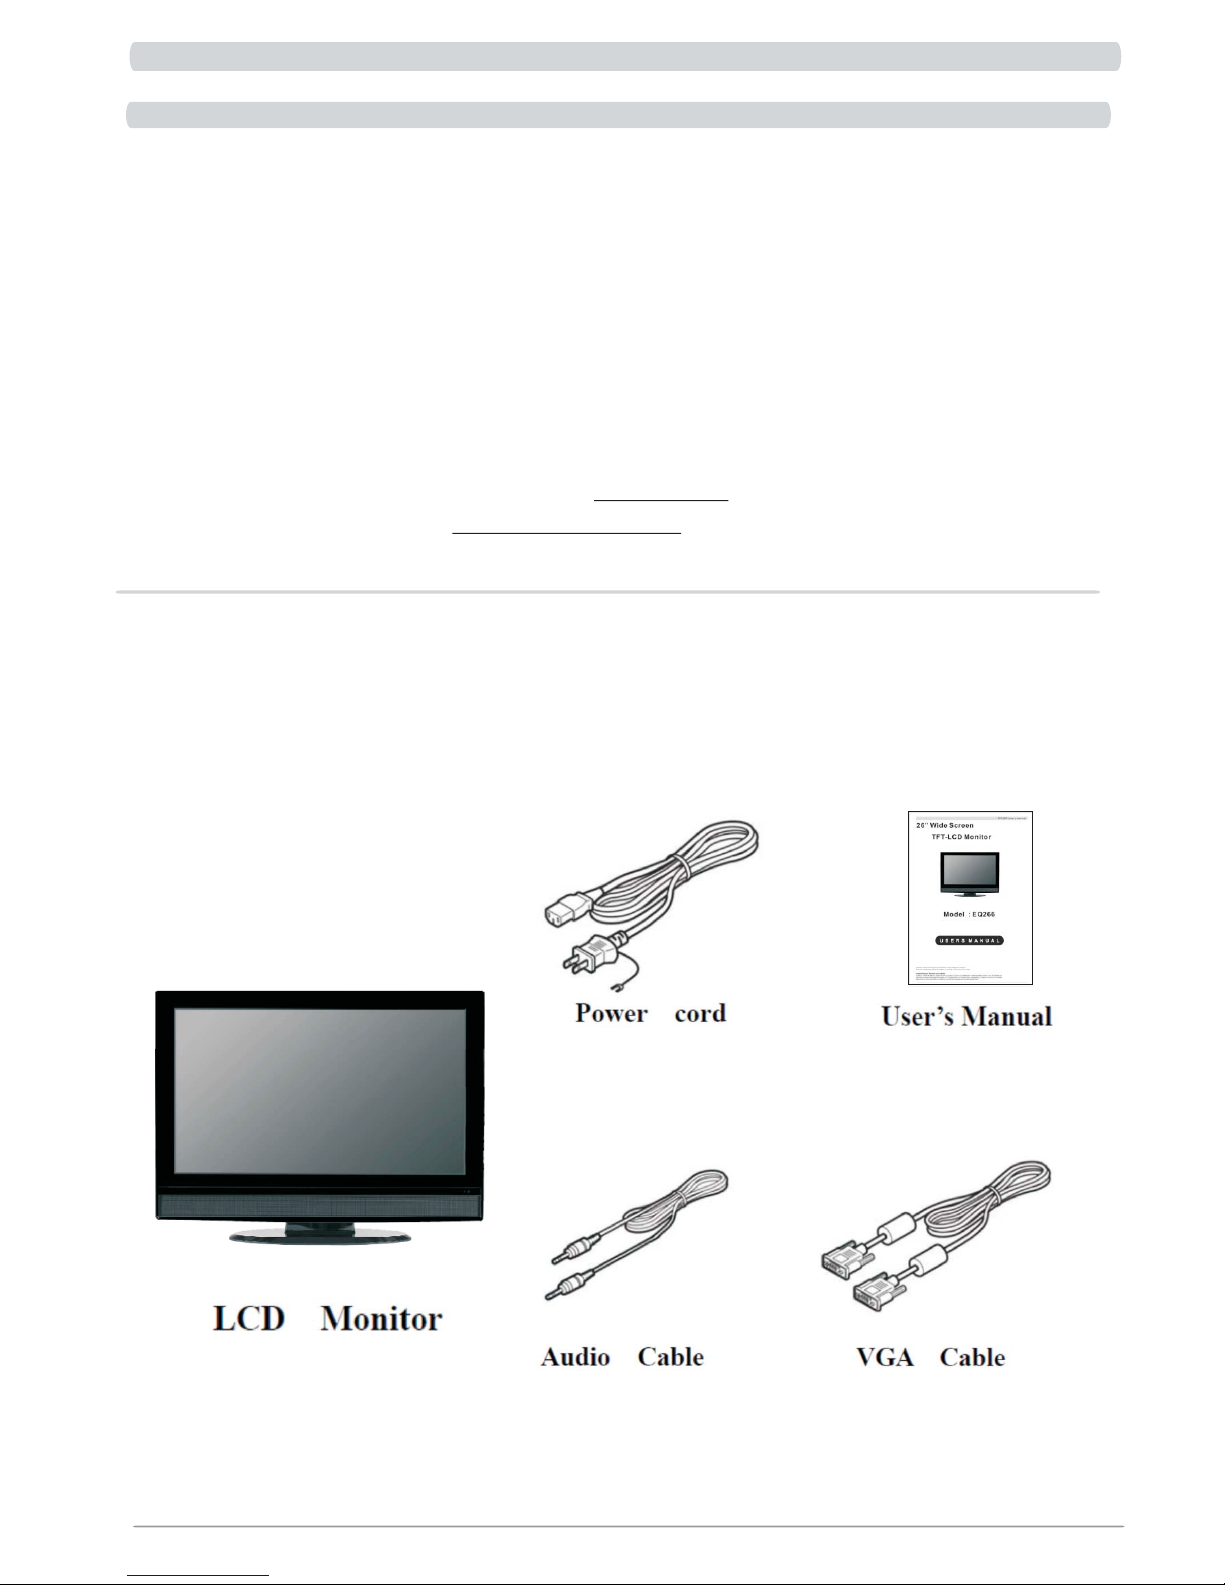
Package Contents
Please check the TFT-LCD Monitor Package to make sure it contains the following items :
Page 5
EQ 266 User ’s manual
Before setting up the monitor, ensure that the power to
the monitor, the computer system, and other attached devices
is turned off.
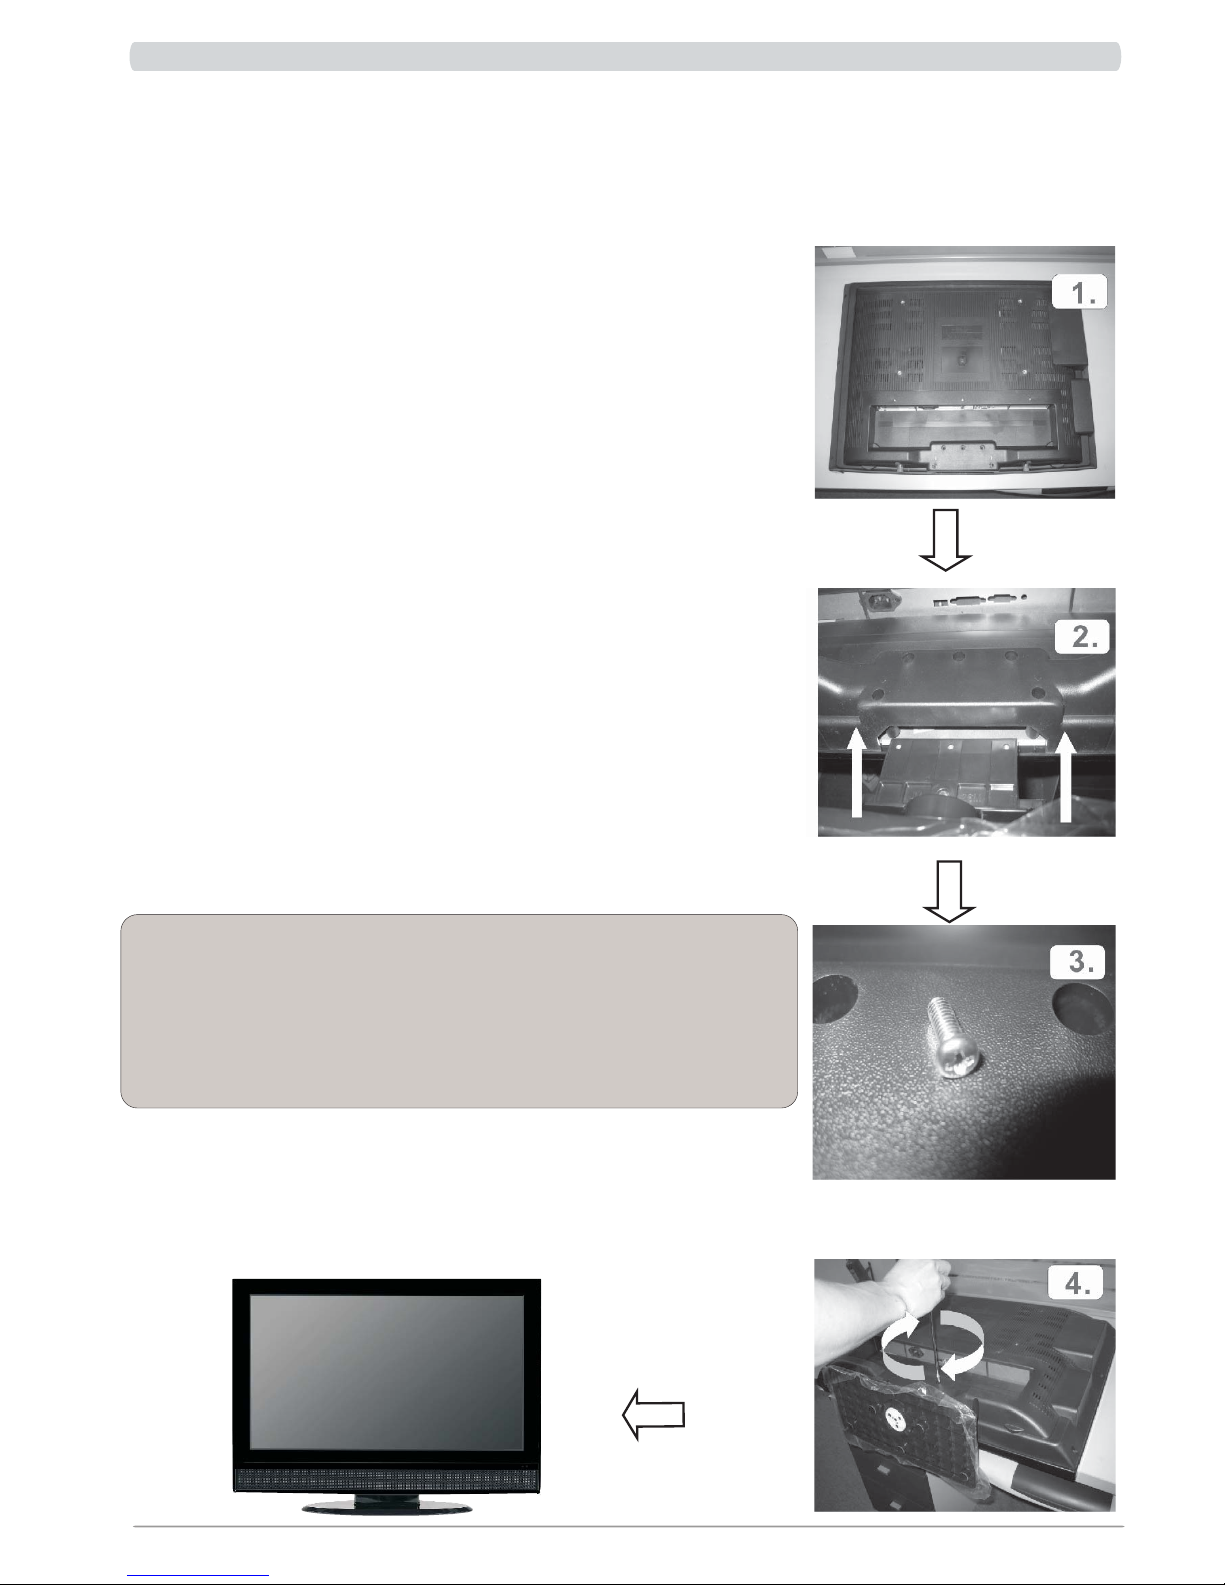
Connecting the stand
1. Place the monitor with its front facing
downward ona soft cloth.
2. Check the direction of the Stand and
connect it into the LCD Monitor.
4. Use the screwdriver fix the screw between
the stand and monitor.
3. Take the screw and put them in
screw aperture.
5. Once assembled take the monitor up carefully
and face the front side.
Important
* This ill ustration depicts the general model of connection.
Your monit or may dif fer from theit ems shown in the pic ture.
* Do not carry the product upside down holding only the stand base.
The product may fall andget damaged or injure your foot.
4
Page 6
EQ 266 User ’s manual
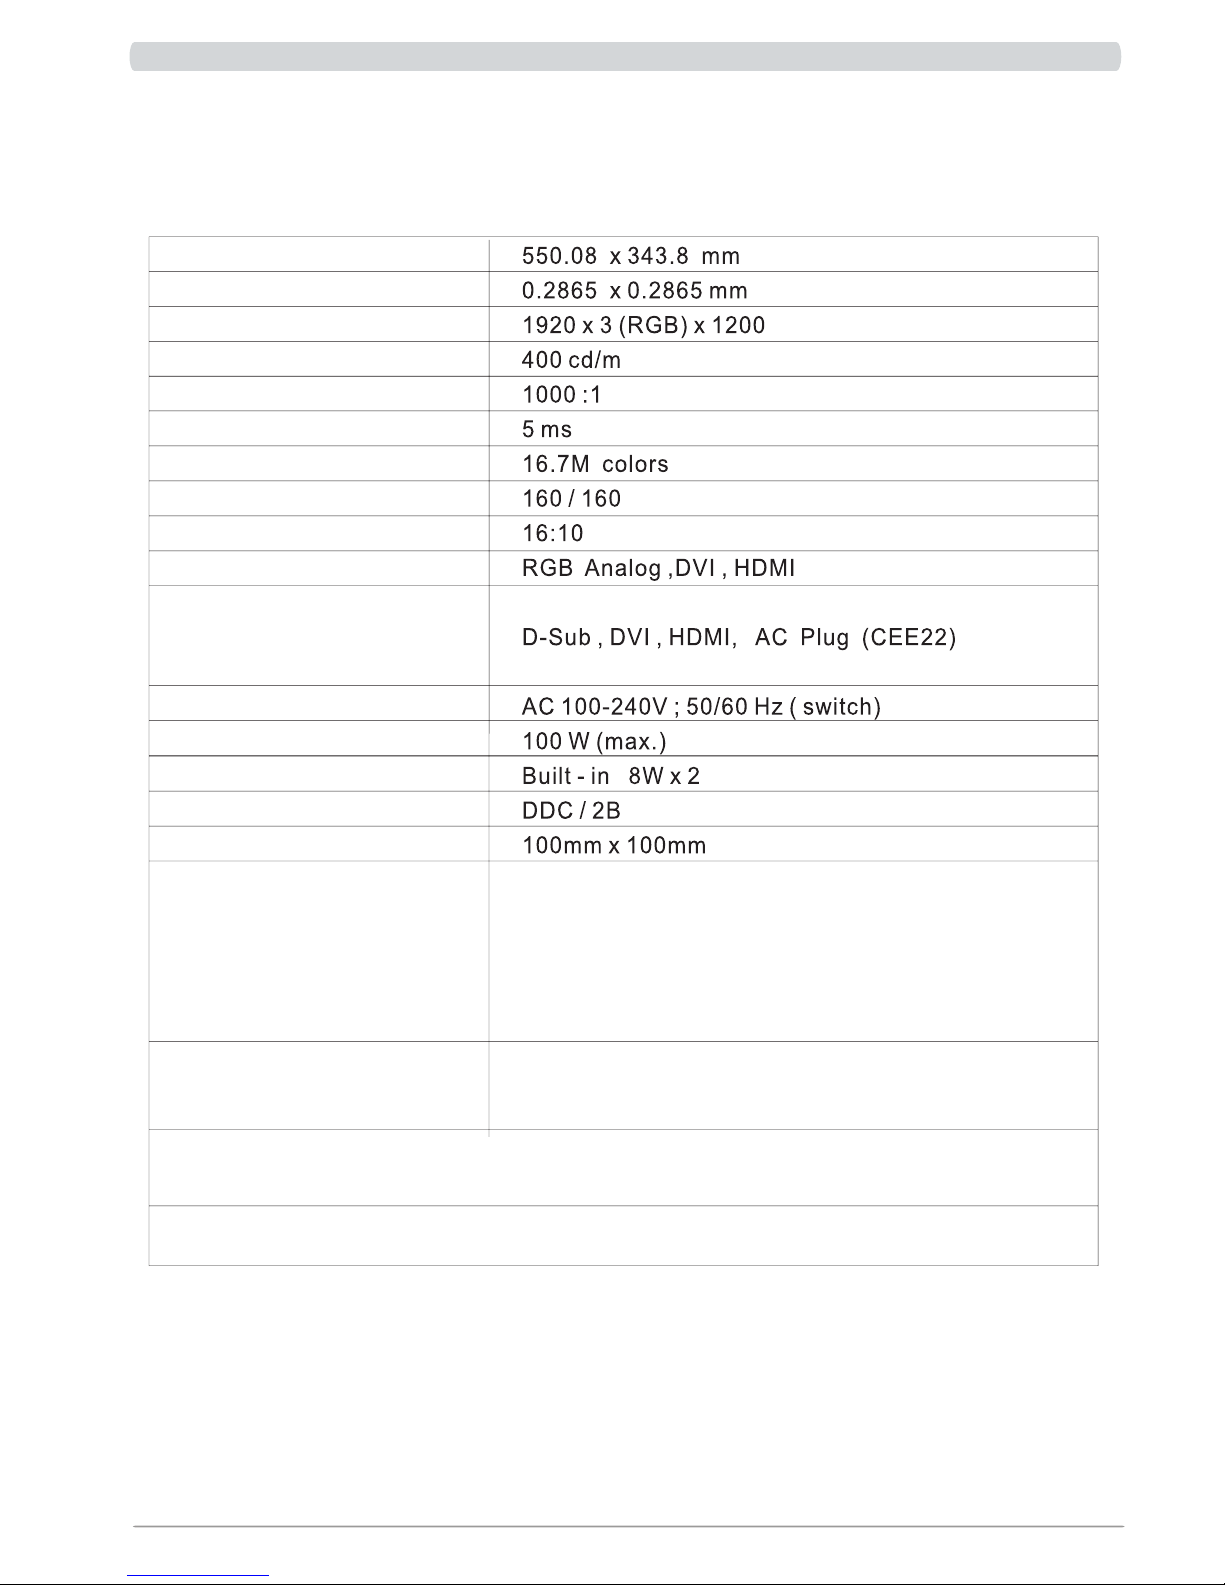
Specification:
Display Area
Pixel Patch
Resolution (Max.)
Brightness
Contrast Ratio
Response Time
Color Support
View Angle(H/V)
Aspect Ratio
Input Signal
Connector
Power Input
Power Consumption
Speaker
Plug & Play
VESA Mount
2
o
o
Controls Basic
OSD
Operate Conditions
Weight Net
Gloss
Certificate
Menu , Left , Right , Auto , Power
Brightness, Contrast, Color
Adjust , Sharpness, Phase ,Colck ,
H/V Position , Auto Color ,
Auto adjust , OSD Timer ,
OSD H/V Positon , Language .
Temperature 0 C ~ 40 C
Humidity 20% -90%
7.5 Kgs
8.5 Kgs
CE , FCC
o
o
5
Page 7
EQ 266 User ’s manual
6
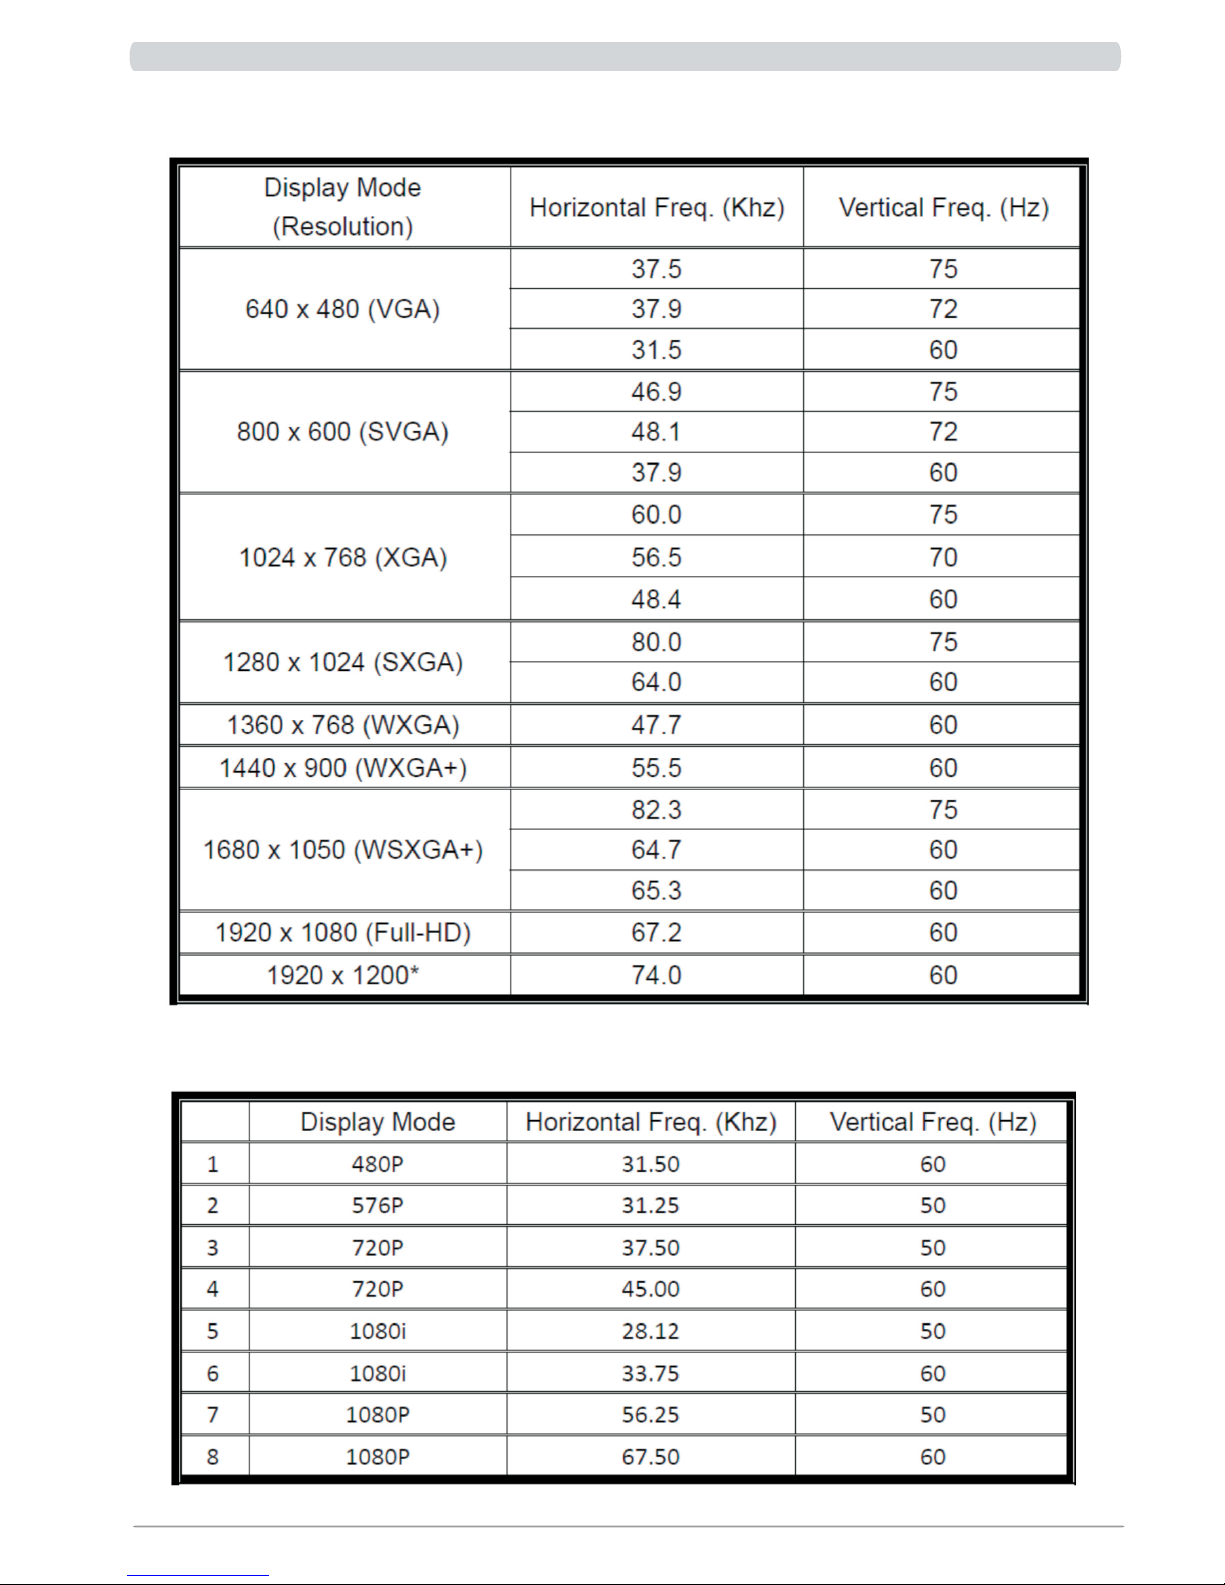
Preset Modes (Resolution) - D-sub(Analog) / DVI(Digital) INPUT
HDMI Vedio INPUT
Page 8
EQ 266 User ’s manual
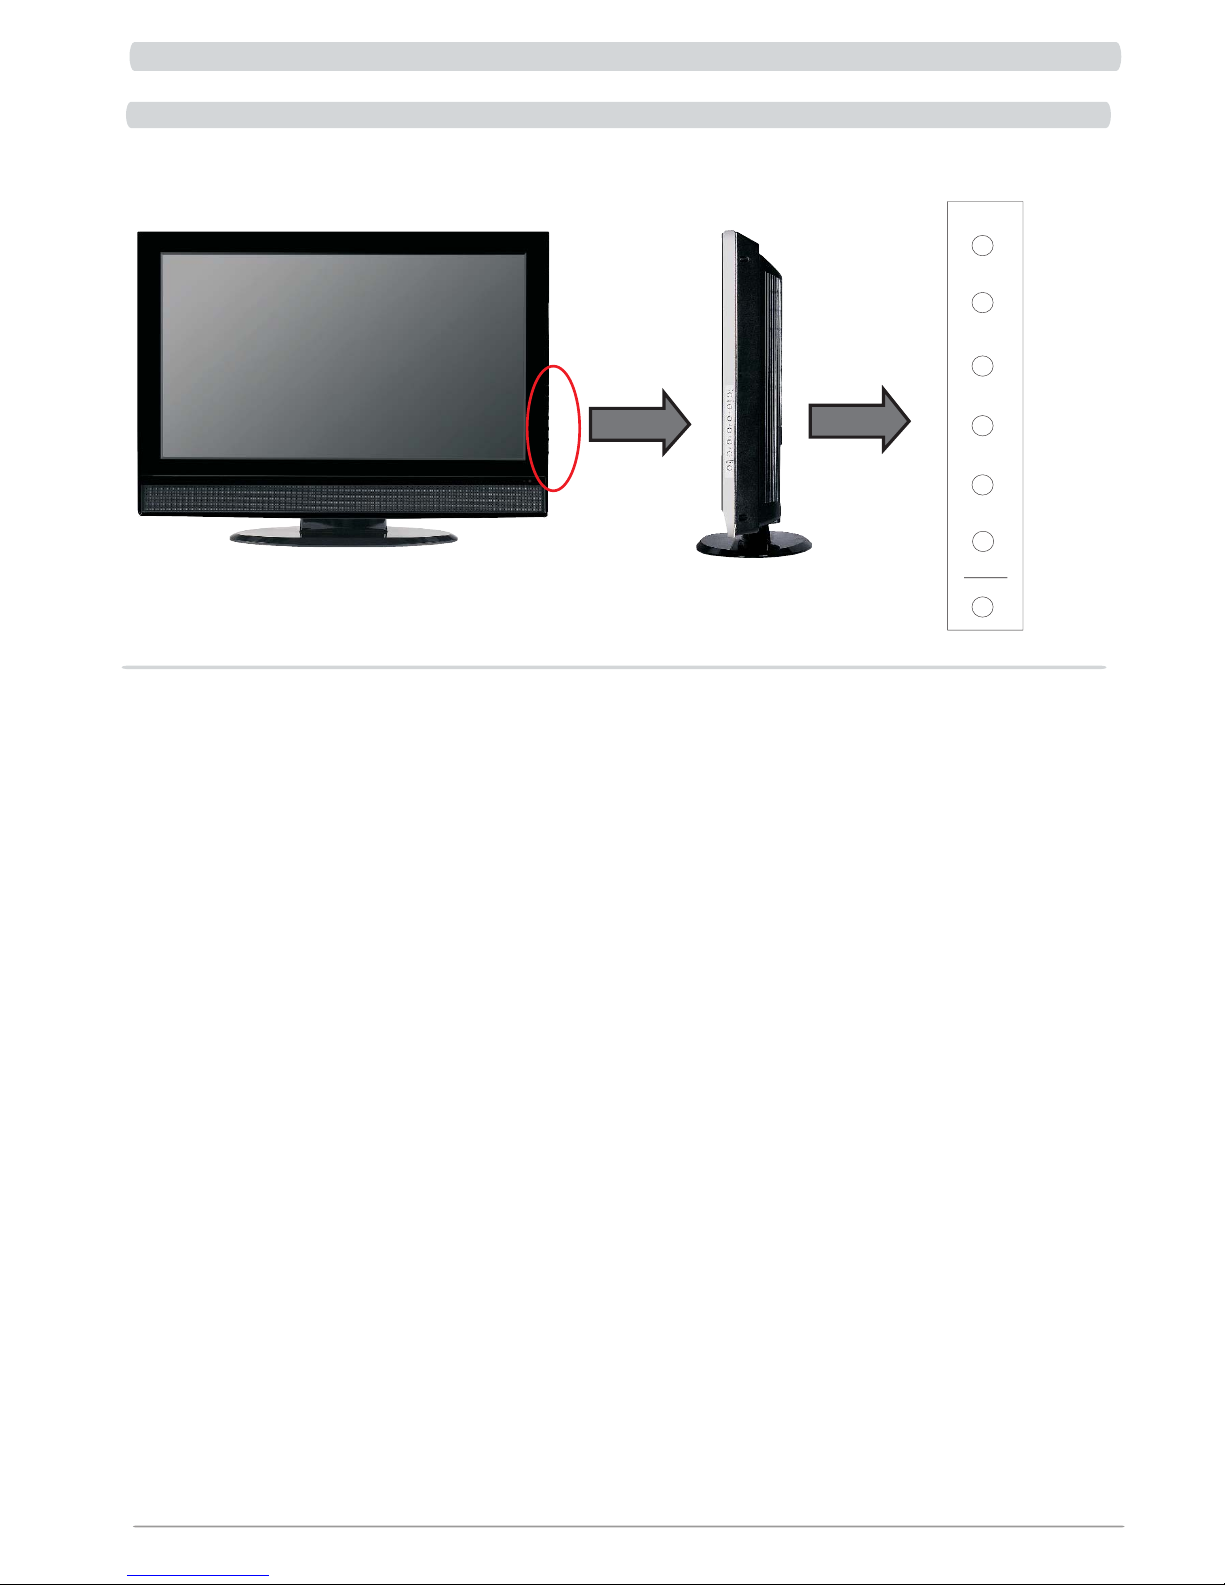
Menu Control Buttons
STANDBY
VOL+
VOL-
CH+
CH-
AV/TV
MENU
Menu : Select command function
Decreases Volume value.
Increase Volume value.
Standby : Power on/off control.
AV/TV : Select Input Signal (VGA , DVI or HDMI)
CH- : Contrast Express Key
CH+ : Brightness Express Key
VOL- :
VOL+ :
LED : Power On : Blue Light
Power Saving or No Signal : Red Light.
7
Page 9
EQ 266 User ’s manual
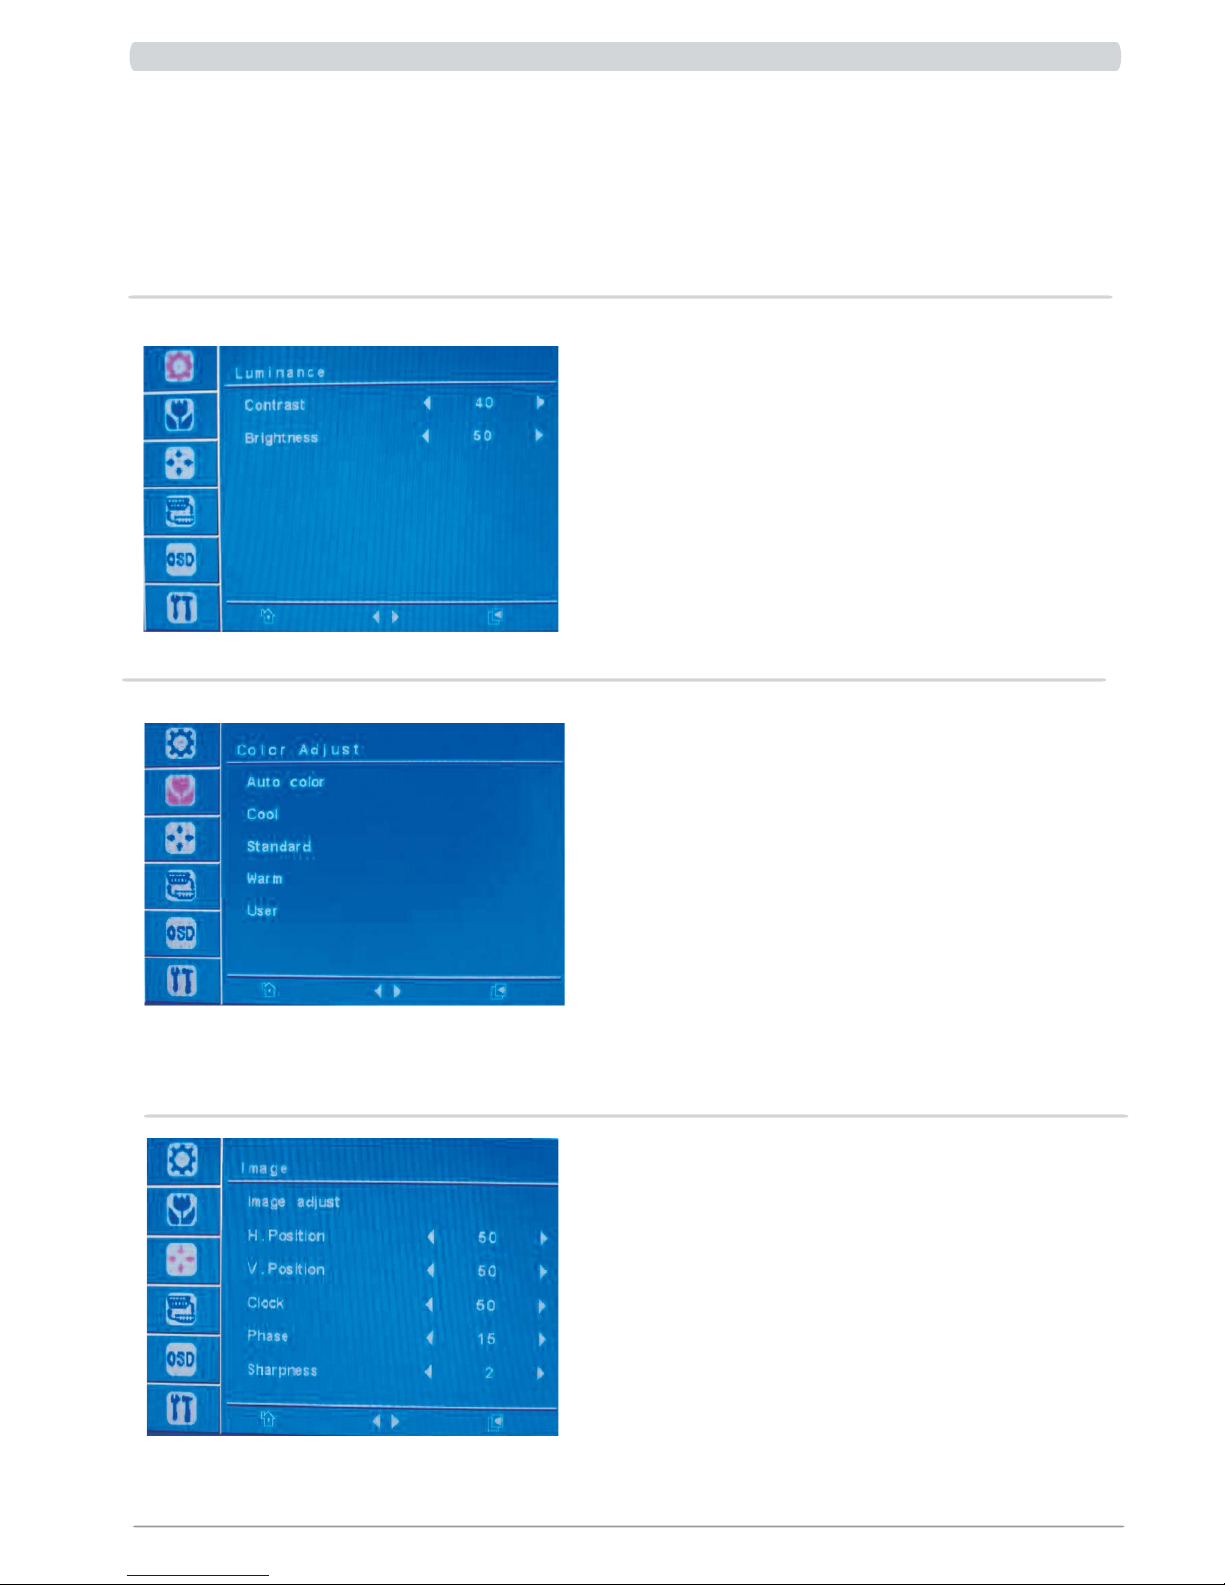
On Screen Display(OSD) Selection and Adjustment
You were introduced to the procedure of selecting and adjusting an itemusing
the OSD system. Listed below are the icons, icon names, and icondescriptions
of the all items shown on the Menu.Touch the MENU Button, then the main menu
of the OSD appears.
Brightness
To adjust the brightness of the screen.
Contrast
To adjust the contrast of the screen.
Auto Color
To Auto adjust the color of the screen.
Cool
This option changes the screen to be cool tone.
Standard
This option changes the screen to be standard tone.
Warm
This option changes the screen to be Warm tone.
User
This option changes the screen by user’s requirement . ( Red , Green , Blue setup)
Image adjust
To Auto adjust Image of the screen.
H. Position
To adjust Image H. Position of the screen.
V. Position
To adjust Image V. Position of the screen.
Clock
To adjust Image Clock of the screen.
Phase
To adjust Image phase of the screen.
Sarpness
To adjust Image Sharpness of the screen.
8
Page 10
EQ 266 User ’s manual
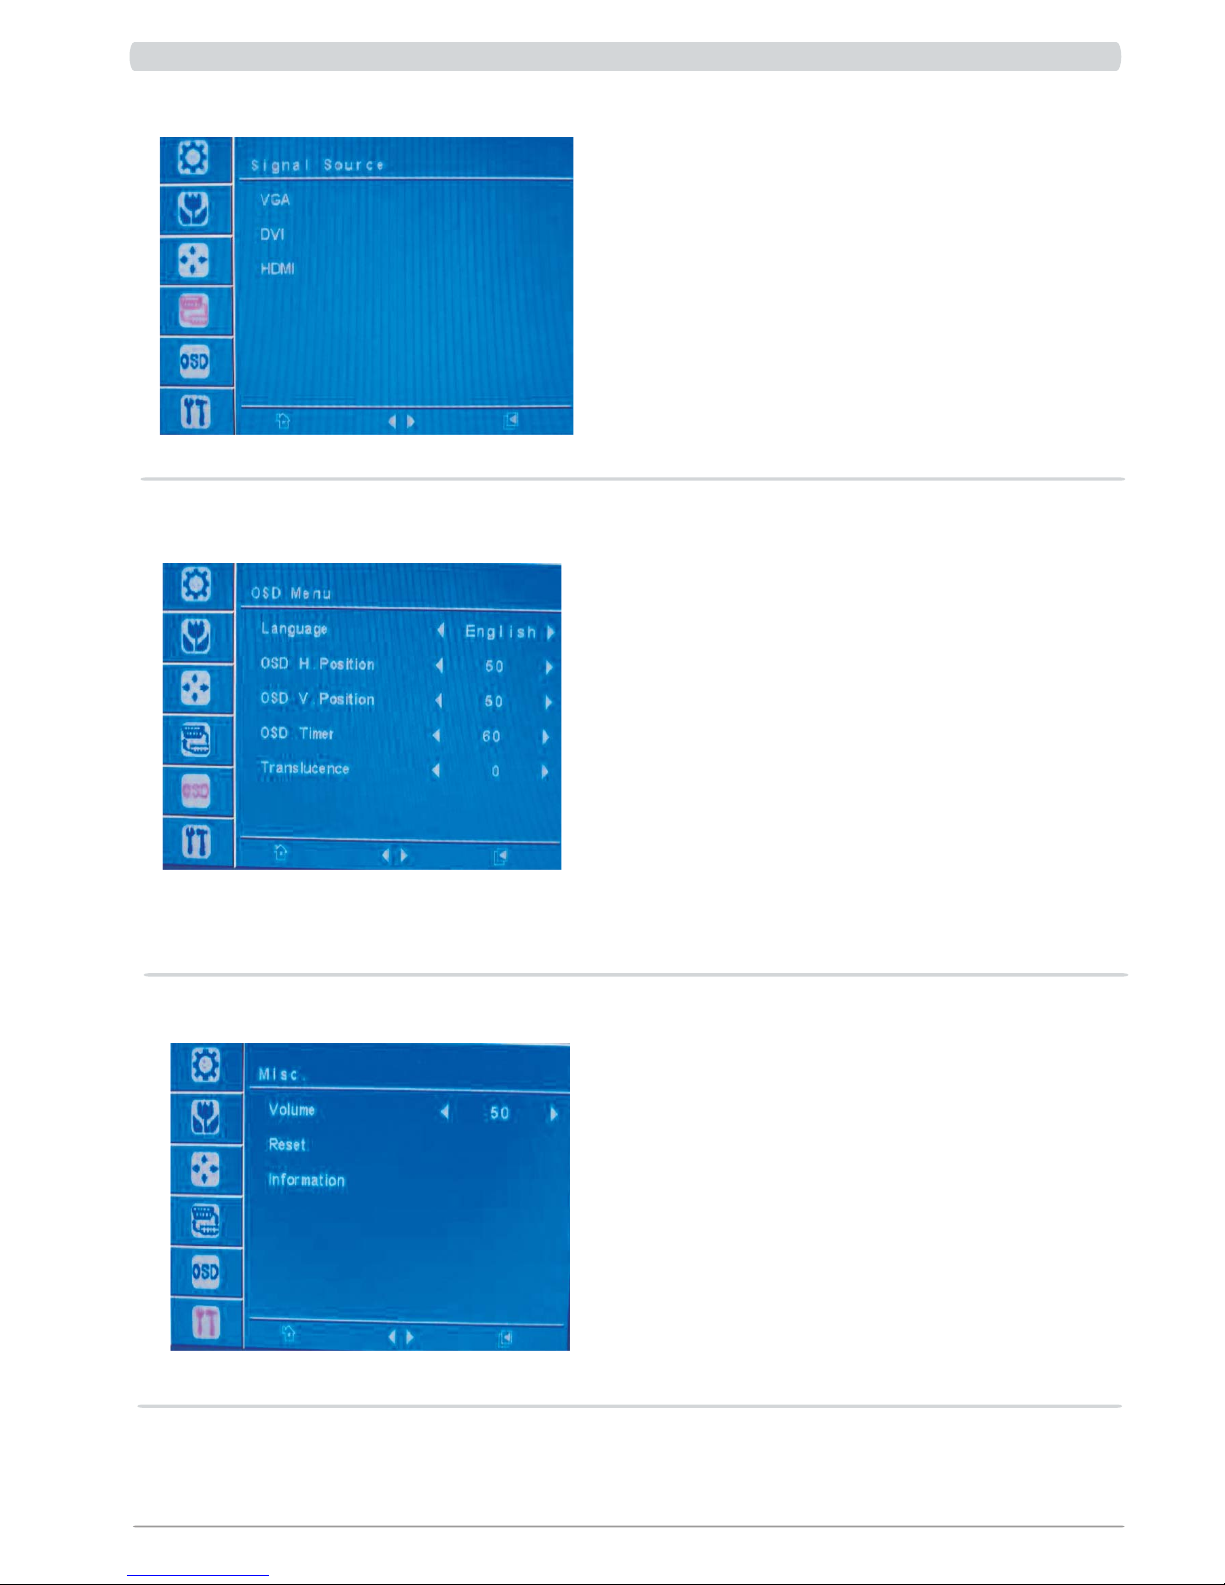
Signal Source
To select the input signal .
VGA Signal input— Analog signal
DVI Signal input — Digital signal
HDMI Signal input — Digital signal
Language
To select the OSD language.
OSD H.Position
To adjust the OSD Menu H.Position.
OSD V.Position
To adjust the OSD Menu V.Position.
OSD Timer
To adjust the OSD Menu show time.
Translucence
To adjust the OSD Menu translucence.
Volume
To adjust the sound volume .
Reset
Restore all factory default settings excep
※ Normally , for VGA analog signal input , after “ AUTO” can get the
optimal image performance. No necessary to manual adjust.
9
Page 11

EQ 266 User ’s manual
Trouble Shooting
※ LCD Pixel Statement
The LCD unit is produced with high-precision manufacturing techniques.
Nevertheless, some pixels may occasionally misfire or appear as black or colored dots.
This has no effect on the recorded image and does not constitute a malfunction.
Normally, a Wide LCD (1920 x 1200) display has nearly 3 million sub-pixels.
According to the inspection specifications of under 5 is acceptable.
** There is no picture on the screen.
A. Please check the color of the LED indicator on the LCD Monitor.
1. “Blue” : During normal operation the LED light will be green .
If it is green and there is no picture contact the customer service line.
2. “ORANGE” : Please check the connection of the VGA cable to the monitor and the
connection to the computer.
3. “NO Power” : Make sure the power cord is securely connected to the adapter
and the light on the adapter is green.
**Missing Colors
A: If any of the red , green , or blue colors are missing, check the signal cable to
make sure it is tightened correctly. The pins in the cable can be loose and cause
a bad connection.
**No image
A: 1. Make sure power button is ON.
2. Check whether the LCD monitor and computer power cords are connected and
whether there is a supply of power.
**No Signal Input
A: Check the signal connection between the computer and LCD Monitor.
**Image too bright / Image too dark
A: Adjust brightness and contrast by OSD.
**Irregular image
A: 1. Check the signal connection between the computer and LCD Monitor.
2. Perform Auto adjust.
10
Page 12

EQ 266 User ’s manual
**Distorted image
A: Reset the LCD monitor. ( perform the “Reset” function by OSD )
**Image is not centered / Size is not appropriate.
A: 1. Use OSD Image Menu to adjust H. Position and V. Position.
2. Check image size setting.
3. Perform AUTO adjust.
**Unev en col or / Col or too dar k / Dark ar ea di stor ted / Whi te col or is not whi te
A: Use OSD Color Temperature Menu to adjust color setting.
**No sound
A: 1. Check the audio signal cable connection between the computer and LCD Monitor.
2. Maybe mis-press the “+” or “-” button ; try to press “+”or “-” button to disable the
volume MUTE function.
11
 Loading...