


23" LCD MONITOR
User Guide
MODEL EQ2367

Contents
Safety Precautions ...............................................................................................1
First Setup ............................................................................................................2
Quick Installation ..................................................................................................2
Front View of the Product .....................................................................................3
Rear View of the Product......................................................................................3
Using On Screen Display (OSD) Functions..........................................................4
Supporting Timing Modes ....................................................................................8
Technical Information........................................................................................... 9
Care and Maintenance .......................................................................................10
Troubleshooting ..................................................................................................10
English

Safety Precautions
English
This monitor is manufactured and tested on a ground principle that a
user’s safety comes first. However, improper use or installation may result danger
to the monitor as well as to the user. Carefully go over the following WARNINGS
before installation and keep this guide handy.
WARNINGS:
This monitor should be operated only at the correct power sources indicated
on the label on the rear end of the monitor. If you’re unsure of the power
supply in your residence, consult your local dealer or power company.
Do not try to repair the monitor yourself as it contains no user- serviceable
parts. The monitor should only be repaired by a qualified technician.
Do not remove the monitor cabinet. There is high-voltage parts inside that
may cause electric shock to human bodies, even when the power cord is
disconnected .
Stop using the monitor if the cabinet is damaged. Have it checked by a
service technician.
Put your monitor only in a clean, dry environment. Unplug the monitor
immediately if gets wet and consult your service technician.
Always unplug the monitor before cleaning it. Clean the cabinet with a clean,
dry cloth. Apply non-ammonia based cleaner onto the cloth, not directly onto
the glass screen.
Keep the monitor away from magnetic objects, motors, TV sets, and transformer.
Do not place heavy objects on the cable or power cord.
For PLUG CABLE EQUIPMENT, the Socket-outlet shall be installed
near the equipment and shall be easily accessible.
Mounting the Monitor
The monitor panel can be attached to a wall, swing arm, or other mounting fixture.
CAUTION: This monitor supports the VESA industry standard 100 mm mounting holes. To attach
a third-party mounting solution to the monitor, four 4 mm, 0.7 mm pitch, and 8 mm long screws are
required. Longer screws must not be used because they may damage the monitor. It is important
to verify that the manufacturer’s mounting solution is compliant with the VESA standard and is rated
to support the weight of the monitor display panel. For best performance, it is important to use the
power and video cables provided with the monitor.
1
First Setup
Congratulation for purchasing this monitor of high performance!
This monitor comes with the following accessories:
Power Cord
VGA Cable (15 pin)
Warranty Card
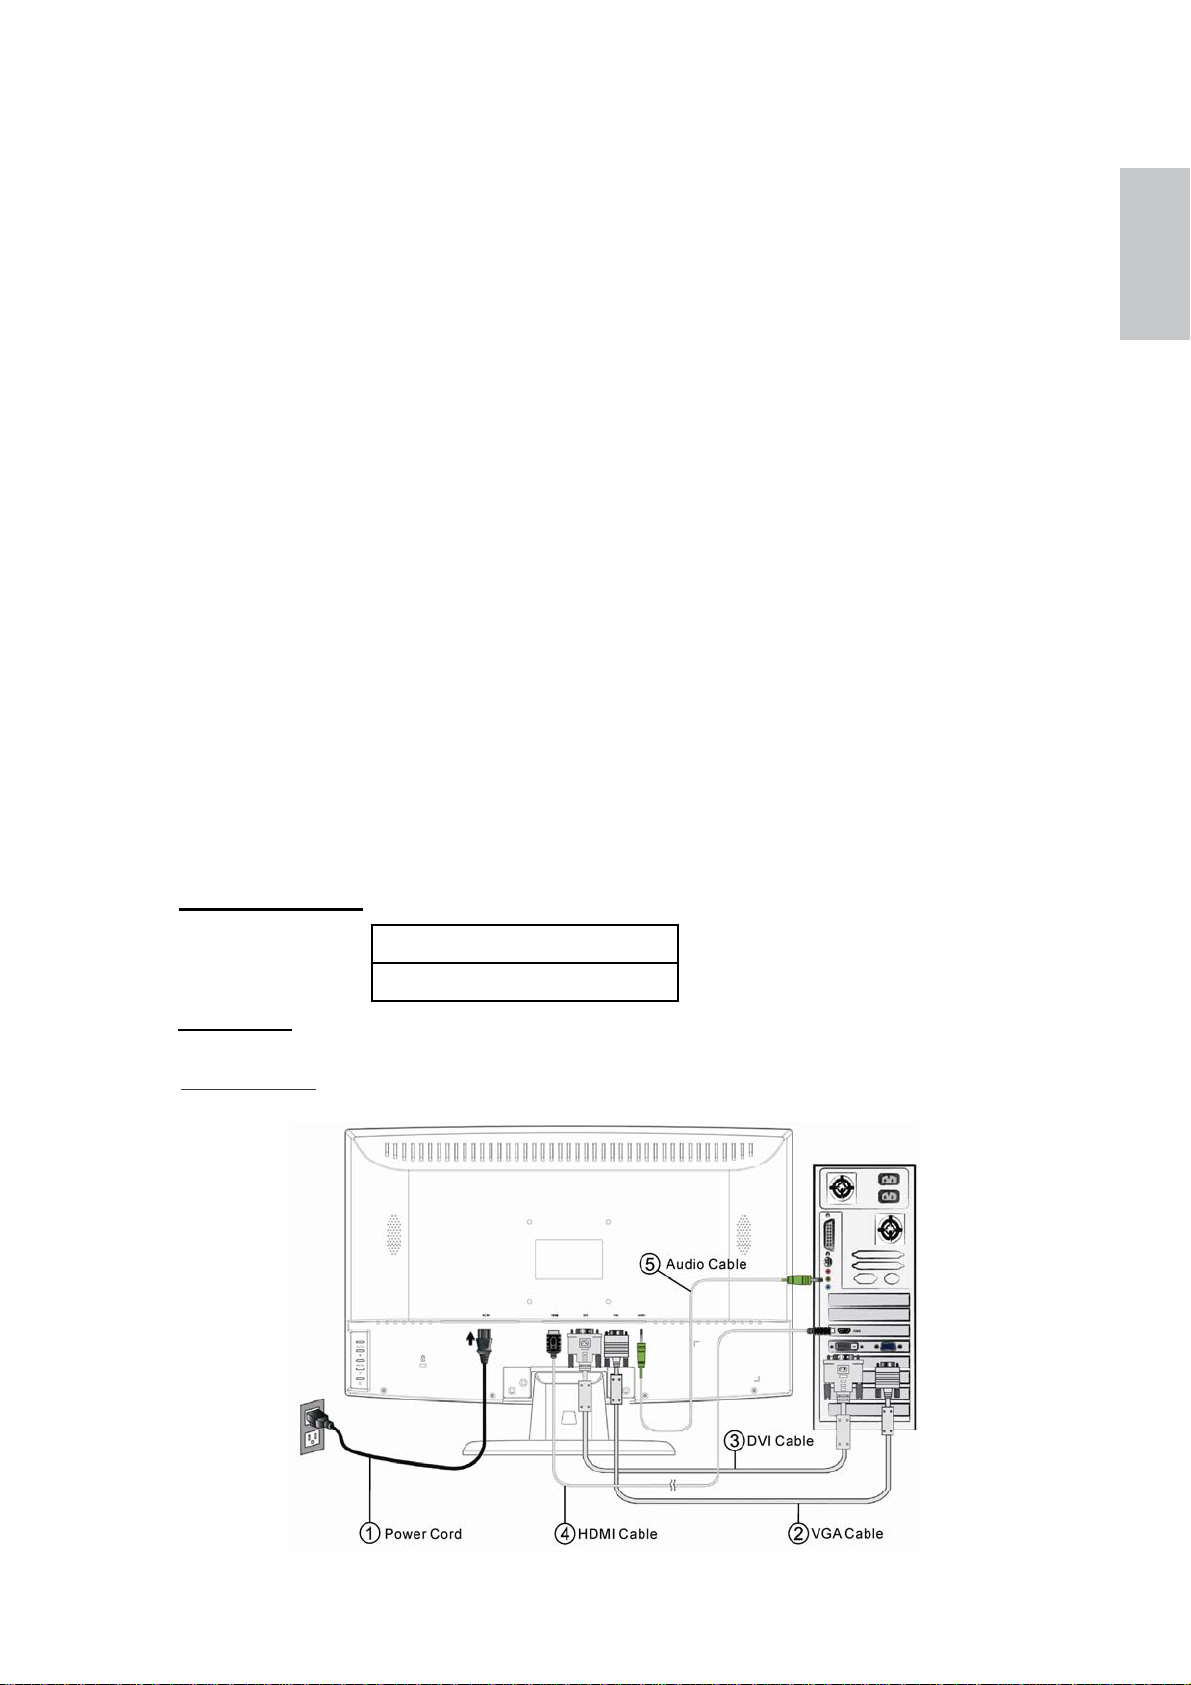
Quick Installation
1. Connect power cord
Connect the power cord to a properly grounded AC outlet, then to the monitor.
2. Connect Analog video cable (VGA cable)
Make sure both monitor and computer are powered OFF. Connect the video
cable (D-Sub cable) to the computer, then to the monitor.
3. Or Connect DVI cable
Connect the DVI cable from DVI output of computer to the DVI input of the monitor.
4. Or Connect HDMI cable
Connect the HDMI cable from HDMI output of computer or other equipment with HDMI
output to the HDMI input of the monitor.
Note: Other HDMI output equipment such as Blue-Ray players, DVD Players, Cable
boxes, VCR/VCD players, and portable PCs.
5. Connect audio cable
Connect the audio cable from audio output of computer to the audio input of the
monitor.
6. Power-ON computer and monitor
Power-ON the computer, then Power-ON the monitor.
7. Windows users:Setting the Timing Mode (Resolution and Refresh Rate)
Recommended:
Resolution Right-click on the Windows desktop > Properties > Settings >
“Desktop Area”. Set the resolution.
Refresh Rate (vertical frequency) See your graphic card’s user guide for instructions.
1920 x 1080 @ 60 Hz
23.6”
English
2

Front View of the Product
English
➊ LED INDICATOR
Rear View of the Product
Control Buttons
➋
➌
➍
➎
AUTO
+
MENU
-
AUTO ADJUSTMENT(VGA ONLY)
INPUT SOURCE SELECT HOTKEY
AND SCROLL UP/INCREASE
OSD TURN ON
VOLUME CONTROL HOTKEY AND
SCROLL DOWN/DECREASE
Input
➏
➐
➑
➒
➓
AC IN
HDMI
AUDIO
POWER ON/OFF
POWER INPUT
HDMI INPUT
DVI INPUT (DVI 24 PIN)
VGA INPUT (D-SUB 15 PIN)
PC AUDIO INPUT
3
DVI
VGA
Using On Screen Display (OSD) Functions
+
-
MENU
AUTO
Main Menu
Display main menu.
Enter the selection
Auto adjust the image when not in OSD menu.
Exit the selection. OSD menu turn off.
Select the desired item when in OSD menu.
When not in OSD menu, it is to show the input source and
then press – or + to change the input source.
Select the desired item when in OSD menu.
When not in OSD menu, it is to show the volume bar and
then press – or + to decrease or increase the volume.
English
If push the MENU key the screen will appear this main menu page, you can
English
use the + or - key ( Shown in Pic1 ) to select the function you need.
The end of this page will be shown the working resolution and frequency.
Pic 1
4
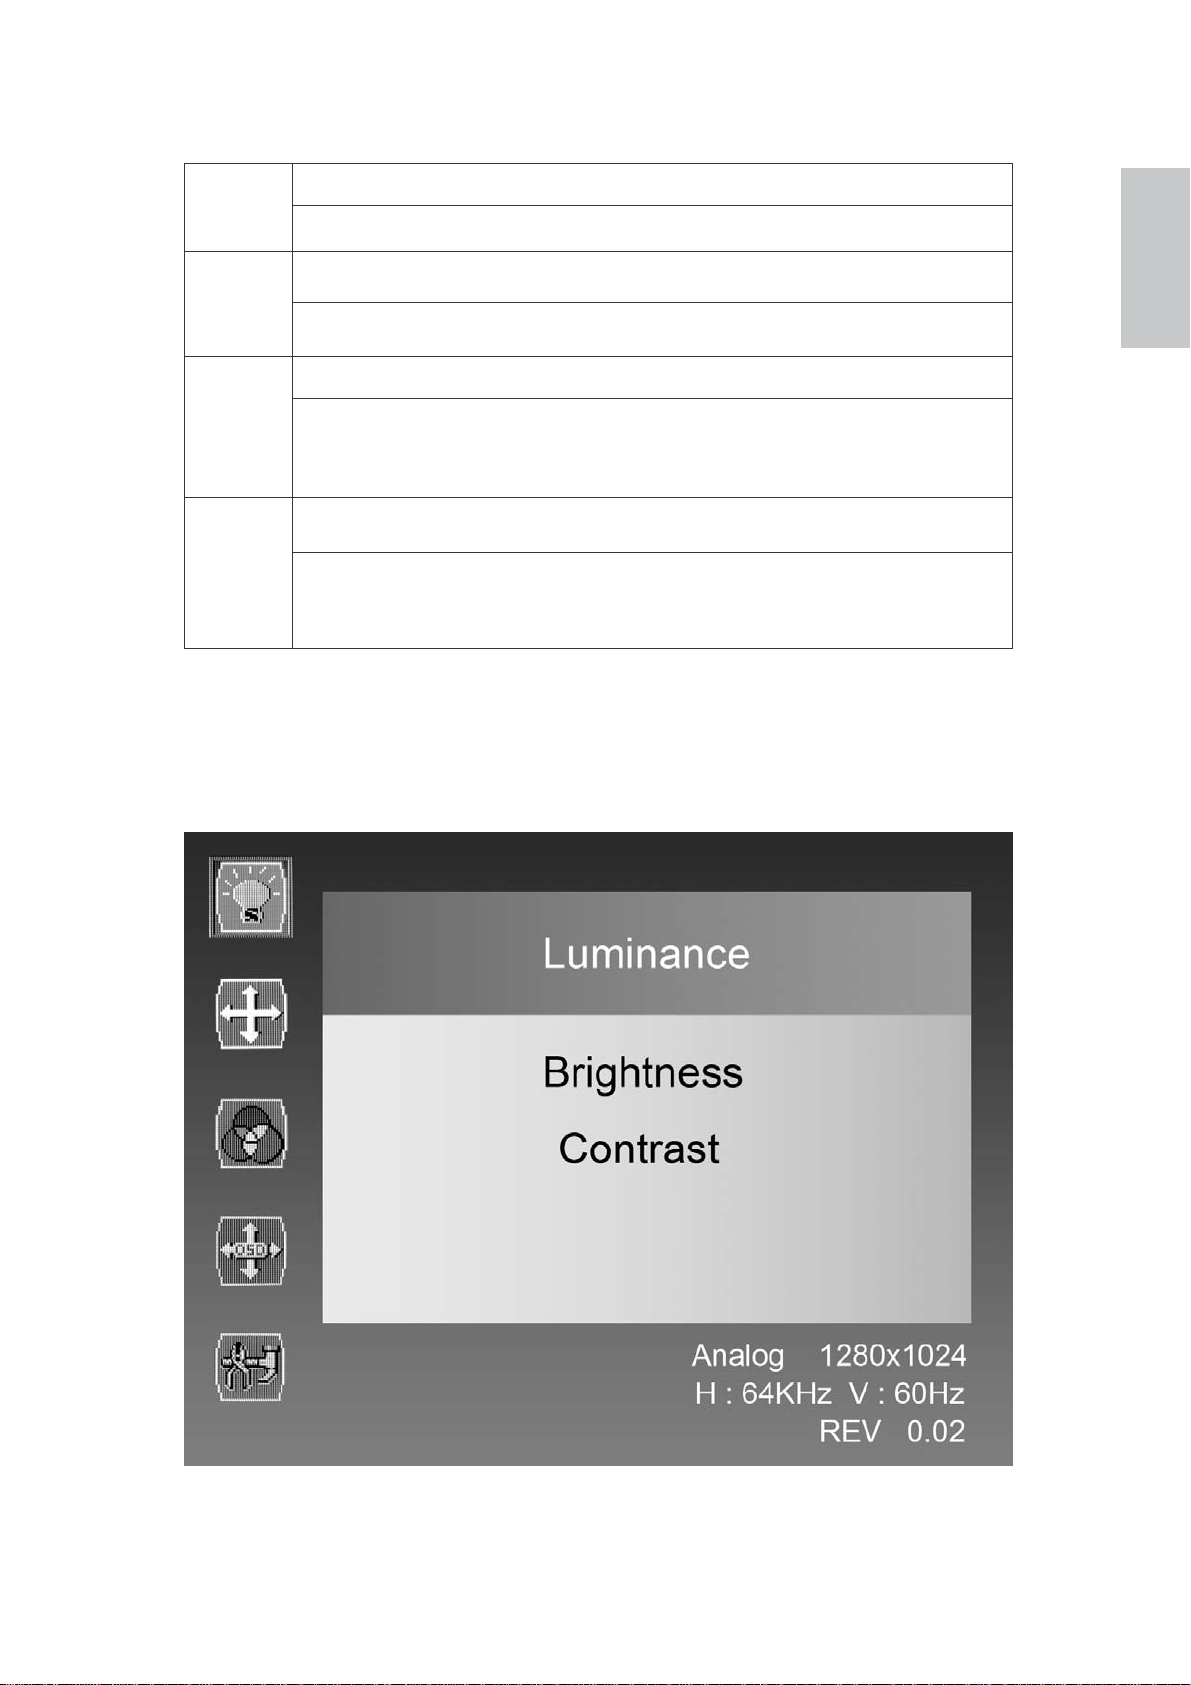
Luminance
In this mode, that could into the sub-page ( Shown in Pic 2 ) to adjust the
English
luminance of the screen image.
English English
Pic 2
Brightness : To adjust the luminance of the video.
+
: increase brightness, - : decrease brightness.
Contrast : To adjust the foreground level of screen image.
+
: increase contrast, - : decrease contrast.
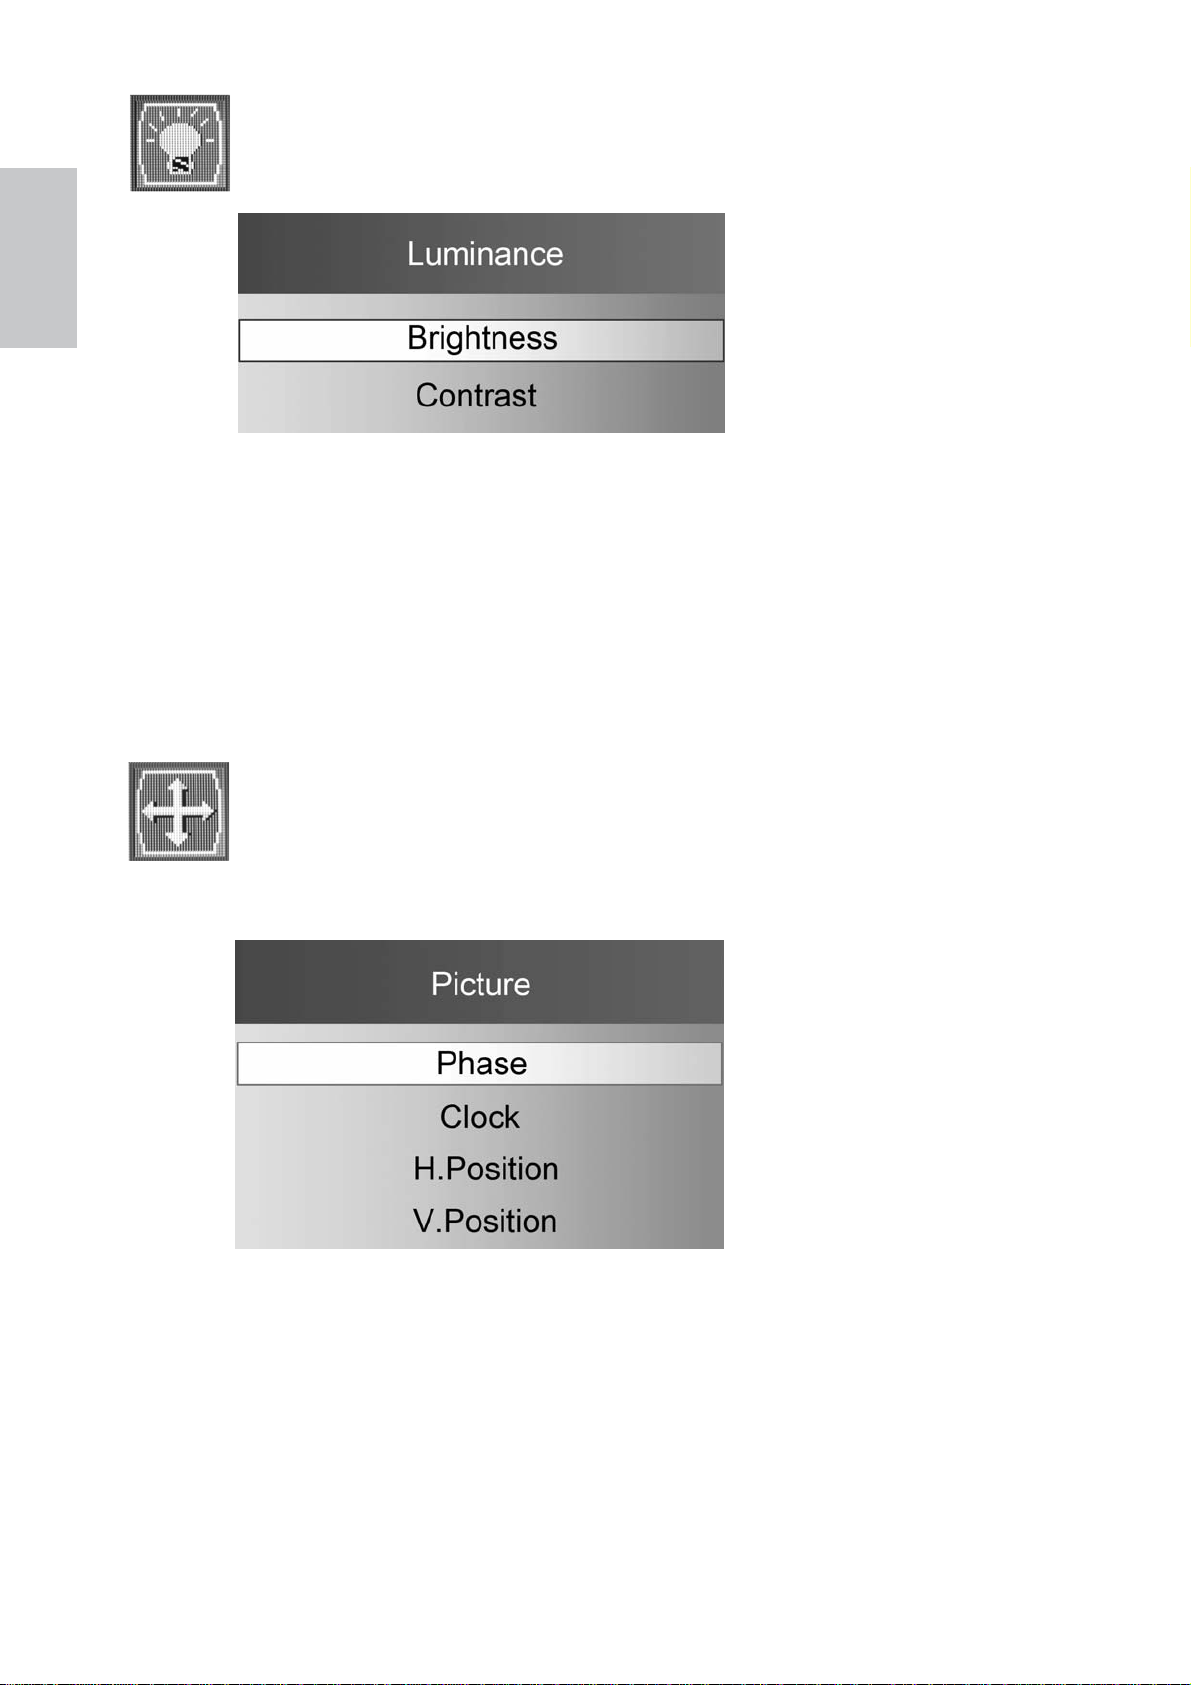
Picture (VGA Only)
In this mode, that could into the sub-page ( Shown in Pic 3 ) to adjust
display’s function of the picture.
Pic 3
Phase : To adjust the picture’s quality
Clock : To adjust the picture’s quality
H./V. Position :To adjust the horizontal and vertical position of the video.
+
H. Position :
V. Position :
: move screen to the right ; - : move screen to the left.
+
: move screen up ; - : move screen down.
5
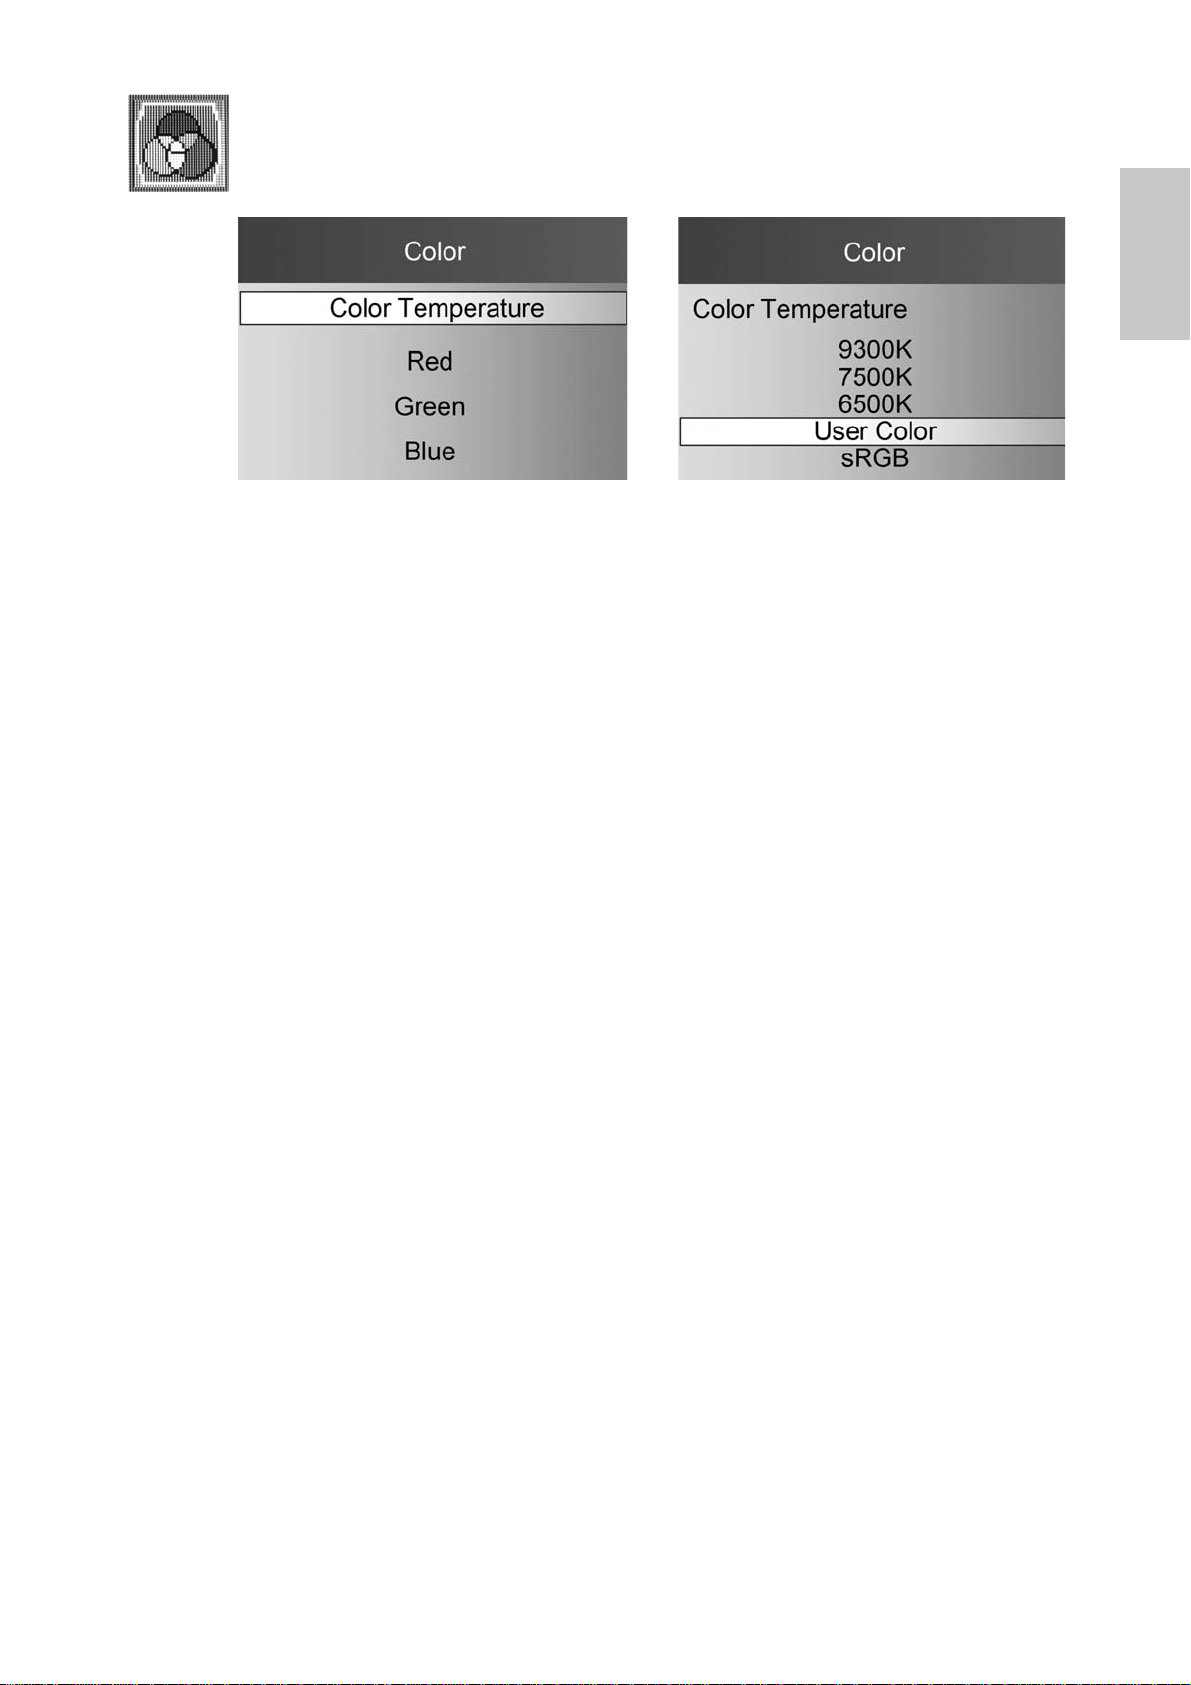
Color
In this function, that could into the sub-page ( Shown in Pic 4 ) to adjust
display color of the picture.
English
Pic 4 Pic 5
Color Temperature :
To select the color for improving brightness and color saturation between
9300K,7500K,6500K,User Color and sRGB ( shown in Pic5 ).
sRGB :
This is quickly becoming the industry standard for color management, with
support being included in many of the latest applications. Enabling this
setting allows the LCD display to more accurately display colors the way
they were originally intended. Enabling the sRGB setting will cause the
Contrast adjustments to be disabled.
User Color :
Individual adjustments for red (R), green (G), blue (B).
1. Press button MENU to select the desired color.
2. Press
+
or - button to adjust selected color.
6

OSD Settings
This function will into the sub-page ( Shown in Pic 6 ) to adjust display’s
English
function for OSD.
Pic 6
OSD Position : Press button + or - to select between horizontal and
vertical OSD Position adjustment.
Horizontal : To horizontally adjust the OSD position.
+
: move OSD to the right, - : move OSD to the left.
Vertical : To vertically adjust the OSD position.
+
: move OSD up, - : move OSD down.
Transparency : To adjust the Transparency of the OSD image.
OSD Time Out : To automatically turn off On Screen Display(OSD)after a
preset period of time.
Setup
This function will into the sub-page ( Shown in Pic 7 ) to adjust display’s
function for OSD.
Language : To allow users to choose from available languages.
Audio:To adjust the volume of speaker output.
Input :
HDMI-Audio Select : The default setup is Digital Audio. When you use
DVI to HDMI cable to plug into the HDMI connector, you must to set the
audio select to Analog Audio.
DCR: To turn On or Off the DCR function(dynamic contrast ratio).
Reset: To recall the default values.
When press Input Select change Input signal to VGA or DVI and HDMI.
Pic 7
7

Supporting Timing Modes
NO. Resolution Mode 23.6"
1 640 х 480@60Hz VESA
2 640 х 480@67Hz MAC
3 640 х 480@72Hz VESA
4 640 х 480@75Hz VESA
5 720 х 400@70Hz DOS
6 800 х 600@56Hz VESA
7 800 х 600@60Hz VESA
8 800 х 600@72Hz VESA
9 800 х 600@75Hz VESA
10 832 х 624@75Hz MAC
11 1024 х 768@60Hz VESA
12 1024 х 768@70Hz VESA
13 1024 х 768@75Hz VESA
14 1152 х 864@60Hz CVT
15 1152 х 864@75Hz VESA
16 1152 х 870@75Hz MAC
17 1280 х 720@60Hz CEA-861
18 1280 х 960@60Hz VESA
19 1280 х 1024@60Hz VESA
20 1280 х 1024@75Hz VESA
21 1360 х 768@60Hz VESA
22 1600 х 1200@60Hz VESA
23 1680 х 1050@60Hz CVT-RB
24 1680 х 1050@60Hz CVT
25 1920 х 1080@60Hz CVT-RB
26 480i@60Hz Video
27 480p@60Hz Video
28 576i@50Hz Video
29 576p@50Hz Video
30 720p@50Hz Video
31 720p@60Hz Video
32 1080i@50Hz Video
33 1080i@60Hz Video
34 1080p@50Hz Video
35 1080p@60Hz Video
English
◎
◎
◎
◎
◎
◎
◎
◎
◎
◎
◎
◎
◎
◎
◎
◎
◎
◎
◎
◎
-
◎
◎
◎
◎
◎
◎
◎
◎
◎
◎
◎
◎
◎
◎
Note: “◎” Support “-"No support
Warning : Do not set the graphic card in your computer to exceed these maximum refresh
rates. Doing so may result in permanent damage to your monitor.
8
Technical Information
English
T
echnical Specification
LCD Display 23.6”
Power Management
Display Colours
Tilt
Temperature
Compliance
Input voltage
LED Indicator
Pixel size
Energy Star compliant VESA DPMS compatible
< 1 W
5° to forward ~ 15° to backward
Operating: 0°C ~ +40°C Storage: -20°C ~ + 60°C
cTUVus
ROHS (REACH)
Energy star
FCC
Input Voltage AC100-240 V
Blue Color:Active
Orange Color:Standby 、No Signal、Not Support
0.282x 0.282 mm
16.7M
(6bits + Hi FRC)
Active Display Area
Internal Speaker
Net Weight
Dimensions
(Physical)
( WxHxD )
Connector
521.3 x 293.2 mm
2W x 2
4.93 Kg
23.6” : 568 x 419 x 210 mm
Power (A/C Input)
HDMI
DVI
VGA
Audio (Stereo Phone Jack)
9

Care and Maintenance
Care
Avoid exposing your monitor directly to sunlight or other heat source. Place
your monitor away from the sun to reduce glare.
Put your monitor in a well ventilated area.
Do not place any heavy things on top of your monitor.
Make certain your monitor is installed in a clean and moisture-free area.
Keep your monitor away from magnets, motors, transformers, speakers,
and TV sets.
Safety Tips
If smoke, abnormal noise or odor came out from your monitor, caution you
should remove the power cord immediately and call your service center.
Never remove the rear cover of your monitor cabinet. The display unit
inside contains high-voltage parts and may cause electric shock to human
bodies.
Never try to repair your monitor yourself. Always call your service center
or a qualified technician to fix it.
English
Troubleshooting
No power
Make sure A/C power cord is securely inserted to both the AC-INLET
socket on the monitor and the wall outlet.
Plug another electrical device into the power outlet to verify that the
outlet is supplying proper voltage.
Make sure all signal cables are installed.
Power on but no screen image
Make sure the video cable supplied with the monitor is tightly secured to
the video output port on back of the computer. If not, tightly secure it.
Adjust brightness.
Wrong or abnormal colors
If any colors (red, green, blue) are missing, check the video cable to make
sure it is securely connected. Loose or broken pins in the cable connector
could cause an improper connection.
Connect the monitor to another computer.
According to WEEE regulation, this monitor can’t be handled as normal trash in
Europe when it is out of usage. Please refer to the recycle information from our
website to handle it.
10

Contenu
Précautions de Sécurité........................................................................................1
Français
Première Installation .............................................................................................2
Installation Rapide.................................................................................................2
Vue avant du produit .............................................................................................3
Produit vu de dos..................................................................................................3
Utiliser les fonctions d’affichage d’écran (OSD)....................................................4
Support des modes minutage...............................................................................8
Informations Technique........................................................................................ 9
Soins et Maintien ................................................................................................10
En Cas de Problème...........................................................................................10

Précautions de Sécurité
Ce moniteur à été fabriqué et testé à partir du principe que la sécurité de
l’utilisateur est primordiale. Néanmoins, l’utilisation ou l’installation
incorrecte peut causer un danger à l’appareil aussi bien que à l’utilisateur. Lisez
attentivement les AVERTISSEMENTS suivants avant de commencer l’installati
Français
on et gardez ce guide à portée de main.
AVERTISSEMENTS:
Ce moniteur ne doit être utilisé que en connexion avec les sources
d’alimentation correctes, indiquées sur l’étiquette à l’arrière du moniteur.
Si vous n’êtes pas sur de l’alimentation dans votre résidence, consultez
votre revendeur locale ou la compagnie d’électricité.
N’essayez pas de réparer le moniteur vous même, car il ne contient
pas de composants réparables par l’utilisateur. Le moniteur ne peut
être réparé que par un technicien qualifié.
N’enlevez pas la cache du moniteur. Il y à des composants sous haute
tension à l’intérieur qui peuvent causer des choques électriques, même
quand le cordon d’alimentation est déconnecté.
N’utilisez plus le moniteur si la caisse est endommagée. Appelez un
technicien d’entretien pour la contrôler.
Placez votre moniteur dans un endroit propre et sec. Si le moniteur se
mouille déconnectez le immédiatement et consultez votre technicien
d’entretien.
Déconnectez toujours votre moniteur avant de le nettoyer. Nettoyez
la caisse avec un chiffon sec et propre. Appliqué un nettoyant nonammonisé sur le chiffon, jamais directement sur l’écran.
Gardez le moniteur éloigné d’objets magnétiques, de moteurs, de sets de
télévision et de transformateurs.
Ne placez pas d’objets lourd sur le câble ou le cordon d’alimentation.
Pour des EQUIPMENTS à FICHE, la fiche de sortie doit être installé près
de l’arrière de l’équipement et à un endroit facilement accessible.
Installation du moniteur
Il est possible de fixer le panneau du moniteur sur un mur, un bras pivotant ou un autre dispositif de montage.
Mise en garde : ce moniteur est compatible avec les trous de montage de 100 mm selon les spécifications VESA. Pour fixer un
autre dispositif de montage au moniteur, utilisez 4 vis de 8 mm de long, d’un pas de 0,7 mm et de 4 mm. N’utilisez pas de vis plus
longues, elles risqueraient d’endommager le moniteur. Vérifiez que le dispositif de montage du fabricant réponde aux
spécifications VESA et qu’il est capable de supporter le poids du panneau écran du moniteur. Pour des performances optimales,
il est important d’utiliser le câble d’alimentation et le câble vidéo fournis avec le moniteur.
1

Première Installation
Félicitations avec votre achat de ce moniteur de haute performance! Ce moniteur est
fourni avec les accessoires suivants:
Français
Cordon d’Alimentation
Câble VGA (15 broches)
Documents de garantie
Installation Rapide
1. Connectez le cordon d’alimentation
Connectez le cordon d’alimentation au dos du moniteur. Branchez le cordon
d’alimentation dans une prise de courant proche.
2. Connecter le câble Analogique vidéo (Câble VGA)
Assurez-vous qu’à la fois le moniteur et l’ordinateur sont bien SOUS tension. Connectez
le câble vidéo de la sortie D-Sub sur l’ordinateur sur l’entrée D-Sub sur le moniteur.
3. Ou Connectez le câble DVI
Connectez le câble DVI de la sortie DVI de l’ordinateur sur l’entrée DVI du moniteur.
4. Ou branchez le câble HDMI
Branchez le câble HDMI entre la sortie HDMI de l'ordinateur, ou d'un autre équipement
disposant d'une sortie HDMI, et l'entrée HDMI du moniteur.
Remarque : autre équipement disposant d'une sortie HDMI, comme les lecteurs Blue-Ray,
les lecteurs DVD, les boîtiers câble, les lecteurs VCR/VCD et les ordinateurs portables.
5. Connecter le câble audio
Connectez une extremite du cable audio au dos du moniteur et connectez l’autre
extremite au port de sortie audio de l’ordinateur.
6. Allumez l’ordinateur et le moniteur
Allumez l’ordinateur et ensuite allumez le moniteur.
Utilisateurs de Windows :Paramétrer le mode de synchronisation(résolution et vitesse
7.
de rafraîchissement) Exemple:
Résolution
>Paramètres > “Espace du bureau”. Paramétrer la résolution : Vitesse
rafraîchissement(fréquence verticale) Voir le guide utilisateur de votre carte graphique pour
les instructions.
Faites un clic droit de la souris sur le bureau de Windows > Propriétés
1920 x 1080 @ 60 Hz
23.6”
de
2

Vue avant du produit
➊ VOYANT DEL
Produit vu de dos
Français
Boutons de
commande
+
-
RÉGLAGE AUTOMATIQUE
RACCOURCI SÉLECTION DE LA SOURCE
D'ENTRÉE ET BARRE DE DÉFILEMENT
VERS LE HAUT/AUGMENTER
MENU À L'ÉCRAN ACTIVÉ
RACCOURCI RÉGLAGE DU VOLUME ET
BARRE DE DÉFILEMENT VERS LE
BAS/DIMINUER
MARCHE/ARRÊT
➋
AUTO
➌
➍
MENU
➎
➏
Entrée
ENTRÉE D'ALIMENTATION
ENTRÉE HDMI
ENTRÉE VGA (15 BROCHES D-SUB)
ENTRÉE AUDIO PC
PC-Audioeingang
3
AC IN
HDMI
DVI
VGA
AUDIO
➐
➑
➒
➓

Utiliser les fonctions d’affichage d’écran (OSD)
Afficher le menu principal.
MENU
Saisissez une sélection
Français
Ajuster automatiquement l’image en dehors du menu OSD.
+
Quitter la sélection. Menu à l'écran désactivé.
Sélectionnez l’élément désiré quand vous êtes dans le menu OSD.
En dehors du menu à l'écran, affichage de la source d'entrée.
Appuyez sur - ou sur + pour modifier la source d'entrée.
Sélectionnez l’élément désiré quand vous êtes dans le menu OSD.
AUTO
-
En dehors du menu à l'écran, affichage de la barre de réglage du
volume. Appuyez sur - ou sur + pour diminuer ou augmenter le
volume.
Menu principal
Si vous appuyez sur la touche MENU, l'écran affiche la page du menu
principal. Appuyez sur la touche + ou - (voir l'illustration 1) pour sélectionner la
fonction voulue.
La résolution et la fréquence de travail s'affichent en fin de page.
l'illustration 1
4

Luminance
Ce mode vous fait accéder à la sous-page permettant de régler la
luminance de l'image à l'écran (voir l'illustration 2).
English English
Français
Luminosité : pour régler la luminance de la vidéo.
+
: augmenter la luminosité, - : diminuer la luminosité.
Contraste
+
: augmenter le contraste, - : diminuer le contraste.
pour régler le niveau du premier-plan de l'image à l'écran.
:
l'illustration 2
Image (
Ce mode vous fait accéder à la sous-page permettant de régler la
UNIQUEMENT
VGA)
fonction d'affichage de l'image (voir l'illustration 3).
l'illustration 3
Phase : Pour régler la qualité de l'image.
Horloge : Pour régler la qualité de l'image.
Position h./v. : Pour ajuster la position horizontale et verticale de la vidéo.
Position h.: + : déplacer l'écran vers la droite; - : déplacer l'écran vers
la gauche.
Position v.: + : déplacer l'écran vers le haut ; - : déplacer l'écran vers le
bas
.
5

Couleur
Cette fonction vous fait accéder à la sous-page permettant d’ajuster la
couleur d'affichage de l'image (voir l'illustration 4).
Français
l'illustration 4 l'illustration 5
Température des couleurs :
Pour choisir la couleur et optimiser la luminosité et la saturation des
couleurs entre 9300 K, 7500 K, 6500 K, couleur utilisateur et sRGB (voir
l'illustration 5).
sRGB :
est en train de devenir rapidement le standard de l’industrie pour la
gestion des couleurs, et la plupart des applications récentes sont
compatibles avec ce format. L’activation de ce paramètre permet à
l’écran LCD d’afficher des couleurs plus fidèles à l’original. L’activation du
paramètre sRGB entraîne la désactive les réglages du contraste.
Couleur utilisateur :
Réglage individuel pour le rouge(R), vert (V), bleu (B).
1. Appuyez sur le bouton Menu pour ajuster et sélectionner la couleur.
Suivante à ajuster.
2. Appuyez sur le bouton
+
ou - pour ajuster la couleur sélectionnée
6

OSD Settings
Cette fonction vous fait accéder à la sous-page (voir l'illustration 6)
permettant d'ajuster la fonction d'affichage du menu à l'écran.
Position OSD: Appuyez sur + ou - pour choisir le réglage de la position
horizontale ou verticale du menu à l'écran.
Horizontal : pour ajuster la position horizontale du menu OSD.
+
:
déplace le menu OSD vers la droite,
-
:
déplace le menu OSD vers la gauche.
Vertical : pour ajuster la position verticale du menu OSD.
+
:
déplace le menu OSD vers le haut,
-
:
déplace le menu OSD vers le bas.
Transparence : Pour régler la transparence de l'image du menu à l'écran.
OSD Time Out : Pour désactiver automatiquement l'affichage d'écran
(OSD) après une durée prédéfinie.
l'illustration 6
Français
Configuration
Cette fonction vous fait accéder à la sous-page (voir l'illustration 7)
permettant d'ajuster la fonction d'affichage du menu à l'écran.
Langue : Permet à l’utilisateur de choisir parmi les langues disponibles.
Audio:Pour régler le volume de la sortie haut-parleur.
Entrée: Lorsque vous appuyez sur Sélection Entrée, le signal d'entrée
passe en VGA ou DVI et HDMI.
Sélection Audio-HDMI
Lorsque vous branchez un câble DVI/HDMI dans le connecteur HDMI,
vous devez régler l'audio sur Audio analogique.
DCR: Pour activer ou désactiver la fonction DCR (Dynamic Contrast
Ratio ou étendue du contraste dynamique).
Réinitialiser:
Pour restaurer les valeurs par défaut.
:
Le réglage par défaut est Audio numérique.
7
l'illustration 7

Françai
s
Support des modes minutage
No. Résolution Mode 23.6"
1 640 х 480@60Hz VESA
2 640 х 480@67Hz MAC
3 640 х 480@72Hz VESA
4 640 х 480@75Hz VESA
5 720 х 400@70Hz DOS
6 800 х 600@56Hz VESA
7 800 х 600@60Hz VESA
8 800 х 600@72Hz VESA
9 800 х 600@75Hz VESA
10 832 х 624@75Hz MAC
11 1024 х 768@60Hz VESA
12 1024 х 768@70Hz VESA
13 1024 х 768@75Hz VESA
14 1152 х 864@60Hz CVT
15 1152 х 864@75Hz VESA
16 1152 х 870@75Hz MAC
17 1280 х 720@60Hz CEA-861
18 1280 х 960@60Hz VESA
19 1280 х 1024@60Hz VESA
20 1280 х 1024@75Hz VESA
21 1360 х 768@60Hz VESA
22 1600 х 1200@60Hz VESA
23 1680 х 1050@60Hz CVT-RB
24 1680 х 1050@60Hz CVT
25 1920 х 1080@60Hz CVT-RB
26 480i@60Hz Video
27 480p@60Hz Video
28 576i@50Hz Video
29 576p@50Hz Video
30 720p@50Hz Video
31 720p@60Hz Video
32 1080i@50Hz Video
33 1080i@60Hz Video
34 1080p@50Hz Video
35 1080p@60Hz Video
◎
◎
◎
◎
◎
◎
◎
◎
◎
◎
◎
◎
◎
◎
◎
◎
◎
◎
◎
◎
-
◎
◎
◎
◎
◎
◎
◎
◎
◎
◎
◎
◎
◎
◎
Remarque : “◎” pris en charge “-"non pris en charge
Avertissement : Ne réglez pas la carte graphique de votre ordinateur en dépassant ces
taux de rafraîchissement maximaux. Si vous le faites, cela va irrémédiablement détériorer
votre moniteur.
8

Informations Technique
Spécifications Techniques
LED-Anzeige 23.6”
Gestion de Courant
Energy Star conforme à VESA
< 1 W
compatible avec DPMS
Français
Inclination
Température
Conformité
Tension d'entrée
Voyant DEL
Dimension des
Zone d’écran active
Couleurs
d’affichage
Haut-parleur
Poids net
Dimensions
(Physique)
5° vers l'avant ~ 15° vers l'arrière
Actif: 0°C ~ +40°C Stockage: -20°C ~ + 60°C
cTUVus 、 ROHS (REACH) 、Energy star、FCC
Voltage d’Entrée 100-240 V CA
Couleur bleue : active
Couleur orange : en veille 、Pas de signal Pas pris en charge
0.282x 0.282 mm
16.7M
(6bits + Hi FRC)
521.3 x 293.2 mm
2W x 2
4.93 Kg
23.6” : 568 x 419 x 210 mm
(LxHxP)
Connecteur
Alimentation (entrée A/C)
HDMI
DVI
VGA
Audio (prise téléphone stéréo)
9

Françai
s
Soins et Maintien
Soins
Evitez d”exposer le moniteur directement à la lumière du soleil ou à une
autre source de chaleur. Placez votre moniteur détourné du soleil pour
éviter des reflets.
Placez votre moniteur dans un emplacement bien ventilé.
Ne mettez pas d’objet lourd sur le moniteur.
Veillez à ce que votre moniteur soit installé dans un endroit sec et propre.
Gardez votre moniteur loin d’aimants, moteurs, transformateurs, haut
parleurs et de set de télévision.
Conseils de Sécurité
Si de la fumée, un bruit anormal ou une odeur sort de votre
moniteur,éteignez immédiatement le courant et appelez votre centre
d’entretien.
N’enlevez jamais le panneau arrière de la caisse du moniteur. L’unité
d’affichage à l’intérieur contient des parties sous haut voltage qui
peuvent causer des chocs électriques à des corps humains.
N’essayez jamais de réparer le moniteur vous même. Appelez toujours
votre centre d’entretien ou un technicien spécialisé pour faire les
réparations.
En Cas de Problème
Pas d’Alimentation
Contrôlez que le courant alternatif soit bien connecter à l’adaptateur de
courant et que le cordon alimentaire soit bien connecter au moniteur.
Connectez un autre appareil électrique à la prise murale pour vérifier
qu’elle émets bien le voltage souhaité.
Vérifiez que tous les câbles soient bien installés.
Allumé mais pas d ‘affichage à l’écran
Vérifiez que le câble vidéo, fourni avec le moniteur soit bien
solidement fixé au port de sortie du signal vidéo, situé à l’arrière de
l’ordinateur. Sinon, fixé le convenablement.
Ajustez la clarté.
Couleurs incorrectes ou anormales
Si une des couleurs manque (rouge, vert, bleu), contrôlez le câble vidéo
pour vous assurez qu’il soit bien correctement connecté. Des broches
desserrées ou cassées peuvent créer une connexion incorrecte.
Connectez le moniteur à un autre ordinateur.
D’après la réglementation WEEE, ce moniteur ne peut pas être éliminé avec
les déchets normaux en Europe quand il est hors d’usage. Veuillez vous
reporter aux informations de recyclage sur notre site web pour la marche à
suivre.
10

Contenido
Precauciones de Seguridad .................................................................................1
Primera Configuración .........................................................................................2
Rápida Instalación................................................................................................2
Vista Frontal del Producto ....................................................................................3
Vista Trasera del Producto....................................................................................3
Using On Screen Display (OSD) Functions..........................................................4
Tiempos soportados..............................................................................................8
Información Técnica............................................................................................. 9
Mantenimiento y Cuidado...................................................................................10
Solución de Problemas.......................................................................................10
Español

Precauciones de Seguridad
Este monitor ha sido manufacturado y probado bajo el principio de que la
seguridad del usuario es lo primero. Sin embargo, el uso o la instalación
impropia puede resultar de peligro para el monitor tanto como para el usuario.
Lea cuidadosamente las siguientes ADVERTENCIAS antes de la instalación
Español
y conserve a mano esta guía.
ADVERTENCIAS:
Este monitor debe ser operado solamente según las fuentes de energía
indicadas en la etiqueta en la parte trasera del monitor. Si usted no está
seguro del suministro de energía en su residencia, consulte a su
vendedor local o a la compañía de energía eléctrica.
No trate de reparar el monitor por usted mismo cuando esto concierne
a partes no ajustables por el usuario. El monitor debe ser reparado
solamente por técnicos cualificados.
No abra el monitor. Hay partes de alto voltaje adentro que pueden causar
un golpe de corriente sobre el cuerpo humano, incluso cuando
el cable de la corriente esté desconectado.
Deje de usar el monitor si se ha dañado la estructura externa del
mismo. Hágalo revisar primero por el servicio técnico.
Ponga su monitor solamente en un ambiente seco y limpio.
Desenchufe el monitor inmediatamente si este se moja y consulte a su
servicio técnico.
Siempre desenchufe el monitor antes de limpiarlo. Limpie la cobertura con
un tela seca y limpia. Aplique limpiadores no basados en
amoníacos sobre la tela que usará para limpiar el monitor, nunca
directamente sobre el vidrio de la pantalla.
Conserve el monitor lejos de objetos magnéticos, motores, televisores,
y transformadores de corriente.
No coloque objetos pesados sobre los cables del monitor.
Para EQUIPOS AÑADIBLES, el enchufe del toma corriente debe estar
cerca del equipo y debe ser de fácil acceso.
Instalar el monitor
El panel del monitor se puede montar en una pared, en un brazo giratorio o en otro elemento de instalación.
Precaución: estos monitores admiten orificios de montaje de 100 mm estándar de la industria VESA. Para acoplar una
solución de montaje de terceros al monitor, se requieren tornillos de 4 mm, paso de 0,7 mm y 8 mm de largo. No debe utilizar
tornillos más largos porque pueden dañar el monitor. Es importante comprobar que la solución de montaje del fabricante es
compatible con el estándar VESA y, según sus especificaciones, soporta el peso del panel de visualización del monitor. Para
obtener el máximo rendimiento, es importante utilizar los cables de alimentación y vídeo proporcionados con el monitor.
1

Primera Configuración
)
Gracias por comprar este monitor de alto rendimiento! Este monitor viene con los siguientes
accesorios:
Cable toma de corriente
Cable VGA (15 pin
Documentos de Garantía
Rápida Instalación
1. Conecte el cable de toma de corriente
Enchufe el cable que toma la corriente a un toma corriente y después al monitor
2. Conectar el cable de vídeo (cable VGA)
Asegúrese de que tanto el monitor como el equipo están APAGADOS.
Conecte el cable de vídeo (cable D-Sub) entre la salida D-Sub del equipo y la entrada D-Sub del
monitor.
3.
O Conecte el cable DVI
Conecte el cable DVI entre la salida DVI del equipo y la entrada DVI del monitor.
4. O conecte el cable HDMI
Conecte el cable HDMI desde la salida HDMI de su PC u otro equipo con salida HDMI a la
entrada HDMI del monitor.
Nota: otros equipos con salida HDMI como reproductores Blue-Ray, reproductores de
DVD, descodificadores, reproductores VCR/VCD y equipos portátiles.
Conectar cable de audio
5.
Conecte un extremo del cable de audio al dorso del monitor y conecte el otro al puerto de salida de
audio del ordenador.
6. Encienda la computadora y después el monitor
Encienda la computadora, espuis,encienda el monitor.
Usuarios de Windows:Configurar el Modo Cronometraje (Resolución e Índice de Renovación
7.
Ejemplo:
Resolución haga el clic derecho en el Escritorio de Windows > Pro piedades > Configuraciones >
“Área de Escritorio”. Configure la resolución.
Índice de Renovación
de gráficas para las instrucciones.
1920 x 1080 @ 60 Hz
23.6”
(frecuencia vertical) vea la guía de usuario de su tarjeta
Español
2

Vista Frontal del Producto
Español
➊
INDICADOR LED
Vista Trasera del Producto
Botones
de control
Entrada
+
-
AJUSTE AUTOMÁTICO (SOLO VGA)
TECLA DE ACCESO DE SELECCIÓN DE
FUENTE DE ENTRADA Y SUBIR/AUMENTAR
ACTIVAR MENÚS OSD
TECLA DE ACCESO AL CONTROL DE
VOLUMEN Y BAJAR/REDUCIR
ENCENDER/APAGAR
ENTRADA DE ALIMENTACIÓN
ENTRADA HDMI
ENTRADA DVI (DVI DE 24 CONTACTOS)
ENTRADA VGA (D-SUB DE 15 CONTACTOS)
ENTRADA DE AUDIO DE PC
DVI
➋
AUTO
➌
➍
MENU
➎
➏
AC IN
HDMI
VGA
AUDIO
➐
➑
➒
➓
3

Usin On Screen Display (OSD) Functions
Muestra el menú principal.
+
Inserte la selección
Autoajusta la imagen cuando no está en el menú OSD.
Salir de la selección. Desactivar menús OSD.
Selecciona el ítem deseado cuando se encuentra en el menú OSD.
Cuando el menú OSD no está activo, permite mostrar la fuente de
entrada. Puede cambiar dicha fuente presionando – o +.
Selecciona el ítem deseado cuando se encuentra en el menú OSD.
MENU
AUTO
Español
-
Cuando el menú OSD no está activo, permite mostrar la barra de
volumen de forma que puede bajar y subir el volumen
presionando – o +, respectivamente.
Menú principal
Si presiona el botón MENÚ, la pantalla mostrará esta página de menú
English
principal. Puede utilizar el botón + o - (Figura 1) para seleccionar la función
que necesite.
Al final de la página aparecerá la resolución y frecuencia de trabajo.
Figura 1
4

Luminancia
En este modo puede entrar en la subpágina (Figura 2) para ajustar la
English
luminancia de la imagen de la pantalla.
Español
Figura 2
Brillo : Permite ajustar la luminancia del vídeo.
+
: aumenta el brillo, - : reduce el brillo.
Contraste: Permite ajustar el nivel de primer plano de la imagen de la pantalla.
+
: aumenta el contraste, - : reducir el contraste
Imagen (SOLO VGA)
En este modo puede entrar en la página secundaria (Figura 3) para
ajustar la función de visualización de la imagen.
Figura 3
Fase : Para ajustar la calidad de la imagen.
Reloj : Para ajustar la calidad de la imagen.
Posición H./V. (H./V. Position) : Para ajustar la posición horizontal y
vertical del video.
Posición H. : + : mover la pantalla hacia la derecha,
-
: mover la pantalla hacia la izquierda
Posición V. : + : mueve la pantalla hacia arriba,
-
: mover la pantalla hacia la izquierda.
5

Color
En esta función puede entrar en la página secundaria (Figura 4) para
ajustar el color de visualización de la imagen.
Figura 4 Figura 5
Temperatura de color :
Puede seleccionar el color para mejorar el brillo y la saturación de color.
Valores disponibles: 9300K, 7500K, 6500K, Color definido por el usuario y
Español
sRGB (Figura 5).
sRGB :
sRGB se está convirtiendo en el estándar para la industria en materia de
gestión del color y la mayor parte de las más novedosas aplicaciones son
compatibles con sRGB. Activar este ajuste permite que la pantalla de
LCD muestre los colores con una precisión inigualable. Además, se
desactivarán los ajustes de contraste cuando se active sRGB.
Color definido por el usuario:
Ajustes individuales para rojo (R), verde (V), azul (A).
1. Pulse el botón Menú para fijar el ajuste y seleccione el siguiente color a
ajustar.
+
2. Pulse
o - para ajustar el color seleccionado..
6

Español
Configuración OSD
Mediante esta función entrará en la página secundaria (Figura 6) para
ajustar la función de visualización de los menús OSD.
Figura 6
Visualización en pantalla: Presione el botón + o - para seleccionar
Horizontal o Vertical para el ajuste de la posición de los menús OSD.
Horizontal : Permite ajustar horizontalmente la posición del menú OSD.
+
:
mover el menú OSD hacia la derecha,
-
:
mover el menú OSD hacia la izquierda.
Vertical : Permite ajustar verticalmente la posición del menú OSD.
+
:
mover el menú OSD hacia arriba,
-
:
mover el menú OSD hacia abajo.
Transparencia :
Tiempo de espera OSD: Para encender y apagar automáticamente la
Muestra En Pantalla (On Screen Display-OSD) después de un periodo de
tiempo predefinido.
Permite ajustar la transparencia de la imagen OSD.
Configuración
Mediante esta función entrará en la página secundaria (Figura 7) para
ajustar la función de visualización de los menús OSD.
Idioma : Permite a los usuarios escoger de los idiomas disponibles.
Audio:Permite ajustar el volumen de salida del altavoz.
Entrada : Al presionar Seleccionar entrada, cambiará la señal de entrada
a VGA o DVI y HDMI.
Selección de audio HDMI : La configuración predeterminada es Audio
digital. Si utiliza un cable DVI a HDMI para enchufarlo al conector HDMI,
debe establecer la selección de audio en Audio analógico.
DCR: Permite activar o desactivar la función DCR (Dynamic Contrast
Ratio, es decir, Relación de contraste dinámico).
Restablecer: Para recuperar los valores predeterminados.
Figura 7
7

Tiempos soportados
Nº Resolución Modo 23.6"
1 640 х 480@60Hz VESA
2 640 х 480@67Hz MAC
3 640 х 480@72Hz VESA
4 640 х 480@75Hz VESA
5 720 х 400@70Hz DOS
6 800 х 600@56Hz VESA
7 800 х 600@60Hz VESA
8 800 х 600@72Hz VESA
9 800 х 600@75Hz VESA
10 832 х 624@75Hz MAC
11 1024 х 768@60Hz VESA
12 1024 х 768@70Hz VESA
13 1024 х 768@75Hz VESA
14 1152 х 864@60Hz CVT
15 1152 х 864@75Hz VESA
16 1152 х 870@75Hz MAC
17 1280 х 720@60Hz CEA-861
18 1280 х 960@60Hz VESA
19 1280 х 1024@60Hz VESA
20 1280 х 1024@75Hz VESA
21 1360 х 768@60Hz VESA
22 1600 х 1200@60Hz VESA
23 1680 х 1050@60Hz CVT-RB
24 1680 х 1050@60Hz CVT
25 1920 х 1080@60Hz CVT-RB
26 480i@60Hz Video
27 480p@60Hz Video
28 576i@50Hz Video
29 576p@50Hz Video
30 720p@50Hz Video
31 720p@60Hz Video
32 1080i@50Hz Video
33 1080i@60Hz Video
34 1080p@50Hz Video
35 1080p@60Hz Video
◎
◎
◎
◎
◎
◎
◎
◎
◎
◎
◎
◎
◎
◎
◎
◎
◎
◎
◎
◎
-
◎
◎
◎
◎
◎
◎
◎
◎
◎
◎
◎
◎
◎
◎
Español
Nota: “◎” Se admite “-”
No se admite
Aviso : No configure la tarjeta gráfica de su ordenador de forma que exceda estas
frecuencias máximas de refresco. Si lo hace podría dañar permanentemente su
monitor.
8

Información Técnica
Especificaciones Técnicas
Visualización
de LED
Español
Administración de
energía
En conformidad con Energy Star Compatible con
VESA DPMS compatible
< 1 W
23.6”
Inclinación
Temperatura
Conformidad
Voltaje de entrada
Indicador LED
Dimensión de Píxel
Colores
Area de
Visualización
Activa
Altavoz interno
Peso neto
5° hacia adelante ~ 15° hacia atrás
Funcionando: 0°C ~ +40°C Almacenado: -20°C ~ + 60°C
cTUVus
ROHS (REACH)
Energy star
FCC
Input Voltage AC100-240 V
Color azul:Activo
Color naranja:Espera 、No hay señal、No se admite
0.282x 0.282 mm
16.7M
(6bits + Hi FRC)
521.3x 29.32 mm
2W x 2
4.93 Kg
Dimensions
(Físicas)
( WxHxD )
Conector
23.6” : 568 x 419 x 210 mm
Alimentación (entrada de CA)
HDMI
DVI
VGA
Audio (conector de sonido estéreo)
9

Mantenimiento y Cuidado
Cuidado
Evite exponer el monitor directamente a la luz del sol o otra fuente de calor.
Coloque su monitor lejos del sol para reducir el deslumbramiento.
Coloque su monitor en un área bien ventilada. No ponga nada pesado
sobre el monitor.
Asegúrese de que el monitor esté instalado en un área limpia y libre
de humedad.
Mantenga el monitor lejos de imánes, objetos magnéticos, motores,
transformadores, parlantes y televisores.
Sugerencias de Seguridad
Si humo, o algún olor o ruido anormal sale de su monitor,
desenchúfelo inmediatamente y llame al servicio técnico.
Nunca quite la cubierta trasera o delantera del monitor. La unidad de
visualización de adentro contiene partes de alto voltaje que podrían
causar golpes eléctricos sobre el cuerpo humano.
Nunca trate de reparar su monitor usted mismo. Llame siempre a su
servicio técnico o a un técnico cualificado para arreglarlo.
Español
Solución de Problemas
No enciende
Asegúrese que el cable del monitor esté bien conectado al
transformador o adaptador de corriente y este al enchufe de la
corriente.
Enchufe otro electrodoméstico en el mismo enchufe para verificar que el
mismo está suministrando un voltaje correcto.
Asegúrese que todos los cables cortos estén bien instalados.
Encendido pero sin imagen en pantalla
Asegúrese que el cable de video suministrado con el monitor esté bien
conectado al puerto de salida de video en la parte de atrás de su
computadora.
Si no está firmemente conectado, conéctelo nuevamente.
Ajuste el brillo.
Colores extraños o anormales
Si algún color (rojo, verde, azul) están faltando, revise el cable de video
para asegurarse que este está bien conectado. Pins sueltos o quebrados
en el cable conector podrían causar una conexión impropia o deficiente.
Conecte el monitor a otra computadora.
Según la regulación WEEE, no se debe desechar este monitor, cuando se
torna obsoleto, como una basura común en Europa. Favor refiera a la
información de reciclaje de nuestro sitio web para tratarlo.
10
 Loading...