

Page 1

for
W20/X100/N100H/N10
Quick Start Guide
Page 2

- 2 -
What Is Required
STEP 1: DOWNLOAD THE AURENDER APP
STEP 2: CONNECT AURENDER TO YOUR LOCAL NETWORK
STEP 3: UPDATE AURENDER’S SYSTEM SOFTWARE TO THE
LATEST VERSION
STEP 4: PREPARING MUSIC CONTENT
Loading music into the Aurender's internal drive using a Mac
Loading music into the Aurender's internal drive using a PC
STEP 5: PLAYING MUSIC
Important Notice Regarding the Power Off Procedure
Procedures To Factory Restore Your Aurender
Table of Contents
3
4
5
6
8
8
10
12
13
14
.....................
.....................
.....................
.....................
.....................
.....................
.....................
.....................
.....................
.....................
Page 3

- 3 -
1. Aurender Music Server
: W20/X100/N100H/N10
2. Apple iPad 2 or later
: iPad Air2 is recommended for its fast processing speed and 801.11ac wireless connection
3. Wireless router with at least 3 gigabit ports
: Apple Airport Extreme is recommended for its easy to setup, reliable and fast (801.11ac) operation, Gigabit
ports router is recommended for faster music file transfer.
Apple Airport Extreme meets meets all these requirements.
4. Various lengths of CAT6 LAN cable
: determined by the location of the equipment involved
What Is Required:
Page 4

- 4 -
1. Find App Store on your iPad
and open it
STEP 1: DOWNLOAD THE AURENDER APP
2. Type “Aurender Conductor”
and search
3. TADA!! GET the free Aurender
Conductor App
Page 5
- 5 -
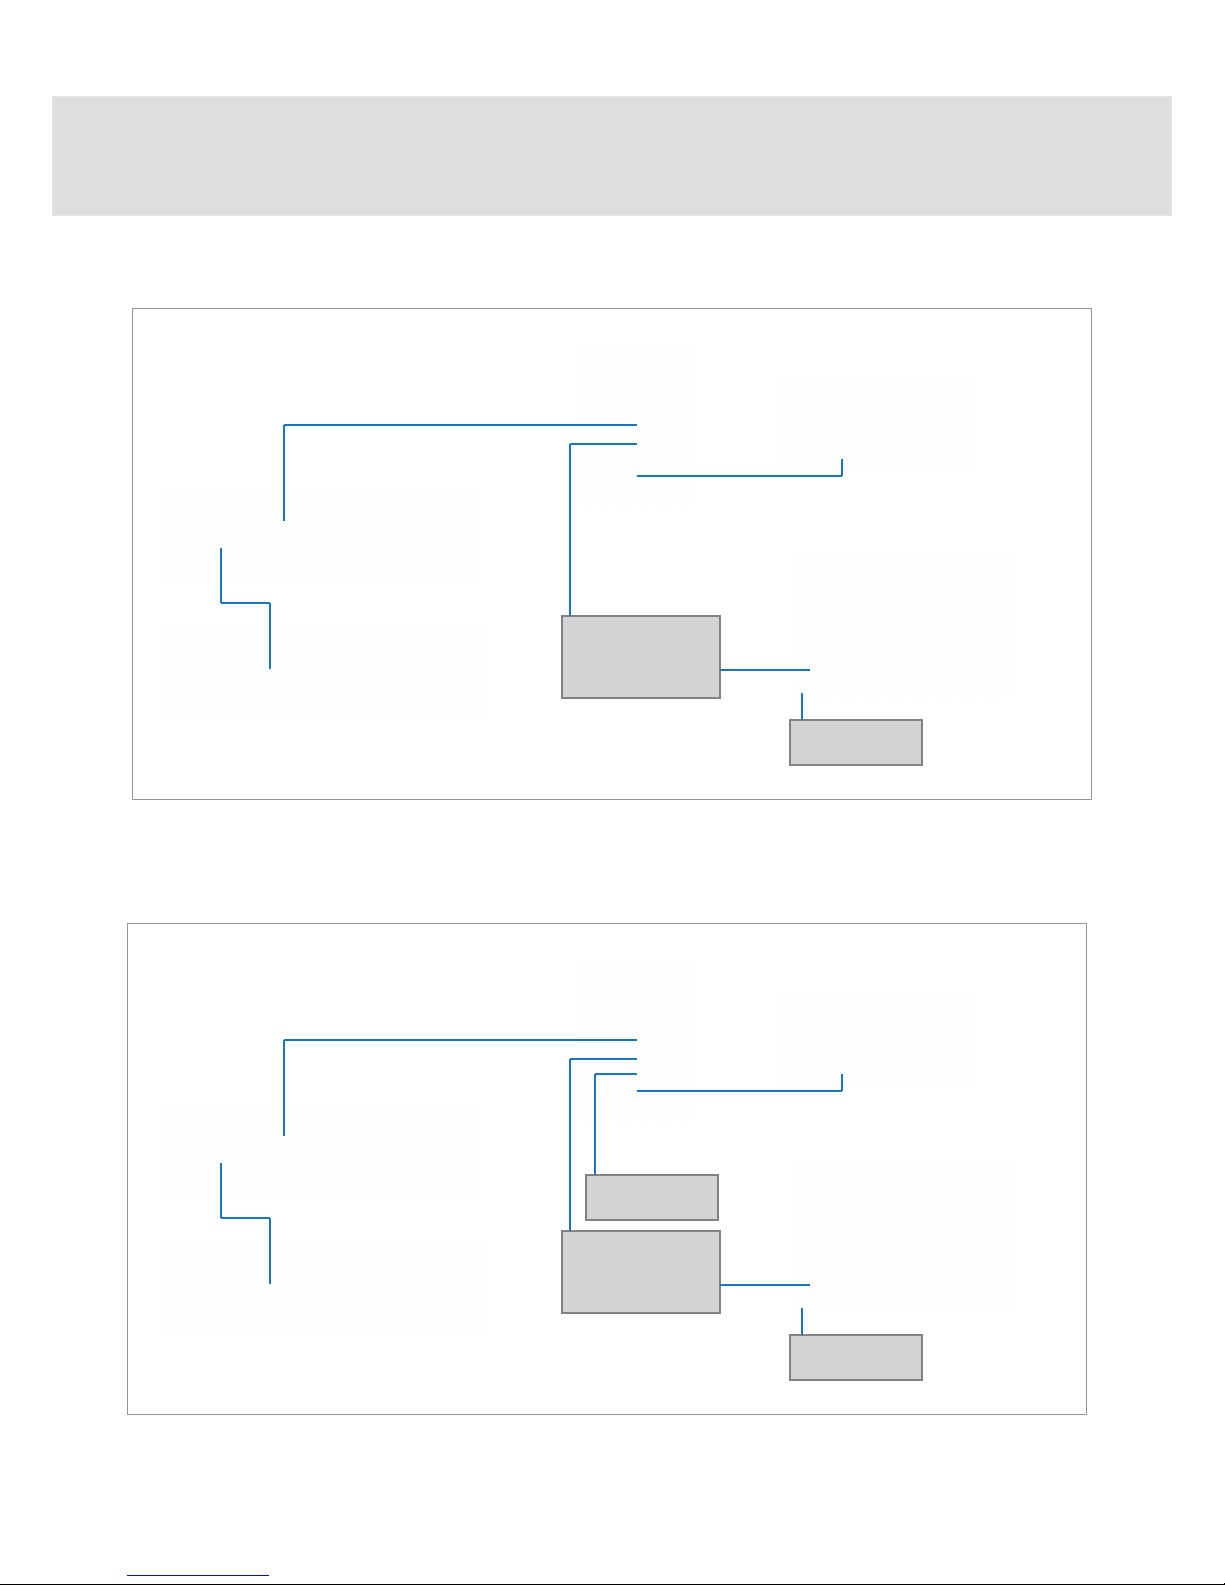
•When the contents are in your Mac/PC’s storage or USB HDD
STEP 2: CONNECT AURENDER TO YOUR
LOCAL NETWORK
•When the contents are in the NAS
Thunderbolt
to Ethernet
USB HDD
Router from Internet Service provider
LAN cable
USB cable
X100/N100H
USB DAC/AMP with USB Input
Thunderbolt
to Ethernet
USB HDD
Router from Internet Service provider
LAN cable
USB cable
X100/N100H
USB DAC/AMP with USB Input
NAS
Page 6

- 6 -
1. Turn on the Aurender.
STEP 3: UPDATE AURENDER’S SYSTEM
SOFTWARE TO THE LATEST VERSION
3. Open Aurender Conductor App.
The app will connect to your Aurender automatically if you have only one Aurender.
*You’ll need to select the Aurender you want to access if you have more than one unit.
2. Connect the iPad to your wireless access point.
(on your iPad: Settings -> Wi-Fi)
* Make sure your iPad is successfully connected to Wi-Fi
4. Enter the passcode.
The first time you connect the Aurender from the iPad App, you will be prompted to enter the passcode.
The passcode will be shown on the front panel of the Aurender unit.
5. Tap on Settings
After you have entered in the passcode, tap on Settings on the upper right-hand side of the app, right
below the search bar.
4
5
Page 7

- 7 -
6. Tap! "Upgrade"
STEP 3: UPDATE AURENDER’S SYSTEM
SOFTWARE TO THE LATEST VERSION
6
7
7. Tap! "Upgrade to the new version"
8. Upgrade will start in a few seconds and Aurender’s front panel will display the status
of the upgrade progress in percentages (%) completed.
9. Exit Aurender Conductor App.
10. Aurender will reboot after upgrade is done.
Page 8

- 8 -
Loading music into the Aurender's internal drive using a
Mac
STEP 4: PREPARING MUSIC CONTENT
1. Make sure your iPad is connected to Wi-Fi
(See Step 3 - #2 for detailed information)
3. From your Mac, open
Finder > Go > select Connect to Server…
OR
press command + k key from the desktop.
4. On your Mac, enter the appropriate IP address
that appears on your iPad screen.
**Make sure you type in “smb://” before you
type in the Aurender IP number.
2. On your Aurender Conductor App, open
Settings by tapping on and select “NAS
Share”.
5. Enter Name and Password according to the
Username and Password shown in NAS Share
on the iPad.
Page 9

- 9 -
Loading music into the Aurender's internal drive using a
Mac
STEP 4: PREPARING MUSIC CONTENT
If your Aurender (W20, N10 or X100L) has two
internal HDDs, you will be prompted to select
the HDD.
(It's your choice which drive to use)
* You will not see this pop-up window with
N100H.
6. After you enter the Name and Password, a new finder window will appear.
You can drag&drop your music folder/files you want to the folder above.
If you have multiple folders in one folder,
Aurender considers the last folder in the hierarchy
as one album. (Below-folder-structure will be
taken care of correctly)
Page 10

- 10 -
Loading music into the Aurender's internal drive using a
PC
STEP 4: PREPARING MUSIC CONTENT
1. Make sure your iPad is connected to Wi-Fi
(See Step 3 - #2 for detailed information)
3. From your Windows, go to
Start > All Programs > Accessories > Run
OR
press Windows + R key on your keyboard.
4. On your Windows, enter the appropriate IP
number that appears on your iPad screen.
**Make sure you type in two backslashes “\\”
before you type in the Aurender IP number.
2. On your Aurender Conductor App, open
Settings by tapping on and select “NAS
Share”.
5. Enter Name and Password according to the
Username and Password shown on the iPad.
Page 11

- 11 -
Loading music into the Aurender's internal drive using a
PC
STEP 4: PREPARING MUSIC CONTENT
6. After the log-in, a window will appear.
You can drag&drop your music folder/files you want to the folder above.
If you have multiple folders in
one folder, Aurender considers
the last folder in the hierarchy
as one album. (Below-folder-
structure will be taken care of
correctly)
Page 12

- 12 -
STEP 5: PLAYING MUSIC
3. Once your music has been copied and
scanned, you can use the Aurender conductor
App to select and play your music. You can
change the view by selecting different
tabs such as Song, Artist, Album, Genre,
Composer and Conductor.
You can also search for songs. (Make sure
your view is in the right one. For example, if
you are searching for an artist, you must be
on the Artist tab)
1. The Aurender scans music files
automatically for meta-data and will show
the album covers and artist names. It may
take several minutes to hours to make the
database. Until the Aurender finishes making
the meta-data database, you will not see any
album covers in the Aurender App as seen in
the screen capture.
2. You can check the scan status in the
Settings -> Scanner menu
Page 13

- 13 -
Important Notice Regarding the Power
Off Procedure
Should you ever have the need to turn off the AC power of your Aurender Music
Server, it is imperative to do so using the following procedure. Failure to do so may
result in unmounting or corrupting the internal SSD drive crippling or rendering the
unit inoperative:
To power down completely, depress the front panel power button until the power
indicator light begins to flash, then release.(0.5~1Sec) When the power indicator
flashing stops, the rear power switch may be switched to the off position.
Should your music server be powered down unexpectedly, for example, from a power
outage, then a full factory recovery may need to be run. Please refer to the procedure
in the next section.
Page 14

- 14 -
Procedures To Factory Restore Your Aurender
1. Make sure the unit is plugged in and the rear panel power switch is in the
off position.
2. While pressing the front panel power button, switch on the back panel
power switch.
3. Once the unit’s display shows the Aurender logo, release the front panel
power button.
4. Wait for the recovery process to finish. Once the recovery is complete, the unit
will reboot.
Please note: After a factory reset recovery your system operating system may need
to be updated. Additionally, if using a NAS, it will need to be remounted
and you will need to run the AMM (Aurender Music Manager) to restore
the erased metadata.
Page 15

- 15 -
Customer Service : support@aurender.com
TVLogic America Co, Ltd
209 N. Victory Blvd, Burbank, CA 91502, USA
TVLogic Co., Ltd
Smart Audio Division,
TVLogic Co., Ltd.
100 Baekhyun-ro, 2802 Jeongja I-Park,
Bungdang-gu, Seongnam, Korea.
Aurender is the registered trade mark of TVLogic.
iPad, Airport Extreme are trademarks of Apple Inc.
Windows is a trademark of Microsoft Inc.
All registered trademarks belong to their respective owners.
Page 16

www.aurender.com
 Loading...