

Page 1
7/27/2018
Instructions
Please read the following instructions carefully before setting up the Aurender Music Player.
• Be careful not to drop the device to avoid internal damage.
• Do not disassemble the device.
• Keep magnetic materials away from Aurender to prevent any damage to data.
• Do not expose device to oil, dust, water, high humidity, or smoke.
• Keep ventilation openings free from obstruction.
• When cleaning, use only a soft cloth. Keep out of contact with water or other liquids.
• All servicing must be performed by a qualied representative, or the warranty will be voided.
• Unplug power cord during severe lightning storms or when unused for a long period of time.
• Unplug the device from the outlet only after completely turning o the unit.
• Always turn the power o before connecting or disconnecting any cables.
• Please note that hard drives can break down.
It is important to back up your music collection periodically to a separate memory device. In the event of
drive failure, Aurender is not responsible for any loss of data. The drive manufacturer will only replace
faulty drives under warranty and do not compensate for any loss of data.
Positioning
• Place your device on a at, horizontal, and stable surface.
• Keep away from heat sources, such as radiators.
• Do not stack other products on top of the Aurender.
• Allow space around the device for ventilation.
• Do not place inside an enclosed cabinet.
https://www.aurender.com/page/manual-a10 3/9
Page 2
7/27/2018 AURENDER - Reference Music System
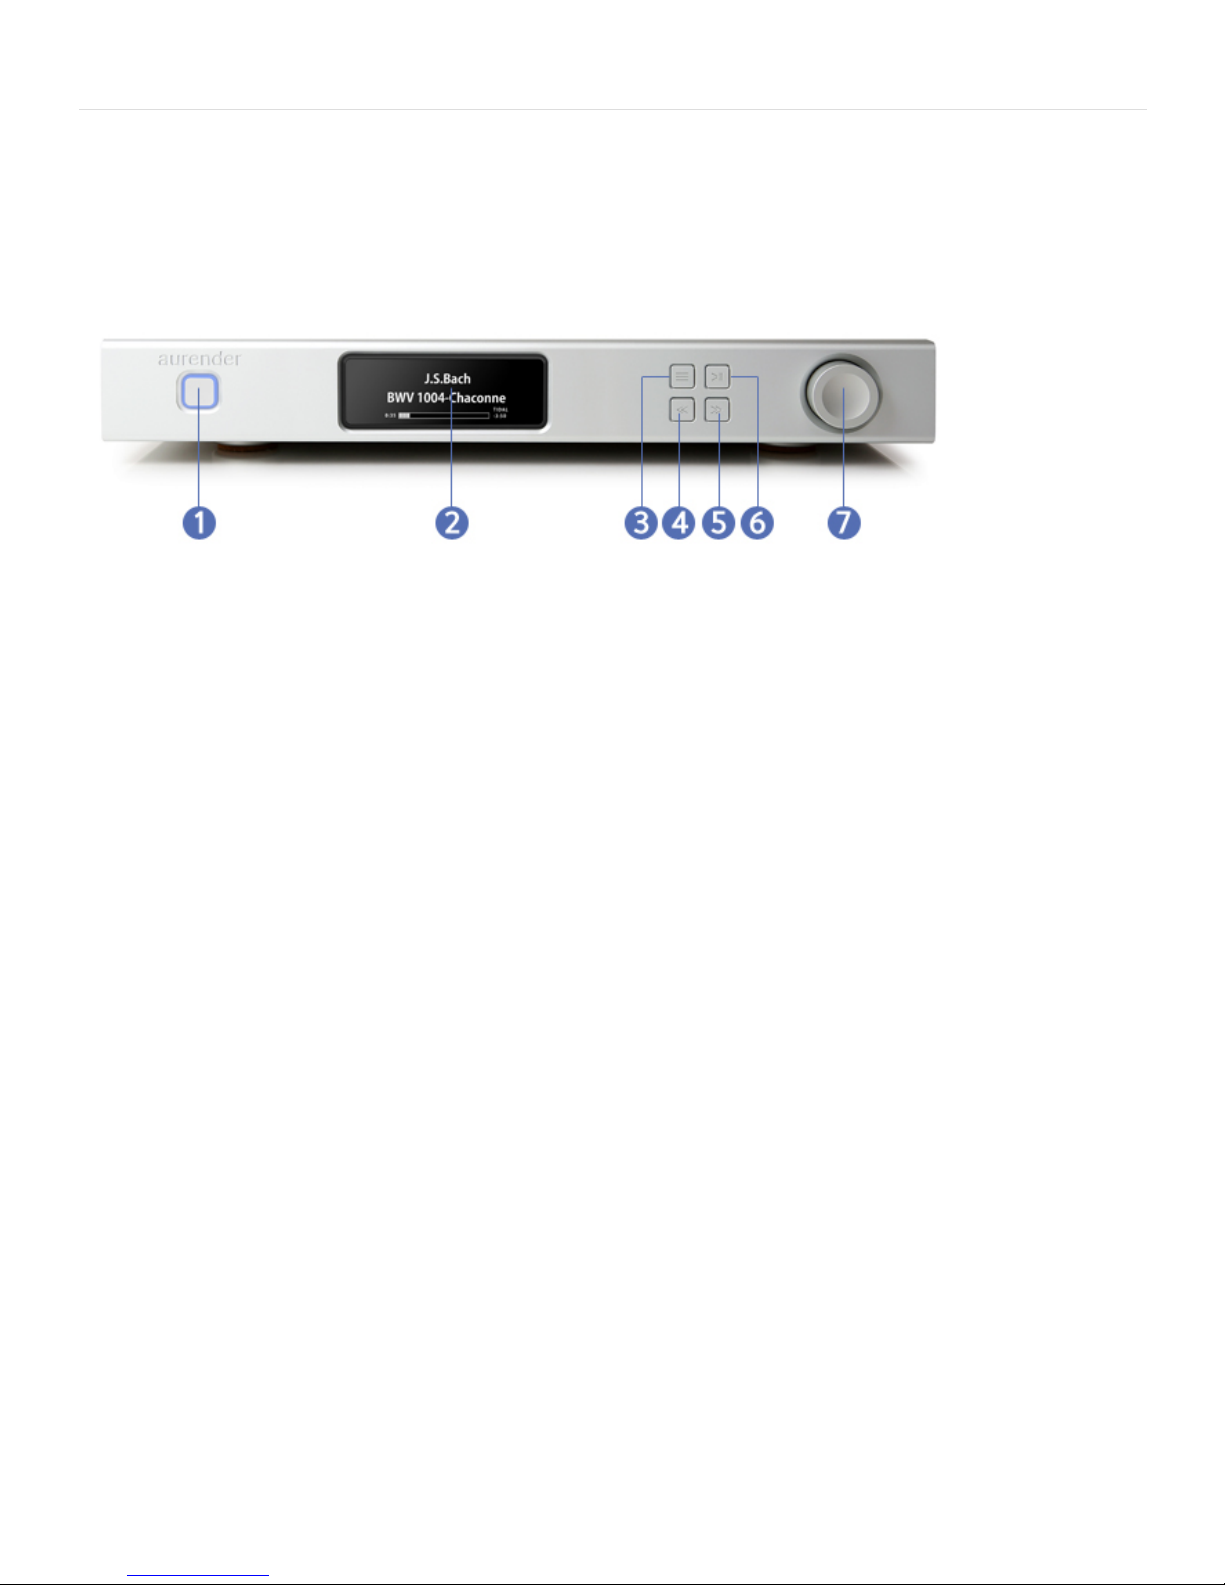
Front and Rear Panel
Front Panel
1. On/O Button
Turns the unit on when it is o and connected to AC power, with the rear panel power switch
in the "on" position. When the front panel AMOLED is active, pressing this button will power
the unit completely o. If no music has played for about 5 minutes, the AMOLED will go dark
and pressing this button will wake the AMOLED back up. A second press will then turn the
unit o. Note that the button will ash during power down and stops ashing once the power
o cycle has completed.
2. AMOLED Display
3.
Display Menu
Press to cycle through 2 display options: Song Information and Playlist. Songs from playlists
may be selected using the four buttons on the right side of the front panel display. Use
buttons 4 and 5 to scroll between playlists and button 6 to select a playlist. After the playlist is
selected, press button 6 again to start playback. Once the playlist is selected, buttons 4 and 5
can be used to select songs within the selected playlist. To see the Device Information Display,
please keep the button depressed for about three seconds until the display blinks, release the
button and wait. The Device Information Display with details about Server name, Network
status, IP address, and other details will appear. To return to the normal display, press the
button again.
4. Play Previous
Press to skip to the previous track.
5. Play Next
Press to skip to the next track.
6. Play/Pause
Press to start or stop playback.
7. Volume Knob
https://www.aurender.com/page/manual-a10 4/9
Page 3

7/27/2018 AURENDER - Reference Music System
Rear Panel
1. Analog Audio Output - XLR Right
2. Analog Audio Output - RCA Right
3. Analog Audio Output - XLR Left
4. Analog Audio Output - RCA Left
5. Digital Audio Input - Optical SPDIF
6. USB Audio Class 2.0 Output
Connect to the USB input of a USB compatible digital-to-analog converter.
7. Gigabit Ethernet port
To connect to home networks and Network Attached Storage (NAS) devices. The Ethernet
cable should be connected to the network router before turning on the Aurender.
8. USB 2.0 Data Ports
For copying from external USB memory devices.
9. AC Power Switch
Press away from the AC power socket to turn on, and towards the power socket to turn o.
The rear panel power switch should be used only after the unit has been turned o
completely using the front panel On/O button, or using one of the power o options from
the Conductor App. Abnormal shutdown or using the rear panel power button while the unit
is in operation or standby can cause the system to check itself after an abrupt power down. In
this case, a message will appear on the display stating that the unit is checking the system.
10. AC Power Socket
Connect to a power outlet with an AC Power cord.
MQA(Master Quality Authenticated)
https://www.aurender.com/page/manual-a10 5/9
Page 4

7/27/2018 AURENDER - Reference Music System
MQA is an award-winning British technology that delivers the sound of the studio. The master MQA le is fully
authenticated and is small enough to stream, while also being backward compatible, so you can play MQA
music on any device.
MQA technology is licensed by labels, music services, and hardware manufacturers worldwide.
Visit mqa.co.uk for more information.*
The Aurender A10 includes Full Decoder MQA technology, and is a fully compliant MQA end-to-end solution
enabling you to play back MQA audio les and streams, delivering the sound of the "original master recording”.
This method of decoding delivers the highest possible sound quality available from MQA.
The Aurender Conductor App will indicate that “MQA" or "MQA Studio” content is being played back. A green or
blue dot next to the MQA logo indicate that the unit is decoding and playing an MQA stream or le, and
denotes provenance to ensure that the sound is identical to that of the source material. The blue dot indicates
it is playing an MQA Studio le, which has either been approved in the studio by the artist/producer or has
been veried by the copyright owner.
The A10's front panel also uses text indicators to display MQA playback and the respective sampling rate of the
le or stream being played. ‘MQA’ or ‘MQA Studio’ indicates that the unit is decoding and playing an MQA
stream or le, and denotes provenance to ensure that the sound is identical to that of the source material.
‘‘MQA Studio’ indicates it is playing an MQA Studio le, which has either been approved in the studio by the
artist/producer or has been veried by the copyright owner.
*The MQA logo is a trade mark of MQA Limited. © MQA Limited 2017
Remote Control
https://www.aurender.com/page/manual-a10 6/9
Page 5

7/27/2018 AURENDER - Reference Music System
Connection
https://www.aurender.com/page/manual-a10 7/9
Page 6

7/27/2018 AURENDER - Reference Music System
Warning
Before connecting audio cables, rst check to see that all devices are grounded using grounded
plugs and grounded sockets. In addition, all devices should be turned o, before connecting any
audio or digital cables. If the devices are not grounded, a voltage potential dierence between
devices can cause a voltage surge through the audio cable that can weaken and eventually damage
sensitive circuits in D/A converters and other devices.
Specication
Dimensions & Weight 430 x 55 x 353 (mm) 16.93 x 2.2 x 13.9 (inches) / 10.2Kg 22.5 lbs
SSD for System and Cache 120G
Music Storage 4TB (2.5" HDD)
Power Full-Linear
Display 3.0" AMOLED
Digital Audio Output USB Audio Class 2.0
Digital Audio Input SPDIF Optical up to 24-bit / 192 kHz
Other I/O Gigabit Ethernet, USB Port x 2
Analog Audio Output Unbalanced(RCA): 2Vrms / Balanced(XLR): 4Vrms
Volume Control -90 dB ~ 0dB, 0.5 dB step Velocity Sensitive Operation
USB Audio Output PCM: up to 32-bit / 384 kHz DSD: DSD64, DSD128 / DoP Mode
DAC Chip AK4490(AKM) x 2 (Dual-Mono Design)
THD + N Min. -112dB, IMD(SMPTE) Min. -113 dB
THD (1KHz 2.5Vrms XLR output) 0.00013 %
Dynamic Range MAX 128 dB (CCITT lter)
Stereo Crosstalk Better than -135dB, 20-20kHz.
Copyright © Aurender
https://www.aurender.com/page/manual-a10 8/9
 Loading...