

AURATON RPT 230, RPT 12 User Manual
RPT 230 / RPT 12
R E P E A T E R
User Manual
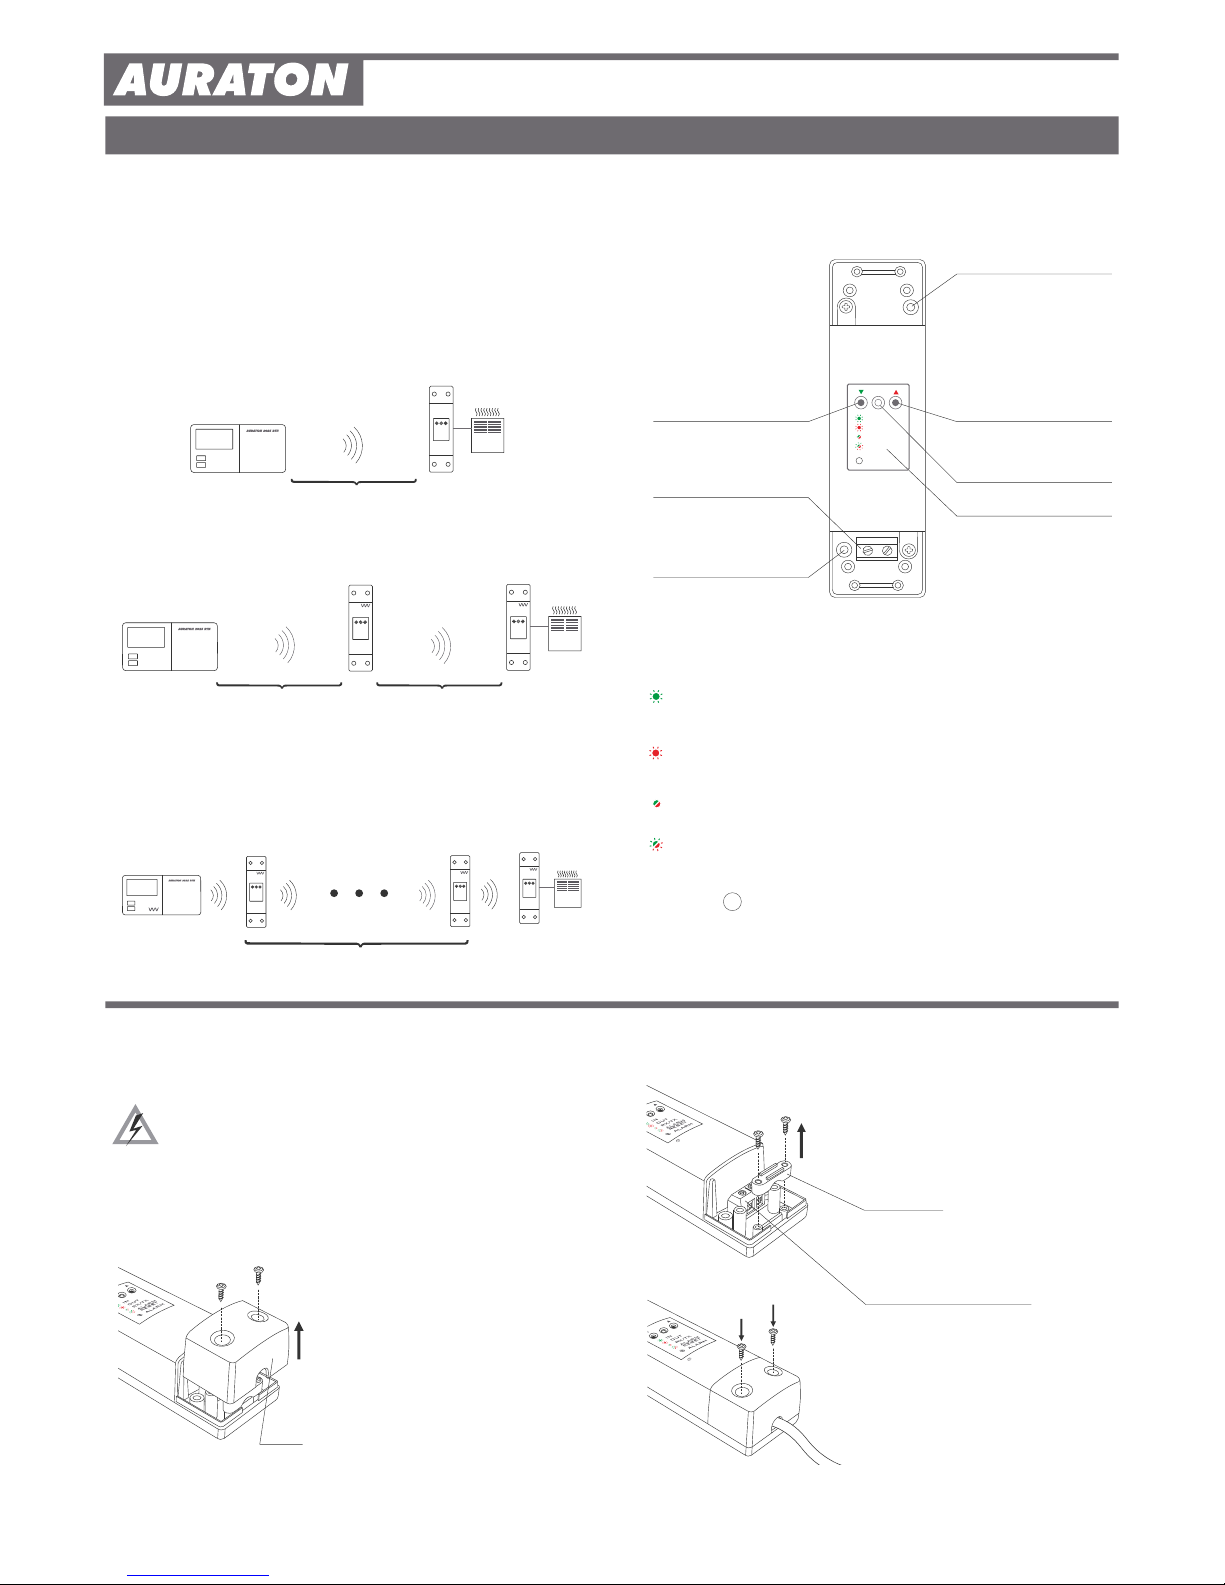
The AURATON RPT repeated is a device that repeats the signal emitted by a
transmitter to the receiver, without any modification of the signal, in order to
increase the range of the transmitter's radio transmission range.
This is done, for example, in manufacturing buildings where the receiver is out
of the transmitter's range or in multi-floor buildings where thick walls hinder
transmission between the transmitter and the receiver.
Principles of operation of the AURATON RPT
AURATON RTH
Receiver
Transmitter
max. 30m
(indoor)
AURATON RTH
Receiver
Transmitter
max. 30m
(indoor)
AURATON RPT
max. 30m
(indoor)
Repeater
AURATON RPT
It is possible to build chains consisting of up to 8 repeaters. Each AURATON RPT
repeater automatically receives the signal from another repeater and forwards
it without any additional user settings.
AURATON RTH
AURATON RPT
Repeater
AURATON RPT
Repeater
max. 8 pcs
AURATON RPT
button for unpairing devices
button for pairing devices
with the repeater
diode indicating operation
of the device
cable fixture
power supply connection terminal
230 V AC or 12 V DC*
key
Green continuous light – the repeater is waiting for a data packet.
Green blinking light – the repeater is waiting for device pairing -
(chapter: "Pairing of LMS devices with the AURATON RPT repeater").
Red blinking light – the repeater is waiting for a device to unpair -
(rozdział: „chapter: "Unpairing of devices from the AURATON RPT
repeater"”).
Alternating red and green light for 1-2 seconds – the repeater
receives/sends a data packet.
Alternating red and green light:
ALARM - the repeater's connection with one of the paired devices is
broken. If AURATON RPT does not receive a data packet from
a paired device for 35 minutes, then it indicates this with
alternating red and greed diode light.
RESET - the repeater unpairs all the previously paired devices -
(chapter: "RESET - Unpairing all devices paired with the
AURATON RPT repeater")
Key - description of diode signaling
hole for the screw fixing
the repeater to the wall
hole for the screw fixing
the repeater to the wall
Description of the AURATON RPT 230/12
repeater
IN
OUT
ALARM
RESET
ALARM
35
RX/TX
min
IN
OUT
ALARM
RESET
35
min
1. Take off protective covers from the
lower and upper part of the AURATON
RPT .
AURATON RPT
Fastening the AURATON RPT repeater.
protective cover
NOTE: When installing the AURATON RPT repeater its power
supply must be disconnected. It is recommended that
the installation is performed by a qualified specialist.
NOTE: The permanent electrical system of a building must
include a breaker and an overcurrent protection.
2.
3.
4.
Take off cable tie clamps from the lower
and upper part of the AURATON RPT.
Connect power supply conductors to the
po wer s u ppl y te rmin als o f the
AURATON RPT, observing safety rules
After connecting the conductors, they
must be secured with the cable tie
clamps and reinstall protective covers of
the AURATON RPT .
ALARM
35
min
AURATON RPT 230
cable tie clamp
AURATON RPT 230
ALARM
35
min
RX/TX
~230 VAC (AURATON RPT 230)
12 VDC (AURATON RPT 12)
*
Receiver
3. Successful pairing is indicated by the LED diode on the AURATON RPT repeater
no longer blinking green and the repeater switching to normal operation.
In the event of a pairing error, steps 1 and 2 must be repeated. If more errors occur,
all devices must be unpaired by RESETTING the AURATON RPT repeater (see "RESET
- Unpairing all devices paired with the AURATON RPT repeater") and try pairing the
devices again.
NOTE:
One AURATON RPT repeated can be paired to several LMS devices (max. 64).
Pairing of LMS devices
with the AURATON RPT repeater
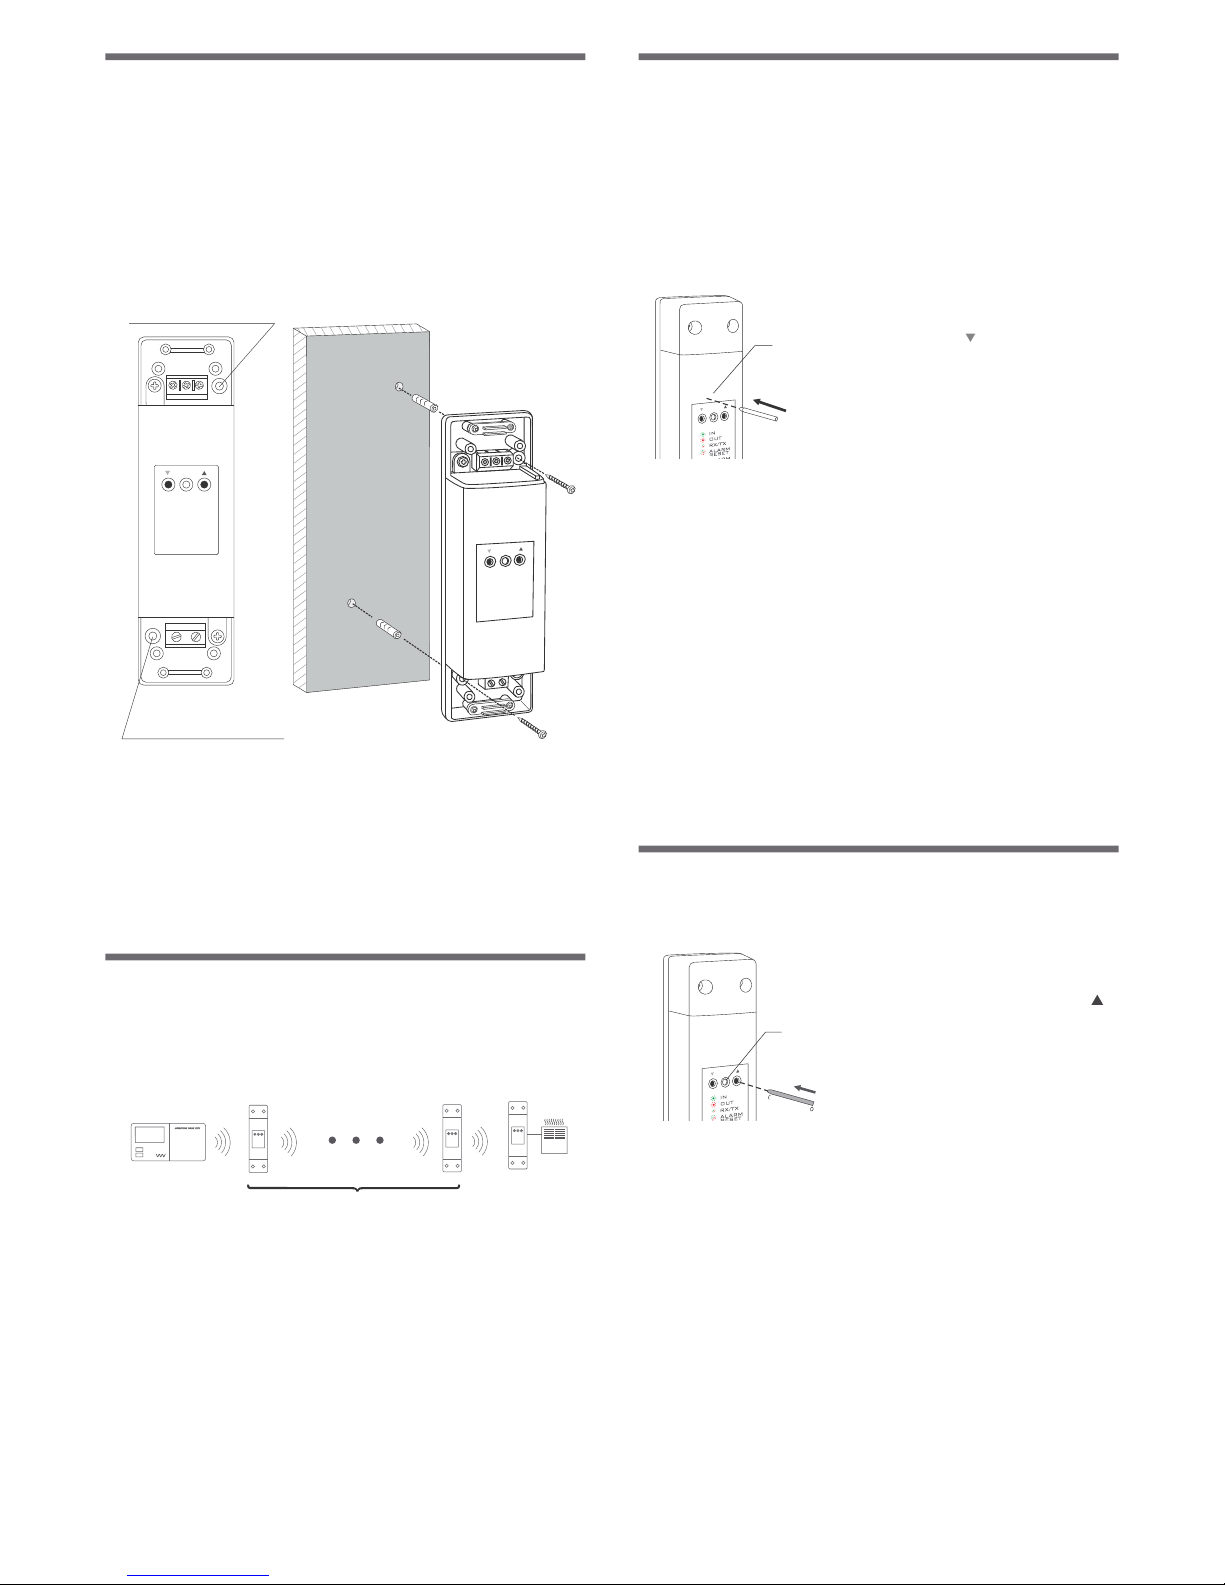
1. Pairing of the AURATON RPT repeater with an
LMS device (e.g. AURATON 2025 RTH or T-1 RTH
thermostats) is initiated by pressing the left pairing
button (green triangle - ) on the AURATON RPT
repeater and holding it for at least 2 s until the LED
diode starts blinking green - then the button must
be released.
The AURATON RPT repeater waits for pairing for
120 seconds. After this period, it automatically
returns to normal operation.
2. When the LED diode on the repeater blinks green, press the "pairing
button" on the device to be paired and hold it for at least 2 seconds
(a detailed pairing instruction is supplied with each LMS device).
LED
NOTE: An LMS device (e.g. the AURATON 2025 RHT - a transmitter)
must first be paired with a receiver (e.g. AURATON RTH) and
only then with the AURATON RPT repeater.
(The detailed instruction for pairing transmitters to receivers is
supplied with each device separately.)
Pairing of an LMS device to several repeaters
"chain" operation
It is possible to build chains consisting of up to 8 repeaters.
In such a case, the LMS device (e.g. AURATON 2025 RTH) must be
paired to only the nearest AURATON RPT repeater.
Every other AURATON RPT repeater automatically receives the signal
from the previous repeater and forwards it without any additional
user settings.
AURATON RTH
AURATON RPT
Repeater
AURATON RPT
Repeater
max. 8 pcs
AURATON RPT
Unpairing devices from the AURATON RPT
repeater
1. Unpairing of a device from the AURATON
RPT repeater is initiated by pressing the
right unpairing button (red triangle - )
on the repeater and holding it for at least 2
seconds until the LED diode starts blinking
red - then the button must be released.
The repeater waits to be unpaired for 120
seconds. After this period, it automatically
returns to normal operation.
LED
2. When the LED diode of the AURATON RPT repeater blinks red, press the
"pairing button" on the device to be unpaired and hold it for at least 2
seconds (a detailed unpairing instruction is supplied with each LMS device).
3. Successful unpairing is indicated by the LED diode no longer blinking red
and the repeater switching to normal operation.
In the event of an error, steps 1 and 2 must be repeated.
Receiver
To fasten the AURATON RPT to the wall:
1) Remove protective covers from the lower and upper part of the regulator.
2) On the wall, mark the location of holes for fastening screws.
3) In marked places, drill holes of a diameter corresponding to the bundled
wall plugs (5 mm).
4) Insert wall plugs into the drilled holes.
5) Screw in the RPT repeater to the wall with screws, making sure they hold the
receiver securely.
Fastening the RPT reapeater to the wall
NOTE: If the wall is wooden, there is no need to use wall plugs. In such a case,
drill two holes 2.7 mm in diameter instead of 5 mm, and screw
the screws directly into the wood.
hole for fastening
the receiver to the wall with a screw
NOTE: The RPT repeater cannot be placed in metal containers (e.g. an
assembly box, a metal enclosure of a heater) in order to not to interfere
with its operation.
hole for fastening
the receiver to the wall with a screw
 Loading...