

Auralog Tell me More - Education 7.0 Installation Manual
TELL ME MORE® Education
Installation Guide
Copyright 2003 Auralog S.A. All rights reserved.

TELL ME MORE® Education
Installation Guide
Contents
TELL ME MORE® Education: system set-up ............................................................................................................3
INTRODUCTION.............................................................................................................................................................4
INSTALLATION OF TELL ME MORE
R
EQUIRED CONFIGURATION............................................................................................................................................5
®
EDUCATION ............................................................................................5
Different types of configuration possible...................................................................................................................5
For the server and auxiliary lesson servers...............................................................................................................6
For the student or Tutor workstations.......................................................................................................................7
For the Administrator workstation ............................................................................................................................7
I
NSTALLATION OF TELL ME MORE® EDUCATION ........................................................................................................8
For multi-workstation licences..................................................................................................................................9
For single workstation licences...............................................................................................................................15
T
O START THE TELL ME MORE SERVER....................................................................................................................18
U
NINSTALLING THE TELL ME MORE® EDUCATION APPLICATIONS............................................................................18
To stop and uninstall the server applications..........................................................................................................18
To uninstall Admin Tools, TELL ME MORE
®
, Tutor Tools or Lesson Copier........................................................18
SERVER MANAGER ....................................................................................................................................................19
To run Server Manager ...........................................................................................................................................19
To define or modify the system parameters .............................................................................................................20
To modify the Administrator Account......................................................................................................................20
L
ESSONS .......................................................................................................................................................................22
To copy the lesson content onto the main server.....................................................................................................22
To organise the auxiliary lesson servers .................................................................................................................23
To view the lessons available on the lesson servers................................................................................................24
To remove lessons....................................................................................................................................................24
W
ORKSTATIONS............................................................................................................................................................25
To add a workstation...............................................................................................................................................25
To update the list of workstations............................................................................................................................26
To modify a workstation ..........................................................................................................................................26
To remove workstation(s) ........................................................................................................................................26
L
ICENCE MANAGEMENT ................................................................................................................................................27
To add a licence.......................................................................................................................................................27
To remove a licence.................................................................................................................................................27
LESSON COPIER ..........................................................................................................................................................28
T
O RUN LESSON COPIER................................................................................................................................................28
T
O ADD LESSONS...........................................................................................................................................................29
T
O REMOVE LESSONS ....................................................................................................................................................29
AUXILIARY LESSON SERVER..................................................................................................................................31
T
O INSTALL THE AUXILIARY LESSON SERVER APPLICATION.........................................................................................31
T
O RUN THE AUXILIARY LESSON SERVER APPLICATION ...............................................................................................32
T
O ADD LESSONS...........................................................................................................................................................33
T
O REMOVE LESSONS ....................................................................................................................................................34
TECHNICAL SUPPORT...............................................................................................................................................35
GLOSSARY.....................................................................................................................................................................36
Copyright 2003 Auralog S.A. All rights reserved. 2
r
A
A
r
(4)
A
(5)
ger
TELL ME MORE® Education
Installation Guide
TELL ME MORE® Education: system set-up
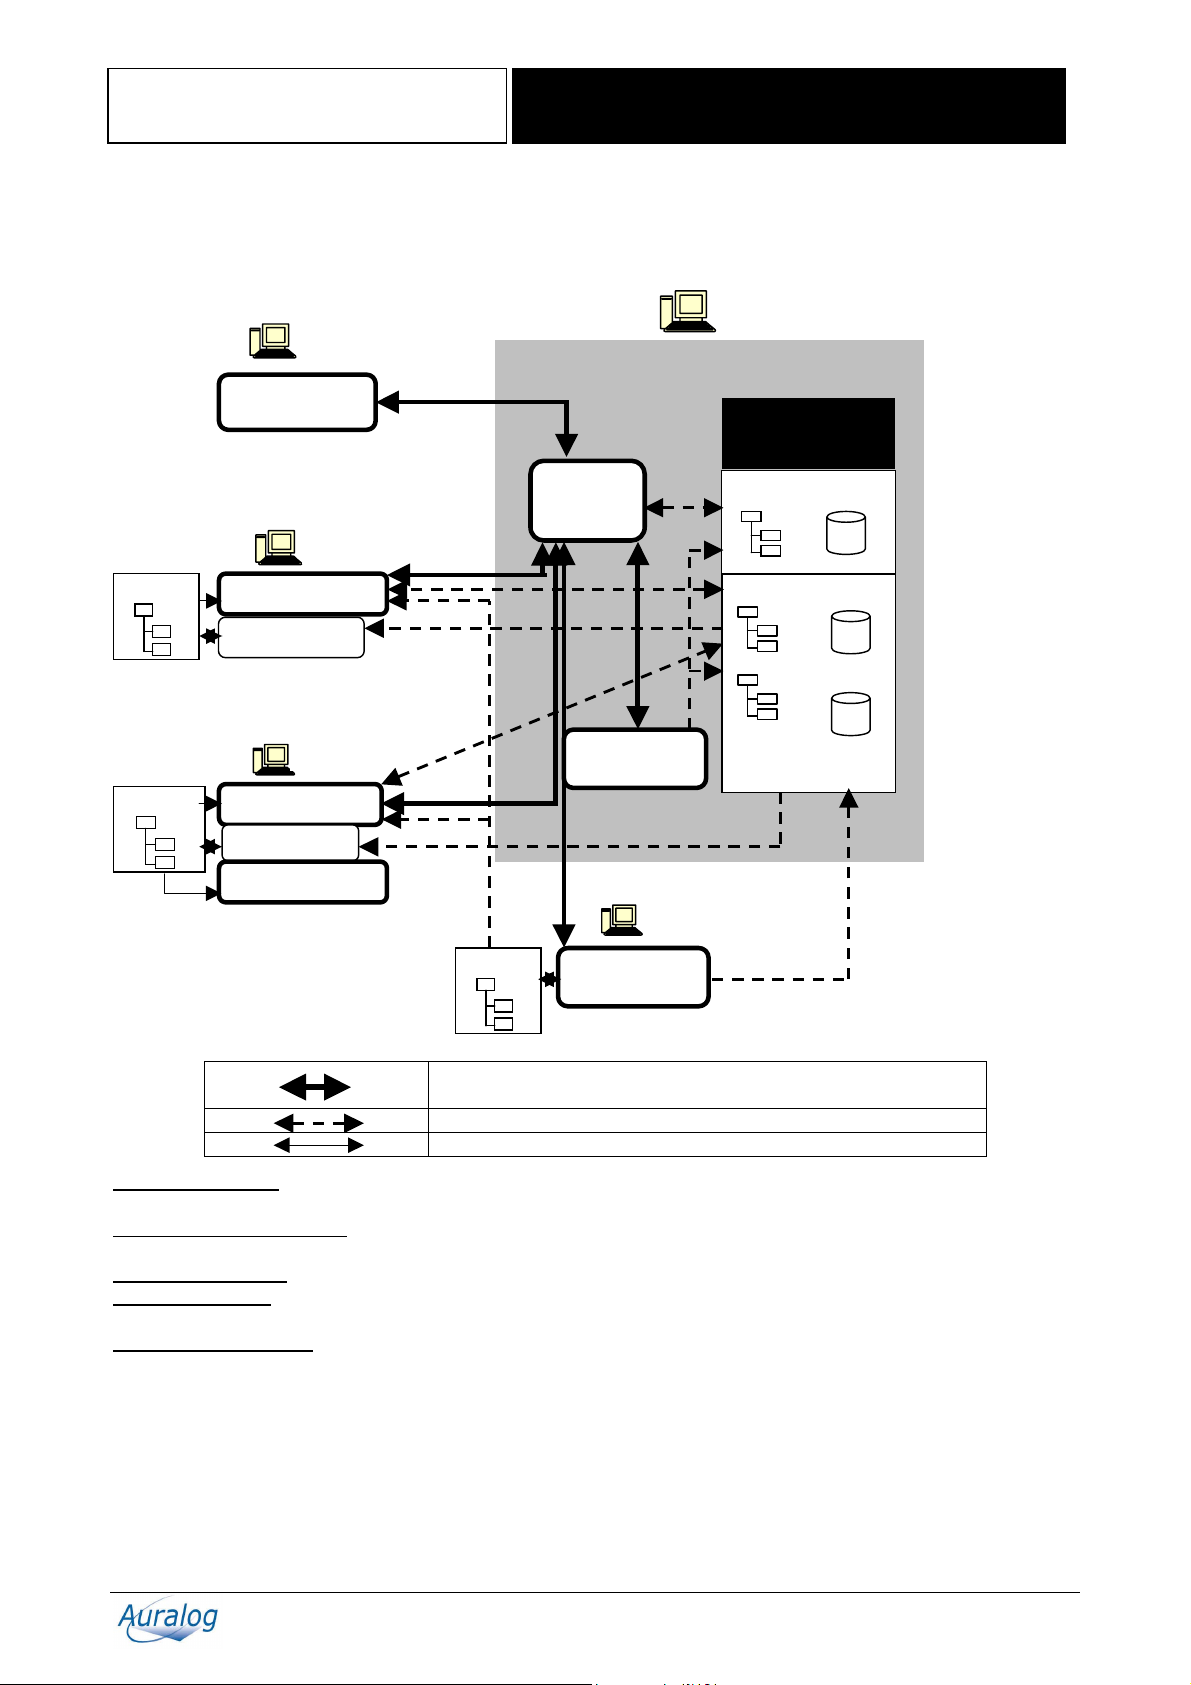
This diagram shows the standard system set-up of TELL ME MORE® Education for a multi-workstation licence.
dfgsdfgsdg
Lessons
Lessons
Administrator
workstation (2)
dmin Tools
Student
workstation (3)
TELL ME MORE
Lesson Copier
Tutor workstation
Tutor Tools
Lesson Copier
TELL ME MORE
TELL ME
MORE
Server
Paramétrages
du serveu
Server
Mana
Server workstation (1)
System data
Shared data
uxiliary lesson
server
File and Data
Server
Users
Lessons
Lessons
uxiliary
Lesson Serve
dfgsdg
Http protocol server connection, most frequently used for
identification purposes
Network access to data and files
Local connection
Server workstation: designated workstation for the technical administrator to configure the system and the File and
Data Server.
Administrator workstation
: designated workstation for the Administrator to organise the structure of the Tutoring
Service (students, Tutors, language and student groups) using the Admin Tools application.
Student workstation
Tutor workstation
: designated workstation for students to work in TELL ME MORE®.
: designated workstation for the Tutor to organise, follow and personalise student training using the
Tutor Tools application.
Auxiliary lesson server
ME MORE
MORE
®
onto an auxiliary server. According to the needs and configuration of the network on which TELL ME
®
Education is installed, the installation of this workstation is optional.
: designated workstation for the technical administrator to copy the lesson content of TELL
Note:
Depending on the network configuration, all applications can be installed on the same workstation.
Copyright 2003 Auralog S.A. All rights reserved. 3
TELL ME MORE® Education
Installation Guide
INTRODUCTION
This guide is aimed at assisting and facilitating the installation of TELL ME MORE® Education on the server and
associated workstations.
This guide also describes the functions of the following applications:
- Server Manager: to define and modify the TELL ME MORE
- Lesson Copier: to copy the lesson content onto student or Tutor workstations;
- Auxiliary Lesson Server: to copy the lesson content onto a workstation accessible through the network.
Note:
To know more about different applications and concepts addressed in this guide, refer to the Glossary.
®
Education user parameters;
Copyright 2003 Auralog S.A. All rights reserved. 4
TELL ME MORE® Education
Installation Guide
INSTALLATION OF TELL ME MORE® EDUCATION
Required Configuration
Different types of configuration possible
The main requirement to use TELL ME MORE® Education through a network is to be able to provide lesson access
at an output rate of 2 MB/second for each student workstation connected to the network.
Depending on the server on which the software is installed, this rate may not always be maintained (due to a weak
server connection, high number of student workstations, etc.).
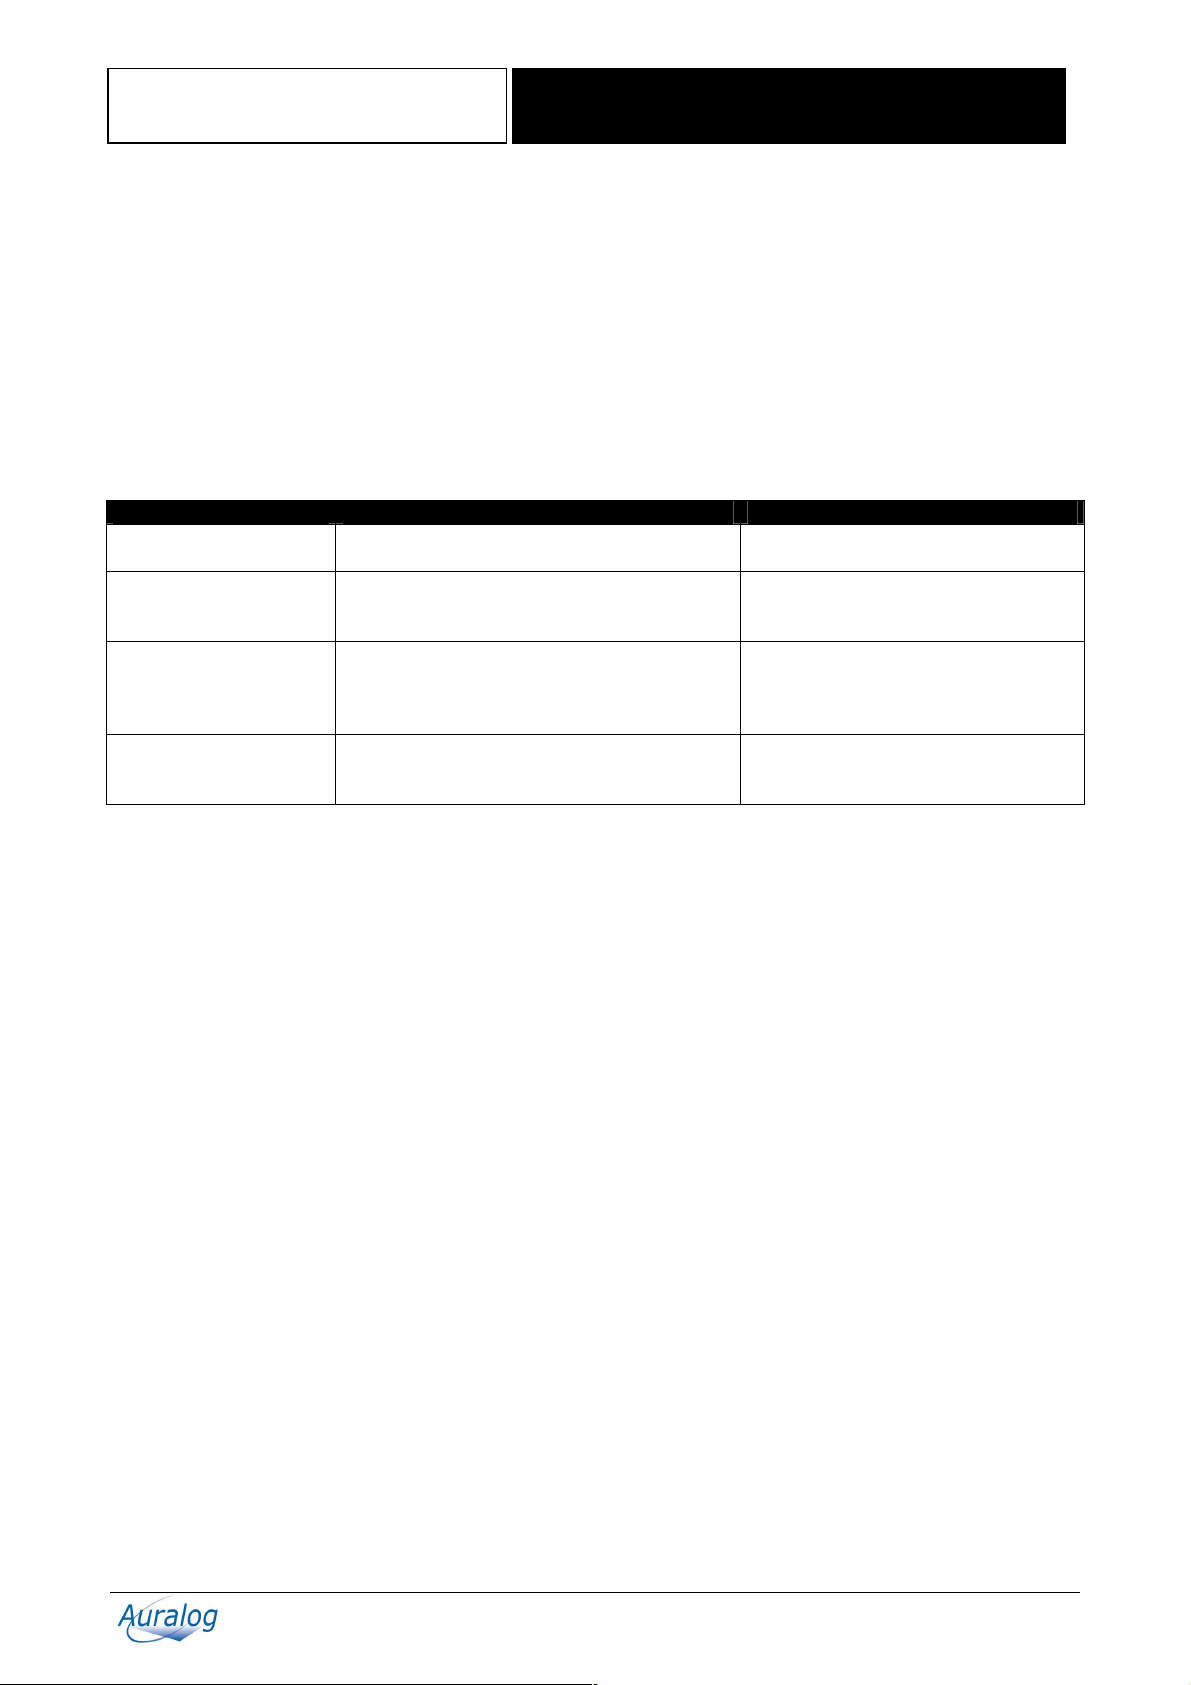
To avoid this problem, different installation configurations are possible:
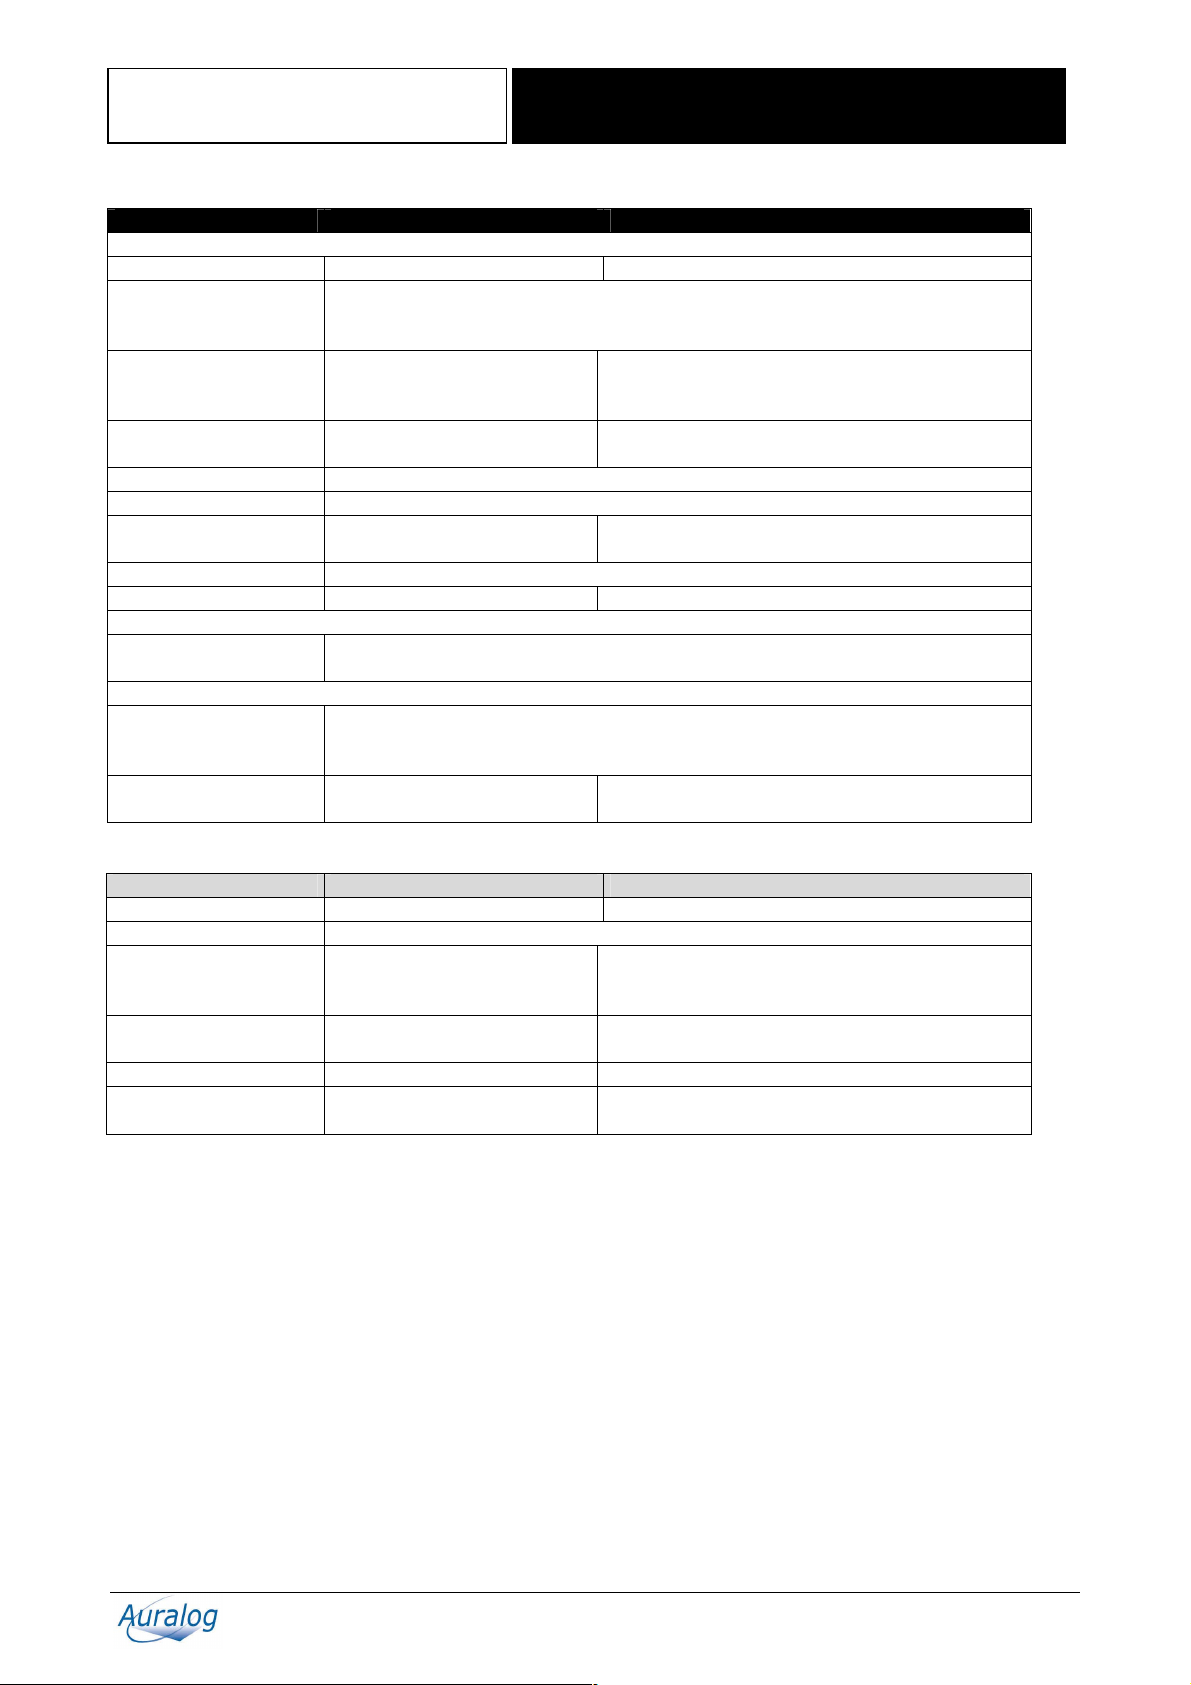
Type of configuration Description Properties
Configuration 1
Configuration 2
Configuration 3
Configuration 4
Copies the lesson content onto the server’s hard
disk.
Makes a local copy of the lesson content on
each student and/or Tutor workstation.
Copies the lesson content onto the server’s hard
disk as well as onto one or more auxiliary lesson
servers.
Provides access to the lesson content from a
CD-ROM for one or more student or Tutor
workstations.
Default configuration
The ‘Lesson Copier’ application enables
the server lesson content to be copied
onto student and/or Tutor workstations.
The ‘Auxiliary Lesson Server’
application enables the lesson content to
be copied onto an auxiliary lesson
server.
Requires a CD-ROM for each
workstation.
Note:
The individual configuration of each student/Tutor workstation can also be defined. To know more about this, refer to
the Server Manager/Workstations section.
Examples of network types and their corresponding configurations
Example: a network with a weak output rate (10 MB/s) and few workstations (less than 10 workstations)
- 1-5 workstations: the lesson content is copied onto the server’s hard disk (Configuration 1).
- 6-9 workstations: it is preferable to make a local copy of the lesson content on each workstation (Configuration 2) or
use a CD-ROM for each workstation (Configuration 4).
Example: a multimedia suite with a network output rate of 100 MB/s
- 1-25 workstations: the whole lesson content can be copied onto the server’s hard disk (Configuration 1).
- 25 workstations or more: the 2 MB/s output rate to access the lesson content must be respected for each workstation
connected to the network. In this case, it is possible to:
§ make a local copy of the lesson content on each workstation (Configuration 2);
§ copy the lesson content onto the auxiliary lesson servers (Configuration 3);
§ use a CD-ROM for each workstation (Configuration 4).
Copyright 2003 Auralog S.A. All rights reserved. 5

TELL ME MORE® Education
For the server and auxiliary lesson servers
Number of TELL ME
MORE® Education
users connected
simultaneously to the
local network
Processor
RAM
Operating system
Server and network
transmission band
Disk space required to
store server data
Disk space required to
copy lesson content
Network protocol
1-5 6-10 10-25 26 or more
Pentium® 200 Pentium® II 400 MHz Pentium® III 450
128 MB 256 MB 512 MB
Windows® 95, 98, Millennium, NT4
(128 MB), 2000, XP, XP Pro and 2003
(192 MB)
10 MB/s 100 MB/s or
10 MB/s for Configurations 2 and 4
300 MB + 1 MB per student
Refer to the table below
Port 81 or 82, available and dedicated to the TELL ME MORE
Installation Guide
MHz
Windows
2003 Server (512 MB)
TCP/IP (network layer)
®
Multiprocessor
or several servers
(with auxiliary
lesson servers)
NT4 Server, 2000 Server and
2 MB/s per
active
workstation or
100 MB/s for
Configurations
2, 3 and 4
®
Education Server
Note:
The data (TELL ME MORE
However, the applications must be installed on workstations equipped with Windows
®
Education Server and lesson content) can also be installed on a non-Windows® server.
®
. To know more about this, refer
to the FAQ (Frequently Asked Questions) in the AurDoc directory on the root directory of the Installation CD-ROM.
Disk space required to copy the lesson content
The disk space required to copy each language’s lesson content is displayed in the table below. The sizes are given for
disks with FAT 32 entry support.
British English, Spanish, German, French Size
(approx.)
- Pack 1 (4 CD-ROMs)
- Pack 2 (3 CD-ROMs)
- Pack 3 (3 CD-ROMs)
Total
American English Size (approx.)
- Pack 2 (2 CD-ROMs)
Total
Italian Size (approx.)
- Pack (5 CD-ROMs) 1.4 GB
Dutch Size (approx.)
- Pack (2 CD-ROMs) 730 MB
The disk space required to copy one CD-ROM is approximately 500 MB on a disk with FAT 32 entry support.
1.3 GB
1.3 GB
1.3 GB
3.1 GB
750 MB - Pack 1 (3 CD-ROMs)
700 MB
1.4 GB
Copyright 2003 Auralog S.A. All rights reserved. 6
TELL ME MORE® Education
Installation Guide
For the student or Tutor workstations
Configuration Minimum Optimal
To use TELL ME MORE®
PC or compatible
Windows®
Celeron
95*, 98, NT4*, Millennium, 2000, XP or 2003
* Note:
Windows
RAM
64 MB (128 MB for NT4,
Millennium, 2000, XP and
2003)
Available hard disk
70 MB 100 MB
space
Network protocol
Sound card
Graphics card
TCP/IP (network layer)
16-bit Windows
800x600 in 65,536 colours
(16 bits)
Accessories
Internet
Microphone and speakers or headset
Connection
To access the TELL ME MORE® lesson content
Network transmission
10 MB/s (not necessary for a single workstation licence)
band
For Configurations 3 and 4
Hard disk space
Refer to the table Disk space required to copy the lesson content above
required
(Configuration 3)
CD-ROM drive
8x CD-ROM drive 24x CD-ROM drive
(Configuration 4)
®
333 MHz or equivalent Pentium® III 650 MHz or equivalent
®
95 and NT4 require Microsoft® Internet Explorer 4 or later.
128 MB (256 MB for NT4, Millennium, 2000, XP
and 2003)
®
-compatible sound card
1024x768 in 16 million colours (24 bits)
For the Administrator workstation
Configuration Minimum Optimal
PC or compatible
Windows®
RAM
Celeron
95*, 98, NT4*, Millennium, 2000, XP or 2003
64 MB (128 MB for NT4,
Millennium, 2000, XP and
2003)
Available hard disk
10 MB 100 MB
space
CD-ROM drive
Graphics card
8x CD-ROM drive 24x CD-ROM drive
800x600 in 65,536 colours (16
bits)
Note:
This configuration is only valid for the installation of ‘Admin Tools’. If the TELL ME MORE
installed on the Administrator workstation, the optimal configuration is the same as that for the student or Tutor
workstations.
®
333 MHz or equivalent Pentium® III 650 MHz or equivalent
128 MB (256 MB for NT4, Millennium, 2000, XP
and 2003)
1024x768 in 16 million colours (24 bits)
®
application must be
Copyright 2003 Auralog S.A. All rights reserved. 7
TELL ME MORE® Education
Installation Guide
Installation of TELL ME MORE® Education
You must install:
1. the server;
2. the Administrator workstation;
3. the student workstation(s);
4. the Tutor workstation(s).
The server and applications can be installed either on a single workstation or on several depending on the type of
installation you implement.
Note:
For all non-Windows
Asked Questions) in the AurDoc directory on the root directory of the Installation CD-ROM.
1. Insert the Installation CD-ROM into the CD-ROM drive. Installation will begin automatically after a few seconds.
If this does not occur, double-click on Setup.exe in the AurInst on the root directory of the CD-ROM.
2. Click on Next on the welcome page.
3. Carefully read the TELL ME MORE
and then on Next to continue with the installation. If you click in the No box, the installation will be stopped.
®
network installation (e.g. Novell, Linux), refer to the process described in the FAQ (Frequently
®
Education licence contract. If you accept its terms, click in the Yes box
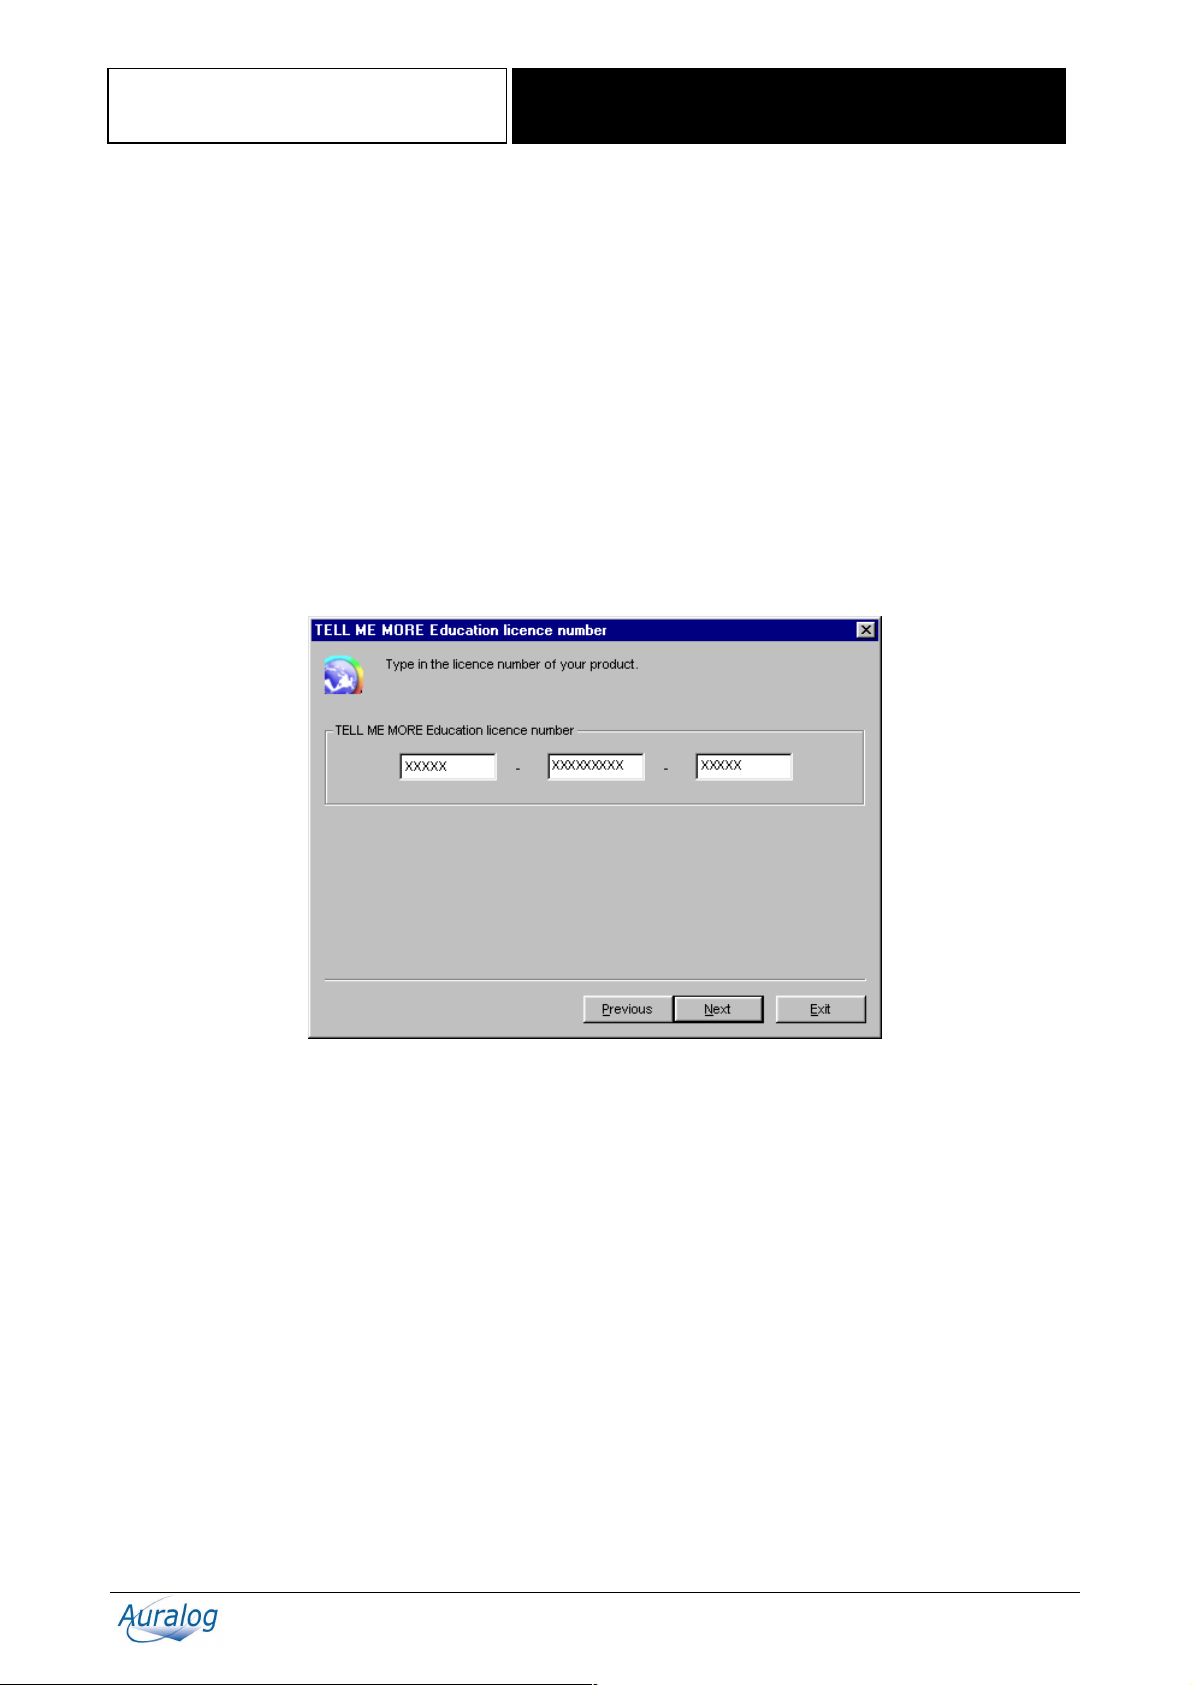
4. Type in the licence number from the TELL ME MORE® Education licence, then click on Next.
If you are installing TELL ME MORE
workstation licences section.
If you are installing TELL ME MORE
workstation licences section.
Copyright 2003 Auralog S.A. All rights reserved. 8
®
Education on a multi-workstation licence, refer to the For multi-
®
Education on a single workstation licence, refer to the For single
TELL ME MORE® Education
Installation Guide
For multi-workstation licences
Note:
Ensure you have first carried out steps 1 to 4 of the Installation of TELL ME MORE
®
Education section.
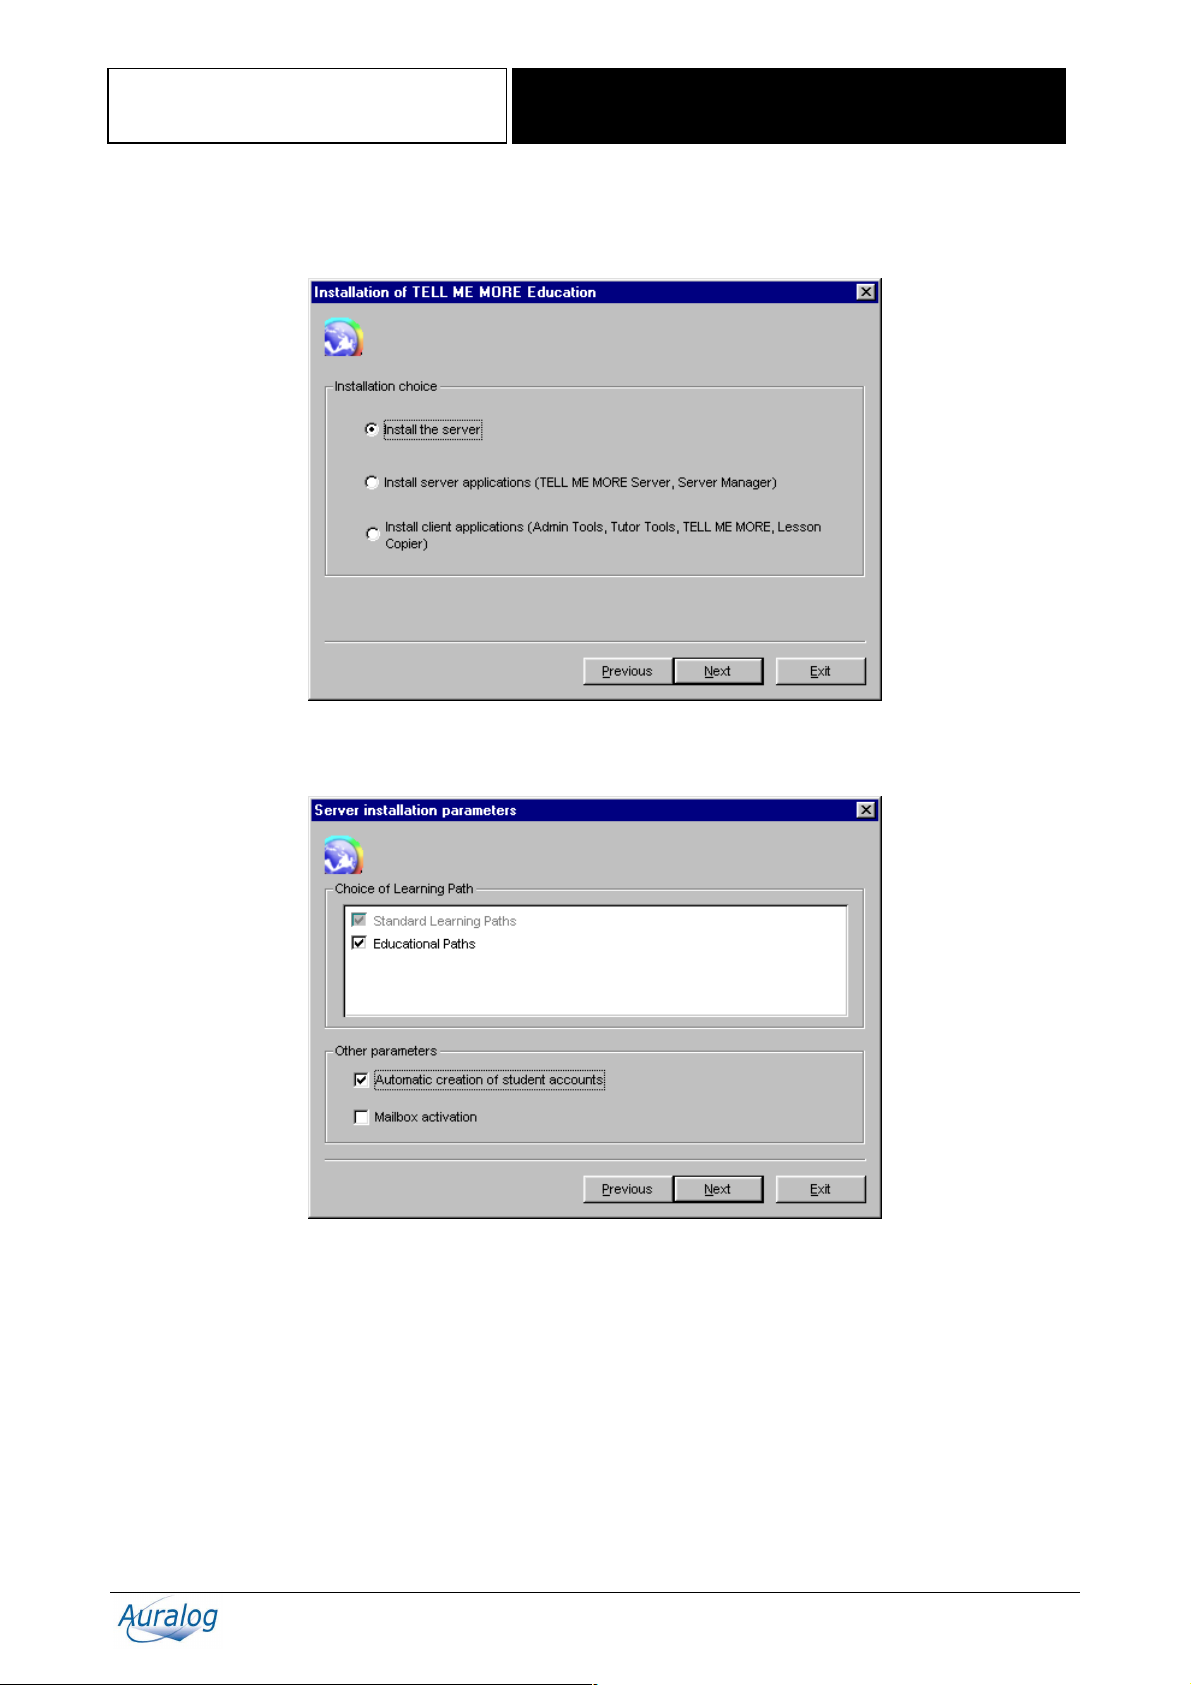
To install the server and server applications
1. Select Install the server, then click on Next.
This screen allows the activation/deactivation of certain parameters in TELL ME MORE® Education.
Copyright 2003 Auralog S.A. All rights reserved. 9
TELL ME MORE® Education
Installation Guide
Parameter Status (by default) Description
Choice of Learning Path (Learning Paths available in the Guided Mode of TELL ME MORE®)
Standard Learning Paths Activated
(non-modifiable)
Educational Paths Activated
There is a Standard Learning Path for each language
and each Lesson Family.
Specific Learning Paths
(modifiable)
Other parameters
Automatic creation of student accounts Activated
(only modifiable
after being installed
in Server Manager)
Mailbox activation Deactivated
(only modifiable
When this parameter is activated, a student account is
automatically created (in Admin Tools, according to
the default values) when the student identifies
themselves at the start of TELL ME MORE
When this parameter is activated, students and Tutors
can communicate by e-mail.
after being installed
in Server Manager)
2. To activate/deactivate a parameter, click on the corresponding box.
3. Click on Next.
®
.
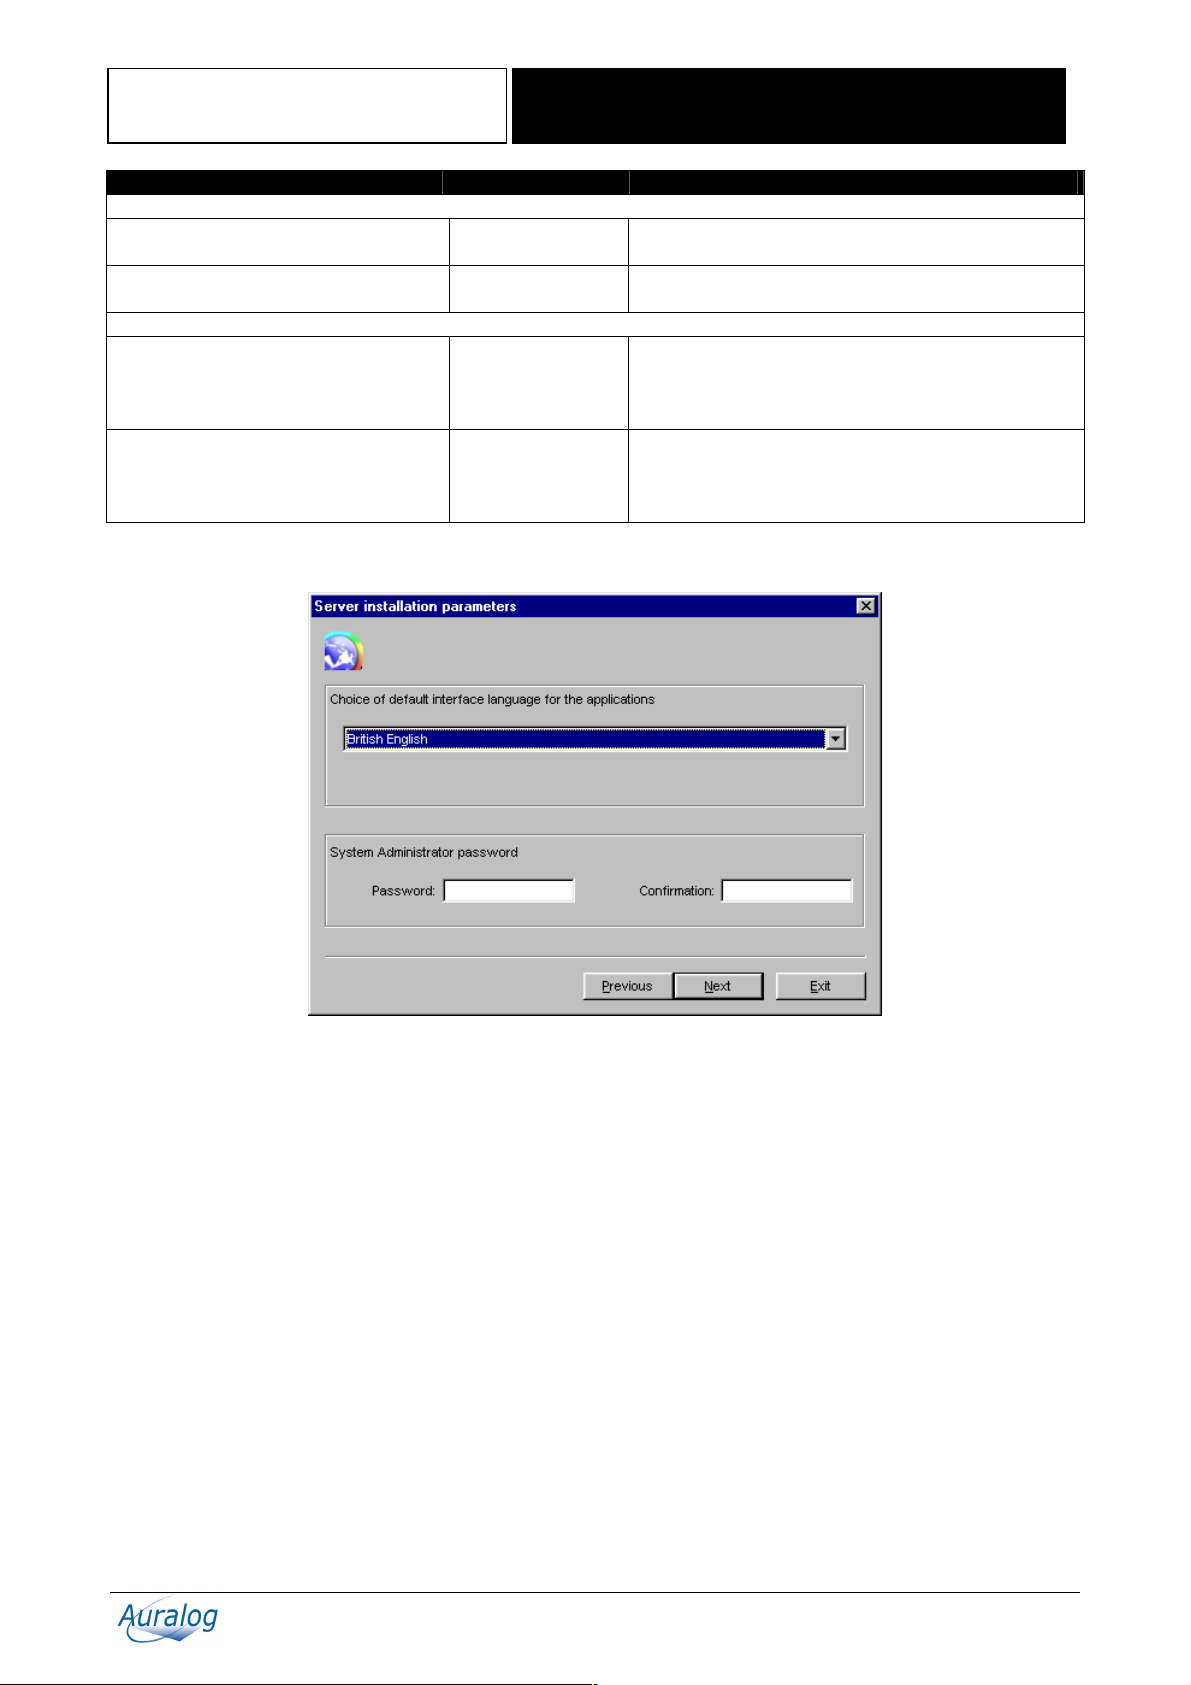
4. Select the default interface language of the server and client applications (i.e. the language in which the on-screen
instructions will be given).
5. Type in a password (max. 16 characters) for the Administrator applications of TELL ME MORE
(Server Manager, Admin Tools, Lesson Copier and Auxiliary Lesson Server).
6. Click on Next.
®
Education
Copyright 2003 Auralog S.A. All rights reserved. 10

TELL ME MORE® Education
Installation Guide
7. Either confirm or modify the directory in which you wish to copy the files necessary for TELL ME MORE®
Education, as well as the shared name of the corresponding directory (i.e. the directory network name). By default,
it is TMM7EDU$ (the $ means the shared name is not visible via the network for reasons of security). You can
modify the shared name or even remove the $.
Note:
Once the installation is completed, you can define the rights (read/write) of the different directories. Refer to the FAQ
(Frequently Asked Questions) in the AurDoc directory on the root directory of the CD-ROM.
8. Click on Copy the installation onto the server if you want to carry out installation of the client applications on the
other workstations (student or Tutor workstations) without having to insert the CD-ROM each time. Note the shared
name of the directory in which the installation is located.
9. Check there is sufficient disk space available, then click on Install.
10. Select Install server applications (TELL ME MORE Server & Server Manager).
Note:
It is strongly recommended to install the server applications (TELL ME MORE Server & Server Manager) at the
same time and on the server workstation
11. Click on Next.
Copyright 2003 Auralog S.A. All rights reserved. 11
 Loading...