

Page 1

Update: 30.04.2004
User Guide
Copyright 2004 Auralog S.A. All rights reserved
Page 2

TUTOR TOOLS
Contents
INTRODUCTION ..................................................................................................................................................................4
Reading the manual...............................................................................................................................................4
Help........................................................................................................................................................................4
To install a client/server Tutor workstation ...................................................................................................................5
1 - Installation of the client/server workstation........................................................................................................5
2 – Program group presentation.............................................................................................................................6
3 – Lesson Copier..................................................................................................................................................6
4 – To run Tutor Tools............................................................................................................................................6
To install the distant Tutor workstation .........................................................................................................................6
Information to be given to the administrator...........................................................................................................6
TO INSTALL AND USE A DISTANT TUTOR WORKSTATION .........................................................................................................6
1 – Installation of the Distant Tutor workstation......................................................................................................6
2 - Presentation of the program group ...................................................................................................................8
3 – Lesson Copier..................................................................................................................................................9
4 – To start the Tutor Tools application................................................................................................................10
5 – To start TELL ME MORE®..............................................................................................................................11
6 – To uninstall a distant Tutor workstation..........................................................................................................11
WHAT TO DO…................................................................................................................................................................12
… if you have changed your personal e-mail address .........................................................................................12
… if you cannot open Tutor Tools ........................................................................................................................12
… if the following message appears ....................................................................................................................12
… if you encounter difficulties connecting to the server .......................................................................................12
… you encounter difficulties .................................................................................................................................12
DISCOVER TUTOR TOOLS........................................................................................................................................13
TO RUN TUTOR TOOLS .....................................................................................................................................................13
TO NAVIGATE WITHIN TUTOR TOOLS .................................................................................................................................. 14
The TUTOR folder................................................................................................................................................15
The STUDENT folder...........................................................................................................................................15
The TOOLS folder................................................................................................................................................16
CONNECTION OPTIONS SPECIFIC TO DISTANT TUTORS..........................................................................................................16
LESSON ACCESS OPTION ..................................................................................................................................................17
THE TUTOR FOLDER .................................................................................................................................................18
INBOX.............................................................................................................................................................................18
To access the Inbox.............................................................................................................................................18
To read and reply to messages............................................................................................................................18
To transfer the message to another Tutor............................................................................................................19
To remove a message .........................................................................................................................................19
SEND A MESSAGE ............................................................................................................................................................20
To select the recipient(s) of the message ............................................................................................................20
To type and send the message............................................................................................................................21
MAILBOX HISTORY............................................................................................................................................................22
To view the messages .........................................................................................................................................22
To reply again to a message................................................................................................................................22
To transfer a message to another Tutor...............................................................................................................22
To remove a message .........................................................................................................................................23
SYSTEM NOTIFICATIONS ................................................................................................................................................... 24
To view the system notifications...........................................................................................................................24
To remove one or more notifications....................................................................................................................24
THE STUDENT FOLDER.............................................................................................................................................25
TO OPEN A STUDENT FOLDER............................................................................................................................................25
From a message in the Inbox of the Tutor folder..................................................................................................25
From the student database ..................................................................................................................................25
TO CLOSE A STUDENT FOLDER...........................................................................................................................................25
STUDENT FILE .................................................................................................................................................................26
The Information tab..............................................................................................................................................26
The Training schedules tab..................................................................................................................................28
The Options tab....................................................................................................................................................32
The Paths tab.......................................................................................................................................................33
The Sessions tab .................................................................................................................................................34
STUDENT TRACKING .........................................................................................................................................................36
To view the results by study session....................................................................................................................36
To view the detailed tracking................................................................................................................................38
Copyright 2004 Auralog S.A. All rights reserved 2
Page 3

TUTOR TOOLS
AUDIO RECORDINGS .........................................................................................................................................................41
REPLY TO STUDENT/SEND A MESSAGE ...............................................................................................................................42
To view the context of the question......................................................................................................................42
To write a reply to a student’s message...............................................................................................................42
To insert a standard message..............................................................................................................................42
To attach the results of a language test or a Detailed Report ..............................................................................43
To attach a file......................................................................................................................................................45
HISTORY.........................................................................................................................................................................47
To add a comment ...............................................................................................................................................47
To delete a comment ...........................................................................................................................................48
THE TOOLS FOLDER..................................................................................................................................................49
STANDARD MESSAGE MANAGEMENT...................................................................................................................................49
To create a standard message table....................................................................................................................49
To add a theme....................................................................................................................................................50
To add a standard message ................................................................................................................................50
To rename a table/a theme..................................................................................................................................50
To modify a standard message............................................................................................................................50
To export and import standard messages............................................................................................................50
To remove a standard message...........................................................................................................................51
To move standard messages...............................................................................................................................51
LEARNING PATHS ............................................................................................................................................................53
To open a Learning Path......................................................................................................................................53
To create a Learning Path....................................................................................................................................54
To transfer a Learning Path to one or more student folders.................................................................................59
To save a Learning Path......................................................................................................................................60
To transfer a Learning Path from one folder to another .......................................................................................60
To export/import a Learning Path.........................................................................................................................61
To modify a Learning Path...................................................................................................................................61
OPTIONS MANAGER ......................................................................................................................................................... 63
To create an options file.......................................................................................................................................63
To save an options file .........................................................................................................................................63
To open an options file.........................................................................................................................................63
To transfer an options file to one ore more student folders..................................................................................64
TO PRINT THE LINGUISTIC AND PEDAGOGICAL CONTENT........................................................................................................65
To define the selection content ............................................................................................................................65
To define the print options....................................................................................................................................69
To add a selection................................................................................................................................................69
To print selections................................................................................................................................................69
To save or open selections files...........................................................................................................................69
To modify, move or remove a selection ...............................................................................................................70
Important information concerning printing of documents......................................................................................70
Appendix..........................................................................................................................................................................71
Description of student options for using TELL ME MORE®..................................................................................71
Print Options ........................................................................................................................................................73
System Notifications.............................................................................................................................................75
Different functions available for local, client/server and distant Tutors.................................................................77
TECHNICAL SUPPORT...............................................................................................................................................79
Copyright 2004 Auralog S.A. All rights reserved 3
Page 4

TUTOR TOOLS
Introduction
Tutor Tools enables Tutors to:
- communicate with students (answer their questions, send Learning Paths, results, files, etc.);
- analyse students’ work;
- create standard messages (answers to recurrent questions);
- create Learning Paths (personalised language-learning programmes in TELL ME MORE
- modify each student’s TELL ME MORE
- print the linguistic and pedagogical content of TELL ME MORE
- be aware of system notifications (allocation of new students etc.).
®
user options;
®
;
Reading the manual
How the Tutor Tools program is organised
®
);
Help
A variety of documents in *.pdf format can be displayed through the Help menu, in order to facilitate your work with
TutorTools:
- the Tutor Tools application User Guide;
- the Pedagogical Handbook;
- the Pedagogical content of TELL ME MORE
Copyright 2004 Auralog S.A. All rights reserved 4
®
e-Learning solutions.
Page 5

TUTOR TOOLS
To install a client/server Tutor workstation
If you are a TELL ME MORE® e-Learning solutions Tutor hosted on a distant server, you must install Tutor Tools.
If you are not a client/server Tutor, go directly to the To run Tutor Tools section.
1 - Installation of the client/server workstation
1. Double-click on the executable e-LearningSolutionsTools.exe. Wait for the files to be installed.
After a few seconds, the installation begins automatically.
2. Select the interface language, then click on Next.
3. Enter the server name and port number provided by the TELL ME MORE e-Learning solutions technician,
then click on Next.
Copyright 2004 Auralog S.A. All rights reserved 5
Page 6

TUTOR TOOLS
4. Confirm or modify the directory in which the application(s) is/are to be stored. Also check that enough disk
space is available, then click on Install.
2 – Program group presentation
A program group called e-Learning Solutions Tools has been installed on your computer. It contains :
General documentation
Pedagogical documentation
Lesson Copier
Tutor Tools
Uninstall
* a PDF file for each lesson language
Tutor Tools – User Manual
Pedagogical content*
Pedagogical Handbook
3 – Lesson Copier
Go to the Lesson Copier section in To install and use a Distant Tutor Workstation.
4 – To run Tutor Tools
Go to the To run Tutor Tools section of the Discover Tutor Tools chapter.
To install the distant Tutor workstation
If you are a distant Tutor for TELL ME MORE® e-Learning solutions, you must install the different applications on
your workstation by following the procedure outlined below.
If you are not a distant Tutor, go directly to the To run Tutor Tools section.
Information to be given to the administrator
You should send your personal e-mail address (which must be different from the dedicated e-mail address for your
Tutor account) to the administrator. This will allow your TELL ME MORE® user account to be created in Admin
Tools and a notification of the creation of your Tutor account to be sent to you. If your Tutor and TELL ME MORE®
user accounts are not created before the installation of TELL ME MORE® and Tutor Tools, you will not be able to
access them.
To install and use a Distant Tutor Workstation
1 – Installation of the Distant Tutor workstation
1. Insert the installation CD-ROM into the CD-ROM drive.
After a few moments, the installation will begin automatically. If this is not the case, then double-click on
Setup.exe, which can be found in the AurInst sub-directory of the CD-ROM.
Copyright 2004 Auralog S.A. All rights reserved 6
Page 7

TUTOR TOOLS
2. Select your interface language, then click on Next.
3. Take note of the license agreement. Click on Yes to accept the terms of the contract and to continue with the
installation, then click on Next.
Copyright 2004 Auralog S.A. All rights reserved 7
Page 8

TUTOR TOOLS
4.
Confirm the port number. This can be modified if necessary.
5. Click on Next.
6. Select the application(s) to be installed.
Note:
If Tutor Tools and/or TELL ME MORE are selected, the Lesson Copier application is also installed.
7. Confirm or modify the installation directory for the application(s). Make sure that enough disk space is
available for the installation and then click on Next. Different screens will inform you of the installation of
each of the applications.
A message will inform you that you can restart your computer to update the installation. If you do not wish to
restart your computer, click on No. You can always do this later by clicking on the Start button, selecting
Shutdown and then Restart.
2 - Presentation of the program group
The installation creates a program group called TELL ME MORE e-Learning solutions on your computer. In this,
you can find:
Applications
Copyright 2004 Auralog S.A. All rights reserved 8
Lesson Copier
Page 9

TUTOR TOOLS
Tutor Tools
TELL ME MORE*
Uninstall
Lesson Copier
Server applications
Tutor Tools
TELL ME MORE*
General documentation
Pedagogical
documentation
Tutor Tools – User Guide
Pedagogical content**
Pedagogical Handbook
* if selected at installation
** one file in .pdf format per lesson language
3 – Lesson Copier
Before copying the TELL ME MORE® lessons, check that there is enough disk space available on your computer. To
know the size of the TELL ME MORE
approximate; they may vary according to the disk used.
Language Number of lesson CD-ROMs Size
British English 9 2.4 GB
French 9 1.8 GB
German 9 1.8 GB
Spanish 9 1.8 GB
Italian 5 1.2 GB
American English 6 1.2 GB
Dutch 2 1 GB
®
lessons, you should refer to the following table. The sizes given here are
To copy TELL ME MORE® lessons, proceed as follows:
1. Go to the menu Start\(All) Programs\TELL ME MORE e-Learning solutions
2. Select Applications\Lesson Copier.
Copyright 2004 Auralog S.A. All rights reserved 9
Page 10

TUTOR TOOLS
3. Click on the icon Add a lesson
1. Click on Directory
find the lessons that you wish to copy.
Note:
The space in MB necessary to copy the directory source is approximate; it may vary according to the partition
type of the hard disk on which you add the lessons.
to select the source directory, entitled Aurdata (on the CD-ROM), in which you will
.
2. Select the directory in which you wish to copy the lessons. By default, Lesson Copier proposes the
following local directory: C:\TMMELS\ …
Note:
All the lessons relating to a particular language must be copied into the same directory.
4 – To start the Tutor Tools application
Note:
Copyright 2004 Auralog S.A. All rights reserved 10
Page 11

TUTOR TOOLS
If using Windows® 95 or 98 with a dial-up modem, you must connect to the Internet before starting Tutor Tools. Note
that you can then disconnect, but you should reconnect when you want to check for new messages.
Using Tutor Tools for the first time
1. Open your personal e-mail account, then click on the message sent by the Training Service, entitled ‘Tutor
Tools: creation of your account’.
2. Double-click on the file attached to the message (extension .ak7) to open it and create your Tutor account.
The Tutor Tools identification screen will appear.
3. If several distant Tutors work on the same computer, select your user name from the list.
4. If a password was provided in the message sent by the Training Service, type it in.
5. Confirm by clicking on the green tick.
Tutor Tools will open.
Important information if you are a distant Tutor for several e-Learning solutions
• Double-click on the file attached to the Training Service message to create your Tutor account.
• The connection parameters of your Tutor accounts are defined when you double-click on the first account creation
file (.ak7). These parameters are then valid for your Tutor accounts for other distant training solutions. Only the
first Training Service can reconfigure your connection parameters.
Starting the Tutor Tools application
To start the application, either click on the Tutor Tools shortcut on your desktop or:
1. Go to the menu Start\(All) Programs\TELL ME MORE e-Learning solutions
2. Select Applications\Tutor Tools.
The Tutor Tools identification screen will appear.
3. If several distant Tutors work on the same computer, select your user name from the list.
4. Use the password provided in the message sent by the Training Service.
Tutor Tools will open.
5 – To start TELL ME MORE®
Using TELL ME MORE® for the first time
Note:
Ensure initially that:
- the administrator has created your student account so that you can use TELL ME MORE
- you have access to the lessons, either by inserting the lesson CD-ROM, or having copied them beforehand onto your
hard disk.
1. Open your personal e-mail inbox, then click on the message sent by the Training Service entitled ‘Your
language training with TELL ME MORE
2. Double-click on the attached file (*.am7) to open it. A message confirms that your account has been
created and TELL ME MORE
®
opens.
®
: account details’.
Starting TELL ME MORE®
To start the application, either click on the TELL ME MORE® shortcut on your desktop or:
1. Go to the menu Start\(All) Programs\TELL ME MORE e-Learning solutions
2. Select Applications\TELL ME MORE.
®
.
6 – To uninstall a distant Tutor workstation
1. Go to Start/(All) Programs.
2. Select TELL ME MORE e-Learning solutions/Uninstall.
3. Select the program(s) that you wish to uninstall.
Copyright 2004 Auralog S.A. All rights reserved 11
Page 12

TUTOR TOOLS
What to do…
… if you have changed your personal e-mail address
Inform the administrator, who will make the necessary modification in the the Admin Tools application for both your
Tutor account (you will then receive a message about this reconfiguration of your connection parameters) and for your
user account, so that you can continue to use TELL ME MORE
… if you cannot open Tutor Tools
Check that your Tutor account has been created. To do so, enter your personal e-mail inbox, open the message from
your Training Service entitled ‘Tutor Tools: creation of your account’, then click on the attached file (extension .ak7) to
create your account.
… if the following message appears
Your account has not been activated. You must open the first message sent by your Training Service before
opening TELL ME MORE!
This message indicates that you have not yet clicked on the file .am7 which enables you to create your user account for
TELL ME MORE
mail inbox, open the message sent by the Training Service and click on the .am7 file in order to create your account.
This message is entitled: ‘Your language training with TELL ME MORE
®
. The creation of your account is necessary in order to use TELL ME MORE®. In your personal e-
… if you encounter difficulties connecting to the server
You can verify that the connection parameters for the POP and SMTP servers are valid.
To do so:
- Go into the Tutor Tools application, then select File/Options.
- Click on POP server test and SMTP server test.
If a connection error appears, please contact your technician.
To find out more, go to the section Discover Tutor Tools/Connection options specific to distant Tutors in the Tutor
Tools User Guide.
®
.
®
: account details’.
… you encounter difficulties
Contact your administrator or your technician, who will help you to find a solution.
Copyright 2004 Auralog S.A. All rights reserved 12
Page 13

TUTOR TOOLS
DISCOVER TUTOR TOOLS
To run Tutor Tools
1. Go into the Start menu.
2. Select Programs.
3. Select the program group TELL ME MORE
*the name of the program group may differ according to the type of Tutor Tools installed.
4. Enter your user name and password defined during the creation of your account in Admin Tools (the
allocation of a password is optional).
5. You can check and/or modify the server name and the port number by clicking on the icon Define server
®
e-Learning solutions\Applications*, then Tutor Tools.
connection parameters
6. Confirm by clicking on the green tick.
. This function is optional and is not available to distant Tutors.
Copyright 2004 Auralog S.A. All rights reserved 13
Page 14

TUTOR TOOLS
To navigate within Tutor Tools
Tutor Tools comprises three folders: Tutor, Student and Tools.
The Student folder is not available directly when the program opens. You must select a student to open this folder. To
know more about this, consult the To select a student section.
To select a student
1. Click on the icon Access student account in the toolbar.
To find a student in the database, you can define your selection criteria using a filter which allows you to
search according to:
- student group;
- language group;
- ID, surname or name.
2. Select the student from the list and confirm by clicking on the green tick.
The Student folder is inserted into the folder menu between the Tutor and Tools folders.
To select one of the three folders, you can either:
- Click on the heading in the folder menu: the selected folder displays all the different related functions.
- Click on the corresponding icon: Tutor
- Click on the Folder menu and select the sub-menu Tutor, Student or Tools.
A menu summarising the contents of the selected function is inserted into the menu bar.
, Student or Tools .
Copyright 2004 Auralog S.A. All rights reserved 14
Page 15

TUTOR TOOLS
The TUTOR folder
The Tutor folder contains four functions:
Ø Inbox
This function allows you to view student messages.
Ø Send a message
This function enables you to send messages to students.
Ø Mailbox history
You can view all messages sent and received using this function.
Ø System notifications
This function allows you to view all the system notifications sent to the Tutor regarding the
tasks in the students’ training schedules, the allocation of new students etc.
The STUDENT folder
Remember!
To open the Student folder, you must first access a student account or reply to a student’s message from the Tutor
Inbox. To select a student, consult the introduction of the To navigate within Tutor Tools section.
This folder contains five functions:
Ø Student file
This function allows you to view student information and the student’s TELL ME MORE
user options.
Ø Student tracking
This function enables you to view a student’s results according to various criteria (i.e. lesson,
activity, date lesson was accessed). This function only appears if the student has already used
TELL ME MORE
®
.
®
Ø Audio recordings*
This feature enables you to listen to a student’s audio recordings (for the Dialogue and
Pronunciation activities). This feature is deactivated by default, but can be activated in the
Options tab of the Student file.
* This feature is only available if the Tutors and students are on the local network.
Ø Reply to student
This function enables you to write a reply to a student’s message. If the Student folder has
been opened (using the icon Access student account), this function is entitled Send a
message.
Ø History
This function allows you to view:
- all messages exchanged with a student;
- Tutor comments;
- Detailed Reports;
- Language Achievement Test results.
Copyright 2004 Auralog S.A. All rights reserved 15
Page 16

TUTOR TOOLS
The TOOLS folder
Remember!
All these functions are optional and are only accessible if you have the corresponding access rights (defined beforehand
by the Administrator in Admin Tools).
This folder contains four functions:
Ø The Standard message manager
This feature allows you to write standard messages or replies, categorised by theme.
Ø Learning Paths
This function enables you to create and modify Learning Paths.
Ø Options Manager
This function allows you to create options files, which can then be transferred to students.
Ø Content Printout
You can print TELL ME MORE
®
’s linguistic and pedagogical content using this function.
Connection options specific to distant Tutors
1. Select the menu File/Options to modify the mail system parameters.
2. Modify, if necessary, the available parameters (permanent connection and time delay between each search for
messages by the system). The other parameters can be modified in Admin Tools and will be subsequently sent
to you via a Tutor Tools reconfiguration file.
3. Click on the icon POP server test
Copyright 2004 Auralog S.A. All rights reserved 16
to check that the POP server parameters are valid.
Page 17

TUTOR TOOLS
4. Click on the icon SMTP server test to check that the SMTP server parameters are valid.
5. Confirm by clicking on the green tick.
Lesson access option
Note :
This function is not available to local Tutors.
1. Select the File menu.
2. Depending upon the location of the lessons you wish to access, select Loading lessons from the CD-Rom or
Loading lessons from the hard disk.
Copyright 2004 Auralog S.A. All rights reserved 17
Page 18

TUTOR TOOLS
THE TUTOR FOLDER
This folder allows you to manage and view all of the messages received and sent by both students and the system.
You can:
- receive messages sent by your students and reply to them;
- send a message to a student, or to more than one student at the same time;
- view the mailbox history.
- view the list of events notified by the system.
Inbox
To access the Inbox
1. Click on the Tutor folder and select the function Inbox.
You can view:
- the name of the person who sent the message;
- any attachments;
- the flag corresponding to the student’s lesson language;
- the Lesson Family concerned;
- the date the mail was sent and received;
- the type of message.
Note:
You can classify your messages according to the sender, date sent, date received or type of message, by
clicking on the column headings.
To read and reply to messages
1. Select a line: the contents of the message will be displayed in the Message window.
2. Double-click on the message line or click on the icon Access student information and reply .
In both cases, a message will inform you that Tutor Tools is retrieving the student information.
You then use the Reply to student function in the Student folder.
To know more about this, consult the Reply to student/Send a message section in the chapter The Student Folder.
Copyright 2004 Auralog S.A. All rights reserved 18
Page 19

TUTOR TOOLS
To transfer the message to another Tutor
Note:
This function is not available to distant Tutors and messages cannot be transferred to a distant Tutor.
1. From the list, click on the message you wish to transfer.
2. Click on the icon Send the message to another recipient or select the menu Inbox/Send the message to
another recipient.
3. Select the Tutor to whom you wish to transfer the message and confirm by clicking on the green tick.
4. You can also add a comment to the message (optional). Confirm by clicking on the green tick.
The message will then disappear from the Inbox.
To remove a message
1. Select the message you wish to remove.
2. Click on the icon Remove the selected message(s) or select the menu Inbox/Remove the selected
message(s).
A message will ask you to confirm the removal of the message.
3. Confirm this choice by clicking on the green tick.
The message will disappear from the Inbox, but will remain in the Mailbox history.
Copyright 2004 Auralog S.A. All rights reserved 19
Page 20

TUTOR TOOLS
Send a message
You can send messages to students, using this function.
The message can be, for example:
- administrative in nature and addressed to a student group (e.g. ‘Don’t forget to finish your Path before October 15th so
I can evaluate your work.’);
- linguistic in nature and addressed to students in the same language group (e.g. ‘The higher level for German is now
available.’);
- for a specific individual (e.g. ‘Having analysed your results, I suggest you continue with the following Path.’).
Select the function Send a message in the Tutor folder.
To select the recipient(s) of the message
1. Click on the icon Select student(s) or select the menu Message/Select student(s).
Copyright 2004 Auralog S.A. All rights reserved 20
Page 21

TUTOR TOOLS
The list of all students is displayed by default. When there is a large number of students in the database, you
can use a filter in order to find the students concerned. This can be done according to:
- student group (e.g. to send a message to all students in the same class);
- language group (e.g. to send a message to all students learning English);
- ID, surname or first name.
2. Select the student(s) who will receive the message. Confirm by clicking on the green tick.
The names of the students selected will be displayed in the Recipients window.
To type and send the message
1. Enter the message in the Message window.
A certain number of functions allow you to modify the style of your message (i.e. font size and colour, bold
type, italics, underlined). You can also copy and paste text by right-clicking on the mouse.
Note:
Consult the section entitled Reply to the student/To send a message in the Student Folder chapter if you wish
to:
- send a standard message,
- attach a file etc.
2. Click on the icon Send the message .
Copyright 2004 Auralog S.A. All rights reserved 21
Page 22

TUTOR TOOLS
Mailbox history
From this window, you can:
§ view all messages (sent and received);
§ respond again to a message already stored in the mailbox archive;
§ remove messages.
Select the function Mailbox history in the Tutor folder.
To view the messages
1. Select the type of message you wish to view from the drop-down menu (All messages, Messages received or
Messages sent).
Note:
If you select Messages received or Messages sent, you can sort them according to either the sender, the date
sent or the date received. If you select All messages, you can view all questions and replies in the form of a
tree diagram.
2. Select a line: the message contents will be displayed in the Message window.
To reply again to a message
1. Select the message to which you wish to reply again.
2. Click on the icon Access student information and reply or select the menu History/Access student
information and reply.
In both cases, a message will inform you that Tutor Tools is retrieving the student information. You then use the Reply
to student function in the Student folder.
To know more about this, consult the Reply to student/Send a message section in the Student Folder chapter.
To transfer a message to another Tutor
Consult the section Inbox/To transfer a message to another Tutor.
Copyright 2004 Auralog S.A. All rights reserved 22
Page 23

TUTOR TOOLS
To remove a message
1. Select the message you wish to remove.
2. Click on the icon Remove the selected message(s) or select the menu History/Remove the selected
message(s).
A message will ask you to confirm the removal of the messages.
3. By clicking on the green tick, you will delete the message from the Mailbox history.
Copyright 2004 Auralog S.A. All rights reserved 23
Page 24

TUTOR TOOLS
System Notifications
In this window, you can:
- view the complete list of events linked to your Tutor and student accounts that have been registered by the system;
- remove one or more notifications.
To view the system notifications
You can select which notifications are displayed, filtering by type and/or by student;
For the detailed list of possible notifications and filter types, consult the table in the appendix.
To remove one or more notifications
1. Select the system notification(s).
2. Click on the icon Delete the selected notification(s) .
Copyright 2004 Auralog S.A. All rights reserved 24
Page 25

TUTOR TOOLS
THE STUDENT FOLDER
The role of a Tutor is to track, help and advise one or more students.
To personalise the student tracking, a Tutor needs to know the student’s ability level and all corresponding information
(e.g. the student’s TELL ME MORE
s/he has been studying, etc.).
Through this folder, you have access to:
- the Student file;
- the Student tracking (this function only appears if the student has used TELL ME MORE
- the Audio recordings (this feature is only available where Tutors and students are on the local network);
- the Reply to student or Send a message function;
- the History.
®
user options, the Learning Paths to which s/he has access, the amount of time
®
at least once);
To open a Student folder
A Student folder can be opened in two ways:
- if you wish to reply to a student: you access the Student folder by replying to a question in the Inbox or the Mailbox
history of the Tutor folder.
- if you wish to view a student’s file or results or send him/her a message: you access the Student folder by opening the
student’s account.
From a message in the Inbox of the Tutor folder
1. Select the function Inbox in the Tutor folder.
2. Select the student’s message and click on the icon Access student information and reply .
Then use the Reply to student function in the Student folder.
From the student database
You can access the student list from any screen in order to access a student folder.
1. Click on the icon Access student account or select the menu File/Access student account.
Then use the Send a message function in the Student folder.
To close a student folder
This function is only available once a student folder has been opened.
1. Click on the icon Close student account in the toolbar.
A message will ask you to confirm the closure of the student account.
2. Confirm by clicking on the green tick.
You then return automatically to the Inbox in the Tutor folder.
Copyright 2004 Auralog S.A. All rights reserved 25
Page 26

TUTOR TOOLS
Student file
This function allows you to view information about a particular student and their TELL ME MORE® user options.
The Student file comprises different tabs which appear according to the student’s options and study time:
- Information;
- Schedules;
- Options;
- Paths;
- Sessions.
Select the function Student file in the Student folder.
The Information tab
This window enables you to view each student’s TELL ME MORE® user information, as well as information relating
to the language(s) they are learning.
1. Click on the Information tab.
Field Description
User information Overview of information regarding the student account created in Admin Tools.
Lesson language Language and, if relevant, the name of the language group and Tutor.
Note:
Lesson languages can only be viewed by local Tutors who have access to all the
students’ accounts.
Objectives Student’s language type and level, where the student has defined his/her learning
objectives for the given language.
Additional information All of the fields that can be added (consult the To add additional information
section).
Copyright 2004 Auralog S.A. All rights reserved 26
Page 27

TUTOR TOOLS
To add additional information
You can create fields and/or text boxes that will constitute sections for additional information, or you can load a form
template.
To create fields
1. Click on the icon Add a new field .
2. Select the type of field.
- If you select Text box, enter the name of the field. In the form, you will enter open information, such as
address, town and postcode.
Go directly to point 7.
- If you select Selection box, a list of choices appears.
3. Click on the icon Add a choice .
4. Type in a name for the value that you are adding to the selection box.
5. Start again for each choice that you wish to add to the selection box.
6. Confirm by clicking on the green tick.
A line corresponding to the field is added.
7. Start again for each field that you wish to add. If you wish to save the form that you have created, in order to
use it for other student accounts, go directly to point 8.
8. Click on the icon Save the form as a template . This is optional.
9. Enter a name for the template, then confirm by clicking on the green tick.
To load a form template
1. Click on the icon Load a form template .
Copyright 2004 Auralog S.A. All rights reserved 27
Page 28

TUTOR TOOLS
2. Select the name of the template you wish to load, then confirm by clicking on the green tick.
To confirm the modifications
Click on the icon Update in the toolbar so that the modifications are taken into account.
The Training schedules tab
This window allows you to view and/or modify students’ training schedules. Training schedules contain tasks (access to
the personal objectives form, reports, follow-up messages and Learning Paths) and important events in the student’s
training for a given language.
Note:
Local Tutors can modify or enter data into students’ training schedules. If you are a distant Tutor, you cannot modify
students’ training schedules ; only the system administrator is authorised to do this using Admin Tools.
1. Click on the Training schedules tab.
Copyright 2004 Auralog S.A. All rights reserved 28
Page 29

TUTOR TOOLS
2. Select the lesson language.
Note:
This function is only available if the student is learning several lesson languages.
3. Define or modify the language training start and end dates.
Note:
The start date can only be modified if the student has not yet defined his/her learning objectives.
4. If the student is expected to suspend his/her training for a predefined period (during the holidays or if s/he is ill,
for
example) you can tick the box Suspend training. This is optional. You should then specify the language
training suspension start and end dates.
When the language training is suspended, the tasks are postponed within the student’s training schedule but the
student can still access TELL ME MORE
®
and send messages to his/her Tutor.
Note:
You are not necessarily entitled to postpone the language training end date beyond the student’s license expiry
date. To do this, you must have the right to use additional licenses (this option is defined in Admin Tools).
You can now define the different tasks that will constitute the student’s training schedule.
Copyright 2004 Auralog S.A. All rights reserved 29
Page 30

TUTOR TOOLS
Add access to the personal objectives form
Note:
This function is optional and depends upon the parameters defined for the student group by the administrator in Server
parameters.
1. Click on the icon Add access to the personal objectives form .
2. Select the send date.
The current date is selected by default. If you retain this date, the link will be sent to the student as soon as you
have updated the schedule. If you select another date, the link will be sent during the night preceding the
chosen date.
3. Confirm by clicking on the green tick.
The task is added to the training schedule.
To add one or more requests for a report
1. Click on the icon Add one or more requests for reports .
2. Select the type of report.
3. Select the time period end date.
For local and online students, the report will be created on this date + a day (n+1).
For distant students, the report will be created the day after the student has sent in his/her tracking from within
TELL ME MORE
®
.
For example: if the end date is 05/01/2004, for online and local students, the report will be created 06/01/2004;
for distant students, the report will be created as soon as they sends their tracking from within TELL ME
®
MORE
4. If you wish to create Detailed Reports on a regular basis, you can tick Create other reports and then
.
determine their frequency (Every x days, Every month or Every week). This is optional.
5. Confirm by clicking on the green tick.
If you have requested the creation of other reports, these task(s) are added to the student’s training schedule.
Add to send a Learning Path
1. Click on the icon Add to send a Learning Path .
The window Add to send a Learning Path appears.
2. Select the send date.
Copyright 2004 Auralog S.A. All rights reserved 30
Page 31

TUTOR TOOLS
3. Select the Lesson Family.
4. Select the title of the Learning Path to be sent to the student.
5. Confirm by clicking on the green tick.
The task is added to the training schedule.
Add a message to send
1. Click on the icon Add a message to send .
The window Add a message to send appears.
2. Select the send date.
3. Select the type of message to be sent (Registration information, contact message etc.).
4. Confirm by clicking on the green tick.
The task is added to the training schedule.
To add a request for a Language Achievement Test
1. Click on the icon Add a request for a Language Achievement Test .
The screen Add a request for a Language Achievement Test appears.
2. Select the send date of the link to the Language Achievement Test.
3. Confirm by clicking on the green tick.
The task is added to the training schedule.
To remove one or more tasks
Note:
Current and completed tasks cannot be removed.
1. Select the task(s) that you wish to remove.
2. Click on the icon Remove the selected task (s) .
To postpone the execution of one or more tasks
Note:
Current tasks cannot be postponed.
1. Select the task that you wish to postpone.
2. Click on the icon Put back the date one or several tasks are carried out .
3. Select the type of postponement (put back by a certain number of days or define a new date).
4. If you wish to postpone all tasks preceding or on this date, you can tick the box Postpone all the following
tasks by the same number of days. This is optional.
5. Confirm by clicking on the green tick.
To use the training schedule templates
You can:
- save the schedule that you have just created in order to use it for other students,
- use a created and saved template in order to apply it to a student account.
To save the training schedule
1. Click on the icon Save the schedule template .
The window Save the schedule template appears.
2. Enter a name and, if you wish, a description of the template (tasks, duration of schedule etc.).
3. Confirm by clicking on the green tick.
Copyright 2004 Auralog S.A. All rights reserved 31
Page 32

TUTOR TOOLS
To use a schedule template
1. Click on the icon Use a schedule template .
The window Use a schedule template appears.
2. Select the name of the training schedule template that you wish to use.
3. Select the start date of the application of the training schedule template.
4. Confirm by clicking on the green tick.
Other parameters
1. Modify the parameters according to the fields available.
Note :
The parameters selected by default – that appear on the screen when an account has been created – were
defined by the principal administrator in the Server parameters application.
Send detailed results of Placement
Test directly to the student
Selected by default when the student does not have a
Tutor for the language concerned. The results will be
sent directly to the student, without going via the
Tutor.
Send first Learning Path directly to
the student
Selected by default when the student does not have a
Tutor for the language concerned.
The student can be sent the Learning Path that
corresponds to his/her learning objectives without
any intervention on the part of the Tutor.
Send reports directly to the student
Selected by default when the student does not have a
Tutor for the language concerned. Detailed Reports
can be sent directly to the student without going via
the Tutor.
E-mail of other recipients
Allows you to send Detailed Reports to other people,
such as the Training Manager.
Send a work follow-up message every
x days
Defined in Server parameters.
Allows you to send regular follow-up messages to
the student if s/he has not worked for x days (local or
online students) or if s/he has not sent in his/her
tracking for x days (distant student).
Activate the training schedule
Selected by default.
To deactivate the training schedule
Remove the tick from Activate training schedule.
- If the student is local, or online, s/he can now neither access TELL ME MORE
Incomplete tasks in the training schedule are suspended.
- If the student is distant, s/he can continue to access TELL ME MORE
/her Tutor. Incomplete tasks in the training schedule are suspended.
®
, but s/he can no longer send messages to his
®
, nor send messages to his/her Tutor.
To confirm the training schedule(s)
Click on the icon Update the training schedule(s) .
The Options tab
This screen comprises 7 categories which contain all the TELL ME MORE® student user options.
1. Click on the Options tab.
Copyright 2004 Auralog S.A. All rights reserved 32
Page 33

TUTOR TOOLS
The categories are:
§ Student Tracking Manager
§ Audio Recordings Tracking Manager (local only)
§ Learning Mode Manager
§ Options related to the activities in free-to-roam mode
§ Options linked to the Guided Mode
§ TELL ME MORE Pedagogical Options
§ TELL ME MORE
General Options
The default parameters of the options within these categories can be modified.
2. To modify a parameter, click in the Value column of the corresponding line and select the new value from the
drop-down menu or type it in.
To know more about the options, consult the chart in the appendix.
3. Click on the icon Update the options file to transfer the modifications of the options to the student’s
folder (the modifications will be applicable the next time the student uses TELL ME MORE
®
).
Note:
This function is not available if the Tutor and/or student is distant In this case, the Tutor must attach the
modifications to a message sent to the student.
The Paths tab
Note:
This feature is not available if the student is distant. Distant Tutors have access to the tab but cannot make
modifications.
Using this tab, you can view the list of Learning Paths available in the student’s folder, i.e. all the Learning Paths that
the student has been allocated. From this window, you can also add or remove Learning Paths from the student folder.
1. Click on the Paths tab.
Copyright 2004 Auralog S.A. All rights reserved 33
Page 34

TUTOR TOOLS
To add a Learning Path
Note:
This function is not available if the Tutor is distant. In this case, the Tutor must attach the Learning Path(s) to a
message sent to the student.
1. Click on the icon Add a learning path or select the menu Learning Paths/Add a learning path.
2. If several lesson languages are available, first select from the list the lesson language for which you are adding
a Learning Path.
Note:
You cannot add a Learning Path to a student’s folder if the student is not learning the language concerned.
3. First select the folder which contains the Path you wish to add:
the Personal folder: the folder which contains the Paths you have created and that only you can use (can
neither be viewed nor used by other Tutors);
the Shared folder: the folder which contains the Paths available to all Tutors on the network (standard Paths,
and Paths created and saved in the Shared folder).
4. Select the desired Path. Confirm by clicking on the green tick.
To remove Learning Paths
1. Select the Learning Path(s) you wish to remove.
2. Click on the icon Remove the learning path(s) or select the menu Learning Paths/Remove the learning
path(s): the student will no longer be able to access this or these Learning Path(s) in TELL ME MORE
The Sessions tab
This tab allows you to view the list of a student’s study sessions.
1. Click on the Sessions tab.
®
.
Copyright 2004 Auralog S.A. All rights reserved 34
Page 35

TUTOR TOOLS
2. Select, if necessary, the lesson language.
The list of study sessions appears.
For each session, you can view:
- the date;
- the total length of the session;
- the length of the session in the Guided Mode;
- the length of the session in the Free-to-Roam Mode.
Copyright 2004 Auralog S.A. All rights reserved 35
Page 36

TUTOR TOOLS
Student tracking
You can track the progress of a student by study session or even exercise by exercise.
The results are displayed in two ways:
- by ‘Overview’ or study session, with the Progress Chart and Breakdown tabs.
- by study session only, with the Detailed record tab.
Select the function Student tracking in the Student folder.
To view the results by study session
1. First select the lesson language and then the Learning Mode.
2. According to the Learning Mode selected, you must subsequently choose:
- the Path, if you selected the Guided Mode;
- the Lesson Family, if you selected the Free-to-Roam Mode.
The Progress Chart contains all the lessons (positioned horizontally) and activities (positioned vertically). If
you wish to hide the icons representing the activities, remove the tick from Display activity icons in the
Student tracking menu.
A ‘lesson’ is a collection of activities grouped by theme (e.g. On the motorway), by Workshop (e.g. Written
Workshop) or by activity type (e.g. Cultural exercises).
The name of the lesson and the activity are displayed when the mouse is placed over the corresponding box.
The filled boxes correspond to activities attempted in the Path:
- the green represents the percentage of the exercise correctly completed;
- the red represents the percentage of the exercise incorrectly completed.
By placing the mouse over a filled-in box, you can view the results of that activity in detail.
Note:
If you click on a filled-in box (with results) and you have selected a precise date, use the Detailed record tab,
in which you can view the lesson and activity concerned in detail.
Copyright 2004 Auralog S.A. All rights reserved 36
Page 37
TUTOR TOOLS
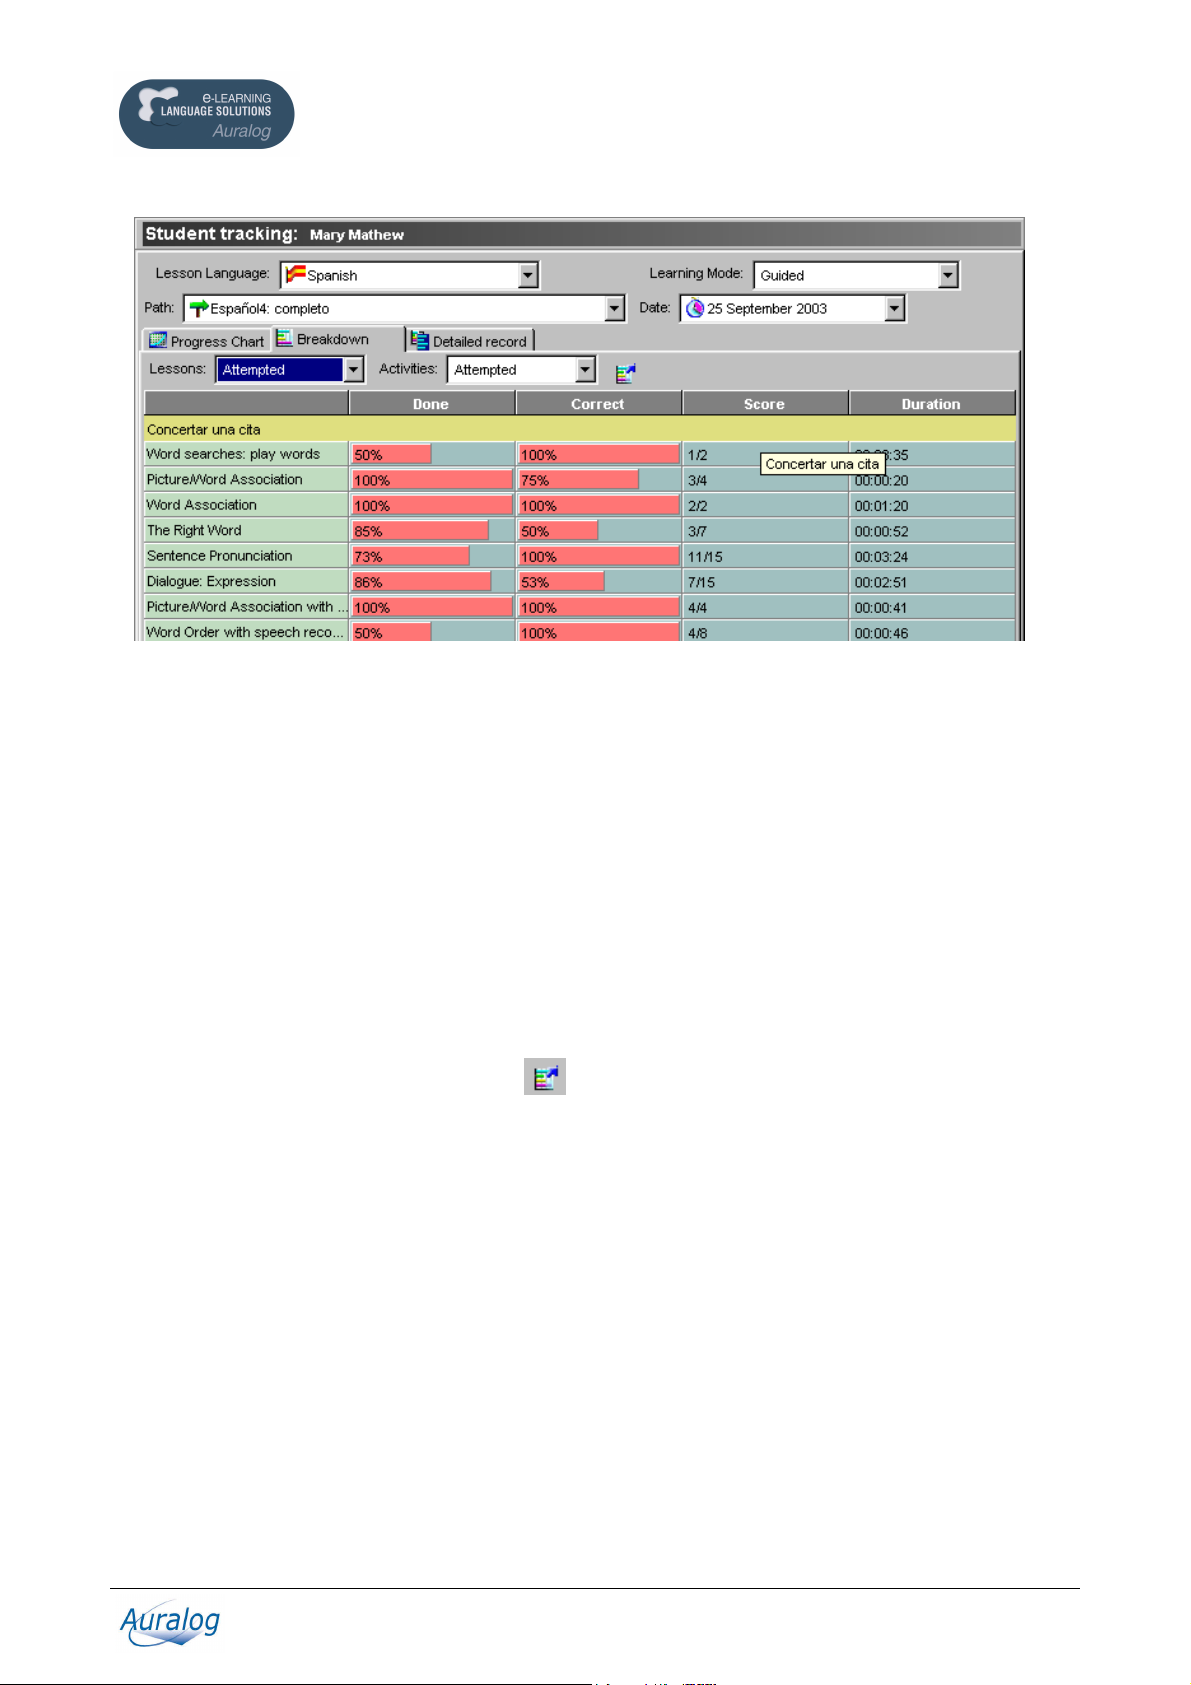
You can also view the results in the form of horizontal bar charts by clicking on the Breakdown tab.
The following details will be displayed for each lesson and activity:
- the percentage of exercises completed;
- the percentage of exercises successfully completed (in relation to the number of exercises undertaken);
- the score (the number of exercises completed successfully);
- the length of time taken to complete the activity.
Note:
The table displayed depends on the lesson/activity combination selected.
Four different displays are possible:
- all lessons and activities;
- all lessons and those activities attempted;
- the lessons attempted and all activities;
- the lessons and activities attempted.
To export the results
To be able to use the results outside of the Tutor Tools application, the results can be exported in the form of a text file,
a Unicode file (a codification which enables the file to contain text in different languages) or as an HTML file.
1. Click on the icon Export the breakdown .
2. Enter the file name.
Example of a Learning Path Breakdown (from the Guided Mode) in HTML format:
Copyright 2004 Auralog S.A. All rights reserved 37
Page 38

TUTOR TOOLS
To view the detailed tracking
The Detailed record tab enables you to view the detailed tracking (i.e. exercise by exercise), but is only accessible if a
precise date has been specified. When a date has been chosen, the Detailed record tab is added to the two existing tabs
(i.e. the Progress Chart and Breakdown tabs).
1. Select a date, then click on the Detailed Record tab.
Copyright 2004 Auralog S.A. All rights reserved 38
Page 39

TUTOR TOOLS
2. Select a lesson.
3. Select an activity or All activities.
Explanation of the columns on the Detailed record tab
COLUMN
EXPLANATION
TITLE
Time
Activity
Description
Time at which the student finished or checked the exercise.
Name of the activity which the exercise belongs to.
First element attempted in the exercise (e.g. first question of the Dialogue, first phrase of
the Dictation).
(Speech
recognition
score)
(Exercise score)
This column concerns all activities for which the speech recognition difficulty level has
been defined (on a scale of 1 to 7, with 7 being the maximum score possible).
Note:
Certain activities are accessible with or without speech recognition.
Number of exercises successfully completed out of the total number of exercises available
for the activity.
Note:
The successful completion of an exercise depends on the different parameters defined for
each exercise.
Exercise details
Select a line to display the wording and details of an exercise.
§ On the left side of the window, various tabs display the different parameters of the activity. These tabs differ
according to activity type and the individual exercises. Amongst others, there are:
- the Cue tab, which displays the question content and, sometimes, the answers proposed;
- the Solution tab, which displays the answer to the exercise or proposed image;
- the Options tab, which displays the various exercise parameters (e.g. timer, translation of words, speech
recognition);
- the Links tab, which displays the grammar points linked to the activity.
§ The right side of the window contains the student’s answers.
You can compare the student’s answer to the correct solution, which enables you to see any errors made. These
details allow you to evaluate student’s work and, if necessary, send them a Learning Path which better corresponds
Copyright 2004 Auralog S.A. All rights reserved 39
Page 40

TUTOR TOOLS
to their ability level and needs.
The icon
indicates that the grammar point related to the phrase or exercise has been consulted.
Copyright 2004 Auralog S.A. All rights reserved 40
Page 41

TUTOR TOOLS
Audio recordings
Note:
This function is only accessible if the Tutor and student are on the same local network and if the option Backup
recordings option has been activated in the student’s options file. For more details about this option, consult the
Student file/Options tab section.
This function enables you to listen to a student’s audio recordings (made while working on the Dialogue and
Pronunciation activities) and evaluate his/her oral expression skills.
Select the function Audio recordings in the Student folder.
1. Select, if necessary, the lesson language
The recordings are first classified by activity, then by lesson.
2. Click on the icon Update to retrieve the most recent of the student’s recordings (if the student is working
in TELL ME MORE
3. Select the phrase or the word you wish to listen to. Click on the icon Play sound or double-click on the
®
at the same time).
line selected to hear the recording.
Copyright 2004 Auralog S.A. All rights reserved 41
Page 42

TUTOR TOOLS
Reply to student/Send a message
This function allows you to reply to a student’s message and also add attachments (e.g. options files, Paths).
Select the function Reply to student in the Student folder.
If the student message contains attachments, the icon
which can be saved if required.
You can:
- view the context of the question, i.e., which TeLL me More
sent;
- write the response or insert a standard message;
- attach the language test results or a Detailed Report;
- attach files to the response.
appears. Click on the icon to view the list of attachments,
®
activity the student was using when the question was
To view the context of the question
Note:
In order to view the context of the question, distant Tutors must have the lesson languages installed on their computers
or accessible from a CD-Rom.
Click on the icon Access detailed tracking
This opens the detailed tracking of the exercise (only for activities for which students can check their answers) that the
student was completing when s/he sent the message.
.
To write a reply to a student’s message
1. Place the cursor in the Reply window and enter your reply.
A certain number of functions allow you to modify the style of your message (i.e. font size and colour, bold
type, italics, underlined). You can also cut, copy and paste text by right-clicking on the mouse.
Note:
If you wish to add attachments (e.g. a Learning Path, file), consult the To attach a file section.
2. Click on the icon Send the reply. The message you have just sent will be transferred from the Inbox to the
Mailbox history. Messages remain in the Inbox until they have been dealt with.
To insert a standard message
Standard messages are replies to questions that students ask frequently. Once Tutors have made a list of recurring
questions, they can prepare a certain number of standard messages which can be saved in a database. To prepare these
standard messages, consult the section entitled Standard message management in the Tools Folder chapter.
Note:
A database of prepared standard messages is supplied with TeLL me More
The standard messages are classified by subject. Below are some examples:
Copyright 2004 Auralog S.A. All rights reserved 42
®
e-Learning solutions.
Page 43

TUTOR TOOLS
- using TELL ME MORE® (for example, start navigation Help using the Tools and Info menu situated in the top right
hand corner of your screen. When this is done, place the cursor in the box surrounding the different navigation buttons
to discover their functions);
- grammar rules;
- vocabulary etc.
1. Click on the Standard message assistant icon .
2. Select firstly the table, and then the theme, for which you wish to search for the standard message(s).
The list of standard messages corresponding to your choice is then displayed.
Note:
If you don’t know under which theme the standard message is filed, you can search by keyword. The keyword
can be found in the title of the standard messages or in the standard message text.
3. Select the standard message. The content will be displayed in the Standard message window.
4. Click on the icon Copy the response directly into the message .
You can decide not to copy the standard message directly into the message, but to copy it to the clipboard by
clicking on the icon Copy reply to clipboard
. This allows you to copy the standard message into another
application.
5. Click on Quit in order to quit the Standard message assistant.
Note:
If you wish to attach a file Learning Path, file, etc.), consult the section entitled To attach a file.
6. Click on Send the reply .
To attach the results of a language test or a Detailed Report
Tutors can receive an automatic message with a student’s language test results or Detailed Report as an attached file in
their Inbox.
1. Double-click on the message-line in the Inbox.
You will then be automatically transferred to the Reply to student feature in the Student file.
2. You can click on the icon Attached files to view the Placement Test results or the Detailed Report.
3. For Placement Test results, go straight to point 4.
Copyright 2004 Auralog S.A. All rights reserved 43
Page 44

TUTOR TOOLS
For a Detailed Report, click on the icon Add a comment . Type in the comment; it will be added to the
bottom of the HTML file. Confirm by clicking on the green tick. Go to point 5.
4. Type your comment into the Reply box.
5. Click on the icon Send the reply .
The file, including the results of the Placement Test or the Detailed Report, will be added to the message sent
to the student.
Copyright 2004 Auralog S.A. All rights reserved 44
Page 45
TUTOR TOOLS
To attach a file
You can add attachments to messages using Tutor Tools.
The attachments can take the form of:
- a Learning Path;
- an options file,
- any other form of file.
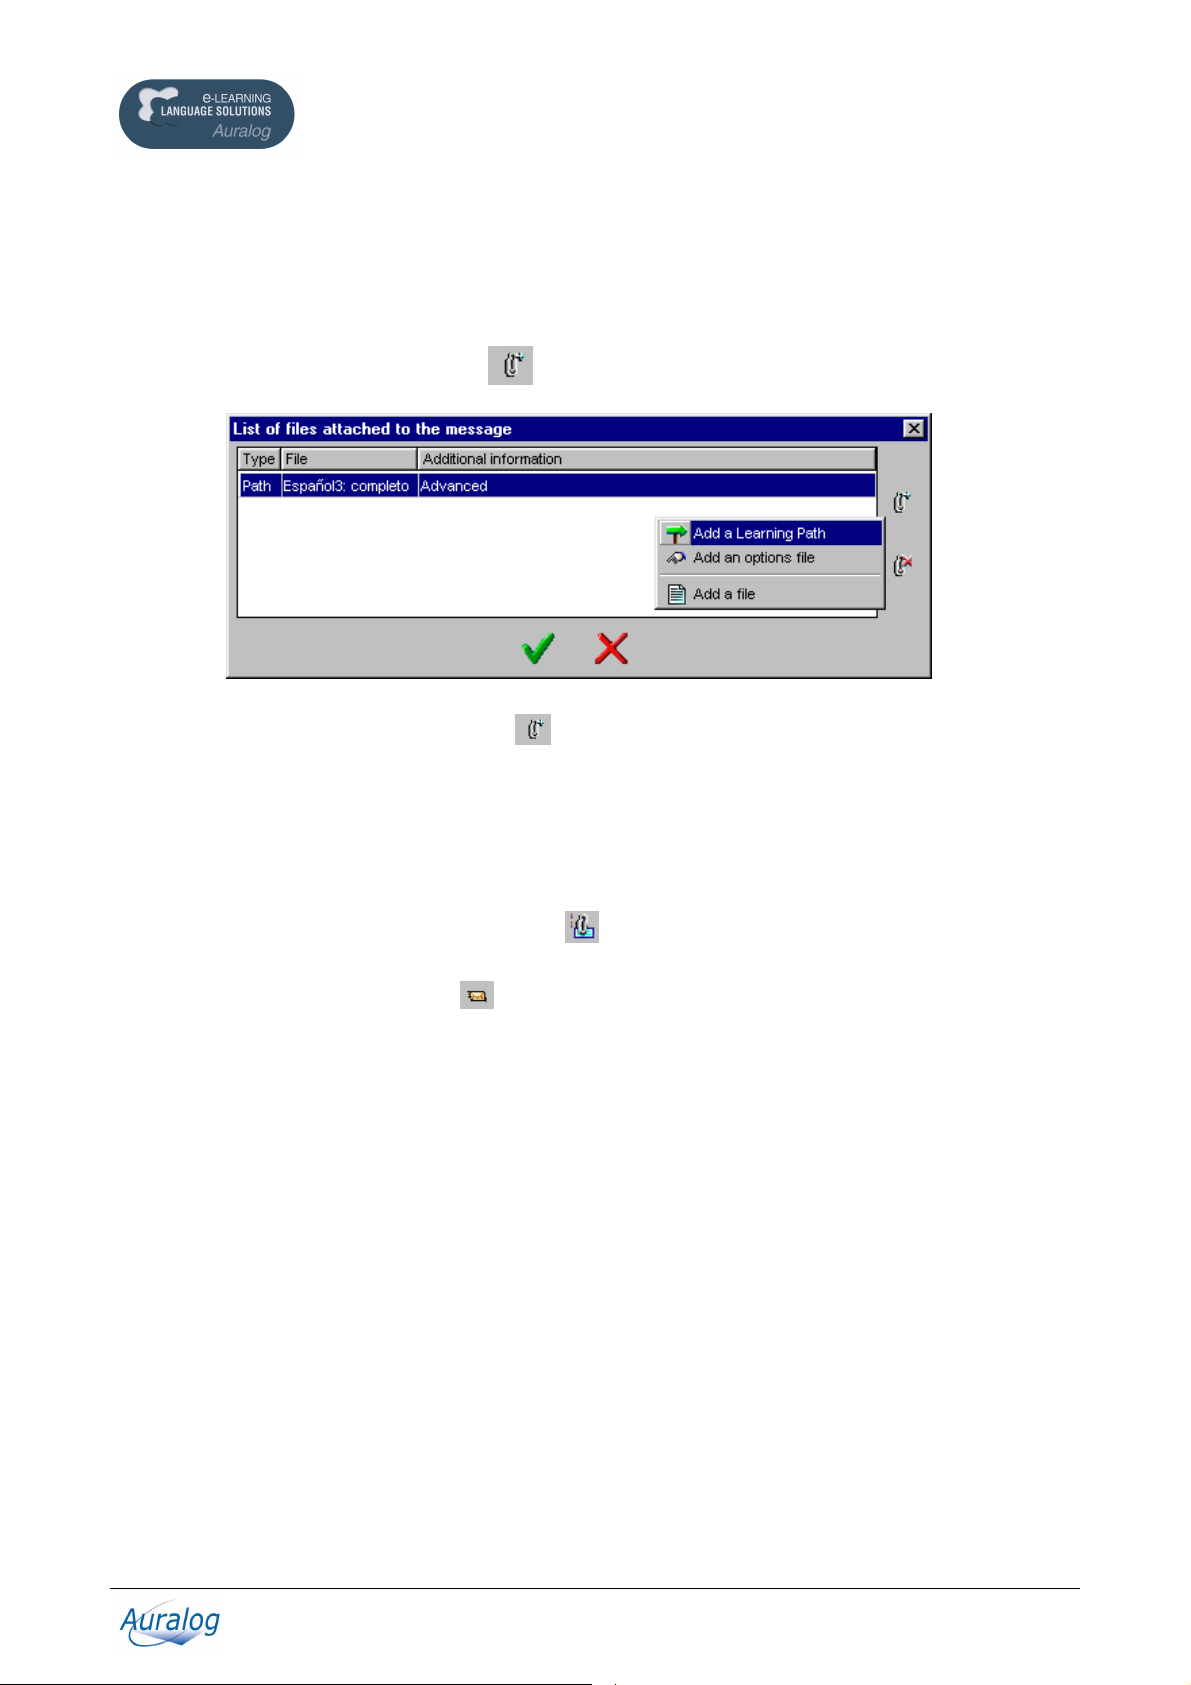
1. Click on the icon Attached elements on the Reply to student screen.
2. Click on the icon Attach a new element .
3. Select the type of attachment you wish to add, then the specific element. To attach a Learning Path, refer
to the To attach a Learning Path section. To attach an options file, consult the To attach an options file
section.
4. Confirm by clicking on the green tick.
Note:
While writing the message, you can consult the list of elements that you have attached to the message at any
time by clicking on the icon Attached elements
, the form of which changes when elements have been
attached to the message.
5. Click on the icon Send the Reply .
When you click on Send the reply, the message you have just sent will be transferred from the Inbox to the
Mailbox history. Messages remain in the Inbox until they have been dealt with.
Note:
Learning Paths and options files are not sent in the form of attachments. They are merely updated when the student
connects to TELL ME MORE
®
. A message containing these types of files is stored in the Mailbox history without the
attachment symbol (a paper clip).
Copyright 2004 Auralog S.A. All rights reserved 45
Page 46

TUTOR TOOLS
To attach a Learning Path
1. Select the folder (Shared or Personal) in which the Path to be attached is situated.
2. Select the Path from the list, then confirm by clicking on the green tick.
3. Go to point 4 in the To attach a file section.
To attach an options file
You must have already created an options file. To know more about this, consult the Options manager/To create an
options file section.
1. Select the file (file with the extension .ini).
2. Click on Open.
3. Go to point 4 in the To attach a file section.
Copyright 2004 Auralog S.A. All rights reserved 46
Page 47
TUTOR TOOLS
History
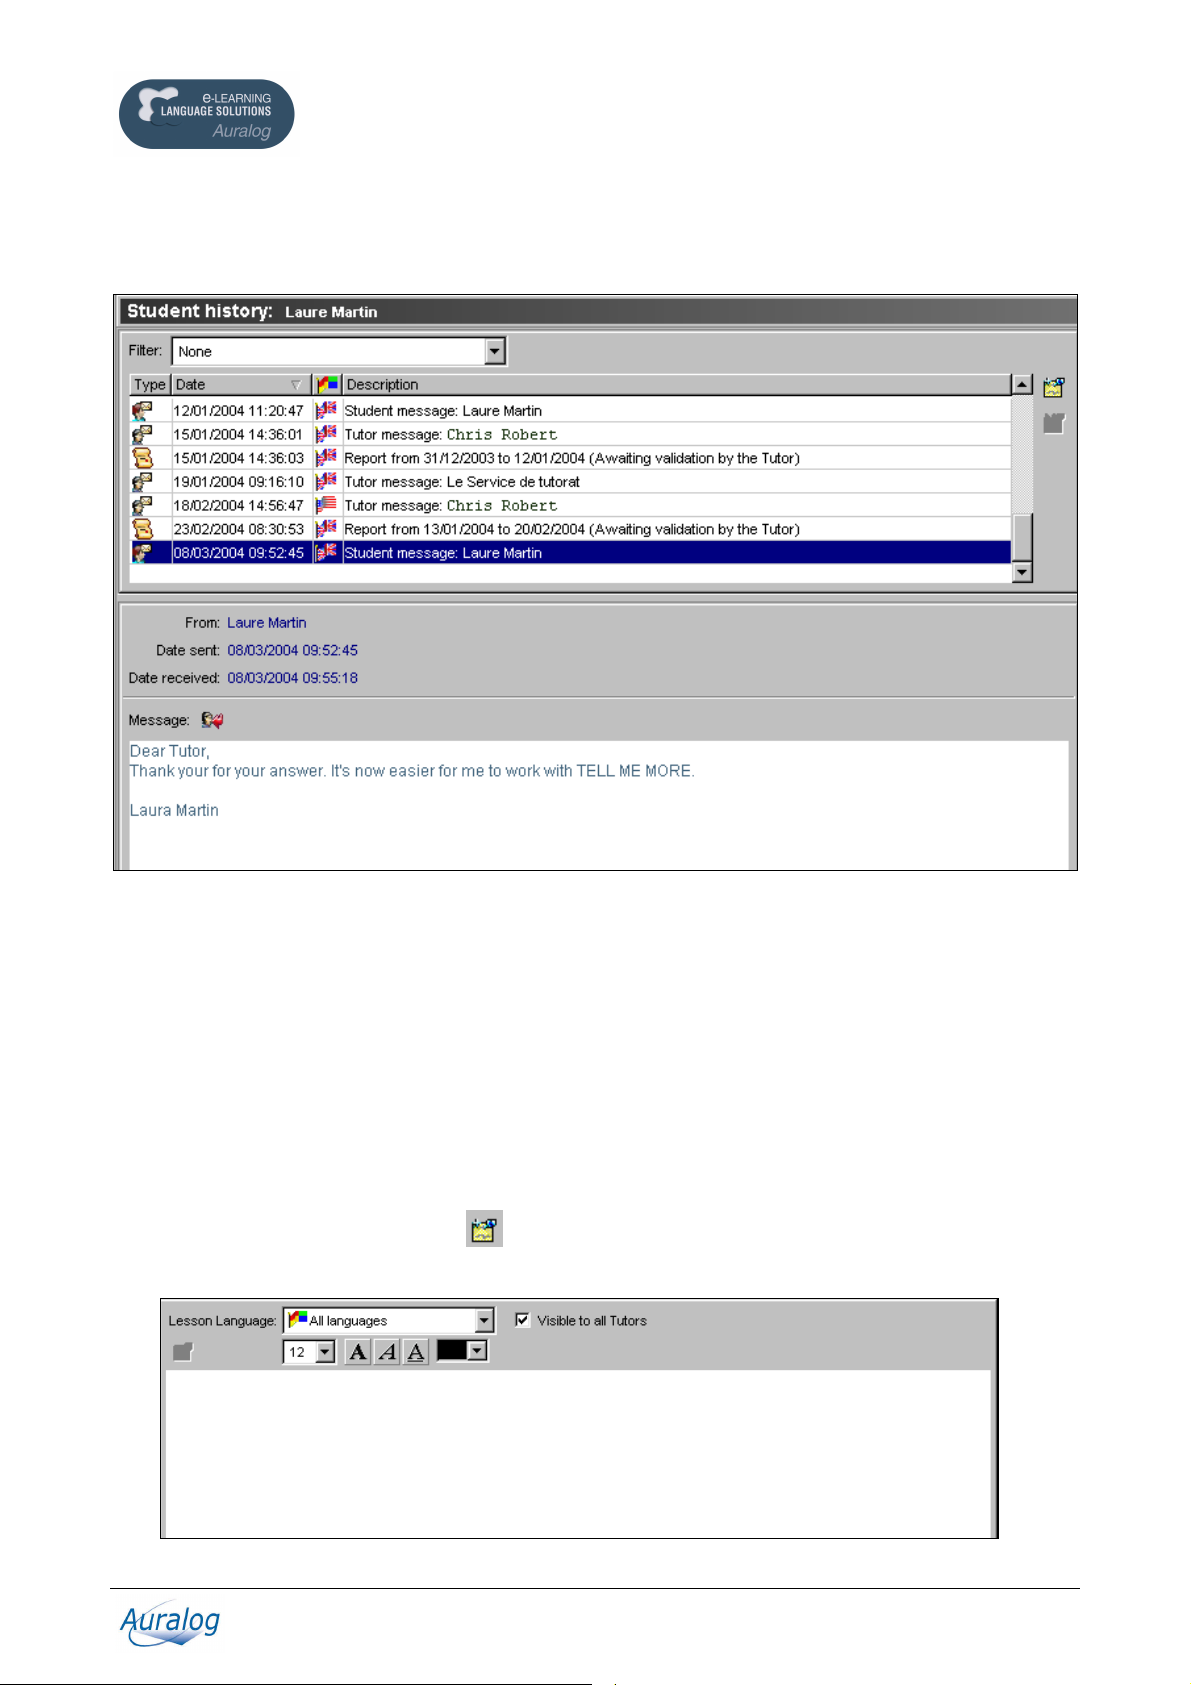
Select the History function in the Student folder.
1. You have the option of filtering the elements that you wish to see displayed in the history.
This screen allows you to display all:
- the messages exchanged with the students. You can then sort again by message type (Messages received or
Messages sent), then by lesson language;
- Placement Tests (results);
- Detailed Reports;
- Comments.
2. Select a line to display the selected element’s contents.
To add a comment
This function allows you to enter a comment (for example: notify regarding a technical intervention on the student’s
workstation).
1. Click on the icon Add a comment .
A text box will appear at the bottom of the window.
Copyright 2004 Auralog S.A. All rights reserved 47
Page 48

TUTOR TOOLS
2. Select the lesson language if the comment only applies to one lesson language.
If not, select All languages.
3. If you wish the comment to remain confidential, remove the tick from the Visible to all Tutors box by
clicking on it.
4. Enter the text.
A certain number of icons allow you to modify the style of your message. Select the text you wish to modify
and click on the different icons to modify the font size and colour, as well as the style (bold type, italics or
underlined).
5. Click on the icon Save comment .
To delete a comment
Note:
You can only delete a comment within 24 hours of its creation and only if it was written by you. After this period, the
comment will remain in the student history indefinitely.
1. Select the comment you wish to delete from the list.
2. Click on the icon Delete comment .
Copyright 2004 Auralog S.A. All rights reserved 48
Page 49

TUTOR TOOLS
THE TOOLS FOLDER
Access to the four Tools available (Standard message management, Learning Paths, Options Manager and
Content Printout) depends upon the access rights defined in Admin Tools when your account was created.
Standard message management
Standard messages are replies to questions that students ask frequently.
Standard messages written by Tutors are filed on the server and can be used at any time by any Tutor on the same local
network.
Standard messages can be created independently of the tool and can be imported. They can also be exported from the
tool. For further information, consult the section entitled To import and export standard messages.
Note:
Distant Tutors’ standard messages are stocked on their workstations; the Tutor is therefore the only person who can
use them.
Select the Standard message manager in the Tools folder.
To create a standard message table
1. Click on the icon Add a new standard message table or select the menu Standard messages/Add a new
standard message table.
2. Enter the name of the table (example: the name of the language that the standard messages are written in), then
confirm by clicking on the green tick.
Copyright 2004 Auralog S.A. All rights reserved 49
Page 50

TUTOR TOOLS
To add a theme
1. Select the table.
2. Click on the icon Add a new theme or select the menu Standard messages/Add a new theme.
3. Enter a name for the new theme (example: Polite constructions, Marking system, How to use the exercises,
etc.).
4. Select the theme root in which you wish to place the new theme. By default, when the first theme is created,
the application will suggest that the theme be placed in the theme Root.
5. Confirm by clicking on the green tick.
To add a standard message
1. Select the table, then the theme.
2. Click on the icon Add a new standard message or select the menu Standard messages/Add a new
standard message.
3. Enter a descriptive name for the standard message, linked to the theme you wish to file it under.
4. Write your message.
5. Click on the icon Save a standard message .
To rename a table/a theme
1. Select the table or theme.
2. Click on the icons Rename a standard message table or Rename a theme .
3. Type in the new name and confirm by clicking on the green tick.
To modify a standard message
1. Select the table, then the theme containing the standard message.
2. Select the standard message.
3. Carry out the modifications to the standard message.
4. Click on the icon Update a standard message or select the menu Standard messages/ Add or update a
standard message.
To export and import standard messages
This function enables, for example, two Tutors who are not working on the same local network to send standard
messages via e-mail. One Tutor can export standard messages into a text file, which can then be sent to another Tutor
who can use the import feature in order to integrate the standard messages into the database.
You can also export a theme from one table in order to import it into another.
To export standard messages
1. Select the table of the theme you wish to export.
2. Click on the icon Export standard messages or select the menu Standard messages/Export standard
messages.
Copyright 2004 Auralog S.A. All rights reserved 50
Page 51

TUTOR TOOLS
3. Select the theme you wish to export, then confirm by clicking on the green tick.
4. Enter a name for the file and save it.
Note:
When you export standard messages from a theme, all standard messages in the sub-themes are also exported. By
exporting from the root, you export all the standard messages in a table.
To import standard messages
It is possible to import a file which has previously been exported.
1. Select the table.
2. Click on Import standard messages or select the menu Standard messages/Import standard messages.
3. Select the file (file with the extension .az7), then click on Open.
A message will inform you that the standard messages have been imported successfully, and the file will be
added to the list of themes, with all the standard messages.
To remove a standard message
1. Select the standard message, following the process described in the To modify a standard message section.
2. Click on the icon Remove a standard message or select the menu Standard messages/Remove a
standard message. A message will ask you to confirm this.
3. Confirm by clicking on the green tick.
To move standard messages
You can move standard messages from one theme to another. It is possible to move one or more standard messages, or
even to move an entire theme.
To move one or more standard messages
1. Select the standard message, following the process as described in the To modify a standard message section.
2. Click on the icon Move one or more standard messages or select the menu Standard messages/ Move
one or more standard messages.
3. Select the new destination theme.
4. Confirm by clicking on the green tick.
To move an entire theme
You can move all the standard messages in one theme to another. The theme you move will become a sub-theme of the
destination theme.
1. Select the theme you wish to move.
2. Click on the icon Move a theme or select the menu Standard messages/Move a theme.
Copyright 2004 Auralog S.A. All rights reserved 51
Page 52

TUTOR TOOLS
3. Ensure that the theme displayed under Theme to be moved is correct.
4. Select the Destination theme.
5. Confirm by clicking on the green tick.
Copyright 2004 Auralog S.A. All rights reserved 52
Page 53

TUTOR TOOLS
Learning Paths
A Learning Path is made up of a combination of lessons and activities.
You can:
- open/modify a Learning Path;
- create a Learning Path;
- save a Path;
- transfer, import, export one or several Paths.
Select the function Learning Paths in the Tools folder.
On the All Paths tab, you can view the list of Learning Paths contained in:
- the Personal folder: this contains all the Tutor’s personal Paths (only accessible by the Tutor);
- the Shared folder: this contains all the Paths shared between all Tutors. During the installation of TELL ME
MORE
®
e-Learning solutions, all the Paths copied and accessible to students by default are copied into this folder.
To open a Learning Path
1. Select the All Paths tab, the folder type, the lesson language and Lesson Family to display the list of Paths
concerned.
2. Double-click on the Path to open it.
The Progress Chart corresponding to all lessons and activities of the Path opens. The name of each activity is
displayed when the cursor is placed over the corresponding box.
Copyright 2004 Auralog S.A. All rights reserved 53
Page 54

TUTOR TOOLS
To create a Learning Path
1. Click on the icon Create a learning path .
Define:
1) the general information regarding the Learning Path;
2) the activity groups.
To define a Learning Path’s general information
1. Select the lesson language from the drop-down menu.
Note:
You only have access to the lesson language(s) you teach, for which the content is accessible (i.e. lessons
stored on your hard drive, access by CD-ROM or by network).
2. Click on the icon Add a Lesson Family .
3. Select the Lesson Family concerned, then confirm by clicking on the green tick.
The Activity group tab appears.
Note:
If you wish to create a Learning Path with lessons belonging to several Lesson Families, you must select the
Lesson Families individually by repeating the above procedure.
4. Enter a title.
5. If you wish to translate the Path title, consult the To translate the title and add a Learning Path description
section. If not, consult the To define activity groups section.
To translate the title and add a Learning Path description
Note:
By default, the Learning Path title is in the interface language in TELL ME MORE
®
. If the title does not exist in this
particular language, the title displayed will be the same as that entered in the Title field on the Information tab.
1. Click on the icons Title translations and Path description .
Copyright 2004 Auralog S.A. All rights reserved 54
Page 55

TUTOR TOOLS
2. Click on the icon Add a translation language .
3. Select the language.
4. Translate the title and write the Path description (optional). Then confirm by clicking on the green tick.
To define activity groups
An activity group represents a line in a Learning Path (maximum authorised: 18 lines and 30 activities per line).
1. Click on the Activity group tab.
2. Click on the icon Add an activity group .
3. You can also copy / paste an activity group that has already been added to the Path; this is optional.
Copyright 2004 Auralog S.A. All rights reserved 55
Page 56

TUTOR TOOLS
4. You can then choose either:
- to select the Linked to a lesson option if you wish to include activities linked to a particular lesson, then
select the relevant lesson;
- to select the Not linked to a lesson option if you wish to include activities linked to a particular level
(Beginner, Intermediate, Advanced, Business).
5. Tick the Title box (by clicking on it) if you wish to modify the activity’s name.
6. Click on the icon Add a new activity .
7. Select an activity type for which you must:
check or modify the options defined by default;
select the exercises.
On the right side of the screen, you can view the skills the activity develops.
8. Tick the Name box (by clicking on it) if you wish to modify the activity’s name.
Copyright 2004 Auralog S.A. All rights reserved 56
Page 57

TUTOR TOOLS
To add an extra activity
You can add a link to an activity outside TELL ME MORE® by selecting Extra activity in the Activity type list.
1. Tick Name to modify the title of the extra activity.
2. Enter the link towards the activity in the Command line file. This link must be URL accessible from the
student’s workstation (Internet site, html page etc.).
3. Select the time (in seconds) that must be spent on the activity so that it may be considered as successfully
completed.
To modify the activity options
To know more about the options, consult the table in the Appendix.
Click on the Value field, then select the new value.
To select the exercises
1. Click on the Exercises tab.
Copyright 2004 Auralog S.A. All rights reserved 57
Page 58

TUTOR TOOLS
By default, all the exercises available for the lesson activity or the level selected are displayed.
By selecting the title or the first element of an exercise on the left side of the screen, you can view the entire
text of the exercise on the opposite side.
Also displayed are:
- the Level, that is the number of elements to complete in order to move on to the next activity.
- the Time per element, i.e. the number of seconds required to complete the exercise, as well as the overall
time taken to do all the exercises.
2. If you wish to limit the activity to certain exercises only, select the different exercises you wish to exclude
from the Learning Path, then click on the icon Delete exercises selected
3. You can also modify the order in which the exercises will be displayed to the student. Select one or more
exercises, then click either on the icon Move the exercises selected up
selected down
4. You can add any deleted exercises by clicking on the icon Add an exercise .
.
.
, or the icon Move the exercises
Select the deleted exercise(s) you wish to add, then confirm by clicking on the green tick. If you put the same
activity into a Path activity group twice and you wish to reuse the exercises already selected, you must remove
the tick from the Hide the exercises already added box.
Note:
If you wish to add all the exercises again, click on the icon Select all
, then confirm by clicking on the
green tick.
5. Confirm by clicking on the green tick.
Copyright 2004 Auralog S.A. All rights reserved 58
Page 59
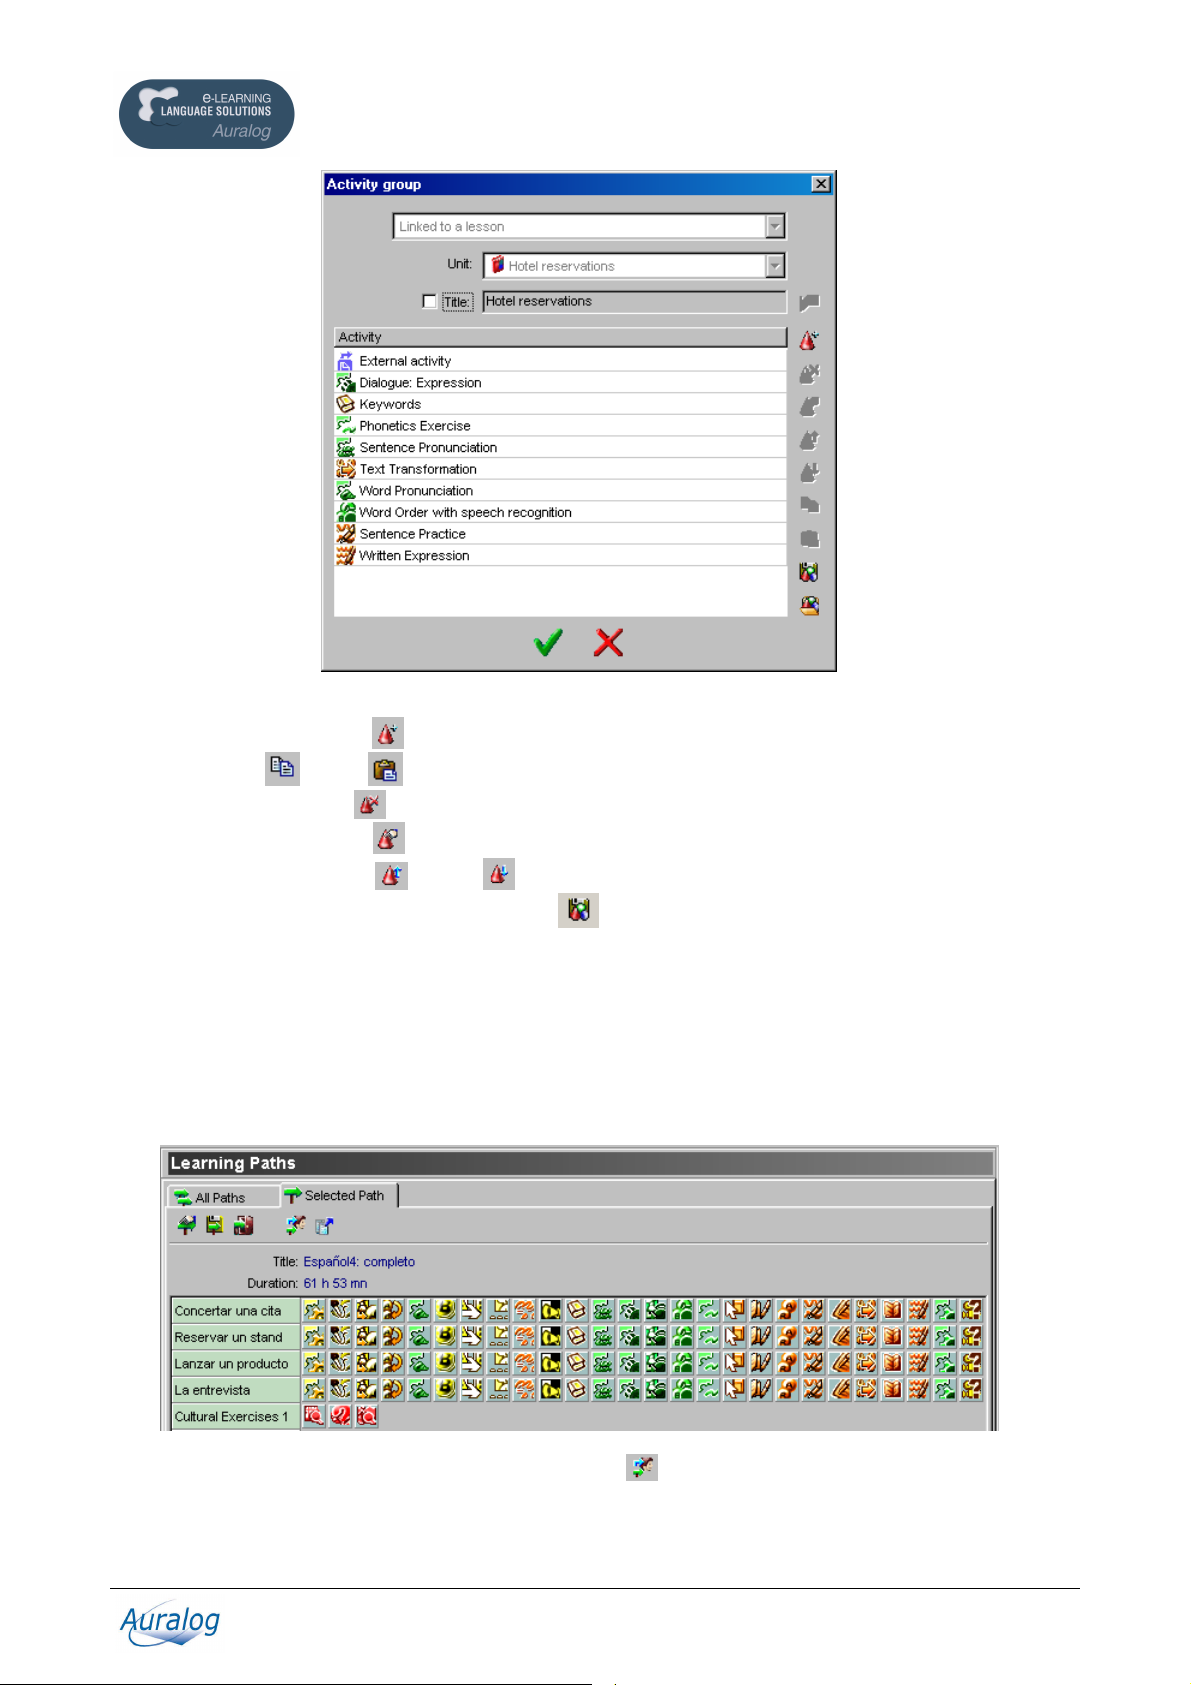
TUTOR TOOLS
6. Various icons allow you subsequently to reorganise the activity group by:
- adding a new activity
- copying
/pasting an activity already included in an activity group;
- deleting an activity
- modifying an activity
- moving an activity up
7. Optional: click on the icon Save the template in order to save the created activity group and to be able to
;
;
;
or down .
re-use it in other Paths.
8. Confirm by clicking on the green tick.
To transfer a Learning Path to one or more student folders
Note:
This function is not available if the Tutor and/or the student is distant.
Once a Learning Path has been selected or created, you can transfer it to one or more students.
1. Click on the icon Transfer the Path to student file(s) .
If the Learning Path has recently been created, it must be saved before being sent. For more details, consult the
To save a Learning Path section.
Copyright 2004 Auralog S.A. All rights reserved 59
Page 60

TUTOR TOOLS
2. Click on the icon Select student(s) .
The Students in the database window appears.
3. From the student database, select the student(s) to whom you wish to send the Learning Path, then confirm by
clicking on the green tick.
4. Confirm by clicking on the green tick.
To save a Learning Path
1. Click on the icon Save the learning path .
2. Select the folder in which you wish to save the Learning Path.
You have two choices:
- to save it in the Personal folder: which contains the Paths you have created and to which only you have
access;
- to save it in the Shared folder: which contains all the Paths available to all Tutors on the network (standard
Learning Paths, Educational Paths and Paths created and saved in the Shared folder).
To transfer a Learning Path from one folder to another
Note:
This function is not available for distant Tutors.
You can subsequently change the folder in which the Learning Paths are stored.
1. Select the All Paths tab, the type of folder, the lesson language and Lesson Family concerned to display the list
of Paths.
2. Select the Learning Path(s).
3. Click on the icon Move the Path(s) selected to the ‘Shared’ folder (or Move the Path(s) selected to the
‘Personal’ folder)
Copyright 2004 Auralog S.A. All rights reserved 60
according to where you wish to place the Path.
Page 61

TUTOR TOOLS
To export/import a Learning Path
To export Learning Paths
1. Select the Learning Path(s).
2. Click on the icon Export .
- If you have selected only one Path, enter the name of the Learning Path (a file with the extension .al7), then
click on Save.
- If you have selected more than one Path, select the directory in which you wish to copy the Paths, then
confirm by clicking on the green tick.
To import Learning Paths
1. Click on the All Paths tab.
2. Click on the icon Import .
3. Select Path(s) you wish to import (Remember: a Learning Path is a file with the extension .al7), then click on
Open.
4. State the folder (Personal or Shared) where you wish to save the Paths.
The Learning Path(s) imported will be added to the list.
To modify a Learning Path
You can:
- modify, move, add or remove an activity group or activity;
- modify, add or remove a translation of the Path’s title.
1. Select the All Paths tab, the type of folder, the lesson language and Lesson Family concerned to display the list
of Paths.
2. You have the option of clicking directly on the activity group or the activity within the Progress Chart that you
wish to modify.
If you wish to modify the title, the Lesson Families etc. go to point 3.
3. Select the Path you wish to modify, then click on Modify the Learning Path .
To modify an activity group
1. Click on the Activity group tab.
You can then:
- add an activity group;
Copyright 2004 Auralog S.A. All rights reserved 61
Page 62

TUTOR TOOLS
- modify an activity group;
- remove one or more activity groups;
- move an activity group up or down.
To add an activity group
1. Click on the icon Add an activity group .
2. Go to point 3 of the To create a Learning Path/To define activity groups section.
To modify an activity group
1. Select the activity group you wish to modify, then click on Modify the activity group .
2. Go to point 3 of the To create a Learning Path/To define activity groups section.
To remove an activity group
1. Select the activity group(s) you wish to remove, then click on Remove activity group(s) .
To move an activity group
1. Select the activity group that you would like to move.
2. Then either click on the icon Move activity group up (the line will move up one space, corresponding to
a move one space to the left
in the Progress Chart), or on the icon Move activity group down (the line
will move down one space, corresponding to a move one space to the right
in the Progress Chart).
Copyright 2004 Auralog S.A. All rights reserved 62
Page 63

TUTOR TOOLS
Options Manager
This function enables the creation of various TELL ME MORE
or attach to messages.
Select the function Options manager in the Tools folder.
®
options files that you can transfer directly to students
To create an options file
Note:
The Value field of each option is empty by default.
To create a set of options, select values (from the range available) for each of the options. You can only select a limited
number of options.
1. Enter or select a value by clicking on the Value field.
For a detailed description of the options, consult the table in the appendix.
2. You can choose either:
to save the options file: consult the To save an options file section;
to transfer the options file to students: consult the To transfer an options file to one or more student folders.
To save an options file
1. Click on the icon Save options file or select the menu Options/Save options file having chosen the values
required.
2. Enter a name for the options file and click on Save (the file has the extension .ini).
To open an options file
1. Click on the icon Open an options file or select the menu Options/Open an options file.
2. Select the required options file (file with the extension .ini) and click on Open.
The options file will be displayed.
Copyright 2004 Auralog S.A. All rights reserved 63
Page 64

TUTOR TOOLS
You can then modify it (consult the To create an options file section) or transfer it (consult the To transfer
an options file to one or more student folders section).
To transfer an options file to one ore more student folders
Note:
This function is not available if the Tutor and/or student is distant.
1. Open the options file you wish to transfer (consult the To open an options file section).
2. Click on the icon Transfer the options to one or more student files .
3. Click on the icon Select one or several student(s) .
4. Select the student(s) to whom you wish to send the options file and confirm by clicking on the green tick.
Note:
You can find the options file you sent to a student by opening the Student folder and clicking on the Options
tab of the Student file.
Copyright 2004 Auralog S.A. All rights reserved 64
Page 65

TUTOR TOOLS
To print the linguistic and pedagogical content
Content Printout enables you to select all or part of the linguistic and pedagogical content of TELL ME MORE® and
print it. You can, for example:
- print the activities without the answers, allowing students to complete the activities on paper;
- print the contents of the Glossary and Grammar to act as support materials.
Note:
You must have access to lessons (copied on your hard disk or accessible by the network or CD-ROM) to be able to print
their contents.
Select the function Content Printout in the Tools folder.
To define the selection content
When the window opens, a selection is displayed by default. You must therefore define its contents.
1. Select the Lesson language for which you wish to print the linguistic and pedagogical content you wish to
print (Remember: you only have access to the languages you teach).
2. Select the Lesson Family or Families concerned by clicking on the icon Add a Lesson Family .
3. Select the Content type you wish to print (Activity, Lesson or Culture). For more details, consult the Content
type: Activity, Content type: Lessons or Content type: Culture sections.
The print options vary depending upon the content type selected.
Copyright 2004 Auralog S.A. All rights reserved 65
Page 66

TUTOR TOOLS
Content type: Activity
1. Select an activity from the drop-down menu (the selection will take the name of the activity selected).
2. Click on the icon Add a selection .
3. Select the lesson(s) for which you wish to print the activities, then confirm by clicking on the green tick.
4. You can define the print options for each of the activities.
To know more about this, consult the To define the print options section.
5. You can modify the selection at any time by changing, moving or removing activities.
For each new activity you wish to print, you need to create a new selection. Therefore, you must repeat the procedure
beginning from the start of the To add a selection section.
Copyright 2004 Auralog S.A. All rights reserved 66
Page 67

TUTOR TOOLS
Content type: Lesson
1. Select the lesson concerned from the drop-down menu (the selection will take the name of the lesson selected).
2. Click on the icon Add a selection .
3. Select the activity or activities you wish to print from the selected lesson, then confirm by clicking on the green
tick.
4. You can define the print options for each of the activities.
To know more about this, consult the To define the print options section.
5. You can modify the selection at any time by changing, moving or removing activities.
For each new activity you wish to print, you need to create a new selection. Therefore, you must repeat the procedure
beginning from the start of the To add a selection section.
Copyright 2004 Auralog S.A. All rights reserved 67
Page 68

TUTOR TOOLS
Content type: Culture
1. Click on the icon Add a selection .
2. Select the activity or activities you wish to print, then confirm by clicking on the green tick.
3. You can define the print options for each of the activities.
To know more about this, consult the To define the print options section.
4. You can modify the selection at any time by changing, moving or removing activities.
Copyright 2004 Auralog S.A. All rights reserved 68
Page 69

TUTOR TOOLS
To define the print options
If you have selected the content type Activity, the options are defined for all lessons selected.
If you have selected the Content type Lesson or Culture, the options are defined for the activity selected.
For each activity, tick the boxes (by clicking on them) on the right side of the screen, according to the options available
(General Options and Specific Options) and the content you wish to print.
For a detailed description of the print options, consult the tables in the appendix.
To add a selection
1. Click on the icon Add a selection .
2. Go to point 1 of the Define the content of a selection section and follow the instructions.
To print selections
1. Before printing, you can open a print preview of the document created by clicking on the icon Print preview
in the toolbar. The print preview includes all the selections.
2. You can also check and modify the layout (definition of the top/bottom/left/right margins) by clicking on the
icon Layout
3. Click on the icon Print .
in the toolbar.
To save or open selections files
This function enables you to save ready-to-print selections files, that you can open and print later.
To save a selections file
Once you have selected the linguistic and pedagogical content you wish to print, you can save it to print later using
Tutor Tools.
1. Click on Save the selections file .
2. Enter a name for the file (which will have the extension .aps) and click on Save.
To open a selections file
Note:
Selections files only contain the selections to be printed and not the linguistic and pedagogical content itself. For
another Tutor to read the file, they need to have access to the content of the lesson(s) selected in the selections file (i.e.
the lessons copied onto their hard disk, or accessible through the network or on CD-ROM).
1. Click on the icon Open a selections file .
2. Select the file you wish and click on Open.
The selections will be displayed: you can then print them.
Copyright 2004 Auralog S.A. All rights reserved 69
Page 70

TUTOR TOOLS
To modify, move or remove a selection
Modify a selection
1. Select the line corresponding to the selection you wish to modify in the Selections to print field.
2. Carry out the modifications. To know more about this, consult the To add a selection.
Move a selection
1. Select the line corresponding to the selection you wish to move in the Selections to print field.
2. Click on the icon Move the selection up , if you wish to move the selection closer to the beginning of the
document to be printed, or click on the icon Move the selection down
towards the end of the document to be printed.
, if you wish to move the selection
Remove a selection
1. Select the line corresponding to the selection you wish to remove in the Selections to print field.
2. Click on Remove the selection .
Important information concerning printing of documents
Dialogue printout: question transition
The transition between different questions in the dialogue illustrates the interactive nature of the activity as the answer
chosen by the student dictates the following question.
The number on the left of the printout corresponds to the dialogue question number.
The numbers on the right correspond to the question which will follow if the student gives that particular answer.
Copyright 2004 Auralog S.A. All rights reserved 70
Page 71

TUTOR TOOLS
g
Appendix
Description of student options for using TELL ME MORE®
The table below provides details of each option.
Parameter Explanation Choice of values
Student Tracking Manager
Number of days detailed tracking
is kept
Audio Recordings Tracking Manager (local only)
Backup recordings
Compress recordings
Maximum number of saved
dialogues
Maximum number of saved
Sentence Pronunciation
exercises
Maximum number of saved Word
Pronunciation exercises
Maximum number of recordings
for each dialogue/sentence/word
Learning Mode Manager
Enable choice of Learning Mode
Learning Mode when TELL ME
MORE starts
Enable access to the Free-toRoam Mode in TELL ME MORE
Enable access to the Guided
Mode in TELL ME MORE
Options related to the activities in free-to-roam mode
Activate timer
Timer duration
Activate speech recognition
Speech recognition difficulty level
Text translations
Translation of words
Activate exercise links
Number of days for which the detailed
tracking of a student (local or online) is
1 to 40 (10 = default)
kept.
Saves local student audio recordings made
for the Pronunciation and Dialogue
Yes/No (default)
activities.
Compresses local student audio recordings
(to the detriment of the sound quality).
Yes/No (default)
Maximum number of Dialogue activity
audio recordings that are saved (local
1 to 5 (2 = default)
students).
Maximum number of Sentence
Pronunciation audio recordings that are
1 to 50 (10 = default)
saved (local students).
Maximum number of Word Pronunciation
audio recordings that are saved (local
1 to 50 (10 = default)
students).
Maximum number of audio recordings of
attempts made per dialogue/sentence/word
which are saved. Only those achieving the
1 (default) to 3
best scores are saved (local students).
Gives student choice of Learning Mode in
TELL ME MORE
®
.
Mode in which TELL ME MORE® begins
when opened by student.
Gives student access to the Free-to-Roam
Mode in TELL ME MORE
Gives student access to the Guided Mode in
TELL ME MORE
®
.
®
.
Yes (default)/No
Free-to-Roam, Guided
(default)
Yes (default)/No
Yes (default)/No
Activates the timer. Yes/No (default)
Timer speed.
Activates speech recognition for those
exercises in which it is used.
Very fast, Fast, Average
(default), Slow, Very slow
Yes (default)/No
Difficulty level of activities with speech
recognition; if you choose, for example, the
value 4 and your score is below this, TELL
ME MORE
®
will not accept your answer.
1/7 to 7/7 (3/7 = default)
Allows translations of texts to be viewed
for the following activities: Dialogue,
Video and Questions, Grammar
Yes/No (default)
Explanations and Cultural Texts.
Allows viewing of word translations for the
Find out more about a word function.
Activates access to exercises for the
Dialo
ue and Video and Questions
Yes (default)/No
Yes (default)/No
Copyright 2004 Auralog S.A. All rights reserved 71
Page 72

TUTOR TOOLS
activities.
Activate Sentence Pronunciation
links
Activate Word Pronunciation
links
Dialogue: mode
Comprehension dialogue:
number of wrong answers
Picture/Word Association: display
words
Picture/Word Association:
number of incorrect answers
Crossword Puzzles: grid size
Activates access to Sentence Pronunciation
from the Dialogue activity.
Activates access to Word Pronunciation
from the activities using the Find out more
about a word function.
Choice of mode for the Dialogue activity.
Number of incorrect answers displayed in
the Comprehension dialogue.
Display the various possible answers in this
activity.
Number of incorrect answers displayed. 1 to 3 (2 = default)
Number of boxes constituting grid size. 5 to 11 (8 = default)
Type of clue provided by TELL ME
Crossword Puzzles: type of clue
MORE
grid.
Word Searches: grid size
Number of boxes constituting grid size. 10 to 15 (12 = default)
Type of clue provided by TELL ME
Word Searches: type of clue
MORE
words.
Video: display subtitles
Displays video subtitles. Yes (default)/No
Increases level of difficulty of dictation by
Dictation
taking into account punctuation in student
responses.
Options linked to the Guided Mode
Enables the student to have access to all
standard Learning Paths (and Educational
Enable access to all Paths
Paths, if they have been copied). If not
activated, the student only has access to
Paths sent by Tutors.
TELL ME MORE Pedagogical Options
Access to the grammar
explanations
Grammar explanations display
mode
Conjugation Tool access
Glossary access
Access to Grammar Explanations. Yes (default)/No
Type of display of Grammar Explanations
in TELL ME MORE
Access to Conjugation Tool. Yes (default)/No
Access to Glossary. Yes (default)/No
TELL ME MORE General Options
Activate automatic Help
Voice display mode
Activate beep before student
answer
Activate background music
Activate right/wrong answer
sound
Activate sound effects
Automatic activation of the animated Help
function in TELL ME MORE
Type of display for voice analysis in
Pronunciation activities.
Activates beep to signal when to speak in
speech recognition activities.
Activates background music in TELL ME
MORE
Activates sounds to indicate successful or
unsuccessful completion of an exercise.
Activates sound effects in activities in
TELL ME MORE
®
to assist student in completing the
®
to assist student in finding the
®
.
®
.
®
.
®
.
Yes (default)/No
Yes (default)/No
Comprehension/Expression
(default)
1 to 3 (2 = default)
Yes (default)/No
Listen to the
words/Translation of words
(default)
Listen to the words
(default)/Display words
Difficult/Easy (default)
Yes (default)/No
Illustrations followed by text
(default)/
Text followed by
illustrations/
Text only (default)
Yes (default)/No
- Display waveform
- Display pitch curve
- Display waveform and
pitch curve (default)
Yes (default)/No
Yes (default)/No
Yes (default)/No
Yes (default)/No
Copyright 2004 Auralog S.A. All rights reserved 72
Page 73
TUTOR TOOLS
Print Options
Description of print options
OPTIONS Descriptions
General Options
Print the solutions
Prints the activities with solutions. By default, this option is activated for all activities.
Print the translations
Translation language
Print the grammar links
Specific Options
Also print MCQ
Comprehension
Expression
Only the Key Grammar
Explanations
Only the Keywords
Print the corresponding
Riddles
Category
Print the clues
Prints the translation of texts for the Dialogue, Grammar Explanations, Glossary, Video
and Questions and Cultural Texts activities.
The language the translation will be printed in.
Prints the titles of the grammar points corresponding to the activity in the Tutor Tools
interface language.
Prints the multiple-choice questions for the Video and Questions activity, in addition to
the text of the video.
Prints the Dialogue in Comprehension or Expression mode.
Prints only the key grammar explanations of the lesson selected in the Grammar
Explanations activity.
Prints only the keywords of the lesson selected in the Glossary activity.
Prints the Riddles corresponding to the Cultural Texts selected in the Cultural Texts
activity.
Prints texts relating to only one or more specific themes in the Cultural Texts activity.
Prints the clues for the Riddles activity.
Print options by activity
Activity Options
Word Association
Print the solutions
Picture/Word Association
Grammar Practice
Text Transformation
Dialogue
Dictation
Sentence Practice
Grammar Explanations
Glossary
The Right Word
Print the solutions
Print the solutions
Print the grammar links
Print the solutions
Print the grammar links
Print the solutions
Print the translations + choose translation language
Specific Options:
Comprehension/Expression
Print the solutions
Print the grammar links
Print the solutions
Print the grammar links
Print the translations + choose translation language
Specific Options:
Only the key explanations
Print the translations + choose translation language
Specific Options:
Only the keywords
Print the solutions
Print the grammar links
Copyright 2004 Auralog S.A. All rights reserved 73
Page 74

TUTOR TOOLS
Mystery Phrase
Words and Functions
Words and Topics
Word Order
Written Expression
Fill-in-the-Blanks
Video
Video and Questions
Video MCQ
Riddles
Cultural Texts
Patchworks
Print the solutions
Print the solutions
Print the solutions
Print the solutions
Print the grammar links
Print the solutions
Print the solutions
Print the grammar links
Content type = Activity:
Print the solutions
Print the translations + choose translation
language
Specific Options:
Content type = Lesson:
Print the translations + choose translation
language
Also print multiple-choice questions
Print the solutions
Print the solutions
Specific Options:
Print the clues (ticked systematically if Print the solutions is ticked)
Print the translations + choose translation language
Specific Options:
Print the corresponding Riddles
Print the clues (ticked systematically if Print the solutions is ticked)
Category
Print the solutions
Copyright 2004 Auralog S.A. All rights reserved 74
Page 75

TUTOR TOOLS
p
System Notifications
Filter visible in Tutor Tools System notifications sent to Tutor Description
Allocation of student(s)
Follow-up message to define
his/her objectives
Work follow-up message
Placement Tests
Definition of learning objectives
Start of training suspension
End of training suspension
Detailed Reports not generated
Manual deactivation of training
schedule
Automatic deactivation of training
schedule
Creation of student account or
manual reactivation of training
schedule
Deletion of student accounts
x
x
x
x
Allocation of new student: [student
name] ([student language]). Training
from [training start date] to [training
end date]
Follow-up message to define learning
objectives sent to [student name]
Work follow-up message sent to
[student name]
[student name] has taken the
Placement Test and has received the
[name of Learning Path] Learning
Path
[student name] has defined his/her
learning objectives and has received
the [name of Learning Path] Learning
Path
[student name]’s training suspension
starts [date]
[student name]’s training suspension
ends [date]
Detailed Report not generated from
[date] to [student name]
Manual deactivation of [student
name]’s training schedule ([student
language])
Automatic deactivation of [student
name]’s training schedule (training in
[student language] completed)
Creation of student account or
manual reactivation of student
name]’s training schedule ([student
language])
Deletion of [student name]’s account Notification of the removal of a
Deactivation of your Tutor account Notification informing the Tutor of
Impossible to send a message as your
workgroup is deactivated
Impossible to send a message as your
Tutor account has been deactivated
Im
ossible to send a message as your Alert if the distant Tutor sends a
Notification that a new student has
been assigned to the Tutor for
tutoring.
Notification that a follow-up message
encouraging him/her to define his/her
learning objectives has been sent to a
student.
Notification that a work follow-up
message has been sent to a student, as
s/he has not worked for a certain
period of time.
Notification that student X received
Learning Path Y after defining
his/her learning objectives and after
sitting the Placement Test.
Notification that student X received
Learning Path Y after defining
his/her learning objectives.
Notification of the suspension of a
student’s training.
Notification that a student has
restarted his/her training.
Notification that a student’s Detailed
Report for a given period could not
be created because s/he had not
worked or because s/he did not send
in his/her TELL ME MORE tracking.
Notification of the manual
deactivation of a student’s learning
project (or training schedule).
Notification of the automatic
deactivation of a student’s learning
project (or training schedule) as the
training is completed.
Notification of the creation of a
student account or of the manual
reactivation of a student’s training
schedule.
student’s account.
the deactivation of his/her Tutor
account.
Alert if the distant Tutor sends a
message and the workgroup to which
s/he belongs is deactivated in the
Admin Tools database.
Alert if the distant Tutor sends a
message and his/her Tutor account is
deactivated in the Admin Tools
database.
Copyright 2004 Auralog S.A. All rights reserved 75
Page 76

TUTOR TOOLS
Tutor account could not be identified message and his/her Tutor account is
x
Impossible to send a message to
[student name] as s/he belongs to a
deactivated work group
x
Impossible to send a message to a
student whose account has been
deactivated
x
Impossible to send [student name] a
message as the learning project has
been deactivated
x Means that no filter is available in Tutor Tools for the corresponding message.
not found in the Admin Tools
database.
Alert if the distant Tutor sends a
message to a student belonging to a
deactivated work group.
Alert if the distant Tutor sends a
message to a student whose account
cannot be found in the Admin Tools
database.
Alert if the distant Tutor sends a
message to a student whose learning
project is deactivated.
Copyright 2004 Auralog S.A. All rights reserved 76
Page 77

TUTOR TOOLS
Different functions available for local, client/server and distant Tutors
FOLDER/FUNCTION FUNCTION(S) LOCAL TUTOR/
CLIENT/SERVER
TUTOR
Tutor
Tutor
Tutor/File
Tutor/File/Options
Tutor/Inbox
Tutor/Inbox
Tutor/Inbox
Tutor/Send a message
Tutor/Mailbox history
Student
Student/Student file
Student/Student file
Student/Student file
Student/Student file
Student/Student file
Student/Student
tracking
Student/Reply to
student
Student/Audio
recordings
Student/History
Possibility of working from
several workstations on a
local network.
Possible for several Tutors
to work from the same
workstation.
Possibility of modifying the
type of lesson access (CDROM or hard drive)
Possibility of modifying the
connection parameters
Receipt of periodic Detailed
Reports (planned in Admin
Tools).
Receipt of student’s
Placement Test results.
Transfer a question from a
student to another Tutor.
Access to the function. Yes No.
Access to the function. Yes Yes
Access to the button Access
student account.
View the lesson languages in
the Information tab.
Access the Paths tab. Yes, if the student is
View a Learning Path on a
student workstation.
Add or remove a Learning
Path in one or more student
folders.
Access the Schedules tab. Yes Yes, but read-only status.
Access to the function.
Access to the button Access
detailed tracking (eye).
Access to the function. Yes, if the student is
Access to the mailbox
history.
Access to the study sessions
history.
Access to the Detailed
Report history.
Yes No
Yes Yes
No Yes
No Yes
Yes Yes
Yes Yes
Yes, only to a local
Tutor
Yes No
Yes No
local.
Yes, if the student is
local.
Yes, if the student is
local.
Yes Yes.
local.
Yes Yes
Yes Yes
Yes Yes
DISTANT TUTOR
No
Yes, from the point at which
the student has already sent
him/her a message.
Yes, but not before the
student has sent him/her a
message.
No
No
No
For the Tutor to have access
to the events, the lessons
corresponding to the
student’s level must be
installed on his/her
workstation or accessible by
CD-ROM.
No
Copyright 2004 Auralog S.A. All rights reserved 77
Page 78

Tools/Standard
message management
Tools/ Standard
message management
Tools/ Standard
message management
Tools/Learning Paths
Tools/Learning Paths
Tools/Option
management
Tools/Option
management
Tools/Option
management
Tools/Student tracking
Tools/Content printout
TUTOR TOOLS
Access to the Placement
Yes Yes
Tests results history.
Access to the function. Yes, if this has been
configured in Admin
Yes, but for his/her use only.
Tools. For all interface
and lesson languages.
Possibility of adding or
modifying a standard
message.
Yes.
When the Tutor
modifies a message (its
content or title), the
modification is made
on the server and
therefore affects the
standard messages of
Yes.
When the distant Tutor
creates or modifies a
message (its content or title),
the modifications only affect
his/her standard messages
and not those of the other
Tutors.
other Tutors on the
network.
Possibility of importing or
Yes Yes
exporting standard
messages.
Transfer a Learning Path
into one or more student
Yes, if the student is
local.
No.
folders.
Create a new Learning Path
(button Create a learning
path). Open a Learning Path
that already exists (button
Open a learning path).
Yes, only in the
language(s) taught by
the Tutor.
Yes, in all the available
lesson languages. The
lessons corresponding to the
student level must be
installed on the Tutor’s
workstation or be accessible
via CD-ROM.
Access to the function and
Yes Yes
possibility of creating an
options file.
Transfer of an options file
into one or more student
folders.
Direct updating of a
student’s options (button
Update the options file).
Yes, if the student is
local.
Yes, if the student is
local.
No, but the options file can
be sent as an element
attached to a message.
No, but the options file can
be sent as an element
attached to a message.
Access to the function. Yes Yes
Access to the function. Yes, only in the
language(s) taught by
the Tutor.
Yes.
To print the lesson content,
the lessons must be installed
on the Tutor workstation or
accessible via CD-ROM.
Copyright 2004 Auralog S.A. All rights reserved 78
Page 79

TUTOR TOOLS
TECHNICAL SUPPORT
If you have difficulty using Tutor Tools, contact your supplier or Auralog’s technical support team, who will help you
find a solution.
AURALOG
6, rue Jean-Pierre Timbaud
78180 Montigny-le-Bretonneux
France
Tel. +33 (0)1 30 07 12 12
Fax. +33 (0)1 30 07 12 01
www.auralog.com
Technical Support
Tel. +33 (0)1 30 07 12 10
E-mail: formation@auralog.fr
Copyright 2004 Auralog S.A. All rights reserved 79
 Loading...