

Aura Elite Compact Sprayer, Elite Click & Tan Plus, Elite Click & Tan Spa Sprayer Translation Of The Original Operating Instructions
Elite Compact
Sprayer
GB/D

Elite Compact Sprayer
Contents
1. Explanation of symbols used .....................................................1
2. Field of application ..............................................................1
3. General Safety Instructions .......................................................1
4. Processable materials ............................................................2
5. Non-processable materials .......................................................2
6. Preparation of the spray area .....................................................3
7. General preparations before the application of spray tanning lotion ...............3
8. Preparation of the skin ...........................................................4
9. Start-up .........................................................................4
10. Operation ......................................................................5
11. Tips on using the spray tanning system ..........................................6
12. After application of the spray tanning lotion .....................................6
13. Taking Out of Operation and Cleaning ...........................................7
14. Maintenance ...................................................................8
15. Spare parts ....................................................................9
16. Correction of Malfunctions ....................................................10
Elite Compact Sprayer
i
Translation of the original operating instructions
Congratulations on the purchase of your Aura Spray Tanning System.
You have purchased a branded product, which requires careful cleaning and care to ensure
smooth operation. Please read the operating manual carefully before commissioning
the Spray Tanning System and note the safety instructions. Keep the operating
instructions in a safe place.
GB
1. Explanation of symbols used
This symbol indicates a potential danger for you or for the Spray
Tanning System. Under this symbol you can nd important
information on how to avoid injuries and damage to the Spray
Tanning System.
Indicates tips for use and other particularly useful information.
2. Field of application
The Aura Spray Tanning System has been specically developed for the application of
liquid spray tanning lotion. Any application other than that described in this operating
manual is not permitted.
3. General Safety Instructions
Do not use the spray guns to spray ammable substances.
•
The spray guns are not to be cleaned with ammable solvents.
•
There must be no sources of ignition such as, for example, open res, smoke of lit
•
cigarettes, cigars and tobacco pipes, sparks, glowing wires, hot surfaces, etc. in the
vicinity during spraying.
Caution against dangers that can arise from the sprayed substance and observe the
•
text and information on the containers or the specications given by the substance
manufacturer.
Do not spray any liquid of unknown hazard potential.
•
Attention! Spray tanning lotions do not generally oer any protection against
•
sunburn. Repeated unprotected contact with the sun increases the risk of skin cancer,
skin aging and other harmful eects.
This Spray Tanning System is not intended for use by persons (including children) with
•
reduced physical, sensory or mental capabilities, or lack of experience and knowledge,
unless they have been given supervision or instruction concerning use of the Spray
Tanning System by a person responsible for their safety.
1

GB
Do not let children play with the Spray Tanning System.
•
Never direct the spray gun at animals.
•
Ensure that the spray area is well ventilated.
•
Do not breathe in spray tanning lotion. Wearing nasal plugs is recommended.
•
Do not spray into the eyes. Wearing safety goggles is recommended.
•
If spray tanning lotion is sprayed into the eyes, wash them out with water immediately
•
and consult a doctor.
Do not spray spray tanning lotion into open wounds or onto damaged skin.
•
Cover your hair when spraying your face. Otherwise bleached hair in particular could
•
be stained by the spray tanning lotion.
Never immerse the Spray Tanning System under water.
•
•
Always remove the power plug after use, if the Spray Tanning System is located near a
•
washbasin or another water source. Water always represents a hazard even when the
system is switched o.
As additional protection, the installation of a residual current protective device (FI/
•
RCD) with a rated tripping current of no more than 30 mA is recommended in the
bathroom circuit. Ask your installer for advice.
Always remove the power plug before topping up the spray container or cleaning the
•
system.
Only use genuine spare parts from the manufacturer. With original Aura accessories
•
and spare parts, you have the guarantee that all safety regulations are fullled.
Never open the Spray Tanning System yourself to carry out electrical repairs!
•
Do not place the spray gun on its side, as material could leak out.
•
Warning: Never use your Spray Tanning System near bath tubs, shower trays
or other receptacles that contain water.
Elite Compact Sprayer
4. Processable materials
Liquid spray tanning lotion
Only use spray tanning lotion up to the expiry date specied on the package.
i
means, for example, that the substance can be used for 12 months after
12 M
opening.
5. Non-processable materials
All materials not approved for skin treatment
2
Elite Compact Sprayer
Description (Fig. 1)
1) Air cap /Nozzle 2) Union nut
3) Spray gun 4) Trigger
5) Material volume regulation 6) Air hose
7) ON/OFF switch 8) Air lter
9) Gun holder 10) Container
1
6
7
GB
3
4
5
2
1
8
9 10
6. Preparation of the spray area
Remove all objects from the spray area if possible, in order to avoid contamination
•
from overspray.
Work in a room with a smooth, easy-to-clean surface.
•
The use of a spray booth/spray tent is recommended.
7. General preparations before the application of spray
tanning lotion
Test the compatibility of the spray tanning lotion on a small patch of skin
approx. 24 hours before the actual application of the spray tanning lotion.
i
Stop application if skin irritations occur.
3
GB
Approx. 24-48 hours prior to treatment remove body hair by shaving or waxing.
•
Do not apply any perfume, deodorant or make-up. These products can negatively
•
inuence the tanning result.
On the day of the treatment wear dark, loose-tting clothing, in order to prevent
•
discoloration of clothing by the spray tanning lotion.
Remove all jewellery, in order to avoid discoloration by the spray tanning lotion.
•
Elite Compact Sprayer
8. Preparation of the skin
Correct preparation of the skin is the key to an even and long lasting tanning
result. Please note the following instructions
i
Remove all dead skin cells by means of exfoliation before applying the spray tanning
•
lotion.
Make sure that the moisture content of the skin is as uniform as possible.
•
Use a moisturizer for dry areas (e.g. elbows and knees). Let the moisturizer dry before
commencing the treatment.
Apply a little balm to lips, nails, palms of the hands, eyebrows and the hairline for
•
protection.
9. Start-up
Before connecting to the mains supply, be
sure that the supply voltage is identical with
the value given on the rating plate.
1.
Unscrew the container from the spray
gun.
2.
Prepare spray tanning lotion according
to manufacturer's instructions and pour
into the container.
3.
Screw the container tightly onto the
spray gun.
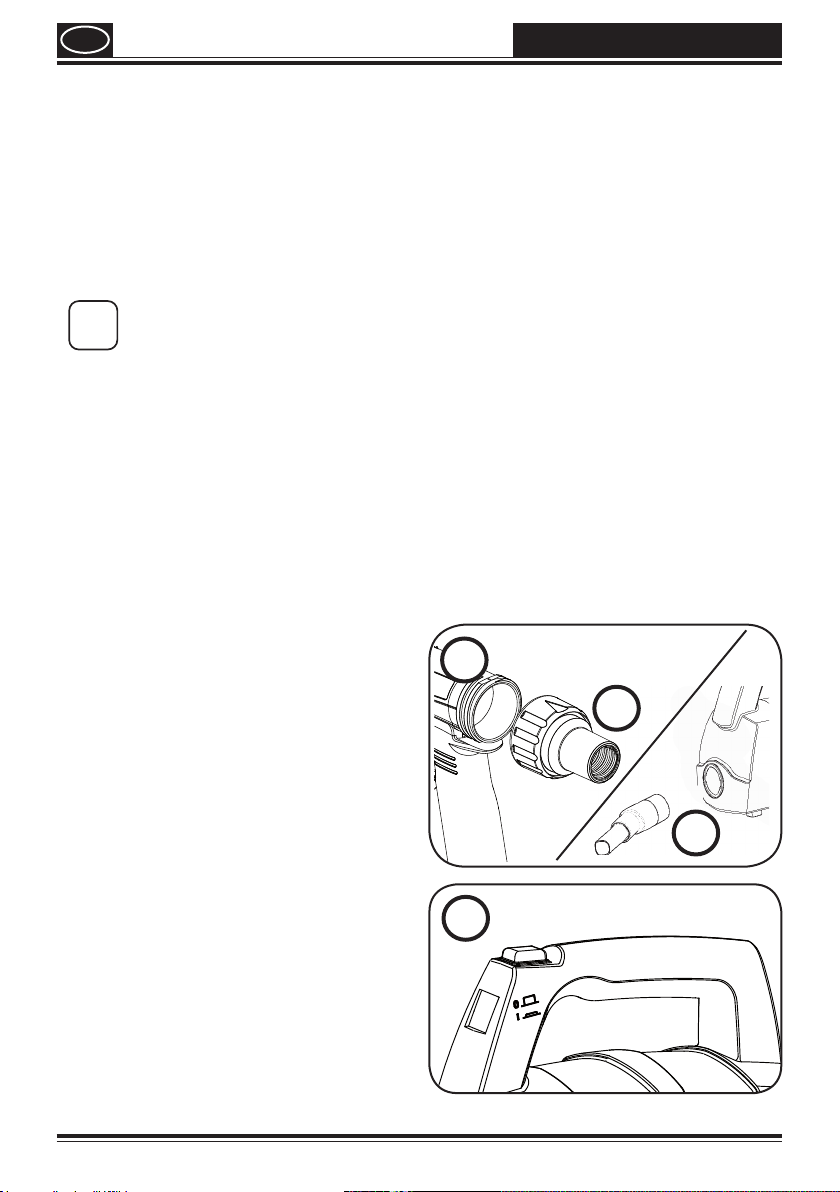
4.
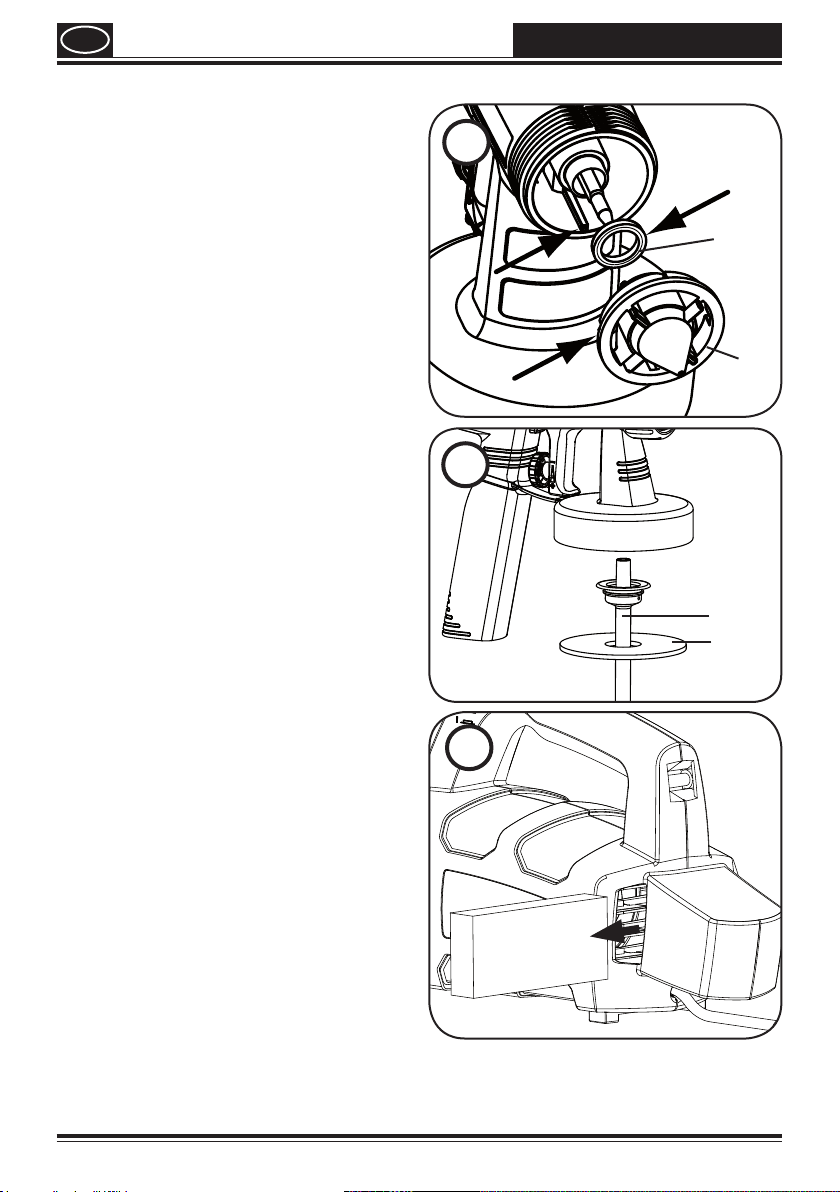
Mount the air hose by aligning the arrow
on the hose cu end and the back of the
gun. (Fig. 2,a) Push together rmly and
twist to lock.
5.
Push the other end of the air hose into
the device. (Fig. 2, b).
6.
Place the device only on a plane and
clean surface. Otherwise, the device may
suck in dust, etc.
7.
Press the ON/OFF switch at the device.
(Fig.3)
4
2
a
➟
b
3

Elite Compact Sprayer
10. Operation
How the Spray Tanning system is handled,
including preparation of the work place
and spray tanning lotion as well as the
nal result, is the sole responsibility of
the operator.
Wagner excludes any liability for damage
which may arise from overspray, application errors, touch-ups, or non-compliance
with the instructions provided here.
Turn the material control (Fig. 4, 1), in
•
order to adjust the desired delivery rate.
lower material volume (-):
turn anti-clockwise
higher material volume (+):
turn clockwise
Turn the air cap (Fig. 5, 1) with the union
•
nut slightly unscrewed (2), to adjust the
shape of the spray jet:
Fig. 6a vertical at jet:
For spray movements from left to
right
Fig. 6b horizontal at jet:
For spray movements from top to
bottom
Pull the trigger to spray the spray tanning
•
lotion.
GB
4
1
5
6
2
1
a
b
5
GB
i
20-30 cm
i
Elite Compact Sprayer
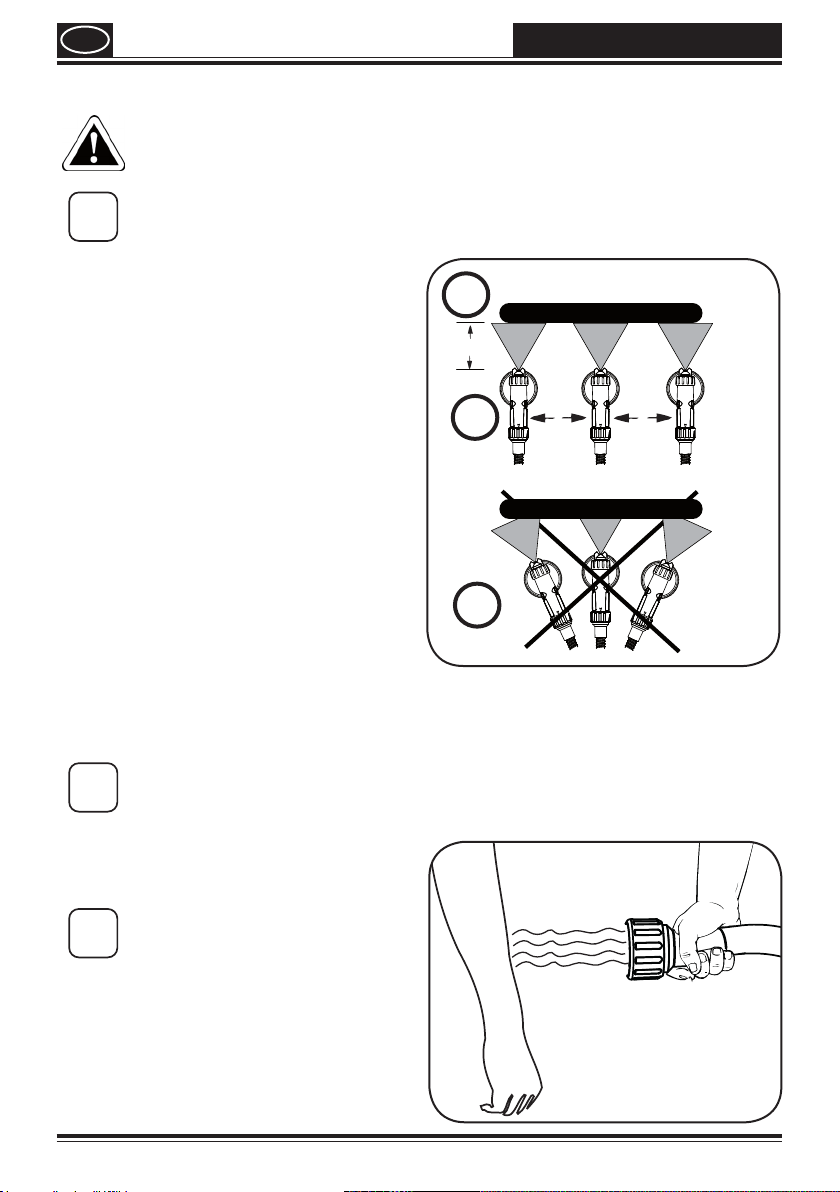
11. Tips on using the spray tanning system
Before commencing application, check that all necessary protective
measures (nasal plugs, safety goggles, hair covering) have been taken.
Practice on a large piece of cardboard or paper rst of all, in order to nd the
optimal settings for the spray tanning lotion used.
Start and end the spray movement
•
outside the body.
Avoid interruptions during the spray
•
movement.
The spray movement should come
•
from the arm, not just from the wrist.
This ensures that a uniform distance is
maintained between the spray gun and
the body during the spray operation.
Select a distance of 20 - 30 cm, depending
on the desired spray jet width.
Fig. 7 a: CORRECT Even distance
Fig. 7 b: INCORRECT uneven distance
will result in uneven tanning
Move the spray gun at an even speed
•
7
a
b
12. After application of the spray tanning lotion
The full tanning eect develops during the rst 24 hours after the treatment.
Allow the spray tanning lotion to dry for
•
15-20 minutes before getting dressed
again.
You can also use the air from the
air hose to accelerate the drying
i
process of the spray tanning
lotion. To do this, simply remove
the spray gun from the air hose
and switch the system on.
Do not shower or bathe in the first 6-8
•
hours after application, as this will affect
the tanning result.
6
Elite Compact Sprayer
Prolonged hot baths and showers should be avoided, in order to maintain the tanning
•
effect for as long as possible. Daily moisturization of the skin is also recommended.
GB
13. Taking Out of Operation and Cleaning
Clean the Spray Tanning System as required, but at the end of the working
day/ application or before changing to a dierent colour as a minimum. Dried
i
spray tanning lotion makes cleaning more dicult and can even damage the
system.
1) Turn the system o.
2) Unscrew the container.
3)
Pour any remaining spray tanning lotion
back into the original packaging.
4)
Preclean the container and feed tube
with a brush.
5) Clean the ventilating bore (Fig. 8, 1).
6) Pour water into the container. Screw
the container back on.
Do not use ammable materials for
cleaning purposes.
7) Turn on the system and spray the water
into a container or a cloth.
8)
Repeat the above procedure until the
water emerging from the nozzle is
clear.
9) Turn o the system.
10)
Screw o the container and empty it. Pull
out the feed tub with container seal.
CAUTION! Never clean seals, nozzles or
air holes of the spray gun with
metal objects.
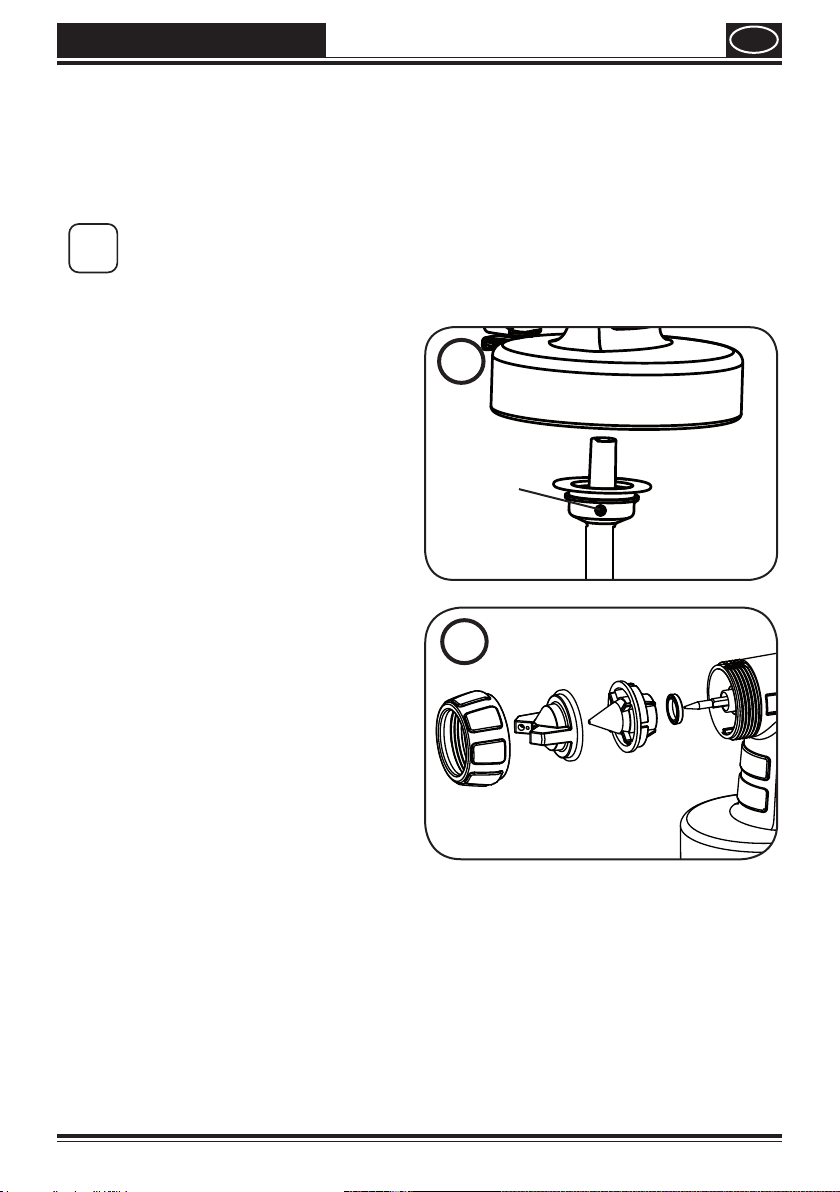
11) Unscrew the union nut and remove the
air cap and nozzle (Fig. 9). Clean the air
cap, nozzle seal and nozzle with a brush
and water.
12) Clean the outside of the spray gun and container with a cloth soaked in water.
13) Assemble the parts again (see “Assembly”).
8
1
9
7
GB
Assembly
1) Slide the nozzle seal (Fig. 10, 1) with the
groove (slot) facing forwards into the
nozzle (2).
2)
Put the nozzle onto the gun body and nd
the correct position by turning it.
3)
Put the air cap onto the nozzle and tighten
it using the union nut.
4) Place the container seal (Fig. 11, 1) from
below on the feed tube (2) and slide it over
the collar, while turning the container seal
slightly.
5)
Insert the feed tube with container seal
in the gun body.
Elite Compact Sprayer
10
1
2
14. Maintenance
Important! Never operate the system
without the air lter; dirt could
be sucked in and interfere with
the function of the system.
1) Change the air lter if it is soiled
(check daily in the case of intensive/
commercial use).
2)
For this pull the air lter out of the unit
(Fig. 12).
3) Insert a new air lter.
11
2
1
12
8
 Loading...