

Page 1
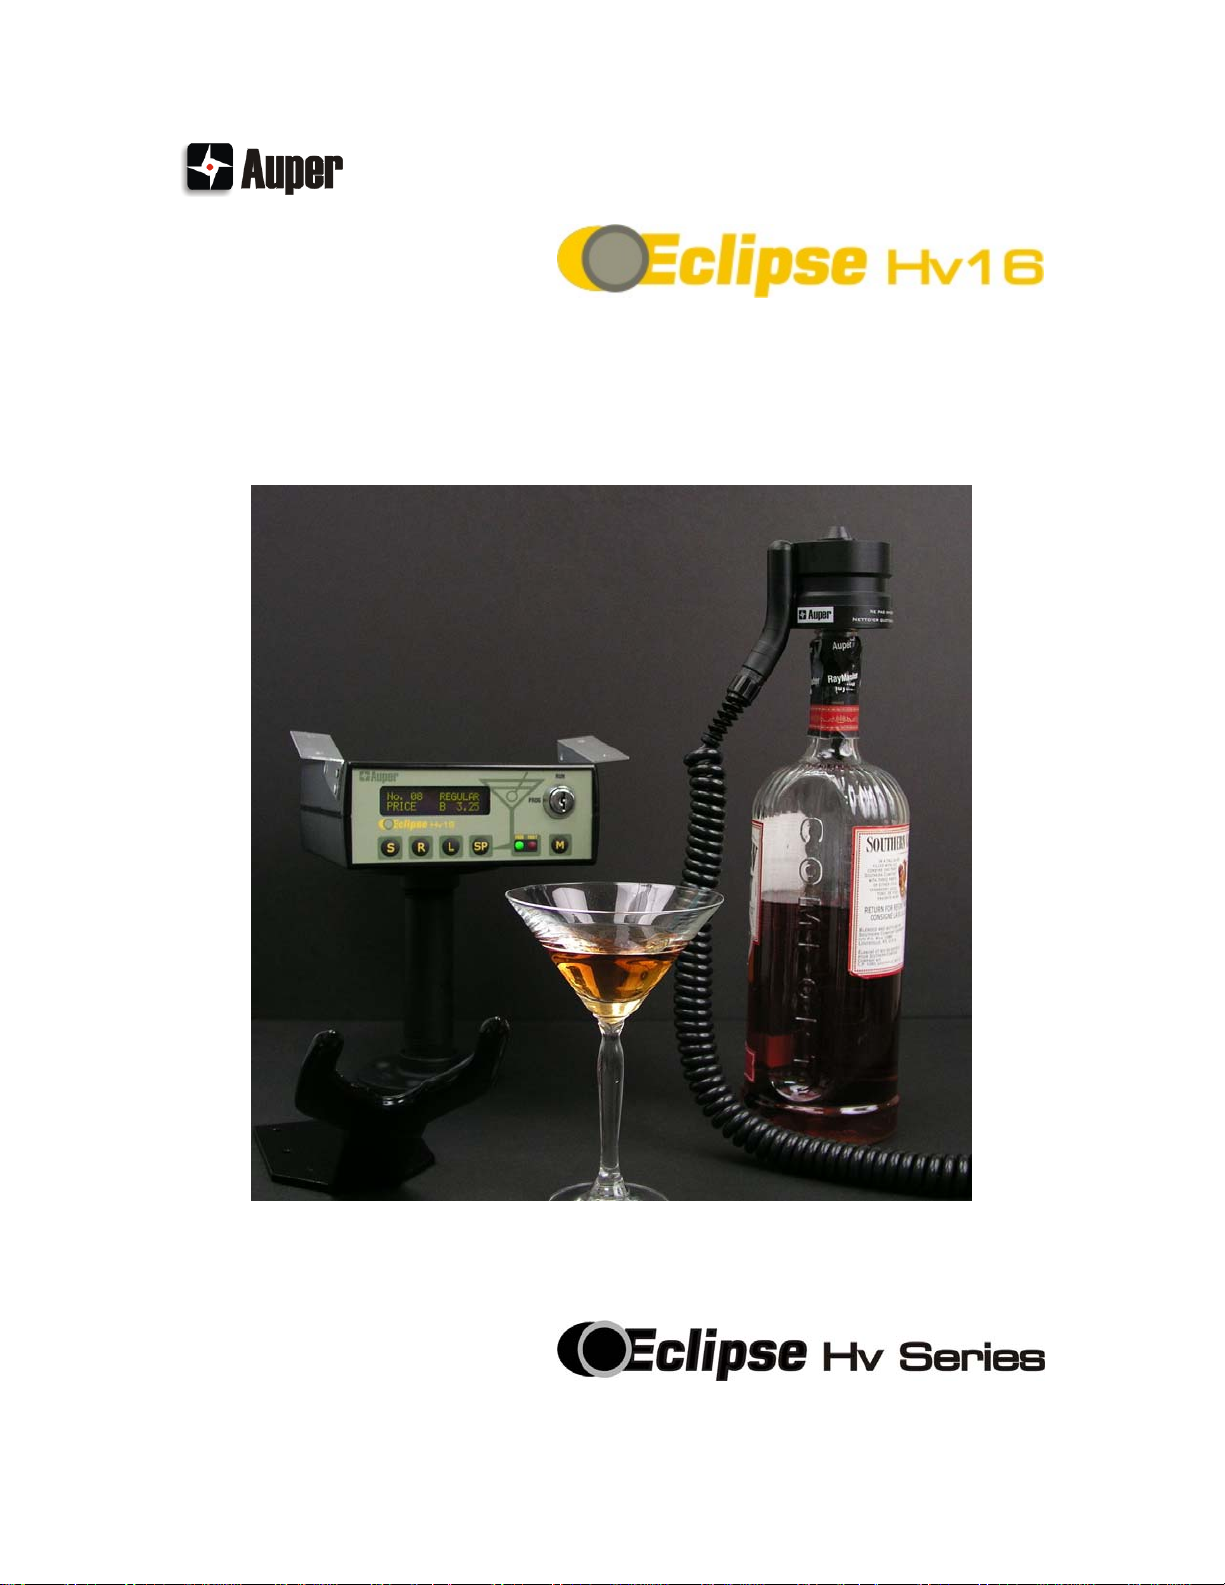
Category liquor dispenser
User Guide
Page 2

Eclipse Hv 16 Installation guide
I80H016E
Table of contents
1. General information........................................................................................................2
1.1. Pour sizes........................................................................................................................................................2
1.2. System maintenance.......................................................................................................................................3
1.3. Number of dispensing station..........................................................................................................................3
1.4. Serial printer....................................................................................................................................................3
1.5. Activator ring ...................................................................................................................................................3
2. Installation .......................................................................................................................4
2.1. Considerations: ...............................................................................................................................................4
2.2. Power supply...................................................................................................................................................4
2.3. Installing the barcode labels............................................................................................................................5
2.4. Installing the pourers.......................................................................................................................................7
2.5. How pourers work ...........................................................................................................................................7
3. Programming the pour sizes and price.........................................................................8
3.1. Testing the pour sizes.....................................................................................................................................9
4. Operating the system......................................................................................................9
4.1. Operation of the Hv 16..................................................................................................................................10
4.2. Pour spout operation.....................................................................................................................................11
5. Installing the printer......................................................................................................12
5.1. Printer settings: .............................................................................................................................................12
5.2. Serial printer cable pin out ............................................................................................................................12
6. Interfacing the HV 16.....................................................................................................12
6.1. Automatic sales transaction ..........................................................................................................................13
6.2. LDS (liquor dispensing system) suspense file..............................................................................................13
6.3. Flow of data...................................................................................................................................................14
6.4. Hv 16 PLU table............................................................................................................................................15
6.5. Trouble shooting the interface.......................................................................................................................16
6.6. Testing the liquor system..............................................................................................................................16
7. Maintenance...................................................................................................................16
7.1. Dispensing liqueurs.......................................................................................................................................17
7.2. Rinsing pourers.............................................................................................................................................17
7.3. Cleaning pourers...........................................................................................................................................17
7.4. Testing pourers .............................................................................................................................................18
7.5. Activator ring maintenance............................................................................................................................18
8. Hardware Warranty .......................................................................................................19
9. Part List..........................................................................................................................20
10. Annexe: PROGRAMMING AND OPERATING FLOW CHART....................................21
Toll free : 1-800-861-1620
Auper Electronic Controls Inc 901 Michelin, Laval, Quebec , Canada H7L 5B6 Email : [email protected]
Phone : (450)663-1993 h Fax : (450)663-0636 Web site : www.bar-controls.com
h
1
Page 3
Eclipse Hv 16 Installation guide
1. General information
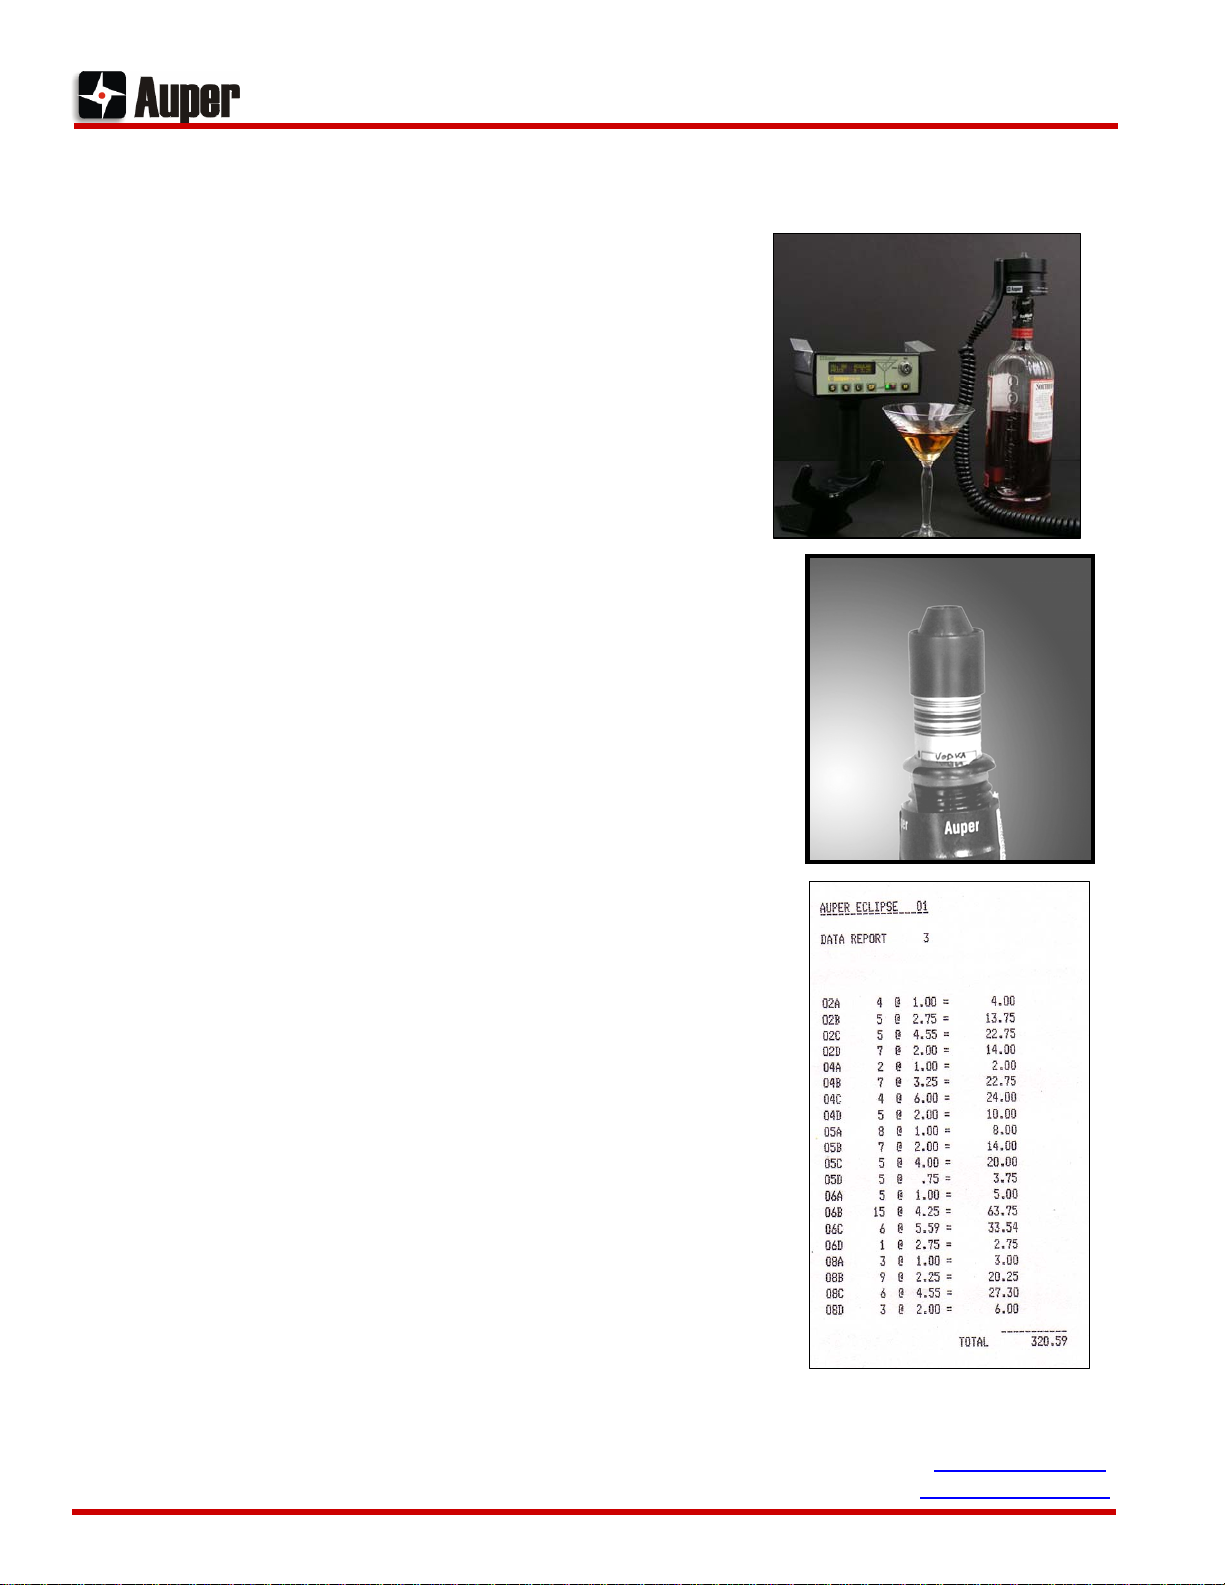
The Eclipse Hv 16 can identify 16 different barcode labels applied to Auper
pourers. The barcode on the labels identify the spout numbers from 0 to 15.
Brands should be grouped by price category and assigned a pourer number
corresponding to that same price category. Four pour sizes can be
programmed for each price category. The system can automatically revert to
the portion required after a few seconds of inactivity.
Other categories can be created for brands with different pour sizes and
some products can be assigned a specific number should they have a
different viscosity making it incompatible with brands of the same price
category.
Every drink poured by the bartender will be registered. The counters can be
read from the display or a report can be printed to a serial printer.
The printed report will list transactions by bottle number and pour size used (A,
B, C or D), the individual prices or size and the total value for each. The «$» field
for each pour size can be used to total the amount dispensed in Oz (or ml) or the
amount of money that should have been collected. In addition, each report
identifies the system number and the report number.
The HV 16 is ready to interface to POS systems and the cash registers that have
software to interface to liquor systems.
When setting up a liquor system, which is not interfaced, special considerations
should be given to the existing cash register reports. A good liquor system setup
is one that will provide the bar manager with a liquor usage report which can be
easily compared with the cash register report. If the information coming from
both systems cannot be easily compared, the managers will have a tough time
reconciling sales and usage.
A thorough analysis performed by both the owner/manager of the bar and the
dealer is the key to customer satisfaction. This analysis should prevent
programming errors which could temporarily disturb the work of the bartenders
and create a negative attitude in the bar area.
1.1. Pour sizes
I80H016E
When setting up the Eclipse HV16, you can program up to 4 portions per pourer
number. The portions are selected and calibrated according to the cocktail
recipes. Some brands will require all four pour sizes while others may requi re
only one. This analysis should be performed by the bar manager and if possible
with the bartenders who will be using it. To set a pour size to zero locks it and
bartenders will not be able to use it. The most used portion size for any given
brand should be programmed on the R (regular) button. If RET TO DEFAULT
has been enabled, the system will go back to the ‘’R’’ pour size automatically 5
seconds after the last pour is finished. The pour sizes are set by time intervals. A
setting of 40 will pour approximately 1 ounce (30 ml).
2
Toll free : 1-800-861-1620
Auper Electronic Controls Inc 901 Michelin, Laval, Quebec , Canada H7L 5B6 Email : [email protected]
Phone : (450)663-1993 h Fax : (450)663-0636 Web site : www.bar-controls.com
h
Page 4
Eclipse Hv 16 Installation guide
1.2. System maintenance
Proper maintenance of both the pourers and the activator ring will
maximize the performance of the liquor system. The number of pourers
available for each brand should be sufficient to insure that no pourer will
be taken off an empty bottle and put back onto another one without being
cleaned thoroughly using the magnetic cleaning device.
Once the system is installed and running, all the employees who will be
using the liquor system, or that take part in the daily maintenance, should
attend a pre-scheduled training session. During that meeting, it is
important to teach the bartenders how to use the Eclipse system, explain
the available functions, the actual setup and explain in detail the daily
maintenance procedures. The system is supplied with a CD-rom
containing a video, which should be viewed by every employee using the
system.
1.3. Number of dispensing station
I80H016E
One Eclipse Hv 16 per bartender working behind the bar is recom m ended
unless sales volume does not justify it. The number of drinks dispensed
per hour should be evaluated to guarantee your bartenders have enough
firepower to meet the demand. During peak periods it would be unf ortunate
to see bartenders having to wait for the liquor system to serve a drink. An
interfaced liquor system can increase the speed of service if the POS or
register is set up to automatically register drinks as they are dispensed. This factor may have to be considered as
well.
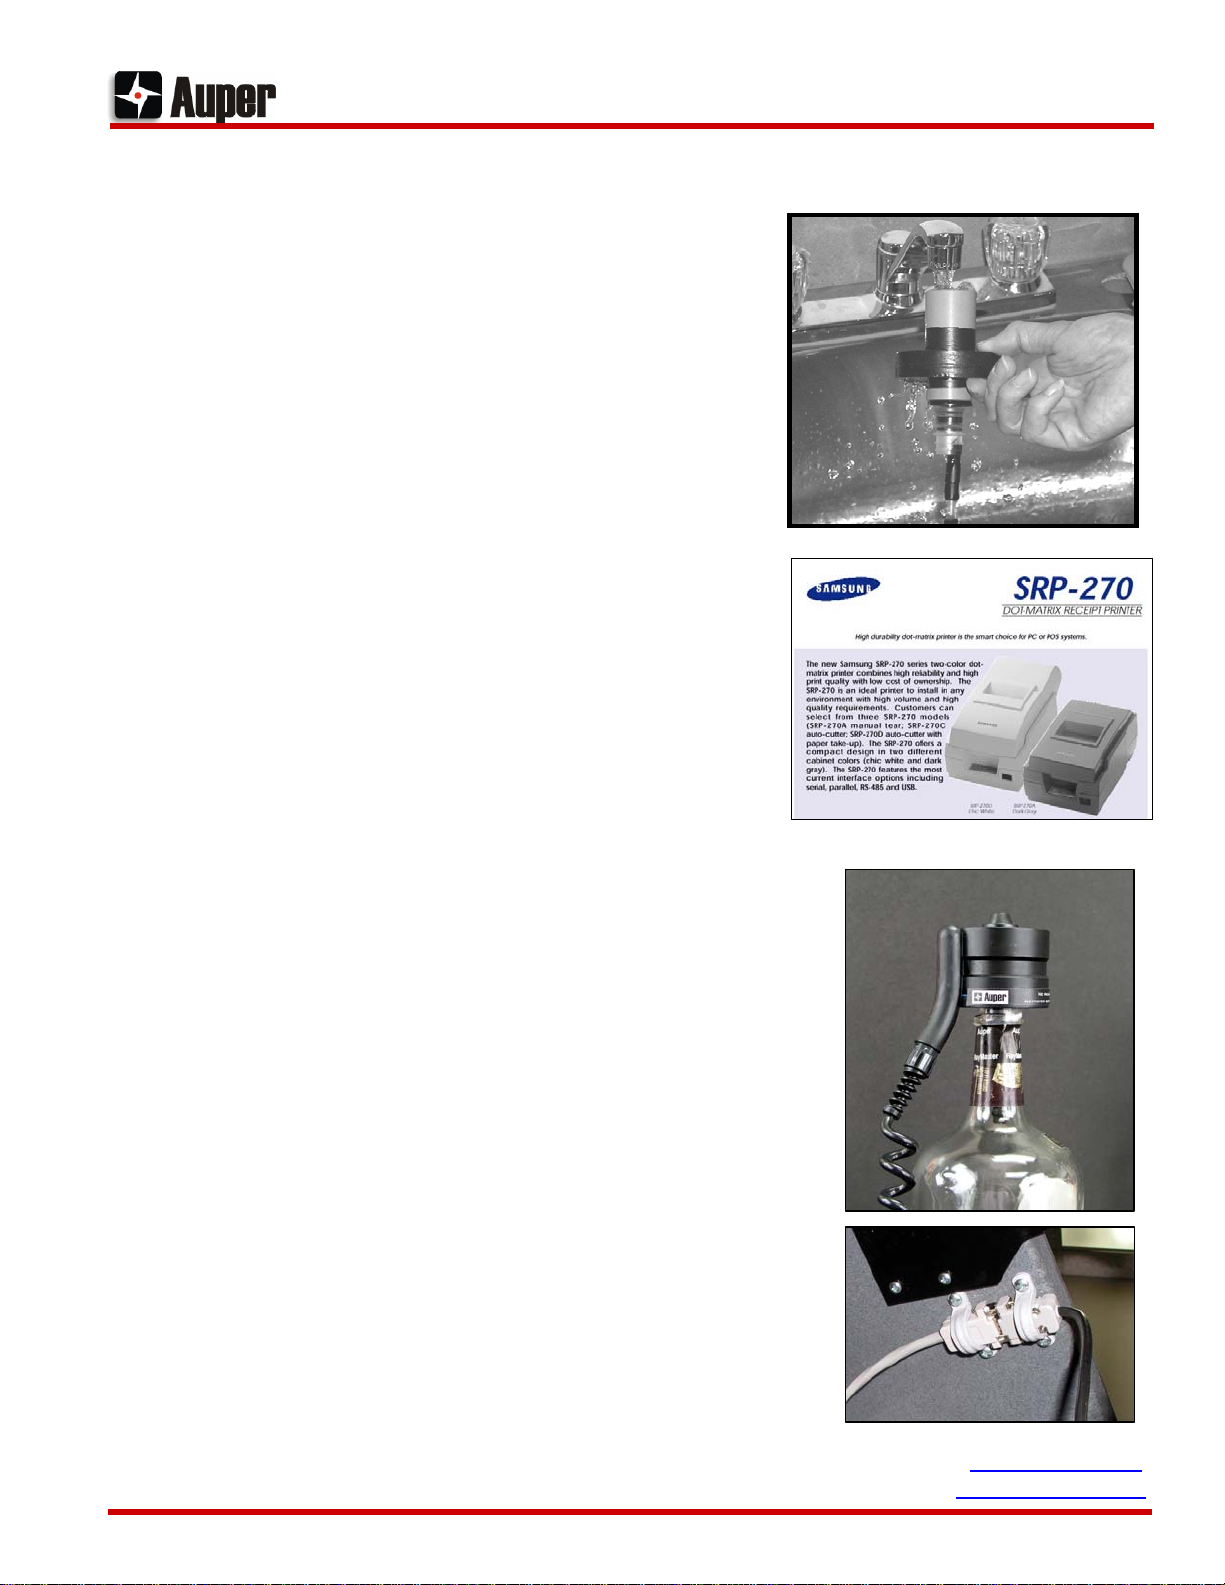
1.4. Serial printer
When a serial printer is ordered form Auper Electronic Controls Inc, we supply
the SRP-270 serial printer (part # 70-400). The printer is connected dire ctly to the
liquor system using the 10ft cable (part # 70-410) supplied (by Auper) with the
printer. This printer is pre-configured at the factory and is ready to print when you
receive it.
1.5. Activator ring
Even though, the Eclipse’s activator ring is built to be liquid resistant, with age
and repeat usage, the seal where the cable enters the ring will deteriorate. DO
NOT WASH THE ACTIVATOR RING UNDER RUNNING WATER OR
SUBMERGE THE RING TO CLEAN IT. Locate the Eclipse system as close as
possible to the serving area to prevent bartenders from having to pull on the
activator ring cord excessively.
Use the 1.25 m 9-pin to 9-pin extension to connect the activator ring to the
Eclipse. DO NOT CONNECT THE ACTIVATOR RING
DIRECTLY TO THE
Toll free : 1-800-861-1620
Auper Electronic Controls Inc 901 Michelin, Laval, Quebec , Canada H7L 5B6 Email : [email protected]
Phone : (450)663-1993 h Fax : (450)663-0636 Web site : www.bar-controls.com
h
3
Page 5
Eclipse Hv 16 Installation guide
ECLIPSE. Secure the connection using the 2 plastic clamps one on each connector.
2. Installation
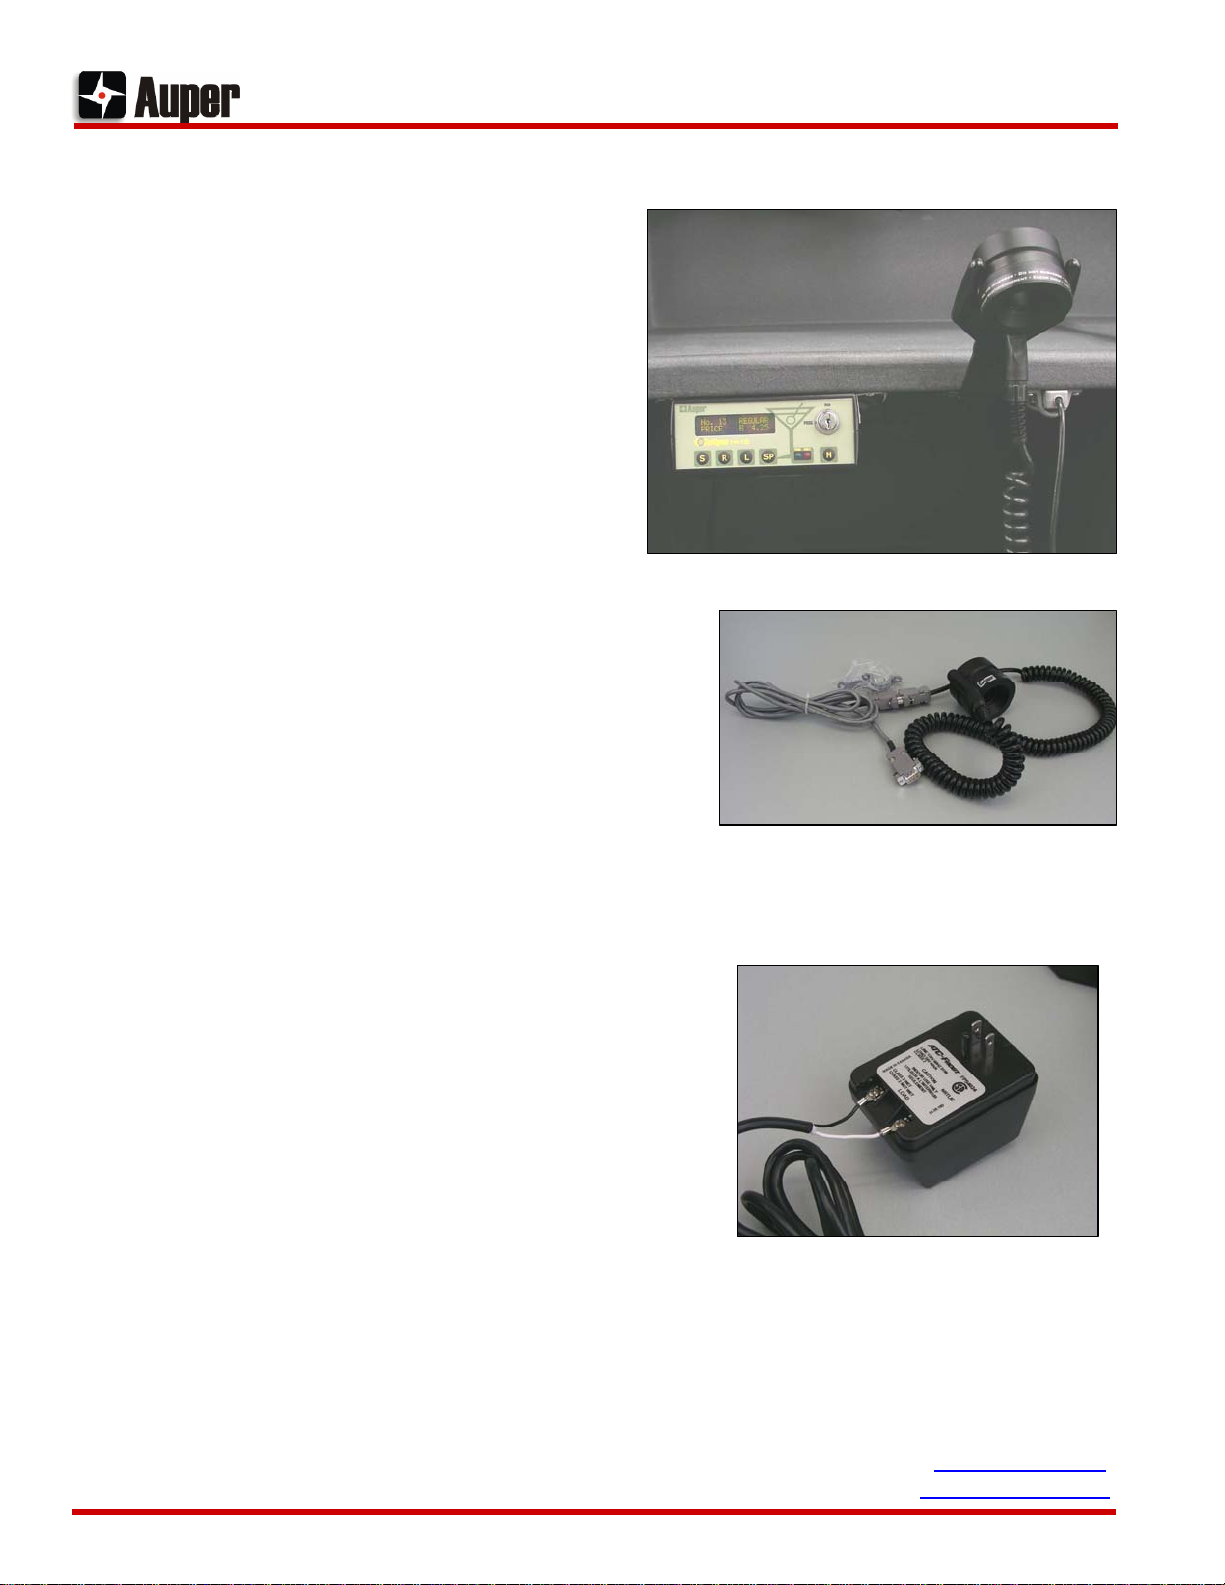
The Eclipse Hv 16 should be installed close to the liquor
bottles in the bar. The system is normally mounted under the
counter with the activator ring holder mounted 2 inches (4 cm)
on the right of the liquor system. Soft drink dispensing guns
used to prepare cocktails should be installed on the left side of
the liquor system since most people are right handed.
Bartenders typically pour liquor using their right hand and use
their left hand to top off the drink with the soft drink dispenser.
2.1. Considerations:
• Avoid installing the activator ring above a sink where it can fall
in water.
• Secure power supply away from splashing water and above
floor level.
• Fill the gap between the Eclipse and the bar with silicone to
prevent spilled liquids from finding their way between the
Eclipse and the bar.
• The activator ring support must be installed high enough to
obtain enough clearance between the bar and the bottom of
the bottles.
2.2. Power supply
I80H016E
• Check that the electrical outlet is intended for electronic
equipment and is 120 volts before connecting the power supply.
• In some buildings, the installation of an un-interruptible power
supply (UPS) may be necessary if power fluctuations are
suspected. The UPS are found in office furniture store in the
computer department. The battery back up of the UPS will
stabilize the 120 Volts power to the Eclipse.
4
Toll free : 1-800-861-1620
Auper Electronic Controls Inc 901 Michelin, Laval, Quebec , Canada H7L 5B6 Email : [email protected]
Phone : (450)663-1993 h Fax : (450)663-0636 Web site : www.bar-controls.com
h
Page 6

Eclipse Hv 16 Installation guide
I80H016E
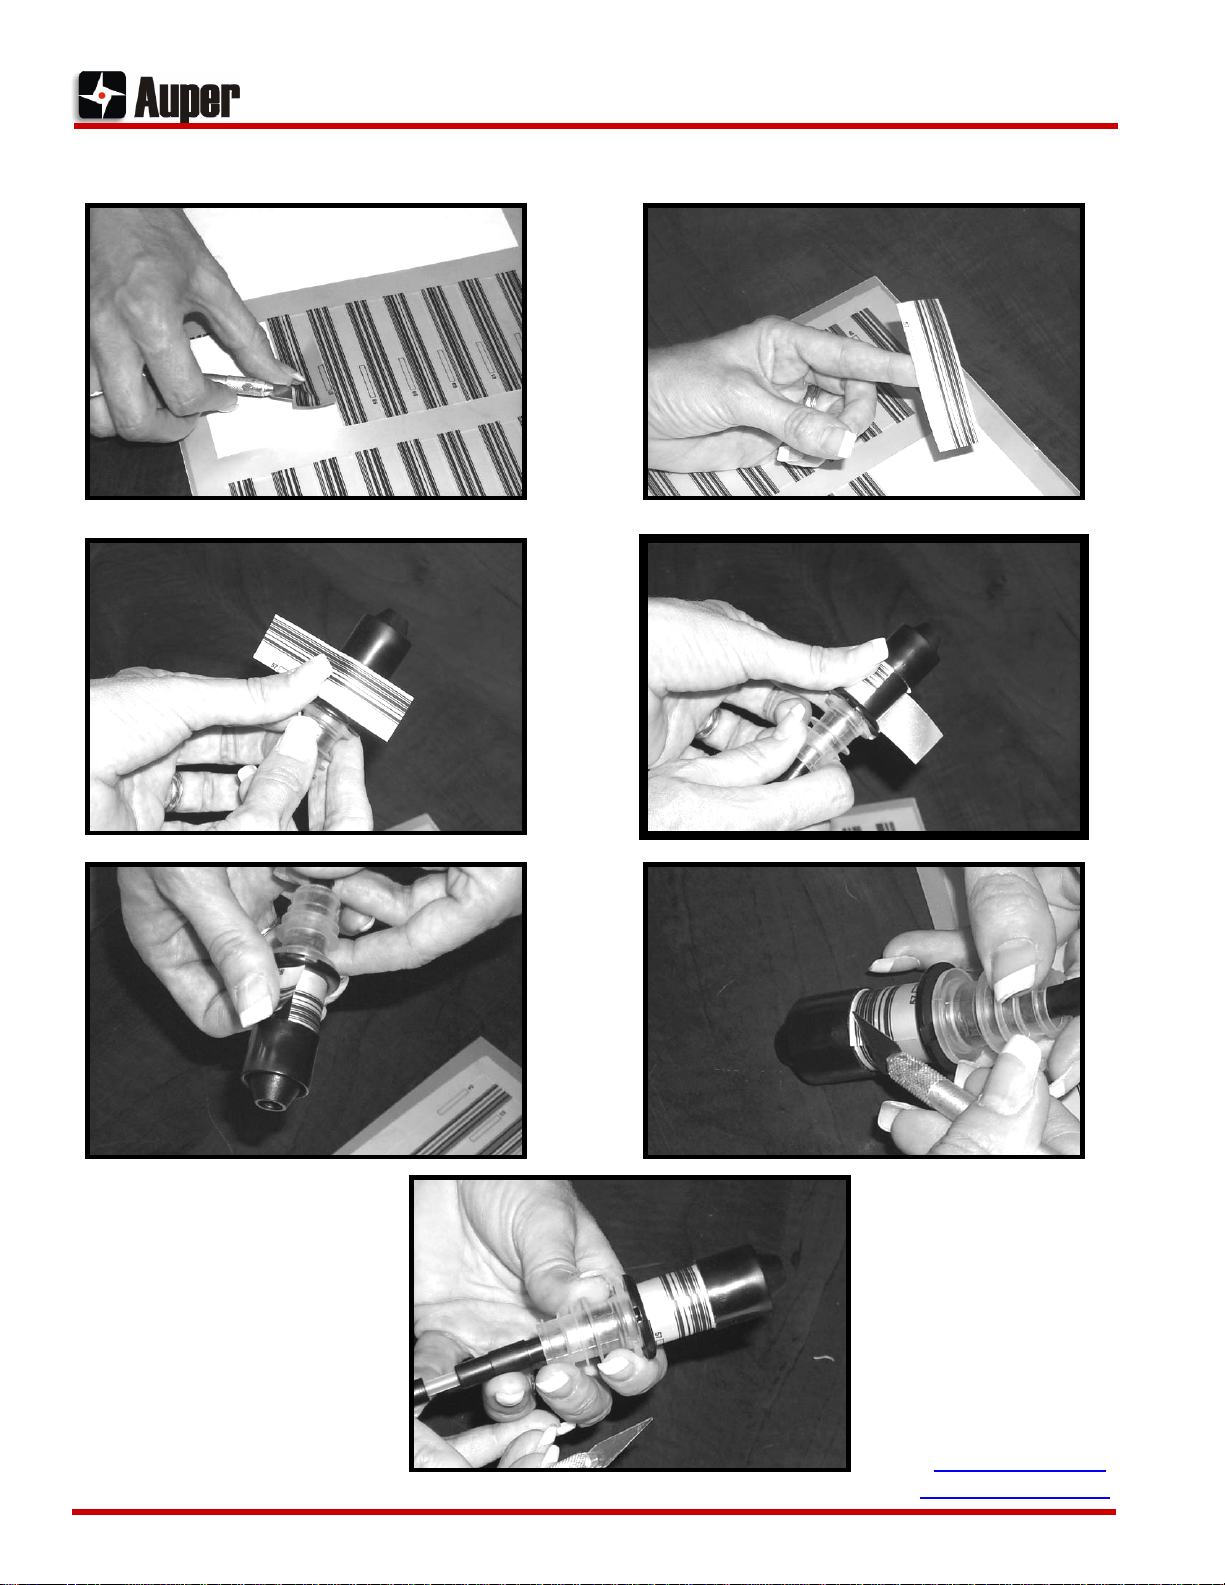
2.3. Installing the barcode labels
The reflective barcode labels for the Eclipse systems are supplied of sheets of 27 label s. There are five sheets in the
series (sheets No1 & 2 required for the HV 16):
• Sheet No.1: barcodes 0 to 8 (three of each for No. 0, 1, 2, 3, 4, 5, 6, 7, 8)
• Sheet No.2: barcodes 9 to 22(two of each from 9 to 21 and one barcode 22)
• Sheet No.3: barcodes 19 to 45
• Sheet No.4: barcodes 46 to 72
• Sheet No.5: barcodes 73 to 99
These labels are extremely resistant to wear and offer maximum optical performance that will not diminish with age
and wear. Since these labels will eventually have to be replaced, either to re-assign a pourer to a different product or
because it has been damaged, it is important, when a label is removed, that the glue
transfer onto the pourer. If it did, the glue would be difficult to remove thus our choice to select glue that is
aggressive. The reflective material is extremely rigid making it difficult to apply since it cannot be stretched in position
as you could with vinyl labels.
We have developed a method to install the reflective barcode labels on the pourers that should facilitate their
installation and extend the life of the labels by preventing corner form curling up.
We strongly recommend cleaning the barcode label sheets with alcohol to remove the greasy film left by the printing
process and fingers of the people who have manipulated the label sheets during production and shipping.
Soak a paper towel with rubbing alcohol and wipe the barcode label sheet thoroughly. The alcohol will dry in a few
seconds. Remove the barcode label with an utility knife and avoid touching the overlapping ends of the label with your
fingers while you apply the label to the pour spout.
This procedure will ensure maximum adhesion of the glue over the label.
Barcode label installation
Steps
o Use the point of the knife and your thumb to lift the label off the sheet.
remains on the label and not
not overly
o Take the label with your fingers holding it by the middle. Do not touch the ends with your fingers, as it will put
grease on the glue.
o Install the label starting from the middle following the top edge keeping it as straight as possible.
o Slowly push the label to apply it on one side taking care not to trap air bubbles underneath it.
o Complete the other side to make the joint in the same manner.
o If the label is not 100 % straight, the top corner will curl up and not stick well. Use the point of the knife to
remove the excess material to obtain a perfect joint. It is not important that the barcodes be 100 % aligned at
the joint.
o Allow 24 hours for the glue to stick well before soaking the pourer in water.
Toll free : 1-800-861-1620
Auper Electronic Controls Inc 901 Michelin, Laval, Quebec , Canada H7L 5B6 Email : [email protected]
Phone : (450)663-1993 h Fax : (450)663-0636 Web site : www.bar-controls.com
h
5
Page 7
Eclipse Hv 16 Installation guide
I80H016E
6
Toll free : 1-800-861-1620
Auper Electronic Controls Inc 901 Michelin, Laval, Quebec , Canada H7L 5B6 Email : [email protected]
Phone : (450)663-1993 h Fax : (450)663-0636 Web site : www.bar-controls.com
h
Page 8
Eclipse Hv 16 Installation guide
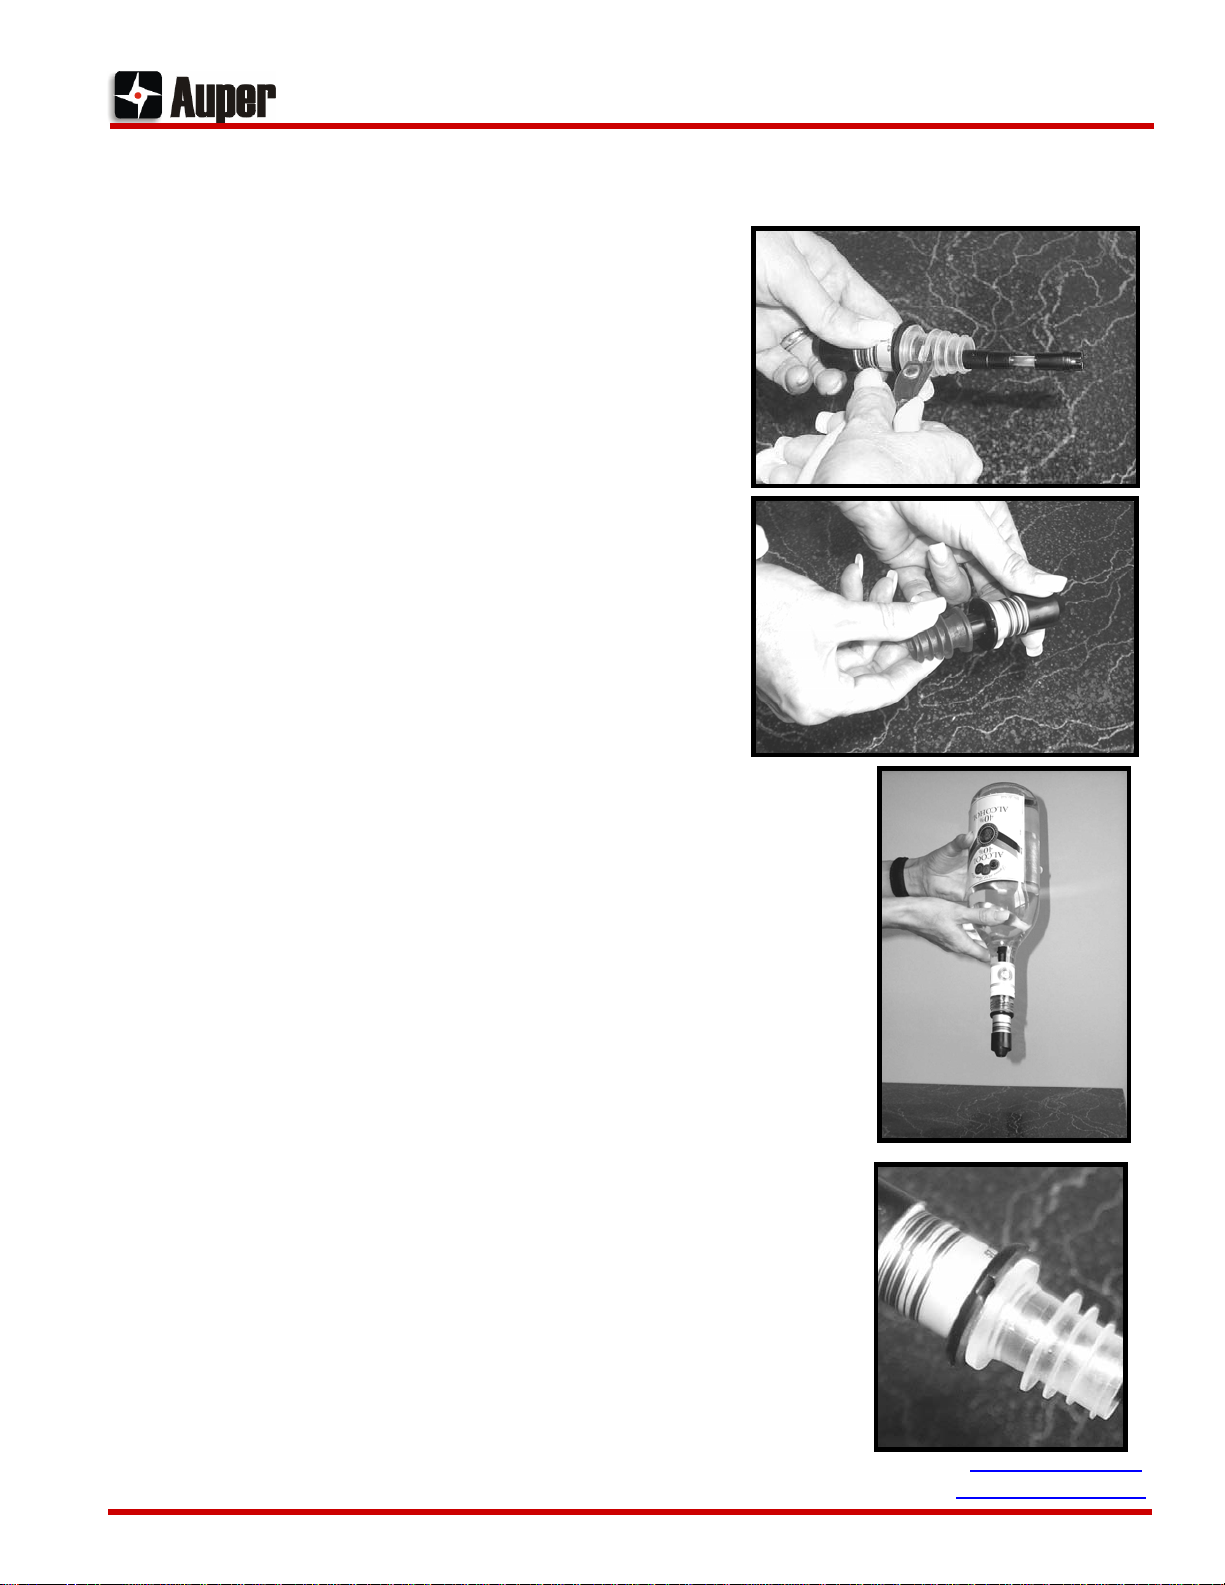
2.4. Installing the pourers
If a cork is loose it will leak and the liquor will spill in the activator ring.
If a cork is too tight:
• You will have a hard time pushing the pourer into the
bottle.
• It may loose its round shape and leak at the base of the
pourer.
• It will be extremely difficult to remove from the empty
bottle.
• 9 times out of 10, the breather tube will end up at the
bottom of the empty bottle.
o Use the red cork for larger bottlenecks.
o Trim the top wings of the clear cork to reduce the size for smaller
bottlenecks.
I80H016E
o Corks wear out and should be changed when they leak.
o Try using the same pourer for each brand.
o Once the pourer is installed, invert the bottle and check for leaks.
2.5. How pourers work
The principle of operation can be compared to pouring gas using red canisters. If
you block the air inlet, the flow of gas will choke and rapidly stop due to air not being
able to penetrate in the canister.
The air inlet on Auper pourers is located between the base of the pourer and the
cork as shown on the picture. The air enters the bottle through this hole and finds its
way inside though the breather tube.
The breather tube is equipped with two check valves that prevent liquid from
escaping the bottle through the air hole when the pourer is inverted with the valve
closed. When the activator ring is energized, it opens the valve in the pourer, which
lets the liquid out. As gravity pushes liquid out, air is sucked in though the breather
tubes. In order for a pourer to function properly, the breather tube check valves must
operate freely and the air inlet must not be blocked. People using heat shrink
seals, must make a small hole between the cork and the base of the pourer to
let air in for the pourers to work we
ll.
Toll free : 1-800-861-1620
Auper Electronic Controls Inc 901 Michelin, Laval, Quebec , Canada H7L 5B6 Email : [email protected]
Phone : (450)663-1993 h Fax : (450)663-0636 Web site : www.bar-controls.com
h
7
Page 9

Eclipse Hv 16 Installation guide
3. Programming the pour sizes and price
I80H016E
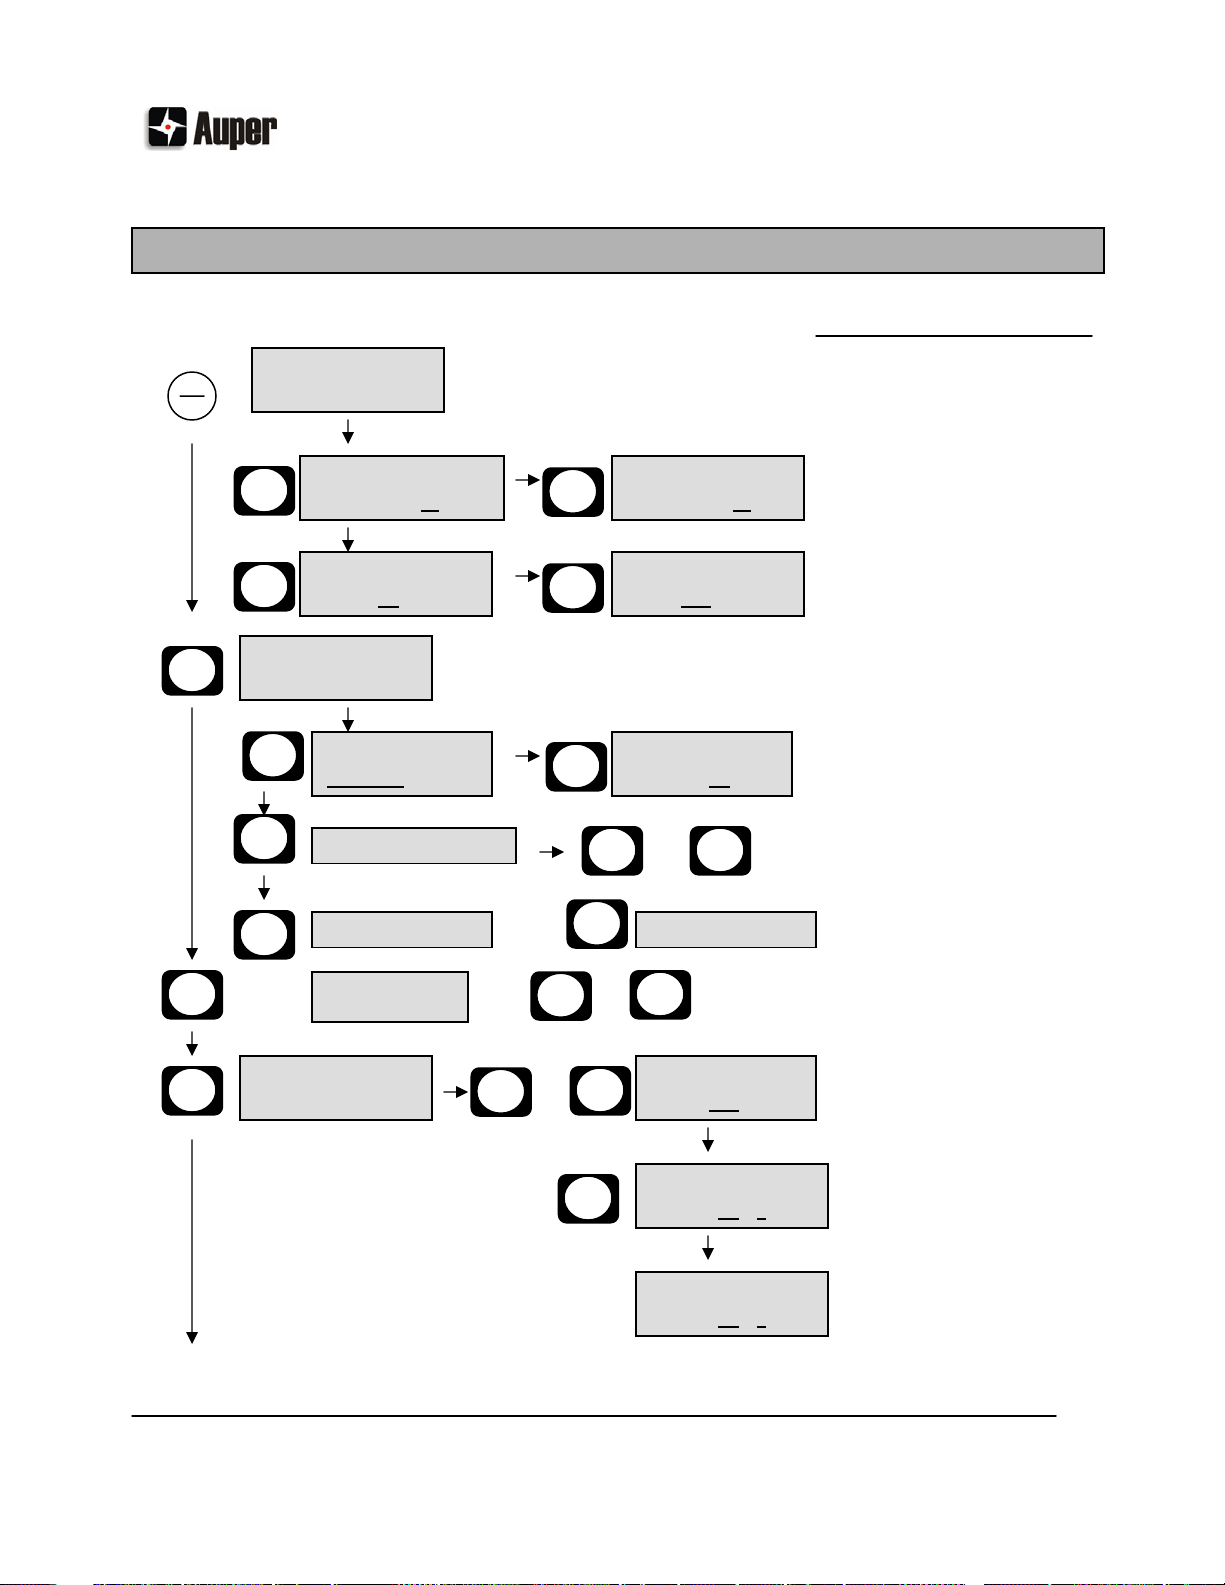
Turn the key to program
The display will show:
POUR SIZE TIMER :
TIMER 00B 0000
o The pour sizes are set using time intervals between 0 and 255.
o 00B is the barcode number, B identifies the pour size button R (A=S, B=R, C=L, D=SP).
o The last four digits on the right identify the timer value.
o A value of 40 equals approximately 30 ml (1 oz) depending on the viscosity of the liquor. If the viscosity
increases, the timer settings will have to be increased.
o A timer value of 20 will pour 15 ml (1/2 oz).
o A timer value of 80 will pour 60 ml (2 oz).
1. Press the S button to change the pour size going up.
2. Press the R button to change the pour size going down.
3. Press the L button to increase the TMR value.
4. Press the SP button to decrease the TMR value.
Press M once: the display shows POS INTERFACE: DISABLED
o Press SP to change it to POS INTERFACE ENABLED (1), (2), (3)
o The number between brackets identifies the POS protocol used (see interface section).
o Press L to change the protocol number (the most commonly used is 1)
o See the interfacing section for details.
o Before you proceed, make sure the system is set to POS INTERFACE DISABLED.
Press M once again : the display shows BAUD RATE: 9600 bps
o Press the L or SP buttons to change the baud rate (2400 bps, 9600 bps, 19.2Kbs)
If system was on POS ENABLE, display will show ACK TIMEOUT = 4S. Use the S and R buttons to adjust ACK
timeout.
Press M once again : The display will show 4-DIGIT PLUs = Y. System will recognize all four digits (including leadin g
zeros) of your PLU. Press the SP button to change to 4-DIGIT PLUs = N. System will eliminate the zeros before the
digits. EX: PLU 21 will be read as 21 and not 0021.
Press M once again: the display shows BAUD RATE: 9600 bps (see above)
Press M again: the display shows PRICE SETTING: PRICE 00B 00.00
o 00B is the barcode number and B identifies the pour size button, R. (A=S, B=R, C=L, D=SP).
8
Toll free : 1-800-861-1620
Auper Electronic Controls Inc 901 Michelin, Laval, Quebec , Canada H7L 5B6 Email : [email protected]
Phone : (450)663-1993 h Fax : (450)663-0636 Web site : www.bar-controls.com
h
Page 10

Eclipse Hv 16 Installation guide
o The last four digits on the right identify the PRICE value.
o Prices are used if you intend to print reports on a serial printer.
1. Press the S button to change the pour size going up.
2. Press the R button to change the pour size going down.
3. Press the L button to change the digit you wish to program.
4. Press the SP button to increase the digit number to set the price (0 to 9).
Press M again: SYSTEM NUMBER 00 will be displayed
I80H016E
The system number will identify the dispensing station on the printed report
.
o Press L to change the system number going up.
o Press SP to change the system number going down.
Press M again: RET TO DEF SIZE: DISABLED will be displayed. The pour size will remain on last portion used until
changed. Press the SP button to enable. The display will show, RET TO DEF SIZE: ENABLED. You will then be
asked to choose your default pour size.
o Press M and DEFAULT SIZE: REGULAR will be displayed.
o Press on desired pour size: S (small) R (regular) L (large) SP (special)
Pressing the M button will loop back to the beginning.
3.1. Testing the pour sizes
1. Make sure the system is on the POS DISABLED MODE
2. Turn the key to RUN
3. Insert a pourer in the activator ring.
4. Select a pour size and invert to pour.
4. Operating the system
Turn the key to Run.
The display shows:
No.00 REGULAR
PRICE B 00.00
o 00B is the barcode number and B identifies the pour size button R. (A=S, B=R, C=L, D=SP)
o The last four digits on the right identify the PRICE value.
This is the pour mode, to select a portion press S, R, L or SP.
Toll free : 1-800-861-1620
Auper Electronic Controls Inc 901 Michelin, Laval, Quebec , Canada H7L 5B6 Email : [email protected]
Phone : (450)663-1993 h Fax : (450)663-0636 Web site : www.bar-controls.com
h
9
Page 11
Eclipse Hv 16 Installation guide
I80H016E
Press the M button once. The display will show: SENSORS ON
o Turn the key to Program to turn the sensors off. When the sensors are off the Pour (green) and Fault (red)
light are flashing.
Press the M button once. The display will show CNT 00B 00000
o 00B is the barcode number and B identifies the pour size button R.
o The last four digits on the right side are the totalizing counter of the shots served.
• Press the S button to change the pour size going up.
• Press the R button to change the pour size going do wn.
Press M again: The system asks: PRINT REPORT?
o Press the SP button to start printing
After the report is finished, the system asks: CLEAR COUNTERS?
o Insert the key, turn it to program and turn it back to run to clear the counters
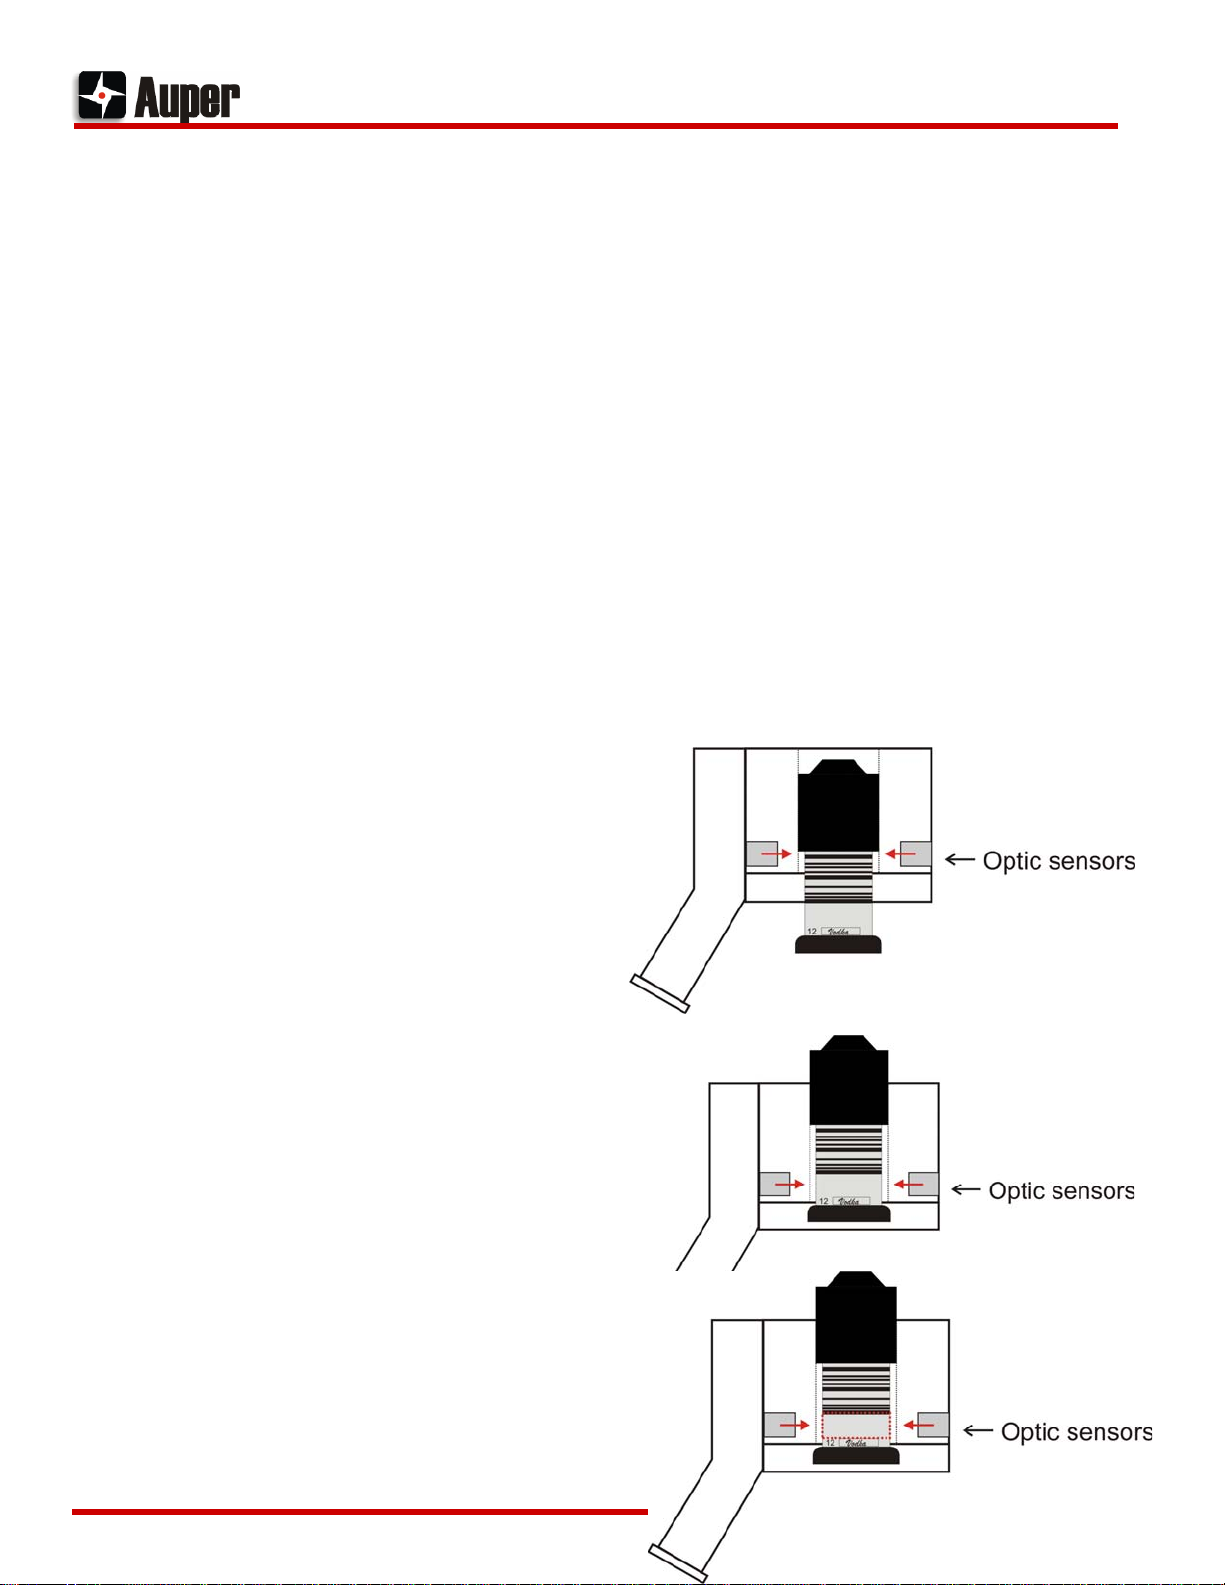
4.1. Operation of the Hv 16
As opposed to other types of pour spout readers; barcodes
are read as the pour spout is being inserted into the activator
ring. When the barcode passes in front of the optic sensors
located at the base of the activator ring, the Eclipse takes
two separate pictures of the barcodes, one from each
sensor. The pictures are then analyzed by the Eclipse to
validate the code. If either one of the barcode pictures is
validated, the Eclipse will turn the green/blue Pour light on.
The display will show the pour spout number with the
corresponding pour size information.
Sequence of events
The Eclipse knows when to start taking the pictures when the
first silver bar at the top of the barcode passes in front of the
sensors. This happens when the pour spout is more then half
way inserted.
From this moment on, until the pour spout is fully inserted into
the activator ring, the Eclipse registers the sequence of black
and silver bars transmitted by the optic sensors. You cannot
stop during this short time since you would alter the sequence
of the barcode.
10
Toll free : 1-800-861-1620
Auper Electronic Controls Inc 901 Michelin, Laval, Quebec , Canada H7L 5B6 Email : auper@bar-controls.com
Phone : (450)663-1993 h Fax : (450)663-0636 Web site : www.bar-controls.com
h
Page 12
Eclipse Hv 16 Installation guide
I80H016E
The speed at which the barcode passes in front of the sensors can vary up to a point. If the passing of the barcode is
too slow, the Eclipse will run out of memory to store the pictures and give you a fault. If the barcode moves too fast in
front of the optic sensors, the system will not be able to differentiate the large and narrow bars and give you a fault.
Under normal operating conditions, the Eclipse will easily read the barcode.
The Eclipse validates the code once the pour spout is fully inserted. This process takes a few milliseconds.
The silver space at the bottom of the label between the last
black bar and the top of the number is used by the Eclipse to
verify that the bottle is in position. There is enough space there
to allow for considerable movement of the activator ring without
loosing the code. This silver space must remain clear of any
markings that could confuse the Eclipse.
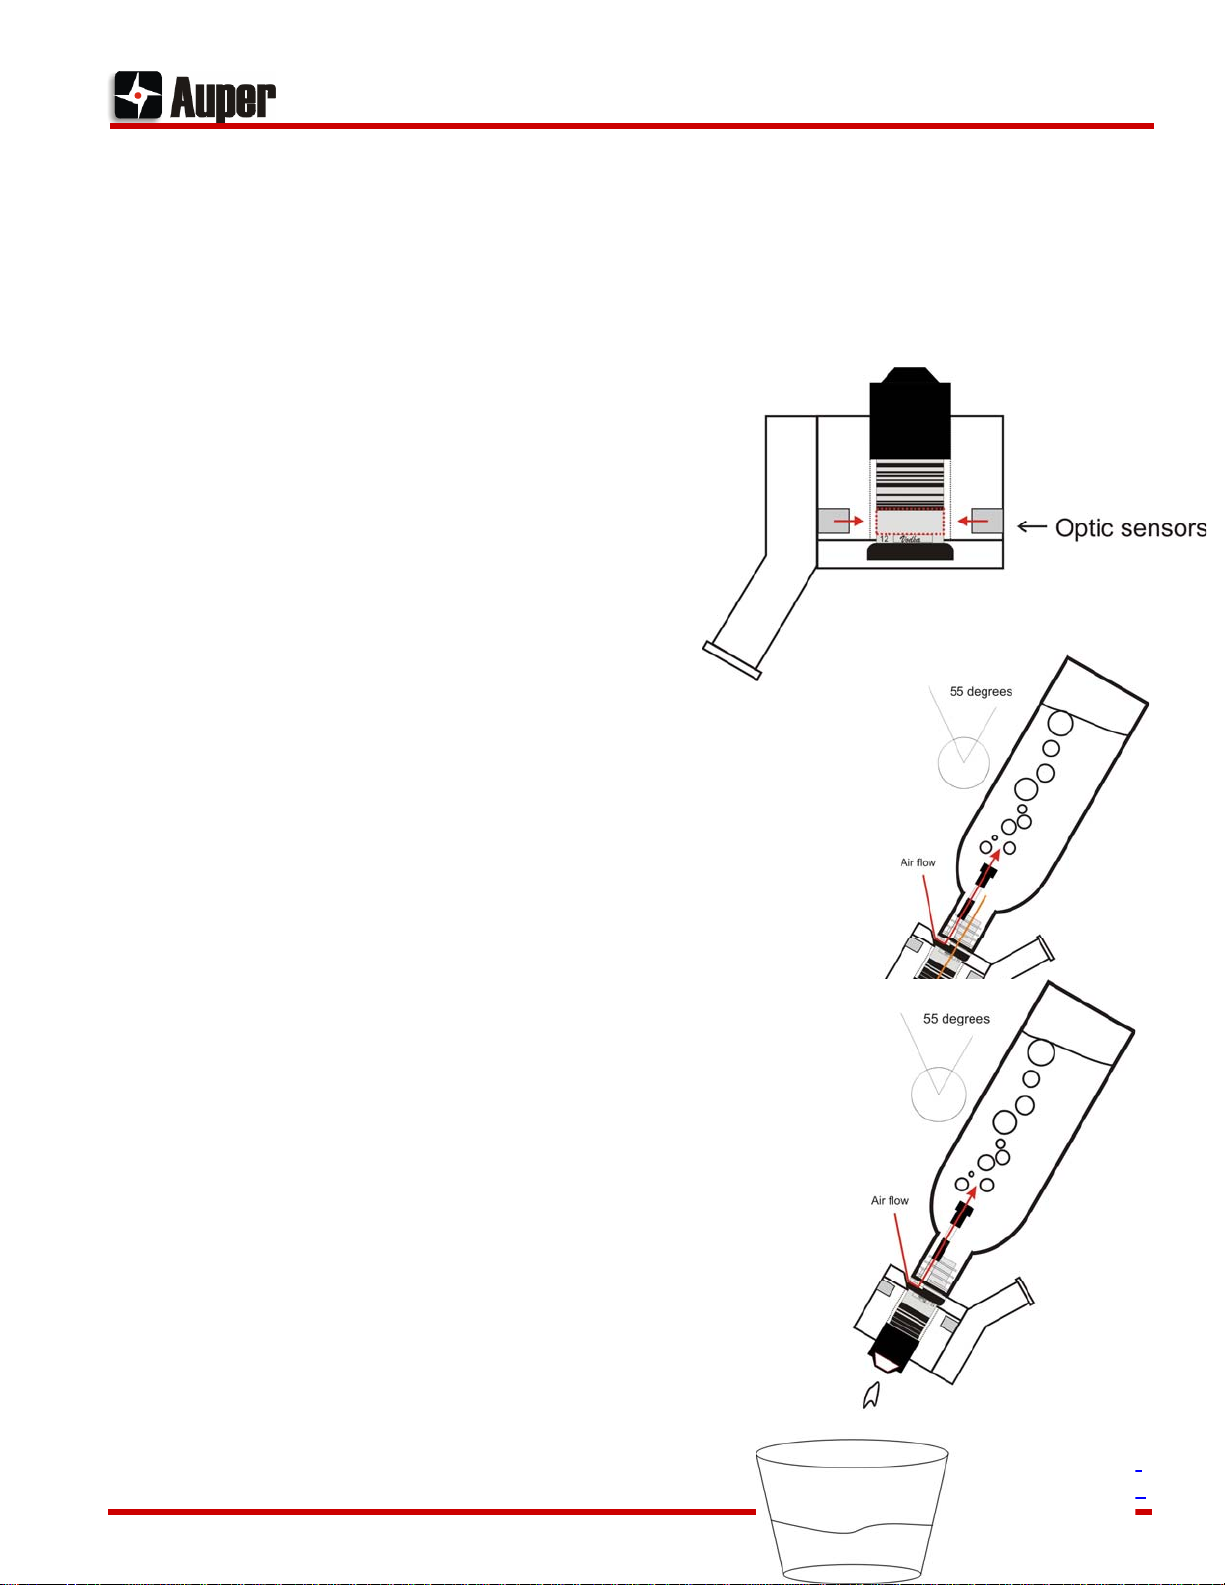
4.2. Pour spout operation
When you invert the activator ring and bottle to pour a drink, the Eclipse
opens the valve inside the pour spout. Gravity pushes the liquid down and
air is sucked inside the bottle. If the air intake is restricted or blocked, the
liquid will not flow out of the bottle freely.
The breather apparatus is composed of two check valves. The check
valves must operate freely to allow air to flow inside the bottle and block
liquid from flowing out through the air vent cavity. The air vent channel
must be cleaned at the same time you clean the pour spouts as described
in the Eclipse maintenance video supplied with the system.
When the pour size timer is complete, the Eclipse shuts the valve off.
A timer setting (TMR) of 40 equals approximately 30 ml depending on
the viscosity of the liquid. If you have problems with pour sizes, it is
most likely caused by an airflow restriction.
When you hold the bottle and activator ring at the recommended
operating angle of 45 to 60 degrees, the cavity above the valve
will empty itself in the glass right after the valve is closed thus
helping you keep your system and work station clean. This
feature is a definite advantage considering that the trapped
liquor on conventional pour spouts will escape at the first abrupt
movement and spill everywhere. If you hold the bottle upside
down, the cavity will not empty in the glass and your pour spout
will act as any other pour spout retaining liquor at the tip.
Always terminate the pour sizes and allow the last drops
to pour in the glass.
Toll free : 1-800-861-1620
Auper Electronic Controls Inc 901 Michelin, Laval, Quebec , Canada H7L 5B6 Email : auper@bar-controls.com
Phone : (450)663-1993 h Fax : (450)663-0636 Web site : www.bar-controls.com
h
11
Page 13

Eclipse Hv 16 Installation guide
I80H016E
If a pour size needs to be reduced, please ask the bar manager to adjust it to the correct level.
Fruit flies:
Fruit flies will not penetrate bottles equipped with these pour spouts from the top. If you use the system as per our
recommendation, the top ends of your pour spouts will not contain much more than a drop of liquor as opposed to
what would be the equivalent of a swimming pool for a fruit fly. Since liquid cannot come out, flies cannot go in. Fruit
flies will find their way inside the bottle through the air vent channel. To prevent fruit flies to enter this cavity, we carry
pourer hoods that cover the pourers, including the air vent channel.
Normal wear
Check the seal between the pour spout and the bottleneck. As corks will wear out, it is important to replace them with
new ones from time to time. The breather tubes can become loose with time. New tubes are available to install on the
check valves as well as the complete replacement breather tube apparatus.
5. Installing the printer
If you are using a printer supplied by Auper Electronic Controls Inc, the printer settings have been set at the factory
and the cable is already installed.
5.1. Printer settings:
1. Baud rate: 9600
2. Data bits: 8
3. Stop bits: 1
4. Corrupt data: not checked
5. Flow control: Xon/Xoff
5.2. Serial printer cable pin out
DB9 DB25
2 ----------- 2
3 ----------- 3
5 ----------- 7
6. Interfacing the HV 16
Terminology used in this document:
POS: Point of sales system. Usually a touch screen, PC based computerized system.
ECR: Electronic Cash regi ster
LDS: Liquor dispensing system
PLU: Price look-up numbe r
Interfacing a liquor system like the Eclipse is very much in demand these days. The technology is simple enough
although many do not understand how it works and some may even be a little frightened by it. If you are, you
shouldn't be.
An interfaced Eclipse offers some very attractive advantages:
12
Toll free : 1-800-861-1620
Auper Electronic Controls Inc 901 Michelin, Laval, Quebec , Canada H7L 5B6 Email : [email protected]
Phone : (450)663-1993 h Fax : (450)663-0636 Web site : www.bar-controls.com
h
Page 14

Eclipse Hv 16 Installation guide
I80H016E
• Sales are registered automatically. Instead of looking for menus or cash register keys, the bartender pours
the drink, which registers automatically identifying the category name and price. They gain speed and
mistakes are avoided.
• No reports to look at. Since the liquor system will not dispense the drink until it has been told to by the POS
or cash register, bar managers do not have to worry about reconciling sales with usage.
• If the POS or ECR is turned off, liquor will not pour.
The Eclipse is ready to interface to most POS systems or ECRs that have the ability to interface to a liquor system.
That means there has to be a program in the POS or ECR to interface to a liquor system (Most POS systems do).
When interfaced to a POS or an ECR, the Eclipse will not pour the drink before it has received the authorization
pour it from the system it is connected to. It means the POS or ECR has to acknowledge
reception of the transaction
to
data to indicate it will be handling the information from now on. Then the Eclipse dispenses the drink.
The whole process takes place in a fraction of a seco nd.
• The liquor system is connected to the POS terminal or ECR at the bar using a stand ard RS-232 null modem
cable.
• It is the POS software that controls the operation of the two systems together, not the liquor system. (See flow
of data next)
There are two types of POS programs
• Automatic sales transactions
• LDS suspense file
6.1. Automatic sales transaction
The bartender must open a guest check first on the POS system. As the bartender pours drinks on the liquor system,
each drink is sent to the POS where it is automatically entered on the check either as a fast transaction finalized using
cash payment or, posted to a running bill. If the drink is ordered from another terminal on the floor and sent to the
printer at the bar, it is usually sent with no price. The bartender will re-open the guest check at the bar's terminal to
serve the drink at which time the price will be posted on the check.
6.2. LDS (liquor dispensing system) suspense file
As drinks are poured at the LDS, the LDS will automatically send debit entries to the suspense file in the POS
software. As drinks are entered on the POS guest checks, credit entries are sent to the suspense file to cancel out
matching debit entries sent by the LDS. At the end of the shift, the POS prints a report listing drinks poured and not
posted and vice-versa.
Toll free : 1-800-861-1620
Auper Electronic Controls Inc 901 Michelin, Laval, Quebec , Canada H7L 5B6 Email : [email protected]
Phone : (450)663-1993 h Fax : (450)663-0636 Web site : www.bar-controls.com
h
13
Page 15

Eclipse Hv 16 Installation guide
I80H016E
The communication between the two systems is always the same. It is how the POS software is designed that will
dictate if you operate with automatic sales transaction or with a suspense file. Some POS systems offer both. Ask the
POS representative for details on the operation of their LDS interface.
Drink information sent by the Raymaster
The drink information sent by the Eclipse is always the same. It is a 4-digit PLU number ( 4-DIGIT PLUs = Y) or
shorter than 4 digits (4-DIGIT PLUs = N). A PLU is an item number and every item programmed in a POS or an ECR
has its own PLU number.
It is that number which is sent to the POS. The same PLU number has to be programmed in the POS or ECR
with the corresponding description and price of the drink.
There are two standard protocols used by POS software: Berg and Micros. Both protocols are available in the
Eclipse HV16. The third protocol (Auper) is for future use.
o POS ENABLED (1) = BERG PROTOCOL
o POS ENABLED (2) = MICROS PROTOCOL
o POS ENABLED (3) = AUPER
6.3. Flow of data
Automatic data entry
Suspense file
Eclipse sends PLU 0301 to POS
POS received data and looks up for PLU 0301 in its table.
If found => Description and price are posted to the check => Bar brand Regular @ $4.25 and ACK
signal (06) is sent to the Eclipse to pour the drink.
If NOT found => Error message is displayed on screen and NACK signal (15) is sent to the Eclipse
NOT to pour the drink.
Eclipse sends PLU 0301 to POS
POS received data and looks up for PLU 0301 in its table.
If found => Description and price are posted to the suspense file => Bar brand Regular @ $4.25 and
ACK signal (06) is sent to the Eclipse to pour the drink.
14
Toll free : 1-800-861-1620
Auper Electronic Controls Inc 901 Michelin, Laval, Quebec , Canada H7L 5B6 Email : [email protected]
Phone : (450)663-1993 h Fax : (450)663-0636 Web site : www.bar-controls.com
h
Page 16
Eclipse Hv 16 Installation guide
I80H016E
If NOT found => Error message is displayed on screen and NACK signal (15) is sent to the Eclipse
NOT to pour the drink.
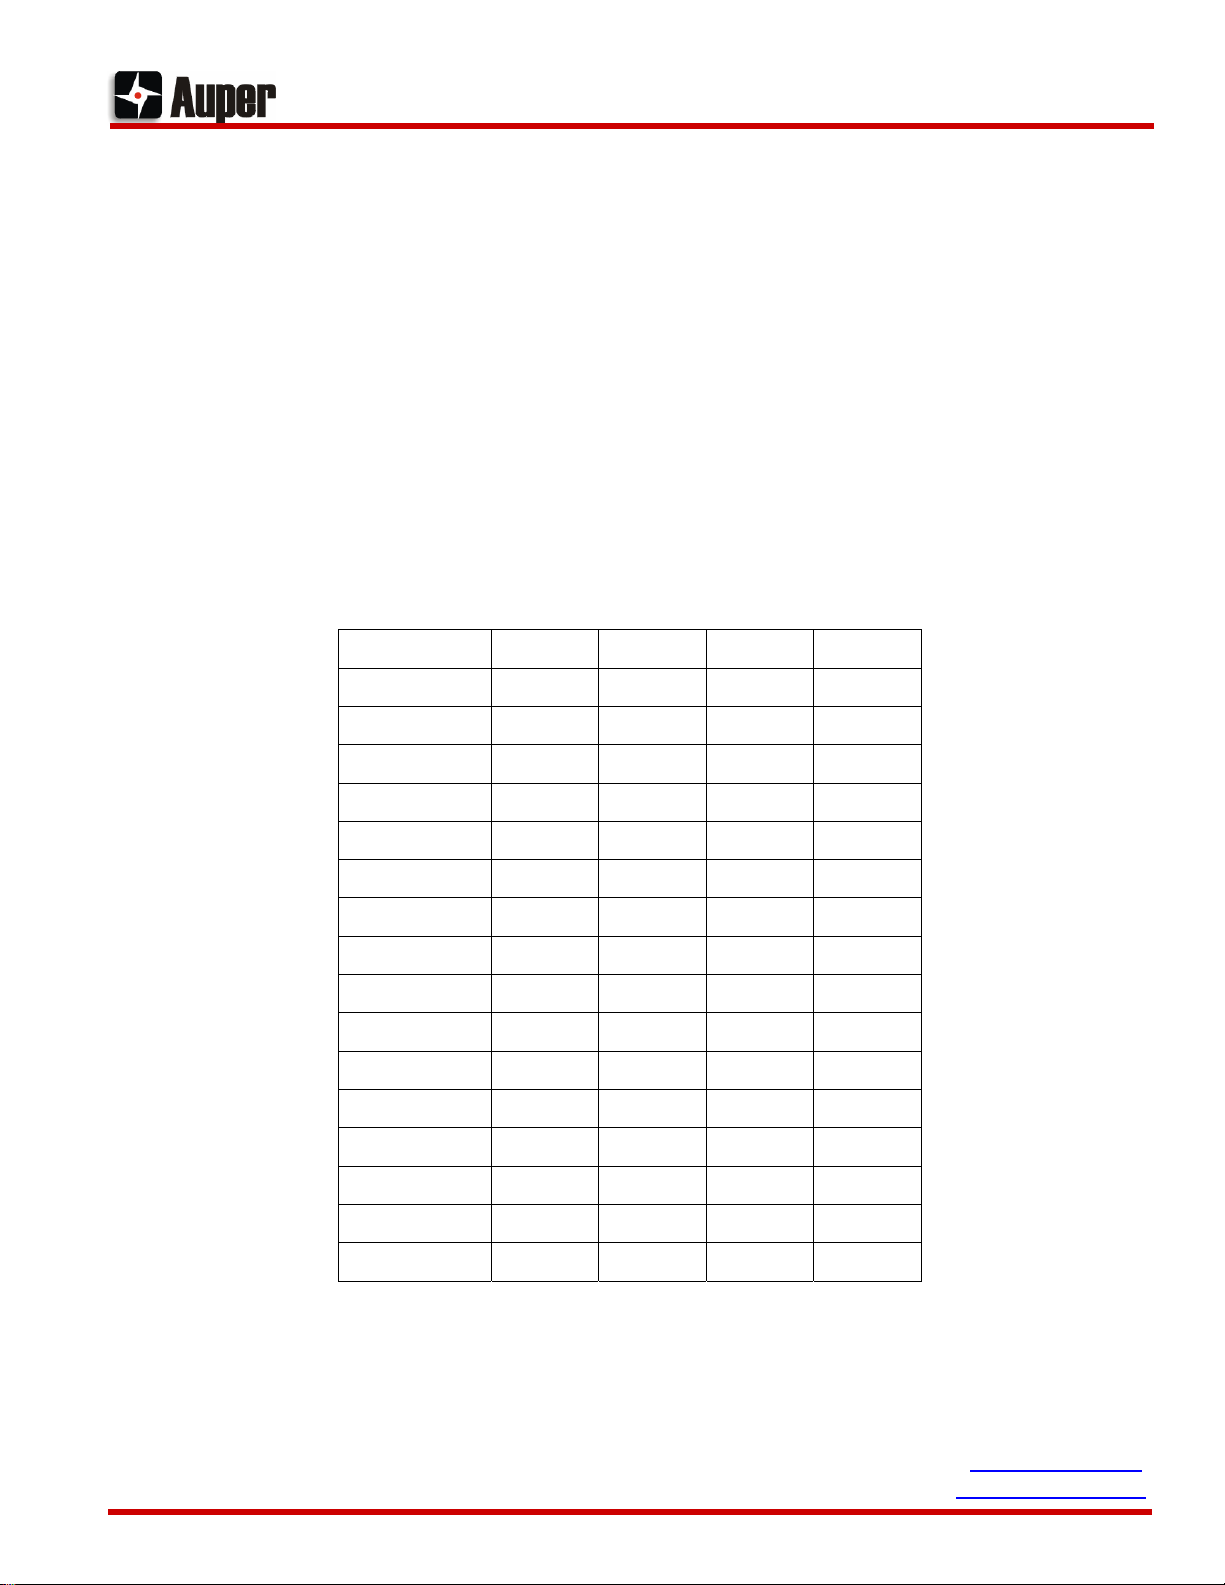
6.4. Hv 16 PLU table
To program the POS or register to interface to the liquor system, Set the COM port configuration to which the Eclipse
is connected with the following values:
• Baud rate: 2400 bps
• Number of transmission bits: 8
• Parity: None
• Stop bits: 1
• Device: Liquor (No. 8 for Samsung only)
Number/size S R L SP
0
1
2
3
4
5
6
7
8
9
10
11
12
13
14
15
0090 0091 0092 0093
0100 0101 0102 0103
0200 0201 0202 0203
0300 0301 0302 0303
0400 0401 0402 0403
0500 0501 0502 0503
0600 0601 0602 0603
0700 0701 0702 0703
0800 0801 0802 0803
0900 0901 0902 0903
1000 1001 1002 1003
1100 1101 1102 1103
1200 1201 1202 1203
1300 1301 1302 1303
1400 1401 1402 1403
1500 1501 1502 1503
Toll free : 1-800-861-1620
Auper Electronic Controls Inc 901 Michelin, Laval, Quebec , Canada H7L 5B6 Email : [email protected]
Phone : (450)663-1993 h Fax : (450)663-0636 Web site : www.bar-controls.com
h
15
Page 17

Eclipse Hv 16 Installation guide
I80H016E
6.5. Trouble shooting the interface
The Eclipse can be disconnected from the ECR or POS it is interfaced to in four easy steps:
I. Turn the key to program. The display show the first mode: [POUR SIZE TIMER: TIMER 00B 0040]
II. Press the M button once: The display shows [POS INTERFACE ENABLED (1)]
III. Press the SP button once to turn the interface off. The display shows [POS INTERFACE DISABLED]
IV. Turn the key back to RUN.
The number besides the POS ENABLED indicates the communication protocol selected by the POS vendor. The L
button can be used to change it from 1 to 3.
On POS DISABLED, the liquor system will not request an ACK signal from the POS or ECR to pour the drink. The
Eclipse is now operating as a stand-alone device. This is how you must test the liquor system.
6.6. Testing the liquor system
A. Insert a spout in the activator ring and select a pour size. Make sure you get the green/blue light.
B. Turn the key to program. The display shows { POUR SIZE TIMER: TIMER XXB 0040]. XX is the spout
number inserted
C. The number on the right indicates the timer setting for this spout and pour size. If this number is zero, the
portion has been turned off. A setting of approximately “40” indicates a portion of 30 ml (1oz).
D. You can activate (above 0) or change the portion size by using the L and SP buttons.
E. Now that you have verified that there is a portion setting, turn the key back to the vertical position.
F. Invert the ring to pour. If the drink pours normally, repeat these steps for other spouts you had problems with.
G. If the drink does not pour as expected, call your Auper distributor for service.
If you have established that the Eclipse is pouring normally without the interface it means:
1. They’re probably is a discrepancy between the PLUs programmed in the Eclipse and the ones programmed in
the POS. If a PLU sent by the Eclipse does not exist in the POS, the POS cannot give the authorization to
pour the drink. Call your POS or ECR vendor for verification.
2. The cable or connection between the two systems is disconnected or defective.
3. The protocol originally selected was changed or is incorrect.
To re-enable the interface:
V. Turn the key to program. The display show the first mode: [POUR SIZE TIMER: TIMER 00B 0040]
VI. Press the M button once: The display shows [POS INTERFACE DISABLED]
VII. Press the SP button once to turn the interface on. The display shows [POS INTERFACE ENABLED (1)]
VIII. Turn the key back to the vertical position.
.
7. Maintenance
In order to perform to its full potential, a liquor system requires a minimum of maintenance. Neglecting the daily
maintenance will eventually lead to dispensing problems. The Eclipse activator ring is a sophisticated electronic
barcode decoder. It must be kept clean in order for the optical system to work properly. The ring should always be put
back on its support after use and never used for any other purpose (breaking ice for example).
16
Toll free : 1-800-861-1620
Auper Electronic Controls Inc 901 Michelin, Laval, Quebec , Canada H7L 5B6 Email : [email protected]
Phone : (450)663-1993 h Fax : (450)663-0636 Web site : www.bar-controls.com
h
Page 18
Eclipse Hv 16 Installation guide
I80H016E
7.1. Dispensing liqueurs
Liqueurs are by nature stickier. Brands that sell fast will not create additional problems as long as the normal
maintenance is properly done. Brands that do not sell fast will require daily “rinsing”. Irish cream will always require
daily rinsing because of the cream it contains.
What happens: The sugars left in the spout when the bottle is sitting in the upright position will crystallize and
prevent the valve from opening and/or closing properly. Some products will dry up faster than others. To prevent
dispensing problems associated with the crystallization of the sugars, you need to melt the sugars with hot water.
7.2. Rinsing pourers
Each day, before the period starts, these spouts should be rinsed under hot water for at least 20 to 30 seconds. The
spout stays on the bottle. The hot temperature will melt the crystallized sugars and free the valve. Allow some water to
penetrate the top of the spout to rinse off any crystallized liquor (especially for Irish cream). Water will not penetrate
into the bottle. Invert the bottle above the sink and shake the water off the top of the spout. Wipe the spouts and bottle
with a clean rag.
The selection of bottles that will require daily rinsing will vary according to the popularity of each brand. For example,
if you sell a bottle of Sambuca every 4 days, chances are that if the spouts are cleaned properly after each bottle, that
you will never need to rinse them.
7.3. Cleaning pourers
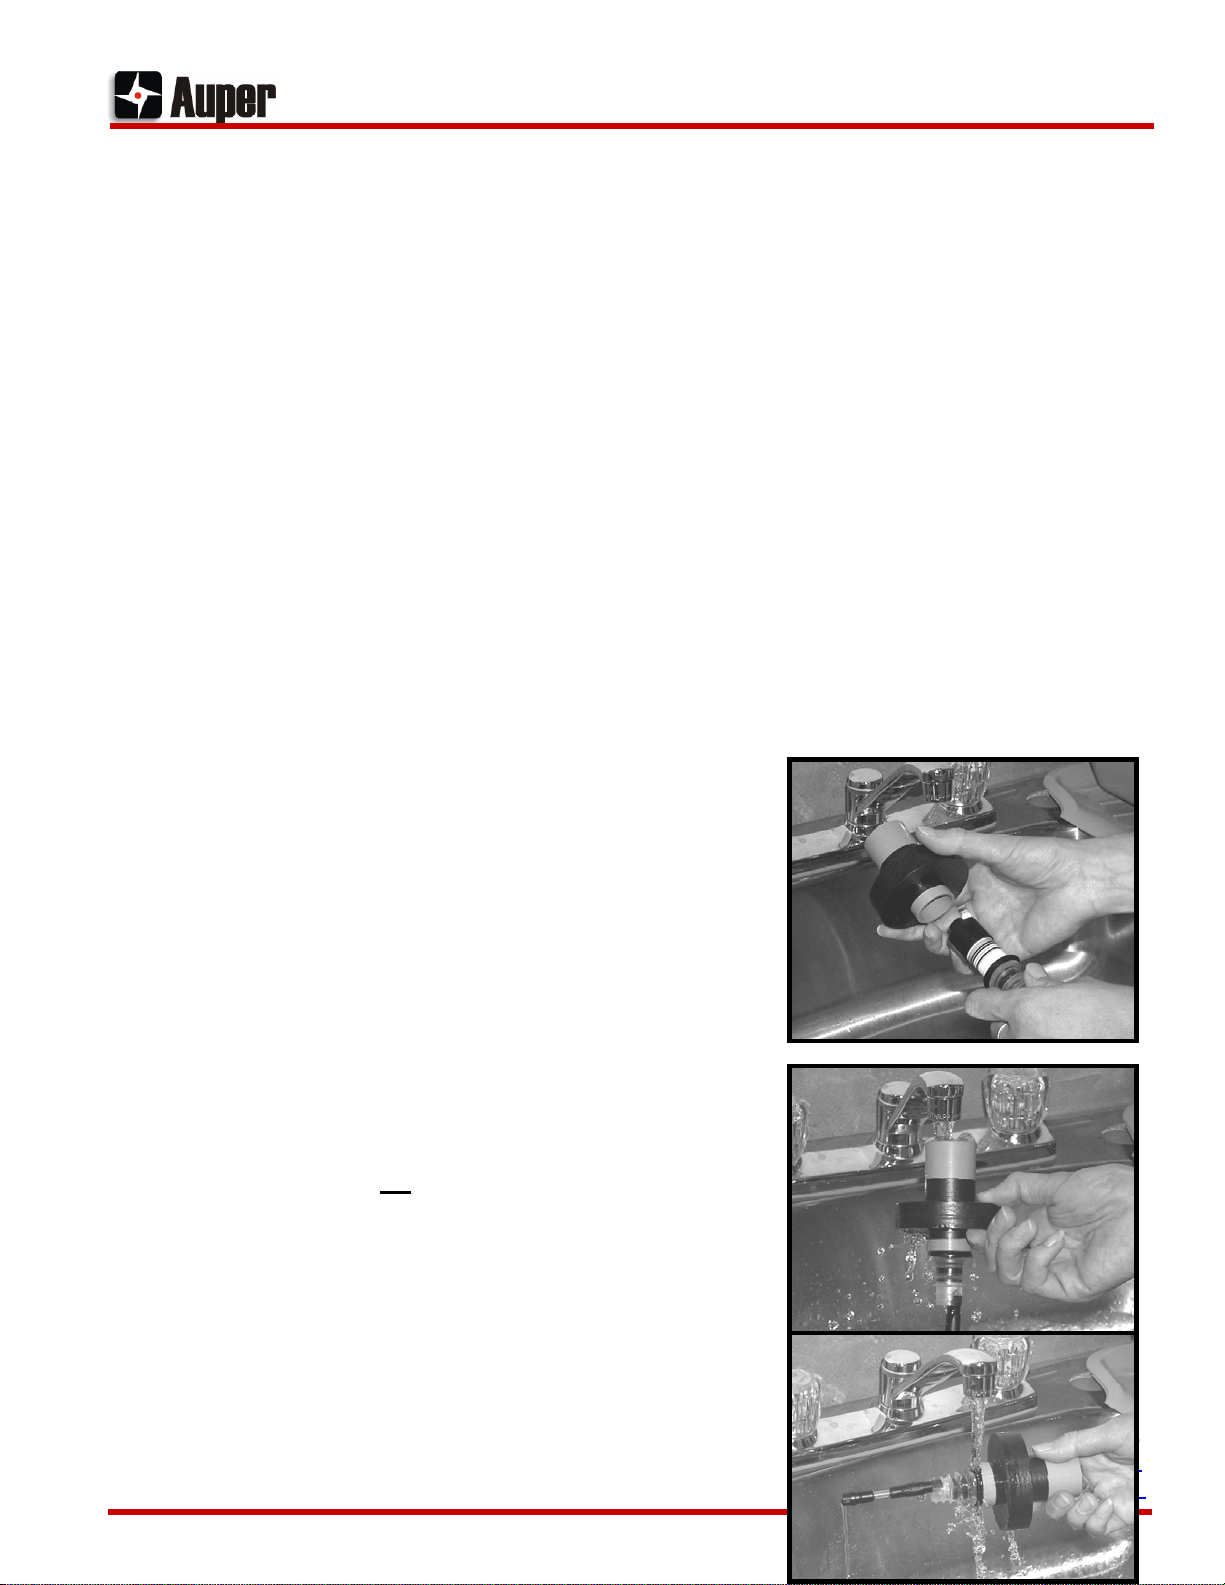
We recommend using the Auper magnetic pourer cleaning (ordered
separatly) device to clean your pourers every time one is removed from an
empty bottle. When a pourer is left on a bottle for more than 30 days, it
should be removed and cleaned as well. Keep this device locked and out
of reach of the bartenders as they will be able to serve liquor with it.
Step 1
o Insert the pourer inside the magnetic device.
o You should hear the pourer open.
o If the pourer remains closed, soak it in hot water for 30 minutes to
dissolve the hardened sugars jamming the valve.
o Try again with the magnetic device.
Step 2
o Hold the pourer under hot
properly.
o The water should flow through the pourer and come out at the
bottom.
o Using cold water is useless to disolve hardened sugars in the
valve mechanism.
Step 3
o Hold the pourer side ways with the air admission hole facing up.
running water for 30 seconds to clean it
Toll free : 1-800-861-1620
Auper Electronic Controls Inc 901 Michelin, Laval, Quebec , Canada H7L 5B6 Email : auper@bar-controls.com
Phone : (450)663-1993 h Fax : (450)663-0636 Web site : www.bar-controls.com
h
17
Page 19
Eclipse Hv 16 Installation guide
I80H016E
o Let water in the air admission hole to clean the breather tube and the check valves.
o Water should come out at the end of the breather tube as shown on the third picture.
7.4. Testing pourers
o You can check if a pourer seals well by inverting a full bottle or by trying to suck air from the top. If it leaks,
clean it again or replace it.
o To test a breather tube, you can remove it from the pourer.
o You should be able to blow air through it.
o You should not be able to suck air through it as the check valves blocks air and liquid circulating in
this direction.
o Always wash a pourer after testing it with your mouth.
o Always check that the cork does not leak any liquor. If it does, replace it.
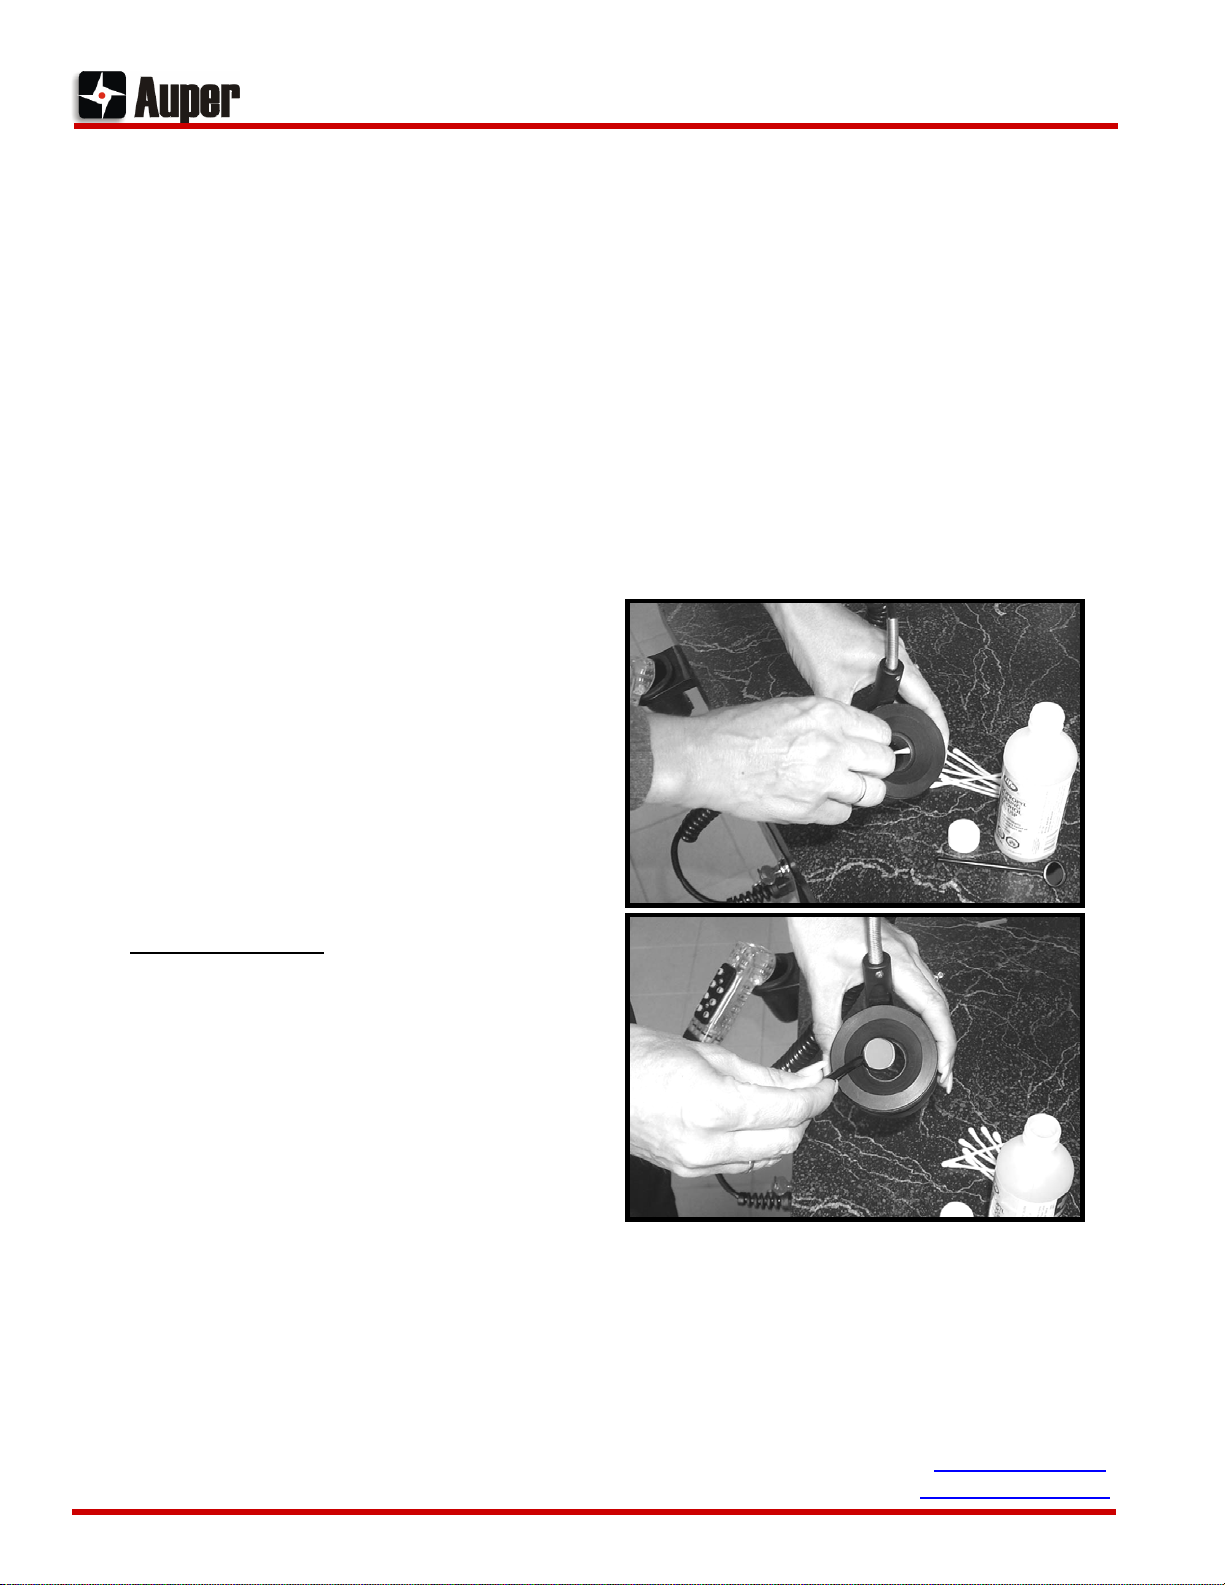
7.5. Activator ring maintenance
A bottle of alcohol and a box of Q-tips should be kept in the
bar at all times. The activator ring should be cleaned daily. It
is easy to skip a few days and forget about the maintenance
since it will take some times before the systems starts
having difficulties reading the barcodes. But it will eventually
catch up with you and the resulting problem is that your
bartenders may have to insert a pourer several times before
the system can actually identify the barcode. It is a waste of
time that can be prevented by making the cleaning of the
sensors a daily routine.
Use a clean and humid rag
and wipe the activator ring and
cable clean of any dried liquor residue.
With a clean cotton swab (Q-Tips) soaked in rubbing
alcohol, clean both lenses inside the ring.
2Tip:
Use the small angles mirror supplied with the system to
check your sensors regularly.
o NEVER submerge the activator ring or clean it
under running water.
o NEVER use industrial or domestic detergent to clean the activator ring. (Ex: ‘’Fantastic’’ will damage
the glass lenses.)
o NEVER hit the activator ring or use it to break ice. (This would temporarily fragment the tilt switch
rendering the system unusable for a while)
18
Toll free : 1-800-861-1620
Auper Electronic Controls Inc 901 Michelin, Laval, Quebec , Canada H7L 5B6 Email : [email protected]
Phone : (450)663-1993 h Fax : (450)663-0636 Web site : www.bar-controls.com
h
Page 20

Eclipse Hv 16 Installation guide
I80H016E
8. Hardware Warranty
Auper Electronic Controls Inc. warrants that this product is in good working condition, according to its specifications at
the time of the shipment, for a period of one (1) year from the date of purchase. Should the product, in Auper
Electronic Controls Inc opinion, malfunction within the warranty period, Auper Electronic Controls Inc. will repair or
replace the product without charge. Any replaced parts become the property of Auper Electronic Controls Inc. This
warranty does not apply to the software component of a product or a product which has been damaged due to an
accident, misuse, abuse, improper installation, usage not in accordance with product specifications and instructions,
natural or personal disaster or unauthorized alterations, repairs or modifications.
LIMITATIONS
All warranty for this product, expressed or implied, are limited to one year from the date of purchase and no warranty,
expressed or implied, will apply after that period.
No warranties for this product expressed or implied will apply to any person who purchases the product in used
condition.
The liability of Auper Electronic Controls Inc. with respect to any defective product will be limited to the repair or
replacement of such product.
In no event shall Auper Electronic Controls Inc be responsible or liable for any damages arising
(a) from the use of the product;
(b) from the loss of use, revenue or profit of the product; or
(c) as a result of any event, circumstances, action or abuse beyond the control of Auper Electronic Controls Inc.;
whether such damage be direct, indirect, consequential, special or otherwise and whether su ch damages are incurred
by the person to whom this warranty extends or a third party.
Toll free : 1-800-861-1620
Auper Electronic Controls Inc 901 Michelin, Laval, Quebec , Canada H7L 5B6 Email : [email protected]
Phone : (450)663-1993 h Fax : (450)663-0636 Web site : www.bar-controls.com
h
19
Page 21

Eclipse Hv 16 Installation guide
I80H016E
9. Part List
System
80-Hv016-K(E) Eclipse Hv-16 complete system (E) European
80-Hv016 Eclipse Hv-16 monitor only
40-010 Eclipse power supply 24V 40VA
80-300 Y bracket for activator ring
55-R-100 Activator ring with spiral cable
70-005 Eclipse 4’ extension cable
30-225 Mounting bracket w/screws for ext ension (2)
70-010 Rs-232 communication cable (DB9M-M)
Accessories
80-005 Pourer
80-015 Security seals (set of 1000)
80-025 Reflective barcode set of 5 sheets (no. 0-99)
80-030 Reflective barcode 1 sheet (no.0-8)
80-031 Reflective barcode 1 sheet (no.9-22)
80-032 Reflective barcode 1 sheet (no.19-45)
80-033 Reflective barcode 1 sheet (no.46-72)
80-034 Reflective barcode 1 sheet (no.73-99)
80-805 Regular clear poly cork (10)
80-010 Lifted pourer 1800
80-810 Large size red cork (10)
80-815 Extra large size beige cork (10)
80-825 Pourer cleaning device
80-840 Cleaning kit (alcohol, Q-Tips & mirror)
70-400 Samsung serial printer
70-410 Serial printer cable 10 ft (DB9 F/DB25M)
70-046 Gender changer DB9 M/M
70-430 Data selector switch
Replacement parts
80-040 Replacement breather tubes (10)
80-066 Replacement breather tube top straw (10)
80-067 Replacement breather tube bottom straw (10)
KEY-2007 Extra key
55-R-065 3 V battery
Manuals & instructions sheets
80-855-CD
I80Hv016E (I80Hv016F) Eclipse Hv100 User guide English (French)
Eclipse maintenance video on CD
20
Toll free : 1-800-861-1620
Auper Electronic Controls Inc 901 Michelin, Laval, Quebec , Canada H7L 5B6 Email : [email protected]
Phone : (450)663-1993 h Fax : (450)663-0636 Web site : www.bar-controls.com
h
Page 22

Eclipse Hv 16 Installation guide
10.
Annex: PROGRAMMING AND OPERATING FLOW CHART
I80H016E
Toll free : 1-800-861-1620
Auper Electronic Controls Inc 901 Michelin, Laval, Quebec , Canada H7L 5B6 Email : [email protected]
Phone : (450)663-1993 h Fax : (450)663-0636 Web site : www.bar-controls.com
h
21
Page 23
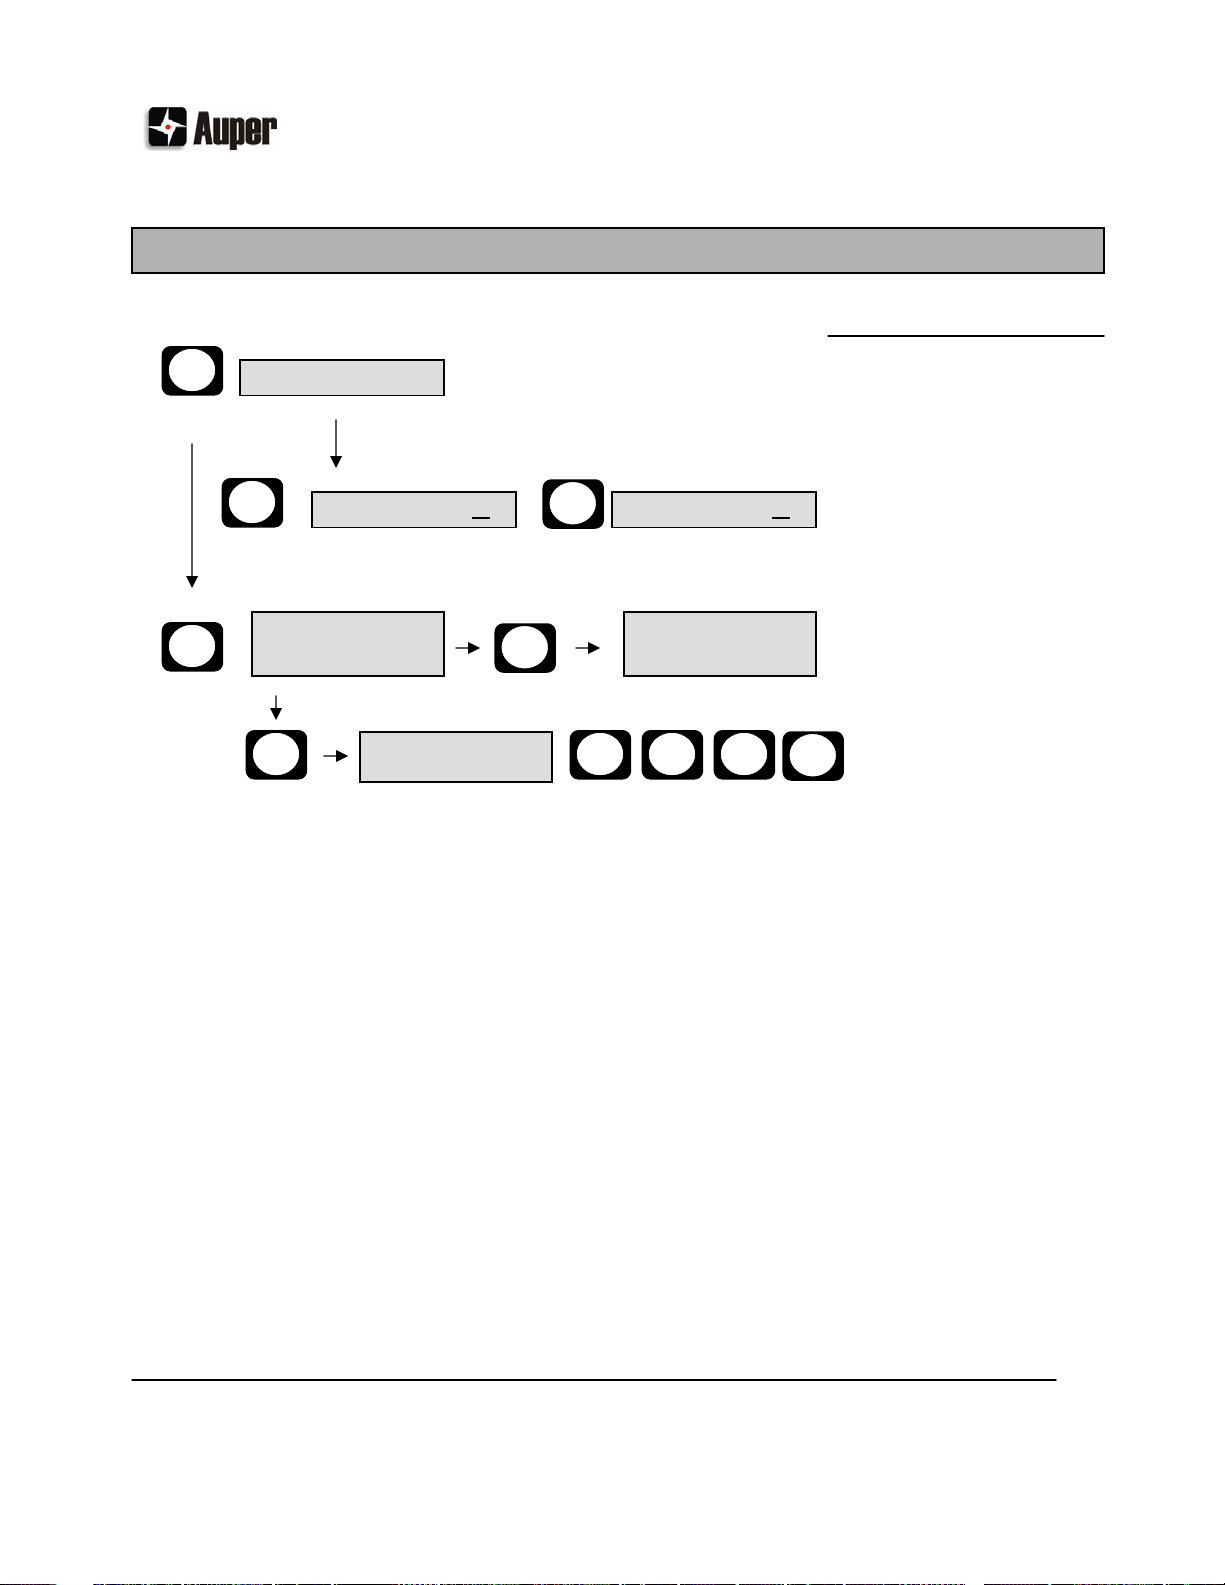
CLEAR/PROG
PROGRAM MODE
RUN
POUR SIZE TIMER
TIMER 00B 0000
ECLIPSE Hv-16 Version 1.1
PROGRAMMING AND OPERATION MODES
FLOW CHART FC80HV016
Description
Turn the Key to its horizontal
position.
Use this mode to set the timer value for
each spout number and size.
M
M
POUR SIZE TIMER
L
TIMER 00B 0025
POUR SIZE TIMER
S
TIMER 02D
POS INTERFACE:
DISABLED
SP
M
M
POS INTERFACE:
ENABLED
ACK TIMEOUT = 4S
4-DIGIT PLUs = Y 4-DIGIT PLUs = N
BAUD RATE:
2400 pbs
0040
{1}
SP
R
L
POUR SIZE TIMER
TIMER 00B 0005
POUR SIZE TIMER
TIMER 15A
POS INTERFACE:
ENABLED {2}
R
SP
or
LSP
To increase and decrease the timer
value.
0040
or
S
To select spout number and shot size.
To enable or disable the POS
INTERFACE MODE.
To select the POS protocol. (1-3)
POS Enable confirmation.
To increase or decrease ACK timeout
delay in seconds
To disregard zeros before digits
on PLUs.
To select the communication baud
rate (2400, 9600 or 19.2K)
M
PRICE SETTING:
PRICE 00B 00.00
R
or
L
S
PRICE SETTING:
PRICE 12C
PRICE SETTING:
PRICE 02D
PRICE SETTING:
PRICE 02D
00.00
00.00
04.00
More information about Auper products at www.bar-controls.com
To change the price per spout
number and shot size. To select
spout number and shot size going up
or down.
To select the digit to edit.
To change the selected digit going
up.
March 2007
Page 1 of 3
Page 24
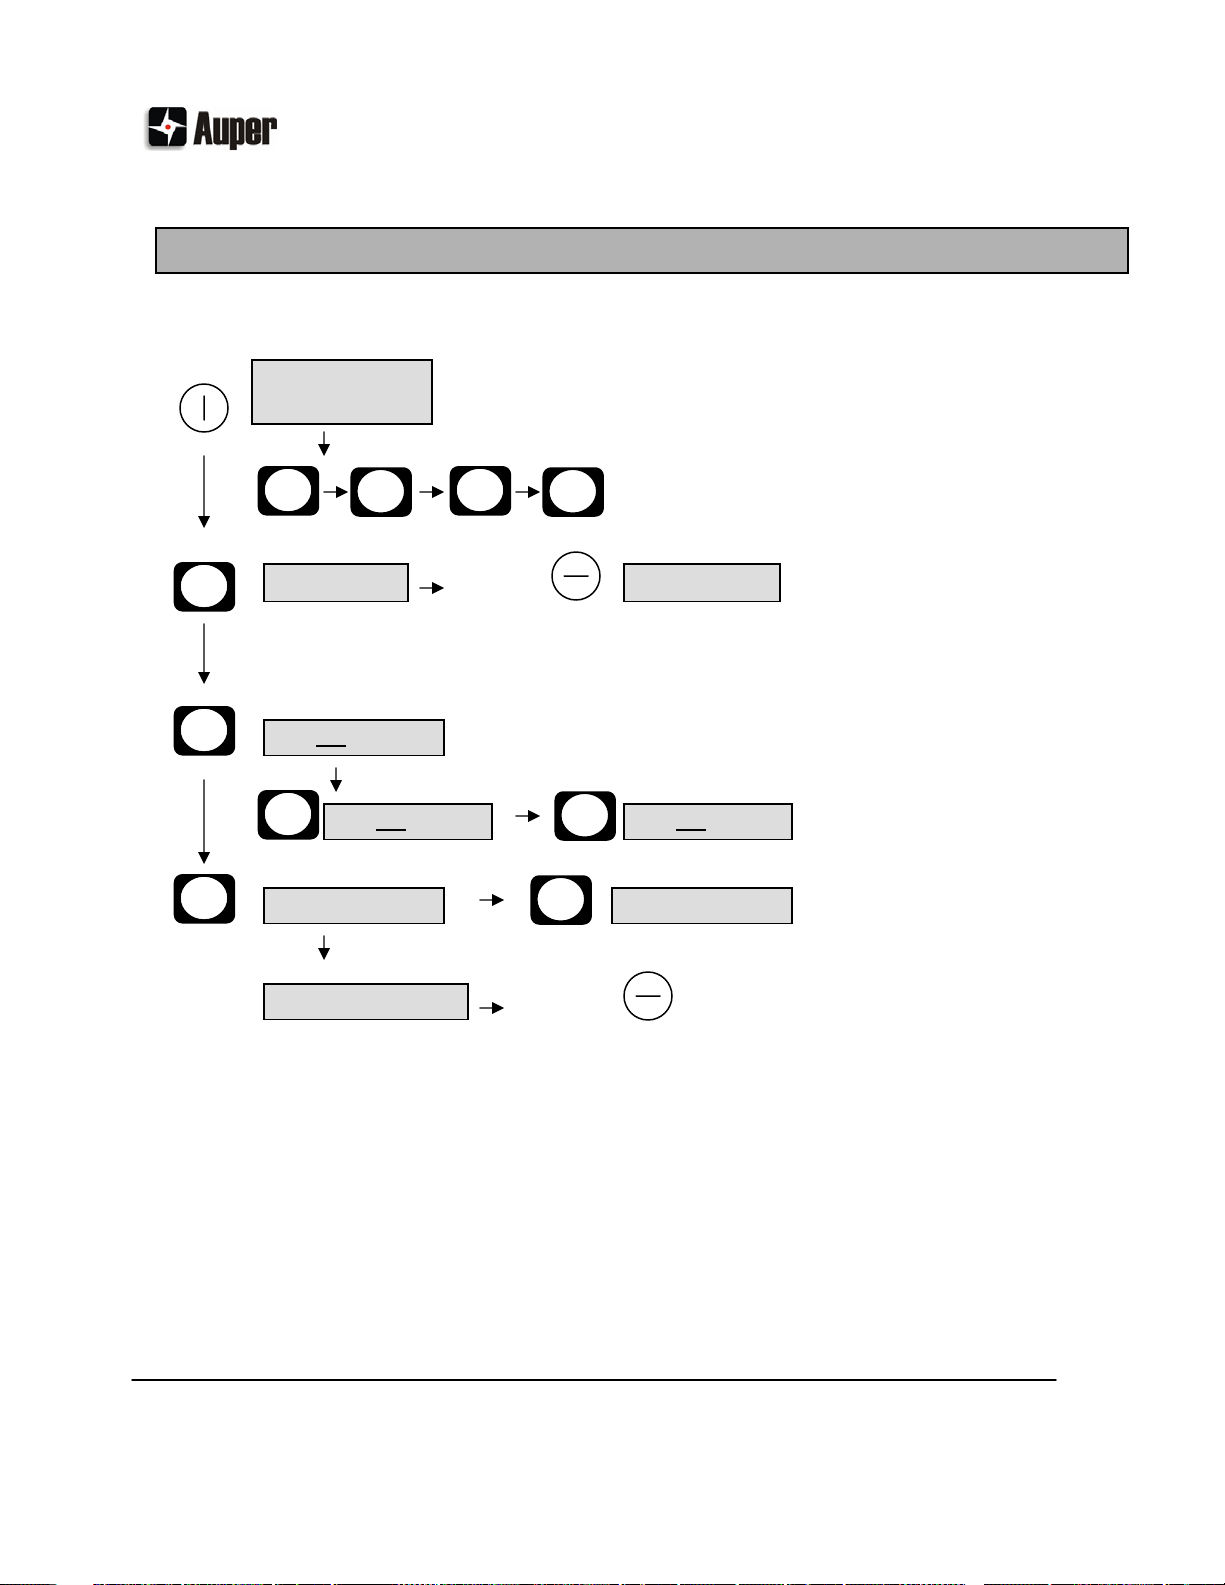
PROGRAM MODE
ECLIPSE Hv-16 Version 1.1
PROGRAMMING AND OPERATION MODES
FLOW CHART FC80HV016
Description
M
M
SYSTEM NUMBER 00
L SP
Program mode is complete. Pressing M will loop back at Pour size timer. Turn key to RUN
mode.
SYSTEM NUMBER 03
RET TO DEF SIZE:
ENABLED
M
DEFAULT SIZE:
REGULAR
SP
SYSTEM NUMBER 98
RET TO DEF SIZE:
DISABLED
R
LS SP
To select the system ID number.
To change the number going up and
down.
To select between enable and disable
mode. If enabled, press on M to
choose your new default size.
Enter pour size desired as
default pour size.
More information about Auper products at www.bar-controls.com
March 2007
Page 2 of 3
Page 25
RUN MODE
ECLIPSE Hv-16 Version 1.1
PROGRAMMING AND OPERATION MODES
FLOW CHART FC80HV016
CLEAR/PROG
RUN
M
M
M
No. 00 REGULAR
PRICE 00B 2.00
S
Sensors on
CNT 00B 000154
S
PRINT REPORT?
R
CNT 09A 000039
L SP
RUN
CLEAR/PROG
SP
Sensors off
R
CNT 14D 000016
DATA PRINTING…
Turn the key to its vertical
position to start the run mode.
Display the bottle number, pour size
and price of the bottle inserted in the
activator ring
To select the pour size.
To turn the sensors on and off.
Display the counters.
To change the bottle number and
pour size to display,going up and
down.
To print reports.
RUN
CLEAR COUNTERS?
CLEAR/PROG
More information about Auper products at www.bar-controls.com
To clear counters.
March 2007
Page 3 of 3
Page 26

Auper Electronic Controls Inc.
901 Michelin Street
Laval – Quebec - Canada - H7L 5B6
Phone 450.663.1993 – Fax 450.663.0636
1.800.861.1620
www.bar-controls.com
 Loading...