

Page 1
IR-150
Internet-Radio / FM / AUX / UPnP & DLNA Media Player
10028443 10028444
http://www.auna-multimedia.com
Page 2

Inhalt
Bedienungsanleitung
Technische Daten 3
Warnung / Sicherheitshinweise 3
Aufstellung / Kleine Objekte / Verpackungsteile 3
Transport des Gerätes 4
Reinigung der äußeren Oberäche 4
Bedienelemente 4
Erste Inbetriebnahme 6
Internet-Radio 7
FM 8
AUX-IN 8
DLNA 8
Media-Center 8
Informations-Center 10
Einstellungen 10
Troubleshooting 13
Hinweise zur Entsorgung / Konformitätserklärung 14
Instruction Manual 15
Instruzioni per l‘uso 28
Mode d‘emploi 40
Manual de instrucciones 52
2
Page 3

Sehr geehrter Kunde,
zunächst möchten wir Ihnen zum Erwerb Ihres Gerätes gratulieren.
Bitte lesen Sie die folgenden Anschluss- und Anwendungshinweise sorgfältig durch und befolgen Sie diese um möglichen technischen Schäden vorzubeugen.
Technische Daten
Artikelnummer 10028443, 10028444
Stromzufuhr Netzteil (Eingang: 100-240V ~50Hz; Ausgang: 9V, 1,5A)
FM Frequenzband 87.5 - 108MHz
Netzwerk-Prol und Verschlüsselung IEEE802.11b/g/n; WEP/WPA/WPA2
Maße 235 x 148 x 135mm
Warnung
Zur Reduzierung der Gefahr von Brand, elektrischem Schlag und Beschädigung:
• Setzen Sie dieses Gerät nicht dem Regen aus.
• Stellen Sie keine mit Flüssigkeiten gefüllten Gefäße, wie Vasen, auf dieses Gerät.
• Verwenden Sie ausschließlich vom Hersteller empfohlenes Zubehör.
• Reparieren Sie dieses Gerät nicht selbst. Wenden Sie sich zur Wartung an qualiziertes Kundendienstpersonal.
• Lassen Sie keine Gegenstände aus Metall in dieses Gerät fallen.
• Stellen Sie keine schweren Gegenstände auf dieses Gerät.
• Blockieren Sie keine Belüftungsönungen.
• Installieren Sie die Geräte nicht in unmittelbarer Nähe von Hitzequellen wie Heizungen, Herden, Öfen oder ande-
ren heiß werdenden Geräten (wie z. B. Verstärkern o. a.)
• Stellen Sie vor Inbetriebnahme sicher, dass die Spannungsversorgung der auf dem Gerät angegebenen entspricht.
• Trennen Sie die Netzverbindung bei Stürmen und Gewitter, wenn das Gerät längere Zeit nicht in Benutzung ist
oder wenn Sie die Wohnung verlassen.
• Dieses Gerät ist kein Spielzeug. Kinder sollten es nur unter Aufsicht benutzen und auf keinen Fall Gegenstände in
Belüftungsönungen stecken.
Aufstellung
• Achtung - Stellen Sie keine Quellen oener Flammen, z. B. brennende Kerzen, auf das Gerät.
• Stellen Sie das Gerät auf eine trockene, ebene, wasserfeste und hitzebeständige Oberäche.
• Suchen Sie einen Aufstellort, an dem Kinder nicht an das Gerät gelangen können.
• Die Steckdose muss leicht zugänglich sein, um im Notfall das Gerät schnell vom Stromkreis trennen zu können.
• Installieren oder positionieren Sie dieses Gerät nicht in einem Bücherregal, Einbauschrank oder einem sonstigen
engen Raum. Stellen Sie eine gute Belüftung des Gerätes sicher.
• Stellen Sie das Gerät nicht auf Verstärker oder andere Geräte, die heiß werden können. Diese Hitze könnte das
Gerät beschädigen.
• Setzen Sie dieses Gerät keinen übermäßigen Erschütterungen aus.
Kleine Objekte/Verpackungsteile
Bewahren Sie kleine Objekte (z. B. Schrauben und anderes Montagematerial, Speicherkarten) und Verpackungsteile außerhalb der Reichweite von Kindern auf, damit sie nicht von diesen verschluckt
werden können. Lassen Sie kleine Kinder nicht mit Folie spielen. Es besteht Erstickungsgefahr!-
3
Page 4
Transport des Gerätes
Bitte bewahren Sie die Originalverpackung auf. Um einen ausreichender Schutz beim Transport des Gerätes zu erreichen,
verpacken Sie das Gerät in der Originalverpackung.
Reinigung der äußeren Oberäche
Verwenden Sie keine üchtigen Flüssigkeiten, wie Insektensprays. Durch zu starken Druck beim
Abwischen können die Oberächen beschädigt werden. Gummi- oder Plastikteile sollten nicht über einen längeren
Zeitraum mit dem Gerät in Kontakt sein. Nutzen Sie ein trockenes Tuch
Bedienelemente
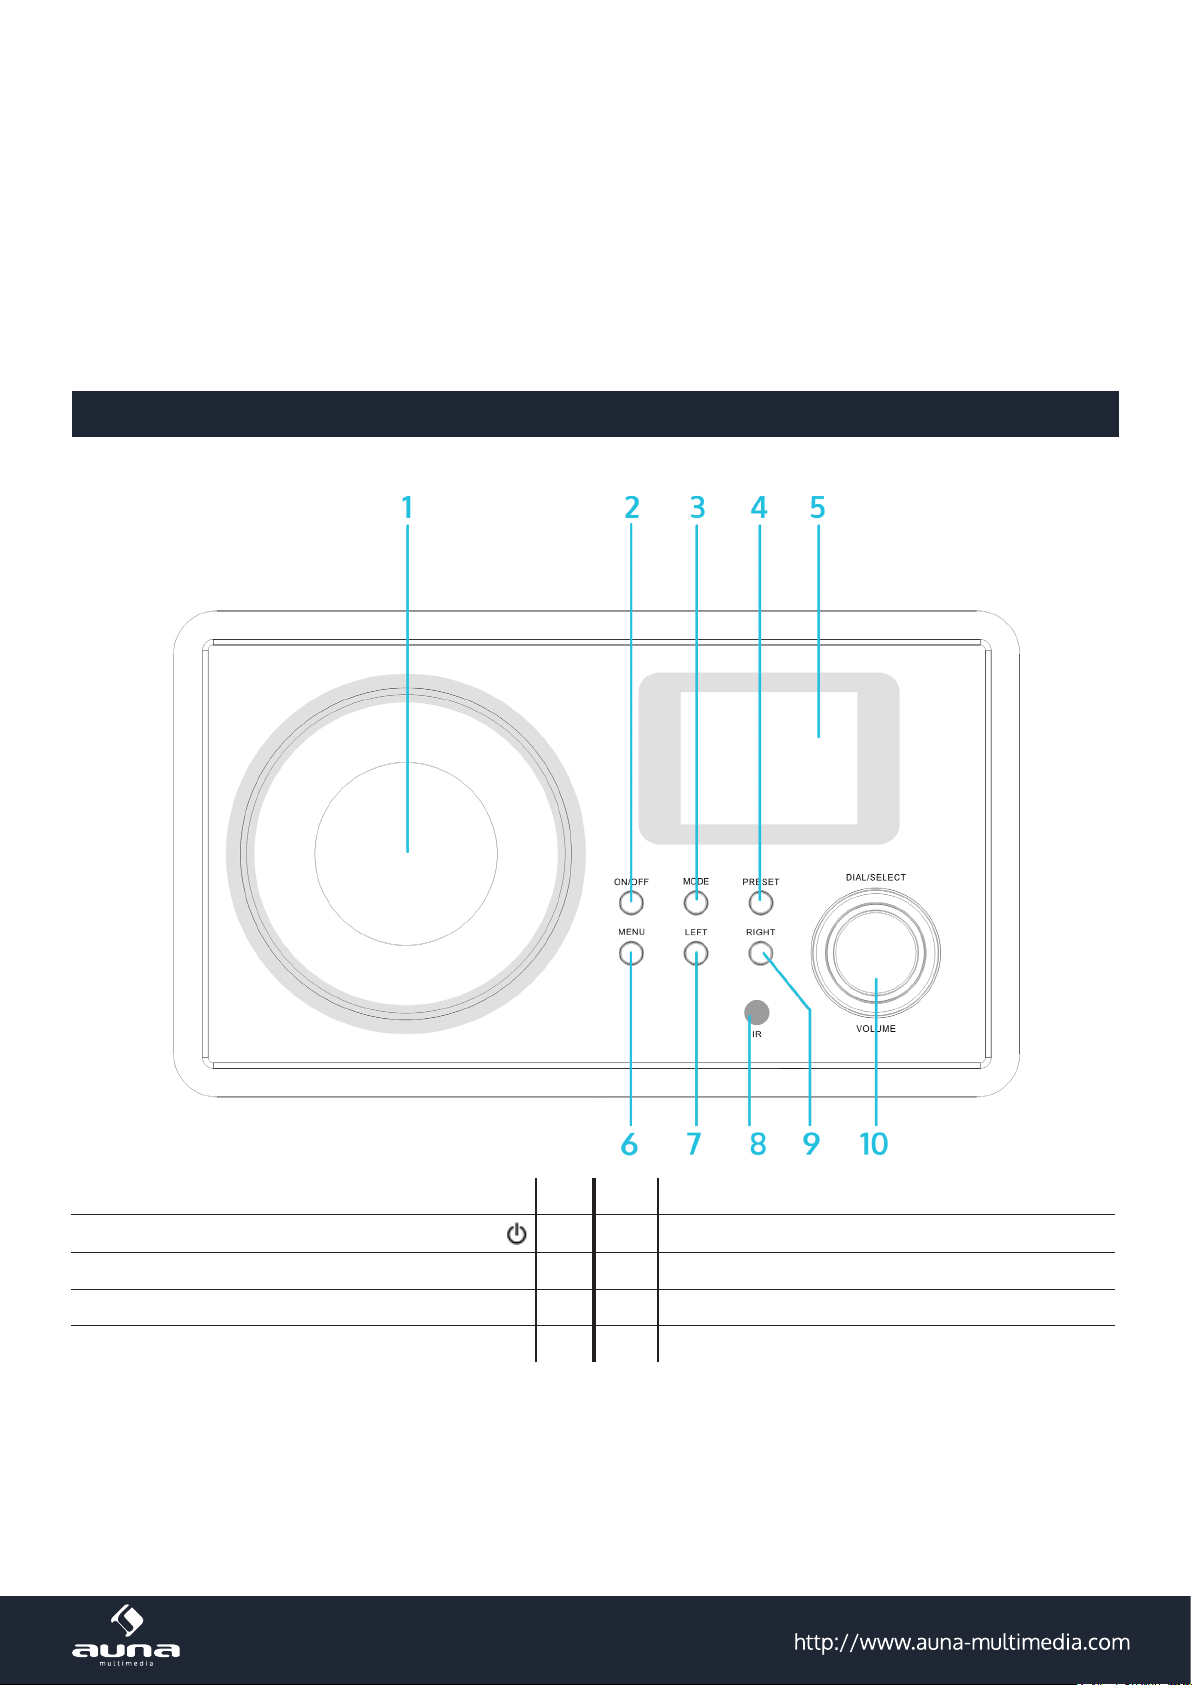
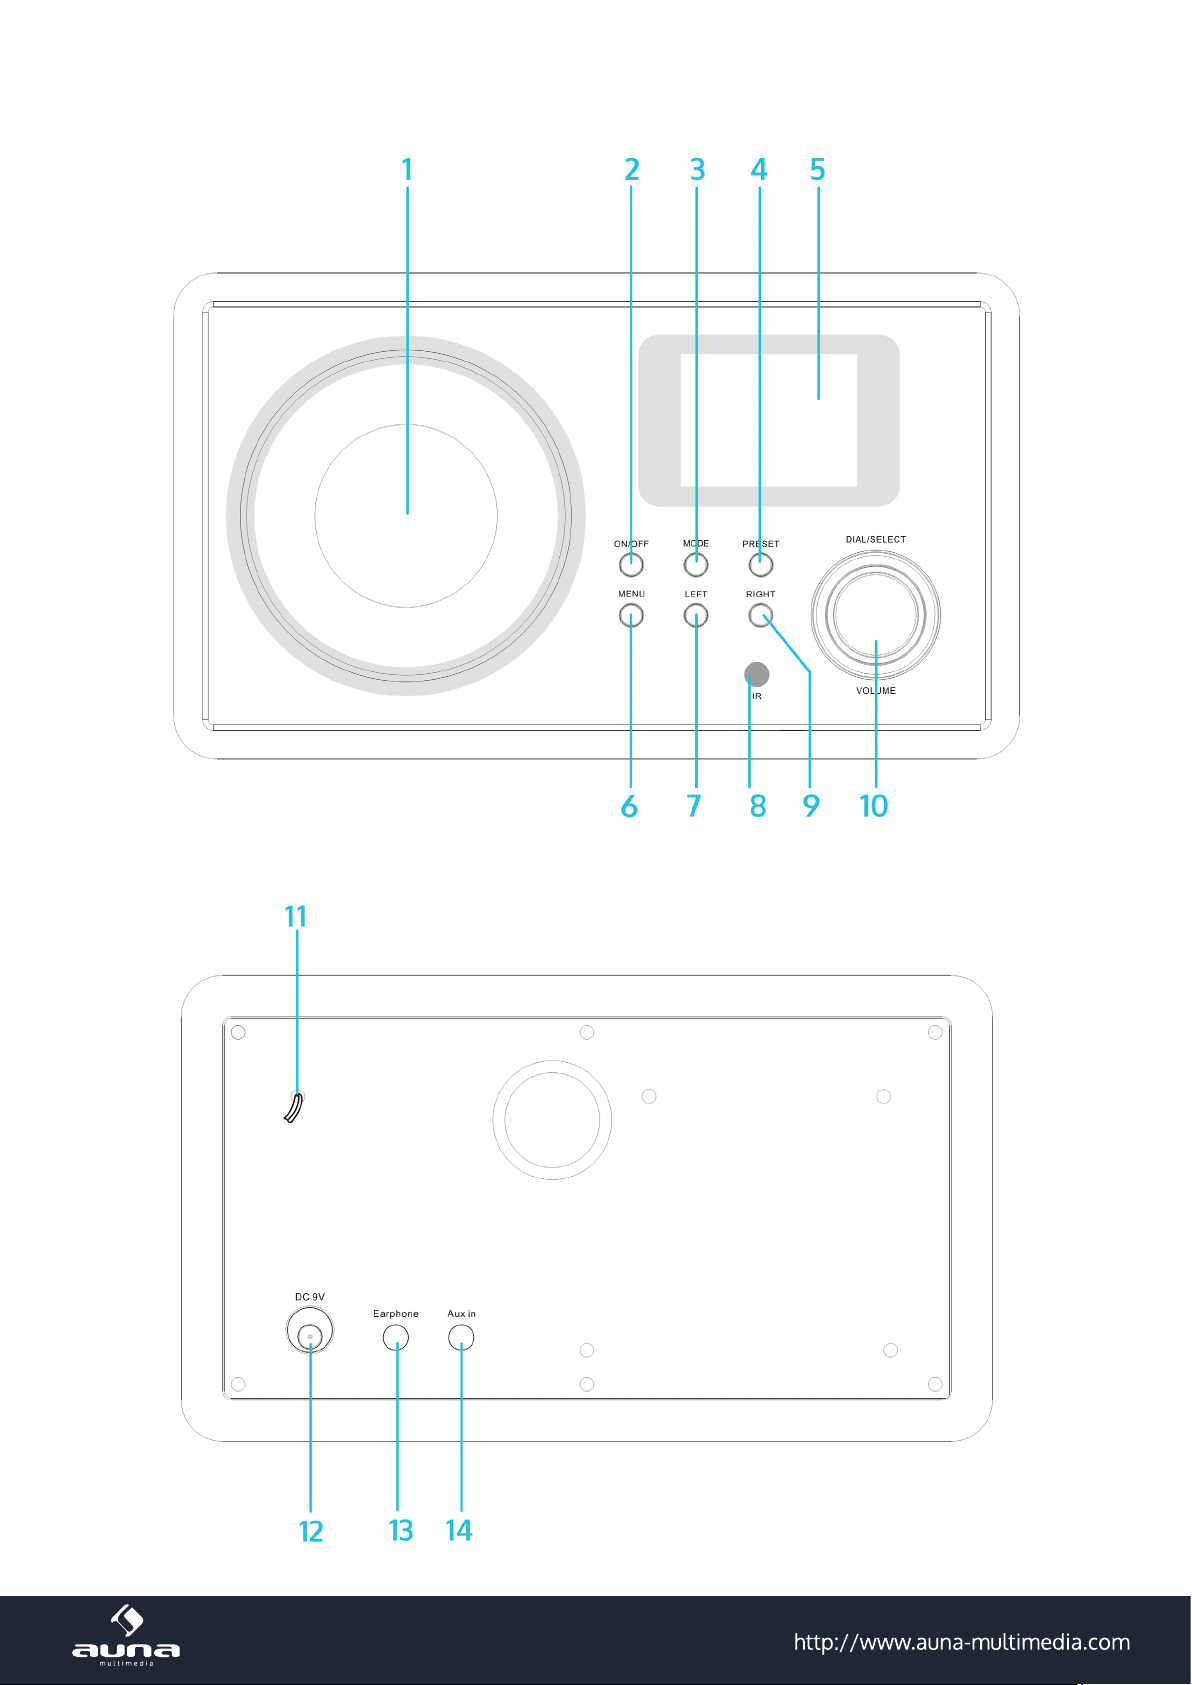
Front
Lautsprecher 1 6 MENU
Power On / O
MODE (Funktionswahl) 3 8 Infrarot-Sensor
PRESET (Speichermodus) 4 9 RIGHT (rechts)
Display 5 10 Dial/Select (Auswahl) / VOLUME (Lautstärke)
2 7 LEFT (Links)
4
Page 5
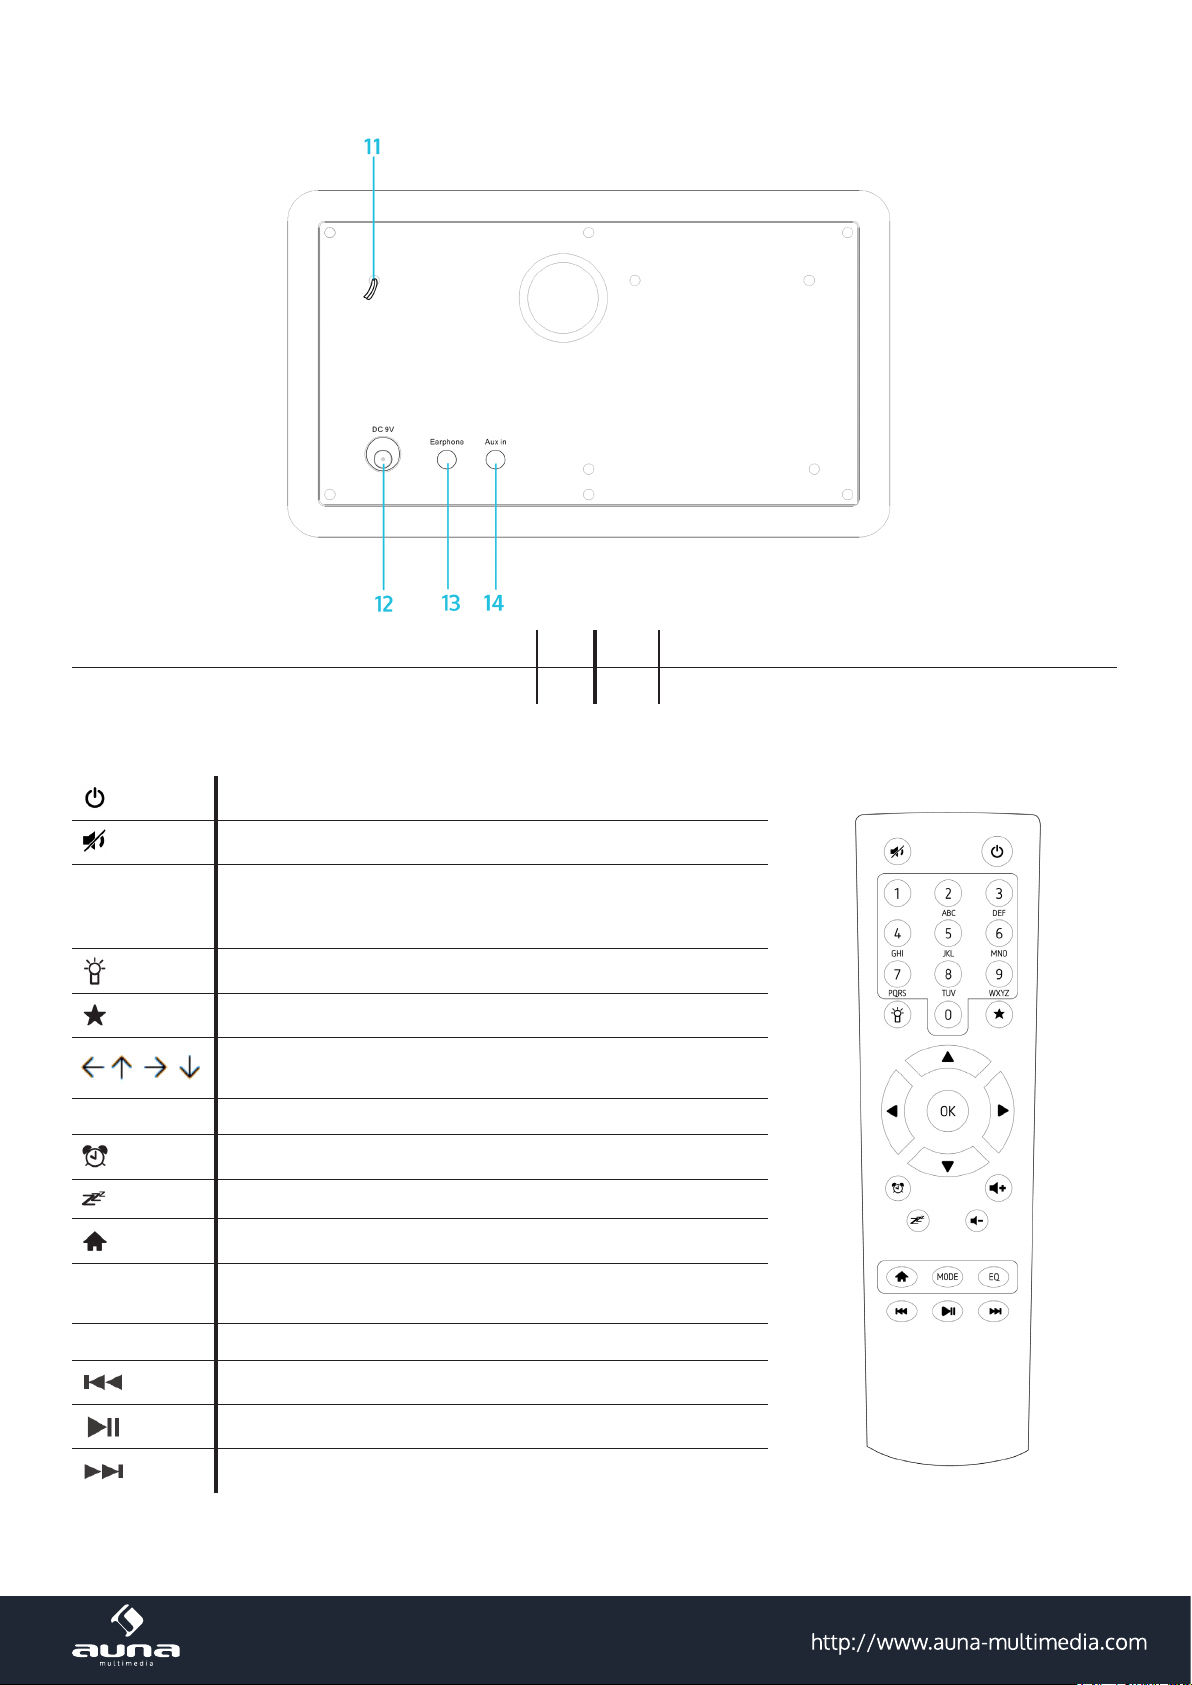
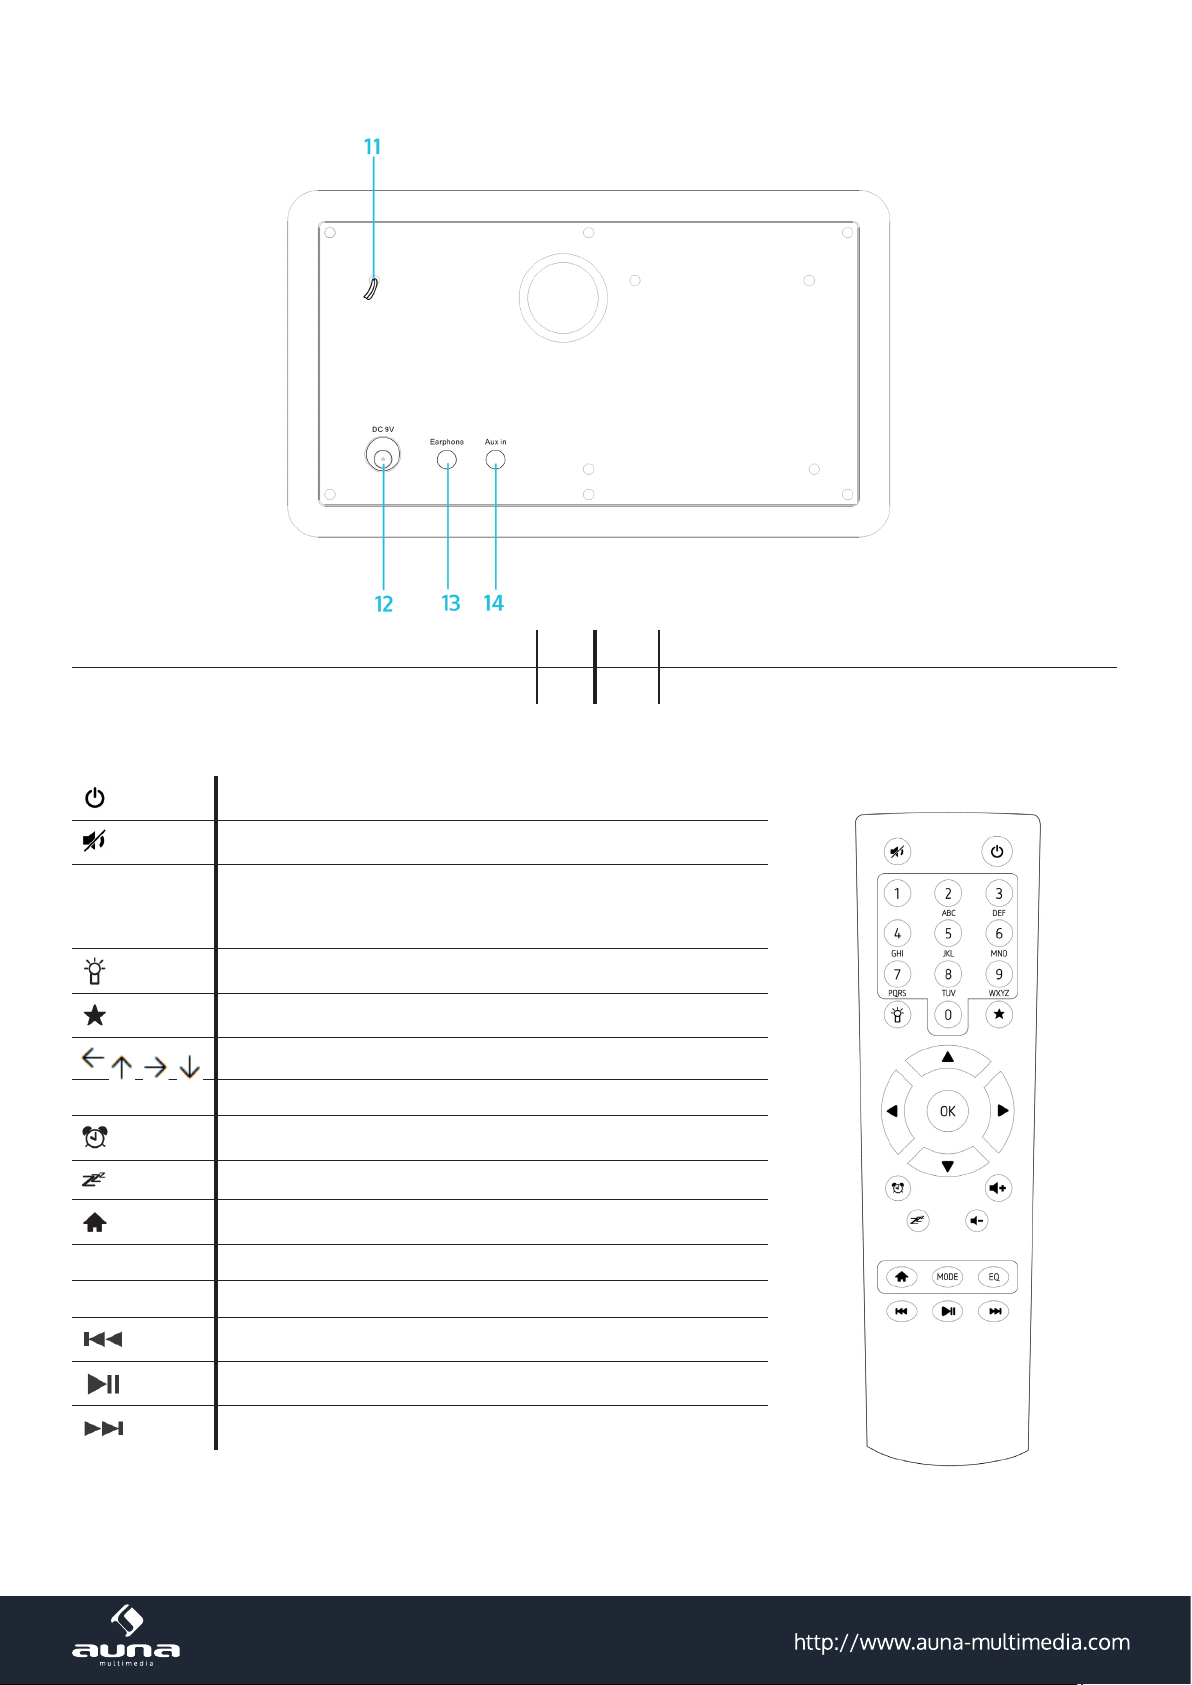
Rückseite
FM-Wurfantenne 11 13 Kopfhörer-Anschluss
Netzteilanschluss 12 14 AUX-IN
Fernbedienung
0 - 9
OK
MODE
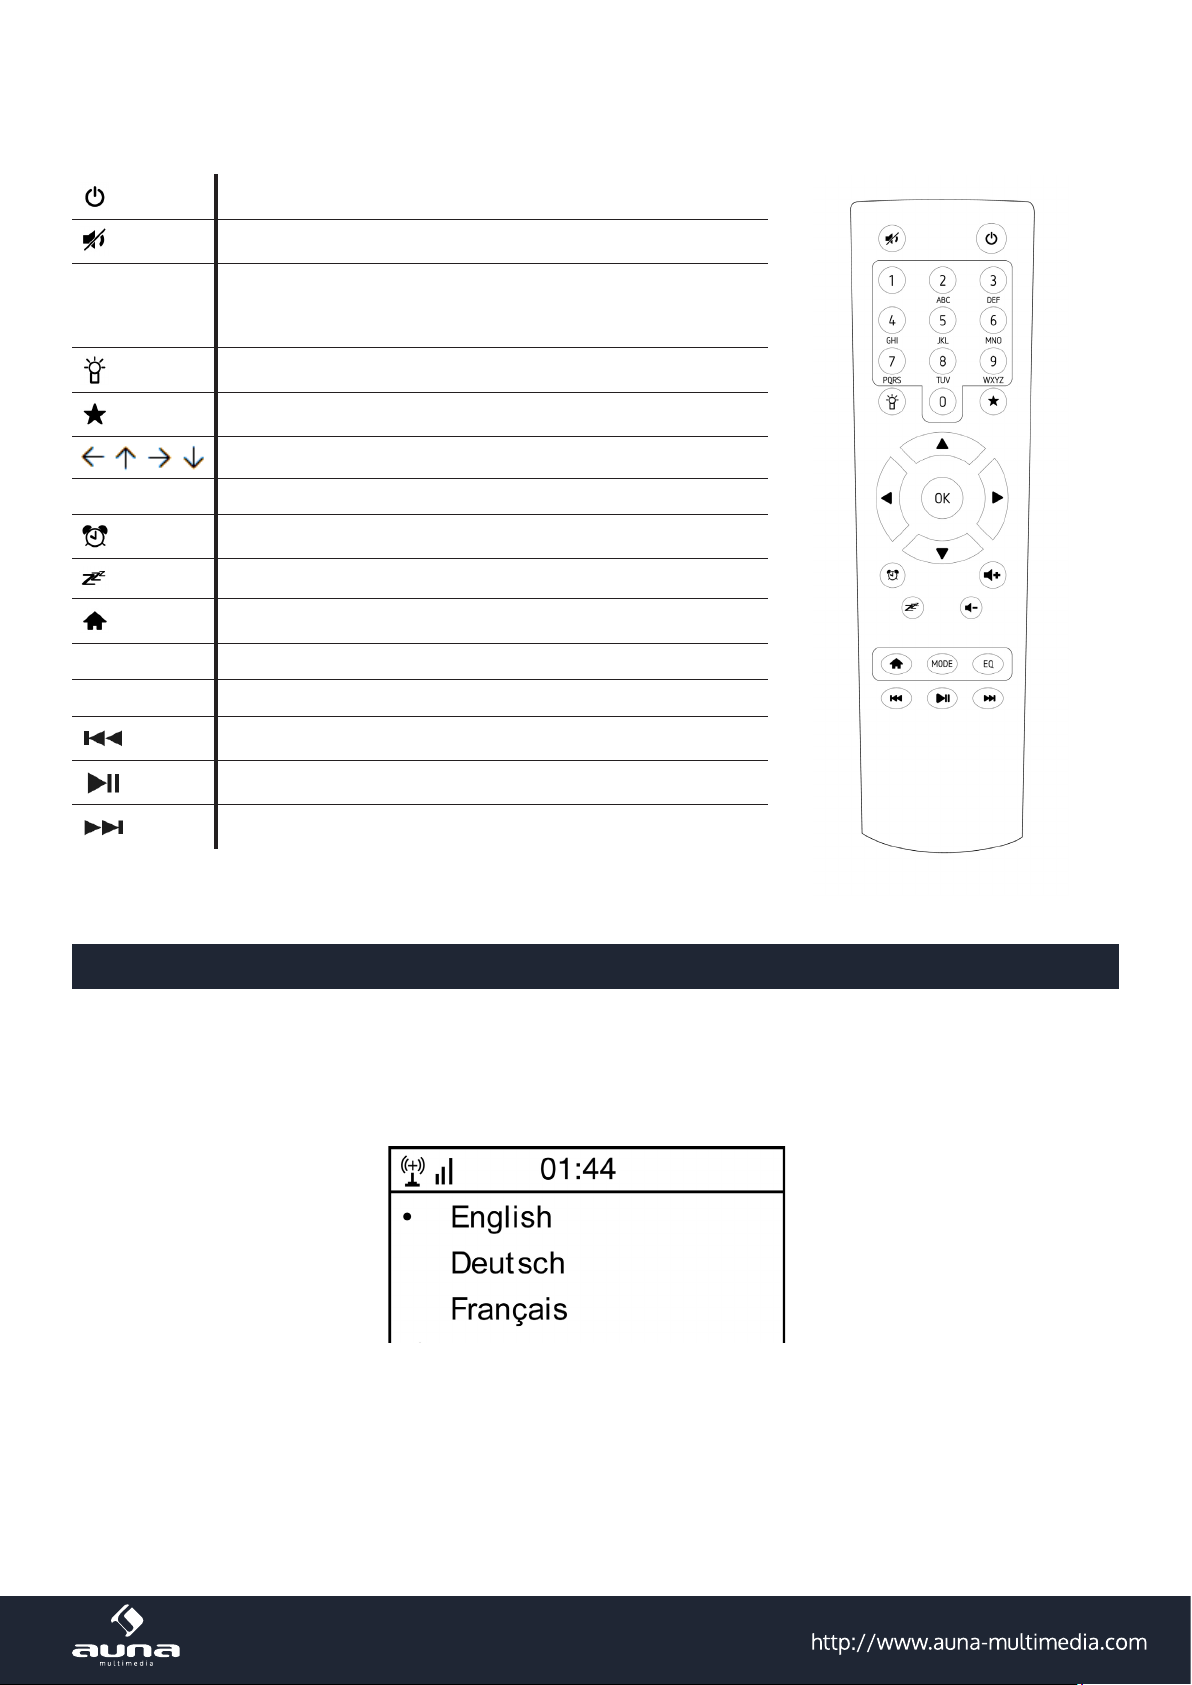
On / Standby
Stummschaltung
Ziern- und Buchstabentasten
(zur direkten Anwahl von Speicherplätzen und Eingabe von
WiFi-Passwörtern; „1“ mehrfach drücken für Sonderzeichen)
Display-Beleuchtung dimmen
Favoriten
Pfeiltasten
(zum Navigieren durch Listen und Menüs)
Wecker ein-/ausschalten / stellen
Sleep Timer einschalten
Zum Hauptmenü
Umschalten zwischen den Betriebsmodi FM, Internet-Radio,
Media-Player
EQ Equalizer
Zurück
Play/Pause
Vor
5
Page 6

Erste Inbetriebnahme
Verbinden Sie das Gerät mit dem Netzteil mit einer Steckdose. Das Display leuchtet auf und begrüßt Sie mit „Welcome“. Sie haben daraufhin die Möglichkeit, eine Menüsprache auszuwählen. Wählen Sie mit den Pfeiltasten und
bestätigen Sie Ihre Auswahl mit OK.
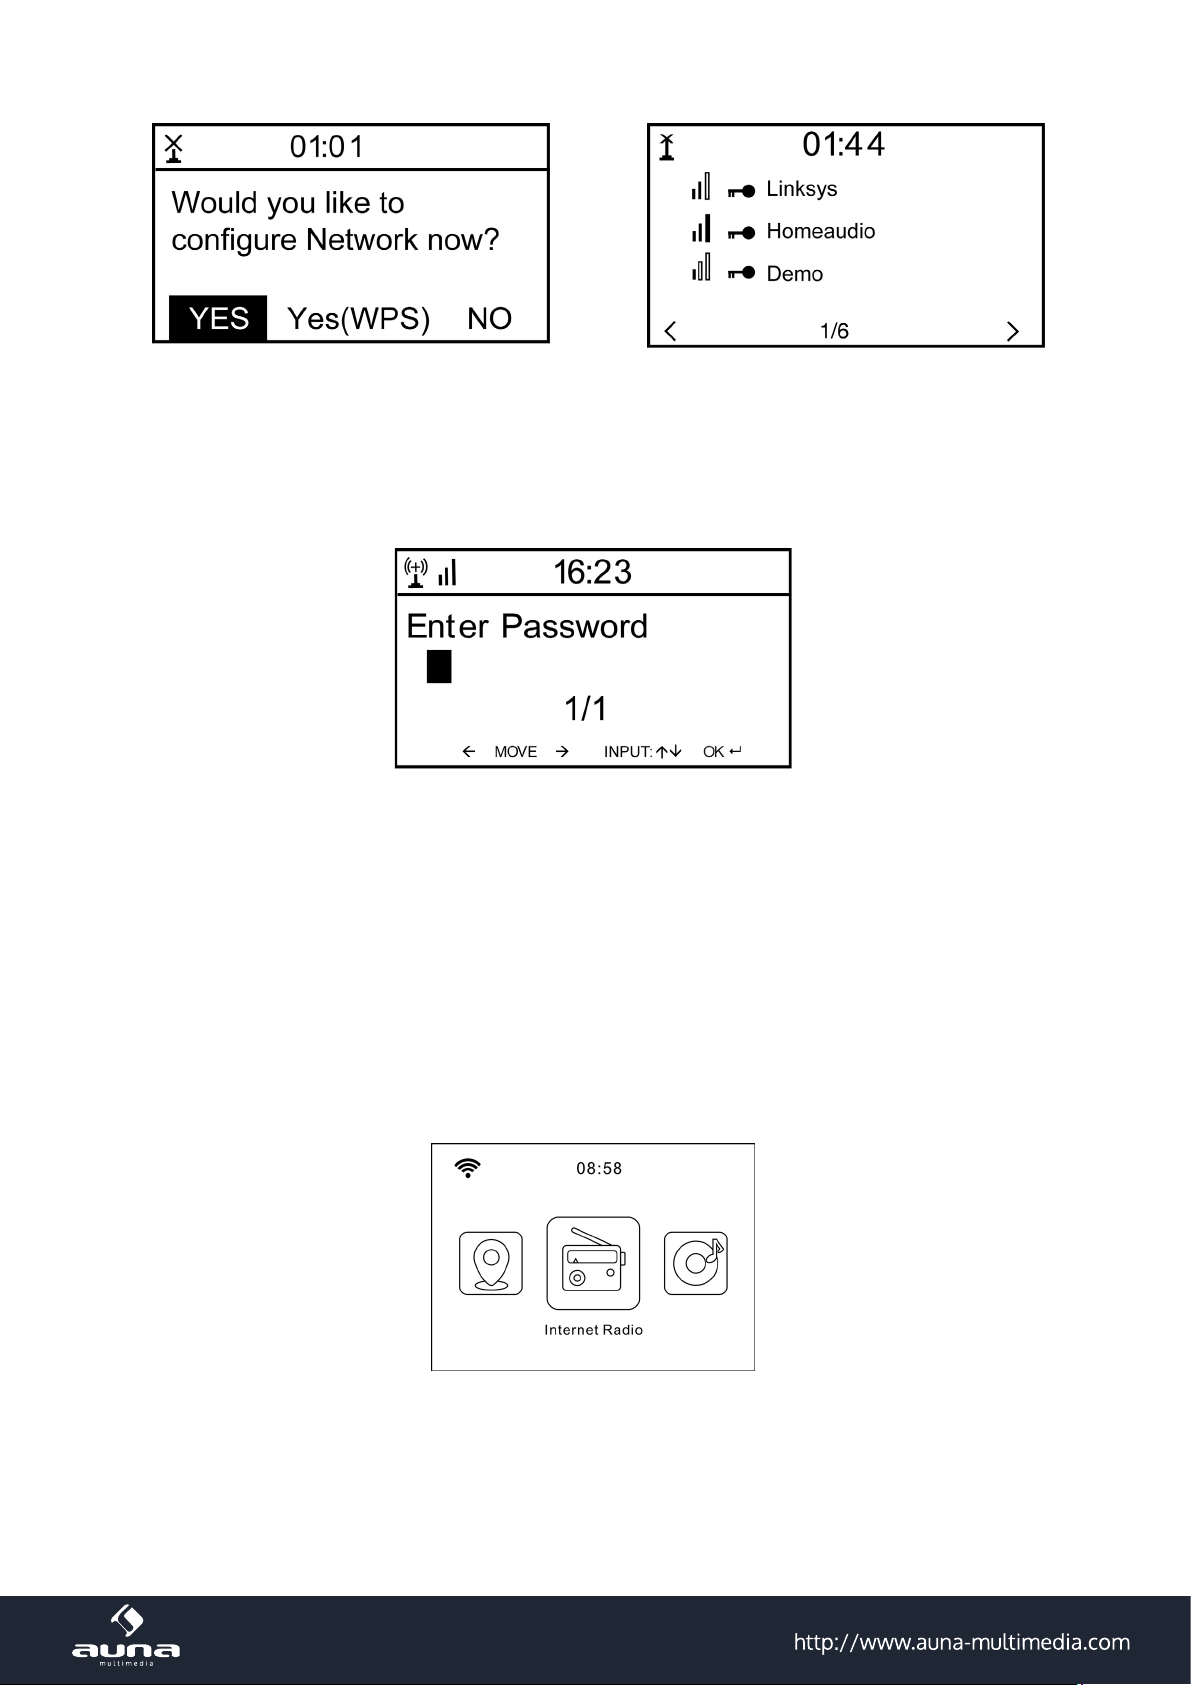
Das Gerät fragt Sie als nächstes, ob es sich beim Einschalten automatisch in ein gespeichertes W-Lan einklinken soll.
Es wird empfohlen, „YES“ zu wählen um zu bestätigen.
Einrichten des W-Lan
Der folgende Bildschirm erscheint. Wählen Sie „YES“, um das Gerät für ein vorhandenes W-Lan einzurichten. Wählen
Sie „YES [WPS]“, falls Ihr Router WPS unterstützt. Das Gerät beginnt mit der Suche nach vorhandenen Netzwerken.
Dies kann einen Moment dauern. Gefundene Netzwerke werden in Listenform angezeigt:
Wählen Sie den entsprechenden Router aus der Liste. Geben Sie nach Auorderung den Netzwerkschlüssel (Passwort)
ein (Ziern- und Buchstabentasten auf der Fernbedienung, per Dial/Enter oder mit LEFT/RIGHT sowie SELECT).
Den erfolgreichen Verbindungsaufbau mit Ihrem W-Lan bestätigt das Gerät mit der Anzeige „Network OK“. Dann wird
das Hauptmenü angezeigt:
6
Page 7
Internet-Radio
Wählen Sie Internet-Radio aus den Möglichkeiten im Hauptmenü. Sie haben die Auswahl zwischen verschiedenen Optionen. Um gleich zu hören, wählen Sie „Radiosender/Musik“ und suchen nach Ihrem gewünschten Sender.
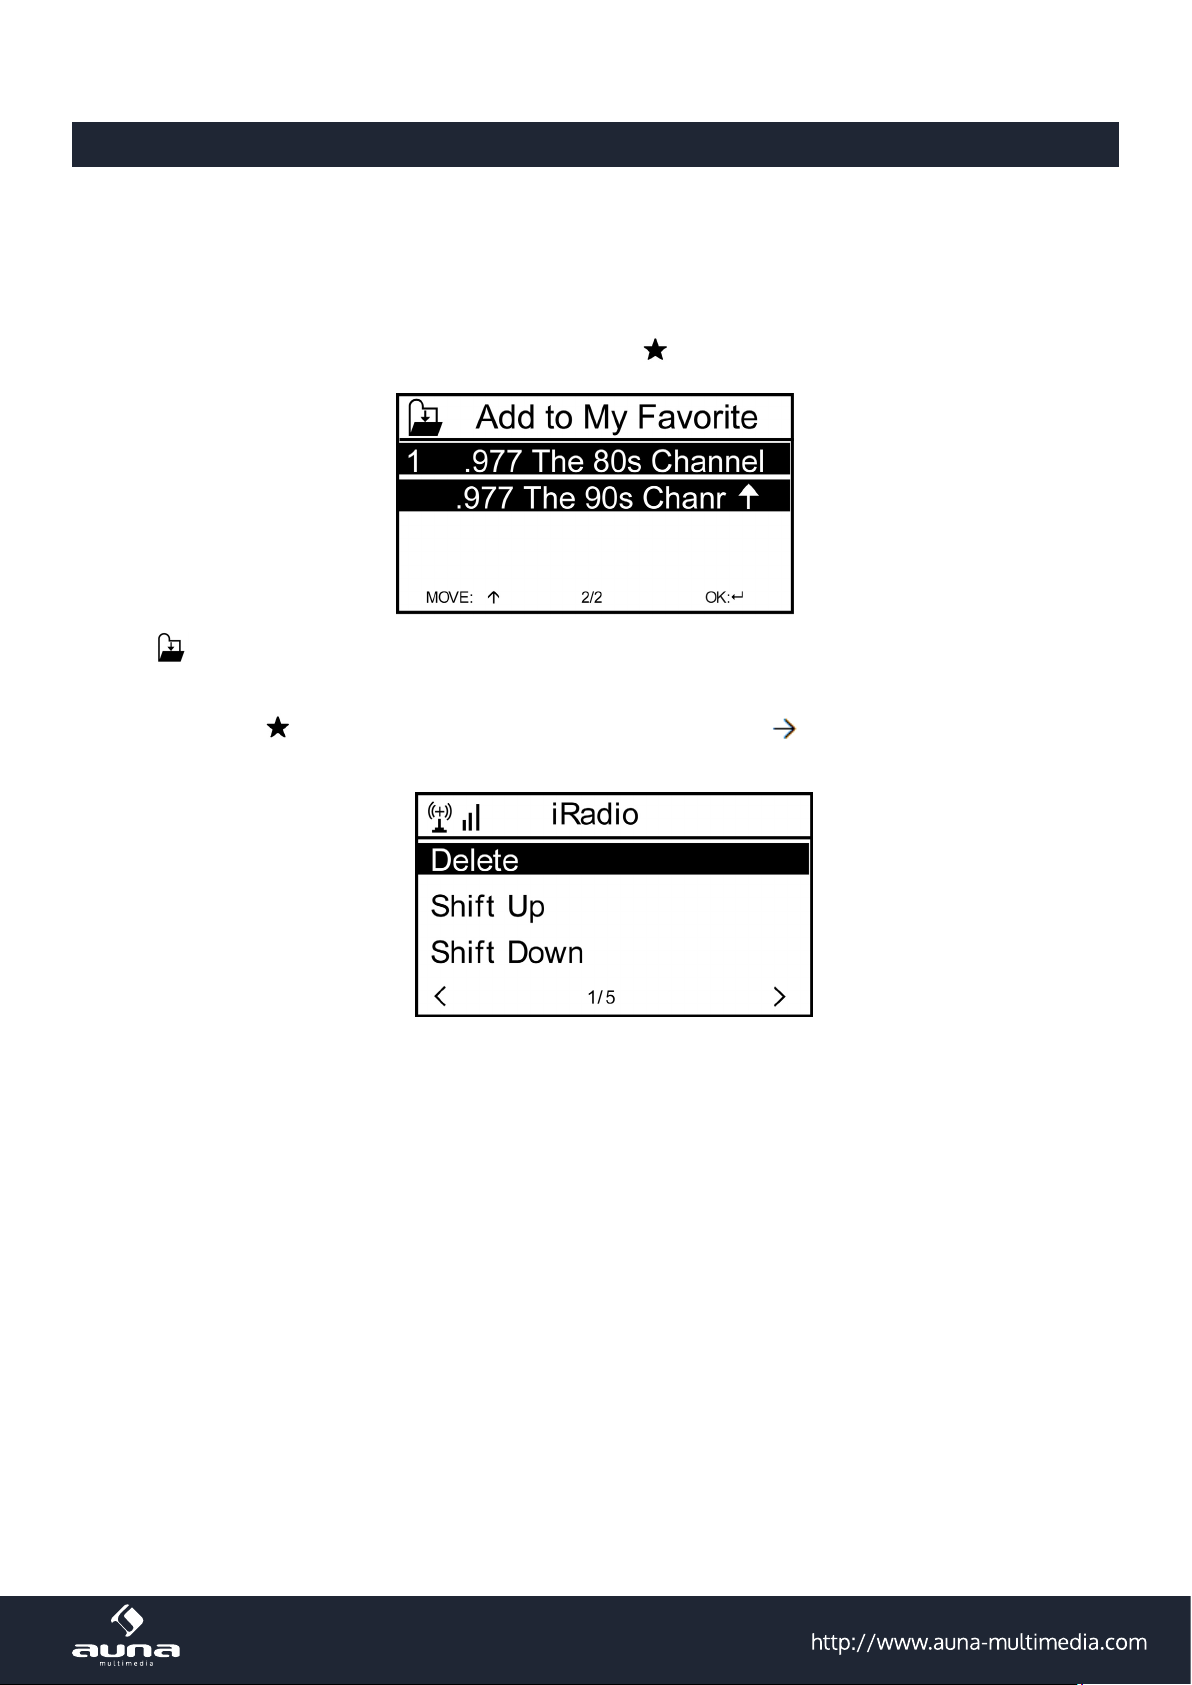
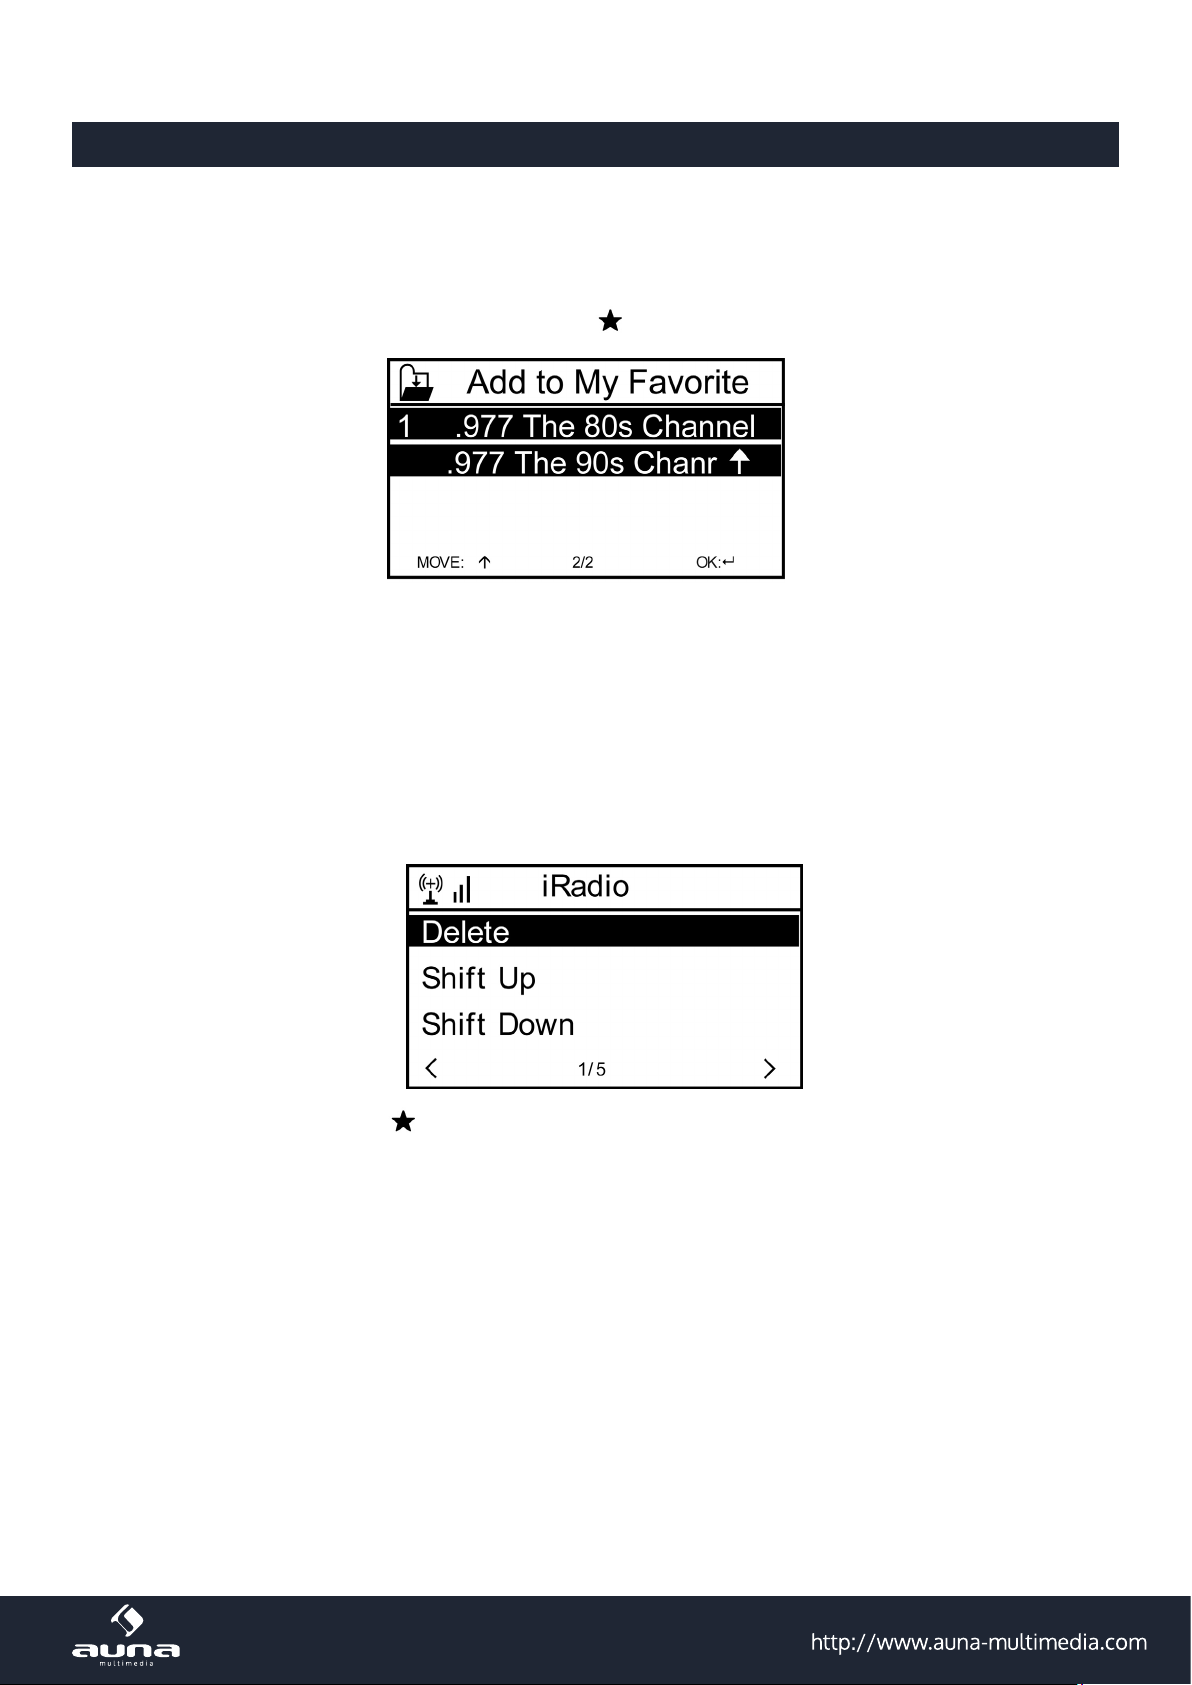
Meine Favoriten
Zeigen Sie die Liste der zuvor als Favoriten gespeicherten Sender an. Um einen Sender als Favoriten abzuspeichern,
halten Sie beim Abspielen des gewünschten Radiosenders die -Taste auf der Fernbedienung gedrückt, bis dieser
Bildschirm erscheint:
Das Icon
bis zu 250 Presets speichern.
Mit kurzem Druck auf können Sie die Favoritenliste bearbeiten. Drücken Sie , um die folgenden Optionen für den
jeweilig ausgewählten Sender aufzurufen:
Wählen Sie DELETE (um den ausgewählten Sender von der Liste zu entfernen), SHIFT UP/DOWN (um den ausgewählten Sender innerhalb der Liste zu verschieben) oder RENAME (um den angezeigten Namen des ausgewählten Senders
ändern). Drücken Sie PLAY, um den ausgewählten Sender abzuspielen.
Bitte beachten Sie: Die Presets 1 - 5 sind feste Speicherplätze, die nicht vom Nutzer belegt werden können.
Radiosender/Musik
Gefundene Sender werden hier nach den Gesichtspunkten „Weltweite Top 20“, „Genre“, „Land/Region“ sowie „Empfehlungen“ in entsprechenden Untermenüs angezeigt.
zeigt an, dass der Sender gespeichert wurde. Die Favoriten werden alphabetisch geordnet. Sie können
Lokale Stationen: Liste der lokal verfügbaren Sender
Zuletzt gehörte Sender: Liste der zuletzt gehörten Sender
Service: Geben Sie hier unter „Sender suchen“ den Namen eines gewünschten Radiosenders ein, um gezielt nach
diesem zu suchen. Wenn Sie bereits eine URL zur Hand haben, geben Sie diese unter „Neuen Sender hinzufügen“ ein.
Sobald Sie einen Sender abspielen, wird (falls vorhanden) ein Icon des Senders übermittelt und auf dem Display angezeigt.
7
Page 8

FM
Wählen Sie im Hauptmenü oder per MODE-Taste auf dem Gerät oder der Fernbedienung FM, um in den FM-Radiobetrieb zu wechseln
Automatischer Sendersuchlauf
Drücken Sie auf DIAL/SELECT, um einen automatischen Sendersuchlauf auszulösen. Das Gerät scannt die FM-Frequenzen und speichert automatisch die Sender mit der besten Empfangsqualität auf den 20 zur Verfügung stehenden
Speicherplätzen ab.
Der Sendersuchlauf kann einen Moment dauern.
Manuelle Sendersuche
Nutzen Sie die Pfeiltasten und bzw. LEFT und RIGHT am Gerät, um automatisch den nächsten empfangbaren
Sender im Frequenzband zu suchen. Nutzen Sie die Pfeiltasten und , um manuell in 0,05-MHz-Schritten durch
das Frequenzband zu blättern.
Senderspeicher
Um den aktuell spielenden Sender zu speichern, halten Sie gedrückt. Wählen Sie mit den Pfeiltasten und
den gewünschten Speicherplatz in der Liste aus und bestätigen Sie mit OK auf der Fernbedienung bzw SELECT am
Gerät. Um die Liste der gespeicherten Sender abzurufen, drücken Sie kurz auf . Wählen Sie mit den Pfeiltasten den
gewünschten Sender aus und spielen Sie ihn mit PLAY ab.
AUX-IN
Schließen Sie externe Audioquellen wie MP3-Player, Smartphones, Tablets oder ähnliches mit einem Audiokabel am
AUX-Eingang an der Rückseite des Geräts an. Wählen Sie im Hauptmenü oder per MODE-Taste den AUX-Modus aus.
Drehen Sie die Lautstärke am externen Gerät auf und regeln Sie am Radio nach.
DLNA
Das IR-150 unterstützt DLNA. Stellen Sie dazu sicher, dass das Gerät im selben Netzwerk angemeldet ist wie Ihr DLNAGerät. Wenn Sie es von dort suchen, wird es als AirMusic angezeigt. Bitte konsultieren Sie Handbücher und Hilfedateien Ihres DLNA-Streaming-Geräts für weitere Details. Bitte beachten Sie: Die DLNA-Funktion ist mit Android-Geräten
kompatibel. Apple-Geräte werden nicht unterstützt.
Media-Center
Mit der Music-Player-Funktion können Sie Ihre Musik-Bibliothek vom Computer über das lokale Netzwerk streamen. Es
können MP3-, AAC-, WMA- sowie FLAC-Dateien gestreamt werden. Um dies zu ermöglichen, geben Sie die entsprechenden Ordner auf Ihrem Rechner im Netzwerk frei.
UPnP erlaubt Ihnen, die auf Ihrem Rechner gespeicherte Musik von einem externen Gerät wie dem IR-150 nach Kategorien zu durchsuchen oder zu ltern. Voraussetzung dafür sind durchgängig getaggte (mit ID3-Tag versehene) Dateien
und ein geeignetes Server-System, also zum Beispiel ein PC mit Windows Media Player 11 (oder höher). Folgen Sie
diesen Schritten:
• Vergewissern Sie sich, dass der PC sowie das Radio im selben Netzwerk angeschlossen und registriert sind.
• Önen Sie den Windows Media Player und fügen Sie die Dateien und Ordner zu der gewünschten Bibliothek hinzu.
• Aktivieren Sie Medienstreaming (Medienbibliothek -> Streamen -> Medienstreaming aktivieren).
• Stellen Sie sicher, dass das Radio Zugrisrechte hat, indem Sie es anwählen und „Erlauben“ klicken.
• Das IR-150 kann nun Medieninhalte von Ihrem Rechner streamen. Der UPnP-Service läuft als Hintergrundprozess,
8
Page 9

so dass der WMP gar nicht gestartet werden muss, um die Medienwiedergabe zu ermöglichen.
Um nun andererseits das IR-150 an die UPnP-Freigabe des Rechners zu koppeln, wählen Sie im Hauptmenü des Radios
Media Player -> UPnP aus. Schalten Sie in dem entsprechenden Untermenü (RIGHT) UPnP ein.
Das Gerät sucht nun nach verfügbaren UPnP Servern. Nach erfolgreichem Scan werden diese auf dem Display angezeigt. Wählen Sie den gewünschten Server aus und betätigen Sie mit OK auf der Fernbedienung bzw. SELECT am Gerät.
Der Rechner wird die Meldung ausgeben, dass ein Gerät versucht, sich mit dem UPnP Server zu verbinden. Önen
Sie „Media Sharing“ im Windows Media Player und klicken Sie im sich önenden Dialogfeld auf „Allow“ / „Erlauben“.
Um den Music Player aufzurufen, wählen Sie ihn mit MODE oder im Hauptmenü aus. Wählen Sie im Music Player Untermenü Shared Media und dann einen Computer mit geteilten Inhalten aus der Liste verbundener UPnP-Geräte (falls
Sie Medienstreaming auf mehreren Computern aktiviert haben).
Die Steuerung der Wiedergabe erfolgt über die konventionellen Pfeiltasten und PLAY/PAUSE, die Navigation über die
Pfeiltasten (auf der Fernbedienung) oder über DIAL/SELECT sowie LEFT/RIGHT an der Gerätefront.
9
Page 10
Informations-Center
Wetter-Informationen
Zeigen Sie hier Wetter-Informationen /-Vorhersagen an. Sie können die Anzeige auch zum Standby-Display hinzufügen. Drücken Sie dazu und bestätigen Sie mit SELECT / OK. Die aktuelle Uhrzeit sowie das Wetter werden nun (im
Wechsel nach jeweils 10 Sekunden) auf dem Standby-Display angezeigt. Lösen Sie den Wechsel alternativ mit SELECT
aus. Mit LEFT/RIGHT können Sie durch die Vorhersagen für die nächsten Tage blättern.
Finanz-Informationen: Anzeige von Börsen-Informationen
Systeminformationen: Anzeige der Firmware-Versionsnummer, MAC- und IP-Adressen
Einstellungen
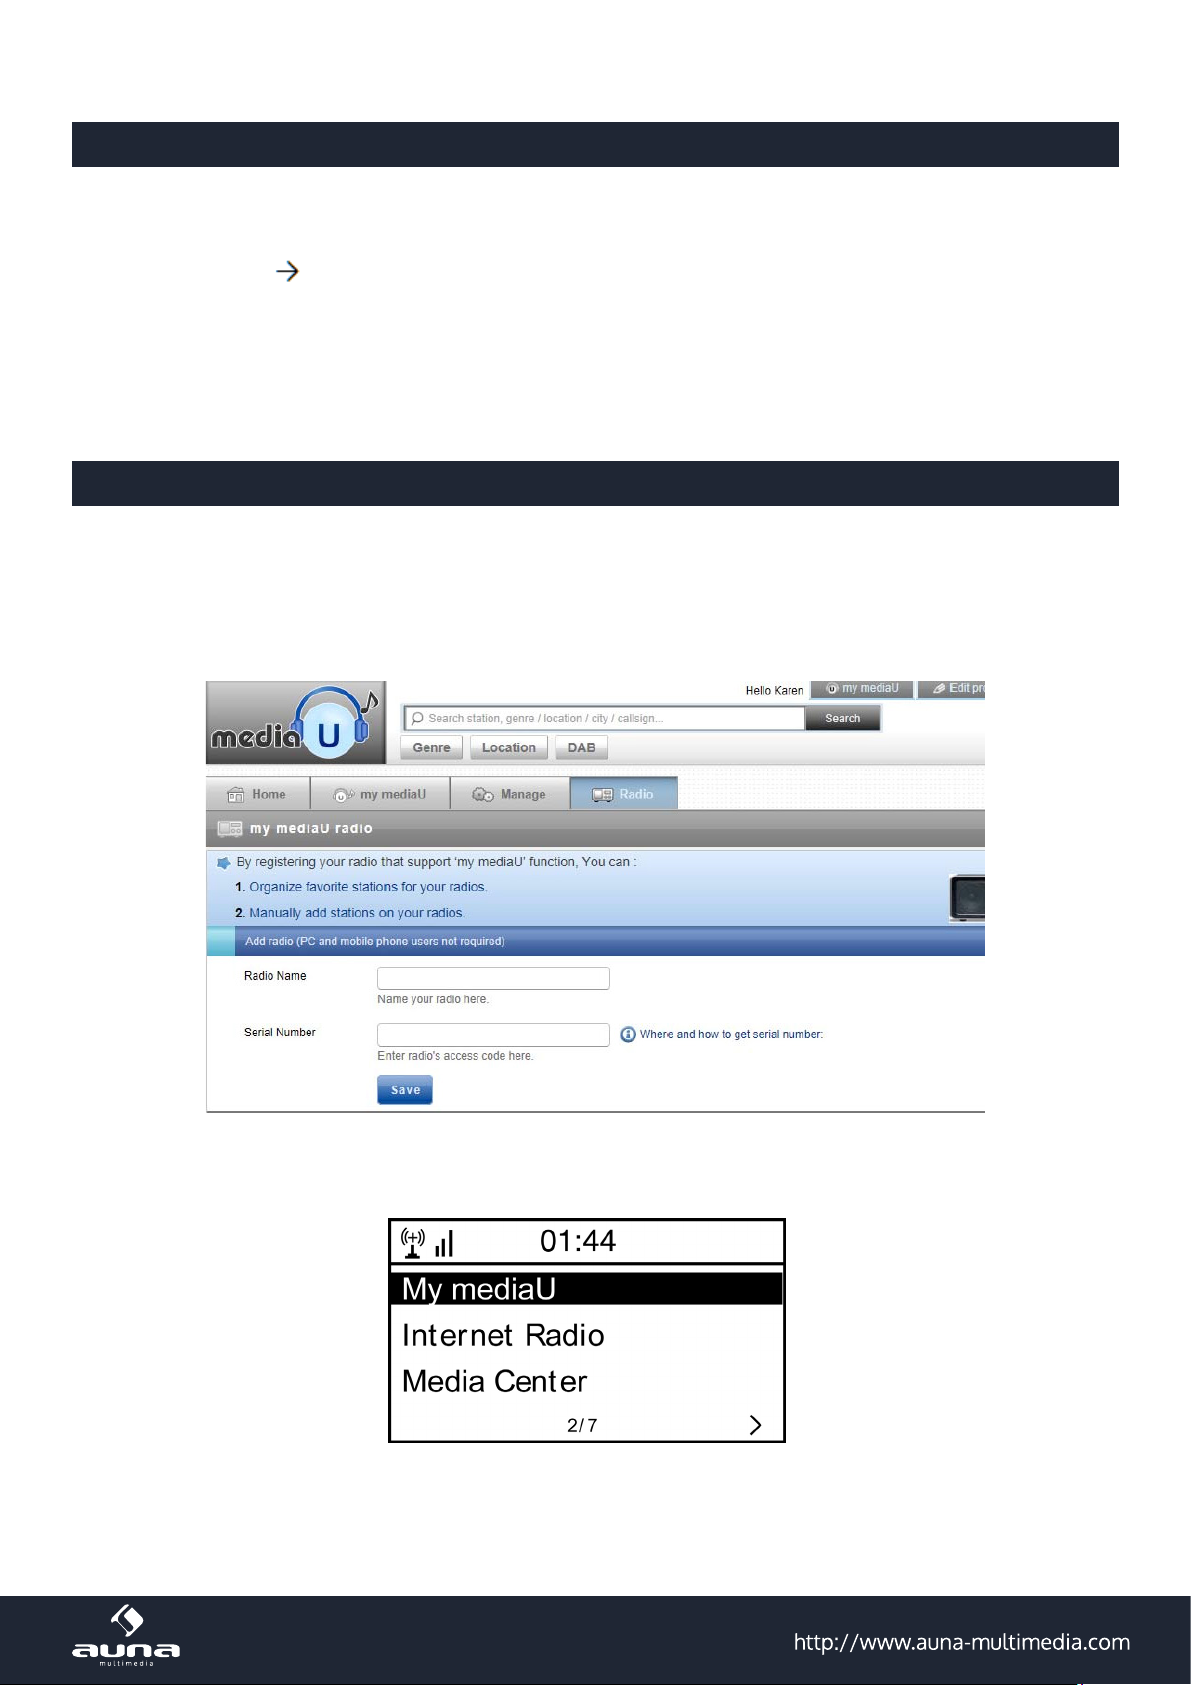
My MediaU Management
Verwalten Sie die Senderlisten bequem von Ihrem Rechner aus, indem Sie MediaU aktivieren (unter Einstellungen ->
My MediaU Management).
Besuchen Sie http://www.mediayou.net/ und registrieren Sie auf dem Portal Ihr Radiogerät. Folgen Sie den Auorderungen der Website.
Organisieren Sie nach erfolgter Anmeldung nun online Ihre Favoritenliste. Die Änderungen (bis zu 5 Nutzer können
sich mit der Seriennummer des Radios registrieren) werden mit dem IR-150 synchronisiert.
10
Page 11

Netzwerk
• Funknetz-Einstellung: Wählen Sie, um nach verfügbaren W-LANs zu scannen und diese als Liste anzuzeigen.
• Funknetz (WPS PBC): Wählen Sie, um nach verfügbaren WPS aktivierten Netzwerken zu scannen.
• Manuelle Konguration: Stellen Sie DHCP und SSID manuell ein oder löschen Sie die aktuelle Netzwerkverbin-
dung.
• Netzwerk prüfen beim Anschalten: Aktivieren Sie, um bei jedem Neustart des Geräts automatisch mit dem letzten
genutzten W-LAN zu verbinden.
Datum & Zeit
Stellen Sie hier die Uhrzeit sowie das aktuelle Datum ein. Nutzen Sie die Pfeiltasten (oben / unten), um die Werte zu
verändern sowie die Pfeiltasten (rechts/links), um die Cursorposition zu verändern.
Einstellungen des Zeitformats: 12std / 24std;
Einstellungen des Datumformats: JJ/MM/TT, TT/MM/YY oder MM/TT/JJ
DST = Sommer/Winterzeit aktivieren/deaktivieren
Wecker
• Aktivieren / deaktivieren Sie Wecker1 und/oder Wecker2. Folgen Sie jeweils der Menüführung, um das Wiederholungsintervall (z.B. täglich / nur an bestimmten Tagen), die Uhrzeit sowie den Weck-Typ (Ton/Melodie/Internet
Radio/FM) auszugwählen.
• Schlummer-Wecker: Halten Sie einen „Power Nap“ und stellen Sie eine bestimmte Minutenzahl ein. Überspringen Sie so die Uhrzeit-Einstellungen der Optionen Wecker1/2..
• Wecker-Lautstärke: Stellen Sie hier die Wecker-Lautstärke ein.
Sprache
Wählen Sie zwischen Englisch, Deutsch, Französisch, Niederländisch, Russisch, Schwedisch, Norwegisch, Dänisch oder
Finnisch als Menüsprache.
Dimmer
Dimmen Sie hier das Display. Wählen Sie Dimm-Level für den Energiesparmodus (wird nach einigen Minuten ohne
Operation aktiviert) und den normalen Nutzungsmodus.
Energie Verwaltung
Stellen Sie hier die Dauer ein, nach der sich das Gerät automatisch in den Standby-Modus begibt, wird es nicht benutzt.
Sie können zwischen 5, 15 und 30 Minuten wählen oder die Funktion abschalten.
Schlaf Timer
Stellen Sie den Schlaftimer auf 15, 30, 60, 90, 120, 150 oder 180 Minuten. Nach Ablauf der gewählten Zeitspanne schaltet das IR-150 automatisch in den Standby-Modus.
11
Page 12

Zwischenspeicher (Buering)
Legen Sie die Mindest-Buering-Zeit auf 2, 4 oder 8 Sekunden fest. Eine längere Zwischenspeicher-Zeit kann bei einer
langsamen oder störungsanfälligen Netzwerk- oder Internetverbindung ein stabileres Streaming ermöglichen.
Wetter
Stellen Sie die Wetter-Anzeige beim Standby-Bildschirm, die Temperatureinheit (°C oder °F) sowie Ihre Region ein.
FM-Einstellung
Stellen Sie Stereo/Mono-Betrieb ein und wählen Sie Ihre Region aus.
Lokale-Station-Einstellung
Das Gerät ndet verfügbare lokale Radiosender automatisch und zeigt diese unter dem entsprechenden Punkt in Internet Radio an. Wählen Sie hier „Manuell einstellen“, um die lokalen Sender einer anderen Region einzustellen falls
gewünscht.
Wiedergabe-Einstellung
Wählen Sie hier zwischen den Wiedergabe-Modi „Wiederholen alle“ (wiederholt beim UPnP-Streaming alle Dateien im
Ordner), „Wiederholen eins“ (wiederholt den aktuellen Titel) oder „Zufällige“ (spielt die verfügbaren Titel in zufälliger
Reihenfolge ab).
DLNA-Einstellung
Ändern Sie hier den Namen des Geräts für die Anzeige bei DLNA-Verbindungen.
Equalizer
Wählen Sie aus acht verschiedenen EQ-Voreinstellungen (Normal, Mittig, Jazz, Rock, Soundtrack, Klassik, Pop, Nachrichten).
Fortsetzen der Wiedergabe beim Anschalten
Wählen Sie hier „An“, damit das Gerät bei jedem Neustart den jeweils zuletzt gehörten Sender / die zuletzt gehörte
Musikquelle wieder (und weiterhin) abspielt.
Software-Update
Informationen zu verfügbaren Upgrades der Firmware können hier eingesehen werden. Installieren Sie verfügbare
Software Updates.
Auf Werkseinstellung zurücksetzen
Setzen Sie das Gerät zurück in den Ursprungszustand. Alle Sender- und Favoritenlisten (sofern lokal gespeichert) sowie Einstellungen werden gelöscht. Das Gerät springt anschließend automatisch zur Sprachauswahl und den W-LANEinstellungen.
12
Page 13

Problem Vorgehen / Ursachen
Die W-LAN-Verbindung kann nicht
etabliert werden.
Troubleshooting
• Stellen Sie sicher, dass das Radio und ein mit dem Netzwerk verbundener Rechner (der eine funktionierende Internetverbindung hat), im selben Netzwerk angemeldet sind.
• Ist ein DHCP-Server verfügbar oder haben Sie eine statische IP-Adresse
eingegeben?
• Ist eventuell eine Firewall so eingestellt, dass ausgehende Ports blockiert sind?
• Manche Access Points / Repeater / Router könnten so eingestellt sein,
dass nur Geräte mit registrierter MAC-Adresse verbunden werden.
Schauen Sie im Handbuch Ihres W-LAN-Equipments nach und fügen Sie
die MAC-Adresse des Radios gegebenenfalls zur „Erlaubt“-Liste des Access Points hinzu.
• Stellen Sie sicher, dass Sie das richtige Passwort (bei verschlüsselten
/ gesichterten W-LANs) eingegeben haben. Achten Sie auf die korekte
Schreibweise.
• Falls Ihr W-LAN „versteckt“ ist (eine mögliche Einstellung bei vielen Routern), geben Sie den Netzwerknamen manuell im IR-150 ein. Gehen Sie
dazu ins Einstellungsmenü -> Netzwerk -> Manuelle Konguration ->
Funknetz -> SSID eingeben.
Das Radio ist mit dem Internet ver-
bunden, aber einige Sender werden
nicht abgespielt.
Sie können keine UPnP Geräte n-
den, oder der gesuchte Rechner wird
nicht angezeigt.
Sie können keinen Ordner für UPnP
freigeben, weil die Funktion gar nicht
verfügbar ist (grau).
Scan-Error
Endlos-Buering
• Vielleicht liegt der Sender in einer anderen Zeitzone und sendet im Moment gar nicht.
• Zu viele User versuchen, den Sender zu erreichen und dessen Kapazität
/Bandbreite reicht nicht aus.
• Der Link ist abgelaufen / existiert nicht mehr.
• Der Sender existiert nicht (mehr).
• Sie sind nicht im Netzwerk angemeldet (siehe oben).
• Es ist eine Firewall installiert und so eingestellt, dass geteilte Dateien
nicht für externe Geräte verfügbar sind.
• Das Radio ist nicht in der selben Arbeitsgruppe oder Domäne wie der
entsprechende Rechner angemeldet.
• Aktivieren Sie Filesharing.
• Es ist möglich, dass Fehler auftreten, wenn das IR-150 Ordner auf einem
PC scannt, zum Beispiel weil die Windows File Sharing Applikation abläuft. Verbinden Sie den PC per Kabel mit dem Netzwerk, um die Scan.
Geschwindigkeit deutlich zu erhöhen.
• Bei einer hohen Rate an Streaming-Abbrüchen oder einer unsicheren
Verbindung kann es vorkommen, dass das IR-150 gar nicht mehr aus
dem „buering“, also dem Zwischenspeichern des Streams herauskommt. Überprüfen Sie die Netzwerk-, Modem- und Internetverbindung
und setzen Sie sich gegebenenfalls mit Ihrem Internet Service Provider
in Verbindung.
13
Page 14

Hinweise zur Entsorgung
Elektroaltgeräte
Bendet sich die diese Abbildung (durchgestrichene Mülltonne auf Rädern) auf dem Produkt, gilt
die Europäische Richtlinie 2002/96/EG. Diese Produkte dürfen nicht mit dem normalen Hausmüll
entsorgt werden. Informieren Sie sich über die örtlichen Regelungen zur getrennten Sammlung
elektrischer und elektronischer Gerätschaften. Richten Sie sich nach den örtlichen Regelungen und
entsorgen Sie Altgeräte nicht über den Hausmüll. Durch die regelkonforme Entsorgung der Altgeräte werden Umwelt und die Gesundheit ihrer Mitmenschen vor möglichen negativen Konsequenzen
geschützt. Materialrecycling hilft, den Verbrauch von Rohstoen zu verringern.
Konformitätserklärung
Der Hersteller dieses Produktes ist die Chal-Tec GmbH, Wallstraße 16, 10179 Berlin, Deutschland.
Dieses Produkt entspricht den folgenden Europäischen Richtlinien:
2004/108/EG (EMV)
2011/65/EU (RoHS)
14
Page 15

Dear Customer,
Congratulations on purchasing this product. Please read and follow these instructions, in order to avoid damaging
the item. We do not cover any damages that may arise from improper use of the item or the disregard of the safety
instructions.
Technical Data
Article no. 10028443, 10028444
Power supply Netzteil (Eingang: 100-240V ~50Hz; Ausgang: 9V, 1,5A)
FM Frequency range 87.5 - 108MHz
Supported network prole and encryption IEEE802.11b/g/n; WEP/WPA/WPA2
Dimensions 235 x 148 x 135mm
Important Safety Instructions
• Read all instructions before using.
• Do not place on or near a hot gas or electric burner or in a heated oven.
• To protect against a re, electric shock or personal injury, do not immerse cord, electric plugs or device in water
or other liquids.
• Do not expose the appliance to extreme temperatures. The appliance shall be used in moderate climates.
• Disconnect the appliance from the power source if it is not going to be used for a long time, if there is a thunder-
storm or if it isn‘t working properly.
• The use of attachments that are not recommended by the appliance manufacturer may result in re, electric shock
or personal injury.
• Do not open the unit by removing any cover parts. Do not attempt to repair the unit. Any repairs or servicing should
be done by qualied personnel only.
• Only qualied persons may perform technical work on the product. The product may not be opened or changed.
The components cannot be serviced by the user. The manufacturer is not responsible for any radio or TV interference caused by unauthorized modications.
Controls
Front
Speaker 1 6 MENU
Power On / O
MODE 3 8 Infrarot-Sensor
PRESET 4 9 RIGHT (rechts)
Display 5 10 Dial/Select (Auswahl) / VOLUME (Lautstärke)
Back
FM-Wurfantenne 11 13 Kopfhörer-Anschluss
Netzteilanschluss 12 14 AUX-IN
2 7 LEFT (Links)
15
Page 16
Front
Back
16
Page 17
Remote Control
0 - 9
On / Standby
Mute
Numpad with Characters
(for the direct selection of presets and for the input of pass
phrases. Special characters: push „1“ repeatedly)
Dimmer
My favourites
OK
MODE Change between the modes FM, internet radio, media player
EQ Equalizer
Arrows for the navigation in menus and lists
Alarms
Sleep timer
Go to main menu
Back
Play/Pause
Next
Initial Use
Plug the connector plug of the mains adaptor into the DC jack on the unit. Connect the other end of the adaptor to the
wall socket. Caution: Use only the main adaptor supplied with the radio. Connecting a power supply with a dierent
rating will cause permanent damage to the radio and may be hazardous.
The display on the front of the radio will light up and say „Welcome“. Then you can select your prefer language on the
radio.
It will ask you if you want to Enable the “Check Network” when Power on”, it is suggested to choose “Yes”. Then the
radio will always check the available WiFi network automatically.
17
Page 18
The screen above (left) will appear. You can choose Yes to proceed to search for the available WiFi network. If your
router has the WPS function, you can select the “Yes[WPS]” to proceed. It will then start scanning the network. After
the search is done, it will display a list of the available router (above right).
Choose your router from the list, enter the WEP(Wired Equivalent Privacy) or WPA(Wi-Fi Protected Access) code. If your
network is not congured to be with the WEP or a WPA code, the unit will connect to the router automatically.
Note: The encryption code would have been set up by the person who set up and congured your network.
Please refer to the “Remote control character list” for you to enter the passwords. Press the RIGHT button to go to the
next word, press LEFT to delete the wrong word you have entered.
If you want to enter the passwords on the radio main unit, you can use the Volume Dial rotary knob. Follow the steps
below:
- Rotate the knob to select the character
- Press the RIGHT button to go to the next entry
- After you nish the entries, push down the Rotary knob to conrm.
The radio will start connecting to the network.
After the router is connected successfully, it will show “Network OK” and display the menu screen:
18
Page 19
Internet Radio
Choose ‘Internet Radio’ from the menu, you can see dierent functions as below:
To start listening the worldwide radio stations, select “Radio Station/Music”,
My Favorites
This is to show the list of your Favorite stations which have been assigned to the presets. To preset a station: While you
are playing the favorite station, simply hold and press the key until the follow screen appears.
The folder icon will appear in the upper left corner of the display, indicating that the station is added to the radio preset.
The presets will be stored in ascending order. You can store up to 250 presets.
You can edit your Favorite list with the following options: Delete – To delete the selected station; Shift up/Shift down
– To shift the selected station to a particular ranking on the list; Rename – To rename the selected station; Play – press
and play the selected station
To do the edit, simply press the RIGHT (or the right arrow on the RC) button briey to enter the Preset station list.
Choose the radio station that you want to make with the above changes. Then press the Right key, it will enter into the
list with the options listed above. Then choose your desire action.
To recall a preset station Press the button and choose your desired station. Please note Preset 1-5 is reserved for
future use and cannot be preset for radio stations.
Radio Station / Music: Select this option to select your desired radio station by Category, Genere or Location.
Local Radio: If you want to access quickly the radio station located in your area, select this function and it will display
the list of the stations available in your area.
History: Show the radio stations that you have listened in the past.
Service: Contains the sub menus Search Stations (You can nd your desire radio station by entering the name of the
radio) and Add New Radio Station (If you cannot nd your desire station from the Radio station list and you have the
URL address, you can input the link here and add to your favourite list).
When the radio station is playing, the display will show a color image transmitted from the radio station.
19
Page 20

FM
Switch the radio to FM mode. The radio will auto scan from the lowest frequency to the highest frequency and store
the available FM stations.
Auto Scan
To do the Auto Scan, press the DIAL/SELECT button to start the scan. It will automatically store the available radio
station to the Presets.
Please note: When you are using the auto scan, the FM related function (such as stations switching, manual searching,
manual tune and gure stored) will not work until the auto searching is completed, and the second searching also will
be refused as well.
Manual Scan
If you want to do the scan manually, please follow the steps below:
• Press RIGHT (or the right arrow on the RC) to scan the next FM available station.
• Press LEFT to scan the previous FM available station.
• You can press Right / Left button to stop searching during the manual scan.
Manual Tune
If you want to tune up the radio station manually, please use the DIAL/SELECT button to tune up and down of the
frequency. The frequency will go up/down by each step of 0.05MHz. Press the UP/DOWN buttons on the remote controller to perform the manual tune.
FM Station Presets
To preset a station, press and hold the “PRESET“ button on the unit, or on the remote controller. It can store up to
20 preset stations. You can select the preset number you want to store the station by using the UP/DOWN buttons and
SELECT/OK to conrm.
To Recall a preset you can press the number buttons on the remote control or press PRESET/ button and enter the
station selecting menu. Use DIAL/SELECT or UP7DOWN to select FM stations 1-20 and press SELECT button to recall
the desired FM station.
Aux In
You can enjoy the music from other audio devices by connecting the audio cable to the AUX IN connector at the rear of
the unit, such as mobile phone, MP3 player, etc.
DLNA
The Internet radio supports DLNA. It allows you to stream music from other devices which has DLNA feature to listen
on this internet radio, provided that the Internet radio and other DLNA devices are under the same Wi-Fi network.
The radio will appear as “AirMusic” when you try to search it on other devices. If you want to change the name from
AirMusic to another, go to Conguration and DLNA setup to make the change.
Please note: The IR-150 DLNA feature is compatible and works with corresponding Android APPs. Apple devices
are not supported.
Media Center
UPnP (Universal Plug and Play)
You can stream music from the Networked device which supports UPnP function, allow sharing of the data and entertainment. For instance, most of the latest computer laptop supports UPnP, and you can stream the music from Win-
20
Page 21

dows Media Player application on the computer and listen on your radio.
• If your PC is running Microsoft Windows XP, then you can use Windows Media Player 11(WMP11) to act as your
UPnP( Universal Plug and Play) media server. (For Windows 7 or above, please download the correspond version
of Windows Media Player). Windows Media Player 11 may be downloaded from Microsoft’s website and install by
following the instructions detailed in its installation wizard.
• Once installed, Windows Media Player 11 will create a library from all the media les available to it on your PC. To
add new media les to the library, select’ File > Add to Library…> Advanced Options’, Click ‘Add’ and choose the
les you wish to add and click’ OK’.
• You will now need to connect your Internet radio to Windows Media Player 11 and congure it to allow the radio to
access your media library. In order to this, you will need to do the following:
• Go to the main menu of the radio, select <Media Player> -> <UPnP>.
• It will scan for all available UPnP servers . Note, this may take a few seconds for the radio to complete its scan
and before the scan has completed, the radio will display ‘[Empty]’. The radio will continue to display ‘[Empty]’
if no UPnP servers and found.
• After a successful scan. Select your UPnP server, by rotating the dial if there is more than one UPnP server, and
then press SELECT (note, your radio will display’ Access Denied’ at this stage)
• Your PC will now prompt you that a device has attempted to connect to your UPnP server. In order to allow the
radio to have access to the media les, you will need to click the ‘Library’ tab from Windows Media Player 11 and
select the <Media Sharing> item to open the ‘Media Sharing’ window.
Selecting ‘Media Sharing‘ for Windows Media Player 11:
• From the ‘Media Sharing’ windows , the radio will be listed as an unknown device. Click on the unknown device
listed, then click the ‘Allow’ button and then click ‘OK’. Allowing the Radio to Connect:
Note: When you are playing the music under UPnP, you are able to change the mode of playback via selecting Media
Player/Playback Mode.
21
Page 22

Information Center
Weather: View world wide weather forecasts.
• Add to Standby Display
Press RIGHT to display the “add to standby display”, then press SELECT to conrm.
“Current Date & Time” and “Current Weather” will be on alternation display every 10 seconds under the standby
mode if the weather forecast display is started.
Remark: In standby mode, you can also press “Enter” button for switching manually between “Current Date &
Time” and “Current Weather”, and you can press the arrow (LEFT/RIGHT) buttons to display the previous/next day
weather forecast.
Remark: The weather is just for reference only. It may have deviation to the actual weather.
Financial Information: View information of Stock Markets all over the world.
System Information: View information of the radio such as the version of rmware / WLan Mac / IP address etc.
Conguration
Manage my mediaU
You can customize your own favourite station list using your computer. First, enable “Manage my MediaU” on your
radio. Go to Conguration -> Manage my MediaU -> Enable. Then you will see “My mediaU” appear on the main menu.
On your computer, go to http://www.mediayou.net/web/index.php, this is the radio portal playing on your radio.
Register as member by selecting “Join now”. After you have become the member, then you can login and register your
radio. Select “Radio” on the following screen and do the radio registration.
You can then organize your own favourite stations or add any new station which is currently not found on the station
list. Once the changes are done, your radio will synchronize the changes immediately and you will nd your favourite
list under “My MediaU” on the radio menu.
It allows maximum 5 users to register with the same radio and you can switch to listen the favorite list under one user
at a time
22
Page 23

Network
• Wireless Network Conguration
Press “Enter” to scan for wireless network and list out.
Wireless Network Conguration (WPS): This is the option for you to use WPS function, which means you can set
the wireless without enter any passwords for Wi-Fi protected if your router has the function.
Manual Conguration: You can set the DHCP on or o, and enter the SSID as you known, or delete the connected
WiFi.
Check network when power on. This is set to enable or disable “Check network when power on”.
Date & Time: Current Date & Time setting: You can press UP/DOWN for parameter setting, and move cursor with
LEFT/RIGHT and press SELECT to conrm.
• Time Format setting: 12hours / 24hours
• Date Format setting: YY/MM/DD, DD/MM/YY or MM/DD/YY
• Daylight Saving Time (On / O)
• GMT: Set the currently time as GMT
Alarm Clock (Switch 2 separate alarms on/o)
• Alarm Clock types
You can select your favorite Alarm setting for every day, once or particular day in the week.
• Alarm Clock NAP function
If you would like to take a nap or need the Alarm in short time, you can use this function. You can select the time
from 5 minutes up to 120 minutes. No Snooze function available for the NAP alarm.
• Alarm Sounds setting (Beep/Melody/Internet Radio/FM) Please note: The NAP Alarm will only with beeping sound.
• When the Alarm Clock goes on, press any key except for “Power” button, to enter the “Snooze” mode. You can
press POWER ON/OFF to stop the ringing when the alarm goes on 5 minutes later again.
Remark. You can select any internet radio station or FM station as Alarm tone from the favorite station. When the
internet station doesn’t work in 1 minute, it will auto set into Beep.
Language: There are 9 Languages available: You can choose the language from English/German/French/Dutch/Danish/Norwegian/Russian/Swedish/Suomi.
Dimmer: You can adjust the backlight of the LCD with below settings:
• Power Saving: You can set the backlight to dim down when there is no operation for a certain time of period. There
are 20 levels of the backlight available.
• Turn on: You can adjust the backlight level for the operation mode, i.e. when you are operating the radio or checking on the menu.
• Dimmer Timer: You can select to dim down the backlight after certain time of period with no operation on the radio.
23
Page 24

Power Management
This function is to allow the radio to go to Standby if there is no internet signal received in order to save power. The
default setting is 30 minutes. When the radio does not receive any internet signal, the radio will go into Standby after
30 minutes. Other time frame for 5 minutes and 15 minutes are available.
Sleep Timer
You can set the timer to put the radio on standby after certain time elapsed, from 15 minutes to 180 minutes with the
step of every 15 minute.
You also can do the setting with the “Sleep” button from remote control, when you press “Sleep”, then you can see the
sleep timer on the top right corner of the display.
Buer: Select your preferred buering time.
Weather: Set the display of weather forecast on the standby mode, select your region and the temperature units (°C
/ °F)
FM Setup: Select Stereo or Mono for the FM and select the region of your location.
Local Radio Setup
The radio will detect your local area stations automatically and it will display under the “Internet radio” you will nd all
the stations under “Internet radio” -> “Local Radio”.
If you would like to change the Local area stations to other countries, you can choose “Manual setup” to make the
change.
Playback Setup: Select REPEAT ONE / REPEAT ALL / SHUFFLE
DLNA Setup
When the MS-60i radio is connected by other DLNA devices, the name of the radio will appear as “AirMusic”. This is
the name in default. You can change other name here as you desire.
Equalizer. Select your prefer music eect.
Software update
• Upgrade information will pop up on the display when there is an upgrade version available on the server.
• When there is an upgrade version available on the server, you can do the manual upgrade from the update menu.
Reset to default
You can do this factory reset to empty all of the settings and it comes back to default settings. Please note that all station presets, settings and conguration will be lost after performing the factory reset.
Remark: Playing is stopped when it comes back to default settings. The device will skip into the language setting automatically. After that it will turn to the internet settings.
24
Page 25

Problem Possible Reasons / Proceeding
If you have trouble connecting the
radio to your wireless network, these
steps may help to resolve the prob-
lem:
Troubleshooting
• Conrm that a Wi-Fi or Ethernet Wired connected PC can access the internet (i.e. can browse the web) using the same network.
• Check that a DHCP server is available, or that you have congured a
static IP address on the radio.
• Check that you rewall is not blocking any outgoing ports.
• Some access points may be set so that only equipment with registered
MAC addresses can connect to them. This is one possible cause of the
Internet Radio being unable to connect to the Wi-Fi network, and the
Internet Radio display will show Bad ESSID or key. To overcome this
problem you will need to add the Internet Radio’s MAC address to the
list of allowed equipment in your access point. The Internet Radio’s MAC
address can be found using the menu <Information Center ->System Information -> Wireless Info MAC address>. You will need to refer to the
guide for you Access Point in order to enter the Internet Radio as an allowed piece of equipment.
• If you have an encrypted network, check that you have entered the correct key or passphrase into the radio. Remember that text-format keys
are case sensitive.
• If your wireless network name(ESSID) is ‘Hidden’(a setting on the wireless access point), then you can either turn on the name, or you can
manually enter the name into the internet radio and media player, Select <Congure -> Network -> Manual Conguration-> Wireless -> Enter
ESSID>. Conrm if the Network is encrypted, e.g. requires a WEP or WPA
key, then enter the network name.
If your radio can connect to the
network successfully, but is unable to
play particular stations, it may be due
to one of the following reasons:.
When you scan for PCs under UPnP
function, none can be found, or the
PC you are looking for does not ap-
pear in the list:
• The station is not broadcasting at this time of the day (remember it may
be located in a dierent time zone).
• The station has too many people trying to attach to the radio station
server and the server capacity is not large enough.
• The station has reached the maximum allowed number of simultaneous
listeners.
• The station is not broadcasting anymore.
• The link on the radio is out of date. This is updated automatically every
day, so the next time you turn on the link will be recognised.
• The internet connection between the server (often located in a dierent
country) and yours is slow. Some internet service providers may fail to
stream in certain geographical areas. Try using a PC to play back the
stream via the broadcaster’s web site. If you can play back the station
with a PC, please report to the customer service where you bought this
radio. If you have a laptop, try connecting it if your Internet Radio cannot
nd the station.
• You have not connected to the wireless Access point. On the internet
radio, select ‘Conguration’, ‘Network ’, ‘Wireless network connection’
and then select your Wireless network. (You may need to enter a security
key to access the network wirelessly).
• You have a rewall set on your PC which is stopping you accessing
shared les.
• If you have a third party rewall (Like Norton, or Zone Alarm) that will
have its own control panel and you will need to consult the manual for
your rewall.
• If your PC is connected to a managed network, with a server sometimes
the PC being searched for needs to be server Workgroup.
25
Page 26

You can see the PC you want to play
music from, but cannot nd any fold-
ers on the PC:.
I can’t share a folder, as the option is
not highlighted:
Scan Error:
Playlists:
• -You have a rewall running which is preventing the internet radio from
seeing the shared folder. As a quick check, you can disable rewalls like
Norton to see if this overcomes the problem, if this resolves the issue
then you can either leave the rewall o, or allow le sharing through
the re wall.
• Note: If you rewall is required to provide security for your system, it
should not be left o.
• When the internet radio is scanning the content of the folders on a PC, it
is possible that a scan error may occur if the windows le sharing application times out. This is most likely to occur if both the PC with the media
content and the Internet Radio are connected wirelessly.
• Try re-connecting the PC with the media content into the network via cable. This will dramatically increase the speed at which the Internet Radio
is able to scan the content of the Media PC.
• Some media ripping applications allow ‘Playlists’ to be created. The Internet Radio is able to detect and stream these playlists, but they must
be stored in the folder with the rest of the Media content and they must
have the le extension.m3u.
• Windows Media player can create suitable playlist, just select ‘create
new playlist’, drag and drop the tracks you want into the playlist, then
use ‘Save as’ to ensure the le type is .m3u. (Existing play lists can be
opened and re-saved in this format) When the Internet Radio detects
you have playlists, it will enable a new menu option allowing the playlist
to be selected and added to the queue.
• If you re-connect to another PC of folder, which does not have any Playlists in the .m3u. format, the playlist option will not be presented in the
menu.
If the Internet Radio keeps re-buer-
ing the radio station:
What is Buering?
• The Internet Radio is streaming the data from the radio station via your
broadband connection, if there is a high error rate on your broadband
connection, or the connection is intermittent, then it will cause the Internet Radio to pause until the connection is re-established and it has
received enough data to start playing again.
• If your Internet Radio keeps stopping, please check the DSL modem to
ensure that the Broadband line is not suering a high error rate or disconnections. If you are experiencing these problems, you will need to
contact your broadband supplier.
• When playing a stream, the Internet Radio/Media player, downloads a
small amount of the stream before it starts playing. This is used to ll
in any gaps in the stream that may occur if the internet or the wireless
network is busy.
• The Internet Radio streams music data from the PC while you are listening. If a stream gets blocked or experiences Internet congestion while
transferring it may stop/interfere with the quality of play. If this happens,
check your internet connection speed- it must be faster than the speed
of the streams.
26
Page 27

Environmental Concerns
According to the European waste regulation 2002/96/EG this symbol on the product or on its packaging indicates that this product may not be treated as household waste. Instead it should be taken
to the appropriate collection point for the recycling of electrical and electronic equipment. By ensuring this product is disposed of correctly, you will help prevent potential negative consequences for
the environment and human health, which could otherwise be caused by inappropriate waste handling of this product. For more detailed information about recycling of this product, please contact
your local council or your household waste disposal service.
Declaration of Conformity
Producer: Chal-Tec GmbH, Wallstraße 16, 10179 Berlin, Germany
This product is conform to the following European directives:
2004/108/EC (EMC)
2011/65/EU (RoHS)
27
Page 28

Gentile cliente,
La ringraziamo per aver scelto il nostro prodotto. La preghiamo di leggere e seguire attentamente le seguenti istruzioni
di installazione e utilizzo del dispositivo per evitare eventuali danni tecnici.
Dati technici
Numero articolo 10028443, 10028444
Alimentazione Netzteil (Entrata: 100-240 V ~50 Hz; Uscita: 9V, 1,5A)
Banda di frequenza FM 87.5 - 108 MHz
Prolo di rete supportato e crittograa IEEE802.11b/g/n; WEP/WPA/WPA2
Dimensioni 235 x 148 x 135 mm
Avvertenze
Per ridurre i rischi di incendio, scosse elettriche e guasti:
• Non esporre il dispositivo alla pioggia.
• Non collocare sul dispositivo recipienti contenenti liquidi, per esempio vasi.
• Utilizzare esclusivamente gli accessori consigliati.
• Non riparare il dispositivo da soli, ma rivolgersi al personale qualicato del nostro servizio clienti.
• Non far cadere al suo interno nessun oggetto metallico.
• Non poggiare sul dispositivo nessun oggetto pesante.
• Pulire il dispositivo solo con un panno asciutto.
• Non ostruire i condotti di ventilazione.
• Non collocare il dispositivo nelle vicinanze di fonti di calore come caloriferi, fornelli, forni e altre apparecchiature
che possono riscaldarsi (per esempio amplicatori e simili).
• Prima dell’utilizzo, assicurarsi che la tensione di alimentazione a diposizione sia conforme a quella richiesta.
• In caso di temporali o di inutilizzo prolungato, scollegare il dispositivo dalla rete di alimentazione.
• Sorvegliare bambini, quando si trovano nelle vicinanze del dispositivo, in modo da evitare che ci giochino. .
Collocazione
Attenzione: Non posizionare sul dispositivo candele o altre sorgenti di amme vive.
Sistemare il dispositivo su una supercie asciutta, piana, impermeabile e resistente al calore.
Collocarlo in un punto non raggiungibile dai bambini.
La presa deve essere a portata di mano, per estrarre facilmente la spina in caso di emergenza.
Non installare o posizionare il dispositivo in impianti incassati, per esempio librerie, armadietti e luoghi simili che
possano impedire una corretta ventilazione
Non collocare il dispositivo su amplicatori e altre apparecchiature che producono calore e che quindi possono
danneggiarlo.
Non esporre il dispositivo a forti vibrazioni
Accessori e materiali di imballaggio
Tenere gli accessori forniti in dotazione (per esempio le viti e altri utensili per il montaggio) e il materiale d’imballaggio fuori dalla portata dei bambini per evitare che li ingeriscano. Non lasciare che i bambini giochino con l’involucro.
Pericolo di soocamento.
28
Page 29

Trasporto
Custodire la confezione originale. Per proteggere il dispositivo durante il trasporto, imballarlo nella confezione originale.
Pulizia
Non utilizzare liquidi volatili (per esempio spray per insetti). Non pulire troppo energicamente: si possono danneggiare
le superci. Parti in plastica o in gomma non devono essere in contatto con l’oggetto per un tempo prolungato.
Comandi di controllo
Lato frontale
Altoparlante 1 6 MENU
Power On /O
MODE (Selezione funzioni) 3 8 Sensore infrarossi
PRESET (Modalità di memorizzazione) 4 9 RIGHT(Destra)
Display 5 10 Dial/Select (Selezione)/VOLUME
2 7 LEFT (Sinistra)
29
Page 30
Lato posteriore
Antenna FM 11 13 Attacco cuie
Attacco alimentatore 12 14 AUX-IN
Telecomando
ON/Standby
MUTE
Testi alfanumerici (per una selezione veloce della posizione
0 - 9
OK
MODE Cambiare modalità FM, Internet Radio, Media Player.
EQ Equalizzatore
in memoria e per inserire le Password WiFi; premere più volte “1” per selezionare caratteri speciali)
Regolare la luminosità del display
Preferiti
Tasti direzionali (per navigare nelle liste e nei Menu)
Impostare/ spegnere e accendere la sveglia
Attivare lo spegnimento automatico
Ritornare al Menu principale
Indietro
Play/Pause
Avanti
30
Page 31

Prima messa in funzione
Inserire l’alimentatore all’attacco apposito del dispositivo e collegarlo alla presa elettrica. Sul display appare il messaggio di saluto “Welcome”. Con i tasti direzionali selezionare la lingua e confermare premendo OK.
Di seguito viene chiesto se si desidera che all’accensione il dispositivo si colleghi automaticamente a una rete Wi-Fi
memorizzata. Si consiglia di confermare selezionando “Yes”.
Congurazione WiFi
Nella schermata successiva, selezionare “YES” per connettere il dispositivo a una rete Wi prestabilita. Selezionare
YES [WPS] in caso il router supporti una rete WPS. Il dispositivo inizia la ricerca delle reti disponibili. Una volta trovate,
le reti vengono visualizzate in una lista:
Dalla lista selezionare il Router corrispondente: inserire la password richiesta utilizzando i tasti alfanumerici, Dial/
ENTER o LEFT/RIGHT e SELECT).
La scritta “Network ok” conferma che la connessione è avvenuta con successo. Ora appare il menu principale:
31
Page 32

Internet- Radio
Dal menu principale selezionare Internet Radio. Sono diponibili diverse opzioni. Per iniziare l’ascolto delle stazioni
radio di tutto il mondo selezionare “Radio Station/Music” e ricercare la stazione radio desiderata.
Preferiti
Appare la lista delle stazioni radio preferite memorizzate in precedenza. Se si desidera aggiungere una stazione radio
alle “preferite”, durante l’ascolto, tenere premuto il tasto del telecomando nche’ appare la schermata
:
L’icona
tico. È possibile memorizzare 250 Presets.
Premendo brevemente è possibile modicare la lista dei preferiti. Premere per accedere alle funzioni relative alla
radio selezionata:
Selezionare DELATE per cancellare dalla lista la stazione radio selezionata, selezionare SHIFT UP/DOWN per cambiarne la posizione nella lista o RENAME per cambiarne il nome.
Premere PLAY per ascolare la radio selezionata.
Attenzione: i preset da 1 a 5 sono posizioni in memoria sse, quindi non possono essere modicate
Stazione radio/musica
in alto a sinistra, indica che la stazione radio è stata memorizzata. I preferiti appaiono in ordine alfabe-
Le stazioni radio trovate possono essere elencate in base ai paramentri “Worldwide top 20” , “Genere” e ”Location”.
Stazioni radio locali: lista delle stazioni radio locali
Ultima radio ascoltata: lista delle ultime radio ascoltate
Service: Contiene i sotto menu “Search stations” ( dove è possibile trovare la radio desiderata, digitando il nome) e
“Add new Radio Station” ( dove è possibile trovare la radio desiderata inserendo il suo indirizzo URL e aggiungerla
così ai preferiti). Se la radio ascoltata dispone di un icona, questa appare sul display durante l’ascolto.
32
Page 33

FM
Dal menu principale o dal tasto MODE sul dispositivo o selezionando FM sul telecomando, è possibile passare alla
modalità FM.
Ricerca automatica
Premere DIAL/SELECT per avviare la ricerca automatica delle stazioni radio.
Il dipositivo scansiona le frequenze FM e salva automaticamente nelle posizioni diponibili in memoria le 20 stazioni
radio con la migliore ricezione.
La ricerca può durare qualche minuto.
Ricerca manuale
Utilizzare i tasti direzionali e del telecomando o ripettivamente LEFT e RIGHT del dipositivo per passare automaticamente alla stazione radio precendete o successiva, utilizzare i tasti e per sfogliare manualmente la
banda di frequenza, con incrementi e decrementi di 0.05MHz.
Memorizzazione delle stazioni
Per memorizzare la stazione radio ascoltata al momento, tenere premuto il tasto : con i tasti direzionali scegliere
la posizione nella memoria dove si desidera salvare la stazione radio e confermare premendo il tasto OK del telecomando oppure SELECT sul dispositivo. Per accedere alla lista delle stazioni radio memorizzate, premere brevemente
. Con i tasti direzionali, selezionare la radio che si desidera ascoltare e premere quindi PLAY.
AUX-IN
Tramite un cavo audio collegare le fonti audio esterne come MP3Player, Smartphone, Tablet o simili all’ingresso AUX
posto sul retro del dispositivo. Dal menu principale o con il tasto MODE, selezionare la modalità AUX. Attivare il volume del dispositivo esterno e regolarlo in seguito dalla radio.
DLNA
IR-150 suppota il DLNA. Assicurarsi che i dispositivi DLNA siano connessi alla stessa rete Wi-Fi della Internet Radio.
Durante lo streaming appare la dicitura AirMusic. Per maggiori informazioni, consultare i manuali di istruzione dei
dispositivi esterni.
Media-Center
Con la funzione MUSIC Player è possibile ascolare su IR-150 in streaming la musica presente sul computer. I formati supportati per lo streaming sono MP3-, AAC-, WMA e FLAC.
Il protocollo di rete UPnP permette a diversi dispositivi, collegati alla stessa periferica di controllo (server o router)
di connettersi l’uno all’altro e di semplicare la condivisione e lo streaming dei dati. Come server di sistema per
esempio si può usare un Pc con Windows Media Player 11 o una versione più recente).
Seguire le seguenti operazioni:
• Assicurarsi che la radio IR-150 e il Pc siano connessi e registrati alla stessa rete Wi-Fi.
• Aprire Windows Media Player e inserire i dati e le cartelle nella biblioteca desiderata.
• Attivare il media streaming (Library -> streaming-> Allow media streaming).
• Assicurarsi che la radio abbia accesso alla biblioteca musicale, cliccando “Allow” (“Consentire l’accesso”).
• Sulla IR-150 Radio è possibile ascoltare in streaming solo i brani presenti nel PC.
33
Page 34

• Il protocollo UPnP è in esecuzione in background e questo implica che non bisogna avviare Windows Media Player
per riprodurre i le audio.
Per abbinare la radio IR-150 al protocollo UPnP del computer, selezionare Media-Player -> UPnP dal menu principale
della radio.
Il dispositivo cerca i server UPnP disponibili. La scansione avvenuta con successo appare sul display. Selezionare il
server desiderato e confermare premendo il tasto OK del telecomando o SELECT sul di-spositivo.
Il computer informa che un dispositivo cerca di collegarsi al server UPnP. In Windows Media Player aprire “Media
Sharing” e cliccare sulla nestra di dialogo “Allow” (“consentire”)
Per accedere al Music Player, selezionarlo con MODE o dal menu principale. Selezionare il sotto menu Shared Media
e successivamente dalla lista di dispositivi con UPnP (in caso la condivisione dei media sia attiva su più computer),
selezionare il computer con i contenuti da condividere sulla radio IR-150.
La riproduzione viene guidata come di consueto, tramite i tasti direzionali e il tasto PLAY/PAUSE; la navigazione nel
contenuto dei dati condivisi si eettua con i tasti direzionali del telecomando o con i tasti SELECT o LEFT/RIGHT del
dispositivo.
34
Page 35

Centro Informazioni
Informazioni meteo
Appaiono le informazioni e le previsioni meteo. È possibile visualizzare questi messaggi anche in modalità standby.
Premere e confermare con SELECT/OK. L’orario e il meteo corrente appaiono sul display in standby, alternandosi
ogni 10 secondi. Per cambiare manualmente le informazioni visualizzate, premere SELECT. Premendo LEFT/RIGHT è
possibile visualizzare il meteo dei giorni precedenti o successivi.
Informazioni sulla borsa: visualizzazione notizie sulla borsa
Informazioni sul sistema: Visualizzazione delle informazioni sulla versione del Firmware, indirizzo IP/Mac.
Impostazioni
My MediaU Management
Attivando MediaU (sotto la voce “Settings” My MediaU Menagement), è possibile gestire comodamente la lista delle
stazioni radio dal computer.
Andare sul sito http://www.mediayou.net/ e registrare la radio IR-150 sul portale, seguendo le indicazioni del sito.
.
Dopo la registrazione, è possibile organizzare on line la lista delle radio preferite. Le modiche apportate sono sincronizzate anche sulla radio IR-150. È possibile registrare no a 5 utenti con lo stesso numero di serie della radio.
35
Page 36

Rete
• Congurazione Rete WiFi : selezionare questa opzione per scansionare e visualizzare le reti WiFi disponibili
• Congurazione Rete WiFi : selezionare questa opzione per scansionare le reti WPs attive disponibili.
• Congurazione manuale: selezionare questa opzione per congurare manualmente il DHCP e il SSID o per can-
cellare la connessione internet in corso.
• Vericare la rete all’accensione: Aktivieren Sie, um bei jedem Neustart des Geräts automatisch mit dem letzten
genutzten W-LAN zu verbinden.
Data e ora
Impostare la data e l’ora corrente. Premere i tasti direzionali (Up e Down) per modicare i valori numerici e i tasti direzionali (Right e Left) per cambiare la posizione del cursore.
Formato dell’orario: 12 ore /24 ore;
Formato della data: AA/MM/GG o MM/GG/AA.
DST: attivare o disattivare l’ora legale e l’ora solare.
Sveglia
• Attivare o disattivare Alarm 1 e /o Alarm 2, seguire ogni volta le indicazioni del menu per selezionare la frequenza
della sveglia (per esempio ogni giorno, solo in un giorno determinato) l’orario delle sveglia e il tipo di sveglia ( il
tono/la melodia/Internet radio /FM).
• Funzione SNOOZE: tenere premuto “POWER NAP” se si desidera che la sveglia impostata si ripeta a intervalli di
tempo deniti. Passare alle impostazioni Alarm1/Alarm2.
• Volume della svegli: Impostare il volume della sveglia.
Lingua
Selezionare una lingua di dialogo tra Inglese, tedesco, francese, olandese, russo, svedese, norvegese, suomi e danese.
Regolatore luminoso
Qui è possibile regolare il grado di luminosità del display per il risparmio energetico (si attiva automaticamente se
dopo diversi minuti il dispositivo non viene utilizzato) nella modalità normale di utilizzo.
Gestione consumo energetico
Stellen Sie hier die Dauer ein, nach der sich das Gerät automatisch in den Standby-Modus begibt, wird es nicht benutzt.
Sie können zwischen 5, 15 und 30 Minuten wählen oder die Funktion abschalten.
Sleep Timer
Impostare lo Sleep Timer su 15,30,60,90, 120 o 180 minuti. Trascorso il lasso di tempo impostato, la radio IR-150 passa
automaticamente nella modalità standby.
36
Page 37

Buering
Impostare il buering su 2,4 o 8 secondi: Tempi di buering prolungati permettono uno streaming più stabile in caso
di connessioni internet lente o disturbate.
Meteo
Sul display in modalità standby prescrivere la visualizzazione del meteo, dell’unità della temperatura (°C o °F) e del
paese
Impostazioni FM
Selezionare la modalità stereo/ mono e il paese in cui si trova il dispositivo.
Impostazioni stazioni radio locali
Il dispositivo trova automaticamente le stazioni radio locali che vengono così mostrate nel sotto menu della modalità
Internet-Radio. Selezionare “Manual Settings” per inserire le radio locali di un altro paese.
Modalità di riproduzione
Scegliere tra le modalità di riproduzione disponibili: REPEAT ALL (riproduzione via UPnP streaming di tutti i brani
presenti nella cartella); REPEAT ONE (riproduce solo il brano corrente), CASUAL (riproduzione casuale dei titoli disponibili).
Impostazioni DLNA
Modicare il nome del dispositivo per le connessioni DLNA.
Equalizzatore
Scegliere tra gli otto tipi di equalizzazione (Normal, Medium, Jazz, Rock, Soundtrack, Classic, Pop, News).
Continuare l’esecuzione all’accensione
Selezionare ON in modo che il dispositivo ad ogni accensione riproduca automaticamente l’ultima stazione radio o
l’ultima fonte audio ascoltata.
Software-Update
IQui è possibile visualizzare le informazioni sugli aggiornamenti Firmware disponibili. Installare gli aggiornamenti
disponibili.
Ritornare alle impostazioni di base
Tutte le stazioni radio, le liste dei preferiti (se memorizzate) e le impostazioni vengono cancellate. Il dispositivo passa
automaticamente alla scelta della lingua e alle impostazioni WiFi.
37
Page 38

Problema Causa/ Soluzione
Impossibile connettersi a una rete
WiFi.
La radio è connessa a Internet, ma
alcune radio non vengono riprodotte.
Risoluzione problemi
• Vericare che la radio e il computer (con connessione internet) siano
collegati alla stessa rete.
• Assicurarsi che sia disponibile un server DHPC o che si dispone di un
indirizzo IP statico sulla radio
• Assicurarsi che un rewall non blocchi le porte d’uscita
• Alcuni Access Points/ Ripetitori/ Router possono essere congurati in
modo tale che solo i dispositivi con un Indirizzo MAC registrato possono
connettersi. Leggere il manuale d’istruzione della vostra apparecchiatura WiFi e inserire l’indirizzo MAC della Radio nella lista di dispositivi
autorizzati all’Access Point.
• Vericare che la password inserita sia quella giusta e che sia scritta correttamente.
• Se la WiFi è “nascosta”, inserire il nome della rete internet manualmente
nella IR-150. Selezionare la voce “Congure”->Network
• -> Manual Conguration -> Wireless-> Enter ESSID (SSID). Confermare.
Inserire la chiave WEP o WPA e digitare il nome della rete.
• La stazione radio è su un fuso orario diverso ed temporaneamente irraggiungibile.
• Diversi utenti cercano di connettersi alla stessa radio e la capacità della
banda di frequenza non è suiciente.
• Il link della stazione radio è cambiato o non è più valido.
• La stazione radio non esiste più.
Non viene riconosciuto nessun dispo-
sitivo UPnP o il PC cercato non viene
visualizzato.
Non è possibile alcuna condivisione
dei dati, in quanto la funzione non è
disponibile (grigia)
Errore durante la scansione dei
media.
Il buering (messa in memoria) non
si arresta.
• I due dispositivi non sono connessi alla stessa rete.
• Un rewall installato è impostato in modo da non permettere la condivi-
sione dei dati con dispositivi esterni.
• la radio non è registrata nello stesso Gruppo di lavoro o dominio del
computer in questione.
• Attivare il le-sharing.
• è possibile che si riscontino degli errori sulla IR Radio durante la scan-
sione della cartella del PC, per esempio se l’applicazione Windows le-sharing si interrompe. Collegare il Pc via cavo alla rete, per aumentare
la velocità della scansione.
• Se la connessione internet cade facilmente o è molto instabile, è possibile che i valori del buering non vengano visualizzati. Vericare la connessione di rete, del modem e di internet. In caso il problema persista,
contattare il servizio assistenza del vostro Internet provider.
38
Page 39

Smaltimento
Elektroaltgeräte
Questo simbolo a sinistra (un cassonetto dei riuti mobile barrato) è conforme alla direttiva europea
2002/96/CE e indica che il presente prodotto non deve essere smaltito insieme ai riuti urbani. Per
ulteriori informazioni sul regolamento vigente in merito alla raccolta dierenziata di apparecchiature
elettroniche ed elettriche, si prega di contattare le autorità locali responsabili dello smaltimento dei
riuti. I vecchi elettrodomestici non rientrano tra i riuti urbani. Attraverso uno smaltimento responsabile e conforme alle direttive, è possibile salvaguardare l´ambiente e chi ci circonda da possibili
conseguenze negative. Il riciclaggio di materiali aiuta a ridurre il consumo di materia prima.
Dichiarazione di conformità
Il produttore di questo prodotto è la Chal-Tec GmbH, Wallstrasse 16, 10179 Berlino, Germania.
Questo prodotto è conforme alle seguenti direttive europee:
2004/108 /UE (EMC)
2011/65/CE (RoHS)
39
Page 40

Chère cliente, cher client,
Toutes nos félicitations pour l’acquisition de ce nouvel appareil. Veuillez lire attentivement les instructions de branchement et d’utilisation an d’éviter d’éventuels dommages techniques. Le fabricant ne saurait être tenu pour responsable des dommages dus au non-respect des consignes de sécurité et à la mauvaise utilisation de l’appareil.
.
Données techniques
Numéro d’article 10028443, 10028444
Alimentation
Bande de fréquence FM 87,5 – 108 MHz
Prol réseau et cryptage IEEE 802.11 b/g/n ; WEP/WPA/WPA2
Dimensions 235 x 148 x 135 mm
Bloc d’alimentation (Entrée : 100 – 240 V ~50 Hz; Sortie
: 9V / 1,5 A)
Avertissements
Pour réduire tout risque d’incendie, d’électrocution et de dommages :
• Ne pas exposer l’appareil à la pluie.
• Ne pas poser des récipients remplis de liquide sur l’appareil, tel que des vases.
• Utiliser exclusivement des accessoires recommandés par le fabricant.
• Ne pas réparer l’appareil soi-même. Pour la maintenance, s’adresser à un technicien du service après-vente.
• Ne pas laisser d’objets métalliques tomber dans l’appareil.
• Ne poser aucun objet lourd sur l’appareil.
• Veiller à ce que les fentes d’aération ne soient jamais obstruées.
• Ne pas placer l’appareil près d’une source de chaleur telle qu’un radiateur, une cuisinière, un four, ou d’autres ap-
pareils pouvant chauer, comme par exemple un amplicateur.
• En cas d’orage ou de tempête, lorsque l’appareil n’est pas utilisé ou lorsque vous quittez votre domicile, débrancher l’appareil.
• Cet appareil n’est pas un jouet. Toute utilisation par des enfants doit avoir lieu sous surveillance. Veiller à ce que
les enfants n’insèrent pas d’objets dans les fentes d’aération.
Installation
• Attention : ne poser aucune amme nue, telle qu’une bougie, sur l’appareil.
• Placer l’appareil sur une surface sèche, plane, imperméable et résistante à la chaleur.
• Installer dans un endroit hors de la portée des enfants.
• La che doit être facilement accessible an de pouvoir être débranchée immédiatement en cas de besoin.
• Ne pas installer l’appareil sur une étagère, dans un placard ou dans un espace étroit. Assurer une bonne ventila-
tion.
• Ne pas installer l’appareil sur un amplicateur ou sur d’autres équipements qui pourraient devenir chauds. Un
contact avec une source de chaleur peut endommager l‘appareil.
• Ne pas exposer l’appareil à des chocs violents.
40
Page 41

Transport de l’appareil
Veuillez conserver la boîte d’emballage originale. Ranger l’appareil dans cette dernière lors de son transport, pour
obtenir une meilleure protection.
Nettoyage des surfaces extérieures
Ne pas utiliser de liquide volatil tel qu’un spray insecticide, près de l’appareil. Ne pas frotter trop fort lors du nettoyage,
ou la surface de l’appareil pourrait être endommagée. Ne pas laisser trop longtemps en contact des éléments en
caoutchouc et en plastique avec l’appareil. Utiliser un chion sec pour le nettoyer.
Boutons de commande
Face avant
Haut-parleur 1 6 MENU
Power On / O (Marche/Arrêt)
MODE (sélection du mode) 3 8 Capteur infrarouge
PRESET (fonction mémorisation) 4 9 RIGHT (droite)
Écran d’aichage 5 10
2 7 LEFT (gauche)
DIAL/SELECT (sélectionner)
VOLUME (réglage du volume)
41
Page 42

Face arrière
Antenne FM 11 13 Sortie casque
Prise d’alimentation 12 14 Entrée AUX
Télécommande
Mise en marche / veille
Couper le son
0 - 9 Pavé numérique / lettres
Régler la luminosité de l’écran digital
Favoris
OK Sélectionner/conrmer
MODE
EQ Égaliseur
Touches échées (pour la navigation dans les listes et menus)
Allumer/éteindre / régler le réveil
Allumer / éteindre la minuterie sleep
Retour au menu principal
Navigation entre les modes Radio FM, Radio Internet, Bibliothèque médias
Retour rapide / piste précédente
Lecture/pause
Avance rapide / piste suivante
42
Page 43

Première utilisation
Brancher l’appareil. L’écran digital s’allume et vous accueille avec le message « Welcome ». Vous avez alors la possibilité de choisir la langue de menu. Sélectionner votre langue à l’aide des touches échées et conrmer avec OK.
L’appareil vous demande ensuite si vous souhaitez qu’il se connecte automatiquement à un réseau Wi lors du démarrage. Il est recommandé de sélectionner OUI pour conrmer cette option.
Conguration de la connexion Wi
L’écran suivant s’aiche. Sélectionner OUI pour congurer la connexion de l‘appareil à un réseau Wi disponible. Sélectionner OUI(WPS) si votre routeur supporte le WPS. L‘appareil lance une recherche des réseaux disponibles. Cela
peut durer quelques minutes. Les réseaux détectés sont aichés dans une liste :
Sélectionner votre routeur dans la liste. Entrer la clé réseau (mot de passe) lorsque cela vous est demandé. Pour cela,
utiliser les touches numériques et les lettres de la télécommande, ou combiner les touches DIAL/ENTER ainsi que
LEFT/RIGHT et SELECT.
L‘appareil conrme la réussite de la connexion au réseau Wi en aichant le message « Réseau OK ». Le menu principal
s’aiche alors :
43
Page 44

Radio Internet
Sélectionner la Radio Internet dans le menu principal. Plusieurs options sont possibles. Pour démarrer l’écoute, sélectionner « Stations de radio / musique » et écouter votre station préférée.
Mes favoris
Cette option sert à aicher la liste de vos stations favorites mémorisées. Pour mémoriser une station dans les favoris,
maintenir la touche enfoncée pendant l’écoute jusqu’à ce que cet écran s’aiche
:
L’icône
possible de mémoriser jusqu’à 250 stations favorites.
En appuyant brièvement sur il est possible de modier la liste des favoris. Appuyer sur la touche pour aicher les
options suivantes concernant la station sélectionnée :
Sélectionner Delete (suppression de la station sélectionnée), Shift Up/Down (pour faire monter ou descendre la station dans la liste) ou Rename (pour modier le nom aiché de la station mémorisée). Appuyer sur PLAY pour lancer la
lecture de la station sélectionnée.
Attention : les favoris 1 à 5 contiennent des stations xes qui ne peuvent être modiées par l’utilisateur.
Station de radio / musique
Dans ce mode, les stations détectées sont classées par « Top 20 mondial », « Genre », « Pays, région » ou encore «
recommandations » dans les sous-menus correspondants.
indique que la station de radio a été mémorisée. Les favoris sont classés par ordre alphabétique. Il est
Stations locales: liste des stations locales disponibles
Dernières stations écoutées : liste des dernières stations écoutées
Service: cette option vous permet de rechercher une station particulière en introduisant son nom dans la section «
Rechercher des stations ». Si vous avez une URL à disposition, l’indiquer dans « Ajouter une nouvelle station ».
Lorsqu’une station est en lecture, son logo s’aiche sur l’écran digital s’il est disponible.
44
Page 45

Radio FM
Sélectionner dans le menu principal ou à l’aide de la touche MODE de l‘appareil ou de la télécommande le mode Radio
FM
Recherche automatique des stations
Appuyer sur la touche DIAL/SELECT pour lancer la recherche automatique des stations. L‘appareil parcourt les fréquences FM et mémorise automatiquement les stations ayant la meilleure qualité de réception dans les 20 plages de
mémoire disponibles.
La recherche automatique des stations peut durer quelques minutes.
Recherche manuelle des stations
Utiliser les touches échées et de la télécommande ou les touches LEFT et RIGHT de l‘appareil pour passer
automatiquement à la prochaine station reçue sur la bande de fréquence FM.
Utiliser les touches échées et , pour naviguer dans la bande de fréquence FM par sauts de 0,05 MHz..
Mémorisation des stations
Pour mémoriser la station actuellement en écoute, maintenir enfoncée la touche gedrückt. Choisir la plage de mémoire dans la liste à l’aide des touches échées et . Appuyer sur la touche OK de la télécommande ou la touche
SELECT de l‘appareil. Pour aicher la liste des stations mémorisées, appuyer brièvement sur la touche . Sélectionner la station souhaitée à l’aide des touches échées et lancer la lecture en appuyant sur la touche PLAY.
Entrée AUX
ScBrancher un câble audio dans l’entrée AUX à l’arrière de l‘appareil pour connecter des sources audio externes du
type lecteur MP3, Smartphone, tablette etc. Sélectionner le mode AUX dans le menu principal ou à l’aide de la touche
MODE. Augmenter le volume du dispositif externe puis ajuster le volume de la radio.
Streaming DLNA
Le IR-150 prend en charge la DLNA. S’assurer que l’appareil est connecté au même réseau que votre dispositif DLNA.
Lorsque la radio est recherchée sur le dispositif, elle apparaît sous le nom « Air Music ». Consulter les notices et ressources explicatives de votre appareil de streaming DLNA pour plus d’informations.
Bibliothèque médias
Il est possible de lire la bibliothèque musicale d’un ordinateur via le réseau local grâce au mode Music Player. Les formats MP3, AAC, WMA et FLAC peuvent être lus en streaming. Pour permettre la lecture de musique, il est nécessaire
d’autoriser la lecture en réseau du dossier contenant votre musique sur votre ordinateur.
Le système UPnP vous permet de visualiser et de ltrer par catégories les chiers musicaux enregistrés sur votre ordinateur à travers un appareil externe tel que le IR-150. Pour cela, il est nécessaire que les chiers soient tous tagués (à
l’aide de tags ID3 assortis) et que le système du serveur soit compatible, par exemple, avec un PC équipé du lecteur
Windows Media version 11 ou plus récente. Suivre les étapes suivantes :
• S’assurer que le PC et la radio sont connectés et enregistrés sur le même réseau.
• Ouvrir le lecteur Windows Media et ajouter les chiers et dossiers à la bibliothèque souhaitée.
• Activer la diusion en continu des médias (Bibliothèque ->Diuser en continu->Activer la diusion en continu des
médias personnels).
• Donner l’autorisation d’accès à la radio en la sélectionnant puis en cliquant sur « Autoriser ».
45
Page 46

• Le IR-150 peut désormais lire des médias depuis votre ordinateur. Le service UPnP fonctionne en arrière-plan : il
n’est pas nécessaire d’ouvrir le lecteur Windows Media pour permettre la lecture de médias.
Pour appairer le IR-150 à la diusion UPnP de votre ordinateur, sélectionner Media Player->UPnP dans le menu principal de la radio.
L’appareil lance alors une recherche de serveurs UPnP. Les serveurs détectés sont alors aichés sur l’écran digital. Sélectionner le serveur désiré et conrmer avec la touche OK de la télécommande ou SELECT sur l’appareil.
L’ordinateur reçoit alors l’information qu’un appareil tente de se connecter au serveur UPnP. Ouvrir la section « Partage
des médias » dans le lecteur Windows Media et cliquer sur « Autoriser » dans la boîte de dialogue
.
L’ordinateur reçoit alors l’information qu’un appareil tente de se connecter au serveur UPnP. Ouvrir la section « Partage
des médias » dans le lecteur Windows Media et cliquer sur « Autoriser » dans la boîte de dialogue.
Sélectionner le mode Music Player de la radio à l’aide de la touche MODE ou dans le menu principal. Dans le sous-menu Médias partagés du Music Player, sélectionner l’ordinateur qui partage des contenus dans la liste des appareils
UPnP (dans le cas où la diusion continue de médias est activée sur plusieurs ordinateurs).
Le contrôle de la lecture s’eectue à l’aide des touches échées et PLAY/PAUSE habituelles et la navigation à l’aide des
touches échées de la télécommande ou des touches DIAL/SELECT et LEFT/RIGHT de l’appareil
46
Page 47

Service d’informations
Informations météo
La fonction météo permet de consulter les informations et prévisions météorologiques de la région de votre choix.
Les informations de météo peuvent être aichées sur l’écran en mode veille. Pour activer ce réglage, appuyer sur
et conrmer avec les touches SELECT ou OK. L’heure actuelle et la météo seront aichées en alternance par tranches
de 10 secondes sur l’écran de veille. Appuyer sur la touche SELECT pour changer manuellement l’information aichée.
Appuyer sur les touches LEFT et RIGHT pour aicher les prévisions météo des prochains jours.
Informations nance : aichage d’informations sur la bourse
Systeminformationen: Anzeige der Firmware-Versionsnummer, MAC- und IP-Adressen
Réglages
Gestion My Media
Activer votre MediaU pour gérer votre liste de stations, confortablement depuis votre ordinateur (dans paramètres ->
Gestion MY MediaU).
Visiter le site http://www.mediayou.net/ et enregistrer votre appareil sur le portail. Suivre les instructions données
par le site.
Après nalisation de votre inscription, organiser votre liste de favoris. Les modications sont synchronisées avec le
IR-150. Jusqu’à 5 utilisateurs maximum peuvent s’enregistrer en ligne avec le numéro de série de la radio.
47
Page 48

Réseau
• Réglage du réseau sans l : sélectionner cette option pour lancer une recherche de réseaux Wi disponible et
aicher la liste de résultats.
• Réseau sans l WPS PBC : sélectionner cette option pour lancer une recherche de réseaux WPS activés.
• Conguration manuelle : Stellen Sie DHCP und SSID manuell ein oder löschen Sie die aktuelle Netzwerkverbin-
dung.
• Vérication du réseau au démarrage : activer cette option pour que l’appareil se connecte automatiquement au dernier réseau Wi utilisé lors du démarrage.
Date et heure
Ajuster la date et l’heure : utiliser les touches échées (haut/bas) pour changer les valeurs et les touches échées
(gauche/droite) pour déplacer le curseur.
Réglage du format de l’heure : 12h/24h ;
Réglage du format de la date : AA/MM/JJ, JJ/MM/AA ou MM/JJ/AA.
DST : activer/désactiver l’heure d’été/d’hiver
Réveil
• Activer/désactiver le réveil1 et/ou le réveil2. Suivre les étapes du menu pour ajuster l’intervalle de répétition (par
exemple tous les jours / seulement certains jours), l’heure du réveil ainsi que le type de réveil (sonnerie, mélodie,
radio internet, radio FM).
• Réveil-sieste : ajuster un certain nombre de minutes pour faire un petit somme. Sauter ainsi l’étape du réglage de
l’heure des réveil1 et réveil2…
• Volume du réveil : ajuster le volume du réveil..
Langue
Sélectionner anglais, allemand, français, néerlandais, russe, suédois, norvégien, nnois ou danois comme langue de
menu.
Luminosité
Ajuster la luminosité de l’écran en mode économie d’énergie (qui s’active après plusieurs minutes sans utilisation) et
en mode normal d’utilisation.
Gestion de l’énergie
Ajuster le nombre de minutes sans utilisation après lesquelles l‘appareil passe en mode économie d’énergie. Il est
possible de choisir entre 5, 15 et 30 minutes ou de désactiver la fonction.
Minuterie sleep
Ajuster la minuterie sleep sur 15, 30, 60, 90, 120, 150 ou 180 minutes. Une fois le temps sélectionné écoulé, le IR-150
passe automatiquement en mode veille.
48
Page 49

Mise en mémoire tampon (buering)
Fixer le temps de mise en mémoire tampon à 2, 4 ou 8 secondes. Si la connexion internet ou réseau est lente ou irrégulière, un temps de mise en mémoire tampon plus long permet une diusion en continu des médias plus stable.
Météo
Régler l’aichage de la météo sur l’écran digital en mode veille, l’unité de température (°C ou °F) ainsi que la région.
Radio FM
Sélectionner le mode stéréo ou mono et la région.
Stations radio locales
L‘appareil détecte automatiquement les stations de radio locales disponibles et les aiche dans le sous-menu du
mode Internet Radio. Sélectionner « réglage manuel » si vous souhaitez aicher les stations de radio locales d’une
autre région.
Modes de lecture
Sélectionner les modes « Tout répéter » (lors de la diusion en continu de médias par UPnP, tous les chiers du dossier
se répètent), « Répéter une piste » (la piste actuelle se répète) ou « Aléatoire » (les pistes disponibles sont lues dans
un ordre aléatoire).
DLNA
Modier le nom aiché de l’appareil pour l’appairage DLNA.
Égaliseur
Sélectionner un type d’égaliseur parmi huit préréglages (normal, centré, jazz, rock, musique de lm, classique, pop,
informations).
Poursuite de la lecture au démarrage
Activer cette option pour lancer automatiquement la lecture de la dernière station ou de la dernière source de musique
écoutée au prochain démarrage de l’appareil.
Mise à jour du logiciel
Des informations sur les mises à jour du logiciel disponibles sont aichées dans cette section. Installer les mises à jour
disponibles.
Revenir aux réglages par défaut
L’appareil revient à son état d’origine. Toutes les stations et listes de favoris (mémorisées localement) ainsi que les paramètres sont supprimés. L’appareil revient automatiquement à l’étape de sélection de la langue et de réglage du Wi.
49
Page 50

Résolution de problèmes
Problème Solutions/actions
La connexion au Wi ne peut être
établie.
La radio est connectée à internet,
mais certaines stations ne peuvent
être lues.
• S’assurer que la radio et l’ordinateur (disposant d’une connexion internet opérationnelle) sont connectés au même réseau.
• Un serveur DHCP est-il disponible ou avez-vous indiqué une adresse IP
statique ?
• Est-il possible qu’un pare-feu bloque les ports de sorties ?
• Beaucoup de points d’accès, répéteurs et routeurs sont paramétrés de
manière à ne pouvoir être appairés qu’avec des appareils disposant
d’une adresse MAC. Consulter le mode d’emploi de votre équipement
Wi et ajouter l’adresse MAC de la radio dans la liste des appareils autorisés du point d’accès.
• S’assurer que le mot de passe correct ait été renseigné (dans le cas d’un
réseau Wi protégé par clé). Attention à bien taper le mot de passe.
• Si votre réseau Wi est masqué (paramètre disponible sur beaucoup de
routeurs), entrer manuellement le nom du réseau dans le IR-150. Pour
cela, aller dans Paramètres ->
• Réseau -> Conguration manuelle -> Réseau sans l -> Entrer le SSID.
• La station est peut-être dans un autre fuseau horaire et n’émet pas pour
le moment.
• Trop d’utilisateurs tentent de recevoir la station radio en même temps,
et sa capacité / bande passante est trop faible.
• Le lien est cassé ou n’existe plus.
• La station n’existe pas ou plus..
Aucun appareil UPnP n’est détecté,
ou l’ordinateur recherché ne s’aiche
pas.
Vous ne pouvez partager aucun dos-
sier via UPnP car la fonction n’est pas
dispo-nible (grisée).
Erreur lors de la recherche de médias
La mise en mémoire tampon ne s’ar-
rête jamais.
• SLes deux appareils ne sont pas connectés au même réseau (voir ci-dessus).
• Un pare-feu installé est réglé pour empêcher le partage de données
avec des appareils externes.
• La radio n’est pas enregistrée dans le même groupe de travail ou domaine que l’ordinateur à appairer.
• Activer le partage de chiers.
• Il est possible que des erreurs surviennent lorsque le IR 150 parcourt des
dossiers sur un ordinateur, par exemple si l’application de partage des
chiers Windows s’interrompt. Connecter l’ordinateur au réseau internet via un câble Ethernet pour accélérer considérablement la recherche
de médias.
• Si la connexion internet s’interrompt régulièrement ou est très instable,
il est possible que le IR 150 ne parvienne pas à achever la période de
mise en mémoire tampon. Vérier la connexion du réseau, du modem et
internet et contacter votre fournisseur d’accès à internet si nécessaire.
50
Page 51

Informations sur le recyclage
Vous trouverez sur le produit l’image ci-contre (une poubelle sur roues, barrée d‘une croix), ce qui
indique que le produit se trouve soumis à la directive européenne 2002/96/CE. Renseignez-vous
sur les dispositions en vigueur dans votre région concernant la collecte séparée des appareils électriques et électroniques. Respectez-les et ne jetez pas les appareils usagés avec les ordures ménagères. La mise en rebut correcte du produit usagé permet de préserver l’environnement et la santé.
Le recyclage des matériaux contribue à la préservation des ressources naturelles
.
Déclaration de conformité
Fabricant : Chal-Tec GmbH, Wallstraße 16, 10179 Berlin, Allemagne
Ce produit est conforme aux directives européennes suivantes :
2004/108/CE (CEM)
2011/65/UE (RoHS)
51
Page 52

Estimado cliente:
Le felicitamos por la adquisición de este aparato.
Por favor, lea con atención el siguiente manual y siga cuidadosamente las instrucciones de uso con el n de evitar
posibles daños técnicos..
Datos técnicos
Número de artículo 10028443, 10028444
Suministro eléctrico
Banda de frecuencia FM 87.5 - 108 MHz
Perl de red y codicación IEEE802.11b/g/n; WEP/WPA/WPA2
Dimensiones 235 x 148 x 135 mm
Fuente de alimentación (entrada: 100-240V ~50Hz;
salida: 9V, 1,5A)
Advertencia
Para reducir el riesgo de incendio, descarga eléctrica y otros daños:
• Proteja el aparato de la lluvia.
• No coloque encima del aparato recipientes que contengan líquidos, como jarrones, etc.
• Utilice exclusivamente los accesorios recomendados por el fabricante.
• No intente reparar el aparato usted mismo. Recurra en su lugar a personal cualicado del servicio técnico.
• No deje caer objetos de metal sobre el aparato.
• No coloque objetos pesados encima del aparato.
• No bloquee los oricios de ventilación.
• No coloque el aparato cerca de fuentes de calor como radiadores, fogones, hornos u otros objetos que puedan
calentarse, como amplicadores o similares.
• Antes de poner el aparato en funcionamiento, asegúrese de que la tensión del suministro eléctrico se adecua a los
valores indicados en el aparato.
• Desenchufe el aparato durante las tormentas, si no lo usa durante un periodo de tiempo prolongado o cuando
salga de casa.
• Este producto no es un juguete. Los niños deberán utilizarlo siempre acompañados de un adulto y no deberán
introducir objetos en las ranuras de ventilación..
Colocación
• Aviso - mantenga el aparato alejado de fuentes de calor, como velas encendidas, etc.
• Coloque el aparato en una supercie seca, plana y resistente al calor y al agua.
• Coloque el aparato en un lugar fuera del alcance de los niños.
• La toma de corriente debe poder alcanzarse fácilmente para desconectar el aparato de inmediato en caso de
emergencia.
• No instale ni coloque este aparato en estanterías, armarios empotrados o en espacios muy estrechos. Asegúrese
de que el aparato dispone de ventilación suciente.
• No coloque el aparato a amplicadores u otros dispositivos que puedan calentarse. El calor podría dañar el aparato.
• Proteja el aparato de movimientos excesivamente bruscos.
Piezas pequeñas/partes del embalaje
Mantenga las piezas pequeñas (p.ej. tornillos y otro material de montaje, tarjetas de memoria) y las partes del emba-
52
Page 53

laje fuera del alcance de los niños para evitar atragantamiento. No permita que los niños jueguen con los plásticos,
puede provocar riesgo de asxia.Transport des Gerätes
Transporte del aparato
Conserve el embalaje original. Para proteger el aparato durante el transporte, introdúzcalo en el embalaje original
Limpieza exterior
No utilice líquidos que se evaporen rápidamente, como sprays insecticidas. El exterior del aparato podría dañarse si
frota demasiado fuerte. Evite que el aparato esté en contacto continuado con objetos de goma o plástico. Utilice un
paño seco para limpiar el aparato.
Controles
Frente
Altavoz 1 6 MENU
Power On/O
MODE (selección de funciones) 3 8 Sensor de infrarrojos
PRESET (modo de memorización) 4 9 RIGHT (derecha)
Monitor 5 10 Dial/Select (Auswahl) / VOLUME (Lautstärke)
2 7 LEFT (izquierda)
53
Page 54

Parte trasera
Conexión para la fuente de alimentación 12 14 AUX-IN
Antena FM 11 13 Conexión para auriculares
Mando a distancia
On/standby
Silencio
Teclado alfanumérico (para selección directa de espacios de
0 - 9
OK
MODE
memoria e introducción de contraseñas WiFi; pulsar “1” varias veces para caracteres especiales)
Atenuar la iluminación de la pantalla
Favoritos
Botones de dirección (para moverse por las listas y menús)
Apagar/encender/congurar alarma
Activar la función de apagado automático
Menú principal
Elegir entre los modos FM, radio-internet, reproductor multimedia
EQ Ecualizador
Anterior
Reproducir/pausar
Siguiente
54
Page 55

Primera puesta en funcionamiento
Conecte el aparato a una toma de corriente con la fuente de alimentación. El monitor se ilumina y le saluda con
“Welcome” (Bienvenido). Tiene la opción de seleccionar el idioma del menú. Elija el idioma deseado con las teclas de
dirección y conrme pulsando OK
El aparato le preguntará si quiere que se conecte automáticamente a una W-LAN guardada cada vez que se encienda.
Se recomienda elegir sí “YES”
Establecer el W-LAN
Aparece la siguiente pantalla. Seleccione YES para establecer la conexión con una W-LAN disponible. Seleccione
“YES[WPS]” en caso de que su router soporte WPS. El aparato comienza a buscar redes disponibles. La acción puede
tardar unos minutos A continuación se mostrará una lista con todas las redes encontradas:
Seleccione el router correspondiente de la lista. Introduzca la clave de red necesaria (contraseña) (teclado alfanumérico del mando a distancia, en Dial/Enter o con LEFT/RIGHT y SELECT).
La conexión establecida se conrmará en su aparato con la pantalla “Network OK”. A continuación se mostrará el
menú principal:
55
Page 56

Radio con internet
Seleccione la opción Internet-Radio en el menú principal. Tiene distintas opciones a elegir. Para escuchar directamente
una emisora, seleccione “Emisora/música” y busque la emisora deseada..
Mis favoritos
Muestra la lista de emisoras que ha guardado como favoritas. Para guardar una emisora como favorita, mantenga
pulsado el botón durante su emisión en el mando a distancia hasta que en la pantalla aparezca:
El icono
hasta 250 emisoras.
Pulsando en puede editar la lista de favoritos. Pulse , para acceder a las siguientes opciones para cada emisora:
Seleccione DELETE para borrar la emisora seleccionada, SHIFT UP/DOWN para mover la emisora hacia arriba/abajo
en la lista o RENAME para cambiar el nombre de la emisora. Pulse PLAY para reproducir la emisora seleccionada.
Aviso: los espacios 1-5 son espacios de memoria jos que el usuario no puede modicar.
Emisora de radio/música
Las emisoras encontradas se mostrarán por los criterios “Top 20 mundial”, “Género”, “País/Región” y “Recomendaciones” en los submenús correspondientes.
muestra que la emisora se ha guardado. Los favoritos se ordenarán alfabéticamente. Puede almacenar
Emisoras locales: lista de las emisoras locales disponibles
Historial de emisoras: lista de las últimas emisoras escuchadas
Servicio: introduzca en “Buscar emisora” el nombre de la emisora que desee para buscarla. Cuando haya conseguido
una URL, seleccione “Añadir nueva emisora”.
En cuanto el aparato capte una emisora, aparecerá en la pantalla el icono de la misma (si está disponible).
56
Page 57

FM
Seleccione en el menú principal o en el botón MODE del aparato o del mando a distancia FM para cambiar a este
modo.
Búsqueda automática de emisoras
Pulse DIAL/SELECT para iniciar una búsquera directa de emisoras. El aparato rastrea las frecuencias FM y guarda automáticamente las emisoras con mejor calidad de recepción en los 20 espacios de memoria disponibles.
La búsqueda de emisoras puede tardar unos minutos..
Búsqueda manual de emisoras
Utilice las teclas de dirección y o LEFT y RIGHT del aparato para buscar las siguientes emisoras disponibles
en la banda de frecuencia. Utilice las echas y para moverse de manera manual cada 0,05MHz en la banda de
frecuencia.
Memoria de emisoras
Para memorizar la emisora actual, mantenga pulsado Seleccione el espacio de memoria donde desea guardarla
con las teclas de dirección y y conrme en OK con el mando a distancia o SELECT en el aparato. Para acceder a
la memoria de emisoras, pulse . Seleccione la emisora deseada con las teclas de dirección y pulse PLAY.
AUX-IN
Conecte una fuente de audio externa, como reproductores MP3, smartphones, tablets o similar a la entrada auxiliar
situada en la parte trasera del aparato con un cable de audio. En el menú principal o en el botón MODE seleccione el
modo AUX. Suba el volumen en el dispositivo externo y regúlelo en la radio.
DLNA
El IR-150 acepta el formato DLNA. Asegúrese de que el aparato está conectado a la misma red que el dispositivo DLNA.
Si busca desde este último, se visualizará como AirMusic. Consulte el manual y el directorio de ayuda de su dispositivo
de transmisión DLNA para más detalles.
Media-Center
Con la función de reproductor de música puede transmitir su biblioteca de música desde su ordenador a través de la
red de área local. Podrá transmitir archivos en formato MP3, AAC, WMA y FLAC. Para ello, comparta en la red la carpeta
correspondiente desde su ordenador.
UPnP le permite a un dispositivo externo como el IR-150 examinar o ltrar la música almacenada en su ordenador por
categorías. Para ello son necesarios archivos de uso común con etiquetas (provistos de etiquetas ID3) y un sistema de
servidor compatible, como un ordenador con Windows Media Player 11 (o más reciente). Siga los pasos detallados a
continuación
:
• Asegúrese de que tanto el ordenador como la radio están conectados y registrados en la misma red.
• Abra el Windows Media Player y añada los datos y carpetas a la biblioteca deseada.
• Active la transmisión multimedia (Biblioteca multimedia > Compartir > Activar transmisión multimedia).
• Compruebe que la radio cuenta con autorización de acceso haciendo click en “Permitir”.
• El IR-150 podrá transmitir los contenidos multimedia de su ordenador. El servicio UPnP se ejecuta como proceso
secundario para que el WMP no tenga que iniciarse para permitir la reproducción multimedia.
57
Page 58

Para conectar el IR-150 a los datos compartidos del UPnP, seleccione en el menú principal del reproductor multimedia
de la radio > apagar UPnP y encienda la función.
El aparato buscará servidores UPnP disponibles. Tras el escaneado se mostrarán en pantalla. Seleccione el servidor
que desee y conrme en OK con el mando a distancia o pulse SELECT en el aparato.
El ordenador recibirá el aviso de que un aparato intenta contectarse al servidor UPnP. Abra la transmisión multimedia
“Media Sharing” en el reproductor de Windows y haga click en “Allow/permitir” en el cuadro de diálogo abierto.
Para acceder al reproductor de música, selecciónelo con el botón MODE en el menú principal. En el submenú del
reproductor seleccione Shared Media y luego un ordenador con contenidos compartidos que aparezca en la lista de
dispositivos UPnP conectados (en caso de que haya activado la transmisión multimedia de varios ordenadores).
El control de la reproducción se ejecutará por medio de los botones de dirección y PLAY/PAUSE y la navegación entre
pistas con las teclas de dirección (en el mando a distancia) o en DIAL/SELECT o LEFT/RIGH en la parte frontal del
aparato
58
Page 59

Centro de información
Información meteorológica
En esta sección podrá comprobar la predicción/información meteorológica. Podrá añadir la función durante el modo
standby del monitor. Pulse y conrme en SELECT/OK. La hora actual y la predicción se mostrarán en el monitor
durante el modo Standby (cambiando de lugar cada 10 segundos). Puede eliminar el cambio de lugar pulsando en
SELECT. Con los botones LEFT/RIGHT podrá cambiar a la predicción de los próximos días.
Información nanciera: información sobre las bolsas.
Información del sistema: muestra información sobre el número de versión del rmware y las direcciones MAC e IP.
Ajustes
My MediaU Management
Administre la lista de emisoras desde su ordenador activando el MediaU (ajustes > My MediaU Management).
Visite http://www.mediayou.net/ y registre su dispositivo en el portal. Siga las instrucciones de la página.
Una vez se haya completado el registro, organice su lista de favoritos online. Los cambios se sincronizarán en su IR-150
(se pueden registrar hasta 5 usuarios con el número de serie de la radio).
59
Page 60

Red
• Ajustes de redes inalámbricas: pulse para rastrear redes W-LAN disponibles y mostrarlas en la lista.
• Redes inalámbricas (WPS PBC): pulse para rastrear redes disponibles con WPS activado.
• Conguración manual: ajuste el DHCP o SSID manualmente o elimine la conexión de red actual.
• Comprobar las redes al encender: actívelo para conectar el aparato cada vez que se encienda con la última red
W-LAN utilizada.
Fecha y hora
Ajuste la hora y la fecha actuales. Utilice los botones de dirección arriba / abajo para modicar los campos y los botones derecha / izquierda para cambiar la posición del cursor.
Ajustes del formato de hora: 12 horas/ 24 horas
Ajustes del formato de fecha: AA/MM/DD, DD/MM/AA o MM/DD/AA
DST = activar/desactivar horario de verano/invierno
Despertador
• Active/desactive el despertador 1 o el despertador 2. Siga los pasos del menú para seleccionar el intervalo de repetición (p.ej. diario/ solo en determinados días), la hora y el tipo de alarma (tono, melodía, radio de internet o FM).
• Función sleep: pulse en “power nap” y congure un intervalo determinado de tiempo. De esta manera transmitirá
los ajustes de hora a las opciones Despertador 1 y 2.
• Volumen de la alarma: ajuste el volumen de la alarma..
Idioma
Elija entre inglés, alemán, francés, holandés, ruso, sueco, noruego, nlandés y danés como idioma del menú.
Función de atenuación
En esta sección podrá atenuar la luz del monitor. Seleccione el nivel de atenuación para el modo de ahorro de energía
(se activará tras unos minutos sin utilizar el aparato) y para el modo en uso.
Uso de energía
Ajuste la duración tras la cual el aparato entra automáticamente en función standby cuando no se utilice. Puede seleccionar entre 5, 15 y 30 minutos o apagar la función.
Apagado automático
Programe el apagado automático para los siguientes 15, 30, 60, 90, 120, 150 o 180 minutos. Una vez transcurrido ese
tiempo el IR-150 entrará automáticamente en el modo standby.
60
Page 61

Buering
Aplique el buering mínimo en 2, 4 o 8 segundos. Un tiempo de buering largo puede crear una emisión más estable
para las conexiones a la red o a internet lentas o con problemas.
Tiempo
Ajuste la visualización de la previsión meteorológica durante la pantalla en modo standby, la unidad de temperatura
(°C o °F) y su región.
Ajustes FM
Ajuste la emisión de radio en estéreo o mono y seleccione su región.
Ajustes de estaciones locales
El aparato encuentra de manera automática emisoras locales disponibles y las muestra en el punto correspondiente
de la radio internet. Seleccione “ajustar manualmente” para congurar las emisoras locales de otra región en caso de
que así lo desee.
Ajustes de reproducción
Seleccione entre los modos de reproducción “Repetir todos” (en transmisiones UPnP repite todos los archivos
de una carpeta), “Repetir uno” (repite la pista actual) o “Aleatorio” (reproduce las pistas disponibles de un modo
aleatorio).
Ajuste DLNA
Cambie el nombre del aparato para su visualización en las conexiones DLNA.
Ecualizador
Elija entre ocho ajustes predeterminados del ecualizador (normal, centrado, jazz, rock, banda sonora, clásico, pop,
noticias).
Continuar la reproducción al encender
Seleccione “On” para que cada vez que encienda el aparato se inicie la reproducción de la última emisora escuchada
o de la última fuente de música.
Actualización de software
Aquí podrá consultar toda la información sobre las actualizaciones disponibles del rmware. Instale las actualizaciones de software disponibles.
Volver a los valores predeterminados
Restaure los ajustes predeterminados en el aparato. Todas las listas de emisoras y favoritos (a menos que se hayan
guardado de manera local) así como los ajustes se borrarán. El aparato iniciará automáticamente la selección del idioma del menú y los ajustes W-LAN
Einstellungen.
61
Page 62

Resolución de problemas
Problema Solución / causas
La conexión W-LAN no puede esta-
blecerse.
La radio está conectada a internet
pero algunas emisoras no se sinto-
nizan.
• Asegúrese de que la radio y el ordenador (con conexión a internet) están
conectados a la misma red.
• Compruebe si el servidor DHCP está disponible o si usted ha introducido
una dirección IP estática.
• Compruebe si hay instalado un cortafuegos que bloquee los puertos de
salida.
• Algunos puntos de acceso/repetidores/routers pueden estar congurados de tal forma que solo se conectan a dispositivos con una dirección
MAC registrada. Consulte el manual de su equipo WLAN y añada la dirección MAC de la radio a la lista de “permitidos” del punto de acceso.
• Asegúrese que ha introducido la contraseña correctamente (en caso de
WLAN codicada/con contraseña). Verique que la ha escrito correctamente.
• En caso de que su WLAN esté “oculta” (un ajuste posible en muchos
routers), introduzca manualmente el nombre de la red en el IR-150. Para
ello, vaya a Menú de ajustes > red> conguración manual > redes de
estaciones radio > introducir SSID..
• Es posible que la emisora se encuentre en otra zona horaria y que en ese
momento no esté emitiendo.
• Una gran cantidad de usuarios intentan sintonizar la emisora y la capacidad/ancho de banda de esta no es suciente.
• El link ha cadudado/ya no existe.
• La emisora ya no existe.
No se pueden encontrar los dispositi-
vos UPnP o el ordenador que se trata
de buscar.
No puede autorizar carpetas para
UPnP porque la función no está dis-
ponible (gris).
Error de escaneado
Buering innito
• No están registrados en la red (ver arriba).
• Se ha instalado un cortafuegos que no permite compartir datos con apa-
ratos externos.
• La radio no está en el mismo grupo de trabajo o dominio que el ordenador correspondiente..
• Active la transmisión de archivos.
• Es posible que aparezcan fallos cuando la carpeta del IR-150 escanee un
ordenador, por ejemplo porque la aplicación de Windows File Sharing
esté en proceso. Conecte el ordenador a la red por cable para aumentar
la rapidez del escaneado.
• Si se produce un alto número de interrupciones en la transmisión o una
conexión insegura puede ocurrir que el IR-150 no salga del modo “bufering”, es decir, el almacenamiento intermedio antes de la reproducción.
Compruebe la conexión a la red, al modem y a internet y si es necesario,
póngase en contacto con el servicio técnico de su proveedor de internet.
62
Page 63

Indicaciones para la retirada del aparato
Aparatos electrónicos antiguos
Si el aparato lleva adherida la ilustración de la izquierda (el contenedor de basura tachado) entonces
rige la normativa europea, directiva 2002/96/CE. Este producto no debe arrojarse a un contenedor
de basura común. Infórmese sobre las leyes territoriales que regulan la recogida separada de aparatos eléctricos y electrónicos. Respete las leyes territoriales y no arroje aparatos viejos al cubo de
la basura doméstica. Una retirada de aparatos conforme a las leyes contribuye a proteger el medio
ambiente y a las personas a su alrededor frente a posibles consecuencias perjudiciales para la salud.
El reciclaje ayuda a reducir el consumo de materias primas.
Declaración de conformidad
Fabricado por Chal-Tec GmbH, Wallstraße 16, 10179, Berlín (Alemania).
Este producto cumple con las siguientes directivas europeas:
2004/108/CE (EMC)
2011/65/UE (refundición RoHS 2)
63
 Loading...