

Page 1

Connect System S
Mikroanlage mit Internetradio/DAB+
Microsytem with Internet Radio / DAB+
Micro chaîne avec radio Internet /DAB+
Microsistema con radio por Internet/DAB+
Microsistema con radio Internet/DAB+
10034071 10034072
www.auna-multimedia.com
Page 2

Page 3
Sehr geehrter Kunde,
wir gratulieren Ihnen zum Erwerb Ihres Gerätes.
Lesen Sie die folgenden Hinweise sorgfältig durch
und befolgen Sie diese, um möglichen Schäden
vorzubeugen. Für Schäden, die durch Missachtung
der Hinweise und unsachgemäßen Gebrauch
entstehen, übernehmen wir keine Haftung. Scannen
Sie den folgenden QR-Code, um Zugri auf die
aktuellste Bedienungsanleitung und weitere
Informationen rund um das Produkt zu erhalten.
Escanee el código QR para descargar el manual de instrucciones
ES
más reciente en su idioma.
Scannez le QR code pour télécharger le mode d‘emploi à jour dans
FR
votre langue.
Scansionate il codice QR per scaricare il manuale d‘uso attuale nella
IT
vostra lingua.
INHALT
Technische Daten 4
Spotify Connect 4
Sicherheitshinweise 5
Lieferumfang 7
Geräteübersicht 8
Anschlüsse 12
Inbetriebnahme 13
Systemeinstellungen 15
Internet-Radio 19
Musik-Player 21
USB-Bedienung 22
DAB-Radio 24
FM-Radio 27
CD-Player 29
BT-Bedienung 31
AUX-Bedienung 32
NetRemote 33
Verwendung von Kopfhörern 33
Sleep-Einstellung 34
Wecker stellen 35
Hinweise zur Entsorgung 36
DE
3
Page 4
DE
TECHNISCHE DATEN
Artikelnummer 10034071, 10034072
Stromversorgung 100-240-V~ 50/60 Hz
Stromverbrauch 28 W
USB-Anschluss 5 V / 1 A
Audioausgang 2 x 5 W RMS
FM-Radio
Frequenzbereich 87,5 MHz - 108 MHz
DAB
Frequenzbereich 174-240 MHz
SPOTIFY CONNECT
Verwende dein Smartphone, Tablet oder deinen Computer als
Fernbedienung für Spotify. Auf spotify.com/connect erfährst du
mehr.
Lizenzen
Die Spotify Software unterliegt den Nutzungsrechten von Drittanbietern,
die auf folgender Seite eingesehen werden können:
https://www.spotify.com/connect/third-party-licenses
4
Page 5

SICHERHEITSHINWEISE
Allgemeine Sicherheitshinweise
• Lesen Sie alle Hinweise genau durch, bevor Sie das Gerät verwenden
und bewahren Sie die Bedienungsanleitung für den zukünftigen
gebrauch auf.
• Verwenden Sie ausschließlich die Stromspannung, die auf dem
Typenschild des Geräts angegeben ist. Vergewissern Sie sich, dass Ihre
Steckdose geerdet ist.
• Das Gerät sollte auf einer achen, stabilen Fläche platziert werden und
darf keinen Vibrationen ausgesetzt werden
• Bitte stellen Sie das Gerät nicht auf schräge oder instabile Flächen, da
das Gerät herunterfallen könnte.
• Die Steckdose sollte sich in der Nähe des Geräts benden und sollte
leicht zugänglich sein.
• Vermeiden Sie extreme Temperaturen, sowohl Hitze als auch Kälte.
Stellen Sie das Gerät in sicherer Entfernung zu Hitzequellen wie
Wärmestrahlern oder Gas-/Elektroherden auf. Setzen Sie das Gerät
nicht direkter Sonneneinstrahlung oder anderen Wärmequellen aus.
• Stellen Sie niemals Kerzen oder ähnliche Gegenstände mit oener
Flamme auf dem Gerät ab.
• Um Brandrisiko, die Gefahr eines Stromschlags und Schäden am Gerät
zu vermeiden, setzen Sie das Gerät keinem Regen, Feuchtigkeit oder
tropfenden und spritzenden Flüssigkeiten aus. Es sollten keine mit
Wasser gefüllten Gegenstände, wie beispielweise Blumenvasen, auf
dem Gerät abgestellt werden.
• Wenn Sie irgendeine Flüssigkeit auf dem Gerät verschütten, können
dadurch schwerwiegende Schäden verursacht werden. Schalten Sie das
Gerät in diesem Fall sofort aus und ziehen Sie den Netzstecker aus der
Steckdose. Setzen Sie sich mit dem Kundendienst in Verbindung.
• Decken Sie die Belüftungsönungen des Geräts nicht ab und achten
Sie darauf, dass Vorhänge und andere Materialien nicht in die
Belüftungsönungen hinein gelangen, um eine Überhitzung des Geräts
und dadurch bedingte Brand- und Stromschlaggefahr zu vermeiden.
• Stellen Sie das Gerät nicht in ein geschlossenes Bücherregal,
einen Einbauschrank oder andere Abstellplätze mit beengten
Platzverhältnissen. Achten Sie darauf, dass das Gerät in einem
Mindestabstand von 10cm zu allen es umgebenden Flächen und
Gegenständen platziert wird, um eine ausreichende Belüftung zu
gewährleisten.
DE
Sicherheit
• Ziehen Sie den Netzstecker des Geräts immer aus der Steckdose, bevor
Sie das Radio mit anderen Geräten verbinden bzw. die Verbindung zu
anderen Geräten trennen oder das Radio bewegen.
• Achten Sie darauf, dass der Netzstecker des Radios während eines
5
Page 6

DE
Gewitters nicht in der Steckdose steckt.
• Das Gerät wird warm, wenn es über einen längeren Zeitraum verwendet
wird. Das ist normal und weist nicht auf ein Problem des Geräts hin.
Stromanschluss
• Achten Sie darauf, dass das Gerät nicht auf dem Stromanschlusskabel
steht, da das Kabel durch das Gewicht des Geräts beschädigt und zu
einem Sicherheitsrisiko werden könnte.
• Sollte das Anschlusskabel des Geräts beschädigt sein, muss es vom
Hersteller dem Kundendienst oder einer anderen hierfür qualizierten
Person ausgetauscht werden, um Schäden zu vermeiden.
Störungen
• Stellen Sie das Radio nicht auf oder in die Nähe von anderen Geräten,
die eine elektromagnetische Störung hervorrufen könnten. Sollten
Sie das Radio in die Nähe von anderen Geräten stellen, könnte die
Wiedergabequalität des Radios negativ beeinusst werden und ein
Störgeräusch könnte auftreten.
Beaufsichtigung
• Kinder, die sich in der Nähe des Geräts aufhalten sollten beaufsichtigt
werden, damit diese das Gerät nicht als Spielzeug verwenden.
• Lassen Sie niemanden, insbesondere Kinder, keine Gegenstände oder
ähnliches in die Löcher, Anschlüsse und sonstige Geräteönungen
hineinstecken, da dies zu einem tödlichen Stromschlag führen könnte.
Bedienung/ Instandhaltung/ Wartung
• Entfernen Sie nicht selbstständig Schrauben, um das Risiko eines
Stromschlags zu verringern. Das Gerät enthält keine Teile, die
vom Benutzer gewartet werden könnten. Überlassen Sie alle
Wartungsarbeiten hierfür qualiziertem Personal.
• Entfernen und önen Sie keine fest angebrachten Abdeckungen des
Geräts, da dadurch gefährliche elektrische Spannung freigesetzt werden
könnte.
• Ziehen Sie den Netzstecker vor der Reinigung des Geräts aus der
Steckdose.
• Verwenden Sie keinen Scheuerschwamm oder aggressive
Reinigungsmittel, da dadurch die Oberäche es Geräts beschädigt
werden kann.
• Verwenden Sie zur Reinigung des Geräts keine Flüssigkeiten.
6
Page 7

LIEFERUMFANG
DE
Radio
Fernbedienung
2 Lautsprecher
Bedienungsanleitung
7
Page 8
DE
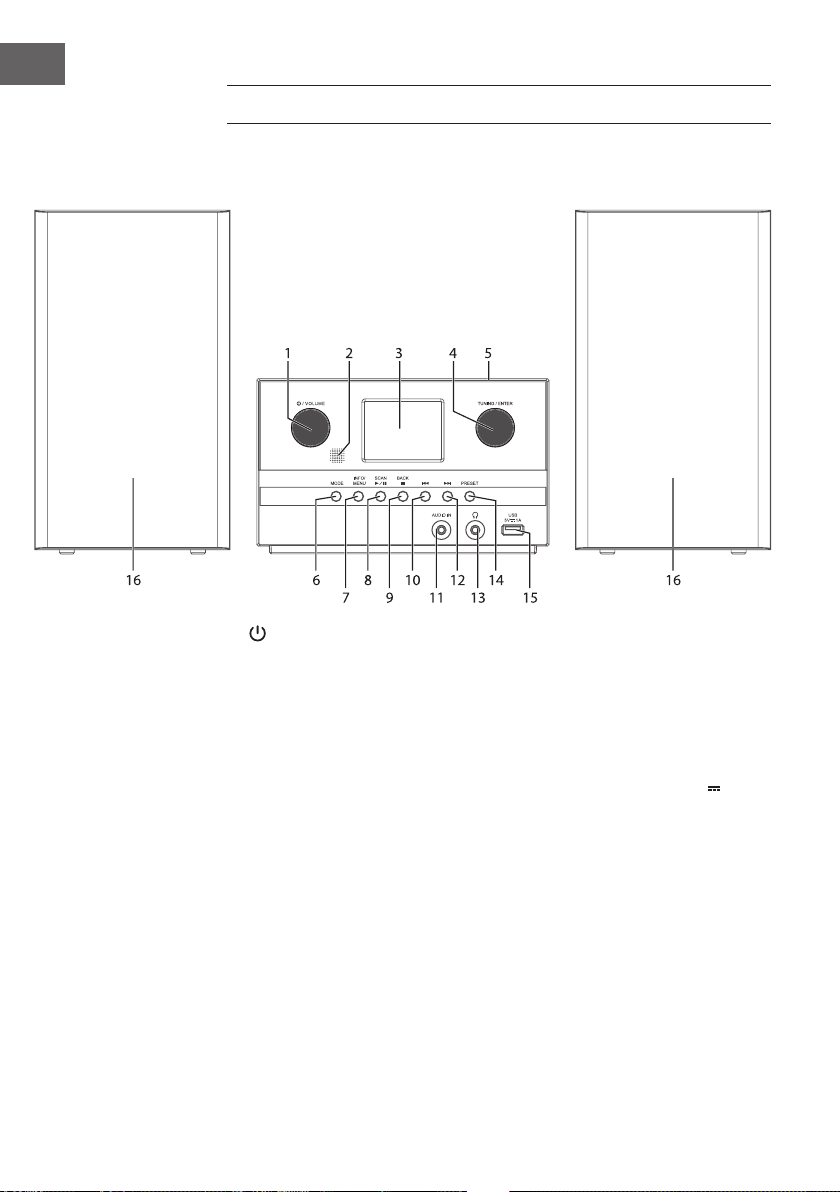
GERÄTEÜBERSICHT
Vorderansicht
1 / Lautstärkeregler
2 Fernbedienungssensor
3 Display
4 TUNING/EINGABE
5 CD-Fach
6 Modus
7 INFO/Men´ü
8 SCAN/ Wiedergabe/Pause
8
9 Zurück / Stopp
10 Titel zurück
11 Audio-In-Buchse
12 Titel vor
13 Kopfhöreranschluss
14 PRESET-Taste (Speicher)
15 USB Ladeanschluss (5 V
16 Lautsprecher
1 A)
Page 9
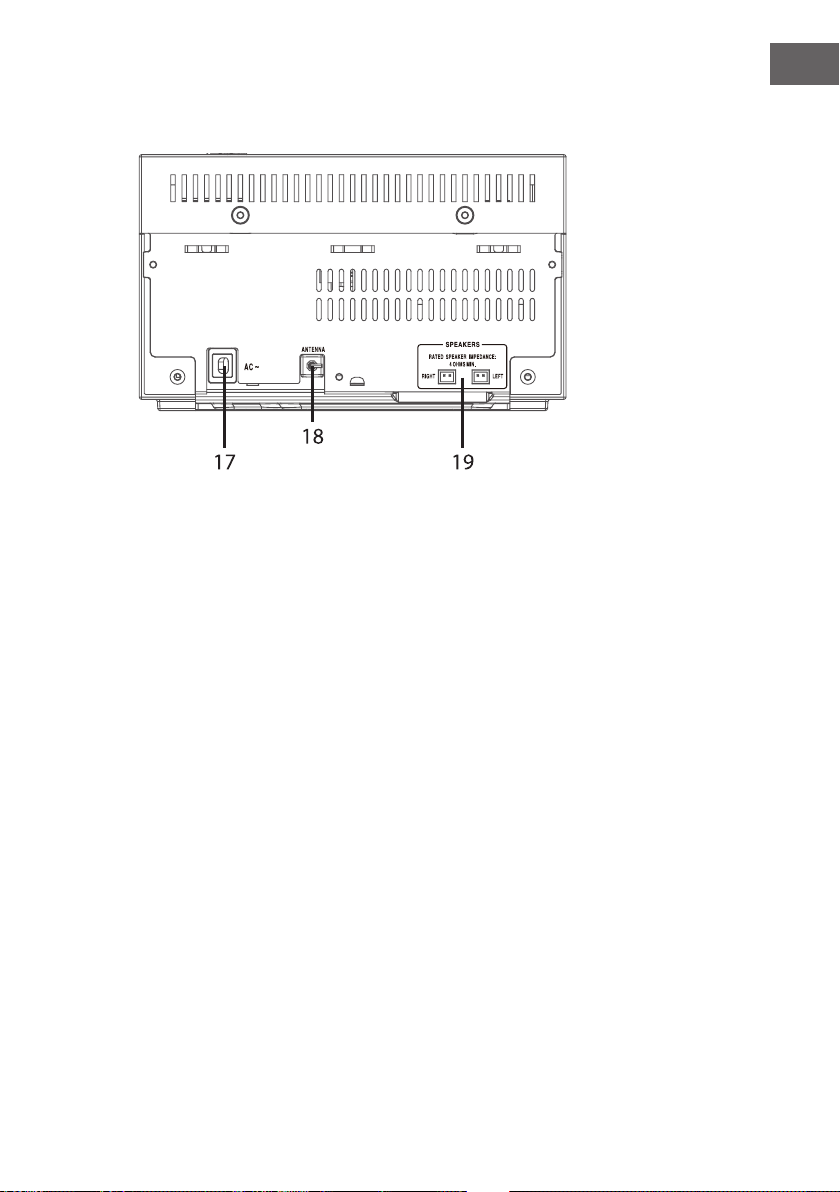
Rückansicht
17 Netzkabel
18 Antenne
19 Lautsprecher (L/R) Anschlüsse
DE
9
Page 10
DE
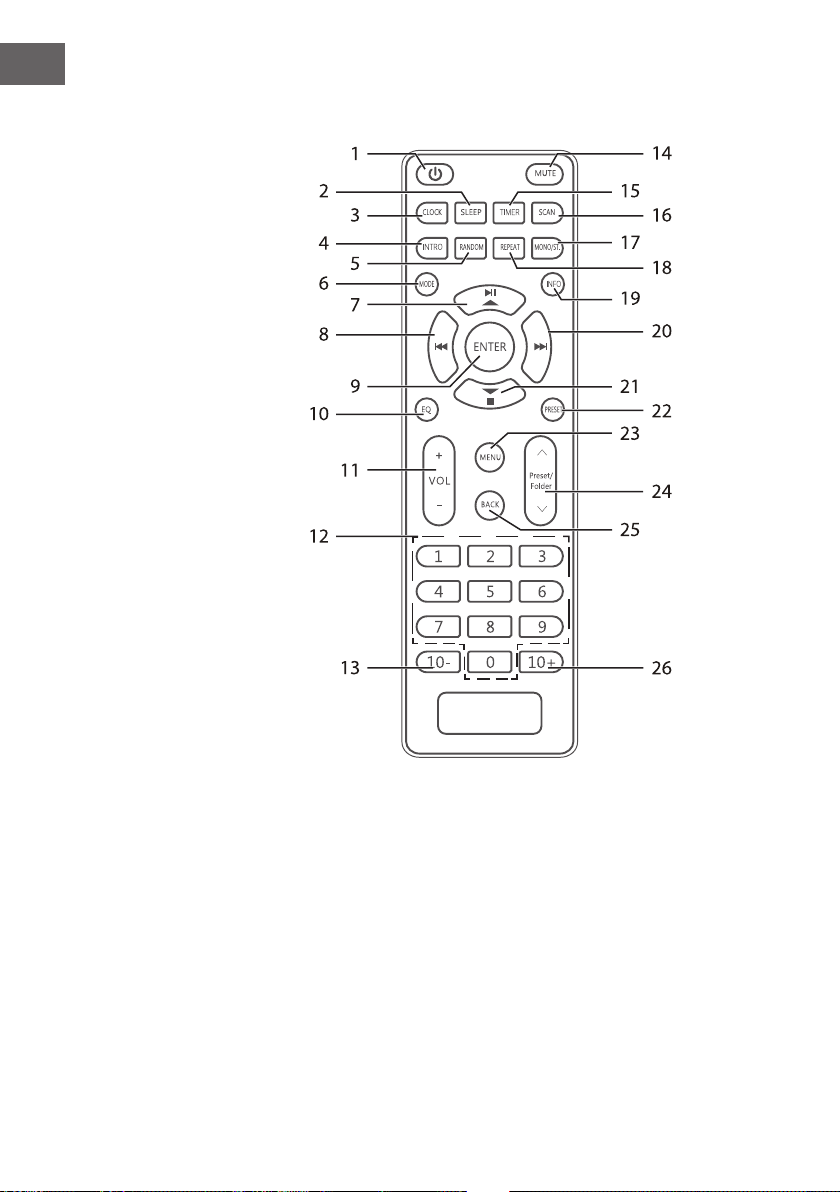
Remote Control
1 Standby Taste
2 Abschalt-Timer
3 Uhr
4 INTRO
5 Zufallswiedergabe
6 Modus
7 Wiedergabe/Pause
8 Titel zurück
9 Eingabe
10 Equalizer
10
11 Lautstärke +/ –
Taste
12 Zierntasten
13 10- Taste
14 Stumm
15 TIMER
16 Sendersuche
17 MONO/STEREO
18 Wiederholen
19 Information
20 Titel zurück
21 Stopp
22 Senderspeicher
23 Menü
24 Preset/Ordner ∨/∧
25 Titel zurück
26 10+ Taste
Page 11

Batteriewechsel für die Fernbedienung
1. Önen Sie die Batterieabdeckung.
2. Legen Sie 2 x AAA 1,5V Alkaline-Batterien ein (nicht im Lieferumfang
enthalten). Achten Sie darauf, dass die (+) und ( -) Enden der Batterie mit
den (+) und ( -) Enden im Batteriefach übereinstimmen.
3. Schließen Sie die Abdeckung.
Umgang mit dem Akku
• Unsachgemäße oder fehlerhafte Verwendung von Batterien kann
zu Korrosion oder Auslaufen der Batterie führen, was Brände,
Personenschäden oder Sachschäden verursachen kann.
• Verwenden Sie nur den in dieser Anleitung angegebenen Batterietyp.
• Verwenden Sie zwei identische Batterien. Batterien mit
unterschiedlichem Alter und Ladung können zu einer
Wärmeentwicklung führen.
• Entsorgen Sie die verbrauchte Batterie nicht im Hausmüll. Entsorgen Sie
Batterien gemäß den örtlichen Vorschriften.
• Entfernen Sie die Batterie aus der Fernbedienung, wenn sie über einen
längeren Zeitraum nicht benutzt wird, da es zu Korrosion oder Auslaufen
der Batterie kommen kann, was zu Verletzungen, Sachschäden und/
oder Feuer führen kann.
DE
Funktionsbereich der Fernbedienung
Richten Sie die Fernbedienung auf das Gerät, nicht mehr als 4 Meter vom
Fernbedienungssensor entfernt und innerhalb von 60° von der Vorderseite
des Geräts.
Der Betriebsabstand kann je nach Helligkeit des Raumes variieren.
t
Note: Der Bedienungsabstand kann je nach Helligkeit des Raumes variieren.
11
Page 12

DE
ANSCHLÜSSE
Anschluss an die Stromversorgung
Wickeln Sie das Netzteilkabel auf die volle Länge ab. Schließen Sie das
Netzteil an die Netzsteckdose an. Das Gerät ist nun angeschlossen und
betriebsbereit.
Der Anschluss des Gerätes an eine andere Stromquelle kann zu Schäden
am Gerät führen.
Netzwerkverbindung
Dieses Gerät unterstützt nur die drahtlose Netzwerkverbindung für den
Netzwerkzugri und keine drahtgebundene LAN-Verbindung.
Drahtloses Netzwerk
1. Überprüfen Sie zunächst, ob die Kontrollleuchten (LINK/ACT) Ihres LAN-
Anschlusses oder Ihres Routers leuchten.
2. Fahren Sie mit dem Vorgang fort, wie im Folgenden beschrieben.
Es wird dringend empfohlen, den Setup-Assistenten im Abschnitt
Systemeinstellungen durchzugehen.
Dieses Gerät kann nicht direkt an ein eigenständiges modernes
Gerät angeschlossen werden. Ein Router oder ein Modem die in
einen Router integriert sind, verwendet werden. Da es verschiedene
Anschlusskongurationen gibt, beachten Sie bitte die Spezikationen und
Anweisungen Ihres Telekommunikationsbetreibers, Internetdienstanbieters
und Router-Einstellanleitung.
12
Page 13
INBETRIEBNAHME
Ein- und Auschalten
Wenn Sie das Gerät zum ersten Mal an die Steckdose anschließen, bendet
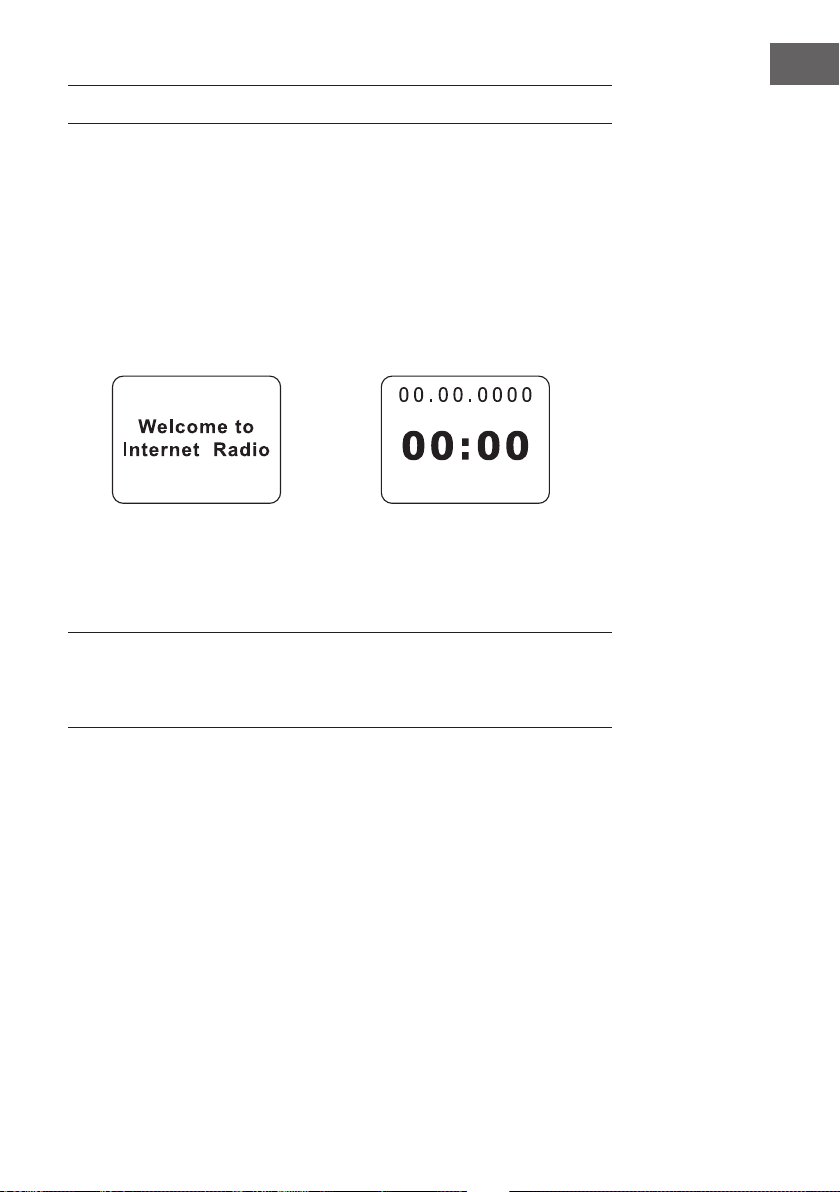
sich das Gerät im Standby-Modus, nachdem es "Willkommen beim Internet
Radio" (F.1)(F.2) angezeigt hat.
1. Drücken Sie den Lautstärkeregler am Gerät oder die Standby-Taste auf
der Fernbedienung, um das Gerät einzuschalten.
2. Drücken Sie den Lautstärkeregler am Gerät oder die Standby-Taste auf
der Fernbedienung, , um das Gerät wieder in den Standby-Modus zu
versetzen.
Betriebsarten auswählen
Drücken Sie wiederholt MODE am Gerät oder auf der Fernbedienung, um
zwischen den Modi Music Player, DAB-Radio, FM-Radio, AUX In, CD, BT und
Internetradio zu wechseln.
Wenn das Gerät ca. 15 Minuten im Ruhezustand ist, schaltet es automatisch
in den Standby-Modus. Um das Gerät vollständig auszuschalten, ziehen Sie
den Netzstecker aus der Steckdose. Bitte schalten Sie das Gerät vollständig
aus, um bei Nichtgebrauch Energie zu sparen.
DE
Lautstärke einstellen
• Drehen Sie den Regler () /LAUTSTÄRKE am Gerät oder drücken Sie VOL
+/- auf der Fernbedienung, um die Lautstärke einzustellen.
• Wenn Sie den Ton ausschalten möchten, drücken Sie MUTE auf
der Fernbedienung. Drücken Sie erneut MUTE oder drücken Sie
LAUTSTÄRKE +/- auf der Fernbedienung oder drehen Sie am Regler () /
LAUTSTÄRKE am Gerät, um das normale Hören fortzusetzen.
Im Menü navigieren
1. Halten Sie die INFO/MENU-Taste am Gerät gedrückt oder drücken Sie
die MENU-Taste auf der Fernbedienung, um in das Menü zu gelangen.
2. Drehen Sie das Einstellrad TUNING/ENTER am Gerät oder drücken Sie
die Tasten / auf der Fernbedienung, um Ihre Wahl zu treen.
3. Drücken Sie zum Bestätigen Ihrer Auswahl die Taste ENTER.
13
Page 14

DE
Erstes Einschalten
Wenn Sie das Gerät zum ersten Mal an die Steckdose anschließen, zeigt
das Display den Willkommensbildschirm an und es erscheint die Seite
mit den Datenschutzrichtlinien. Bitte besuchen Sie die auf der Seite
erwähnte Website für die Details der Datenschutzerklärung. Drücken Sie
das Einstellrad TUNING/ENTER am Gerät oder die ENTER-Taste auf der
Fernbedienung, um den nächsten Schritt zu bestätigen.
1. Um den anfänglichen Setup-Assistenten zu starten, drehen Sie das
Einstellrad TUNING/ENTER am Gerät oder die Tasten 7 / 8 auf
der Fernbedienung, um [JA] auszuwählen, und drücken Sie dann das
Einstellrad TUNING/ENTER am Gerät oder die ENTER-Taste auf der
Fernbedienung zur Bestätigung.
2. Im nächsten Schritt können Sie das Zeitformat auswählen. Wählen Sie
die gewünschte Einstellung [12] oder[24] und drücken Sie das Einstellrad
TUNING/ ENTER am Gerät oder die ENTER-Taste auf der Fernbedienung,
um zum nächsten Schritt überzugehen.
3. Hier kann ausgewählt werden, mit welcher Quelle (DAB/FM/Netzwerk/
No Update) das Gerät die Uhrzeit und das Datum bezieht und
aktualisiert. Wenn "Aus Netzwerk aktualisieren" ausgewählt ist, fahren
Sie mit dem nächsten Schritt fort, um die Zeitzone auszuwählen, um
sicherzustellen, dass die Zeit korrekt angezeigt wird. Und dann wählen
Sie "Sommerzeit": [EIN] oder[AUS].
4. Im nächsten Schritt können Sie festlegen, ob das Produkt im StandbyModus mit dem Internet verbunden bleiben soll. Drehen Sie das
Einstellrad TUNING/ENTER am Gerät oder drücken Sie die Tasten
auf der Fernbedienung, um [JA] auszuwählen, und drücken Sie dann das
Einstellrad TUNING/ENTER am Gerät oder drücken Sie zur Bestätigung
die ENTER-Taste auf der Fernbedienung.
5. Ihr Radio sucht nun nach Ihrem drahtlosen Netzwerk, dies kann einige
Sekunden dauern, dann erscheint eine Liste aller drahtlosen Netzwerke
auf dem Bildschirm. Wählen Sie das Ihnen bekannte WLAN-Netzwerk
aus und ob Sie WPS (Drucktaste/Pin) oder Skip WPS verwenden
möchten, um das Passwort über die angezeigte Tastatur einzugeben.
6. Während Sie "WPS überspringen" drücken, wird die virtuelle Tastatur auf
dem Display angezeigt, Sie können das Einstellrad TUNING/ENTER am
Gerät drehen oder die 7/8 bTasten auf der Fernbedienung drücken,
um die Markierung zu verschieben. Drücken Sie das Einstellrad TUNING/
ENTER am Gerät oder die ENTER-Taste auf der Fernbedienung, um die
Taste auszuwählen.
7. Nachdem Sie das Passwort eingegeben haben, wählen Sie [OK] und
drücken Sie dann das Einstellrad TUNING/ENTER am Gerät oder
die ENTER-Taste auf der Fernbedienung zur Bestätigung. Wenn das
eingegebene Passwort korrekt ist, wird nun eine Verbindung zum
Netzwerk hergestellt. Drücken Sie TUNING/ ENTER am Gerät oder
ENTER-Taste auf der Fernbedienung, um das Menü zu verlassen.
7/8
14
Page 15

8. Die Einstellungen können jederzeit geändert werden, indem Sie die
MENU-Taste drücken, um das Menü anzuzeigen. Drücken Sie die Tasten
/ um Systemeinstellungen auszuwählen, und drücken Sie dann die
ENTER-Taste zur Bestätigung. Drücken Sie dann die Tasten / um
den Setup-Assistenten auszuwählen, und drücken Sie dann die ENTERTaste, um den Setup-Assistenten erneut zu starten.
Diese Bedienungsanleitung erklärt die grundlegende Anleitung zur
Bedienung dieses Gerätes. Sofern nicht anders angegeben, basieren alle
beschriebenen Vorgänge auf der Verwendung der Fernbedienung
SYSTEMEINSTELLUNGEN
Halten Sie die INFO/MENU-Taste am Gerät oder die MENU-Taste auf
der Fernbedienung gedrückt, um das Menü anzuzeigen. Schalten Sie das
Einstellrad TUNING/ENTER ein oder drücken Sie die Tasten / um die
Systemeinstellungen auszuwählen, und drücken Sie dann das Einstellrad
TUNING/ENTER am Gerät oder die ENTER-Taste auf der Fernbedienung zur
Bestätigung..
Equalizer
Dieses System unterstützt eine Vielzahl von Equalizern und Soundeekten.
Drücken Sie die EQ-Taste, um alternativ in das Equalizer-Menü zu gelangen.
Drücken Sie im Systemeinstellungsmodus die Tasten / um Equalizer
auszuwählen, und drücken Sie dann zur Bestätigung ENTER.
DE
1. Das Display zeigt : FLAT > CLASSIC > ROCK > POP > JAZZ
2. Drücken Sie die Tasten / zur Auswahl und drücken Sie dann die
ENTER-Taste zur Bestätigung.
Netzwerk
1. Drücken Sie im Systemeinstellungsmodus die Tasten /, um
Netzwerk auszuwählen, und drücken Sie zur Bestätigung ENTER.
2. Drücken Sie die Tasten /, um die folgenden Einstellungen
auszuwählen, und drücken Sie zur Bestätigung ENTER.
15
Page 16
DE
SSID - wählen Sie das gewünschte
drahtlose Netzwerk aus. Rescan - Scannt
Network wizard
PBC Wlan setup
View settings Zeigt die Einstellung am Gerät an
Wlan region Wählen Sie ein Land Ihrer Wahl aus.
Manual settings
NetRemote PIN Setup
Network prole Zeigt das verbundene Netzwerk an.
Keep network connected
nach verfügbaren Netzwerken.Manuelle
Konguration - wählen Sie ein drahtloses
Netzwerk mit DHCP-Aktivierung/
Deaktivierung.
Wählen Sie WPS am Gerät aus und drücken
Sie die WPS-Taste auf dem Modemgerät,
mit dem Sie eine Verbindung herstellen
möchten. Drücken Sie die ENTER-Taste, um
fortzufahren.
Wählen Sie ein drahtloses Netzwerk mit
DHCP-Aktivierung/Deaktivierung aus.
So legen Sie eine PIN-Nummer fest, die
eingegeben werden soll, bevor Sie sich
über ein Netzwerk mit dem Gerät verbinden
können.
So löschen Sie den verbundenen
Netzwerkspeicher im Netzwerkprol.
Um festzulegen, ob die Verbindung zu ihrem
Netzwerk im Standby-Modus und außerhalb
des Netzwerk-Radiomodus erhalten bleibt.
Dies ist notwendig für die Fernbedienung
und das Audio-Streaming im Music PlayerModus.
3. Drücken Sie die Taste BACK/ am Gerät oder die Taste BACK auf der
Fernbedienung, um die Einstellung abzubrechen und zum vorherigen
Menü zurückzukehren.
Uhrzeit/Datum
Die Uhrzeit/Datum kann automatisch eingestellt werden, sobald sie mit
einem Internet-, DAB- oder FM-Radiosender mit Uhrzeit/Datum verbunden
ist. Sie können die Uhrzeit/Datum auch manuell einstellen.
• Drücken Sie die Taste UHR, um auf Zeit/Datum einstellen zuzugreifen.
• Oder drücken Sie im Systemeinstellungsmodus die Tasten / um
Zeit/Datum auszuwählen, und drücken Sie zur Bestätigung ENTER.
16
Page 17

1. Die Datumsziern blinken auf der Anzeige.
2. Drücken Sie die Tasten / um den Tag einzustellen, und drücken Sie
zur Bestätigung ENTER.
3. Wiederholen Sie dies über Schritt (2), um den Monat/Jahr/Stunde/
Minute einzustellen.
4. Die Datums- und Zeiteinstellungen sind nun abgeschlossen. Für die
anderen Einstellungen unter Zeit/Datum drücken Sie die Tasten /
um die folgenden Optionen auszuwählen, und drücken Sie dann zur
Bestätigung ENTER.
DE
Auto update
Format einstellen
Zeitzone einstellen
Sommerzeitumstellung
Die Standardeinstellung für die automatische Zeitaktualisierung ist "Update
vom Netzwerk". Wenn Sie die Uhrzeit manuell einstellen möchten, wird
empfohlen, die Funktion Auto-Aktualisierung zu deaktivieren.
Sprache
1. Drücken Sie im Systemeinstellungsmodus die Tasten / zur Auswahl
der Sprache und drücken Sie dann zur Bestätigung ENTER.
2. Drücken Sie die Tasten / um die gewünschte Anzeigesprache zu
ändern.
3. Drücken Sie zur Bestätigung ENTER.
Werkseinstellungen
Es kann vorkommen, dass Sie Ihr Gerät wieder auf die Werkseinstellungen
zurücksetzen müssen, insbesondere wenn Sie einen Wohnortswechsel
vorgenommen haben . Wenn Sie Empfangsprobleme haben, sollten Sie
einen Reset durchführen und es erneut versuchen. Wenn Sie in einen
anderen Teil des Landes umziehen und die lokalen und nationalen DABSender in diesem Gebiet abholen, sind Ihre zuvor eingestellten Sender
möglicherweise nicht mehr verfügbar.
Update von DAB / FM / Netzwerk / Kein
Update
12 / 24 Zeitformat.
Wählen Sie eine Zeitzone aus. (Nur
verfügbar, wenn die automatische
Aktualisierung aus dem Netzwerk
eingeschaltet ist.)
Wählen Sie die Sommerzeit. (Nur verfügbar,
wenn die automatische Aktualisierung aus
dem Netzwerk eingeschaltet ist.)
1. Drücken Sie im Systemeinstellungsmodus die Tasten / um
Werkseinstellungen auszuwählen, und drücken Sie zur Bestätigung
17
Page 18
DE
ENTER.
2. Drücken Sie die Tasten 7 / 8 um [ Ja] auszuwählen, und drücken Sie zur
Bestätigung ENTER. Oder wählen Sie [ Nein], um abzubrechen.
Nach dem Systemreset werden alle eingestellten Sender, DAB- und FMSender gelöscht.
Software-Update
1. Drücken Sie im Systemeinstellungsmodus die Tasten / um
Software-Update auszuwählen, und drücken Sie dann zur Bestätigung
ENTER.
2. Drücken Sie die Tasten / um "Einstellung für automatische
Überprüfung" oder "Jetzt prüfen" auszuwählen, und drücken Sie dann die
ENTER-Taste zur Bestätigung.
Bevor Sie Software herunterladen, vergewissern Sie sich, dass das
Radio an ein stabiles Stromnetz angeschlossen ist. Eine Unterbrechung
der Netzversorgung während des Software-Downloads kann zu
Funktionsstörungen und/oder Schäden am Gerät führen!
Einrichtungsassistent
Der Installationsassistent ist im Abschnitt Systemeinstellungen verfügbar;
Sie können ihn durchlaufen, um Einstellungen für Datum/Uhrzeit und
Netzwerk zu kongurieren. Sobald dies abgeschlossen ist, ist Ihr Radio
betriebsbereit.
Info
1. Drücken Sie im Systemeinstellungsmodus die Tasten / um Info
auszuwählen, und drücken Sie dann die ENTER-Taste zur Bestätigung.
2. Die Softwareversion, die Radio-ID und der Benutzername werden auf
dem Display angezeigt.
Hintergrundbeleuchtung
1. Drücken Sie im Systemeinstellungsmodus die Tasten /, um
Hintergrundbeleuchtung auszuwählen, und drücken Sie dann zur
Bestätigung ENTER.
2. Für die anderen Einstellungen unter Hintergrundbeleuchtung drücken
Sie die Tasten /, um die folgenden Optionen auszuwählen, und
drücken Sie dann die ENTER-Taste zur Bestätigung.
Betriebsmodus
Standby Modus
18
Hoch/ Mittel/ Niedrig
Zeitlimit: Aus/ 10 Sek/ 30 Sek/ 60 Sek/ 60 Sek.
Standby-Level: Hoch/ Mittel/ Niedrig/AUS
Page 19
INTERNET-RADIO
Um Internet-Radio zu hören, muss Ihr Radio mit dem Internet verbunden
sein. Versuchen Sie, Ihr Radio so nah wie möglich an Ihrem Router zu
positionieren, um die besten Verbindungsgeschwindigkeiten zu erzielen.
Wenn der Internet-Radio-Modus ausgewählt ist, verbindet sich das Radio
mit dem Internet-Radio-Portal von Frontier Silicon, um eine Liste der Sender
herunterzuladen. Sobald ein Sender ausgewählt ist, verbindet sich das
Radio direkt mit diesem Sender.
Drücken Sie im Internet-Radio-Modus die MENU-Taste auf der
Fernbedienung, um auf das Menü zuzugreifen. Sie können wählen zwischen:
Zuletzt angehört, Senderliste, Systemeinstellungen und Hauptmenü.
Drücken Sie die Tasten / zur Auswahl und drücken Sie die ENTERTaste zur Bestätigung. Wenn das Internet-Radio neu gestartet wird, wird
automatisch der zuletzt gehörte Sender ausgewählt.
Zuletzt gehört
1. Drücken Sie die Tasten /, um den Verlauf der Sender auszuwählen,
die Sie zuvor gehört haben.
2. Drücken Sie zur Bestätigung die ENTER-Taste.
Station list
Drücken Sie die Tasten /, um die folgenden Optionen auszuwählen, und
drücken Sie dann zur Bestätigung ENTER.
http:/ /
Internet
Radio
DE
Internet
radio
Local “Country”
Stations
Sie können gezielt nach Sendern aus Ihrem Land suchen. In
diesem Rahmen können Sie Ihre Suche nach verschiedenen
Gruppierungen weiter einschränken oder alle Sender
anzeigen.
Wählen Sie im Menü Sender aus verschiedenen Kategorien
aus.
Sie können Sender auch nach verschiedenen Stichworten
durchsuchen.
Der Name und eine Beschreibung des ausgewählten Senders
werden auf dem Display angezeigt.
Halten Sie die INFO/MENÜ-Taste am Gerät gedrückt
oder drücken Sie wiederholt die INFO-Taste auf der
Fernbedienung, um weitere Informationen für die
Station anzuzeigen. Die angezeigten Informationen
durchlaufen Zyklen wie Name / Beschreibung, Genre /
Ort, Zuverlässigkeit, Bitrate / Codec / Sampling-Rate,
Wiedergabepuer und aktuelles Datum.
19
Page 20
DE
Save to Preset
1. [Not set]
2. [Not set]
3. [Not set]
4. [Not set]
5. [Not set]
Wählen Sie Podcasts aus den Kategorien im Podcast-Menü
aus.
Podcasts
Sie können auch eine bestimmte Episode auswählen, indem
Sie Schlüsselwörter eingeben, um Podcasts zu durchsuchen
Hilfe
Sie können die Portaladresse und den Besuch für den
Support nden.
Drücken Sie die BACK-Taste am Gerät oder auf der Fernbedienung kann
eine Menüebene zurückgehen.
Preset Stations
Die voreingestellten Internet-Radiosender sind im Radio gespeichert und
können von anderen Radios nicht erreicht werden.
1. Um eine Internet-Radio-Voreinstellung zu speichern, halten Sie die
PRESET-Taste am Gerät oder an der Fernbedienung gedrückt, bis auf
dem Display "In Voreinstellung speichern" erscheint. (F.4)".
2. Wählen Sie eine der 30 Voreinstellungen, um den aktuellen Sender
zu speichern, indem Sie die Tasten / drücken, um die Nummer
auszuwählen, und drücken Sie zur Bestätigung ENTER.
Eine gespeicherte Station abrufen
1. Um ein Preset auszuwählen, drücken Sie die PRESET-Taste am Gerät
oder an der Fernbedienung und drücken Sie dann die Tasten /, um
einen der aufgeführten Preset-Sender auszuwählen.
2. Drücken Sie ENTER, um die Auswahl zu bestätigen.
20
Alternative
Drücken Sie die Tasten PRESET/FOLDER / auf der Fernbedienung, um
zum nächsten/vorherigen gespeicherten Sender zu wechseln.
Oder drücken Sie die Zierntasten auf der Fernbedienung, um zum
voreingestellten Sender zu wechseln. ("0" für voreingestellten Sender 10).'.
- Wenn kein Sender gespeichert ist, wird "Voreinstellung leer" angezeigt
Die Bedienung der Voreingestellten und der Aufrufstationen ist für
Internetradio, DAB und FM gleich.
Internet-Radio-Anzeigemodi
Jedes Mal, wenn Sie die INFO/MENÜ-Taste am Gerät oder die INFO-
Taste auf der Fernbedienung drücken, zeigt das Display die folgenden
Anzeigemodi an:
Kanalinfo - Beschreibung - Genre/Show Land - Zuverlässigkeit - Bitrate/
Sound-Format - Wiedergabepuer - Datum
Page 21

MUSIK-PLAYER
Mit dem integrierten Musik-Player können Sie ungesicherte Audiodateien,
die auf einem vernetzten Computer oder einem angeschlossenen USBMassenspeichergerät gespeichert sind, über das Gerät wiedergeben. Um
Musik vom Computer wiederzugeben, müssen Sie eine gemeinsame Datei
oder Medienbibliothek auf dem Computer einrichten.
Drücken Sie die MODUS-Taste am Gerät oder auf der Fernbedienung
wiederholt, um den Music Player-Modus auszuwählen.
Medienfreigabe
Bitte stellen Sie sicher, dass Ihr Computer im Netzwerk verfügbar
ist und dass Ihr Computer so eingerichtet ist, dass er die Freigabe
Ihrer Medienordner oder -dateien ermöglicht. Lesen Sie in der
Bedienungsanleitung Ihres Computers, wie Sie einen Ordner für die
Freigabe einrichten.
1. Drücken Sie im Musikplayermodus die Tasten /, um freigegebene
Medien auszuwählen, und drücken Sie die ENTER-Taste, um nach allen
verfügbaren Ordnern oder Dateien für Freigabemedien zu suchen.
2. Auf dem Display werden alle gefundenen Medienordner aus dem
Netzwerk angezeigt. Drücken Sie die Tasten /, um den Computer
auszuwählen, mit dem Sie eine Verbindung herstellen möchten.
3. Das Gerät sucht nach allen freigegebenen Medien vom Computer.
4. Drücken Sie die Tasten / und wählen Sie Ihr gewünschtes
gemeinsames Medium aus, drücken Sie dann die ENTER-Taste.
5. Dieses Gerät kann nicht auf Ihren Computer zugreifen, bis Ihr Computer
es zulässt.
6. Drücken Sie die ENTER-Taste, um die Wiedergabe des gewünschten
Tracks zu starten.
DE
Sender löschen
1. Drücken Sie im Musikplayermodus die Tasten /, um Prune Server
auszuwählen, und drücken Sie die ENTER-Taste zur Bestätigung.
2. Drücken Sie die Tasten /, um [ JA ] auszuwählen, um Server zu
entfernen, die nicht mehr verfügbar sind. Drücken Sie zur Bestätigung
die ENTER-Taste. Oder wählen Sie [ NEIN], um abzubrechen.
21
Page 22
DE
USB-BEDIENUNG
Wenn ein USB-Gerät an das Gerät angeschlossen ist, zeigt das Display
"USB-Disk angeschlossen - Ordner önen?" an. Drücken Sie dann die
ENTER-Taste zur Bestätigung von [ JA ].
Alternativ: Drücken Sie im Musik-Player-Modus die Tasten (/), um die
USB-Wiedergabe auszuwählen, und drücken Sie die ENTER-Taste zur
Bestätigung.
Drücken Sie zum Auswählen die Tasten /. Drücken Sie dann ENTER, um
eine Songdatei zu bestätigen.
Das Gerät kann nur MP3-Dateiformate im USB-Betrieb wiedergeben.
Das Gerät ist möglicherweise nicht mit allen USB-Geräten kompatibel; dies
ist kein Hinweis auf ein Problem mit dem Gerät.
Gerät auaden
Sie können Ihr Gerät über die USB-Buchse an diesem Gerät mit einem USB-
Kabel (nicht mitgeliefert) auaden.
• Der maximale Strom für die USB-Ladung beträgt 1A.
• Alle Geräte zum Laden über USB sind nicht garantiert.
• Die USB-Ladung wird unabhängig davon unterstützt, ob das Gerät einoder ausgeschaltet ist.
Musikwiedergabe Anzeigemodi
Jedes Mal, wenn Sie die INFO/MENÜ-Taste am Gerät oder die INFO-
Taste auf der Fernbedienung drücken, zeigt das Display die folgenden
Anzeigemodi an.
Künstler - Album - Bitrate/Soundformat - Wiedergabepuer - Datum
22
Taste
/
Funktion
Drücken Sie die SCAN/ () Taste am Gerät oder (/)
Taste auf der Fernbedienung, um die Wiedergabe
anzuhalten oder die normale Wiedergabe
fortzusetzen..
Drücken Sie diese Taste, um zum vorherigen Titel zu
gelangen.
Halten Sie diese Taste gedrückt, um den aktuellen
Track schnell zurückzuspulen.
Page 23
Drücken Sie diese Taste, um zum nächsten Titel zu
Wiederholungsmodus
1. Drücken Sie im Menü des Music Player-Modus die Tasten /,
um Wiederholung auszuwählen, und drücken Sie die ENTER-Taste
wiederholt, oder drücken Sie die REPEAT-Taste auf der Fernbedienung
während der Wiedergabe, um die Wiederholung ein- und auszuschalten.
2. Wenn die Wiederholungswiedergabe eingeschaltet ist, wird
dem Display angezeigt und der aktuelle Ordner wird wiederholt
wiedergegeben
Modus mit zufälliger Reihenfolge
1. Drücken Sie im Menü des Music Player-Modus die Tasten /, um
Shule Play auszuwählen, und drücken Sie die ENTER-Taste wiederholt,
oder drücken Sie die RANDOM-Taste auf der Fernbedienung während
der Wiedergabe, um die Shule Play ein- und auszuschalten.
2. Wenn die Zufallswiedergabe eingeschaltet ist, wird auf dem Display
angezeigt und die Songdateien werden nach dem Zufallsprinzip
wiedergegeben.
gelangen.
Halten Sie diese Taste gedrückt, um den aktuellen
Titel schnell vorzuspulen..
auf
DE
23
Page 24
DE
DAB-RADIO
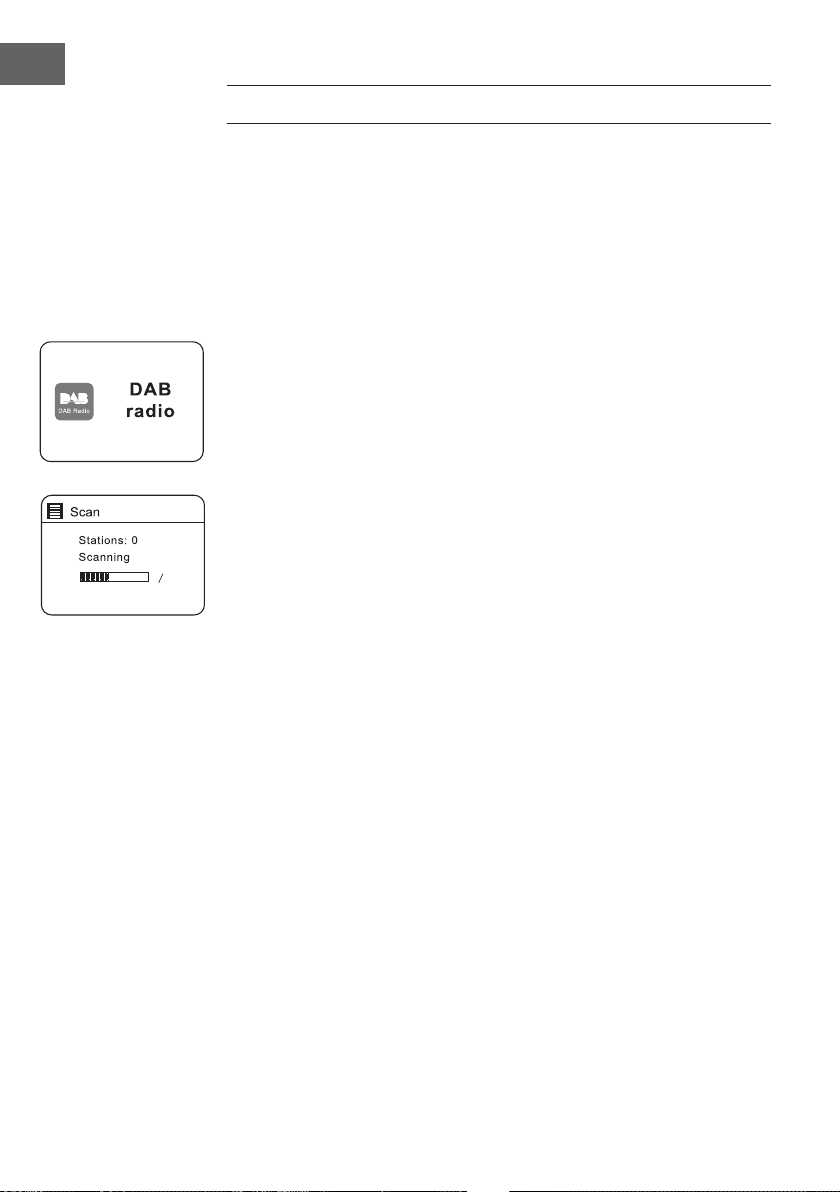
Drücken Sie wiederholt MODUS am Gerät oder an der Fernbedienung, um
DAB-Radio auszuwählen. (F.6) Das Gerät wechselt in den DAB-Modus und
führt die automatische Scanfunktion aus. Während des Scans erscheint auf
der Anzeige "Scannen....". " zusammen mit einer Leiste, die den Fortschritt
des Scans und die Anzahl der bisher gefundenen Stationen anzeigt. (F.7)
Nach Abschluss des Scans wählt das Gerät die erste alphanumerisch
gefundene Station aus. Um die gefundenen Sender zu erkunden, drücken
Sie die Tasten / zur Auswahl und drücken Sie zur Bestätigung ENTER.
Senderliste
1. Drücken Sie im DAB-Modus die MENU-Taste, um das DAB-Menü
aufzurufen.
2. Drücken Sie die Tasten / um "Senderliste" auszuwählen, und
drücken Sie dann zur Bestätigung ENTER.
3. Eine Liste der DAB-Sender wird auf dem Display angezeigt.
Automatischer Scan
1. Drücken Sie die Taste / am Gerät oder die Taste SCAN auf der
Fernbedienung, um den automatischen Scan zu aktivieren.
2. Auf der Anzeige erscheint "Scannen..." und ein Fortschrittsbalken.
3. Alle gefundenen Stationen werden automatisch gespeichert. Um die
gefundenen Sender zu erkunden und anzuhören, drücken Sie die Tasten
/ zur Auswahl und drücken Sie ENTER zur Bestätigung.
24
Manuelles Tuning
Neben der Auto-Tune-Funktion können Sie den Empfänger auch manuell
einstellen. Dies kann Ihnen bei der Ausrichtung Ihrer Antenne helfen oder
beim Hinzufügen von Sendern, die bei der automatischen Abstimmung
übersehen wurden.
1. Drücken Sie MENU auf der Fernbedienung, um das Menü anzuzeigen.
2. Drücken Sie die Tasten / um Manuelles Tuning auszuwählen, und
drücken Sie zur Bestätigung ENTER.
3. Auf der Anzeige erscheint das Multiplex 5A bis 13F.
4. Drücken Sie die Tasten / /), um den Kanal auszuwählen, und
drücken Sie zur Bestätigung ENTER.
5. Um einen gefundenen Sender anzuhören, kehren Sie zum aktuellen
Wiedergabebildschirm zurück und drücken Sie die Tasten /, um den
gewünschten Sender aus der Senderliste auszuwählen, und drücken Sie
die ENTER-Taste zur Bestätigung.
Page 25

DAB-Anzeigen
Jedes Mal, wenn Sie die INFO/MENÜ-Taste am Gerät oder die INFO-Taste
auf der Fernbedienung drücken, zeigt das Display die folgenden Anzeigen
an:
DLS: – Programmart – Ensemble/Frequenz – Signalfehler/Signalstärke Bitrate / Codec / Kanäle - Datum
DLS (Dynamic Label Segment): Dies ist eine durchlaufende Nachricht mit
Echtzeitinformationen, z.B. Songtitel, Schlagzeilen.
Programme Type: Dies beschreibt die Sparte der zu übertragenden
Sendung.
Ensemble Name/Frequency: Der Fehler wird als Zahl angezeigt. Wenn die
Zahl 0 ist, bedeutet dies, dass das empfangene Signal fehlerfrei ist und
die Signalstärke stark ist. Wenn die Fehlerquote hoch ist, wird empfohlen,
die Funkantenne neu zu positionieren oder das Gerät neu zu positionieren.
Auf dem Display erscheint ein Ladebalken zur Anzeige der Signalstärke, je
stärker das Signal, desto länger ist der Balken von links nach rechts.
Signalfehler/ Signalstärke:Der Fehler wird als Zahl angezeigt. Wenn die
Zahl 0 ist, bedeutet dies, dass das empfangene Signal fehlerfrei ist und
die Signalstärke stark ist. Wenn die Fehlerquote hoch ist, wird empfohlen,
die Funkantenne neu zu positionieren oder das Gerät neu zu positionieren.
Auf dem Display erscheint ein Ladebalken zur Anzeige der Signalstärke, je
stärker das Signal, desto länger ist der Balken von links nach rechts.
DE
Bit-Rate / Codec / Kanäle: Auf dem Display wird die empfangene digitale
Audio-Bitrate mit zusätzlichen Informationen über den Audiocodec und die
Kanalkonguration angezeigt.
Datum: Hier wird das aktuelle Datum angezeigt, das vom Sender
automatisch bereitgestellt wird.
Ungültige Sender entfernen
Sie können alle nicht verfügbaren Sender aus der Liste entfernen.
1. Drücken Sie im DAB-Modus die MENÜ-Taste und drücken Sie die Tasten
/, um Beschneiden ungültig auszuwählen, und drücken Sie die
ENTER-Taste zur Bestätigung.
2. Drücken Sie die Tasten /, um [ JA] auszuwählen, und drücken Sie die
ENTER-Taste zur Bestätigung. Oder wählen Sie [ NEIN], um abzubrechen.
25
Page 26

DE
DRC (Dynamic Range Compression)
Wenn Sie in einer lauten Umgebung Musik mit hohem Dynamikumfang
hören, sollten Sie den Audiodynamikbereich komprimieren.
1. Drücken Sie im DAB-Modus die MENÜ-Taste und drücken Sie die Tasten
/, um DRC auszuwählen, und drücken Sie die ENTER-Taste zur
Bestätigung.
2. Drücken Sie die Tasten /, um DRC hoch/niedrig/aus auszuwählen,
und drücken Sie die ENTER-Taste, um die Einstellung zu bestätigen.
Senderreihenfolge
Sie können die Reihenfolge der Sendereinträge festlegen
1. Drücken Sie im DAB-Modus die MENÜ-Taste und drücken Sie die Tasten
/ um die Senderreihenfolge auszuwählen, und drücken Sie die
ENTER-Taste zur Bestätigung.
2. Drücken Sie die Tasten / um Alphanumerisch/Ensemble/Gültig
auszuwählen, und drücken Sie die ENTER-Taste, um die Einstellung zu
bestätigen.
Speichern und Abrufen der voreingestellten Station
Siehe "Voreinstellung der Sender" und "Voreingestellte Sender abrufen" im
Abschnitt Internet Radio für weitere Informationen.
26
Page 27
FM-RADIO
Um das Gerät in den FM-Modus zu versetzen, drücken Sie wiederholt MODE
am Gerät oder auf der Fernbedienung, um in den FM-Modus zu wechseln
(F.8) Auf der Anzeige erscheint die Frequenz.
Auto Scan
Drücken Sie die Taste SCAN am Gerät oder die Taste SCAN auf der
Fernbedienung, um die Suche nach einem Sender zu starten. Sobald eine
Station gefunden wurde, stoppt der Scanvorgang automatisch.
Manuelle Abstimmung
Um manuell nach FM-Sendern zu suchen, drehen Sie das Einstellrad
TUNING/ENTER, bis die gewünschte Frequenz erreicht ist.
Bei UKW-Radio kann es erforderlich sein, jeden Sender durch Drücken
der Tasten (/) fein abzustimmen. Jede Betätigung stellt die Frequenz um
0,05 MHz ein. Wenn der Empfang immer noch schlecht ist, stellen Sie die
Position der Antenne ein oder versuchen Sie, das Radio an einen anderen
Ort zu bringen.
Scan-Einstellung
1. Drücken Sie die MENÜ-Taste, um das FM-Menü aufzurufen.
2. Drücken Sie die Tasten / um die Scan-Einstellung auszuwählen, und
drücken Sie dann zur Bestätigung ENTER.
3. Drücken Sie die Tasten / um [ Ja ] auszuwählen, um nur ein starkes
Signal zu empfangen, und drücken Sie dann zur Bestätigung ENTER.
FM Radi o
DE
FM
radio
Audio-Einstellung
Drücken Sie MONO/ST. auf der Fernbedienung, um zwischen der Auswahl
Nur Mono oder Mono/Stereo umzuschalten.
Alternativ
1. Drücken Sie die MENU-Taste, um das Hauptmenü aufzurufen.
2. Drücken Sie die Tasten / um die Audioeinstellung auszuwählen, und
drücken Sie die ENTER-Taste zur Bestätigung.
3. Drücken Sie die Tasten
zu hören, oder [ NEIN ], um das Gerät Stereo oder Mono automatisch
auswählen zu lassen.
4. Drücken Sie zur Bestätigung die ENTER-Taste.
/ um [ JA ] auszuwählen, um nur in Mono
27
Page 28

DE
FM-Radio-Anzeigen
Jedes Mal, wenn Sie die INFO/MENÜ-Taste am Gerät oder die INFO-Taste
auf der Fernbedienung drücken, erscheinen im Display die folgenden
Anzeige:
Radiotext - Programmtyp - Frequenz - Datum
RDS-Radio-Text: Dies ist eine durchlaufende Information über das aktuelle
Programm.
Programmtyp: Dies beschreibt den "Stil" oder das "Genre" der Musik, die
übertragen wird.
Stationsname / Frequenz: Wenn ein RDS-Sender empfangen wird, wird
der Name dieses Senders angezeigt, oder wenn nicht, wird die Frequenz
angezeigt.
Datum: Hier wird das aktuelle Datum angezeigt, das vom Sender
automatisch bereitgestellt wird.
Speichern und Abrufen der voreingestellten Station
Siehe "Voreinstellung der Sender" und "Abruf eines gespeicherten Senders"
im Abschnitt Internetradio für weitere Informationen
28
Page 29
CD-PLAYER
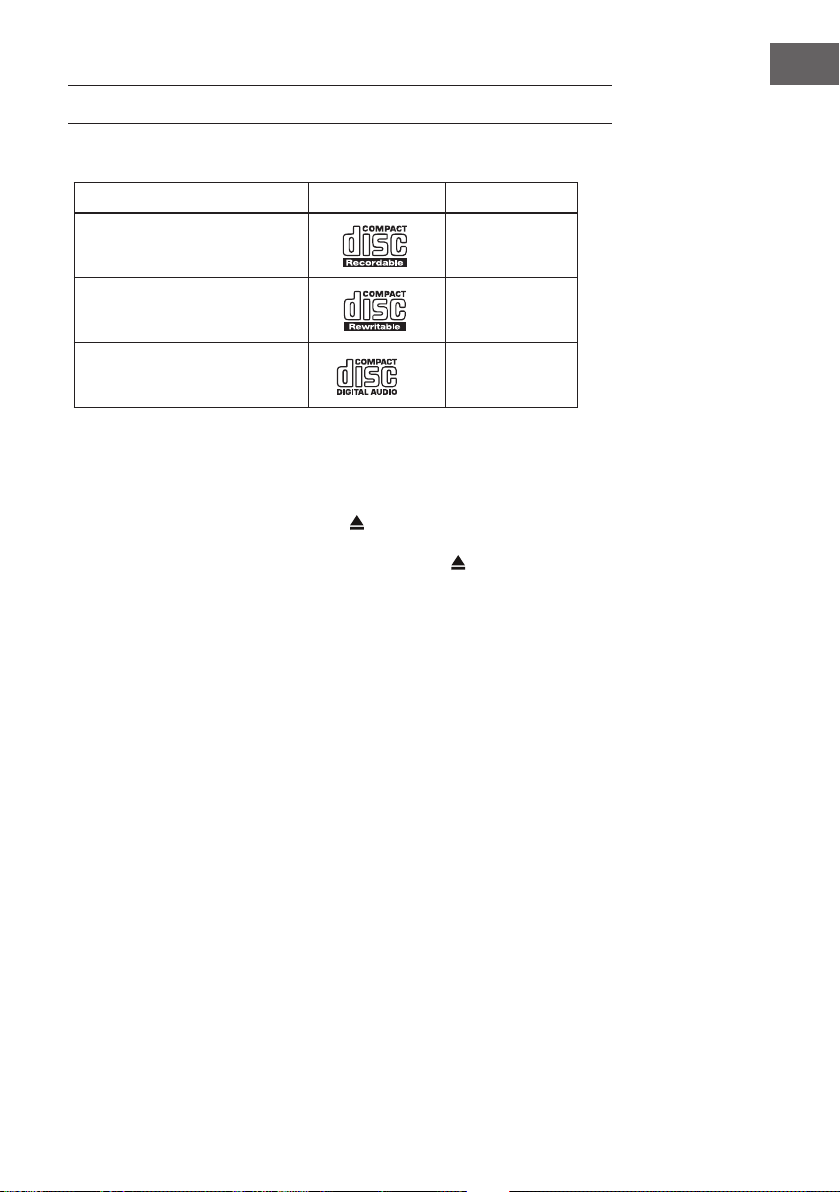
Kompatible Disc-Typen
Disc type Disk-Logo Medieninhalt
DE
CD-R
(CD beschreibbar)
CD-RW (CD wiederbeschreibbar) Audio
AUDIO CD
(Compact Disc Digital Audio)
Drücken Sie wiederholt MODUS am Gerät oder auf der Fernbedienung, um
den CD-Modus auszuwählen.
Wiedergabe
1. Drücken Sie ÖFFNEN/SCHLIESSEN (
2. Legen Sie die CD mit der Beschriftungsseite nach oben in das CD-Fach
und schließen Sie dann das CD-Fach mit der Taste .
3. Wenn keine Disc vorhanden ist oder die Disc nicht gelesen werden kann,
erscheint "No disc" auf dem Display.
4. Die Gesamtzahl der Titel wird auf dem Display angezeigt, dann drücken
Sie die Taste SCAN am Gerät oder auf der Fernbedienung, um den
ersten Titel der CD/ MP3-Disc automatisch wiederzugeben.
Wiedergabe pausieren: Drücken Sie die
auf der Fernbedienung, um die Wiedergabe zu unterbrechen. Drücken Sie
erneut, um die Wiedergabe fortzusetzen.
So beenden Sie die Wiedergabe: Drücken Sie die
Taste auf der Fernbedienung, um die Wiedergabe zu stoppen.
) um das CD-Fach zu önen.
- Taste am Gerät oder () Taste
-Taste am Gerät oder ()
Audio
Audio
Zu einem anderen Titel springen
Drücken Sie
rückwärts zu springen oder zum nächsten Titel vorwärts zu springen.
Halten Sie / gedrückt, um schnell vor- oder zurückzuspulen.
Wenn Sie eine MP3-Disc mit Musik abspielen, die in einem anderen Ordner
gruppiert ist, drücken Sie PRESET/ORDNER / auf der Fernbedienung,
um zum nächsten/vorherigen Ordner zu wechseln.
/ , um zum Anfang des Tracks oder des vorherigen Titels
29
Page 30
DE
1
1
F
1
F
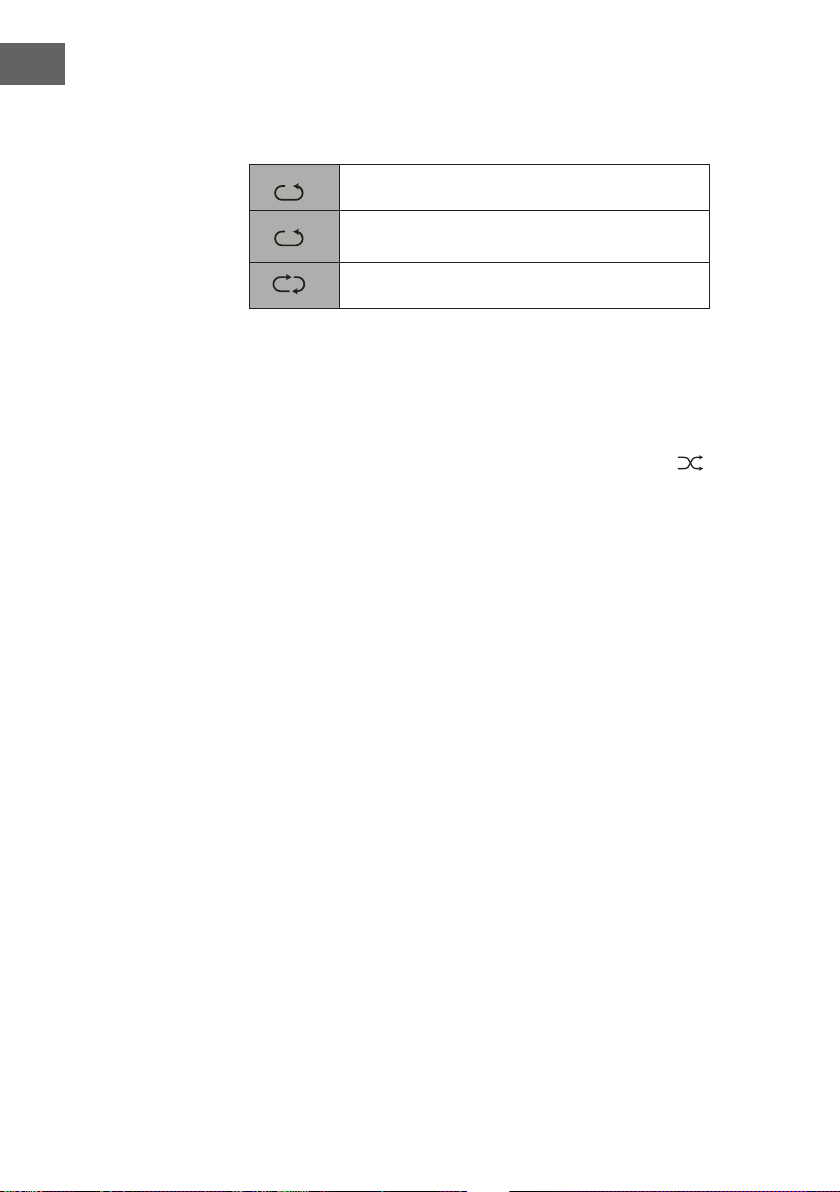
Wiedergabe wiederholen
1. Drücken Sie die Taste REPEAT wiederholt, um eine Funktion
auszuwählen.
Es wird der aktuelle Titel wiederholt abgespielt.
Es werden alle Dateien im aktuellen Ordner
wiederholt abgespielt (nur bei Daten-CDs).
Es werden alle Titel wiederholt abgespielt.
2. Drücken Sie REPEAT noch einmal, um die Wiederholungsfunktion
auszuschalten.
Zufällige Wiedergabe
Alle Titel auf der Disc können in zufälliger Reihenfolge wiedergegeben
werden.
1. Drücken Sie RANDOM auf der Fernbedienung. Die Anzeige
dem Display angezeigt. Alle Titel werden zufällig wiedergegeben.
2. Drücken Sie / um den nächsten zufälligen Titel wiederzugeben.
3. Nachdem alle Tracks einmal abgespielt wurden, stoppt die Wiedergabe
automatisch.
4. Um die Zufallswiedergabe abzubrechen, drücken Sie RANDOM während
der Zufallswiedergabe. Die normale Wiedergabe wird fortgesetzt.
Intro-Wiedergabe
1. Drücken Sie INTRO auf der Fernbedienung. Die Anzeige "INTRO " wird
auf dem Display angezeigt. Das Gerät spielt die ersten 10 Sekunden
jedes Titels an.
2. Drücken Sie erneut INTRO auf der Fernbedienung, um die normale
Wiedergabe fortzusetzen.
wird auf
Programmeinstellung
Sie können bis zu 20 Titel in beliebiger Reihenfolge programmieren. Der
Programmmodus wird im STOP-Modus aktiviert.
1. Drücken Sie die Taste PRESET, um in den Programmmodus zu gelangen.
2. Drücken Sie
möchten.
3. Drücken Sie ENTER, um den Titel zu bestätigen.
4. Wiederholen Sie die Schritte 2-3, um weitere Titel zu programmieren.
Drücken Sie nach Abschluss des Vorgangs die Taste , um die
Wiedergabe der programmierten Spuren zu starten.
Programmabbruch: Drücken Sie die -am Gerät oder auf der
Fernbedienung zweimal, oder önen Sie das Diskfach und schließen Sie
es wieder, um den Speicher zu löschen.
/ um den Track auszuwählen, den Sie voreinstellen
30
Page 31

BT-BEDIENUNG
Das Gerät verfügt über eine BT-Funktion, die ein Signal innerhalb von 8
Metern empfangen kann. Verbinden Sie das Gerät mit einem BT-Gerät, um
Musik zu hören:
1. Drücken Sie wiederholt MODUS am Gerät oder auf der Fernbedienung,
um den BT-Modus auszuwählen.
2. Wenn das Gerät nicht mit einem BT-Gerät gekoppelt ist, blinkt die
Anzeige mit dem BT-Symbol.
3. Aktivieren Sie Ihr BT-Gerät und wählen Sie den Suchmodus.
4. Auf Ihrer BT-Geräteliste wird"Connect System S" angezeigt.
5. Wählen Sie "Connect System S" und geben Sie bei Bedarf "0000" für das
Passwort ein.
6. Um die BT-Funktion zu trennen, wechseln Sie zu einer anderen Funktion
am Gerät oder deaktivieren Sie die Funktion von Ihrem BT-Gerät aus.
Musikwiedergabe über BT
• Möglicherweise müssen Sie die Lautstärke Ihres Radios und BT-Geräts
anpassen.
• Drücken Sie die
abzuspielen/pausen.
• Drücken Sie die / Tasten am Gerät oder an der Fernbedienung, um
zum vorherigen/nächsten Titel zu gelangen.
• Wenn die Signalstärke schwach ist, kann es sein, dass Ihr BT-Empfänger
die Verbindung trennt, aber er wechselt automatisch wieder in den
Verbindungsmodus.
• Um den Signalempfang zu verbessern, beseitigen Sie alle Hindernisse
zwischen dem Gerät und dem BT-Gerät.
• Dieses Gerät unterstützt die Funktionen A2DP (Advanced Audio
Distribution Prole) und AVRCP (Audio Video Remote Control Prole).
Dies kann nur mit jeweils einem BT-Gerät gekoppelt werden.
• Die Kompatibilität mit allen Geräten und Medientypen ist nicht
gewährleistet.
• Einige Mobiltelefone mit der BT-Funktion können sich verbinden und
trennen, während Sie Anrufe tätigen und beenden. Dies ist kein Hinweis
auf ein Problem mit Ihrem Gerät.
-Taste am Gerät auf der Fernbedienung, um Musik
DE
31
Page 32

DE
AUX-BEDIENUNG
An der Vorderseite des Gerätes bendet sich eine "AUDIO IN"-Buchse.
Analoge Audiosignale von anderen Quellen können über diese Buchse in
das Gerät eingegeben werden.
1. Verbinden Sie den Eingang mit einem anderen Audiogerät über ein AUXKabel (nicht im Lieferumfang enthalten) mit der Buchse "AUDIO IN".
2. Drücken Sie wiederholt MODUS am Gerät oder auf der Fernbedienung,
um den AUX-Modus auszuwählen.
3. Drehen Sie VOL +/- am Gerät oder auf der Fernbedienung, um die
Lautstärke für den gewünschten Lautstärkepegel einzustellen.
4. Bedienen Sie Ihr Audiogerät im AUX-Modus direkt für
Wiedergabefunktionen.
Informationen zum Anschluss des externen Audiogeräts nden Sie in der
Bedienungsanleitung des externen Geräts.
32
Page 33

NETREMOTE
Das Gerät bietet eine Funktion von NetRemote per Smartphone oder
Tablett im iOS- oder Android-System. Durch das Herunterladen der
zugeordneten App namens UNDOK können Sie alle Modi von Internetradio,
Music Player, DAB, FM, Bluetooth und AUX-In anzeigen.
Suchen Sie UNDOK in Google Play oder Apple Store nach und installieren
Sie es auf Ihrem Smartphone oder Tablett. Bevor Sie die UNDOK-App
verwenden, stellen Sie sicher, dass sich das Gerät und das Smartphone
oder Tablett im selben WLAN-Netzwerk benden.
Starten Sie die App.
Die App initialisiert und sucht nach dem Gerät im Netzwerk. Tippen Sie auf
das Gerät, um die NetRemote-Verbindung herzustellen.
• Sobald das Smartphone oder Tablett bereits auf das Gerät zugegrien
hat, wird es beim nächsten Mal automatisch verbunden, wenn Sie die
App erneut önen.
• Beachten Sie, dass, wenn ein anderes Smartphone oder Tablett mit der
App im selben Netzwerk Zugri auf das Gerät hat, die ursprüngliche
Verbindung getrennt wird.
Wenn Sie das Gerät zum ersten Mal an das Gerät anschließen, fordert Sie
die App möglicherweise zur Eingabe der PIN auf. Der Standard-PIN ist 1234.
Einzelheiten zum Ändern der PIN zur Sicherheit nden Sie im Abschnitt
Systemeinstellungen: Netzwerk - NetRemote PIN-Einrichtung.
DE
Wählen Sie auf der Hauptseite den gewünschten Modus aus. Sie können
dann den ausgewählten Modus auf Ihrem Smartphone oder Tablett und auf
dem Gerät gleichzeitig steuern.
VERWENDUNG VON KOPFHÖRERN
Hören Sie keine Musik mit hoher Lautstärke, wenn Sie Kopfhörer
verwenden. Andernfalls kann es zu dauerhaften Hörschäden kommen.
Drehen Sie die Lautstärke des Tuners auf die niedrigste Stufe, bevor Sie
Kopfhörer verwenden.
• Verwenden Sie nur Kopfhörer mit einem 3,5-mm-Klinkenstecker.
• Stecken Sie den Kopfhöreranschluss in die Kopfhörerbuchse vor dem
Gerät.
33
Page 34

DE
SLEEP-EINSTELLUNG
Mit dieser Funktion können Sie programmieren, dass das Gerät nach einer
bestimmten Zeitspanne selbstständig in den Standby-Modus wechselt.
1. Um die Ruhefunktion zu aktivieren, drücken Sie die Taste SLEEP
wiederholt. Die Uhrzeit ändert sich bei jeder Betätigung in der folgenden
Reihenfolge:
AUS 15 Minuten 30 Minuten 45 Minuten 60 Minuten 60 Minuten 90
Minuten 120 Minuten.
2. Wenn Ihre gewünschte Schlafzeit im Display erscheint, stoppen Sie das
Drücken der Taste und die Schlaunktion wird nach zwei Sekunden
aktiviert. “ ” wird auf dem Display angezeigt. Neben dem Symbol in der
Anzeige wird auch die verbleibende Zeit bis zum Ausschalten angezeigt.
3. Wenn der Sleep-Timer auf Null herunterzählt, wechselt das Gerät in
den Standby-Modus. Um die Sleep-Funktion auszuschalten, während
die Sleep-Timer noch abwärts zählen, drücken Sie die SLEEP-Taste
wiederholt, um "SLEEP OFF" auszuwählen”. “ ” verschwindet aus der
Anzeige.
4. Drücken Sie die SLEEP-Taste einmal, um den Status der Sleep-Timer auf
dem Display anzuzeigen, wenn sie eingeschaltet wird.
Alternativ:
1. Drücken Sie die MENU-Taste auf der Fernbedienung, um das Hauptmenü
der Funktion anzuzeigen. Drücken Sie die Tasten / um das
Hauptmenü auszuwählen, und drücken Sie dann zur Bestätigung ENTER.
2. Drücken Sie die Tasten / um Schlaf auszuwählen, und drücken Sie
dann zur Bestätigung ENTER.
3. Drücken Sie die Tasten / um den Sleep-Timer auszuwählen, und
drücken Sie dann zur Bestätigung ENTER.
34
Page 35

WECKER STELLEN
1. Drücken Sie TIMER auf der Fernbedienung, auf der Anzeige erscheint
"Alarm (1 oder 2)": Aus [hh:mm]".
2. Drücken Sie die Tasten / um die Alarmnummer (1 oder 2)
auszuwählen, und drücken Sie dann ENTtER, um die Einstellung der
folgenden Parameter zu starten.
3. Drücken Sie die Tasten / zur Auswahl und dann ENTER zur
Bestätigung.
Aktivieren Aus/ Täglich/ Einmal/ Wochenende/ Werktage
Zeit (Alarm Einschaltzeit)
Modus Buzz/ Internetradio/ DAB/ FM/ CD
Voreinstellung Zuletzt gehört/ (Voreingestellter Sender)
Lautstärke Stumm, 1-32
Sichern
4. Wählen Sie schließlich "Speichern" und drücken Sie ENTER, um die
Alarmeinstellung zu speichern. Auf der Anzeige erscheint Alarm
Gespeichert. Wenn der Alarm eingestellt ist, erscheint das Wecker
symbol auf dem Display im Standby-Modus.
5. Um den Alarm auszuschalten, wenn er ertönt, drücken Sie die Taste ()
oder TIMER. Drücken Sie im Standby-Modus die TIMER-Taste wiederholt,
um den gespeicherten Alarm ein- und auszuschalten.
Speichern und bestätigen Sie die
Alarmeinstellung
DE
Wecker abbrechen
1. Drücken Sie TIMER auf der Fernbedienung, auf der Anzeige erscheint
"Alarm (1 oder 2)": An [hhh:mm]".
2. Drücken Sie die Tasten (/), um die Alarmnummer (1 oder 2) auszuwählen,
und drücken Sie dann ENTER, um die Einstellung des Timers zu starten.
3. Drücken Sie die Tasten (/), um "Aktivieren" auszuwählen, und drücken Sie
dann zur Bestätigung ENTER.
4. Drücken Sie die Tasten (/), um "Aus" auszuwählen, und drücken Sie dann
zur Bestätigung ENTER.
5. Wählen Sie abschließend "Speichern" und drücken Sie ENTER, um die
Einstellung zu speichern.
Wird keine Taste ca. 30 Sekunden lang gedrückt, verlässt das Gerät
automatisch den Timereinstellmodus.
35
Page 36

DE
HINWEISE ZUR ENTSORGUNG
Bendet sich die linke Abbildung (durchgestrichene
Mülltonne auf Rädern) auf dem Produkt, gilt die Europäische
Richtlinie 2012/19/EU. Diese Produkte dürfen nicht mit dem
normalen Hausmüll entsorgt werden. Informieren Sie sich
über die örtlichen Regelungen zur getrennten Sammlung
elektrischer und elektronischer Gerätschaften. Richten Sie
sich nach den örtlichen Regelungen und entsorgen Sie
Altgeräte nicht über den Hausmüll. Durch die regelkonforme
Entsorgung der Altgeräte werden Umwelt und die
Gesundheit Ihrer Mitmenschen vor möglichen negativen
Konsequenzen geschützt. Materialrecycling hilft, den
Verbrauch von Rohstoen zu verringern.
Das Produkt enthält Batterien, die der Europäischen
Richtlinie 2006/66/EG unterliegen und nicht mit dem
normalen Hausmüll entsorgt werden dürfen. Bitte
informieren Sie sich über die örtlichen Bestimmungen zur
gesonderten Entsorgung von Batterien. Durch regelkonforme
Entsorgung schützen Sie die Umwelt und die Gesundheit
Ihrer Mitmenschen vor negativen Konsequenzen.
Konformitätserklärung
Hersteller: Chal-Tec GmbH, Wallstraße 16, 10179 Berlin.
Dieses Produkt entspricht den folgenden Europäischen
Richtlinien:
2011/65/EU (RoHS)
2014/53/EU (RED)
36
Die vollständige Konformitätserklärung des Herstellers
nden Sie unter folgenden Link.
Scannen Sie dazu diesen QR-Code oder geben Sie die
URL ein.
use.berlin/10034071
Page 37

Dear Customer,
Congratulations on purchasing this equipment.
Please read this manual carefully and take care of
the following hints on installation and use to avoid
technical damages. Any failure caused by ignoring
the items and cautions mentioned in the operation
and installation instructions are not covered by our
warranty and any liability.
CONTENTS
Technical Data 38
Spotify Connect 38
Safety Instructions 39
Unpacking 41
Product Overview 42
Connections 46
Getting Started 47
Initial Set-up 48
System Settings 49
Internet-Radio 53
Music Player Operation 55
USB Operation 56
DAB Operation 57
FM Operation 59
CD Operation 61
BT Operation 63
AUX Operation 64
NetRemote 64
Using Headphones 65
Sleep Setting 65
Setting the Alarm 66
Disposal Considerations 67
EN
37
Page 38

EN
TECHNICAL DATA
Item number
Rated voltage 100-240-V~ 50/60 Hz
Power consumption 28 W
USB rating 5 V / 1 A
Audio output 2x5 W RMS
FM Radio
Frequency range 87,5 MHz - 108 MHz
DAB
Frequency range 174-240 MHz
10034071, 10034072
SPOTIFY CONNECT
Use your phone, tablet or computer as a remote control for Spotify.
Go to spotify.com/connect to learn how.
38
Licenses
The Spotify Software is subject to third party licenses found here:
https://www.spotify.com/connect/third-party-licenses
Page 39

SAFETY INSTRUCTIONS
Read all the instructions carefully before using the unit and keep them
for future reference.
• Check that the voltage marked on the rating label matches your mains
voltage.
• The unit must be placed on a at stable surface and should not be
subjected to vibrations.
• Do not place the unit on sloped or unstable surfaces as the unit may fall
o or tip over.
• The mains socket must be located near the unit and should be easily
accessible.
• Avoid extreme degrees of temperature, either hot or cold. Place the
unit well away from heat sources such as radiators or gas/electric res.
Avoid exposure to direct sunlight and other sources of heat.
• Never place any type of candle or naked ame on the top of or near the
unit.
• To reduce the risk of re, electric shock or product damage, do not
expose this unit to rain, moisture, dripping or splashing. No objects
lled with liquids, such as vases, should be placed on the unit.
• If you spill any liquid into the unit, it can cause serious damage. Switch
it o at the mains immediately. Withdraw the mains plug and consult
your dealer.
• To prevent the risk of electric shock or re hazard due to overheating,
ensure that curtains and other materials do not obstruct the ventilation
vents.
• Do not install or place this unit in a bookcase, built-in cabinet or in
another conned space. Ensure that a minimum of 10cm should be kept
around the unit for ventilation.
EN
Safety
• Always disconnect the unit from the mains supply before connecting/
disconnecting other devices or moving the unit.
• Unplug the unit from the mains socket during a lightning storm.
• This unit will become warm when used for a long period of time. This is
normal and does not indicate a problem with the unit.
Mains Adapter
• Make sure the unit is not resting on top of the mains cable, as the
weight of the unit may damage the cable and create a safety hazard.
• If the mains cable is damaged it must be replaced by the manufacturer,
its service agent, or similarly qualied persons in order to avoid a
hazard.
39
Page 40

EN
Interference
• Do not place the unit on or near appliances which may cause
electromagnetic interference. If you do, it may adversely aect the
operating performance of the unit, and cause a distorted sound.
Supervision
• Children should be supervised to ensure that they do not play with the
unit.
• Never let anyone especially children push anything into the holes, slots
or any other openings in the case - this could result in a fatal electric
shock.
Service/Maintenance
• To reduce the risk of electric shock, do not remove screws. The unit
does not contain any user serviceable parts.
• Leave all maintenance work to qualied personnel.
• Do not open any xed covers as this may expose dangerous voltages.
• Ensure to unplug the unit from the mains socket before cleaning.
• Do not use any type of abrasive pad or abrasive cleaning solutions as
these may damage the unit's surface.
• Do not use liquids to clean the unit.
40
Page 41

UNPACKING
Speaker x 2Main Unit Remote Instruction Manual
Remove all items from the packaging. Retain the packaging. If you dispose
of it, please do so according to local regulations.
The following items are included:
EN
41
Page 42

EN
PRODUCT OVERVIEW
Front view
42
1 / VOLUME dial
2 Remote Control Sensor
3 Display
4 TUNING/ENTER dial
5 CD door
6 MODE button
7 INFO/MENU button
8 SCAN/
12 button
9 BACK/
10 Skip backward (
11 Audio in socket
12 Skip forward (
13 Earphone socket
14 PRESET button
15 USB 5V
16 Speaker
3 button
1 A charging port
7 ) button
8 ) button
Page 43

Rear view
17 Mains Cable
18 Aerial
19 SPEAKER (L/R) Sockets
EN
43
Page 44

EN
Remote Control
44
1 STANDBY
2 SLEEP
3 CLOCK
4 INTRO
5 RANDOM
6 MODE
7 Play/Pause/Nav
up
8 SCAN/Play Pause
9 ENTER
10 EQ
11 VOL +/ –
12 Number buttons
13 10–
14 MUTE
15 TIMER
16 SCAN
17 MONO/ST.
18 REPEAT
19 INFO
20 Skip forward
21 STOP/Nav down
22 PRESET
23 MENU
24 Preset/Folder
25 BACK
26 10+
Page 45

Battery replacement for the remote control
1. Open the battery cover.
2. Insert 2 x AAA 1.5V alkaline batteries (not included). Make sure to match
the (+) and ( - ) ends of the battery with the (+) and ( - ) ends indicated in
the battery compartment.
3. Close the cover.
Handling the Battery
• Improper or incorrect use of batteries may cause corrosion or battery
leakage, which could cause re, personal injury or damage to property.
• Only use the battery type indicated in this manual.
• Use two identical batteries. Batteries of dierent age and charge may
cause heat to build up.
• Do not dispose of the used battery as domestic waste. Dispose of it in
accordance with local regulations.
• Remove the battery from the remote control when not in use for a long
period of time, as corrosion or battery leakage may occur and result in
physical injury, and/or property damage, and/or re.
EN
Remote control operation range
The remote control sensor on the front unit is sensitive to the remote
control’s commands up to a maximum of 4 metres away and within a
maximum of 60° arc.
Note that the operating distance may vary depending on the brightness of
the room.
45
Page 46

EN
CONNECTIONS
Connecting to the Mains Supply
Unwind the mains adapter cable to its full length. Connect the mains
adapter to the mains socket. The unit is now connected and ready to use.
Connecting the unit to any other power source may cause damage to the
unit.
Network Connection
This product only supports wireless network connection for network access
and did not support wired LAN connection
Wireless network
1. Check rst of all whether the control lamps (LINK/ACT) of your LAN
connection or your router light up.
2. Proceed with the operations described in the below “Getting Started”. It
is recommended to run through the setup wizard in the System Settings
section.
This unit cannot be connected to a standalone modem directly. A router or a
modem incorporated with a router has to be used.
Since there are various connection congurations, follow the specications
and instructions of your telecommunication carrier, internet service
provider, and router setting guidebook.
46
Page 47

GETTING STARTED
Powering ON/OFF
When you rst connect the unit to the mains socket, the unit will be in
STANDBY mode after showing “Welcome to Internet Radio”
EN
1. Press the STANDBY / VOLUME dial on the unit or
to switch the unit on.
2. Press the STANDBY / VOLUME dial on the unit or on remote control
to switch the unit back to standby mode.
Selecting Modes
Press the MODE button repeatedly on the unit or remote control to switch
between Music player, DAB radio, FM radio, AUX; CD, BT, and Internet radio
modes.
When the unit is idle for approximately 15 minutes , it will automatically
switch to standby. To switch the unit o completely, remove the mains plug
from the main socket. Turn the unit o completely to save energy when not
in use.
Adjusting the Volume
Press the VOLUME dial on the unit or press the VOL +/– buttons on the
remote control to adjust the volume.
If you wish to turn the sound o, press the MUTE button on the remote
control. Press the MUTE button again or press the VOL +/– buttons on the
remote control or press the VOLUME dial on the unit to resume normal
listening.
on remote control
Navigating the Menu
1. Press the INFO/MENU button on the unit or press the MENU button on
the remote control to access the menu.
2. Turn the TUNING/ENTER on the unit or press the / buttons on the
remote control.
3. Drücken Sie zum Bestätigen Ihrer Auswahl die Taste ENTER.
47
Page 48

EN
INITIAL SET-UP
When you rst connect the unit to the mains socket, the display will show
the welcome screen then with the privacy policy page come up. Please visit
the website mentioned in the page for the details of the privacy policy.
Press TUNING/ENTER dial on unit or ENTER button on remote control to
accept for next step.
1. To launch the initial Setup wizard, turn the TUNING/ENTER dial on the
unit or 7 / 8 buttons on remote control to select [YES], then press the
TUNING/ENTER dial on the unit or ENTER button on the remote control
to conrm.
2. In the next step you can select the time format. Select the desired setting
[12] or [24] and press the TUNING/ENTER dial on the unit or ENTER
button on the remote control to move on to the next step.
3. Here it is possible to select which source (DAB/FM/Network/No update)
the unit uses to obtain and update the time and date. If "Update from
Network" selected, proceed to the next step to select time zone to
ensure that the time is displayed correctly. And then select the "Daylight
savings" is [ON] or [OFF].
4. In the next step you can specify whether the product should remain
connected to the Internet when on standby. Turn the TUNING/ENTER
dial on the unit or press 7 / 8 buttons on the remote to select [YES],
then press the TUNING/ENTER dial on the unit or press ENTER button on
the remote to conrm.
5. Your radio will now scan for your wireless network, this may take a few
seconds then a list of all the wireless networks will appear on the screen.
Select the WLAN network you know and whether to use WPS (Push
Button/ Pin) or Skip WPS to enter the password using the displayed
keyboard.
6. While you press "Skip WPS", the virtual keyboard is shown on the
display, you can turn the TUNING/ENTER dial on the unit or press PLAY/
PAUSE or 7/8 buttons on the remote control to move the highlight.
PressTUNING/ENTER dial on unit or ENTER button on remote to select
the key.
7. After enter the password, select [OK] and then press TUNING/ENTER
dial on unit or ENTER button on remote to conrm. If the password
entered is correct, a connection to the network is now established. Press
TUNING/ENTER dial on unit or ENTER button on remote to exit.
8. Settings can be changed at any time by pressing the MENU button to
display the menu. Press /to select system settings and then press
the ENTER button to conrm. And press / buttons to select Setup
wizard and then press the ENTER button to launch Setup wizard again.
This instruction manual explains the basic instruction for operating this
unit. Unless otherwise stated, all operations described are based on remote
control use.
48
Page 49

SYSTEM SETTINGS
Press the INFO/MENU button to display the menu or MENU button on
remote to display the menu. Turn the TUNING/ENTER on unit or press
/ on the remote control to select System settings and then press the
ENTER button to conrm.
Equalizer
This system supports a variety of equalizers and sound eects.
Press the EQ button to access the Equaliser menu
Alternatively:
During System settings mode, press
press the ENTER to conrm.
1. The display will show : FLAT > CLASSIC > ROCK > POP > JAZZ
2. Press the / buttons to select and then press the ENTER button to
conrm.
Network
1. During System Settings mode, press the /, buttons to select
Network and press the ENTER button to conrm.
2. Press
/, buttons to select from the following settings, and then
press the ENTER button to conrm.
/ to select Equaliser and then
EN
49
Page 50

EN
SSID – select the desire wireless network.
Network wizard
PBC Wlan setup
View settings Display the setting on the unit.
Wlan region Select a country of your choice.
Manual settings
NetRemote PIN Setup
Network prole View the connected network..
Keep network connected
3. Press the BACK button on the unit or on the remote control to cancel the
setting and return back to the previous menu.
Rescan – Scan for available networks.
Manual cong – select wireless network
with DHCP enable/disable.
Select WPS on the unit and press the WPS
button on the modem device that you
wish to connect with. Press the ENTER
button to continue.
Select wireless network with DHCP enable/
disable.
Allows you to dene a PIN number to be
entered before being able to connect the
device remotely over a network.
Allows you to dene whether the device
remains connected to its network in Standby
mode and when not in Network radio mode.
50
Time/Date
The Time/Date can be automatically set once it has been connected to the
Internet, DAB+ or FM radio station with time/date information. You may
also adjust the Time/Date manually.
In System settings mode, press the / buttons to select Time/Date and
press the ENTER button to conrm. Press the / buttons to select Set Time/
Date and press the ENTER button to conrm.
1. The date digits will ash on the display.
2. Press the / buttons to adjust the day and then press the ENTER
button to conrm.
3. Repeat above Step (2) to set the Month/Year/Hour/Minute.
4. The date and time settings are now complete.
For the other settings under Time/Date, press the / buttons to select
from the following options and then press the ENTER button to conrm.
Page 51

EN
Auto update
Set format 12 / 24 hour format.
Set timezone
Daylight savings
The default auto time update setting is “Update from Network”. If you would
like to manually set the time, it is recommended to turn the Auto update
function o.
Language
1. During System settings mode, press the / buttons to select
Language and then press the ENTER button to conrm.
2. Press the / buttons to change the display language of your choice.
3. Press ENTER to conrm.
Factory Reset
There may be times when you need to reset your unit back to the factory
settings especially when you have moved house. If you experience
reception problems you may want to reset and try again.
If you move to another part of the country and pick up the local and national
DAB+ stations in that area, your previously tuned channels may no longer
be available.
Update from DAB / FM / Network or No
update.
Select a time zone. (Only available when
Auto update from Network is on.)
Select daylight savings. (Only available
when Auto update from Network is on.)
1. During System settings mode, press the / buttons to select “Factory
reset”, and press the ENTER button to conrm.
2. Press the
conrm or select No to cancel.
After the system reset, all the tuned stations, Internet, DAB & FM preset
stations will be erased.
7 / 8 buttons to select Yes, and press the ENTER button to
51
Page 52

EN
Software update
1. During System settings mode, press the / buttons to select Software
update and then press the ENTER button to conrm.
2. Press the / buttons to select Auto-check setting or Check now, and
then press the ENTER button toconrm.
Before downloading software, ensure that the radio is plugged into a stable
mains power connection. Interrupting the mains supply during software
download can lead to functional disturbances and/or damage to the unit!
Setup wizard
The setup wizard is available in the system settings section; you can run
through this to congure settings for date/time and network. Once this has
nished, your radio is ready to use.
Info
1. During System settings mode, press the / buttons to select Info and
then press the ENTER button toconrm.
2. The software version, Radio ID and Friendly Name will show on the
display.
Info
1. During System settings mode, Press / buttons to select Info and
then press ENTER button to conrm.
2. The software version, Radio ID and Friendly name will show on the
display.
Backlight
1. During System settings mode, press the / buttons to select Backlight
and then press the ENTER button to conrm.
2. For the other settings under Backlight, press the / buttons to select the
following options and then press the ENTER button to conrm.
52
Operation Mode
Standby Mode
High / Medium/ Low
Timeout o/ 10 sec / 30 sec / 60 sec
Standby Level: High /Medium/Low/O
Page 53

INTERNET-RADIO
This radio can play thousands of radio stations and podcasts from all over
the world via a broadband internet connection. When Internet Radio mode
is selected, the radio connects with the Frontier Silicon Internet radio portal
to download a list of stations. Once a station is selected, the radio will
connect directly to that station.
Press the MODE button repeatedly to select internet radio mode. (F.3)
During Internet Radio mode, press the MENU button on the remote control
to access the menu. You can choose between: Last listened, Station list,
System settings and Main menu.
Press the / buttons to select and press the ENTER button to conrm.
Last listened
1. Press the / buttons to select the history of stations that you have
listened to before.
2. Press the ENTER button to conrm.
Station list
Press the / buttons to select from the following options, and then press
the ENTER button to conrm.
You can search specically for stations from your country.
Local “Country”
Stations
Podcasts
Help
Within this scope, you can further limit your search according
to genres, or display all station.
Select stations from various categories in the menu:
Location, Genre, Popular Stations, New Stations.
You can also search stations using various keywords.
The name and a description of your selected station will show
on the display.
Press the INFO/MENU button repeatedly to view further
information for the station. Information displayed cycles
through name/description, genre/location, reliability, bitrate/
codec/sampling rate, playback buer and current date.
Select podcasts from the categories in the Podcast menu:
Location, Genre.
You can also select a particular episode by entering keywords
to search podcasts
You can nd the portal address and visit for support.
http:/ /
Internet
Radio
EN
Internet
radio
Press the BACK/ button on unit or BACK button on remote control can
move back a menu level.
53
Page 54

EN
Save to Preset
1. [Not set]
2. [Not set]
3. [Not set]
4. [Not set]
5. [Not set]
Preset Stations
The preset Internet radio stations are stored in the radio and cannot be
accessed from other radios.
1. To store an Internet radio preset, press and hold the PRESET button until
the display shows the "Save toPreset".
2. Select one of the 10 presets to store the current station by pressing the
/ buttons to select the number and then press the ENTER button to
conrm.
Recalling a Stored Station
1. To select a preset, press the PRESET button, and then press the /
buttons to select one of the listed preset stations.
2. Press the ENTER button to conrm the selection.
Alternatively,
• Press PRESET/FOLDER / buttons on remote can switch to next/
previous preset station.
• Or press the number buttons on remote to switch to the preset station.
("0" for preset station 10).'
• If there is no station be saved, it will show "Preset empty".
Die Bedienung der Voreingestellten und der Aufrufstationen ist für
Internetradio, DAB und FM gleich.
54
Internet Radio Display Modes
Every time you press the INFO/MENU button on unit or INFO button on
remote control, the display will show the
following display modes:
Channel Info – Description – Genre/Show country – Reliability – Bit rate/
Sound format – Playback buer – Date
Page 55

MUSIC PLAYER OPERATION
The built-in Music Player allows you to play unprotected audio les (AAC,
MP3, WMA, FLAC) stored on a networked computer. To play music from the
computer, you must setup a shared le or media library on the computer.
Press the MODE button repeatedly to select Music Player mode.
Media Sharing
Ensure that your computer is available on the network, and that your
computer is set up to allow sharing your media folders or les. Check how
to setup a folder for sharing from your computer’s instruction manual.
1. During Music Player mode, press the /, buttons to select Shared
media and press the ENTER button to scan for all the available shared
media folders or les.
2. The display will show all found media folders from the network. Press
the /, buttons to select the computer that you wish to connect to.
3. The unit will search for all shared media from the computer.
4. Press the /, buttons and select your desire shared media, and then
press the ENTER button.
5. This unit cannot access your computer, until your computer allows it.
6. Press the ENTER button to start playback of the desired track.
Prune servers
1. During Music Player mode, press the /, to select Prune servers and
press the ENTER button toconrm.
2. Press the /, buttons to select YES to remove servers that are no
longer available. Press the ENTER button to conrm, or select NO to
cancel.
EN
55
Page 56

EN
USB OPERATION
Charge your device
You can charge your device through the USB socket on this unit with a USB
cable (not supplied).
• The maximum current for USB charging is 1A.
• All devices for USB charging are not guaranteed.
Music playback modes
Every time you press the INFO/MENU button on unit or INFO button on
remote control , the display will show the following display modes:
Artist - Album - Bit rate/sound format - Playback buer - Date.
Playback buttons on unit and remote control:
Buttons Function
/ Press to pause playback or resume normal playback.
Press to skip to the previous track.
Press and hold to fast rewind the current track.
Press to skip to the next track.
Press and hold to fast forward the current track.
56
Repeat Mode
1. Under menu of Music Player mode, press / buttons to select Repeat
play and press ENTER button repeatedly , or press REPEAT button on
remote during playback to turn repeat play on/o.
2. When repeat play is ON,
current folder repeatedly.
Shule Mode
1. Under menu of Music Player mode, press 12 w / 3 s buttons to select
Shule play and press ENTER button repeatedly , or press RANDOM
button on remote during playback to turn shule play on/o.
2. When Shule play is ON,
song les randomly.
will show on the display and it will play the
will show on the display and it will play the
Page 57

DAB OPERATION
Press the MODE button repeatedly to select “DAB radio”. The unit will enter
DAB mode and perform the auto scan function. During the scan the display
will show “Scanning… ” together with a slide bar that indicates the progress
of the scan and the amount of stations that have been found so far. (F.7)
Once the scan has nished, the unit will select the rst alpha numerically
found station. To explore the found stations, press the / buttons to
select and press ENTER to conrm.
Station List
1. During DAB mode, press the MENU button to access DAB menu.
2. Press the / buttons to select “Station List” and then press the
ENTER button to conrm.
3. A list of DAB+ stations will show on the display.
Auto Scan
1. Press MENU, and then press the / buttons to select Scan. Press the
ENTER button to conrm.
2. The display will show “Scanning…” and a progress slide bar.
3. All the stations that have been found will be stored automatically. To
explore and listen to the found stations, press the / buttons to
select and the press the ENTER button to conrm.
Manual Tuning
As well as the auto tune function, you can manually tune the receiver. This
can help you when aligning your aerial or when adding stations that were
missed while auto tuning.
EN
1. Press MENU on the remote control to display the menu.
2. Press the / buttons to select “Manual tune”, and press the ENTER
button to conrm.
3. The display will show the multiplex 5A to 13F.
4. Press the / buttons to select the channel, and press the ENTER
button to conrm.
5. To listen to any stations found, return to the now playing screen and
press the /buttons to select the required station from the station list
and press ENTER button to conrm.
57
Page 58

EN
DAB Display Modes
Every time you press the INFO/MENU button on the remote control or press
and hold the INFO/MENU button on the unit, the display will show the
following display modes:
DLS: Programme Type – Ensemble/Frequency – Signal error/Strength – Bit
rate/Codec/Channels – Date
DLS (Dynamic Label Segment): This is a scrolling message giving real-time
information, e.g. song titles, news headlines, etc.
Programme Type: This describes the "style" or "genre" of the programme
that is being broadcast.
Ensemble Name/Frequency: This display the name of the multiplex that
contains the station you are listening to and the frequency. A
multiplex is a collection of radio stations that are bundled and transmitted
on one frequency. There arenational and local multiplexes. Local ones
contain stations that are specic to that area.
Signal Error/ Signal Strength: The error is shown as a number. If the number
is 0, it means the signal received is error free and the signal strength is
strong. If the error rate is high, it is recommended to reposition the radio
aerial or reposition the unit. The display will show a slide bar to indicate the
signal strength, the stronger the signal, the longer the bar will be from left
to right.
58
Bit Rate / Codec / Channels: The display will show the digital audio bit rate
being received with additional information about the audio
codec and channel conguration.
Date: This displays the current date provided automatically by the
broadcaster.
Prune Invalid
You may remove all unavailable stations from the list.
1. During DAB mode, press the MENU button and press the / buttons
to select Prune invalid and then press the ENTER button to conrm.
2. Press the / buttons to select YES and press the ENTER button to
conrm, or select NO to cancel.
DRC (Dynamic Range Compression)
If you are listening to music with high dynamic range in a noisy
environment, you may wish to compress the audio dynamic range.
Page 59

1. During DAB mode, press the MENU button and press the / buttons
to select DRC and press the ENTER button to conrm.
2. Press the / buttons to select DRC high/low/o and press the ENTER
button to conrm the setting.
Station Order
You may wish to arrange the station listing order.
1. During DAB mode, press the MENU button and press the / buttons
to select Station Order and press the ENTER button to conrm.
2. Press the / buttons to select Alphanumeric/Ensemble/Valid order
and press the ENTER button to conrm the setting.
Saving and Recalling Preset Station
Refer to "Preset Stations" and "Recalling a Stored Station" under Internet
Radio section for instruction.
FM OPERATION
To switch the unit to FM mode, press the MODE button repeatedly to switch
to FM mode. The display will show the frequency.
Auto Scan
Press the SCAN button on the unit or on the remote control to start
searching for a station. Once a station has been found, the scanning wil
lstop automatically.
FM Radi o
EN
FM
radio
Manual Tuning
To search for FM stations manually, press the TUNING buttons repeatedly
until your desired frequency is reached.
With FM radio, it may be necessary to ne tune each station by pressing
the TUNINGbuttons repeatedly. Each press will adjust the frequency by
0.05MHz. If reception is still poor, adjust the position of the aerial or try
moving the radio to another location.
Scan Setting
1. Press the MENU button to access FM menu.
2. Press the / buttons to select Scan setting and then press the ENTER
button to conrm.
3. Press the / buttons to select Yes to receive Strong stations only and
then press the ENTER button to conrm.
59
Page 60

EN
Audio Setting
Press the MONO/ST. button on the remote control to toggle between the
Stereo or Mono selection.
Alternatively
1. Press the MENU button to access the main menu.
2. Press the / buttons to select Audio setting and press the ENTER
button to conrm.
3. Press the / buttons to select YES to listen in Mono only or NO to let
the unit select Stereo or Mono automatically.
4. Press the ENTER button to conrm.
FM Display Modes
Every time you press the INFO/MENU button on unit or INFO button on
remote control, the display will show the following display modes:
Radio Text – Programme Type – Frequency – Datei
RDS Radio Text: This is a scrolling message information about the current
programme.
Programme Type: This describes the “Style” or “Genre” of music that is
being broadcast.
Station Name / Frequency: When an RDS station is received, the name of
that station will be displayed, or if not the frequency will be displayed.
Date: This displays the current date provided automatically by the
broadcaster.
60
Saving and Recalling Preset Station: Refer to "Preset Stations" and
"Recalling a Stored Station" under Internet Radio section for instruction.
Page 61

CD OPERATION
Compatible disc types
Disc type Disk-Logo Recorded Content
EN
CD-Recordable
CD-RW
(CD Rewritable)
Audio CD (Compact
Disc Digital Audio)
Press MODE repeatedly on the unit or press CD/USB repeatedly on the
remote control to select CD mode.
Playback
1. Press the OPEN/CLOSE (
2. Place the CD with the label side up into the CD compartment, and then
press the OPEN/CLOSE Disk Tray , button to close the disc tray.
3. If there is no disc or the disc can’t be read, “No disc” will show on the
display.
4. The total number of tracks will display on the display, then press the
button on the unit or the remote control to play the rst track of CD/
MP3 disc automatically.
To pause playback: Press the
playback by press this button again.
To stop playback: Press the
Skiping to another track: Press the
the beginning of the track or previous track or skip forwards to the next
track. Press and hold the / buttons to perform fast forward/reverse
playback.
) to open the CD door.
button to pause the playback. And resume
button to stop playback.
/ buttons to skip backwards to
Audio
Audio
Audio
61
Page 62

EN
1
1
F
1
F
Repeat playback
1. Press the REPEAT button repeatedly to choose a function.
It will play the current track repeatedly.
It will play all les in the current folder
repeatedly (for data CDs only).
Alle Titel wiederholen.
2. Press the REPEAT button once more again, the REPEAT function will turn
o.
Random playback
All tracks on the disc can be played in a random order.
1. Press the RANDOM button on the remote control. The
show on the display. All tracks will be played randomly.
2. Press the / buttons to playback the next random track.
3. After all the tracks have played once, the playback will stop
automatically.
4. To cancel random playback, press the RANDOM button during Random
playback. Normal playback will resume.
Intro playback
1. Press the INTRO button on the remote control. The “ INTR ” indicator will
show on the display. The unit will play the rst 10 seconds of each track.
2. Press the INTRO button on the remote control again to resume normal
playback.
Programme setting
User can program up to 20 tracks in any desired order. And Programme
mode is activated while in STOP mode.
1. Press the MEMORY button to enter programme mode..
2. Press the
3. Press the ENTER button to conrm the track.
4. Repeat steps 2-3 to programme more tracks. When nished selecting
tracks, press the , button to start playback of the programmed tracks.
Programme cancel: Press the
close it again to erase the memory.
/ buttons to select the track that you want to preset.
button twice, or open the disk tray and
. indicator will
62
Page 63

BT OPERATION
The unit has a BT function that can receive a signal within 8 metres.
Pairing the unit with a BT device to listen to music:
1. Press the MODE button repeatedly to select BT mode.
2. If the unit is not paired with any BT device, the right hand corner will
show a ash the BT symbol.
3. Activate your BT device and select the search mode.
4. “Connect System S” will appear on your BT device list.
5. Select “Connect System S” and enter “0000” for the password if
necessary.
6. To disconnect the BT function, switch to another function on the unit or
disable the function from your BT device.
Playing Music via BT
You may need to adjust the volume on your radio and BT device.
• Press the SCAN/
play/pause music or
• Press / buttons on unit or remote control to skip to the previous/
next track
• If the signal strength is weak, your BT receiver may disconnect, but it
will re-enter pairing mode automatically.
• For better signal reception, remove any obstacles between the unit and
the BT device.
• This unit supports A2DP (Advanced Audio Distribution Prole) and
AVRCP (Audio Video remote Control Prole) functions. This can only be
paired with one BT device at one time.
• Compatibility with all devices and media types is not guaranteed.
• Some mobile phones with the BT function may connect and disconnect
as you make and end calls. This is not an indication of a problem with
your unit.
button on unit or button on remote control to
EN
63
Page 64

EN
AUX OPERATION
There is an “AUDIO IN” socket located at the rear of the unit. Analogue
audio sound signals from other sources can be input to the unit through this
socket.
1. Connect the input to another audio device via an AUX cable (not
included) with an “AUDIO IN” socket.
2. Press the MODE button repeatedly to select AUX mode.
3. Turn the VOLUME dial on the unit or press the VOL +/– buttons on the
remote control to adjust the volume control for your desired sound
output level.
4. In AUX mode, operate your audio device directly for playback features.
When connecting the external audio device, refer to the owner's manual of
the external device.
NETREMOTE
The device gives a feature of NetRemote by smartphone or tablet in iOS or
Android system. By downloading the
assigned app named UNDOK, you can view all the modes of Internet radio,
Music player, DAB, FM, BT and AUX in.
Search UNDOK from Google Play or Apple Store for UNDOK app, and
install it to your smartphone or tablet. Before using the UNDOK app, make
sure the device and the smartphone or tablet are in the same WiFi network.
Launch the app.
64
The app initializes and scans for the device in the network. Tap the device to
make the NetRemote connection.
• Once the smartphone or tablet has already accessed the device, they
will automatically connect the next time when you open the app again.
• Be aware that if another smartphone or tablet with the app in the same
network has access with the device; the original connection will be cut
o.
When it is the rst time that you connect the device to the unit, the app may
ask you to enter the PIN. Default PIN is 1234. For details of changing the PIN
for security, please refer to System Settings section: Network - NetRemote
PIN Setup. Select your desired mode in the main page. You may then
control the selected mode on your smartphone or tablet and on the device
simultaneously.
Page 65

USING HEADPHONES
Do not listen to music at high volume when using headphones. Doing so
can cause permanent hearing impairment. Turn the tuner volume level to
the lowest before using headphones.
• Only use headphones with a 3.5 mm jack plug.
• Insert the headphone connector in the headphone socket in front of the
unit.
SLEEP SETTING
This function allows you to program the unit to turn to standby mode by
itself after a set period of time.
1. To activate the sleep function, press the SLEEP button repeatedly. The
time will change in the below sequence on every press:
SLEEP OFF -> 15 minutes -> 30 minutes -> 45 minutes -> 60 minutes ->
90 minutes -> 120 minutes.
2. When your desired sleep time appears in the display, stop pressing the
button and the sleep function will be activated in two seconds. “ ” will
show on the display. Also the time remaining until switch o is displayed
next to the symbol in the display.
3. When the sleep timer counts down to zero, the unit will turn to standby
mode. To turn the sleep function o while the sleep timer is still counting
down, press the SLEEP button repeatedly to select “SLEEP OFF”. “ ” will
disappear from the display.
4. Press the SLEEP button once to show the sleep timer status on the
display when it is turned on.
EN
Alternatively:
1. Press the MENU button on the remote control to display the function
main menu. Press the / buttons to select Main menu, and then press
the ENTER button to conrm.
2. Press the / buttons to select Sleep mode, and then press the ENTER
button to conrm.
3. Press the / buttons to select sleep timer, and then press the ENTER
button to conrm..
65
Page 66

EN
SETTING THE ALARM
1. Press the TIMER button on the remote control, the display shows “Alarm
(1 or 2): O [hh:mm]”.
2. Press the / buttons to select the Alarm number (1 or 2) and then
press the ENTER button to start the setting of the following parameters.
3. For the following setting, press the / buttons to select then press
the ENTER button to conrm.
Enable O/ Daily/ Once/ Weekends/ Weekdays
Time (Alarm On time)
Mode Buzzer/ Internet radio/ DAB/ FM
Preset Last Listened/ (Preset station)
Volume Muted, 1-32
Save Save and conrm the alarm setting
4. Finally, select “Save” and press the ENTER button to save the alarm
setting. When the alarm is set, the alarm icon will appear on the display
during standby mode.
5. To turn o the alarm when it sounds, press the STANDBY or ALARM
button.
During Standby mode, press the ALARM button repeatedly to turn the
saved Alarm on/o.
66
Cancelling the Alarm
1. Press the TIMER button on the remote control, the display shows “Alarm
(1 or 2): On [hh:mm]”..
2. Press the /, buttons to select the Alarm number (1 or 2) and then
press ENTER to start the setting of the timer.
3. Press the / buttons to select “Enable” then press the ENTER button
to confirm.
4. Press the / "buttons to select “Off” then press the ENTER button to
confirm.
5. Finally, select “Save” and press the ENTER button to save the setting.
If no button is pressed within approx. 15 seconds, the unit exits timer setting
mode automatically.
Page 67

DISPOSAL CONSIDERATIONS
According to the European waste regulation 2012/19/EU this
symbol on the product or on its packaging indicates that this
product may not be treated as household waste. Instead it
should be taken to the appropriate collection point for the
recycling of electrical and electronic equipment. By ensuring
this product is disposed of correctly, you will help prevent
potential negative consequences for the environment
and human health, which could otherwise be caused by
inappropriate waste handling of this product. For more
detailed information about recycling of this product, please
contact your local council or your household waste disposal
service.
Your product contains batteries covered by the European
Directive. 2006/66/EC, which cannot be disposed of with
normal household waste. Please check local rules on
separate collection of batteries. The correct disposal of
batteries helps prevent potentially negative consequences
on the environment and human health.
Declaration of Conformity
Producer: Chal-Tec GmbH, Wallstraße 16, 10179 Berlin.
Germany
This product is conform to the following European Directives:
2011/65/EU (RoHS)
2014/53/EU (RED)
EN
The complete declaration of conformity of the
manufacturer can be found at the following link.
Scan this QR code or enter the URL.
use.berlin/10034071
67
Page 68

Page 69

Chère cliente, cher client,
Toutes nos félicitations pour l’acquisition de ce
nouvel appareil. Veuillez lire attentivement et
respecter les instructions de ce mode d’emploi an
d’éviter d’éventuels dommages. Nous ne saurions
être tenus pour responsables des dommages dus
au non-respect des consignes et à la mauvaise
utilisation de l’appareil. Scannez le QR-Code pour
obtenir la dernière version du mode d'emploi et des
informations supplémentaires concernant le produit.
Escanee el código QR para descargar el manual de instrucciones
ES
más reciente en su idioma.
Scannez le QR code pour télécharger le mode d‘emploi à jour dans
FR
votre langue.
Scansionate il codice QR per scaricare il manuale d‘uso attuale nella
IT
vostra lingua.
SOMMAIRE
Fiche technique 72
Spotify connect 72
Consignes de sécurité 73
Contenu de l'emballage 75
Aperçu de l'appareil 76
Connexions 80
Mise en marche 81
Paramètres système 83
Radio internet 87
Lecteur de musique 89
Utilisation de l'USB 90
Radio DAB 92
Radio FM 95
Lecteur CD 97
Utilisation du BT 99
Utilisation de la prise aux 100
Netremote 101
Utilisation d'un casque 101
Réglage de la mise en veille 102
Réglage de l'alarme 103
Informations sur le recyclage 104
FR
69
Page 70

FR
FICHE TECHNIQUE
Numéro d'article
Alimentation 100-240-V~ 50/60 Hz
Consommation 28 W
Port USB 5 V / 1 A
Sortie audio 2 x 5 W RMS
Radio FM
Plage de fréquences 87,5 MHz - 108 MHz
DAB
Plage de fréquences 174-240 MHz
10034071, 10034072
SPOTIFY CONNECT
Utilisez votre smartphone, votre tablette ou votre ordinateur comme
télécommande pour Spotify. En savoir plus sur spotify.com/connect.
70
Licences
Le logiciel Spotify est soumis aux droits d’utilisation de tiers, disponibles à
la page suivante : https://www.spotify.com/connect/third-party-licenses
Page 71

CONSIGNES DE SÉCURITÉ
Consignes générales de sécurité
• Lisez attentivement toutes les consignes avant d'utiliser l'appareil
et conservez le mode d'emploi en lieu sûr pour vous y référer
ultérieurement.
• Utilisez uniquement la tension indiquée sur la plaque signalétique de
l'appareil. Assurez-vous que votre prise de courant est mise à la terre.
• L'appareil doit être placé sur une surface plane et stable et ne doit pas
être exposé à des vibrations.
• Ne placez pas l'appareil sur des surfaces en pente ou instables, car il
pourrait tomber.
• La prise de courant doit être proche de l’appareil et doit être facilement
accessible.
• Évitez les températures extrêmes, chaudes et froides.
• Tenez l'appareil à l'écart de sources de chaleur telles que radiateurs
ou cuisinières à gaz / électriques. N'exposez pas l'appareil à
l'ensoleillement direct ou à d'autres sources de chaleur.
• Ne placez jamais de bougies ou d'objets similaires avec une amme nue
sur l'appareil.
• Pour réduire les risques d'incendie, de choc électrique et de
dégâts matériels, n'exposez pas l'appareil à la pluie, à l'humidité, à
l'égouttement ou aux éclaboussures. Aucun objet rempli d'eau, tel qu'un
vase à eurs, ne doit être placé sur l'appareil.
• Tout liquide renversé sur l'appareil peut causer de graves dommages.
Dans ce cas, éteignez immédiatement l'appareil et débranchez le
cordon d'alimentation de la prise. Contactez ensuite le service clientèle.
• Ne couvrez pas les ouvertures de ventilation de l'appareil et assurez-
vous que les rideaux et autres matériaux ne puissent pas y pénétrer an
d'éviter toute surchaue de l'appareil et tout risque d'incendie et de
choc électrique.
• Ne placez pas l'appareil dans une bibliothèque fermée, un placard ou
tout autre rangement conné. Assurez-vous que l'appareil est à une
distance minimale de 10 cm par rapport à toutes les surfaces et objets
environnants pour assurer une ventilation adéquate.
FR
Sécurité
• Débranchez toujours l'appareil de la prise avant de connecter la radio à
un autre appareil, de le déconnecter d'un autre appareil ou de déplacer
la radio.
• Assurez-vous que le cordon d’alimentation de la radio ne reste pas
branché pendant un orage.
• L'appareil chaue s'il est utilisé pendant une longue période. Ceci est
normal et n'est pas signe d'un problème de l'appareil.
71
Page 72

FR
Branchement au secteur
• Veillez à ne pas poser l'appareil sur le cordon d'alimentation, car son
poids pourrait l'endommager et constituer un danger pour la sécurité.
• Si le câble d'alimentation de l'appareil est endommagé, il doit être
remplacé par le fabricant, le service après-vente ou une autre personne
qualiée pour éviter tout dommage.
Parasites
• Ne placez pas la radio sur ou à proximité d'un autre équipement
susceptible de provoquer des interférences électromagnétiques. Si vous
placez la radio à proximité d'un autre équipement, la qualité de lecture
de la radio risque d'être aectée et cela peut provoquer des parasites.
Surveillance
• Surveillez les enfants à proximité de l'appareil pour qu'ils ne l'utilisent
pas comme un jouet.
• Ne laissez personne, en particulier les enfants, insérer des objets ou
autres dans les ouvertures, ou les connecteurs de l’appareil, car cela
peut provoquer un choc électrique fatal.
Utilisation/ entretien/ maintenance
• Ne retirez pas de vis vous-même pour réduire le risque de choc
électrique. L'appareil ne contient aucune pièce pouvant être réparée
par l'utilisateur. Conez tous les travaux de maintenance à un personnel
qualié.
• Ne retirez et n’ouvrez aucun capot xe de l’appareil, car cela pourrait
libérer une tension électrique dangereuse.
• Débranchez le cordon d'alimentation avant de nettoyer l'appareil.
• N'utilisez pas de tampon à récurer ni de détergent agressif, car cela
pourrait endommager la surface de l'appareil.
• Ne pas utiliser de liquides pour nettoyer l'appareil.
72
Page 73

CONTENU DE L'EMBALLAGE
FR
Radio
Télécommande
2 Enceintes
Mode d'emploi
73
Page 74

FR
APERÇU DE L'APPAREIL
Vue de face
74
1 / réglage du volume
2 Capteur de la télécommande
3 Ecran
4 TUNING/SAISIE
5 Lecteur CD
6 Mode
7 INFO/Menu
8 SCAN/ lecture /pause
9 Retour / Stop
10 Titre précédent
11 Prise Audio-In
12 Titre suivant
13 Prise casque
14 Touche PRESET (mémoire)
15 Port de charge USB (5 V
16 Enceinte
1 A)
Page 75

Vue de dos
17 Câble d'alimentation
18 Antenne
19 Prises d'enceinte (L/R)
FR
75
Page 76

FR
Télécommande
76
1 Touche de veille
2 Minuterie d'arrêt
3 Heure
4 INTRO
5 Lecture aléatoire
6 Mode
7 Lecture /pause
8 Titre suivant
9 Saisie
10 Egaliseur
11 Touche volume +/ –
12 Touches
numériques
13 Touche 1014 Muet
15 TIMER
16 Recherche de
stations
17 MONO/STEREO
18 Répétition
19 Information
20 Titre précédent
21 Stop
22 Mémorisation de
station
23 Menu
24 Mémoire/dossier
∨/∧
25 Titre précédent
26 Touche 10+
Page 77

Remplacement des piles de la télécommande
1. Ouvrez le cache du compartiment à piles.
2. Insérez 2 x piles alcalines AAA 1,5 V (non fournies). Veillez à ce que
les pôles (+) et (-) de la pile correspondent aux pôles (+) et ( -) du
compartiment à piles.
3. Refermez le cache du compartiment à piles.
Manipulation des piles rechargeables
• Une utilisation incorrecte des piles peut entraîner une corrosion ou une
fuite de la pile, ce qui peut causer un incendie, des blessures ou des
dommages matériels.
• Utilisez uniquement le type de pile spécié dans ce mode d'emploi.
• Utilisez deux piles identiques. Des batteries d'âge et de charge
diérents peuvent produire de la chaleur.
• Ne jetez pas les piles usagées avec les ordures ménagères. Recyclez les
piles conformément à la réglementation locale.
• Retirez les piles de la télécommande lorsque vous ne l'utilisez
pas pendant une période prolongée, car cela pourrait provoquer
la corrosion ou une fuite de la pile, entraînant des blessures, des
dommages matériels et / ou un incendie.
FR
Zone de fonctionnement de la télécommande
Dirigez la télécommande vers l'appareil en étant à moins de 4 mètres
du capteur de la télécommande et à l'intérieur d'un angle de 60° face à
l'appareil.
La portée peut varier en fonction de la luminosité de la pièce.
Note : La portée peut varier en fonction de la luminosité de la pièce.
77
Page 78

FR
CONNEXIONS
Branchement sur l'alimentation de secteur
Déroulez le câble d'alimentation sur toute sa longueur. Branchez
l’adaptateur secteur sur la prise secteur. L'appareil est maintenant connecté
et prêt à être utilisé.
Brancher l'appareil à une autre source d'alimentation peut l'endommager.
Connexion au réseau
Cet appareil prend en charge uniquement la connexion réseau sans l pour
l’accès réseau et aucune connexion réseau câblée.
Réseau sans l
1. Tout d’abord, assurez-vous que les voyants (LINK / ACT) de votre réseau
local ou de votre routeur sont allumés.
2. Poursuivez avec la procédure décrite ci-dessous. Il est vivement
recommandé de passer par l’assistant de conguration présenté à la
section Paramètres système.
Cet appareil ne peut pas être connecté directement à un appareil autonome
moderne. Un routeur ou un modem intégré à un routeur est nécessaire.
Comme il existe diérentes congurations de ports, merci de vous reporter
aux spécications et instructions de votre opérateur téléphonique, de votre
fournisseur d'accès à Internet et de votre guide de conguration du routeur.
78
Page 79

MISE EN MARCHE
Pour allumer et éteindre l'appareil
Lorsque vous branchez l'appareil pour la première fois à la prise de secteur,
il passe en mode veille après avoir aiché "Bienvenue sur la radio Internet"
(F.1) (F.2).
1. Appuyez sur la touche de volume de l'appareil ou sur la touche veille de
la télécommande pour allumer l'appareil.
2. Appuyez sur la touche de volume de l'appareil ou sur la touche veille de
la télécommande pour remettre l'appareil en mode veille.
Choix du mode de fonctionnement
Appuyez plusieurs fois sur la touche MODE de l'appareil ou de la
télécommande pour basculer entre les modes Lecteur de musique, Radio
DAB, Radio FM, Entrée auxiliaire, CD, BT et Radio Internet.
Au bout de 15 minutes d'inactivité environ, l'appareil passe
automatiquement en mode veille. Pour l'éteindre complètement,
débranchez le cordon d'alimentation de la prise. Veuillez éteindre
complètement l'appareil pour économiser de l'énergie lorsque vous ne
l'utilisez pas.
FR
Réglage du volume
• Tournez le bouton () / VOLUME de l'appareil ou appuyez sur VOL +/- sur
la télécommande pour régler le volume.
• Si vous souhaitez désactiver le son, appuyez sur MUTE sur la
télécommande. Appuyez à nouveau sur MUTE ou appuyez sur VOLUME
+/- sur la télécommande ou tournez le bouton () / VOLUME de l'appareil
pour reprendre l'écoute normale.
Pour naviguer dans le menu
1. Appuyez sur la touche INFO / MENU de l’appareil et maintenez-la ou
appuyez sur la touche MENU de la télécommande pour accéder au
menu.
2. Tournez la molette TUNING / ENTER sur l’appareil ou appuyez sur les
79
Page 80

FR
touches die Tasten / de la télécommande pour faire votre choix.
Premier démarrage
Lorsque vous branchez l'appareil pour la première fois, l'écran d'accueil
s'aiche et la page Politique de condentialité apparaît. Veuillez consulter le
site Web pour plus de détails sur la politique de condentialité mentionnée
sur la page. Appuyez sur la molette TUNING / ENTER de l’appareil ou sur la
touche ENTER de la télécommande pour conrmer l’étape suivante.
1. Pour lancer l’assistant de conguration, tournez la molette TUNING
/ ENTER de l’appareil ou appuyez sur les touches 7 / 8 de la
télécommande pour choisir [OUI], puis appuyez sur la molette de réglage
TUNING/ENTER de l'appareil ou la touche ENTER de la télécommande
pour conrmer.
2. A l'étape suivante, vous pouvez sélectionner le format de l'heure.
Sélectionnez le réglage souhaité [12] ou [24] et appuyez sur la
molette TUNING / ENTER de l'appareil ou sur la touche ENTER de la
télécommande pour passer à l'étape suivante.
3. Ici, vous pouvez sélectionner la source (DAB / FM / Réseau / No update)
utilisée par l'appareil pour obtenir et mettre à jour l'heure et la date. Si
l'option Mise à jour à partir du réseau est sélectionnée, passez à l'étape
suivante pour sélectionner le fuseau horaire an de vous assurer que
l'heure est correctement aichée. Sélectionnez ensuite "Heure d'été":
[ON] ou [OFF].
4. À l'étape suivante, vous pouvez choisir de laisser l'appareil connecté
à Internet en mode veille. Tournez la molette TUNING / ENTER de
l’appareil ou appuyez sur les touches
choisir [OUI], puis appuyez sur la molette TUNING / ENTER de l'appareil
ou sur la touche ENTER de la télécommande pour conrmer.
5. Votre radio recherche maintenant votre réseau sans l, cela peut prendre
quelques secondes, puis une liste de tous les réseaux sans l apparaît à
l'écran. Choisissez le réseau Wi que vous connaissez et indiquez si vous
souhaitez utiliser WPS (bouton / pin) ou Ignorer WPS pour saisir le mot
de passe à l'aide du clavier aiché.
6. Lorsque vous appuyez sur ignorer WPS, le clavier virtuel apparaît à
l'écran. Tournez la molette TUNING / ENTER de l’appareil ou appuyez
sur les touches 7/8 de la télécommande pour déplacer le surligneur.
Appuyez sur la molette TUNING / ENTER de l’appareil ou sur la touche
ENTER de la télécommande pour sélectionner la touche.
7. Après avoir saisi le mot de passe, sélectionnez [OK], puis appuyez sur
la molette TUNING / ENTER de l’appareil ou sur la touche ENTER de
la télécommande pour conrmer. Si le mot de passe saisi est correct,
la connexion au réseau s'établit. Appuyez sur TUNING / ENTER de
l’appareil ou sur la touche ENTER de la télécommande pour quitter le
menu.
7/8 de la télécommande pour
80
Page 81

8. Vous pouvez à tout moment modier les paramètres en appuyant sur la
touche MENU pour aicher le menu. Appuyez sur les touches / et
choisissez paramètres système, puis appuyez sur la touche ENTER pour
conrmer. Appuyez ensuite sur les touches / pour choisir l'assistant
d'installation, et appuyez sur la touche ENTER pour redémarrer
l'assistant d'installation.
Ce mode d'emploi présente les instructions de base pour utiliser cet
appareil. Sauf indication contraire, toutes les opérations décrites sont
basées sur l'utilisation de la télécommande.
PARAMÈTRES SYSTÈME
Maintenez la touche INFO / MENU de l’appareil ou la touche MENU de
la télécommande pour aicher le menu. Activez la molette TUNING /
ENTER ou appuyez sur les touches / pour sélectionner les paramètres
système, puis appuyez sur la molette TUNING / ENTER de l'appareil ou sur
la touche ENTER de la télécommande pour conrmer.
Egaliseur
Ce système prend en charge une variété d’égaliseurs et d’eets sonores.
Appuyez sur la touche EQ pour entrer dans le menu de l'égaliseur.
En mode paramètres système, appuyez sur les touches / pour choisir
l'égaliseur, puis conrmez en appuyant sur ENTER.
FR
1. L'écran aiche : FLAT > CLASSIC > ROCK > POP > JAZZ
2. Appuyez sur les touches / pour eectuer votre choix puis conrmez
en appuyant sur ENTER.
Réseau
1. En mode paramètres système, appuyez sur les touches /, et
choisissez Réseau puis conrmez en appuyant sur ENTER.
2. Appuyez sur les touches /, pour choisir les paramètres suivants et
conrmez en appuyant sur ENTER.
81
Page 82

FR
SSID - sélectionnez le réseau sans l
souhaité. Nouveau scan - recherche les
Assistant réseau
Wi PBC setup
View settings Aiche les paramètres de l'appareil
Région de wi Sélectionnez un pays de votre choix.
Réglages manuels
NetRemote PIN Setup
Prol réseau Aiche le réseau connecté.
Keep network connected
réseaux disponibles Conguration manuelle
- sélectionnez un réseau sans l avec
activation / désactivation de DHCP.
Sélectionnez WPS sur l'appareil et appuyez
sur la touche WPS du modem auquel vous
souhaitez vous connecter. Appuyez sur la
touche ENTER pour continuer.
Sélectionnez un réseau sans l avec
activation / désactivation DHCP.
Pour spécier un code PIN à saisir avant de
pouvoir vous connecter à l'appareil sur un
réseau.
Pour supprimer le réseau mémorisé dans le
prol réseau.
Pour déterminer si la connexion à votre
réseau doit être maintenue en mode veille
et en mode radio réseau. Ceci est nécessaire
pour le contrôle à distance et la diusion
audio en mode Lecteur de musique.
82
3. Appuyez sur la touche BACK/ de l'appareil ou sur la touche BACK de
la télécommande pour quitter les paramètres et retourner au menu
précédent.
Heure /Date
L’heure / la date se règlent automatiquement dès que vous êtes connecté à
une station de radio Internet, DAB ou FM avec l’heure / la date. Vous pouvez
également régler l'heure / la date manuellement.
• Appuyez sur la touche HEURE pour accéder au réglage de la date et de
l'heure.
• Ou bien, en mode paramètres système, appuyez sur les touches /
et choisissez heure/date puis conrmez en appuyant sur ENTER.
1. Les chires de la date clignotent à l'écran.
2. Appuyez sur les touches / pour régler le jour et conrmez en
appuyant sur ENTER.
Page 83

3. Wiederholen Sie dies über Schritt (2), um den Monat/Jahr/Stunde/
Minute einzustellen.
4. Vous avez terminé le réglage de la date et de l'heure. Pour les autres
paramètres sous Heure / Date appuyez sur les touches / pour
choisir les options suivantes et conrmez en appuyant sur ENTER.
FR
Auto update
Réglage du format Format horaire 12 / 24.
Réglage du fuseau
horaire
Réglage de l'heure
d'été
Le réglage par défaut pour la mise à jour automatique de l'heure est Mise
à jour par le réseau. Si vous souhaitez régler l'heure manuellement, il est
recommandé de désactiver la fonction de mise à jour automatique.
Langue
1. En mode paramètres système, appuyez sur les touches / pour
choisir la langue et conrmez en appuyant sur ENTER.
2. Appuyez sur les touches / pour modier la langue d'aichage.
3. Conrmez en appuyant sur ENTER.
Paramètres d'usine
Il se peut que vous ayez parfois besoin de réinitialiser votre appareil aux
paramètres d'usine, surtout si vous avez déménagé. Si vous avez des
problèmes de réception, réinitialisez l'appareil et essayez à nouveau. Si
vous déménagez dans une autre région du pays et que vous choisissez
des stations DAB locales et nationales dans cette région, vos stations
précédemment réglées risquent de ne plus être disponibles.
Mise à jour de DAB / FM / réseau / pas de
mise à jour
Sélectionnez un fuseau horaire. (Disponible
uniquement si la mise à jour automatique à
partir du réseau est activée.)
Choisissez l'heure d'été. (Disponible
uniquement si la mise à jour automatique à
partir du réseau est activée.)
1. En mode paramètres système, appuyez sur les touches / pour choisir
Paramètres d'usine et conrmez en appuyant sur ENTER.
2. Appuyez sur les touches
appuyant sur ENTER. Ou sélectionnez [Non] pour annuler.
Après la réinitialisation du système, toutes les stations présélectionnées,
DAB et FM sont supprimées
7 / 8 et choisissez [Oui] puis conrmez en
83
Page 84

FR
Mise à jour du software
1. En mode paramètres système, appuyez sur les touches / pour choisir
mise à jour du Software et conrmez en appuyant sur ENTER.
2. Appuyez sur les touches / pour sélectionner "vérication
automatique" ou "vérier maintenant", puis appuyez sur la touche ENTER
pour conrmer.
Avant de télécharger un logiciel, assurez-vous que la radio est connectée
à une prise électrique stable. Une interruption de l'alimentation
secteur pendant le téléchargement du logiciel peut entraîner des
dysfonctionnements et / ou endommager l'appareil !
Assistant d'installation
L'assistant d'installation est disponible dans la section Paramètres système.
Vous pouvez le parcourir pour congurer la date / heure et les paramètres
réseau. Une fois que cela est fait, votre radio est prête.
Info
1. En mode paramètres système, appuyez sur les touches / pour choisir
Info et conrmez en appuyant sur ENTER.
2. La version du logiciel, l'identiant de la radio et le nom d'utilisateur
s'aichent à l'écran.
Rétroéclairage
1. En mode paramètres système, appuyez sur les touches /, pour
choisir rétroéclairage et conrmez en appuyant sur ENTER.
2. Pour les autres paramètres sous rétroéclairage, appuyez sur les touches
/, pour choisir les options suivantes et conrmez en appuyant sur la
touche ENTER.
84
Mode de
fonctionnement
Mode veille
Elevé / moyen/ bas
Limite de durée : arrêt / 10 Sec/ 30 Sec/ 60 Sec/
60 Sec
Niveau de veille : élevé / moyen/ bas /ARRÊT
Page 85

RADIO INTERNET
Pour écouter la radio Internet, votre radio doit être connectée à Internet.
Essayez de positionner votre radio aussi près que possible de votre routeur
pour obtenir les meilleures vitesses de connexion.
Lorsque le mode Radio Internet est sélectionné, la radio se connecte au
portail Frontier Silicon Internet Radio pour télécharger une liste de stations.
Une fois la station sélectionnée, la radio s'y connecte directement.
En mode radio Internet, appuyez sur la touche MENU de la télécommande
pour accéder au menu. Vous pouvez choisir parmi : Dernièrement écouté,
Liste des chaînes, Paramètres système et Menu principal. Appuyez sur les
touches / pour sélectionner, puis appuyez sur la touche ENTER pour
conrmer. Lorsque vous redémarrez la radio Internet, la dernière station
écoutée est automatiquement sélectionnée.
Dernièrement écoutée
1. Appuyez sur les touches /, pour sélectionner l'historique des stations
que vous avez déjà écoutées.
2. Conrmez en appuyant sur la touche ENTER.
Liste des stations
Appuyez sur les touches /, pour choisir les options suivantes et
conrmez en appuyant sur la touche ENTER.
Vous pouvez rechercher spéciquement des stations de votre
Local “Country”
pays. Dans ce cadre, vous pouvez ainer votre recherche
pour diérents groupes ou aicher toutes les stations.
Sélectionnez les stations de diérentes catégories dans le
menu.
http:/ /
Internet
Radio
FR
Internet
radio
Stations
Vous pouvez également rechercher des stations avec
diérents mots clés.
Le nom et une description de la station sélectionnée
apparaissent à l'écran.
Appuyez sur la touche INFO / MENU de l'appareil et
maintenez-la, ou appuyez plusieurs fois sur la touche INFO
de la télécommande pour aicher plus d'informations
sur la station. Les informations aichées délent : nom /
description, genre / lieu, abilité, débit, codec / fréquence
d'échantillonnage, tampon de lecture et date du jour.
85
Page 86

FR
Save to Preset
1. [Not set]
2. [Not set]
3. [Not set]
4. [Not set]
5. [Not set]
Sélectionnez des podcasts dans les catégories du menu
Podcasts
Aide
podcast. Vous pouvez également sélectionner un épisode
spécique en entrant des mots-clés pour rechercher des
podcasts
Vous pouvez trouver l'adresse du portail et du site d'aide et
de support.
Appuyez sur la touche BACK de l’appareil ou de la télécommande pour
revenir au niveau de menu précédent.
Stations mémorisées
Les stations radio Internet préréglées sont enregistrées sur la radio et ne
peuvent pas être lues par d'autres radios.
1. Pour mémoriser le réglage d'une station de radio Internet, maintenez
la touche PRESET de l'appareil ou de la télécommande jusqu'à ce que
l'écran aiche "mémoriser le réglage". (F.4)".
2. Choisissez l'un des 30 emplacements pour mémoriser la station en cours
en appuyant sur les touches / pour choisir le numéro puis conrmez
en appuyant sur ENTER.
Pour rappeler une station mémorisée
1. Pour sélectionner une station préréglée, appuyez sur la touche PRESET
de l'appareil ou de la télécommande, puis appuyez sur les touches /,
pour sélectionner l'une des stations préréglées répertoriées.
2. Appuyez sur ENTER pour conrmer la sélection.
86
Alternative
Appuyez sur les touches PRESET/FOLDER / de la télécommande pour
passer à la station mémorisée suivante/précédente. Ou appuyez sur les
touches numériques de la télécommande pour passer à la station préréglée.
("0" pour la station préréglée 10). - Si aucune station n'est enregistrée,
"préréglage vide" s'aiche.
Le fonctionnement des stations préréglées et leur rappel est le même pour
la radio Internet, DAB et FM.
Modes d'aichage de la radio Internet
Chaque fois que vous appuyez sur la touche INFO / MENU de l'appareil ou
sur la touche INFO de la télécommande, l'écran aiche les informations
suivantes :
Infos sur la station - Description - Genre / Pays du spectacle - Fiabilité Débit / Format de son - Tampon de lecture – Date
Page 87

LECTEUR DE MUSIQUE
Le lecteur de musique intégré vous permet de lire sur l'appareil les chiers
audio non sécurisés stockés sur un ordinateur en réseau ou un périphérique
de stockage de masse USB. Pour lire de la musique à partir de l'ordinateur,
vous devez congurer un partage de chier ou de bibliothèque multimédia
sur l'ordinateur.
Appuyez plusieurs fois sur la touche MODE de l'appareil ou de la
télécommande pour sélectionner le mode de lecture de musique.
Partage de médias
Vériez que votre ordinateur est disponible sur le réseau et qu'il est
conguré pour permettre le partage de vos dossiers ou chiers multimédias.
Reportez-vous au mode d'emploi de votre ordinateur pour congurer un
dossier à partager.
1. En mode lecteur de musique, appuyez sur les touches /, pour choisir
des médias partagés, et conrmez en appuyant sur la touche ENTER
pour rechercher tous les dossiers et chiers de médias partagés.
2. L'écran aiche tous les dossiers multimédias trouvés sur le réseau.
Appuyez sur les touches /, pour sélectionner l’ordinateur auquel
vous souhaitez vous connecter.
3. L'appareil recherche tous les médias partagés sur l'ordinateur.
4. Appuyez sur les touches / pour sélectionner le médium partagé de
votre choix, puis appuyez sur la touche ENTER.
5. Cet appareil ne peut pas accéder à votre ordinateur tant que votre
ordinateur ne le permet pas.
6. Appuyez sur la touche ENTER pour lancer la lecture de la piste souhaitée.
FR
Pour eacer une station
1. En mode lecteur de musique, appuyez sur les touches /, et
choisissez Prune Server, puis conrmez en appuyant sur la touche
ENTER.
2. Appuyez sur les touches /, et choisissez [OUI] pour supprimer les
serveurs qui ne sont plus disponibles. Conrmez en appuyant sur la
touche ENTER. Ou bien choisissez [ NON ] pour annuler.
87
Page 88

FR
UTILISATION DE L'USB
Lorsqu'un périphérique USB est connecté à l'appareil, l'écran aiche
"Disque USB connecté - Ouvrir le dossier ?". Appuyez sur la touche ENTER
pour conrmer [ OUI ].
Alternative : En mode lecteur de musique, appuyez sur les touches (/) pour
sélectionner la lecture USB et appuyez sur la touche ENTER pour conrmer.
Appuyez sur les touches / pour sélectionner. Appuyez ensuite sur
ENTER pour conrmer un chier de chanson.
L'appareil ne peut lire les formats de chiers MP3 qu'en mode USB. Il est
possible que l'appareil ne soit pas compatible avec tous les périphériques
USB ; cela n'indique pas un problème de l'appareil.
Pour recharger l'appareil
Vous pouvez charger votre appareil avec un câble USB (non fourni) sur le
port USB de cet appareil.
• L'intensité maximale de charge par USB est de 1 A.
• La charge par USB n'est pas garantie pour tous les appareils.
• La charge par USB fonctionne, que l'appareil soit éteint ou allumé.
Modes d'aichage de la musique
Chaque fois que vous appuyez sur la touche INFO / MENU de l'appareil ou
sur la touche INFO de la télécommande, l'écran aiche les informations
suivantes.
Artiste - Album – Taux d'échantillonnage / Format de son - Tampon de
lecture - Date
88
Touche Fonction
Appuyez sur la touche SCAN / () de l'appareil ou (/)
/
de la télécommande pour suspendre la lecture ou
reprendre la lecture normale.
Appuyez sur cette touche pour passer au titre
précédent.
Maintenez cette touche pour reculer rapidement à
l'intérieur du titre en cours.
Page 89

Mode répétition
1. Dans le menu du lecteur de musique, appuyez sur les touches /,
pour choisir répétition, et appuyez sur la touche ENTER plusieurs fois
ou bien appuyez sur la touche REPEAT de la télécommande pendant la
lecture pour activer et désactiver la répétition.
2. Lorsque le mode répétition est activé, l'icône
dossier en cours est répété.
Mode lecture aléatoire
1. Dans le menu du lecteur de musique, appuyez sur les touches /,
pour choisir Shule Play, et conrmez en appuyant plusieurs fois
sur la touche ENTER, ou bien appuyez sur la touche RANDOM de la
télécommande pendant la lecture pour activer et désactiver le mode
Shule Play.
2. Lorsque la lecture aléatoire est activée, l'écran aiche et les chiers
de chanson sont lus de manière aléatoire.
s'aiche à l'écran et le
FR
89
Page 90

FR
RADIO DAB
Appuyez plusieurs fois sur la touche MODE de l'appareil ou de la
télécommande pour sélectionner la radio DAB. (F.6) L'appareil passe
en mode DAB et exécute la fonction de scan automatique. Pendant la
recherche, "Scan...." apparaît à l'écran. "ainsi qu'une barre indiquant la
progression de l'analyse et le nombre de stations trouvées jusqu'à présent.
(F.7) Lorsque l'analyse est terminée, l'appareil sélectionne la première
station trouvée par ordre alphanumérique. Pour explorer les stations
trouvées, appuyez sur les touches / pour effectuer votre choix et
confirmez en appuyant sur ENTER.
Liste de stations
1. En mode DAB, appuyez sur la touche MENU pour appeler le menu DAB.
2. Appuyez sur les touches / pour choisir "liste des stations" et
conrmez en appuyant sur ENTER.
3. Une liste des stations DAB s'aiche à l'écran.
Recherche automatique
1. Appuyez sur les touches / de l'appareil ou sur la touche SCAN de la
télécommande pour activer la recherche automatique.
2. L'écran aiche "Scan..." et une barre de progression.
3. Toutes les stations trouvées sont automatiquement enregistrées. Pour
parcourir et écouter les stations trouvées, appuyez sur les touches
/ pour eectuer votre choix et appuyez sur ENTER pour conrmer.
Recherche manuelle
En plus de la fonction de tuner automatique, vous pouvez également
régler le récepteur manuellement. Cela peut vous servir à orienter votre
antenne ou à ajouter des canaux qui ont été ignorés lors de la recherche
automatique.
90
1. Appuyez sur la touche MENU de la télécommande pour aicher le menu.
2. Appuyez sur les touches / pour choisir Tuning manuel et conrmez
en appuyant sur ENTER.
3. L'écran aiche le Multiplex 5A à 13F.
4. Appuyez sur les touches / /), pour choisir le canal et conrmez en
appuyant sur ENTER.
5. Pour écouter une station trouvée, revenez à l'écran de lecture actuel et
appuyez sur les touches /, pour choisir la station souhaitée dans la
liste et conrmez en appuyant sur ENTER.
Page 91

Aichages DAB
Chaque fois que vous appuyez sur la touche INFO / MENU de l'appareil ou
sur la touche INFO de la télécommande, l'écran aiche les informations
suivantes :
DLS : – Type de programme – Ensemble/Fréquence – Erreur de signal /
force du signal - Bitrate / Codec / Canaux - Date
DLS (Dynamic Label Segment) : Il s’agit d’un message continu contenant
des informations en temps réel, par exemple. Titres de chansons, gros
titres.
Type de programme : décrit la catégorie de l'émission à transmettre.
Nom de l'ensemble /fréquence : aiche le nom du multiplex contenant
la station que vous écoutez et la fréquence. Un multiplex est un ensemble
de stations de radio regroupées et retransmises sur une fréquence. Il existe
des multiplexes nationaux et locaux. Les stations locales contiennent des
stations spéciques à cette zone.
Erreur de signal / force du signal : L'erreur est aichée sous forme de
nombre. Si le nombre est égal à 0, cela signie que le signal reçu est sans
erreur et que l'intensité du signal est forte. Si le taux d'erreur est élevé,
il est recommandé de repositionner l'antenne radio ou de repositionner
l'appareil. L'écran aiche une barre de chargement indiquant l'intensité
du signal. Plus le signal est puissant, plus la barre est longue de gauche à
droite.
FR
Bit-Rate / Codec / canaux : L'écran aiche le débit binaire audio numérique
reçu avec des informations supplémentaires sur le codec audio et la
conguration du canal.
Date : aiche la date du jour automatiquement fournie par la station.
Suppression des stations indisponibles
Vous pouvez supprimer de la liste toutes les stations non disponibles.
1. En mode DAB, appuyez sur la touche MENU et appuyez sur les touches
/, pour choisir supprimer les stations indisponibles et conrmez en
appuyant sur ENTER.
2. Appuyez sur les touches /, pour choisir [OUI] et conrmez en
appuyant sur la touche ENTER. Ou bien choisissez [NON] pour annuler.
91
Page 92

FR
DRC (Dynamic Range Compression)
Lorsque vous écoutez de la musique à plage dynamique élevée dans un
environnement bruyant, vous pouvez compresser la plage dynamique
audio.
1. En mode DAB, appuyez sur la touche MENU puis sur les touches /,
pour choisir DRC et conrmez en appuyant sur la touche ENTER.
2. Appuyez sur les touches /, pour choisir DRC élevé/bas/arrêt et
conrmez le réglage en appuyant sur la touche ENTER.
Ordre des stations
Vous pouvez déterminer l'ordre d'entrée des stations :
1. En mode DAB, appuyez sur la touche MENU puis sur les touches /
pur choisir Ordre des stations et conrmez en appuyant sur la touche
ENTER.
2. Appuyez sur les touches / pour sélectionner Alphanumérique /
Ensemble / Valide et conrmez le réglage en appuyant sur la touche
ENTER.
Mémorisation et rappel d'une station mémorisée
Pour plus d'informations, voir "Présélection de stations" et "Rappel de
stations mémorisées" dans la section Radio Internet.
92
Page 93

RADIO FM
Pour régler l’appareil en mode FM, appuyez plusieurs fois sur MODE sur
l’appareil ou sur la télécommande pour passer en mode FM (F.8). L’aichage
indique la fréquence.
FR
Recherche automatique
Appuyez sur la touche SCAN de l'appareil ou de la télécommande pour
lancer la recherche d'une station. Une fois qu'une station a été trouvée, le
scan s'arrête automatiquement.
Réglage manuel
Pour rechercher manuellement des stations FM, tournez la molette TUNING
/ ENTER jusqu'à atteindre la fréquence souhaitée.
En mode radio FM, il peut être nécessaire d’ajuster le réglage de chaque
station en appuyant sur les touches (/). (/). Chaque appui modie la
fréquence de 0,05 MHz. Si la réception est toujours mauvaise, ajustez la
position de l'antenne ou essayez de changer la radio d'emplacement.
Paramètres de recherche
1. Appuyez sur la touche MENU pour accéder au menu FM.
2. Appuyez sur les touches / pour sélectionner le réglage de la
recherche et conrmez en appuyant sur ENTER.
3. Appuyez sur les touches / pour choisir [Oui] pour ne recevoir que les
signaux puissants et conrmez en appuyant sur la touche ENTER.
Paramètres audio
Appuyez sur MONO/ST. Sur la télécommande pour basculer entre les choix
Mono uniquement ou Mono/Stéréo.
Alternative
1. Appuyez sur la touche MENU pour accéder au menu principal.
2. Appuyez sur les touches / pour modier les paramètres audio et
conrmez en appuyant sur la touche ENTER.
3. Appuyez sur les touches
en Mono seulement, ou bien [ NON ] pour laisser l'appareil choisir
automatiquement entre Mono ou Stéréo.
4. Conrmez en appuyant sur la touche ENTER.
/ pour choisir [ OUI ] pour écouter
FM Radi o
FM
radio
93
Page 94

FR
Aichages de la radio FM
Chaque fois que vous appuyez sur la touche INFO / MENU de l'appareil ou
sur la touche INFO de la télécommande, l'écran suivant s'aiche :
Radiotext - Programmtyp - Frequenz - Datum
Texte radio - Type de programme - Fréquence – Date
Type de programme : décrit le "style" ou le "genre" de la musique
retransmise.
Nom / fréquence de la station : quand vous recevez une station RDS, le
nom de cette station ou la fréquence s'aiche.
Date : aiche la date du jour automatiquement fournie par la station.
Mémorisation et rappel d'une station mémorisée
Pour plus d'informations, voir "Présélection des stations" et "Rappel d'une
station mémorisée" dans la section Radio Internet.
94
Page 95

LECTEUR CD
Disques compatibles
Disc type Logo sur le disque Contenu du
médium
FR
CD-R (CD enregistrable)
CD-RW (CD réinscriptible) Audio
CD AUDIO (Compact Disc Digital
Audio)
Appuyez plusieurs fois sur MODE sur l'appareil ou sur la télécommande
pour choisir le mode CD.
Lecture
1. Appuyez sur OUVRIR/FEMER (
2. Insérez le CD avec l'étiquette vers le haut dans le lecteur CD, puis fermez
le compartiment avec la touche .
3. S'il n'y a pas de disque ou si le disque ne peut pas être lu, "No disc"
apparaît à l'écran.
4. Le nombre total de titres s’aiche, puis appuyez sur la touche SCAN
de l'appareil ou de la télécommande pour lire automatiquement le
premier titre du CD/ disque MP3.
Pour mettre la lecture en pause: appuyez sur la touche
ou de la télécommande pour interrompre la lecture. Appuyez à nouveau
pour reprendre la lecture.
Pour arrêter la lecture : appuyez sur la touche
télécommande pour arrêter la lecture
) pour ouvrir le lecteur CD.
de l'appareil ou de la
Audio
Audio
- de l'appareil
Pour passer à un autre titre
Appuyez sur
précédente ou pour avancer à la piste suivante.
Maintenez les touches / pour reculer ou avancer rapidement. Si
vous lisez un disque audio MP3 groupé dans un autre dossier, appuyez sur
PRESET/ORDNER / de la télécommande pour passer au dossier suivant
/précédent.
/ , pour revenir au début de la piste ou de la piste
95
Page 96

FR
1
1
F
1
F
Pour répéter la lecture
1. Appuyez plusieurs fois sur la touche REPEAT pour sélectionner une
fonction.
Le titre en cours est répété.
Tous les chiers du dossier en cours sont répétés
(uniquement pour les CD de données).
Tous les titres sont répétés.
2. Appuyez encore une fois sur REPEAT pour quitter le mode de lecture à
répétition.
Lecture aléatoire
Vous pouvez lire tous les titres d'un disque dans un ordre aléatoire.
1. Appuyez sur RANDOM sur la télécommande. L'écran aiche l'icône
Tous les titres sont lus dans un ordre aléatoire.
2. Appuyez sur / pour lire le prochain titre dans l'ordre aléatoire.
3. Lorsque tous les titres ont été lus une fois, la lecture aléatoire s'arrêt
automatiquement.
4. Pour interrompre la lecture aléatoire, appuyez sur RANDOM pendant la
lecture aléatoire. La lecture normale reprend.
Lecture des intros
1. Appuyez sur INTRO sur la télécommande. L'écran affiche "INTRO ".
L'appareil lit les 10 premières secondes de chaque titre.
2. Appuyez de nouveau sur INTRO sur la télécommande pour reprendre la
lecture normale.
Programme de lecture
Vous pouvez programmer jusqu'à 20 titres dans n'importe quel ordre. Le
mode programme est activé en mode STOP.
1. Appuyez sur la touche PRESET pour accéder au mode programme.
2. Appuyez sur
3. Appuyez sur ENTER pour conrmer le titre.
4. Répétez les étapes 2-3 pour programmer d'autres titres. Lorsque vous
avez terminé, appuyez sur la touche , pour démarrer la lecture des
pistes programmées.
Pour interrompre le programme : appuyez deux fois sur la touche
-de l'appareil ou de la télécommande, ou bien ouvrez le lecteur CD et
refermez-le pour eacer la mémoire.
/ pour choisir la piste que vous souhaitez programmer.
96
Page 97

UTILISATION DU BT
L'appareil dispose d'une fonction BT capable de recevoir un signal dans un
rayon de 8 mètres. Connectez l'appareil à un périphérique BT pour écouter
de la musique :
1. Appuyez plusieurs fois sur MODE sur l'appareil ou sur la télécommande
pour choisir le mode BT.
2. Si l'appareil n'est pas associé à un appareil BT, le voyant de l'icône BT
clignote.
3. Activez votre appareil BT et sélectionnez le mode de recherche.
4. Votre liste d'appareils BT aiche "Connect System S".
5. Sélectionnez "Connect System S" et entrez "0000" comme mot de passe
si nécessaire.
6. Pour déconnecter la fonction BT, passez à une autre fonction de
l'appareil ou désactivez-la sur votre appareil BT.
Lecteur de musique par BT
• Vous devrez peut-être régler le volume de votre radio et de votre
appareil BT.
• Appuyez sur la touche
mettre en pause de la musique.
• Appuyez sur les touches / de l'appareil ou de la télécommande
pour passer au titre précédent / suivant.
• Si la force du signal est faible, votre récepteur BT peut se déconnecter,
mais il repasse automatiquement en mode de connexion.
• Pour améliorer la réception du signal, supprimez tout obstacle entre
l’appareil et le périphérique BT.
• Cet appareil prend en charge les fonctions A2DP (Advanced Audio
Distribution Prole) et AVRCP (Audio Video Remote Control Prole).
Vous ne pouvez vous connecter qu’avec un seul appareil BT à la fois.
• La compatibilité avec tous les périphériques et types de supports n'est
pas garantie.
• Certains téléphones mobiles dotés de la fonction BT peuvent se
connecter et se déconnecter quand un appel arrive ou que vous
raccrochez. Il ne s'agit pas d'un problème de votre appareil.
-de l'appareil sur la télécommande pour lire /
FR
97
Page 98

FR
UTILISATION DE LA PRISE AUX
Une prise "AUDIO IN" se trouve à l'avant de l'appareil. Vous pouvez
brancher des sources audio analogiques d’autres appareils sur cette prise.
1. Branchez l'entrée à un autre appareil audio via un câble AUX (non fourni)
sur la prise "AUDIO IN".
2. Appuyez plusieurs fois sur la touche MODE de l'appareil ou de la
télécommande pour sélectionner le mode AUX.
3. Tournez VOL +/- sur l'appareil ou sur la télécommande pour régler le
volume au niveau souhaité.
4. Utilisez votre périphérique audio en mode AUX directement pour les
fonctions de lecture.
Pour plus d'informations sur la connexion du périphérique audio externe,
reportez-vous au mode d'emploi du périphérique concerné.
98
Page 99

NETREMOTE
L'appareil ore une fonctionnalité de NetRemote par smartphone ou
tablette sous iOS ou Android. En téléchargeant l'application associée
appelée UNDOK, vous pouvez aicher tous les modes de radio Internet,
lecteur de musique, DAB, FM, Bluetooth et entrée auxiliaire.
Recherchez UNDOK dans Google Play ou Apple Store et installez-la sur
votre smartphone ou votre tablette. Avant d'utiliser l'application UNDOK,
assurez-vous que l'appareil et le smartphone ou la tablette sont sur le
même réseau Wi.
Démarrez l'application.
L'application s'initialise et recherche l'appareil sur le réseau. Appuyez sur
l'appareil pour établir la connexion NetRemote.
• Lorsque le smartphone ou la tablette a déjà accédé à l'appareil, la
connexion suivante se fait automatiquement à la prochaine ouverture
de l'application.
• Notez que si un autre smartphone ou tablette avec l'application sur le
même réseau a accès à l'appareil, la connexion d'origine sera perdue.
Lorsque vous connectez le périphérique à l'appareil pour la première fois,
l'application peut vous demander de saisir le code PIN. Le code PIN par
défaut est 1234. Pour plus d'informations sur la modication du code PIN
pour la sécurité, voir Paramètres système : Réseau - Conguration du code
PIN NetRemote.
FR
Sur la page principale, sélectionnez le mode souhaité. Vous pouvez ensuite
contrôler le mode sélectionné sur votre smartphone ou votre tablette et sur
l'appareil en même temps.
UTILISATION D'UN CASQUE
N'écoutez pas la musique à volume élevé lorsque vous utilisez un casque.
Sinon, vous risquez une perte auditive dénitive. Réduisez le volume du
tuner au niveau le plus bas avant d’utiliser un casque.
• Utilisez uniquement des écouteurs avec une prise jack 3,5 mm.
• Branchez le casque dans la prise située devant l'appareil.
99
Page 100

FR
RÉGLAGE DE LA MISE EN VEILLE
Cette fonction vous permet de programmer le passage automatique de
l’appareil en veille au bout d’un certain temps.
1. Pour activer la fonction de veille, appuyez plusieurs fois sur la touche
SLEEP. A chaque appui, la durée est modiée dans l'ordre suivant :
ARRÊT 15 minutes 30 minutes 45 minutes 60 minutes 90 minutes 120
minutes.
2. Lorsque la durée souhaitée pour le passage automatique en veille
apparaît, cessez d'appuyer sur la touche pour activer la fonction de veille
au bout de deux secondes. “ ” s'aiche à l'écran. À côté de l'icône à
l'écran, le temps restant jusqu'à l'arrêt s'aiche.
3. Lorsque la minuterie de mise en veille atteint le zéro, l'appareil passe
en mode veille. Pour désactiver la fonction de veille pendant le compte
à rebours, appuyez plusieurs fois sur la touche SLEEP pour sélectionner
"SLEEP OFF”. “ ” disparaît de l'aichage.
4. Appuyez une fois sur la touche SLEEP pour aicher l'état de la minuterie
d'arrêt à l'écran, lorsqu'elle est activée.
Autre possibilité :
1. Appuyez sur la touche MENU de la télécommande pour aicher le menu
principal de la fonction. Appuyez sur les touche / pour choisir le
menu principal puis appuyez sur ENTER pour conrmer.
2. Appuyez sur les touches / pour choisir veille, puis appuyez sur
ENTER pour conrmer.
3. Appuyez sur les touches / pour choisir la minuterie d'arrêt, puis
appuyez sur ENTER pour conrmer.
100
 Loading...