

Page 1

Silver Star Mini
Internetradio mit DAB+
Internet Radio with DAB+
Radio Internet avec DAB+
Web radio con DAB+
Radio de internet con DAB+
10032791 10032792
www.auna-multimedia.com
Page 2

Page 3

Sehr geehrter Kunde,
wir gratulieren Ihnen zum Erwerb Ihres Geräts.
Lesen Sie die folgenden Hinweise sorgfältig
durch und befolgen Sie diese, um möglichen
Schäden vorzubeugen. Für Schäden, die durch
Missachtung der Hinweise und unsachgemäßen
Gebrauch entstehen, übernehmen wir keine Haf-
tung. Scannen Sie den QR-Code, um Zugri auf
die aktuellste Bedienungsanleitung und weitere
Informationen rund um das Produkt zu erhalten.
INHALT
Technische Daten 4
Sicherheitshinweise 5
Geräteübersicht 7
Fernbedienung 9
Inbetriebnahme 10
Menüstruktur 12
Internetradio 16
Media-Center 17
Informationscenter 18
Einstellungen 19
DNLA / UPnP 22
AUX-Eingang 24
BT 24
FM-Radio 24
DAB+ Radio 25
Fehlerbehebung 26
Hinweise zur Entsorgung 28
DE
3
Page 4

DE
TECHNISCHE DATEN
Artikelnummer 10032791 10032792
Stromversorgung Netzgerät Eingang: 100-240 V ~ 50/60 Hz , 0,6 A
Ausgang: 12 V / 1 A
Anschlüsse USB, Aux-Eingang (3,5 mm), Line-out (3,5 mm)
UKW-Radio
Frequenzbereich 87,5 MHz - 108 MHz
DAB
Frequenzbereich 174-240 MHz
WLAN 802.11b/g/n
Verschlüsselung: WEP, WPA, WPA 2(PSK), WPS
Streaming UPnP, DLNA
Unterstützte Dateiformate WMA, MP3
4
Page 5

SICHERHEITSHINWEISE
Lesen Sie vor der Verwendung des Geräts die Bedienungsanleitung
vollständig durch. Befolgen Sie alle Sicherheitshinweise, um Schäden durch
unsachgemäßen Gebrauch vorzubeugen.
• Bewahren Sie die Bedienunganleitung zum Nachschlagen auf. Wenn Sie
das Gerät einer dritten Person geben, muss diese Bedienungsanleitung
auch weiter gegeben werden.
• Verwenden Sie das Gerät nur zu dem vorbestimmten Zweck.
• Dieses Gerät ist nur für hausübliche Zwecke bestimmt.
• Sie können das Gerät drinnen oder im Freien verwenden.
• Gefahr eines Stromschlags! Tauchen Sie das Gerät, das Netzgerät oder
den Netzstecker nicht in Wasser oder andere Flüssigkeiten.
• Stellen Sie das Gerät nicht in der Nähe von Flüssigkeiten auf neben
Badewannen und Waschbecken, in einem feuchten Keller oder in der
Nähe eines Schwimmbeckens.
• Nehmen Sie das Gerät nicht mit feuchten Händen in Betrieb oder wenn
Sie auf einem nassen Boden stehen. Fassen Sie die den Netzstecker nie
mit feuchten oder nassen Händen an.
• Der Hersteller übernimmt keine Haftung für mögliche Schäden,
die durch falsche Bedienung oder falsche Handhabung des Geräts
entstehen.
• Das Gerät ist nicht zum Gebrauch durch kleine Kinder oder gebrechliche
Personen bestimmt, außer sie wurden durch eine verantwortliche
Person unterwiesen, um zu gewährleisten, dass sie das Gerät sicher
bedienen können.
• Kleine Kinder müssen beaufsichtigt werden, so dass sie mit dem Gerät
nicht spielen.
• Halten Sie das Gerät von heißen Flächen und oenen Flammen fern.
• Stellen Sie keine Gegenstände auf das Gerät. Stellen Sie keine
Gegenstände mit oenen Flammen (wie Kerzen) auf das Gerät oder
daneben auf. Stellen Sie nie Gegenstände mit Flüssigkeiten (wie Vasen)
auf das Gerät oder daneben auf.
• Setzen Sie das Gerät nicht der direkten Sonneneinstrahlung aus.
• Verwenden Sie das Gerät nicht, wenn es beschädigt ist. Zur Vermeidung
von Gefahren darf ausschließlich der Hersteller, der Kundendienst oder
eine ähnlich qualizierte Person Teile auswechseln.
• Önen Sie nicht das Gehäuse. Versuchen Sie nicht das Gerät selbst zu
reparieren.
• Führen Sie keine Fremdkörper in das Gehäuse ein.
• Bedecken Sie das Gerät während der Benutzung nicht.
• Das Gerät darf nur mit der Stromversorgung, wie sie auf Typenschild
angegeben ist, betrieben werden.
• Schalten Sie das Gerät aus, bevor Sie den Netzstecker einstecken oder
ziehen.
• Vermeiden Sie Schäden am Netzkabel, indem Sie es nicht quetschen,
DE
5
Page 6

DE
knicken oder es über scharfe Kanten ziehen. Halten Sie das Netzkabel
von heißen Flächen und oenen Flammen fern.
• Halten Sie immer am Netzstecker fest und nicht am Netzkabel, wenn
Sie das Gerät von der Stromversorgung trennen.
• Schließen Sie das Gerät an einer leicht erreichbaren Steckdose an,
so dass Sie es in einem Notfall zügig herausziehen können. Um
das Gerät vollständig außer Betrieb zu setzen und um es von der
Stromversorgung zu trennen, ziehen Sie den Netzstecker.
• Wenn das Gerät aufgrund einer elektrostatischen Auadung oder einer
kurzen Spannungsspitze nicht funktioniert, trennen Sie das Gerät von
der Stromversorgung und schließen es wieder an.
• Ziehen Sie den Netzstecker, wenn ein Gewitter aufkommt und wenn das
Gerät lange Zeit nicht genutzt wird.
6
Page 7
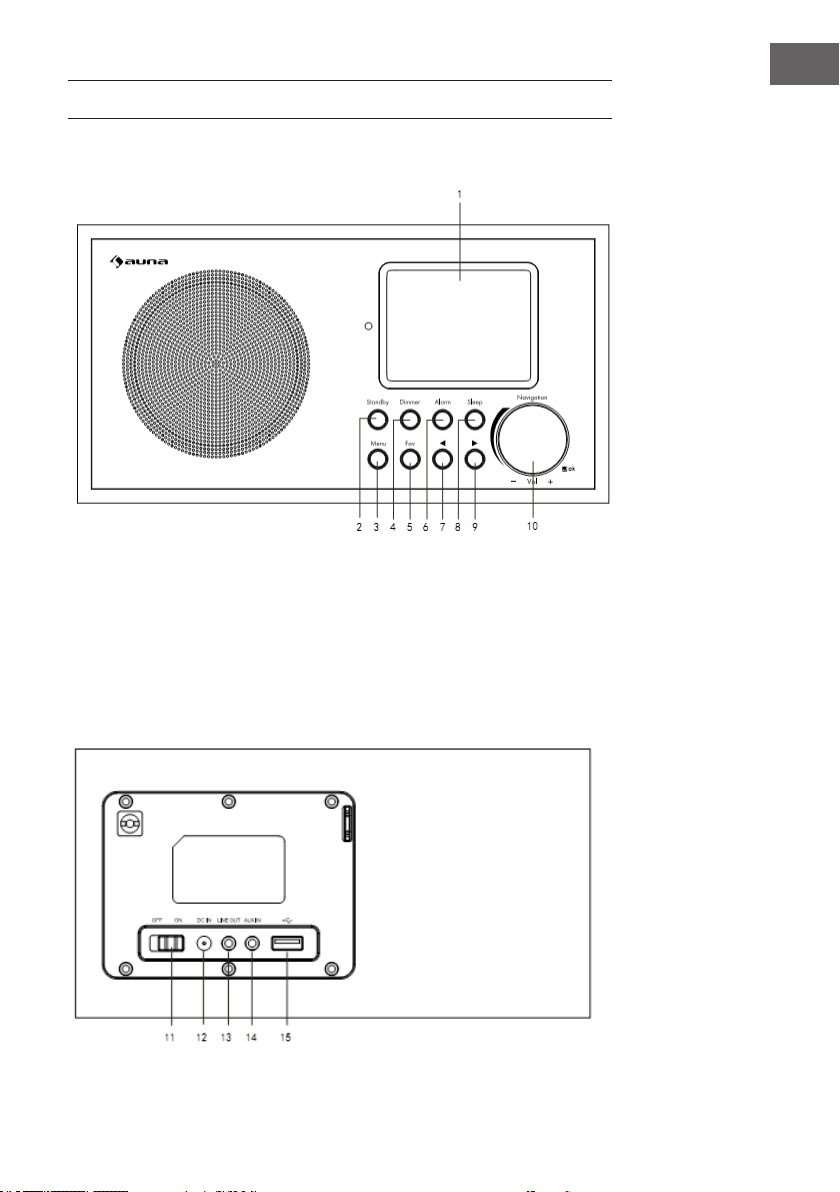
GERÄTEÜBERSICHT
Vorderseite
DE
1 Display
2 Standby
3 Menü
4 Dimmer
Rückseite
5 Gespeicherte
Sender
6 Alarm
7 Zurück
8 Schlaf
9 Vor
10 Lautstärke+/
Lautstärke –
7
Page 8

DE
Rückseite
11 Ein/Aus-Taste
12 DC IN 12 V: Buchse zum Anschluss des Netzteils
13 LINE OUT: Stereo-Audioausgang (3,5 mm)
14 AUX IN: Stereo-Audioeingang (3,5 mm)
15 USB-Anschluss
Unterseite
16 Bassreexrohr
8
Page 9
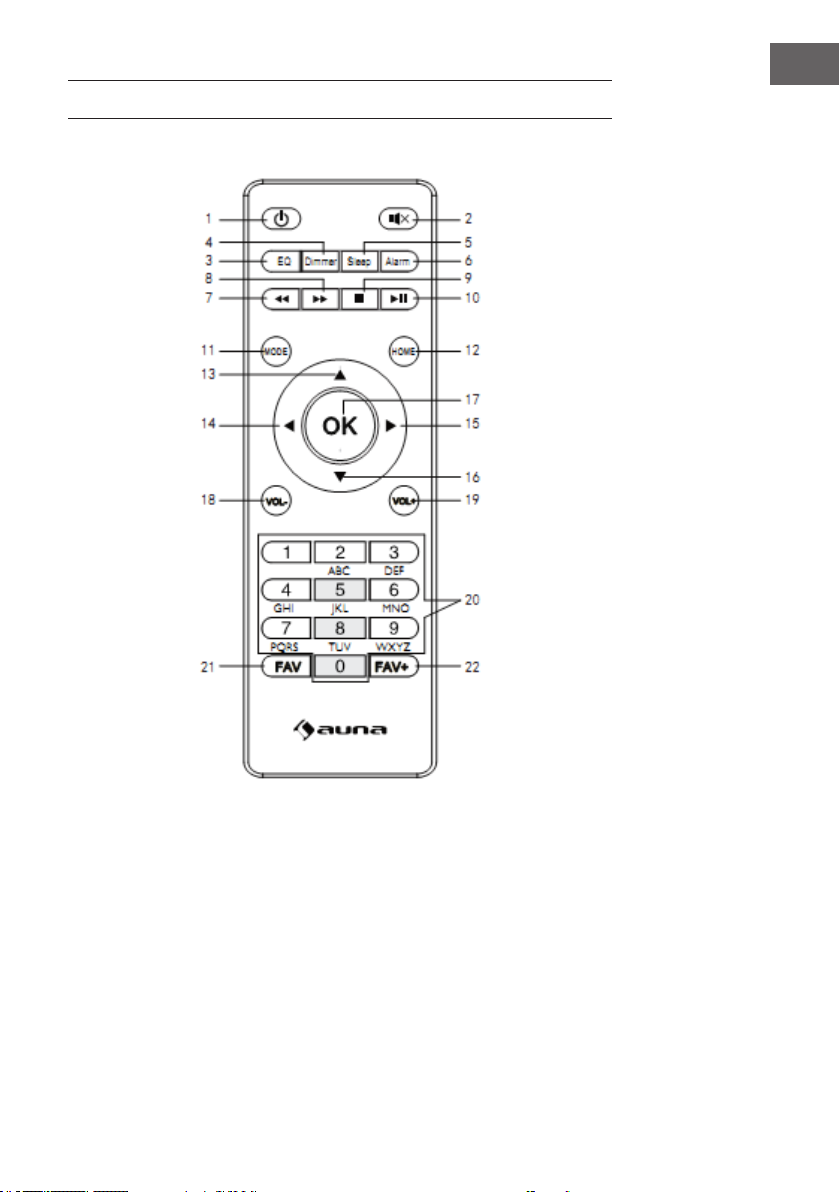
FERNBEDIENUNG
DE
1 Standby
2 Stumm
3 Equalizer
4 Dimmer
5 Schlummer
6 Alarm
7 voriger Titel
8 nächster Titel
9 Stopp
10 Wiedergabe/
Pause
11 Modus
12 Hauptmenü
13 Cursor hoch
14 Cursor links
15 Cursor rechts
16 Cursor runter
17 OK: Bestätigen
18 Lautstärke –
19 Lautstärke +
20 Eingabe von
Zahlen und
Buchstaben
21 Sender aufrufen
22 Sender speichern
9
Page 10
DE
INBETRIEBNAHME
• Achten Sie vor der Inbetriebnahme darauf, dass die auf den Typenschild
angegebene Spannung mit der Spannung in Ihrem Haushalt
übereinstimmt.
• Verwenden Sie das mitgelieferte Netzgerät, um es an eine Steckdose im
Haushalt anzuschließen.
• Schalten Sie das Gerät mit dem Ein/Aus-Schalter auf der Rückseite ein.
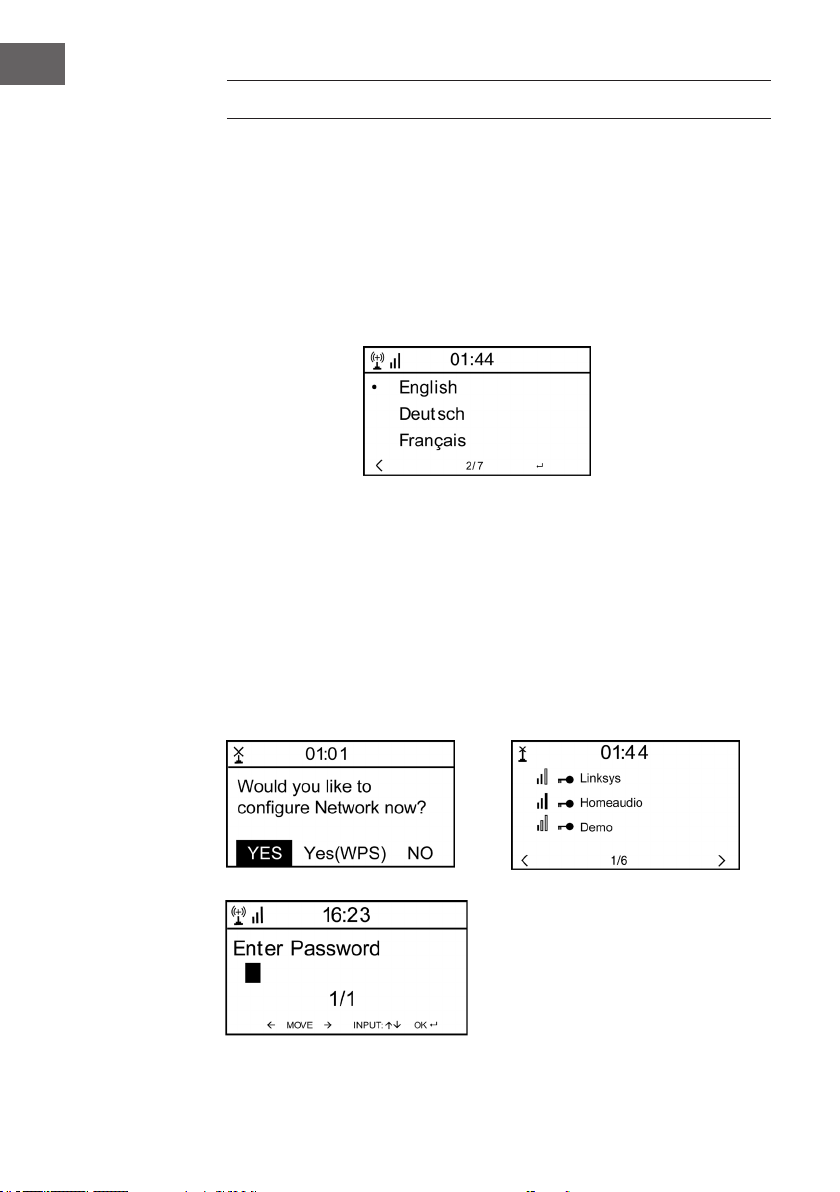
• Wenn das Gerät zum ersten Mal startet, fordert das System Sie dazu
auf, die Sprache und die Netzwerkkonguration einzustellen. Sie
können die Netzwerkverbindung sofort oder später einstellen.
Netzwerkkonfiguration
1. Normale Netzwerkkonfiguration
Wählen Sie „Ja“, um die normale Netzwerkkonguration einzustellen.
Wählen Sie anschließend den erforderlichen Zugangspunkt (AP),
indem Sie das Navigationsrad drehen und zum Bestätigen auf OK am
Navigationsrad drücken.
Drücken Sie >, um das nächste Zeichen zu wählen.
In diesem Schritt die Taste drücken, um nach links zu gehen und
gleichzeitig die Zeichen links zu löschen. Wenn das Passwort vollständig
ist, zum Bestätigen auf dem Navigationsrad OK drücken.
10
Page 11

Folgende Zeichen sind für das Gerät verfügbar:
Ziern (0-9)
Lateinische Buchstaben (A-Z, a-z)
Weitere Zeichen: ( DEL,@,Blank,!,”,#,$,%,&,*,’,+ and (,)
2. WPS PBC Netzwerkkonfiguration
Wählen Sie „Ja WPS“, wenn Sie die Einrichtung mit einem drahtlosen
Netzwerk (WPS PBC) vornehmen möchten. Wenn Sie einen Router mit
WPS-Taste verwenden, können Sie können Sie die Einrichtung ganz
einfach über die WPS-Funktion vornehmen. In die Einstellungen gehen
und die WPS-Taste 120 Sekunden lang gedrückt halten. Die Verbindung
zwischen dem Router und dem Gerät wird automatische vorgenommen.
3. Keine Netzwerkkonfiguration
Drücken Sie „NO“ bzw. „Nein“, wenn Sie das Netzwerk jetzt nicht
kongurieren wollen.
Den erfolgreichen Verbindungsaufbau mit Ihrem W-Lan bestätigt das Gerät
mit der Anzeige „Network OK“. Dann wird das Hauptmenü angezeigt:
DE
11
Page 12
DE
Drehknopf
drehen und
drücken
um etwas
auszuwählen.
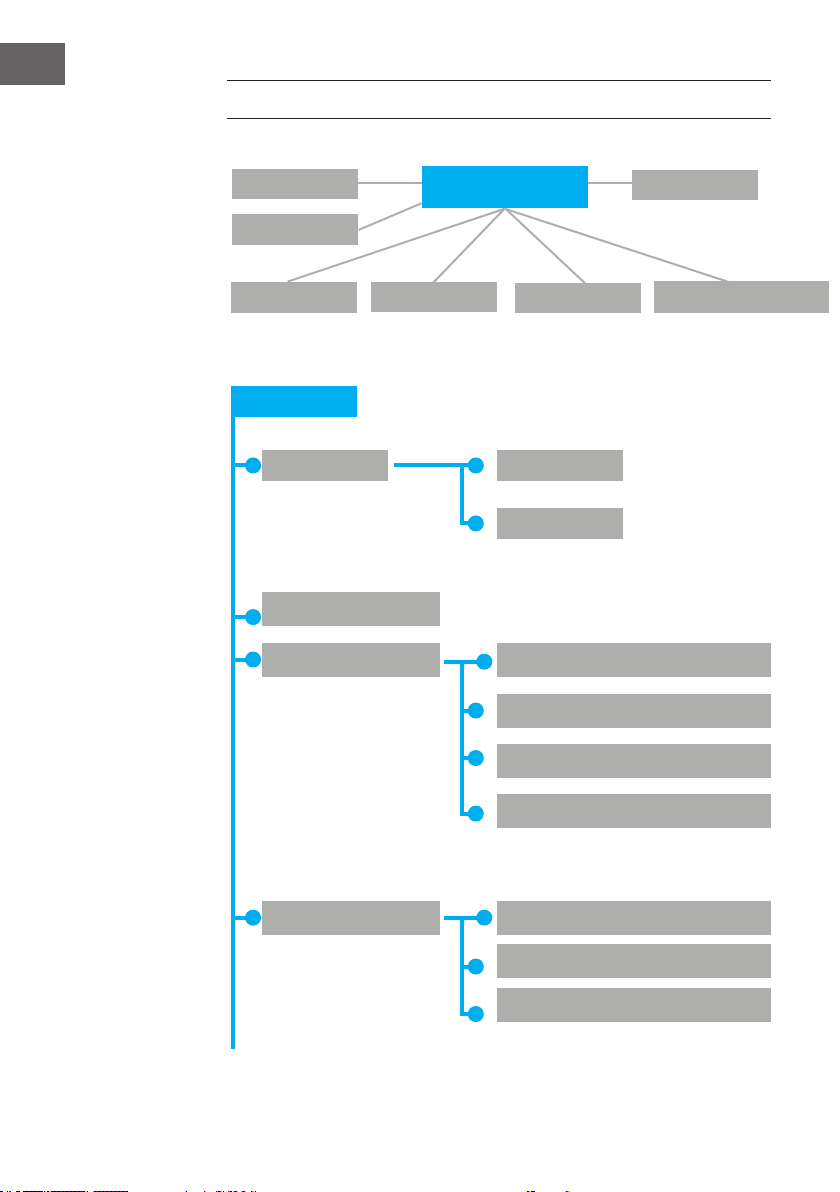
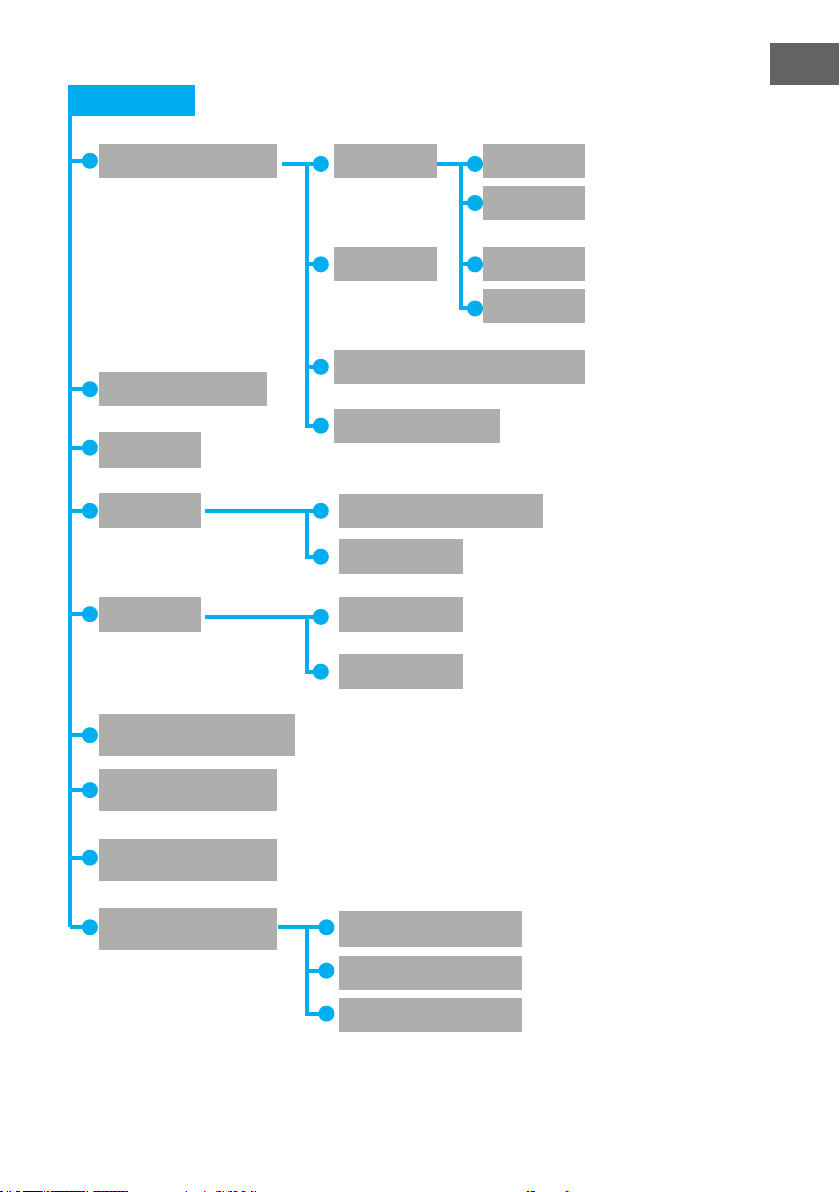
MENÜSTRUKTUR
FM-Radio
DAB+ Radio
Hauptmenü
AUX
Um einen
Menüpunkt
zurückzugehen
LEFT drücken.
Einstellungen
Einstellungen
Zeitanzeige
My mediaU verwalten
Netzwerk
Internetradio
Media-Center
Analog
Digital
Funknetz-Einstellung
Funknetz (WPS PBC)
Manuelle Konguration
Netzwerk prüfen beim Anschalten
Informations-Center
Datum & Zeit
12
Datum und Zeit einstellen
Zeitformat einstellen
Datumsformat einstellen
Page 13
Einstellungen
DE
Wecker Wecker 1
Wecker 2
Schlummer-Wecker
Timer
Wecker-Lautstärke
Sprache
Dimmer
Anzeige
Energieeinstellungen
Energiesparmodus
Einschalten
Farbe
Monochrom
Ein
Aus
Ein
Aus
Sleep Timer
Zwischenspeicher
Wetter
Lokale Einstellungen
Temperatureinheit
Anzeigen bei Standby
13
Page 14
DE
Einstellungen
Lokale Stationseinstellung
Wiedergabe-Einstellung
Gerät
Equalizer
Fortsetzen der Wiedergabe
Automatisch (Land)
Manuell (Stadt)
Automatische Erkennung
Aus
Alle wiederholen
Eins wiederholen
zufällig
Umbennen (AirMusic)
AirMusic Control App
Ein
Aus
Softwareupdate
Auf Werkeinstellungen zurückksetzen
14
Page 15
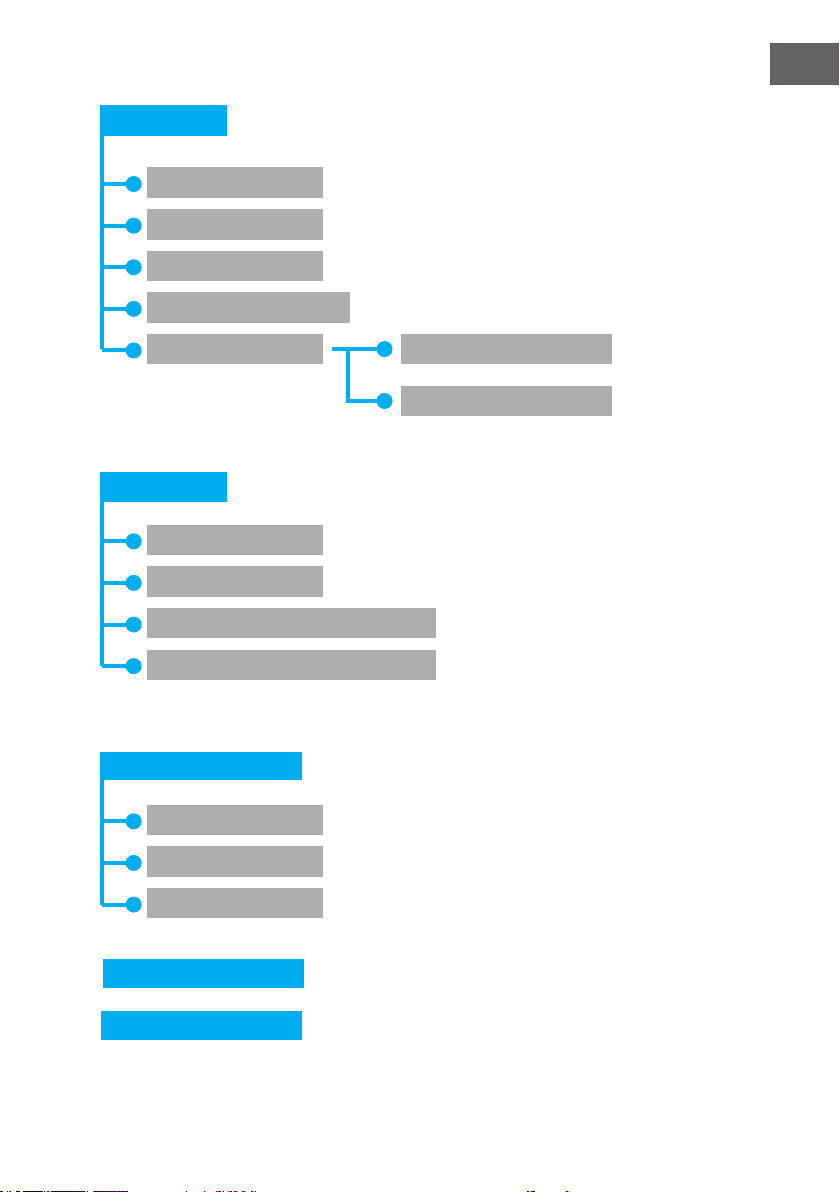
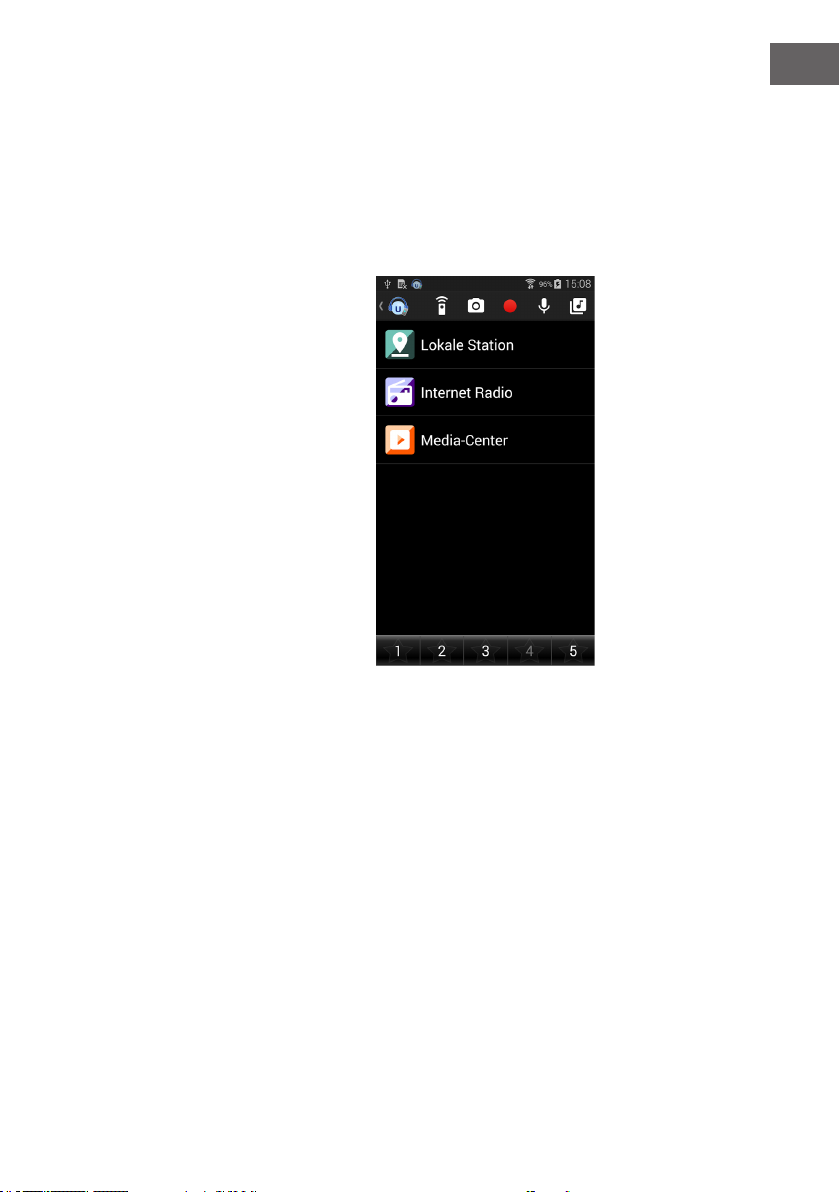
Internet-Radio
Meine Favoriten
Radiosender/Musik
Lokale Station
Zuletzt gehörte Sender
DE
Service
Media -Center
USB
UPnP
Meine Wiedergabeliste
Meine Wiedergabeliste löschen
Informations-Center
Wetter-Information
Finanz-Information
Systeminformation
Radiosender suchen
Radiosender hinzufügen
FM-Radio
DAB-Radio
15
Page 16
DE
INTERNETRADIO
Drücken Sie STANDBY, um in den Betriebsmodus zu gehen. Drehen Sie das
Navigationsrad, um durch das Hauptmenü zu blättern. OK drücken, um in
die Untermenüs zu gelangen oder die Einstellungen zu bestätigen.
Mit < ins vorherige Menü gehen.
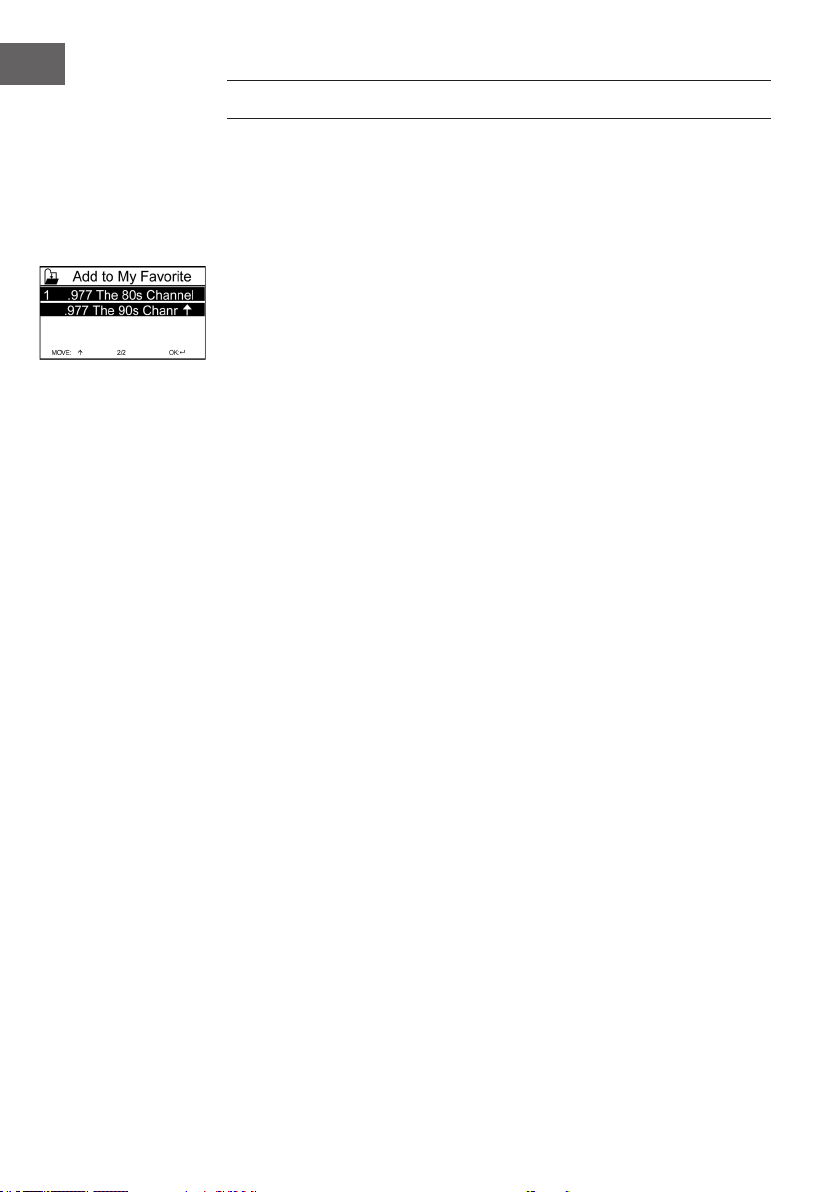
Meine Favoriten (Liste der gespeicherten Sender)
Bis zu 250 Einträge mit Sendern und Ordner werden unterstützt. Wenn im
Display die Senderwiedergabe angezeigt wird, halten Sie die Taste FAV auf
der Fernbedienung gedrückt, um den Sender zu speichern. Sie können den
vorher gespeicherten Sender durch den neuen ersetzen.
Wenn der gewählte Sender gespeichert ist, können Sie ihn nicht erneut
speichern. Die gespeicherten Sender werden in diesem Menü angezeigt.
Sie können FAV auch drücken, um in die Liste der gespeicherten Sender zu
gehen. Mit dem Zahlenfeld der Fernbedienung rufen Sie die gespeicherten
Sender auf.
Gehen Sie in der Liste der gespeicherten Sender zu Ihrem Sender. Zur
Wiedergabe drücken Sie auf der Fernbedienung OK.
Gehen Sie mit > ins Untermenü, um Sender zu löschen, nach oben oder
unten zu verschieben, umzubenennen, wiederzugeben oder als Wecker zu
verwenden.
Radiosender/Musik
Die Sender sind nach Global Top20, Genre, Land/Ort (Afrika, Asien, Nahost,
Nordamerika, Ozeanien/Pazik und Südamerika) kategorisiert und werden
hervorgehoben. Auswählen, um zu den Unterkategorien zu gelangen und
Sender anzuhören.
Drücken Sie bei dem jeweiligen Sender OK (am Gerät oder auf der
Fernbedienung), um ihn abzuspielen. Die Taste > Anwählen, um zu den
Unterkategorien zu gelangen.
Um ins Untermenü zu gelangen drücken Sie >. Wenn Sie „Auto Scan“
wählen, wird es der Kurzwiedergabe der Sender in der Unterkategorie
hinzugefügt. Jeder Sender wird 30 Sekunden lange angespielt, bis alle
Sender durchgegangen wurden oder Sie OK drücken, um den Kurzdurchlauf
zu beenden. Mit > sehen Sie die Informationen zum Sender.
Lokale Station (Lokalradio)
Die Sender sind nach Land/Ort geordnet, in dem das Radiogerät verwendet
wird.
16
Page 17

Schlaf-Radio
Wählen Sie Vögel, Klavier, Regen, Mineralbad, Weltraum und Welle als
Einschlaunktion.
Zuletzt gehörte Sender
Wählen Sie die 10 zuletzt gehörten Sender.
Service
Suchen Sie mit einem Suchwort nach Sendern aus der Liste. Fügen Sie
durch die Eingabe der IP-Adresse ein neues Radio hinzu. Die hinzugefügten
Sender werden in der „MyFavorite“-Liste gespeichert.
Beachten Sie, dass die Höchstanzahl von Zeichen für den Sendernamen 250
ist.
MEDIA-CENTER
Wählen Sie über das Navigationsrad den USB/UPnP-Modus oder den
Playlist-Modus.
UPnP
Wenn Sie einen UPnP-Server eingerichtet haben, können Sie die geteilten
Medien über UPnP sehen. Wenn Sie mehr als einen PC haben, der Medien
teilt, werden die Alternativen aufgelistet.
Wählen Sie die geteilten Medien, die Sie wiedergeben möchten.
Benutzen Sie die Tasten Wiedergabe/Pause (8,7) und Stopp (9). Drücken Sie
die Pfeiltaste rechts (15), um die Informationen auf dem Display anzuzeigen.
DE
Hinweis: Das Radio kann nur den Titel mit weniger als 40 Zeichen anzeigen.
Die Zeichen müssen im Bereich des lateinischen Alphabets liegen. Wenn ein
Lesefehler bei einem Titel im UPnP-Modus auftritt, versuchen Sie die Datei
umzubenennen. Wenn die Datei allerdings nicht abgespielt werden kann,
versuchen Sie die Datei in verschiedene Formate zu konvertieren.
USB
Hier werden Menüs aus den Ordern des USB-Speichermediums erstellt.
Durchsuchen Sie die Ordner mit dem Navigationsrad oder den Pfeiltasten
auf der Fernbedienung. Im Display erscheinen die Ordner und Dateinamen
(nicht notwendigerweise die Titelnamen).
Wenn Sie einen Titel gefunden haben, drücken Sie OK.
Hinweis: Der USB-Anschluss unterstützt keine Ladefunktion und keinen
Datenaustausch mit einem PC.
17
Page 18

DE
Meine Wiedergabeliste
Sie können eine Wiedergabeliste mit Favoriten von UPnP erstellen.
Wenn Sie Musik abspielen, halten Sie OK gedrückt, um sie in Ihrer
Wiedergabeliste abzuspeichern.
Meine Wiedergabeliste leeren
Wählen Sie diesen Punkt, um Ihre Wiedergabeliste zu leeren.
My media U
Gehen Sie auf die Internetseite http://www.mediayou.net/.
Legen Sie ein mediaU-Konto an. Loggen Sie sich auf der Webseite ein.
Geben Sie auf der Internetseite die MAC-Adresse des Internetradios
an. Diese Information erlangen Sie über „Informations-Center >
Systeminformation > Funknetzinfo.
Wenn das System erfolgreich konguriert wurde, sind Sie in der Lage,
die Wiedergabeliste Ihres eigenen mediaU-Senders zu speichern und
anzusehen. Den Benutzernamen und das Passwort müssen Sie nicht ins
Gerät eingeben.
Wenn im Gerät mehrere Konten gespeichert sind, können Sie in den
Einstellungen das aktuell benutzte Konto wählen. Auf der Internetseite
können Sie Sender nach Ihren Lieblingsradiosendern, Ort/Genre und Ihrer
Stadt speichern oder die Sender manuell hinzufügen. Die Sender können
Sie über Ihr Radio in MyMedia sehen.
INFORMATIONSCENTER
Wetterinformation
Es gibt Wetterinformationen für über 2000 Städte.
Wählen Sie das Land und dann die Stadt für die Wettervorhersage.
Mit den Tasten < / > können Sie den Wetterbericht anzeigen.
Auch im Standbymodus zeigt das Gerät die Wettervorhersage an. Drücken
Sie auf der Wetterinfo-Seite die Taste OK, um die Wettervorhersage für eine
Stadt anzuzeigen. Stellen Sie dann die Wetteranzeige ein.
Finanzinformation: Anzeige der Börsennotierungen.
Systeminformation
Sehen Sie die Einzelheiten der verbundenen Geräte im Netzwerk. Die
Informationen beinhalten die MAC-Adresse, die Sie bei der Registrierung
bei „my mediaU“ angeben.
18
Page 19
EINSTELLUNGEN
Zeitanzeige analog, digital
MyMediaU Wenn MyMediaU aktiviert ist, erscheint im Hauptmenü
ein Eintrag . Wenn im Internetradio verschiedene Konten
angelegt wurde, wählen Sie hier das Standardkonto.
Netzwerk Konfiguration des Netzwerks
WLAN aktivieren oder deaktivieren: Wenn Sie WLAN
aktivieren, wählt das System automatisch den benötigten
Zugangspunkt. Geben Sie den WEP- bzw. den WPASchlüssel ein, um die WLAN-Verbindung herzustellen.
Drahtloses Netzwerk (WPS PBS): Wenn Sie einen
Router mit WPS/QSS-Taste verwenden, können Sie die
Netzwerkverbindung einfach über die WPS-Funktion
verbinden. Gehen Sie in das entsprechende Menü und
drücken Sie innerhalb von 120 Sekunden die WPA/
QSS-Taste auf Ihrem Router. Die Verbindung zwischen
dem Router und dem Gerät wird dann automatisch
konguriert.
Manuelle Konfiguration: Sie können DHPC wählen (die
IP wird automatisch zugewiesen) oder die IP-Adresse
manuell zuweisen. Wenn Sie die Einstellungen für
kabelgebundenes LAN per Hand vornehmen, machen Sie
folgende Eingaben: SSID (Name des Zugangspunkts), IPAdresse, Subnetzmaske, Standardgateway, bevorzugter
DNS-Server, alternativer DNS-Server.
Netzwerküberprüfung bei eingeschaltetem Gerät:
WLAN-Netzwerk aktivieren, deaktivieren. Wenn Sie
das drahtlose Netzwerk aktivieren, sucht das System
automatisch nach verfügbaren Zugangspunkten.
Datum und
Zeit
Datum und Zeit eintellen
Stellen Sie das 12 Stunden bzw. 24 Stunden-Zeitformat
ein.
Einstellung des Datumformats (YYYY/MM/DD; DD/
MM/YYYY; MM/DD/YYYY)
(Y=Jahr, M= Monat, D= Tag)
Sommerzeiteinstellung (wenn eingeschaltet (ON), ist
die Stunde +1). Wenn die Sommerzeit ausgeschaltet ist
(OFF), wird die aktuelle Uhrzeit angezeigt.
DE
19
Page 20
DE
Wecker
(Alarm)
Timer Countdowntimer (max. 100 Minuten)
Sprache English /Deutsch / Espanol /Francais / Portugese /
Dimmer Energiesparmodus / Einschalten
Anzeige Farbe / Monochrom
Engergieeinstellugnen
Schlaftimer Stellen Sie den Schlaftimer auf 15/ 30/ 60/ 90/ 120/
Zwischenspeicher
Es gibt 3 unabhängige Wecker: 2 Wecker zur einer
fest eingestellten Uhrzeit (Alarm 1 , Alarm2) und einen
Schlummerwecker. Drücken Sie auf der Fernbedienung
ALARM, um direkt ins Einstellungsmenü zu gelangen.
Wenn als Quelle für den Weckton das Internetradio
eingestellt ist, wird der voreingestellte Sender
verwendet. Für Alarm 1 und Alarm 2 kann nur derselbe
Sender gewählt werden. Wenn die Weckzeit gekommen
ist, verbindet das Gerät sich mit dem Internet (falls das
eingestellte Netzwerk verfügbar ist). Daher kann es zu
einer leichten Verzögerung der Weckzeit zum Abspielen
des Radiosenders kommen. Falls innerhalb einer Minute
keine Verbindung hergestellt werden kann, wechselt der
Weckton zur Melodie.
Wenn der Schlummerwecker eingestellt ist, ertönt der
Weckton einmal in 5/10/20/30/60/90/120 Minuten, je
nach dem, was Sie eingestellt haben.
Nederlands / Italiano / Pyccknn / Svenska / Norske /
Dansk / Magyar /Cesky /Slovensky / Polski / Turkce /
Suomi
Einstellen des automatischen Standby-Betriebs, wenn
das Gerät sich im Menü bendet oder ohne WLAN-
Einstellungen ist. Wählen Sie den Abschalttimer (5/15/30
Minuten), um die Dauer einzustellen, nach der das Gerät
sich ohne Tasteneingabe automatisch in den StandbyModus vesetzt.
150/ 180 Minuten. Wenn der Schlatimer eingestellt ist,
erscheint ein Bettsymbol mit den verbleibenden Minuten
in der Ecke oben rechts. Nach dem Ablauf der Zeit geht
das Geät in den Standbymodus. Auf der Fernbedienung
drücken Sie die entsprechende Schnellwahltaste.
Kongurieren Sie den Puer der Musikwiedergabe auf
2/4/8 eingestellt wird.
20
Page 21
DE
FMEinstellung
Lokale
Sender-einstellung
Wiedergabeeinstellungen
Gerät Voreingestellter DLNA-Name für das Gerät. Sie können
Equalizer Der voreingestellte Equalizer ist „normal“. Sie können
Fortsetzen
der
Wiedergabe
Softwareupdate
Auf
Werkseinstellungen
zurücksetzen
Der Modus (Stereo/Mono) und die Empndlichkeit des
FM-Radios sind leicht einstellbar.
Im Menü von Internetradio gibt es einen Eintrag
"Lokalradio". Sie können in diesem Menü den Ort
manuell festlegen oder das System den Ort automatisch
über die IP erkennen lassen.
Wählen Sie den Wiedergabemodus des Mediacenters:
AUS (keine Wiederholung oder Zufallswiedergabe),
alle wiederholen,
einen Titel wiederholen
zufällig
das Gerät für die DLNA-Einrichtung am PC oder
Mobilgerät umbenennen.
zwischen Flat, Jazz, Rock, Soundtrack, Classical, Pop,
News oder „my EQ“ wählen. Drücken Sie auf der
Fernbedienung EQ, um zwischen den verschiedenen EQModi zu wechseln.
Das System ist werkseitig so eingestellt,
dass die Internetradiowiedergabe oder die
Mediacenterwiedergabe fortfährt, wenn Sie das
Gerät wieder einschalten. Wenn Sie diese Eistellung
ausschalten, ist das Gerät beim Einschalten im
Hauptemenü.
Software aktualisieren. Wenn es auf dem Server eine
aktualisierte Systemsoftware gibt, wird das System
Sie benachrichtigen. Gewährleisten Sie vor dem
Systemupdate, dass der Netzstecker an einer stabilen
Stromversorgung angeschlossen ist. Eine Unterbrechung
der Stromversorgung während eines Updates kann zu
einer dauerhaften Beschädigung des Geräts führen.
Wiederherstellung der Werkseinstellungen. Nachdem
das Gerät zurückgesetzt wurde, beginnt das System mit
der Auswahl der Sprache.
21
Page 22

DE
DNLA / UPNP
Sie können den DLNA-Namen nach Belieben ändern. Die Informationen
unten sind eine Einführung in die Einrichtung des Medienstreaming vom
PC oder anderen Medienservern. Lesen Sie die Anleitungen der Software
oder Apps, die Sie für die Medienwiedergabe verwenden. Die Musikdateien
müssen in den Formaten MP3, WHA, WAV oder AAC vorliegen.
UPnP
Schließen Sie Ihren PC an das Netzwerk an. Das Radio muss eingeschaltet
sein.
Önen Sie die UPnP-Plattform (z. B. Windows Media Player ab Version 11,
eine andere Plattform oder einen Server wie die Windows Media Plattform.
Erteilen Sie die Erlaubnis, dass Ihre Medien mit dem Internetradio geteilt
werden.
Fügen Sie Audiodateien von Ihrem Mobiltelefon hinzu.
Sie können auch von anderen Quellen streamen wie Smarthpones
(Android). Schließen Sie das Smartphone ans Netzwerk an. Suchen und
installieren Sie Medienstreaming-Apps aus dem Google Play Store. Fügen
Sie Audiodateien von ihrem Smartphone hinzu, die Sie im Netzwerk teilen
möchten. Nach der Einrichtung des gemeinsamen Servers wählen Sie die
Musik aus und steuern die Wiedergabe am Internetradio.
DLNA
Neben UPnP unterstützt das Gerät die DLNA-Funktion. Sie teilen
Audiodateien mit dem PC oder einem Android-Mobilgerät. Sie steuern die
Medienwiedergabe über Ihren PC oder Ihr Android-Smartphone. Es ist nicht
erforderlich, jede einzelne Wiedergabe am Mobiltelefon zu steuern.
Die Systemvoraussetzungen für den PC sind mindestens Windows 7 und
der Windows Media Player 12.
22
Teilen Sie zuerst die Medien Ihres PC mit dem Radio:
Systemsteuerung\Alle Systemsteuerungselemente\Netzwerk- und
Freigabecenter\Medienstreamingoptionen.
Önen Sie den Widows Media Player, um die Remotesteuerung für den
Player zuzulassen.
Klicken Sie die Titel in der Musikbibliothek mit der rechten Maustaste an
und wählen die Titel zur Wiedergabe über das Radio aus („Play to Radio“).
Es erscheint ein Fenster zu Steuerung der Wiedergabe im Radio.
Wenn Sie ein Android-Smartphone oder iPhone verwenden, können
Sie jede freie oder kommerzielle DNLA-App aus dem Google Play Store
bzw. dem App Store verwenden. Insbesondere die Apps bubble UPnP
(Android) und Twonky Beam (Android, iOS) sind zu empfehlen. Einige
Apps funktionieren evtl. nicht über das iPhone, iPod. Sie können das iPhone,
Page 23
den iPod immer noch verwenden, um den Stream von anderen Servern zu
steuern.
Bitte beachten: Wenn Sie die DLNA-Streaming-Funktion am Internetradio
verwenden, können Sie am Gerät nur die Lautstärke und Standby steuern.
Die weiteren Steuerungsfunktionen sind beschränkt. Beenden Sie DLNA am
PC oder Mobilgerät, bevor Sie die Steuerung am Gerät wieder übernehmen.
App-Steuerung über Air Music Control
Sie können das Internetradio über Ihr
Smartphone oder Tablet bedienen.
Laden Sie dazu die App „Air Music
Control“ aus dem „Google Play Store“
oder dem „Apple AppStore“ herunter.
Die Geräte müssen dazu in demselben
Netzwerk verbunden sein.
DE
23
Page 24

DE
AUX-EINGANG
Im Aux-Betrieb werden externe Audioquellen wie MP3-Player wiedergegeben.
Über den AUX-Eingang abspielen
Um über den AUX-Eingang abzuspielen, drehen Sie bei beiden Geräten die
Lautstärke runter (falls bei dem externen Gerät verfügbar).
Schließen Sie die externe Audioquelle an AUX IN (3,5-mm-Klinkenbuchse
an). MODE drücken, bis auf dem Display AUX IN erscheint. Alternativ
drücken Sie im Hauptmenü AUX. Stellen Sie die Lautstärke des Radios ein
(und falls erforderlich am Gerät der Audioquelle).
BT
Entweder drücken Sie MODE, bis im Display BT erscheint, oder Sie
wählen BT im Hauptmenü. Der BT-Suchton erklingt. Suchen Sie in den BTEinstellungen des externen Geräts mit dem Namen „Silver Star Mini“. Zum
Koppeln anklicken. Der Kopplungston erklingt. Sie können nun Musik über
BT abspielen. Die Lautstärke regeln Sie über das Radio oder das externe
Gerät.
FM-RADIO
24
Wählen Sie mit dem Navigationsrad oder auf der Fernbedienung im
Hauptmenü FM. Nach der Auswahl startet der Radiobetrieb mit 87,5 MHz.
Um alle Sender mit einem starken Signal zu speichern, drücken Sie das
Navigationsrad. Im Display erscheint „Auto-Scannen?“. Wählen Sie „Ja“.
Dann beginnt die automatische Sendersuche. Wenn die Sendersuche
abgeschlossen ist, werden die Sender bei den Favoriten gespeichert.
Sie können dann durch die gespeicherten Sender blättern. Halten Sie die
Tasten < oder > gedrückt.
Um die Frequenzen manuell anzusteuern drücken Sie die Tasten < oder >,
um rückwärts oder vorwärts durch die Frequenzen zu gehen.
Sender speichern
Sender manuell speichern
1. Wählen Sie den Sender aus, den Sie speichern wollen.
2. Halten Sie FAV-Taste 1-2 Sekunden gedrückt. Die „01“ erscheint im
Display. Mit dem Navigationsrad durch die Speicherplätze zu blättern.
Page 25

Wählen Sie durch Drücken des Navigationsrades einen Speicherplatz
(1-99) aus.
Sender aufrufen
Rufen Sie die gespeicherten Sender auf, indem Sie die Taste FAV drücken
und durch drehen des Navigationsrads durch die Senderliste blättern.
DAB+ RADIO
Wählen Sie im Hauptmenü DAB/DAB+ aus (Navigationsrad drehen und
drücken). Alternativ können Sie die Navigationstasten der Fernbedienung
verwenden.
Wenn Sie DAB zum ersten Mal starten, beginnt das Radio mit der Suche
nach DAB-Sendern. Im Display erscheint „Scanning“. Es zeigt an, wie viele
Sender während der laufenden Suche bereits gefunden wurden. Wenn
alle verfügbaren Sender gefunden wurden, erscheinen sie als Liste in der
Anzeige. Blättern Sie über das Navigationsrad oder die Navigationstasten
durch die Sender, die sie hören möchten.
Wenn Sie einen Sender gewählt haben, zeigt das Display den Sender an.
Das Navigationsrad drücken, um den Sender abzuspielen.
Um zur Sendeliste zurückzukommen, drücken Sie die Taste <.
Um erneut zu nach Sendern zu scannen, gehen Sie in die Liste der DABSender und drücken die Taste <. Es erscheint die Meldung „Senderliste
löschen?“ Wählen Sie „Ja“, um einen erneuten Scan durchzuführen.
Wenn Sie einen DAB-Sender eingestellt haben, drücken Sie die Taste >, um
Informationen zum Sender anzuzeigen.
DE
Die Lieblingssender einstellen
Wenn Sie den gewünschten Sender gefunden haben, halten Sie die FAVTaste gedrückt, um zum Bildschirm „Zu Favoriten hinzufügen“ zu gelangen.
Drehen Sie das Navigationsrad, um einen Senderplatz zu wählen (1-6) und
treen Sie eine Auswahl.
DAB-Sender aufrufen
Sehen Sie die Liste Ihrer Lieblingssender, indem Sie im DAB-Radiobetrieb,
die FAV-Taste drücken und durch die Liste blättern.
25
Page 26

DE
FEHLERBEHEBUNG
Problem Vorgehen / Ursachen
Stellen Sie sicher, dass das Radio und ein mit
dem Netzwerk verbundener Rechner (der eine
funktionierende Internetverbindung hat), im
selben Netzwerk angemeldet sind.
Ist ein DHCP-Server verfügbar oder haben Sie
eine statische IP-Adresse eingegeben?
Ist eventuell eine Firewall so eingestellt, dass
ausgehende Ports blockiert sind?
Manche Access Points / Repeater / Router
könnten so eingestellt sein, dass nur Geräte
mit registrierter MAC-Adresse verbunden
Die W-LAN-Verbindung
kann nicht etabliert
werden.
Das Radio ist mit dem
Internet verbunden, aber
einige Sender werden nicht
abgespielt.
Sie können keine UPnP
Geräte nden, oder der
gesuchte Rechner wird
nicht angezeigt.
werden. Schauen Sie im Handbuch Ihres
W-LAN-Equipments nach und fügen Sie die
MAC-Adresse des Radios gegebenenfalls zur
„Erlaubt“-Liste des Access Points hinzu.
Stellen Sie sicher, dass Sie das richtige Passwort
(bei verschlüsselten / gesichterten W-LANs)
eingegeben haben. Achten Sie auf die korekte
Schreibweise.
Falls Ihr W-LAN „versteckt“ ist (eine mögliche
Einstellung bei vielen Routern), geben Sie den
Netzwerknamen manuell im Internetradio
ein. Gehen Sie dazu ins Einstellungsmenü ->
Netzwerk -> Manuelle Konguration -> Funknetz
-> SSID eingeben.
Vielleicht liegt der Sender in einer anderen
Zeitzone und sendet im Moment gar nicht.
Zu viele User versuchen, den Sender zu
erreichen und dessen Kapazität /Bandbreite
reicht nicht aus.
Der Link ist abgelaufen / existiert nicht mehr.
Der Sender existiert nicht (mehr).
Sie sind nicht im Netzwerk angemeldet (siehe
oben).
Es ist eine Firewall installiert und so eingestellt,
dass geteilte Dateien nicht für externe Geräte
verfügbar sind.
Das Radio ist nicht in der selben Arbeitsgruppe
oder Domäne wie der entsprechende Rechner
angemeldet.
26
Page 27

Sie können keinen Ordner
für UPnP freigeben, weil
die Funktion gar nicht
verfügbar ist (grau).
Scan-Error
Endlos-Buering
DE
Aktivieren Sie Filesharing.
Es ist möglich, dass Fehler auftreten, wenn
das Internetradio Ordner auf einem PC scannt,
zum Beispiel weil die Windows File Sharing
Applikation abläuft. Verbinden Sie den PC
per Kabel mit dem Netzwerk, um die Scan.
Geschwindigkeit deutlich zu erhöhen.
Bei einer hohen Rate an Streaming-Abbrüchen
oder einer unsicheren Verbindung kann es
vorkommen, dass das IR-6 gar nicht mehr aus
dem „buering“, also dem Zwischenspeichern
des Streams herauskommt. Überprüfen Sie die
Netzwerk-, Modem- und Internetverbindung
und setzen Sie sich gegebenenfalls mit Ihrem
Internet Service Provider in Verbindung.
27
Page 28
DE
HINWEISE ZUR ENTSORGUNG
Bendet sich die linke Abbildung (durchgestrichene
Mülltonne auf Rädern) auf dem Produkt, gilt die
Europäische Richtlinie 2012/19/EU. Diese Produkte dürfen
nicht mit dem normalen Hausmüll entsorgt werden.
Informieren Sie sich über die örtlichen Regelungen zur
getrennten Sammlung elektrischer und elektronischer
Gerätschaften. Richten Sie sich nach den örtlichen
Regelungen und entsorgen Sie Altgeräte nicht über
den Hausmüll. Durch die regelkonforme Entsorgung
der Altgeräte werden Umwelt und die Gesundheit Ihrer
Mitmenschen vor möglichen negativen Konsequenzen
geschützt. Materialrecycling hilft, den Verbrauch von
Rohstoen zu verringern.
Das Produkt enthält Batterien, die der Europäischen
Richtlinie 2006/66/EG unterliegen und nicht mit dem
normalen Hausmüll entsorgt werden dürfen. Bitte
informieren Sie sich über die örtlichen Bestimmungen
zur gesonderten Entsorgung von Batterien. Durch
regelkonforme Entsorgung schützen Sie die Umwelt
und die Gesundheit Ihrer Mitmenschen vor negativen
Konsequenzen.
Konformitätserklärung
Hersteller: Chal-Tec GmbH, Wallstraße 16, 10179 Berlin
28
Dieses Produkt entspricht den folgenden Europäischen
Richtlinien:
2011/65/EU (RoHS)
2014/53/EU (RED)
2014/35/EU (LVD)
Die vollständige Konformitätserklärung des Herstellers nden Sie hier unter folgendem
Link.
https://use.berlin/10032791
Page 29
Dear Customer,
Congratulations on purchasing this equipment.
Please read this manual carefully and take care
of the following hints to avoid damages. Any
failure caused by ignoring the items and cautions mentioned in the instruction manual are
not covered by our warranty and any liability.
Scan the QR code to get access to the latest user
manual and other information about the product.
CONTENTS
Technical Data 26
Safety Instructions 27
Product Description 29
Remote Control 31
Initial use 32
Basic Operation 34
Internet Radio 38
Media Center 39
Information Center 40
Conguration 41
DNLA / UPnP 45
AUX (line input) 47
BT 47
FM Operation 47
DAB+ Operation 48
Troubleshooting 49
Disposal Considerations 52
EN
29
Page 30

EN
TECHNICAL DATA
Item number 10032791 10032792
Power adaptor Input: 100-240 V ~ 50/60 Hz , 0.6 A
Output: 12 V / 1 A
Connections USB, AUX IN (3.5 mm), Line-out (3.5 mm)
FM radio
Frequency range 87.5 MHz - 108 MHz
DAB
Frequency range 174-240 MHz
WLAN 802.11b/g/n
Encryption: WEP, WPA, WPA 2(PSK), WPS
Streaming UPnP, DLNA
Supported le formats WMA, MP3
30
Page 31

SAFETY INSTRUCTIONS
Please read this instruction manual thoroughly before using this appliance!
Follow all the safety instructions to avoid damage cause by improper use.
Keep the instruction manual for future reference.
• Keep the instruction manual for future reference .Should this appliance
be given to a third party ,then this instruction manual must also be
handed over.
• Use this appliance solely for it intended purpose.
• This appliance is intended for household use only.
• Use this appliance indoors or outdoors.
• Danger of electroshock! Do not immerse the appliance, adapter or
power plug in water or in other liquids.
• Do not place the appliance in the direct vicinity of liquids – e.g.
bathtubs and sinks, in a damp basement or close to a swimming pool.
• Do not start up the appliance with damp hands or if you are standing on
a wet oor. Never grasp the power plug with damp or wet hands.
• The manufacturer assumes no liability for possible damages that may
have been caused by incorrect usage or mishandling of the appliance.
• This appliance is not intended for use by young children or inrm
persons unless they have been adequately supervised by a responsible
person to ensure that they can use the appliance safely.
• Young children should be supervised to ensure that they don’t play with
the appliance.
• Keep the appliance away from all hot surfaces and naked ames.
• Do not place any object on the appliance. Don’t put objects with naked
ames(such as candles) on or next to the appliance .Never put items
containing liquid(such as vases) on or next to the appliance.
• Do not expose the appliance to direct sunlight.
• Do not use the appliance if it is damaged. To avoid hazards, defective
components must only be replaced by the manufacturer, his customer
service or similar qualied persons.
• Do not dismantle and repair the appliance by yourself.
• Do not insert any foreign objects into the housing.
• Do not cover the appliance while in use.
• This appliance should be only operated with the type of power source
indicated on the marking label.
• Always turn the power o before plugging the appliance into the power
outlet or unplugging it.
• Prevent damage to the power cord by not squeezing, bending or
rubbing it on sharp edges. Keep the cord away from hot surfaces and
open ames.
• Always pull the plug, not the power cord when disconnecting the
appliance from a power outlet.
• Plug the appliance into a easily accessible socket, so that you can
disconnect it quickly from the mains, in the event of an emergency.
EN
31
Page 32

EN
Unplug the appliance from the power socket to switch it o completely.
Use the mains plug as a disconnecting appliance.
• If the appliance malfunctions due to electrostatic discharge or shortterm overvoltage, disconnect it from the power supply and connect it
once again.
• Unplug the appliance during lightning storms or when unused for a long
period of time..
32
Page 33

PRODUCT DESCRIPTION
Front
EN
1 Display
2 Standby button
3 Menu button
4 Dimmer button
Rear
5 Fav button
6 Alarm button
7 Previous button
8 Sleep button
9 Next button
10 Vol+/Vol-/ok knob
33
Page 34

EN
Rear
11 ON/OFF switch button
12 DC IN socket
13 Line out socket(3.5mm)
14 AUX IN socket(3.5mm)
15 USB port
Bottom
34
16 Bass reex tube
Page 35

REMOTE CONTROL
EN
1 Standby button
2 Mute button
3 EQ set tone
4 Dimmer button
5 Sleep button
6 Alarm button
7 Previous button
8 Next button
9 Stop button
10 Play/ Pause button
11 Mode selection
button
12 Home button
13 Up cursor button
14 Left cursor button
15 Right cursor
button
16 Down cursor
button
17 OK button
18 Vol- button
19 Vol+ button
20 Input letters and
numbers button
35
Page 36

EN
INITIAL USE
• Before operation, please make sure that the VOLTAGE mentioned on
the power supply is same as the voltage of your local area.
• Use the supplied mains adaptor to connect the device to a household
mains socket.
• Switch the device on with the power switch on the rear.
• When it is the rst time running the device, the system will ask you to
set Language and Network Congurations. You may setup the network
connection immediately, or set it later. Use Navigate to select the
desired option. Press Navigate/OK to conrm.
• Press Standby button when unit is power on, unit will go to standby
mode. Press again will make it on again.
Network configuration
1. Normal network conguration
Select “Yes” for the normal Wireless Network Conguration: Then
select the required AP by turning” Navigate” and conrm it by pressing”
Navigate/OK”.
Enter WEP or WPA code to connect the WiFi network by select the
correct character turning the “Navigate/OK” button.
Press button to select the next character.
In this condition, press button you can turn left and delete the left
characters at the same time: when the password is complete please
36
Page 37

press” Navigate/OK” button to conrm.
Note: Below characters are available for the radio:
Numbers (from 0-9)
English letters (from A to Z and from a to z)
Other charcters ( DEL,@,Blank,
,!,”,#,$,%,&,*,’,+ and (,)
2. WPS PBC network configuration
Select “Yes WPS” when you would like set up with Wireless Network
(WPS PBC) feature: If you are using a router with WPS button, you may
set up the network connection simple via WPS function. Enter it and
go to press the WPS button on your router within 120 seconds. The
connection between the router and the Radio will then be congured
automatically.
3. No network configuration
Pls select “NO” when you do not like to congure the network
connection at the moment.
The radio will start connecting to the network. After the router is connected
successfully, it will show “Network OK” and display the menu screen:
EN
37
Page 38

EN
BASIC OPERATION
Rotate button
and press OK
to access a
menu item.
To go back to
the last menu
level press
LEFT.
FM Radio
DAB+ Radio
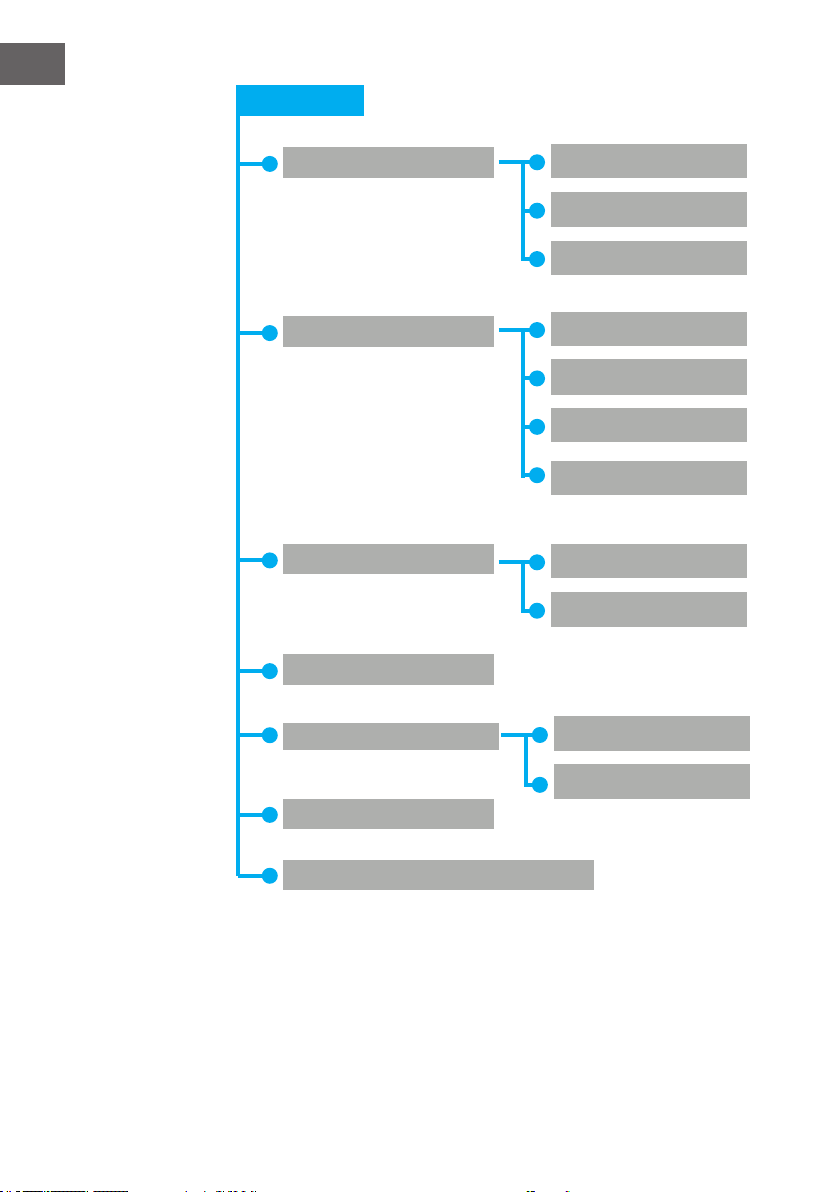
Configuration
Configuration
Time Display
Manage my mediaU
Network
Main Interface
Internet Radio
AUX
Media Center
Analog
Digital
Wireless Network Conguration
Wireless Network(WPS PBC)
Manual Conguration
Information Center
38
Date&Time
Check Network when Power On
Set Date and Time
Set Time Format
Set Date Format
Page 39

Configuration
EN
Alarm Alarm 1
Alarm 2
NAP Alarm 1 (turn o)
Timer
Alarm Volume
Language
Dimmer
Display
Power Management
Power Saving
Turn On
Color
Monochrome
Turn on
Turn o
Turn on
Turn o
Sleep Timer
Buer
Weather
Set Location
Temperature Unit
Show on Standy
39
Page 40

EN
Configuration
Local Radio Setup
Playback Setup
DLNA Setup
Equaliser
Resume When Power On
Manual Setup (Country)
Manual Setup (City)
Auto Detect
O
Repeat all
Repeat one
Shule
Rename (AirMusic)
AirMusic Control App
On
40
O
Software Update
Reset to Default
Page 41

DAB-Radio
Internet Radio
My Favorite
Radio Station/Music
Local Radio
History
EN
Service
Media Center
USB
UPnP
My Playlist
Clear My Playlist
Information Center
Weather Information
Financial Information
System Information
Search Radio Station
Add New Radio Station
FM Radio
DAB+ Radio
41
Page 42

EN
INTERNET RADIO
Press “Standby” to go to working mode and rotate Navigate to scroll
through the main menu. Press OK (to enter sub menus or conrm settings)
Press < to return to the previous menu.
After connection of any station successful, station information will be
shown and information content can be changed with < or > button.
My Favorites
List of my favorite preset stations. It supports 250 favorite entries including
stations and folder. During the station playing screen, press and hold Fav
on the device or” Fav add “on the remote control to save the station as my
favorite. You may replace the previous saved station to the new one.
If the Selected station has been saved, you cannot save it again. The saved
stations are showed under this menu. You may also press Fav to enter the
saved station list. You may enter the number key on the remote control to
recall the saved station.
Under the preset station list, move to your station; press OK from unit or OK
from remote control to listen.
Enter its submenu with > button, Delete, Shift Up/Down along the list,
Rename, Play, or Use as Alarm (if you chose internet as alarm sound in
alarm conguration).
Radio Station/Music
Stations are categorized into Global Top 20, Genre, Country/Location
(Africa, Asia, Europe, Middle East, North America, Oceania/Pacic and South
America) and Highlight. Enter to continue the subcategories and choose the
station to listen.
For each station, press OK from unit or remote control to play directly
Press > to enter its submenu. When you choose Auto Scan, it becomes the
playback of marquee of each station in the subcategory. Each station plays
30 seconds until all have played or you press “OK” to stop the marquee
listening. Press > button to view the display information of the playing
station.
42
Local Radio
Stations are categorized to the country/location which the unit is operated.
Sleep Radio
You can choose Birds, Piano, Rain, Spa, Space, and Wave as sleep radio.
History
List of the ten recently listened stations.
Service
Page 43

Search radio station-Enter your keyword to search radio station from the
list.
Add new radio by adding IP address, the added stations will be stored in My
Favorite. Note that the maximum character of the station name is 250.
MEDIA CENTER
Select the USB/UPnP mode or playlist mode with Navigate/OK or with the
Mode button.
UPnP
If you have set up shared media, you should see the shared media from
UPnP.
If you have more than one computer sharing media, the alternatives are
listed.
Select the shared media you want to play.
Use Play/Pause (10), Next/Prev (8, 7) and Stop (9) .Press Right cursor button
(15) to view the display information of the playing track.
Note: The radio can only read the track with the le name less than
40 characters. The characters should be in European Language. If you
encounter failure of reading the track under UPnP mode, you may try to
rename the le. However, if the track is still unable to play, you can try
converting the le to dierent formats.
EN
USB
From this point on, menus are generated from the folders on the USB
device. Brows folders with the NAV wheel or direction keys (16/10/9/8) on
the remote control.
The display shows folder and le names (not necessarily track names).
Once you have found a track you want to play, press the navigate wheel on
the device or press OK on the remote control.
Note: The USB port does not support charging or data transfer with
computers.
My Playlist
You can create a playlist of favorites music from UPnP. When you playing
the music, press and hold OK from unit or remote control to save it into My
Playlist
43
Page 44

EN
Clear My Playlist
Please select this option for clearing the playlist .Please conrm the
questions.
My media U
Display and playback your own mediaU station list on the mediaU server.
Set your account rst. To activate your own station list, follow the steps
below:
Access http://www.mediayou.net/. Join my mediaU membership. Login to
the website;
Enter the wireless MAC address of Radio to the mediaU website.
This information can be obtained in information Center>System
information>Wireless Info;
When successfully congured, you are able to save and view your own
mediaU station playlist(s).Username and password is not required to enter
to the Radio.
If there are dierent accounts stored in Radio, you can choose the one you
currently use under Conguration menu. On the website, you may save
stations to Favorite Station, set Favorite Location/Genre and My Local City,
or add stations manually. The stations can be viewed from My Media mode
on the Radio.
INFORMATION CENTER
Weather Information
There are weather information and forecasts for 2000 cities.
Select the country and then the city for the weather details.
Press </> to see the weather forecasts.
The device is able to display the weather information on the standby mode.
On the weather information page, press OK to set the city to displaying on
the standby mode. Then turn on the weather display.
44
Financial Information
View the stock index
System Information
View details of units and of connect network. The information includes MAC
address which you are required to ll in when registration of “my mediaU”
membership.
Page 45

CONFIGURATION
EN
Time
Display
MyMediaU When it is enabled, my mediaU will exist on the main
Netzwerk Wireless Network Configuration: Enable/disable WiFi
Analog/digital
menu.If various mediaU accounts exist in the Radio,
Select the default login account in here.
network. When you enable the WiFi network, the system
will automatically select the required AP. Enter WEP or
WPA code to connect the WiFi
Wireless Network (WPS PBC): If you are using a router
with WPS/QSS button, you may set up the network
connection simple via WPS function. Enter it and go to
press the WPS/QSS button on your router within 120
seconds. The connection between the router and device
will then be congured automatically.
Manual Configuration: You can choose DHPC (which IP
assigned automatically) or manually input IP address for
wireless network connection. When you select manual
setting for wired connection, the following have to be
entered: SSID (name of access point), IP Address, subnet
mask, default gateway, preferred DNS server, alternate
DNS server.
Check Network When Power On: : Enable/disable WiFi
network. When you enable the WiFi network, the system
will automatically search the available AP. Select required
AP.
45
Page 46

EN
Date & Time Setup the date and time
Set time format display as 12 Hour or 24 Hour.
Set date format (YYYY/MM/DD; DD/ MM/YYYY; MM/
DD/YYYY)
(Y=Jahr, M= Monat, D= Tag)
Daylight Saving Time :
“ON:, the time will be one hour More than the actual
time.
OFF: the time will be same as the actual time. If it was
on the model of the “Daylight Saving Time(DST) and you
choose” OFF”, the time will be deducted one hour ,that’s
to say, the time will be same as the actual time.
Alarm There are three independent alarms-2 alarms of absolute
time setting (Alarm 1 and Alarm 2) and 1 alarm for relative
time setting (Alarm NAP).Press Alarm on the remote
control to enter this menu directly.
Note that the alarm source is from the preset Internet
radio if Alarm Sound is set to be Internet Radio. It can
only set one same IR station for Alarm 1 and Alarm
2.When the alarm is reached the unit connects to the
Internet if the set network is available. Therefore there
may be some delay from the alarm to the radio play. If
no network is connection can be established within one
minute, the alarm will change to Melody automatically.
When Alarm” NAP” is set, it alarms once in
5/10/20/30/60/90/120 minutes depending on which one
you have set.
Choose Alarm Volume to congure the volume of the
alarms.
Timer Countdowntimer (max. 100 Minuten)
Language English /Deutsch / Espanol /Francais / Portugese /
Nederlands / Italiano / Pyccknn / Svenska / Norske /
Dansk / Magyar /Cesky /Slovensky / Polski / Turkce /
Suomi
Dimmer Power Saving / Turn On
Display Color/ monochrome
46
Page 47

Power Mgmt Congure to go to standby mode automatically during in
the menu or/ and without Wi signal. Choose the power
management timer ( 5/15/30mins) to set the duration of
the radio to switch standby mode automatically when
you are not controlling it. Choose Turn o to ignore the
power management function.
Sleep Timer Turn o or set the sleep timer of 5/ 30/ 60/ 90/ 120/
150/ 180 minutes. Once the time is set, there will be a bed
icon with remaining minutes at the top right corner and
the device will turn to standby then .Press Sleep on the
remote control for the shortcut of this function.
Buer Congure the buer time of the music playback,2/4/8
seconds.
Weather Activate/deactivate the weather forecast for the standby
display. Choose your preferred temperature unit (°C or °F)
and then proceed entering your location. When activated,
the weather forecast is shown in turns with the clock
display on the standby screen (each 10 secs).
Local Radio
Setup
Playback
Setup
There is a shortcut Local Radio under Internet Radio so
that you can easily go to the station list of your location.
You may Manual Setup your location, or let the system
Auto Detect your current location. The system detects the
location according to the IP address of your connected
network. Press Local Station to enter this local radio list
directly.
Setup Select the playback mode of media center-O ( no
repeat or shule),Repeat all, Repeat one, or Shule.
EN
Device Default device name for DLNA is “AirMusic”. You may
rename it for DLNA setup on the PC or mobile. QR code
for downlode and install “AirMusic” control App.
Equalizer Default equalizer is Normal, you may change to Flat, Jazz,
Rock, Soundtracks, Classical, Pop, News or my EQ. Press
EQ on the remote control to swap among the EQ mode
for shortcut..
Resume
When Power
On
The system is default to resume internet radio playback
if you were listening to internet radio or media center
before switch o the unit. If turn this setting o, the
system will remain in the main menu when switching on
the unit.
47
Page 48

EN
Software
Update
Reset to
Default
Update software. If there is an updated software version
on the server, the system will notify you .Before starting
a software upgrade, ensure that the unit is plugged into
a stable mains power connection. Disconnected power
during a software update may permanently damage the
unit.
Restore the default settings. After the device is reset, the
system will move to language is elected.
48
Page 49

DNLA / UPNP
You may change the default DLNA name as you like. The information below
is the introduction of how to setup media streaming from PC or other media
server. Study the own instruction of the software or apps you use to enjoy
music streaming if necessary. Make sure the music les are in the format of
MP3,WHA,WAV or AAC for music streaming to the radio.
UPnP
Connect the PC to the network.
Ensure the Radio is powered on and connected to the same network.
Open the UPnP platform Windows Media Player (11 or later).Alternatively,
other platforms or server such as Windows Media Connection may be used.
Allow to share your media to Radio.
Add the audio les and folders you want to share with radio to the media
library.
You may also enjoy the streaming music from other music server, such as
smart phone (Android platform).
DLNA
The PC system requirement for DLNA is Windows 7 and Windows Media
Player 12.Setup as below:
First, share the media on your PC to Radio.
Control Panel > Network and Internet >Network and Sharing Center >
Change Advanced Sharing>Media streaming options.
EN
Open Windows Media Player to enable Allow remote control of my Player.
Right click any music in the library and choose Play to Radio.
There will be a window for controlling music playback on Radio.
You may search and install any free or commercial DLNA apps from Google
Play or Apple Store if you are using Android mobile, tablet or iPhone / iPad.
It is suggested to use bubble UPnP, Twonky.
Beam on Android mobile, tablet or Twonky Beam on iPhone /iPad. Some
apps may not support streaming music from iPhone /iPod but iPhone/iPod
could still be used to control streaming music from other servers.
Procedures for playing shared music on the app are as follows:
• Select Radio as the player. Some apps may allow playing the music to
multi players at the same time.
• Select music server and choose the music .Some app can create a
playlist if you choose several music.
49
Page 50

EN
Please note: When using DLNA music streaming function on the Internet
Radio, you can only control the volume and standby via the unit. It is
restricted to control the other functions. Stop DLNA on PC, mobile or tablet
before you resume Internet radio’s own control.
Control via Air Music Control
You can operate the internet radio via you
smartphone or tablet.
Download “Air Music Control“ from the
“Google Play Store“ or “Apple AppStore“.
The devices must be connected to the same
network.
50
Page 51

AUX (LINE INPUT)
Aux in mode plays audio from an external source such as an MP3 player.
To play audio with Aux in mode
Turn the volume low on both the Radio and if adjustable, the audio source
device.
Connect the external audio source to the AUX IN 3.5mm stereo socket.
Either press MODE until the display shows AUX IN or selects AUX in under
Main menu. Adjust the volume of the Radio (and, if necessary, the audio
source device) as required.
BT
Either press MODE until the display shows BT or selects BT under Main
menu. It will have remind sound “pairing”, search the pairing name "Silver
Star Mini" in your phone and click it to pair. It will have reminding sound
“connected” after paired successfully. You now can play music via BT; you
can adjust volume from the radio or your phone.
FM OPERATION
Select ‘FM mode’ on the main display screen with the navigation knob or
with the navigation buttons on the remote. Once selected, the FM mode will
start on 87.5MHz.
To save all stations with strong signal, press the navigation knob, it will
show “auto scan?” choose YES. Then it will start auto scan. Once the autoscan is complete, stations will be saved in your favorites.
You will then be able to browse through these saved stations by holding
down the ‘<’ or ‘>’ buttons to skip between saved stations.
To manually scroll through FM frequency, simply press the ‘<’ or ‘>’ buttons
to go backwards or forwards through the frequency wave.
EN
Pre-setting your favourite FM stations
To save presets manually, select and listen to the station frequency number
for the station you wish to save.
Follow by holding down the ‘Fav’ button for 1-2 secs and the number ‘01’ will
display on the screen. Use the navigation knob to browse through preset
numbers(up to 99) and select the chosen prest number you wish to save it
as by pressing the navigation knob.
Recalling preset FM stations
View your favourite FM stationss when you are on FM mode by simply
selecting the ‘Fav’ button and begin scrolling through saved stations.
51
Page 52

EN
DAB+ OPERATION
Select ‘DAB/DAB+’ on the main display screen by turning the knob and
pressing the navigation knob or with the remote navigation buttons.
On rst use of the DAB on your radio, your radio will begin scanning for
DAB stations and will show’ Scanning’ on the display screen. It will display
how many stations have been found as the search continues.
Once all of the available stations have been found, the screen will display
the choice of available stations. Scroll through using the navigation knob or
navigation buttons to select the station you wish to listen to.
When you have selected a station, the screen will display the station and
press navigation knob to play. To choose previous or next station, use the
navigation knob to scroll accordingly.
To go back to the list to scroll through manually, select the ‘<’ button to go
back. To rescan your stations, go on the main list page for the DAB stations
and there will be reminder ‘Delete station list?’ .Choose ‘YES’ to do rescan.
When on your chosen station, select the ‘>’ button to show information on
the station. The screen will automatically scroll through information and
display genre,MHz, song playing, KHz and Kbps.
Pre-setting your favourite DAB/DAB+ stations
When you have found your desired station, hold down ‘Fav’ for a few
seconds to go to the ‘Add to my Favorites’ screen. Turn the select dial to
choose the preset number(1 to 6) and select your option.
Alternatively, when you are on the list screen of DAB stations you are able
to highlight the chose station and hold down ‘Fav’ to go to the ‘Add to my
Favorites’ screen.
52
Recalling preset DAB/DAB+ stations
View your favourite DAB/DAB+ stations when you are on DAB mode by
simply selecting the ‘Fav’ buton and begin scrolling through saved stations.
Page 53

TROUBLESHOOTING
Problem Cause / Solution
Conrm that a Wi-Fi or Ethernet Wired connected PC
can access the internet (i.e. can browse the web) using
the same network.
Check that a DHCP server is available, or that you have
congured a static IP address on the radio.
Check that you rewall is not blocking any outgoing
ports.
Some access points may be set so that only equipment
with registered MAC addresses can connect to them.
This is one possible cause of the Internet Radio being
unable to connect to the Wi-Fi network, and the Internet
Radio display will show Bad ESSID or key. To overcome
this problem you will need to add the Internet Radio’s
If you have trouble
connecting the radio to
your wireless network,
these steps may help to
resolve the problem:
MAC address to the list of allowed equipment in your
access point. The Internet Radio’s MAC address can be
found using the menu <Information Center ->System
Information -> Wireless Info > MAC address>. You will
need to refer to the guide for you Access Point in order
to enter the Internet Radio as an allowed piece of
equipment.
If you have an encrypted network, check that you have
entered the correct key or passphrase into the radio.
Remember that text-format keys are case sensitive.
If your wireless network name (ESSID) is ‘Hidden’(a
setting on the wireless access point), then you can
either turn on the name, or you can manually enter the
name into the internet radio and media player, ENTER
<Congure -> Network -> Manual Conguration->
Wireless -> Enter ESSID>. Conrm if the network is
encrypted, e.g. requires a WEP or WPA key, then enter
the network name..
EN
53
Page 54

EN
If your radio can
connect to the network
successfully, but is
unable to play particular
stations, it may be due
to one of the following
reasons.
When you scan for PCs
under UPnP function,
none can be found, or
the PC you are looking
for does not appear in
the list.
I can’t share a folder,
as the option is not
highlighted.
The station is not broadcasting at this time of the day
(remember it may be located in a dierent time zone).
The station has too many people trying to attach to the
radio station server and the server capacity is not large
enough.
The station has reached the maximum allowed number
of simultaneous listeners.
The station is not broadcasting anymore.
The link on the radio is out of date. This is updated
automatically every day, so the next time you turn on the
link will be recognised.
The internet connection between the server (often
located in a dierent country) and yours is slow. Some
internet service providers may fail to stream in certain
geographical areas. Try using a PC to play back the
stream via the broadcaster’s web site. If you can play
back the station with a PC, please report to the customer
service where you bought this radio. If you have a
laptop, try connecting it if your Internet Radio cannot
nd the station.
You have not connected to the wireless Access point.
On the internetradio, ENTER ‘Conguration’, ‘Network’,
‘Wireless network connection’ and then ENTER your
Wireless network. (You may need to enter a security key
to access the network wirelessly).
You have a rewall set on your PC which is stopping you
accessing shared les.
If you have a third party rewall (Like Norton, or Zone
Alarm) that will have its own control panel and you will
need to consult the manual for your rewall.
If your PC is connected to a managed network, with a
server sometimes the PC being searched for needs to be
server Workgroup..
When the internet radio is scanning the content of the
folders on a PC, it is possible that a scan error may
occur if the windows le sharing application times out.
This is most likely to occur if both the PC with the media
content and the Internet Radio are connected wirelessly.
Try re-connecting the PC with the media content into
the network via cable. This will dramatically increase
the speed at which the Internet Radio is able to scan the
content of the Media PC.
54
Page 55

Scan-Error
If the Internet Radio
keeps re-buering the
radio station:
EN
When the internet radio is scanning the content of the
folders on a PC, it is possible that a scan error may
occur if the windows le sharing application times out.
This is most likely to occur if both the PC with the media
content and the Internet Radio are connected wirelessly.
Try re-connecting the PC with the media content into
the network via cable. This will dramatically increase
the speed at which the Internet Radio is able to scan the
content of the Media PC.
The Internet Radio is streaming the data from the radio
station via your broadband connection, if there is a
high error rate on your broadband connection, or the
connection is intermittent, then it will cause the Internet
Radio to pause until the connection is re-established and
it has received enough data to start playing again.
If your Internet Radio keeps stopping, please check the
DSL modem to ensure that the Broadband line is not
suering a high error rate or disconnections. If you are
experiencing these problems, you will need to contact
your broadband supplier.
55
Page 56

EN
DISPOSAL CONSIDERATIONS
According to the European waste regulation 2012/19/EU
this symbol on the product or on its packaging indicates
that this product may not be treated as household waste.
Instead it should be taken to the appropriate collection
point for the recycling of electrical and electronic
equipment. By ensuring this product is disposed of
correctly, you will help prevent potential negative
consequences for the environment and human health,
which could otherwise be caused by inappropriate waste
handling of this product. For more detailed information
about recycling of this product, please contact your local
council or your household waste disposal service..
Your product contains batteries covered by the European
Directive. 2006/66/EC, which cannot be disposed of with
normal household waste. Please check local rules on
separate collection of batteries. The correct disposal of
batteries helps prevent potentially negative consequences
on the environment and human health.
Declaration of Conformity
Producer: Chal-Tec GmbH, Wallstraße 16, 10179 Berlin.
Germany
56
This product is conform to the following European
Directives:
2011/65/EU (RoHS)
2014/53/EU (RED)
The complete declaration of
conformity of the manufacturer
can be found at the following
link. Scan this QR code or enter
the URL.
https://use.berlin/10032791
Page 57

Chère cliente, cher client,
Toutes nos félicitations pour l’acquisition de ce
nouvel appareil. Veuillez lire attentivement et re-
specter les instructions de ce mode d’emploi an
d’éviter d’éventuels dommages. Nous ne saurions
être tenus pour responsables des dommages dus
au non-respect des consignes et à la mauvaise
utilisation de l’appareil. Scannez le QR-Code pour
obtenir la dernière version du mode d'emploi et
à d'autres informations concernant le produit.
SOMMAIRE
Fiche Technique 58
Consignes de sécurte 59
Aperçu de l'appareil 61
Télécommande 63
Mise en marche 64
Structure du menu 66
Radio internet 70
Media-Center 71
Information center 72
Paramètres 73
DNLA / UPnP 76
Entrée AUX 78
BT 78
Radio FM 78
DAB+ Radio 79
Résolution des problèmes 80
Informations sur le recyclage 82
FR
57
Page 58

FR
FICHE TECHNIQUE
Numéro d'article
Alimentation de l'adaptateur
secteur
Connectivité
Radio FM
Plage de fréquences 87,5 MHz - 108 MHz
DAB
Plage de fréquences 174-240 MHz
WLAN 802.11b/g/n
Streaming UPnP, DLNA
Formats de fichiers compatibles
10032791 10032792
Entrée : 100-240 V ~ 50/60 Hz , 0,6 A
Sortie: 12 V / 1 A
USB, entrée Aux (3,5 mm), Line-out (3,5 mm)
Verschlüsselung: WEP, WPA, WPA 2(PSK), WPS
WMA, MP3
58
Page 59

CONSIGNES DE SÉCURTE
Lisez entièrement les instructions d'utilisation avant d'utiliser l'appareil.
Suivez toutes les instructions de sécurité pour éviter les dommages causés
par une mauvaise utilisation.
• Conservez le mode d'emploi pour vous y référer ultérieurement. Si vous
transmettez l'appareil à une tierce personne, ce manuel doit également
être transmis.
• N'utilisez l'appareil qu'aux ns prévues.
• Cet appareil est destiné à un usage domestique uniquement.
• Vous pouvez utiliser l'appareil à l'intérieur ou à l'extérieur.
• Risque d'électrocution ! Ne pas immerger l'appareil, l'adaptateur
secteur ou la che d'alimentation dans l'eau ni dans d'autres liquides.
• Ne placez pas l'appareil à proximité de liquides, près d'une baignoire ou
d'un lavabo, dans un sous-sol humide ou près d'une piscine.
• N'utilisez pas l'appareil avec les mains mouillées ou en vous tenant sur
un sol mouillé. Ne touchez jamais la che d'alimentation avec les mains
humides ou mouillées.
• Le fabricant ne saurait être tenu pour responsable des éventuels
dommages résultant d'un fonctionnement incorrect ou d'une
manipulation incorrecte de l'appareil.
• L'appareil n'est pas conçu pour être utilisé par de jeunes enfants ou
des personnes inrmes à moins d'avoir été formés par une personne
responsable pour s'assurer qu'ils puissent utiliser l'appareil en toute
sécurité.
• Les jeunes enfants doivent être surveillés an qu'ils ne jouent pas avec
l'appareil.
• Gardez l'appareil à l'écart des surfaces chaudes et des ammes nues.
• Ne placez aucun objet sur l'appareil. Ne placez pas d'objets avec des
ammes nues (telles que des bougies) sur ou à proximité de l'appareil.
Ne placez jamais d'objets contenant des liquides (tels que des vases)
sur ou près de l'appareil.
• N'exposez pas l'appareil à la lumière directe du soleil.
• N'utilisez pas l'appareil s'il est endommagé. Pour éviter tout danger,
seul le fabricant, le service après-vente ou une personne de qualication
similaire peut remplacer les pièces.
• N'ouvrez pas le boîtier. N'essayez pas de réparer l'appareil vous-même.
• N'insérez pas d'objets étrangers dans le boîtier.
• Ne couvrez pas l'appareil pendant son utilisation.
• L'appareil ne doit être utilisé qu'avec l'alimentation électrique indiquée
sur la plaque signalétique.
• Mettez l'appareil hors tension avant de brancher ou de débrancher le
câble d'alimentation.
• Évitez d'endommager le câble d'alimentation en le serrant, en le
pliant ou en le faisant passer sur des bords tranchants. Tenez le câble
d'alimentation loin des surfaces chaudes et des ammes nues.
FR
59
Page 60

FR
• Tenez toujours la che d'alimentation et non le câble pour débrancher
l'appareil.
• Connectez l'appareil à une prise de courant facilement accessible pour
pouvoir l débrancher rapidement en cas d'urgence. Pour désactiver
complètement l'appareil et le débrancher de l'alimentation électrique,
débranchez la che.
• Si l'appareil ne fonctionne pas en raison d'une charge électrostatique
ou d'une brève pointe de tension courte, débranchez et rebranchez
l'alimentation.
• Débranchez la che en cas d'orage et lorsque l'appareil n'est pas utilisé
pendant une longue période.
60
Page 61

APERÇU DE L'APPAREIL
Face avant
FR
1 Ecran
2 Veille
3 Menu
4 Dimmer
Dos de l'appareil
5 Stations
mémorisées
6 Alarme
7 Retour
8 Nuit
9 Avance
10 Volume +/
Volume –
61
Page 62

FR
Dos de l'appareil
11 Bouton de marche / arrêt
12 DC IN 12 V: prise de l'adaptateur secteur
13 LINE OUT: sortie audio stéréo (3,5 mm)
14 AUX IN: entrée audio stéréo (3,5 mm)
15 Port USB
Dessous de l'appareil
62
16 Tube bassreex
Page 63

TÉLÉCOMMANDE
FR
1 Veille
2 Muet
3 Égaliseur
4 immer
5 Répétition de
l'alarme
6 Alarme
7 Titre précédent
8 Titre suivant
9 Stop
10 Lecture / Pause
11 Mode
12 Menu principal
13 Curseur haut
14 Curseur gauche
15 Curseur droite
16 Curseur gauche
17 OK: conrmer
18 Volume –
19 Volume +
20 Saisie de chires
et lettres
21 Appeler une
station
22 Mémoriser une
station
63
Page 64

FR
MISE EN MARCHE
• Avant de démarrer, assurez-vous que la tension indiquée sur la plaque
signalétique correspond à celle de votre secteur.
• Utilisez l'adaptateur secteur fourni pour le brancher à une prise
électrique domestique.
• Allumez l'appareil avec l'interrupteur marche / arrêt situé à l'arrière.
• Au premier démarrage de l'appareil, le système vous invite à dénir
la langue et à congurer le réseau. Vous pouvez dénir la connexion
réseau immédiatement ou le faire plus tard.
.
Netzwerkkonfiguration
Configuration réseau
1. Choisissez "oui" pour paramétrer
Choisissez "oui" pour paramétrer la conguration normale du réseau.
Puis choisissez le point d'accès requis (AP), en tournant la molette de
navigation et en appuyant sur OK sur le bouton de navigation pour
conrmer.
Appuyez sur >, pour sélectionner le caractère suivant.
A cette étape appuyez sur la touche pour aller vers la gauche et eacer
en même temps le caractère de gauche. Lorsque le mot de passe est
complet, appuyez sur OK sur la molette de navigation pour conrmer.
64
Page 65

Les caractères suivants sont disponibles sur l'appareil :
Chires (0-9)
Lettres latines (A-Z, a-z)
Autres caractères : ( DEL,@,Blank,!,”,#,$,%,&,*,’,+ and (,)
2. Configuration réseau WPS PBC
Sélectionnez "Oui WPS" si vous souhaitez congurer un réseau sans
l (WPS PBC). Si vous utilisez un routeur avec un bouton WPS, vous
pouvez facilement le congurer à l'aide de la fonction WPS. Allez dans
Paramètres et appuyez sur le bouton WPS pendant 120 secondes. La
connexion entre le routeur et l'appareil est automatique.
3. Pas de configuration réseau
Appuyez sur "NO" ou "NON" si vous ne voulez pas congurer le réseau
maintenant.
L'appareil conrme l'établissement de la connexion avec votre réseau Wi
par le message "Réseau OK". Ensuite, le menu principal s'aiche:
FR
65
Page 66

FR
Tournez
le bouton
rotatif et
appuyez pour
sélectionner.
STRUCTURE DU MENU
FM-Radio AUX
DAB-Radio
Menu principal
BT
Pour revenir
en arrière d'un
élément de
menu, appuyez
sur GAUCHE.
Paramètres
Paramètres
Aichage de
l'heure
Gestion de My
mediaU
Réseau
Internet-Radio
Media-Center
Analogique
Numérique
Paramètres de réseau sans l
Réseau sans l (WPS PBC)
Conguration manuelle
Vérier le réseau au démarrage
Centre d'informations
66
Date & heure
Réglage de la date et de l'heure
Réglage du format d'aichage de
l'heure
Réglage du format d'aichage de
la date
Page 67

Paramètres
FR
Alarme Alarme 1
Alarme 2
Alarme snooze
Minuterie
Volume de l'alarme
Langue
Réglage
de la
luminosité
Ecran
Paramètres d'énergie
Mode d'économie
d'énergie
Allumer
Couleur
Monochrome
Marche
Arrêt
Marche
Arrêt
Arrêt programmable
Mémoire tampon
Météo
Paramètres locaux
Unité de température
Aichages en mode
veille
67
Page 68

FR
Paramètre
Paramètres de stations
locales
Paramètres de lecture
Appareil
Egaliseur
Poursuite de le lecture
Automatique (pays)
Manuel (ville)
Détection automatique
Désactivé
Répéter tous
Répéter un titre
Ordre aléatoire
Renommer (AirMusic)
Application AirMusic
Control
Activé
68
Désactivé
Mise à jour logicielle
Retour aux paramètres d'usine
Page 69

Radio Internet
Mes favoris
Station de radio /
musique
Station locale
Dernière station écoutée
FR
Service
Media -Center
USB
UPnP
Ma liste de lecture
Eacer ma liste de lecture
FM-Radio
DAB-Radio
Centre d'informations
Informations météo
Informations nancières
Recherche de station radio
Ajouter une station radio
Informations système
Radio FM
Radio DAB
69
Page 70

FR
RADIO INTERNET
Appuyez sur STANDBY pour accéder au mode de fonctionnement. Tournez
la molette de navigation pour faire déler le menu principal. Appuyez sur
OK pour entrer dans les sous-menus ou pour conrmer les réglages.
Retournez au menu précédent avec <.
Mes favoris (Liste des stations mémorisées)
L'appareil prend en charge jusqu'à 250 entrées avec des stations et des
dossiers. Lorsque la lecture de la station est aichée, maintenez le bouton
FAV de la télécommande pour l'enregistrer. Vous pouvez remplacer une
station précédemment enregistrée par une nouvelle.
Si la station sélectionnée est mémorisée, vous ne pouvez plus la
sauvegarder. Les stations mémorisées sont aichées dans ce menu. Vous
pouvez également appuyer sur FAV pour accéder à la liste des stations
mémorisées. Utilisez le pavé numérique de la télécommande pour appeler
les stations mémorisées.
Accédez à votre station par la liste des stations mémorisées. Pour l'écouter,
appuyez sur OK sur la télécommande.
Utilisez > pour accéder au sous-menu et supprimer des stations, monter,
descendre, renommer, lire ou utiliser la fonction réveil.
Stations radio /Musique
Les stations sont classées et présentées par Global Top20, genre, pays /
lieu (Afrique, Asie, Moyen-Orient, Amérique du Nord, Océanie / Pacique
et Amérique du Sud). Sélectionnez pour accéder aux sous-catégories et
écouter les stations.
70
Appuyez sur OK (sur l'appareil ou sur la télécommande) pour écouter la
station choisie. Sélectionnez > pour accéder aux sous-catégories.
Pour accéder au sous-menu, appuyez sur >. Si vous sélectionnez "Auto
Scan", elle sera ajoutée à la lecture d'introduction des stations de la souscatégorie. Chaque station est écoutée pendant 30 secondes jusqu'à ce
que toutes les stations aient été lues ou que vous appuyiez sur OK pour
terminer l'écoute des introductions. La touche > vous permet d'aicher les
informations sur la station.
Stations locales (radios locales)
Les stations sont classées par pays / emplacement dans lequel la radio est
utilisée.
Page 71

Fonction arrêt automatique
Choisissez oiseaux, piano, pluie, bain minéral, espace et onde comme arrêt
programmé.
Dernières stations écoutées
Choisissez parmi les 10 dernières stations écoutées.
Service
Utilisez un mot-clé pour rechercher des stations dans la liste. Ajoutez une
nouvelle radio en entrant l'adresse IP. Les stations ajoutées sont stockées
dans la liste MyFavorite.
Notez que le nombre maximum de caractères pour le nom d'une station est
de 250.
MEDIA-CENTER
Utilisez la molette de navigation pour sélectionner le mode USB / UPnP ou
le mode Playlist.
UPnP
Ici, les menus sont créés à partir des commandes du support de stockage
USB. Parcourez les dossiers à l'aide de la molette de navigation ou des
touches échées de la télécommande. L'écran aiche les dossiers et les
noms de chiers (pas nécessairement les noms de titres).
Lorsque vous avez trouvé un titre, appuyez sur OK.
Remarque : le port USB ne peut pas recharger les appareils ni échanger des
données avec un PC.
FR
Remarque : La radio ne peut aicher que les titres de moins de 40
caractères. Les caractères doivent appartenir à l'alphabet latin. Si une erreur
de lecture se produit sur une piste en mode UPnP, essayez de renommer le
chier. Toutefois, si le chier ne peut pas être lu, essayez de le convertir en
plusieurs formats.
USB
Ici, les menus sont créés à partir des commandes du support de stockage
USB. Parcourez les dossiers à l'aide de la molette de navigation ou des
touches échées de la télécommande. L'écran aiche les dossiers et les
noms de chiers (pas nécessairement les noms de titres).
Remarque : le port USB ne peut pas recharger les appareils ni échanger des
données avec un PC.
71
Page 72

FR
Meine Wiedergabeliste
Sie können eine Wiedergabeliste mit Favoriten von UPnP erstellen.
Wenn Sie Musik abspielen, halten Sie OK gedrückt, um sie in Ihrer
Wiedergabeliste abzuspeichern.
Meine Wiedergabeliste leeren
Wählen Sie diesen Punkt, um Ihre Wiedergabeliste zu leeren.
My media U
Allez sur le site http://www.mediayou.net/.
Créez un compte mediaU. Connectez-vous au site Web. Sur le site Web,
entrez l'adresse MAC de la radio Internet. Vous pouvez obtenir ces
informations via "Information center > Systeminformation > Informations
sur le réseau sans l.
Si le système a été conguré avec succès, vous pourrez enregistrer et
aicher la playlist de votre propre chaîne mediaU. Vous n'aurez pas besoin
d'entrer le nom d'utilisateur et le mot de passe dans l'appareil.
Si plusieurs comptes sont enregistrés dans l'appareil, vous pouvez
sélectionner le compte actuellement utilisé dans les paramètres. Sur le
site Web, vous pouvez enregistrer des stations en fonction de vos favoris,
de votre lieu / genre et votre ville préférés, ou ajouter manuellement des
stations. Vous pouvez voir les chaînes sur votre radio dans MyMedia.
INFORMATION CENTER
72
Informations météo
Les informations météorologiques sont disponibles pour plus de 2000
villes.
Sélectionnez le pays, puis la ville pour obtenir les prévisions météo. Utilisez
les boutons </> pour voir le bulletin météo.
L'appareil aiche également les prévisions météo en mode veille. Sur la
page Info météo, appuyez sur le bouton OK pour aicher les prévisions
météo pour une ville. Ensuite, paramétrez l'aichage de la météo.
Informations financières: aichage des notications de la bourse.
Informations système
Voir les détails des périphériques connectés sur le réseau. Les informations
incluent l'adresse MAC que vous spéciez lors de l'enregistrement avec "my
mediaU".
Page 73

PARAMÈTRES
FR
Affichage de
l'heure
MyMediaU
Réseau
Date et
heure
analog, digital
Si MyMediaU est activé, une entrée apparaît dans le
menu principal. Si diérents comptes ont été créés sur la
radio Internet, sélectionnez ici le compte par défaut.
Conguration du réseau
Activer ou désactiver le WiFi : lorsque vous activez le
WiFi, le système sélectionne automatiquement le point
d'accès requis. Entrez la clé WEP ou WPA pour établir la
connexion sans l.
Réseau sans l (WPS PBS): Si vous utilisez un routeur
avec le bouton WPS / QSS, vous pouvez facilement
connecter le réseau à l'aide de la fonction WPS. Entrez
dans le menu correspondant et appuyez sur le bouton
WPA / QSS de votre routeur dans les 120 secondes.
La connexion entre le routeur et l'appareil est alors
automatiquement congurée.
Conguration manuelle: Vous pouvez activer DHPC
(l'adresse IP est attribuée automatiquement) ou
attribuer manuellement l'adresse IP. Si vous dénissez
manuellement les paramètres du réseau local câblé,
saisissez les données suivantes : SSID (nom du point
d'accès), adresse IP, masque de sous-réseau, passerelle
par défaut, serveur DNS préféré, serveur DNS secondaire.
Réglage de la date et de l'heure
Réglez le format d'aichage de l'heure sur 12 heures ou
24 heures.
Réglage du format de la date (YYYY/MM/DD; DD/ MM/
YYYY; MM/DD/YYYY)
(Y=année, M= mois, D= jour)
Réglage de l'heure d'été (si activé (ON), l'heure est réglée
sur +1). Si l'heure d'été est désactivée (OFF), l'heure
normale est aichée.
73
Page 74

FR
Réveil
(Alarm)
Minuterie
Langues
Dimmer
Affichage
Paramètres
de gestion
de l'énergie
Arrêt programmé
Mémoire
tampon
3 réveils indépendants sont disponibles : 2 réveils à
heure xe (Alarme 1, Alarme 2) et un
Rappel d'alarme. Appuyez sur ALARM sur la
télécommande pour accéder directement au menu des
paramètres.
Si la source de l'alarme est la radio Internet, la station
préréglée sera utilisée. Pour l'alarme 1 et l'alarme 2, vous
ne pouvez sélectionner que la même station. Lorsque
l'heure de l'alarme arrive, l'appareil se connecte à
Internet (si le réseau déni est disponible). Il peut donc y
avoir un léger retard par rapport à l'heure d'alarme pour
la lecture de la station de radio. Si aucune connexion ne
peut être établie en moins d'une minute, la tonalité de
l'alarme change pour la mélodie.
Lorsque la minuterie est réglée, l'alarme retentit une fois
en 5/10/20/30/60/90/120 minutes, en fonction de ce que
vous avez déni.
Mode d'économie d'énergie / allumer
English /Deutsch / Espanol /Francais / Portugese /
Nederlands / Italiano / Pyccknn / Svenska / Norske /
Dansk / Magyar /Cesky /Slovensky / Polski / Turkce /
Suomi
Mode d'économie d'énergie / allumer
Couleur / Monochrome
Paramétrage du mode de veille automatique lorsque
l'appareil est dans le menu ou sans paramètres WiFi.
Sélectionnez la minuterie de veille (5/15/30 minutes)
pour dénir la durée au bout de laquelle l'appareil passe
automatiquement en mode veille ai vous ne faites aucune
saisie.
Réglez l'arrêt automatique sur 15/30/60/90/120/150/180
minutes. Lorsque l'arrêt automatique est programmé,
un symbole de lit apparaît avec les minutes restantes
dans le coin supérieur droit. Une fois le temps écoulé,
l'appareil passe en mode veille. Sur la télécommande,
appuyez sur la touche d'accès rapide correspondante.
Congurez la mémoire tampon de lecture de musique sur
2/4/8.
74
Page 75

FR
Réglages FM
Réglage
des radios
locales
Paramètres
de lecture
Appareil
Égaliseur
Poursuite de
la lecture
Softwareupdate
Réinitialisation aux
paramètres
d'usine
Vous pouvez facilement régler le mode (stéréo/mono) et
al sensibilité de la radio FM.
Dans le menu de la radio internet se trouve une entrée
"Radio locale". Vous pouvez dénir manuellement
l'emplacement à partir de ce menu ou laisser le système
détecter automatiquement l'emplacement via l'adresse
IP.
Sélectionnez le mode de lecture du Mediacenter : OFF
(pas de répétition ou lecture aléatoire), tout répéter,
répéter un titre aléatoire
Nom DLNA prédéni pour l'appareil. Vous pouvez
renommer l'appareil pour la conguration DLNA sur le PC
ou l'appareil mobile.
L'égaliseur est réglé par défaut sur "normal". Vous pouvez
choisir entre Flat, Jazz, Rock, Soundtrack, Classique, Pop,
News ou "my EQ". Appuyez sur EQ sur la télécommande
pour basculer entre les diérents modes EQ.
Le système est réglé par défaut pour continuer la lecture
de la radio Internet ou du Media Center lorsque vous
rallumez l'appareil. Si vous désactivez ce paramètre,
l'appareil aichera le menu principal au démarrage.
Mettre à jour le logiciel. S'il existe un logiciel système mis
à jour sur le serveur, le système vous en avertira. Avant la
mise à jour du système, assurez-vous que l'alimentation
est stable. Une coupure de courant pendant une mise à
jour peut entraîner des dommages dénitifs à l'appareil.
Réinitialisation aux paramètres d'usine. Une fois
l'appareil réinitialisé, le système commence à
sélectionner la langue.
75
Page 76

FR
DNLA / UPNP
nformations ci-dessous constituent une introduction à la conguration du
streaming multimédia à partir du PC ou d'autres serveurs multimédias. Lisez
les instructions du logiciel ou des applications que vous utilisez pour la
lecture multimédia. Les chiers musicaux doivent être au format MP3, WHA,
WAV ou AAC.
UPnP
Connectez votre PC au réseau. La radio doit être allumée.
Ouvrez la plate-forme UPnP (par exemple, Windows Media Player 11 ou
une version ultérieure, une autre plate-forme ou un autre serveur, tel que
Windows Media Platform). Autorisez le partage de vos médias avec la radio
Internet.
Ajoutez des chiers audio depuis votre téléphone portable.
Vous pouvez également diuser à partir d'autres sources comme
Smarthpones (Android). Connectez le smartphone au réseau. Recherchez et
installez des applications de streaming multimédia sur le Google Play Store.
Ajoutez des chiers audio de votre smartphone que vous souhaitez partager
sur le réseau. Après avoir conguré le serveur partagé, sélectionnez la
musique et contrôlez la lecture sur la radio Internet.
DLNA
En plus de UPnP, l'appareil prend en charge la fonction DLNA. Vous
partagez des chiers audio avec le PC ou un appareil mobile Android.
Vous contrôlez la lecture multimédia depuis votre PC ou votre smartphone
Android. Il n'est pas nécessaire de lancer les lectures une à une sur le
téléphone portable.
La conguration requise pour le PC est au moins Windows 7 et Windows
Media Player 12.
76
Tout d'abord, partagez le média de votre PC avec la radio : Panneau de
conguration \ réseau et Internet \ Centre Réseau et partage \ Options de
diusion multimédia.
Ouvrez Widows Media Player pour démarrer Remote Control pour le
lecteur.
Faites un clic droit sur les chansons de la bibliothèque musicale et
sélectionnez les chansons à lire sur la radio ("Play to Radio"). Une fenêtre
apparaîtra pour contrôler la lecture sur la radio.
Si vous utilisez un smartphone Android ou un iPhone, vous pouvez utiliser
n'importe quelle application DNLA gratuite ou commerciale du Google Play
Store ou de l'App Store. Les applications bubble UPnP (Android) et Twonky
Beam (Android, iOS) sont particulièrement recommandées. Certaines
applications peuvent ne pas fonctionner sur l'iPhone ou l'iPod.
Page 77

Vous pouvez tout de même utiliser l'iPhone ou l'iPod pour contrôler le ux
d'autres serveurs.
Remarque : Si vous utilisez la fonction de diusion en continu DLNA sur
la radio Internet, vous ne pouvez contrôler que le volume et la veille sur
l'appareil. Les autres fonctions de contrôle sont limitées. Arrêtez DLNA sur
le PC ou l'appareil mobile avant de reprendre le contrôle de l'appareil.
Contrôle par l'application Air Music
Control
Vous pouvez utiliser la radio Internet
depuis votre smartphone ou votre
tablette.
Pour ce faire, téléchargez l'application
"Air Music Control" depuis "Google Play
Store" ou "Apple AppStore".
Les appareils doivent être connectés au
même réseau.
FR
77
Page 78

FR
ENTRÉE AUX
En mode Aux, vous pouvez lire les sources audio externes telles que les
lecteurs MP3.
Lecture sur l'entrée AUX
Pour lire l'entrée AUX, baissez le volume sur les deux appareils (si
disponible sur l'appareil externe).
Connectez la source audio externe à AUX IN (prise jack 3,5 mm). Appuyez
sur MODE jusqu'à ce que AUX IN apparaisse sur l'aichage. Vous pouvez
également appuyer sur AUX dans le menu principal. Réglez le volume de la
radio (et, si nécessaire, celui du périphérique audio source).
BT
Appuyez sur MODE jusqu'à ce que BT apparaisse sur l'aichage ou
sélectionnez BT dans le menu principal. Le signal de recherche de BT
retentit. Recherchez dans les paramètres BT l'appareil externe appelé
"Silver Star Stereo". Cliquez pour appairer. La tonalité de couplage retentit.
Vous pouvez maintenant jouer de la musique via BT. Le volume peut être
contrôlé via la radio ou l'appareil externe.
RADIO FM
78
Sélectionnez FM à l'aide de la molette de navigation ou de la
télécommande dans le menu principal. La radio s'allume sur la fréquence
87,5 MHz.
Pour enregistrer toutes les stations ayant un signal fort, appuyez sur la
molette de navigation. L'écran aiche "Auto Scan?". Sélectionnez "Oui".
Ensuite, la recherche automatique des stations commence. Lorsque la
recherche de station est terminée, les stations sont enregistrées dans les
favoris.
Vous pouvez ensuite faire déler les stations mémorisées. Maintenez les
touches < ou >.
Pour contrôler manuellement les fréquences, appuyez sur les boutons < ou
> pour avancer ou reculer dans les fréquences.
Mémorisation de station
Mémorisation manuelle de station
1. Sélectionnez la station que vous souhaitez enregistrer.
2. Appuyez sur le bouton FAV et maintenez-le pendant 1-2 secondes. "01"
Page 79

apparaît sur l'aichage. Utilisez la molette de navigation pour faire
déler les emplacements de mémoire. Sélectionnez un emplacement de
mémoire (1 à 99) en appuyant sur la molette de navigation.
Appeler une station
Rappeler les stations mémorisées en appuyant sur le bouton FAV et en
faisant déler la liste des stations en tournant la molette de navigation.
DAB+ RADIO
Dans le menu principal, sélectionnez DAB / DAB + (tournez la molette
de navigation puis appuyez dessus). Vous pouvez également utiliser les
boutons de navigation de la télécommande.
Lorsque vous démarrez la radio DAB pour la première fois, celle-ci
commence à rechercher les stations DAB. L'écran aiche "Scanning". Elle
aiche le nombre de stations déjà trouvées au cours de la recherche.
Lorsque toutes les stations disponibles ont été trouvées, elles apparaissent
sous la forme d'une liste à l'écran. Utilisez la molette de navigation ou
les boutons de navigation pour faire déler les stations que vous voulez
écouter.
Si vous sélectionnez une station, l'écran l'aiche. Appuyez sur la molette de
navigation pour lire la station.
Pour revenir à la liste de transmission, appuyez sur la touche <.
Pour rechercher à nouveau les stations, accédez à la liste des stations DAB
et appuyez sur la touche <. Le message "Supprimer la liste des chaînes?"
S'aiche. Sélectionnez "Oui" pour eectuer une nouvelle recherche.
Si vous avez déni une station DAB, appuyez sur le bouton > pour aicher
des informations sur la station.
FR
Réglage des stations favorites
Lorsque vous trouvez la station souhaitée, maintenez la touche FAV
enfoncée pour accéder à l'écran Ajouter aux favoris. Tournez la molette de
navigation pour sélectionner un emplacement de station (1-6) et eectuez
une sélection.
Appeler une station DAB
Aichez la liste de vos stations préférées en appuyant sur le bouton FAV en
mode radio DAB et en faisant déler la liste.
79
Page 80

FR
RÉSOLUTION DES PROBLÈMES
Problème Procédure / causes
Stellen Sie sicher, dass das Radio und ein mit
dem Netzwerk verbundener Rechner (der eine
funktionierende Internetverbindung hat), im
selben Netzwerk angemeldet sind.
Ist ein DHCP-Server verfügbar oder haben Sie
eine statische IP-Adresse eingegeben?
Ist eventuell eine Firewall so eingestellt, dass
ausgehende Ports blockiert sind?
Manche Access Points / Repeater / Router
könnten so eingestellt sein, dass nur Geräte
mit registrierter MAC-Adresse verbunden
Impossible d'établir la
connexion Wi.
La radio est connectée à
Internet, mais certaines
stations ne peuvent être
lues.
Vous ne pouvez pas
trouver les périphériques
UPnP ou l'ordinateur que
vous recherchez n'est pas
aiché.
werden. Schauen Sie im Handbuch Ihres
W-LAN-Equipments nach und fügen Sie die
MAC-Adresse des Radios gegebenenfalls zur
„Erlaubt“-Liste des Access Points hinzu.
Stellen Sie sicher, dass Sie das richtige Passwort
(bei verschlüsselten / gesichterten W-LANs)
eingegeben haben. Achten Sie auf die korekte
Schreibweise.
Falls Ihr W-LAN „versteckt“ ist (eine mögliche
Einstellung bei vielen Routern), geben Sie den
Netzwerknamen manuell im Internetradio
ein. Gehen Sie dazu ins Einstellungsmenü ->
Netzwerk -> Manuelle Konguration -> Funknetz
-> SSID eingeben.
Vielleicht liegt der Sender in einer anderen
Zeitzone und sendet im Moment gar nicht.
Zu viele User versuchen, den Sender zu
erreichen und dessen Kapazität /Bandbreite
reicht nicht aus.
Der Link ist abgelaufen / existiert nicht mehr.
Der Sender existiert nicht (mehr).
Sie sind nicht im Netzwerk angemeldet (siehe
oben).
Es ist eine Firewall installiert und so eingestellt,
dass geteilte Dateien nicht für externe Geräte
verfügbar sind.
Das Radio ist nicht in der selben Arbeitsgruppe
oder Domäne wie der entsprechende Rechner
angemeldet.
80
Page 81

Vous ne pouvez pas
partager un dossier avec
UPnP car la fonctionnalité
n'est pas disponible (gris).
Erreur de scan
Buering en boucle
FR
Aktivieren Sie Filesharing.
Es ist möglich, dass Fehler auftreten, wenn
das Internetradio Ordner auf einem PC scannt,
zum Beispiel weil die Windows File Sharing
Applikation abläuft. Verbinden Sie den PC
per Kabel mit dem Netzwerk, um die Scan.
Geschwindigkeit deutlich zu erhöhen.
Bei einer hohen Rate an Streaming-Abbrüchen
oder einer unsicheren Verbindung kann es
vorkommen, dass das IR-6 gar nicht mehr aus
dem „buering“, also dem Zwischenspeichern
des Streams herauskommt. Überprüfen Sie die
Netzwerk-, Modem- und Internetverbindung
und setzen Sie sich gegebenenfalls mit Ihrem
Internet Service Provider in Verbindung.
81
Page 82

FR
INFORMATIONS SUR LE RECYCLAGE
Vous trouverez sur le produit l’image ci-contre (une
poubelle sur roues, barrée d‘une croix), ce qui indique
que le produit se trouve soumis à la directive européenne
2012/19/UE. Renseignez-vous sur les dispositions en
vigueur dans votre région concernant la collecte séparée
des appareils électriques et électroniques. Respectezles et ne jetez pas les appareils usagés avec les ordures
ménagères. La mise en rebut correcte du produit usagé
permet de préserver l’environnement et la santé. Le
recyclage des matériaux contribue à la préservation des
ressources naturelles.
Ce produit contient des piles qui sont soumises à la
directive européenne 2006/66/CE selon laquelle elles ne
doivent pas être éliminées avec les ordures ménagères.
Renseignez-vous sur les dispositions en vigueur
concernant la mise en rebut séparée des piles. La mise
en rebut correcte du produit usagé permet de préserver
l’environnement et la santé.
Déclaration de conformité
Fabricant : Chal-Tec GmbH, Wallstraße 16, 10179 Berlin
82
Ce produit est conforme aux directives européennes
suivantes:
2011/65/EU (RoHS)
2014/53/EU (RED)
2014/35/EU (LVD)
La déclaration complète de
conformité du fabricant est accessible par le lien suivant.
https://use.berlin/10032791
Page 83

Gentile Cliente,
La ringraziamo per aver acquistato il dispositivo.
La preghiamo di leggere attentamente le seguenti
istruzioni per l’uso e di seguirle per evitare
possibili danni tecnici. Non ci assumiamo alcuna
responsabilità per danni scaturiti da una mancata
osservazione delle avvertenze di sicurezza e da un
uso improprio del dispositivo. Scansionare il codice
QR seguente, per accedere al manuale d’uso più
attuale e per ricevere informazioni sul prodotto.
INDICE
Dati Tecnici 84
Indicazioni di sicurezza 85
Prospetto del dispositivo 87
Telecomando 89
Attivazione 90
STRUTTURA DEL MENU 92
Web radio 96
Media-Center 97
Centro di informazioni 98
Paramètres 99
DNLA / UPnP 102
Ingresso AUX 104
BT 104
FM-Radio 104
DAB+ Radio 105
Risoluzione dei preblemi 106
Indicazioni sullo smaltimento 108
FR
83
Page 84

FR
DATI TECNICI
Numero articolo
Ingresso alimentazione
Connessioni
Radio FM
Intervallo di frequenza 87,5 MHz - 108 MHz
DAB
Intervallo di frequenza 174-240 MHz
WLAN 802.11b/g/n
Streaming UPnP, DLNA
Formats de fichiers compatibles
10032791 10032792
Ingresso : 100-240 V ~ 50/60 Hz , 0,6 A
Uscita: 12 V / 1 A
USB, entrée Aux (3,5 mm), Line-out (3,5 mm)
Codica: WEP, WPA, WPA 2(PSK), WPS
WMA, MP3
84
Page 85

INDICAZIONI DI SICUREZZA
Leggere completamente il manuale dell'utente prima di utilizzare il
dispositivo. Seguire tutte le istruzioni di sicurezza per evitare danni da uso
improprio.
• Conservare le istruzioni operative come riferimento. Qualora il
dispositivo venga consegnato a una terza persona, questo manuale
utente deve essere altrettanto allegato.
• Utilizzare il dispositivo solo per lo scopo pressato.
• Questo dispositivo è solo per uso domestico.
• È possibile utilizzare il dispositivo in ambienti interni od esterni.
• Rischio di scosse elettriche! Non immergere il dispositivo, l'alimentatore
o la spina di alimentazione in acqua o altri liquidi.
• Non posizionare il dispositivo vicino a liquidi, vasche e lavandini, in un
seminterrato umido o
• vicino a una piscina.
• Non utilizzare il dispositivo con le mani bagnate o quando stai su un
pavimento bagnato. Non toccare mai la spina di alimentazione con le
mani bagnate o umide.
• Il produttore non si assume alcuna responsabilità per eventuali danni
sorti a causa di un funzionamento errato o di un’utilizzazione errata del
dispositivo.
• Il dispositivo non deve essere utilizzato da bambini o persone disabili,
salvo che l´uso non sia sottoposto a una persona incaricata di assicurare
che il dispositivo sia utilizzato in maniera sicura.
• I bambini piccoli devono essere sorvegliati in modo che non giochino
con il dispositivo.
• Tenere il dispositivo lontano da superci calde e amme.
• Non disporre oggetti sul dispositivo. Non mettere oggetti con amme
(come candele) sopra il dispositivo o accanto ad esso. Non mettere mai
oggetti con liquidi (come vasi) sul dispositivo o accanto ad esso.
• Non esporre il dispositivo alla luce diretta del sole.
• Non utilizzare il dispositivo se è danneggiato. Per evitare pericoli, le
parti del dispositivo possono essere cambiate esclusivamente dal
produttore, servizio clienti o una persona qualicata.
• Non aprire la custodia. Non tentare di riparare il dispositivo da soli.
• Non inserire oggetti estranei nell'alloggiamento.
• Non coprire il dispositivo durante l'uso.
• Il dispositivo può essere alimentato solo con l'alimentazione come
indicato sulla targhetta dei dati.
• Spegnere il dispositivo prima di collegare o tirare la spina.
• Evitare di danneggiare il cavo di alimentazione schiacciandolo,
attorcigliandolo o tirandolo su spigoli spigliati. Tieni il cavo di
alimentazione lontano da superci calde e amme.
• Tenere sempre ferma la spina di alimentazione e non il cavo, quando
togliete il dispositivo dall'alimentazione.
FR
85
Page 86

FR
• Collegare il dispositivo a una presa di corrente facilmente accessibile, in
modo da tirarlo fuori rapidamente in caso di emergenza. Per disattivare
completamente il dispositivo o per scollegarlo dall´alimentazione,
tirare il cavo di alimentazione.
• Se il dispositivo non funziona per causa di cariche elettrostatiche o di
breve picco di tensione, scollegare il dispositivo dall´alimentatore e
collegarlo di nuovo.
• Scollegare la spina di alimentazione quando si verica un temporale
oppure quando il dispositivo non viene utilizzato per molto tempo.
86
Page 87

PROSPETTO DEL DISPOSITIVO
Parte anteriore
FR
1 Display
2 Standby
3 Menu
4 Dimmer
Dos de l'appareil
5 Emittenti salvate
6 Sveglia
7 Indietro
8 Sonno
9 Avanti
10 Volume+/Volume-
87
Page 88

FR
Retro
11 On/O
12 DC IN 12 V: connessione del trasformatore
13 LINE OUT: uscita audio Stereo (3,5 mm)
14 AUX IN: ingresso audio Stereo (3,5 mm)
15 Connessione USB
Dessous de l'appareil
88
16 Tubo Bassreex
Page 89

TELECOMANDO
FR
1 Standby
2 Muto
3 Equalizzatore
4 Dimmer
5 Snooze
6 Sveglia
7 Titolo precedente
8 Titolo successivo
9 Stop
10 Play/Pausa
11 Modalità
12 Menu principale
13 Cursore verso
l’alto
14 Cursore a sinistra
15 Cursore a destra
16 Cursore verso il
basso
17 OK: confermare
18 Volume19 Volume+
20 Inserire numeri e
lettere
21 Aprire emittente
22 Salvare emittente
89
Page 90

FR
ATTIVAZIONE
• Prima dell´attivazione faccia attenzione che la tensione indicata nella
targhetta coincida con la tensione di casa vostra.
• Utilizzare l'adattatore CA, incluso nella consegna, per collegarlo ad una
spina a casa vostra.
• Collegare il dispositivo con l'interruttore on/o sul retro.
• Quando il dispositivo è avviato per la prima volta, il sistema richiede di
impostare la lingua e la congurazione di rete. È possibile impostare la
connessione di rete immediatamente o in seguito.
Configurazione di rete
1. Configurazione di rete normale
Selezionare "Sì" per la normale congurazione di rete. In seguito
selezionare il punto di accesso desiderato (AP) ruotando la rotella di
navigazione e per confermare selezionare OK per premendo sulla rotella
di navigazione.
Premere > per selezionare il carattere successivo. In questo passaggio
premere il tasto per andare a sinistra e allo stesso tempo cancellare i
caratteri a sinistra. Se la password è completa, per confermare i caratteri
sulla rotella premere OK
90
Page 91

I seguenti caratteri sono disponibili per il dispositivo:
Cifre (0-9)
Lettere latine (AZ, az)
Altri caratteri :! (DEL, @, Spazio vuoto,", #, $,%, &, *, '+ e (,)
2. Configurazione di rete WPS PBC
Selezionare "Sì WPS" quando si vuole impostare con una rete wireless
(WPS PBC). Se si utilizza un modem con pulsanti WPS, è possibile
congurare il dispositivo facilmente tramite la funzione WPS.
Andare nelle impostazioni e tener premuto il pulsante WPS per 120
secondi. La connessione tra il modem e il dispositivo viene attivata
automaticamente.
3. Nessuna configurazione di rete
Premere il tasto "NO" se non si vuole congurare il dispositivo.
La corretta connessione con la rete wireless è confermata dal dispositivo
con l´espressione “Network OK”. Allora viene visualizzato il menu
principale.
FR
91
Page 92

FR
Ruotare la
manopola e
premerla per
selezionare
qualcosa.
STRUTTURA DEL MENU
Radio FM AUX
Radio DAB
Menu principale
BT
Per tornare
indietro di
un punto
del menu,
premere LEFT
(SINISTRA).
Impostazioni
Impostazioni
Orario
Gestire My mediaU
Rete
Web radio
Media-Center
Analagico
Digitale
Impostazione rete radio
Rete radio (WPS PBC)
Congurazione manuale
Controllare rete al momento
dell’accensione
Centro informazioni
92
Data & ora
Impostare data e ora
Impostare il formato dell’ora
Impostare il formato della data
Page 93

Impostazioni
FR
Sveglia Sveglia 1
Sveglia 2
Snooze
Timer
Volume sveglia
Lingua
Modalità di risparmio
Volume
sveglia
Display
Impostazioni
energetiche
energetico
Accendere
Colori
Monocromatico
On
O
On
O
Timer di
autospegnimento
Memoria cache
Meteo
Impostazioni locali
Unità della
temperatura
Indicazione in standby
93
Page 94

FR
Impostazioni
Impostazione stazioni
locali
Impostazione riproduzione
Dispositivo
Equalizzatore
Proseguire con la
riproduzione
Aggiornamento software
Automatica (Paese)
Manuale (Città)
Rilevamento automatico
O
Ripetere tutti
Ripetere uno solo
Casuale
Rinominare (AirMusic)
App di controllo
AirMusic
On
O
94
Tornare alle impostazioni di fabbrica
Page 95

Web radio
I miei preferiti
Emittente radio/
Musica
Stazione locale
Emittente ascoltata più di
recente
Service
Centro multimedia
USB
UPnP
Il mio elenco di riproduzione
Cancellare il mio elenco di
riproduzione
FR
Cercare emittente
Inserire emittente
Radio FM
Radio DAB
Centro informazioni
Informazioni meteo
Informazioni nanziarie
Informazioni di
sistema
Radio FM
Radio DAB
95
Page 96

FR
WEB RADIO
Premere STANDBY per passare in modalità operativa e ruotare la manopola
di navigazione per scorrere all’interno del menu principale. Premere OK per
accedere ai sottomenu o per confermare le impostazioni. Premere < per
tornare al menu precedente.
I miei preferiti (lista delle emittenti salvate)
La lista supporta 250 preferiti tra emittenti e cartelle. Quando sul display
viene mostrata la riproduzione dell’emittente, tenere premuto FAV sul
telecomando per salvarla. L’emittente salvata in precedenza può essere
sostituita con una nuova.
Una volta salvata l’emittente selezionata non è più possibile salvarla. Le
emittenti salvate vengono mostrate in questo menu. Premere FAV per
accedere alla lista con le emittenti salvate. Possono essere utilizzati i tasti
numerici sul telecomando per accedere alle emittenti salvate.
Muoversi nella lista delle emittenti no all’emittente desiderata. Premere
OK sul telecomando per iniziare l’ascolto. Aprire il sottomenu con > per
cancellare, spostare verso l’alto/il basso nella lista, rinominare, riprodurre o
utilizzare come sveglia.
Emittente radio/Musica
Le stazioni sono suddivise nelle categorie Global Top 20, genere, Paese/
località (Africa, Asia, Europa, Medio Oriente, Nordamerica, Oceania/Pacico,
Sudamerica) e vengono messe in risalto. Selezionare per raggiungere le
sottocategorie e scegliere l’emittente da ascoltare.
Premere OK (su dispositivo o telecomando) per riprodurre l’emittente.
Selezionare > per accedere al sottomenu e per ascoltare l’emittente.
Premere > per raggiungere il sottomenu. Se si seleziona “Auto Scan”,
viene aggiunta nel sottomenu la breve riproduzione dell’emittente. Ogni
emittente viene riprodotta per 30 secondi, no a quando sono state
riprodotte tutte. Premere OK per terminare la riproduzione breve. Premere >
per mostrare informazioni sull’emittente in riproduzione.
Stazione locale (radio locale)
Le stazioni sono categorizzate in base a Paese/località in cui viene utilizzato
il dispositivo.
96
Musica per addormentarsi
Come musica per addormentarsi è possibile selezionare Uccellini,
Pianoforte, Pioggia, Bagno minerale, Spazio e Onda.
Ultime emittenti ascoltate
Lista delle ultime 10 emittenti ascoltate.
Page 97

Service
Cercare emittenti radio nella lista con una parola chiave. Inserire l’indirizzo
IP di una nuova emittente radio. Le emittenti aggiunte vengono salvate ne
“i Miei preferiti”. Attenzione, il numero massimo di caratteri per il nome
dell’emittente è di 250.
.
MEDIA-CENTER
Selezionare con la rotella la modalitá USB/UPnP oppure la modalità
Playlist.
UPnP
Se avete impostato un server UPnP , puoi vedere i media condivisi tramite
UPnP. Se si dispone di più di un PC, che condivide i media, verranno
elencate le alternative.
Selezionare i media condivisi, che si vogliono riprodurre. Usa i tasti
riproduzione/pausa tasto (8.7) e STOP (9). Premete il tasto freccia a destra
(15), per mostrare le informazioni sul display.
Nota: La radio può mostrare solo il titolo con meno di 40 caratteri. I
caratteri devono essere in alfabeto latino. Se si verica un errore di lettura
su una traccia in modalità UPnP, provare a rinominare il le. Se il le non
può essere riprodotto, tuttavia, provare a convertire il le in diversi formati.
FR
USB
Qui sono eseguiti i menu delle cartelle memorizzate sul supporto USB.
Cercate la cartella con la rotella di navigazione o il tasto freccia sul
telecomando. Nel display vengono visualizzati i nomi di cartelle e le (non
necessariamente i nomi dei titoli). Se avete trovato una traccia, premere OK.
NOTA: la porta USB non supporta alcuna funzione di alimentazione o
scambio dati con un PC.
La mia lista di riproduzione
È possibile estendere una lista di riproduzione con musica favorita da UPnP.
Se si riproduce la musica, tenere premuto il pulsante OK per salvarlo nella
sua lista di riproduzione.
97
Page 98

FR
Svuotare la mia Playlist
Selezionare questo punto per svuotare la vostra lista di riproduzione.
My media U
Andare sull´indirizzo internet http://www.mediayou.net/. Creare un account
MediaU. Accedi al sito Web. Inserisci l'indirizzo MAC della radio Internet
nel sito. Queste informazioni le ottiene tramite “Centro di Informazioni –
informazioni di sistema> informazioni su rete radiofonica.
Se il sistema è congurato, con successo siete in grado di salvare e di
vedere la playlist con le proprie stazioni mediaU. Non è necessario inserire
Il nome utente e la password nel dispositivo.
Se sono memorizzati più account nel dispositivo, è possibile selezionare
l'account attualmente in uso su Impostazioni. Sul sito Web, è possibile
salvare le stazioni nelle stazioni radio preferite, posizione/genere e città
o aggiungere manualmente stazioni. È possibile vedere le stazioni su
MyMedia della radio.
CENTRO DI INFORMAZIONI
Informazioni meteo
Ci sono informazioni meteo per più di 2.000 città. Selezionare il paese e
poi la città per le previsioni del tempo. Con i tasti </> è possibile mostrare
il bollettino metereologico. Anche in modalità standby, l'unità visualizza le
previsioni del tempo. Premi il pulsante OK sulla pagina delle informazioni
meteo per visualizzare le previsioni del tempo per una città. Quindi
impostare l´inserzione meteo.
98
Informazioni finanziarie: Visualizzazione delle quotazioni del mercato
azionario.
Informazioni di sistema
Visualizza i dettagli dei dispositivi connessi sulla rete. Le informazioni
includono l´indirizzo MAC, che avete dato durante la registrazione "my
mediaU".
Page 99

PARAMÈTRES
FR
Indicatore
dell´ora
MyMediaU
Networking Configurazione del networking
Analogico, digitale
Quando MyMediaU è attivato, appare nel menu
principale. Se sono stati attivati in internet radio diversi
account, selezionare in questo caso il conto standard.
Attivare o disattivare WLAN: Se attivi WLAN, il sistema
seleziona automaticamente il punto di accesso
necessario. Inserire la chiave WEP o la chiave WPA per la
connessione WLAN.
Connessione wireless (WPS PBS): Se si utilizza un modem
con pulsante WPS/QSS, si può semplicemente
collegare la connessione tramite funzione WPS. Andare
sul rispettivo menu e premere il tasto WPA/QSS sul
modem entro 120 secondi. Il collegamento tra il modem il
dispositivo è quindi congurato automaticamente.
Verifica della rete quando il dispositivo è acceso: È
possibile selezionare DHPC (L'IP viene assegnato
automaticamente) o assegnare manualmente l'indirizzo
IP. Se inserite le impostazioni per collegamento cavo
LAN a mano, inserire quanto di seguito: SSID (nome del
punto di accesso), l'indirizzo IP, subnet mask, gateway
predenito, server DNS preferito, Server DNS alternativo.
Verifica della rete quando il dispositivo è acceso: attivare
la rete WLAN, disattivare. Se attivi la rete wireless,
il sistema cerca in automatico un punto di accesso
disponibile.
Data e ora Imposta data e ora
Impostare il formato di 12 ore ovvero di 24.
Impostare il formato della data (YYYY/MM/DD; GG/MM/
AAAA,MM/DD/YYYY) (Y = anno, M = mese, D = giorno)
Impostare l´ora legale (se abilitato (ON), l'ora è +1). Se
l'ora legale è spenta (OFF), si visualizza l'ora corrente.
99
Page 100

FR
Sveglia
(Allarme)
Timer
Lingua
Regolatore
luminoso
Display
Impostazioni risparmio
energetico
Timer di spegnimento
Memoria
intermedia
Ci sono 3 sveglie indipendenti: 2 sveglie per un tempo
sso (Allarme 1, Allarme 2) e una sveglia- sonno. Premere
sul telecomando ALARM, per andare direttamente al
menu delle impostazioni. Se è impostato come tono
di sveglia la, è utilizzata la stazione preimpostata in
precedenza. Per l´allarme 1 e l´allarme 2 può essere
selezionato solo lo stesso trasmettitore. Quando il
tempo per la sveglia è arrivato, il dispositivo si connette
a internet (se la rete impostata è disponibile). Pertanto,
è possibile che ci sia un leggero ritardo del tempo della
sveglia per la riproduzione della stazione radio.
Se entro un minuto non è prodotto alcun collegamento,
il tono di sveglia si trasforma in melodia. Se la suoneria
a ripetizione è attivata, il tono di sveglia suona una volta
in 5/10/20/30/60/90/120 minuti a seconda di quello che
hai impostato.
Conto alla rovescia max. 100 minuti)
English /Deutsch / Espanol /Francais / Portugese /
Nederlands / Italiano / Pyccknn / Svenska / Norske /
Dansk / Magyar /Cesky /Slovensky / Polski / Turkce /
Suomi
Modalità di risparmio energetico/accensione
Colore/monocromo
Impostazione della modalità automatica in standby,
quando
il dispositivo si trova in modalità menu oppure senza
impostazione Wi-Fi. Seleziona il timer di spegnimento
(15/5/30 Minuti) per impostare la durata, dopo la quale il
dispositivo entra automaticamente in modalità standby.
Impostare il timer di spegnimento su
15/30/60/90/120/150/180 minuti. Se il timer di
spegnimento è impostato, si visualizza un simbolo letto
con i minuti restanti in un angolo in alto a destra. Dopo
l'intervallo il dispositivo va in modalità standby. Sul
telecomando, premere il tasto di selezione rapida.
Congura il buer di riproduzione musicale, è impostato
2/4/8.
100
 Loading...