

Page 1

Pure Precision Box
Aktiver Lautsprecherset
Active Loudspeaker Set
Set de altavoz activo
Ensemble d'enceintes actives
Set di altoparlanti attivi
10032939
www.auna-multimedia.com
Page 2

Page 3

Sehr geehrter Kunde,
wir gratulieren Ihnen zum Erwerb Ihres
Gerätes. Lesen Sie die folgenden Hinweise
sorgfältig durch und befolgen Sie diese,
um möglichen Schäden vorzubeugen. Für
Schäden, die durch Missachtung der Hinweise
und unsachgemäßen Gebrauch entstehen,
übernehmen wir keine Haftung.
INHALT
Technische Daten 4
Lieferumfang 4
Sicherheitshinweise 5
Geräteübersicht 6
Inbetriebnahme und Bedienung 7
AUX IN 8
Reinigung und Pege 8
Hinweise zur Entsorgung 9
DE
3
Page 4
DE
TECHNISCHE DATEN
Artikelnummer 10032939
Stromversorgung
Netzgerät
Lautsprecher 2-Wege-System
Impedanz 6 Ω
Frequenzbereich 70 Hz - 20 kHz
Gewicht 10,5 kg
Eingang 100-240 V~ 50/60 Hz
Ausgang 15 V / 3 A
LIEFERUMFANG
Teile Anzahl
Lautsprecher 2
Netzstromadapter 1
Bedienungsanleitung 1
4
Page 5

SICHERHEITSHINWEISE
• Setzen Sie das Gerät keiner direkten Sonneneinstrahlung aus und
stellen Sie es nicht in der Nähe von Hitzequellen oder in heißer
Umgebung auf. Stellen Sie das Gerät nicht auf einem Verstärker
oder anderen wärmeerzeugenden Geräten ab, welche die
Betriebstemperatur der Lautsprecher übersteigen könnte. Dadurch
könnten die Lautsprecher entfärbt oder deformiert werden oder
Fehlfunktionen aufweisen.
• Achten Sie darauf, dass sich genügend Freiraum um die Lautsprecher
herum bendet, da diese während der Verwendung sehr heiß werden
können und deshalb ausreichend belüftet werden müssen. Halten Sie
einen Abstand zu anderen Geräten und der Wand ein.
• Wenn Sie das Gerät beispielsweise auf ein Regal stellen, lassen Sie
mindestens 35 cm oberhalb und 10 cm dahinter frei. Sollten diese
Lücken fehlen, kann es zu einem Hitzestau im inneren der Lautsprecher
kommen, wodurch diese Schaden nehmen könnten.
• Bewegen Sie das Gerät während der Wiedergabe nicht, da sich die
Schallplatte dreht. Wird das Gert während der Wiedergabe bewegt,
kann dies zu Beschädigungen der Schallplatte, der Nadel, des Gehäuses
oder des gesamten Geräts führen.
• Die verwendete Stromspannung sollte der auf dem Typenschild des
Geräts angegebenen Spannung entsprechen. Sollten Sie diesbezüglich
Zweifel hegen, konsultieren Sie einen Elektriker.
DE
5
Page 6

DE
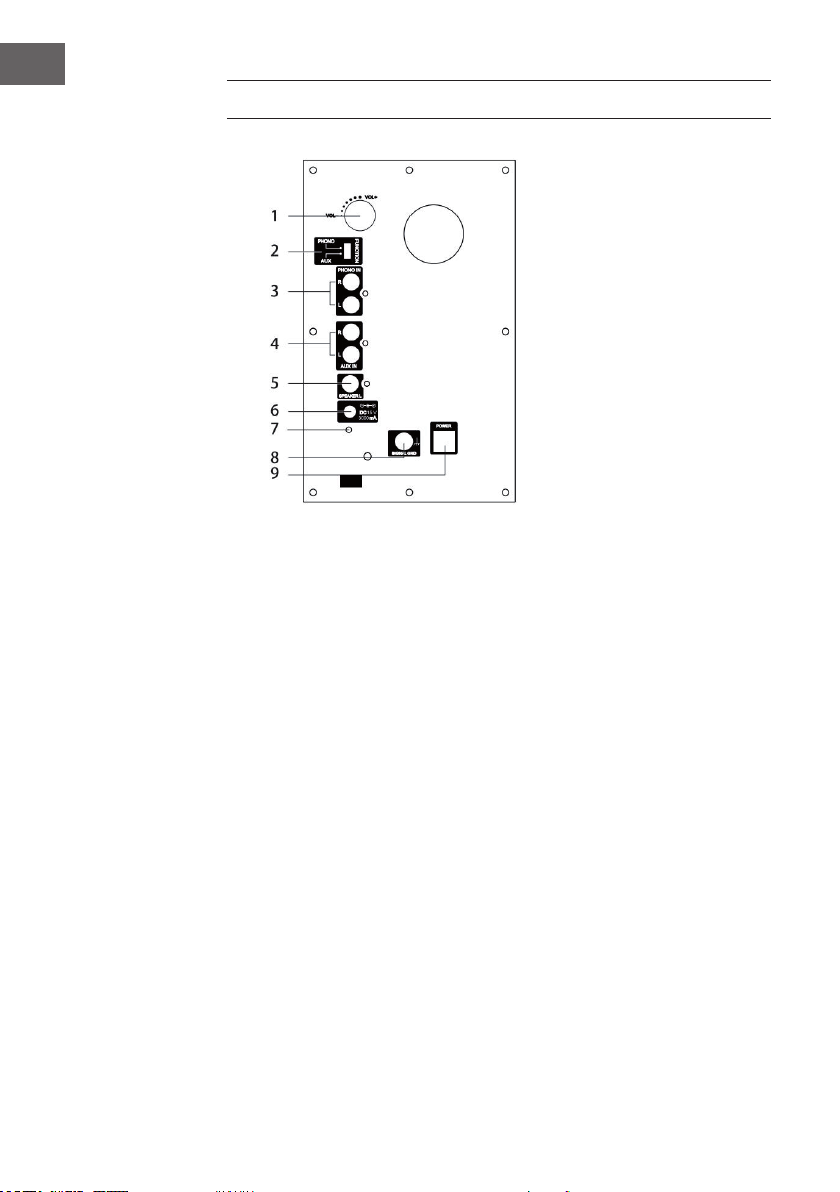
GERÄTEÜBERSICHT
1 VOLUME Die Lautstärke erhöhen/senken.
2 FUNCTION Auswahl von PHONO oder AUX
3 PHONO IN PHONO-Verbindung, RCA, Stereo
4 AUX IN Anschluss an externer Quelle (Stereo-Cinch)
5 Lautsprecher L Anschluss linker Lautsprecher
6 DC IN 15 V, 3000 mA
7 Power-LED Einschaltanzeige
8 GND Erdung
9 Power Netzstromanschluss
6
Page 7

INBETRIEBNAHME UND BEDIENUNG
• Verbinden Sie das Verbindungskabel der passiven Lautsprecher mit
dem Anschluss der Hauptlautsprecher (Position 5).
• Stecken Sie den Netzstromadapter in den Anschluss der
Hauptlautsprecher (Position 9) und stecken Sie den Netzstromstecker in
eine 100 – 240 V-Steckdose
• Die Einschaltanzeige leuchtet auf
• Stellen Sie die Lautstärke niedrig ein.
Phono-Eingang
• Bringen Sie den Schalter des Hauptlautsprechers in die Position
„PHONO IN“.
• Verwenden Sie ein Doppel-Cinch-Kabel, um den Lautsprecher mit
dem Plattenspieler zu verbinden. Ein Kabelende kommt in den
PHONO IN Anschluss (R&L) des Hauptlautsprechers und das andere
Kabelende wird mit dem RCA-Anschluss des Plattenspielers verbunden.
Vergewissern Sie sich, dass am Plattenspieler „Phono Out“ eingestellt
wurde.
• Legen Sie eine Schallplatte in den Plattenspieler ein und passen Sie die
Lautstärke am Hauptlautsprecher an.
• Genießen Sie die Musik.
Hinweis
Verwenden Sie keinesfalls die „PHONO IN“ Funktion des
Hauptlautsprechers, wenn am Plattenspieler „Line Out“ eingestellt wurde,
da der Lautsprecher dadurch beschädigt werden könnte.
DE
7
Page 8

DE
AUX IN
• Stellen Sie am Schalter des Hauptlautsprecher „AUX IN“ ein.
• Verwenden Sie ein Doppel-Cinch-Kabel, um den Lautsprecher mit
dem Plattenspieler zu verbinden. Ein Kabelende kommt in den AUX IN
Anschluss (R&L) des Hauptlautsprechers und das andere Kabelende
wird mit dem RCA-Anschluss des Plattenspielers verbunden. Stellen Sie
sicher, dass am Plattenspieler „Line Out“ eingestellt wurde. Alternativ
können Sie ein 3,5 mm Kabel verwenden, um die Lautsprecher
mit einem externen Audiogerät (Smartphone, MP3-Player etc.) zu
verbinden. Der RCA-Anschluss des Kabels wird mit dem AUX IN
Anschluss (R&L) des Hauptlautsprechers verbunden und der 3,5 mm
Stecker kommt in den Anschluss des Audiogerätes.
• Legen Sie eine Schallplatte auf den Drehteller oder starten Sie die
Wiedergabe der Musik über Ihr externes Audiogerät. Passen Sie die
Lautstärke am Hauptlautsprecher an.
• Genießen Sie die Musik!
Hinweis
Verwenden Sie keinesfalls die AUX IN Funktion des Hauptlautsprechers,
wenn am Plattenspieler „Phono Out“ eingestellt wurde, da die Lautstärke
ansonsten nur sehr leise wiedergegeben wird.
REINIGUNG UND PFLEGE
• Sollte die Geräteoberäche schmutzig werden, reiben Sie das Gerät
mit einem weichen Tuch ab oder verwenden Sie in Wasser aufgelöste
Flüssigseife. Achten Sie darauf, dass das Gerät vollständig getrocknet
ist, bevor Sie es wieder verwenden.
• Verwenden Sie zur Reinigung keine chemischen Reinigungstücher,
Verdünnungsmittel oder ähnliche Substanzen, da diese die
Geräteoberäche beschädigen könnten.
Vorsicht: Stromschlaggefahr!
Ziehen Sie aus Sicherheitsgründen vor der Reinigung den
Netzstecker aus der Steckdose.
8
Page 9

HINWEISE ZUR ENTSORGUNG
Bendet sich die linke Abbildung (durchgestrichene
Mülltonne auf Rädern) auf dem Produkt, gilt die
Europäische Richtlinie 2012/19/EU. Diese Produkte dürfen
nicht mit dem normalen Hausmüll entsorgt werden.
Informieren Sie sich über die örtlichen Regelungen zur
getrennten Sammlung elektrischer und elektronischer
Gerätschaften. Richten Sie sich nach den örtlichen
Regelungen und entsorgen Sie Altgeräte nicht über
den Hausmüll. Durch die regelkonforme Entsorgung
der Altgeräte werden Umwelt und die Gesundheit Ihrer
Mitmenschen vor möglichen negativen Konsequenzen
geschützt. Materialrecycling hilft, den Verbrauch von
Rohstoen zu verringern.
Konformitätserklärung
Hersteller: Chal-Tec GmbH, Wallstraße 16, 10179 Berlin.
Dieses Produkt entspricht den folgenden Europäischen
Richtlinien:
2014/30/EU (EMV)
2014/35/EU (LVD)
2011/65/EU (RoHS)
DE
9
Page 10

Page 11

Dear Customer,
Congratulations on purchasing this
equipment. Please read this manual carefully
and take care of the following hints to avoid
damages. Any failure caused by ignoring
the items and cautions mentioned in the
instruction manual are not covered by our
warranty and any liability. Scan the QR code
to get access to the latest user manual and
other information about the product..
CONTENTS
Technical Data 2
Included Items 2
Safety Instructions 3
Product Description 4
Getting started and Basic Operation 5
AUX IN 6
Cleaning and Care 6
Disposal Considerations 7
EN
11
Page 12
EN
TECHNICAL DATA
Item number 10032939
Power supply
Net adaptor
Speakers 2-way system
Impedance 6 Ω
Frequency range 70 Hz - 20 kHz
Weight 10.5 kg
Input 100-240 V~ 50/60 Hz
Output 15 V / 3 A
INCLUDED ITEMS
Part Qty
Speakers 2
AC adapter 1
Owner manual 1
12
Page 13

SAFETY INSTRUCTIONS
• Avoid placing the unit in direct sunlight, close to a source of heat or in
other similar conditions. Do not place the unit on top of an amplier or
other equipment that might generate heat the exceeds the operating
temperature range of this unit. Doing so could cause discolouration,
deformation or malfunction.
• As the unit could become warm during operation, always leave
suicient space around it for ventilation. When installing this unit, leave
a little space between it and other devices and walls to allow good heat
dissipation.
• When placing it in a rack, for example, leave at least 35 cm open above
it and 10 cm open behind it. Failure to provide these gaps could cause
heat to build up inside and result in free.
• Do not move the unit during playback. During playback, the record
rotates. Do not lift or move the unit during playback. Doing so may
damage the record, the stylus, the cartridge or the unit.
• The voltage supplied to the unit should match the voltage as printed on
the rear panel. IF you are in any doubt regarding this matter, consult an
electrician.
EN
13
Page 14
EN
PRODUCT DESCRIPTION
1 VOLUME: Increase/decrease volume
2 FUNCTION: Selection function: PHONO, AUX
3 PHONO IN: PHONO connection, RCA, stereo
4 AUX IN: Connection external source, RCA, stereo
5 Speaker L: Connection loudspeaker L
6 DC IN: 15V, 3000mA
7 Power-LED
8 GND: Ground
9 Power: DC jack in
14
Page 15

GETTING STARTED AND BASIC OPERATION
• Passive loudspeaker connecting cable insets to port of master
loudspeaker (position 5);
• Put power adapter jack into master loudspeaker (position 9), and place
adapter insets in a 100-240V wall socket;
• Power LED is lighting;
• Adjust volume on master loudspeaker in a low level.
Phono input
• Turn switch into PHONO IN position on master loudspeaker
• Using dual RCA to dual RCA audio cable connects speaker and
turntable, one connects
• PHONO IN(R&L) on master loudspeaker, the other inserts RCA
connector from turntable, please make sure that turntable is on phono
out position.
• Place a record on turntable, adjusting volume on master loudspeaker as
you like.
• Enjoy your music.
Note
When turntable is on line out position, please don’t use PHONO in function
on master loudspeaker, otherwise speaker may damage.
EN
15
Page 16

EN
AUX IN
• Turn switch into AUX IN position on master loudspeaker;
• Using dual RCA to dual RCA audio cable connects speaker and
turntable, one connects AUX IN(R&L) on master loudspeaker, the other
inserts RCA connector from turntable, please make sure that turntable
is on line out position; or using 3.5mm to dual RCA audio cable to
connect speaker and your audio device (phone, MP3, etc.), dual RCA
port connects AUX IN (R&L) on master loudspeaker, the other 3.5mm
port inserts to your audio device.
• Place a record on turntable or playing music source from your audio
device, adjusting volume on master loudspeaker as you like.
• Enjoy your music.!
Note
When turntable is on phono out position, please don’t use AUX in function
on master loudspeaker, otherwise speaker sound is very small..
CLEANING AND CARE
• If the surface of the unit gets dirty, wipe it with a soft cloth or use
diluted mild liquid soap. Allow the surface of the unit to dry completely
before using.
• Do not use chemical cleaning cloths, thinner or similar substances as
they could damage the surface or the unit.
Caution: Dange of electric shock!
For safety, disconnect the power cord from the socket before
cleaning.
16
Page 17

DISPOSAL CONSIDERATIONS
According to the European waste regulation 2012/19/EU
this symbol on the product or on its packaging indicates
that this product may not be treated as household waste.
Instead it should be taken to the appropriate collection
point for the recycling of electrical and electronic
equipment. By ensuring this product is disposed of
correctly, you will help prevent potential negative
consequences for the environment and human health,
which could otherwise be caused by inappropriate waste
handling of this product. For more detailed information
about recycling of this product, please contact your local
council or your household waste disposal service..
Declaration of Conformity
Producer: Chal-Tec GmbH, Wallstraße 16, 10179 Berlin.
Germany
This product is conform to the following European
Directives:
2014/30/EU (EMC)
2014/35/EU (LVD)
2011/65/EU (RoHS)
EN
17
Page 18

Page 19

Chère cliente, cher client,
Toutes nos félicitations pour l’acquisition de ce
nouvel appareil. Veuillez lire attentivement et
respecter les instructions de ce mode d’emploi
an d’éviter d’éventuels dommages. Nous ne
saurions être tenus pour responsables des
dommages dus au non-respect des consignes
et à la mauvaise utilisation de l’appareil.
SOMMAIRE
Fiche technique 20
Contenu de l'emballage 20
Consignes de sécurité 21
Aperçu de l'appareil 22
Mise en marche et utilisation 23
Aux in 24
Nettoyage et entretien 24
Informations sur le recyclage 25
FR
19
Page 20

FR
FICHE TECHNIQUE
Numéro d'article 10032939
Alimentation
Adaptateur secteur
Enceintes système 2 voies
Impédance 6 Ω
Plage de
fréquences
Poids 10,5 kg
Entrée 100-240 V~ 50/60 Hz
Sortie 15 V / 3 A
70 Hz - 20 kHz
CONTENU DE L'EMBALLAGE
Pièces quantité
Enceintes 2
Adaptateur secteur 1
Mode d'emploi 1
20
Page 21

CONSIGNES DE SÉCURITÉ
• N'exposez pas l'appareil à la lumière directe du soleil et ne le placez pas
près de sources de chaleur ou dans un environnement chaud. Ne placez
pas l'appareil sur un amplicateur ou tout autre appareil générateur
de chaleur pouvant dépasser la température de fonctionnement
des enceintes. Cela pourrait décolorer ou déformer les enceintes ou
entraîner leur dysfonctionnement.
• Assurez-vous qu'il y a suisamment d'espace autour des enceintes,
car elles peuvent devenir très chaudes pendant l'utilisation et doivent
donc être correctement ventilées. Gardez une distance avec les autres
appareils et le mur.
• Par exemple, si vous placez l'appareil sur une étagère, laissez-le au
moins 35 cm au-dessus et à 10 cm d'espace derrière lui. Faute de
quoi cela peut entraîner une accumulation de chaleur à l'intérieur des
enceintes, ce qui pourrait les endommager.
• Ne déplacez pas l'appareil pendant la lecture car le disque vinyle
tourne. Déplacer l'appareil pendant la lecture peut endommager le
disque, l'aiguille, le boîtier ou l'appareil entier.
• La tension utilisée doit correspondre à la tension indiquée sur la plaque
signalétique de l'appareil. En cas de doute, consultez un électricien.
FR
21
Page 22

FR
APERÇU DE L'APPAREIL
1 VOLUME augmenter/diminuer le volume.
2 FUNCTION sélecteur pour PHONO ou AUX
3 PHONO IN connexion PHONO, RCA, Stéréo
4 AUX IN branchement à une source externe (RCA stéréo)
5 Enceinte L connexion de l'enceinte gauche
6 DC IN 15 V, 3000 mA
7 Power-LED témoin de marche
8 GND mise à la terre
9 Power branchement de l'alimentation secteur
22
Page 23

MISE EN MARCHE ET UTILISATION
• Branchez le câble de connexion des enceintes passives à la prise des
enceintes principales (position 5).
• Branchez l’adaptateur secteur sur la prise de l'enceinte principale
(position 9) et branchez la che secteur dans une prise 100-240V
• Le témoin d’alimentation s’allume
• Diminuez le volume.
Entrée Phono
• Réglez le commutateur d’enceinte principale sur la position "PHONO
IN".
• Utilisez un câble double RCA pour connecter l'enceinte à la platine.
Une extrémité de câble vient dans la connexion PHONO IN (R & L)
de l'enceinte principale et l'autre extrémité du câble est connectée à
la prise RCA de la platine. Assurez-vous que la platine est réglée sur
"Phono Out".
• Posez un disque sur la platine et réglez le volume sur l'enceinte
principale.
• Ecoutez votre musique.
Remarque
N'utilisez jamais la fonction "PHONO IN" de l'enceinte principale si la
platine a été réglée sur "Line Out", car cela pourrait endommager l'enceinte.
FR
23
Page 24

FR
AUX IN
• Réglez "AUX IN" sur le commutateur de l'enceinte principale.
• Utilisez un câble RCA double pour brancher l'enceinte à la platine.
Une extrémité du câble se connecte au connecteur AUX IN (R & L) de
l'enceinte principale et l'autre extrémité du câble se connecte à la prise
RCA de la platine vinyle. Assurez-vous que la platine est réglée sur
"Line Out". Vous pouvez également utiliser un câble de 3,5 mm pour
connecter les enceintes à un périphérique audio externe (smartphone,
lecteur MP3, etc.). Le connecteur RCA du câble est branché à la prise
AUX IN (R & L) de l'enceinte principale et la che 3,5 mm va dans la
prise du périphérique audio.
• Placez un disque sur la platine ou commencez à lire la musique via votre
périphérique audio externe. Ajustez le volume sur l'enceinte principale.
• Protez de votre musique !
Remarque
N'utilisez pas la fonction AUX IN du haut-parleur principal si "Phono Out" a
été réglé sur la platine, sinon le volume sera très faible.
NETTOYAGE ET ENTRETIEN
• Si la surface de l'appareil est sale, essuyez-la avec un chion doux
ou utilisez du savon liquide dissous dans de l'eau. Assurez-vous que
l'appareil est complètement sec avant de l'utiliser à nouveau.
• N'utilisez pas de lingettes, de diluants ou de substances similaires pour
le nettoyage, car ils pourraient endommager la surface de l'appareil
24
Attention : Risque d'électrocution !
Pour des raisons de sécurité, débranchez la che secteur de la
prise avant le nettoyage.
Page 25

INFORMATIONS SUR LE RECYCLAGE
Vous trouverez sur le produit l’image ci-contre (une
poubelle sur roues, barrée d‘une croix), ce qui indique que le
produit se trouve soumis à la directive européenne 2012/19/
UE. Renseignez-vous sur les dispositions en vigueur dans
votre région concernant la collecte séparée des appareils
électriques et électroniques. Respectez-les et ne jetez pas
les appareils usagés avec les ordures ménagères. La mise
en rebut correcte du produit usagé permet de préserver
l’environnement et la santé. Le recyclage des matériaux
contribue à la préservation des ressources naturelles.
Déclaration de conformité
Fabricant : Chal-Tec GmbH, Wallstraße 16, 10179 Berlin.
Ce produit est conforme aux directives européennes
suivantes :
2014/30/UE (CEM)
2014/35/UE (LVD)
2011/65/UE (RoHS)
FR
25
Page 26

Page 27

Estimado cliente:
Le felicitamos por la adquisición de este
producto. Lea atentamente el siguiente manual
y siga cuidadosamente las instrucciones de
uso con el n de evitar posibles daños. La
empresa no se responsabiliza de los daños
ocasionados por un uso indebido del producto
o por haber desatendido las indicaciones de
seguridad.
ÍNDICE
Datos técnicos 28
Partes suministradas 28
Indicaciones de seguridad 29
Visión general del aparato 30
Puesta en marcha y uso 31
Aux in 32
Limpieza y cuidado 32
Retirada del aparato 33
ES
27
Page 28

ES
DATOS TÉCNICOS
Número de
artículo
Suministro eléctrico
Fuente de
alimentación
Altavoz Sistema de 2 vías
Impedancia 6 Ω
Rango de
frecuencia
Peso 10,5 kg
10032939
Entrada 100-240 V~ 50/60 Hz
Salida 15 V / 3 A
70 Hz - 20 kHz
PARTES SUMINISTRADAS
Componentes Cantidad
Altavoz 2
Adaptador de red 1
Manual de instrucciones 1
28
Page 29

INDICACIONES DE SEGURIDAD
• No coloque el aparato bajo la luz directa del sol ni cerca de fuentes de
calor o entornos calientes. No coloque el aparato sobre amplicadores
u otros aparatos que pueda generar calor y aumentar la temperatura
de funcionamiento del altavoz. A causa de ello, el altavoz podría
decolorarse o deformarse o presentar problemas en el funcionamiento.
• Asegúrese de que tenga suciente espacio alrededor del aparato, pues
durante el uso alcanza temperaturas muy elevadas y por ello necesita
suciente ventilación. Mantenga una distancia entre otros aparatos y la
pared.
• Si, por ejemplo, coloca el aparato sobre una estantería, deje al
menos 35 cm de espacio hacia arriba y 10 cm hacia atrás. Si no puede
garantizar estos espacios, puede almacenarse calor dentro del altavoz y
provocar daños.
• No mueva el aparato durante la reproducción, pues el vinilo está
girando. Si el aparato se mueve durante la reproducción se podría dañar
el vinilo, la aguja, la carcasa o todo el aparato.
• El voltaje utilizado debe coincidir con la tensión indicada en la placa
técnica del aparato. Si tiene dudas sobre ello, consulte a un electricista.
ES
29
Page 30

ES
VISIÓN GENERAL DEL APARATO
1 VOLUME Aumentar/reducir el volumen.
2 FUNCTION Selección de PHONO o AUX
3 PHONO IN Conexión PHONO, RCA, estéreo
4 AUX IN Conexión a fuente externa (cable RCA estéreo)
5 Altavoz L Conexión izquierda del altavoz
6 DC IN 15 V, 3000 mA
7 LED de encendido indicador de encendido
8 GND Toma a tierra
9 Power Toma para suministro eléctrico
30
Page 31

PUESTA EN MARCHA Y USO
• Una el cable de conexión del altavoz pasivo a la conexión del altavoz
principal (posición 5).
• Conecte el adaptador de red a la conexión del altavoz principal
(posición 9) y encaje el enchufe en una toma de corriente 100 - 240 V.
• El indicador de encendido se ilumina
• Ajuste el volumen a un nivel bajo.
Entrada Phono
• Coloque el interruptor del altavoz principal en la posición "PHONO IN".
• Utilice un cable de doble clavija para conectar el altavoz al tocadiscos.
Un extremo del cable se conecta a la toma PHONO ON (R&L) del
altavoz principal y el otro extremo del cable se conecta a la toma RCA
del tocadiscos. Asegúrese de que en el tocadiscos se haya seleccionado
"Phono out".
• Coloque un vinilo en el tocadiscos y ajuste el volumen del altavoz
principal.
• Disfrute de la música.
Nota
En ningún caso utilice la función "PHONO IN" del altavoz principal si se ha
congurado el tocadiscos "Line Out", pues el altavoz podría dañarse.
ES
31
Page 32

ES
AUX IN
• Coloque el interruptor del altavoz principal en "AUX IN".
• Utilice un cable de doble clavija para conectar el altavoz al tocadiscos.
Un extremo del cable de conecta a la toma AUX IN (R&L) del altavoz
principal y el otro extremo del cable se conecta a la toma RCA del
tocadiscos. Asegúrese de que en el tocadiscos se haya seleccionado
"Line out". Como alternativa, puede conectar un cable de 3,5 mm para
conectar el altavoz a un dispositivo de audio externo (smartphone,
reproductor MP3, etc.). La conexión RCA del cable se conecta a la
conexión AUX IN (R&L) del altavoz principal y la clavija de 3,5 mm se
conecta al dispositivo de audio.
• Coloque un disco sobre el plato del tocadiscos o inicie la reproducción
de la música a través de su dispositivo de audio externo. Ajuste el
volumen en el altavoz principal.
• Disfrute de la música.
Nota
En ningún caso utilice la función AUX IN del altavoz principal si se ha
congurado el tocadiscos para "Phono Out", pues se reproduciría el sonido
a un volumen muy reducido.
LIMPIEZA Y CUIDADO
32
• Si la supercie del aparato está sucia, lávela con un paño suave o utilice
jabón líquido diluido en agua. Asegúrese de que el aparato se seque
completamente antes de volver a utilizarlo.
• Para limpiar, no utilice toallitas químicas limpiadoras, disolventes o
sustancias similares, pues podrían dañar la supercie del aparato.
Atención: Riesgo de descarga eléctrica
PDesconecte el enchufe antes de limpiar el aparato por motivos
de seguridad.
Page 33

RETIRADA DEL APARATO
Si el aparato lleva adherida la ilustración de la izquierda (el
contenedor de basura tachado) entonces rige la normativa
europea, directiva 2012/19/UE. Estos productos no pueden
depositarse en los contenedores destinados a la basura
común. Infórmese sobre las leyes territoriales que regulan
la recogida separada de aparatos eléctricos y electrónicos.
Guíese por las regulaciones locales y no deseche el aparato
como un residuo doméstico. Una retirada de aparatos
conforme a las leyes contribuye a proteger el medio
ambiente y a las personas a su alrededor frente a posibles
consecuencias perjudiciales para la salud. El reciclaje ayuda
a reducir el consumo de materias primas.
Declaración de conformidad
Fabricante: Chal-Tec GmbH, Wallstraße 16, 10179 Berlín
(Alemania).
Este producto cumple con las siguientes directivas
europeas:
2014/30/UE (EMC)
2014/35/UE (baja tensión)
2011/65/UE (refundición RoHS)
ES
33
Page 34

Page 35

Gentile Cliente,
La ringraziamo per aver acquistato il
dispositivo. La preghiamo di leggere
attentamente le seguenti istruzioni per l’uso
e di seguirle per evitare possibili danni tecnici.
Non ci assumiamo alcuna responsabilità per
danni scaturiti da una mancata osservazione
delle avvertenze di sicurezza e da un uso
improprio del dispositivo. Scansionare il
codice QR seguente, per accedere al manuale
d’uso più attuale e per ricevere informazioni
sul prodotto.
INDICE
Dati tecnici 36
Volume di consegna 36
Avvertenze di sicurezza 37
Descrizione del dispositivo 38
Messa in funzione e utilizzo 39
Aux in 40
Pulizia e manutenzione 40
Smaltimento 41
IT
35
Page 36

IT
DATI TECNICI
Numero articolo 10032939
Alimentazione
Trasformatore
Altoparlanti Sistema a 2 vie
Impedenza 6 Ω
Intervallo di
frequenza
Peso 10,5 kg
Ingresso 100-240 V~ 50/60 Hz
Uscita 15 V / 3 A
70 Hz - 20 kHz
VOLUME DI CONSEGNA
Componente Quantità
Altoparlanti 2
Adattatore 1
Manuale d’uso 1
36
Page 37

AVVERTENZE DI SICUREZZA
• Non esporre il dispositivo a luce solare diretta, vicino a fonti di calore
o in ambienti estremamente caldi. Non posizionare il dispositivo su
amplicatori o altri dispositivi che producono calore e che superano
la temperatura operativa del dispositivo. In caso contrario possono
vericarsi cambi di colore, deformazioni o malfunzionamenti.
• Assicurarsi di lasciare spazio libero suiciente intorno agli altoparlanti,
dato che diventano molto caldi durante il funzionamento e necessitano
di una buona ventilazione. Mantenere la distanza da pareti e altri
dispositivi.
• Ad esempio, se il dispositivo viene posizionato su una mensola, lasciare
almeno 35 cm di spazio sopra e 10 cm di anco. Se manca questo
spazio, è possibile che il calore si accumuli all’interno del dispositivo e
che questo si danneggi.
• Non spostare il dispositivo durante la riproduzione, dato che il disco
gira. Se si sposta il dispositivo durante la riproduzione, è possibile
che risultino danni al disco, alla puntina, all’alloggiamento o all’intero
dispositivo.
IT
37
Page 38

IT
DESCRIZIONE DEL DISPOSITIVO
1 VOLUME Alzare/abbassare il volume
2 FUNCTION Selezionare PHONO o AUX
3 PHONO IN Connessione PHONO, RCA, Stereo
4 AUX IN Connessione a fonti esterne (RCA Stereo)
5 Altoparlante L Connessione altoparlante sinistro
6 DC IN 15 V, 3000 mA
7 Power-LED Spia di accensione
8 GND Messa a terra
9 Power Connessione alla rete elettrica
38
Page 39

MESSA IN FUNZIONE E UTILIZZO
• Collegare il cavo degli altoparlanti passivi con la connessione
dell’altoparlante principale (posizione 5).
• Collegare l’adattatore alla connessione dell’altoparlante principale
(posizione 9) e a una presa elettrica da 100-240 V.
• La spia di accensione si illumina.
• Impostare il volume su un livello basso.
Ingresso Phono
• Posizionare l’interruttore dell’altoparlante principale su “PHONO IN”.
• Utilizzare un doppio cavo RCA per collegare l’altoparlante al giradischi.
Un’estremità del cavo viene collegata alla connessione PHONO IN
(R&L) dell’altoparlante principale e l’altra alla connessione RCA del
giradischi. Assicurarsi che il giradischi sia impostato su “Phono Out”.
• Mettere un disco sul piatto e regolare il volume sull’altoparlante
principale.
• Godetevi la vostra musica.
Avvertenza: non utilizzare la funzione “PHONO IN” dell’altoparlante
principale se sul giradischi è impostato “Line Out”, altrimenti l’altoparlante
potrebbe subire danni.
IT
39
Page 40

IT
AUX IN
• Impostare sull’altoparlante principale “AUX IN”.
• Utilizzare un doppio cavo RCA per collegare l’altoparlante al giradischi.
Un’estremità del cavo viene collegata alla connessione AUX IN (R&L)
dell’altoparlante principale e l’altra alla connessione RCA del giradischi.
Assicurarsi che il giradischi sia impostato su “Line Out”. In alternativa, è
possibile utilizzare un cavo da 3,5 mm per collegare gli altoparlanti con
un dispositivo esterno (smartphone, lettore MP3, ecc.). La connessione
RCA del cavo viene collegata alla connessione AUX IN (R&L)
dell’altoparlante principale e lo spinotto da 3,5 mm con la connessione
del dispositivo esterno.
• Mettere un disco sul piatto e regolare il volume sull’altoparlante
principale.
• Godetevi la vostra musica.
Avvertenza: non utilizzare la funzione AUX IN dell’altoparlante principale se
sul giradischi è impostato “Phono Out”, altrimenti il volume di riproduzione
sarà molto basso.
PULIZIA E MANUTENZIONE
• Se la supercie è sporca, sfregare il dispositivo con un panno morbido
o utilizzare acqua e sapone. Assicurarsi di asciugare completamente il
dispositivo prima di utilizzarlo.
• Non utilizzare panni con detergenti chimici, diluenti o sostanze simili, in
quanto potrebbero rovinare la supercie.
40
Attenzione: pericolo di folgorazione
Per motivi di sicurezza, spegnere il dispositivo e staccare la spina
prima della pulizia.
Page 41

SMALTIMENTO
Se sul prodotto è presente la gura a sinistra (il bidone dei
riuti con le ruote), si applica la direttiva europea 2012/19/
UE. Questi prodotti non possono essere smaltiti con i
riuti normali. Informarsi sulle disposizioni vigenti per la
raccolta di dispositivi elettrici ed elettronici. Attenersi alle
disposizioni vigenti e non smaltire i vecchi dispositivi con i
riuti domestici. Grazie al corretto smaltimento dei vecchi
dispositivi si tutela il pianeta e la salute delle persone da
possibili conseguenze negative. Il riciclo di materiali aiuta a
diminuire il consumo di materie prime.
Dichiarazione di conformità
Produttore: Chal-Tec GmbH, Wallstraße 16, 10179 Berlino.
Questo prodotto è conforme alle seguenti direttive
europee:
2014/30/UE (EMC)
2014/35/UE (LVD)
2011/65/UE (RoHS)
IT
41
Page 42

Page 43

Page 44

 Loading...