


Mobiles PA System mit DVD Player
Mobile PA System with DVD Player
Système PA portable avec lecteur DVD
Sistema de PA móvil con reproductor de DVD
Impianto PA portatile con lettore DVD
10032598
www.auna-multimedia.com


Sehr geehrter Kunde,
wir gratulieren Ihnen zum Erwerb Ihres
Gerätes. Lesen Sie die folgenden Hinweise
sorgfältig durch und befolgen Sie diese,
um möglichen Schäden vorzubeugen. Für
Schäden, die durch Missachtung der Hinweise
und unsachgemäßen Gebrauch entstehen,
übernehmen wir keine Haftung. Scannen Sie
den folgenden QR-Code, um Zugri auf die
aktuellste Bedienungsanleitung und weitere
Informationen rund um das Produkt zu erhalten.
INHALT
Technische Daten 4
Sicherheitshinweise 5
Bedienelemente 7
Bedienung 10
Hinweise zur Entsorgung 14
DE
3

DE
TECHNISCHE DATEN
Artikelnummer
Stromversorgung
Leistungsaufnahme 33 W
Ausgangsleistung max. 20 W x 2
UKW-Frequenzbereich 87,5 - 108 MHz
Anschlüsse
AUX-IN-Eingang
Mikrofoneingang
BT
Reichweite bis zu 10 Meter
Kompatible BT-Prol A2DP
10032598
100-240 V~ 50/60 Hz
3,5 mm
6,3 mm
4

SICHERHEITSHINWEISE
• Lesen Sie vor der Benutzung des Geräts die Bedienungsanleitung.
• Befolgen Sie die Hinweise. Unternehmen Sie alle
Sicherheitsvorkehrungen, um einen Brand oder Stromschlag zu
vermeiden. Reparaturen dürfen nur von einem qualizierten Elektriker
vorgenommen werden.
• Wenn Sie das Gerät zum ersten Mal einschalten, kann ein Geruch
ausströmen. Das ist normal und geht nach einer Zeit vorüber.
• Dieses Gerät enthält stromführende Teile. Önen Sie nicht das
Gehäuse.
• Stellen Sie keine Metallgegenstände oder Flüssigkeiten auf das Gerät.
Dies kann zu einem Stromschlag oder eine Fehlfunktion führen.
• Stellen Sie in der Nähe des Geräts keine Wärmequellen auf wie
Radiatoren usw. Stellen Sie das Gerät nicht auf eine vibrierende Fläche.
• Die Lüftungsönungen nicht abdecken.
• Das Gerät ist nicht für den lang anhaltenden Einsatz geeignet.
• Gehen Sie mit dem Netzkabel vorsichtig um und beschädigen es nicht.
Ein fehlerhaftes oder beschädigtes Netzkabel kann zu einem
• Stromschlag oder einer Fehlfunktion führen.
• Halten Sie beim Ziehen des Netzsteckers immer den Stecker fest
undziehen Sie nicht am Netzkabel.
• Den Netzstecker nicht mit nassen Händen einstecken oder ziehen.
• Wenn der Netzstecker oder das Netzkabel beschädigt sind, müssen sie
von einem qualizierten Elektriker ausgetauscht werden.
• Wenn das Gerät derartig beschädigt ist, dass innere Teile sichtbar sind,
schließen Sie das Gerät nicht an die Stromversorgung an und schalten
• Sie es nicht ein. Wenden Sie sich an einen Kundendienst. Schließen Sie
das Gerät nicht einen Rheostat (Regelwiderstand) oder Dimmer an.
• Das Gerät nicht Regen oder Feuchtigkeit aussetzen. Vermeiden Sie so
eine Brand- oder Stromschlaggefahr..
• Schließen Sie das Gerät an einen geerdeten Anschluss (220 -240 V~ /
10-16 A) an.
• Ziehen Sie den Netzstecker während eines Gewitters oder wenn das
• Gerät für längeren Zeitraum nicht gebraucht wird.
• Wenn das Gerät für längere Zeit nicht gebraucht wird, kann es zu
• Kondensation kommen. Lassen Sie das Gerät sich auf Raumtemperatur
erwärmen, bevor Sie es einschalten. Verwenden Sie das Gerät nie im
feuchten Räumen oder im Freien.
• Zur Vermeidung von Unfällen in Firmen müssen Sie die anwendbaren
Richtlinien und Hinweise befolgen.
• Schalten Sie das Gerät nicht wiederholt ein und aus. Dies verkürzt die
Lebenszeit des Geräts.
• Halten Sie das Gerät außerhalb der Reichweite von Kindern. Lassen Sie
das Gerät nicht unbeaufsichtigt.
• erwenden Sie zur Reinigung der Schalter keine Reinigungssprays.
• Die Rückstände dieser Sprays können zu Ablagerungen von Staubund
DE
5

DE
Fett führen. Holen Sie sich im Fall einer Fehlfunktion Rat bei
Fachpersonal.
• Wenden Sie an den Bedienelementen keine Gewalt an.
• Dieses Gerät verfügt über Lautsprecher, die ein magnetisches Feld
aufbauen. Stellen Sie das Gerät mindestens 60 cm von Computern oder
Fernsehgeräten auf.
• Das Gerät verfügt über einen eingebauten wiederauadbaren Bleiakku.
• Laden Sie den Akku alle 3 Monate auf, wenn Sie das Gerät über längere
• Zeit nicht nutzen. Sonst kann der Akku beschädigt werden.
• Wenn der Akku beschädigt ist, ersetzen Sie ihn durch einen
gleichwertigen. Entsorgen Sie einen beschädigten Akku umweltgerecht.
• Wenn das Gerät heruntergefallen ist, lassen Sie es von einer fachlich
qualifzierten Person überprüfen, bevor Sie es wieder verwenden.
• Verwenden Sie keine chemischen Reiniger, da sie die Oberäche
beschädigen können. Verwenden Sie zur Reinigung ausschließlich ein
Reinigungstuch.
• Halten Sie das Gerät von elektrischen Komponenten fern, die
Interferenzen verursachen können.
• Achten Sie darauf, dass das Netzkabel nicht beschädigt werden kann,
wenn Personen darauf treten. Überprüfen Sie das Netzkabel vor jeder
Benutzung auf Schäden hin.
• Die korrekte Stromversorgung ist 220 V~ / 50 Hz. Sehen Sie nach, ob
die Stromversorgung in Ihrem Haushalt korrekt ist und zum Gerät passt.
• Bewahren Sie die Originalverpackung auf.
6

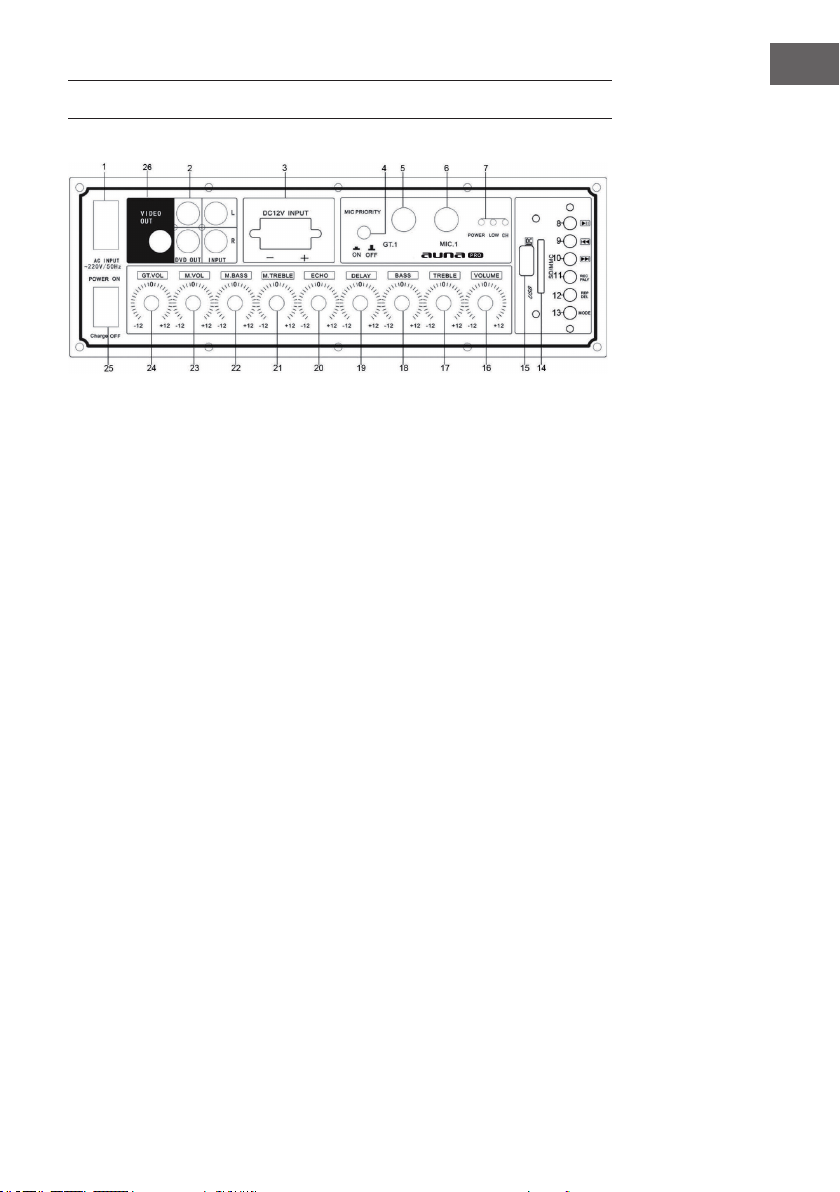
BEDIENELEMENTE
DE
1 Stromeingang
2 AUX-Eingang
3 12-V-Eingang
4 Mikrofon-Priorität
5 Gitarrenanschluss
6 Mikrofonanschluss
7 Anzeige des Ladestands:
voll - geringe Ladung
8 Wiedergabe/Pause
9 Titel zurück
10 Titel vor
11 Aufnahme
12 Wiederholung
13 Modus
14 CD/MMC-Karteneingang
15 USB-Eingang
16 Hauptlautstärke
17 Höhenregler
18 Bassregler
19 Mikrofonverzögerung
20 Musikecho
21 Mikrofon-Höhen
22 Mikrofon-Bass
23 Mikrofon-Hauptlautstärke
24 Gitarrenlautstärke
25 Ein-/Ausschalter
26 Videoausgang
7

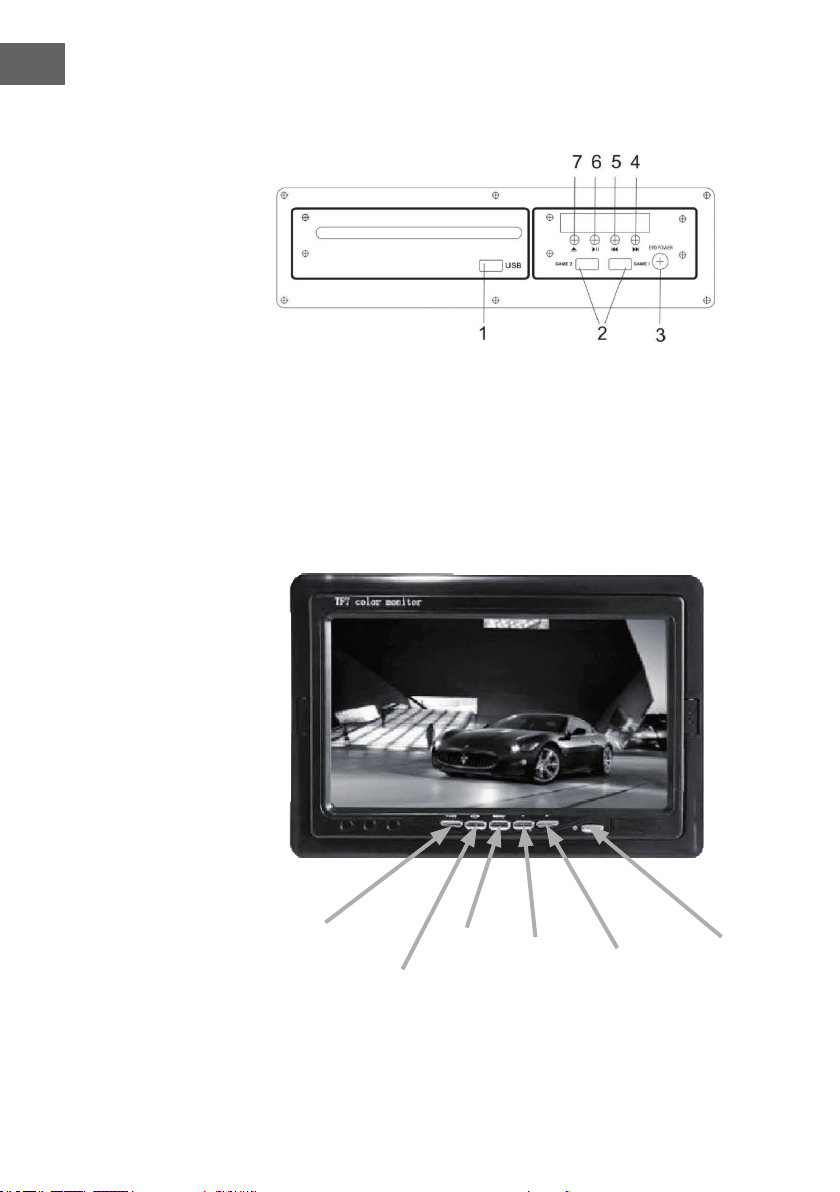
DE
DVD-Bedienfeld
1 USB-Anschluss
2 Spieleanschluss
3 Ein/Aus
4 Titel vor
Display
AV1/AV2-Quelle
U/D/R/L weiterblättern oder
16:9 / 4:3 Format
Menü
5 Titel zurück
6 Wiedergabe/Pause
7 CD-Fach ö nen/schließen
Menü
Menü
Ein/Aus
8
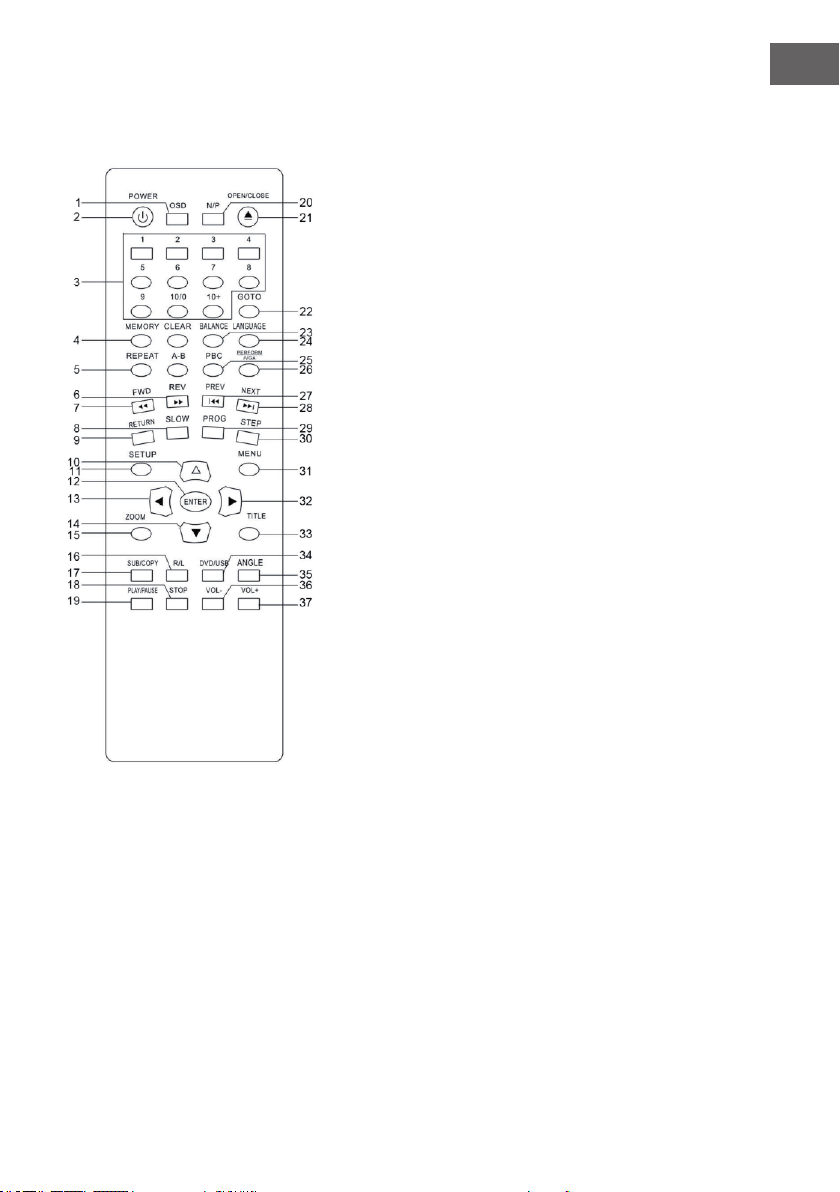
DVD-Fernbedienung
1 OSD - Bedienungsanzeige
2 Ein/Aus-Tasten
3 Zahlenfeld
4 Memory: Disk-/Titelspeicher
5 Wiederholung von Disks und
Titeln
6 vorspulen
7 zurückspulen
8 Langsame Wiedergabe
9 Bestätigen
DE
10 Navigationstaste hoch
11 Einstellungen
12 Bestätigen: Bestägigen der
Bedienung
13 Navigaion links
14 Navigation runter
15 Zoom: Während der Wiedergabe
vergrößern.
16 Navigation nach unten
17 Untertitel/Copy
18 Stopp
19 Wiedergabe/Pause
20 Wechsel zwischen PAL/NTSC/
AUTO
21 Disk-Fach ö nen/schließen
22 GOTO: zu einer Stelle springen
23 Balance, Equalizer, Wahl
verschiedener Sound-E ekte
24 Sprache wählen
25 PBC: Alle Menüs einer DVD ö nen
26 HD/VGA
27 Titel zurück
28 Titel vor
29 Programm zur Wiedergabe erstellen
30 Step: Film schrittweise
wiedergeben.
31 DVD-Menü
32 Navigation rechts
33 Titel: Wiedergabe eines Titels
34 DVD/USB-Wechseltaste
35 Winkel: Wahl zwischen
verschiedener Winkel in einem Film
36 Lautstärke erhöhen
37 Lautstärke senken
9

DE
BEDIENUNG
Ein-/Ausschalten
Den PA-Lautsprecher können Sie verwenden, wenn Sie ihn an die
Netzspannung anschließen oder den internen 12-V-Akku anschließen
1. Schließen Sie das Netzkabel oben am Lautprecher an..
2. Stecken Sie das andere Ende des Netzkabels in eine Steckdose.
3. Betätigen Sie den Netzschalter.
4. Wen der PA-Lautsprecher am Stromnetz angeschlossen ist, schaltet er
sich ein.
Hinweis: Wenn Sie den internen Akku verwenden möchten, schalten Sie
einfach den Akkuschalter auf ON.
Laden des Akkus
Bevor Sie den PA-Lautsprecher das erste Mal verwenden, laden Sie ihn das
erste Mal mindestens 8 Stunden auf.
1. Schließen Sie das Netzkabel oben an der Konsole an.
2. Stellen Sie die Stromzufuhr über den Akku an der Bedienkonsole ab.
3. Die Ladelampe leuchtet, während der Akku lädt.
Hinweise zum Akku: Der interne Akku lädt, während das Gerät in Betrieb
ist und der Ein/Aus-Schalter eingeschaltet ist. Es ist eektiver, den Akku
zu laden, wenn das Gerät ausgeschaltet ist. Nach dem Laden wird wird
automatisch auf Erhaltungsladen umgeschaltet. Lassen Sie das Gerät aber
nicht dauerhaft mit einer Steckdose verbunden. Wenn die Anlage längere
Zeit nicht gebraucht wird, sollte der Akku mindestens alle 30 Tage geladen
werden. Laden Sie den Akku vor und nach jeder Anwendung, um eine
anhaltende Akkuleistung zu erreichen.
Verwendung einer externen Batterie
Um das Gerät länger verwenden zu können besteht die Möglichkeit, eine
externe 12-V-Batterie an das Gerät anzuschließen.
1. Lokalisieren Sie den 12- V-Eingang auf der Oberseite des Geräts.
2. Schließen Sie die Batterie über das richtige Kabel an diesen Anschluss
an.
Hinweis: Das Gerät wird zunächst die interne Batterie verbrauchen.
Wenn die interne Batterie schwach wird, leuchtet die Anzeigeleuchte für
einen niedrigen Batteriestatus auf. Sie können dann die externe Batterie
verwenden. Während der Verwendung wird die externe Batterie ebenfalls
die interne Batterie auaden.
10
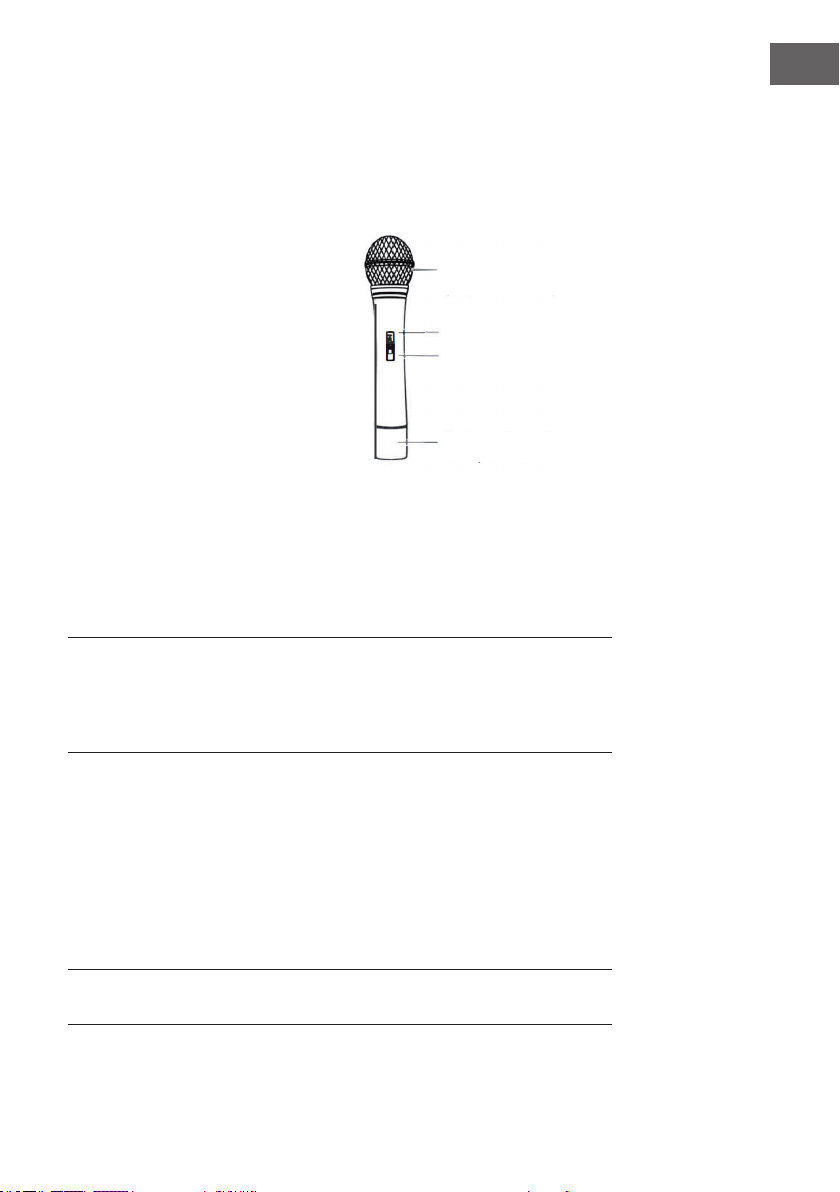
Verwendung des UHF-Funkmikrofons
Der PA-Lautsprecher wird mit Funkmikrofonen geliefert, damit Sie sofort
loslegen können.
1. Schalten Sie das Gerät ein.
2. Schrauben Sie die Mikrofonbasis
ab, um an das Batteriefach zu
gelangen. Legen Sie 2 Batterien
des Typs LR-6 ein. Achten Sie
beim Einsetzen der Batterien auf
die Polarität.
3. Setzen Sie den
Batteriefachdeckel wieder auf.
4. Das Funkmikrofon Mikrofon
blinkt einmal auf und verbindet
sich automatisch mit dem Gerät
und kann, nach dem Verbinden,
sofort verwendet werden. Falls
das Mikrofon nicht blinkt, sollten
Sie überprüfen, ob Sie die
Batterien richtig eingelegt haben
oder ob diese gegebenenfalls
leer sind und ausgetauscht
werden müssen.
5. Passen Sie die Mikrofonlautstärke mit der Taste MIC VOL an.
Mikrofongrill
Mikrofonkapsel innen
Batteriestatusanzeige
Ein/Aus-Schalter
Batteriefachdeckel
DE
Hinweis: Verwenden Sie das Gerät nicht direkt vor dem Gerät und stellen
Sie die Tasten MIC VOL/ ECHO auf eine niedrige Stufe ein, bevor Sie das
Mikrofon einschalten. Eine falsche Bedienung des Mikrofons führt zu
lautem, quietschendem Lärm. Schalten Sie das Mikrofon aus, wenn Sie es
nicht verwenden. Dadurch wird die Lebensdauer der Batterie erhöht
Kabelmikrofon verwenden
Verbinden Sie das Mikrofonkabel mit dem Mikrofonanschluss MIC 1 des
Geräts.
1. Schalten Sie das Gerät aus.
2. Verbinden Sie Ihr Kabelmikrofons mit dem Mikrofonanschluss MIC 1 des
Geräts.
3. Passen Sie die Mikrofonlautstärke durch Drücken der Taste MIC VOL/
ECHO an.
Hinweis: Die können das Kabelmikrofon und das drahtlose Mikrofon zur
gleichen Zeit verwenden.
11

DE
Gitarre anschließen
Sie können eine Gitarre über einen ¼“ Gitarrenanschlussstecker mit dem
Gerät verbinden.
1. Schalten Sie das Gerät ein.
2. Verbinden Sie das Gitarrenkabel mit dem Gitarrenanschluss GUITAR
INPUT.
3. Passen Sie die Lautstärke über die Taste GUITAR VOL an.
USB-/ SD-Karten-Wiedergabe
Sie können Musik von einem USB-Stick oder einer SD-Karte über das Gerät
wiedergeben lassen.
1. Schalten Sie das Gerät ein.
2. Stecken Sie den USB-Stick oder die SD-Karte in den dafür vorgesehenen
Anschluss.
3. Sobald Sie den USB-Stick oder die SD-Karte eingefügt haben, wird das
Gerät die Wiedergabe automatisch starten.
4. Drücken Sie zur Bedienung und Regulierung der Wiedergabe die Tasten
// .
Hinweis: Das Gerät kann die folgenden Audiodateiformate wiedergeben:
MP3, MP4 und WMA. Verwenden Sie nur USB-Sticks/ SD-Karten mit
einer maximalen Speicherkapazität von 32 GB. Das Gerät benötigt einige
Sekunden, um zu antworten, wenn sich viele Dateien auf dem USB-Stick/
der SD-Karte benden.
BT-Wiedergabe
Sie können ein BT-fähiges Smartphone oder andere externe Geräte mit dem
Gerät verbinden.
1. Schalten Sie das Gerät ein.
2. Drücken Sie die Taste INPUT.
3. BT ist aktiviert, wenn Sie zwei aufeinander ertönende Laute hören.
4. Suchen Sie in der Liste verfügbarer BT-Geräte Ihres externen Geräts nach
„DisGo Box“.
5. Verbinden Sie Ihr externes Gerät, indem Sie „DisGo Box“ auswählen.
6. Geben Sie das Passwort „0000“ ein.
7. Wenn Sie nun Musik auf Ihrem externen Gerät abspielen, wird der Ton
via BT über den Gerätelautsprecher wiedergegeben.
8. Sie können die Lautstärke im BT-Modus entweder über die Tasten VOL/
BASS/ TREBLE oder direkt am externen Gerät regulieren.
Hinweis: Wenn im BT-Modus kein Ton zu hören ist, überprüfen Sie sowohl
die Lautstärkeeinstellung des Geräts als auch die Lautstärkeeinstellung des
externen Geräts.
12

Verwendung des Radios
1. Schalten Sie das Gerät ein.
2. Drücken Sie einmal die Taste OK, um Radio auszuwählen.
3. Drücken Sie die Tasten PRE/ NEXT, um den von Ihnen gewünschten
Radiosender auszuwählen. Vergewissern Sie sich, dass Sie die Antenne,
welche sich an der Rückseite des Geräts bendet, komplett ausgefahren
haben. Dadurch wird die bestmögliche Radioqualität und Signalstärke
gewährleistet
4. Drücken Sie bei der ersten Verwendung des Radios zweimal die Taste
NEXT. Dadurch wird ein automatischer Sendersuchlauf gestartet und die
Sender mit dem stärksten Signal werden gespeichert.
DE
13
DE
HINWEISE ZUR ENTSORGUNG
Bendet sich die linke Abbildung (durchgestrichene
Mülltonne auf Rädern) auf dem Produkt, gilt die
Europäische Richtlinie 2012/19/EU. Diese Produkte
dürfen nicht mit dem normalen Hausmüll entsorgt
werden. Informieren Sie sich über die örtlichen
Regelungen zur getrennten Sammlung elektrischer
und elektronischer Gerätschaften. Richten Sie sich nach
den örtlichen Regelungen und entsorgen Sie Altgeräte
nicht über den Hausmüll. Durch die regelkonforme
Entsorgung der Altgeräte werden Umwelt und
die Gesundheit Ihrer Mitmenschen vor möglichen
negativen Konsequenzen geschützt. Materialrecycling
hilft, den Verbrauch von Rohstoen zu verringern.
Das Produkt enthält Batterien, die der Europäischen
Richtlinie 2006/66/EG unterliegen und nicht mit dem
normalen Hausmüll entsorgt werden dürfen. Bitte
informieren Sie sich über die örtlichen Bestimmungen
zur gesonderten Entsorgung von Batterien. Durch
regelkonforme Entsorgung schützen Sie die Umwelt
und die Gesundheit Ihrer Mitmenschen vor negativen
Konsequenzen.
KONFORMITÄTSERKLÄRUNG
Hersteller:
Chal-Tec GmbH, Wallstraße 16, 10179 Berlin,
Deutschland.
Dieses Produkt entspricht den folgenden
Europäischen Richtlinien:
2011/65/EU (RoHS)
2014/53/EU (RED)
Die vollständige Konformitätserklärung des
Herstellers nden Sie unter folgendem Link:
https://use.berlin/10032598
14
Dear Customer,
Congratulations on purchasing this equipment.
Please read this manual carefully and take
care of the following hints to avoid damages.
Any failure caused by ignoring the mentioned
items and cautions mentioned in the instruction
manual are not covered by our warranty and
any liability. Scan the QR code to get access to
the latest user manual and other information
about the product.
CONTENTS
Technical Data 16
Safety Instructions 17
Controls 19
Operation 22
Disposal Considerations 25
EN
15

EN
TECHNICAL DATA
Item number
Power supply
Leistung 300 W
Ausgangsleistung max. 20 #W x 2
UKW-Frequenzbereich 87,5 - 108 MHz
Anschlüsse
AUX-IN-Eingang
Mikrofoneingang
BT
Reichweite bis zu 10 Meter
Kompatible BT-Prol A2DP
10032598
100-240 V~ 50/60 Hz
3,5 mm
6,3 mm
t
16

SAFETY INSTRUCTIONS
• Lesen Sie vor der Benutzung des Geräts die Bedienungsanleitung.
• Read the manual prior to using the product. Take all precautions to
avoid re and/or electrical shock. Repairs must only be carried out by a
qualied technician in order to avoid electrical shock. Keep the manual
for future reference.
• Prior to using the product, please ask advice from a specialist. When the
product is switched on for the rst time, some smell may occur. This is
normal and will disappear after a while.
• The product contains voltage carrying parts. Therefore do NOT open the
housing.
• Do not place metal objects or pour liquids into the product. This may
cause electrical shock and malfunction.
• Do not place the product near heat sources such as radiators, etc.
• Do not place the product on a vibrating surface. Do not cover the
ventilation holes.
• The product is not suitable for continuous use.
• Be careful with the mains lead and do not damage it. A faulty or
damaged mains lead can cause electrical shock and malfunction.
• When unplugging the product from a mains outlet, always pull the plug,
never the lead.
• Do not plug or unplug the product with wet hands.
• If the plug and/or the mains lead are damaged, they need to be
replaced by a qualied technician.
• If the product is damaged to such an extent that internal parts are
visible, do NOT plug the product into a mains outlet and DO NOT
switch the unit on. Contact your dealer. Do NOT connect the product to
a rheostat or dimmer.
• To avoid re and shock hazard, do not expose the product to rain and
moisture.
• All repairs should be carried out by a qualied technician only.
• Connect the product to an earthed mains outlet (220-240 V AC/50 Hz)
protected by a 10-16 A fuse.
• During a thunderstorm or if the product will not be used for a longer
period of time, unplug it from the mains. The rule is: Unplug it from the
mains when not in use.
• If the product has not been used for a longer period of time,
condensation may occur. Let the unit reach room temperature before
you switch it on. Never use the product in humid rooms or outdoors.
• To prevent accidents in companies, you must follow the applicable
guide lines and follow the instructions.
• Do not repeatedly switch the product on and o. This shortens the life
time.
• Keep the product out of the reach of children. Do not leave the product
unattended.
• Do not use cleaning sprays to clean switches. The residues of these
EN
17

EN
sprays cause deposits of dust and grease. In case of malfunction,
always seek advice from a specialist.
• Do not force the controls.
• If this product is with speaker inside which can cause magnetic eld.
• Keep the product at least 60 cm away from computer or TV.
• If the product has built-in lead-acid rechargeable battery. Please
recharge the battery every 3 months if you are not going to use the unit
for a long period of time. Or the battery may be damaged.
• If the battery is damaged please replace with same specications
battery. And dispose the damaged battery environment friendly.
• If the product has fallen, always have it checked by a qualied
technician before you switch the product on again.
• Do not use chemicals to clean the unit. They damage the varnish. Only
clean the product with a dry cloth.
• Keep away from electronic equipment that may cause interference.
• Only use original spares for repairs, otherwise serious damage and/or
dangerous radiation may occur.
• Switch the product o prior to unplugging it from the mains and/ or
other equipment. Unplug all leads and cables prior to moving the
product.
• Make sure that the mains lead cannot be damaged when people walk
on it. Check the mains lead before every use for damages and faults!
• The mains voltage is 220-240 V AC/50 Hz. Check if power outlet match.
• If you travel, make sure that the mains voltage of the country is suitable
for this product.
• Keep the original packing material so that you can transport the product
in safe conditions.
18
CONTROLS
EN
1 AC Power input
2 AUX input/DVD output
3 DC12V input
4 Microhone priority
5 Guitar input
6 Wired microphone input
7 Electric quantity indicating lamp
Full charge/Low power
8 Play/Pause
9 Previous track
10 Next track
11 REC
12 REP
13 MODE
14 SD/MMC card input
15 USB input
16 Main Volume
17 TREBLE Volume
18 BASS Volume
19 Microphone DELAY
20 Music ECHO
21 Microphone TREBLE
22 Microphone BASS Volume
23 Microphone Main volume
24 Guitar Volume
25 Power ON/OF F
26 Video out
19
EN
DVD-Bedienfeld
1 USB slot
2 Game Slot
3 Power ON/OFF
4 Next
Display screen
AV1/AV2 source
U/D/R/L turn over or
16:9 / 4:3 mode
Menu
5 Previous
6 Play /Pat1se
7 Disc Open/Close
Menu
Menu
POWER
20

DVD REMOTE
1. 0SD: Operation situation
display
2.POWER: power in or standby
your DVD player 2
3.1-10.: 10+: Numbers for choose
discs or songs
4.Memory:Memory for disc or
songs
5.Repeat: Repeat for disc or
songs
6.REV:Backforward
7.FWD:Fast forward
8.Slow:Will slow down your
EN
playing
9.Return
10,13,14,32:Four direction controllers
11. Set up: Set up for many pictures
12.Con rm: Con rm for your operation
15.Zoom: Enlarge what you are playing
16.R/L
17 .SUB/COPY
18.Stop:stop the disc playing
19 .Play/pause controllers
20.N/P: PAL/NTSC/AUTO switch
21.0pen/close: Open/Close for DVD
22.GOTO
23.Balance :EQ,choose di erent sound
e ect
24.Languge:Choose to di erent
operation languge
25.PBC: Open all menu for dies
26. Perform/VGA
27 .Prev: Prevous for song or other
playing
28.Next: Next for song or other playing
29. Prog: Make the programmer for
your playing 19
30.Step:Step playing the present videos
or pictures
31.Menu: Menu for the DVD player
33.Title: Press this will playing from title
34.DVD/USB switch
35. Angle: Chooese di erent angles for
visual
36.VOL-: Decrease the volume level
37.VOL +: Increase the voluem level
21

EN
OPERATION
Turning ON/OFF
The PA speaker can be powered when connected to main power
or using the internal 12V battery.
1. Connect the power cable to the top of the unit.
2. Connect the other end of power cable to main power.
3. Turn on tl1e switch for the main power.
4. The unit will a11tomatically power on when connected to mam power.
Notes: If you wish to use the i11ternal battery power of the unit, just simply
turn on the Battery switch located on the top of unit to ON.
Charging the Battery
Before usiNg the PA speaker for the rst time, charge the unit at least 8
hours.
1. Connect the power cable to the top of the panel.
2. Turn o the battery switch on the top of the panel.
3. Recharge indicator light will be on when unit is charging.
Notes: The internal battery will charge while tl1e unit is being operated
and the power switch is on. It is better to charge the unit while the power
switch is o. The batty will be charged automatically as soon as the device
is connected to power. After recharging, the device switches to trickle
charging. However, do not leave the device constantly connected to a
socket. Turning o the device via remote control switches it to standby
mode, which consumes more power than switching it completely o at the
panel of the appliance. Charge the battery before and after each usage for a
lasting battery performance.
22
Use of the External Battery Option
To use the PA speaker longer than the internal battery life, you can connect
the PA speaker to a external 12V Battery Source.
1. Find the INPUT DC 12V on the top control pallel.
2. Use the correct cable co1mect the INPUT DC 12V.
NOTES: The PA speaker will consume the inter11al battery rst, when it is
low, the LOW BATTERY indicator light located on the control panel will turn
011, you can use the external 12V battery to power on the unit. The external
12V battery will also charge the internal battery while in use.

Using the Wireless UHF Microphone
The PA speaker comes with wireless microphones to get you started straight
out of the box.
1. Tune on the unit.
2. Unscrew the bottom of the microphone to access the battery enclosure.
Insert 2XAA batteries into the
microphone. Take note the battery
polarity when inserting the batteries.
3. Replace the botton microphone cover.
4. The wireless microphone will ash
once and automatically pair with the
PA speaker, it is ready to use. If it
does not ash, check that you have
inserted the batteries correctly or
replace old batteries.
5. Adjust the volume of the microphone
by turning the MIC VOL knob located
011 top control pa11el
Notes: Please do not operate the
microphone directly in front of the PA speaker, please set the MIC VOL/
ECHO at a lower level before turning on the wireless microphone.
Operating the microphone incorrectly will cause a loud squealing noise.
Please turn o the power switch when the wireless microphone
is not in use. This will save the battery.
EN
Using the Wired Microphone
You can connect the wired microphone to this unit using the MIC
INPUT located on the top of control panel.
1. Turn o the unit.
2. Connect your wired microphone to the MIC INPUT located ontop of the
control panel.
3. Adjust the microphone volume by tuning the MIC VOL/ECHO knobs
located on top control panel.
NOTES: You can use the wired microphone and wireless microphone at the
same time.
Connecting a Guitar
You can connect your· guitar to unit using the 1/4'' GUITAR INPUT plug.
1. Turn on the unit.
2. Connect your guitar cable to GUITAR INPU.T port on top control panel.
23

EN
3. Adjust the volume by turning the GUITAR VOL on top control panel.
USB/SD Card Playback
You can play music from USB stick or SD Card using the USB/SD slot on the
PA speaker. .Turn on the unit.
1. Insert your USB or SD card into the slot.
2. Once inserted the USB or SD card unit will automatically play.
3. You can 11se tl1e PRE/NEXT/PL AY /PAUSE to control and play music.
NOTES: The speaker system can play the following audio le formats: MP3,
MP4, WMA.The USB/SD Card no more than 32GB. Operation may be slower
when searching large memory les. It will need several seconds to respond
when your USB/SD Card full of contents.
BT playback
You can connect your BT phone or other device to the PA speaker.
1. Turn on the unit.
2. Press the INPUT button which is located on top control panel, next to the
USB/SD slot.
3. The BT is on when you hear two ''tone'' indicator sound.
4. Use your BT phone or other device to search for the PA speaker. It will
displayed as DisGo Box.
5. Connect your device by selecting "DisGo Box".
6. Enter the code and connect with unit.
7. Play m11sic on your phone or device, sound will come from th speaker
through the BT wireless connection.
8. You can use the VOLUME/BASS/TREBLE to adjust the sound level for BT,
also you can adjust the BT music sound through your own phone or other
device.
NOTES: If there is no sound through the PA speaker during BT, check the
volume controller,· both on the unit and on your phone or other device.
24
Using the Radio
1. Turn on the unit.
2. Press INPUT once, to select FM Radio.
3. Press PRE/NEXT to select your desired radio station. Ensure that you
have the extended the antenna located on the rear of the speaker. It will
ensure the best possible radio quality and signal strength.
4. When you rst use the radio, press NEXT button twice, it will auto search
and store the radio statio11s with the strongest signal.

DISPOSAL CONSIDERATIONS
According to the European waste regulation 2012/19/
EU this symbol on the product or on its packaging
indicates that this product may not be treated as
household waste. Instead it should be taken to the
appropriate collection point for the recycling of
electrical and electronic equipment. By ensuring this
product is disposed of correctly, you will help prevent
potential negative consequences for the environment
and human health, which could otherwise be caused by
inappropriate waste handling of this product. For more
detailed information about recycling of this product,
please contact your local council or your household
waste disposal service..
Your product contains batteries covered by the
European Directive. 2006/66/EC, which cannot be
disposed of with normal household waste. Please
check local rules on separate collection of batteries.
The correct disposal of batteries helps prevent
potentially negative consequences on the environment
and human health.
DECLARATION OF CONFORMITY
EN
Producer:
Chal-Tec GmbH, Wallstraße 16, 10179 Berlin, Germany.
This product is conform to the following European
Directives:
2011/65/EU (RoHS)
2014/53/EU (RED)
The complete declaration of conformity of the
manufacturer can be found at the following link:
https://use.berlin/10032598
25

FR
Chère cliente, cher client,,
Toutes nos félicitations pour l’acquisition de ce
nouvel appareil. Veuillez lire attentivement et
respecter les instructions de ce mode d’emploi
an d’éviter d’éventuels dommages. Nous ne
saurions être tenus pour responsables des
dommages dus au non-respect des consignes
et à la mauvaise utilisation de l’appareil.
Scannez le QR-Code pour accéder à la dernière
version du mode d'emploi et à d'autres
informations concernant le produit.
SOMMAIRE
Fiche technique 30
Consignes de sécurité 31
Éléments de commande 33
Utilisation 36
Informations sur le recyclage 40
26

FICHE TECHNIQUE
Numéro d'article 10032598
Alimentation
Puissance consommée 33 W
Puissance de sortie max. 20 W x 2
Gamme de fréquence FM 87,5 - 108 MHz
Connexions
Entrée AUX-IN
entrée de micro
BT
Portée bis zu 10 Meter
Prol BT compatible A2DP
100-240 V~ 50/60 Hz
3,5 mm
6,3 mm
FR
27

FR
CONSIGNES DE SÉCURITÉ
• Lisez le mode d'emploi avant d'utiliser l'appareil.
• Suivez les instructions. Prenez toutes les précautions de sécurité pour
éviter un incendie ou un choc électrique. Les réparations ne peuvent
être eectuées que par un électricien qualié.
• Lorsque vous allumez l'appareil pour la première fois, il peut se dégager
une odeur. C'est normal et disparaît rapidement.
• Cet appareil contient des éléments conducteurs. N'ouvrez pas le boîtier.
• Ne placez pas d'objets métalliques ou de liquides sur l'appareil. Cela
peut entraîner un choc électrique ou un dysfonctionnement.
• Ne placez pas de sources de chaleur à proximité de l'appareil, telles que
des radiateurs, etc. Ne placez pas l'appareil sur une surface vibrante.
• Ne recouvrez pas les ouvertures de ventilation.
• L'appareil n'est pas conçu pour être utilisé de façon continue sur une
longue période.
• Soyez prudent avec le câble d'alimentation et ne l'endommagez pas.
Un câble d'alimentation défectueux ou endommagé peut provoquer un
choc électrique ou dysfonctionnement.
• Tenez toujours le corps de la che pour débrancher le câble
d'alimentation et ne tirez pas sur le câble lui-même.
• Ne branchez ou débranchez pas le câble d'alimentation avec les mains
mouillées.
• Si la che ou le cordon d'alimentation sont endommagés, faites-les
remplacer par un électricien qualié.
• Si l'appareil est endommagé et que les pièces internes sont visibles, ne
connectez pas l'appareil à l'alimentation et ne l'allumez pas.
• Ne l'utilisez pas. Contactez un service client. Ne connectez pas l'appareil
à un rhéostat ou à un gradateur.
• N'exposez pas l'appareil à la pluie ou à l'humidité, pour éviter le risque
d'incendie ou de choc électrique.
• Connectez l'appareil à une prise reliée à la terre (220-240V ~ / 10-16A).
• Débranchez la che en cas d'orage ou en cas de non utilisation
prolongée.
• Si l'appareil n'est pas utilisé pendant une longue période, il peut se
former de la condensation vient. Laissez l'appareil se réchauer à
température ambiante avant de l'allumer. N'utilisez jamais l'appareil
dans une pièce humide ou à l'extérieur.
• Pour éviter les accidents dans les entreprises, vous devez suivre les
directives et instructions applicables.
• Ne pas allumer et éteindre l'appareil plusieurs fois. Cela raccourcit la
durée de vie de l'appareil.
• Gardez l'appareil hors de portée des enfants. Ne le laissez pas sans
surveillance.
• N'utilisez pas de sprays pour nettoyer les interrupteurs.
28

• Les résidus de ces sprays peuvent entraîner des dépôts de poussière
et de graisse. En cas de dysfonctionnement, demandez conseil à un
personnel qualié.
• Ne forcez pas sur les commandes.
• Les enceintes de cet appareil créent un champ magnétique. Placez
l'appareil à au moins 60 cm des ordinateurs ou des téléviseurs.
• L'appareil est équipé d'une batterie au plomb-acide intégrée et
rechargeable.
• Chargez la batterie tous les 3 mois si vous n'utilisez pas l'appareil
pendant une longue période. Sinon, la batterie pourrait être
endommagée.
• Si la batterie est endommagée, remplacez-la par une batterie
équivalente. Débarrassez-vous d'une batterie endommagée de manière
écologique.
• Si l'appareil a fait une chute, faites-le vérier par une personne qualiée
avant de l'utiliser à nouveau.
• N'utilisez pas de produits chimiques car ils peuvent endommager la
surface. Utilisez uniquement un chion pour le nettoyage.
• Tenez l'appareil à l'écart des composants électriques susceptibles de
provoquer des interférences.
• Veillez à ne pas endommager le câble d'alimentation en marchant
dessus. Vériez le bon état du câble d'alimentation avant chaque
utilisation.
• L'alimentation correcte est de 220 V ~ / 50 Hz. Vériez que
l'alimentation de votre maison correspond bien à celle de l'appareil.
• Conserver l'emballage d'origine.
FR
29

FR
ÉLÉMENTS DE COMMANDE
1 Alimentation
2 Entrée AUX
3 Entrée 12 V
4 Priorité micro
5 Prise de la guitare
6 Prise du micro
7 A ichage du niveau de batterie :
pleine – niveau faible
8 Lecture / Pause
9 Titre précédent
10 Titre suivant
11 Enregistrement
12 Répétition
13 Mode
14 Lecteur CD / cartes MMC
15 Port USB
16 Volume principal
17 Réglage des aigus
18 Réglage des basses
19 Distorsion du micro
20 Echo
21 Aigus du micro
22 Basses du micro
23 Volume principal du micro
24 Volume de la guitare
25 Marche / arrêt
26 Sortie Vidéo
30

Panneau de commande DVD
FR
1 Port USB
2 Port des jeux
3 Marche/arrêt
4 Suivant
Écran
Source AV1 AV2
Parcourir vers H/B/D/G
ou format 16:9 ou 4:3
Menu
5 Précédent
6 Lecture / pause
7 Ouvrir/fermer le tiroir CD
Menu
Menu
Marche /
arrêt
31

FR
Télécommande DVD
1 Voyant d'utilisation OSD
2 Touches marche/arrêt
3 Pavé numérique
4 Mémoire : enregistrement de
disque / titre
5 Répétition de disques et de
titres
6 Parcourir vers l'avant
7 Parcourir en arrière
8 Lecture au ralenti
9 Con rmer
10 Touche de navigation haut
11 Paramètres
12 Con rmer : con rmation de
l'utilisation
13 Navigation gauche
14 Navigation bas
15 Zoom : agrandir pendant la lecture
16 Navigation vers le bas
17 Sous-titre / copie
18 Stop
19 Lecture / Pause
20 Basculer entre PAL/NTSC/AUTO
21 Ouvrir/fermer le tiroir à CD
22 GOTO : aller vers un emplacement
23 Balance, égaliseur, choix de
di érents e ets sonores
24 Choix de la langue
25 PBC : ouvrir tous les menus d'un
DVD
26 HD/VGA
27 Titre précédent
28 Titre suivant
29 Créer un programme de lecture
30 Step : lecture pas à pas d'un lm
31 Menu DVD
32 Navigation droite
33 Titre : lecture d'un titre
34 Basculer entre DVD/USB
35 Angle : choix de di érents angles de
vue dans un lm
36 Augmenter le volume
37 Réduire le volume
32

UTILISATION
Allumer/Eteindre
Vous pouvez utiliser l'enceinte PA en la branchant sur le secteur ou en
branchant la batterie interne 12 V.
1. Branchez le câble d'alimentation sur le haut du haut-parleur.
2. Branchez l'autre extrémité du câble d'alimentation dans une prise.
3. Appuyez sur l'interrupteur d'alimentation.
4. Lorsque l'enceinte PA est connectée au secteur, elle s'allume.
Remarque : Si vous voulez utiliser la batterie interne, il suit d'activer le
commutateur de batterie (ON).
Chargement de la batterie
Avant d'utiliser l'enceinte de sonorisation pour la première fois, chargez la
batterie pendant au moins 8 heures.
1. Branchez le câble d'alimentation sur le haut de la console.
2. Éteignez l'alimentation de la batterie sur le panneau de commande.
3. Le témoin de charge s'allume pendant le chargement de la batterie.
Remarques concernant la batterie : La batterie interne se charge lorsque
l'appareil est en marche et que l'interrupteur marche/arrêt est activé. Il est
plus eicace de charger la batterie lorsque l'appareil est éteint. Après le
chargement, la batterie bascule automatiquement en mode de maintien
de charge. Ne laissez pas l'appareil connecté en permanence à une prise
de courant. Si le système n'est pas utilisé pendant une longue période, la
batterie doit être chargée au moins tous les 30 jours. Chargez la batterie
avant et après chaque utilisation pour maintenir la vie de la batterie.
FR
Utilisation d'une batterie externe
Pour utiliser l'appareil plus longtemps, il est possible de connecter une
batterie externe de 12 V à l'appareil.
1. Localisez l'entrée 12V sur le dessus de l'appareil.
2. Connectez la batterie à ce connecteur avec le bon câble.
Remarque : L'appareil utilise d'abord la batterie interne. Lorsque la batterie
interne faiblit, le témoin de batterie faible s'allume. Vous pouvez ensuite
utiliser la batterie externe. Pendant l'utilisation, la batterie externe chargera
également la batterie interne.
33

FR
Utilisation du micro sans fi l UHF
L'enceinte de sonorisation est livrée avec des micros sans l pour que vous
puissiez démarrer tout de suite.
1. Allumez l'appareil.
2. Dévissez la base du micro pour
accéder au compartiment des
piles. Insérez deux piles LR6.
Veuillez à respecter les polarités.
3. Remettez en place le cache du
compartiment des piles.
4. Le micro sans l clignote
une fois et se connecte
automatiquement à l'appareil
puis est immédiatement prêt à
l'emploi. Si le micro ne clignote
pas, véri ez que vous avez bien
installé les piles dans le bon
sens, et qu'elles ne sont pas
usées, auquel cas changez-les.
5. Ajustez le volume du micro avec
la touche MIC VOL.
Remarque : n'utilisez pas le micro juste devant l'appareil et réglez les
touches MIC VOL et ECHO à un faible volume avant d'allumer le micro.
Une mauvaise utilisation du micro provoque des bruits stridents et forts.
Eteignez le micro lorsque vous ne l'utilisez pas. Vous préserverez ainsi la
durée de vie des piles.
Grille du micro
Capsule du micro à
l'intérieur
Niveau des piles
On/O
Couvercle du
compartiment des
piles
34
Utilisation d'un micro fi laire
Branchez le câble du micro dans la prise micro MIC1 de l'appareil.
1. Eteignez l'appareil.
2. Connectez votre microphone câble au connecteur microphone MIC 1 de
l'appareil.
3. Réglez le volume du microphone en appuyant sur le bouton MIC VOL/
ECHO.
Remarque : Vous pouvez utiliser le microphone laire et le microphone sans
l en même temps.

Branchement d'une guitare
Vous pouvez connecter une guitare à l'appareil via un connecteur de guitare
¼ ".
1. Allumez l'appareil.
2. Utilisez le câble de guitare avec la prise de guitare GUITAR INPUT.
3. Ajustez le volume avec la touche GUITAR VOL.
Lecture sur port USB / lecteur de cartes SD
Vous pouvez lire de la musique à partir d'un lecteur ash USB ou d'une carte
SD sur l'appareil..
1. Allumez l'appareil.
2. Branchez la clé USB ou la carte SD dans le port approprié.
3. Dès que vous insérez la clé USB ou la carte SD, l'appareil démarre
automatiquement la lecture.
4. Pour contrôler et régler la lecture, appuyez sur les touches // .
Remarque: L'appareil peut lire les formats de chiers audio suivants: MP3,
MP4 et WMA. N'utilisez que des clés USB / cartes SD d'une capacité de
stockage maximale de 32 Go. L'appareil prend quelques secondes pour
répondre s'il y a beaucoup de chiers sur la clé USB / carte SD.
Lecture BT
Vous pouvez connecter un smartphone compatible BT ou un autre
périphérique externe à l'appareil.
FR
1. Allumez l'appareil.
2. Appuyez sur le bouton INPUT.
3. BT est activé lorsque vous entendez deux sons consécutifs.
4. Recherchez "DisGo Box" dans la liste des appareils BT disponibles sur
votre appareil externe.
5. Connectez votre périphérique externe en sélectionnant "DisGo Box".
6. Entrez le mot de passe "0000".
7. Si vous lisez de la musique sur votre appareil externe, le son sera diusé
via BT sur l'enceinte de l'appareil.
8. Vous pouvez régler le volume en mode BT soit via les touches VOL/
BASS/TREBLE ou directement sur l'appareil externe.
9. Remarque : S'il n'y a pas de son en mode BT, vériez à la fois le réglage
du volume de l'unité et le réglage du volume de l'unité externe.
Remarque : S'il n'y a pas de son en mode BT, vériez à la fois le réglage du
volume de l'unité et le réglage du volume de l'unité externe.
35

FR
Utilisation de la radio
1. Allumez l'appareil.
2. Appuyez une fois sur la touche OK pour sélectionner Radio.
3. Appuyez sur les touches PRE/NEXT pour sélectionner la station de radio
souhaitée. Assurez-vous que vous avez complètement déployé l'antenne
située à l'arrière de l'unité. Cela garantit la meilleure qualité radio et la
meilleure puissance du signal.
4. Lorsque vous utilisez la radio pour la première fois, appuyez deux fois sur
le bouton NEXT. Ceci démarre une recherche automatique de station et
stocke les stations avec le meilleur signal.
36

INFORMATIONS SUR LE RECYCLAGE
Vous trouverez sur le produit l’image ci-contre
(une poubelle sur roues, barrée d‘une croix), ce qui
indique que le produit se trouve soumis à la directive
européenne 2012/19/UE. Renseignez-vous sur les
dispositions en vigueur dans votre région concernant
la collecte séparée des appareils électriques et
électroniques. Respectez-les et ne jetez pas les
appareils usagés avec les ordures ménagères. La mise
en rebut correcte du produit usagé permet de préserver
l’environnement et la santé. Le recyclage des matériaux
contribue à la préservation des ressources naturelles.
Ce produit contient des piles qui sont soumises à
la directive européenne 2006/66/CE selon laquelle
elles ne doivent pas être éliminées avec les ordures
ménagères. Renseignez-vous sur les dispositions en
vigueur concernant la mise en rebut séparée des piles.
La mise en rebut correcte du produit usagé permet de
préserver l’environnement et la santé.
DÉCLARATION DE CONFORMITÉ
FR
Fabricant :
Chal-Tec GmbH, Wallstraße 16, 10179 Berlin,
Allemagne.
Ce produit est conforme aux directives
européennes suivantes :
2011/65/UE (RoHS)
2014/53/UE (RED)
La déclaration complète de conformité du fabricant
est accessible par le lien suivant :
https://use.berlin/10032598
37

ES
Estimado cliente:
Le felicitamos por la adquisición de este
producto. Lea atentamente el siguiente manual
y siga cuidadosamente las instrucciones de uso
con el n de evitar posibles daños. La empresa
no se responsabiliza de los daños ocasionados
por un uso indebido del producto o por haber
desatendido las indicaciones de seguridad.
Escanee el siguiente código QR para tener
acceso al manual de instrucciones más
actualizado y a información adicional sobre el
producto.
ÍNDICE
Datos técnicos 42
Indicaciones de seguridad 43
Elementos de control 45
Utilización 48
Indicaciones para la retirada del aparato 52
38

DATOS TÉCNICOS
ES
Número de artículo
Suministro eléctrico
Consumo 33 W
Potencia de salida max. 20 W x 2
Rango de frecuencia FM 87,5 - 108 MHz
Conexiones
Entrada AUX-IN
Entrada del micrófono
BT
Alcance hasta 10 metros
Perl BT compatible A2DP
10032598
100-240 V~ 50/60 Hz
3,5 mm
6,3 mm
39

ES
INDICACIONES DE SEGURIDAD
• Antes de utilizar el aparato, lea el manual de instrucciones.
• Siga las indicaciones. Siga todas las disposiciones de seguridad para
evitar un incendio o una descarga eléctrica. Las reparaciones solo
podrán ser realizadas por un electricista cualicado.
• Si enciende el aparato por primera vez, puede generarse un poco de
olor. Se trata de un fenómeno normal que desaparecerá con el tiempo.
• Este aparato contiene componentes conductores de tensión. No abra la
carcasa.
• No coloque objetos metálicos ni líquidos encima del aparato. Esto
puede provocar una descarga eléctrica o una avería.
• No coloque fuentes de calor, como radiadores, cerca del aparato. No
someta el aparato a supercies vibratorias.
• No cubra los oricios de ventilación.
• El aparato no es apto para un uso permanente.
• Manipule el cable de alimentación con cuidado y no lo dañe. Un cable
de alimentación en mal estado o averiado puede provocar una avería o
una descarga eléctrica.
• A la hora de desconectar el aparato, tire siempre del enchufe y nunca
del cable de alimentación.
• No conecte ni desconecte el enchufe con las manos mojadas.
• Si el cable de alimentación o el enchufe están dañados, deberán ser
sustituidos por un electricista cualicado.
• Si el aparato se avería y las piezas interiores quedan visibles, no lo
conecte al suministro eléctrico ni lo encienda. Contacte con el servicio
de atención al cliente. No conecte el aparato con un termostato o un
regulador ni atenuador.
• No exponga el aparato a la lluvia o a la humedad. Así evitará el riesgo
de incendio o de descarga eléctrica.
• Conecte el aparato a una toma de corriente con toma de tierra (220
-240 V~ /10-16 A).
• Desconecte el enchufe durante una tormenta o si el aparato no se ha
utilizado durante mucho tiempo.
• Si el aparato no se ha utilizado durante mucho tiempo, puede formarse
condensación.
• Deje que el aparato se caliente a temperatura ambiente antes de
encenderlo. Nunca utilice el aparato en espacios húmedos ni al aire
libre.
• Para evitar accidentes en empresas, deben seguirse las directrices e
indicaciones de uso.
• No apague y encienda el aparato repetidamente. Esto acorta la vida útil
del aparato.
• Mantenga el aparato fuera del alcance de los niños. No deje el aparato
sin supervisión.
• Para limpiar el interruptor, no utilice sprays limpiadores.
• Los restos de este spray pueden provocar acumulaciones de polvo y
40

grasa. En caso de una avería, pida asesoramiento a personal cualicado.
• No ejerza violencia sobre los elementos de control.
• Este aparato dispone de un altavoz que genera un campo magnético.
Coloque el aparato a un mínimo de 60 cm de ordenadores o televisores.
• El aparato dispone de una batería integrada recargable.
• Cargue la batería cada 3 meses si no utiliza el aparato durante un
periodo de tiempo prolongado. De lo contrario, la batería podría
dañarse.
• Si la batería está dañada, sustitúyala por una del mismo valor. Deseche
la batería dañada de un modo respetuoso para el medioambiente.
• Si el aparato se ha caído, deje que lo examine una persona cualicada
antes de volver a usarlo.
• No utilice limpiadores químicos, pues pueden dañar la supercie. Para
la limpieza, utilice exclusivamente un paño de limpieza.
• Mantenga el aparato alejado de componentes eléctricos que puedan
provocar interferencias.
• Asegúrese de que el cable de alimentación no se pueda dañar cuando
las personas lo pisen. Compruebe que el cable de alimentación no
presente daños antes de cada uso.
• El suministro eléctrico correcto es de 220 V~ / 50 Hz. Compruebe que el
suministro eléctrico de su hogar coincida con la tensión del aparato.
• Conserve el embalaje original.
ES
41

ES
ELEMENTOS DE CONTROL
1 Toma del suministro eléctrico
2 Entrada AUX
3 Entrada 12 V
4 Prioridad micrófono
5 Conexión de guitarra
6 Conexión de micrófono
7 Indicación del nivel de carga:
carga completa/baja
8 Reproducción/pausa
9 Pista anterior
10 Pista siguiente
11 Grabación
12 Repetición
13 Modo
14 Ranura para tarjeta CD/MMC
15 Entrada USB
16 Altavoz principal
17 Regulador de agudos
18 Regulador de graves
19 Reverberación del micrófono
20 Eco de música
21 Agudos del micrófono
22 Graves del micrófono
23 Volumen principal del micrófono
24 Volumen de la guitarra
25 Interruptor on/o
26 Salida de vídeo
42

Panel de control DVD
ES
1 Conexión USB
2 Conexión
3 On/o
4 Pista siguiente
Display
Fuente AV1/AV2
Navegar arriba/ abajo/ izda./
dcha. o formato 16:9/ 4:3
Menú
5 Pista anterior
6 Reproducción/pausa
7 Abrir/cerrar compartimento del
CD
Menú
Menú
On/o
43

ES
DVD-Fernbedienung
1 OSD - Bedienungsanzeige
2 Ein/Aus-Tasten
3 Zahlenfeld
4 Memory: Disk-/Titelspeicher
5 Wiederholung von Disks und
Titeln
6 vorspulen
7 zurückspulen
8 Langsame Wiedergabe
9 Bestätigen
10 Navigationstaste hoch
11 Einstellungen
12 Bestätigen: Bestägigen der
Bedienung
13 Navigaion links
14 Navigation runter
15 Zoom: Während der Wiedergabe
vergrößern.
16 Navigation nach unten
17 Untertitel/Copy
18 Stopp
19 Wiedergabe/Pause
20 Wechsel zwischen PAL/NTSC/
AUTO
21 Disk-Fach ö nen/schließen
22 GOTO: zu einer Stelle springen
23 Balance, Equalizer, Wahl
verschiedener Sound-E ekte
24 Sprache wählen
25 PBC: Alle Menüs einer DVD ö nen
26 HD/VGA
27 Titel zurück
28 Titel vor
29 Programm zur Wiedergabe erstellen
30 Step: Film schrittweise
wiedergeben.
31 DVD-Menü
32 Navigation rechts
33 Titel: Wiedergabe eines Titels
34 DVD/USB-Wechseltaste
35 Winkel: Wahl zwischen
verschiedener Winkel in einem Film
36 Lautstärke erhöhen
37 Lautstärke senken
44

UTILIZACIÓN
Encender / apagar
El altavoz PA puede utilizarse al conectarlo a una tensión de red o a una
batería interna de 12 V.
1. Conecte el cable de alimentación a la parte superior del altavoz.
2. Conecte el otro extremo de cable a una toma de corriente.
3. Pulse el interruptor de red.
4. Si el altavoz PA está conectado a la red eléctrica, se encenderá.
Nota: Si desea utilizar la batería interna, coloque el interruptor de la batería
en la posición ON.
Carga de la batería
Antes de utilizar el altavoz PA por primera vez, cárguelo durante al menos 8
horas.
1. Conecte el cable de alimentación a la parte superior de la consola.
2. Desconecte el interruptor de suministro de la batería situado en el panel
de control.
3. El indicador de carga se ilumina mientras la batería se carga.
Indicaciones sobre la batería: La batería interna se carga mientras el
aparato esté en funcionamiento y el interruptor on/o esté activado. Es
más efectivo cargar la batería con el aparato apagado. Tras la carga, el
aparato cambiará automáticamente a una carga de mantenimiento. No
deje el aparato conectado demasiado tiempo a una toma de corriente. Si
el dispositivo no se utiliza en un periodo prolongado de tiempo, la batería
deberá cargarse al menos cada 30 días. Cargue la batería antes y después
de cada uso para obtener una potencia de la batería permanente.
ES
Uso de una batería externa
Para utilizar el aparato durante más tiempo, puede conectar una batería
externa de 12 V al aparato.
1. Localice la entrada de 12 V situada en la parte superior del aparato.
2. Conecte la batería mediante el cable correcto a esta conexión.
Nota: El aparato consumirá primero la batería interna. Cuando la batería
interna se agote, se ilumina el indicador luminoso de estado bajo de la
misma. Entonces podrá utilizar la batería externa. Durante el uso, la batería
externa cargará también la batería interna.
45

ES
Uso del micrófono UHF
El altavoz de PA se entrega con un micrófono inalámbrico para que pueda
comenzar enseguida.
1. Encienda el aparato
2. Desatornille la base del
micrófono para acceder al
compartimento de las pilas.
Introduzca 2 pilas del tipo LR6.
Recuerde introducirlas en la
polaridad correcta.
3. Coloque de nuevo la tapa del
compartimento de las pilas.
4. El micrófono inalámbrico
parpadea una vez y se conecta
automáticamente al aparato y
puede utilizarse inmediatamente
después de la conexión. Si el
micrófono no parpadea, debe
comprobar si ha introducido las
pilas correctamente y si están
vacías, deberá sustituirlas.
5. Ajuste el volumen del micrófono
con el botón MIC VOL.
Nota: no utilice el aparato justo delante del aparato y ajuste con los botones
MIC VOL/ECHO a un nivel inferior antes de encender el aparato. Un uso
incorrecto del micrófono puede provocar ruidos altos y molestos. Apague el
micrófono cuando no lo use. Así aumentará la vida útil de las pilas.
Rejilla del micrófono
Cápsula en el interior
Indicador estado pilas
Interruptor on/o
Tapa compartimento pilas
46
Utilizar el micrófono con cable
Conecte el micrófono con cable al conector MIC1 del aparato.
1. Apague el aparato.
2. Conecte el micrófono con cable a la toma MIC1 del aparato.
3. Ajuste el volumen pulsando el botón MIC VOL/ECHO.
Nota: puede utilizar simultáneamente un micrófono inalámbrico y un
micrófono con cable.

Conectar una guitarra
Puede conectar una guitarra mediante un conector de guitarra de 1/4".
1. Encienda el aparato.
2. Conecte el cable de la guitarra a su conector GUITAR INPUT.
3. Ajuste el volumen mediante el botón GUITAR VOL.
Reproducción de USB/tarjetas SD
Puede reproducir música de una memoria USB o de una tarjeta SD a través
del aparato.
1. Encienda el aparato.
2. Conecte la memoria USB o la tarjeta SD a la conexión prevista.
3. En cuanto la memoria USB o la tarjeta SD se introduzcan, el aparato
iniciará automáticamente la reproducción.
4. Para controlar y regular la reproducción, pulse los botones // .
Nota: El aparato puede reproducir los siguientes archivos de audio: MP3,
MP4 y WMA. Utilice solamente memorias USB/tarjetas SD con una
capacidad máxima de memoria de 32 GB. El aparato necesita algunos
segundos para responder si en la memoria USB/tarjeta SD se encuentran
guardados muchos archivos.
Reproducción BT
Puede conectar un smartphone con BT o cualquier otro dispositivo externo
al aparato.
ES
1. Encienda el aparato.
2. Pulse el botón INPUT.
3. El BT estará activado cuando escuche dos tonos consecutivos.
4. Busque en la lista de dispositivos BT disponibles su dispositivo externo
"DisGo Box".
5. Conecte su dispositivo externo seleccionando "DisGo Box".
6. Introduzca la contraseña "0000".
7. Si quiere reproducir música desde su dispositivo externo, el audio se
reproduce a través del BT hacia el altavoz del aparato.
8. Puede regular el volumen en modo BT mediante los botones VOL/
BASS/ TREBLE o en el dispositivo externo.
Nota: Si en modo BT no escucha el audio, compruebe que el ajuste de
volumen y del altavoz no sea demasiado bajo.
47

ES
Uso de la radio
1. Encienda el aparato.
2. Pulse una vez el botón OK para seleccionar la radio.
3. Pulse el botón PRE/ NEXT para seleccionar la emisora de radio deseada.
Asegúrese de que la antena que se encuentra en la parte trasera del
aparato esté completamente extendida. Así se garantiza la mejor calidad
de radio y potencia de señal.
4. Durante el primer uso de la radio, pulse dos veces el botón NEXT. Así se
iniciará una búsqueda automática de emisoras y se guardarán aquellas
que tengan la señal más potente.
48

INDICACIONES PARA LA RETIRADA DEL APARATO
Si el aparato lleva adherida la ilustración de la
izquierda (el contenedor de basura tachado) entonces
rige la normativa europea, directiva 2012/19/UE. Este
producto no debe arrojarse a un contenedor de basura
común. Infórmese sobre las leyes territoriales que
regulan la recogida separada de aparatos eléctricos y
electrónicos. Respete las leyes territoriales y no arroje
aparatos viejos al cubo de la basura doméstica. Una
retirada de aparatos conforme a las leyes contribuye
a proteger el medio ambiente y a las personas
a su alrededor frente a posibles consecuencias
perjudiciales para la salud. El reciclaje ayuda a reducir
el consumo de materias primas.
El producto contiene pilas sujetas a la Directiva
Europea 2006/66/CE, según la cual estas no pueden
depositarse en los contenedores destinados a la
basura común. Infórmese sobre la normativa vigente
sobre la eliminación de pilas. Una gestión adecuada de
estos residuos previene consecuencias potencialmente
negativas para el medio ambiente y la salud de las
personas.
DECLARACIÓN DE CONFORMIDAD
ES
Fabricante:
Chal-Tec GmbH, Wallstraße 16, 10179 Berlín
(Alemania).
Este producto cumple con las siguientes directivas
europeas:
2011/65/UE (refundición RoHS)
2014/53/UE (RED)
Puede descargar la declaración de conformidad
completa del fabricante en el siguiente enlace:
https://use.berlin/10032598
49

IT
Gentile Cliente,
La ringraziamo per aver acquistato il
dispositivo. La preghiamo di leggere
attentamente le seguenti istruzioni per l’uso e
di seguirle per evitare possibili danni tecnici.
Non ci assumiamo alcuna responsabilità per
danni scaturiti da una mancata osservazione
delle avvertenze di sicurezza e da un uso
improprio del dispositivo. Scansionare il codice
QR seguente, per accedere al manuale d’uso
più attuale e per ricevere informazioni sul
prodotto.
INDICE
Dati tecnici 54
Avvertenze di sicurezza 55
Elementi di controllo 57
Utilizzo 60
Smaltimento 64
50

DATI TECNICI
Numero articolo 10032598
Alimentazione
Potenza assorbita 33 W
Potenza di uscita max. 20 W x 2
Intervallo di frequenza FM 87,5 - 108 MHz
Connessioni
Ingresso AUX-IN
Ingresso microfono
BT
Copertura no a 10 metri
Prolo BT compatibile A2DP
100-240 V~ 50/60 Hz
3,5 mm
6,3 mm
IT
51

IT
AVVERTENZE DI SICUREZZA
• Leggere il manuale d’uso prima di utilizzare il dispositivo.
• Seguire le avvertenze. Mettere in atto tutte le procedure di sicurezza per
evitare incendi e folgorazioni. Le riparazioni devono essere realizzate
solo da un elettricista qualicato.
• Quando si accende il dispositivo per la prima volta, può presentarsi un
odore. Questo è del tutto normale e scompare dopo breve tempo.
• Questo dispositivo contiene componenti che trasmettono corrente. Non
aprire l’alloggiamento.
• Non posizionare oggetti metallici o liquidi sopra al dispositivo. Questo
può comportare folgorazioni o malfunzionamenti.
• Non posizionare fonti di calore vicino al dispositivo, come termosifoni,
ecc. Non posizionare il dispositivo su superci soggette a vibrazioni.
• Non coprire le aperture di ventilazione.
• Il dispositivo non è adatto all’uso continuato per periodi di tempo
prolungati.
• Trattare con cura il cavo di alimentazione e non danneggiarlo. Un cavo
guasto può causare folgorazioni o malfunzionamenti.
• Scollegare dalla rete elettrica impugnando la spina e non tirando dal
cavo.
• Non staccare o inserire la spina con le mani bagnate.
• Se cavo o spina sono danneggiati, devono essere sostituiti da un
elettricista qualicato.
• Se il dispositivo è danneggiato in modo tale da poter vedere i
componenti interni, non collegarlo alla rete elettrica e non accenderlo.
Rivolgersi al servizio di assistenza ai clienti. Non collegare il dispositivo
a un reostato (regolatore d’intensità della corrente) o a un dimmer.
• Non esporre il dispositivo a pioggia o umidità, in modo da evitare il
rischio d’incendi e folgorazioni.
• Collegare il dispositivo a una presa con messa a terra (220 -240 V~ /
10-16 A).
• Staccare la spina durante un temporale o se il dispositivo non viene
utilizzato per lunghi periodi.
• Se il dispositivo non viene utilizzato per lunghi periodi può formarsi
condensa. Lasciare che il dispositivo si riscaldi a temperatura ambiente
prima di accenderlo. Non utilizzare mai il dispositivo in locali umidi o
all’aperto.
• Per evitare incidenti in aziende, seguire le normative e le avvertenze
applicabili.
• Non accendere e spegnere ripetutamente il dispositivo, in modo da non
accorciare la sua vita utile.
• Tenere il dispositivo fuori dalla portata dei bambini. Non lasciare il
dispositivo privo di controllo.
• Non utilizzare detergenti spray per pulire l’interruttore.
• Residui di spray di questo tipo possono causare accumuli di polvere
e grasso. Consultare personale tecnico specializzato in caso di
52

malfunzionamento.
• Non esercitare forza sugli elementi di controllo.
• Questo dispositivo è dotato di altoparlanti che creano un campo
magnetico. Posizionare il dispositivo ad almeno 60 cm da computer e
televisori.
• Il dispositivo è dotato di una batteria piombo-acido integrata e
ricaricabile.
• Caricare la batteria ogni 3 mesi se il dispositivo non viene utilizzato per
lungo tempo. In caso contrario la batteria può essere danneggiata.
• Se la batteria è danneggiata, sostituirla con una equivalente. Smaltire la
batteria danneggiata in modo ecologico.
• Se il dispositivo è caduto, farlo controllare da un tecnico qualicato
prima di tornare a utilizzarlo.
• Non utilizzare detergenti chimici, in quanto potrebbero rovinare la
supercie. Utilizzare solo un panno per la pulizia.
• Tenere il dispositivo lontano da componenti elettrici che possono
causare interferenze.
• Assicurarsi che il cavo non venga danneggiato da persone che lo
calpestano. Controllare prima di ogni utilizzo che il cavo non sia
danneggiato.
• L’alimentazione corretta è 220 V~ / 50 Hz. Controllare che la corrente
della vostra casa sia corretta per questo dispositivo.
• Conservare l’imballaggio originale.
IT
53

IT
ELEMENTI DI CONTROLLO
1 Ingresso alimentazione
2 Ingresso AUX
3 Ingresso 12 V
4 Priorità microfono
5 Connessione chitarra
6 Connessione microfono
7 Indicazione del livello di carica:
carica alta o bassa
8 Play/Pausa
9 Titolo precedente
10 Titolo successivo
11 Registrazione
12 Ripetizione
13 Modalità
14 Ingresso scheda CD/MMC
15 Ingresso USB
16 Volume principale
17 Regolazione alti
18 Regolazione bassi
19 Ritardo microfono
20 Eco musica
21 Alti microfono
22 Bassi microfono
23 Volume principale microfono
24 Volume chitarra
25 Interruttore On/O
26 Uscita video
54

Pannello di controllo DVD
IT
1 Connessione USB
2 Connessione giochi
3 On/O
4 Titolo successivo
Display
Fonte AV1/AV2
Sfogliare U/D/R/L o
formato 16:9/4:3
Menu
5 Titolo precedente
6 Play/Pausa
7 Aprire/chiudere vano CD
Menu
Menu
On/O
55

IT
Telecomando DVD
1 Indicazione di controllo OSD
2 On/O
3 Tasti numerici
4 Memoria: memoria disco/titolo
5 Ripetizione di dischi e titoli
6 Avanti
7 Indietro
8 Riproduzione rallentata
9 Confermare
10 Tasto di navigazione in alto
11 Impostazioni
12 Confermare: confermare
l’immissione
13 Navigazione a sinistra
14 Navigazione in basso
15 Zoom: ingrandire durante la
riproduzione
16 Navigazione verso il basso
17 Sottotitolo/Copy
18 Stop
19 Play/Pausa
20 Cambia tra PAL/NTSC/AUTO
21 Aprire/chiudere vano CD
22 GO TO: passare a una fonte
23 Balance, Equalizer, selezione di
diversi e etti sonori
24 Selezione lingua
25 PBC: aprire tutti i menu di un DVD
26 HD/VGA
27 Titolo precedente
28 Titolo successivo
29 Impostare programma per la
riproduzione
30 Step: riproduzione frame per frame
di lm
31 Menu DVD
32 Navigazione a destra
33 Titolo: riproduzione di un titolo
34 Tasto per cambiare tra DVD/USB
35 Angolo: selezionare tra diversi
angoli in un lm
36 Alzare volume
37 Abbassare volume
56

UTILIZZO
Accendere/spegnere
L’altoparlante PA può essere utilizzato collegandolo alla rete elettrica o alla
batteria interna da 12 V.
1. Collegare il cavo nella parte alta dell’altoparlante.
2. Collegare l’altra estremità a una presa elettrica.
3. Attivare l’interruttore di rete.
4. Quando l’altoparlante PA è collegato alla rete elettrica si accende.
Avvertenza: se si desidera utilizzare la batteria interna, basta posizionare
l’interruttore della batteria su ON.
Caricare la batteria
Prima di utilizzare il dispositivo, caricare la batteria per la prima volta per
almeno 8 ore.
1. Collegare il cavo nella parte alta della consolle.
2. Interrompere la trasmissione di corrente alla consolle tramite la batteria.
3. La luce si accende durante la carica.
Avvertenze sulla batteria: la batteria interna si carica mentre il dispositivo
è in funzione e l’interruttore On/O è acceso. Caricare la batteria a
dispositivo spento è più eicace. Dopo la carica passa automaticamente al
mantenimento di carica. Non lasciare il dispositivo costantemente collegato
a una presa elettrica. Se non viene utilizzato per periodi prolungati, la
batteria deve essere caricata almeno ogni 30 giorni. Caricare la batteria
prima e dopo ogni utilizzo, per raggiungere performance durature.
IT
Utilizzo di una batteria esterna
Per utilizzare il dispositivo più a lungo, è possibile collegare una batteria
esterna da 12 V.
1. Localizzare l’ingresso 12 V sul lato superiore del dispositivo.
2. Collegare una batteria a questo ingresso con il cavo corretto.
Avvertenza: il dispositivo utilizzerà prima la batteria interna. Quando la
carica della batteria interna è bassa, la spia si illumina per indicarlo. Ora è
possibile utilizzare la batteria esterna. Durante l’utilizzo, la batteria esterna
caricherà quella interna.
57

IT
Utilizzo del radiomicrofono UHF
L’altoparlante PA viene consegnato con radiomicrofoni per poter iniziare
subito l’utilizzo.
1. Accendere il dispositivo.
2. Svitare la base del microfono
per raggiungere il vano delle
batterie. Inserire 2 batterie
tipo LR-6. Fare attenzione alla
corretta polarità.
3. Riposizionare il coperchio del
vano delle batterie.
4. Il radiomicrofono lampeggia una
volta, si connette al dispositivo
e può essere utilizzato. Se il
microfono non lampeggia,
controllare di avere inserito
correttamente le batterie
o assicurarsi che non siano
scariche.
5. Regolare il volume del microfono
con MIC VOL.
Avvertenza: non utilizzare il microfono direttamente davanti al dispositivo
e impostare MIC VOL/ECHO al minimo prima di accendere il microfono. Un
utilizzo errato del microfono comporta forti schi. Spegnere il microfono se
non lo si utilizza. In tal modo si aumenta la durata della batteria.
Griglia microfono
Capsula microfono
interna
Indicazione stato di
carica
Interruttore On/O
Coperchio del vano
delle batterie
58
Utilizzo del microfono con cavo
Collegare il cavo del microfono all’ingresso microfono MIC1 del dispositivo.
1. Schalten Sie das Gerät aus.
2. Verbinden Sie Ihr Kabelmikrofons mit dem Mikrofonanschluss MIC 1 des
Geräts.
3. Passen Sie die Mikrofonlautstärke durch Drücken der Taste MIC VOL/
ECHO an.
Avvertenza: il microfono con cavo e il radio microfono possono essere
utilizzati contemporaneamente.

Collegare una chitarra
Con uno spinotto da ¼” è possibile collegare una chitarra al dispositivo
1. Accendere il dispositivo.
2. Collegare il cavo della chitarra nell’ingresso GUITAR INPUT.
3. Regolare il volume con GUITAR VOL.
Riproduzione da USB o schede SD
È possibile ascoltare musica tramite il dispositivo da supporti USB o SD.
1. Accendere il dispositivo.
2. Inserire il supporto USB o SD nell’ingresso adatto.
3. Non appena il supporto è stato inserito, il dispositivo inizia
automaticamente la riproduzione.
4. Per controllare e regolare la riproduzione utilizzare i tasti // .
Avvertenza: il dispositivo riproduce i seguenti formati: MP3, MP4 e WMA.
Utilizzare solo supporti USB e SD con una capacità massima di memoria di
32 GB. Il dispositivo ha bisogno di qualche secondo per rispondere, se ci
sono molti le sul supporto USB o SD.
Riproduzione BT
È possibile connettere uno smartphone con BT o altri dispositivi esterni con
l’impianto.
1. Accendere il dispositivo.
2. Premere INPUT.
3. Il BT è attivato quando si sentono due segnali acustici.
4. Cercare nella lista dei dispositivi BT disponibili “DisGo Box”.
5. Collegare il dispositivo esterno selezionando “DisGo Box”.
6. Inserire la password “0000”.
7. Se si inizia la riproduzione sul dispositivo esterno, l’audio viene
trasmesso all’altoparlante via BT.
8. Il volume in modalità BT può essere controllato con VOL/BASS/TREBLE
o sul dispositivo esterno.
IT
Avvertenza: se non si sente audio in modalità BT, controllare le impostazioni
del volume sull’impianto e sul dispositivo esterno.
59

IT
Utilizzo della radio
1. Accendere il dispositivo.
2. Premere una volta OK per selezionare la radio.
3. Premere PRE/NEXT per selezionare l’emittente desiderata. Assicurarsi
di aprire completamente l’antenna sul retro del dispositivo, in modo da
garantire la migliore qualità e intensità di segnale.
4. Quando si utilizza la radio per la prima volta, premere due volte NEXT.
In questo modo inizia la ricerca automatica delle emittenti e quelle con
segnale più forte vengono salvate.
60

SMALTIMENTO
Se sul prodotto è presente la gura a sinistra (il bidone
dei riuti con le ruote), si applica la direttiva europea
2012/19/UE. Questi prodotti non possono essere smaltiti
con i riuti normali. Informarsi sulle disposizioni vigenti
per la raccolta di dispositivi elettrici ed elettronici.
Attenersi alle disposizioni vigenti e non smaltire i vecchi
dispositivi con i riuti domestici. Grazie al corretto
smaltimento dei vecchi dispositivi si tutela il pianeta e la
salute delle persone da possibili conseguenze negative.
Il riciclo di materiali aiuta a diminuire il consumo di
materie prime.
Il prodotto contiene batterie che sono soggette alla
direttiva europea 2006/66/CE e non possono essere
smaltite con i normali riuti domestici. Preghiamo
di informarvi sulle regolamentazioni vigenti sullo
smaltimento delle batterie. Grazie al corretto
smaltimento dei vecchi dispositivi si tutela l’ambiente e
la salute delle persone da conseguenze negative.
DICHIARAZIONE DI CONFORMITÀ
IT
Produttore:
Chal-Tec GmbH, Wallstraße 16, 10179 Berlino,
Germania.
Questo prodotto è conforme alle seguenti
direttive europee:
2011/65/UE (RoHS)
2014/53/UE (RED)
La dichiarazione di conformità completa del
produttore è disponibile al seguente link:
https://use.berlin/10032598
61


 Loading...