

Page 1
www.auna-multimedia.com
10028658
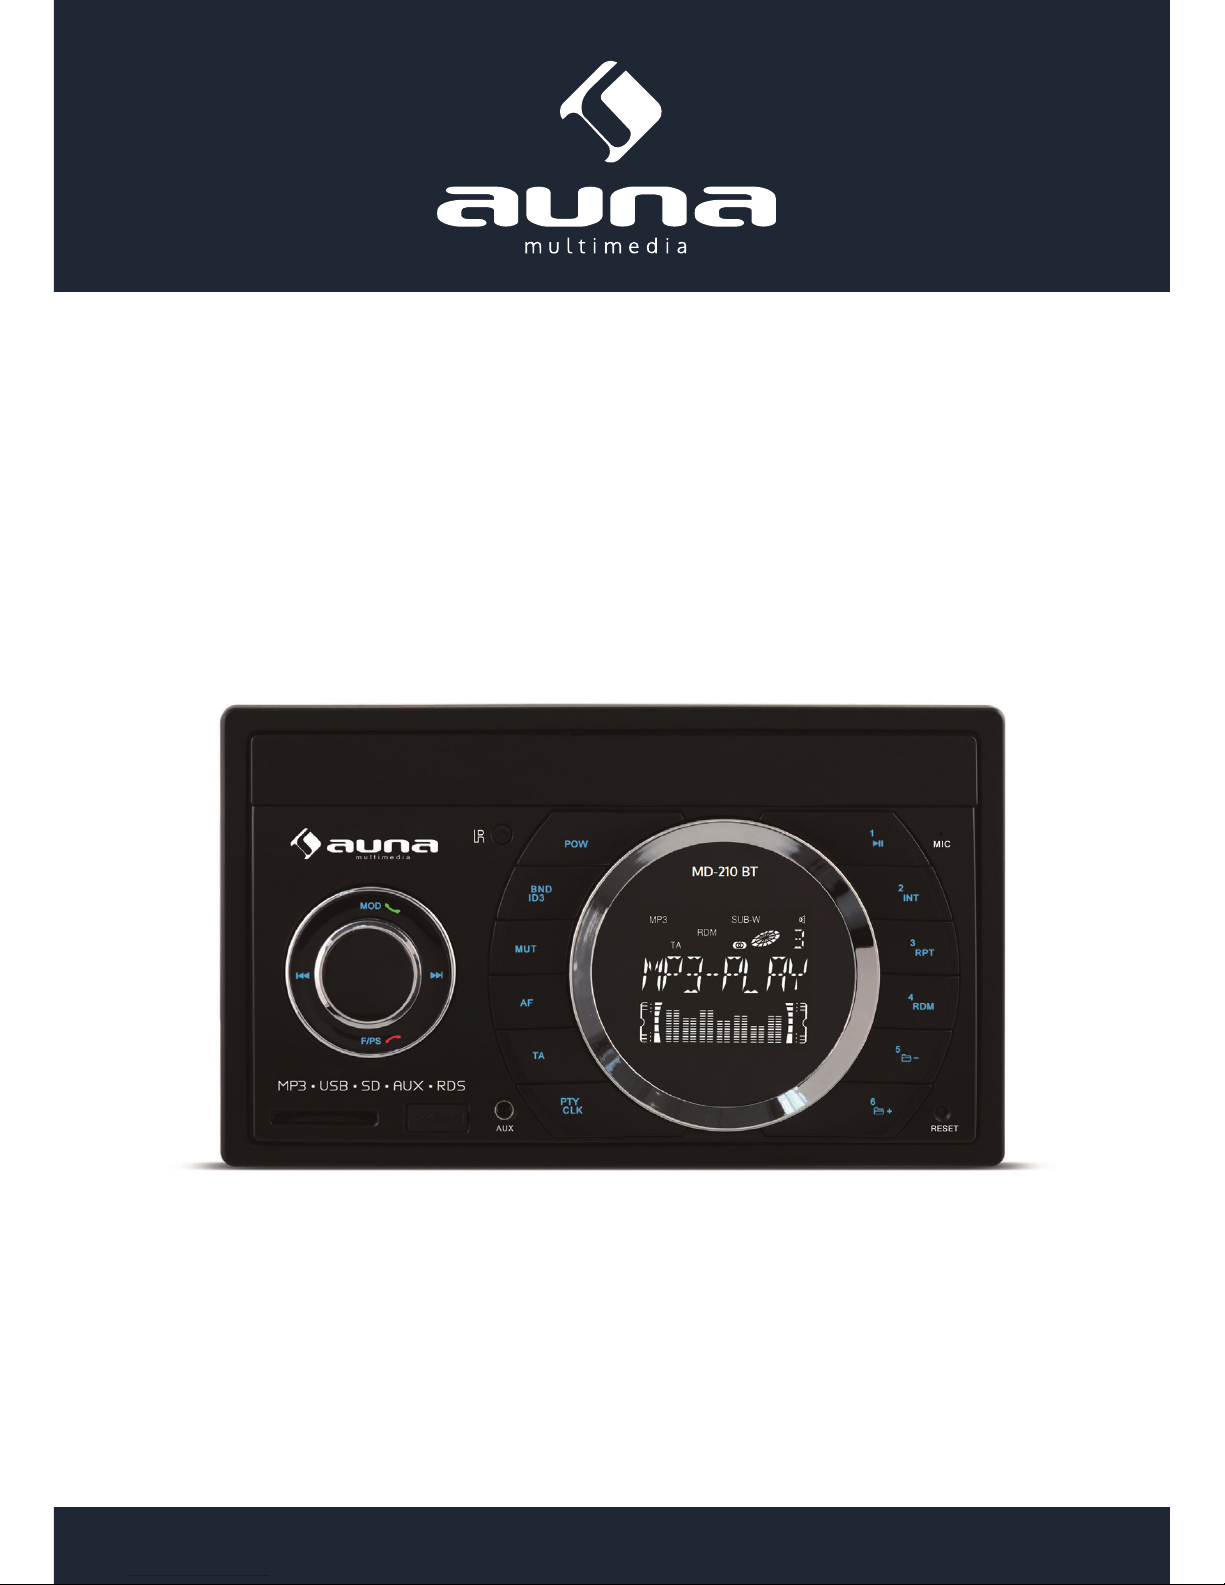
2 Din BT RDS Autoradio
MD-210 BT
Page 2

2
Sehr geehrter Kunde,
zunächst möchten wir Ihnen zum Erwerb Ihres Gerätes gratulieren.
Bitte lesen Sie die folgenden Anschluss- und Anwendungshinweise sorgfältig durch und befolgen Sie diese,
um möglichen technischen Schäden vorzubeugen.
Sicherheitshinweise und Gewährleistung
• Diese Bedienungsanleitung dient dazu, Sie mit der Funktionsweise dieses Produktes vertraut zu machen. Bewahren Sie diese Anleitung daher stets gut auf, damit Sie jederzeit darauf zugreifen können.
• Sie erhalten bei Kauf dieses Produktes zwei Jahre Gewährleistung auf Defekt bei sachgemäßem Gebrauch.
• Bitte verwenden Sie das Produkt nur in seiner bestimmungsgemäßen Art und Weise. Eine anderweitige Verwendung führt eventuell zu Beschädigungen am Produkt oder in der Umgebung des Produktes.
• Ein Umbauen oder Verändern des Produktes beeinträchtigt die Produktsicherheit. Achtung Verletzungsgefahr!
• Önen Sie das Produkt niemals eigenmächtig und führen Sie Reparaturen nie selber aus!
• Behandeln Sie das Produkt sorgfältig. Es kann durch Stöße, Schläge oder den Fall aus bereits geringer
Höhe beschädigt werden.
• Halten Sie das Produkt fern von Feuchtigkeit und extremer Hitze.
• Lassen Sie keine Gegenstände aus Metall in dieses Gerät fallen.
• Stellen Sie keine schweren Gegenstände auf dieses Gerät.
• Reinigen Sie das Gerät nur mit einem trockenen Tuch.
• Blockieren Sie nicht die Belüftungsönungen.
• Verwenden Sie ausschließlich vom Hersteller oder vom qualizierten Fachhandel empfohlenes Zubehör.
Die Gewährleistung verfällt bei Fremdeingrien in das Gerät.
Kleine Objekte/Verpackungsteile (Plastikbeutel, Karton, etc.)
Bewahren Sie kleine Objekte (z.B. Schrauben und anderes Montagematerial, Speicherkarten) und
Verpackungsteile außerhalb der Reichweite von Kindern auf, damit sie nicht von diesen verschluckt
werden können. Lassen Sie kleine Kinder nicht mit Folie spielen. Es besteht Erstickungsgefahr!
Transport des Gerätes
Bitte bewahren Sie die Originalverpackung auf. Um ausreichenden Schutz beim Transport des Gerätes zu
erreichen, verpacken Sie das Gerät in der Originalverpackung.
Reinigung der äußeren Oberäche
Verwenden Sie keine üchtigen Flüssigkeiten, wie Insektensprays. Durch zu starken Druck beim
Abwischen können die Oberächen beschädigt werden. Gummi- oder Plastikteile sollten nicht über einen
längeren Zeitraum mit dem Gerät in Kontakt sein. Nutzen Sie ein trockenes Tuch.
Page 3
3
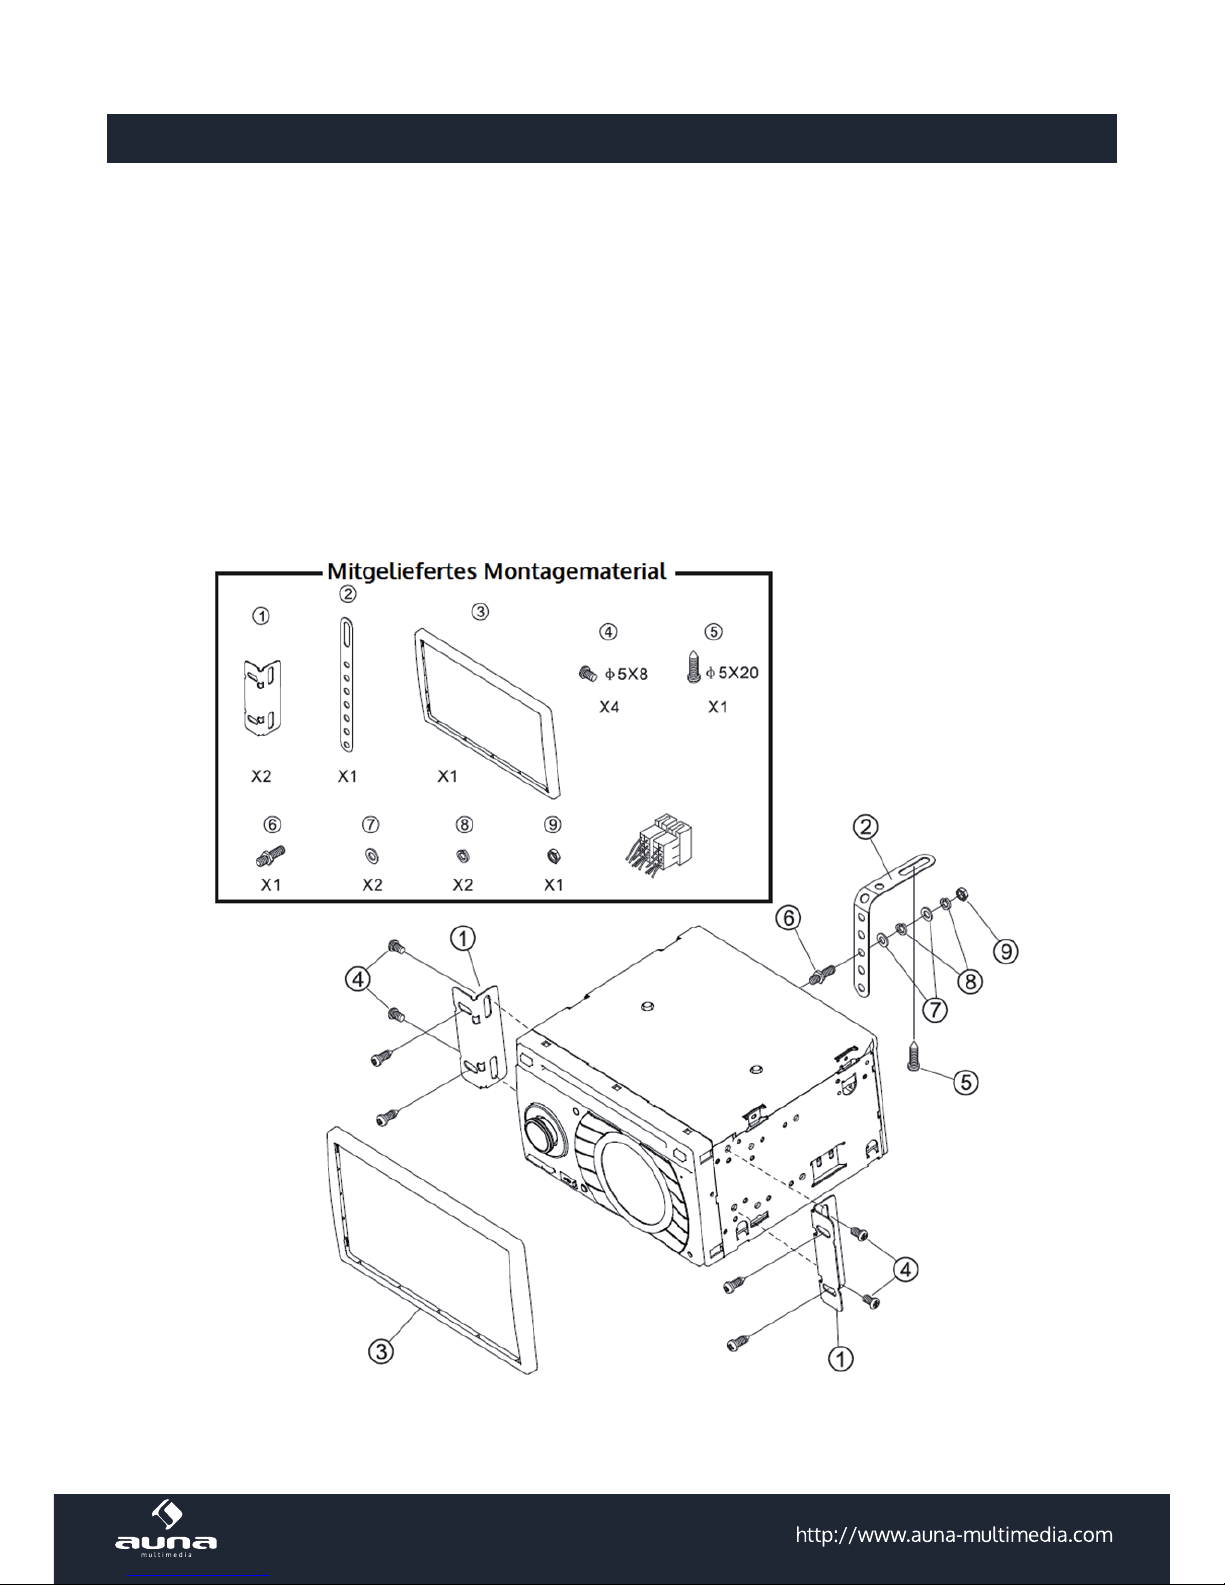
Einbauhinweise
• Wählen Sie einen Einbauort, an dem das Gerät den Fahrer nicht behindert.
• Schließen Sie die Kabel testweise an und testen das Gerät, bevor Sie das Gerät endgültig xieren.
• Verwenden Sie nur das mitgelieferte Montagezubehör.
• Sollten Sie Veränderung an Ihrem Fahrzeug vornehmen bzw. Löcher bohren müssen, fragen Sie vorher
bei Ihrem Fahrzeughersteller nach.
• Das Gerät muss so befestigt werden, dass es den Fahrer nicht behindert und bei einer Vollbremsung
keinen Fahrzeuginsassen gefährdet.
• Das Gerät darf keinen hohen Temperaturen aus der Heizung oder direkter Sonnenlicht, Staub, Schmutz
und starken Vibrationen ausgesetzt werden.
DIN Front-/Rückseitenmontage
Page 4
4
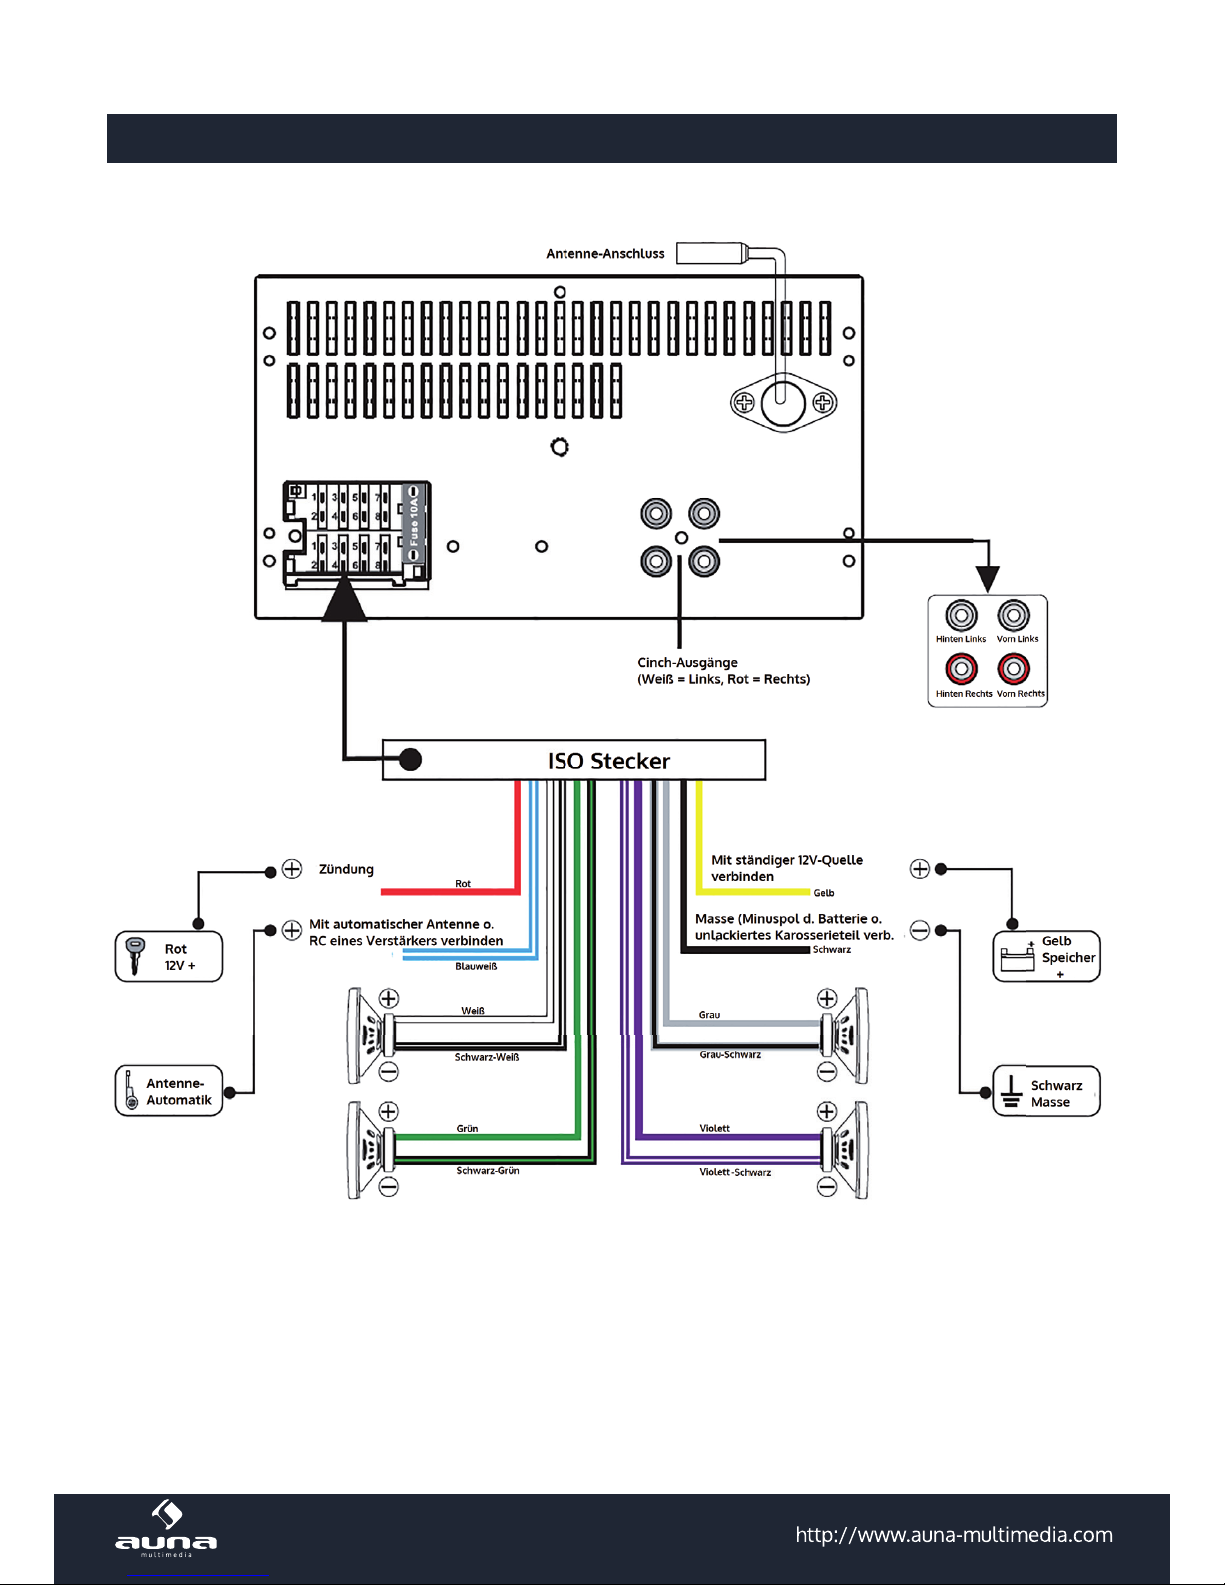
Anschluss-Skizze
Page 5
5
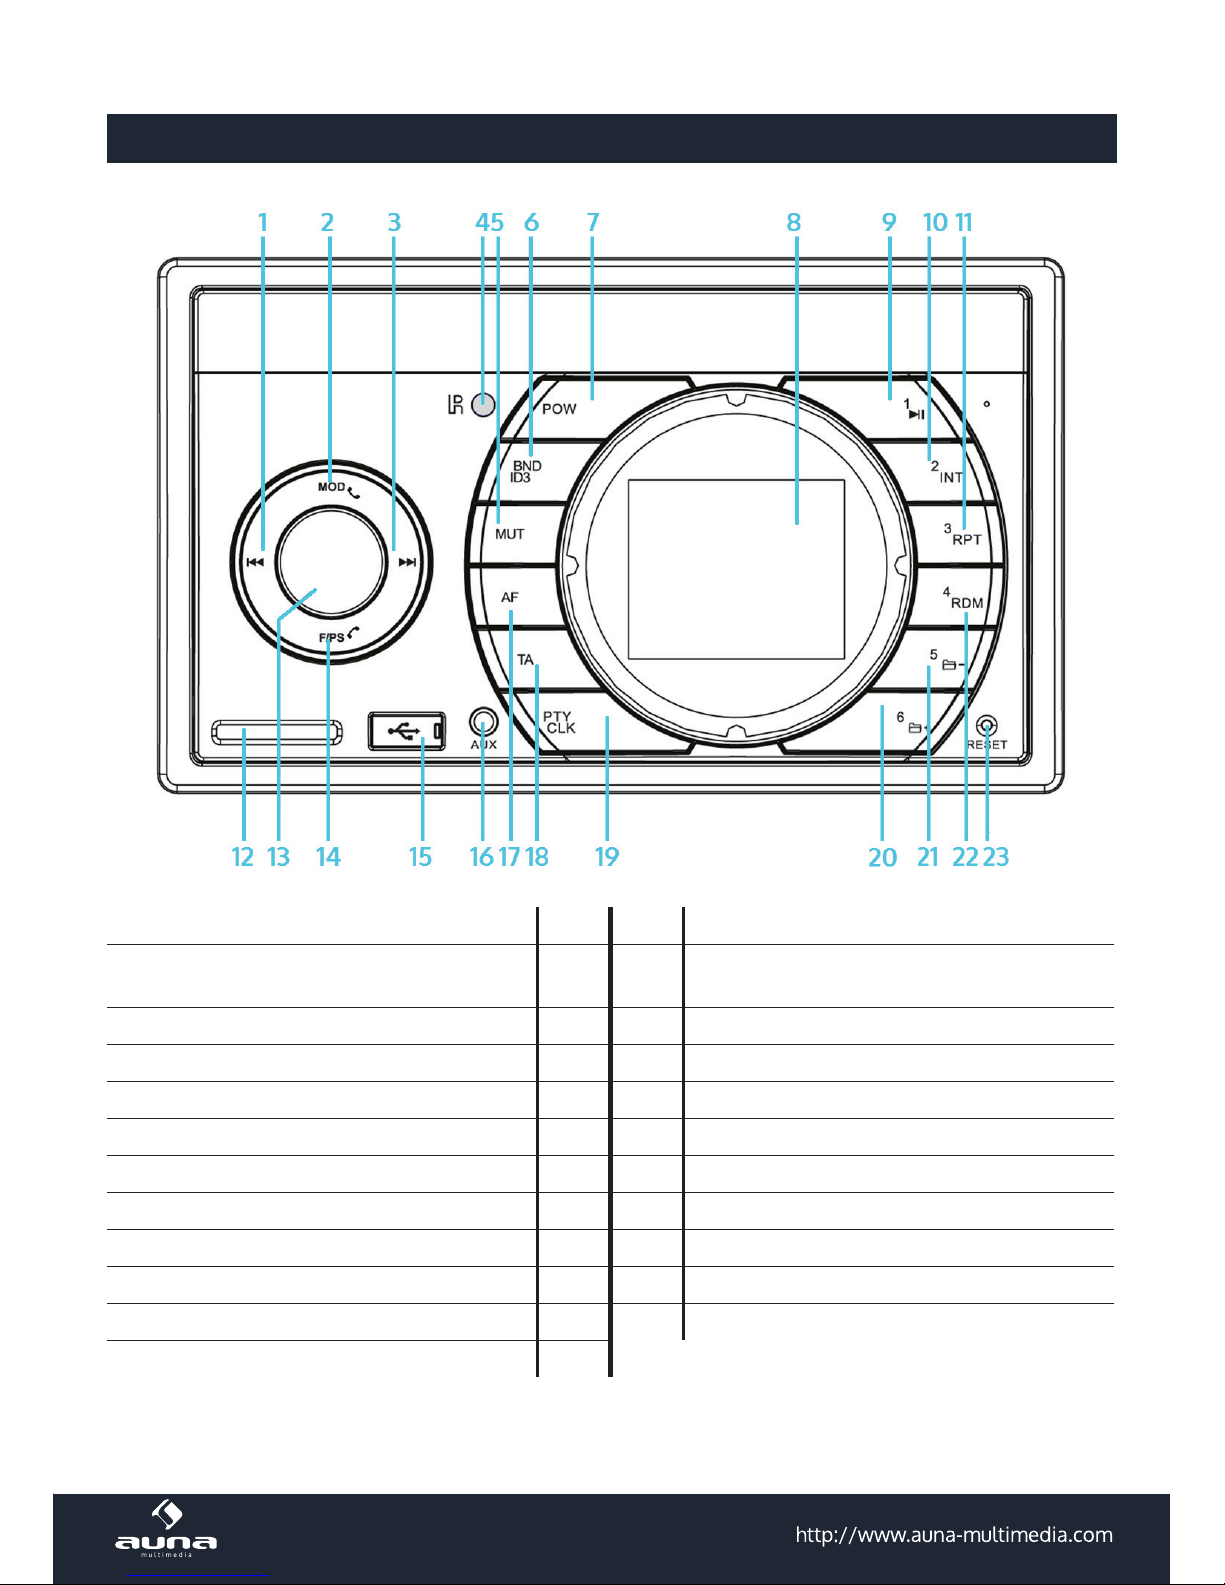
Bedienelemente
Medien/Sender: Zurück 1 13 SEL-Button, Lautstärkeregler
Betriebsmodusauswahl / Anruf annehmen
(bei eingehendem Telefonat im BT-Modus)
2 14 Automatische Sendersuche / im BT-Modus:
Eingehenden Anruf ablehnen/Au egen
Medien/Sender: Vor 3 15 USB-Eingang
Fernbedienungsempfänger 4 16 AUX-Eingang
Stummschaltung 5 17 AF-Funktion
Bandauswahl / ID3 6 18 TA-Funktion
Ein-/ausschalten 7 19 PTY-Funktion / Uhr
Display 8 20 Nummerntaste 6 / Ordnersuche aufwärts
Nummerntaste 1 / Play/Pause 9 21 Nummerntaste 5 / Ordnersuche abwärts
Nummerntaste 2 / Intro-Funktion 10 22 Nummerntaste 4 / Zufallswiedergabe
Nummerntaste 3 / Wiederholen 11 23 RESET
SD-Eingang 12
Page 6
6
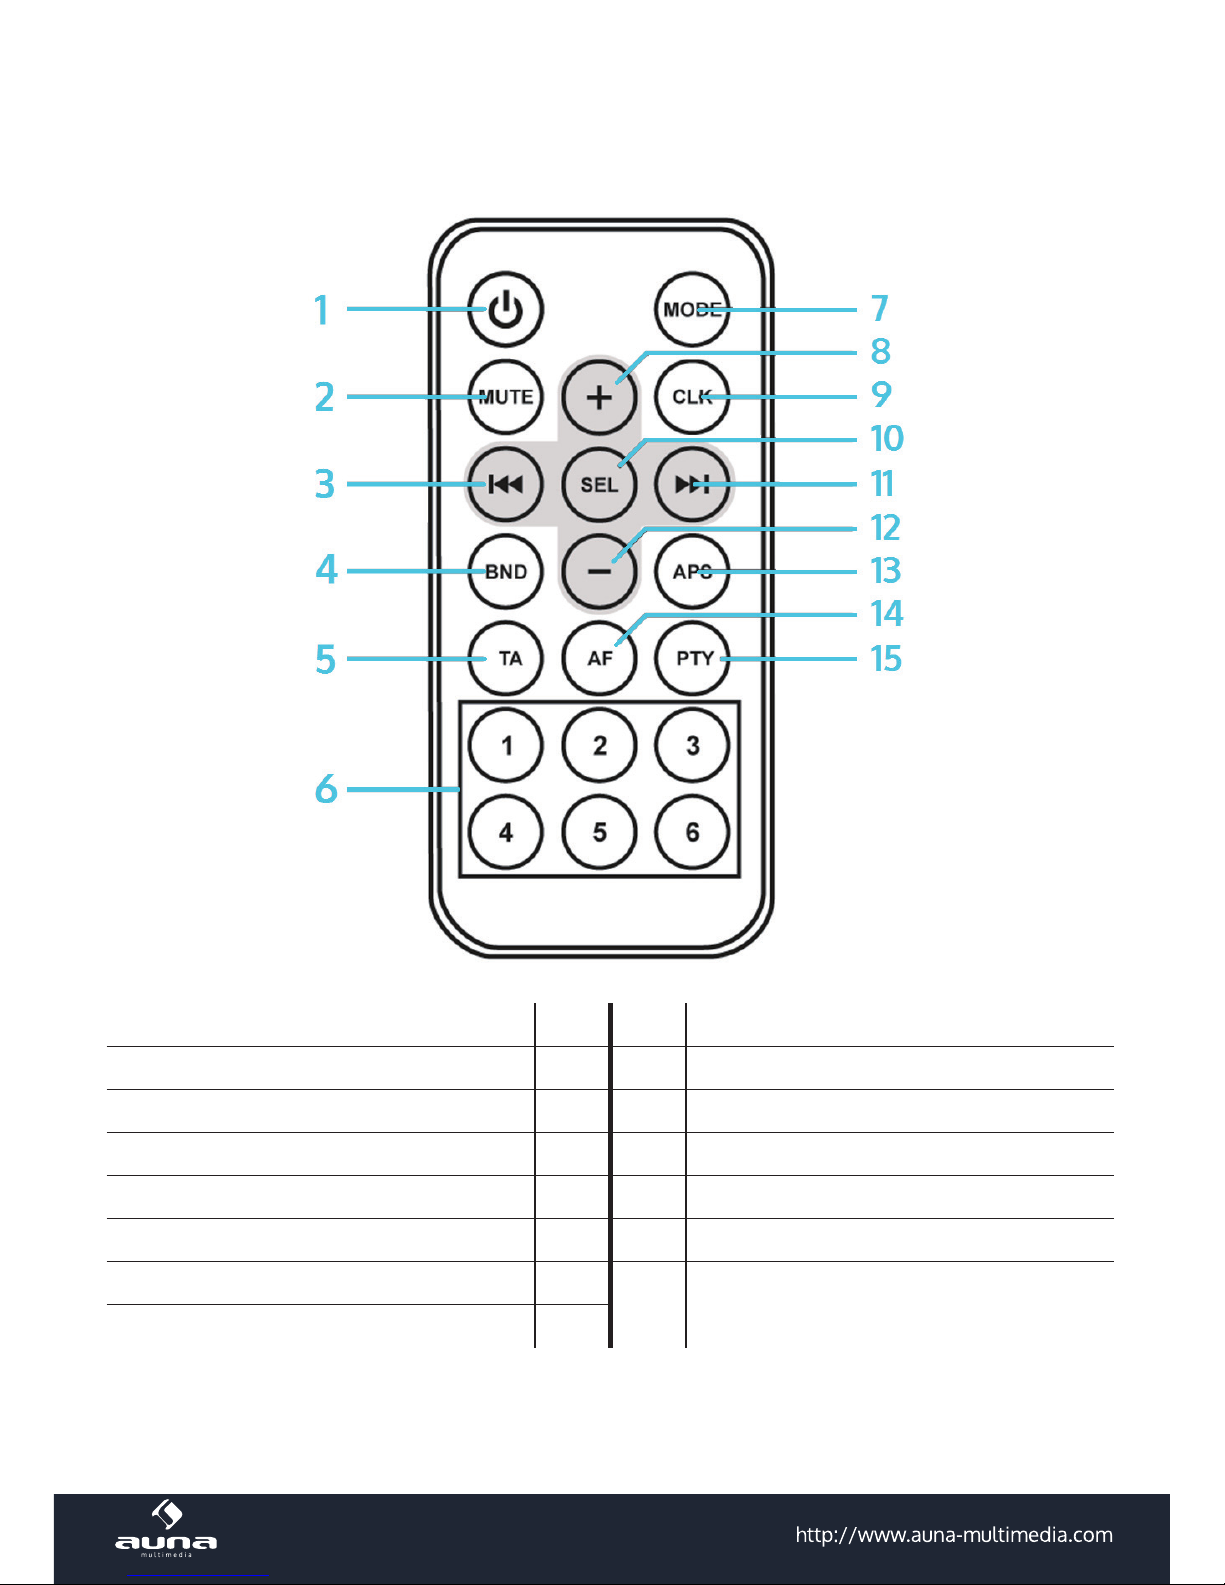
Fernbedienung
Ein/Aus 1 9 Uhrzeit anzeigen
Stummschaltung 2 10 Auswahl (SEL)
Sendersuche / Titel zurück 3 11 Sendersuche / Titel vor
Frequenzband wählen 4 12 VOL-
TA (ein/aus) 5 13 Automatischer Sendersuchlauf
Nummerntasten 1-6 6 14 AF (ein/aus)
Betriebsmoduswahl 7 15 PTY (ein/aus)
VOL+ 8
Page 7

7
Nutzungshinweise
Grundlegende Bedienung
Ein-/Ausschalten Drücken Sie POWER, um das Gerät ein- res. auszuschalten.
Moduswahl Drücken Sie MODE, um zwischen verschiedenen Betriebsmodi zu wechseln.
Loudness
Drücken Sie SEL wiederholt bis das Display „LOUD ON“ oder „LOUD OFF“ anzeigt.
Drehen Sie nun den Lautstärkeregler, um zwischen diesen beiden Optionen zu wäh-
len.
Stummschaltung Drücken Sie MUTE, um die Stummschaltung zu aktivieren res. deaktivieren.
Laustärke Drehen Sie den Lautstärkeregler. Drehung im Uhrzeigersinn erhöht die Lautstärke.
Bass
Drücken Sie SEL wiederholt bis das Display „BAS“ anzeigt. Drehen Sie nun den
Lautstärkeregler, um den Bass anzupassen. Die Bassregelung ist bei Auswahl eines
DSP-Abspielmodus inaktiv.
Höhen
Drücken Sie SEL wiederholt bis das Display „TRE“ anzeigt. Drehen Sie nun den Lautstärkeregler, um den Höhen anzupassen. Die Höheregelung ist bei Auswahl eines
DSP-Abspielmodus inaktiv.
Balance
Drücken Sie SEL wiederholt bis das Display „BAL“ anzeigt. Drehen Sie nun den Lautstärkeregler, um die Balance anzupassen
Fader
Drücken Sie SEL wiederholt bis das Display „FAD“ anzeigt. Drehen Sie nun den
Lautstärkeregler, um den Fader anzupassen.
DSP-EQ-Modi
Drücken Sie SEL wiederholt bis das Display „EQ“ anzeigt. Drehen Sie nun den Lautstärkeregler, um zwischen den Modi „Flat“, „Rock“, „Pop“ und „Class“ zu wählen. I
Flatmodus ist kein DSP-Programm aktiv.
Akustische Eing-
abgesignale
Drücken Sie SEL wiederholt bis das Display „BEEP“ anzeigt. Drehen Sie nun den
Lautstärkeregler, um die akustischen Tastensignale zu aktivieren res. zu deaktivieren.
Vorgegebene
Lautstärke
Halten Sie SEL 2 Sekunden gedrückt bis „TA ALARM“ auf dem Display angezeigt
wird. Drücken Sie nun wiederholt den SEL bis „P_VOL“ auf dem Display angezeigt
wird. Drehen Sie den Lautstärkeregler auf den Wert, den Sie beim Einschalten des
Radios wünschen.
Uhr
Halten Sie die „CLK“-Taste gedrückt, um die Uhrzeit auf dem Display anzuzeigen.
Halten Sie die CLK-Taste noch länge gedrückt, wird die Uhrzeitanzeige zu blinken
beginnen. Drehen Sie den „SEL“-Knopf, um die Stunde einzustellen. Drücken Sie den
„SEL“-Knopf, um die Minuteneinstellung anzuwählen. Drehen Sie den „SEL“-Knopf,
um die Minuten einzustellen. Bestätigen Sie Ihre Eingaben abschließend durch Drü-
cken des „CLK“-Knopfes.
Page 8

8
Radiobetrieb
FrequenzbandAuswahl
Drücken Sie wiederholt die „BND“-Taste, um zwischen den drei UKW-Frequenzbändern FM1, FM2 und FM3 sowie den Mittelwelle-Bändern AM1 und AM2 zu changieren.
Manuelle Sendersuche
Drücken Sie die Pfeiltasten „Titelsprung rückwärts“ res. „Titelsprung vorwärts“, um
sich schrittweise durch das Senderspektrum zu bewegen.
Drücken Sie die Pfeiltasten „Titelsprung rückwärts“ res. „Titelsprung vorwärts“, um
automatisch den nächstgelegenen empfangsstarken Sender zu erreichen.
Mono/Stereo
Drücken Sie weiderholt den „SEL“-Knopf, um zwischen dem Mono- und Stereo-Empfangsmodus zu wählen.
Sender abspeichern
Es stehen auf jedem Frequenzband 6 Speicherplätze – also insgesamt 30 Senderspeicher – zur Wahl. Halten Sie eine Nummerntaste Ihrer Wahl gedrückt, um den
laufenden Sender hier abzuspeichern.
Automatische
Sendersuche
Drücken Sie die Taste „F/PS“ für 3 Sekunden, um den automatischen Sendersuchlauf
zu starten. Der Sendersuchlauf wird gestartet und empfangsstarke Station automatisch gespeichert.
Local / DX
Drücken Sie wiederholt die „LOC“-Taste, um das LOC-Menü zu aktivieren. Drehen
Sie den Lautstärkeregler, um zwischen „LOC On“ und „LOC OFF“ zu wählen.
RESET
Halten Sie die „MOD“- und „BND“-Tasten 3 Sekunden gedrückt, um alle Einstellungen zurückzusetzen und die Senderspeicher aufzuheben,
RDS-Funktionen
AF
Alternativfrequenz
Drücken und halten Sie den Lautstärkeregler, um ein optimales UKW-Sendesignal
zu erhalten, das kontinuierlich mit dem Sendesignal abgeglichen wird. Ist die AF-
Funktion aktiviert und wird ein AF-Signal empfangen, wird ein entsprechendes Symbol auf dem Display angezeigt.
TA
Verkehrsdurchsage
Halten Sie den „TA“-Knopf gedrückt, um den TA-Modus zu aktivieren. Um zwischen den beiden „TA“-Modi „TA Seek“ und „TA Alarm“ zu wählen, halten Sie den
„ SELECT“-Knopf 2 Sekunden gedrückt. Wählen Sie dann den gewünschten Modus
durch Drehen des Lautstärkereglers.
PTY
Programmtyp
Halten Sie den „PTY“-Knopf gedrückt, um den PTY-Modus zu aktivieren. Mit den
Nummerntasten 1 bis 6 können Sie zwischen unterschiedlichen Programmtypen
wählen.
Drücken Sue den „PTY“-Knopf zweimal, um sprecherzentrierte Programme auszuwählen, die wiederum mit den Tasten 1 bis 6 selektiert werden können.
Page 9

9
Mask DPI / Mask
All
Drücken Sie die „Sound Select“-Tate für 2 Sekunden bis „TA Seek“ auf dem Display
angezeigt wird. Durch Drehen des Lautstärkereglers können Sie zwischen den Modi
„Mask DPI“ und „Mask All“ wählen.
Retune Lang / Kurz
Halten Sie den „Sound Select“-Knopf gedrückt bis „TA Seek“ auf dem Display angezeigt wird. Durch Drücken des „SELECT“-Knopfes können Sie nun zwischen langen
und kurzen Suchintervallen für die TA-Funktion wählen.
BT
Pairing
Das Gerät ist automatisch im Pairingmodus (BT-Symbol blinkt). Verbinden Sie Ihr
Smartphone/Tablet mit MD-210BT (Symbol leuchtet durchgängig) und schalten Sie
per MODE-Taste zum BT-Modus / in andere Modi.
Anrufen
Wenn Sie einen Anruf absetzen, wird die Freisprecheinrichtung automatisch aktiviert und „Call Out“ auf dem Display angezeigt.
Eingehende Anrufe weist das Display mit „Call In“ aus. Wird das Gespräch angenommen, wird „BT Talk“ angezeigt. Mit Hilfe des Lautstärkereglers können Sie die
Gesprächslautstärke beeinussen.
Anrufe ablehnen Abgelehnte Anrufe weist das Display mit „End Call“ aus.
Musik abspielen
Sind Autoradio und BT-Gerät miteinander gepairt, werden Titel, die Sie auf letzterem
Abspielen, über das Radio wiedergegeben.
Pairing aufheben Sie heben das Pairing vermittels Ihres BT sendenden Gerätes auf.
Nutzung der USB- und SD-Eingänge
Abspielen von
Tracks von USB-/
SD-Datenträgern
Stecken Sie einen USB- oder SD-Datenträger in den jeweils passenden Eingang auf
der Frontseite des Gerätes. Vorhandene MP3- oder WMA-Titel werden automatisch
abgespielt. Das Display weist wahlweise „USB Play“ oder „SD/MMC“ aus.
Abspielmodus
wechseln
Durch wiederholtes Drücken des „MODE“-Knopfes können Sie den Abspielmodus
für USB- und SD-Datenträger verlassen und wieder zu diesem zurückkehren.
Titelsuche
• Drücken Sie die Pfeiltasten „Titelsprung rückwärts“ res. „Titelsprung vorwärts“,
um schrittweise durch Songbibliotheken zu navigieren.
• Drücken Sie die „F/PS“ Taste. Sodann wird die Titelnummer auf dem Display
blinkend dargestellt. Durch Drehen des Lautstärkereglers können Sie die Song-
bibliotheken navigieren. Drücken Sie „SELECT“ um Ihre Auswahl zu bestätigen.
ID3-Anzeige ID3-Informationen werden automatisch auf dem Display angezeigt.
Abspielen /
Pausieren
Drücken Sie die „Play/Pause“-Taste einmal, um das Abspielen zu pausieren und ein
weiteres Mal, um den Abspielbetrieb wiederaufzunehmen.
Page 10

10
Intro-Funktion
Drücken Sie die „2 INT“-Taste, um die Titel auf einem Datenträger jeweils 10 Sekunden anzuspielen.
Wiederholfunktion
Drücken Sie die „3 RPT“, um das Abspielen eines Titels zu wiederholen. Durch nochmaliges Drücken der Taste verlassen Sie diesen Abspielmodus.
Zufallswiedergabe
Drücken Sie die „4 RDM“, um Titel in zufälliger Reihenfolge abzuspielen. Durch
nochmaliges Drücken der Taste verlassen Sie diesen Abspielmodus.
Ordnerwahl
Durch Drücken der Tasten „5“ und „6“ können Sie sich durch MP3-Bibliotheken bewegen.
Nutzung des AUX-Eingangs
Verbinden Sie den Line-Ausgang eines externen Wiedergabegerätes (typscherweise CD- oder MP3-Player)
mit dem 3,5mm-Klinke-Eingang an der Vorderseite des Gerätes und spielen Sie Musik ab.
Hinweise zur Entsorgung
Elektroaltgeräte:
Bendet sich die diese Abbildung (durchgestrichene Mülltonne auf Rädern) auf dem Produkt, gilt die Europäische Richtlinie 2002/96/EG. Diese Produkte dürfen nicht mit dem
normalen Hausmüll entsorgt werden. Informieren Sie sich über die örtlichen Regelungen
zur getrennten Sammlung elektrischer und elektronischer Gerätschaften. Richten Sie sich
nach den örtlichen Regelungen und entsorgen Sie Altgeräte nicht über den Hausmüll.
Durch die regelkonforme Entsorgung der Altgeräte werden Umwelt und die Gesundheit
ihrer Mitmenschen vor möglichen negativen Konsequenzen geschützt. Materialrecycling
hilft, den Verbrauch von Rohstoen zu verringern.
Konformitätserklärung
Der Hersteller dieses Produktes ist die CHAL-TEC Vertriebs- + Handels GmbH, Wallstraße 16, 10179 Berlin, Deutschland
Dieses Produkt entspricht den folgenden Europäischen Richtlinien:
2014/30/EU (EMV)
2014/35/EU (LVD)
2011/65/EU (RoHS)
Page 11

11
Dear Customer,
Congratulations on purchasing this product. Please read and follow these instructions, in order to avoid
damaging the item. We do not cover any damages that may arise from improper use of the item or the
disregard of the safety instructions.
Important Safety Advice
• Read all instructions before using.
• To protect against a re, electric shock or personal injury, do not immerse cord, electric plugs or device
in water or other liquids.
• Do not expose the appliance to extreme temperatures. The appliance shall be used in moderate climates.
• The use of attachments that are not recommended by the appliance manufacturer may result in re,
electric shock or personal injury.
• Do not open the unit by removing any cover parts. Do not attempt to repair the unit. Any repairs or
servicing should be done by qualied personell only.
• Only qualied persons may perform technical work on the product. The product may not be opened or changed. The components cannot be serviced by the user. The manufacturer is not responsible
for any radio or TV interference caused by unauthorized modications.
• The appliance is not a toy. Do not let children play with it. Never let children insert foreign objects into
the appliance.
• Never clean the surface of the device with solvents, paint thinners, cleansers or other chemical products. Instead, use a soft, dry cloth or soft brush.
• This appliance is to be used with 12V car power supply.
• Save these instructions.
Small objects
Keep small objects (i.e. screws, mounting material, memory cards etc.) and packaging out of the range of
children. Do not let Children play with foil. Choking hazard!
Transporting the device
Please keep the original packaging. To gain suicient protection of the device while shipment or transportation, make sure to put it back in its original packaging.
Cleaning the surface
Do not use any volatile liquids, detergents or the like. Use a clean dry cloth.
Page 12

12
Installation
• Choose the mounting location where the unit will not interfere with the normal driving.
• Before nally installing the unit, connect the wiring temporarily and make sure it is all connected up
properly and the unit and the system work properly.
• Consult your nearest dealer if any other modications of the vehicle are required.
• Install the unit where it does not get in the driver‘s way and cannot injure any passenger.
• Avoid installing the unit where it would be subject to high temperature, such as from direct sunlight, or
from hot air, from the heater, or where it would be subject to dust, dirt or excessive vibration.
DIN FRONT/REAR-MOUNT
This unit can be properly installed either from „Front“(conventional DIN Front-mount) or „Rear“(DIN Rearmount installation, utilizing threaded screw holes at the sides of the unit chassis). For details, refer to the
followingillustrated installation methods.
Page 13

13
Connections
Page 14

14
Controls
Back (track/media/radio) 1 13 SEL / Volume knob
Mode selection (in BT mode: Accept inco-
ming calls)
2 14 Automatic station scan (in BT mode: decline
incoming / end calls)
Next (track/media/radio) 3 15 USB slot
IR Sensor 4 16 AUX In
Mute / mute o 5 17 AF (on/o )
Band / ID3 6 18 TA (on/o )
On/o 7 19 PTY / Clock
Display 8 20 # 6 / Folder up
# 1 / Play/Pause 9 21 # 5 / Folder down
# 2 / Intro mode 10 22 # 4 / Random mode
# 3 / Repeat 11 23 RESET
SD slot 12
Page 15

15
Remote Control
On/o 1 9 Show clock
Mute / mute o 2 10 SEL(ect)
Back (track/media/radio) 3 11 Next (track/media/radio)
Band 4 12 VOL-
TA (on/o) 5 13 Automatic station scan
Num keys 1-6 6 14 AF (on/o)
Mode selection 7 15 PTY (on/o)
VOL+ 8
Page 16

16
Operation
Basics
On/o Press POWER to turn the device on or o.
Mode selection Press MODE to select from the dierent modes.
Loudness
Press SEL repeatedly until the display shows LOUD ON or LOUD OFF. Turn the volume knob to select out of these options (press SEL to conrm).
Mute Press MUTE to mute or unmute the audio output.
Volume Turn the volume knob clockwise to increase, anti-clockwise to decrease the volume.
Bass
Press SEL repeatedly until the display shows BAS. Turn the volume knob to adjust
the bass. (Inactive when in DSP mode)
Treble
Press SEL repeatedly until the display shows TRE. Turn the volume knob to adjust the
treble. (Inactive when in DSP mode)
Balance
Press SEL repeatedly until the display shows BAL. Turn the volume knob to adjust
the stereo balance.
Fader
Press SEL repeatedly until the display shows FAD. Turn the volume knob to adjust
the fader.
DSP EQ mode
Press SEL repeatedly until the display shows EQ. Turn the volume knob to select
from FLAT, ROCK, POP or CLASS. In FLAT mode, DSP is set inactive.
Beep
Press SEL repeatedly until the display shows BEEP. Turn the volume knob to adjust
the keys „beeps“ or deactivate completely.
Standard Volume
Press and hold SEL for 2 seconds untin TA ALARM is displayed. Then, press SEL
repeatedly until P_VOL is displayed. Adjust by turning the volume knob (standard
output volume when turning the device on).
Clock
Press and hold CLK to display the time. Keep holding, until the time display starts
ashing.
By turning the vol knob you can now change the hour. Press SEL to process to changing the minutes. After successfully changing the displayed time, press CLK to save
and conrm.
FM Radio
Band Select Press BND repeatedly to select from band FM1, FM2, FM3, AM1, AM2.
Manual Station
Scan
Press Back/Next to manually scroll through the frequencies by steps of 0.05Mhz.
Press and hold for automatically scaning to the next available/receptable station.
Page 17

17
Mono/Stereo Press SEL repeatedly to select mono or stereo receiving mode.
Station storage
In each band, there are 6 station presets available (adding up to 30 presets). To save
the current station to one of the presets, select one band and then press and hold
the desired num key until the station is saved.
Automatic station scan
Press and hold F/PS for about 3 seconds to start a automatic scan for available/
receptable stations. Received stations will automatically be saved to the available
presets (max 30).
Local / DX
Press LOC repeatedly to activate the LOC menu. Turn the vol knob to select LOC on
/ LOC o.
RESET
Press and hold MOD and BND at the same time for 3 seconds to delete all saved
stations and reset all changes.
RDS Functions
AF
Press and hold the Vol knob, to receive an optimal radio signal that will continuously
be compared to any other available frequencies. If there is another frequency available sending the same program, the device switches to this frequency automatically
to ensure unalloyd radio pleasure.
TA
Press and hold TA to activate / deactivate the TA (=traic announcement) mode.
When active, press and hold SEL for 2 seconds and choose between the available
modes TA SEEK and TA ALARM by turning VOL.
PTY
Press and hold PTY to activate / deactivate PTY. You can choose from dierent program types using the num keys. Double press PTY to emphasize language/news
oriented programs. Choose with 1-6 again.
Retune long/short
Press and hold SEL until TA SEEK is displayed. Choose between long and short
search intervals for the TA function by pressing SEL repeatedly.
BT
Pairing
The device is in pairing mode automatically. Just look for it in thelist of available BT
devices on your smartphone / tablet and connect.
Making calls
When makink a call, the hands free mode will be activated automatically and CALL
OUT will be shown on the display.
Incoming calls are marked CALL IN. If answered, the display shows BT TALK. Adjust
the talk volume turning the vol knob.
Playing music
When the car radio and your BT device are properly paired, music that you play on
the BT device will be put out via the car stereo.
Page 18

18
Disconnecting Use your BT device to disconnect BT.
USB and SD slots
Playback from
USB/SD
Insert USB drives or SD cards into the appropriate slot on the front. Contained MP3
les and WMA les will be played back automatically.
Mode selection Select another mode pressing MOD repeatedly.
Search
• Either, use NEXT/BACK to navigate through your media library, or
• Press F/PS. The current title number will display. Navigate turning the vol knob
and select with SEL.
ID3 display ID3 tags will be displayed automatically if available.
Play/Pause Press Play/Pause.
Intro function Press INT for the intro function (the rst 10 seconds of each song will be played).
Repeat mode Press RPT for repeating the current track. Press again to stop repeating.
Shule mode Press RDM for playing all contained les in a random order.
Folders Press 5 and 6 to navigate through folders.
Aux Input
Connect the line out of your external media player (like a cd player or mp3 player) with the 3.5mm audio
input. Use your external player to play back music. Don‘t forget to turn it up. Use the radio‘s volume knob
to change the volume.
Page 19

19
Environment Concerns
According to the European waste regulation 2002/96/EG this symbol on the product
or on its packaging indicates that this product may not be treated as household waste.
Instead it should be taken to the appropriate collection point for the recycling of electrical
and electronic equipment. By ensuring this product is disposed of correctly, you will hep
prevent potential negative consequences for the environment and human health, which
could otherwise be caused by inappropriate waste handling of this product. For more
detailled information about recycling of this product, please contact your local council or
your household waste disposial service.
Declaration of Conformity
Producer: CHAL-TEC Vertriebs- + Handels GmbH, Wallstraße 16, 10179 Berlin, Germany.
This product is conform to the following European directives:
2014/30/EU (EMC)
2014/35/EU (LVD)
2011/65/EU (RoHS)
Page 20

20
Chère cliente, cher client,
Toutes nos félicitations pour l’acquisition de ce nouvel appareil.
Veuillez lire attentivement les instructions de branchement et d’utilisation an d’éviter d’éventuels dom-
mages techniques.
Consignes de sécurité et garantie
• Ce mode d’emploi sert à vous familiariser avec les diérentes fonctions de votre achat. Conservez-le
précieusement de manière à pouvoir le relire dès que nécessaire.
• À l’achat de ce produit, vous obtenez une garantie de deux ans en cas de défaut si vous utilisez
l’appareil de manière conforme.
• Veuillez n’utiliser ce produit que conformément à l’usage prévu. Un usage non conforme pourrait con-
duire à d’éventuels dommages du produit ou à des dégâts dans l’environnement du produit.
• Toute modication du produit en altère la sécurité. Attention aux risques de blessure !
• N’ouvrez jamais le produit de votre propre chef et n’eectuez jamais de réparations vous-même.
• Manipulez le produit avec précaution. Les coups et chutes, même d’une hauteur minime, risquent de
l’endommager.
• N’exposez pas ce produit à l’humidité ni à une chaleur extrême.
• Ne faites pas tomber d’objets en métal dans cet appareil.
• Ne posez pas d’objet lourd sur cet appareil.
• Nettoyez-le uniquement avec un chion sec.
• Ne bloquez pas les sorties d’aération.
• N’utilisez que des accessoires recommandés par le constructeur ou par les commerces spécialisés et
habilités.
La garantie expire prématurément en cas d’intervention d’un tiers.
Petits objets/emballages (sacs en plastique, carton, etc.)
Conservez les petits objets (comme les vis et autres éléments de montage, les cartes mémoires) et les emballages hors de portée des enfants pour qu’ils ne puissent pas les avaler. Ne laissez pas les jeunes enfants
jouer avec les plastiques. Ils risquent de s’asphyxier !
Transport de l’appareil
Veuillez conserver l’emballage original. Pour assurer une protection suisante lors du transport de
l’appareil, emballez-le avec l’emballage original.
Nettoyage de la surface extérieure
N’utilisez pas de liquides volatiles comme les pulvérisateurs insecticides. La surface extérieure peut être
endommagée par une pression trop forte lors du nettoyage. Les parties en caoutchouc et en plastique ne
doivent pas être trop longtemps en contact avec l’appareil. Utilisez un chion sec.
Page 21

21
Instructions de montage
• Installez l’autoradio à un endroit qui ne gênera pas le conducteur.
• Connectez les câbles à titre d’essai et testez l’appareil avant de le xer dénitivement.
• N’utilisez que le matériel de montage fourni.
• Si vous devez procéder à des modications sur votre véhicule ou percer des trous, veuillez d’abord
consulter votre constructeur automobile.
• L’appareil doit être xé de manière à ne pas gêner le conducteur et à ne mettre aucun passager en
danger en cas de freinage brusque.
• L’appareil ne doit pas être exposé aux fortes températures du chauage, ni aux rayons directs du soleil,
à la poussière, à la saleté ou aux fortes vibrations.
Montage avant et arrière DIN
Page 22

22
Croquis de branchement
Page 23

23
Bedienelemente
Média/station : retour 1 13 Touche SEL, réglage du volume
Choix du mode de fonctionnement /
accepter un appel (en cas d’appel entrant
en mode BT)
2 14
Recherche automatique des stations / en
mode BT : rejeter un appel entrant/ raccro-
cher
Média/station : avance 3 15 Port USB
Récepteur de la télécommande 4 16 Port AUX
Mise en sourdine 5 17 Fonction AF
Choix de la bande / ID3 6 18 Fonction TA
Marche/arrêt 7 19 Fonction PTY / heure
Écran 8 20 Touche n°6 / recherche de dossier supérieur
Touche n°1 / play / pause 9 21 Touche n°5 / recherche de dossier inférieur
Touche n°2 / fonction intro 10 22 Touche n°4 / lecture aléatoire
Touche n°3 / répéter 11 23 RESET
Entrée SD 12
Page 24

24
Télécommande
Marche/arrêt 1 9 Aicher l’heure
Mise en sourdine 2 10 Choix (SEL)
Recherche de station / titre précédent 3 11 Recherche de station / titre suivant
Choix de la bande de fréquence 4 12 VOL-
TA (marche/arrêt) 5 13 Recherche automatique de station
Touche n°1-6 6 14 AF (marche/arrêt)
Choix du mode de fonctionnement 7 15 PTY (marche/arrêt)
VOL+ 8
Page 25

25
Instructions d’utilisation
Marche/arrêt Appuyez sur POWER pour allumer ou éteindre l’appareil.
Choix du mode Appuyez sur MODE pour changer de mode de fonctionnement.
Loudness
Appuyez plusieurs fois sur SEL jusqu’à ce que l’écran aiche « LOUD ON » ou « LOUD
OFF ». Tournez maintenant le bouton de réglage du volume pour choisir entre ces
deux options.
Mise en sourdine Appuyez sur MUTE pour activer ou désactiver la mise en sourdine.
Volume
Tournez le bouton de réglage du volume. Tourner dans le sens des aiguilles d’une
montre augment le volume.
Basses
Appuyez plusieurs fois sur SEL jusqu’à ce que l’écran aiche « BAS ». Tournez maintenant le bouton de réglage du volume pour ajuster les basses. Le réglage des basses n’est pas actif si vous avez sélectionné le mode de reproduction DSP.
Aigus
Appuyez plusieurs fois sur SEL jusqu’à ce que l’écran aiche « TRE ». Tournez maintenant le bouton de réglage du volume pour ajuster les aigus. Le réglage des aigus
n’est pas actif si vous avez sélectionné le mode de reproduction DSP.
Balance
Appuyez plusieurs fois sur SEL jusqu’à ce que l’écran aiche « BAL ». Tournez maintenant le bouton de réglage du volume pour ajuster la balance.
Fader
Appuyez plusieurs fois sur SEL jusqu’à ce que l’écran aiche « FAD ». Tournez maintenant le bouton de réglage du volume pour ajuster le fader.
Mode DSP-EQ
Appuyez plusieurs fois sur SEL jusqu’à ce que l’écran aiche « EQ ». Tournez maintenant le bouton de réglage du volume pour choisir entre les modes « Flat », « Rock
», « Pop » et « Class ». En mode Flat, le programme DSP n’est pas actif.
Signaux d’entrée
acoustiques
Appuyez plusieurs fois sur SEL jusqu’à ce que l’écran aiche « BEEP ». Tournez maintenant le bouton de réglage du volume pour activer ou désactiver les signaux acous-
tiques des touches.
Volume préétabli
Maintenez la touche Sel enfoncée 2 secondes jusqu’à ce que « TA ALARM » s’aiche
sur l’écran. Appuyez maintenant de nouveau sur SEL jusqu’à ce que « P_VOL »
s’aiche sur l’écran. Tournez le bouton de réglage du volume jusqu’à obtenir le volu-
me que vous souhaitez avoir en allumant la radio.
Heure
Maintenez la touche « CLK » enfoncée pour aicher l’heure sur l’écran. Maintenez
encore plus longtemps la touche « CLK » enfoncée et l’aichage de l’heure se mettra
à clignoter. Tournez le bouton « SEL » pour changer les heures. Tournez le bouton «
SEL » pour choisir de modier les minutes. Tournez le bouton « SEL » pour changer
les minutes. Conrmez vos choix en appuyant sur la touche « CLK ».
Page 26

26
Fonctionnement de la radio
Choix de la bande de fréquence
Appuyez plusieurs fois sur la touche « BND » pour choisir entre les trois bandes de
fréquence VHF (FM1, FM2 et FM3) ou les bandes AM1 et AM2.
Recherche
manuelle des
stations
Appuyez sur les èches « titre précédent » et « titre suivant » pour avancer petit à
petit dans la recherche des stations de radio.
Appuyez sur les èches « titre précédent » et « titre suivant » pour passer automatiquement à la station captable suivante.
Mono/stéréo
Appuyez plusieurs fois sur la touche « SEL » pour choisir entre les modes de réception mono et stéréo.
Enregistrer une
station
Vous pouvez enregistrer 6 stations pour chaque bande de fréquence, soit 30 station
au total. Maintenez une touche numéro enfoncée pour y enregistrer la station écoutée au même moment.
Recherche
automatique de
stations
Appuyez 3 secondes sur la touche « F/PS » pour lancer la recherche automatique.
La recherche est lancée et enregistre automatiquement les stations bien captées.
Local / DX
Appuyez plusieurs fois sur la touche « LOC »pour activer le menu LOC. Tournez le
bouton de réglage du volume pour choisir entre « LOC On » et « LOC OFF ».
RESET
Appuyez 3 secondes sur les touches « MOD » et « BND » pour remettre à zéro tous
les réglages et eacer toutes les stations enregistrées.
Fonctions RDS
AF Fréquence
alternative
Restez appuyé sur le bouton de réglage du volume pour obtenir un signal VHF optimal qui sera continuellement ajusté avec le signal de la station. Si la fonction AF est
activée et qu’un signal AF est reçu, un symbole correspondant s’aichera sur l’écran.
TA informations
routières
Maintenez la touche TA enfoncée pour activer le mode TA. Pour choisir entre les
deux modes « TA » (« TA SEEK » et « TA Alarm »), restez appuyé 2 secondes sur la
touche « SELECT ». Choisissez ensuite le mode souhaité en tournant le bouton du
volume.
PTY Type de
programme
Maintenez la touche PTY enfoncée pour activer le mode PTY. Vous pourrez choisir
entre les diérents types de programme à l’aide des touches des numéros 1 à 6.
Appuyez deux fois sur la touche PTY pour choisir parmi les programmes centrés sur
l’interlocuteur, vous pourrez sélectionner le programme souhaité avec les touches
1 à 6.
Mask DPI / Mask
All
Appuyez 2 secondes sur la touche « Sound Select » jusqu’à ce que l’écran aiche
« TA SEEK ». Vous pourrez choisir entre les modes « Mask DPI » et « Mask All » en
tournant le bouton de réglage du volume
Page 27

27
Retune long/
court
Appuyez sur la touche « Sound Select » jusqu’à ce que l’écran aiche « TA SEEK ». En
appuyant sur la touche « SELECT », vous pouvez maintenant choisir entre les intervalles de recherche longs et courts pour la fonction TA.
BT
Appairer
L’appareil est automatiquement en mode pairing (le symbole BT clignote). Connectez votre smartphone/tablette avec le MD-210BT (le symbole est allumé en continu)
et avec la touche MODE, changez pour le mode BT / d’autres modes.
Appeler
Quand vous composez un numéro, la fonction mains libres est automatiquement
activée et « Call Out » s’aiche sur l’écran. L’écran indique les appels entrants avec
« Call In ». Si l’appel est accepté, « BT Talk » s’aiche. Vous pouvez régler le volume
de l’appel à l’aide du bouton de réglage du volume.
Rejeter un appel L’écran aiche « End Call » quand vous rejetez un appel.
Lire de la mu-
sique
Si l’autoradio et l’appareil BT sont appariés, les titres que vous lancerez sur cet appareil seront lus par l’autoradio.
Supprimer le
pairing
Vous pouvez supprimer le pairing à l’aide de votre appareil connecté au BT.
Utilisation des ports USB et SD
Lire des titres de-
puis le support
USB/SD
Insérez un support USB ou SD dans le port correspondant sur le devant de
l’autoradio. Les titres MP3 ou WMA sont lus automatiquement. L’écran aiche soit «
USB Play » soit « SD/MMC ».
Changer le mode
de lecture
En appuyant plusieurs fois sur la touche « MODE » vous pouvez quitter ou revenir au
mode de lecture des supports USB et SD.
Recherche d’un
titre
• Appuyez sur les èches « titre précédent » ou « titre suivant » pour passer d’un
titre à l’autre.
• Appuyez sur la touche « F/PS ». Les numéros des titres s’aichent alors en cli-
gnotant sur l’écran. En tournant le bouton de réglage du volume, vous pouvez
naviguer parmi les titres disponibles. Appuyez sur « SELECT » pour conrmer
votre choix.
Aichage ID3 Les informations ID3 s’aichent automatiquement sur l’écran.
Lecture/Pause
Appuyez une fois sur la touche « Play/Pause » pour mettre la lecture en pause et une
fois de plus pour reprendre la lecture.
Fonction intro Appuyez sur la touche « 2 INT » pour lire les 10 premières secondes de chaque titre.
Page 28

28
Répétition
Appuyez sur « 3 RPT » pour répéter la lecture d’un titre. En appuyant de nouveau sur
cette touche, vous quitterez ce mode de lecture.
Lecture aléatoire
Appuyez sur « 4 RDM » pour lire les titres de manière aléatoire. En appuyant de
nouveau sur cette touche, vous quitterez ce mode de lecture.
Choix des dossiers
En appuyant sur les touches « 5 » et « 6 » vous pouvez naviguer dans la bibliothèque
MP3.
Utilisation des sorties AUX
Connectez la sortie LINE d’un lecteur de musique externe (comme un lecteur CD ou MP3) à l’entrée jack de
3,5mm sur le devant de l’autoradio pour lire de la musique.
Remarques pour la mise aux déchets
Si vous trouvez cette illustration (poubelle barrée avec des roues) sur le produit, vous
devez suivre la directive européenne 2002/96/EG. Ces produits ne doivent pas être jetés avec les ordures ménagères. Informez-vous sur les réglementations locales quant au
ramassage séparé des appareils électriques et électroniques. Suivez les réglementations
locales et ne jetez pas les appareils usagers dans la poubelle normale. En respectant les
réglementations, vous préservez l’environnement et la santé de vos voisins face à de
possibles conséquences négatives. Recycler permet de réduire l’utilisation des matières
premières.
Déclaration de conformité
Le constructeur de ce produit est CHAL-TEC GmbH, Wallstrasse 16, 10179 Berlin, Allemagne.
Ce produit correspond aux directives européennes suivantes :
2014/30/UE (CEM)
2014/35/UE (LVD)
2011/65/UE (RoHS)
 Loading...