

Page 1
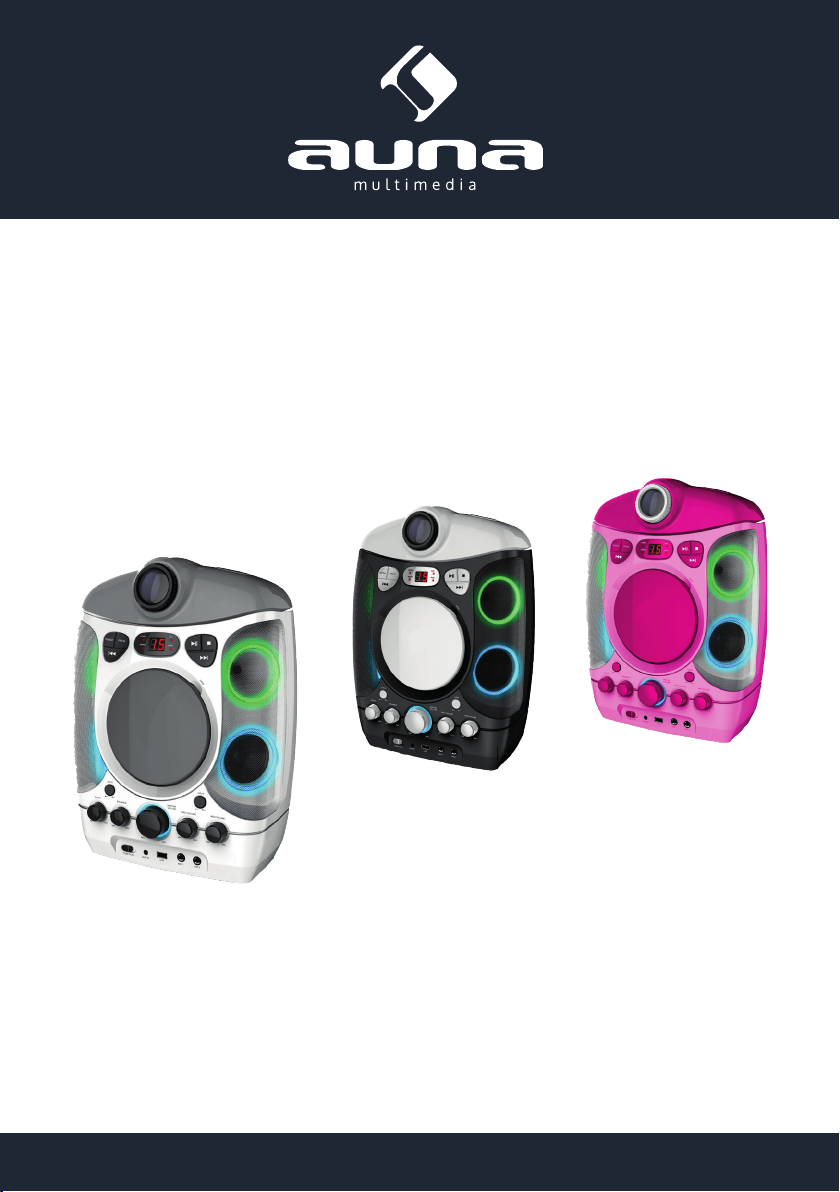
Kara Projectura
Karaokemachine mit Projektor
www.auna-multimedia.com10030546 10030547 10030548
Page 2
Sehr geehrter Kunde,
wir gratulieren Ihnen zum Erwerb Ihres Gerätes. Lesen Sie die folgenden Anschluss- und Anwendungshinweise sorgfältig durch und befolgen Sie diese, um möglichen technischen Schäden vorzubeugen.
Für Schäden, die durch Missachtung der Sicherheitshinweise und unsachgemäßen Gebrauch entstehen,
übernehmen wir keine Haftung.
Inhalt
Technische Daten ........................................................................2
Sicherheitshinweise ......................................................................3
Geräteübersicht ..........................................................................4
Einführung ...............................................................................7
Einrichtung ..............................................................................9
Projektor ................................................................................11
Bedienung der Funktionen ...............................................................14
Musikwiedergabe via CD+G, USB und AUX-IN ..............................................17
Problembehebung ...................................................................... 20
Hinweise zur Entsorgung .................................................................21
Entsorgung .............................................................................22
Konformitätserklärung ...................................................................22
Technische Daten
Artikelnummer 10030546, 10030547, 10030548
Stromversorgung (Netzgerät) 220-240 V~ 50/60 Hz
Abspielbare CD-Formate CD/CD+G/CD-R/CD-RW/MP3
Abspielbare Dateiformate über USB MP3
2
Page 3

Sicherheitshinweise
Schutz vor dem Aussetzen von Laserstrahlen
• Der Laserstrahl des CD-Players in diesem Gerät schadet den Augen. Versuchen Sie nicht das Gehäuse auseinanderzunehmen.
• Schalten Sie das Gerät umgehend aus, wenn Flüssigkeiten oder harte Gegenstände in das Gehäuse
gefallen sind.
• Berühren Sie die Linse nicht und stochern Sie daran nicht herum, sonst wird die Linse beschädigt
und das Gerät funktioniert nicht mehr richtig.
• Führen Sie keine Gegenstände in die Sicherheitsschlitze. Wenn dies geschieht, ist die Laserdiode
einschaltet, während die CD-Klappe noch oen ist.
• Wenn Sie das Gerät für lange Zeit nicht benutzen, gewährleisten Sie, dass die Stromversorgung
von Gerät getrennt wird.
• Dieses Gerät verwendet einen Laser. Eine andere Benutzung der Bedienelemente, Einstellungen
oder und Leistungsmodikationen als die angegebenen kann Sie einer gefährlichen Strahlung aussetzen.
Aufstellung
• Stellen Sie das Gerät nicht an Orten auf, die besonders heiß, kalt, staubig oder feucht sind.
• Stellen Sie das Gerät auf eine ache, ebene Oberäche.
• Behindern Sie die Luftzirkulation des Gerätes nicht, indem Sie es an einen schlecht belüfteten Ort
stellen, es mit einem Tuch abdecken oder es auf einen Teppich stellen.
Kondensation
• Wenn das Gerät in einem beheizten Raum stehen gelassen wird, wo es warm und feucht ist, können sich Wassertropfen oder Kondensat bilden.
• Wenn im Gerät Kondensation entsteht, funktioniert es nicht ordnungsgemäß.
• Lassen Sie das Gerät 1-2 Stunden stehen, bevor Sie es einschalten. Erwärmen Sie den Raum allmählich und lassen das Gerät vor dem Gebrauch trocken werden.
Bei Problemen ziehen Sie den Netzstecker und wenden sich an den Kundendienst.
Möbelschutz
• Dieses Gerät ist mit rutschfesten Gummifüßen ausgestattet, damit das Gerät sich beim Benutzen
der Bedienelemente nicht bewegt. Diese Füße bestehen aus abriebfestem Gummi, das speziell
dafür entwickelt wurde, um auf den Möbeln keine Spuren zu hinterlassen.
• Allerdings können einige Arten von Möbelpolituren auf Ölbasis, Holzschutzmittel oder Reinigungssprays das Material der Gummifüße so weich werden, dass sie Spuren bzw. Gummirückstände
auf den Möbeln hinterlassen. Um dies zu verhindern, empfehlen wir, auf der Unterseite Filzgleiter
aufzukleben, die es im Einzelhandel zu kaufen gibt.
3
Page 4
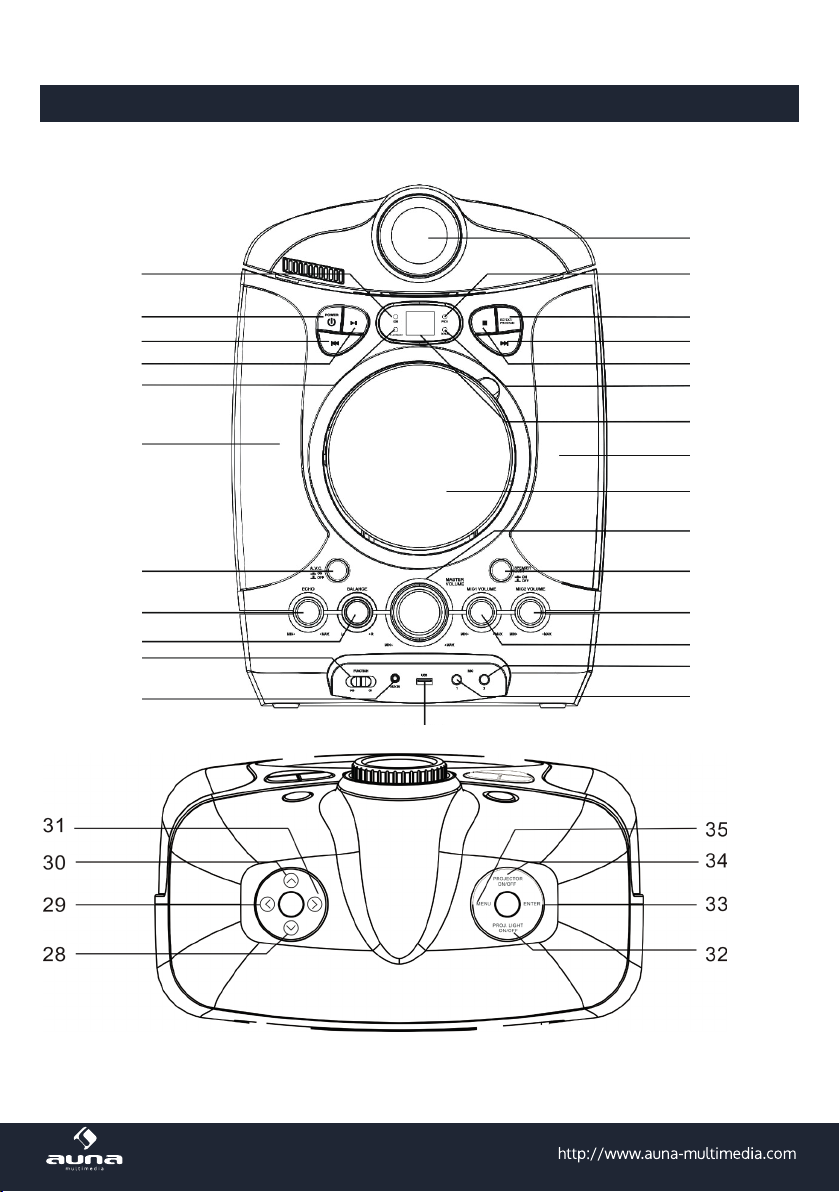
Geräteübersicht
1
27
26
25
24
23
22
21
20
19
18
17
2
3
4
5
6
7
8
9
10
11
12
13
14
15
16
4
Page 5

Elemente auf der Vorderseite
1 Projektorlinse
2 LED: Programm
3 Taste: Wiederholen / Programm
4 Taste: Nächster Titel
5 Taste: Stopp
6 LED: Wiederholung
7 Display
8 Lautsprecher rechts
9 CD-Klappe
10 Master Volume
11 Taste: Lautsprecherlicht (Light Show)
ein/aus
12 Lautstärkeregler Mikrofon: MIC2
13 Lautstärkeregler Mikrofon: MIC1
14 Mikrofoneingang: MIC2
15 Mikrofoneingang: MIC1
16 USB-Anschluss
17 AUX-Anschluss
18 Funktionswahlschalter: CD/USB
19 Drehregler: Balance
20 Drehregler: Echo
21 Taste: AVC (automatische Stimmsteuerung)
22 Lautsprecher links
23 LED: Play/Pause
24 Taste: Wiedergabe/Pause
25 Taste: Zurück
26 Taste: Ein/Aus
27 LED: CD-G
Tasten auf der Oberseite
28 Menü-Cursor hoch
29 Menü-Cursor links
30 Menü-Cursor runter
31 Menü-Cursor rechts
32 Projektorlicht ein/aus
33 Projektor-Eingabetaste
34 Projektor Ein/Aus
35 Projektor Menü
5
Page 6
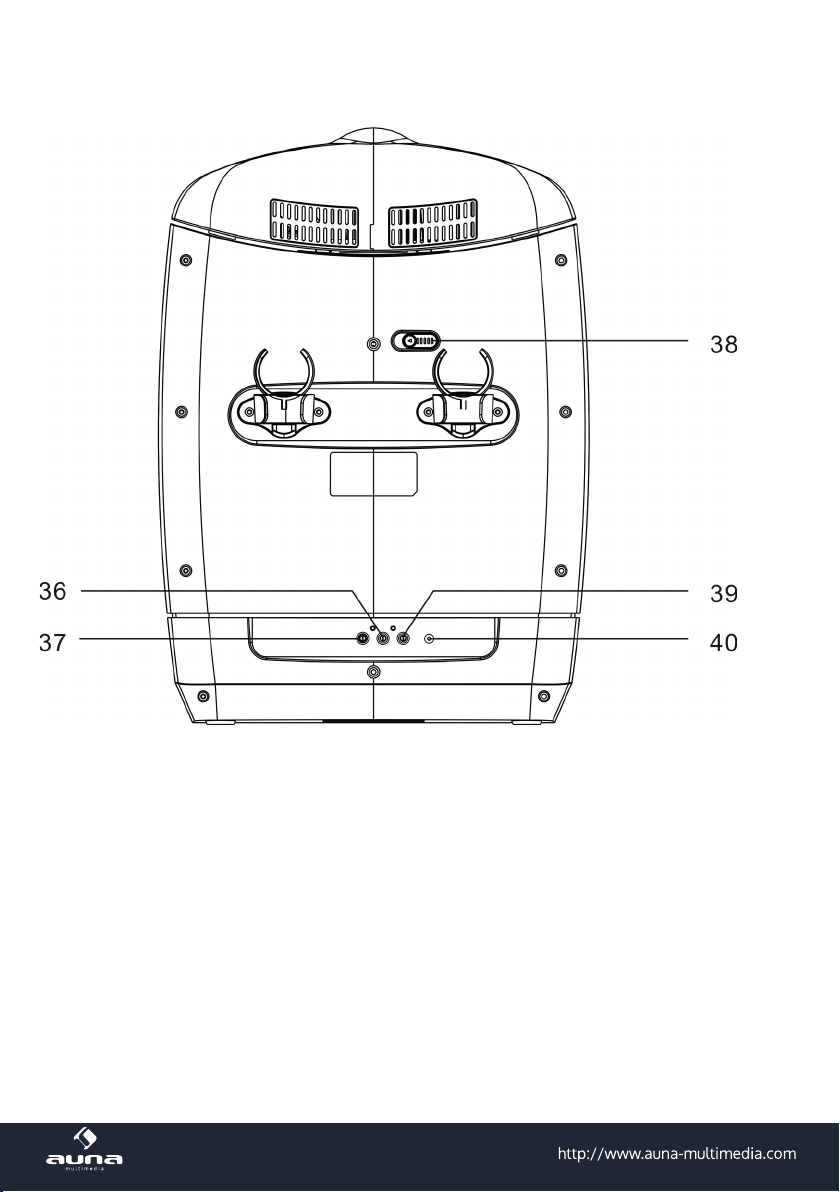
Elemente auf Rückseite
36 AUDIO-OUT-Ausgang (links)
37 AUDIO-OUT-Ausgang (rechts)
38 Schieber: Anheben des Projektors
39 Videoausgang
40 DC-Stromanschluss
6
Page 7

Einführung
Die Karaokeanlage
Dieses Grak-CD-Karaokesystem versorgt Sie mit Jahren Spaß und Unterhaltung. Werden Sie ein Star,
wenn Sie indem Sie zu Ihren liebsten Karaoke-CDs mitsingen und Ihre Stimme über die Lautsprecher
hören.
Das Karaokesystem hat ein kompaktes Design und ist trotz seiner vielen Funktionen leicht zu benutzen.
Nach einigen einfachen Anleitungen werden Sie zum Pro.
Bevor Sie die Anlage benutzen lesen Sie diese Bedienungsanleitung und machen Sie sich mit den ganzen Funktionen vertraut und mit den jeweiligen Kapiteln. Sehen Sie für die Funktion, die Sie benötigen
im jeweiligen Kapitel nach. Ein handelsübliches Fernsehgerät mit Cinch-Anschluss ist alles, was Sie
benötigen, um den Liedtext der CD+G anzeigen.
Glossar
Im Bereich der Unterhaltungselektronik werden einige Begrie insbesondere für Karaoke verwendet.
Das Glossar soll Sie mit der Welt des Karaoke vertraut machen.
Echo
Echo verleiht einer Stimme Tiefe und Resonanz, ohne die Musik zu beeinussen. Das Echo wird durch
die Erzeugung von etwas Feedback in der Stimme des Sängers erzeugt.
CDGM (Compact Disc Plus Graphics Multiplex)
Es gibt CDs mit Liedern mit der Stimme des Leadsängers, die mit Hilfe einer Karaokeanlage mit Balance- oder Mulitplex-Steuerung herausgenommen werden können. So können Sie mit dem Leadsänger
zusammen singen oder seine Stimme durch die Ihrige ersetzen. Die Backgroundstimmen und -sänger
bleiben erhalten.
AVC (Automatic Voice Control - automatische Stimmensteuerung)
Wenn AVC aktiviert ist, wird die Stimme einer Aufnahme ausgeblendet, sobald Sie ins Mikrofon singen.
Wenn der Karaokesänger aufhört zu singen, wird die Stimme des Interpreten wieder eingeblendet.
Dies ist vor allem nützlich, wenn Sie ein Lied üben. Beachten, dass die AVC-Funktion nur mit Mulitplexaufnahmen und nicht mit herkömmlichen Aufnahmen funktioniert.
CD+G
Dies ist ein Akronym für
Graphics
CD+G beinhaltet auch einfache Grakfunktionen (keine Vollformatvideos). Für Karaoke wird die Grak
genutzt, um die Liedtexte synchron mit der Musik anzuzeigen. Meist markiert die CD+G-Software die
gerade zu singende Liedzeile farbig.
. Hier handelt es sich um reguläre CDs mit Informationen auf einer zusätzlichen Datenspur. Die
Compact Disc plus Graphics
. Sie begegnen auch den Varianten
CD+G
und
CD-
7
Page 8

Leistungsmerkmale:
Liedtext auf dem Fernsehbildschirm Bei bei der Wiedergabe wird der Liedtext syn-
chron zur Musik angezeigt.
Balance-Steuerung Lässt Sie die Balance zwischen der voraufge-
zeichneten Stimme und der Musik steuern,
wenn Sie eine Multiplex-Karaoke-CD verwenden
Audio Voice Control (AVC) Damit können Sie die Originalstimme durch
Ihre eigene Stimme ersetzen. Die Mikrofonlautstärke und AVC einstellen, um die richtige
Balance zwischen dem Playback und der Mik-
rofonlautstärke zu nden.
Echo-Regler Zum Hinzufügen eines Echos, um die Stimme
mit einem Konzerthallenklang zu belegen.
Eingebaute Lautsprecher Lassen Sie Ihre Familie und Freunde an der
Musik teilhaben
Audioausgänge Zum Anschluss anderer Audiokomponenten
wie einem Equalizer/ Booster oder einer PAAnlage.
Videoausgänge Anzeige der TV/Monitore, die Liedtexte einer
CD+G anzeigen.
8
Page 9
Einrichtung
Anschluss
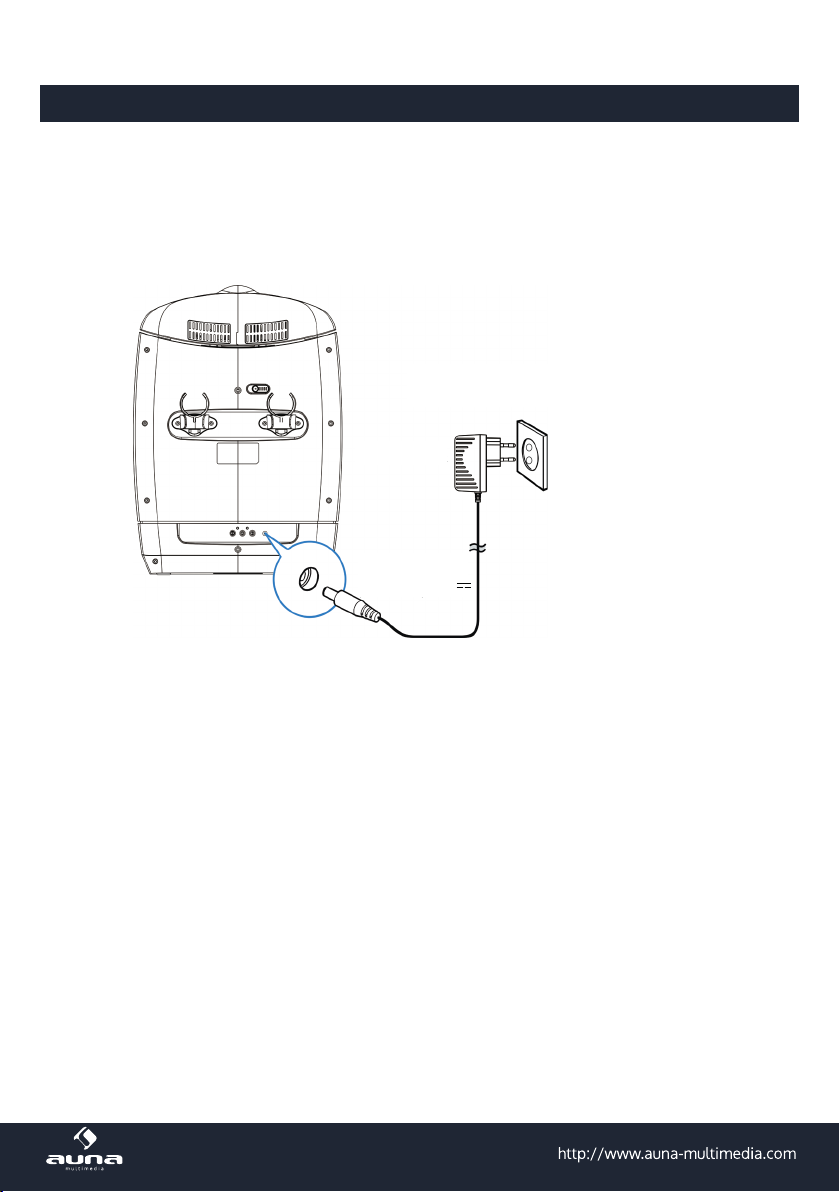
Schließen Sie das dabeiliegende Netzgerät auf der Rückseite des Gerätes an und stecken Sie es in eine
Steckdose mit einer Stromversorgung von 220-240 V~ 50/60 Hz.
Hinweis: Wenn das Gerät lange benutzt wird, trennen Sie das Netzgerät vom Gerät und
von der Steckdose.
Wandsteckdose
220-240 V~
Netzgerät
Stecker
12 V 3,5 A
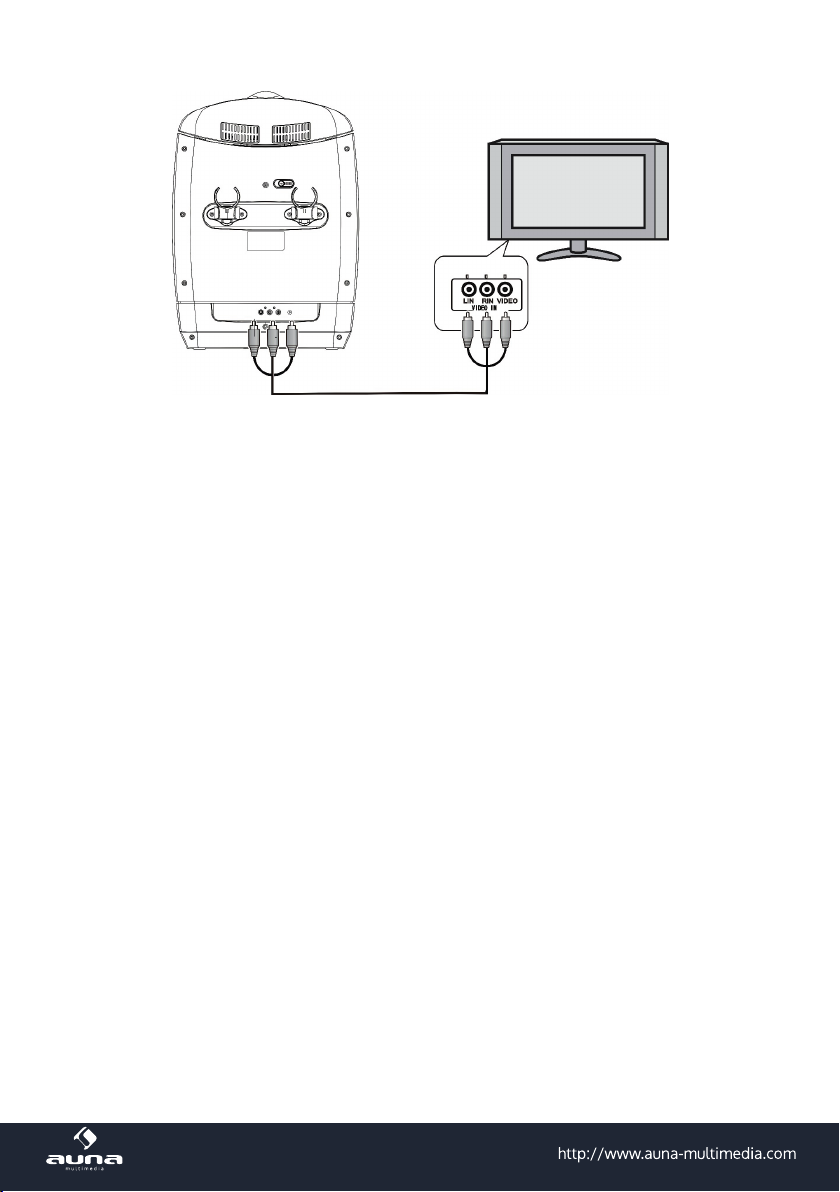
Anschluss an den Fernseher
Die Karaokeanlage hat ein Verbindungskabel mit der Möglichkeit, das Gerät an ein externes Audiobzw. Videogerät anzuschließen. Das Verbindungskabel hat auf jeder Seite drei Cinch-Stecker. Weiß und
Rot stehen für den linken und rechten Audiokanal. Gelb steht für das Videosignal. Moderne Flachbildfernseher und Heimaudiosysteme sind in der Regel mit farbigen Cinchbuchsen ausgestattet, um den
richtigen Anschluss zu erleichtern. Am besten eine CD+R in die Karaokeanlage einlegen, bevor Sie das
Kabel anschließen. Sobald Sie den Liedtext auf dem Bildschirm Ihres Fernsehers sehen, wissen Sie,
dass der Fernseher richtig eingestellt ist.
Videoanschluss
Zur Anzeige des Liedtextes der CD+G auf dem Fernseher:
1. Die Verbindungskabel mit der Farbkodierung bereithalten.
2. Das Videokabel (gelb) in den Vidoanschluss (VIDEO OUT) auf der Rückseite der Karaokeanlage
stecken.
3. Das andere Ende des Videokabels (gelb) an den Video/AV-Eingang ihres Fernsehers stecken.
9
Page 10
Wenn Ihr Fernseher nicht über den erforderlichen Videoeingang verfügt, brauchen Sie einen RF-Modulator, der eine Verbindung über den Antenneneingang herstellt. Der RF-Modulator kann im Fachhandel
erworben werden.
Wenn Sie die Anlage mit Videoanschluss eines Fernsehers verbinden, müssen Sie am Fernseher die
Quelle wählen. Sehen Sie dazu in der Bedienungsanleitung Ihres Fernsehers nach. Falls Sie für Ihren
Fernseher keine Bedienungsanleitung mehr haben wenden Sie sich an den Kundendienst des jeweiligen Fernsehgeräteherstellers. Nur dort erhalten genaue Informationen darüber, wie Sie zur Anzeige des
Videoeingangs umschalten.
Hinweis: Einige Projektions-TV-Geräte zeigen nicht standardmäßig den blauen Hintergrund
an, der bei den meisten CD+G-Disks verwendet wird. Wenn die Hintergrundfarbe nicht
gleichmäßig ist oder ackert, versuchten Sie es mit dem Anschluss an einen Fernseher, mit
einem Standard CRT/LCD-Display.
Audioverbindung
Schließen Sie die Kabel mit den weißen und roten Stecker auf der einen Seite an den Audioausgang der Karaokeanlage und auf der anderen Seite den Audioeingang des Fernsehers
(mit AUDIO IN oder AUX markiert) an. Die roten Stecker gehören in die rotfarbeigen Buchsen und die weißen Stecker in die weißfarbigen Buchsen.
Mikrofonanschluss
1. Schließen Sie ein Mikrofon an den Anschluss MIC 1 oder MIC2 auf der linken Seite des Gerätes an
(ein Mikrofon ist im Lieferumfang inbegrien). Das Mikrofonsignal wird mit der Quelle (CD/CD+G/
USB-Speicher) gemixt.
2. Schalten Sie das Mikrofon ein (auf ON schalten), bevor Sie singen. Schalten Sie es nach der Benutzung wieder aus (auf OFF) schalten.
Achtung: Nicht auf das Mikrofon klopfen oder das Mikrofon fallen lassen. Es kann zu einem
dauerhaften Schaden führen. Das Mikrofon nicht am Kabel halten oder schlenkern.
10
Page 11
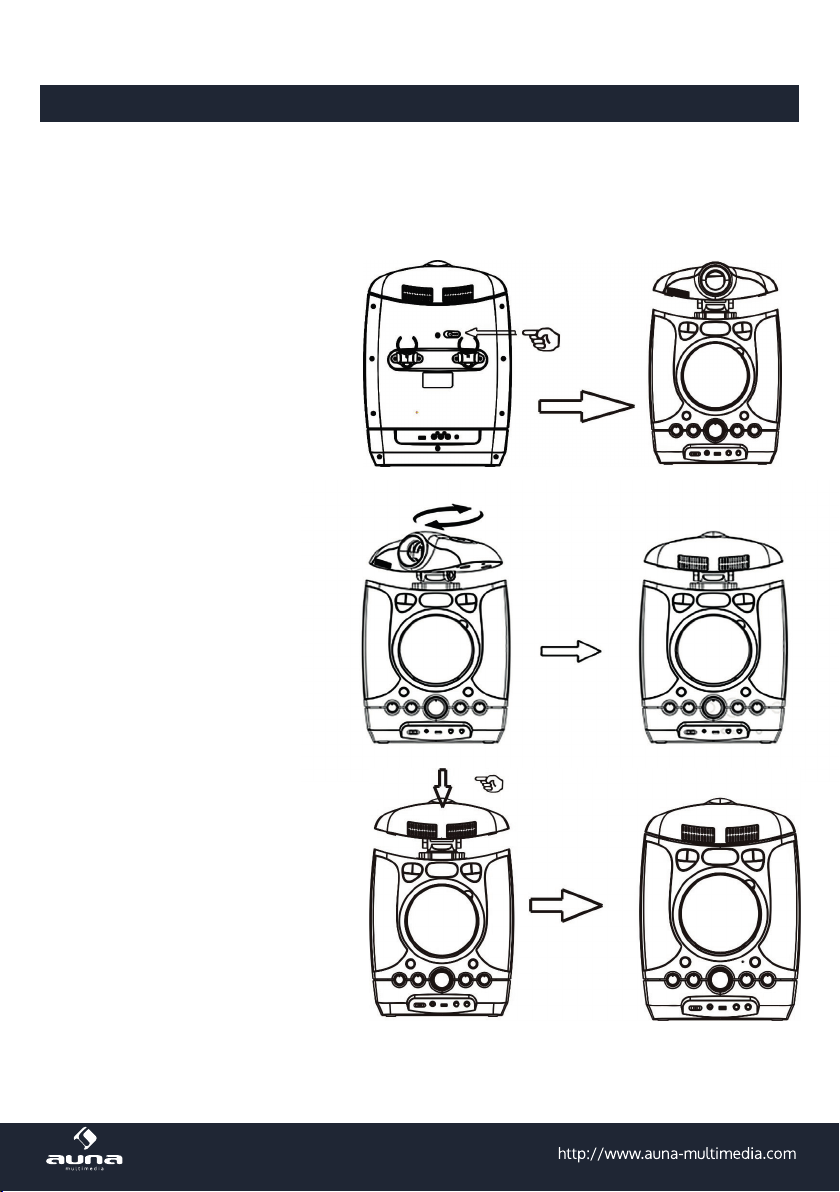
Projektor
Projektor einrichten
Die Linseneinstellung ermöglicht mehr Auswahl bei der Aufstellung der Anlage und dem Betrachten
des Bildes.
A: Den Schalter schieben, um den
Projektorkopf anzuheben.
B: Den Projektorkopf drehen.
C: Den Projektorkopf nach unten
drücken, um ihn festzustellen.
11
Page 12
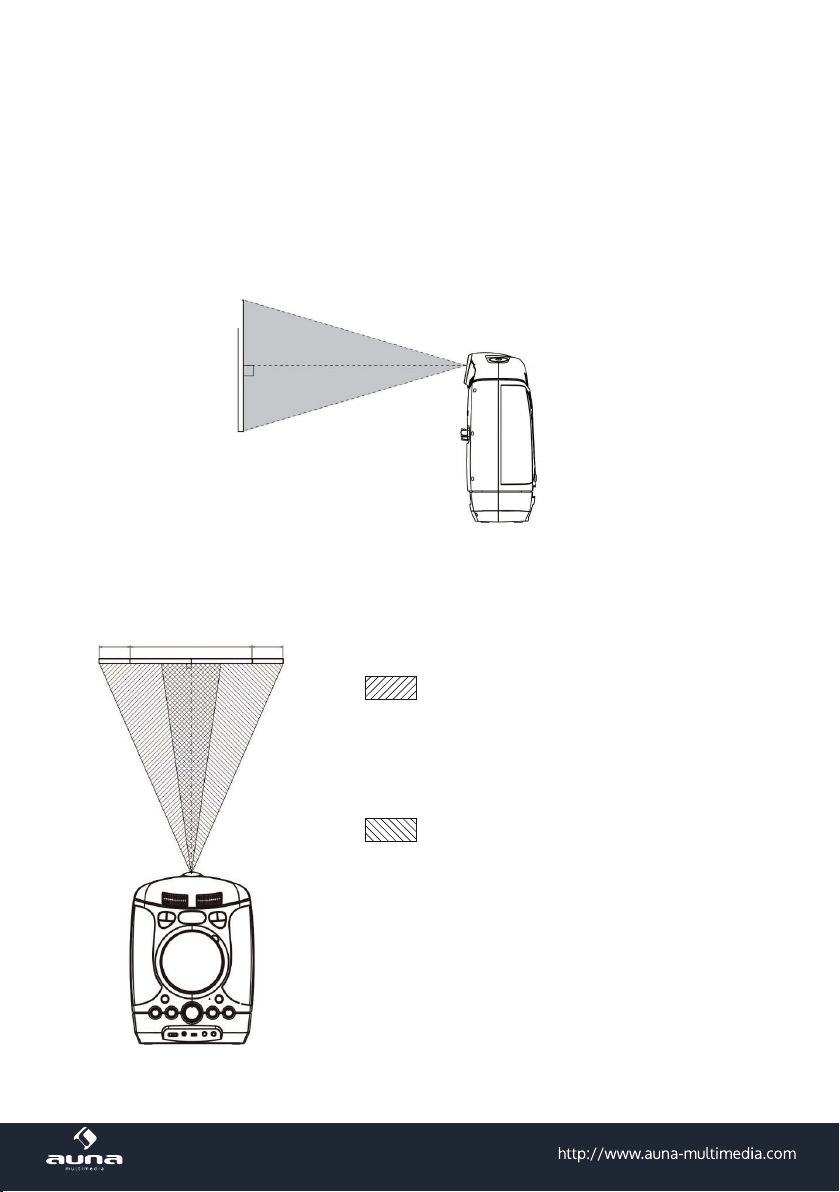
Die Karaokeanlage aufstellen
Die Entfernung der Anlage zur Projektionsäche variiert und hängt von der Größe der Leinwand ab und
davon, wie Sie die Linse einstellen. Stellen Sie die Anlage so auf, dass sie zur Größe der Leinwand passt.
Einzelheiten zum Abstand zwischen Gerät und der Projektionsäche
1. Parallel zur Projektionsäche aufstellen
Projektionsäche
Seitenansicht
2. Die horizontale Position einstellen
Das Bild, das auf die Leinwand projiziert wird, bewegt sich maximal 31 Prozent der Bildbreite von der
Mitte der Linse nach links oder rechts.
Bildposition, wenn das Bild zur äußersten Position
nach rechts bewegt wurde.
Bildposition, wenn das Bild zur äußersten Position
nach links bewegt wurde.
Draufsicht
12
Page 13
3. Projizieren Sie ein Bild auf die Projektionsäche und stellen Sie das Bild so ein, dass es zur Fläche
passt. Wenn Sie eine unebene Projektionsäche verwenden, können Streifenmuster im Bild und
auf dem Gerät entstehen, abhängig vom Abstand zwischen Gerät und Projektionsäche und dem
Vergrößerungsfaktor. Dies ist keine Fehlfunktion des Gerätes.
Den Projektor in Betrieb nehmen und ausschalten
4. Drücken Sie die Taste ON/OFF, um die Anlage einzuschalten. Der Linsenschutz önet sich.
5. Die „Projektor LED“ Taste drücken.
6. Die Projektor-Menü-Taste drücken, um in das Menü zu gelangen. Die Tasten / und /
drücken, um das gewünschte Menü zu wählen und verschiedene Einstellungen vorzunehmen. Zum
Bestätigen die Taste ENTER drücken.
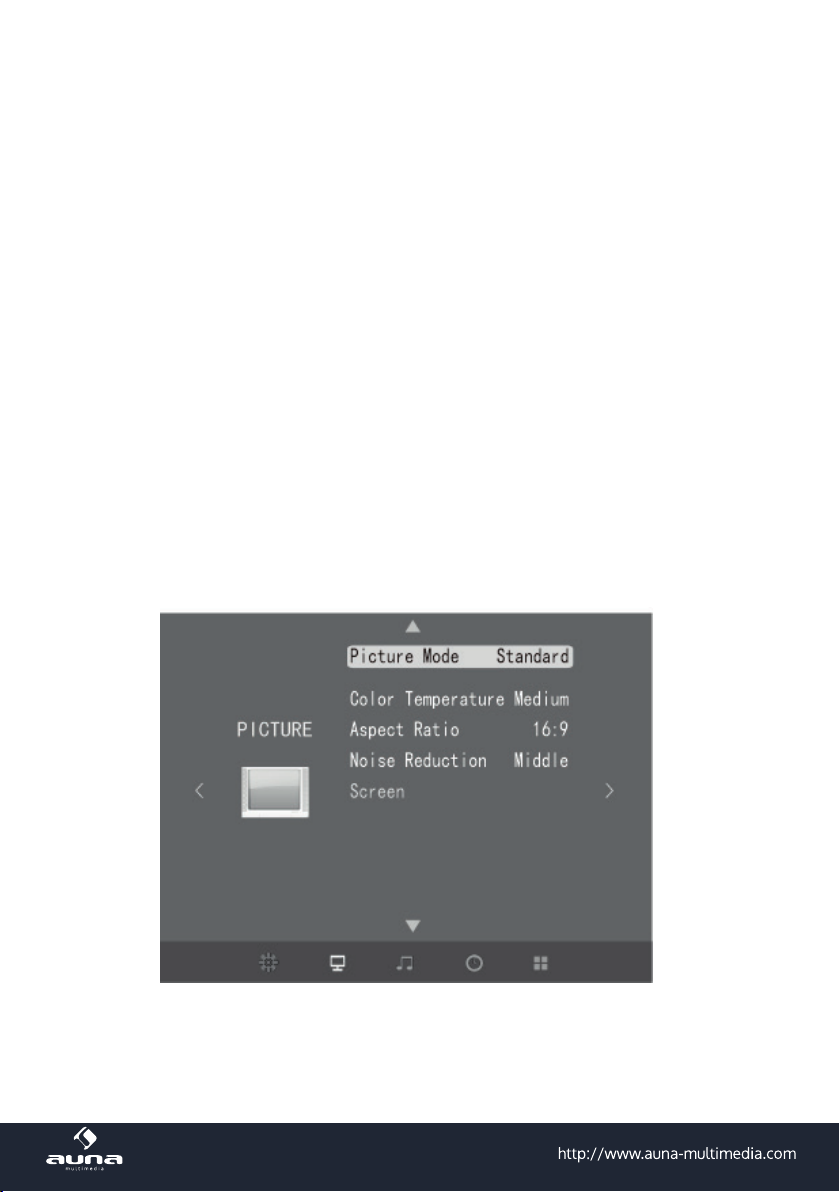
Bildmenü
Bildmodus, Farbtemperatur, Seitenverhältnis, Rauschminderung, Bildschirmoptionen.
Beachten Sie, dass die Menüs sich je nach ausgewählter Signalart unterscheiden können
Den Projektionsfokus einstellen
Die Projektorlinse ist senkrecht zum Projektionsschirm angeordnet. Drücken Sie die ProjektormenüTaste, um den Menübildschirm anzuzeigen. Drehen Sie die Linse, bis der der Text klar zu sehen ist.
13
Page 14

Bedienung der Funktionen
Einschalten und Playback
1. Funktionswahl (CDG/USB)
• Den CD/USB-Wahlschalter in die Stellung CD schieben, um CDs, MP3, CD+G und CD-R/CD-RWDisks wiederzugeben.
• Den CD/USB-Wahlschalter in die Stellung USB schieben, um MP3 auf einem USB-Stick wiederzugeben.
• Wenn die AUX IN-Buchse belegt ist, geht das Gerät automatisch in den AUX-Modus über. Sie können
den AUX-Anschluss an den Audioausgang (z. B. Kopfhörerausgang anderer Musikquellen anschließen (IPod, MP3 oder andere digitale Abspielgeräte).
2. Ein/Aus-Schalten
Diese Taste drücken, um das Gerät einzuschalten.
Diese Taste gedrückt halten, um das Gerät auszuschalten.
3. drücken.
Einmal darauf tippen, um das gewählte Lied zu wählen, wenn Sie eine CD/CD+G/CD-R/CD-RW-Disk
oder MP3-Dateien auf einem USB-Speichermedium abspielen.
Während der Wiedergabe noch einmal drücken, um das Lied anzuhalten. Die PLAY/PAUSE-Anzeige
blinkt.
4. STOP
Lied anhalten
5.
Zum nächsten Titel springen.
6.
Zum vorherigen Titel springen.
7. Taste REPEAT/PROGRAM
Wiederholfunktion (REPEAT)
Während der Wiedergabe von CD/CD+G/CD-R/CD-RW/USB
• 1x drücken: Wiederholung des aktuellen Titels (Repeat1)
• 2x drücken: Wiederholung aller Titel (Repeat All)
• 3x drücken: Beenden der Wiederholung
14
Page 15
Programmfunktion
Mit dieser Funktion können die Titel in einer programmierten Reihenfolge abgespielt werden. Dazu
muss die Wiedergabe angehalten sein ( drücken).
1. Die PROGRAM-Taste drücken. Die Programmnummer 01 erscheint im Display und die ProgrammLED blinkt.
2. oder drücken, um vor- oder zurückzublättern und den zu programmierenden Titel auszuwählen.
3. Die PROGRAM-Taste erneut drücken, um die Auswahl zu speichern. Die Programmnummer rückt
auf 02 vor, um die nächste Eingabe entgegenzunehmen.
4. Wiederholen Sie die Schritte Nr. 2 und 3, um bis zu 20 Titel zu programmieren. Sobald Sie den
zwanzigsten Titel eingegeben haben. Im Display erscheint „FU“, was anzeigt, dass der Programmspeicher voll ist.
5. Drücken Sie
gramms beenden.
6. Sie können die Funktion REPEAT wiederholt verwenden, um einem bestimmten Titel (Repeat 1)
oder alle Titel abzuspielen.
7. Der CD-Player stoppt, wenn alle programmierten Titel einmal abgespielt wurden. Um die Programme zu wiederholen, drücken Sie die Taste PLAY/PAUSE.
8. Um die Wiedergabe des Programms abzubrechen, drücken, während die Wiedergabe läuft, oder
die CD-Klappe önen, wenn der CD-Player angehalten ist.
Sie können bis zu 20 (CD)/99 (MP3)
Titel programmieren.
Falls Sie versuchen mehr als 20
(CD)/99 (MP3) Titel zu programmieren wird [FU] bzw. [PROG FULL] im
Display angezeigt.
, um das Abspielen des Programms zu starten. Mit die Wiedergabe des Pro-
Abspielen der Programmliste
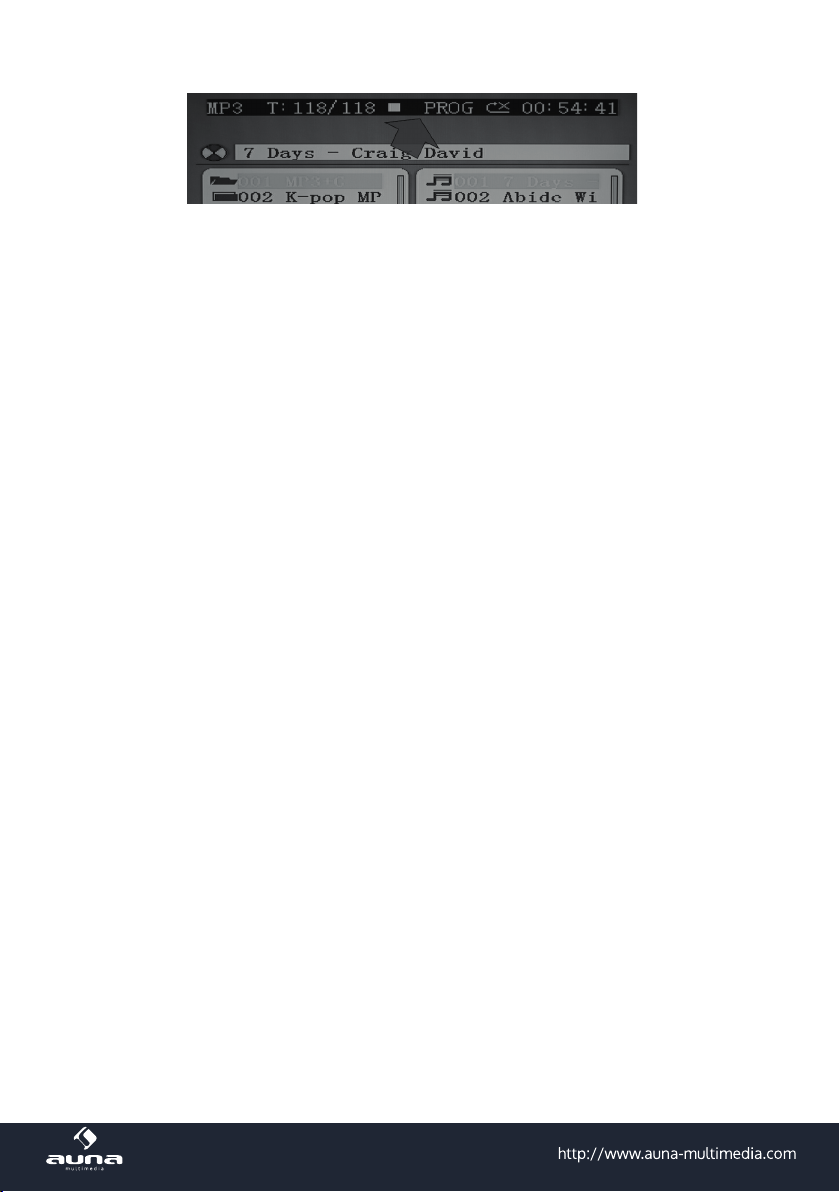
Wenn die Programmierung abgeschlossen ist, zur Bestätigung die -Taste drücken und die Wiedergabe des Programms starten, die Programm-LED im Display leuchtet auf. Während der Wiedergabe
können Sie die Tasten oder drücken, um zum gewünschten Titel der Programmliste zu springen.
Um die Wiedergabe das Programms zeitweise anzuhalten, einmal drücken. Die Programmanzeige im
Display und auf dem TV bleibt bestehen.
15
Page 16
Die -Taste drücken, um mit der Wiedergabe fortzufahren.
Hinweis: Wenn Sie 2x drücken, brechen Sie die Programmwiedergabe ab und löschen die
Programmliste vollständig. Die Programmanzeige im Display verschwindet.
Ansehen der Programmliste:
Bei angehaltenem Gerät können Sie die Programmliste mit den Tasten und betrachten.
Eingänge
• DC–Stromanschluss: Den 12-V-DC-Stecker des Netzgeräts an diese Buchse anschließen.
• USB-Anschluss: Ein USB-Gerät (formatiert mit FAT32) mit bis zu 32 GB an diesen Anschluss anschließen, um MP3-Dateien wiederzugeben (nicht im Lieferumfang enthalten).
• AUX-IN-Eingang: Zum Anschluss des 3,5-mm-Cinchsteckers eines Stereo-Audiokables (nicht im Lieferumfang enthalten).
• MIC 1 / MIC 2-Anschlüsse: Das Mikrofon an einen dieser Anschlüssen anschließen. Im Lieferumfang
ist ein Mikrofon enthalten.
Ausgänge
• VIDEO-OUT-Anschluss: Den gelben Cinchstecker anschließen.
• AUDIO-OUT-Anschluss (L/R): Den weißen (L) und den roten (R) Cinchstecker anschließen.
• Lautsprecher: Das Gerät verfügt über zwei eingebaute Lautsprecher.
Karaokefunktionen
• MASTER VOLUME: Drehen Sie an diesem Regler, um die gewünschte Lautstärke für den eingebauten
Lautsprecher einzustellen.
• BALANCE CONTROL: Einstellen, um beim Abspielen einer CD+G oder MP3 die optimale Musik- und
Gesanglaustärke zu haben oder auf dem linken und rechten Kanal die richtige Balance einzustellen.
• AVC (automatische Sprachsteuerung): Wenn die automatische Sprachsteuerung eingeschaltet ist,
wird die Gesangsstimme auf einer Mulitplex-Aufnahme ausgeblendet, sobald jemand ins Mikrofon
singt. Wenn der Sänger mit dem Singen aufhört, wird die Stimme der Mulitplexaufnahme wieder
einblendet. Diese Funktion wird hauptsächlich während Übungsaufnahmen ausgeführt.
• Mikrofonlautstärke: Einstellen, um beim Singen die gewünschte Mikrofonlautstärke zu erhalten. Sie
wird für die Eingänge MIC1 und MIC2 gleichzeitig eingestellt.
• ECHO: Diesen Regler im Uhrzeigersinn drehen, um einen größeren Echoeekt zu erzielen und der
Stimme einen Konzerthalleneekt hinzuzufügen.
16
Page 17
Musikwiedergabe via CD+G, USB und AUX-IN
Vorbereitung
• Verbinden Sie die Karaokeanlage über das mitgelieferte AV-Kabel mit einem kompatiblen Fernsehgerät.
• Schließen Sie das beiliegende Mikrofon an den Anschluss MIC1 oder MIC2 an.
Hinweis: Stellen Sie das Mikrofon stets in die Position AUS bis Sie bereit sind zu singen, um
mögliche Rückkopplungsgeräusche zu vermeiden.
Zur einer CD+G,CD, CR-R/CD-RW oder MP3 singen
1. Den Funktionwahlschalter auf CD stellen.
2. Legen Sie die CD wie folgt ein: Greifen Sie die CD-Tür am oberen Rand und ziehen Sie leicht daran,
um sie zu önen. Das Display geht an und zeigt [OP] an. Legen Sie die CD vertikal ein, die bedruckte Seite sollte zu Ihnen zeigen. Schließen Sie die Tür sanft. Das Gerät beginnt die CD zu lesen. Das
Display zeigt die gesamte Anzahl der Titel an. Falls keine CD geladen ist oder die CD nicht erkannt
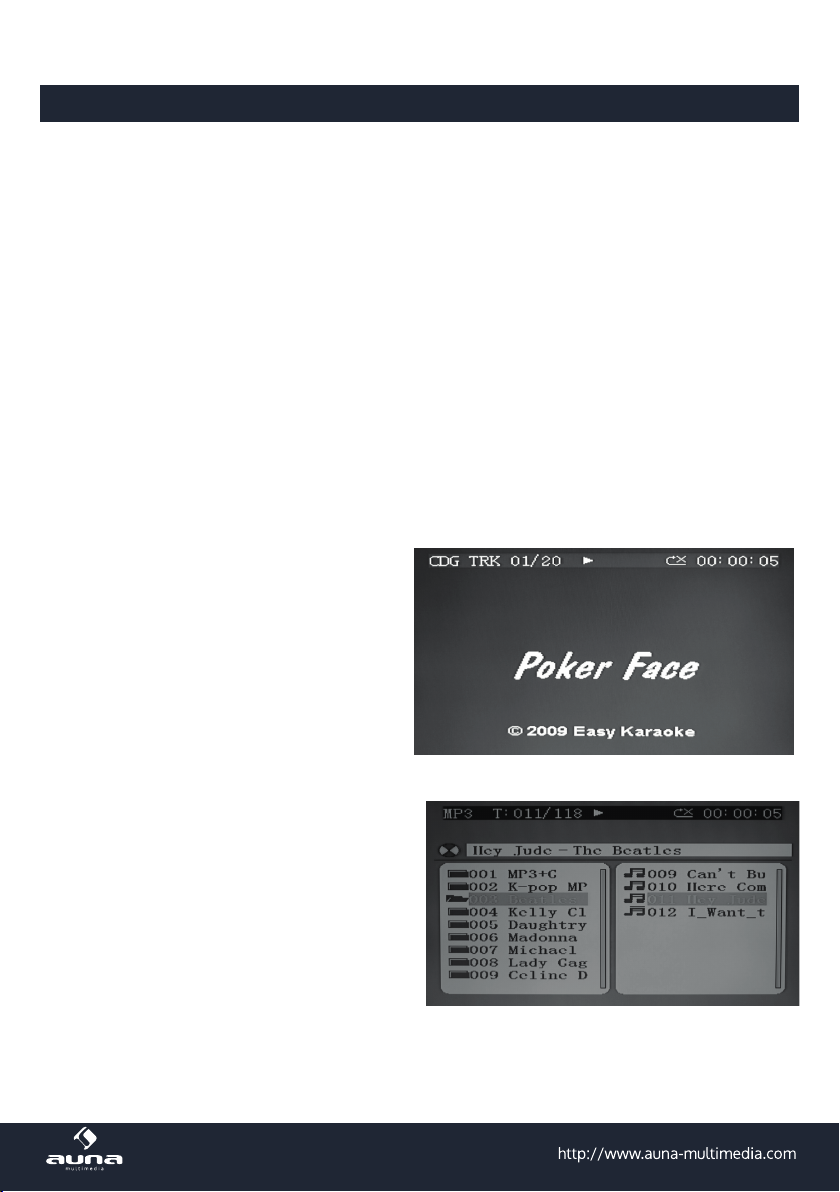
wird, zeigt das Display [NO] an. Wenn das Gerät eine CD+G Disk erkennt und abspielt, erscheint
CDG im Display.
3. Drücken Sie auf die Play/Pause-Taste, um
die CD abzuspielen. Falls das Gerät eine
CD+G Disk erkennt wird ein ähnlicher
Bildschirm wie dieser angezeigt.
Falls Sie selbstgebrannte CD-R/CD-RW
oder MP3-Files via USB abspielen wird
dieser Bildschirm angezeigt.
In der obersten Menüzeile sehen Sie die
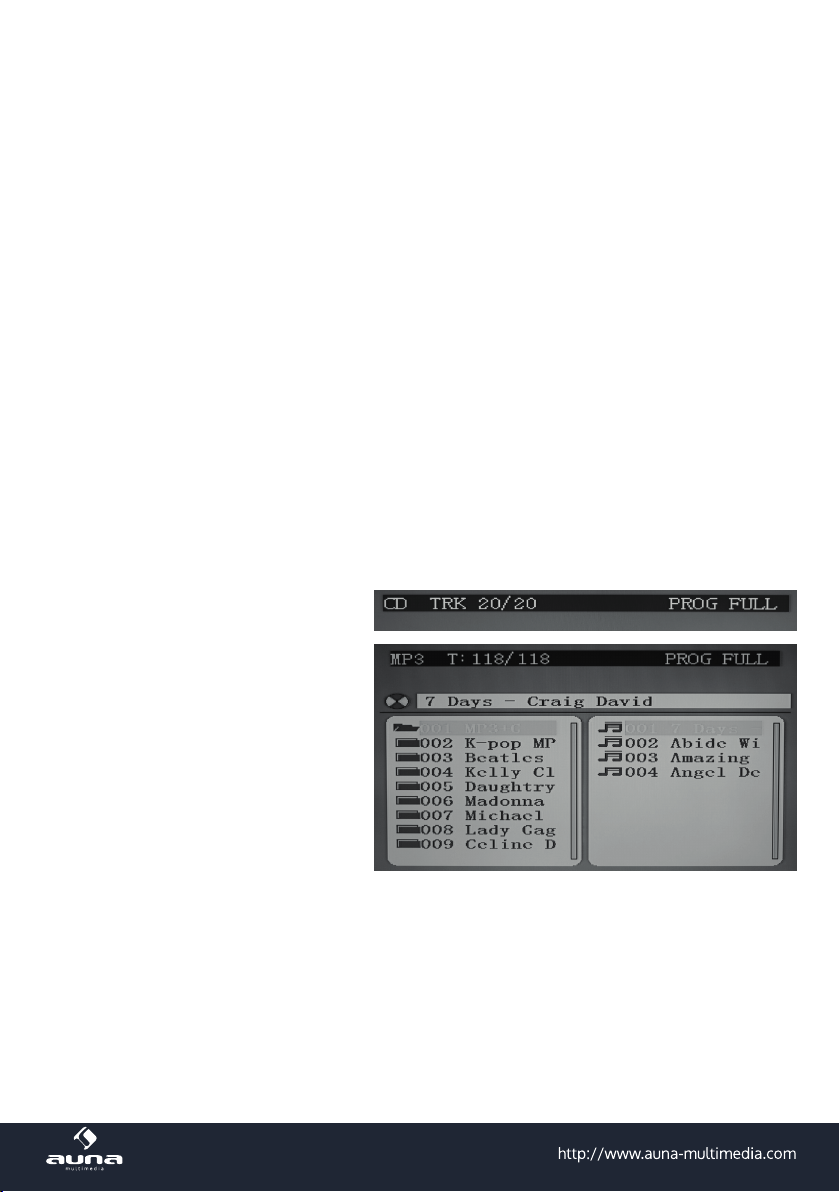
Anzeige [T: 011/118]. Das bedeutet: Track 11
von insgesamt 118 Tracks wird abgespielt.
17
Page 18
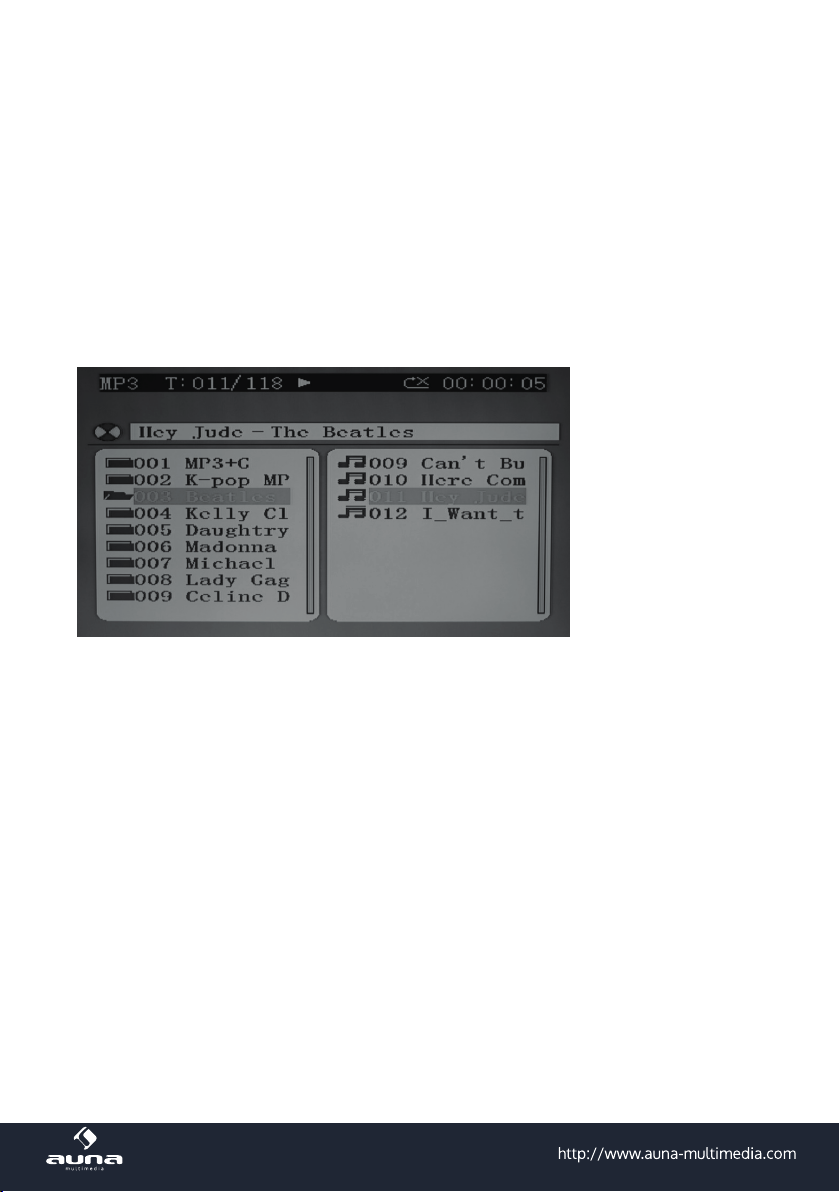
Falls die Anzahl der Titel auf CD/USB mehr als 99 beträgt, werden die ersten zwei Zahlen der
Track-Nummer durch die Buchstaben A bis F ersetzt (a=10, b=11, c=12, d=13, e=14, f=15). Wenn die CD
beispielsweise 118 Titel enthält, gibt das Display für den Titel 118 die Anzeige [b8] aus. Falls Anzahl
der Titel mehr als 159 beträgt, gibt das Display ab Titel 160 die Anzeige [99] aus. Falls sie das Gerät
an Ihren Fernseher angeschlossen haben, wird der komplett Inhalt angezeigt. Benutzen Sie die
Tasten Vorwärts, Rückwärts, Play/Pause und Stop genau wie im CD-Modus.
4. Wählen Sie mit der Vorwärts/Rückwärts-Taste, den gewünschten Titel aus.
5. Drücken Sie auf die Play-Taste, um den Titel abzuspielen.
6. Schalten Sie das Mikrofon ein und beginnen Sie zu singen. Passen Sie die Lautstärke falls nötig
mit dem Master-Regler, dem Regler für die Mikrofon-Lautstärke und dem Lautstärke-Regler am
Fernseher an.
Wichtige Hinweise zum Abspielen von CDs
• Das CD-Laufwerk kann alle Kauf-CDs problemlos lesen. Das Gerät liest auch selbstgebrannte CD-R/
CD-RW, es kann aber bis zu 10 Sekunden dauern, bis die Wiedergabe zu startet. Wenn die Wiedergabe nicht startet, liegt es wahrscheinlich an der Qualität der CD-R/CD-RW und/oder der Kompatibilität der CD-Compilation-Software. Der Hersteller ist nicht verantwortlich für die Wiedergabequalität von CD-R/CD-RW-Discs. Bringen Sie keine Aufkleber an beiden Seiten der CD-R/CD-RW an,
dies führt zu Fehlfunktionen.
• Wenden Sie keine übermäßige Kraft an, wenn Sie auf die CD-Tür drücken, während eine CD abgespielt wird.
• Legen Sie nicht anderes, als Compact-Discs in das Disc-Fach ein. Fremdkörper können das Gerät
beschädigen.
• Legen Sie immer nur eine einzige Disc in das Disc-Fach zu ein.
18
Page 19

So singen Sie zu Musik von AUX-Geräten
Das Gerät ermöglicht es, zu Musik von externen AUX-Geräten, wie iPod, MP3-Player oder anderen digitalen Ausgabegeräten zu singen.
1. Verbinden Sie den Kopfhörer-Ausgang ihres externen Geräts mit dem AUX-Eingang an der Karaokeanlage. HINWEIS: Das benötigte Kabel ist nicht im Lieferumfang enthalten.
2. Schalten Sie die Karaokeanlage ein und sie wechselt automatisch in den AUX-Modus, sobald ein
externes Gerät über den AUX-Eingang verbunden ist.
3. Verbinden Sie den Kopfhörer-Ausgang ihres externen Audio-Geräts (CD-Player, MP3-Player, iPhone,
iPod, etc.) über ein Audiokabel mit dem Gerät. HINWEIS: Das Audiokabel ist nicht im Lieferumfang
enthalten.
4. Wählen Sie den gewünschten Titel am externen Gerät aus. Stellen Sie die gewünschte Lautstärke
am externen Gerät ein, falls das Gerät über den Kopfhörer-Ausgang mit der Karaokeanlage verbunden ist.
5. Schalten Sie das Mikrofon ein und beginnen Sie zu singen. Regeln Sie die Lautstärke über den
Master-Regler oder den Regler für die Mikrofonlautstärke.
6. Benutzen Sie den Balance- und Echo-Regler, um den Klang nach Ihren Wünschen anzupassen.
7. Schalten Sie nach dem Gebrauch alle Geräte und das Mikrofon aus.
HINWEIS: Sobald sie ein AUX-Gerät anschließen wechselt die Karaokeanlage automatisch
in den AUX-Modus, egal auf welcher Funktion sich die Schieber benden. Entfernen Sie das
AUX-Kabel nach dem Gebrauch, um wieder in den CD/USB-Modus zu wechseln.
Das Gerät als Lautsprecher benutzen
Sie können das Gerät auch als reinen Lautsprecher benutzen. Um Feedback während der Benutzung zu
vermeiden, halten Sie das Mikrofon während der Benutzung nicht zu nah an den Lautsprecher.
1. Beenden Sie das Abspielen von CD oder USB und entfernen Sie den 3,5-mm-Klinkenstecker, falls
einer mit dem AUX-Ausgang verbunden sein sollte.
2. Schalten Sie das Mikrofon ein und beginnen Sie. Regeln Sie die Lautstärke über den Master-Regler
oder den Regler für die Mikrofonlautstärke.
LED-Lichtshow
• Die Lightshow im Inneren des Lautsprechers und in den unteren Ecken des Geräts reagiert automatisch auf die Musik, die gegenwärtig abgespielt wird.
• Um die Lightshow zu starten, schieben Sie den Schieber für die Lightshow auf ON.
• Schieben Sie den Schieber auf OFF, um die Lightshow auszuschalten.
Hinweis: Wenn die Helligkeit blendet, schalten Sie das Licht im Raum ein oder schalten Sie
die LED-Lichtshow aus.
19
Page 20
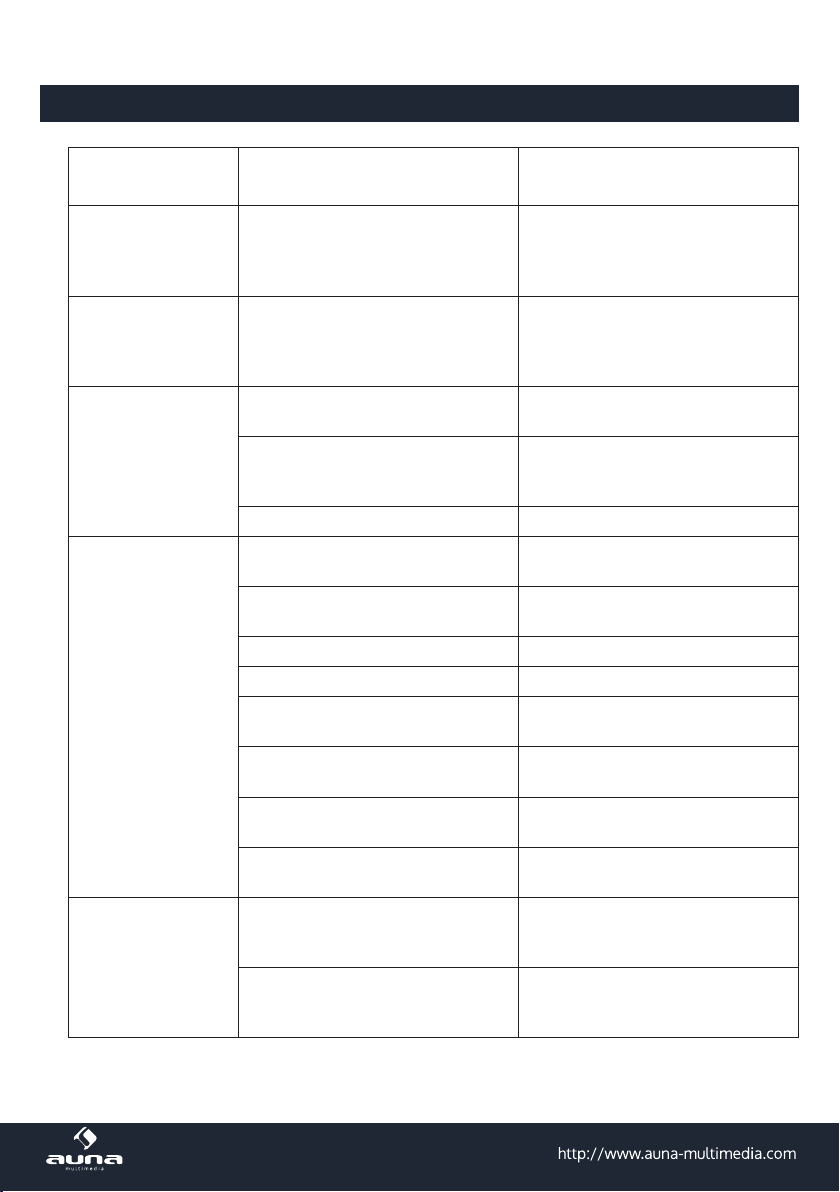
Problembehebung
Problem Mögliche Ursache Lösung
Das Gerät geht beim
Drücken der Ein/AusTaste nicht an.
Das Gerät geht
nicht an obwohl der
Stecker eingesteckt
ist.
Kein Sound. Die Masterlautstärke ist auf
Der CD Player
funktioniert nicht
oder das Display
zeigt [No] an.
Kein Sound während
Audio über TV
oder Stereoanlage
abgespielt wird.
Das Netzgerät ist nicht
angeschlossen oder der Stecker
ist nicht an die Steckdose
angeschlossen.
Die Steckdose führt keinen Strom. Prüfen Sie ob die Steckdose
Minimum gestellt.
Die Lautstärke am TV oder am
externen Gerät ist auf Minimum
gestellt.
Der TV ist ausgeschaltet. Schalten Sie den TV ein.
Die CD wurde falsch herum
eingelegt.
Die CDi ist dreckig. Reinigen Sie die CD mit einem
Die CD ist zerkratzt. Verwenden Sie eine andere CD.
Die CD ist verzogen. Verwenden Sie eine andere CD.
Es wurde keine Standard-CD
eingelegt.
Die Linse ist dreckig. Reinigen Sie die Linse mit einem CD-
Im CD-Deck hat sich Feuchtigkeit
gebildet.
Die Karaokeanlage muss
zurückgesetzt werden.
Am TV oder an der Stereoanlage
wurde die falsche Audioquelle
ausgewählt.
Das Gerät wurde nicht richtig an den
Fernseher angeschlossen.
Schließen Sie das Netzgerät an
und stecken Sie den Stecker in die
Steckdose.
funktioniert oder verwenden Sie
eine andere Steckdose.
Drehen Sie die Master-Lautstärke
hoch.
Drehen Sie die Lautstärke am TV
oder externen Gerät hoch.
Legen Sie die CD korrekt ein.
weichen Tuch.
Verwenden Sie nur kompatible CDs.
Linsenreiniger.
Warten Sie 20-30 Minuten, dmit das
Deck trocknen kann.
Ziehen Sie den Stecker und warten
Sie 30 Minuten lang.
Wählen Sie die richtige Audioquelle
am TV oder an der Stereoanlage.
Wählen Sie den AV-Eingang wenn
Sie die Karaokeanlage am TV oder
der Stereoanlage anschließen.
20
Page 21

Problem Mögliche Ursache Lösung
Es erscheinen keine
Songtexte auf dem
TV-Bildschirm.
Es erscheint kein
Bild auf dem TVBildschirm.
Der Gesang vom
Mikrofon ist nicht zu
hören.
Das Videokabel ist nicht richtig am
TV angebracht.
Als Quelle wurde am TV nicht der
Video- oder AV-Eingang gewählt.
Der TV besitzt keinen Video-Eingang. Verbinden Sie den Videoausgang am
Es wurde eine CD+G eingelegt aber
die CDG-Anzeige leuchtet nicht.
Die Quelle wurde nicht richtig am TV
eingestellt.
Die Lautstärke ist falsch eingestellt. Passen Sie die Mikrofonlautstärke
Das Mikrofon ist aus. Schalten Sie das Mikrofon ein.
Das Mikrofon ist nicht richtig
eingesteckt.
Verbinden Sie das Videokabel
mit dem Video-Ausgang der
Karaokeanlage und dem VideoEingang am TV.
Stellen Sie am TV als Eingangsquelle
den Video- oder AV-Eingang ein.
Gerät mit einem RF-Modulator und
schließen Sie diesen an den TV an.
Überprüfen Sie ob es sich um eine
CD+G handelt oder reinigen Sie sie.
Wählen Sie am TV den AV-Eingang
als Quelle.
an.
Stecken Sie den Stecker des
Mikrofons fest in einen der
Mikrofon-Eingänge am Gerät.
Hinweise zur Entsorgung
21
Page 22

Entsorgung
Bendet sich die linke Abbildung (durchgestrichene Mülltonne auf Rädern) auf dem
Produkt, gilt die Europäische Richtlinie 2012/19/EU. Diese Produkte dürfen nicht mit
dem normalen Hausmüll entsorgt werden. Informieren Sie sich über die örtlichen Regelungen zur getrennten Sammlung elektrischer und elektronischer Gerätschaften.
Richten Sie sich nach den örtlichen Regelungen und entsorgen Sie Altgeräte nicht
über den Hausmüll. Durch die regelkonforme Entsorgung der Altgeräte werden Umwelt und die Gesundheit ihrer Mitmenschen vor möglichen negativen Konsequenzen
geschützt. Materialrecycling hilft, den Verbrauch von Rohstoen zu verringern.
Konformitätserklärung
Hersteller: Chal-Tec GmbH, Wallstraße 16, 10179 Berlin.
Dieses Produkt entspricht den folgenden Europäischen Richtlinien:
2014/30/EU (EMV)
2011/65/EU (RoHS)
2014/35/EU (LVD)
22
Page 23

Kara Projectura
#Karaoke machine with projector
www.auna-multimedia.com10030546 10030547 10030548
Page 24

Dear Customer,
Congratulations on purchasing this equipment. Please read this manual carefully and take care of the
following hints on installation and use to avoid technical damages. Any failure caused by ignoring the
items and cautions mentioned in the operation and installation instructions are not covered by our
warranty and any liability.
Contents
Technical Data ......................................................................... 24
Safety Instructions .....................................................................25
Device Description ..................................................................... 26
Introduction ............................................................................29
Setting up for Operation .................................................................31
Projector Functions ......................................................................33
Using the Control Functions ............................................................. 36
Singing with CD+G, USB OR AUX-IN Music Source ..........................................39
Troubleshooting .......................................................................42
Disposal Considerations ................................................................44
Declaration of Conformity ............................................................... 44
24
Technical Data
Item number 10030546, 10030547, 10030548
Power supply (AC/DC power adaptor) 220-240V~ 50/60Hz
Compact Disc Support CD/CD+G/CD-R/CD-RW/MP3
USB le types MP3
Page 25

Safety Instructions
Protection against laser energy exposure
• As the laser beam used in this compact disc player is harmful to the eyes, do not attempt to disassemble the casing.
• Stop operation immediately if any liquid or solid object should fall into the cabinet.
• Do not touch the lens or poke at it. If you do, you may damage the lens and the player may not operate properly.
• Do not put anything in the safety slot. If you do, the laser diode will be “ON” when the CD door is
still open.
• If the unit is not to be used for a long period of time, make sure that the power source is disconnected
from the unit. Unplug the AC cord from the wall outlet. Make it a practice to remove the AC cord by
grasping the main body and not by pulling the cord.
• This unit employs a laser. The use of controls or adjustment or performance of procedures other than
those specied here may result in exposure to hazardous radiation.
Placement
• Do not use the unit in places which are extremely hot, cold, dusty or humid.
• Place the unit on a at and even surface.
• Do not restrict the air ow of the unit by placing it in a place with poor ventilation, by covering it with
a cloth or by placing it on a carpet.
Condensation
• When left in a heated room where it is warm and damp, water droplets or condensation may form
inside the unit.
• When there is condensation inside the unit, the unit may not function normally.
• Let it stand for 1 to 2 hours before turning the power on, or gradually heat the room up and dry the
unit before use.
Should any trouble occur, remove the power source and refer servicing to qualied personnel.
Protect your furniture
• This system is equipped with non-skid rubber ‘feet’ to prevent the product from moving when you
operate the controls. These ‘feet’ are made from non-migrating rubber material specially formulated
to avoid leaving any marks or stains on your furniture. However certain types of oil based furniture
polishes, wood preservatives, or cleaning sprays may cause the rubber ‘feet’ to soften, and leave
marks or a rubber residue on the furniture.
• To prevent any damage to your furniture we strongly recommend that you purchase small self-adhesive felt pads, available at hardware stores and home improvement centers everywhere, and apply
these pads to the bottom of the rubber ‘feet’ before you place the product on ne wooden furniture
25
Page 26

Device Description
1
27
26
25
24
23
22
21
20
19
18
17
2
3
4
5
6
7
8
9
10
11
12
13
14
15
16
26
Page 27

Elements on the front
1 Projector lens
2 LED: Program indicator
3 Button: Repeat / Program
4 Button: NEXT
5 Button: Stop
6 LED: Repeat indicator
7 Display
8 Speaker on the right
9 CD door
10 Master Volume
11 Button: Light Show on/o
12 MIC2 volume
13 MIC1 volume
14 Microphone jack: MIC2
15 Microphone jack: MIC1
16 USB jack
17 AUX jack
18 Switch: CD/USB
19 Knob: Balance control
20 Knob: Echo
21 Button: AVC (automatic voice control)
22 Speaker on the left
23 LED: Play/Pause
24 Button: Play/Pause
25 Button: PREV
26 Button: Power on/o
27 LED: CD-G indicator
Keys on the top
28 Menu cursor up
29 Menu cursor left
30 Menu cursor down
31 Menu cursor right
32 Projector light on/o
33 Projector enter button
34 Projector power on/o button
35 Projector menu button
27
Page 28

28
Elements on the back
36 Audio LEFT out
37 Audio RIGHT out
38 Projector lift switch
39 VIDEO out jack
40 DC jack
Page 29

Introduction
Introduction
• Your CD+Graphics Karaoke System will provide you with many years of fun and entertainment. It
makes you a "star" as you sing along with your favourite karaoke discs and hear your voice with the
music through the system's speakers.
• This Karaoke System has a compact design and is full of features yet it is easy to use. Just a few sim-
ple instructions and you will become an expert.
• Before using your unit, please read this manual to familiarize yourself with all the features available
and the sections of the manual that describe their operations. Next go to the section for the specic
operation you wish to perform.
• Balance Control - lets you adjust the balance between the pre-recorded original singer's voice and
the music if you use a multiplex karaoke disc.
• Automatic Voice Control (AVC) - lets you replace the original singer's voice with your own voice when
any pre-recorded multiplex karaoke disc is played. To activate, just adjust the Mic Volume and Auto
Voice Control for the best balance between playback and microphone levels.
• Echo Control - lets you add echo to enrich your voice for a concert hall eect.
• Built-in Speakers - lets you share the music with your family and friends.
• Audio Out Jacks - lets you connect to another audio output component, such as an equalizer/booster
or a PA system.
• Video Out Jacks - lets you connect to your TV/monitor for displaying the lyrics from CD+G discs.
Glossary of Karaoke
In addition to all of the terminology associated with consumer electronics products, a few additional
terms are used almost exclusively in karaoke. These terms are meant to familiarize you with the world
of karaoke. Following are some brief explanations.
Echo
Echo adds depth and resonance to a singer's voice, without aecting the music. This echo is produced
by creating minor controlled feedback in the singer's voice.
CDGM (Compact Disc Plus Graphics Multiplex )
They are CD’s that contain songs that include the lead singer's voice, which can be removed with a
karaoke system that has a balance or multiplex control. The idea is to sing along with the lead singer or
replace the lead singer’s voice with yours. Background vocals and backup singers are provided.
Automatic Voice Control (AVC):
When the AVC function is activated, the vocals on a multiplex recording are eliminated as soon as the
singer begins singing into the microphone. When the singer stops singing, the vocals on the multiplex
recording are automatically re-activated. This useful function is used primarily during practice sessions
while a singer is learning a song. Please note that the AVC function only works with multiplex recordings and not with standard audio recordings.
29
Page 30

CD+G
This is an acronym for Compact Disc plus Graphics. You will also see variations CD+G and CD+Graphics.
This is a regular CD with information stored on a data track simultaneous to music. CD+G has video
output for simple graphics (not full motion video). In the case of karaoke, the graphics function is used to
store song lyrics and display the lyrics in sync with music. In most cases, CD+G software displayed lyrics
change color as they are to be sung. A regular television with a video-in RCA jack is all that is required
to display CD+G lyrics.
Features:
Lyrics on TV screen Displays lyrics in rhythm with the music when
playing CD+G discs.
Balance Control Lets you adjust the balance between the pre-
recorded original singer's voice and the music
if you use a multiplex karaoke disc.
Automatic Voice Control (AVC) Lets you replace the original singer's voice
with your own voice when any pre-recorded
multiplex karaoke disc is played. To activate,
just adjust the Mic Volume and Auto Voice
Control for the best balance between playback and microphone levels.
Echo Control Lets you add echo to enrich your voice for a
concert hall eect.
Built-in speakers Let you share the music with your family and
friends
Audio Out Jacks Lets you connect to another audio output
component, such as an equalizer/booster or
a PA system.
Video Out Jacks Lets you connect to your TV/monitor for dis-
playing the lyrics from CD+G discs.
30
Page 31

Setting up for Operation
Connecting power
Plug the supplied AC adapter into the DC jack on the rear side of the unit and connect to a standard AC
wall socket with 220-240V~ 50/60Hz continuous power supply.
Note: When the unit is not operated for long periods of time, unplug the AC adapter from
the unit and wall outlet.
Connecting to the TV
The karaoke system provides a patch cord to give you the option of connecting your unit to an external
audio/video device. The patch cord has three RCA jacks at each end. White and Red are for left and
right audio connections and the Yellow is for video. Modern at panel digital TV sets and home music
systems are usually equipped with corresponding colour-coded RCA jacks to assist correct connections.
Make sure that you have a CD+G disc in the karaoke system playing when you are making this connection. You will know you have the proper settings on your TV as soon as you see the lyrics on the screen.
Video connection
Please follow the steps below to display CD+G lyrics on the TV screen:
1. Locate the color-coded patch cords.
2. Connect video cable (Yellow) to the VIDEO OUT on the back of the karaoke system.
3. Connect the other end of the video cable (Yellow) to the VIDEO/AV INPUT on your TV.
31
Page 32

If your television does not have the required Video Input, you will need a RF modulator (Radio Frequency Modulator), which connects through your TV Antenna or cable line and serves as your Video Input.
The RF Modulator can be purchased at almost any consumer electronics retailer. If you are connecting
the video from the karaoke system to a television video input jack, you must specify the source the TV
is to display. Your TV tuser guide can tell you how to display the video signal from the 'Video In' jack.
If you do not have the manual for your TV, we suggest calling the TV manufacturer's customer service
department. Only the manufacturer will be able to tell you accurately how to congure your TV to display the video signal coming from the 'Video Input' jack.
Note: Some projection TV sets do not properly display the standard blue background used
on most CD+G discs. If the background colour is inconsistent or ashing, please try connecting your karaoke system to a standard CRT/LCD television instead.
Audio connection
Connect the unit to your TV or home stereo system using the White and Red connections on the supplied patch cord. Plug the white end of the patch cord into the white AUDIO OUT jack on the unit. Plug
the red end of the patch cord into the red AUDIO OUT jack on unit. Now connect the other end of the
cable's white (left channel) and red (right channel) plugs to your TV or home stereo system's 'AUDIO
IN' or 'AUX IN' jacks.
Connecting a microphone
1. Plug a microphone (one microphone is included) into the MIC 1 or MIC 2 JACK on the lower left side
of your unit. The mic output will be mixed with an audio source from CD/CD+G/USB ash drive.
2. Slide ON/OFF switch on microphone to “ON” before singing and always slide to “OFF” after use.
Caution: Tapping or dropping the microphone while it is on can cause permanent damage
to it. Never grip and swing the microphone around by the connecting cord.
32
Page 33

Projector Functions
Installing the unit
The lens shift allows you to have broader options for placing the unit and viewing pictures easily.
A: Push switch, lift the lens
B: Rotating lens
C: Press down the lens will be auto locked
33
Page 34

Installing the unit
The installation distance between the unit and a screen varies depending on the size of the screen or
whether or not you use the lens shift features. Install this unit so that it ts the size of your screen. For
details on the distance between the unit and the screen (the projection distance) and the size of projected video, see “Projection Distance and Lens. Shift Range”
1. Position the unit parallel to the screen
Side view
2. To adjust the horizontal position
The picture projected on the screen moves right or left by a maximum of 31% of the screen width
from the center of the lens.
34
Picture position when moving the picture to the left
at maximum.
Picture position when moving the picture to the right
at maximum.
Top view
Page 35

3. Project an image on the screen and adjust the picture so that it ts the screen
Note: When using a screen with an uneven surface, stripes pattern may rarely appear on
the screen depending on the distance between the screen and the unit or the zooming
magnications. This isnot a malfunction of the unit.
Tart-up and shut down the projector
1. . Press Projector ON/OFF button to turn on the unit. The lens protector will open.
2. Press Projector LED button Close projection display output.
3. . Press Projector MEUN button on the projector to turn the menu on. Press / and / to
select a desired menu and making various adjustments and settings, press ENTER to conrm.
Press MENU to leave and save the settings.
Picture menu
Picture mode, Colour Temperature, Aspect Ratio, Noise Reduction and Screen options.
Please note that the menus vary according to the signal type selected.
Adjusting the projection focus
The projector lens is placed perpendicular to the projection screen, press the Projector MEUN button
to display the menu screen, rotate the lens until the clear text display.
35
Page 36

Using the Control Functions
Power and playback functions
1. Functions selector (CDG/USB)
• Slide the CD/USB FUNCTION switch to CD position to playback a CD, MP3, CD+G, CD-R/CD-RW isc.
• Slide the CD/USB FUNCTION switch to USB position to playback MP3 les on a USB ash drive.
• Once the AUX IN JACK is plugged into, the unit will automatically enter the AUX mode. You can at-
tach other music sources (iPod, MP3 or other digital audio players) through the AUX IN JACK to your
external player’s audio out jack or headphone jack.
2. Power ON/OFF button
Press this button to turn unit ON.
Press and hold this button to turn unit OFF.
3. Press
Tap once to play a selected song when playing a CD/CD+G/CD-R/CD-RW disc or MP3 les on a USB
ash drive. The PLAY/PAUSE INDICATOR will light.
4. STOP
While a selected song is playing, tap this to stop
5.
Tap once to skip forward to the following song during playback or stop mode.
6.
Tap once to skip back to the start of the current song during playback or skip back to the previous
song during stop mode.
7. REPEAT/PROGRAM button
REPEAT function
During CD/CD+G/MP3 playback on CD/CD-R/CD-RW/USB Flash Drive
• tap once for Repeat 1 (REPEAT INDICATOR in LED DISPLAY will ash) to playback current song only;
• tap again for Repeat All (REPEAT INDICATOR will light steadily) to repeat all available tracks on
the disc;
• tap again to cancel Repeat mode (REPEAT INDICATOR will be OFF)
36
Page 37

PROGRAM function
This function allows music tracks to be played in a programmed sequence.
NOTE: Program function can only be set in STOP mode
1. Press the PROGRAM button once. Program Number 01 will display and PROGRAM INDICATOR will
ash.
2. Press the SKIP FORWARD or SKIP BACKWARD button to select the track to be programmed.
3. Press the PROGRAM button again to store the selection. The Program number. will advance to 02
to prompt for the next input.
4. You may repeat steps #2 to #3 to program up to 20 tracks. As soon as you have entered the 20th
track, the LCD DISPLAY will show “FU”, indicating that program is full.
5. Press the PLAY button to complete and start program play. Press STOP button to stop program
play.
6. You may use the REPEAT function to repeatedly play a certain track (Repeat 1) or all tracks (Repeat
All) in the Program Play Mode.
7. The CD player will stop when all the programmed tracks have been played through once. To repeat
program play, press the PLAY/PAUSE button.
8. To cancel program play, press the STOP button twice while program play is running or open the CD
DOOR in stop mode.
Up to 20 tracks can be programmed.
If you attempt to program more
than 20 tracks, “FU” will appear in
the LED DISPLAY and “PROG FULL”
will appear on the TV screen as
shown below (if connected).
Program Play mode
When nished programming, tap PLAY BUTTON to conrm and start program play. The PROG
INDICATOR in the LED DISPLAY will light. While playing, you may tap the NEXT or PREV BUTTON to
skip to a desired song in the program list.
To stop program play temporarily, tap the STOP BUTTON once. The PROG INDICATOR in the LED
DISPLAY and TV screen (as shown below) will remain ON.
37
Page 38

Tap PLAY BUTTON to resume program play.
Note: if you tap the STOP BUTTON twice consecutively, you will cancel program play and
erase the program list permanently. The PROG INDICATOR in the LED DISPLAY and TV
screen will go OFF.
Program review:
In stop mode, you can review the program list by pressing the NEXT or PREV BUTTON.
Input functions
• DC JACK : Connect the DC plug of the DC12V output AC Adapter (included) to this jack.
• USB JACK: Connect a USB ash drive (FAT32 formatted) up to 32GB (not included) to this jack for
playback of MP3 les.
• AUX IN JACK: Connect the 3.5mm stereo plug of a stereo audio cable (not included) to this jack and
the other end to an external audio player for playback.
• MIC 1 / MIC 2 JACKS: Connect the microphone (one included) to either one of the jacks to sing.
Output functions
• VIDEO OUT JACK: Connect the yellow coded RCA plug of the A/V cable (included) to this jack and the
other end to the VIDEO/AV INPUT of your TV.
• AUDIO OUT JACKS (L/R): Connect the white coded RCA plug (L) and red coded plug (R) of the A/V
cable (included) to these jacks and the other end to the audio inputs of your TV.
• SPEAKER: There are two built-in speakers for this unit.
Karaoke control funktions
• MASTER VOLUME: Adjust this to obtain the desired volume level from the built-in speaker.
• BALANCE CONTROL: Adjust this to obtain the optimum music and vocal levels while playing a CD+G
or le or as left (L) and right (R) channel balance while playing ordinary stereo sound tracks of CD
or MP3.
• AVC (AUTOMATIC VOICE CONTROL) BUTTON : When AVC is On, the vocals on a multiplex recording
are eliminated as soon as the singer begins singing into the microphone. When the singer stops
singing, the vocals on the multiplex recording are automatically re-activated. This function is used
primarily during practice sessions
• MIC VOLUME: Adjust this control to obtain the desired mic volume output during singing. Volume
level of both Mic 1 and Mic 2 will be adjusted at the same time.
• ECHO CONTROL: Turn this control clockwise for a more signicant echo eect to enrich your voice
for a concert hall eect.
38
Page 39

Singing with CD+G, USB OR AUX-IN Music Source
Getting prepared
• Connect your unit to a compatible TV using the included A/V cable.
• Plug in the included MICROPHONE into either the MIC 1 or MIC 2 JACK
Note: Always set the mic to OFF until you are ready to sing to avoid possible sharp feedback
noises.
Singing along with cd+g, cd, cd-r/cd-rw or usb ash drive with mp3 les
1 Set the FUNCTION SELECTOR to “CD”.
2 Load a CD/CD+G disc as follows: Grip the top front edge on the CD DOOR where indicated and
pull gently to open it. The LED DISPLAY will display “OP”.Load a disc vertically into the compartment with the printed side facing you. Gently close the CD DOOR. The unit begins to read the disc.
The LED DISPLAY will display the total number of tracks. (If no disc is loaded or the disc cannot be
recognized, “No” will be displayed in the LED DISPLAY). When a CD+G disc is detected and being
played, the CDG INDICATOR in the LED DISPLAY will light.
3 Press PLAY/PAUSE BUTTON to play the
disc. If a CD+G track is being played, the
following TV screen will appear.
NOTE: If you try to play a self-compiled
CD-R/RW disc or USB ash drive with
MP3 songs (both are not included), you
will see the following menu instead.
On the top line of the menu, “T: 011/118
means track #11 out of total 118 tracks is
now playing. The elapsed time of current
track is shown on the right
39
Page 40

If the number of songs on the disc/USB drive is more than 99, the 10th digit of LED DISPLAY will show
letter A to F (A=10, b=11, C=12, d=13, E=14 & F=15). For example, if it contains “118” songs, “b8” will show
on the LED DISPLAY. If the number of songs on the disc/USB ash drive is over 159, the LED DISPLAY
will show 99.
• However, if you have connected to a TV, full disc content information will be shown as on page 11.
• All basic play/pause, stop and skip controls are identical to CD mode.
4. Select your favorite song using the NEXT / PREV BUTTON.
5. Tap PLAY/PAUSE BUTTON to start playing.
6. Turn ON your microphone and starting singing. Adjust the MASTER VOLUME, MIC VOLUME and TV
VOLUME if necessary.
Notes on CDs
• CD mechanisms used in devices like this are designed to fully read all commercial CDs. They will
also read self-compiled CD-R/CD-RW discs but it may take up to 10 seconds for playback to start. If
playback does not start, it is likely due to the quality of the CD-R/CD-RW disc and/or the compatibility
of the CD compilation software. Manufacturer is not responsible for the playback quality of CD-R/
CD-RW discs.
• Do not attach a label or seal to either side of the CD-R/CD-RW disc. It may cause a malfunction
• Do not apply excessive force or press the CD DOOR while it is playing.
• Never place anything except a compact disc in the disc compartment. Foreign objects can damage
the unit.
• Only load one disc into the disc compartment at a time.
40
Page 41

Singing along from aux input sources
This karaoke unit features an AUX-IN jack for connecting your iPod, MP3 player or other digital music
player.
1. Connect the headphone jack of your external device to the AUX IN jack located on the lower side of
this unit (The connection cable is not included).
2. Turn on the unit player and it will enter the AUX function mode once an external device is plugged
into the AUX IN jack.
3. Connect the line out or headphone jack of your external audio device (e.g. a CD player, MP3 player,
iPhone, iPod, etc…) to the unit with a suitable audio cable (not included).
4. Select your favorite song on your external audio device to play. You may need to adjust the output
volume of your external audio device if the headphone jack is used for making the connection.
5. Turn on your microphone and start singing. Adjust the MASTER VOLUME and/or MIC VOLUME if
necessary.
6. You may also use the BALANCE and ECHO CONTROLS to enhance your singing experience.
7. Turn o both devices after us.
NOTE: Once the AUX IN jack has been plugged into, the unit automatically enters the AUX
mode no matter what position the Function Selector is in. Remember to disconnect the Aux
In cable from the unit after use in order to listen to the CD or USB input again.
Using the unit as a public address system
This unit can also be used as a PA (Public Address System).
Note: To prevent feedback or whistling from occurring, please be sure that the microphone is not held
too close to unit’s speaker.
1. With unit stopped at CD or USB mode, unplug any 3.5mm audio cable (not included) connected to
the AUX IN JACK previously.
2. Turn on your MICROPHONE (one included) and start your performance. Adjust the MASTER
VOLUME, MIC VOLUME and ECHO control if necessary.
LED light show
• The LED light shows inside the speaker and in the lower corners of the unit are created automatically
based on the music source being played at the time
• To turn o the LED light show, press the LIGHT ON/OFF to OFF .
• To turn on the LED light show, press LIGHT SHOW Switch to ON.
Note: If the brightness is glaring, turn on room lights or turn o LED light show
41
Page 42

Troubleshooting
Problem Possible Cause Solution
No power when
POWER ON/OFF
BUTTON is pressed
No power when
plugged in
No sound MASTER VOLUME of this unit is set
CD player of Karaoke
System does not
work normally or the
“No” appears on the
LED DISPLAY.
No sound - If audio
is going through TV/
home stereo
DC plug of the AC adapter is not
plugged into the DC JACK properly.
The AC outlet may not have power. Check the outlet with a working
to minimum.
Volume control on TV set/PA system
is set to minimum.
TV set/PA system power is OFF. Turn ON the power of TV/PA system.
Disc is inserted upside down. Insert disc correctly.
Disc is dirty. Wipe it clean with soft cloth.
Disc is scratched. Use a new disc.
Disc is warped. Use a new disc.
A non-standard disc is inserted. Only use compatible discs
Lens is dirty. Clean the optical pickup with a CD
Moisture has condensed inside the
CD deck.
Karaoke system needs to be reset. Disconnect the machine from power
Source Selection on your TV/home
stereo is not set properly.
Improper connection to stereo
system or PA.
Re-insert the DC plug of the AC
adapter properly.
lamp or other electrical appliance.
Turn up the MASTER VOLUME.
Turn up the volume of the TV/PA
system.
mentioned in this manual.
lens cleaner.
Wait about 20 to 30 minutes to let
it dry out.
source for 30 seconds.
Select AV INPUT as the source for
your TV/home stereo.
Follow directions on ‘Audio
Connection’ section for connecting
to a home stereo system.
42
Page 43

Problem Possible Cause Solution
No song lyrics
appear on the TV
screen
No image on TV
screen
Cannot sing through
the mic
Video cable is not connected
properly to the TV.
Source selector on TV is not set to
VIDEO or A/V IN.
TV does not have video line input. Connect from VIDEO OUT of the unit
TV input is not properly set. Set TV input to correct A/V input that
Improper mic volume setting. Adjust MIC and MASTER VOLUME
Mic is o. Turn on mic with the ON/OFF switch
Mic is not properly plugged in. Insert the mic plug fully into either
Connect the video cable to the
VIDEO OUT of the unit and to the
TV’s Video In jack.
Use your TV Remote to select VIDEO
or A/V input.
to a RF modulator and then to the TV
cable input.
is connected to the unit.
CONTROLS to appropriate levels.
located on the microphone.
MIC 1 or MIC 2 JACK of the unit
properly.
43
Page 44

Disposal Considerations
According to the European waste regulation 2012/19/EU this symbol on the product or on
its packaging indicates that this product may not be treated as household waste. Instead
it should be taken to the appropriate collection point for the recycling of electrical and
electronic equipment. By ensuring this product is disposed of correctly, you will help
prevent potential negative consequences for the environment and human health, which
could otherwise be caused by inappropriate waste handling of this product. For more
detailed information about recycling of this product, please contact your local council or
your household waste disposal service.
Declaration of Conformity
Producer: Chal-Tec GmbH, Wallstraße 16, 10179 Berlin. Germany
This product is conform to the following European Directives:
2014/30/EU (EMC)
2011/65/EU (RoHS)
2014/35/EU (LVD)
44
Page 45

Cher client,
Toutes nos félicitations pour l’acquisition de ce nouvel appareil. Veuillez lire attentivement les instruc-
tions suivantes an d’éviter d’éventuels dommages. Le fabricant ne saurait être tenu pour responsable
des dommages dus au non-respect des consignes de sécurité et à la mauvaise utilisation de l’appareil.
Sommaire
Fiche technique ........................................................................45
Consignes de sécurité ..................................................................46
Aperçu de l’appareil .....................................................................47
Introduction ...........................................................................50
Installation ............................................................................ 52
Projecteur .............................................................................54
Utilisation des fonctions .................................................................57
Lecture de musique via CD+G, USB et AUX-IN .............................................60
Résolution des problèmes ............................................................... 63
Hinweise zur Entsorgung ................................................................ 64
Recyclage ............................................................................. 65
Déclaration de conformité. . . . . . . . . . . . . . . . . . . . . . . . . . . . . . . . . . . . . . . . . . . . . . . . . . . . . . . . . . . . . . . 65
Fiche technique
Numéro d’article 10030546, 10030547, 10030548
Alimentation (Appareil sur secteur) 220-240 V~ 50/60 Hz
Formats de CD compatibles CD/CD+G/CD-R/CD-RW/MP3
Format de chier compatibles par USB MP3
45
Page 46

Consignes de sécurité
• Protection contre l’exposition aux faisceaux laser
• Le faisceau laser du lecteur de CD de cet appareil est dangereux pour les yeux. N’essayez pas de
démonter le boîtier.
• Débranchez immédiatement l’appareil si des liquides ou des objets durs sont tombés à l’intérieur
du boîtier.
• Ne touchez pas à la lentille ni à ses abords, au risque de l’abîmer et d’empêcher le fonctionnement
correct de l’appareil.
• N’insérez aucun objet dans les fentes de sécurité. La diode laser resterait allumée pendant que le
tiroir à CD serait encore ouvert.
• En cas de non-utilisation prolongée, assurez-vous que l’appareil n’est plus branché sur le secteur.
• Cet appareil utilise un laser. Une utilisation des commandes ou réglages diérente de celle qui est
indiquée, ou/et une modication de la puissance peut vous exposer à un rayon dangereux.
Installation
• Ne posez pas l’appareil à un endroit particulièrement chaud, froid, poussiéreux ou humide.
• Posez l’appareil sur une surface plane et horizontale.
• N’empêchez pas la circulation de l’air autour de l’appareil en l’installant dans une zone mal aérée
en le couvrant d’un torchon ou en le posant sur un tapis.
Condensation
• Si l’appareil est laissé dans un endroit chaué et humide, il peut se former des gouttes de conden-
sation.
• Si de la condensation apparaît dans l’appareil, il ne pourra fonctionner correctement.
• Laissez l’appareil reposer 1 à 2 heures avant de l‘allumer. Réchauez la zone progressivement et
laissez l’appareil sécher entièrement avant de l’utiliser.
• En cas de problème, débranchez l’appareil et adressez-vous au service client.
Protection des meubles
• Cet appareil est équipé de pieds de support antidérapants an que l’appareil ne bouge pas lors
de l’utilisation des éléments de commande. Ces pieds de support sont en caoutchouc résistant à
l’abrasion spécialement conçu pour ne laisser aucune trace sur les meubles.
• Toutefois, certains types de cires à base d’huile, de produits de protection d’entretien du bois
peuvent rendre le matériau des supports souple au point qu’il laisserait des traces ou des restes
de caoutchouc sur les meubles. Pour éviter cela, nous vous conseillons de coller des tampons de
feutre sous l’appareil, disponibles chez les détaillants.
46
Page 47

Aperçu de l’appareil
1
27
26
25
24
23
22
21
20
19
18
17
2
3
4
5
6
7
8
9
10
11
12
13
14
15
16
47
Page 48

Eléments sur la face avant
1 Lentille du projecteur
2 LED : Programme
3 Touche : Répétition / Programme
4 Touche : Titre suivant
5 Touche : Stop
6 LED : Répétition
7 Écran
8 Haut-parleur droit
9 Tiroir à CD
10 Volume Master
11 Touche : Eets de lumière du haut-parleur
(Light Show) marche/arrêt
12 Volume du micro : MIC2
13 Volume du micro : MIC1
14 Entrée micro : MIC2
15 Entrée micro : MIC1
16 Prise USB
17 Prise AUX
18 Bouton de sélection de fonction : CD/USB
19 Molette : Balance
20 Molette : Écho
21 Touche : AVC (Contrôle automatique de la
voix)
22 Haut-parleur gauche
23 Touche : Lecture/Pause
24 Touche : Retour
25 Touche : Marche/Arrêt
26 LED : CD-G
27 LED: CD-G
Eléments sur la face avant
28 Curseur de menu haut
29 Curseur de menu gauche
30 Curseur de menu bas
31 Curseur de menu droite
32 Lumière du projecteur Marche/Arrêt
33 Projecteur-Touche de saisie de données
34 Projecteur Marche/Arrêt
35 Menu du projecteur
48
Page 49

Eléments au dos
36 AUDIO-OUT-Sortie (gauche)
37 AUDIO-OUT-Sortie (droite)
38 Réglage : régler la hauteur du projecteur
39 Sortie Vidéo
40 Alimentation DC
49
Page 50

Introduction
La chaîne karaoké
Cette chaîne karaoké CD graphique vous apportera des années de plaisir et de divertissement. Devenez
une star lorsque vous accompagnez vos CD karaoké préférés et entendez votre voix dans les hautparleurs.
La chaîne karaoké est de design compact et est simple à utiliser malgré ses nombreuses fonctions. Vous
deviendrez un pro après avoir pris connaissance de quelques instructions simples.
Avant d’utiliser la chaîne, lisez le mode d’emploi et faites connaissance avec toutes les fonctions et les
chapitres correspondants. Consultez les chapitres correspondant aux fonctions dont vous avez besoin.
Un téléviseur simple muni d’une connexion RCA est tout ce dont vous avez besoin pour aicher les
paroles des CD+G.
Glossaire
Dans le domaine des appareils électroniques de divertissement, et en particulier concernant les ka-
raokés, certains termes spéciques sont employés. Le glossaire a pour but de vous familiariser avec le
monde du karaoké.
Écho
L‘écho donne à la voix profondeur et résonance, sans aecter la musique. L‘écho est ajouté à la voix du
chanteur en produisant un peu de feedback.
CDGM (Compact Disc Plus Graphics Multiplex)
Il existe des CD et des chansons avec la voix du chanteur au premier plan, que l’on peut supprimer grâce
à la chaîne karaoké en contrôlant la balance ou le multiplex. Vous pouvez ainsi chanter avec la voix du
chanteur de premier plan, ou remplacer celle-ci par la vôtre. Les voix et chanteurs d’arrière-plan sont
conservées.
AVC (Automatic Voice Control – contrôle automatique de la voix)
Lorsque la fonction AVC est activée, la voix d’un enregistrement est eacée dès que vous commencez
à chanter dans le micro. Lorsque le chanteur de karaoké arrête de chanter, la voix de l’interprète est
de nouveau audible. Cela est utile pour vous entraîner sur une chanson. Attention, la fonction AVC ne
fonctionne qu’avec les enregistrements en multiplex et non avec les enregistrements courants.
CD+G
Il s’agit de l’acronyme pour Compact Disc plus Graphics. Vous rencontrerez également les variantes
CD+G et CD-Graphics. Il s’agit ici de CD normaux contenant des informations sur une piste de données
supplémentaire. Le CD+G contient aussi des données graphiques simples (pas de vidéos plein écran).
Les graphiques sont utilisés pour le karaoké pour aicher le texte synchronisé avec la musique. Le
plus souvent, le programme du CD+G surligne les mots en couleur juste avant que vous ne deviez les
chanter..
50
Page 51

Caractéristiques de fonctionnement :
Paroles de la chanson sur l’écran du
téléviseur
Contrôle de la balance Vous permet de contrôler la balance entre
Audio Voice Control (AVC) Grâce à cette fonction, vous pouvez rempla-
Réglage de l’écho Pour ajouter de l’écho, pour donner à la voix la
Haut-parleurs intégrés Faites participer votre famille et vos amis à
Sorties audio Pour brancher d’autres appareils audio tels
Sorties vidéo Aichage de la TV/ moniteur sur lesquels les
Lors de la lecture, le texte de la chanson s’af-
che de façon synchronisée avec la musique.
la voix préenregistrée et la musique, lorsque
vous utilisez un CD karaoké multiplex
cer la voix d’origine par la vôtre. Réglez le
volume du micro et de l’AVC, pour obtenir la
bonne balance entre le Playback et le volume
du micro.
sonorité d’une salle de concert.
l’événement musical.
qu’un égaliseur/booster ou une chaîne stéréo
paroles d’un CD+G seront à l’écran
51
Page 52

Installation
Branchement
Branchez l’adaptateur secteur fourni au dos de l’appareil et branchez-le dans une prise de courant délivrant une tension de 220-240 V~ 50/60 Hz.
Remarque : En cas de non utilisation prolongée, débranchez l’adaptateur secteur de
l’appareil ainsi que de la prise murale.
Prise murale
220-240 V~
Adaptateur
secteur
Prise Jack
12 V 3,5 A
Branchement au téléviseur
La chaîne karaoké est équipée d’un câble de raccordement avec la possibilité de brancher l’appareil à
une source audio ou vidéo externe. Le câble de raccordement présente à chaque extrémité trois prises
RCA. Le blanc et le rouge correspondent aux canaux audio gauche et droit. Le jaune correspond au
signal vidéo. Les téléviseurs modernes à écran plat et les systèmes audio domestiques sont générale-
ment équipés de prises RCA pour faciliter le branchement. Pour être tout à fait sûr, placez un CD+R dans
la chaîne karaoké avant de brancher le câble. Dès que vous verrez le texte des paroles sur l’écran de
votre téléviseur, vous aurez conrmation que le branchement au téléviseur est correct.
Branchement vidéo
Pour aicher le texte d’une chanson du CD+G sur le téléviseur :
1. Gardez le câble de connexion avec le code couleur.
2. Branchez le câble vidéo (jaune) dans la prise vidéo (VIDEO OUT) au dos de la chaîne karaoké.
3. Branchez l’autre extrémité du câble vidéo (jaune) à l‘entrée Vidéo/AV de votre téléviseur.
52
Page 53

Si votre téléviseur ne dispose pas de l’entrée vidéo requise, il vous faut alors un modulateur RF qui permet la connexion par la prise d’antenne. Vous trouverez un modulateur RF dans le commerce spécialisé.
Lorsque vous connectez la chaîne à l’entrée vidéo d‘un téléviseur, vous devez sélectionner la source
à partir du téléviseur. Consultez pour cela le mode d’emploi de votre téléviseur. Si vous n’avez plus le
mode d’emploi de votre téléviseur, adressez-vous au service client de la marque concernée. Lui seul
pourra vous indiquer de façon précise comment régler votre appareil sur l’aichage vidéo.
Remarque : certains projecteurs et téléviseurs n’achent pas l’écran à fond bleu standard
qui est utilisé sur la plupart des CD+G. Si la couleur de fond n’est pas homogène ou si elle
scintille, essayez le branchement sur téléviseur équipé d’un écran standard CRT/LCD.
Connexion audio
Branchez le câble muni de prises rouge et blanche à la sortie audio de la chaîne karaoké, et l’autre extrémité à l’entrée audio du téléviseur (noté AUDIO IN ou AUX). Les embouts rouges correspondent aux
prises rouges et les embouts blancs aux prises blanches.
Branchement des micros
1. Branchez un micro à la prise MIC 1 ou MIC2 sur le côté gauche de l’appareil (un micro est inclus
dans le colis). Le signal du micro est mixé avec la source (CD/CD+G/ support USB).
2. Allumez le micro avant de commencer à chanter (mettez sur ON). Éteignez-le de nouveau après
utilisation (sur OFF).
Attention : Ne tapez as sur le micro et ne laissez pas tomber le micro. Cela pourrait l’endommager dénitivement. Ne pas tenir le micro par son câble ni le faire pendre.
53
Page 54

Projecteur
Installation du projecteur
Le réglage de l'objectif permet plus de choix lors de la conguration du système et l'aichage de l'image.
A : Faites glisser l’interrupteur pour
surélever la tête du projecteur.
B : Tournez la tête du projecteur.
C : Poussez la tête du projecteur vers
le bas pour la xer.
54
Page 55

Installation de la chaîne karaoké
L’éloignement de la chaîne par rapport à l‘écran de projection est variable et dépend de la taille de
l’écran et de la façon dont vous réglez l’objectif. Installez la chaîne an qu’elle corresponde à la taille
de l’écran.
Détails concernant la séparation entre l’appareil et la surface de projection
1. Installation parallèlement à la surface de projection.
Surface de projection
Vue de côté
2. Réglez la position horizontale
L’image qui est projetée au mur se déplace de 31 % maximum de la largeur de l’image ver la droite
ou la gauche, à partir du centre de l’objectif.
Position de l‘image, lorsque l'image est déplacée
vers la position extrême à droite.
Vue d’en haut
Position de l‘image, lorsque l'image est déplacée
vers la position extrême à gauche.
55
Page 56

3. . Projetez une image sur la surface de projection et réglez l’image de sorte qu’elle s’adapte à la
surface. Si vous utilisez une surface de projection non plane, des bandes peuvent apparaître dans
l’image et sur l’appareil, en fonction de la distance entre l’appareil et la surface de projection et le
facteur de grossissement. Cela n’est aucunement un dysfonctionnement de l’appareil.
Mettre le projecteur en marche et l’éteindre
4. Appuyez sur le bouton ON/OFF pour allumer la chaîne. La protection de l’objectif s’ouvre.
5. Appuyez sur le bouton „ LED projecteur “.
6. Appuyez sur le bouton de menu du projecteur pour entrer dans le menu. Appuyez sur les boutons
/ et / pour choisir le menu désiré et procéder aux diérents réglages. Pour conrmer,
appuyez sur la touche ENTER.
Menu image
Mode d‘image, température de couleur, rapport largeur hauteur, réduction du bruit, options de l’aichage.
Notez que les menus peuvent varier en fonction du type de signal sélectionné.
Réglage de la mise au point du projecteur
L’objectif du projecteur est placé perpendiculairement à l'écran de projection. Appuyez sur le bouton
de menu du projecteur pour aicher le menu de l’écran. Tournez l’objectif jusqu’à ce que vous puissiez
voir clairement le texte.
56
Page 57

Utilisation des fonctions
Démarrage et lecture
1. Choix de fonction (CDG/USB)
• Mettez l’interrupteur de sélection CD/USB en position CD pour lire les CD, MP3, CD+G et CD-R/
CD-RW.
• Mettez l’interrupteur de sélection CD/USB en position USB pour lire des MP3 sur une clé USB.
• Quand la prise AUX In est occupée, l’appareil se met automatiquement en mode AUX. Vous pouvez connecter la prise AUX à la sortie audio d’autres sources musicales (par ex. sortie casque
d’IPod, lecteur MP3 ou autres lecteurs numériques).
2. Marche/Arrêt
Appuyez sur ce bouton pour allumer l’appareil.
Maintenez ce bouton enfoncé pour éteindre l’appareil.
3. Appuyez sur drücken.
Appuyez brièvement une fois pour choisir le titre de la chanson lorsque vous lisez un CD/CD+G/
CD-R/CD-RW-Disk ou des chiers MP3 sur un support USB.
Pendant la lecture appuyez à nouveau une fois pour mettre en pause la chanson. L’aichage PLAY/
PAUSE-clignote.
4. STOP
pour arrêter la chanson
5.
Pour passer au titre suivant.
6.
Pour revenir au titre précédent.
7. Bouton REPEAT/PROGRAM fonction répétition (REPEAT)
Pendant la lecture de CD/CD+G/CD-R/CD-RW/USB
• 1x appui : Répétition du titre en cours (Repeat1)
• 2x appuis : Répétition de tous les titres (Repeat All)
• 3x appuis : Fin de la répétition
57
Page 58

Fonction programme
Avec cette fonction vous pouvez lire des titres selon un ordre programmé. Pour cela, la lecture doit être
arrêtée ( appuyez sur).
1. Appuyez sur le bouton PROGRAM. Le numéro de programme 01 apparaît à l’écran et le témoin LED
programme clignote.
2. Appuyez sur ou pour passer les titres en revue vers l’avant ou l’arrière et sélectionner le titre
à programmer.
3. Appuyez de nouveau sur le bouton PROGRAM pour enregistrer votre sélection. Le numéro de
programme passe au 02 pour prendre en compte votre prochaine saisie.
4. Répétez les étapes 2 et 3 pour programmer jusqu’à 20 titres. Dès que vous aurez sélectionné le
vingtième titre, l’écran aichera „FU“, ce qui signie que la liste programmable est pleine.
5. Appuyez sur
en appuyant sur.
6. Vous pouvez utiliser la fonction REPEAT plusieurs fois pour répéter un titre en particulier (Repeat 1)
ou pour lire tous les titres.
7. Le lecteur CD s’arrête lorsque tous les titres programmés ont été lus une fois. Pour répéter le programme, appuyez sur le bouton PLAY/PAUSE.
8. Pour arrêter la lecture du programme, appuyez sur , pendant la lecture, ou bien ouvrez le tiroir à
CD lorsque le lecteur CD est arrêté.
Vous pouvez programmer jusqu’à
20 titres (CD) ou 99 (MP3).
Si vous essayez de programmer
plus de 20 titres (CD) ou 99 (MP3),
[FU] ou [PROG FULL] s’aicheront
à l’écran.
, pour commencer la lecture de votre programme. Arrêtez la lecture du programme
Lecture de liste programmée
Lorsque la programmation est terminée, appuyez sur -pour conrmer et commencez la lecture du
programme. La LED programme s’allume à l’écran. Pendant la lecture vous pouvez appuyer sur les
touches ou pour passer au titre de votre choix dans la liste. Pour arrêter momentanément la
lecture du programme, appuyez une fois sur . L’aichage du programme à l’écran et sur le téléviseur
reste inchangé.
58
Page 59

Appuyez sur - pour poursuivre la lecture.
Remarque : Si vous appuyez deux fois sur vous stoppez la lecture du programme et vous
eacez entièrement la liste programmée. L’achage du programme disparaît de l’écran.
Voir la liste programmée :
Lorsque l’appareil est à l‘arrêt, vous pouvez consulter la liste des programmes avec les boutons et
.
Entrées
• Prise DC : brancher la che 12-V-DC de l’adaptateur secteur sur cette prise.
• Prise USB : brancher un appareil USB jusqu’à 32 GB (formaté en FAT32) à cette prise pour lire des
chiers MP3 (non inclus).
• Entrée AUX-IN : pour brancher la che jack 3,5 mm d’un câble audio stéréo (non inclus).
• Branchement des MIC 1 / MIC 2 : brancher le micro à l’une de ces prises. Un micro est inclus.
Sorties
• Prise VIDEO-OUT : brancher la che RCA jaune.
• Prise AUDIO-OUT (L/R) : brancher la che RCA blanche (L) et la rouge (R).
• Haut-parleur : l’appareil dispose de deux haut-parleurs intégrés.
Fonctions karaoké
• MASTER VOLUME : tournez le bouton pour choisir le volume sonore des haut-parleurs intégrés.
• BALANCE CONTROL : eectuez le réglage pour obtenir les volumes adaptés pour le chant et la musique lors de la lecture d’un CD+G ou MP3 ou pour équilibrer les canaux droit et gauche.
• AVC (contrôle automatique de la voix) : lorsque le contrôle automatique de la voix est activé, la voix
du chanteur d’origine d’un enregistrement en multiplex est masquée dès qu’une personne chante
devant le micro. Si le chanteur arrête de chanter, la voix de l’enregistrement multiplex réapparaît.
Cette fonction est particulièrement utilisée pour les exercices d‘entrainement.
• Volume du micro : eectuez le réglage pour obtenir le volume souhaité pour le chant. Il est réglé
simultanément pour les entrées MIC1 et MIC2.
• ÉCHO : tournez ce bouton dans le sens horaire pour augmenter l’eet écho et appliquer à la voix la
sonorité d’une salle de concert.
59
Page 60

Lecture de musique via CD+G, USB et AUX-IN
Préparation
• Branchez la chaîne karaoké sur un téléviseur compatible grâce au câble AV fourni.
• Branchez le micro fourni sur la prise MIC1 ou MIC2.
Remarque : laissez toujours le micro sur position AUS jusqu’à ce que vous soyez prêt à
chanter, pour éviter les éventuels larsens.
Chanter sur un CD+G, CD, CR-R/CD-RW ou MP3
1. Placez le sélecteur de fonction sur CD.
2. Installez le Cd comme suit : prenez le tiroir à CD par le bord supérieur et tirez-le délicatement
pour l‘ouvrir. L’écran s’allume et aiche [OP]. Placez le CD verticalement, face imprimée vers vous.
Fermez doucement le tiroir. L’appareil commence la lecture du CD. L’écran aiche le nombre total
de titres. Si aucun CD n’est chargé ou si le CD n’est pas reconnu ; l’écran aiche [NO]. Si l’appareil
reconnaît un disque CD+G et le lit, CDG s’aiche sur l’écran.
3. Appuyez sur le bouton Play/Pause pour
lire le CD. Si l’appareil reconnaît un disque
CD+G, un écran semblable s’aiche.
Si vous lisez un CD-R/CD-RW gravé à do-
micile ou des chiers MP3 via USB, l’écran
ci-contre s’aiche.
Dans la barre de menu tout en haut vous
pouvez voir [T: 011/118]. Cela signie : piste
11 sur un total de 118 pistes en cours de
lecture.
60
Page 61

Si le nombre de titres dépasse 99 sur un CD ou support USB, les deux premiers chires du numéro de
piste sont remplacés par les lettres A à F (a=10, b=11, c=12, d=13, e=14, f=15). Par exemple, si le CD conti-
ent 118 titres, l’écran aiche [b8] pour le numéro 118. Si le nombre de titres dépasse 159, l’écran aiche
[99] à partir du titre 160. Si vous avez branché l’appareil à votre téléviseur, le contenu entier s’aiche.
Utilisez les boutons Avant, Arrière, Play/Pause et Stop exactement comme dans le mode CD.
4. Sélectionnez le titre de votre choix grâce aux boutons Avant/Arrière.
5. Appuyez sur le bouton Play pour commencer la lecture du titre.
6. Allumez le micro et commencez à chanter. Si besoin ajustez le volume avec le réglage du Master, le
bouton de volume du micro et le bouton de volume du téléviseur.
Remarques importantes pour la lecture de CD
• Le lecteur de CD peut lire tous les types de CD. L’appareil lit également les CD-R/ CD-RW gravés à
domicile, toutefois il peut prendre jusqu’à 10 secondes avant de commencer la lecture. Si la lecture
ne commence pas, cela est probablement dû à la qualité du CD-R/CD-RW et/ou à la compatibilité
du logiciel de compilation du CD. Le fabricant n’est pas responsable de la qualité de lecture avec
les CD-R/CD-RW. Ne posez aucun autocollant sur les faces des CD-R/CD-RW, cela conduit à des
dysfonctionnements.
• Ne forcez pas le tiroir à CD pendant la lecture.
• Ne placez que des Compact-Discs dans le lecteur CD. Les corps étrangers peuvent endommager
l’appareil.
• N’insérez qu’un seul disque à la fois dans le lecteur CD.
61
Page 62

Pour chanter sur un accompagnement en utilisant des appareils AUX
L’appareil permet de chanter sur des musiques stockées sur des appareils externes AUX tels que iPod,
lecteur MP3 ou d’autres appareils numériques.
1. Branchez la sortie casque de votre appareil externe sur l’entrée AUX de la chaîne karaoké. REMARQUE : Le câble nécessaire n’est pas fourni.
2. Allumez la chaîne karaoké, elle se met automatiquement en mode AUX dès qu’un appareil externe
est branché sur son entrée AUX.
3. Reliez la sortie casque de votre appareil audio externe (lecteur CD, lecteur MP3, iPhone, iPod, etc.)
à la chaîne par un câble audio. REMARQUE : le câble audio n’est pas fourni.
4. Choisissez un titre sur l’appareil externe. Ajustez le volume sonore sur l’appareil externe si l’appareil est relié par la sortie casque à la chaîne karaoké.
5. Allumez le micro et commencez à chanter. Réglez le volume par le réglage du master ou par le
réglage du volume du micro.
6. Utilisez les réglages de balance et d’écho pour ajuster le son selon vos préférences.
7. Après utilisation, éteignez le micro et tous les appareils.
REMARQUE : Dès que vos branchez un appareil AUX la chaîne karaoké se met automatiquement en mode AUX, indépendamment de la position des sélecteurs. Débranchez le câble
AUX après utilisation pour retourner au mode CD/USB.
Utilisation de l’appareil comme haut-parleur
Vous pouvez également utiliser l’appareil comme simple haut-parleur. Pour éviter le Feedback pendant
l’utilisation, ne tenez pas le micro trop près des haut-parleurs pendant l‘utilisation.
1. Terminez la lecture de CD ou USB et débranchez le câble jack 3,5 mm s’il s’en trouve un branché à
la sortie AUX.
2. Allumez le micro et commencez. Ajustez le volume par le réglage du master ou par le bouton de
volume du micro.
Jeux de lumière LED
• Les jeux de lumière à l’intérieur du haut-parleur et dans les coins inférieurs de l’appareil sont sensibles au rythme de la musique qui est en cours de lecture.
• Pour activer les jeux de lumière, placez le sélecteur de jeux de lumière sur ON.
• Placez le sélecteur de jeux de lumière sur OFF pour arrêter les jeux de lumière.
Remarque : Si la luminosité vous éblouit, allumez la lumière dans la pièce ou éteignez les
jeux de lumière LED.
62
Page 63

Résolution des problèmes
Problème Cause possible Solution
L’appareil ne
s’allume pas
lorsqu’on appuie sur
le bouton marche/
arrêt.
L’appareil ne
s’allume pas, bien
que la che soit
branchée.
Pas de son. Le volume du master est réglé au
Le lecteur CD ne
fonctionne pas ou
l’écran aiche [No].
Pas de son lors de la
lecture d’audio par
la TV ou la chaîne
stéréo.
L’adaptateur secteur n’est pas
branché ou la che n’est pas
branchée dans la prise murale.
La prise murale ne délivre pas de
courant.
minimum.
Le volume est réglé au minimum sur
le téléviseur ou l’appareil externe.
La TV est éteinte. Allumez la TV.
Le CD a été inséré à l‘envers. Insérez correctement le CD.
Le CD est sale. Nettoyez le CD avec un chion doux.
Le CD est rayé. Utilisez un autre CD.
Le CD est déformé. Utilisez un autre CD.
Aucun CD standard n’a été inséré. Utilisez uniquement des CD
La lentille est sale. Nettoyez l’objectif avec un produit
De l’humidité s’est formée dans le
lecteur CD.
La chaîne karaoké doit être
réinitialisée.
La bonne source n’a pas été
sélectionnée sur la TV ou la chaîne
stéréo.
L’appareil n’a pas été correctement
relié au téléviseur.
Branchez l‘adaptateur secteur et
branchez la che dans la prise
murale.
Vériez le fonctionnement de la
prise ou utilisez une autre prise.
Augmentez le volume du master.
Augmentez le volume de la TV ou de
l’appareil externe.
compatibles.
nettoyant pour lentille de CD.
Patientez 20 à 30 minutes an que le
compartiment CD puisse sécher.
Retirez le câble et attendez 30
minutes.
Sélectionnez la bonne source sur la
TV ou la chaîne stéréo.
Choisissez l’entrée AV lorsque vous
souhaitez brancher la chaîne karaoké
sur la TV ou la chaîne stéréo.
63
Page 64

Problème Cause possible Solution
Aucun texte de
chanson n’apparaît
sur l’écran de la TV.
Aucune image
n’apparaît sur l’écran
TV.
Pas de son en
provenance du
micro.
Le câble vidéo n’est pas
correctement relié à la TV.
Sur la TV, la source sélectionnée
n’est pas l’entrée Vidéo ou AV.
La TV ne possède aucune entrée
vidéo.
Un CD+G est inséré mais l’aichage
du CDG ne s’allume pas.
La source sélectionnée sur le TV est
inexacte.
Le volume est mal réglé. Ajustez le volume du micro.
Le micro est éteint. Allumez le micro.
Le micro est mal branché. Enfoncez bien la che du micro dans
Branchez le câble vidéo sur la sortie
vidéo de la chaîne karaoké et sur
l’entrée vidéo de la TV.
Sur la TV, sélectionnez comme
source l’entrée vidéo ou AV.
Connectez la sortie vidéo de
l’appareil à un modulateur RF et
branchez celui-ci à la TV.
Vériez qu’il s’agit bien d’un CD+G
ou nettoyez-le.
Sur la TV sélectionnez l’entrée AV
comme source.
une des entrées micro de l’appareil.
Hinweise zur Entsorgung
64
Page 65

Recyclage
Le pictogramme ci-contre apposé sur le produit signie que la directive européenne
2012/19/UE s‘applique (poubelle à roulettes rayée). Ces produits ne peuvent être jetés
dans les poubelles domestiques courantes. Renseignez-vous concernant les règles
appliquées pour la collecte d’appareils électriques et électroniques. Conformez-vous
aux réglementations locales et ne jetez pas vos anciens produits avec les ordures
ménagères. Le respect des règles de recyclage des vieux produits aide à la protection
de l’environnement et de la santé de votre entourage contre les conséquences négatives possibles. Le recyclage des matériaux aide à réduire l’utilisation des matières
premières.
Déclaration de conformité
Fabricant : Chal-Tec GmbH, Wallstraße 16, 10179 Berlin.
Ce produit est conforme aux directives européennes suivantes :
2014/30/UE (CEM)
2011/65/UE (RoHS)
2014/35/UE (LVD)
65
 Loading...